

Page 1

Thinix WiFi Hotspot™ User Manual
For version 2.1
June 20, 2013
Page 2

Thinix WiFi Hotspot™ User Manual
Contents
Overview ....................................................................................................................................................... 3
Core Features & Benefits .............................................................................................................................. 3
Software Access Point for Windows 7 and 8 Features ............................................................................. 3
Create a WiFi Hotspot ............................................................................................................................... 3
Getting Started .............................................................................................................................................. 3
Requirements ............................................................................................................................................ 3
Download Thinix WiFi Hotspot™ .............................................................................................................. 4
Install Thinix WiFi Hotspot in Windows 7 ................................................................................................. 4
Install Thinix WiFi Hotspot in Windows 8 ................................................................................................. 6
Using Thinix WiFi Hotspot™ .......................................................................................................................... 9
The New Interface ..................................................................................................................................... 9
Hotspot Status ........................................................................................................................................ 10
More Details ............................................................................................................................................ 11
Configure ................................................................................................................................................. 12
Device Priorities ...................................................................................................................................... 15
Language ................................................................................................................................................. 15
Advanced ................................................................................................................................................ 17
About....................................................................................................................................................... 17
PIN Security ............................................................................................................................................. 18
Help Tips .................................................................................................................................................. 18
Page 2
Page 3

Thinix WiFi Hotspot™ User Manual
Overview
Thinix WiFi Hotspot™ is an application designed to create a WiFi Hotspot using a WiFi adapter
on a Microsoft Windows PC running Windows 7 or later. Allowing wireless enabled devices to
use the same internet connection without dedicated hardware to create a personal WiFi Access
Point.
Core Features & Benefits
Software Access Point for Windows 7 and 8 Features
Simple User Interface to control and configure a WiFi Hotspot and share it with other users
Share Paid service in a Hotel or Airport with your family/friends or other devices
Customize the SSID of your WiFi Hotspot
Built-in WPA2 Security
Easily customize the password of your WiFi Hotspot
Share your connection with up to 100 users
Auto-Start Hotspot option allows the Hotspot to start when the application loads.
Allows you to share a single WiFi connection (doesn’t require multiple WiFi adapters)
Compatible with iOS, Android, Windows and OSX client devices
Automatic Internet connection identification and connection prioritization
Allows creating WiFi Hotspots which are local-only and don’t allow Internet connectivity
Pass-through link detection, can automatically turn off the shared WiFi Hotspot when the
Internet connection is down
Save Profiles of the settings for easy change.
Multilanguage support.
Create a WiFi Hotspot
Wired Ethernet Internet Connection
Wireless WiFi based Internet Connection
Wireless 3G/4G based Internet Connection
Getting Started
Requirements
1. Windows 7 or 8 with a qualifying wireless adapter
Page 3
Page 4
2. .NET Framework 3.5 from Microsoft
Download Thinix WiFi Hotspot™
Download the installer package from the website at. Once the download has completed run the
installer package to install Thinix WiFi Hotspot™.
Install Thinix WiFi Hotspot in Windows 7
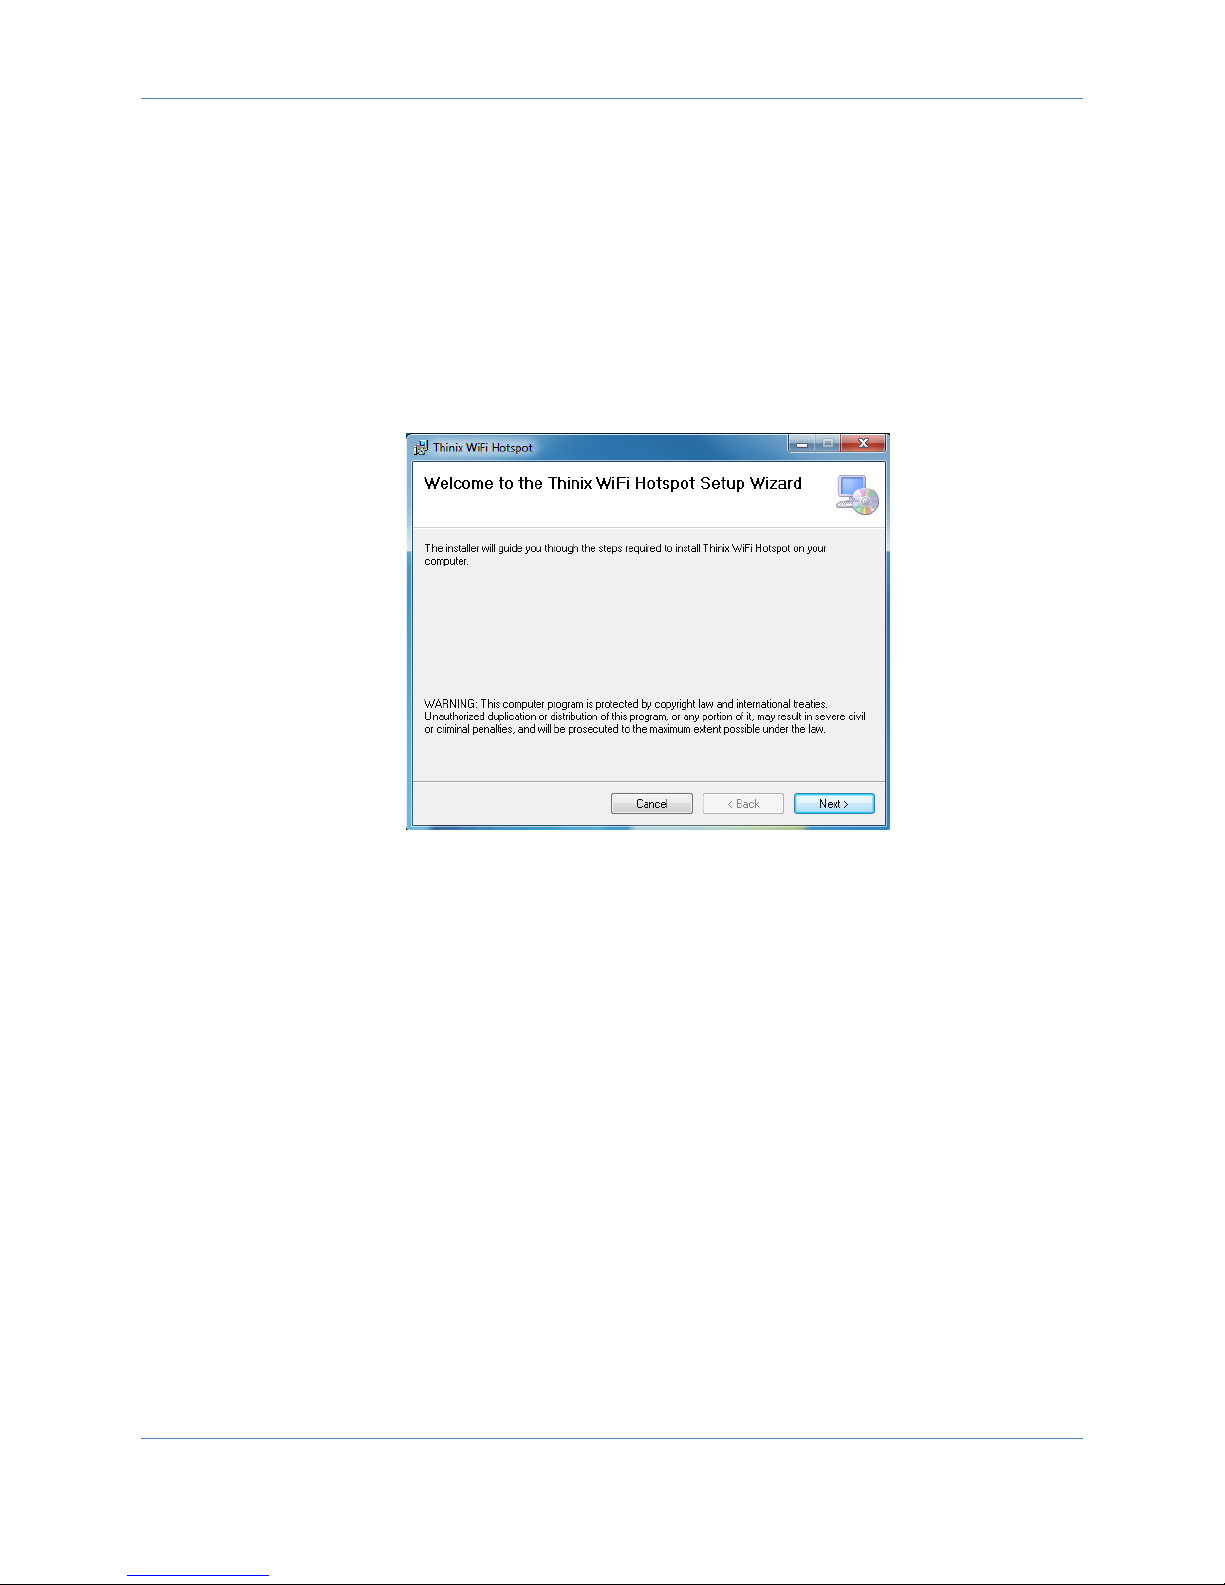
1. Start the Thinix WiFi Hotspot™ installer.
2. In Figure 1 click “Next”
Thinix WiFi Hotspot™ User Manual
Figure 1
3. The window pictured in Figure 2 has configurable options.
a. The install folder of the program can be specified, this can be done manually by either
clicking the “Browse…” button or manually entering a path in the text box or by using
the default. The default path is: C:\Program Files (x86)\Thinix\Thinix WiFi Hotspot\ on
32-bit machines and C:\Program Files\Thinix\Thinix WiFi Hotspot\ on 64-bit machines.
b. This program can be installed for the current user or for every user on the device. By
selecting the “Everyone” option every user on the PC will have access to Thinix WiFi
Hotspot™ and be able to make changes, If you wish for only the current user to have
access to the program choose the “Just me” option.
c. Click “Next” to continue
Page 4
Page 5
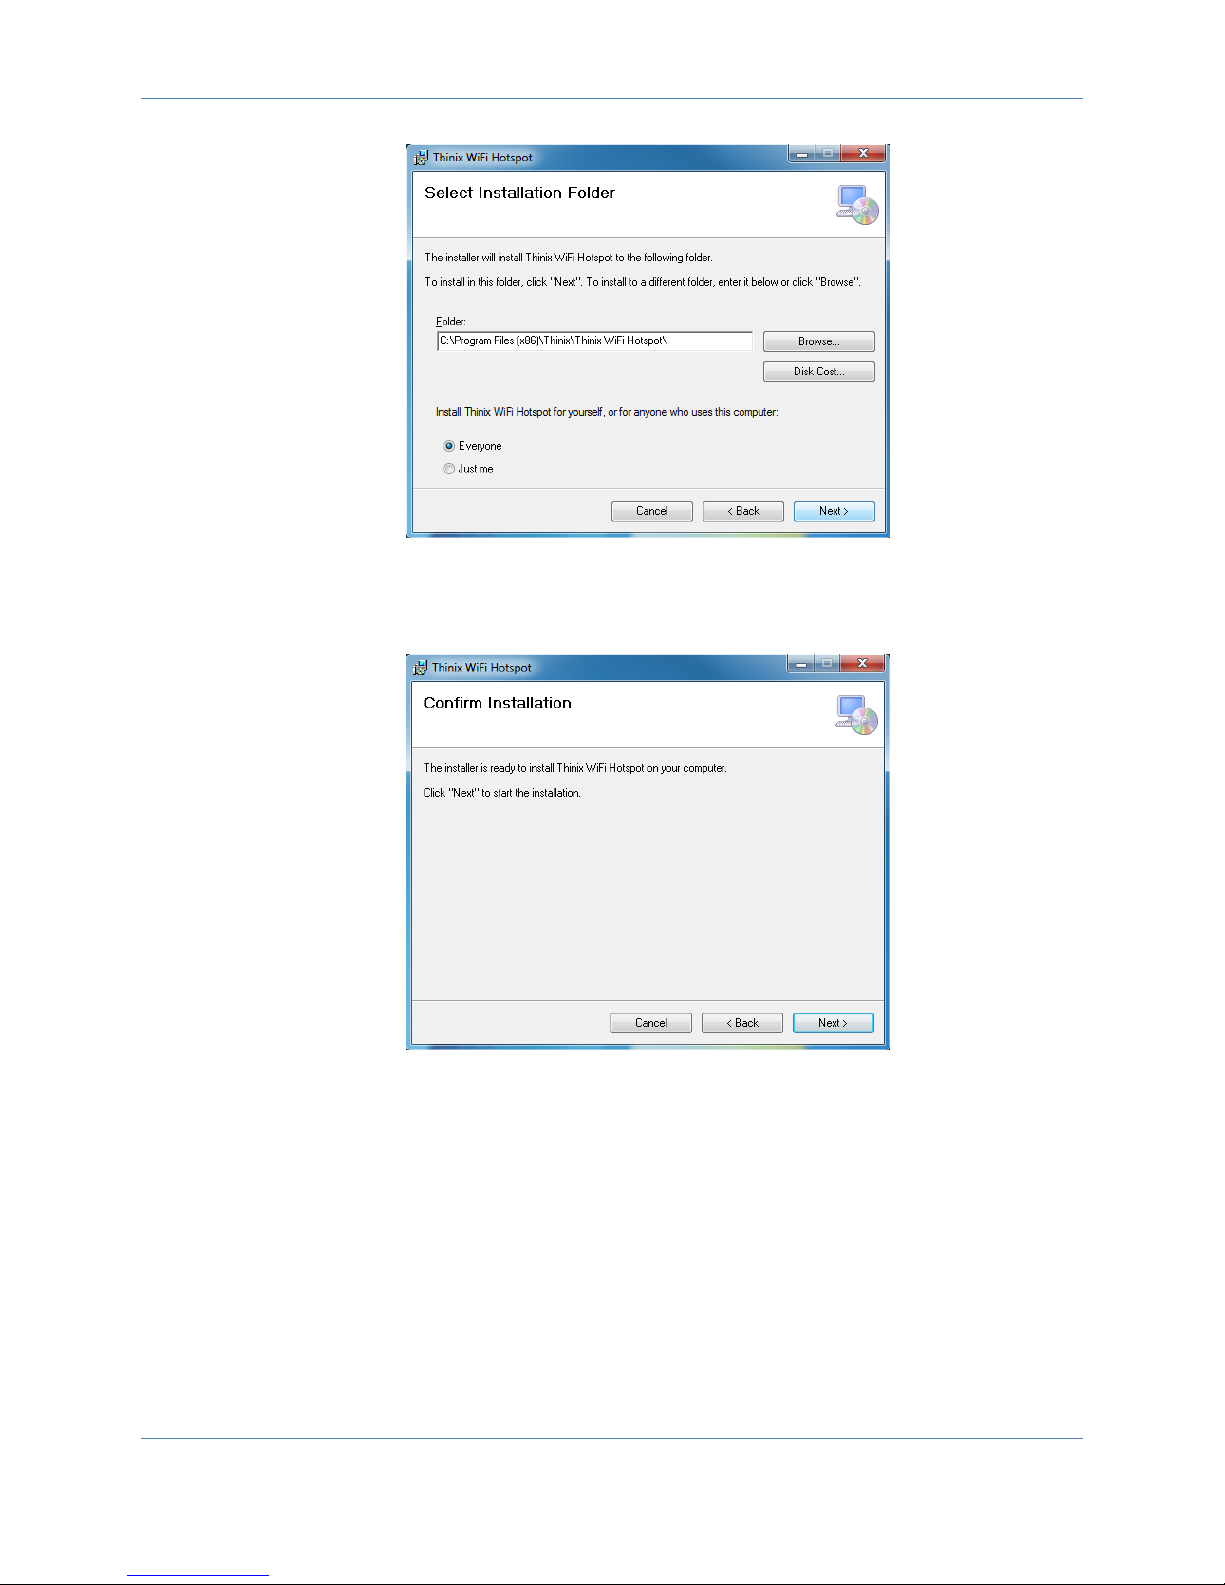
Figure 2
4. Click the “Next” button to start the installation pictured in Figure 3.
Thinix WiFi Hotspot™ User Manual
5. At this point the user will be asked if they wish to let the program make changes to the
computer. Click “Yes” to continue.
6. At this point a progress window will appear and show the progress of the installation, this
window will disappear when installation has finished.
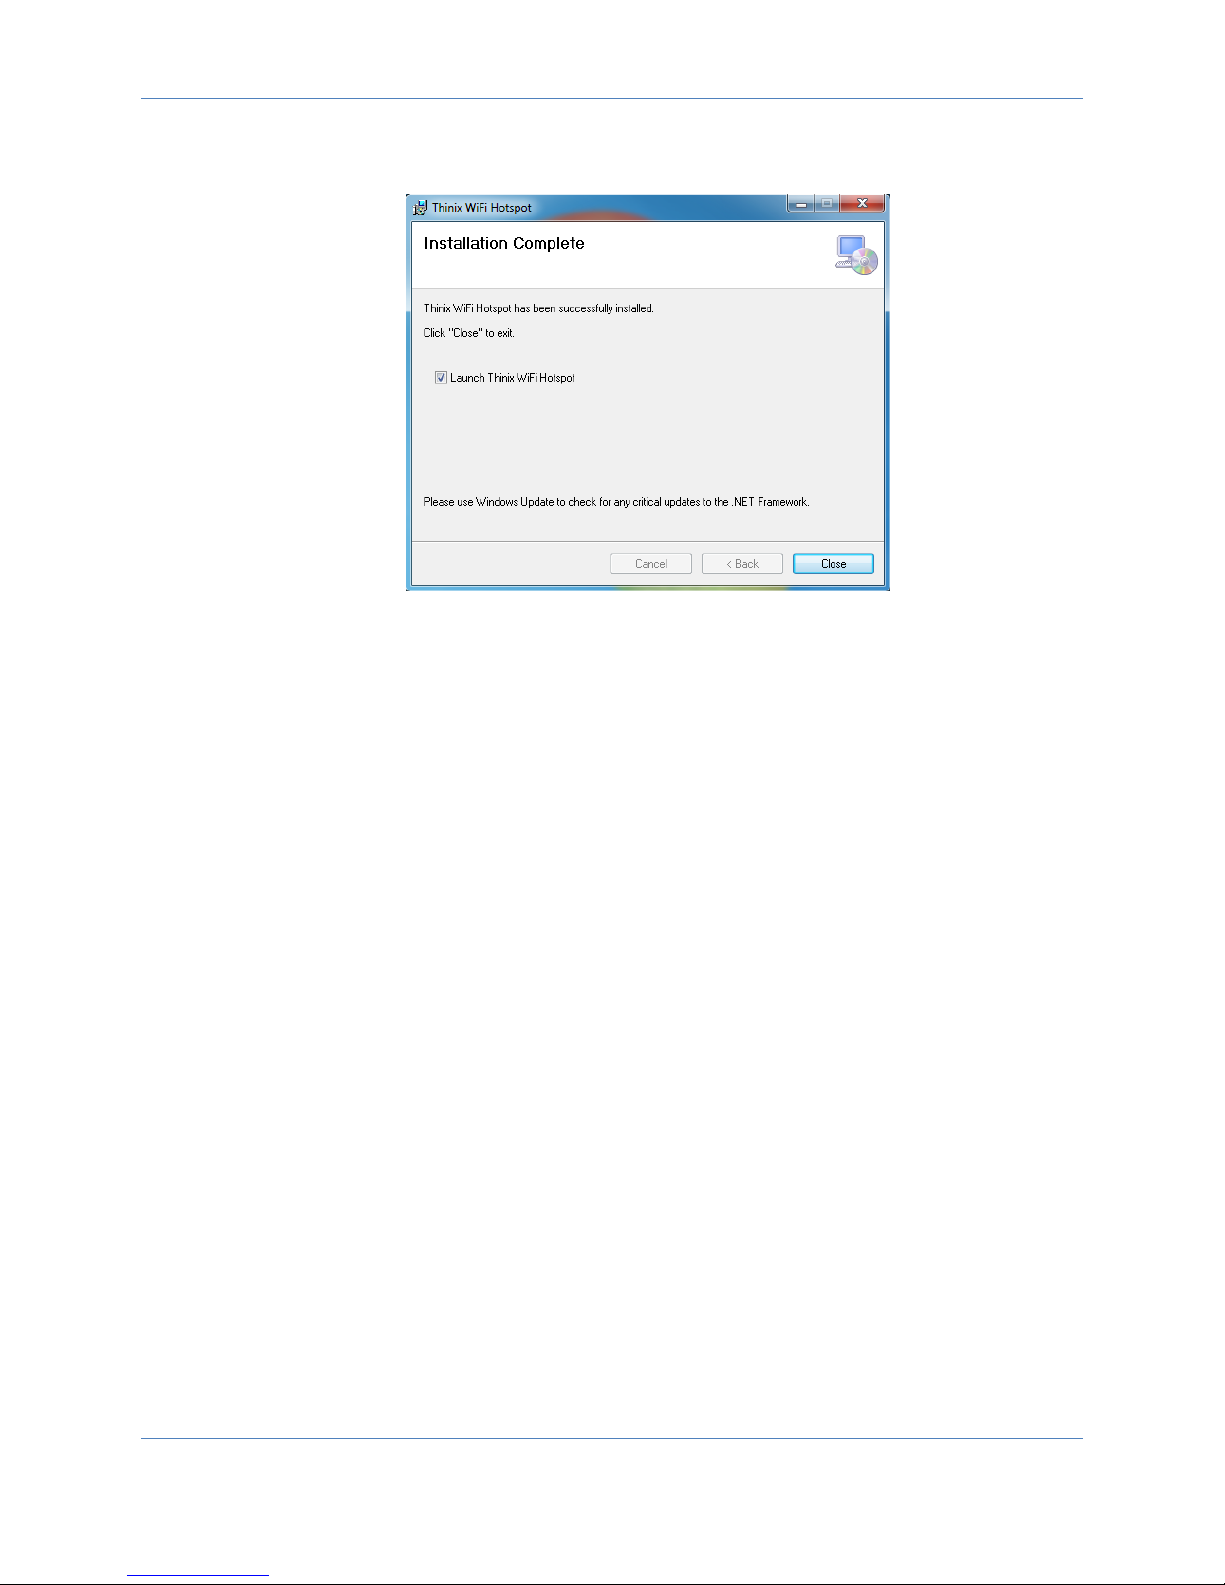
7. The final window step is to choose if Thinix WiFi Hotspot™ should be started after installation
pictured in Figure 4.
a. Check the “Launch Thinix WiFi Hotspot” box to start the program upon exit of the
installer. Uncheck the box if Thinix WiFi Hotspot™ is not to be started after installation.
Figure 3
Page 5
Page 6
Thinix WiFi Hotspot™ User Manual
b. Click “Close” to exit installation
Figure 4
Install Thinix WiFi Hotspot in Windows 8
1. Make Sure .NET Framework Version 3.5 is installed
a. Search for “Programs and Features” in settings option and open “Programs and
Features”
b. Turn Features on/off in Windows
c. In the dialog window make sure that .NET Framework 3.5 option is checked, and then
press OK. If no new window appears skip to step 2.
d. A window will open asking if you wish to Download/Install or Cancel, click
Download/Install and Windows will complete the installation for you.
2. Start the Thinix WiFi Hotspot™ installer.
3. In the first window pictured in Figure 5 click “Next”
Page 6
Page 7
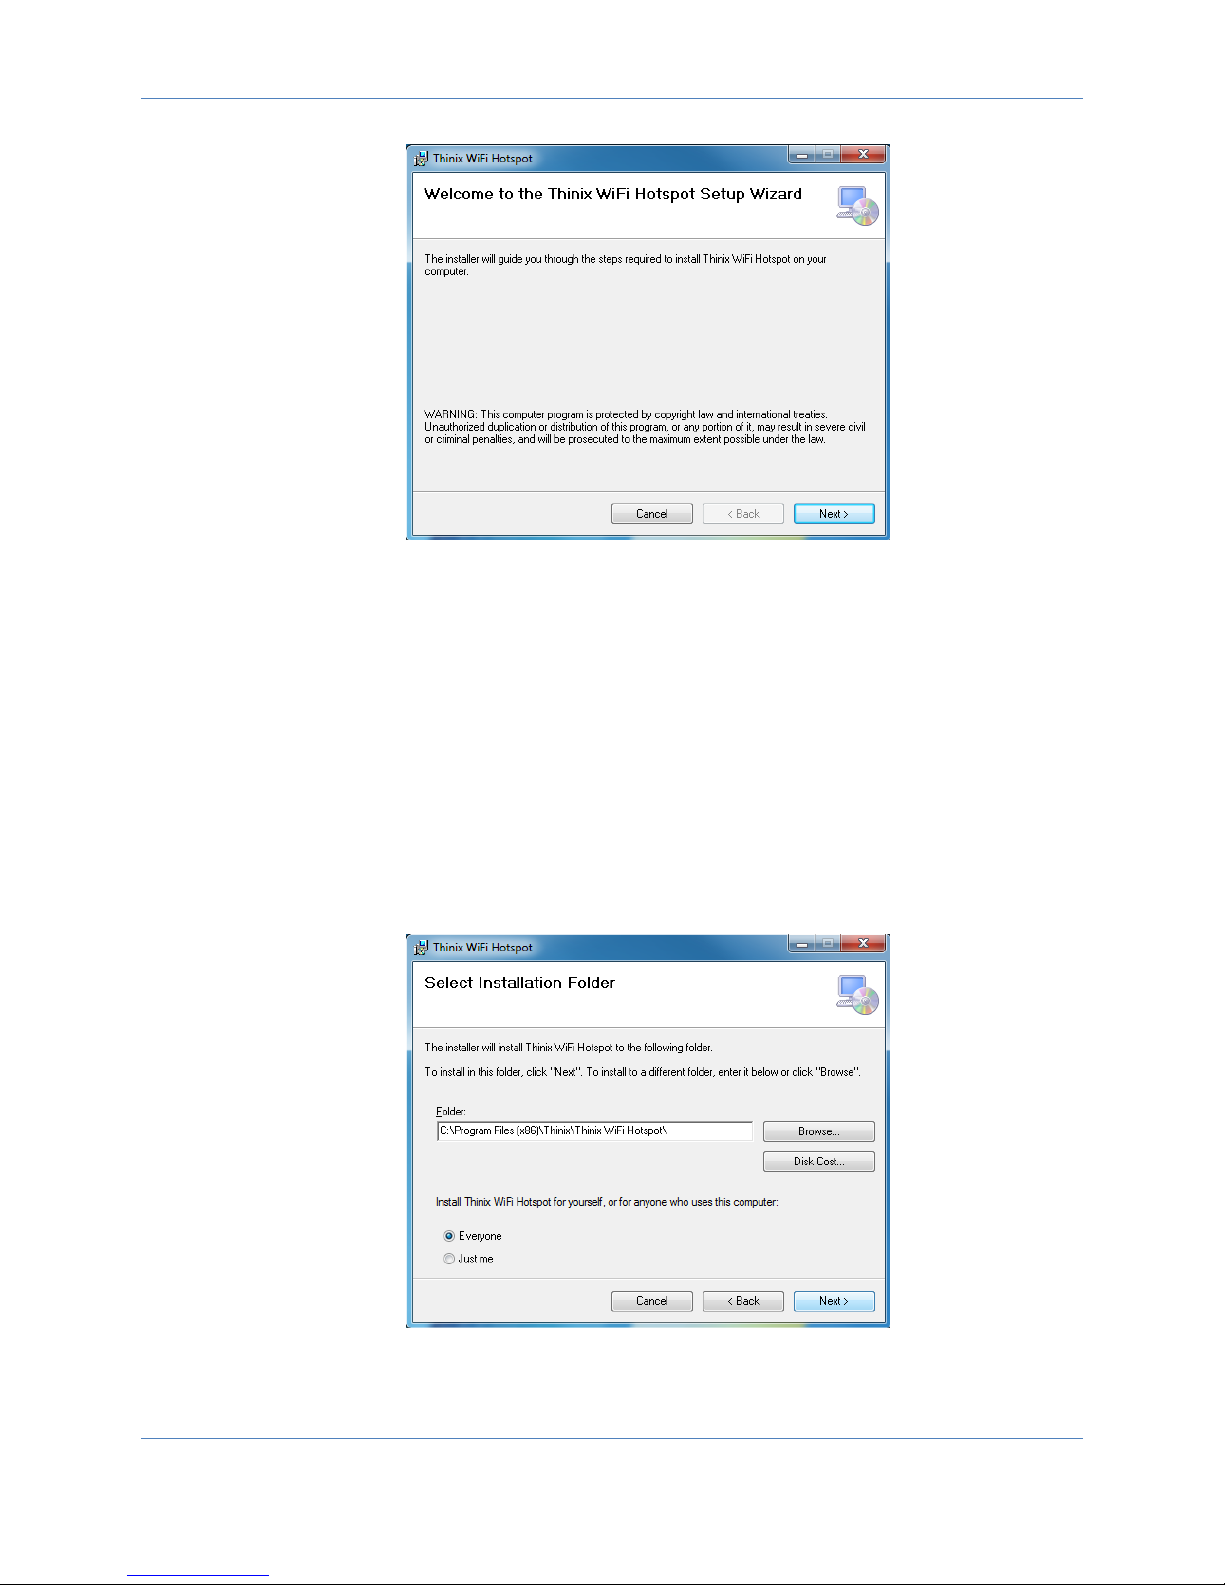
Figure 5
4. The second window shown in Figure 6 has configurable options.
a. The install folder of the program can be specified, this can be done manually by either
clicking the “Browse…” button or manually entering a path in the text box or by using
the default. The default path is: C:\Program Files (x86)\Thinix\Thinix WiFi Hotspot\ on
32-bit machines and C:\Program Files\Thinix\Thinix WiFi Hotspot\ on 64-bit machines.
b. This program can be installed for the current user or for every user on the device. By
selecting the “Everyone” option every user on the PC will have access to Thinix WiFi
Hotspot™ and be able to make changes, If you wish for only the current user to have
access to the program choose the “Just me” option.
c. Click “Next” to continue
Thinix WiFi Hotspot™ User Manual
Figure 6
Page 7
Page 8
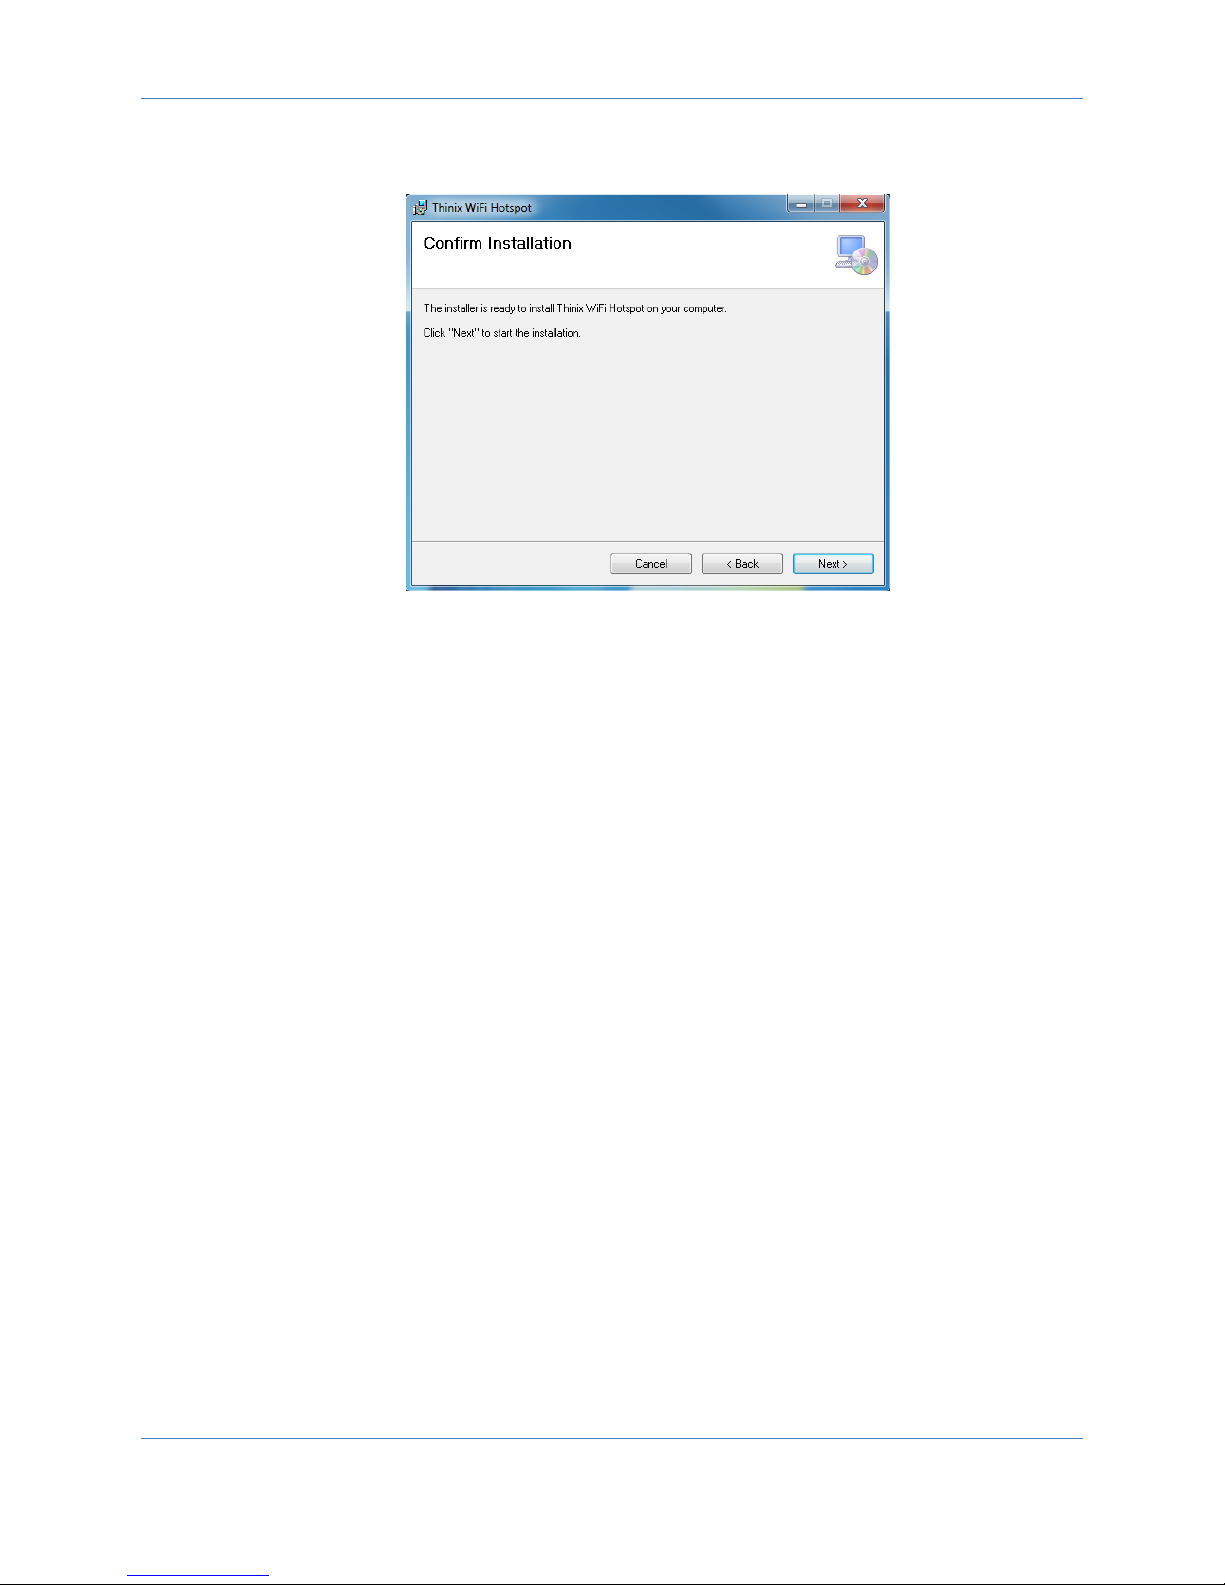
5. Click the “Next” button to start the installation shown in Figure 7.
Figure 7
Thinix WiFi Hotspot™ User Manual
6. At this point the user will be asked if they wish to let the program make changes to the
computer. Click “Yes” to continue.
7. At this point a progress window will appear and show the progress of the installation, this
window will disappear when installation has finished.
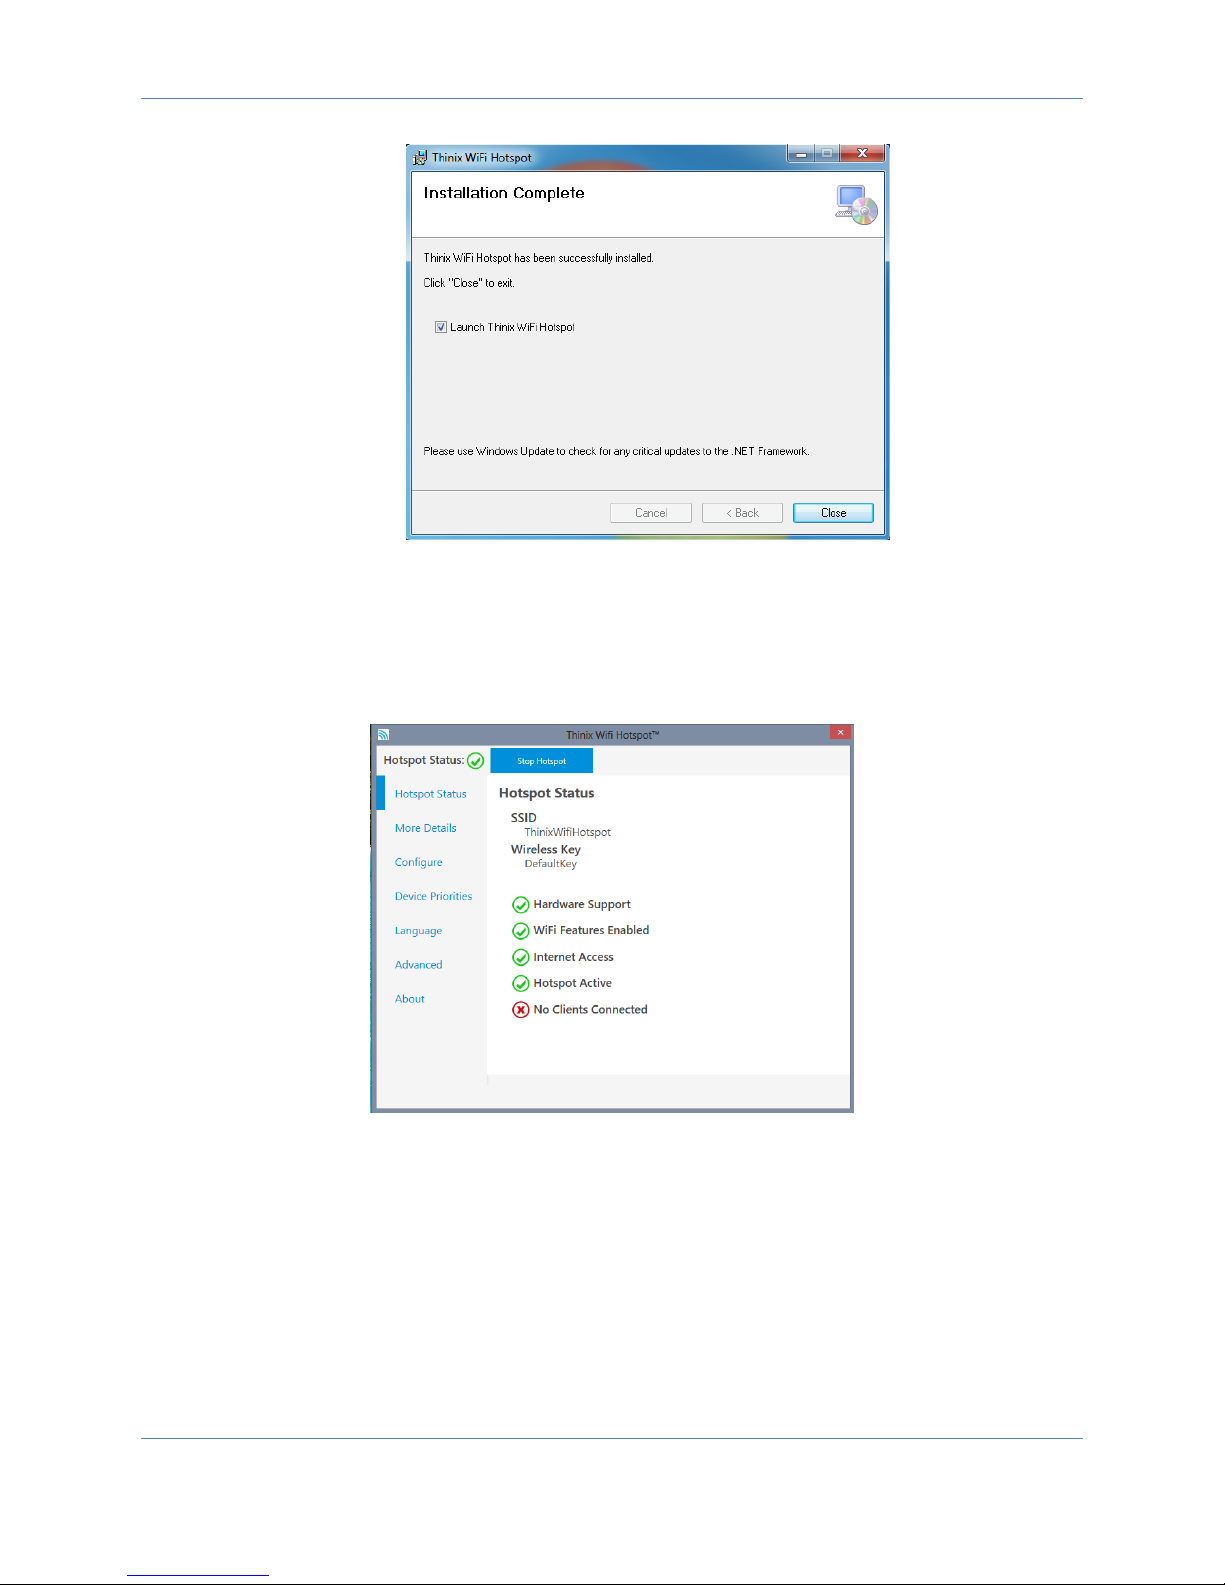
8. The final window step is to choose if Thinix WiFi Hotspot™ should be started after installation
shown in Figure 8.
a. Check the “Launch Thinix WiFi Hotspot” box to start the program upon exit of the
installer. Uncheck the box if Thinix WiFi Hotspot™ is not to be started after installation.
b. Click “Close” to exit installation
Page 8
Page 9
Using Thinix WiFi Hotspot™
Thinix WiFi Hotspot™ User Manual
Figure 8
The New Interface
Figure 9
Figure 9 shows an image of the new interface developed to give better usability to the application so it
may reach a larger audience. Some of the new Improvements include the ability to change the language
create multiple settings profiles that can be change seamlessly. Through the new status page the user is
given a new compatibility check of the wireless adapters to become an Access Point. These Features will
be explained later in this document.
Page 9
Page 10

Thinix WiFi Hotspot™ User Manual
To allow for the ability to express more information the interface was changed to a tabbed layout with
the tab section chooser located at the left of the application window. Directly above this is an overall
status of the hotspot. The user is able to navigate sections by selecting a tab on the list. The application
will then display the wanted tab to the user.
Hotspot Status Tab
The Hotspot Status Tab is pictured in Figure 9. It contains information about the SSID and the Key.
1. ‘SSID’ (Secure Set Identifier) is 8 to 32 characters in length used to identify the access point to
wireless devices. Devices use this as an identifier to connect to the access point.
2. ‘Wireless Key’ is 8 to 64 characters in length and is used by the access point to limit connections
by devices.
3. ‘Hardware Support’ indicates if the hardware configuration of the computer is able to support
Thinix WiFi Hotspot™. If this status is green then the wireless adapter in the hardware is
compatible, otherwise this will show red if the wireless adapter will not support this
functionality.
4. ‘WiFi Features Enabled’ indicator will be green if required software components have been
initialized and are being used. The software will always try to initialize these components. This
should always be green. If this is red and the hardware is supported contact technical support.
5. ‘Internet Access’ indicator show if the current computer has access to the internet. This does
not indicate if the hotspot can send data to the internet.
6. ‘Hotspot Active’ indicator indicates if the hotspot is acting as an access point. If this indicator is
green the hotspot is active and broadcasting. If the indicator is red then the hotspot is not
active.
7. ‘Clients Connected’ indicator is green if the hotspot is on and has clients that have authenticated
with the hotspot. If the indicator is red no clients are connected to the hotspot. This indicator’s
state will not affect the state of the ‘Hotspot Status’ indicator.
Page 10
Page 11
Thinix WiFi Hotspot™ User Manual
More Details
Figure 10
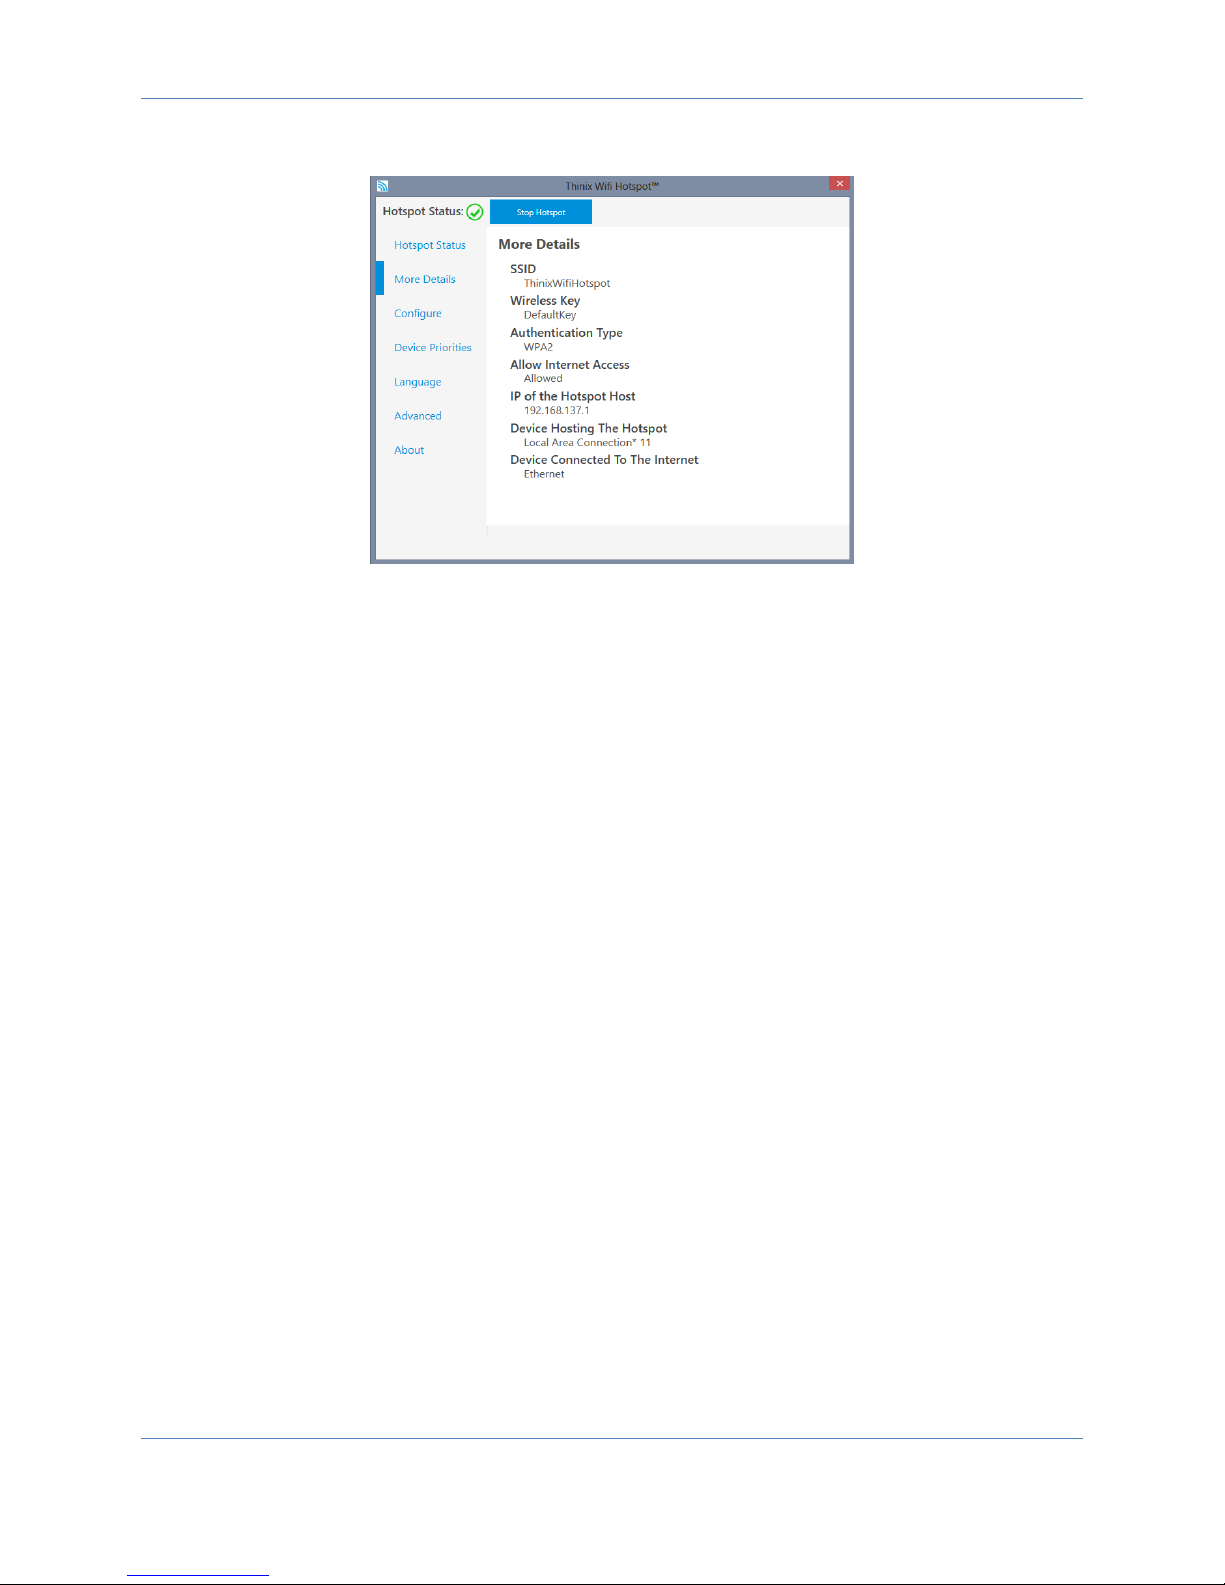
Figure 10 shows the More Details tab. This tab shows information about how the device is broadcasting
and how the device routes information. These items include SSID, Wireless Key, Authentication Type,
Allow Internet Access, IP of the Hotspot Host, Device hosting the Hotspot. Device Connected to the
Internet.
1. ‘SSID’ is 8 to 32 characters in length and is used to identify the access point to wireless devices.
Devices use this identifier to choose an access point with which to try and connect.
2. ‘Wireless Key’ is 8 to 64 characters in length and is used as a password to filter devices not
allowed to connect to the hotspot.
3. ‘Authentication Type’ is the authentication standard being used to limit devices and to secure
the transfer of data.
4. ‘Allow Internet Access’ indicates if the hotspot allows connected devices to reach the internet
through the provided connection. If devices are allowed text indicating devices are allowed will
appear. This field will only have a value once the hotspot has been started.
5. ‘IP of the Hotspot Host’ is the internet protocol (IP) address that is seen by devices trying to
connect to the Access Point. The IP addresses are normally 192.168.137.1 when internet access
is allowed and 192.168.173.1 when internet access is restricted. If these values are changed it
might adversely affect the Hotspot. The address will not be shown until the Hotspot has been
started.
6. ‘Device Hosting the Hotspot’ is the virtual wireless device that is acting as an access point. The
friendly name will be displayed of the device. The device name will be Microsoft Hosted
Network Virtual Adapter in Windows 8 and Microsoft Virtual WiFi Miniport Adapter in Windows
7.
Page 11
Page 12
Thinix WiFi Hotspot™ User Manual
7. ‘Device Connected To The Internet’ is the device through which data traffic from the software
access point is routed through to reach the internet. The friendly name of the adapter is
displayed and this field will not be displayed until the hotspot has been started.
Configure
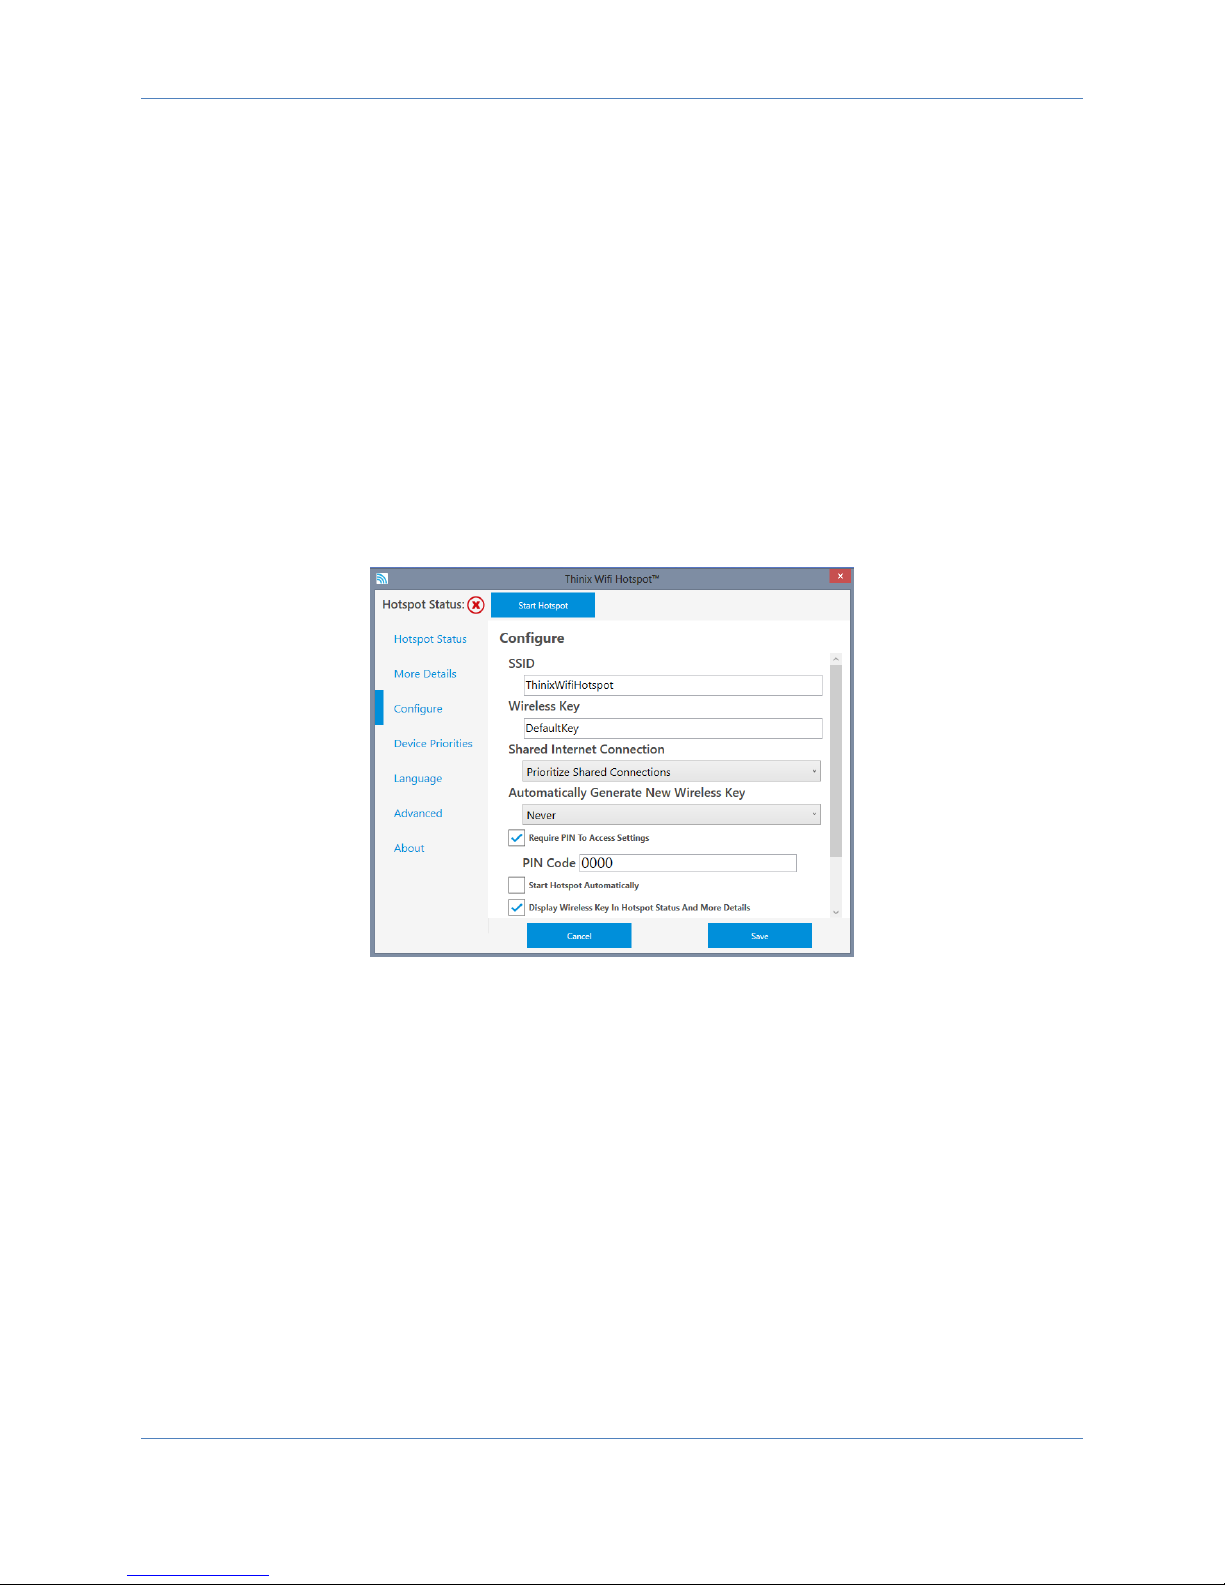
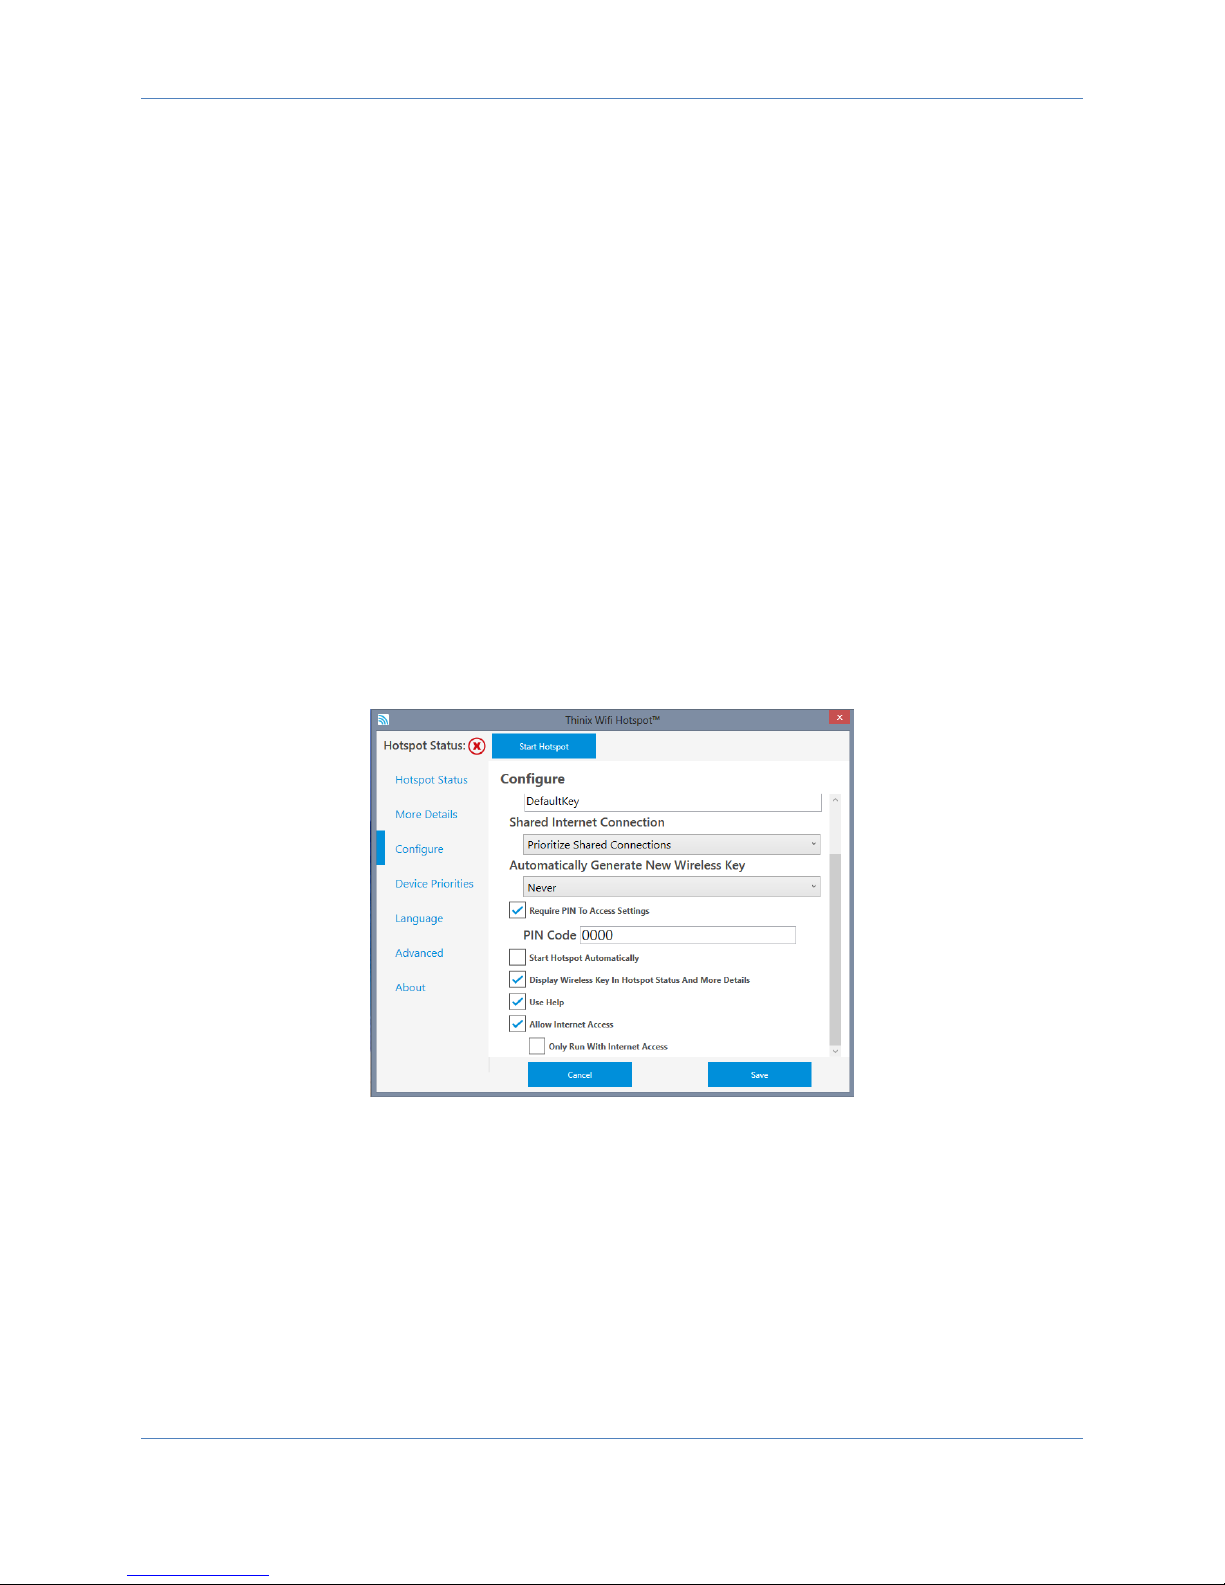
The Configure Tab shown in Figures 11-16 allows the user to change the settings of the hotspot. These
settings determine how the application acts as a hotspot and how the interface reacts to the user.
Pictured in Figure 12 are the SSID, Wireless Key, Shared Internet Connection, Automatically Generate
new Wireless Key, Require Pin to Access Settings, Start Hotspot Automatically and Display Wireless Key
in Hotspot Status and More Details.
Figure 11
1. ‘SSID’ the text box labeled SSID allows the user to set the expression that will be used for the
SSID. This field is required to be 8 to 32 characters long, containing only letters, numbers, and
the characters “$@^`,|%;.~()/\{}:?[]=+-_#!”.
2. ‘Wireless Key’ is the passphrase used to allow connections to the hotspot. It is a 8 to 64
character field using the same characters allowed in the SSID.
3. ‘Shared Internet Connection’ is a drop down menu that allows the user to pick which internet
adapter available on their system will be used for hosting an internet connection. If “Prioritized
Shared Connections” is chosen the connection will be chosen by the order specified by Device
Priorities.
Page 12
Page 13
Thinix WiFi Hotspot™ User Manual
4. ‘Automatically Generate New Wireless Key’ option gives the user an ability to have the system
choose when and if the Wireless Key is auto generated. The intervals by which keys are able to
be generated are as follows:
a. Hourly the wireless key is generated in hour intervals from when the generation time
was set.
b. Daily, the wireless key is generated at a specific time of day specified by the user.
c. Weekly, the wireless key is generate at on a specific weekday and time specified by the
user.
d. Monthly, the wireless key will be generated when the month changes.
e. On Startup, every time the program restarts the wireless key will be regenerated.
5. ‘Require PIN To Access Settings’ option restricts access to the Configure, Device Priorities,
Language, and Advanced Tabs.
6. ‘Start Hotspot Automatically’ starts the hotspot functionality of the application on application
startup.
7. ‘Display Wireless Key in General and More Details’ option allows anyone with access to the
application the ability to see the wireless key displayed in the General and More Details Tabs.
Figure 12
8. ‘Use Help’ option displays help tips like those pictured in Figure 22.
9. ‘Allow Internet Access’ allows the hotspot users to gain access to the internet.
10. ‘Only Run With Internet Access’ this option only allows the hotspot to be activated when the
hotspot can send information to the internet.
Page 13
Page 14
Thinix WiFi Hotspot™ User Manual
Figure 11
Figure 12
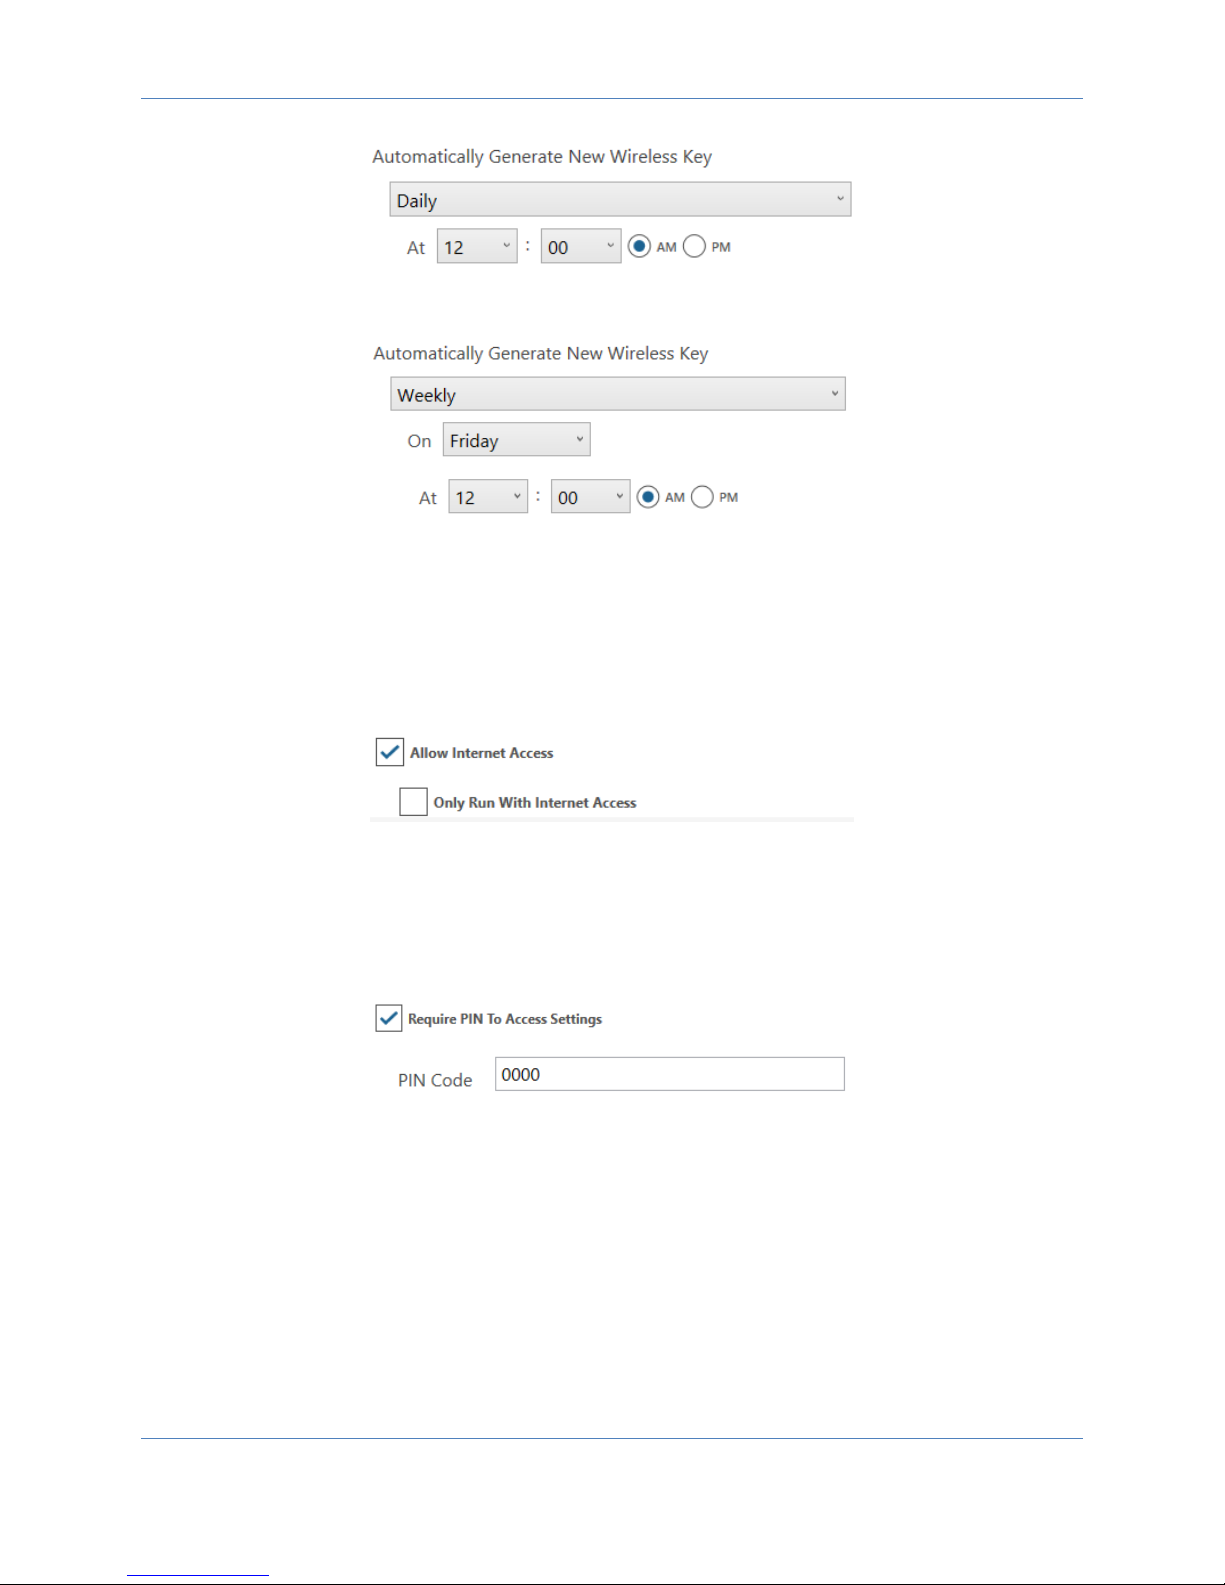
When ‘Automatically Generate New Wireless Key’ is set to Daily as in Figure 13 or Weekly as in Figure 14
the application uses more information to decide when to generate a Wireless Key. For Daily generation
of wireless keys the application will generate a key at the time specified by the drop down boxes.
Weekly generation also allows the user to pick which day of the week the key will be changed.
Figure 135
When ‘Allow Internet Access’ the option ‘Only Run With Internet Access’ is displayed. This option allows
the user to have the hotspot turn off when internet access is lost and have the hotspot turn back on
when internet access is regained.
Figure 16
If the option to ‘Require a PIN to Access Settings’ is check the option to designate the PIN code is shown.
The user is able to enter a PIN code in the text box labeled PIN code.
All of these settings will only be set after save has been clicked. This allows the user to change their
mind if they no longer wish to change the settings. Pressing Cancel will make the settings revert to their
previous configuration.
Page 14
Page 15
Thinix WiFi Hotspot™ User Manual
Device Priorities
Figure 14
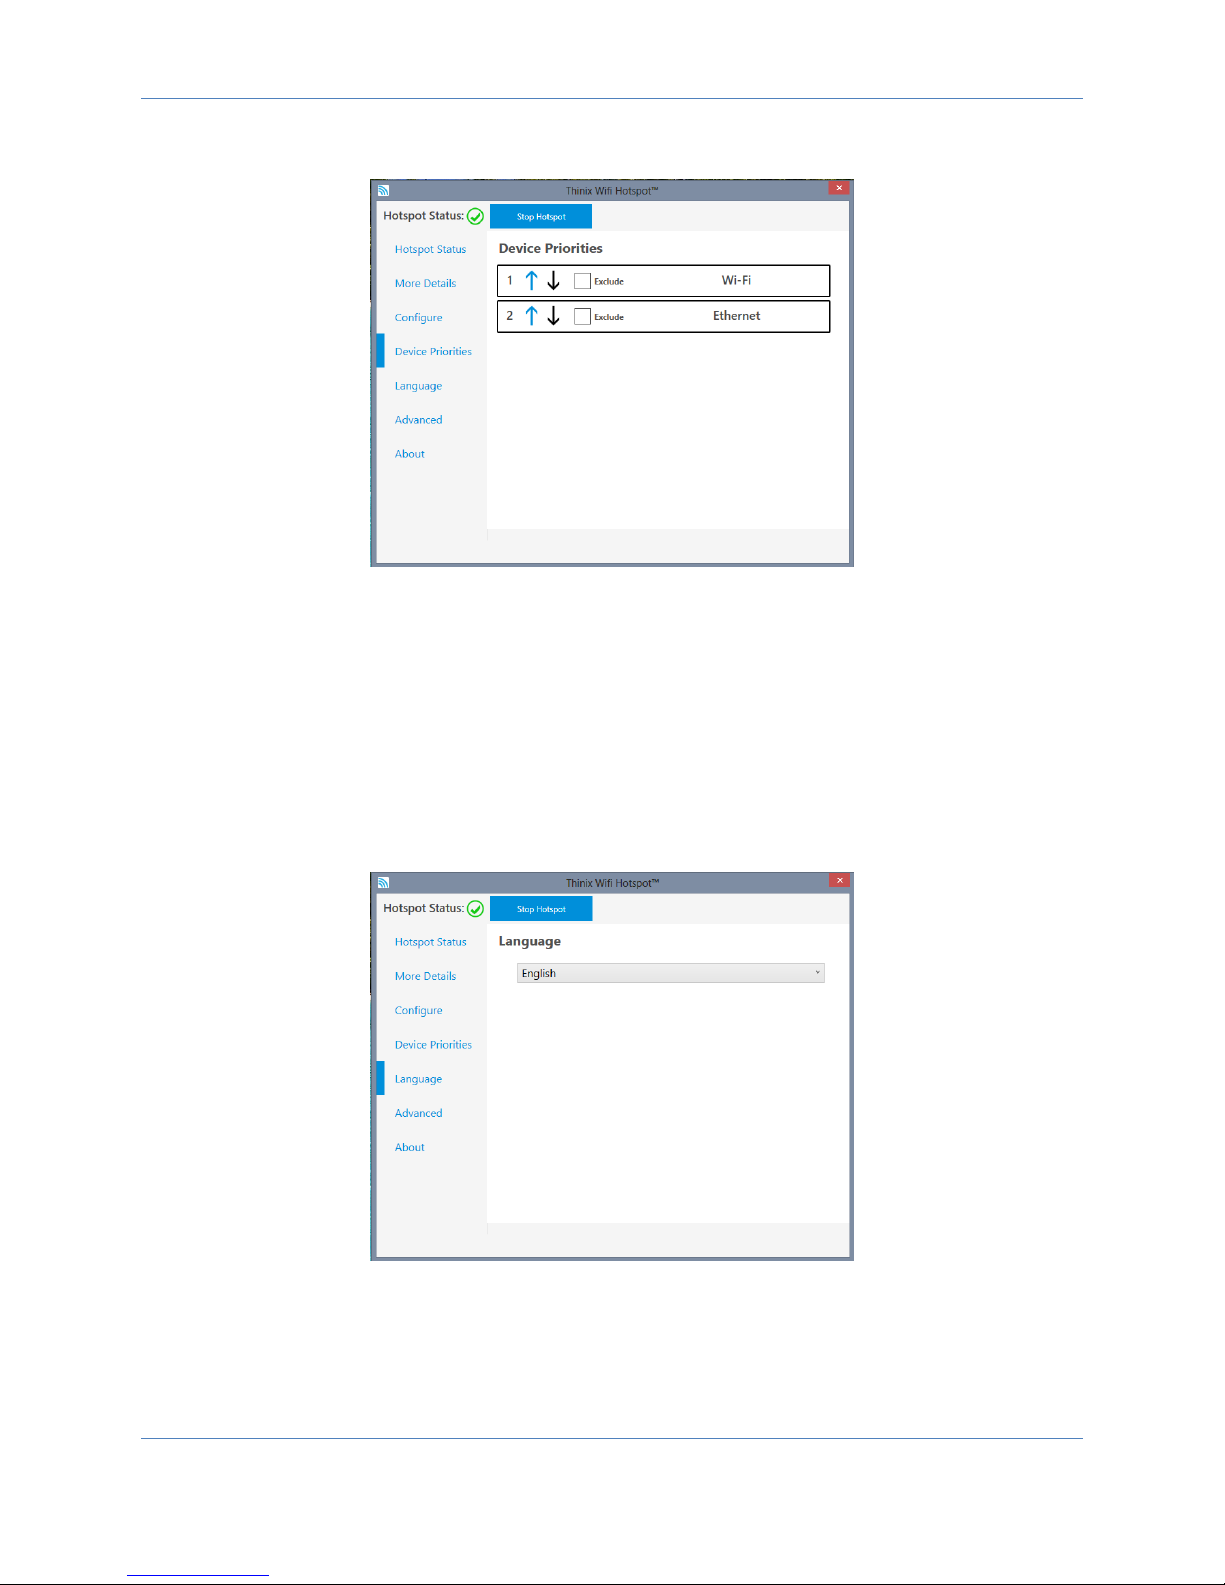
The Device Priorities Tab pictured in Figure 17. Allows the user to set the order in which a device will be
used to send data to the internet. Devices can be dragged and dropped determine the order of the list,
or can be adjusted with the arrows next to the exclude box. The number next to the device Is the order
by which it will be chosen starting with one and counting upwards. The exclude box determines if the
adapter should be excluded from being used. The device is excluded when the box is checked otherwise
it is in use.
Language
Figure 15
By selecting a language from the drop down menu in the Language tab shown in Figure 18, the user is
able to change the display language of the program. This language change will exist across every time
Page 15
Page 16

Thinix WiFi Hotspot™ User Manual
the program is run, and can be changed at any time by selecting another language from the drop down
menu. Currently supported languages are:
1. English
2. Afrikaans
3. Български
4. Čeština
5. Dansk
6. Deutsch
7. Ελληνικά
8. Español
9. Suomi
10. Français
11.
12. Kreyòl Ayisyen
13. Magyar
14. Indonesia
15. Italiano
16. 日本語
17. 한국어
18. Latvain
19. Lietuvių
20. Nederlands
21. Norsk
22. Polski
23. Português
24. Română
25. русский
26. slovenčina
27. slovenščina
28. Svenska
29. ไทย
30. Türkçe
31. українська
32. Việt Nam
33. 中文
Page 16
Page 17
Thinix WiFi Hotspot™ User Manual
Advanced
Figure 16
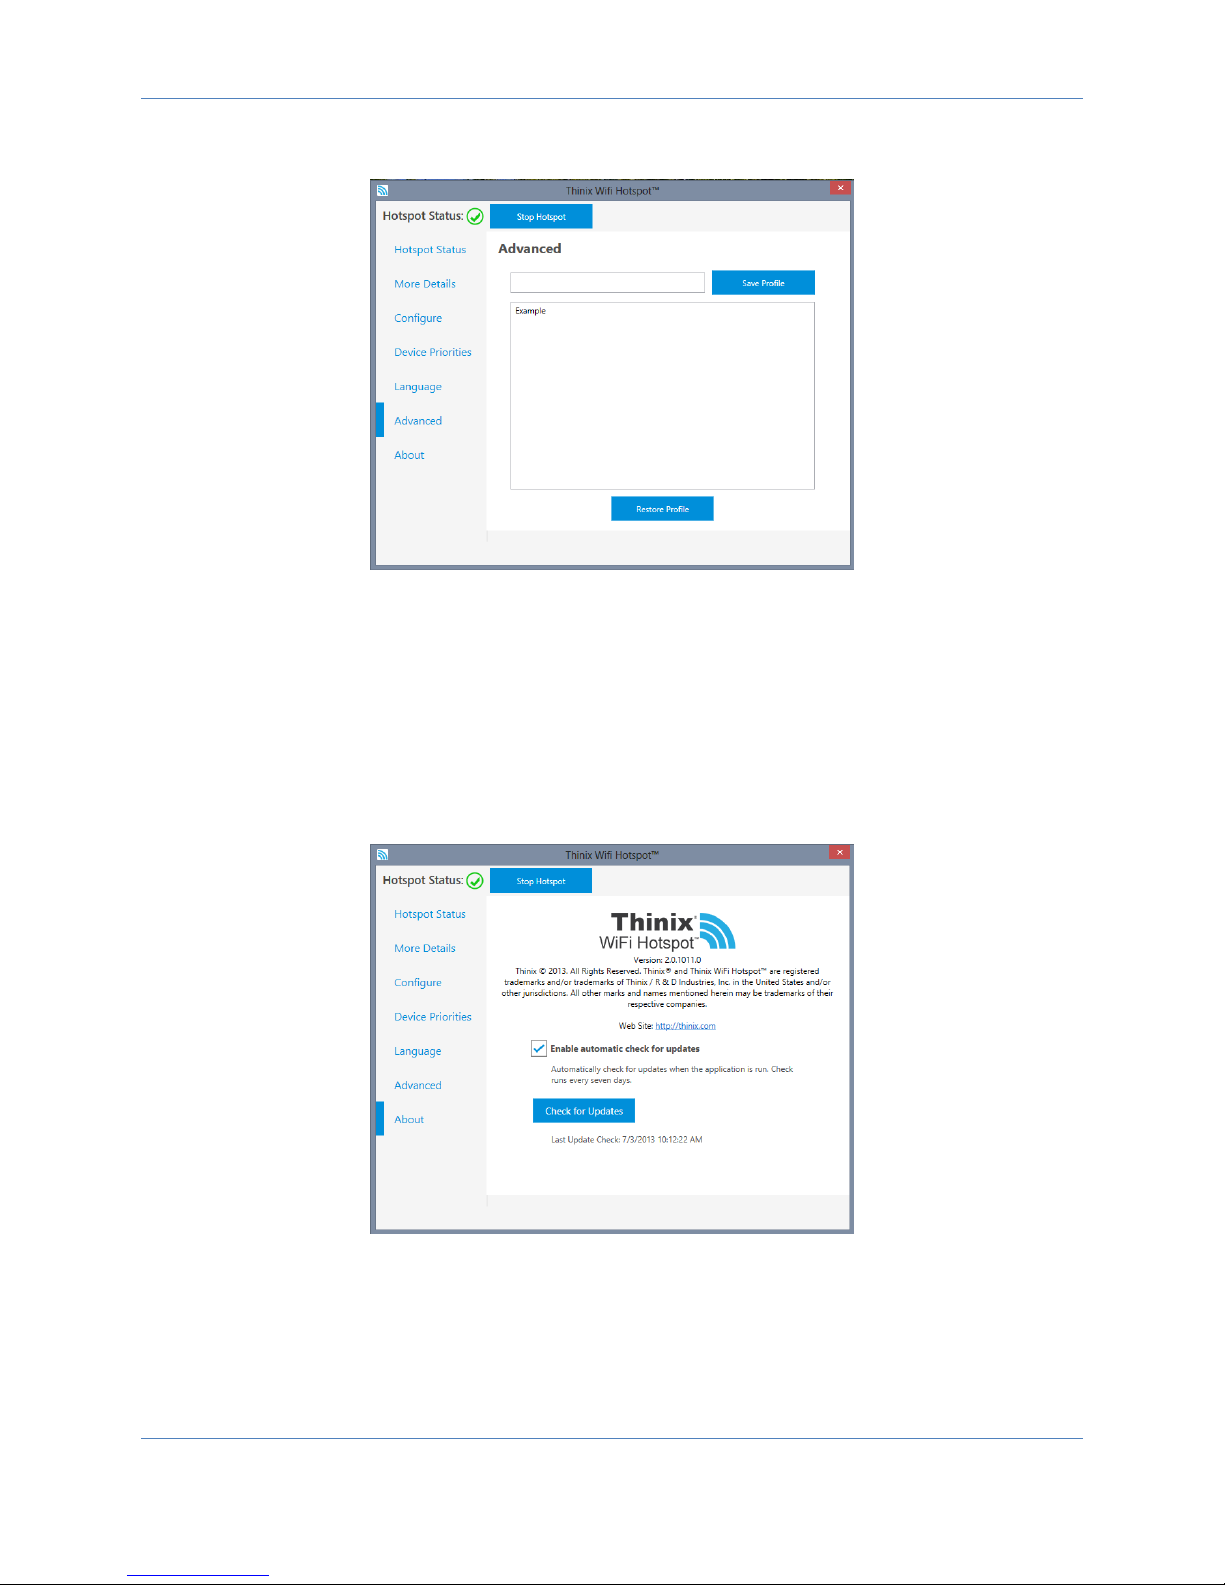
The advanced tab allows the user to save multiple settings profiles and change the entire profiles
instantly. To save a profile enter a name in the text box next to the ‘Save Profile’ button and then click
the ‘Save Profile’ button. This will save the profile and store the profile in the list below. To restore a
profile choose a stored profile from the list and then select the ‘Restore Profile’ button. This will load the
settings and the device priorities into the application.
About
Figure 17
The About Tab shown in Figure 20 shows important legal and contact information. This is a most basic
overview and more information can be obtained by contacting Thinix.
Page 17
Page 18
Thinix WiFi Hotspot™ User Manual
1. ‘Enable automatic check for updates’ will make Thinix WiFi Hotspot™ check for updates to the
product on a scheduled interval.
2. ‘Check for Updates’ will force the product to check for updates now instead of waiting for the
next automatic check.
3. ‘Last Update Check’ displays the time and date of the last update check
PIN Security
Figure 18
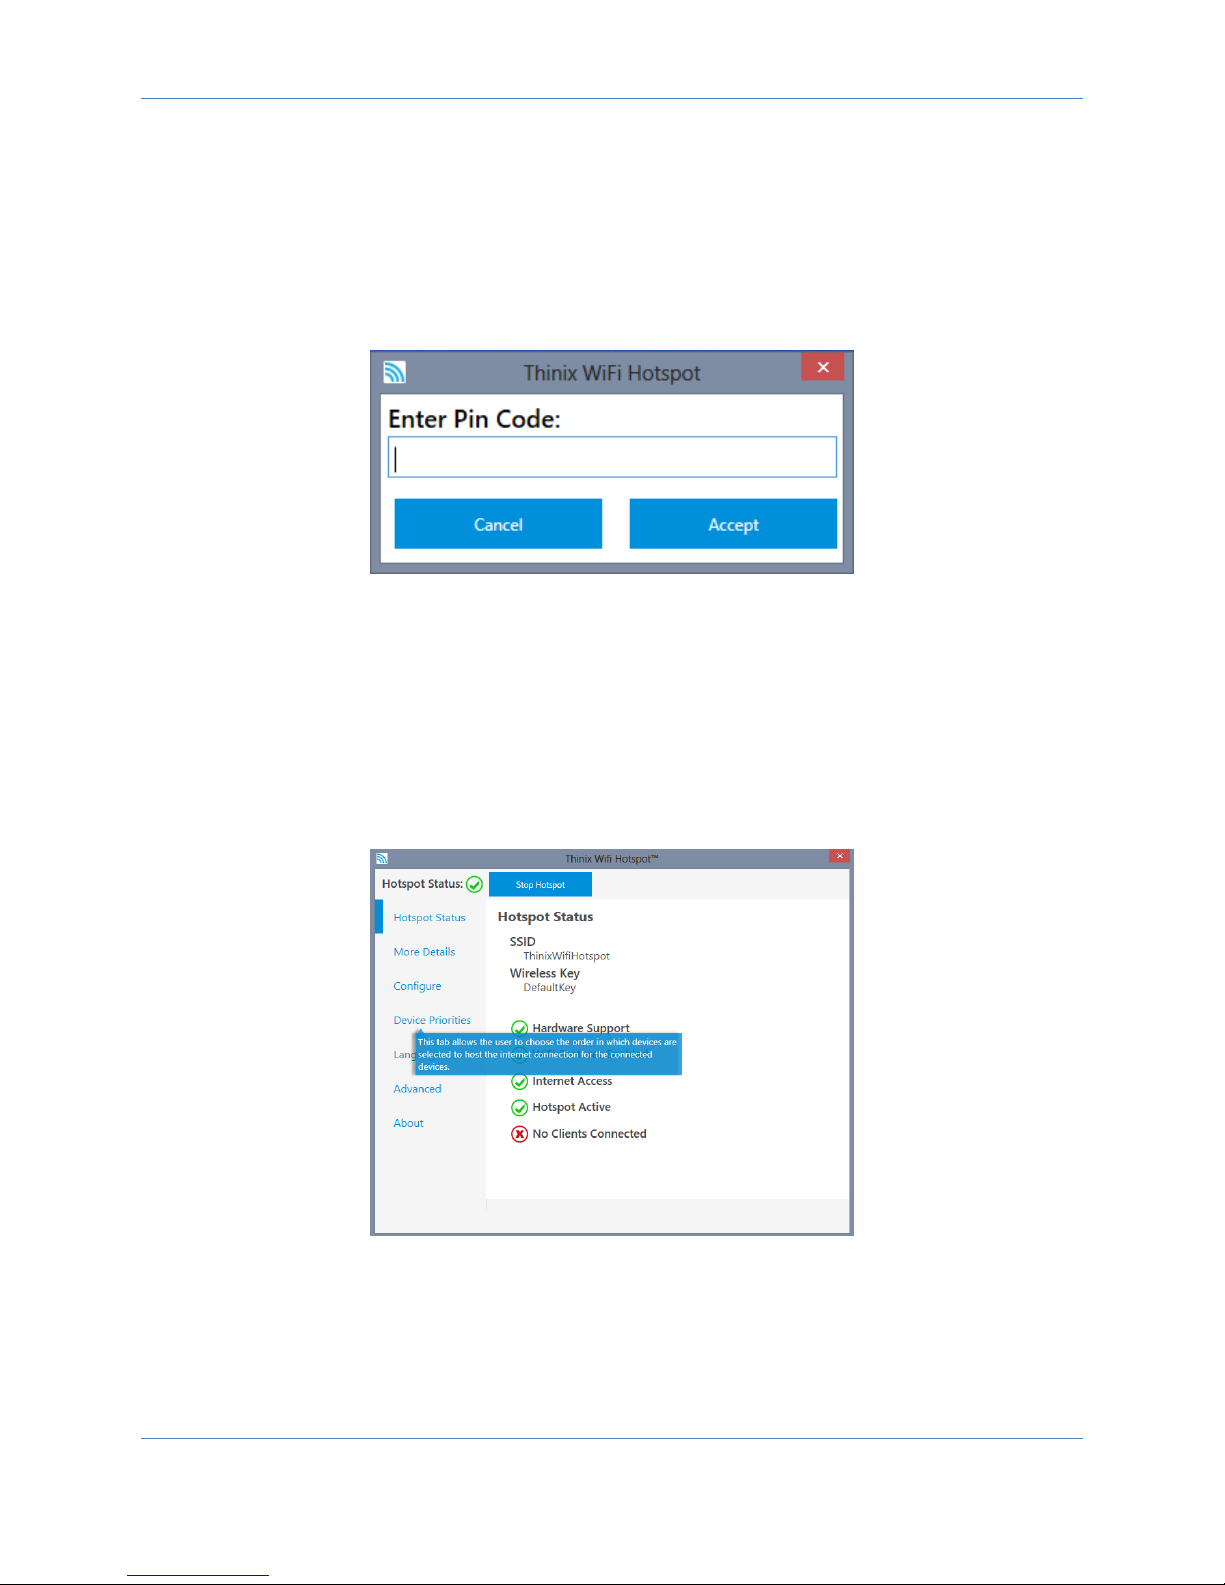
Figure 21 is an image of the window that displays if the user attempts to enter a protected section of the
application. This will only show when ‘Require PIN To Access Settings’ is checked in the Configure Tab.
To pass this box the correct pin must be entered in the password box, and the accept key pressed. If
cancel or the exit button is pressed the box will close and the user will not proceed to the protected tab
that has been requested. The default PIN code is 0000.
Help Tips
Figure 19
Page 18
Page 19
Thinix WiFi Hotspot™ User Manual
Help Tips like those shown in Figure 22 are shown when you mouse over an item. These items are there
to explain fields in more detail. If you wish to turn them off you can uncheck the ‘Use Help’ box show in
the configure tab.
Figure 20
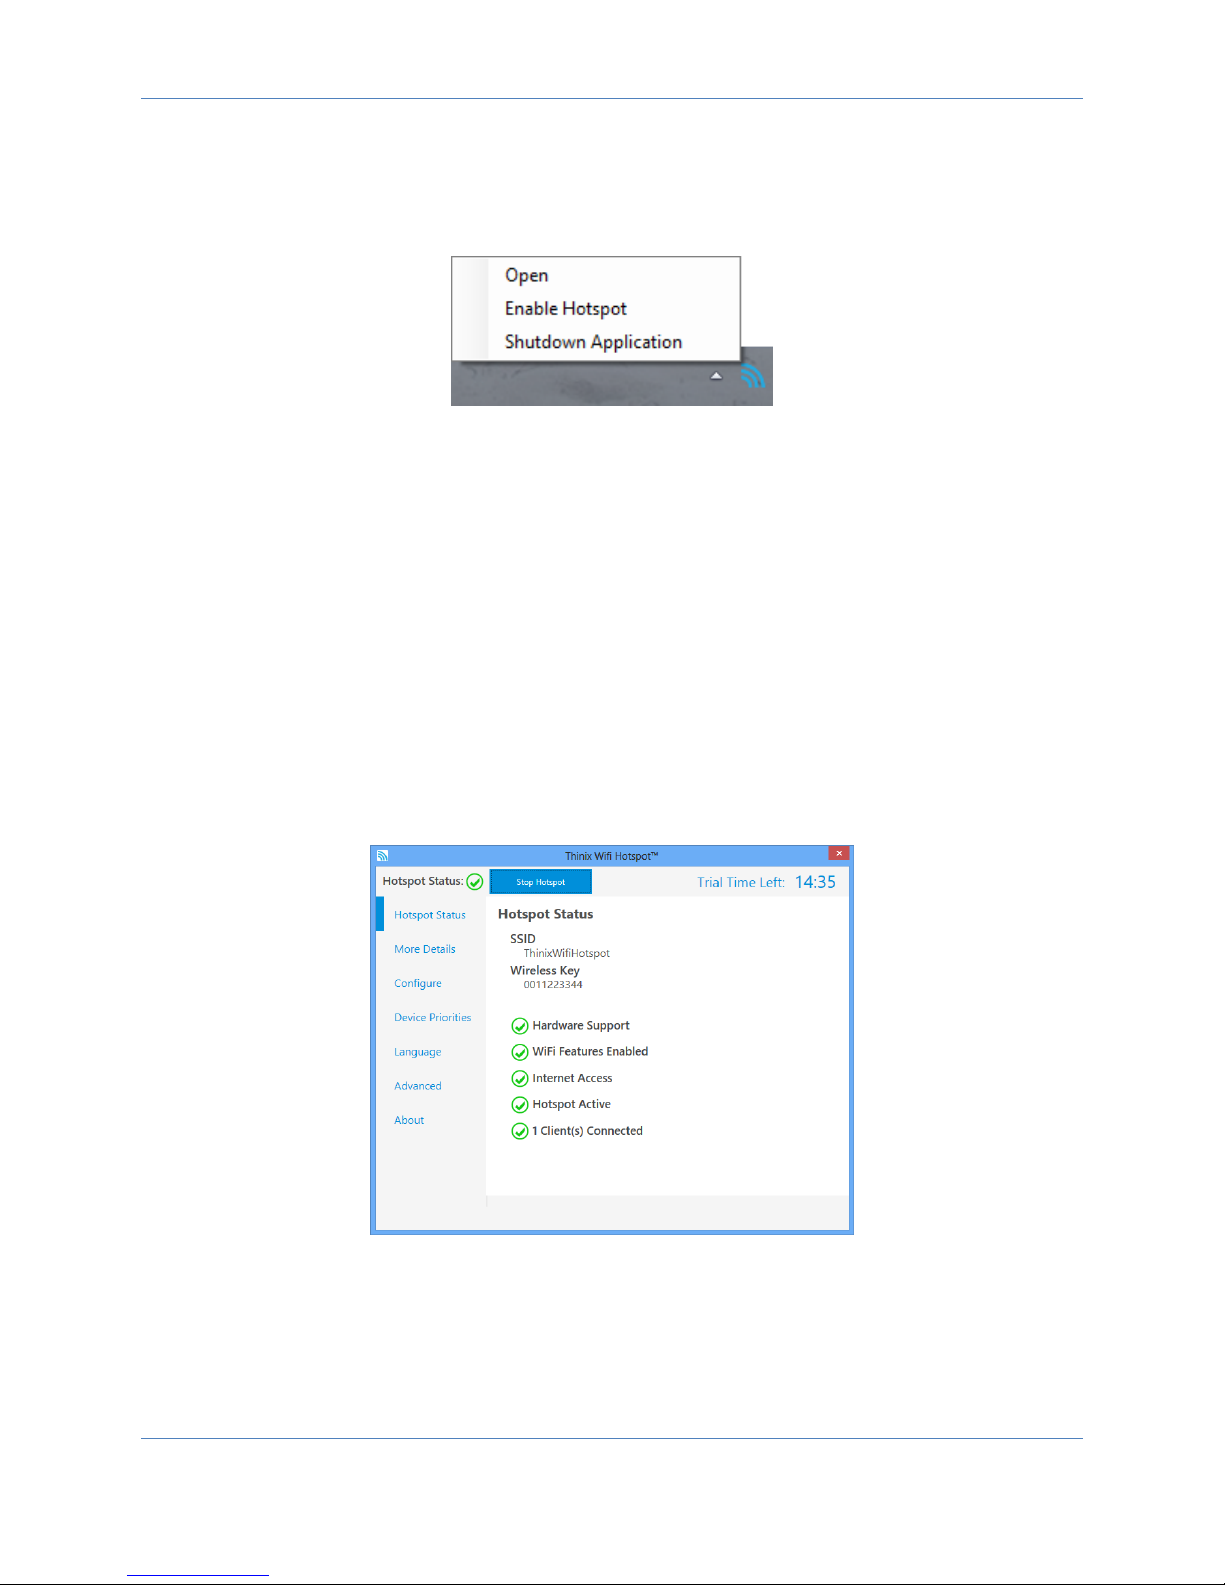
The tray icon in Figure 23 is used to control the hotspot outside of the window and to stop the
application from running. When the user right-clicks on the icon in Figure 23 the menu is displayed,
giving the user the three options shown.
1. ‘Open’ will display or open the menu that has been closed or hidden by the user earlier.
2. ‘Enable Hotspot’ will enable the access point. This option will also be ‘Disable Hotspot’ which
will stop the access point when it is started.
3. ‘Shutdown Application’ will cause stop the access point if it is running and close the application
fully.
Trial Mode
New in version 2.1 is Trial Mode. Trial Mode allows the hotspot to run for only 15 minutes when the
product has not been activated. When Trial Mode is active there a countdown clock like that shown in
Figure 21 will appear in the upper right hand corner of the screen. This clock indicates how much time is
left on the trial.
Page 19
Page 20

Thinix WiFi Hotspot™ User Manual
Page 20
 Loading...