

THIEYE T5 Pro User Manual
Action Cam T5 Pro
USER MANUAL
www.thieye.com
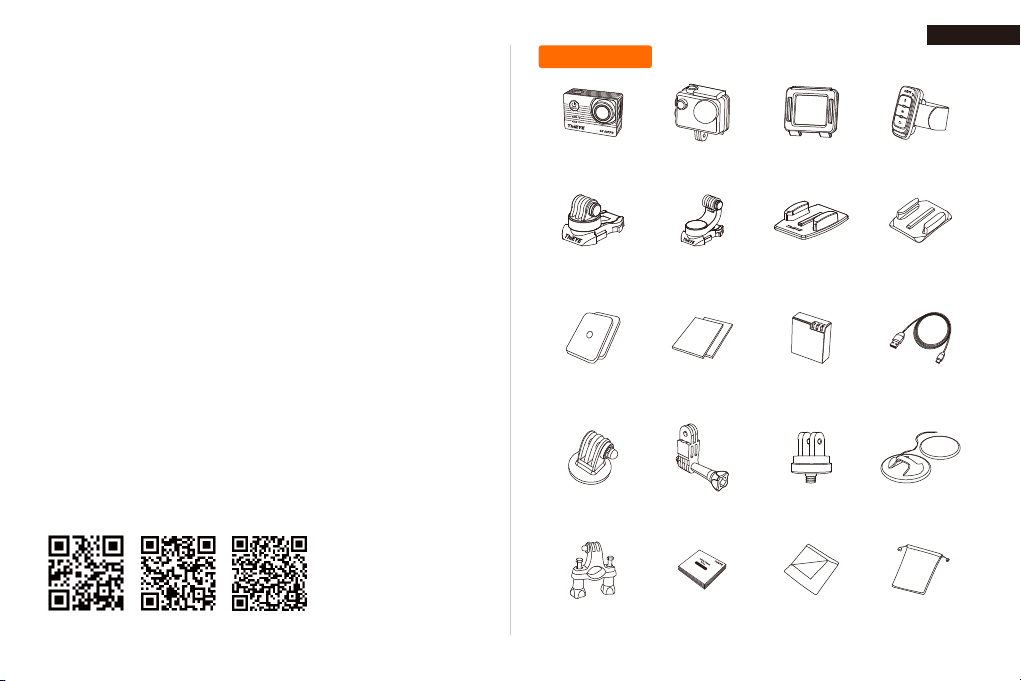
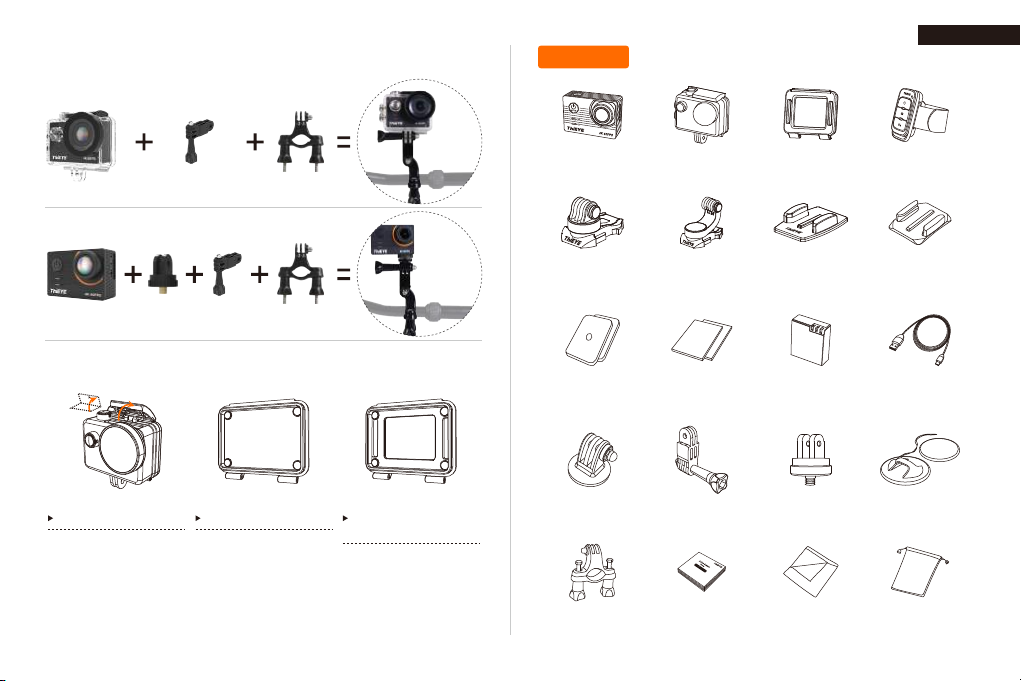
Packing List
English
USER MANUAL
快速操作指南
.......................
.......................
Guide de démarrage rapide
Deutsche Anleitung
...................
Guida di Operazione Rapida
Guía de Inicio Rápido
取り扱い説明書
..................
.......................
Инструкция пользователя
Hướng dẫn sử dụng
....................
ThiEYE Social Media
Facebook YouTubeOfficial Website
.............
.............
..............
01
33
59
93
129
164
199
228
263
Action Camera Waterproof
360° Rotating
Release Buckle
Adhesive
Sticker ×4
1/4” Tripod
Mount Adaptor
Handlebar /
Pole Mount
Housing
360° Vertical Quick
Release Buckle
Anti-fog Inserts
Switch Support Adaptor Adhesive Anchor
User Manual Wiper Pouch
Additional Skeleton
Backdoor
Flat Adhesive
Mount
Rechargeable
Battery
— 01 —
Wrist
Remote Control
Curved Adhesive
Mount
Micro USB Cable
& Sticker
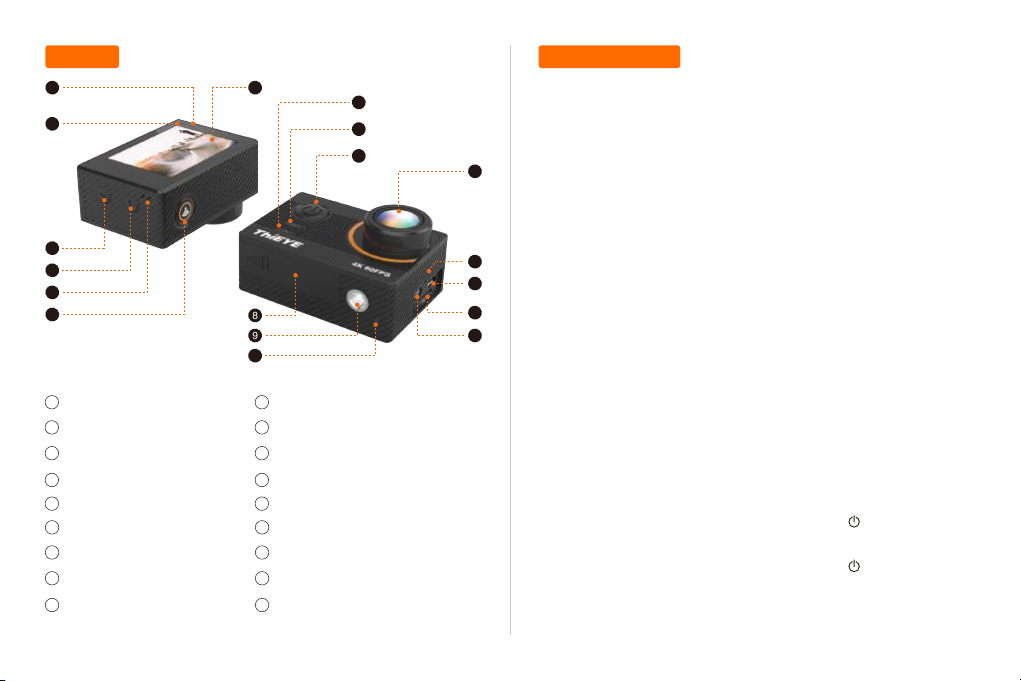
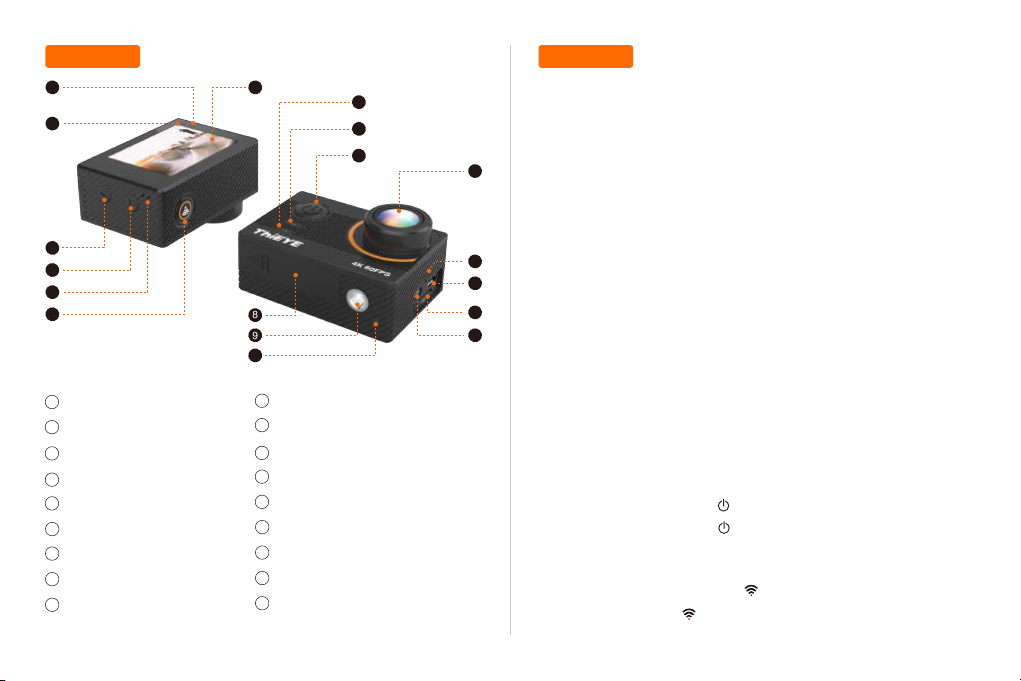
Layout Getting Started
1 7
2
3
4
5
6
11
12
13
8
9
10
14
15
16
17
18
1. Insert a Micro SD Card (Sold Separately)
Use brand name memory cards that meet the following requirements:
• Micro SD, Micro SDHC, or Micro SDXC
• U3 rating only
• Capacity up to 128GB
Notice:
• Please format the micro SD card in this camera before first use. To
keep your Micro SD card in good condition, reformat it on a regular
basis. Reformatting erases all of your content, so be sure to back up
your photos and videos first.
• FAT32 and exFAT format Micro SD card stops recording when the
storage of each file is over 4GB and starts to record again on a new file.
Charging Indicator Light
1
2
Recording Indicator Light
Down Button
3
Up Button
4
MIC
5
6
Shutter / Select / WiFi Button
7
2.0” Touch Screen
8
Battery Cover
9
1/4” Thread Insert
Recording Indicator Light
10
11
Recording Indicator Light
WiFi Indicator Light
12
Power / Mode / Exit Button
13
170° Super Wide Angel Lens
14
15
Speaker
16
Micro USB Port
17
Micro SD Slot
18
HDMI (Type D)
— 02 — — 03 —
2. Charging the Camera
Connect the camera with power plug or PC via USB cable, the red
charging indicator light remains ON when charging, and the charging
indicator light will turn off when charging is completed.
3. Power ON/OFF
• To Power On: Press and hold the power button “ ” for 3 seconds to
turn on the camera.
• To Power Off: Press and hold the power button “ ” for 3 seconds to
turn off the camera.
4. Turn ON/OFF WiFi
• To Turn On WiFi: Turn on camera, in Video or Photo Mode press and
hold Wi-Fi button for three seconds to turn on Wi-Fi.
• To Turn Off WiFi: Press and hold Wi-Fi button for three seconds to
turn off Wi-Fi.
5. Turn ON/OFF Bluetooth
• To Turn On BT: Turn on camera, in Video or Photo Mode press and
hold Down button for three seconds to turn on BT.
• To Turn Off BT: Press Mode button to turn off BT.
6. Mode Switching
• To Switch Mode: Press the Mode Button “ ” after you turn on the
camera, you can switch the mode.
• To Exit Mode: Press the Mode Button to exit mode.
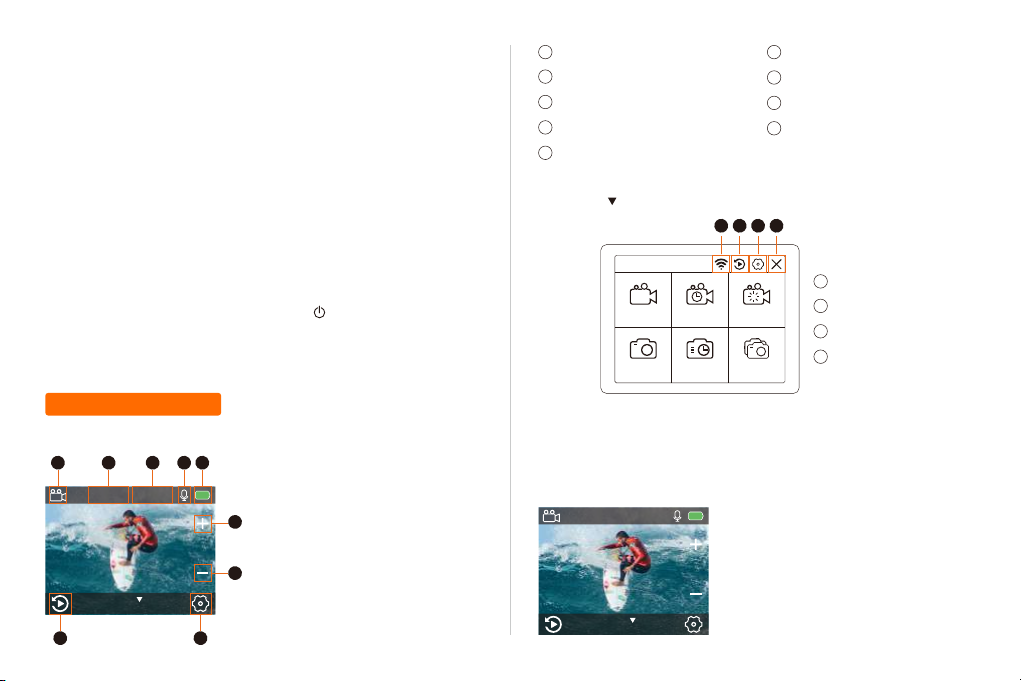
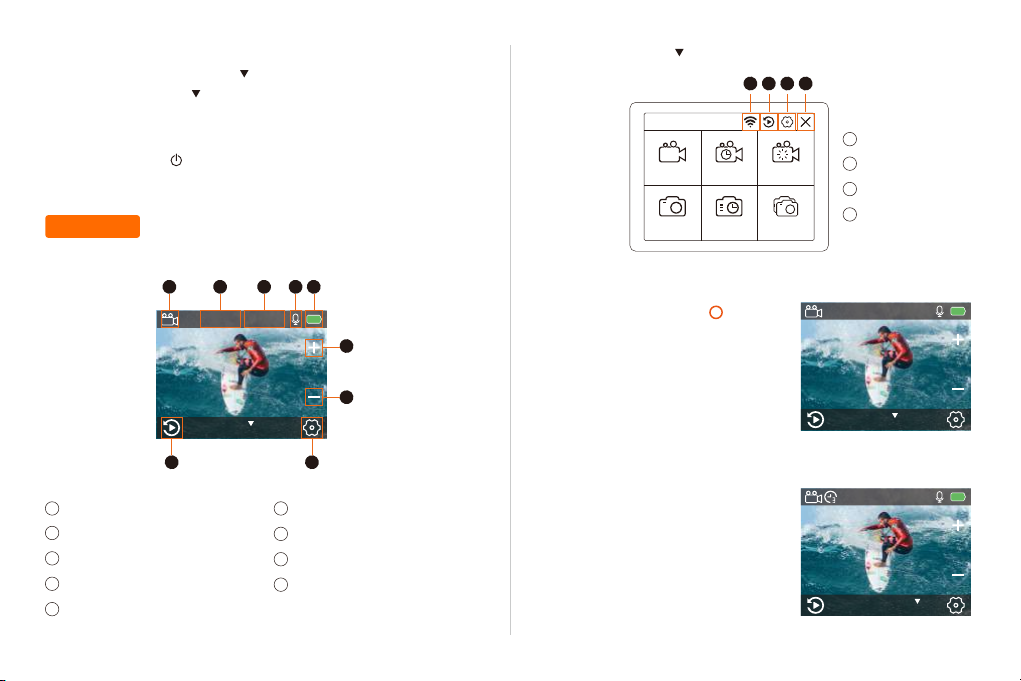
Camera Mode
1
2
Current Recording Duration
3
Remaining microSD Card Storage
4
Microphone
5
Battery Status
Playback
6
Setting
7
Zoom In
8
Zoom Out
9
• Tap the “ ” at the bottom to select one of the following 6 modes and
shoot as you like.
Video Time Lapse Video Slow Motion
Photo Time Lapse Photo Photo Burst
1 2 3 4
WiFi
1
2
Playback
3
Setting
4
Exit
Overview of Modes
• Turn on the action camera, the LCD Screen displayed as follow:
1 2 3 4 5
00:00:00︱02:17:45
8
9
Video
4K 30fps
6 7
— 04 — — 05 —
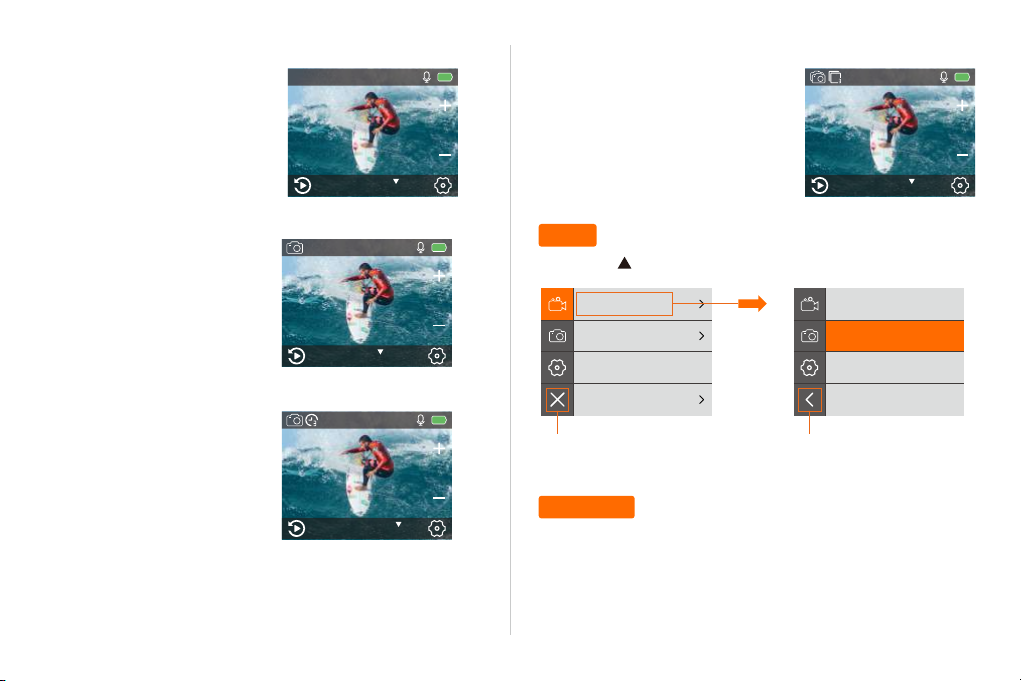
Video Mode
Video Mode is the default mode when you turn on the camera.
In Video Mode, press Shutter button, the camera starts recording video.
Press Shutter button again to stop recording video.
00:00:00︱02:17:45
Video
4K 30fps
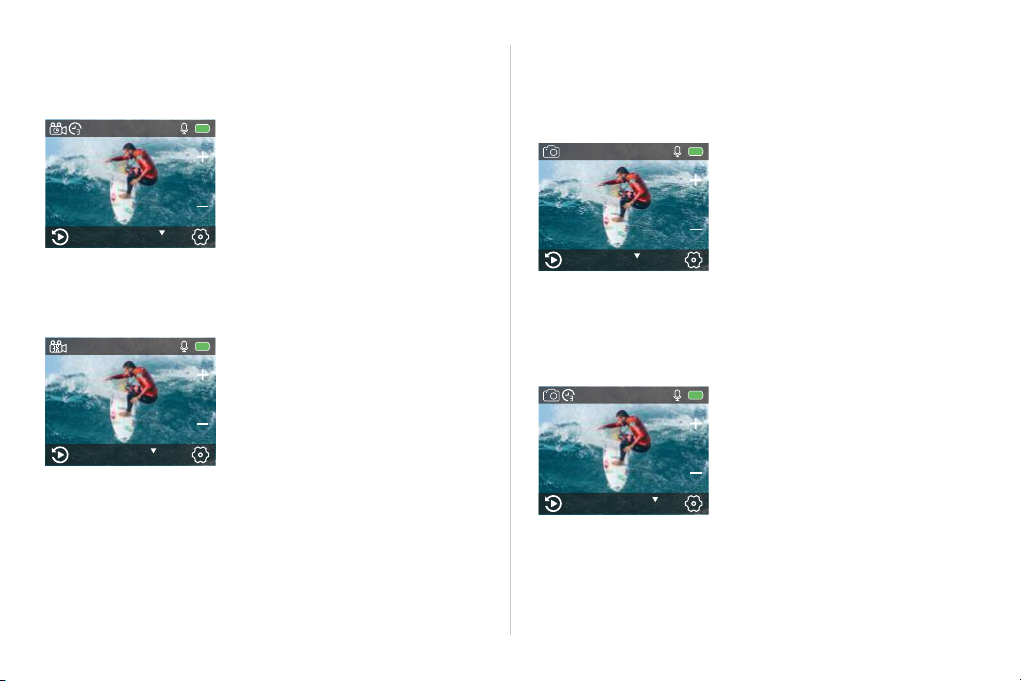
Time Lapse Video Mode
In Time Lapse Video Mode, press Shutter button, the camera takes
video at 1 Sec / 3 Sec / 5 Sec / 10 Sec / 30 Sec / 1 Min intervals.
00:00:00︱02:17:45
Time Lapse Video
4K 30fps
Slow Motion Mode
In Slow Motion Mode, Press Shutter button, the camera takes slow
motion video.
00:00:00︱02:17:45
Slow Motion
1080P 120fps
Photo
Press Mode button once to switch to Photo Mode after you turn on
camera.
In Photo Mode, press Shutter button, the camera takes a photo.
2︱3320
Photo
20MP
Time Lapse Photo Mode
In Time Lapse Photo Mode, press Shutter button, the camera takes a
serial of photos at 3 Sec / 5 Sec / 10 Sec / 30 Sec / 1 Min intervals.
2︱3320
Time Lapse Photo
20MP
— 06 — — 07 —
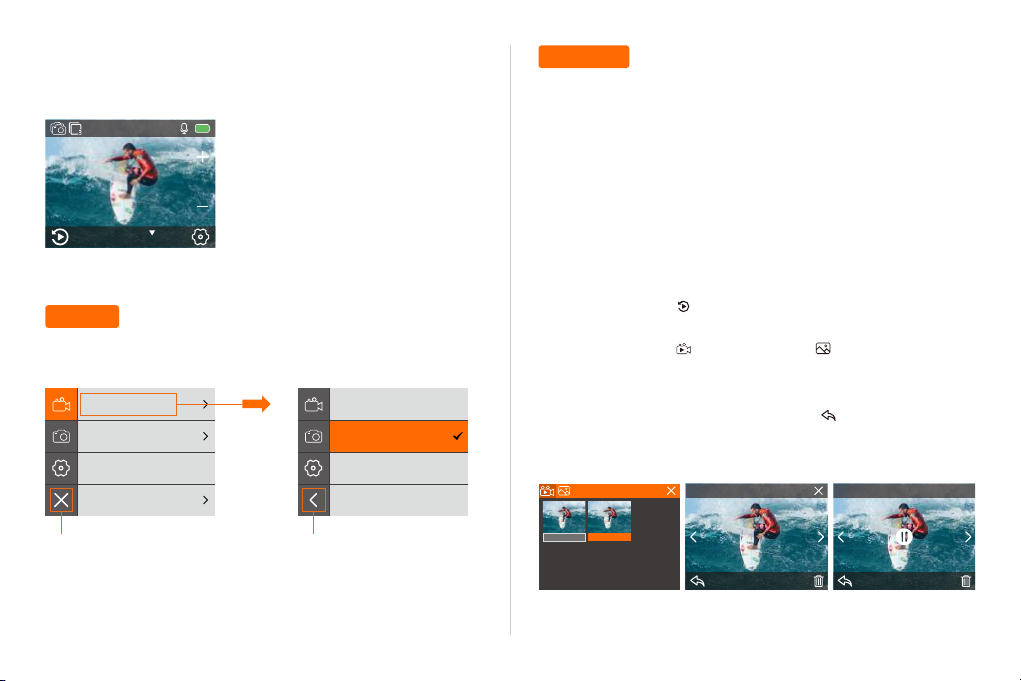
Photo Burst Mode
In Photo Burst Mode, press Shutter button, the camera takes photos at
3/7/15/30 photos per time.
2︱3320
Time Brust
20MP
Setting
Press and hold Up button for 3 seconds to enter Setting Mode.
Video Resolution
Video Encoder
Image Stabilization
Loop Recording
4K 60fps
4K 30fps
2.7K 60fps
2.7K 30fps
Playback
You can play back your content on the camera’s touch display, your
computer, TV, or smartphone / tablet.
You can also play back content by inserting the micro SD card directly
into a device, such as a computer or compatible TV. With this method,
playback resolution depends on the resolution of the device and its
ability to play back that resolution.
Viewing Videos and Photos on Your T5 Pro
1. Turn on camera.
2. Tap video file icon “ ” at the left corner of the screen to enter
playback mode.
3. Tap video file icon “ ” or photo file icon “ ”.
4. Tap video or photo file to playback video and photo in full-screen
view.
5. To exit video or photo files, tap return icon “ ”.
Note: If your micro SD card contains a lot of content, it might take a
minute for it to load.
2/2
2/26.55MB 00:00:02 / 00:05:34
4K 30FPS
Exit
Return
— 08 — — 09 —
00:00:01 00:00:08
1/1
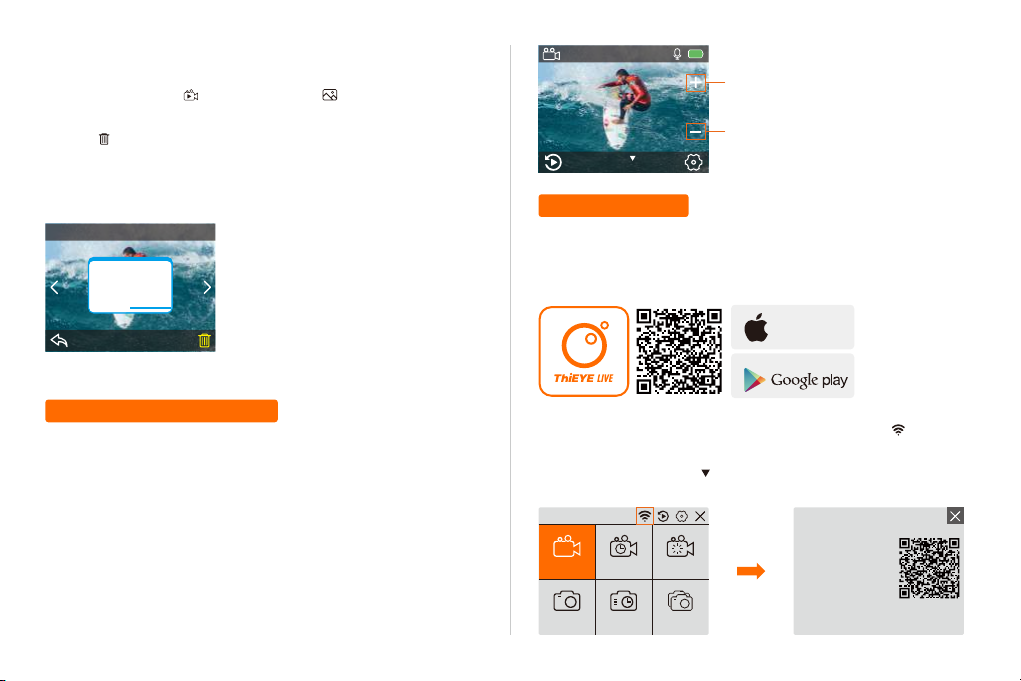
Deleting Videos and Photos on Your T5 Pro
1. Enter playback mode.
2. Tap video file icon “ ” or photo file icon “ ”.
3. Tap the video or photo file you want to delete.
4. Tap “ ”. The screen shows ‘Delete This File? Yes / No’.
5. Tap ‘Yes’, the selected file will be deleted.
Note: You cannot delete video or photo files when they are in
full-screen view.
1/36.55MB
Delete This File?
No
Yes
00:00:00︱02:17:45
Zoom in
Zoom out
Video
4K 30fps
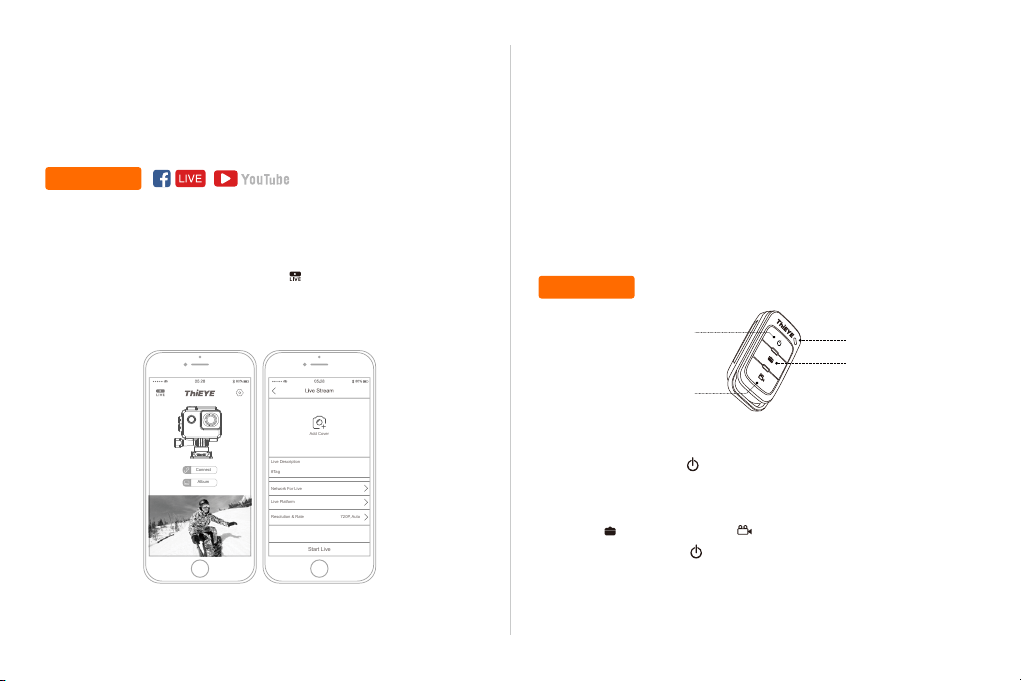
APP Connection
1. Download ThiEYE LIVE App
Please scan the QR Code or visit our official website www.thieye.com
to download ThiEYE LIVE App.
DOWNLOAD ON THE
App Store
ANDROID APP ON
Adjusting the Zoom Level
The Zoom function lets you adjust how close or far away the subject
appears in your video or photo. The default is no zoom. Zoom function
is available in Video mode and Photo mode. T5 Pro can support 8X
zoom.
1. Turn on the camera.
2. Press Up or Down button to adjust the zoom level.
Note: You cannot zoom when Image Stabilization is on.
— 10 — — 11 —
2. Turn on camera, press and hold Shutter / WiFi Button “ ” for 3s to
turn on WiFi.
OR click the screen icon “ ” with your fingertip, tap WiFi icon, then
WiFi is on.
SSID:
Normal Video Time Lapse Video Slow Motion
Normal Photo Time Lapse Photo Photo Burst
ThiEYE_CAM
_161DA7
PWD:
1234567890
Waiting for Wi-Fi Connection...

3. Connect your smartphone to the WiFi of the action camera (WiFi
Add Cover
Live Description
Connect
Album
Start Live
#Tag
Network For Live
Live Platform
Resolution & Rate 720P, Auto
account: ThiEYE_CAM, Password: 1234567890), then open the App
and click the “Connect” button.
4. View, edit and control your action camera with via App.
Live Streaming
2. After setting all the information of live streaming, tap the “Start Live”
to generate a QR Code.
3. Turn on your action camera, choose the Live function in the System
Setting, then press OK Button to enter the interface of scanning the QR
Code, using the camera to scan the QR Code generated by ThiEYE
LIVE App. This makes your camera automatically connect to the live
streaming platforms and network, then broadcast to your live stream!
This camera can broadcast Full HD live streaming from your social
media such as Facebook or YouTube Channel to your family or friends,
via WiFi network or cellphone hotspot.
1. Open your ThiEYE LIVE App, tap the live streaming icon “ ” to set
the information of live stream, such as Live Description / Network For
Live / Live Platform.
— 12 — — 13 —
4. When the camera is live streaming, press OK Button to enter the
prompt window of stopping Broadcast. Then press Mode Button to
choose Yes or No, and press the OK Button to confirm.
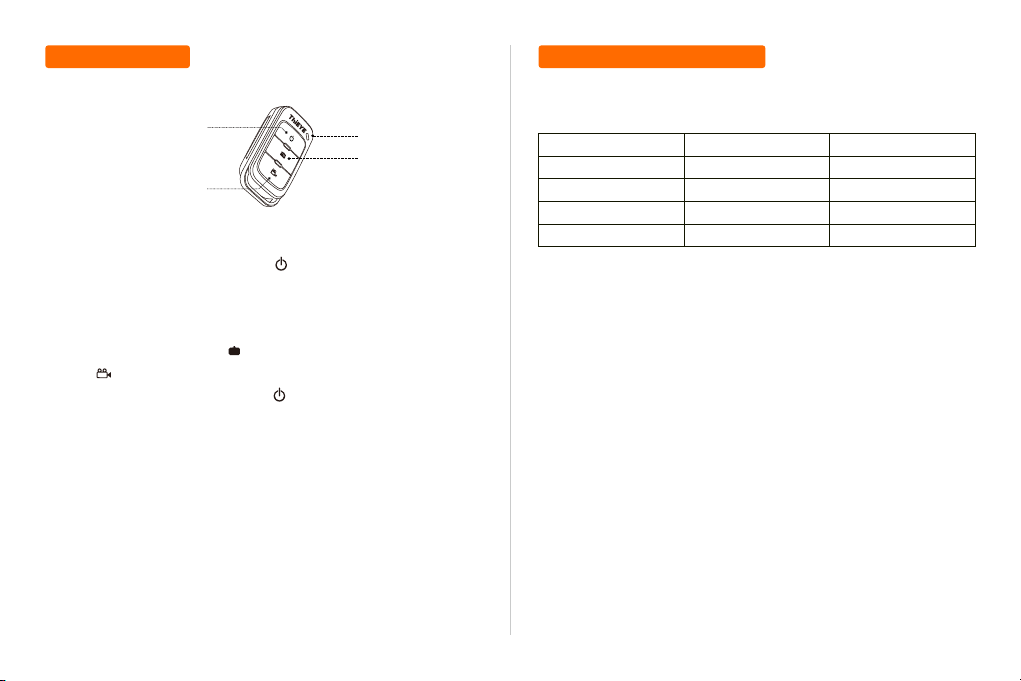
Remote Control Customizing Your T5 Pro
Video Setting
Power ON / OFF Button
Video Button
Connection Method:
① Press and hold the power button “ ” for 3s to turn on the remote
Control.
② Click “Remote Pair” in the camera setting menu, then press any
button on the remote. The working indicator remains on red, succeed.
③ Short press Photo button “ ” to take photos, and short press Video
button “ ” to start or stop recording.
④ Press and hold the power button “ ” for 3s to turn off the remote
control.
Tips: If pairing the remote with camera fails, please reset to the Factory
Settings and try again.
— 14 — — 15 —
Working Indicator
Photo Button
1. Video Resolutions
Video Resolution
4K
2.7K
1080P
720P
Default setting is 4K 30fps.
Note: When capturing video at high resolutions or high frame rates in
warm ambient temperatures, the camera may become warm and use
more power.
2. Video Encoder: H.264 / H.265
Default setting is H.264.
A video codec is an electronic circuit or software that compresses or
decompresses digital video. It converts uncompressed video to a
compressed format or vice versa.
According to multiple studies, HEVC, High Efficiency Video Coding
(H.265) should deliver up to 50% better compression than H.264 in
video on demand (VOD) applications, which means better quality at half
the bit rate. In live encoding, which obviously has to be performed in
real time, the initial expectations are a 35% bandwidth reduction at
similar quality levels. Alternatively, HEVC can also enable larger
resolution movies, whether 2K or 4K.
FPS
60fps/30fps
60fps/30fps
120fps/60fps/30fps
240fps/120fps/60fps
Screen Resolution
3840×2160
2704×1520
1920×1080
1280×720

In addition, encoding existing SD and HD content with HEVC rather
than H.264 will add to cost savings and/or the ability to stream higher
quality video to lower bit rate connections.
For example: If you select 4K / 30FPS and 3 seconds, you need to
record 90 seconds, then you can get 1 second video for 4K / 30FPS.
Note: Time Lapse Video is disabled when Image Stabilization is on.
3. Image Stabilization: On / Off
Default setting is Off.
This setting adjusts the footage to offset for motion during capture. The
result is smoother footage, especially in activities with relatively small
but fast motion including cycling, motorcycling, and handheld uses.
Note: Image Stabilization is disabled when you select 4K 60FPS, 2.7K
60FPS, 1080P 120FPS or all 720P video resolution.
4. Loop Recording: Unlimited / 2 Min / 3 Min / 5 Min
Default setting is Unlimited.
In the case of recording and saving at interval of 2/3/5 minutes, when
the Micro SD card is full, the latest video will automatically cover the
earliest in a circular way.
Note: Loop Recording is disabled when Image Stabilization is on.
5. Time Lapse Interval:
Off / 1 Sec / 3 Sec / 5 Sec / 10 Sec / 30 Sec / 1 Min
Default setting is Off.
Time Lapse Video creates video from frames captured at specific
intervals. This option lets youcapture a time lapse event and immediately view or share it as a video. Time Lapse Video is captured without
audio.
Select 3 seconds means recording 3 seconds to get one frame.
— 16 — — 17 —
6. Time Lapse Duration:
Unlimited / 5 Min / 10 Min / 15 Min / 20 Min / 30 Min / 60 Min
Default setting is Unlimited.
Note: If you want to set Time Lapse Duration, please turn on Time
Lapse Interval first.
7. Slow Motion Movie: On / Off
Default setting is Off.
Slow motion is an effect in film-making whereby time appears to be
slowed down.
Note: Please select 1080P 120FPS, 720P 240FPS or 720P 120FPS
when you want to record slow motion movie.
8. Fast Motion Movie: Off / 2x / 4x / 6x / 10x / 15x
Default setting is Off.
Action that appears to move faster than normal on the screen,
accomplished by filming the action at less than normal speed in the
camera and then projecting it at normal speed.
9. Wind Noise Reduction: On / Off
Default setting is Off.
Turn on Wind Noise Reduction, it can lower the noise to an acceptable
level.

10. Angle: Wide / Medium / Narrow
Default setting is Wide.
The angle refers to how much of the scene can be captured through the
camera lens. Wide angle captures the largest amount of the scene,
while Narrow angle captures the least.
Note: Medium and Narrow is disabled when Image Stabilization is on.
11. Auto Low Light: On / Off
Default setting is Off.
Auto Low Light will automatically adjust settings according to lighting
conditions to achieve the optimal exposure and best results. It allows
you to shoot in low-light environments or when quickly transitioning in
and out of low-light conditions, you do not need to manually adjust the
camera settings.
Note: Auto Low Light is disabled when you select 4K 60FPS, 4K
30FPS, 2.7K 60FPS or 2.7K 30FPS video resolution.
12. Drive Mode: On / Off
Default setting is Off.
With the camera off and automotive charger connecting, when the car is
started, the camera will turn on and record automatically. When the car
is off, the video will be saved and the camera will turn off automatically.
13. Video Scene Mode: Manual, Water, Riding, Winter, Diving, Night
Default setting is Manual.
Photo Setting
1. Photo Resolutions: 20MP / 16MP/ 12MP / 10MP / 8MP/ 5MP
Default setting is 20M.
2. ISO: Auto / 100 / 200 / 400 / 800 / 1600 / 3200
Default setting is Auto.
ISO determines the camera’s sensitivity to light, and creates a trade-off
between brightness and resulting image noise. Image noise refers to
the degree of graininess in the image.
3. Time Lapse Interval:
Unlimited / 3 Sec / 5 Sec / 10 Sec / 30 Sec / 1 Min
Default setting is Unlimited.
Time Lapse Photo captures a series of photos at specified intervals.
Use this mode to capture photos of any activity, then choose the best
ones later.
Note: Time Lapse Photo is disabled when Burst Photo is on.
4. Time Lapse Duration: Unlimited / 5 Min / 10 Min / 15 Min / 20 Min /
30 Min / 60 Min
Default setting is Unlimited.
Note: If you want to set Time Lapse Duration, please turn on Time
Lapse Interval first.
5. Night Lapse: On / Off
Default setting is Off.
— 18 — — 19 —

Captures a series of photos at specific intervals and exposure times.
Use Night Lapse Photo in low light environments, such as when
capturing the night sky over a period of time.
6. Burst Photo:
Off, 3 shots / 1s, 7 shots / 2s, 15 shots / 4s, 30 shots / 8s
Default setting is Off.
Burst captures up to 30 photos in 8 seconds, so it is perfect for
capturing fast-moving activities.
7. Delay Timer: Off / Delay 3s / Delay 5s / Delay 10s / Delay 20s
Default setting is Off.
A delay timer gives a delay between pressing the shutter release and
the shutter's firing. It is most commonly used to let photographers to
take a photo of themselves.
8. Long Exposure: Off / 1 Sec / 2 Sec / 5 Sec / 8 Sec / 30 Sec / 1 Min
Default setting is Off.
Long exposures are easiest to accomplish in low-light conditions, but
can be done in brighter light using neutral density filters or specially
designed cameras.
Note: Long Exposure is disabled when Burst Photo is on.
9. RAW: ON / OFF
Default setting is OFF.
When this setting is turned on, all photos are captured with an
accompanying .jpg image for immediate viewing on your camera or
— 20 — — 21 —
sharing with the APP. RAW photos are saved as .gpr files, which are
based on the Adobe.dng format.
10. Photo Scene Mode:
Manual, Indoor, Outdoor, Portrait, Landscape, Night
Default setting is Manual.
Camera Setting
1. Sounds
Shutter: On / Off Boot-up: On / Off
Beep: On / Off Volume: 0 / 1 / 2 / 3 Default setting is 2.
Default setting is on.
You can turn on or off the shutter, boot-up, beep sounds.
2. Remote Pair: On/ Off
Default setting is Off.
You can also hold and press Down button for three seconds to turn on
BT. Press Mode button to turn off BT.
3. Distortion Calibration: On / Off
Default setting is Off.
Turn on Distortion Calibration, it can reduce or eliminate the distortion
for a more natural shooting effect.
Note: Distortion Calibration is disabled when you select 4K 60FPS
video resolution.

4. Special Effect: None, Black&White, Sepia, Vivid, Natural, Negative,
Warm, Cold, Red, Green, Blue
Default setting is None.
5. Diving Mode: On / Off
Default setting is Off.
Turn on Diving Mode, it can compensate for the lack of red light in
underwater scenes.
Diving Mode is designed to be used in tropical and blue water,
optimized for use between 10 and 80 feet.
Powers off your action camera after a period of inactivity to save battery
life.
10. Power-on Auto Record: On / Off
Default setting is Off.
If you turn on Power-on Auto Record, the camera records video
automatically after you turn on the camera.
11. Power Frequency: 50Hz / 60Hz
Default setting is 50Hz.
6. Date Stamp: Off / Date / Date&Time
Default setting is Off.
If you select Date&Time, this camera adds date and time to the video or
photos you take.
Note: Date Stamp is disabled when Image Stabilization is on.
7. Date & Time
Default setting is MM / DD / YY HH / MM / SS
8. Screen Saver: Off / 30 Sec / 1 Min / 2 Min
Default setting is 1 Min.
Turns off the display after a period of inactivity to save battery life. To
turn on the display again, press any button on the camera.
9. Auto Power Off: Off / 1 Min / 2 Min
Default setting is 2 Min.
— 22 — — 23 —
12. White Balance:
Auto / Daylight / Cloudy / Tungsten Light / White Fluorescent
Default setting is Auto.
White Balance lets you adjust the color temperature of videos and
photos to optimize for cool or warm lighting conditions. When you
change this setting, the display immediately shows you the effect on
your image.
13. Exposure: -2.0 / -1.0 / +0.0 / +1.0 / +2.0
Default setting is +0.0.
By default, your camera uses the entire image to determine the
appropriate exposure level. However, Exposure lets you select an area
that you want the camera to prioritize when determining exposure. This
setting is particularly useful in shots where an important region might
otherwise be over- or underexposed.
When you change this setting, the display immediately shows you the

effect on your image. If you change modes, the camera returns to using
the entire scene to determine the correct level of exposure.
14. Reset Wi-Fi Setting: Yes/ No
Default setting is No.
This option can erase the Wi-Fi data of T5 Pro.
15. Language: English, 简体中文, 繁體中文, Português, 日本語,
Deutsch, Italiano, Español, Français, русский, Tiếng Việt
Default setting is English.
16. Format Card: Yes / No
Default setting is No.
To keep your micro SD card in good condition, reformat it on a regular
basis. Reformatting erases all of your content, so be sure to back-up
your photos and videos first.
To reformat your card, please enter Camera Setting, then press Up or
Down button to scroll through the options to locate ‘Format Card’ option,
press shutter button - Up button - Shutter button.
17. System
Default Setting: Yes / No
System Info: T5 Pro: YYYYMMDD-V2
Card Info: Capacity / Free Space
• Default Setting option resets all settings to their default values.
Heads Up: Restoring the factory settings will not delete any content
from your SD card or have any effect on your camera’s software.)
• System Info option let you check the model, version and updated time
of your T5 Pro.
• Card Info option let you check the capacity and free space of your
micro SD card.
※ Some functions cannot be used at the same time. Please refer
to the information below.
Image Stabilization
Image Stabilization
Image Stabilization
Image Stabilization
Image Stabilization
Image Stabilization
Distortion Calibration
Loop Recording
Burst Photo
Burst Photo
4K / 60fps, 2.7K / 60fps, 1080P / 120fps, 720P / 240fps,
720P / 120fps, 720P / 60fps
Slow Motion Movie
Angle: Middle, Narrow
Zoom
Time Lapse Video
Date Stamp
4K 60fps
4K 60fps
Time Lapse Photo
Long Exposure
— 24 — — 25 —
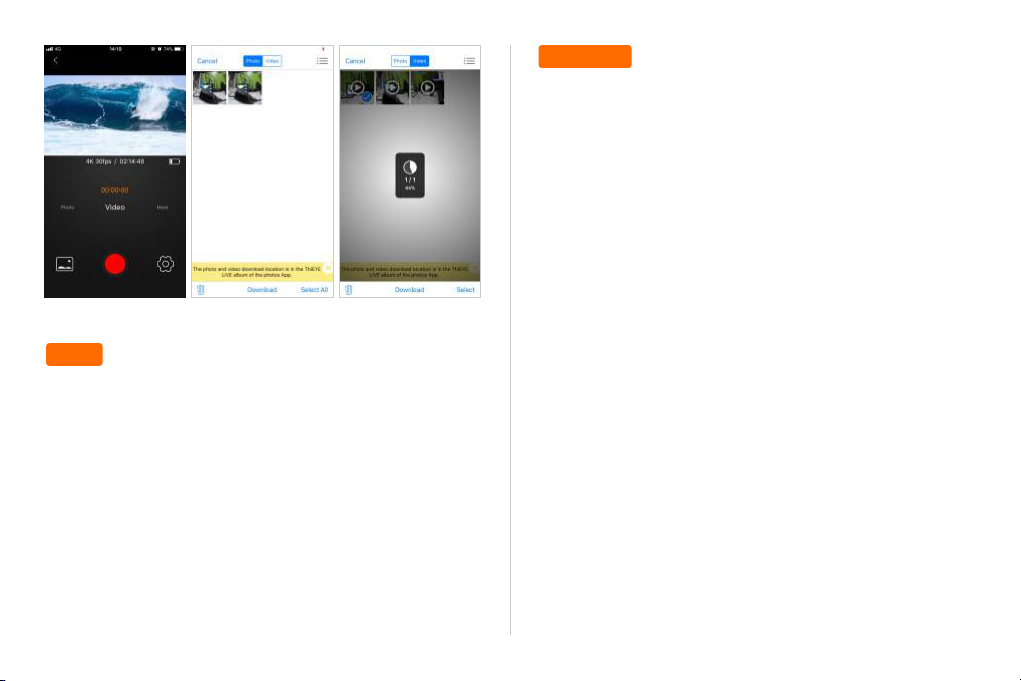
Offloading Your Content
Offloading Your Content to a Computer
To play back your video and photos on a computer, you must first
transfer these files to a computer. Transferring also frees up space on
your micro SD card for new content.
To offload files to a computer using a card reader (sold separately) and
your computer’s file explorer, connect the card reader to the computer,
then insert the micro SD card. You can then transfer files to your
computer or delete selected files on your card. Note that you must use
a card reader to offload photos or audio files.
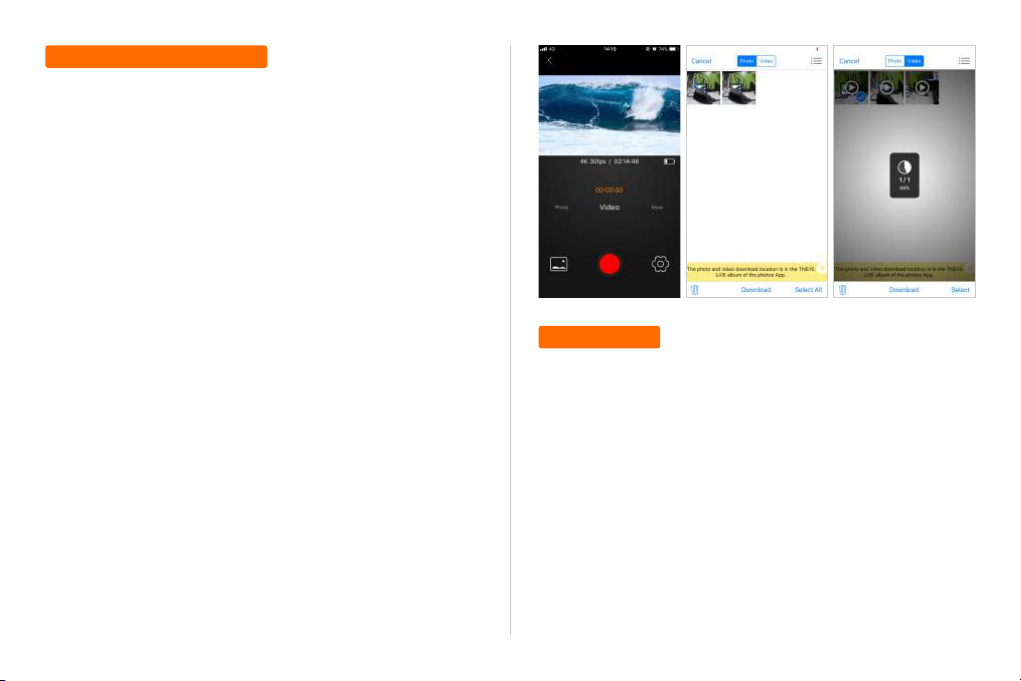
Offloading Your Content to Smartphone or Tablet
1. Open the ‘ThiEYE LIVE’ app. Click “Connect” on the App to connect
camera.
2. Tap ‘Album’ at the left corner of the bottom screen.
3. Tap ‘Select’ at the right corner of the top screen.
4. Tap the files you want to save.
5. Tap ‘Download’ at the bottom screen.
6. The files has been offloaded to Smartphone or Tablet.
Note:
If you cannot offload videos or photos to iPhone or iPad, please enter
Setting -> Privacy-> Photos , find "ThiEYE LIVE" and select "Read and
Write".
— 26 — — 27 —
Maintenance
Follow these guidelines to get the best performance from your camera:
1. For best audio performance, shake the camera or blow on the mic to
remove debris from the microphone holes.
2. To clean the lens, wipe it with a soft, lint-free cloth. Do not insert
foreign objects around the lens.
3. Don’t touch the lens with fingers.
4. Keep the camera away from drops and bumps, which may cause
damage to the parts inside.
5. Keep the camera away from high temperature and strong sunshine
to avoid being damaged.

Battery Information
Maximizing Battery Life
If the battery reaches 0% while recording, the camera saves the file and
powers off.
To maximize battery life, follow these guidelines when possible:
• Turn off Wireless Connections
• Capture video at lower frame rates and resolutions
• Use Screen Saver setting.
Battery Storage and Handling
The camera contains sensitive components, including the battery. Avoid
exposing your camera to very cold or very hot temperatures. Low or
high temperature conditions may temporarily shorten the battery life or
cause the camera to temporarily stop working properly. Avoid dramatic
changes in temperature or humidity when using the camera, as
condensation may form on or within the camera.
• Do not dry the camera or battery with an external heat source such as
a microwave oven or hair dryer. Damage to the camera or battery
caused by contact with liquid inside the camera is not covered under
the warranty.
• Do not store your battery with metal objects, such as coins, keys or
necklaces. If the battery terminals come in contact with metal objects,
this may cause a fire.
may compromise safety, regulatory compliance, performance, and may
void the warranty.
WARNING: Do not drop, disassemble, open, crush, bend, deform,
puncture, shred, microwave, incinerate or paint the camera or battery.
Do not insert foreign objects into the battery opening on the camera. Do
not use the camera or the battery if it has been damaged - for example,
if cracked, punctured or harmed by water. Disassembling or puncturing
the battery can cause an explosion or fire.
• Do not make any unauthorized alterations to the camera. Doing so
— 28 — — 29 —
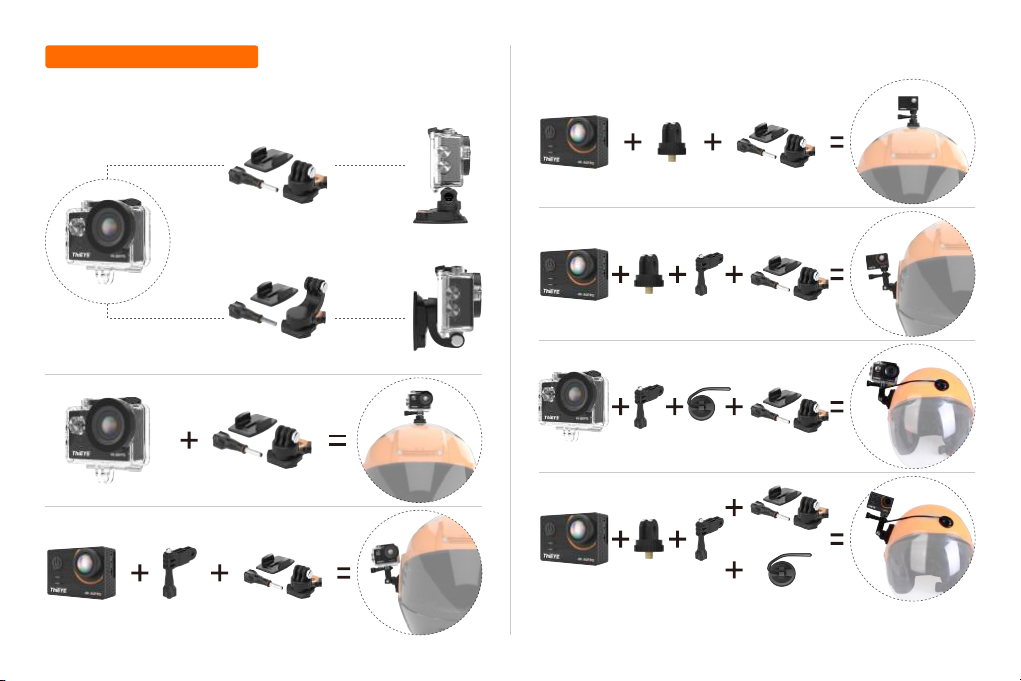
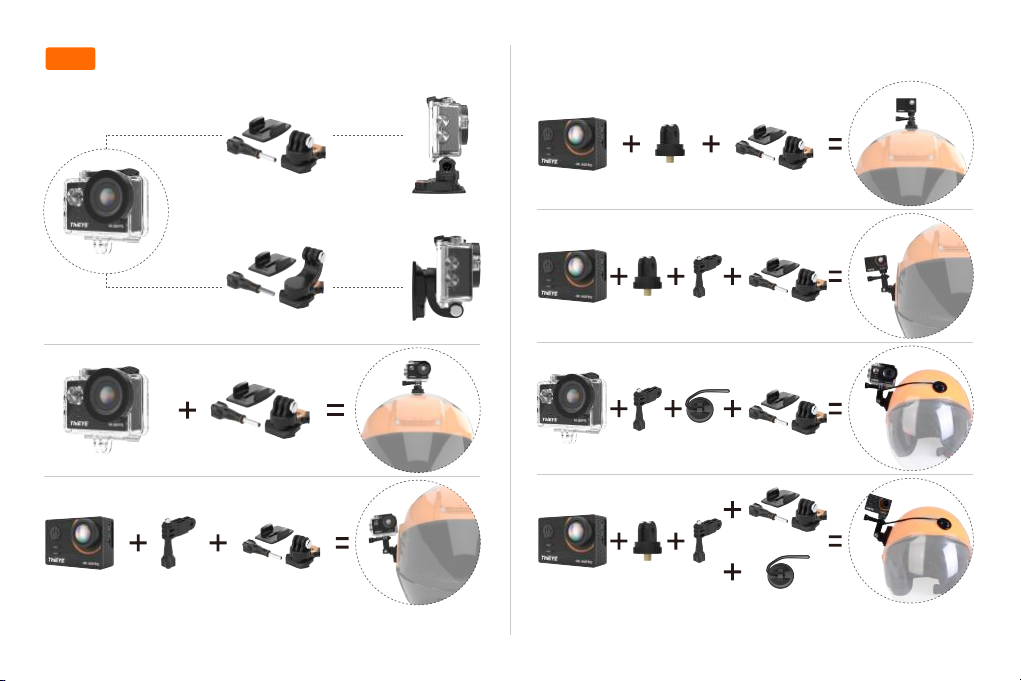
Mounting Your Camera
Attach your camera to helmets, gear and equipment.
— 30 — — 31 —
物品清單
運動攝像機 防水殼 非防水後蓋 腕帶式遙控器
360°旋轉標準卡扣 360°旋轉J型卡扣 平面粘貼底座 弧面粘貼底座
繁体中文
Necessary Accessories | Special Note
Waterproof Housing
Please test the housing
by placing it in water
before diving.
Waterproof Backdoor
Supports up to 60 meters
waterproof level.
— 32 — — 33 —
Additional Skeleton
Backdoor
Not waterproof, enables
enhanced audio capture
during activities.
底座粘膠×4 電池 Micro USB線
1/4英寸通用轉接頭 長轉軸 兩插適配器 安全扣&粘膠
自行車支架 說明書 清潔布 便攜袋
防霧嵌片
外觀介紹 開始使用
1 7
2
3
4
5
6
1
充電指示燈
2
狀態指示燈
3
下調鍵
4
上調鍵
5
麥克風
6
快門/WiFi鍵
7
2.0”觸摸屏
8
電池蓋
9
1/4”標準螺旋孔
— 34 — — 35 —
8
9
10
10
狀態指示燈
11
狀態指示燈
WiFi指示燈
12
13
電源/模式鍵
14
170°廣角鏡頭
15
揚聲器
16
Micro USB接口
17
Micro SD卡槽
18
HDMI接口
11
12
13
14
15
16
17
18
歡迎使用全新的T5 Pro,如須拍攝影片及相片,您必須使用 microSD 記憶
卡(另 售)。
1.MICROSD 記憶卡
請使用符合以下需求的知名品牌記憶卡:
• microSD、microSDHC 或 microSDXC
• 只支持U3等級
• 容量最高可達 128GB
注意:
· 第一次使用請格式化 MICROSD 記憶卡。另外,為確保 microSD 記憶卡
維持良好狀態,請定期進行重新格式化。重新格式化會清除所有內容,因此
請務必先匯出您的相片與影片。
· 當每個文件的存儲超過4GB時,FAT32和exFAT格式的Micro SD卡會停止
在這個文件上繼續記錄,而是開始在另一個新文件上重新記錄。
2.充電
可直接用隨附的USB數據線連接電腦或電源適配器充電,當充電指示燈為
紅色常亮時,表示正在充電,直到充電指示燈熄滅表示充電完成。
3.開關機
電源開機:長按電源/模式鍵“ ”(3s)開機。
電源關機:長按電源/模式鍵“ ”(3s)關機。
4.打開/關閉WiFi
打開WiFi:打開相機,長按WiFi鍵“ ”(3s)打開WiFi。
關閉WiFi:長按WiFi鍵“ ”(3s)關閉WiFi。
5.打開/關閉藍牙
打開藍牙:打開相機,長按下鍵“ ”(3s)打開藍牙。
關閉藍牙:短按模式鍵“ ”關閉藍牙。
6.模式切換
開機後短按模式鍵“ ”即可切換拍攝模式。
拍攝模式
· 開機后,相机屏幕画面显示如下:
1 2 3 4 5
00:00:00︱02:17:45
8
· 點擊觸摸屏幕下方“ ”圖標,可進行拍攝模式選擇。
1 2 3 4
1
Video Time Lapse Video Slow Motion
Photo Time Lapse Photo Photo Burst
2
3
4
攝像
在錄像模式下,按壓快門鍵“ ”進行
00:00:00︱02:17:45
錄像,再次按壓快門鍵,可停止錄像。
WiFi
回放
設置
退出
相機模式
1
2
拍攝檔案时长
3
記憶卡剩餘容量
4
麥克風
5
電池狀態
Video
4K 30fps
6 7
文件回放
6
設定
7
放大
8
縮小
9
— 36 — — 37 —
9
Video
4K 30fps
縮時錄影
在縮時錄影模式下,按壓快門鍵,相機
00:00:00︱02:17:45
以1 / 3 / 5 / 10 / 30 / 60秒為時間間隔
錄製一幀的視頻畫面,把幾分鐘、幾小
時的過程壓縮在一個較短的時間內以
視頻的方式播放。
Time Lapse Video
4K 30fps
慢攝影
在慢攝影模式下,按壓快門鍵,開始
錄製慢動作視頻。
00:00:00︱02:17:45
照片連拍
在照片連拍模式下,按壓快門鍵,單
次連拍3 / 7 / 15 /30張照片。
2︱3320
拍照
在拍照模式下,按壓快門鍵即可。
延時拍照
在延時拍照模式下,按壓快門鍵,相
機以3 / 5 / 10 / 30 / 60秒為時間間隔
連續自動拍照。
— 38 — — 39 —
Slow Motion
1080P 120fps
2︱3320
Photo
20MP
2︱3320
Time Lapse Photo
20MP
Time Brust
20MP
設置
長按上調鍵“ ”3s進入設置模式。
Video Resolution
Video Encoder
Image Stabilization
Loop Recording
4K 60fps
4K 30fps
2.7K 60fps
2.7K 30fps
返回退出
文件回放
您可以在相機的觸控顯示器、電腦、電視或智慧型手機/平板電腦上播放內
容。
您也可以直接將 microSD 記憶卡插入裝置(例如電腦或相容的電視)以播
放內容。如果使用這種方式,播放解析度取決於裝置解析度,以及裝置播放
該解析度內容的能力。

在T5 Pro上檢視影片和相片
1.打開相機
2.點擊相機屏幕左下角圖標“ ”進入文件回放模式
3.點擊視頻文件圖標“ ”或圖片文件圖標“ ”
4.點擊屏幕進入全屏預覽視頻或圖片
5.點擊返回圖標“ ”退出視頻或圖片預覽模式
注意:如果micro SD卡的圖片和視頻占用較多內存,完全加載出視頻或圖
片需要一定時間。
2/2
2/26.55MB 00:00:02 / 00:05:34
4K 30FPS
縮放功能
縮放功能可以讓您調整畫面在視頻或照片中的遠近,支持視頻模式和照
片模式,且支持8倍變焦。
1.打開攝像機
2.按壓上鍵或下調,或點擊屏幕
“ ”“ ”放大或縮小
注意:當陀螺儀防抖功能打開時,
縮放功能被禁用。
00:00:00︱02:17:45
Video
4K 30fps
放大
縮小
00:00:01 00:00:08
從T5 Pro相機上刪除影片和相片
1.進入回放模式
2.點擊視頻文件圖片“ ”或圖片文件圖標“ ”
3.點擊你想刪除的視頻或圖片文件
4.點擊“ ”,屏幕會顯示“刪除此文件?是/否”
5.點擊“是”,文件將會被刪除
1/36.55MB
Delete This File?
No
Yes
— 40 — — 41 —
APP連接
1/1
1. 下載App
通過掃描二維碼或訪問官網 www.thieye.com 下載 “ ThiEYE LIVE ” App。
DOWNLOAD ON THE
App Store
ANDROID APP ON
2.打開相機,長按相機上調键/WiFi鍵“ ”3秒,WiFi開啟。或點擊觸摸屏幕
下方“ ”圖標,會出現快捷菜單WiFi标志,打開WiFi。
SSID:
Normal Video Time Lapse Video Slow Motion
Normal Photo Time Lapse Photo Photo Burst
ThiEYE_CAM
_161DA7
PWD:
1234567890
Waiting for Wi-Fi Connection...
3.用手機連接相機WiFi(名稱:ThiEYE _ CAM,密碼1234567890),打開App,
Add Cover
Live Description
Connect
Album
Start Live
#Tag
Network For Live
Live Platform
Resolution & Rate 720P, Auto
點擊 " 連接相機 " 按鈕。
2.直播信息設置成功后,點擊“Start Live”按鈕,并生成二維碼。
4.通過手機App觀看并操作相機。
直播功能
通過WiFi和手機熱點可直播分享至Facebook或YouTube平臺,還可將直播
畫面自定義推流至各大網絡直播平臺,向全世界實時分享你的精彩直播。
1.通過ThiEYE LIVE App,點擊LIVE圖標“ ”,開始創建直播。設置Live
Description / Network For Live / Live Platform等直播信息。
— 42 — — 43 —
3.開啟運動相機,在相機系統設置中選擇“直播”功能,短按OK鍵進入
掃描二維碼界面,并掃描由ThiEYE LIVE App生成的二維碼,掃描成功后,
相機自動連接至Wifi及直播平臺,并開始直播。
4.直播過程中,短按OK鍵彈出“退出直播”的提示窗口,短按模式鍵可
選擇“是”或者“否”,按OK鍵選擇“是”即退出直播。
遙控器
開關機鍵
錄像鍵
操作說明
① 長按遙控器開關鍵“ ”(3s),啟動遙控器。
② 打開相機“遙控配對”功能,按遙控器任意鍵進行藍牙配對,當工作指示
燈為紅色常亮時,表示連接成功。
③ 短按“ ”開始拍照;短按“ ”開始/停止錄像。
④ 長按遙控器開關鍵“ ”(3s),關閉遙控器
注意:如果遙控器與相機配對失敗,請恢復出廠設置后再重新配對。
工作指示燈
拍照鍵

自訂您的T5 Pro
視頻設置
1.視頻分辨率
影片解析度
4K
2.7K
1080P
720P
FPS(幀率)
60fps/30fps
60fps/30fps
120fps/60fps/30fps
240fps/120fps/60fps
螢幕解析度
3840×2160
2704×1520
1920×1080
1280×720
3. 陀螺儀防抖: 打開 / 關閉
默認設置為關閉
此設定可在拍攝過程調整影像動作偏移。這能夠拍攝較為流暢的影片,特
別是包含動作相對微小但快速的活動,例如騎單車、騎摩托車及手持拍攝
等。
注意:在4K 60fps, 2.7K 60fps, 1080P 120fps以及所有的720P視頻分辨率
下,陀螺儀防抖功能是被禁用的。
4. 循環錄影: 無限 / 2分鐘 / 3分鐘 / 5分鐘
默認設置為無限
以2/3/5分鐘為時長進行的視頻錄製與存儲,當存儲卡存滿以後,新的視
頻將自動覆蓋最早的視頻,形成循環錄製。
注意:當陀螺儀防抖功能打開時,循環錄影是被禁用的。
2.編碼器: H.264 / H.265
默認設置為H.264
視頻編碼方式是指通過特定的壓縮技術,將某個視頻格式的文件轉換成另
一種視頻格式文件的方式。
H.264與H.265 區別:
·H.265旨在在有限寬帶下傳輸更高質量的網絡視頻,僅需原先的一半寬帶
即可播放相同質量的視頻。
·同樣的畫質和碼率,H.265比H.264佔用的存儲空間理論上要少50%。
·如果存儲空間一樣大,意味著在一樣的碼率下H.265會比H.264畫質更高
一些,理論值是30%~40%。
— 44 — — 45 —
5. 縮時錄影: 關閉 / 1秒 / 3秒 / 5秒 / 10秒 / 30秒 / 1分鐘
默認設置為關閉
Time Lapse Video(縮時錄影)以特定時間間隔拍攝影像並製成影片。此
選項可讓您拍攝縮時攝影,並立即製成影片以便檢視或分享。(影片不帶
有音頻)
注意:當陀螺儀防抖功能打開時,縮時錄影是被禁用的。
6. 縮時視頻持續時間: 無限制 / 5分鐘 / 10分鐘 / 15分鐘 / 20分鐘 / 30分
鐘 / 60分鐘.
默認設置為無限制
注意: 如果你需要設置縮時視頻持續時間,請先打開縮時錄影功能。

7. 慢動作錄影: 打開 / 關閉
默認設置為關閉
開啟慢動作模式后,可以在1080P 120FPS, 720P 240FPS or 720P 120FPS
的分辨率下錄製慢動作視頻。
8. 快動作錄影: 關閉 / 2倍 / 4倍 / 6倍 / 10倍 / 15倍
默認設置為關閉
開啟快動作錄影模式后,可以選擇2倍 / 4倍 / 6倍 / 10倍 / 15倍的速度錄
製快動作視頻。
12. 車載模式: 打開 / 關閉
默認設置為關閉
當開啟車載模式時,當相機關機但與車載充電器相連接的狀態下,如果汽
車啟動或發生碰撞,相機便會自動開機并開始錄影;當斷開電源時,相機
便會自動保存錄像并關機。
13. 錄影情景模式: 手動 / 水上 / 騎行 / 冬季 / 潛水 / 夜景
默認設置為手動
9. 減低風聲: 打開 / 關閉
默認設置為關閉
打開減低風聲功能,可以有效降低噪音。
10. 視角設置: 寬 / 中 / 窄
默認設置為寬
Field of View (FOV)(視野 (FOV))是指能夠透過相機鏡頭拍攝的場景範圍
(以度數為單位)。廣角 FOV(視野)能夠拍攝最大的場景範圍,而窄角 FOV
(視野)則是拍攝最小範圍。
注意:當陀螺儀防抖功能打開時,中/窄角視野是被禁用的。
11. 低亮度: 打開 / 關閉
默認設置為關閉
Auto Low Light(低光源自動功能)模式能讓您在低光源環境中,或快速進
出低光源環境時拍出清晰作品。可以的話,相機會自動調整幀率,以獲得
最佳曝光與最好的拍攝成果。
注意:當你選擇4K 60fps, 4K 30fps, 2.7K 60fps, 2.7K 30fps視頻分辨率時,
低亮度功能是被禁用的。
— 46 — — 47 —
拍照設置
1. 拍照分辨率: 20MP / 16MP/ 12MP / 10MP / 8MP/ 5MP
默認設置為20M.
2. ISO: Auto / 100 / 200 / 400 / 800 / 1600 / 3200
默認設置為Auto
ISO 會決定相機的感光度,並平衡亮度與所產生的影像雜訊。影像雜訊意指
影像的顆粒度。
3. 縮時照片間隔: 關閉 / 3秒 / 5秒 / 10秒 / 30秒 / 1分鐘
默認設置為關閉
Time Lapse Photo(縮時相片)以特定時間間隔拍攝一連串相片。使用此模
式拍攝任何活動的相片,便可在稍後選擇最佳相片。
注意:當照片連拍功能開啟時,縮時相片間隔被禁用。
4. 縮時照片持續時間:
無限制 / 5分鐘 / 10分鐘 / 15分鐘 / 20分鐘 / 30分鐘 / 60分鐘
默認設置為關閉

注意: 如果你需要設置縮時照片持續時間,請先打開縮時照片間隔功能。
5. 夜景縮時拍照: 打開 / 關閉
默認設置為關閉
Night Lapse Photo(夜景縮時相片)可在光源環境黑暗時,以設定的時間間
隔拍攝一連串相片。快門會保持長時間開啟,以便在黑暗的環境中讓更多
光源進入。
6. 照片連拍: 關閉 / 3連拍 / 7連拍 / 15連拍 / 30連拍
默認設置為關閉
Burst(照片連拍)每8秒可拍攝最多30張相片,因此非常適合拍攝快速移動
的活動。
7. 延遲拍照: 關閉/ 延遲3秒 / 延遲5秒 / 延遲10秒 / 延遲20秒
默認設置為關閉
使用延遲拍照設定自拍、團體照以及各種拍照情境。
8. 長時曝光: 關閉 / 1秒 / 2秒 / 5秒 / 8秒 / 30 秒 / 1分鐘
默認設置為關閉
長曝光是一種常見的攝影手法,由於曝光時間的延長,可以記錄下物體移
動的軌跡,畫面也隨之變的更明亮,常用於拍攝流動的瀑布、雲朵、星軌、車
河等等。
注意:當照片連拍功能開啟時,長曝光被禁用。
9. RAW: 打開 / 關閉
默認設置為關閉
此設定開啟時,所有相片會以 .jpg 影像拍攝,以便立即在您的相機上檢視,
或使用ThiEYE LIVE APP應用程式分享。RAW 相片會根據 Adobe 的 .dng 格
式儲存為 .gpr 檔案。
— 48 — — 49 —
10.拍照情景模式: 手動/水上/騎行/冬季/潛水/夜景
默認設置為手動
系統設置
1. 聲音設定
快門聲音: 打開 / 關閉 開機聲音: 打開 / 關閉
按鍵聲音: 打開 / 關閉 音量: 0 / 1 / 2 / 3 (默認設置為2)
默認設置為打開
2. 遥控配对: 打開 / 關閉
默認設置為關閉
長按下調鍵“ ”3秒打開藍牙,短按模式鍵“ ”關閉藍牙。
3. 畸變矯正: 打開 / 關閉
默認設置為關閉
運動相機採用的大都是超廣角鏡頭,邊上的線條會向中間彎曲,產生嚴重
的桶行畸變。該功能開啟的情況下能夠減少或徹底消除這種畸變。
注意:當你選擇4K 60fps視頻分辨時,畸變矯正功能被禁用。
4. 特效模式: 正常,黑白,復古,鮮艷,自然,負片,暖色調,冷色調,紅 色 ,綠
色,藍色,潛水模式
默認設置為正常
5. 潛水模式: 打開 / 關閉
默認設置為關閉
打開潛水模式,能夠補償光在水傳播過程中丟失的紅光。
水下模式適用於熱帶或藍色水域,適合在水下10-80英尺之間使用。

6. 時間水印: 關閉 / 日期 / 日期時間
默認設置為關閉
開啟時間水印選項,視頻和照片中會以水印的形式出現拍攝的時間和日期
信息。
注意:當陀螺儀防抖功能開啟時,時間水印功能被禁用。
7. 日期時間
默認設置為 MM / DD / YY HH / MM / SS
8. 熒幕保護: 關閉 / 30秒 / 1分鐘 / 2分鐘
默認設置為1分鐘
一段時間未使用後,將關閉觸控顯示器以節省電力。選項有 30秒、1分鐘(預
設)、2分鐘及 Never(永不)。若要再次開啟觸控顯示器,請點擊畫面任意處。
9. 省電設定: 關閉 / 1 分鐘 / 2分鐘
默認設置為2分鐘
相機開機且處於非工作狀態,相機會在設定的時間後,自動關機,節省電力。
10. 開機錄影: 打開 / 關閉
默認設置為關閉
開機自動錄影,指功能開啟後,相機下次啟動時,會自動開始錄影;錄影分辨
率為上次最後設置的分辨率選項;該功能能夠滿足用戶追求簡潔性的需求,
快速實現錄影。
11. 光頻: 50赫茲 / 60赫茲
默認設置為50赫茲
12. 白平衡: 自動 / 日光 / 陰天 / 白熾燈 / 螢光燈(H) / 水下
默認設置為自動
White Balance(白平衡)可讓您調整影片與相片的色溫,獲得最佳冷色或暖
色光源環境。當您變更此設定時,觸控顯示器會立即顯示影像上的效果。
13. 曝光補償: -2.0 / -1.0 / +0.0 / +1.0 / +2.0
默認設置為 +0.0.
您的相機預設會使用整張影像,以決定適合的曝光程度。但 Exposure
Control(曝光控制)可在決定曝光時,讓您選取想要相機優先使用的區域。
對於進行拍攝時重要區塊可能過度曝光或曝光不足的情形,請善用這項設
定 。
當您變更此設定時,觸控顯示器會立即顯示影像上的效果。如果您變更模
式,相機會回復到使用整個場景來決定正確的曝光程度。
14. Wi-Fi重置: 是 / 否
默認設置為否,WiFi重置會刪除T5 Pro的WiFi數據。
15. 語言: English, 简体中文, 繁體中文, Português, 日本語, Deutsch,
Italiano, Español, Français, русский, Tiếng Việt
默認語言為英語
16. 格式化: 是 / 否
默認設置為否
為確保 microSD 記憶卡維持良好狀態,請定期進行重新格式化。重新格式
化會清除所有內容,因此請務必先匯出您的相片與影片。
要重新格式化microSD記憶卡,請進入相機設置,找到“格式化”選項,按壓
快門鍵 - 上鍵 - 快門鍵進行格式化卡。
— 50 — — 51 —

17. 系統
恢復原廠設定: 是 / 否
系統信息: T5 Pro: YYYYMMDD-V2
卡信息: 容量 / 存儲空間
· 恢復原廠設定,選擇該選項會將您攝像機的所有設置重置為默認設置。
· 系統信息選項,讓您檢查T5 Pro型號,版本和更新時間。
· 卡信息選項,讓您檢查您的micro SD卡的容量及可存儲空間。
※ 攝像機中某些功能不能同時使用,請參照下面信息:
陀螺儀防抖功能
陀螺儀防抖功能
陀螺儀防抖功能
陀螺儀防抖功能
陀螺儀防抖功能
陀螺儀防抖功能
畸變矯正
循環錄影
照片連拍
照片連拍
4K / 60fps, 2.7K / 60fps, 1080P / 120fps,
720P / 240fps, 720P / 120fps, 720P / 60fps
慢動作攝影
視角:中、窄
縮放功能
縮時錄影
時間水印
4K 60fps
4K 60fps
延時拍照
長曝光
匯出您的內容
將內容匯出至電腦
若要在電腦上播放影片和相片,必須先將這些檔案傳輸至電腦。傳輸作業
也可以釋放 microSD 記憶卡的空間,讓您儲存新的內容。
若要使用讀卡機(另售)將檔案匯出至電腦,請將其連接到電腦,並插入
microSD 記憶卡。然後即可將檔案傳輸至電腦,或者刪除記憶卡中選取的
檔案。請注意,若要匯出 RAW 相片或 RAW 音訊檔案,請使用讀卡機。
將內容匯出至手機或平板電腦
1.打開ThiEYE LIVE App
2.點擊屏幕左下角“相冊”
3.點擊屏幕右下角“選擇”
4.點擊你想要保存的文件
5.點擊屏幕底部的“下載”
6.文件將會被下載到智能手機或平板電腦上。
注意:如果未能成功將內容匯出至手機或平板電腦,請進入設置 -> 私人 ->
相冊,找到“ThiEYE LIVE”,然後選擇“讀取和寫入”。
— 52 — — 53 —
維護
遵循以下指南可發揮相機的最佳效能:
1. 請輕輕搖晃相機,或對著麥克風孔吹氣,去除裡面殘餘的水和碎屑,以獲
得最佳音訊效果。
2. 若要清潔鏡頭,請使用不會產生棉絮的柔軟布料擦拭。如果碎屑卡在鏡
頭與接環間,請以水沖掉,或吹氣吹掉。請勿在鏡頭周圍插入異物。
3. 不要用手觸摸相機鏡頭。
4. 在潮濕的環境中,請使用軟布擦乾觸控顯示器,才能感應您的觸控。
5. 相機應遠離高溫和強光,以免損壞。
電池資訊
延長電池續航力
電力降到 10% 以下時,觸控螢幕上會顯示電力不足的訊息。
若您在攝錄影片時電力耗盡,相機將會停止攝錄,然後儲存影片,並自動關
機。
下列方法可以幫助您延長電池續航力:
• 關閉 Wireless Connections(無線連線)
• 以較低幀率與解析度拍攝影片
• 使用螢幕保護程式,並降低螢幕亮度
電池收納 + 處理
• 相機含有各種脆弱元件,電池即為其中之一。請避免讓相機暴露在極度寒
冷或酷熱的環境中。低溫或高溫環境可能會暫時縮短電池壽命,或造成相
機暫時無法正常運作。請避免在溫度或濕度急劇變化時使用相機,以免相
機表面或內部因此凝結水氣。
• 切勿試圖以外部熱源(如微波爐或吹風機)烘乾相機或電池。因相機內部
接觸液體而導致相機或電池受損皆不在保固範圍內。
• 避免將電池與金屬物體存放在同一處,例如硬幣、鑰匙或項鍊。如果電池
極頭接觸到金屬物體,可能引發火災。
• 請勿對相機進行未經授權的修改變動。這樣可能會危及安全、法規、效能,
並將會使保固失效。
警告:請勿摔落、拆解、打開、擠壓、扭曲、變形、穿刺、絞碎、微波、焚燒或彩繪
相機或電池。請勿將異物插入相機的電池開口。如果相機或電池已損壞(例
如破裂、遭異物刺破或進水損壞),請立即停止使用。拆解或刺破電池可能
導致爆炸或火災。
— 54 — — 55 —
安裝
— 56 — — 57 —
 Loading...