

THIEYE Safeel Zero+ User Manual

Dash Cam Safeel Zero+
USER MANUAL
PSFZP - V1.0

01
USER MANUAL
17
Guide de démarrage rapide
33
Deutsche Anleitung
65
取り扱い説明書
ThiEYE Social Media
Facebook YouTubeOfficial Website
49
Guida di Operazione Rapida
Part 01 - Get Started
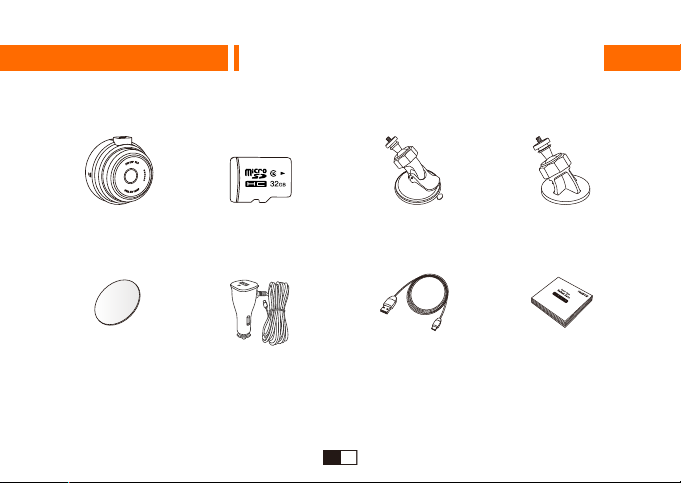
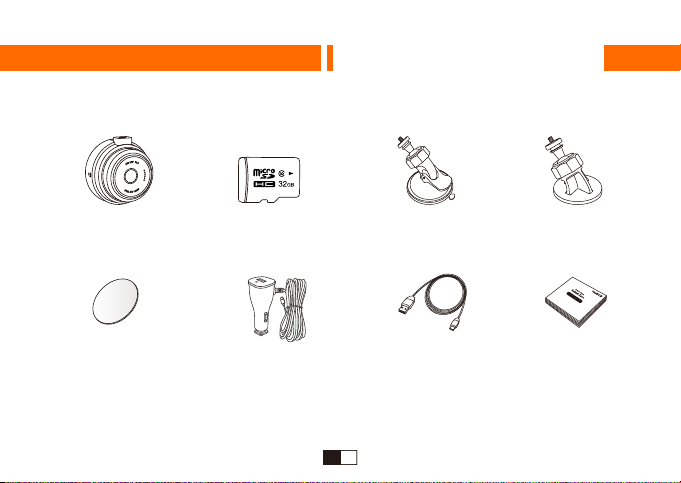
1. Packing List
English
Dash Cam 32GB Micro SD Card
Static Stickers
Additional USB
Suction Cup Mount Adhesive Mount
Micro USB Cable User ManualCar Charger with
EN EN EN EN
01 02 03 04

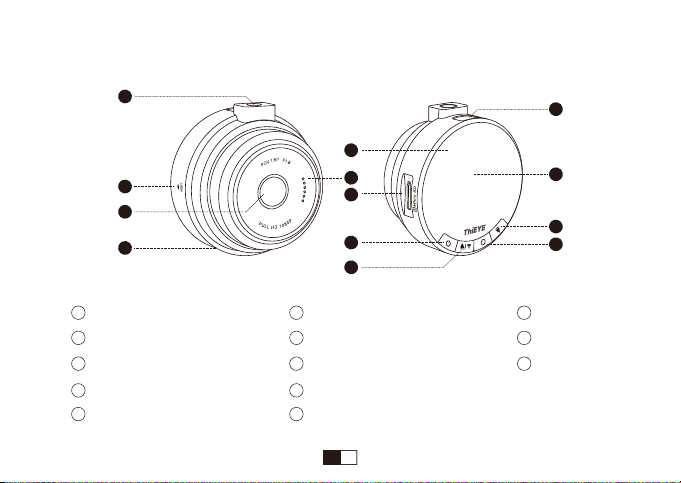
2. Product Overview
1
2
3
4
Threaded Insert
1
2
Reset
3
170° Wide Angle Lens
4
Microphone
5 10
Status Indicator
5
6
7
8
9
Speaker
6
7
Micro SD Slot
8
Power / Mode Button
9
Up / WiFi Button
OK Button
Down Button
11
12
1.5” LCD Screen
13
Micro USB Port
13
12
11
10
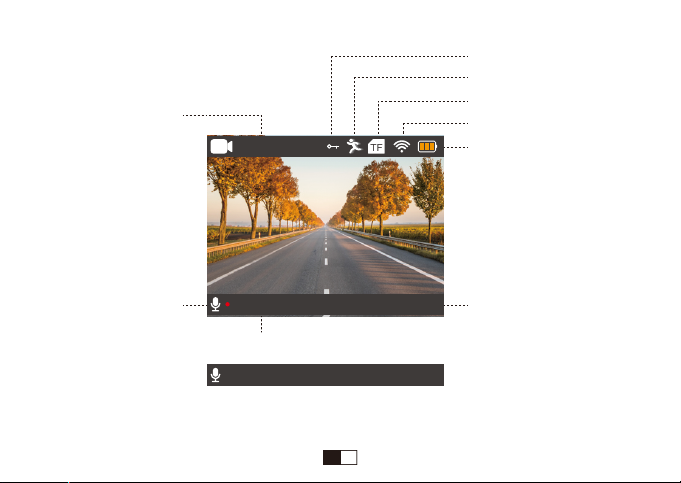
3. LCD Screen
File Lock Icon
Motion Detection Icon
Video Resolution
1080P 30FPS
1080P 30FPS
000258 2019/02/03 045606
Microphone Icon Date/Time
000258 2019/02/03 045606
TF Card Icon
WiFi
Battery Status
Recording Status: When Recording
000000 2019/02/03 045606
Recording Status: When Not Recording

4. LED Indicators
Status
When Recording
When Not Recording
Blue Indicator Light
Continuous Flash
Constant ON
Part 02 - Basic Operation
1. Insert TF Card
We recommend to use up to 32G Class 10 or UHS-1 Micro SD Card.
Please format the Micro SD Card in the camera before first use.
To keep your Micro SD card in good condition, please reformat it regularly. As reformatting
erases all of your content, be sure to back up your photos and videos first.
· Micro SD Card File
There are two folders on the SD card, one is named “1”, which contains UNLOCK files, the other
one is called “Lock” and it’s the LOCK files.

2. Power On/Off
Auto Power On/Off with Ignition - When powered by the car charger, the dash camera will
automatically turn on when you start your car engine. When turning off your car, the camera will
automatically turn off after approximately 10 seconds.
Manual Power On/Off - To manually turn the camera on/off, press and hold the power button
for at least 3 seconds.
· Switching the camera OFF manually and pulling off the car charger is required for vehicles
where the vehicle’s power socket provides continuous power after the engine is turned OFF.
3. Mode Switching
When the dash cam is Powered ON, it’ll automatically start recording.
Press OK Button to stop recording.
Repeatedly press Power/Mode Button to switch to switch mode, there will be modes:
Video, Photo, Playback, Settings.
EN EN EN EN EN EN EN EN EN
05 06 07 08 09 10 11 12 13
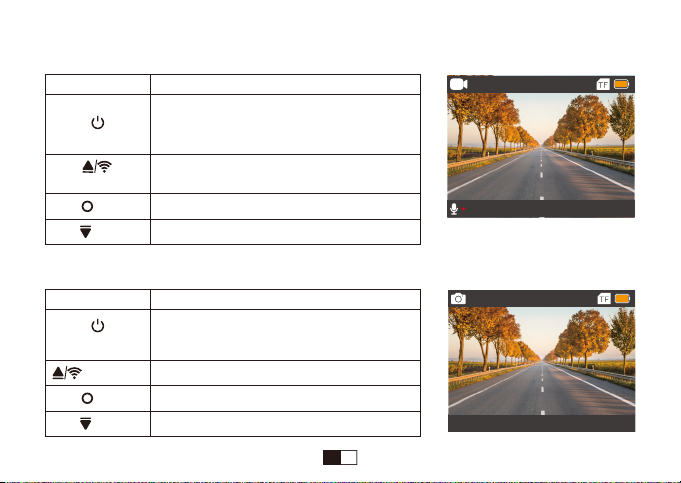
4. Video Mode
Button Function
POWER / MODE
Up / WiFi
OK
DOWN
5. Photo Mode
Button
When not recording:
Switch to Photo/Playback/Settings Mode
When recording: Manually Lock File
Display the WiFi SSID and Password
Start / Stop Video Recording
Turn ON/OFF the LCD display
Function
1080P 30FPS
1080P 30FPS
000258 2019/02/03 035606
000258 2019/02/03 035606
12M
12M
POWER / MODE
Up / WiFi
OK
DOWN
Switch to Playback/Settings Mode
×
Take a Photo
Turn ON/OFF the LCD display
EN EN EN EN EN EN EN EN
06 07 08 09 10 11 12 13
2019/02/03 040658
2019/02/03 040658
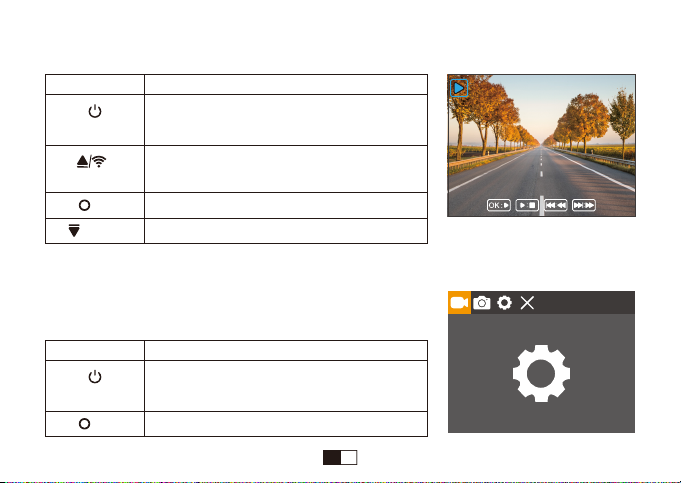
6. Playback Mode
VID_002MOV
Button Function
POWER / MODE
00:00:34
Switch to Settings Mode
VID_002MOV
1080P 30FPS
1080P 30FPS
Navigate UP to choose video/photo file
Up / WiFi
OK
DOWN
Long Press to preview the LOCK files
Play/Pause
Navigate DOWN to choose video/photo file
When you preview the recorded files, the default is to preview Unlocked files, if you need to
preview the Locked files, please LONG PRESS Up Button.
7. Settings Mode
Button
POWER / MODE
OK
Function
Switch to Video Recording Mode, and
automatically start recording.
Enter Menu Settings
EN EN EN EN EN EN EN
07 08 09 10 11 12 13

Part 03 - Menu Settings Instruction
Menu Switching
When the dash cam is Powered ON, it’ll automatically start recording.
Short press OK Button to stop recording.
Repeatedly press Power / Mode Button to switch to Settings.
Press OK Button to enter menu settings, there will be:
Video Settings, Photo Settings, System Settings, Exit Settings.
MUST Press OK Button
EN EN EN EN EN EN
08 09 10 11 12 13
Resolution
Cyclic Record
Motion Detection
Voice Recording
Date Stamp
1080P
3 Min

1. Video Settings
Loop Recording
In the case of recording and saving at interval of 3 / 5 / 10 minutes, the dash cam will
automatically overwrite the earliest file in the memory card once the card is full.
Tips
If you turn off the loop recording function, the dash cam will record every five-minute segment of
video when recording.
Motion Detection
When the camera is turned ON and the motion detection is ON, the dash camera will
automatically activate and record any movement that is detected in front of the camera, and it
stops recording when no dynamic motion appears.
Tips
· If you turn on the motion detection function, it only works when the dash camera is Powered
ON, the camera will record when it detects motion, which will cause discontinuous recording.
· If you need record continuously, we suggest you to turn off the motion detection function.
EN EN EN EN EN
09 10 11 12 13

G-sensor
G-sensor will lock the file when detecting a collision during the recording, please check the “Lock”
file in the card and back up your important files regularly in case of overwritten by loop recording
once the card is full.
Parking Monitor
When the car is parked and the Parking Monitor has been turned on, the dash cam will activate
and start recording automatically once it detects collision. And it will turn off after continuously
recording about 20 seconds.
Tips
Only turn on the Parking Monitor while parking, the dash cam will record when detecting a
collision. It means that you do not need to turn on G-sensor and Motion Detection.
WDR ( Wide Dynamic Range)
Wide Dynamic Range (WDR) retains a greater level of detail and color in an image. This setting
is especially useful for scenes that include shadows or bright areas.
EN EN EN EN
10 11 12 13

2. Photo Settings
Capture Mode
Single shot - the camera will take one photo every time.
Delayed shot - the camera will wait for 2/5/10s depending on setting before taking the shot.
Sequence
Once set in photo burst mode, the camera will take 3 shots in a row every time. Otherwise, the
camera only takes one photo every time. (Default: OFF)
3. System Menu Settings
Screen Saver
If you turn on Screen Saver Mode, the screen display will be turned off after a period of inactivity,
but the camera is still recording. You can see the Blue Indicator Light is flash during recording.
Auto Power Off
If you set to 3-minute auto power off, the camera will automatically power off if it is not recording
and without any operation in 3 minutes.
EN EN EN
11 12 13
Upgrade Firmware
· Please download the latest firmware from ThiEYE website (thieye.com/support.html) and
upgrade the camera according to the instruction in the file.
· Two ways to upgrade the firmware: Advanced Update (by PC) and Quick Update(by the
camera). We suggest Advanced Update, which is much more convenient.
· Please keep upgrading the firmware in time to maintain the best user experience.
· Do not disconnect your device from power while it is being updated. This will result in damage to
the dash cam.
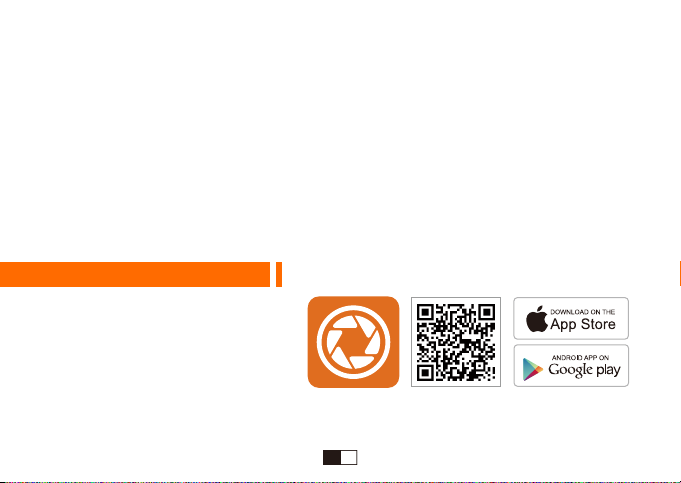
Part 04 - APP Connection
1. Download ThiEYE DVR App
Please scan the QR Code or visit
our official website www.thieye.com
to download ThiEYE DVR App.
EN EN
12 13
2. WiFi is defaulted “ON”, the LCD will show a “ ” icon. Press Up/WiFi Button “ ” can
display the interface of WiFi SSID and Password, and press again that the interface will be
closed.
3. Connect your smartphone to the WiFi of the dash cam (WiFi Account: ThiEYE_CAM,
Password:12345678), then open the App to view and control your camera.
About Turing ON/OFF WiFi
Note: WiFi is defaulted “ON” when you using this camera for the first time, if you want to turn on/off
the WiFi manually, the method as follows:
There is a “WiFi” in the System Settings, the option value is Off / On, and the default is On.
· If you need to TURN OFF WiFi, please setting the “WiFi” is Off, the WiFi is OFF.
· When the WiFi is off, if you want to TURN ON WiFi, please setting the “WiFi” is On, the WiFi is ON.
EN
13
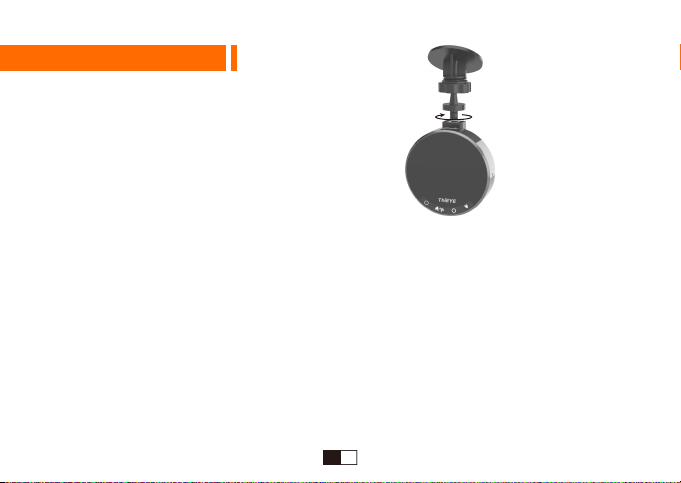
Part 05 - Installation
1. Connect the Dash Cam and the Mount
2. Install the Dash Cam
Clean the area on the windshield where the dash cam will be installed.
You can attach the suction cup mount or adhesive mount to the windshield
where it will not obstruct the driver’s view.
(Note: If you use adhesive mount, please attach static stickers to prevent the adhesive from
sticking to dirty up the clean windshield of your car.)
Hide the power cable by placing it in the space between the windshield and headliner.
Recommended locations for the adhesive wire clips to arrange the power cable.
EN EN EN FR FR FR FR FR FR
14 15 16 17 18 19 20 21 22

3. Connect to Power
Connect the power cable to Micro USB port of the
dash cam.
Plug the car charger adapter end of the power cable
into a vehicle power socket.
The car charger with additional USB, you can keep the dash cam charging on the go, and at
the same time charge your smartphone or pad with the same charger. Convenient!
Part 06 - Connect to Computer
With TF card inserted, when connected to computer, three options will be available:
Mass Storage, PC Camera, REC-mode.
Mass Storage allows the TF card to be accessed via computer as an
external storage.
PC Camera can act as a camera for your computer.
REC_mode allows the dash cam to function normally while charging
via computer.
EN EN FR FR FR FR FR FR
15 16 17 18 19 20 21 22
Mass Storage
PC Camera
REC_mode

Part 07 - Frequently Asked Questions
FAQ Solutions
Why won’t the camera
record continuously?
How to monitor while parking?
When recording,
It will stop automatically.
There are horizontal stripes
in the image.
This is caused by the Motion Detection.
If you need record continuously, we suggest you to
turn off the motion detection function.
Only need to turn on the Parking Monitor.
(Don't need to turn on the G-sensor or motion detection).
Due to the huge HD video data, please use up to
Class 10 Micro SD Card and format the card on the
camera before first use.
This is caused by setting the wrong “Frequency”.
Please set it to “50Hz” or “60Hz” according to the local
power supply frequency.
Please use the reset key to restore manufacturer defaults.When any abnormality occurs.
EN FR FR FR FR FR FR
16 17 18 19 20 21 22
Partie 01 – Guide de démarrage
1. Liste d’emballage
Français
Caméra de voiture
Autocollants statiques
Carte Micro SD 32GO
USB additionnel
Support à ventouse Support adhésif
Câble Miro USB Mode d’emploiChargeur de voiture avec
FR FR FR FR FR FR
17 18 19 20 21 22
2. Vue d'ensemble du produit
1
2
3
4
Insert fileté
1
2
Réinitialisation
3
Objectif à grand angle de 170°
4
Microphone
5 10
Voyant d'état
13
5
6
7
8
9
Haut-parleur
6
7
Fente pour carte Micro SD
8
Bouton d’alimentation/de mode
9
Bouton Haut / Bouton wifi
12
11
10
Bouton Bas
11
12
Écran LCD 1,5”
13
Port Micro USB
Bouton OK
FR FR FR FR FR
18 19 20 21 22

3. Écran LCD
Résolution vidéo
1080P 30FPS
1080P 30FPS
1080P 30FPS
1080P 30FPS
000258 2019/02/03 045606
000258 2019/02/03 045606
000258 2019/02/03 045606
Icône du microphone Date/Temps
000258 2019/02/03 045606
Icône du verrouillage des fichiers
Icône de la détection de mouvement
Icône de la carte TF
WiFi
État de batterie
État d’enregistrement: En cours d’enregistrement
000000 2019/02/03 045606
État d’enregistrement: Pas en cours d’enregistrement
FR FR FR FR
19 20 21 22

4. Voyants LED
État
En cours d’enregistrement
Pas en cours d’enregistrement
Voyant bleu
Clignotement continu
Toujours en état allumé
Partie 02 – Opération de base
1. Insertion d’une carte Micro SD
Il est recommandé d’insérer une carte Micro SD de niveau 10 ou UHS-1 jusqu’à 32G.
Veuillez formater la carte Micro SD dans la caméra avant la première utilisation.
Veuillez périodiquement reformater la carte Micro SD pour la maintenir en bon état, et
sauvegarder vos photos et vidéos avant le formatage pour éviter toute perte.
· Fichier dans la carte Micro SD
Il y a deux fichiers dans la carte Micro SD, le fichier nommé « 1 » signifie des fichiers non
verrouillés, l’autre fichier est des fichiers verrouillés.
FR FR FR
20 21 22

2. Mise sous tension/hors tension
Mise sous tension/hors tension automatique - La caméra de voiture, alimentée par le
chargeur de voiture, sera automatiquement mise sous tension en cas d’allumage, et sera
automatiquement mise hors tension environ 10 secondes après que le moteur de la voiture s’est
éteint.
Mise sous tension/hors tension manuelle - Veuillez longuement appuyer sur le bouton
d’alimentation pour au moins 3 secondes pour manuellement mettre sous tension/hors tension la
caméra de voiture.
· Pour la voiture qui fournit une alimentation continue via la prise d’alimentation après que le
moteur s’est éteint, veuillez manuellement mettre hors tension la caméra et le chargeur de
voiture.
3. Changement du mode
La caméra de voiture commence automatiquement l’enregistrement après sa mise sous
tension.
Vous pouvez arrêter l’enregistrement en pressant le bouton OK.
En pressant de façon répétitive le bouton d’alimentation/de mode, vous pouvez réaliser un
changement entre des modes suivants: Vidéo, Photo, Lecture, Paramètres.
FR FR
21 22
4. Mode vidéo
Bouton Fonction
Alimentation/Mode
Bouton Haut / WiFi
OK
Bas
5. Photo Mode
Bouton Fonction
Pas en cours d’enregistrement:
Changement en mode Photo/Lecture/Paramètres
En cours d’enregistrement:
Verrouillage manuel du fichier
Afficher le SSID de WiFi et le mot de passe
Commencer/arrêter l’enregistrement vidéo
Démarrer/arrêter l’affichage LCD
1080P 30FPS
000258 2019/02/03 035606
12M
Alimentation/Mode
Haut / WiFi
OK
Bas
Changement en mode Lecture/Paramètres
×
Prendre une photo
Démarrer/arrêter l’affichage LCD
FR
22
2019/02/03 040658
2019/02/03 040658

6. Mode Lecture
Bouton Fonction
Alimentation/Mode
Haut / WiFi
Bas
Des fichiers enregistrés que vous prévisualisez sont par défaut des fichiers non verrouillés. Si vous voulez
prévisualiser des fichiers verrouillés, veuillez longuement appuyer sur le bouton Haut.
Changement en mode Paramètres
Appui court:
pour sélectionner le fichier vidéo/photo
Appui long:
pour prévisualiser des fichiers verrouillés
OK
Lecture/suspension
Appui court: pour sélectionner le fichier vidéo/photo
00:00:34
VID_002MOV
1080P 30FPS
7. Mode Paramètres
Bouton
Alimentation/Mode
Fonction
Changement en mode Enregistrement vidéo,
et l’enregistrement automatique commence.
OK
Entrer dans Réglages du menu
FR FR FR FR FR FR FR FR FR
23 24 25 26 27 28 29 30 31
 Loading...