

Thies CLIMA SENSOR US Short Manual

THE WORLD OF WEATHER DATA - THE WORLD OF WEATHER DATA - THE WORLD OF WEATHER DATA
Short manual
CLIMA SENSOR US
ADOLF THIES GmbH & Co. KG
021690/10/14/short
4.920x.00.00x
Hauptstraße 76 37083 Göttingen Germany
Box 3536 + 3541 37025 Göttingen
Phone +49 551 79001-0 Fax +49 551 79001-65
www.thiesclima.com info@thiesclima.com

Safety Instructi o ns
• Before operating with or at the device/product, read through the operating instructions.
This manual contains instructions which should be followed on mounting, start-up, and operation.
A non-observance might cause:
- failure of important functions
- endangerment of persons by electrical or mechanical effect
- damage to objects
• Mounting, electrical connection and wiring of the device/product must be carried out only by a qualified
technician who is familiar with and observes the engineering regulations, provisions and standards applicable in
each case.
• Repairs and maintenance may only be carried out by trained staff or Adolf Thies GmbH & Co. KG. Only
components and spare parts supplied and/or recommended by Adolf Thies GmbH & Co. KG should be used
for repairs.
• Electrical devices/products must be mounted and wired only in a voltage-free state.
• Adolf Thies GmbH & Co KG guarantees proper functioning of the device/products provided that no
modifications have been made to the mechanics, electronics or software, and that the following points are
observed:
• All information, warnings and instructions for use included in these operating instructions must be taken into
account and observed as this is essential to ensure trouble-free operation and a safe condition of the measuring
system / device / product.
• The device / product is designed for a specific application as described in these operating instructions.
• The device / product should be operated with the accessories and consumables supplied and/or recommended
by Adolf Thies GmbH & Co KG .
• Recommendation: As it is possible that each measuring system / device / product may,under certain conditions,
and in rare cases, may also output erroneous measuring values, it is recommended using redundant systems
with plausibility checks for security-relevant applications.
Environment
• As a longstanding manufacturer of sensors Adolf Thies GmbH & Co KG is committed to the
objectives of environmental protection and is therefore willing to take back all supplied
products governed by the provisions of "ElektroG"
Equipment Act) and to perform environmentally compatible disposal and recycling. We are
prepared to take back all Thies products concerned free of charge if returned to Thies by our
customers carriage-paid.
• Make sure you retain packaging for storage or transport of products. Should packaging
however no longer be required, please arrange for recycling as the packaging materials are
designed to be recycled.
(German Electrical and Electronic
Documentation
• © Copyright Adolf Thies GmbH & Co KG, Göttingen / Germany
• Although these operating instruction has been drawn up with due care, Adolf Thies GmbH & Co KG can
accept no liability whatsoever for any technical and typographical errors or omissions in this document that
might remain.
• We can accept no liability whatsoever for any losses arising from the information contained in this document.
• Subject to modification in terms of content.
• The device / product should not be passed on without the/these operating instructions.
Remark:
This document is an instruction for starti ng-up the
ClimaSensorUS. For the complete Instructions for Use please
refer to the attached CD.
2 - 14 021690/10/14/short
Article- No.
Description
Parameter, output, interface, equipment, etc.
4.920x.00.00x
CLIMA SENSOR US
You will find each the complete and detailed
9.1700.81.000
Program “ThiesDeviceUtility.EXE”
1 Introduction
Thies “brief instruction” describes the installation and startup of t he “ ClimaSensor US” by means of
the PC-program “ThiesDeviceUtility”.
Instruction for Use on the attached CD.
Scope of Delivery:
1 x ClimaSensorUS 4.920x.00.00x
1 x Brief instruction for 4.920x.00. 00x
1 x Supplementary sheet with the factory settings
1 x CD with:
Program “ThiesDeviceUtility.EXE” (9.1700.81.000)
Manual “ThiesDeviceUtility”
Instruction for Use for 4.920x.00.00x
Please check the completeness of delivery.
For an initial start-up, we recommend to use a PC, the power supply unit 9.3389.20. 000, the
connecting cable 509427 or 509311, and the interface converter 9.1702.40.000. For connection
diagrams for wiring please refer to chapter 3.
2 Installation of the CLIMA SENSOR US
Attention:
The working position of the CLIMA SENSOR US is v ertical (plug
connection underneath).
During mounting, de-mounting, transport or maintenance of the
CLIMA SENSOR US please make sure that no water gets into
the instrument base or plug.
When using a lightning rod please take care that it is mounted
at below 45° to a wind measuri ng di stance, in order to avoid
malfunctions caused by reflections.
The instrument must be mounted and wired only by qualified
personnel, who knows and observes the generalities of
techniques, and applicable regulations and norms.
3 - 14 021690/10/14/short
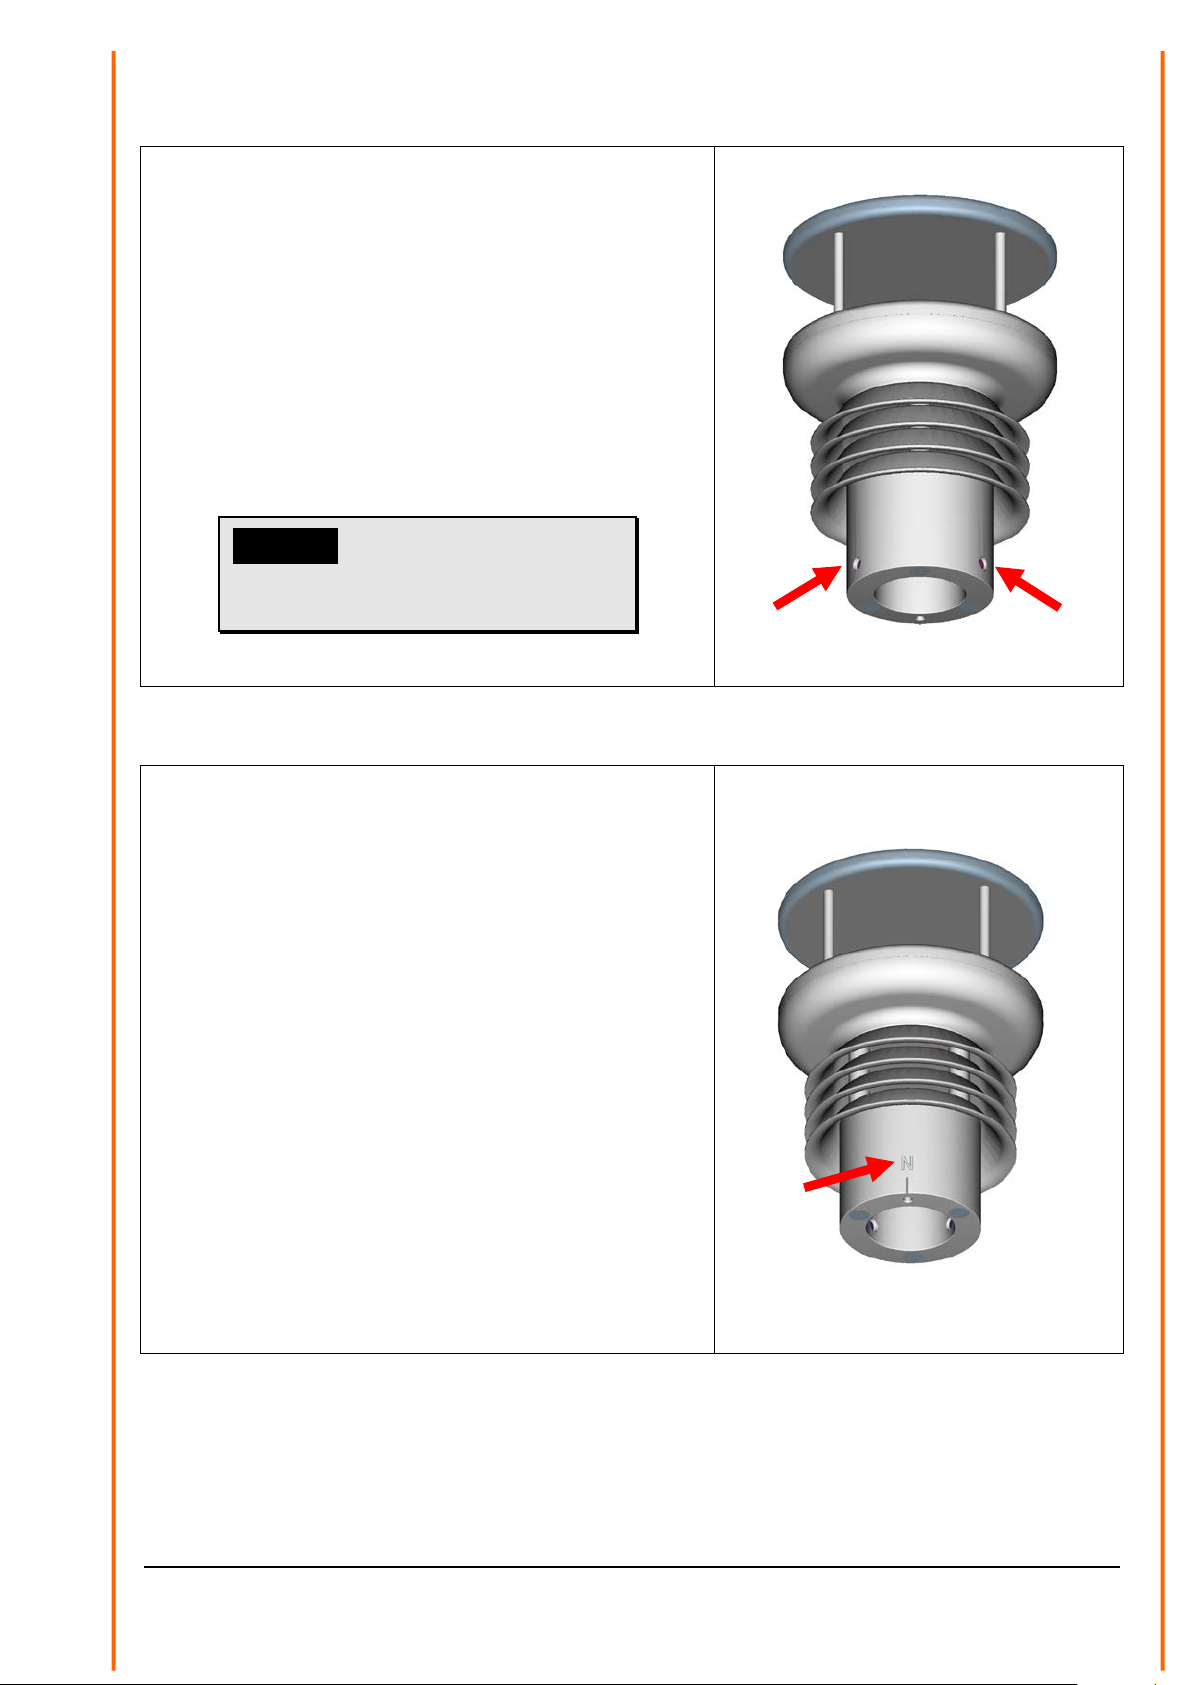
2.1 Mechanical installation
Proper installation of the CLIMA SENSOR US is carried
out using a tube socket R1½" ( Ø 48. 3 m m) and at least
30 mm in length. The inside diameter of the tube socket
must be at least 30 mm as the electrical connec t ion of
the CLIMA SENSOR US is carried out at the bottom of
the device. After connection the CLIMA SENSOR US is
then mounted on the tube or mast socket. The marking
for north on the device must be aligned to north (see
section 4.2.1). The device is fixed to the shaft with the
two Allen screws (AF 4 mm).
Caution:
The allen screws must be
tightened to 2 Nm
2.1.1 Alignment to north
For exact determination of the wind and Brightness
direction the CLIMA SENSOR US must be installed
aligned to north (true north) .
When aligning t he device, t he m ar ki ng f or nor t h ( N)
must point to north (true nor th). To do so, select a
conspicuous feature of the landsc ape t o t he nor th or
south with a compass and turn the mast or sensor unt il
the marking for nor th points to true north.
When aligning t he device to nor t h using a compass, bear
in mind the magnetic variation (= deviation in the
direction of the compass needle from true north) and
possible interference from m agnetic fields (e.g. iron
parts, electric cables).
The lower edge of the sensor base is equipped with a
bore for north aligned to the marking for north. T his
bore allows a mast adapter with a pin for north to be
used here. The mast adapter is not included in t he scope
of supply.
4 - 14 021690/10/14/short
Cable
Parameter DM
Used duplex-mode
Connection diagram
16pole
1
Full-duplex
Chapter 3 page 7
16pole
2
Full-duplex
Chapter 3 page 7
8pole
0
Half-duplex
Chapter 5 page 9
8pole
1
Full-duplex
Chapter 4 page 8
8pole
2
Full-duplex
Chapter 4 page 8
2.2 Electrical installation / Start-up
1. The connection of the ClimaSensor US to the interface module and power supply unit
differs, depending on t he inst r um ent variant. You have to distinguish between the
connection types full-duplex and half-duplex with cable 16pole or resp. 8pole. Information
on the duplex-mode are given by parameter DM on the supplemental sheet “Factory
settings” of the ClimaSensor US.
The following table serves for the circ uit diagram selection. The following assignm ent s
apply:
Table 1: Selection Connection Diagram
2. Connect the supplied 8pole or resp. 16pole cable to the power supply unit 9.3389.20.000,
acc. to the connection diagram, s ee Table 1.
3. Put the plug of the 8pole or resp. 16pole cable into the ClimaSensor US.
4. Connect the USB/RS485 interface converter to the power supply unit 9.3389.20. 000.
5. Connect the 230V / 115V line to the power supply unit
9.3389.20.000.
6. Insert the included CD into the CD-ROM drive of your
PC.
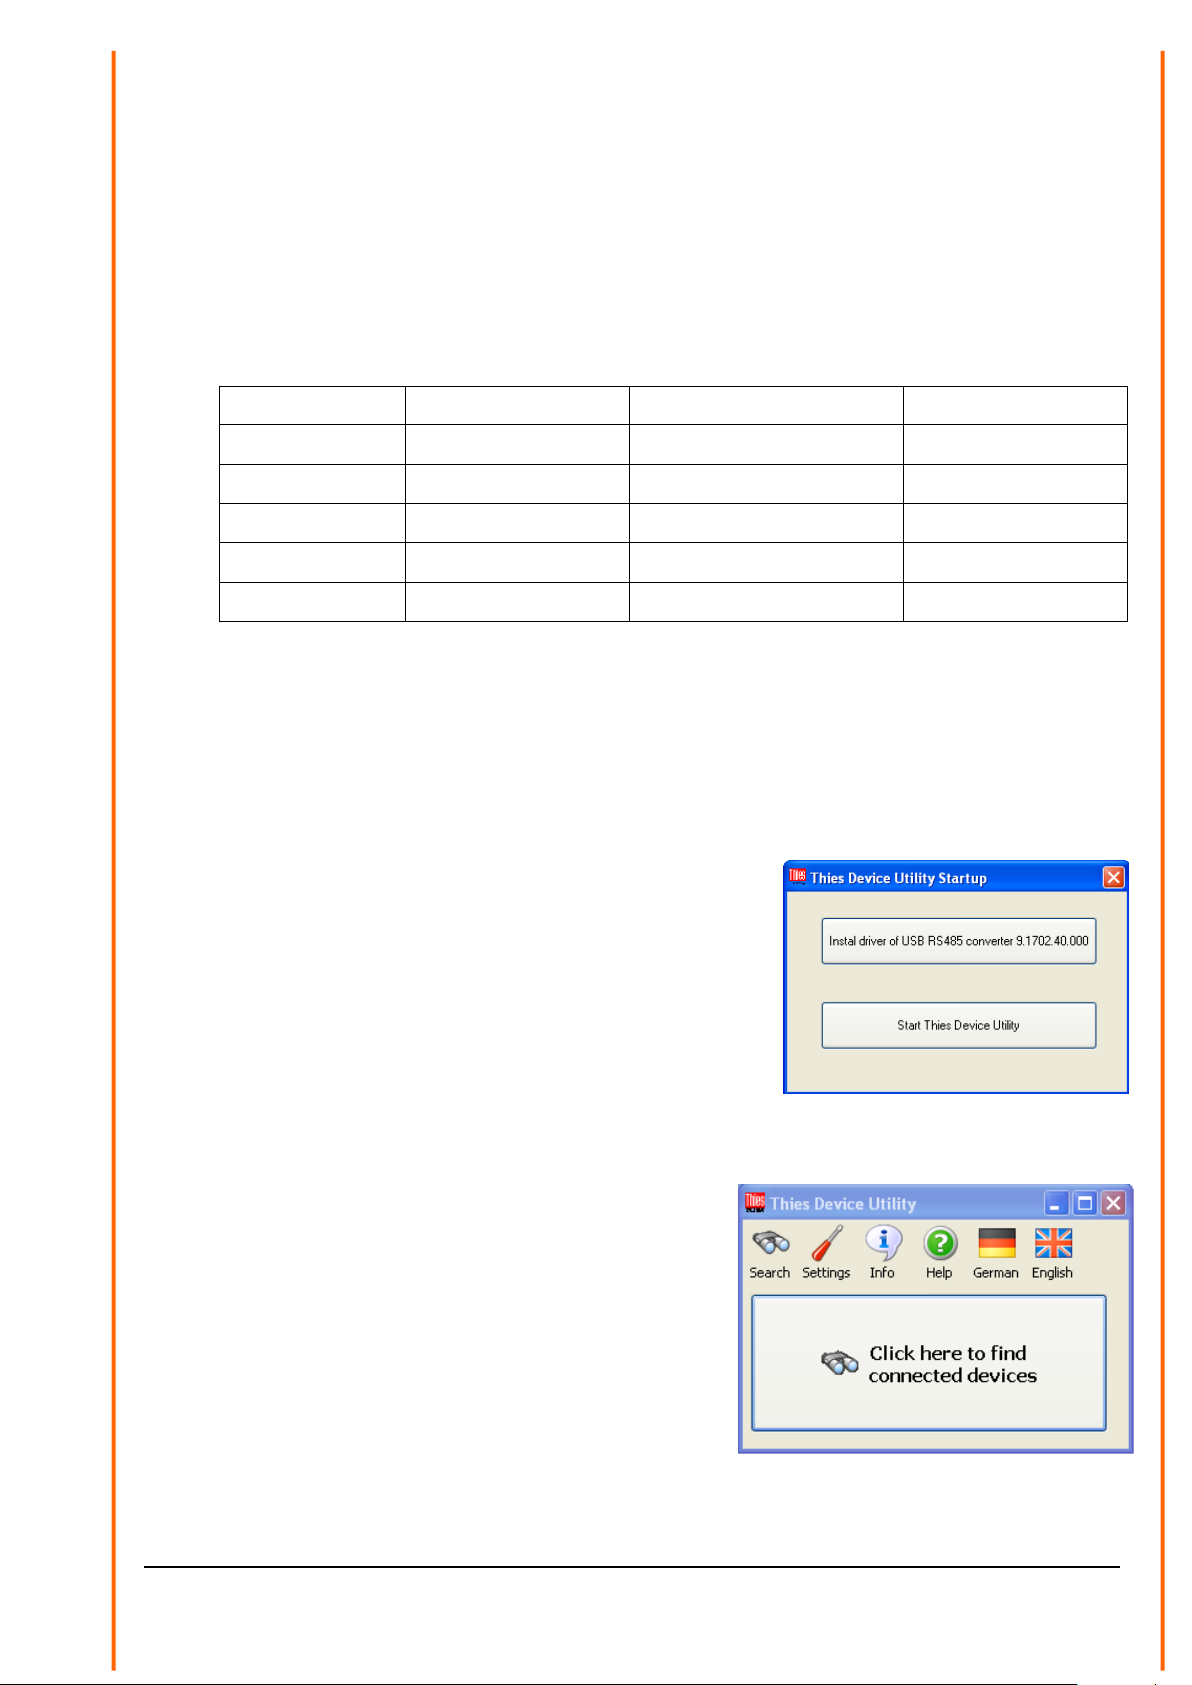
7. Start the program “T hiesDeviceUtilityStartup. exe” from
the included CD.
8. For installation of the interface t r ansduc er select the
button “install driver for USB RS485 converter”.
9. Connect the USB/RS485 interface converter and your
PC by means of the included USB-cable.
10. For starting the program “T hiesDeviceUtility.exe” select the but t on “Start Thies
DeviceUtility” in the program
“ThiesDeviceUtilityStartup”.
11. After the program start select t he but ton “Search”.
12. The program searches for connected instruments,
and displays the search result and detail
parameter.
5 - 14 021690/10/14/short
 Loading...