

Page 1
GM057XMPO28011204/GM057S1XMPO28031204
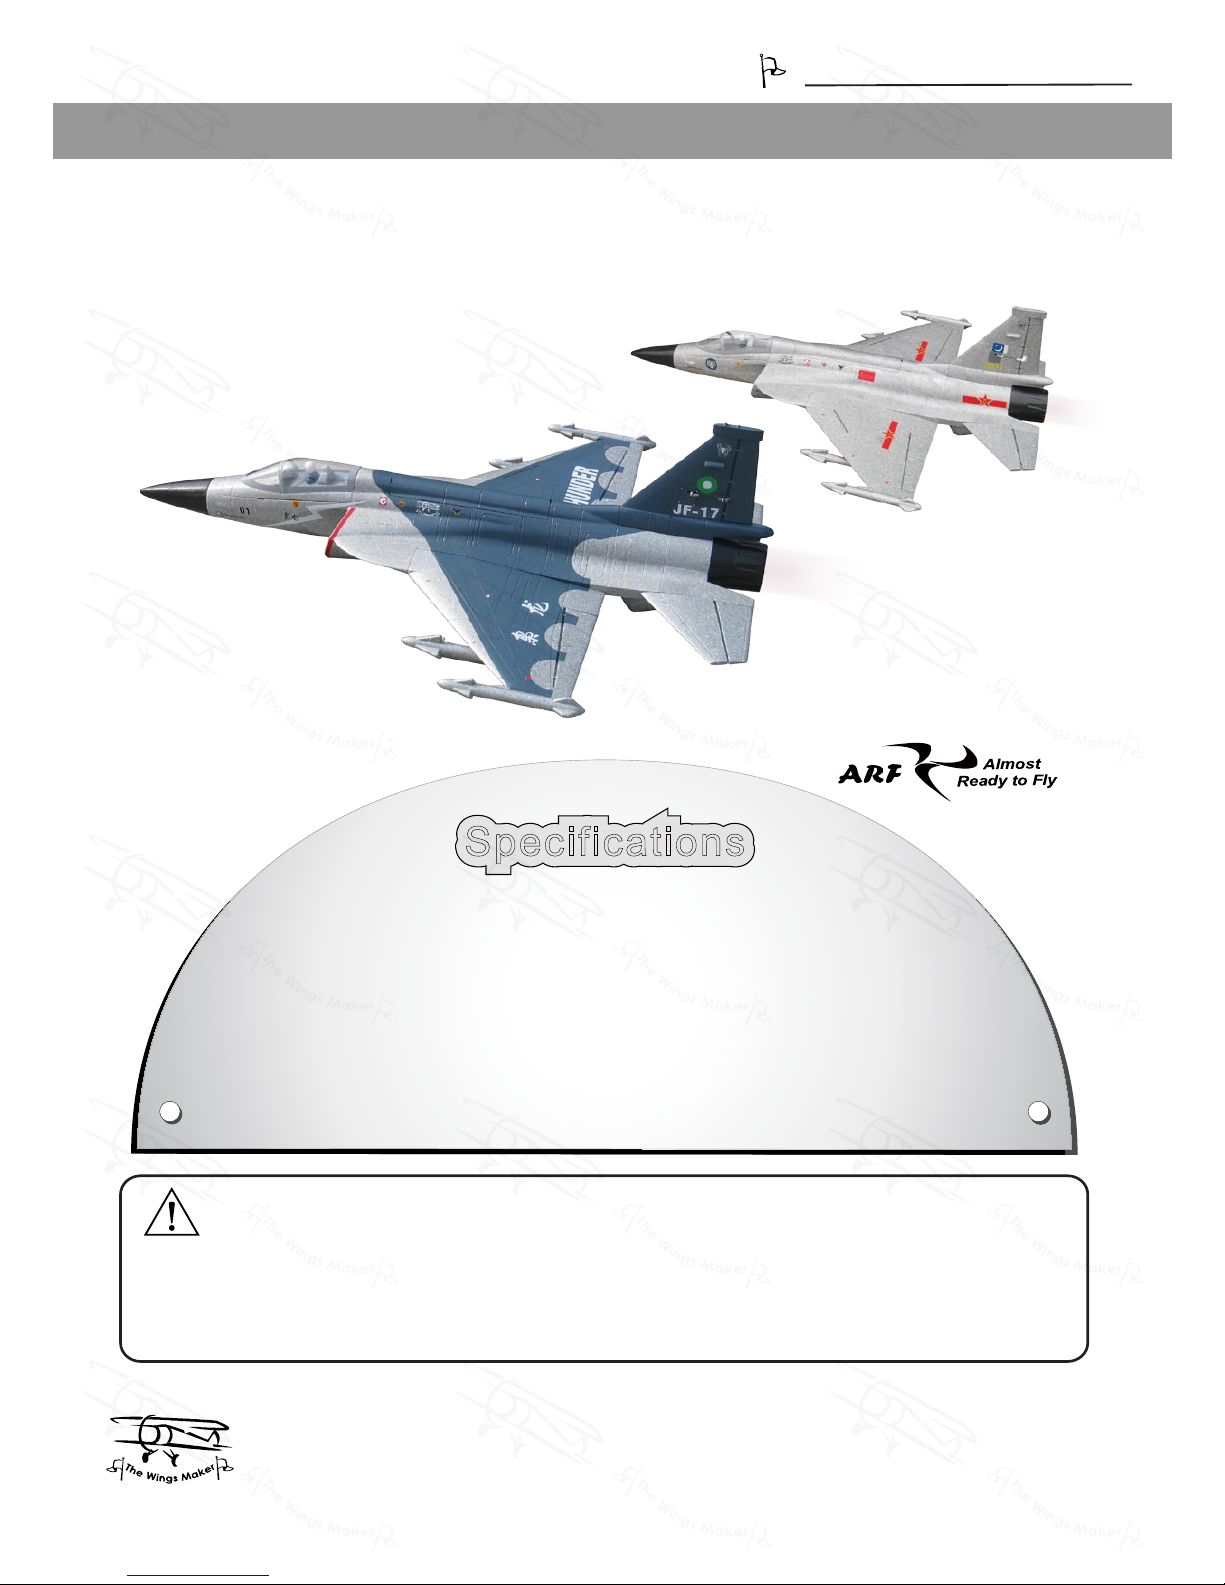
It is designed for maximum performance. Please seek advice if one is not familiar with this kind
of electric powered precision model. Operating this model without prior preparation may cause
injuries. Remember, safety is the most important thing. Always keep this instruction manual at
hand for quick reference.
Warning ! This model is not a toy.
THE WINGS MAKER
FACTORYPRE-FABRICATED
ALMOST-READY-TO-FLY(ARF) SERIES
MADE IN CHINA
* Specifications are subject to change without notice.*
www thewingsmaker com. .
SpecificationsSpecifications
Before commencing assembly please read these instructions thoroughly, .
INSTRUCTION MANUAL
Wing Span: 37.5 in / 950 mm
Wing Area: 583 sq in / 37.6 sq dm
Flying Weight: 69 oz / 1950 g
Fuselage Length: 57.5 in / 1460 mm
Requires: 6-channel radio w/ 9 micro servos, 60A
Brushless ESC and 6 cells 22.2V 25C 2800 mAh
battery and charger
)&-)7+81'(5
(
GM057XM
)
ᨧఆ
ᨧఆ
Page 2
GM057XMPO28011204/GM057S1XMPO28031204
INDEX
BEFORE YOU BEGIN
BEFORE YOU BEGIN
PARTS LIST
ASSEMBLY
SAFETY PRECAUTIONS
P.1
P.2
P.3-P.12
P.12
Check all parts. If you find any defective or missing parts contact your local dealer. Please
DRY FIT and check for defects for all parts that will require CA or Epoxy for final assembly.
Any parts you find to be defective after the gluing process may be difficult to remove for
warranty replacement. The manufacturer will replace any defective parts, but will not extend
to the parts that are good before gluing to defective parts during assembly. Warranty will
not cover any parts modified by customer.
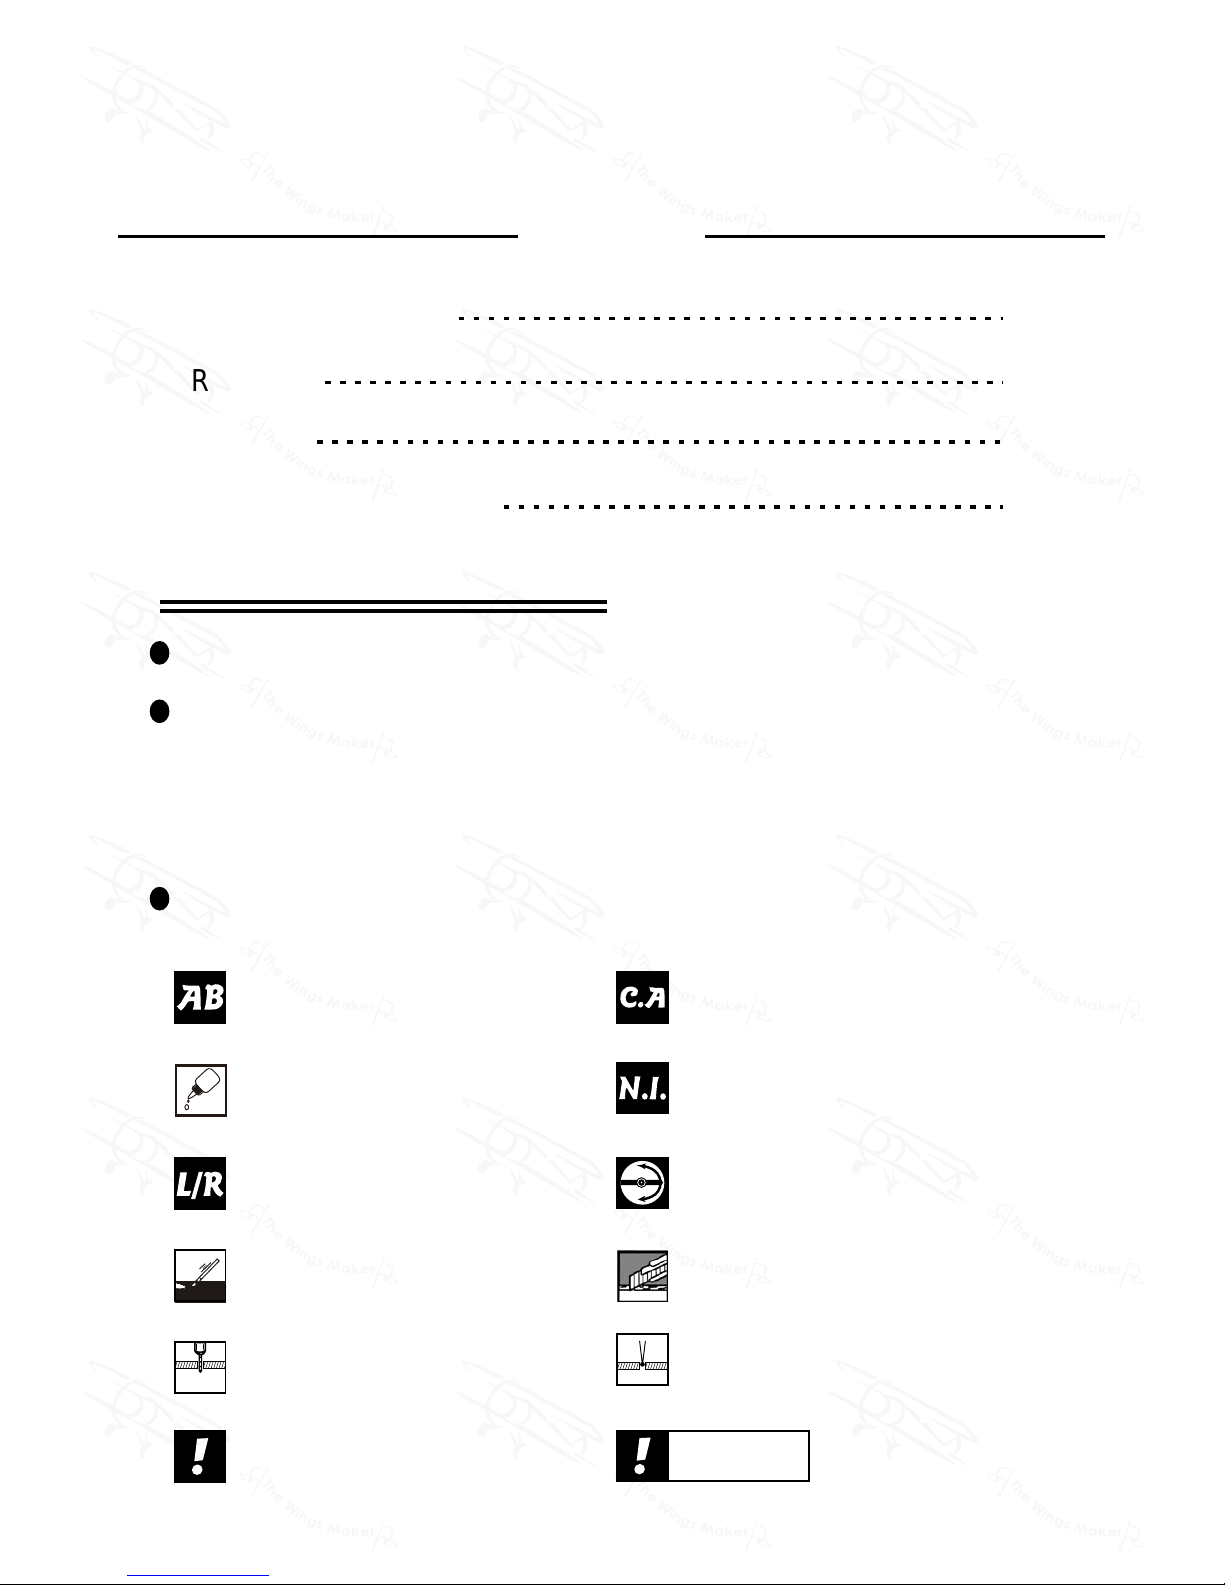
Symbols used throughout this instruction manual comprise of the following :-
Read through the manual before you begin, so you will have an overall idea of what to do.
1
2
3
Cut off shaded portion.
Ensure smooth non-binding
movement while assembling.
Apply instant glue
(C.A.glue, super glue.)
Assemble left and right
sides the same way.
Peel off shaded portion
covering film.
Pay close attention here!
Apply epoxy glue.
Must be purchased separately !
Drill holes with the specified
diameter (here: 3mm).
Pierce the shaded portion
covering film.
3mm
Do not overlook this symbol !
Warning!
Apply thread locker
P.1
)&-)7+81'(5
ᨧఆ
ᨧఆ
Page 3
GM057XMPO28011204/GM057S1XMPO28031204
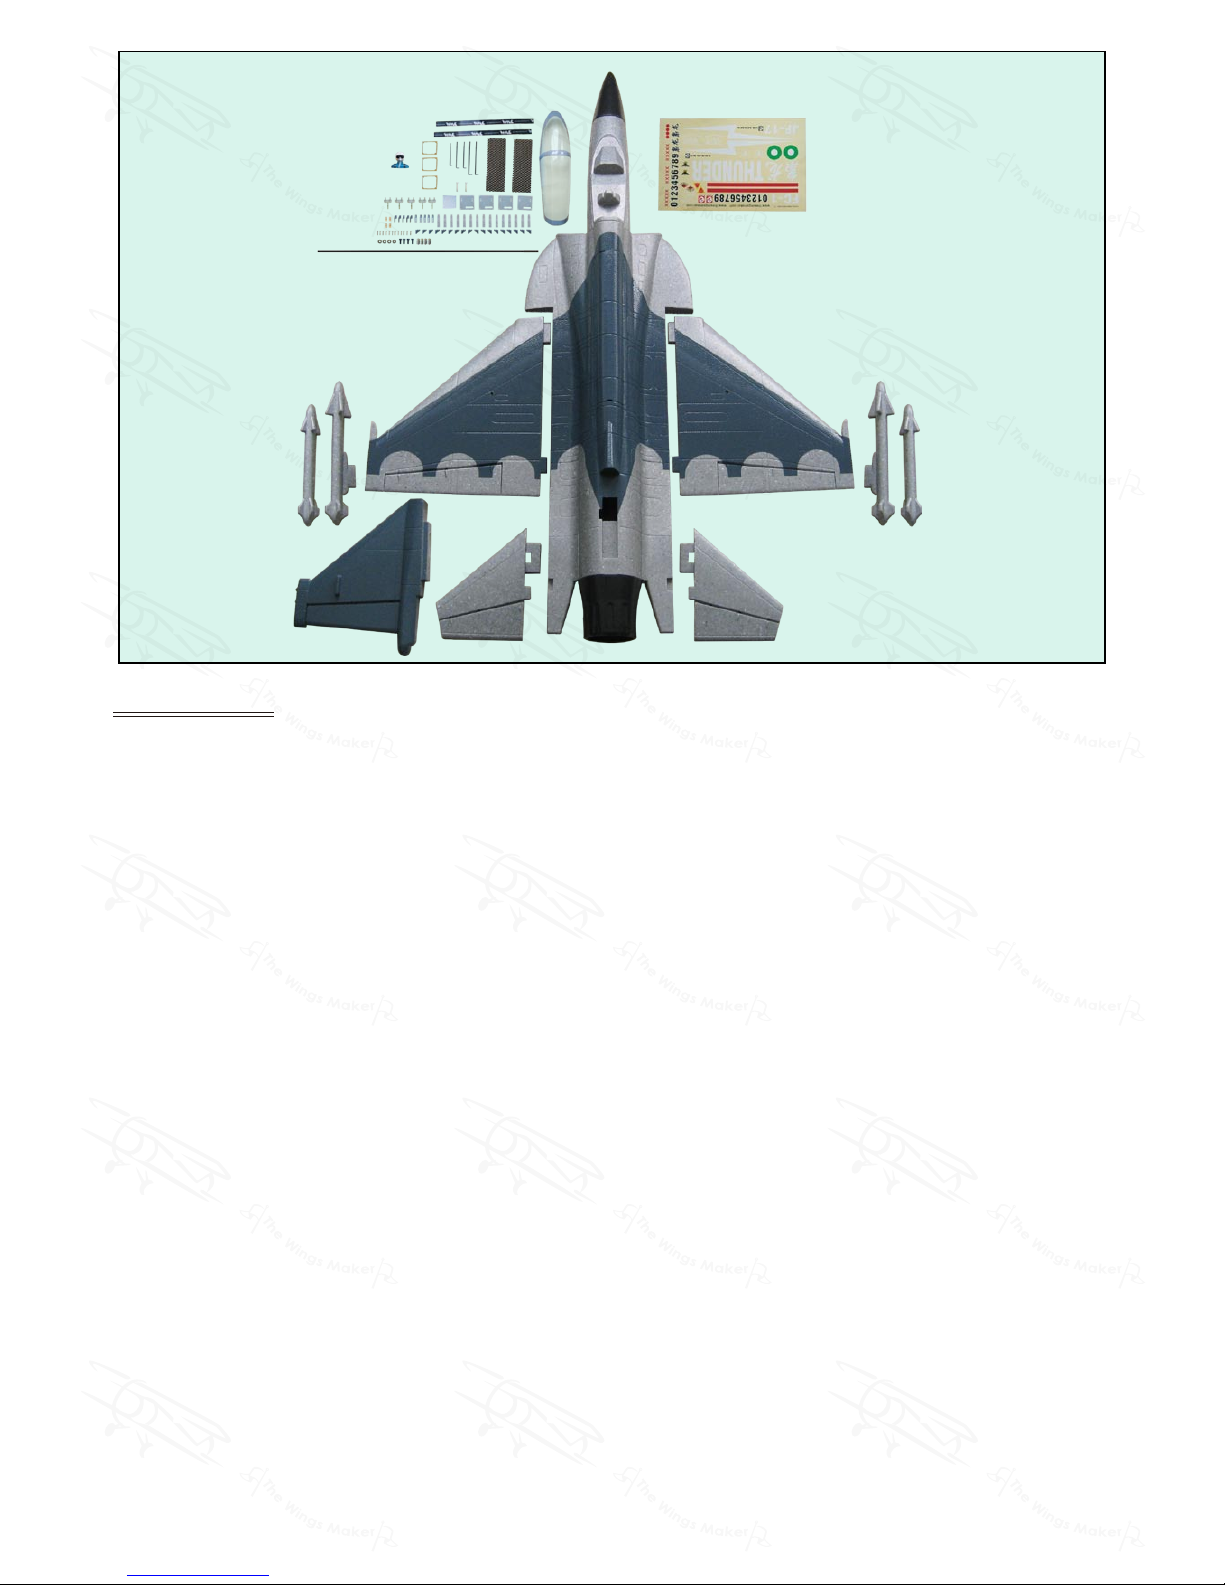
Parts List
1. MAIN WING -- 1 pair
SCREW PA1.7x8mm -- 8 pcs
SERVO MOUNTING PANEL PL5310020 -- 1 pair
STRAPER PL4112102 -- 2 pcs
CLEVIS PL4112103 -- 2 pcs
FUEL TUBE d2xD4x4mm -- 4 pcs
HORN PL4113103 -- 2 pcs
PUSHROD Ø1.4x75mm w/ Threads (For Aileron) -- 2 pcs
PLYWOOD 36.5x36.5x2mm -- 2 pcs
HINGES PL4115050 -- 6 pcs
2. VERTICAL FIN & RUDDER -- 1 pc.
SCREW PA1.7x8mm -- 4 pcs
SERVO MOUNTING PANEL PL5310020 -- 1 pc.
STRAPER PL4112102 -- 1 pc.
CLEVIS PL4112103 -- 1 pc.
FUEL TUBE d2xD4x4mm -- 2 pc.
HORN PL4113103 -- 1 pc.
PUSHROD Ø1.4x65mm w/ Threads (For Rudder) -- 1 pc.
PLYWOOD 36.5x36.5x2mm -- 1 pc.
HINGES PL4115050 -- 3 pcs
3. STABILIZER & ELEVATOR -- 1 pair
STRAPER PL4112102 -- 2 pcs
CLEVIS PL4112103 -- 2 pcs
FUEL TUBE d2xD4x4mm -- 4 pcs
HORN PL4113103 -- 2 pcs
PUSHROD Ø1.4x93mm w/ Threads (For Elevator) -- 2 pcs
PLYWOOD 12x6x2mm -- 4 pcs
HINGES PL4115050 -- 6 pcs
4. FUSELAGE -- 1 set
MECHANICAL NOSE RETRACT -- 1 set
PUSHROD Ø1.4x75mm w/ Threads -- 1 pc.
PUSHROD Ø1.4x40mm w/ Threads -- 1 pc.
LINKAGE CONNECTOR 2.1mm HW7111050 -- 4 sets
RETRACTABLE LANDING GEAR--1 pair
PUSHROD Ø1.4x45mm w/ Threads -- 2 pcs
5. SCREW PM3x8mm -- 4 pcs
WASHER d3xD7x0.5mm -- 4 pcs
DUCTED FAN COVER -- 1 pc.
6. CARBON FIBER TUBE Ø6x505mm -- 1 pc.
NYLON BOLT M3x25mm -- 2 pcs
7. MISSILE -- 2 sets
10.NOSE CONE -- 1 pc.
11.BATTERY TIE 250mm -- 2 pcs
BATTERY MAT 50x150mm -- 2 pcs
DOUBLE-SIDED TAPE 30x35mm -- 1 pc.
12.CANOPY -- 1 pc.
PILOT PC101042B -- 1 pc.
COCKPIT -- 1 pc.
RECEIVER COVER -- 1 pc.
13.DECALS: GM057DEC -- 1 set
P.2
Page 4
GM057XMPO28011204/GM057S1XMPO28031204
P.3
Aileron Servo
1
PA1.7x8mm Screw
8
PA1.7x8mm
Hinge
Horn
Plywood 36.5x36.5x2mm
02L
03L
04L
02R
03R
04R
Please choose either (02L & 02R) or (03L & 03R) or (04L & 04R) that suits your servo.
TWM PL8210010
CLEVIS WRENCH
Clevis
Pushrod
Ø1.4x75mm
Fuel Tube
d2xD4x4mm
Horn
Straper
Fuel Tube
d2xD4x4mm
Bottom View
Bottom View
Bottom View
Hinge Setting Hinge
Completed
Section View
Page 5
GM057XMPO28011204/GM057S1XMPO28031204
P.4
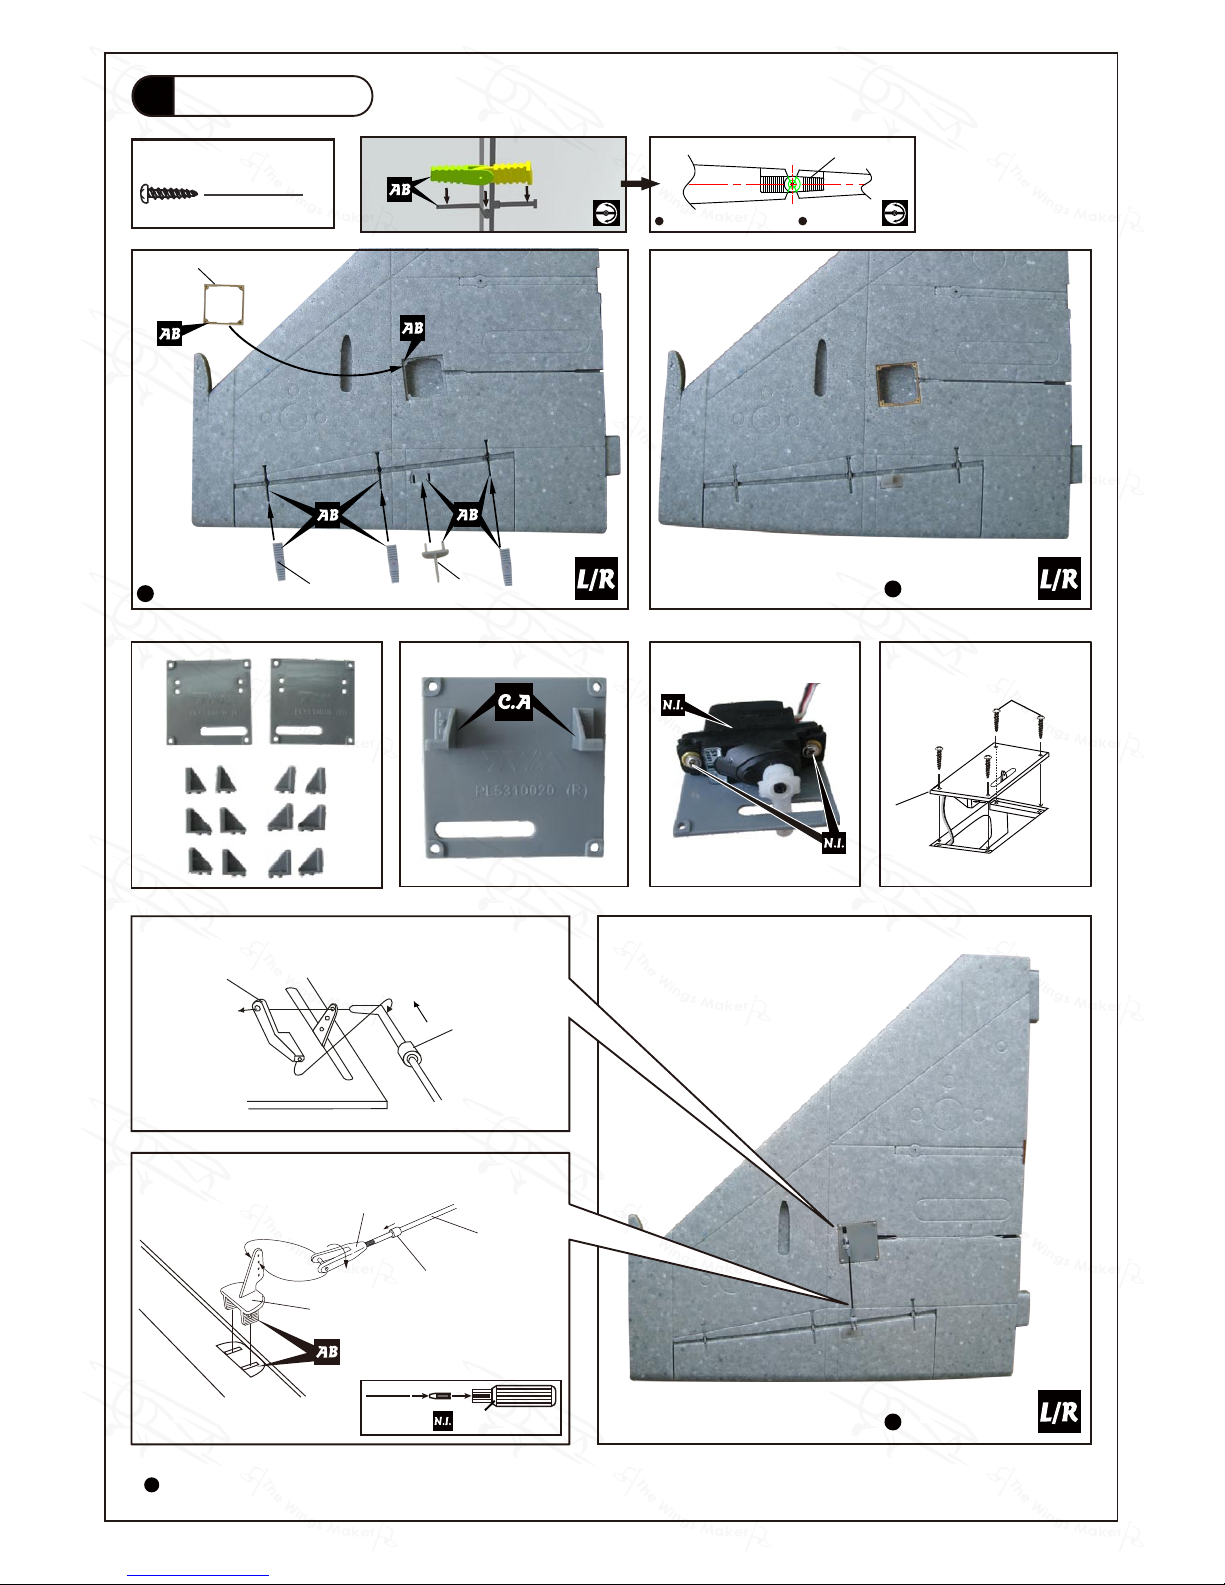
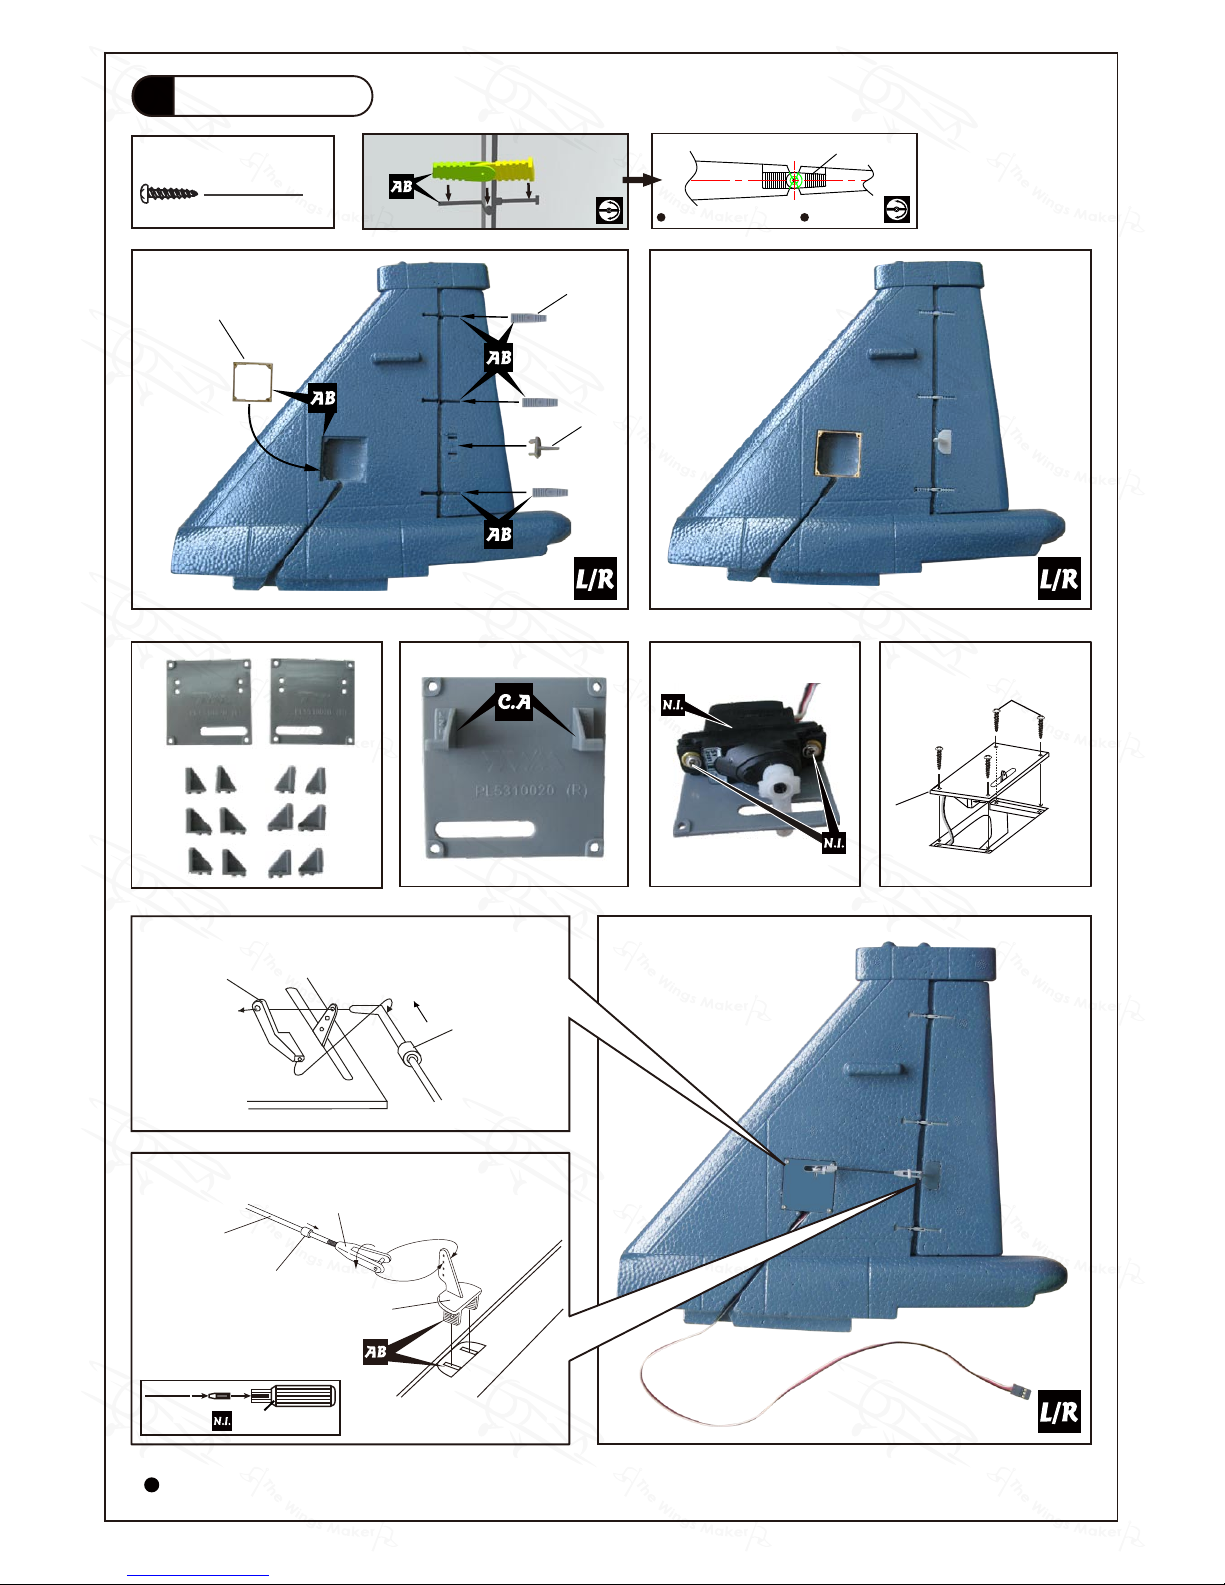
Rudder Servo
2
PA1.7x8mm Screw
4
PA1.7x8mm
Hinge
Plywood 36.5x36.5x2mm
02L
03L
04L
02R
03R
04R
Please choose either (02L & 02R) or (03L & 03R) or (04L & 04R) that suits your servo.
TWM PL8210010
CLEVIS WRENCH
Clevis
Pushrod
Ø1.4x65mm
Fuel Tube
d2xD4x4mm
Horn
Straper
Fuel Tube
d2xD4x4mm
Hinge Setting
Horn
Hinge
Completed
Section View
Page 6
GM057XMPO28011204/GM057S1XMPO28031204
P.5
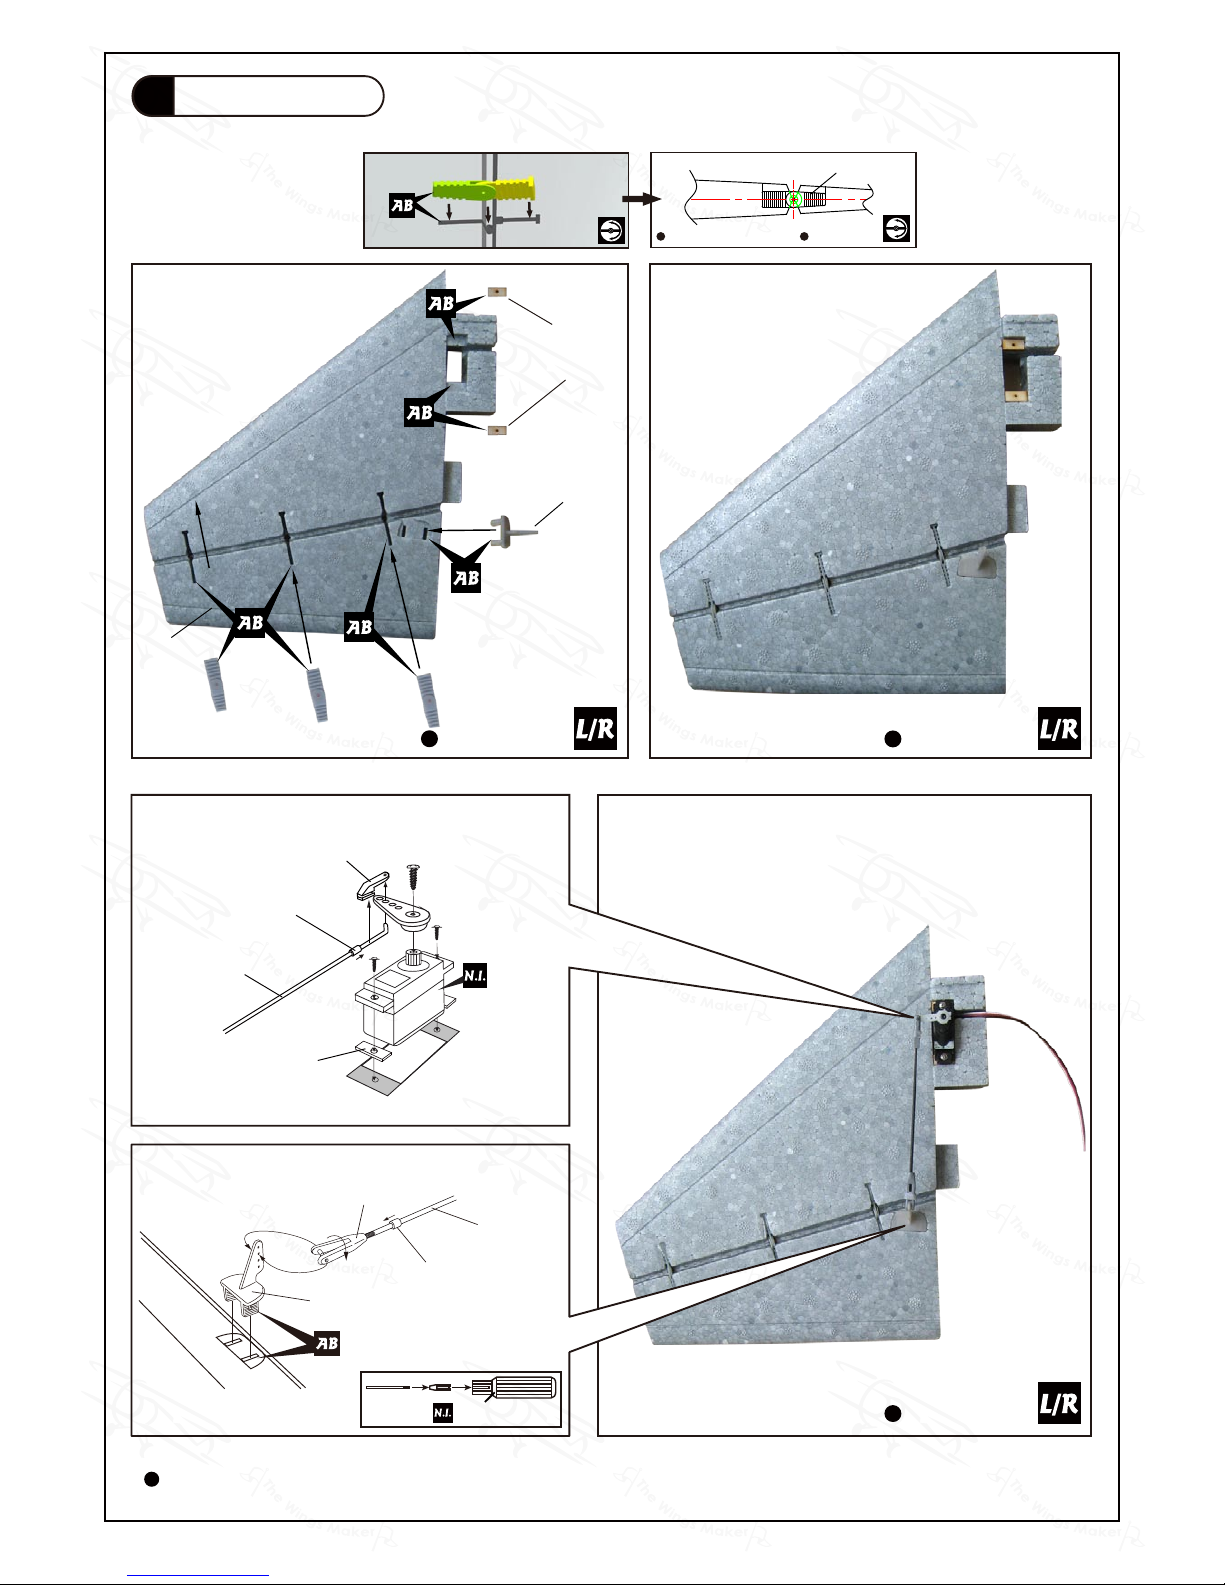
Elevator Servo
3
Hinge
Horn
Plywood
12x6x2mm
Please choose either (02L & 02R) or (03L & 03R) or (04L & 04R) that suits your servo.
TWM PL8210010
CLEVIS WRENCH
Clevis
Pushrod
Ø1.4x93mm
Fuel Tube
d2xD4x4mm
Horn
Bottom View
Bottom View
Bottom View
Straper
Pushrod
Ø1.4x93mm
Plywood
12x6x2mm
Fuel Tube
d2xD4x4mm
Hinge Setting
Hinge
Completed
Section View
Page 7
GM057XMPO28011204/GM057S1XMPO28031204
P.6
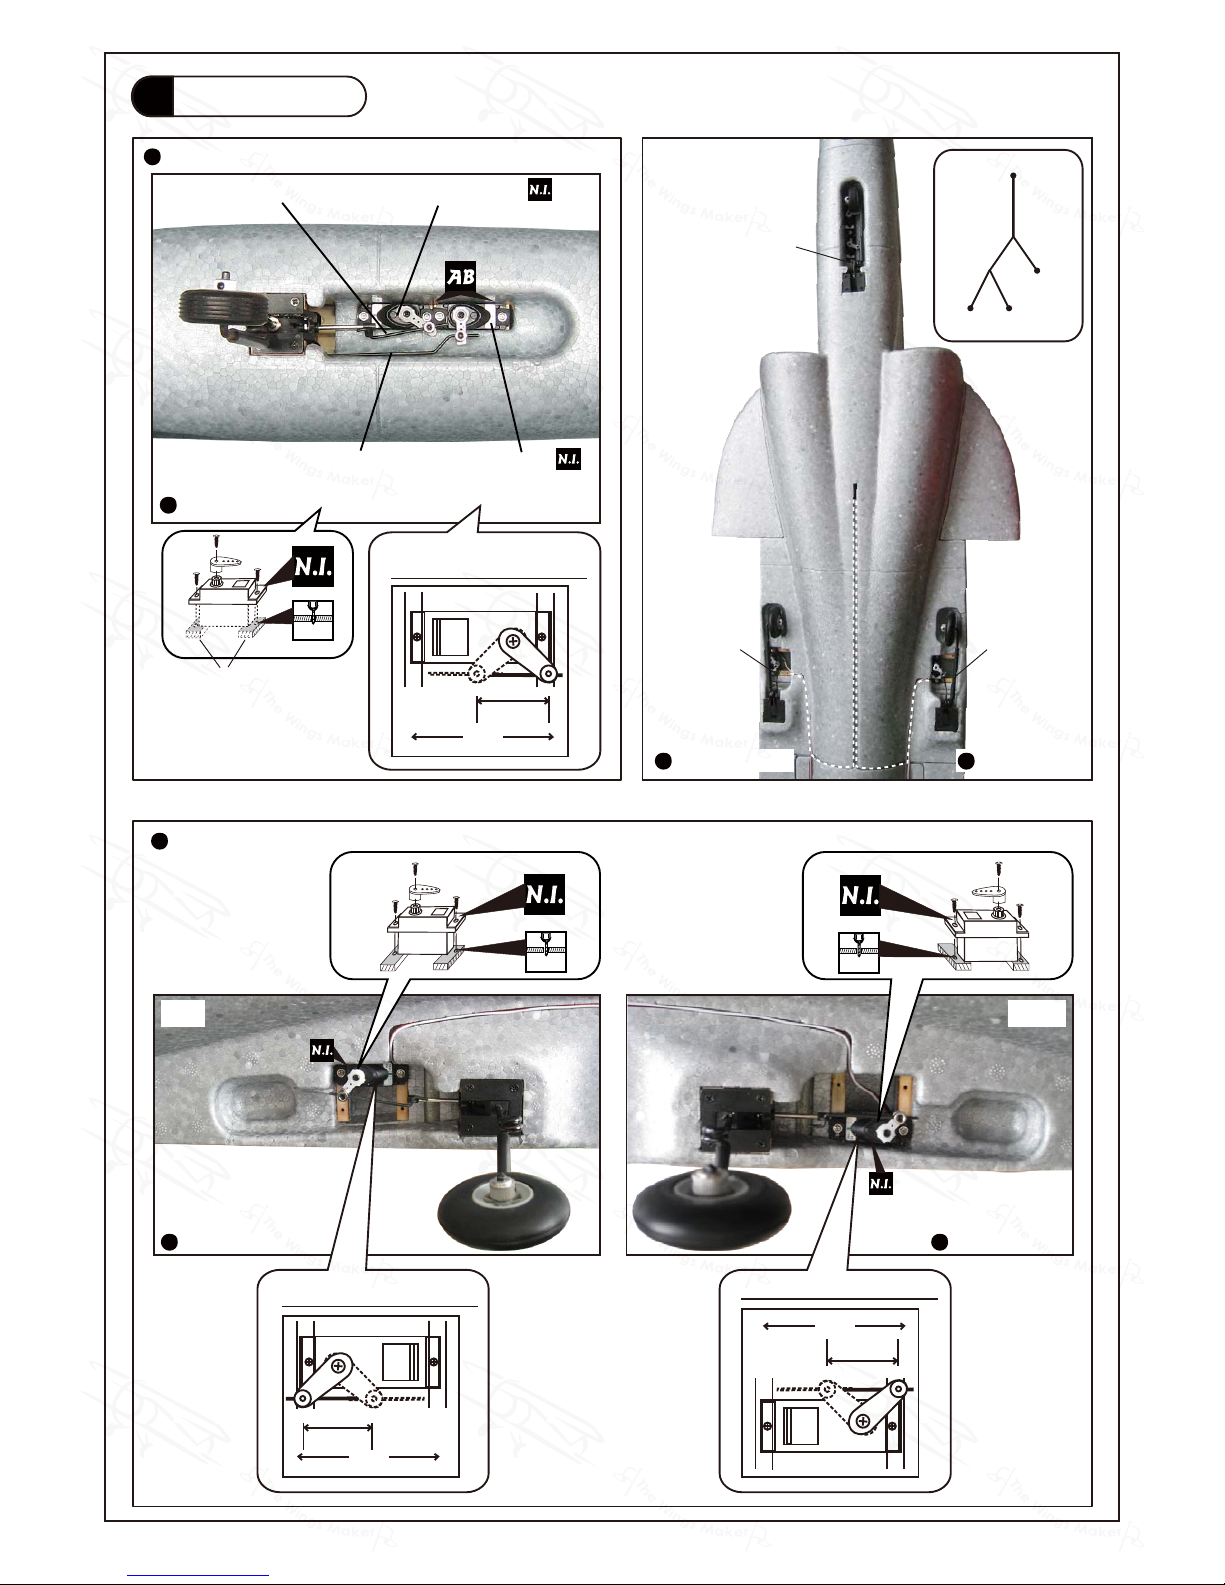
Retract Servo
4
PUSHROD TRAVEL
Pushrod Ø1.4x40mm
Pushrod Ø1.4x75mm
1mm
1mm
Nose Retract Servo
Steering Servo
(For Steering Servo)
To receiver landing gear channel
Right main
landing gear
Right main
landing gear
Left main
landing gear
Left main
landing gear
Nose landing gear
Nose
landing gear
Bottom View Bottom View
Main landing gears
Nose landing gear
Bottom View
CompletedBottom View
16mm
Travel
Wheel Down Wheel Up
1mm
PUSHROD TRAVEL
16mm
Travel
Wheel Down
Wheel Up
PUSHROD TRAVEL
16mm
Travel
Wheel Down
Wheel Up
Nose Retract Servo
Plywood
12x6x2mm
Left Right
Page 8
GM057XMPO28011204/GM057S1XMPO28031204
P.7
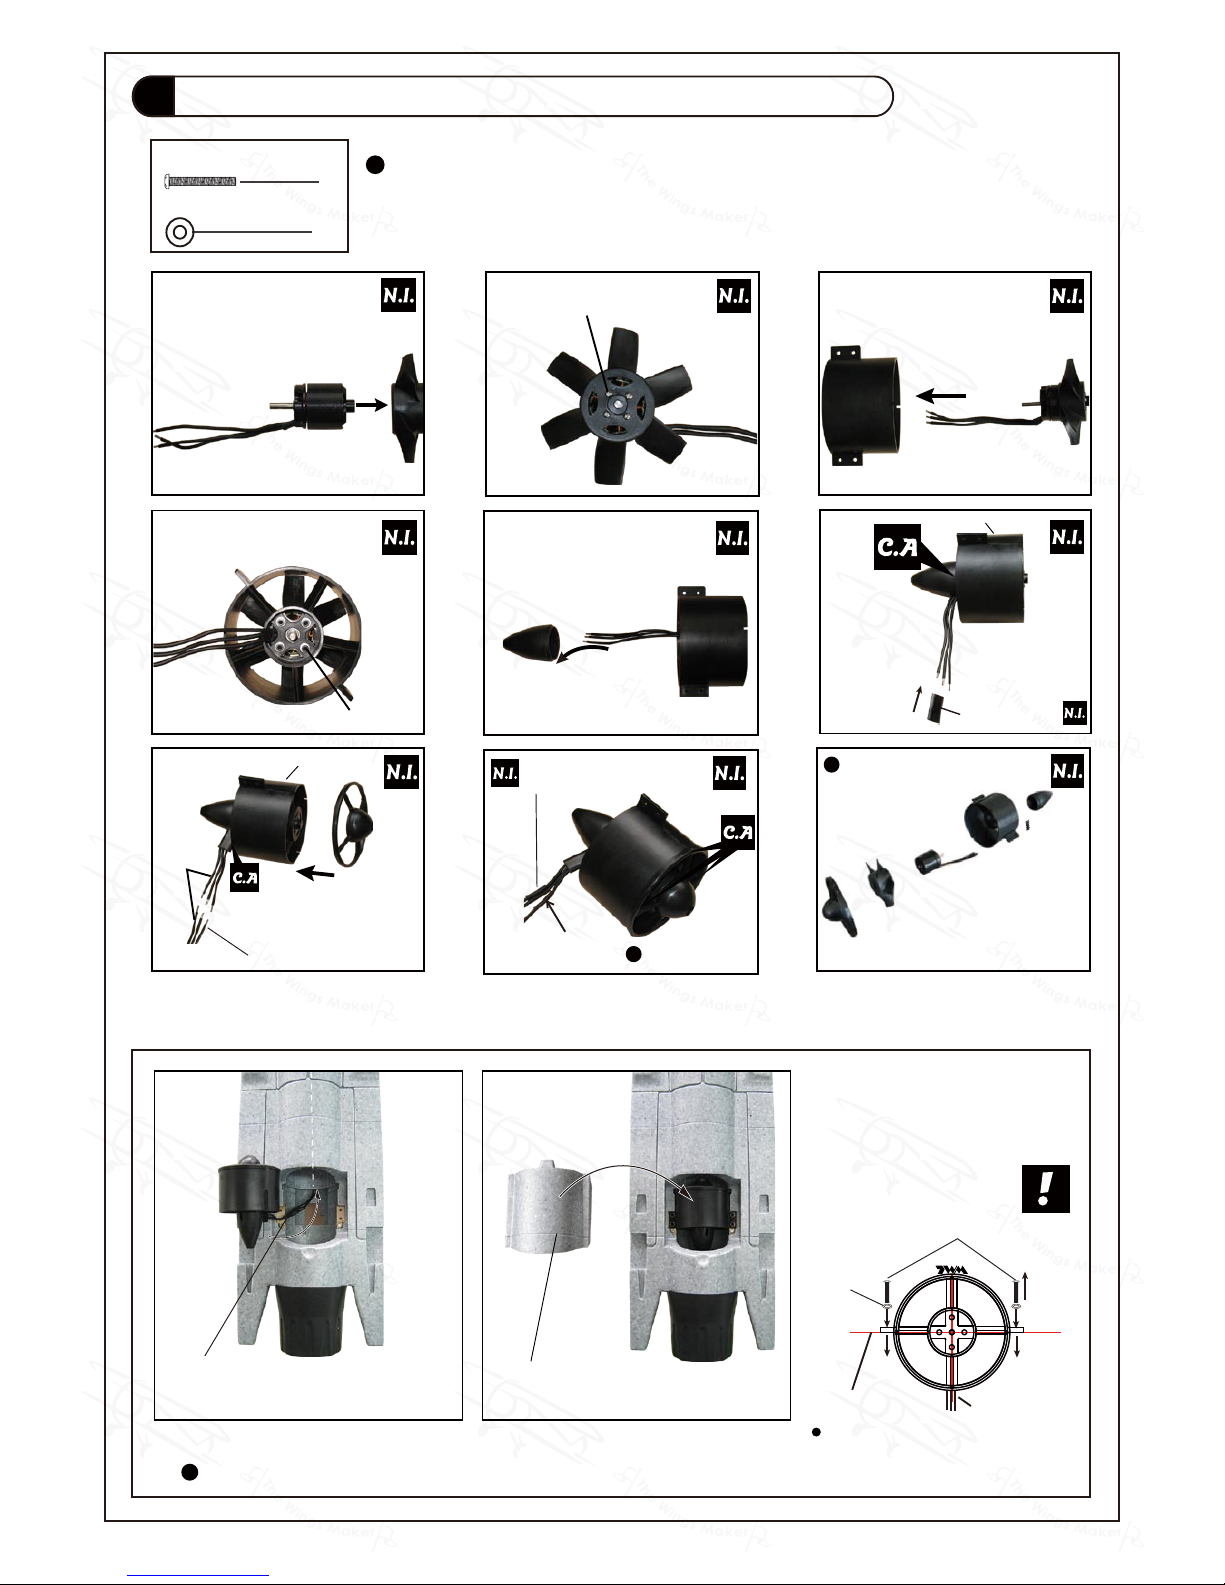
Make sure rotating motor casing is not in contact with
wirings or anything.
1
2
3
4
5
6
M3x6mm
TWM logo on the side
TWM logo on the side
PM2.5x4mm
7
Completed
d3xD7mm
Washer
PM3x8mm
4
4
Make sure TWM logo on ducted
fan stay on bottom of fusealge.
Center Line
Bottom
Optional Parts
Ducted Fan
Propulsion Unit PL6800020
& Outrunner 37 / 49 KM0374910
Solder
HEAT SHRINK TUBE
D5x30mm
Wire fairing tube
Electric Wire
Electric Wire
Insulation
Ducted Fan Cover
Bottom View
PM3x8mm Screw
d3xD7mm Washer
Ducted Fan Propulsion Unit with 37/49 Motor
5
Apply a drop of CA to each notch will hold the intake cone in place, pry the notch with screw
driver to remove the cone for impeller or motor replacement.
Ducted Fan Lead
Page 9
GM057XMPO28011204/GM057S1XMPO28031204
P.8
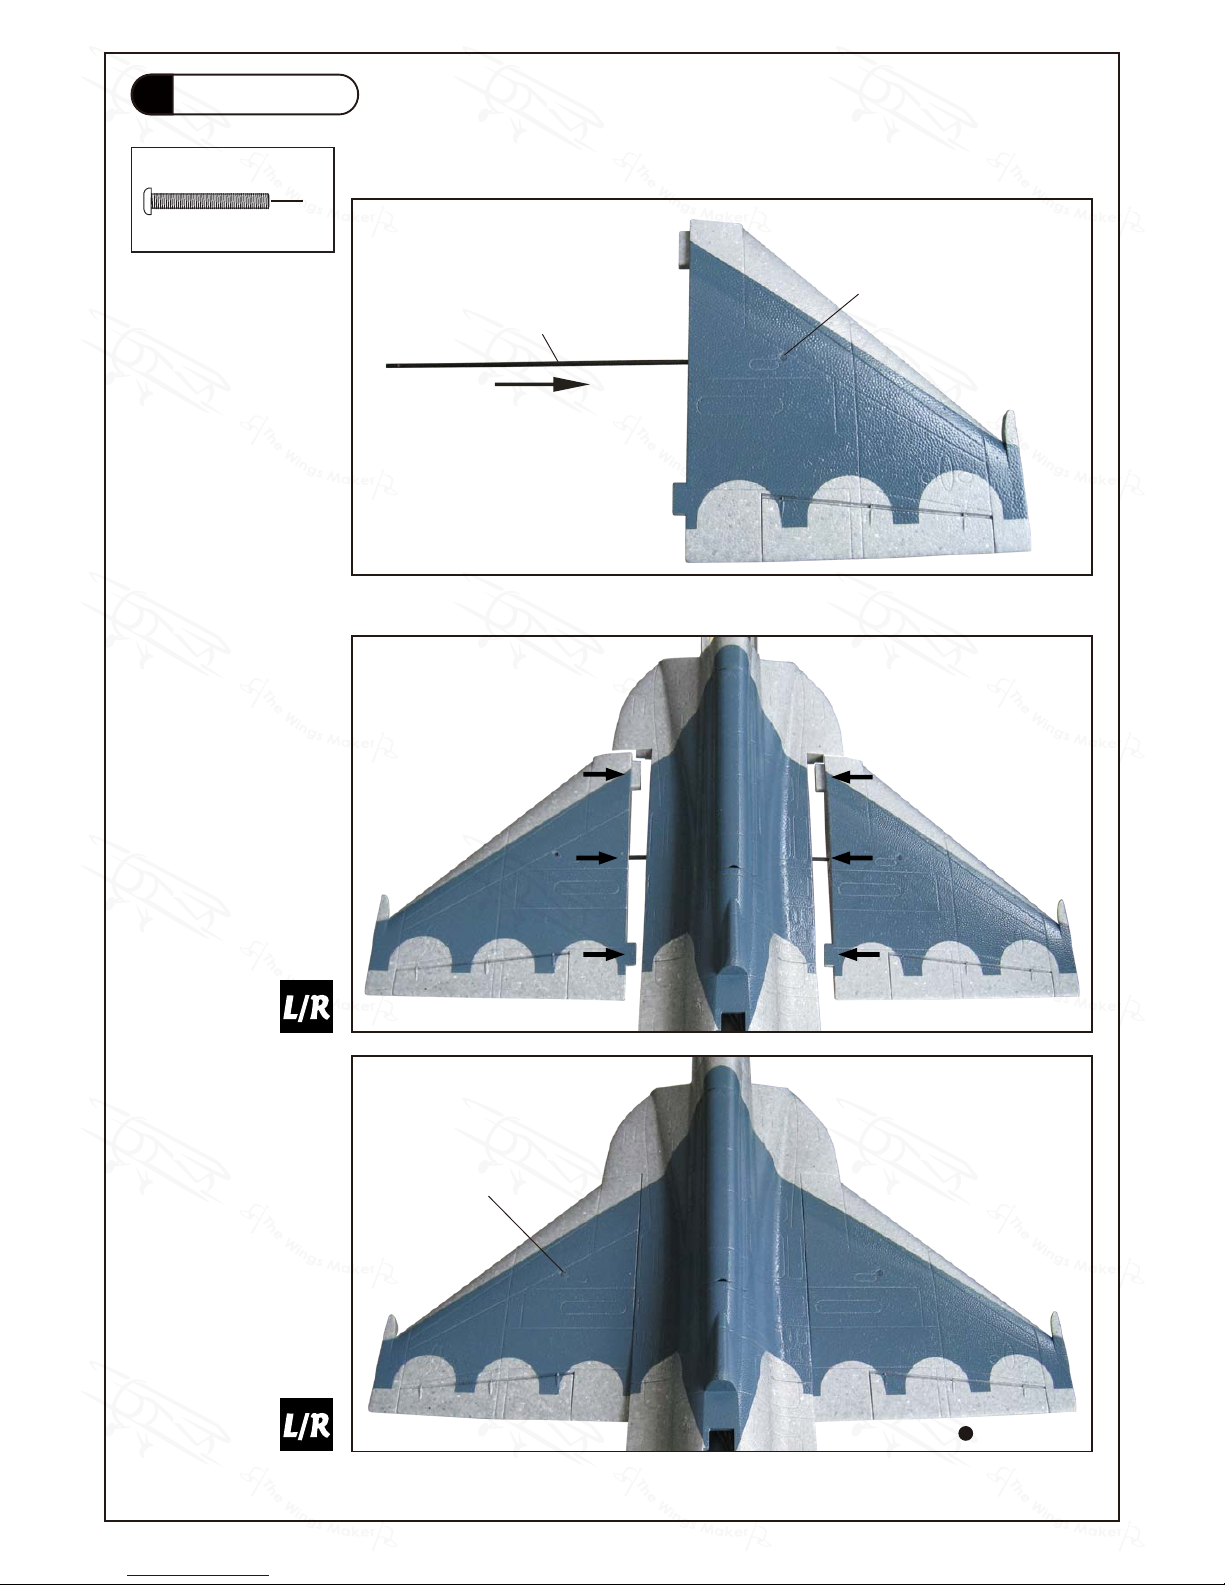
Main Wing
6
Carbon Fiber Tube
Ø6x505mm
Nylon Bolt
M3x25mm
Nylon Bolt
M3x25mm
Completed
Step2. Install the right wing to the fuselage by inserting the wing tube (now attached to the
right wing) through the fuselage then install the left wing.
Step 3. Make sure the wings are resting against the fuselage tightly. Locate the pre-drilled 2.5mm
hole at top of left wing, then apply the M3 x25mm through the pre-drilled hole in top of the wing.
M3x25mm Nylon Bolt
2
Step 1. Insert the carbon fibre wing tube with the pre-drilled hole end into the right wing. Align
the lines marked at the wing root and wing tube, then apply the M3 x 25mm nylon screw through
the pre-drilled hole on top of the wing. ( please confirm the alignment of the hole by putting a
2.5mm diameter rod through the pre-drilled wing hole before applying the screw ) The hole on
the wing tube is pre-threaded, do not over tighten the M3 screw, the set up is for future removal
of the wing.
Page 10
GM057XMPO28011204/GM057S1XMPO28031204
P.9
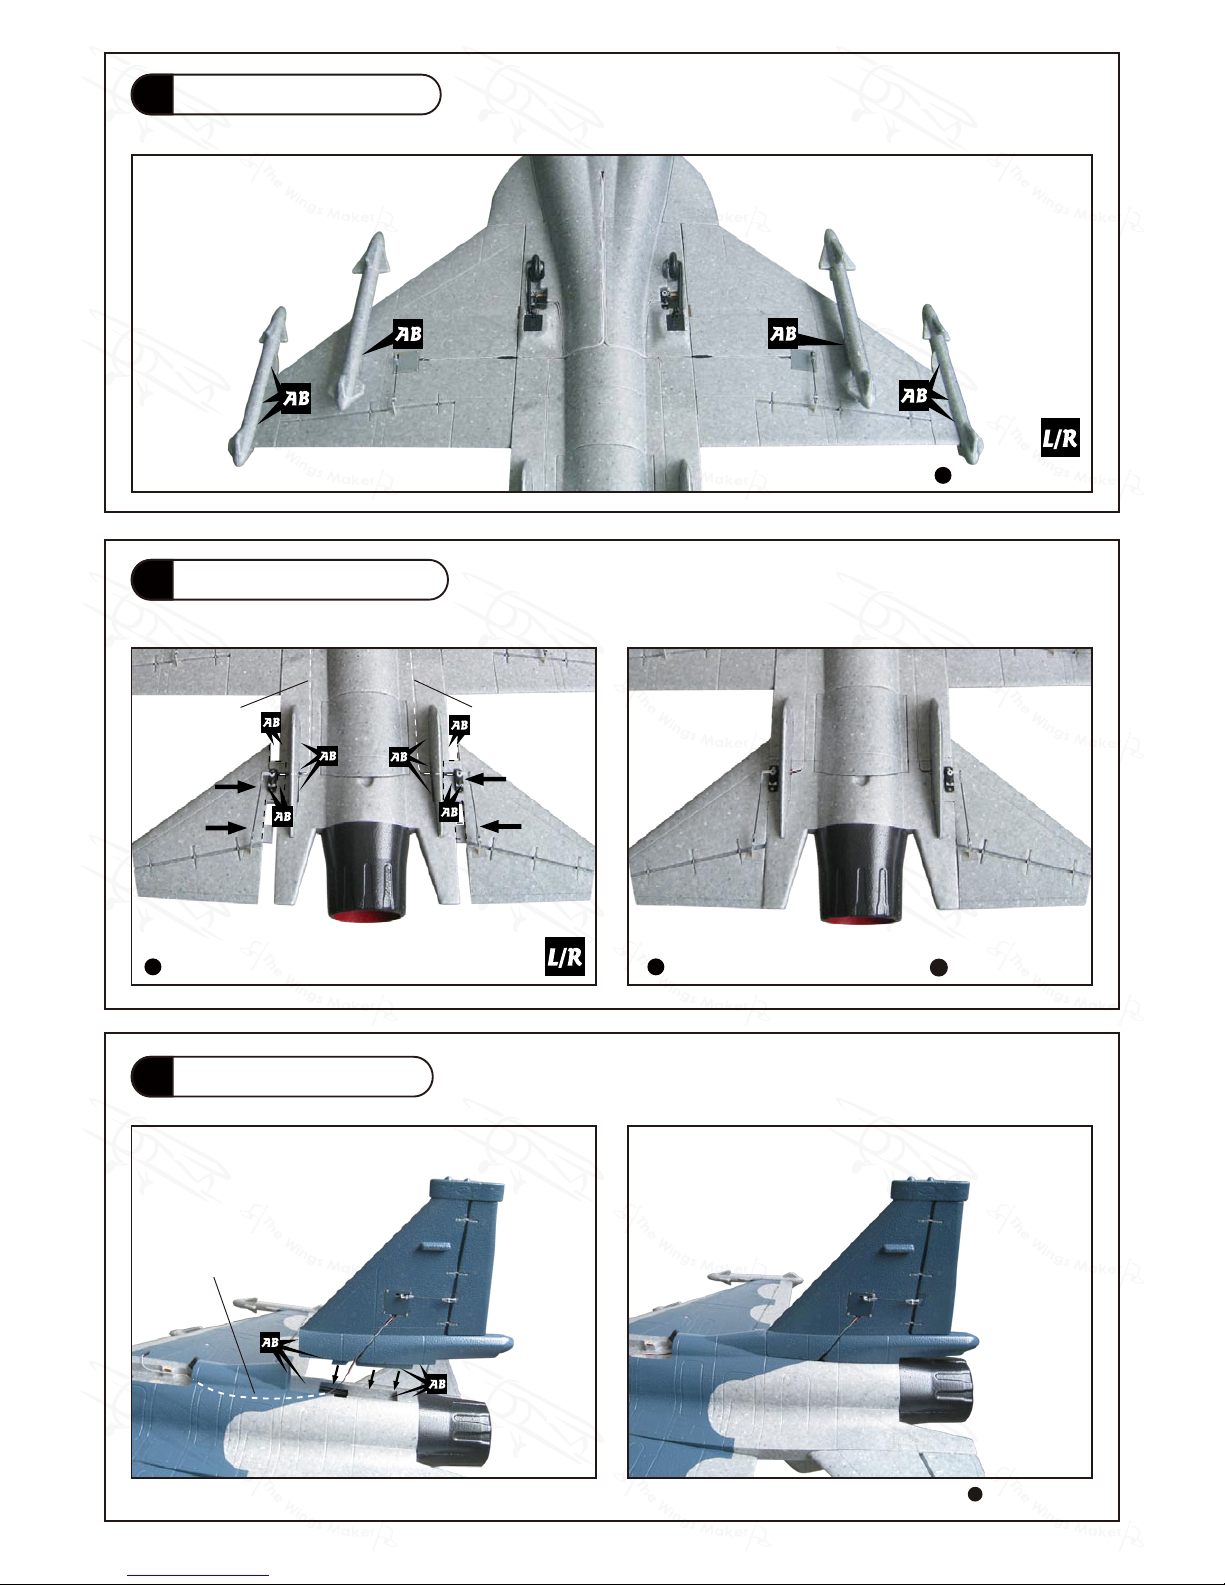
Missiles Setting
7
Elevator Setting
8
Rudder Setting
9
Completed
Completed
Bottom View Bottom View
Bottom View
Elevator Servo Lead
Rudder Servo Lead
Elevator Servo Lead
Page 11
GM057XMPO28011204/GM057S1XMPO28031204
P.10
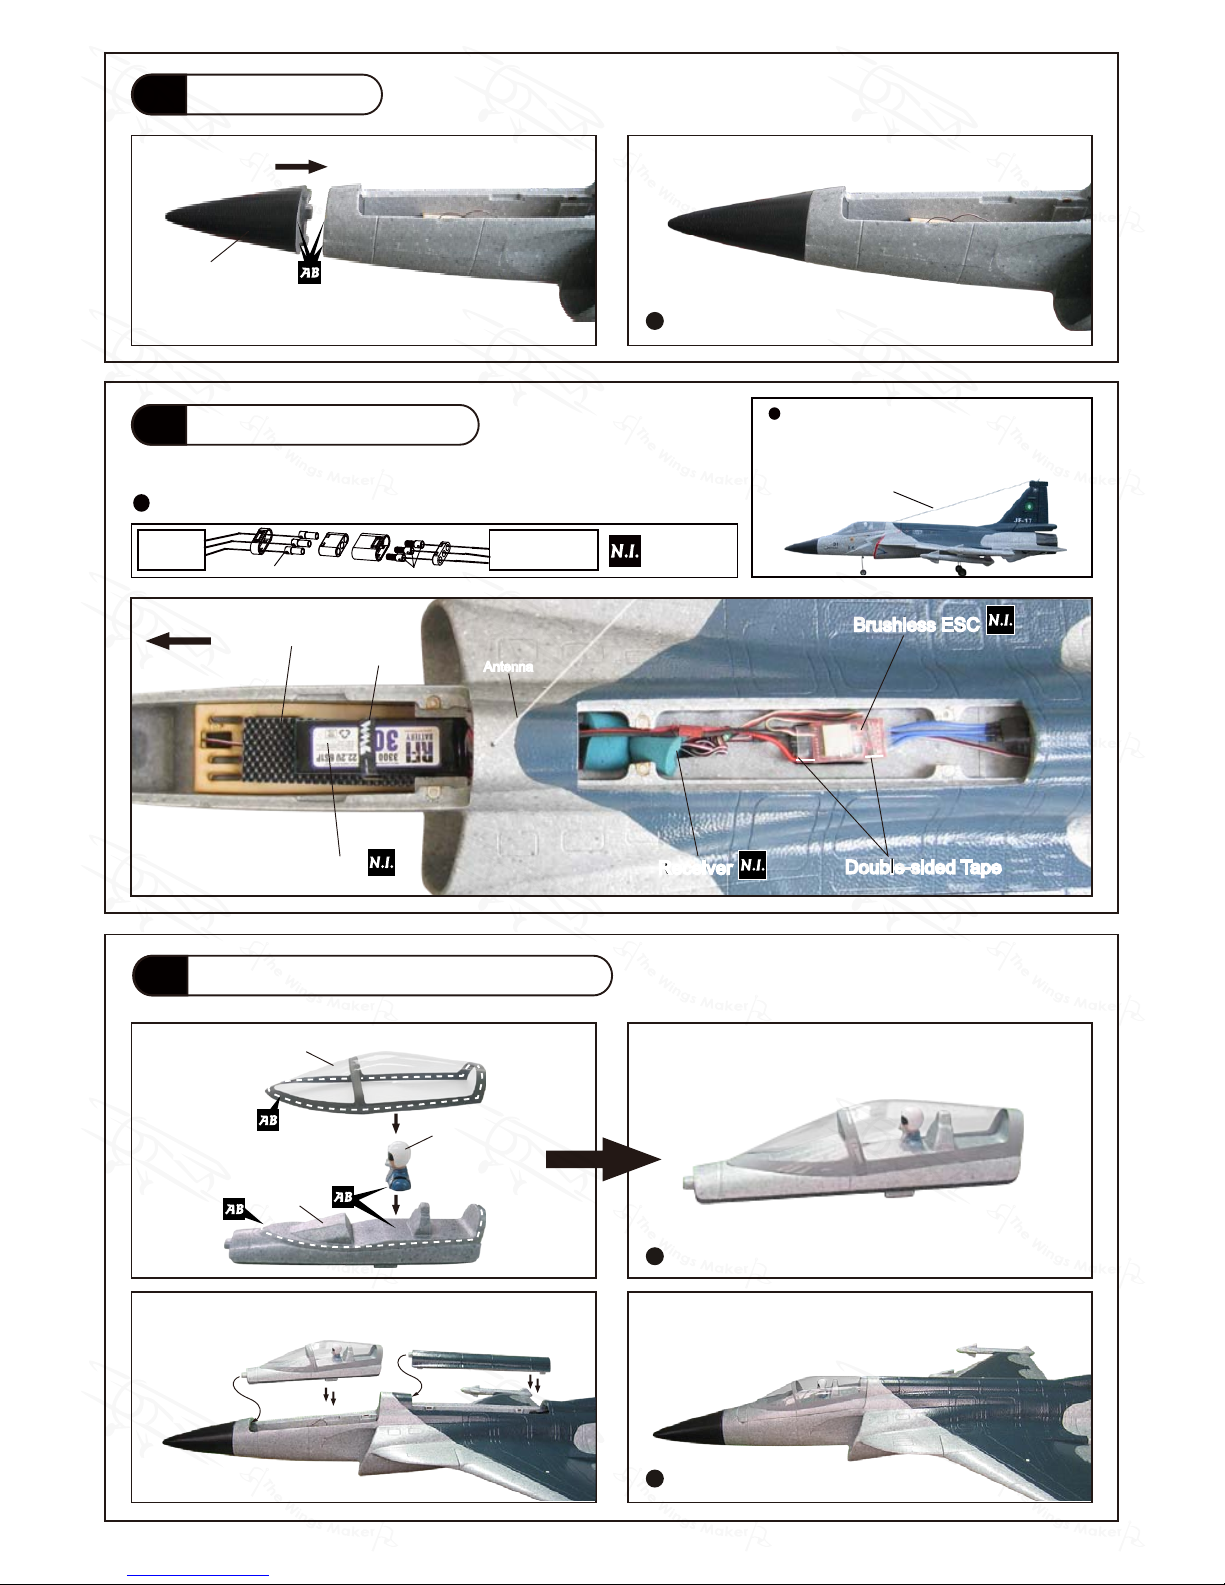
Nose Cone
10
Radio Equipment
11
Install and arrange the equipment as shown in the picture.
If you are using 72MHz radio, place the
receiver antenna as far away from the ESC
as possible to minimize interference.
Solder
Solder
TWM
KM0374910
ESC
Ducted Fan
Front
Completed
Completed
Completed
Battery Tie
Double-sided Tape
Double-sided Tape
Battery Mat
50x150mm
Nose Cone
Battery
ReceiverReceiver
Brushless ESC
Brushless ESC
Canopy & Receiver Cover
12
Canopy
Cockpit
Pilot
Receiver Antenna
Antenna
Page 12
GM057XMPO28011204/GM057S1XMPO28031204
P.11
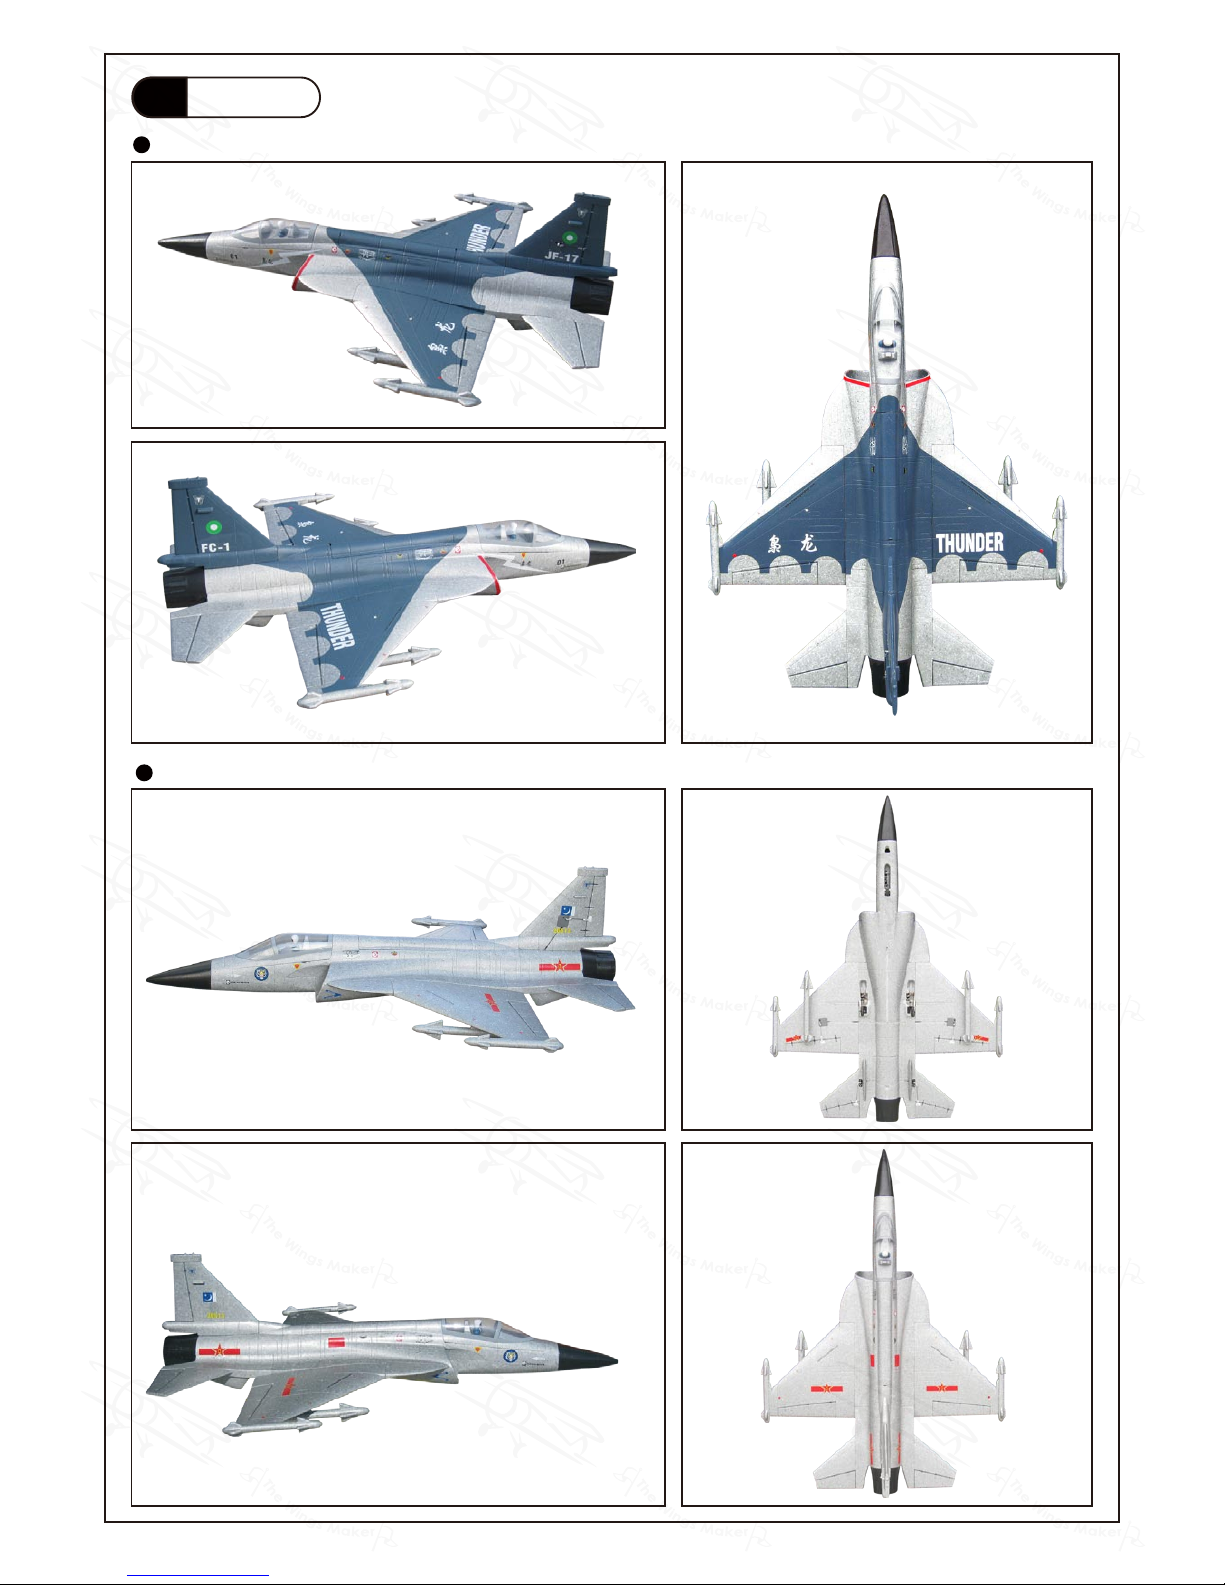
Decals
13
GM057S1XM JF-17
GM057XM ᨧఆ FC-1
Page 13
GM057XMPO28011204/GM057S1XMPO28031204
P.12
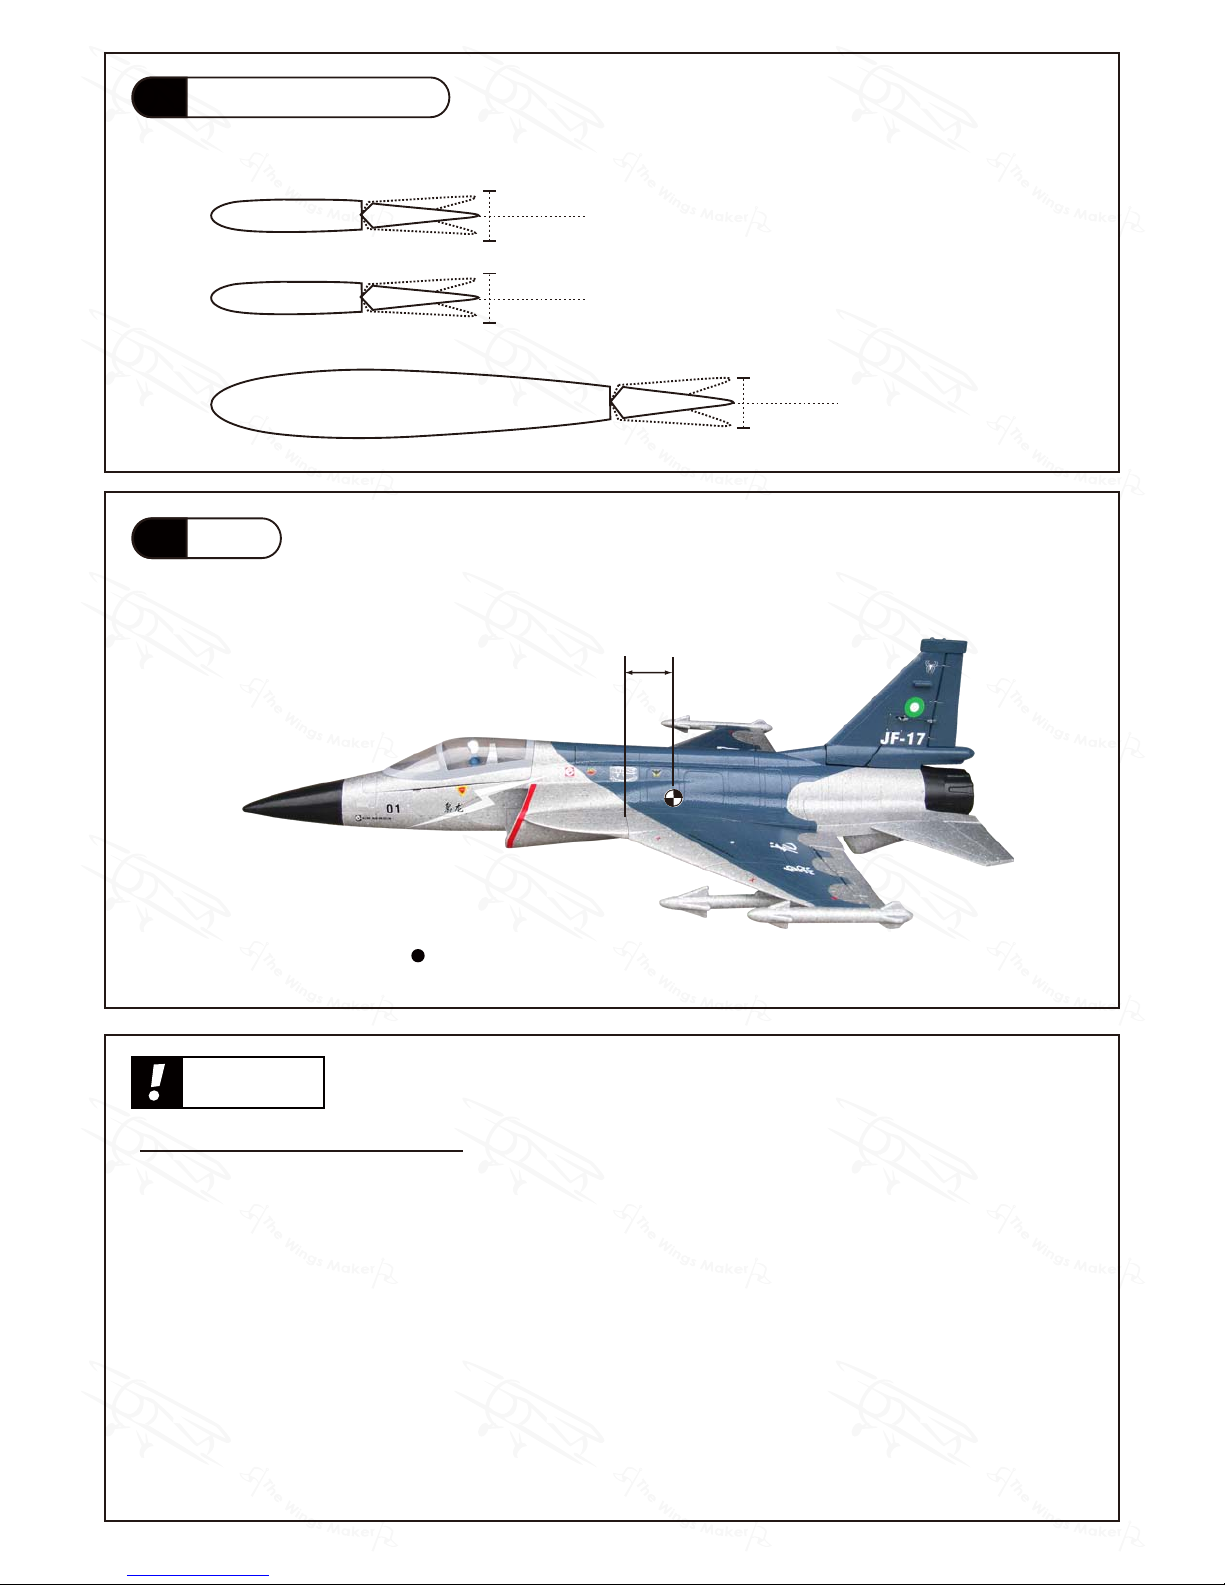
Control Throws
14
C.G.
15
Adjust the control throws as shown in
the diagram. These throws are good for
general flying. You can adjust according
to your personal preference.
Elevator
15mm
15mm
Aileron
18mm
18mm
25mm
25mm
Rudder
The ideal C.G. position is 85mm (3.3 in.) behind the leading edge
measured at where the wing meets the fuselage. In order to obtain
the C.G. specified, add weight to the fuselage or move the battery
position. Check the C.G. before flying.
85mm
3.3in
C.G.
Measure C.G. with the wheels in retracted position.
http://www.thewingsmaker.com/instructionManuals.php
Important Safety Precautions
# First time flyer should never fly by himself / herself. Assistance from experienced flyer
is absolutely necessary.
# Pre-flight adjustment must be done before flying, it is very dangerous to fly a badly
pre-adjusted aircraft.
# is specially designed to be powered by KM0374910 Outrunner
Motor.
# Make sure the air field is spacious, never fly the plane too close to people and never
get too close to a running propeller.
# Check and re-tighten up all factory assembled screws, use thread locker if necessary.
Warning!
)&-)7+81'(5
ᨧఆ
ᨧఆ
Page 14

GM057XMPO28011204/GM057S1XMPO28031204
Page 15
GM057XMPO28011204/GM057S1XMPO28031204
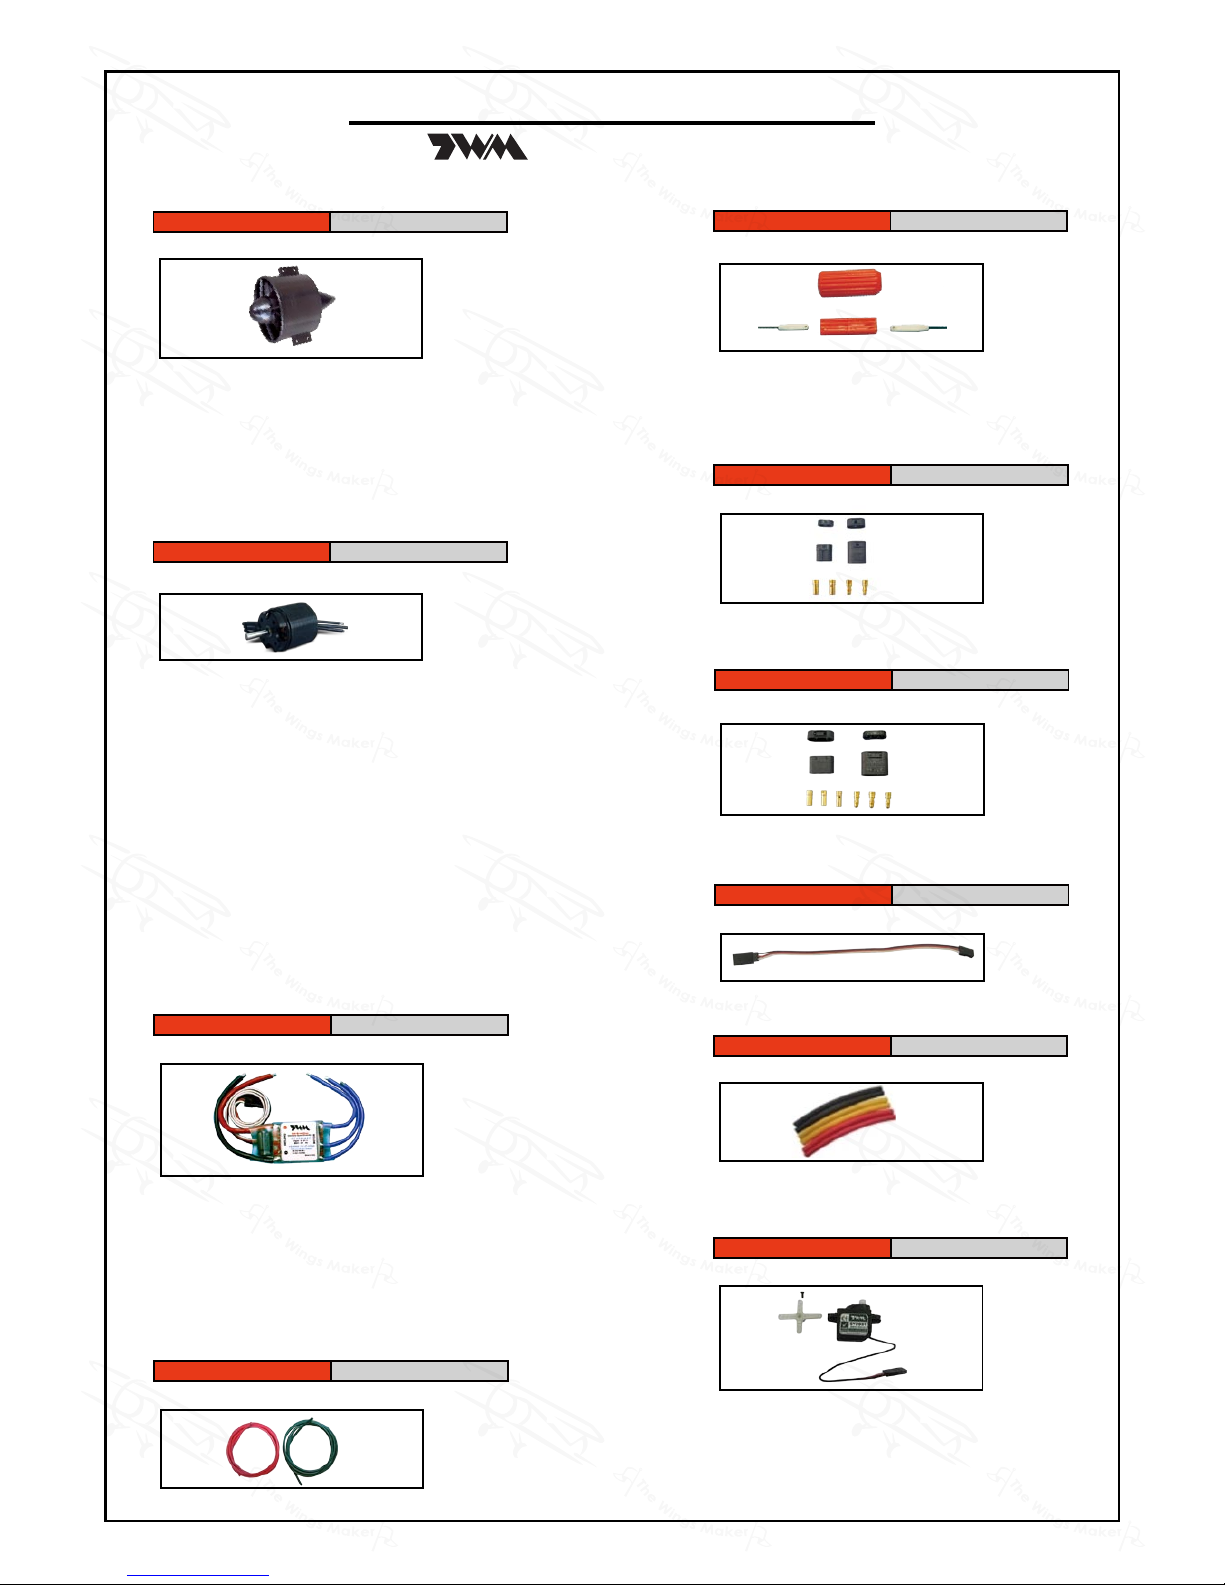
Optional Parts
60A Brushless ESC
Code No. Size Package
KC2060A02 70 x 31 x14mm 1 pc
-Current : 60A continuous
-Burst current ( < 10 seconds) : 80A
-Weight : 60g (with wires)
-BEC output : 3A
-Input :
Li - ion / Li - poly 2 - 6 cells;
Nimh / Nicd 5 - 18 cells
3 - Pin EZ Connector
Code No. Size Package
KP0011310 40A Max. Current 1 set
-ideal for electric models
-ideal for electric models
180mm Extension
Code No. Size Package
KW0011800 180mm 1 set
Speed : 0.1 sec / 60° @4.8V
Torque : 16kg.cm / 22.2 oz - in @4.8V
Size : 22.4 x 11.4 x 20.0mm /
0.88x0.45 x 0.79in
Weight : 7.8 g / 0.28 oz
Micro Servo
Clevis Wrench
Code No. Size Package
PL8210010 1 set
Small Clevis
Large Clevis
( ACCESSORIES)
Ducted Fan Propulsion Unit without Motor
Code No. Size Package
PL6800020 1 set
-Operating Voltage / Current :
22.2V / 50A
-Thrust : Approx. 1500g
-Weight : 115g (without motor)
-Rotor diameter : 89 mm
-Outer casing diameter : 93 mm
-Color : Black
Turbo Outrunner for ducted fan
Code No. Size Package
KM0374910 1 set
-Kv (rpm / V): 1700
-Operating Power: 1200W
-Operating Voltage: 8.5 - 22.2V
-Operating Current: 50A
-Peak Current: 62A (max. 15 sec.)
-Internal Resistance: 21 m ohms
-Diameter: 37.2 mm
-Length: 49.5 mm
-Weight: 165 g
-Shaft Diameter: 5 mm
-Shaft Length: 21 mm
-Mounting Screw:
M3 (Front) & M2.5 (Back)
-Distance of Mounting Holes:
25 mm(Front) and 15.5 mm (Back)
2 - Pin EZ Connector
Code No. Size Package
KP0011210 40A Max. Current 1 set
Heat Shrink Tube
Code No. Size Package
Code No. Size Package
PT1115050 D5mm x 10cm 2 pcs x 3 colors
SV2031 1 set
-Three colors (Black, Red, Yellow)
Silicon Wire
Code No. Size Package
HW2110101 D4.0mm 1 set
-1 M black & 1 M red / pkg
Special tool for clevis installation.
Suitable for standard and small
(EP) clevis.
Page 16

GM057XMPO28011204/GM057S1XMPO28031204
THE WINGS MAKER
www.thewingsmaker.com
 Loading...