

The Whistler Group BU02C User Manual
WBU-800
User Guide
BACK-UP CAMER
INSTALLS IN MINUTES
roduct Marketing Name: Camera
P
Hardware Version Identification Number: WBU-800C
Product Marketing Name: Monitor
Hardware Version Identification Number: WBU-800M
A

Because the WBU-800 is truly wireless and does not tap into
your vehicle's transmission or backup light, you must tell the
unit when you are backing up. This also allows you to use your
back up camera to view behind the vehicle at any time.
When power is applied to the monitor an image will be
present for 60 sec by default or the user selected time, if the
screen goes blank and more time is required press the
for an image to return to the monitor.
INTRODUCTION
Welcome
Thank you for choosing a Whistler product. We are dedicated
to providing products that represent both quality and value.
Please read the User Guide carefully before using this product.
If you have additional questions visit our website at
www.whistlergroup.com
or call Toll Free (800) 531-0004 / Tel (479) 273-6012,
8am to 5pm CT, Monday through Friday
to speak to a Customer Service Representative.
2

TABLE OF CONTENTS
Components ............................................................................ 4
Getting Started .................................................................... 5-6
Test the Camera / Pairing....................................................7-8
Assembly / Installation ........................................................... 9
Attach to Vehicle .................................................................. 10
Mounting the Monitor .......................................................... 11
Setup ...................................................................................... 12
Monitor Settings .............................................................. 13-15
Troubleshooting .................................................................... 16
Disclaimer .............................................................................. 17
Safety ..................................................................................... 18
Care and Maintenance .......................................................... 19
FCC and IC Information ................................................... 20-21
Specifications ........................................................................ 22
Warranty Information ...................................................... 23-27
3
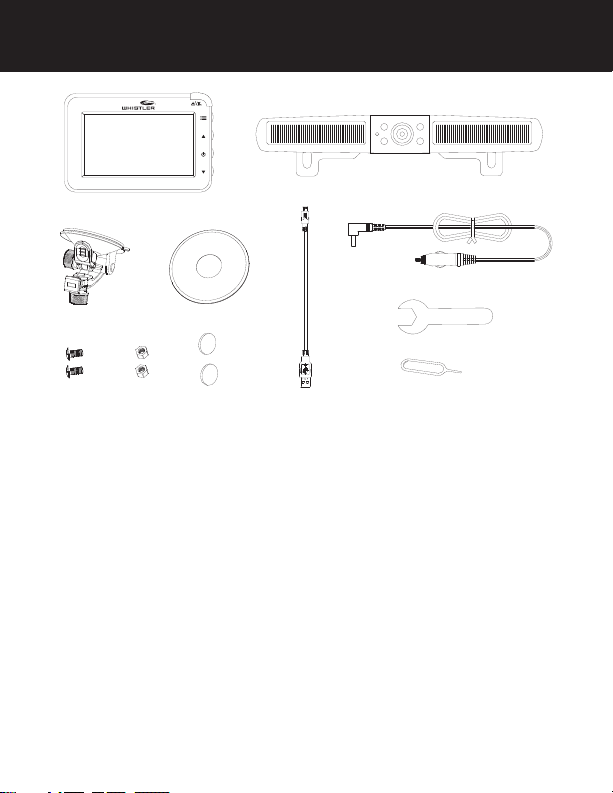
COMPONENTS
1
3 4
5 8
6 7
1. Monitor
2. Camera with solar cells
3. Suction cup mount
4. Dash disk
5. Short machine screws (2)
6. Machine nuts (2)
7. Cushions (2)
8. USB Charge cord
9. Monitor power cord
10. Wrench
11. Pairing tool
2
9
10
11
4

GETTING STARTED
The WBU-800 is equipped with a built-in rechargeable lithium
battery and is connected with two solar panels that trickle
charge the built-in lithium battery when sunlight is available.
This will minimize or eliminate the need to manually charge
the unit during the year.
A USB charging port is provided to initially charge the battery
prior to mounting on your vehicle as well as to recharge if
needed. Your rechargeable battery when fully charged will
last for several months of average use with NO SUNLIGHT
(average use is defined as 4~6 times per day). With the
addition of sunlight, the solar cells will charge your battery
thereby extending the cameras ability to provide usage day
after day and month after month without requiring you to
recharge it manually.
Remove camera assembly from box and make sure all
components are included.
5
GETTING STARTED
Charge The Camera
1. Connect the supplied USB cord to the micro USB port of
the camera assembly.
2. Plug the USB cable into any standard USB charger with an
output rating of 500ma or higher. The power switch will
illuminate when charging.
3. Charge the camera for 5 to 6 hours. When charging is
complete, illumination of the power switch will turn off.
4. Close USB door securely to ensure waterproof integrity.
Micro USB port
USB door closed USB door opened
Under normal use, the camera maintains a charge with
exposure to sunlight. A battery status indicator is provided on
the monitor when the camera is in use.
NOTE: If vehicle will be stored for periods of time greater
than two months, please turn off camera using the switch
on the rear of the camera to the Off position to prevent the
battery from discharging.
6

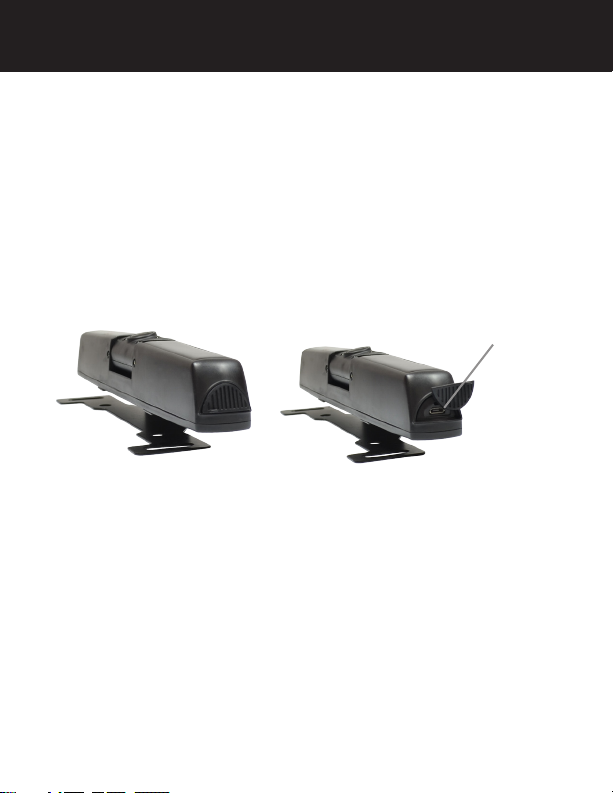
TEST THE CAMERA / PAIRING
Test the Camera
Prior to attaching the license plate to your vehicle, follow the
steps below to ensure pairing between the backup camera and
monitor.
1. Slide the switch on the rear housing of the camera to the On
position.
2. With power applied to the monitor, the top right button will
illuminate to indicate the monitor is ON.
3. The top right button will blink briefly to indicate that it
is attempting to communicate with the camera. When
connected to the camera, the top right button will turn solid.
It may take a moment for the camera to begin sending the
video information. Allow time for the image to be displayed.
4. If no image appears, see Troubleshooting section of this user
guide. The image will time out in 60 seconds (unless user has
selected a different time out option) however, if you wish to
shut the image off manually, press
is present to stop the video transmission and put the camera
back into the power conserve mode. (The top right button
will shut off when the timer expires)
5. The camera is equipped with 4 IR LEDs and a light sensor to
automatically illuminate during low light conditions. These IR
LED's are invisible to the human eye.
NOTE: If using a switched 12-volt DC Power port, it is not
necessary to power off the monitor.
anytime that video
7

TEST THE CAMERA / PAIRING
PAIRING MONITOR TO CAMERA
Your WBU-800 should automatically pair with your monitor.
If your monitor does not automatically pair with the camera
after initial charge, the following steps are to be used.
NOTE: There are two ways to pair the camera, select the one
that works best for your situation.
1. Turn off the camera using the switch on the back of the
camera. If already mounted to vehicle skip step 1.
2. Power on monitor.
3. Press then or to place cursor over SETUP, then
press power to select.
4. With PAIR icon selected, press power to select process.
5. This system can support 2 cameras, select the camera you
would like to pair. Camera 1 is the rear camera, Camera 2
is the front camera.
6. Using switch on back of camera, turn camera back on.
If your camera is mounted to your vehicle, use the pairing
tool to press and release the pair button located above
the Micro USB charge port.
Pair OK will be displayed when the pairing process is
completed.
Switch
Pair button
8
2
1
ON
PAIR
PAIR
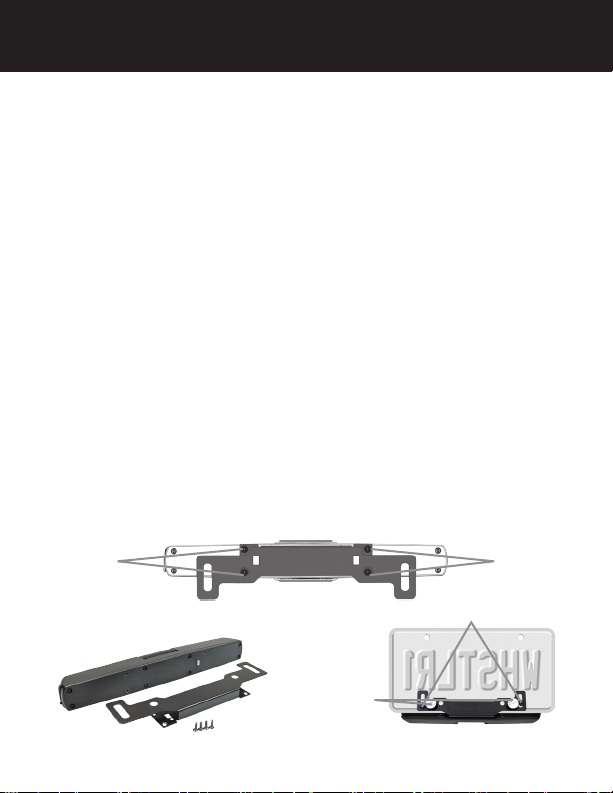
ASSEMBLY / INSTALLATION
Unit is assembled at the factory for mounting along top
edge of License plate. See Disclaimer section of this user
guide before mounting to vehicle.
NOTE: If you will be attaching the unit to the bottom of your
license plate, please follow the steps below:
1. Locate then remove the four screws holding the bracket
onto the camera.
2. Flip bracket, use the four screws to attach to back of
camera. The end result should be the USB door on the
right hand side as you face the camera when mounted to
the bottom of your license plate.
3. Secure the camera assembly to license plate using the short
machine screws and machine nuts. Cushions have been
included to avoid scratching your vehicles paint.
NOTE: Be sure to adjust the height of the camera assembly
to not impair readibility of the state, registration decal, stamp,
or other device indicating the month and year in which the
vehicles registration expires when securing to your license
plate.
ScrewsScrews
1
Machine Screws
Cushions
2
9
3
 Loading...