


VLC-3
Light Program Controller
USER'S MANUAL
6
7
,
5
)81&7,216
352*5$0
6(77,1*6
'
8
6
.
7
2
'
$
:
1
3
(
$
.
6
&
8
5
5
(
1
7
3
(
5
,
2
'
+50, 1
+50,1
0,16(&
M 890-00189 rev. 04 K 895-00406 rev. 00

2
VLC-3 rev.04
VLC-3
GENERAL................................................................ 3
1. INTRODUCTION.....................................................................3
2. PRECAUTIONS ......................................................................4
3. MOUNTING INSTRUCTIONS .....................................................4
4. CONNECTIONS......................................................................5
5. LOCATION OF THE CONTROLS.................................................6
6. OVERVIEW ...........................................................................7
USING AND PROGRAMMING..................................... 9
7. QUICK START-UP ...................................................................9
8. DESCRIPTION OF COMMUN PARAMETERS ..............................16
8.1 Light Intensity ..............................................................16
8.2 Clock..........................................................................16
8.3 Day Counter ................................................................ 16
8.4 Minimum Light Intensity ................................................. 17
8.5 Sunrise .......................................................................17
8.6 Sunset ........................................................................ 18
8.7 Auxiliary Light Output.................................................... 18
8.8 Period Mode ................................................................ 20
9. OVERVIEW OF PROGRAMMING SEQUENCES ...........................21
9.1 Setting the No Period Mode ........................................... 22
9.1.1 Dusk-to-Dawn Programs..........................................22
9.1.2 Light Peaks...........................................................23
9.2 Setting the Period Mode................................................. 25
9.2.1 Dusk-to-Dawn Programs..........................................26
9.2.2 Light Peak ............................................................. 28
10. DISPLAYING A PROGRAM UNIT ..........................................2 9
11. DELETE A PROGRAM UNIT..................................................30
12. REPARTITIONING THE PERIODS ...........................................31
13. MANUAL MODE ................................................................34
14. ALARM CONDITIONS .........................................................34
15. BACKUP BATTERY.............................................................. 34
16. TECHNICAL SPECIFICATIONS..............................................35
17. TROUBLESHOOTING ..........................................................36

3
VLC-3.rev.04
GENERAL
1. INTRODUCTION
The VLC-3 is a light program controller designed for livestock buildings.
Light intensities vary according to a light program sequence. Up to 12
dusk-to-dawn programs and 20 light peaks can be programmed per
period with up to 20 different periods in one year. The controller
includes a four-digit display, function pilot lights, two adjustment knobs
and a push-button for easy programming. Additional features include:
- gradual increasing and decreasing of light intensity to simulate
sunrises and sunsets
- minimum and maximum intensities specified as a percentage of full
lamp intensity
- display of current time, day, light intensity and period
- step-by-step programming
- minimum inertia method used to smooth sudden transitions in light
intensity
- manual mode
- a lamp output activated above or below a threshold value
- an alarm output
- a real-time clock with backup battery for keeping time in case of a
power failure
- overload protection on the output
- a 115/230 VAC - 50/60Hz power supply
- the unit can be connected to a computer communications module

4
VLC-3 rev.04
VLC-3
2. PRECAUTIONS
Although fuses at the input and outputs of the controller
protect its circuits in case of an overload or overvoltage,
we recommend installing an additional protection device
on the controller's supply circuit.
The room temperature where the controller is located
MUST ALWAYS REMAIN BETWEEN 32°F AND 104°F
(0°C TO 40°C).
To avoid exposing the controller to harmful gases or
excessive humidity, it is preferable to install it in a
corridor.
DO NOT SPRAY WATER ON THE CONTROLLER
3. MOUNTING INSTRUCTIONS
Open the latch on the right and lift the cover. Mount the enclosure on
the wall using four screws. Be sure the electrical knockouts are at the
bottom of the enclosure in order to prevent water from entering the
controller. Insert the screws in the mounting holes provided and tighten.
Fasten the black caps provided with the controller onto the mounting
holes.

5
VLC-3 rev.04
VLC-3
ALL WIRING MUST BE DONE BY AN AUTHORIZED ELECTRICIAN AND MUST COMPLY WITH APPLICABLE
CODES, LAWS AND REGULATIONS. BE SURE POWER IS
OFF BEFORE DOING ANY WIRING TO AVOID ELECTRICAL SHOCKS AND EQUIPMENT DAMAGE.
4. CONNECTIONS
To connect the controller, refer to the wiring diagram enclosed with this
user's manual.
Set the voltage switch to the appropriate voltage.
Use the electrical knockouts provided at the bottom of the enclosure. Do not make additional holes in the enclosure, particularly on
the top of the enclosure when using a computer communications
module.
Two types of alarms are currently available on the market. The first
type is activated when current is cut off at the source; the other is
activated when current is supplied to the input. Use the NC terminal
for an alarm of the first type; otherwise use the NO terminal.
!
WARNING
Voltage Selector

6
VLC-3 rev.04
VLC-3
5. LOCATION OF THE CONTROLS
The pilot lights on the left indicate which function is currently active on
the digital display. When the function has a corresponding value associated to it (for example, Start Time), the value appears on the display.
The function selector changes the current function. The adjustment
knob is used to adjust the currently displayed parameter value. The Day,
PM and % pilot lights to the right of the display indicate the unit of the
value currently displayed. If no user activity is recorded after one
minute while inside a function other than CLOCK or MANUAL MODE,
the display returns to the clock time.
Internal Switches: located inside the front cover.
)81&7,216
6(77,1*6
&
8
5
5
(
1
7
3
(
5
,
2
'
352*5$0
'
8
6
.
7
2
'
$
:
1
3
(
$
.
6
+50,1
+50,1
0,16(&
/
'
3
'
2
$
)
#FFONO
1
DEKCOLNU
SRETEMARAP
SRETEMARAPDEKCOL
2H21EDOMKCOLCH42EDOMKCOLC
3
TNECSEDNACNI
EVRUC
EVRUCTNECSEROULF
4V01-0V01-1
5
FFO/NOLAUNAM
EDOM
EVISSERGORPLAUNAM
EDOM
6
DEMROFREPTESNUS
EMITPOTSEHTRETFA
DEMROFREPTESNUS
EMITPOTSEHTEROFEB
21-7DEVRESER

7
VLC-3 rev.04
VLC-3
When switch #1 is ON, the timer parameters are locked and can only be
displayed (except the clock time). When switch #2 is ON, the display
shows 24-hour time. Otherwise, the display shows 12 hour time (AM /
PM). Use switch #3 to select a curve (ON = fluorescent curve, OFF =
incandescent curve). The switch #4 determines the output operation
mode (ON = 1-10V, OFF = 0-10V). The switch #5 determines the
progression of lights intensity on manual mode. The switch #6 determines whether the sunset is performed before or after the Stop Time
(ON= before the stop time, OFF = after the stop time).
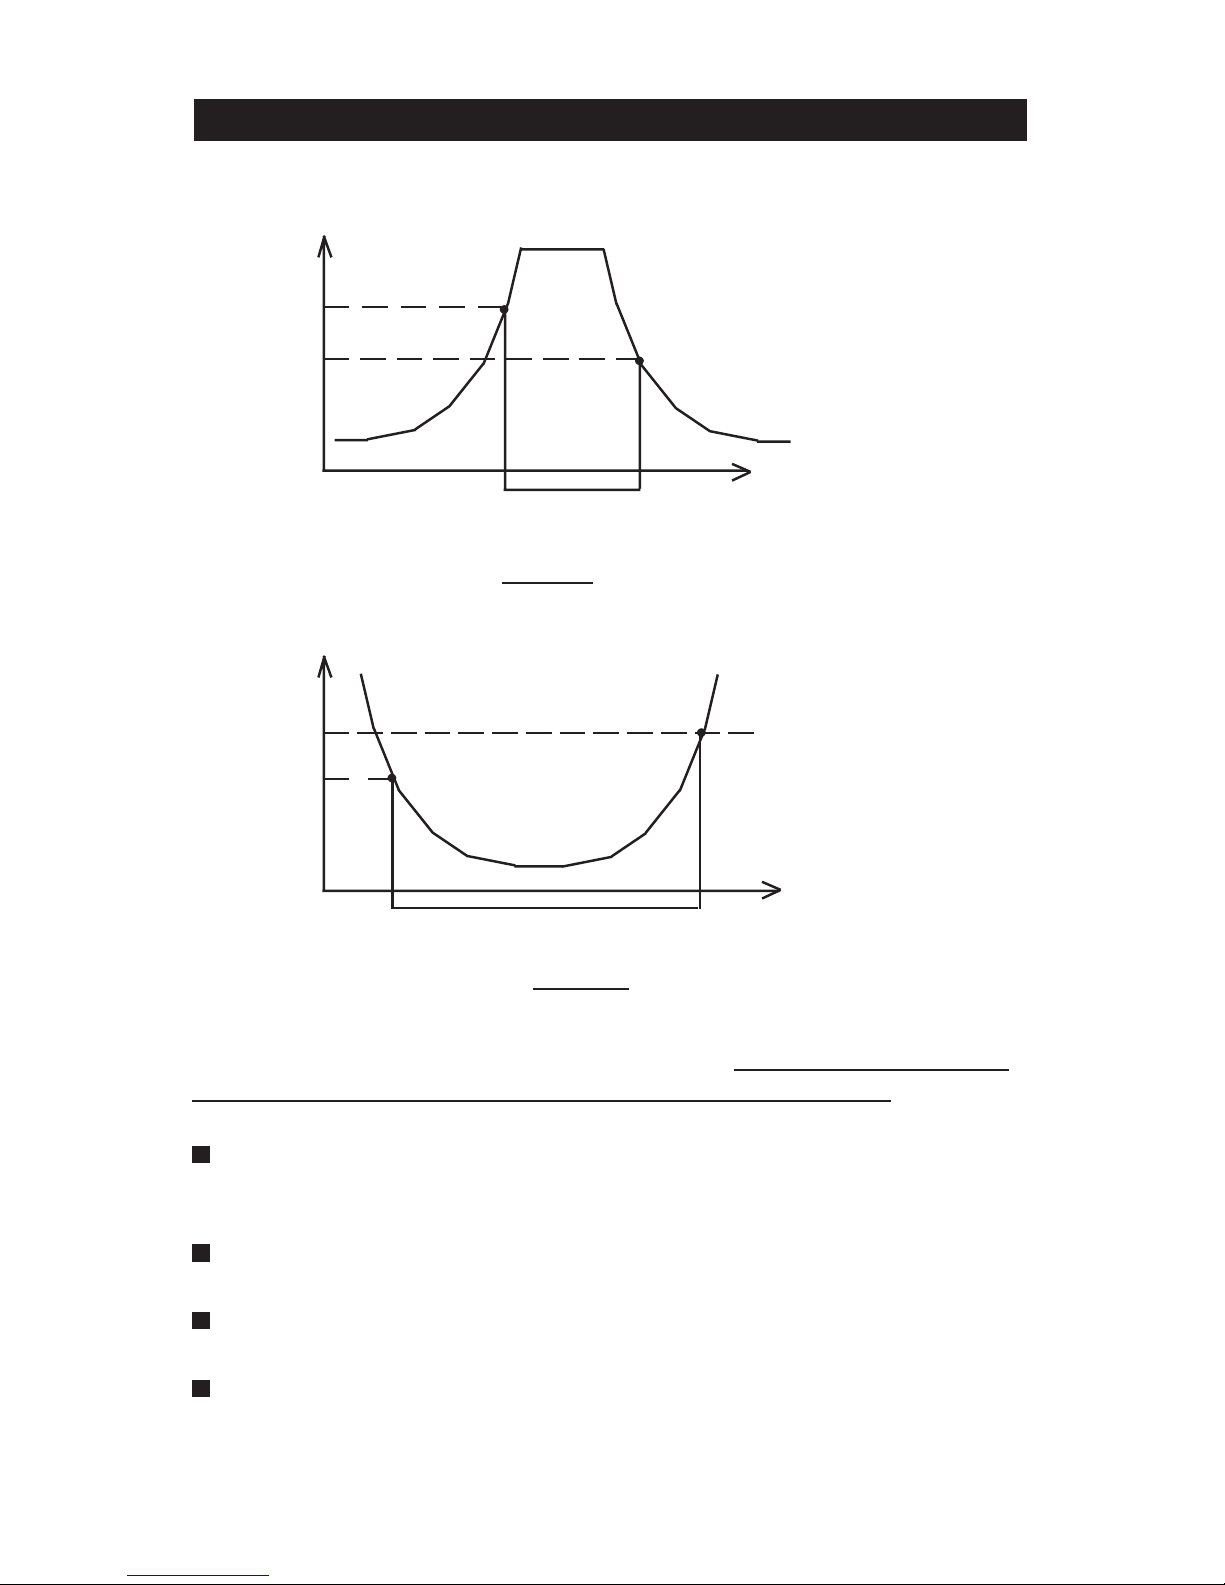
6. OVERVIEW
Notes:
(i) The minimum programmed intensity, sunrise duration and sunset
duration are common to all light programs.
(ii) Peaks are programmed separately for each period using a start time
and a duration and assume that the current intensity is at its maximum
programmed intensity. If this is not the case, the peak is not executed.
LIGHT
INTENSITY
TIME
100%
Maximum
Programmed
Intensity
Minimum
Programmed
Intensity
Dusk-to-Dawn
Start Time
Peak #1
Duration
Peak #2
Duration
Sunset
Duration
Peak #1
Start time
Peak #2
Start time
Sunrise
Duration
Dusk-to-Dawn
Stop Time
(If dipswitch
#6 = OFF)
Dusk-to-Dawn
Stop Time
(If dipswitch
#6 = ON)

8
VLC-3 rev.04
VLC-3
(iii) Light intensity between programs never drops below the minimum
programmed intensity.
(iv) The slope of the transition curve is exponential rather than linear so
that the perceived transition in light intensity is equally distributed over
the duration.

9
VLC-3.rev.04
USING AND PROGRAMMING
7. QUICK START-UP
Follow these basic steps for activating the controller. If necessary,
consult the indicated reference for each step to get detailed informations.
ADJUSTING COMMON PARAMETERS
1. Connect the control according to the wiring diagram enclosed with
this manual.
2. Turn the power ON.
3. Adjust the clock (see sec. 8.2).
4. Adjust the day counter. This counter is used to activate the light
programs (see sec. 8.3).
5. Adjust the minimum light intensity. This is the lowest level of lighting
used when no programs are currently active (see sec. 8.4).
6. Adjust the sunrise duration. This is the duration of the transition from
minimum to maximum light intensity in a light program (see sec. 8.5).
7. Adjust the sunset duration. This is the duration of the transition from
maximum to minimum light intensity in a program (see sec. 8.6).
8. Adjust the percentage used for activating the auxiliary output. (see.
sec 8.7).
9. Adjust the percentage used for deactivating the auxiliary output (see
sec. 8.8).
10 . Set the period menu to On or Off depending if you are planing to use
periods or not. The controller uses periods to automatically change
the lighting programs based on the animal age (see sec. 8.8).

10
VLC-3 rev.04
VLC-3
STEP BY STEP PROGRAMMING :
Once step 1 to 10 are done, the user must enter the programming mode
to adjust the periods, dusk-to-dawn and peak parameters. The first
example shows the key sequence for programming 2 dusk-to-dawn
programs without periods. The second example illustrates the key
sequence for programming 2 periods with 2 dusk-to-dawn programs.
EXAMPLE 1 : Two dusk-to-dawn programs without periods.
Dusk-to-Dawn Program 1:
start time: 6:30am
stop time: 10:30am
maximum light intensity: 80%
NB. The numbers shown in bold characters flash on the display.
PETSNOITCAYALPSIDsDELGNINAEM
1
otrotcelesnruT
MARGORP
OTPETSHSUP
GORPRTNE
margorPgniretnE
edoM
2nottub-hsupsserP.dd 1
nwaD-ot-ksuD
1margorP
3nottub-hsupsserP ffO
nwaD-ot-ksuD
etatS1margorP
4NOottsujdA nO
txenhtiweunitnoC
margorp
5nottub-hsupsserP 21 00:
tratSmargorP
)nim;sruoh(emiT
6sruohtsujdA 6 00:
7nottub-hsupsserP:6 00
8setunimtsujdA:6 03
9nottub-hsupsserP 21 00:
potSmargorP
)nim;sruoh(emiT
01sruohtsujdA 01 00:
Dusk-to-Dawn Program 2:
start time: 12:45pm
stop time: 3:10pm
maximum light intensity: 75%

11
VLC-3 rev.04
VLC-3
PETSNOITCAYALPSIDsDELGNINAEM
11nottub-hsupsserP:01 00
21setunimtsujdA:01 03
31nottub-hsupsserP 0 %
rofytisnetnixaM
1margorP
41ytisnetnithgilmumixamtsujdA 08 %
51nottub-hsupsserP.dd 2
margorPnwaD-ot-ksuD
2
61nottub-hsupsserP ffO
margorPnwaD-ot-ksuD
etatS2
71NOottsujdA nO
txenhtiweunitnoC
margorp
81nottub-hsupsserP 21 00:
emiTtratSmargorP
)nim;sruoh(
91sruohtsujdA 21 00:mp
02nottub-hsupsserP:21 00 mp
12setunimtsujdA:21 54 mp
22nottub-hsupsserP 21 00:mp
emiTpotSmargorP
)nim;sruoh(
32sruohtsujdA 3 00:mp
42nottub-hsupsserP:3 00 mp
52setunimtsujdA:3 01 mp
62nottub-hsupsserP 0 %
rofytisnetnixaM
2margorP
72ytisnetnithgilmumixamtsujdA 57 %
82nottub-hsupsserP.dd 3
margorPnwaD-ot-ksuD
3
92nottub-hsupsserP FFO
03ffOotetatsmargorptsujdA FFO
nwaD-ot-ksuDfodnE
smargorP
131.EPotmargorptsujdA.EP 1 1margorPkaePthgiL
23nottub-hsupsserP nO
1margorPkaePthgiL
etatS
33ffOot1.EPmargorptsujdA ffO
kaePthgiLfodnE
smargorP
43nottub-hsupsserP
OTPETSHSUP
GORPRTNE
53noitcnufrehtonaotrotcelesehtnruT

12
VLC-3 rev.04
VLC-3
EXAMPLE 2: Two periods with 2 Dusk-to-Dawn programs
PERIOD 1
Dusk-to-Dawn 1
start time: 6:30am
stop time: 10:30am
maximum light intensity: 80%
Dusk-to-Dawn 2
start time: 12:45pm
stop time: 3:10pm
maximum light intensity: 75%
PERIOD 2
Dusk-to-Dawn 1
start time: 6:00am
stop time: 11:30am
maximum light intensity: 85%
Dusk-to-Dawn 2
start time: 1:45pm
stop time: 4:30pm
maximum light intensity: 80%
NB. The numbers shown in bold characters flash on the display.
PETSNOITCAYALPSIDsDELGNINAEM
1
otrotcelesnruT
MARGORP
OTPETSHSUP
GORPRTNE
edoMmargorPgniretnE
2nottub-hsupsserP1yad
1yad(1doirePfoyadtsriF
)tluafedyb
3nottub-hsupsserP 563 yad1doirePfoyadtsaL
4
doirePfoyadtsaltsujdA
1
04 yad
5nottub-hsupsserP.dd 1 1margorPnwaD-ot-ksuD
6nottub-hsupsserP ffO
1margorPnwaD-ot-ksuD
etatS
7NOottsujdA nO margorptxenhtiweunitnoC
8nottub-hsupsserP 21 00:
;sruoh(emiTtratSmargorP
)nim
9sruohtsujdA 6 00:
01nottub-hsupsserP:6 00

13
VLC-3 rev.04
VLC-3
PETSNOITCAYALPSIDsDELGNINAEM
11setunimtsujdA:6 03
21nottub-hsupsserP 21 00:
emiTpotSmargorP
)nim;sruoh(
31sruohtsujdA 01 00:
41nottub-hsupsserP:01 00
51setunimtsujdA:01 03
61nottub-hsupsserP 0 %
margorProfytisnetnixaM
1
71ytisnetnithgilmumixamtsujdA 08 %
81nottub-hsupsserP.dd 2 2margorPnwaD-ot-ksuD
91nottub-hsupsserP ffO
2margorPnwaD-ot-ksuD
etatS
02NOottsujdA nO
txenhtiweunitnoC
margorp
12nottub-hsupsserP 21 00:
emiTtratSmargorP
)nim;sruoh(
22sruohtsujdA 21 00:mp
32nottub-hsupsserP:21 00 mp
42setunimtsujdA:21 54 mp
52nottub-hsupsserP 21 00:mp
emiTpotSmargorP
)nim;sruoh(
62sruohtsujdA 3 00:mp
72nottub-hsupsserP:3 00 mp
82setunimtsujdA:3 01 mp
92nottub-hsupsserP 0 %
margorProfytisnetnixaM
2
03ytisnetnithgilmumixamtsujdA 57 %
13nottub-hsupsserP.dd 3 3margorPnwaD-ot-ksuD
23nottub-hsupsserP FFO
33ffOotetatsmargorptsujdA FFO
nwaD-ot-ksuDfodnE
smargorP
431.EPotmargorptsujdA.EP 1 1margorPkaePthgiL
53nottub-hsupsserP nO
1margorPkaePthgiL
etatS

14
VLC-3 rev.04
VLC-3
PETSNOITCAYALPSIDsDELGNINAEM
63ffOot1.EPmargorptsujdA ffO smargorPkaePthgiLfodnE
73nottub-hsupsserP14yad
2doirePfoyadtsriF
83nottub-hsupsserP 563 yad2doirePfoyadtsaL
932doirepfoyadtsalehttsujdA 563 yad
04nottub-hsupsserP.dd 1 1margorPnwaD-ot-ksuD
14nottub-hsupsserP ffO etatS1margorPnwaD-ot-ksuD
24NOottsujdA nO margorptxenhtiweunitnoC
34nottub-hsupsserP 21 00:)nim;sruoh(emiTtratSmargorP
44sruohtsujdA 6 00:
54nottub-hsupsserP:6 00
64setunimtsujdA:6 00
74nottub-hsupsserP 21 00:)nim;sruoh(emiTpotSmargorP
84sruohtsujdA 11 00:
94nottub-hsupsserP:11 00
05setunimtsujdA:11 03
15nottub-hsupsserP 0 %1margorProfytisnetnixaM
25ytisnetnithgilmumixamtsujdA 58 %
35nottub-hsupsserP.dd 2 2margorPnwaD-ot-ksuD
45nottub-hsupsserP ffO etatS2margorPnwaD-ot-ksuD
55NOottsujdA nO margorptxenhtiweunitnoC
65nottub-hsupsserP 21 00:)nim;sruoh(emiTtratSmargorP
75sruohtsujdA 1 00:mp
85nottub-hsupsserP:1 00 mp
95setunimtsujdA:1 54 mp
06nottub-hsupsserP 21 00:mp)nim;sruoh(emiTpotSmargorP

15
VLC-3 rev.04
VLC-3
PETSNOITCAYALPSIDsDELGNINAEM
16sruohtsujdA 4 00:mp
26nottub-hsupsserP:4 00 mp
36setunimtsujdA:4 03 mp
46nottub-hsupsserP 0 %2margorProfytisnetnixaM
56ytisnetnithgilmumixamtsujdA 08 %
66nottub-hsupsserP.dd 3 3margorPnwaD-ot-ksuD
76nottub-hsupsserP FFO
86ffOotetatsmargorptsujdA FFO
nwaD-ot-ksuDfodnE
smargorP
961.EPotmargorptsujdA.EP 1 1margorPkaePthgiL
07nottub-hsupsserP nO etatS1margorPkaePthgiL
17ffOot1.EPmargorptsujdA ffO smargorPkaePthgiLfodnE
27nottub-hsupsserP
OTPETSHSUP
GORPRTNE
37noitcnufrehtonaotrotcelesehtnruT

16
VLC-3 rev.04
VLC-3
8. DESCRIPTION OF COMMUN PARAMETERS
8.1 LIGHT INTENSITY
The current light intensity. Values range from 0 to 100 % of full lighting
intensity.
Turn the function selector until the LIGHT INTENSITY pilot light
turns on. The current intensity is displayed. This parameter can only
be displayed.
8.2 CLOCK
The clock time for operating the light programs.
Turn the function selector until the CLOCK pilot light turns on. The
current time is displayed. When 12-hour time is used, the PM pilot
light to the right of the display turns on when the time displayed is
PM time.
To change the time setting, press the push-button. The hours value
flashes.
Use the adjustment knob to set the hours. Press the push-button to
store the hours in memory. The minutes value flashes.
Use the adjustment knob to set the minutes.
Press the push-button to store the minutes in memory and reset the
seconds to zero.
8.3 DAY COUNTER
The day number for operating the light programs. Values range from 1
to 365.
Turn the function selector until the DAY COUNTER pilot light turns
on. The current day is displayed.
To change the day counter, press the push-button. The value flashes.

17
VLC-3 rev.04
VLC-3
Use the adjustment knob to set the day. Press the push-button. If
the change in the day counter implies a jump to a new period, the
light programs for the new period will be executed. If the change in
the day counter implies a change in the period, the new period pilot
light will turn on.
8.4 MINIMUM LIGHT INTENSITY
The lowest level of lighting used by the controller when no programs are
currently active. It is expressed as a percentage of full intensity. Values
range from 0 to 100%.
Turn the function selector until the MINIMUM INTENSITY pilot light
turns on. The current value of the minimum intensity is displayed.
Press the push-button. The current value of the minimum intensity
flashes.
Using the adjustment knob, adjust the minimum intensity to the
desired value.
8.5 SUNRISE
The duration of the transition from minimum to maximum light intensity
in a light program. Values range from 0 to 11 hours 59 minutes.
Turn the function selector until the SUNRISE pilot light turns on. The
current value of the rising transition is displayed.
Press the push-button. The hours value flashes.
Use the adjustment knob to set the hours. Press the push-button to
store the hours in memory. The minutes value flashes.
Use the adjustment knob to set the minutes.
Press the push-button to store the minutes in memory.

18
VLC-3 rev.04
VLC-3
8.6 SUNSET
The sunset is the duration of the transition from maximum to minimum
light intensity in a program. Values range from 0 to 11 hours 59 minutes.
Turn the function selector until the SUNSET pilot light turns on. The
current value of the rising transition is displayed.
Press the push-button. The hours value flashes.
Use the adjustment knob to set the hours. Press the push-button to
store the hours in memory. The minutes value flashes.
Use the adjustment knob to set the minutes.
Press the push-button to store the minutes in memory.
8.7 AUXILIARY LIGHT OUTPUT
The VLC-3 can be programmed to activate or deactivate a fluorescent
light output at a specified light intensity. Two modes of operation are
possible. In the first case, the fluorescent lights are turned on when the
light intensity increases above a certain level (AUXILIARY ON). When
the light intensity falls below the turnoff level (AUXILIARY OFF), the
fluorescent lights are turned off. In the second case, the fluorescent
lights are activated when the light intensity falls below a certain level
(AUXILIARY ON). When the light intensity increases above the turnoff
level (AUXILIARY OFF), the fluorescent lights are turned off. The two
cases are illustrated in the figures below.
19
VLC-3 rev.04
VLC-3
Mode I
Mode II
Values for both values range from 0 to 100%. Note that to disable this
feature, the on and off values must be set to the same value.
Turn the function selector until the AUXILIARY ON pilot light turns
on. The current value of the intensity is displayed.
Press the push-button. The current value of the intensity flashes.
Using the adjustment knob, adjust the intensity to the desired value.
Press the push-button to store the value in memory.
Light
Intensity
Time
AUX. OFF
AUX. ON
Time
Light
Intensity
AUX. OFF
AUX. ON

20
VLC-3 rev.04
VLC-3
Turn the function selector until the AUXILIARY OFF pilot light turns
on. The current value of the intensity flashes on the display.
Press the push-button. The current value of the intensity flashes on
the display.
Using the adjustment knob, adjust the intensity to the desired value.
Press the push-button to store the value in memory.
8.8 PERIOD MODE
This parameter allows to activate or deactivate the controller’s operation
in period mode. If the period mode is activated, the controller will
automatically change the dusk-to-dawn programs according to the animal
age. For example, the controller can operate this way:
If the period mode is deactivated, the same dusk-to-dawn program will
operate each day. The animal age will not influence the programming.
Refer to section 9.2 to set a programming using periods.
doirePegAnoitarepOfosruoH
gnithgiL
emiT
15yadot1yaD00h61-00h6h01
202yadot6yaD00h81-00h6h21
354yadot12yaD00h22-00h6h61

21
VLC-3 rev.04
VLC-3
9. OVERVIEW OF PROGRAMMING SEQUENCES
The VLC-3 is programmed in sequential fashion using the push-button to
advance to the different steps in the program. Two basic program units
are defined: dusk-to-dawn programs and light peaks. Once inside a
program unit, the user must step through all the parameters defined for
the unit before stepping to another unit. This ensures that program
definitions are always complete. However, all program units do not have
to be entered at once. The user can add program units by stepping
through the initial program and adding new units as required. The
diagram below shows how programs are organized. The highest level of
definition in a program is the period number. Each period contains a
number of dusk-to-dawn programs followed by a number of light peaks.
These units are ordered according to the order in which they were
entered. When stepping through an existing program for a given period,
all the dusk-to-dawn programs are presented, followed by all the light
peaks. If you continue stepping through, the following period is presented.
DUSK-TO-DAWN PROGRAM 1
DUSK-TO-DAWN PROGRAM 2
DUSK-TO-DAWN PROGRAM 3
etc.
LIGHT PEAK 1
LIGHT PEAK 2
etc.
Selecting a program unit: When you are at the top of a program level —
for example, period 1, dusk-to-dawn program 1 or light peak 1 — the
adjustment knob (on the right) can be used to select a program unit. For
example, when you enter program mode, before you step through the
first program unit, you can select the period you want to display. The
adjustment knob allows you to go forwards and backwards in the list.
Adding a program unit: To add a new program unit to an existing
program, step to the end of the list for that type of program unit (e.g.
dusk-to-dawn program). The last item displayed is always a blank
program used for adding new program units. Press the step push-button
to step to the state (which is OFF) and change the state to ON. Follow
through the parameter sequence by pressing the push-button and adjusting the parameters using the adjustment knob.

22
VLC-3 rev.04
VLC-3
9.1 SETTING THE NO PERIOD MODE
Turn the function selector until the PERIOD MODE pilot light turns
on. The current state of the controller is displayed. When OFF is
displayed, the controller does not use periods (the NO PERIOD pilot
light is turned on). When ON is displayed, the controller is in period
mode.
Using the adjustment knob, adjust the controller state to OFF.
9.1.1 Dusk-to-Dawn Programs
Turn the function selector until the PROGRAM pilot light turns on.
The message “PUSH STEP TO ENTR PROG” (PUSH STEP TO ENTER
PROGRAM) is displayed.
Press the push-button. The PROGRAM pilot light turns off and the
PROGRAM NUMBER pilot light turns on.
Program number: Programs are numbered from 1 to 12 for each period.
The display shows dd . 1 where 1 (flashing) is the dusk-to-dawn program
number. If no dusk-to-dawn programs have yet been entered in the
controller, the user must start by entering program 1. Otherwise, the
user can select the program using the adjustment knob. If you turn the
adjustment knob past the currently defined dusk-to-dawn programs, the
program will jump to the light peaks (i.e. PE . 1 etc.). You can backtrack
by turning the knob in the opposite direction.
67(3
Press the push-button to step to the program state.
Program state: The program state is used to signal the end of the duskto-dawn programs. As long as the program state is ON, the user can
continue adding programs. When a dusk-to-dawn program is turned off,
the user exits the dusk-to-dawn program cycle and enters the light peak
cycle. The current state of the dusk-to-dawn program flashes on the
display. Use the adjustment knob to set the state of the program.

23
VLC-3 rev.04
VLC-3
67(3
If the program state is ON, push the push-button to step to the start
time. Otherwise, push the push-button to step to light peak #.
Start time: The start time is entered as a clock time. The hours value
flashes on the display. Use the adjustment knob to set the hours. Press
the push-button. The minutes flash on the display. Use the adjustment
knob to set the minutes.
67(3
Press the push-button to step to the stop time.
Stop time: The stop time is entered as a clock time. The hours value
flashes on the display. Use the adjustment knob to set the hours. Press
the push-button. The minutes flash on the display. Use the adjustment
knob to set the minutes.
67(3
Press the push-button to step to the maximum intensity.
Maximum intensity: This is the maximum light intensity for the current
light program. Use the adjustment knob to set the value as required.
Values range from 0 to 100% of full intensity.
67(3
Press the push-button to step to the next dusk-to-dawn program in
this period.
9.1.2 Light Peaks
Peak #: Light peaks are numbered from 1 to 20 for each period. The
display shows PE . 1 where 1 (flashing) is the light peak number. If no
light peaks have yet been entered in the controller, the user must start
by entering light peak 1. Otherwise, the user can select the light peak
using the adjustment knob. If you turn the adjustment knob past the

24
VLC-3 rev.04
VLC-3
currently defined light peaks, the program will jump to the dusk-to-dawn
programs. You can backtrack by turning the knob in the opposite
direction.
67(3
Press the push-button to step to the state.
State: The program state is used to signal the end of the light peaks. As
long as the state is ON, the user can continue adding light peaks. When
a light peak is turned off, the user exits the light peak cycle and enters a
new period. The current state of the light peak flashes on the display.
Use the adjustment knob to set the state.
67(3
If the state is ON, push the push-button once to step to the start
time. Otherwise, push the push-button to exit programming mode.
Start time: The start time is entered as a clock time. The hours value
flashes on the display. Use the adjustment knob to set the hours. Press
the push-button once. The minutes flash on the display. Use the adjustment knob to set the minutes.
67(3
Press the push-button to step to the duration.
Duration: The duration is the duration of the light peak. It is measured
in minutes and seconds and ranges from 0 to 15 minutes. Use the
adjustment knob to set the duration. When the duration is greater than
one minute, the adjustment knob increments the value in steps of five
seconds.
67(3
Press the push-button to step to the next light peak.

25
VLC-3 rev.04
VLC-3
9.2 SETTING THE PERIOD MODE
Turn the function selector until the PERIOD MODE pilot light turns
on. The current state of the controller is displayed. When OFF is
displayed, the controller does not use periods (the NO PERIOD pilot
light is turned on). When ON is displayed, the controller is in period
mode (the PERIOD 1 pilot light is turned on).
Using the adjustment knob, adjust the controller state to ON.
Programming:
Turn the function selector until the PROGRAM pilot light turns on.
The message “PUSH STEP TO ENTR PROG” (PUSH STEP TO ENTER
PROGRAM) is displayed.
Press the push-button. The PROGRAM pilot light turns off and the
FIRST DAY OF PERIOD pilot light turns on. The appropriate PERIOD
pilot light flashes to indicate which period is currently being programmed.
Use the push-button to step to the different program functions.
Selecting a period: If no periods are currently programmed in the system,
the user must start with the first period starting on day 1. If periods
have been programmed, the user can step to a particular period by using
the adjustment knob on the right. The flashing PERIOD pilot lights on the
right indicate the current period being programmed. The steady PERIOD
pilot light represents the currently active period.
Périods
First day of period: This is the first day for the current period. If no
programs have been entered, this value is set to 1 and cannot be
changed. Otherwise, the first day is the day following the last day of the
previous period. Use the adjustment knob to adjust the value as required.
Pr

26
VLC-3 rev.04
VLC-3
67(3
Press the push-button to enter the last day for this period.
Last day of period: This is the last day for the current period. Use the
adjustment knob to adjust the value as required. If this is the last period
needed, the last day must be 365. If this is not done, the controller will
define an empty period ending on day 365.
67(3
Press the push-button to enter the dusk-to-dawn programs for this
period.
9.2.1 Dusk-to-Dawn Programs
Program number: Programs are numbered from 1 to 12 for each period.
The display shows dd . 1 where 1 (flashing) is the dusk-to-dawn program
number. If no programs have yet been entered in the controller, the user
must start by entering program 1. Otherwise, the user can select the
dusk-to-dawn program using the adjustment knob. If you turn the
adjustment knob past the currently defined programs, the program will
jump to the light peaks (i.e. PE . 1 etc.). You can backtrack by turning
the knob in the opposite direction.
67(3
Press the push-button to step to the program state.
Program state: The program state is used to signal the end of the duskto-dawn programs. As long as the program state is ON, the user can
continue adding programs. When a dusk-to-dawn program is turned off,
the user exits the dusk-to-dawn program cycle and enters the light peak
cycle. The current state of the dusk-to-dawn program flashes on the
display. Use the adjustment knob to set the state of the program.
dd

27
VLC-3 rev.04
VLC-3
67(3
If the program state is ON, push the push-button to step to the
start time. Otherwise, push the push-button to step to peak #.
Start time: The start time is entered as a clock time. The hours value
flashes on the display. Use the adjustment knob to set the hours. Press
the push-button. The minutes flash on the display. Use the adjustment
knob to set the minutes.
67(3
Press the push-button to step to the stop time.
Stop time: The stop time is entered as a clock time. The hours value
flashes on the display. Use the adjustment knob to set the hours. Press
the push-button. The minutes flash on the display. Use the adjustment
knob to set the minutes.
67(3
Press the push-button to step to the maximum intensity.
Maximum intensity: This is the maximum light intensity for the current
dusk-to-dawn program. Use the adjustment knob to set the value as
required. Values range from 0 to 100% of full intensity.
67(3
Press the push-button to step to the next dusk-to-dawn program in
this period.

28
VLC-3 rev.04
VLC-3
9.2.2 Light Peak
Peak #: Light peaks are numbered from 1 to 20 for each period. The
display shows PE . 1 where 1 (flashing) is the light peak number. If no
light peaks have yet been entered in the controller, the user must start
by entering light peak 1. Otherwise, the user can select the light peak
using the adjustment knob. If you turn the adjustment knob past the
currently defined light peaks, the program will jump to the dusk-to-dawn
programs. You can backtrack by turning the knob in the opposite
direction.
67(3
Press the push-button to step to the state.
State: The program state is used to signal the end of the light peaks. As
long as the state is ON, the user can continue adding light peaks. When
a light peak is turned off, the user exits the light peak cycle and enters a
new period. The current state of the light peak flashes on the display.
Use the adjustment knob to set the state.
67(3
If the state is ON, push the push-button to step to the start time.
Otherwise, push the push-button to step to the next period (see
First Day of period).
If this is the last period (i.e. the Last Day of Period entered is 365),
programming mode is exited.
Start time: The start time is entered as a clock time. The hours value
flashes on the display. Use the adjustment knob to set the hours. Press
the push-button. The minutes flash on the display. Use the adjustment
knob to set the minutes.
67(3
Press the push-button to step to the duration.
PE

29
VLC-3 rev.04
VLC-3
Duration: The duration is the duration of the light peak. It is measured
in minutes and seconds and ranges from 0 to 15 minutes. Use the
adjustment knob to set the duration.
67(3
Press the push-button to step to the next light peak.
10. DISPLAYING A PROGRAM UNIT
Turn the function selector until the PROGRAM pilot light turns on.
The message “PUSH STEP TO ENTR PROG” (PUSH STEP TO ENTER
PROGRAM) is displayed.
Press the push-button.
If you are using periods, the PROGRAM pilot light turns off and the
FIRST DAY OF PERIOD pilot light turns on. The appropriate PERIOD
pilot light flashes to indicate which period is currently being programmed. Use the adjustment knob to step to the appropriate period
and press the push-button. If you are not using periods, the PROGRAM NUMBER pilot light turns on.
Press the push-button to step through the different program functions.

30
VLC-3 rev.04
VLC-3
11. DELETE A PROGRAM UNIT
Individual program units can be deleted without affecting the other
program units. The program units that follow the deleted item are
moved up one knotch to fill the gap, as shown below:
Before After
dd . 1 dd . 1
dd . 2 dd . 2
Delete this item dd . 3 dd . 3
dd . 4 dd . 4
dd . 5
Turn the function selector until the PROGRAM pilot light turns on.
The message “PUSH STEP TO ENTR PROG” (PUSH STEP TO ENTER
PROGRAM) is displayed.
Press the push-button.
If you are using periods, the PROGRAM pilot light turns off and the
FIRST DAY OF PERIOD pilot light turns on. The appropriate PERIOD
pilot light flashes to indicate which period is currently being programmed. Use the adjustment knob to step to the appropriate period
and press the push-button. If you are not using periods, the PROGRAM NUMBER pilot light turns on.
Use the adjustment knob to select the program unit to delete.
Press the push-button. The STATE pilot light turns on.
Use the adjustment knob to set the state to OFF.
Press the push-button.

31
VLC-3 rev.04
VLC-3
The program returns to DUSK-TO-DAWN PROGRAM NUMBER or PEAK
# depending on the type of program unit deleted. The display shows the
first program unit (i.e. dd.1 or Pe.1).
12. REPARTITIONING THE PERIODS
Periods can be repartitioned without affecting the program units defined
for each period. For example:
The values that cannot be changed are the first days of each period and
the Last Day of the last period (always 365). Once you change the last
day of a period, the first day of the next period is one greater than this
value, etc.
Turn the function selector until the PROGRAM LED turns on. The
message “PUSH STEP TO ENTR PROG” (PUSH STEP TO ENTER
PROGRAM) is displayed.
Press the push-button.
The PROGRAM pilot light turns off and the FIRST DAY OF PERIOD
pilot light turns on. Period 2 is defined to begin where Period 1 ends.
The appropriate PERIOD pilot light flashes to indicate which period is
currently being programmed. Use the adjustment knob to step to the
appropriate period.
251
26
125 126
200 201 365
Day
Day
Original Partitions:
New
Partitions
Period 1
8 dd
12 PE
Period 2
4 dd
3 PE
Period 3
1 dd
20 PE
Period 4
1 dd
1 PE
981
99
125
126
181
365
180

32
VLC-3 rev.04
VLC-3
Press the push-button.
The LAST DAY OF PERIOD pilot turns on and the last day flashes on
the display. Initially, the last day for period 2 is set to 365. Use the
adjustment knob to change the last day to its new value. The
program units defined previously for Period 2 are carried over to the
new period definition as shown below. At this point, no other
periods are defined. However, the program units defined for the
remaining periods are still in memory. As each new period is defined, the program units stored in memory are assigned to it.
Press the push-button.
The PROGRAM NUMBER pilot light turns on and the display shows:
“dd . 1” where “1” (flashing) is the number of the dusk-to-dawn
program. Turn the adjustment knob until you reach the last light
peak for the current period (i.e. “PE . x” where x is the number of
light peaks for the period).
Press the push-button twice to advance to the next period.
The FIRST DAY OF PERIOD pilot turns on for the next period. Period
3 is defined to begin where Period 2 ends.
Press the push-button.
The LAST DAY OF PERIOD pilot light turns on and the last day
flashes on the display. Initially, the last day for period 3 is set to
365. Use the adjustment knob to change the last day to its new
value. The program units defined previously for Period 3 are carried
over to the new period definition, etc.
98199
365
Jour
Période 1
8 dd
12 PE
Période 2
4 dd
3 PE

33
VLC-3 rev.04
VLC-3
Notes:
(i ) If you repartition so as to reduce the number of periods, the pro-
grams belonging to the deleted periods are kept in memory but are
not executed. They can be retrieved at a later time by adding
periods.
(ii) You can add a new period by repartitioning so as to increase the
number of periods. New periods are added onto the end of the list.
981
365
Day
Period 1
8 dd
12 PE
Period 2
4 dd
3 PE
12699 127
Period 2
1 dd
20 PE

34
VLC-3 rev.04
VLC-3
13. MANUAL MODE
Manual mode is used to manually control the light intensity. When the
controller is in manual mode, all light programs are stopped. When the
user exits manual mode, programming is resumed according to the
current clock time. If a power failure occurs while in manual mode, the
controller will resume operation at the same light intensity when power
is restored.
Turn the function selector until the MANUAL MODE pilot light turns
on. The current light intensity expressed as a percentage of full
intensity flashes on the display.
Use the adjustment knob to manually set the light intensity. Values
range from 0 to 100 % of full intensity.
14. ALARM CONDITIONS
An alarm is set off when one of the following situations occurs:
(i) the permanent memory chip is not working properly
(ii) a power failure occurs
(iii) the microprocessor is defective.
15. BACKUP BATTERY
A CR-2032 coin-type lithium battery is included with the controller. It is
used to power the internal clock in the event of a power failure. None of
the other functions will operate if this happens. When power is restored,
the VLC-3 will resume activation of the dusk-to-dawn programs and
peaks according to the current clock time.

35
VLC-3 rev.04
VLC-3
16. TECHNICAL SPECIFICATIONS
Supply: 115/230 VAC, 50/60 Hz, overload and overvoltage protec-
tion fuse F11-1A fast blow.
Lamp Output: Variable output, 115/230 VAC, 50/60 Hz, 1200W
(120V) or 2400W (240V) RES, fuse F1-15A slow blow.
Auxiliary Output: ON-OFF output, 115/230 VAC, 50/60 Hz 10A, fuse
F2-15A slow blow.
0-10V Output 0-10V: 20mA max.
Alarm: ON-OFF output, 115/230 VAC, 50/60 Hz, 30 VDC, 3A,
fuse F8-3A slow blow.
Enclosure: ABS, moisture and dust-tight.
The room temperature where the controller is located
MUST ALWAYS REMAIN BETWEEN 32o AND 104oF (0o AND 40oC).

36
VLC-3 rev.04
VLC-3
17. TROUBLESHOOTING
MELBORPESUACNOITULOS
t'nseodyalpsidehT
.krow
ecivresehttarekaerbtiucriC
.deppirtroffosilenap
.tcerrocnisigniriW
.nwolbsiesuftupni11F
ehtnisihctiwsrotcelesegatloV
.noitisopgnorw
elbactcennocretnidraobyalpsiD
rewopehtmorfdeggulpnusi
.draobylppus
.rekaerbtiucricehtteseR
.gniriwehttcerroC
.esufehtecalpeR
tcerrocehtothctiwsehtteS
.noitisop
.ylmrifnielbacehtgulP
smeesrellortnocehT
ehtybgnikrowebot
.nonrutt'nodsthgil
.esoolrotcerrocnisigniriW
nwolbsiesuftuptuo1F
.gniriwehtkcehC
.esufehtecalpeR
emitkcolcehT
.sehsalf
.teserneebsahkcolC
.evitcefedsiyrettaB
.kcolcehtteS
otrewopffonruT.kcolcehtteS
fI.nokcabtinrutdnatinueht
ksa,sehsalfllitsemitkcolceht
ehtecalperotrelaedruoy
.yrettab
sehsalfyalpsidehT
."RPEE"sretteleht
.evitcefedebyampihcyromeMtinunottub-hsupdlohdnasserP
ehtesaeleR.sraelcyalpsid
steserrellortnoC.nottub-hsup
.emitkcolcsyalpsiddna
.tsolebyamgnimmargorP
sehsalfyalpsidehT
"CTR"sretteleht
rehtiesipihckcolcemit-laeR
.detrohsrognissim
ehtecalperotrelaedruoyksA
.pihc
 Loading...