

Page 1
TM
SML712BK/SML712W
INSTRUCTION MANUAL/ MANUAL DE INSTRUCCIONES/
MODE D’EMPLOI
www.singingmachine.com
The Singing Machine® is a registered trademark of The Singing Machine Co., Inc.
The Singing Machine® es marca registrada de The Singing Machine Co., Inc.
Singing Machine® est une marque déposée par The Singing Machine Co., Inc.
Page 2
Warnings
CAUTION
RISK OF ELECTRIC SHOCK
DO NOT OPEN
CAUTION: TO REDUCE THE RISK OF ELECTRIC SHOCK, DO NOT
REMOVE COVER (OR BACK). NO USER-SERVICEABLE PARTS INSIDE.
REFER SERVICING TO QUALIFIED SERVICE PERSONNEL.
DANGEROUS VOLTAGE: The lightning flash with arrowhead
symbol within an equilateral triangle is intended to alert the
user to the presence of uninsulated dangerous voltage within
the product’s enclosure that may be of sufficient magnitude
to constitute a risk of electric shock to persons.
ATTENTION: The exclamation point within an equilateral
triangle is intended to alert the user to the presence of
important operating and maintenance (servicing) instructions
in the literature accompanying this product.
DRIPPING WARNING: This product shall not be exposed to dripping or
splashing, and no objects filled with liquids, such as vases, shall be placed
on the product.
VENTILATION WARNING: The normal ventilation of the product shall not be
impeded for intended use.
THIS PRODUCT COMPLIES WITH DHHS RULES 21 CFR CHAPTER 1,
SUBCHAPTER J APPLICABLE AT DATE OF MANUFACTURED.
Warnings:
• This CD player employs a laser light beam. Only a qualified service
person should remove the cover or attempt to service this device, due to
possible eye injury.
• The use of controls, adjustments, or procedures other than those
specified herein might result in hazardous radiation exposure.
• The apparatus shall be used in an open area.
CAUTION!
Invisible laser radiation when open and interlocks defeated. Avoid exposure
to beam.
WARNING: TO PREVENT FIRE OR SHOCK HAZARD, DO NOT EXPOSE
THIS UNIT TO RAIN OR MOISTURE.
CAUTION: TO PREVENT ELECTRIC SHOCK, MATCH WIDE BLADE OF
PLUG TO WIDE SLOT AND FULLY INSERT.
FCC WARNING: This equipment may generate or use radio frequency
energy. Changes or modifications to this equipment may cause harmful
interference unless the modifications are expressly approved in the
instruction manual. The user could lose the authority to operate this
equipment if an unauthorized change or modification is made.
This device complies with part 15 of the FCC Rules. Operation is subject
to the following two conditions: (1) This device may not cause harmful
interference, and (2) this device must accept any interference received,
including interference that may cause undesired operation.
NOTE: This equipment has been tested and found to comply with the
limits for a Class B digital device, pursuant to part 15 of the FCC Rules.
These limits are designed to provide reasonable protection against harmful
interference in a residential installation. This equipment generates, uses
and can radiate radio frequency energy and, if not installed and used in
accordance with the instructions, may cause harmful interference to radio
communications. However, there is no guarantee that interference will
not occur in a particular installation. If this equipment does cause harmful
interference to radio or television reception, which can be determined by
turning the equipment off and on, the user is encouraged to try to correct
the interference by one or more of the following measures:
• Reorient or relocate the receiving antenna.
• Increase the separation between the equipment and receiver.
• Connect the equipment into an outlet on a circuit different from that
to which the receiver is connected.
• Consult the dealer or an experienced radio/TV technician for help.
• The rating information is located at the bottom of the unit.
INDUSTRY CANADA NOTICE:
This device contains licence-exempt transmitter(s)/receiver(s) that
comply with Innovation, Science and Economic Development Canada’s
licence-exempt RSS(s). Operation is subject to the following two
conditions:
(1) This device may not cause interference.
(2) This device must accept any interference, including interference that
may cause undesired operation of the device.
CAN ICES-3(B)/NMB-3(B)
Important Safety Information
1. Read these Instructions.
2. Keep these Instructions.
3. Heed all Warnings.
4. Follow all Instructions.
5. Do not use this apparatus near water.
6. Clean only with a dry cloth.
7. Do not block any of the ventilation openings. Install in
accordance with the Manufacturer’s instructions.
8. Do not install near any heat sources such as radiators, heat
registers, stoves, or other apparatus (including amplifiers) that
produce heat.
9. Do not defeat the safety purpose of the polarized or groundingtype plug. A polarized plug has two blades with one wider than
the other. A grounding type plug has two blades and a third
grounding prong. The wide blade or the third prong are provided
for your safety. When the provided plug does not fit into your
outlet, consult an electrician for replacement of the obsolete
outlet.
10. Protect the power cord from being walked on or pinched
particularly at plugs, convenience receptacles, and the point
where they exit from the apparatus.
11. Only use attachments/accessories specified by the
manufacturer.
12. Use only with a cart, stand, tripod, bracket,
or table specified by the manufacturer, or
sold with the apparatus. When a cart is
used, use caution when moving the cart/
apparatus combination to avoid injury
from tip-over.
13. Unplug this apparatus during lightning
storms or when unused for long periods of
time.
14. Refer all servicing to qualified service personnel. Servicing is
required when the apparatus has been damaged in any way, such
as power-supply cord or plug is damaged, liquid has been spilled
or objects have fallen into the apparatus, the apparatus has been
exposed to rain or moisture, does not operate normally, or has
been dropped.
15. WARNING: To reduce the risk of fire or electric shock, do not
expose this apparatus to rain or moisture. Do not place objects
filled with water, such as a vase, on the apparatus.
16. The AC mains plug is used as the power disconnect device
and it should remain readily accessible and operable during
intended use. In order to completely disconnect the apparatus
from power, the mains plug should be completely removed
from the AC outlet socket.
17. CAUTION: To reduce the risk of fire or explosion, do not expose
batteries to excessive heat such as sunshine, fire or other
— E1 —
heat sources.
Page 3
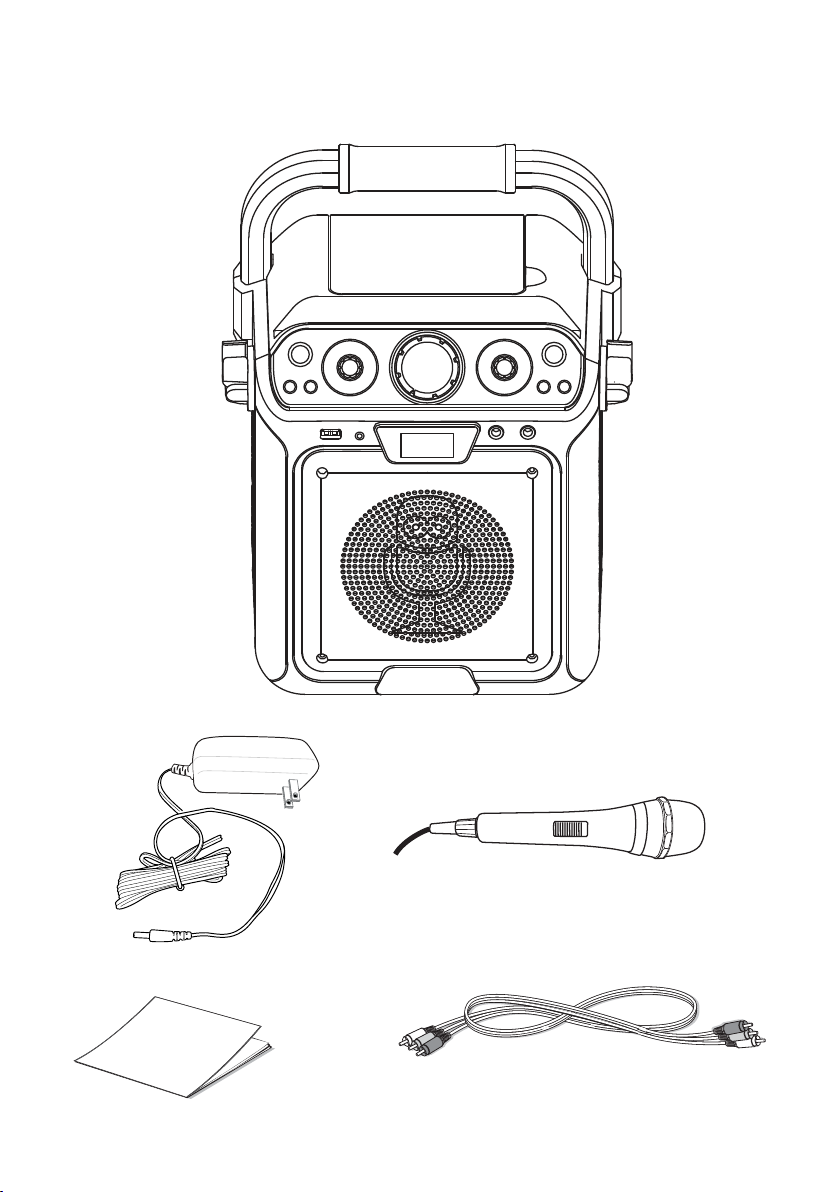
Included
Manual
What’s in the box.
Main Unit
Wired Microphone
AC Adapter
Audio/Video Cables
— E2 —
Page 4
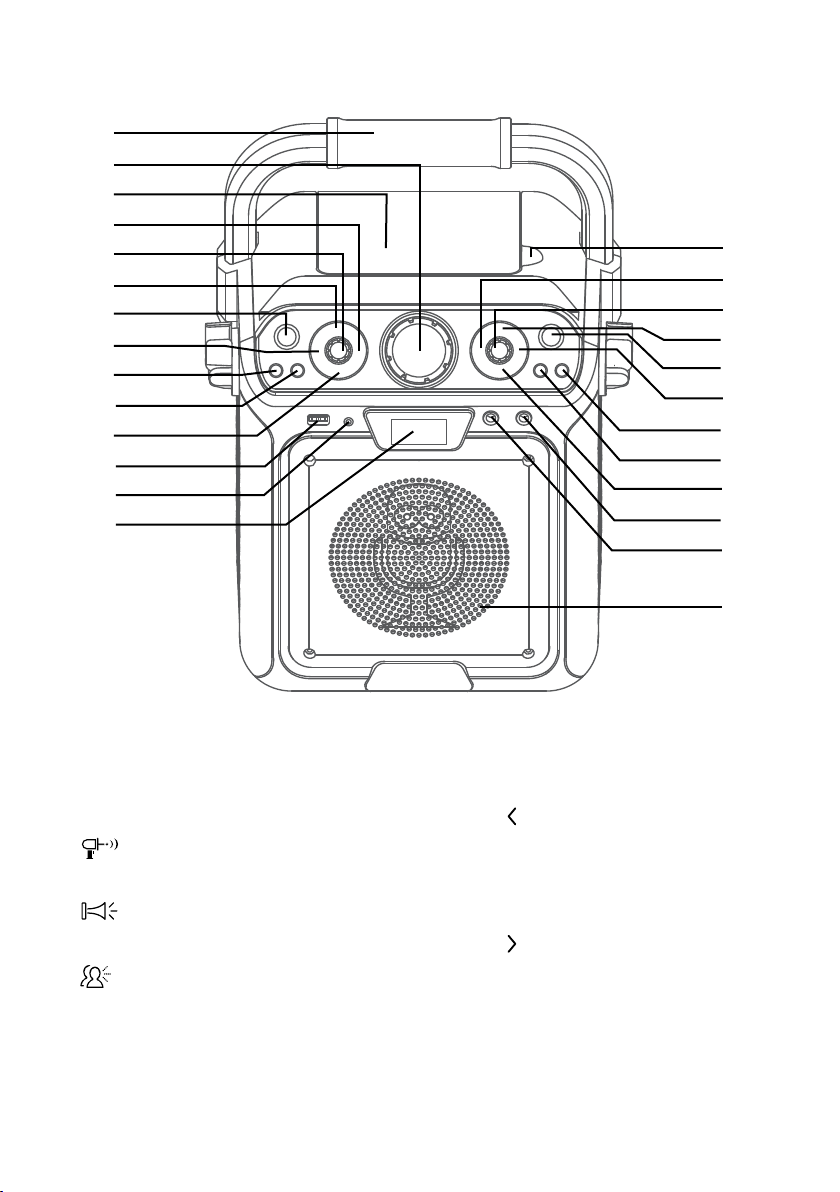
Location of Controls (Top/Front)
u
v
w
x
y
U
V
W
X
at
ak
al
am
an
ao
ap
aq
ar
as
bt
bk
bl
bm
bn
bo
bp
1. Handle
2. MASTER VOLUME Control
3. CD Compartment
4.
5. VOICE EFFECT Control
6.
7. ON/OFF Button
8.
9. FUNCTION Button
10. PAIR Button
11. Build-in loop Songs Button
12. USB Jack
13. LINE IN Jack
Button
Button
Button
14. Display
15. Open/Close Tab
16. Skip
17. MIC VOLUME Control
18. Repeat/Program Button
19. RECORD Button
20. Skip
21. LIGHTS Button
22. STOP Button
23. ENTER/Play/Pause Button
24. MIC 2 Jack
25. MIC 1 Jack
26. Speaker
— E3 —
Button
Button
Page 5
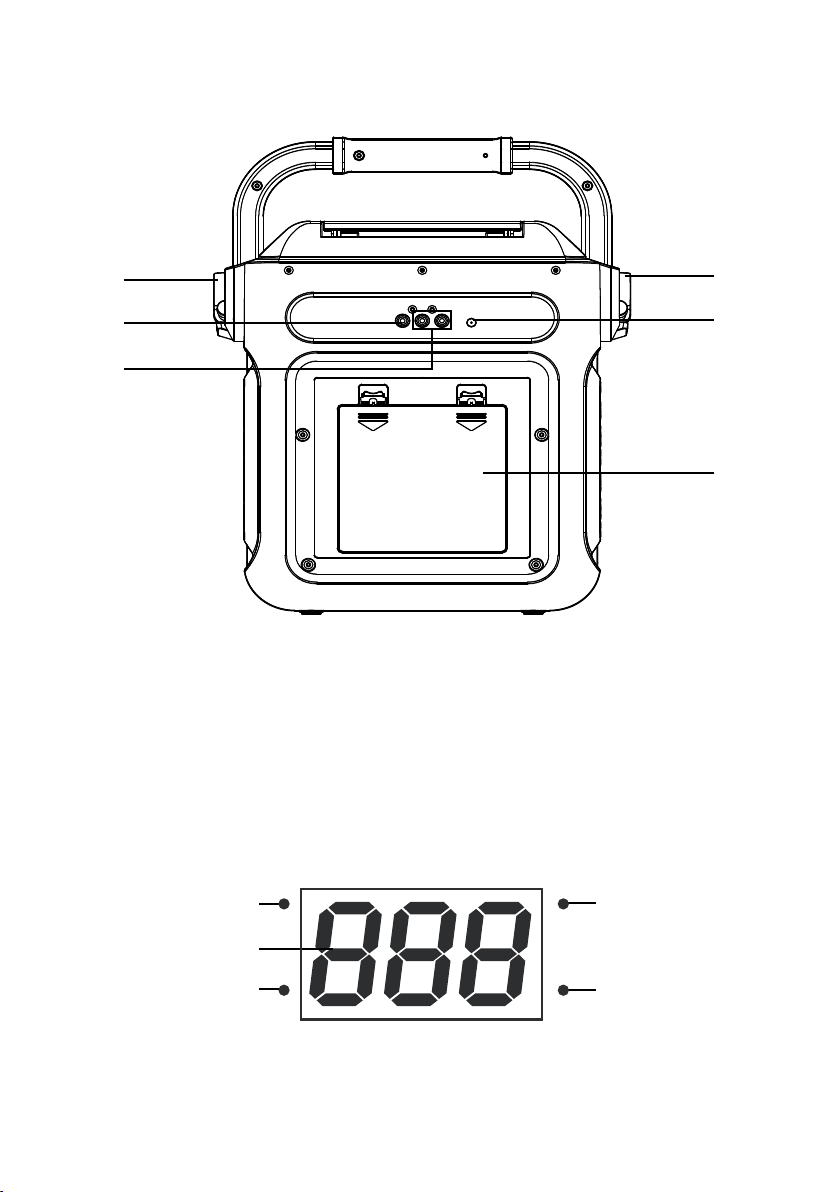
Location of Controls (Rear)
v
u
w
1. Video Out Jack
2. Mic Holder (side of unit)
3. Right/Left Audio Out Jacks
4. DC In Jack
5. Mic Holder (side of unit)
6. Battery Compartment
Location of Controls (Display)
y
x
U
1. CDG Indicator
2. Display
3. Repeat Indicator
CDG
1
2
3
REPEAT
— E4 —
PLAY/PAUSE
4
5
PROGRAM
4. PLAY/PAUSE Indicator
5. Program Indicator
Page 6

Connection
Connecting the Microphone(s)
u
Connecting the Unit to a TV
Microphones:
Connect a microphone into MIC jack 1 u
as well as MIC jack 2 v (when desired).
Note: Do not drop or tap the Mic as
damage to the Mic or speakers may occur.
Do not twirl the microphone by cord as it
will cause damage to the encased wiring.
v
To output the video, lyrics and
audio to your TV, perform the
following steps:
Connect the RCA video cable
1
(Yellow) to the VIDEO OUT
jack and the audio cables
VIDEO OUT
(yellow)
AUDIO OUT
(white - L
red - R)
REAR VIEW OF TV
VIDEO
AUDIO
INPUT
INPUT
R L
(White and Red) to the AUDIO
OUT jacks located on the back
of the Singing Machine.
Connect the opposite end of
2
the RCA video cable (Yellow)
RCA cables
Notes:
• This unit can be used with or without a TV, but it is highly recommended to use a TV in
order to utilize all the features.
• Also refer to the TV’s User Guide.
• To see the lyrics on the screen, you must use a CD+G disc or MP3+G files.
— E5 —
to the VIDEO IN jack and the
audio cables (White and Red)
to the AUDIO IN on your TV.
Page 7
Connection
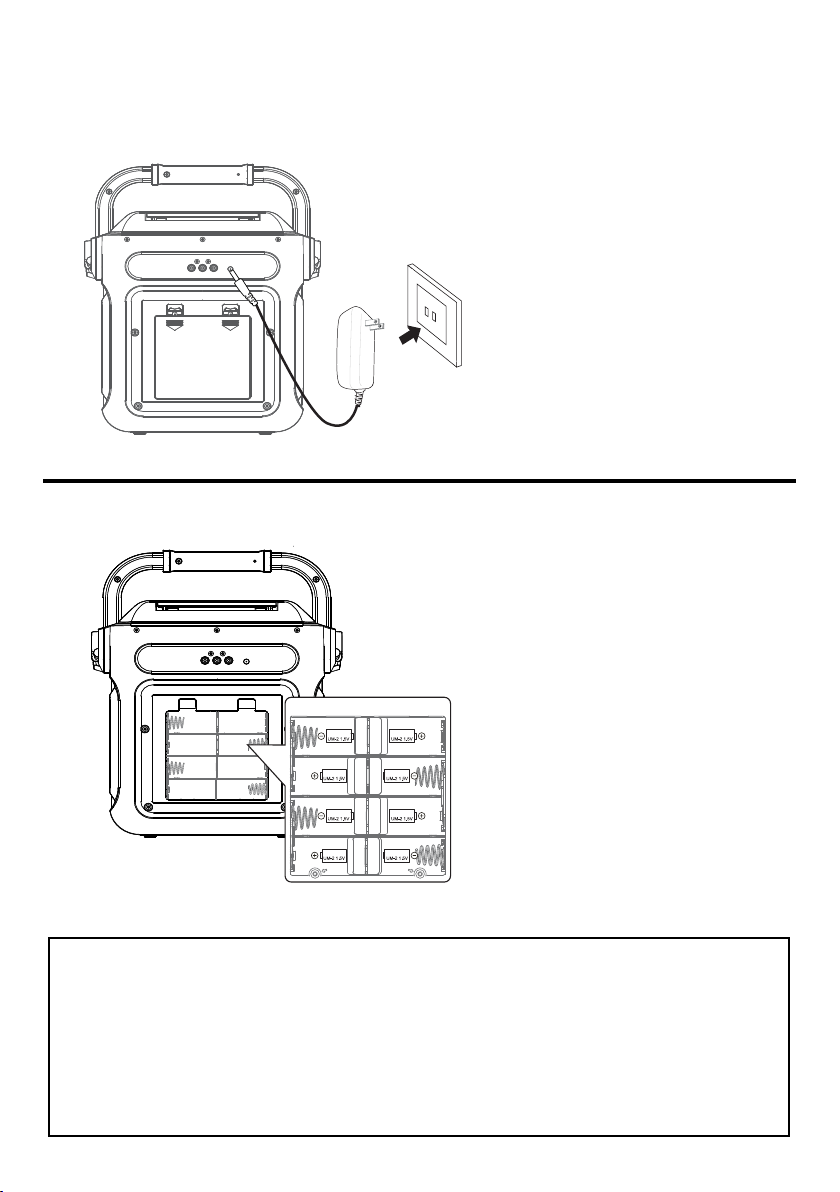
MAKING THE CONNECTIONS
INSTALLATION OF BATTERIES
“C” size
UM2 1.5V
“C” size
UM2 1.5V
“C” size
UM2 1.5V
“C” size
UM2 1.5V
“C” size
UM2 1.5V
“C” size
UM2 1.5V
“C” size
UM2 1.5V
“C” size
UM2 1.5V
DC OPERATION
1. Slide the battery door in the direction the arrows to reveal the
battery compartment. Insert eight (8) “C” size alkaline batteries
(not included) as indicated on the diagram.
2. Replace cover tightly before operating.
CAUTION:
• Replace all batteries at the same time.
• Do not mix old batteries with new batteries.
Connecting to AC Power
Inserting Batteries
Insert the AC power cord into a
conveniently located AC outlet
having 120V AC, 60Hz.
Note:
Make all connections before
connecting to AC power.
INSTALLATION OF BATTERIES
“C“ SIZE
“C“ SIZE “C“ SIZE
“C“ SIZE
“C“ SIZE “C“ SIZE
Battery Precautions
The precautions below should be followed when using batteries in
this device:
1. Use only the size and type of batteries specified.
2. Be sure to follow the correct polarity when installing the
batteries as indicated in the battery compartment. Reversed
batteries may cause damage to the device.
3. Do not mix different types of batteries together (e.g. Alkaline
and Carbon Zinc) or old b
4. If the device is not to be used for a long period of time,
remove the batteries to prevent damage or injury from
possible battery leakage.
at
teries with fresh ones.
Slide the battery door in the
1
direction the arrows to reveal
the battery compartment.
Insert eight (8) “C” size
alkaline batteries (not
included) as indicated on the
diagram.
“C“ SIZE
Replace cover tightly before
2
operating.
“C“ SIZE
5. Do not try to recharge batteries not intended to be recharged,
they can overheat and rupture. (Follow battery manufacturer’s
directions.)
6. Rechargeable batteries are to be removed from the product
before being charged.
7. Rechargeable bat
supervision.
8. Exhausted batteries are to be removed from the product.
9. Batteries shall not be exposed to excessive heat such as
sunshine, fire or the like.
teries are only to be charged under adult
— E6 —
Page 8
Operation
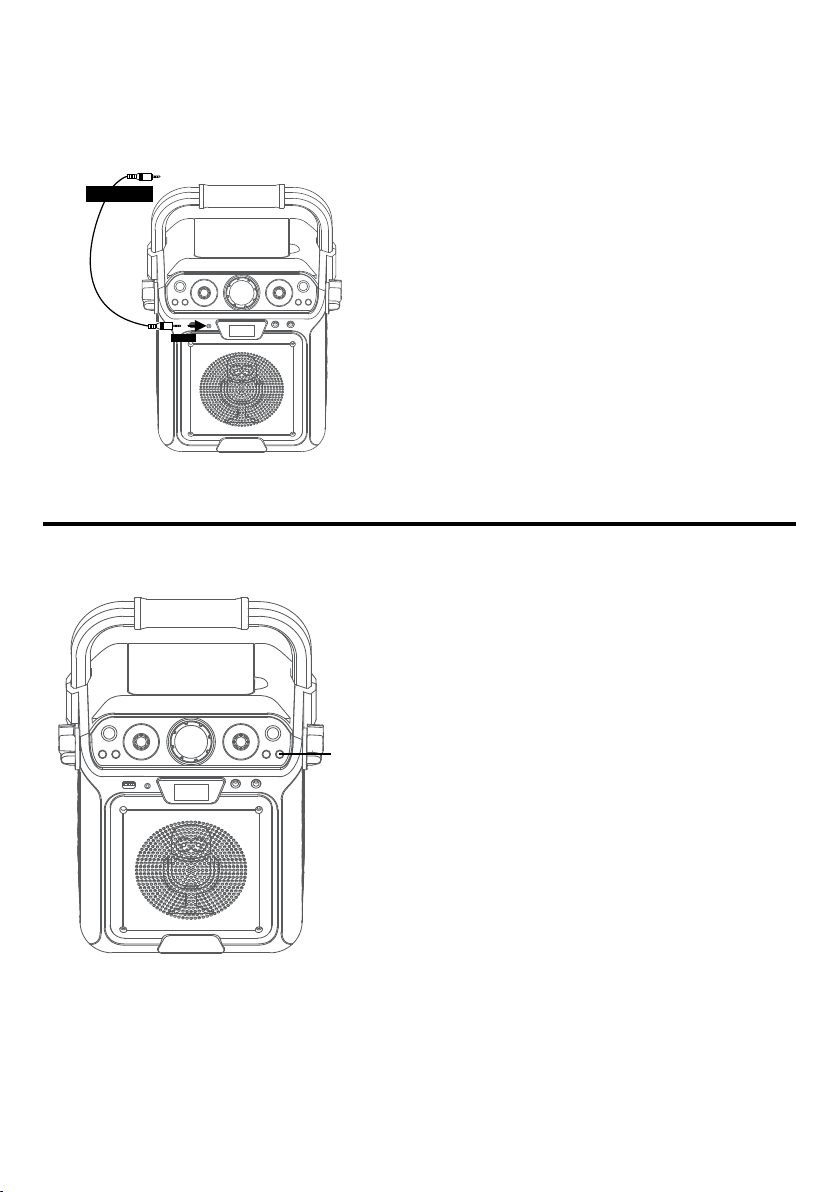
Connecting to Line In Jack
AUDIO OUTPUT
/ HEADPHONE JACK
Disco Lights
To External Unit
LINE IN
u
Connect an external device by using an
appropriate cable (3.5mm audio cable not
included) as shown.
Note:
See page E20 to select and use the Line In
function.
When the unit is turned on, the Light mode 1 is
automatically activated. The lights will light up
and will synchronize with sound when you speak
or sing into the microphone.
Press the LIGHTS button for Light mode 2
which will display the light show but will not
respond to the microphone.
Press the LIGHTS button once again to turn off
the Lights.
— E7 —
Page 9
Operation
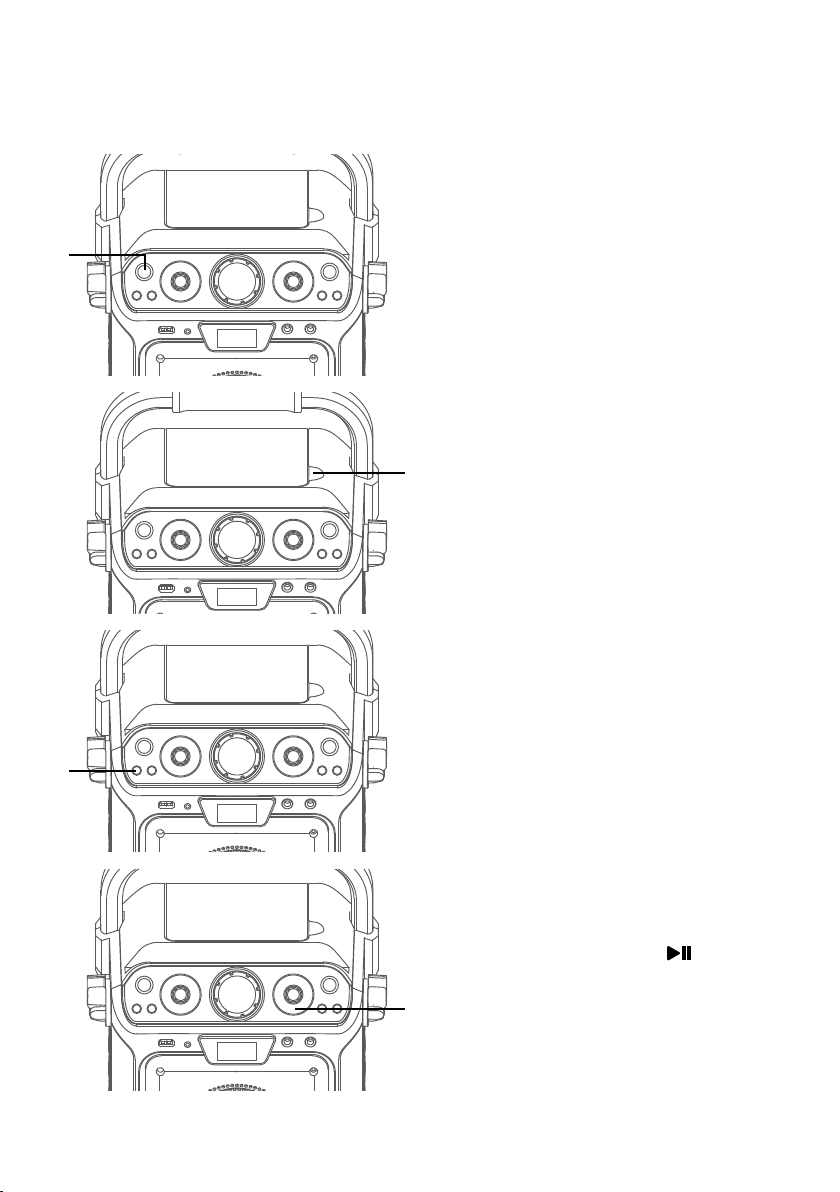
Playing a CD
u
Connect the unit as described
1
2
Notes:
v
• What is a CD+G?
A CD+G (CD+Graphics) is the standard
• What is an MP3+G?
MP3+G is the newest format for
previously; it should be connected
to a TV. Press the ON/OFF
button to turn the unit on.
Lift open the CD door and insert
a CD (with standard or MP3+G
files) or a CD+G by gently
pressing it on the center spindle.
Then close the CD door.
format for most karaoke discs that will
display the words on the screen.
karaoke music utilizing the MP3’s small
file size. It will display the words on
the screen. See page 20 to order and
download MP3+G files.
w
x
— E8 —
Repeatedly press the FUNCTION
3
4
button to select the CDG/CD
mode; “---” will blink when
searching the disc and then
the total number of tracks will
appear.
Press the ENTER/ button to
start playback; if listening to a
CD+G file, the image and lyrics
will appear on the TV screen (if
connected) and the indicator of
PLAY/PAUSE and CDG will light.
Page 10
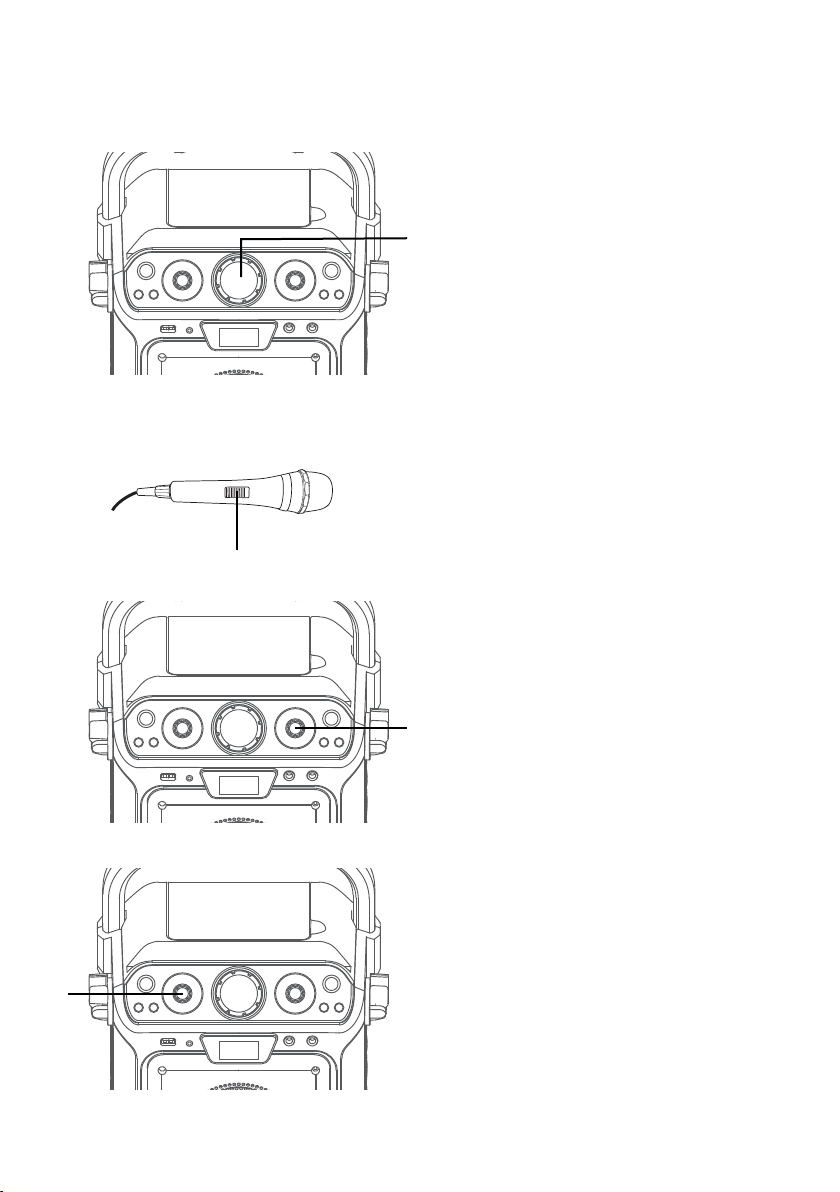
Operation
Playing a CD (Continued)
U
Adjust the volume to a
5
Notes:
y
• Never place anything other than a CD
• If no disc is inserted, “no” will appear on
• If connected to a TV or other audio
comfortable level using the
MASTER VOLUME control.
in the compartment, as foreign objects
can damage the unit.
the display.
source, adjust the volume of the TV
using its own volume control.
Connect microphone(s) and
6
7
V
slide the ON/OFF switch on the
microphone to the ON position.
Adjust the MIC VOLUME control
as desired. Increasing this control
will increase the volume of both
microphones.
W
— E9 —
SING-ALONG WITH BUILT-IN
8
EF0 - NONE,
EF1 - ECHO,
EF2 - FEMALE,
EF3 - MALE,
EF4 - CHIPMUNK,
EF5 - ROBOT, or
EF6 - RADIO.
VOICE CHANGERS
There are 6 built-in voice
changers in this unit. Adjust the
VOICE EFFECT control the voice
will change when the singer starts
to sing through the microphone.
Page 11
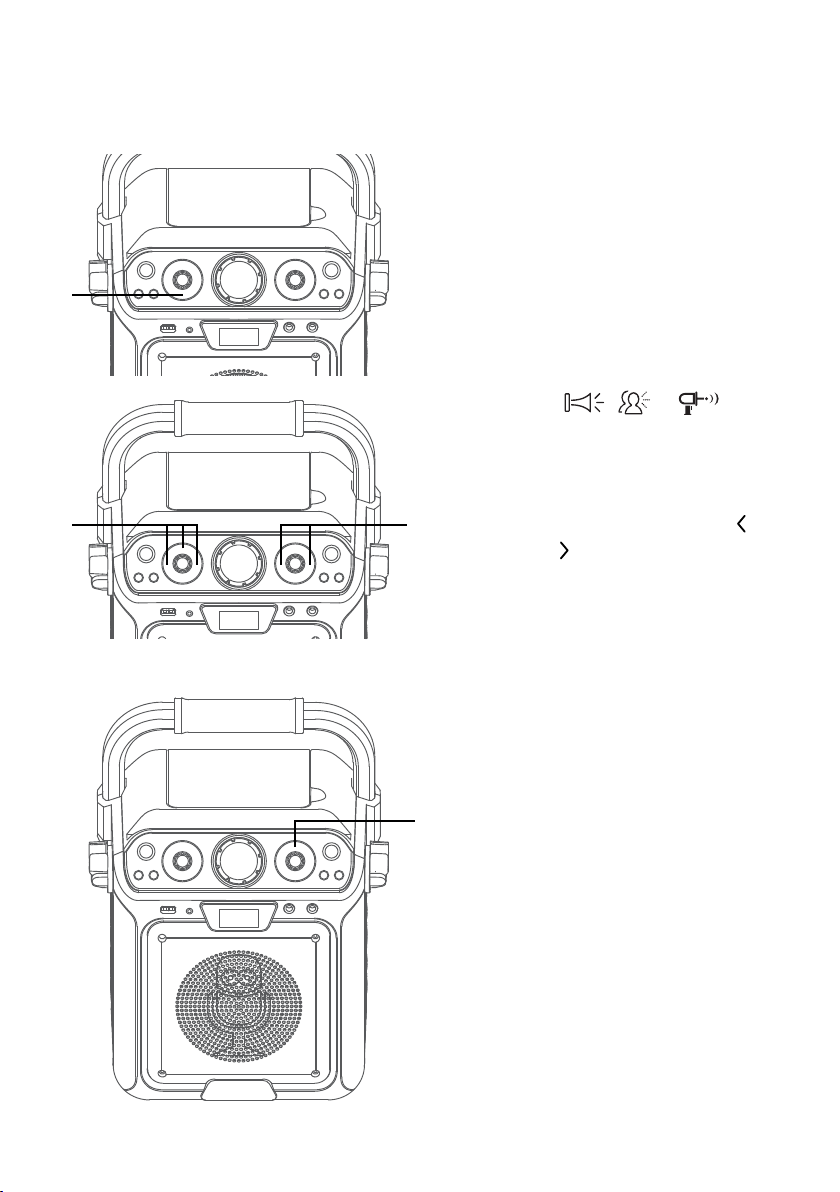
Operation
Playing a CD (Continued)
X
at
SING-ALONG WITH BUILT-IN
9
There are 3 built-in loop songs.
1 0
11
ak
12
al
am
LOOP SONGS
Repeatly press SONGS buttons
to play the 3 different songs. The
loop song will stop when pressing
fourth time.
PLAYING BUILT-IN EFFECTS
Press , or button
to play three different built-in
sound effects.
SKIP: Advance or go back one
track by pressing the Skip
button.
Skip
REPEAT: During playback, press
the PROG /REPEAT button once
to repeatedly play the selected
song; the Repeat indicator
will blink. Press the PROG /
REPEAT button a second time to
repeatedly play the whole CD; the
Repeat indicator will light solid.
Press it again to cancel Repeat
function, the Repeat indicator
turns off.
and
— E10 —
13
PROGRAM: You can program
up to 20 tracks on any disc for
playback in any desired order.
While in the Stop mode, press
the PROG /REPEAT button;
the Repeat/Program indicator
will blink and “01” will appear on
the display indicating the first
program is ready to program.
Page 12
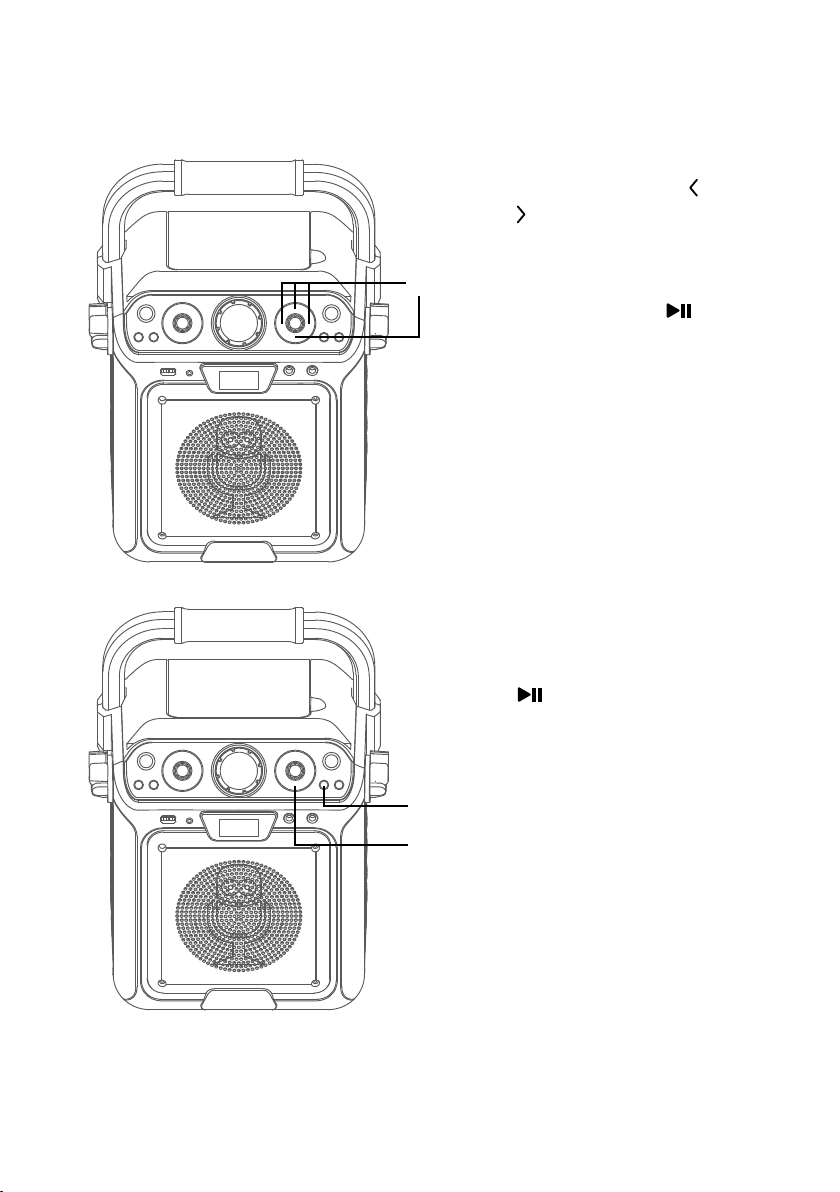
Operation
Playing a CD (Continued)
PROGRAM: Select the first
14
an
Program Notes:
• Press the STOP button TWICE to stop
• If more than 20 tracks are attempted
15
track using the SKIP
buttons. Press the PROG /
REPEAT button again to confirm
the entry. Repeat to set up to 20
tracks into memory. When done,
press the ENTER/
start playback.
and clear the program.
to be programmed, “FUL” will appear in
the display.
PAUSE: During playback, if
you wish to pause the disc
momentarily, press the ENTER/
button; the PLAY/PAUSE
indicator will blink. Press again to
resume normal playback.
and SKIP
button to
ap
ao
— E11 —
16
Press the STOP button to stop
playback.
Page 13
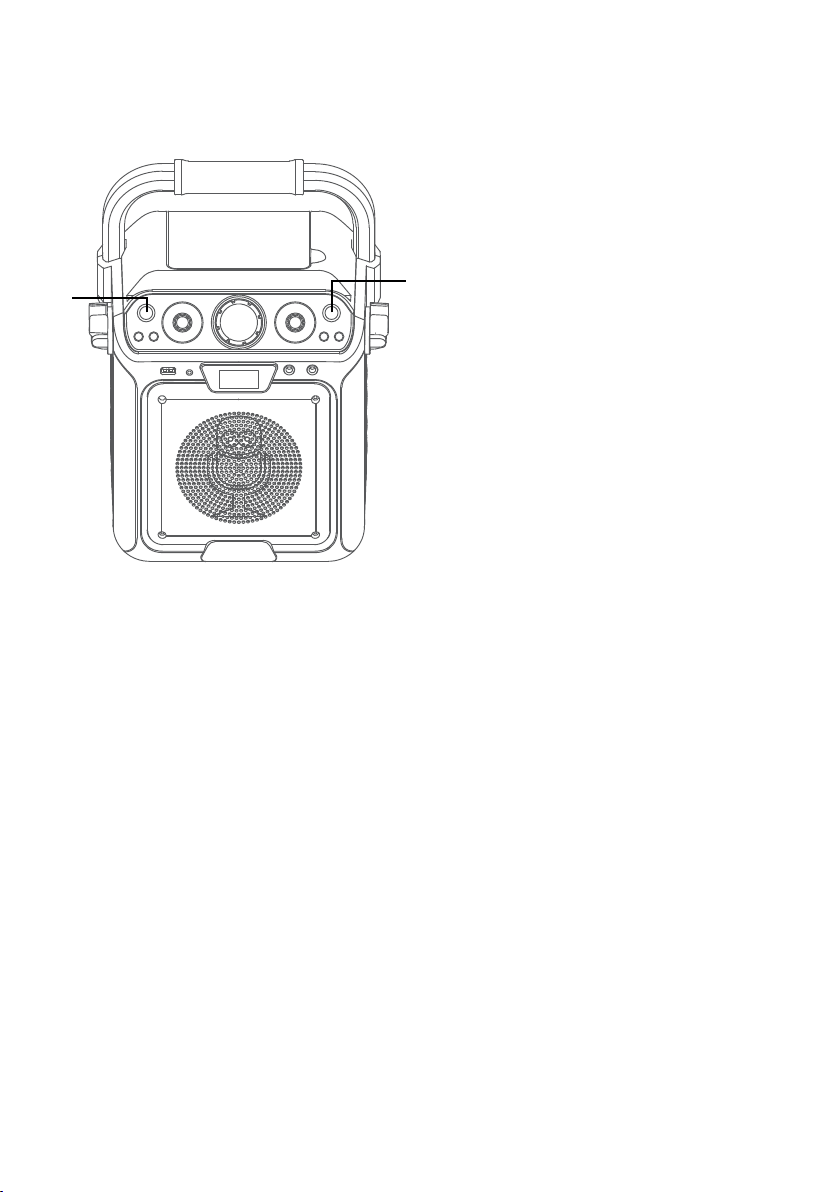
Operation
Playing a CD (Continued)
ar
RECORD YOUR VOCAL
17
To record your singing as well as
aq
When done recording, press
Notes:
• The recorded audio file will record onto
• See section “
18
PERFORMANCE:
the music, press the REC button.
Recording will begin and the light
around the REC button will light
solid.
the REC button again; the light
around the REC button will turn
off.
the USB drive.
Playing Songs from the
to play back your recorded files.
USB“
Press the ON/OFF button to turn
the unit off.
— E12 —
Page 14
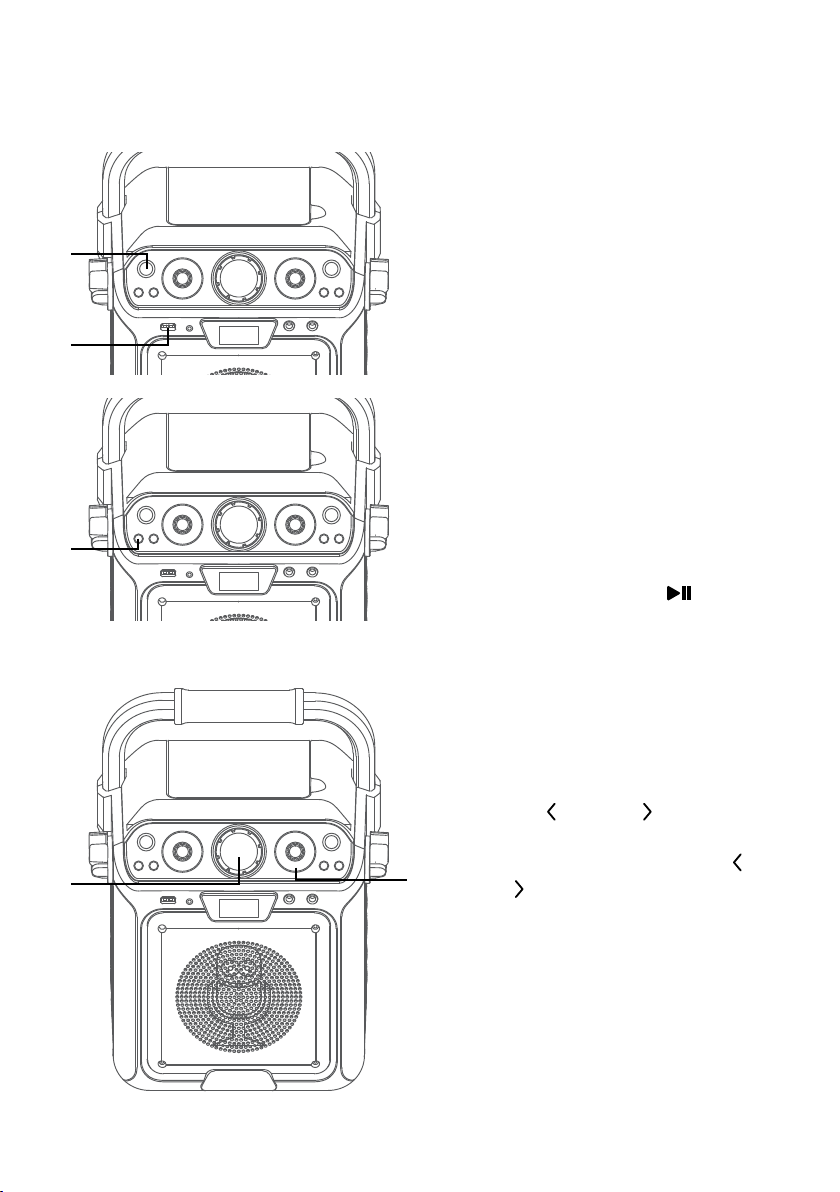
Operation
Playing Songs from the USB
u
v
w
y
Connect the unit as described
1
2
3
Note: It is highly recommended to have it
connected to a TV for USB playback.
4
Notes:
• If connected to a TV you will see the
• If you recorded any audio files you can
x
previously; it should be connected
to a TV. Press the ON/OFF
button to turn the unit on.
Insert a USB flash drive into the
USB slot on the unit so it faces
upward.
Repeatedly press the FUNCTION
button to select the USB mode;
“USb” will appear when searching
the drive and then the total
number of files will appear.
Press the ENTER/ button to
start playback; if listening to an
MP3+G file, the image and lyrics
will appear on the TV screen (if
connected).
selected song and folders on the TV
screen. You can navigate them using
the SKIP
also select them using the SKIP
SKIP
on the TV screen.
and SKIP buttons.
buttons to select the REC folder
and
— E13 —
Adjust the volume to a
5
Note: If connected to a TV or other audio
source, adjust the volume of the TV using
its own volume control.
comfortable level using the
MASTER VOLUME control.
Page 15
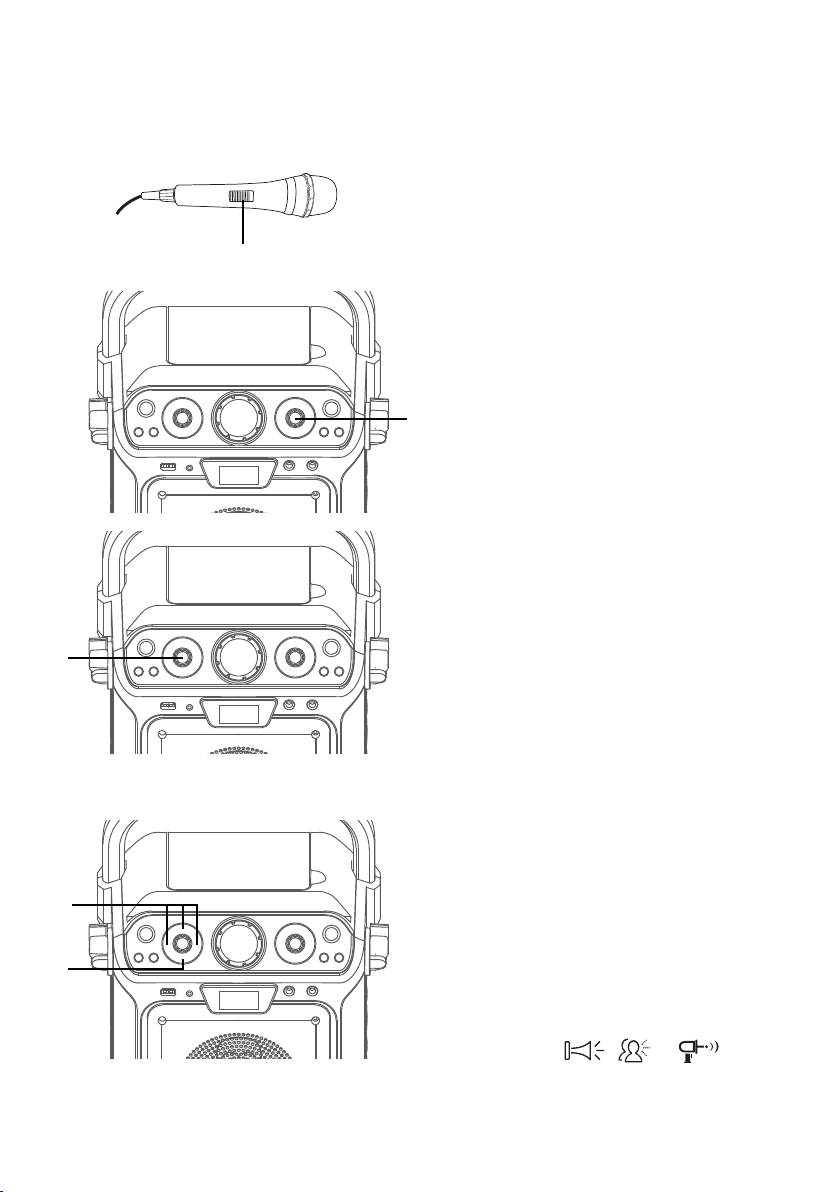
Operation
Playing Songs from the USB (Continued)
U
W
Connect microphone(s) and
6
7
slide the ON/OFF switch on the
microphone to the ON position.
Adjust the MIC VOLUME control
as desired. Increasing this control
will increase the volume of both
microphones.
V
SING-ALONG WITH BUILT-IN
8
EF0 - NONE,
EF1 - ECHO,
EF2 - FEMALE,
EF3 - MALE,
EF4 - CHIPMUNK,
EF5 - ROBOT, or
EF6 - RADIO.
VOICE CHANGERS
There are 6 built-in voice
changers in this unit. Adjust the
VOICE EFFECT control the voice
will change when the singer starts
to sing through the microphone.
at
X
— E14 —
SING-ALONG WITH BUILT-IN
9
There are 3 built-in loop songs.
1 0
LOOP SONGS
Repeatly press SONGS buttons
to play the 3 different songs. The
loop song will stop when pressing
fourth time.
PLAYING BUILT-IN EFFECTS
Press , or button
to play three different built-in
sound effects.
Page 16
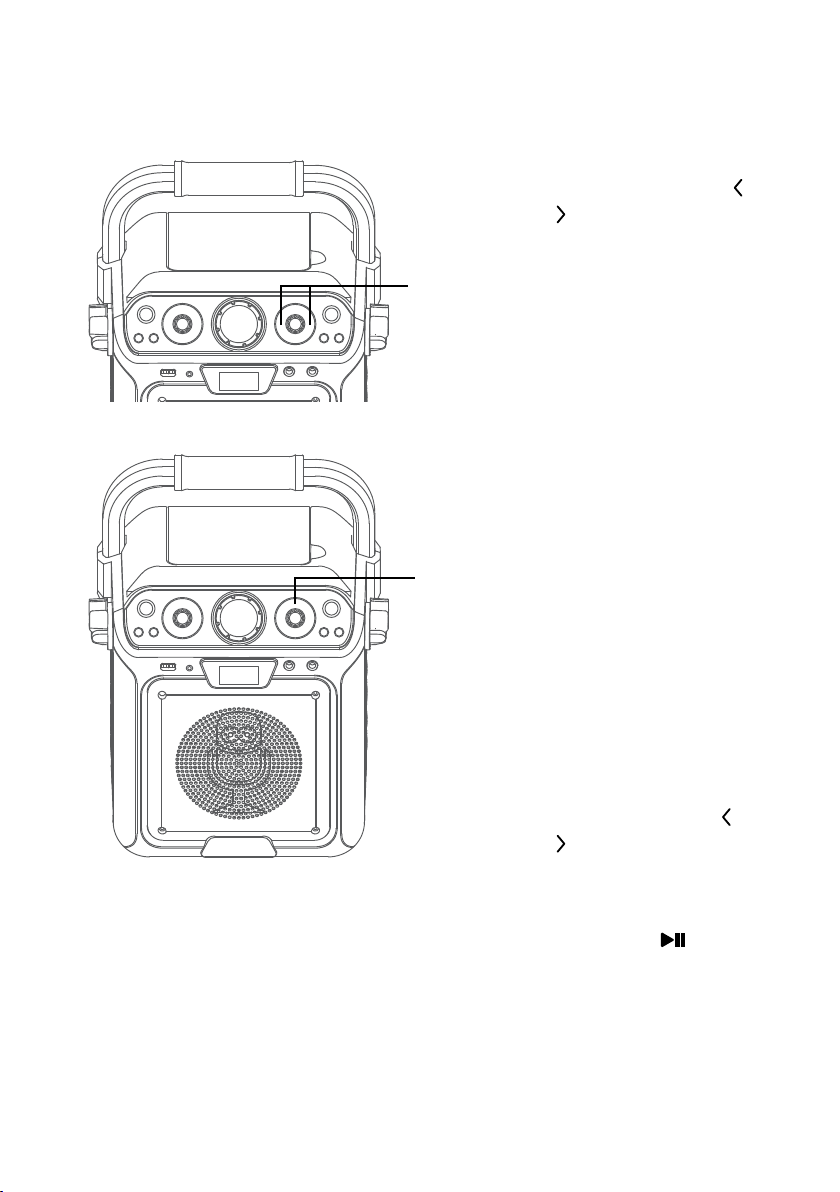
Operation
Playing Songs from the USB (Continued)
SKIP: Advance or go back one
11
ak
12
al
am
13
Notes:
• Press the STOP button TWICE to stop
• If more than 20 tracks are attempted to
track by pressing the SKIP
SKIP
REPEAT: During playback, press
the PROG /REPEAT button once
to repeatedly play the selected
song; the Repeat/Program
indicator will blink rapidly. Press
the PROG /REPEAT button a
second time to repeatedly play
the selected folder; the Repeat
indicator will blink slowly. Press
a third time to repeatedly play
the USB; the Repeat/Program
indicator will light solid. Press it
again to cancel Repeat function;
the indicator will turn off.
PROGRAM: You can program up
to 20 tracks for playback in any
desired order. While in the Stop
mode, press the PROG /REPEAT
button; the Program indicator will
blink and ”01” will appear on the
display indicating the first program
is ready to program. Select the
first track using the SKIP
SKIP
REPEAT button again to confirm
the entry. Repeat to set up to 20
tracks into memory. When done,
press the ENTER/ button to
start playback.
and clear the program.
be programmed, “FUL” will appear in the
display.
buttons.
buttons. Press the PROG /
and
and
— E15 —
Page 17
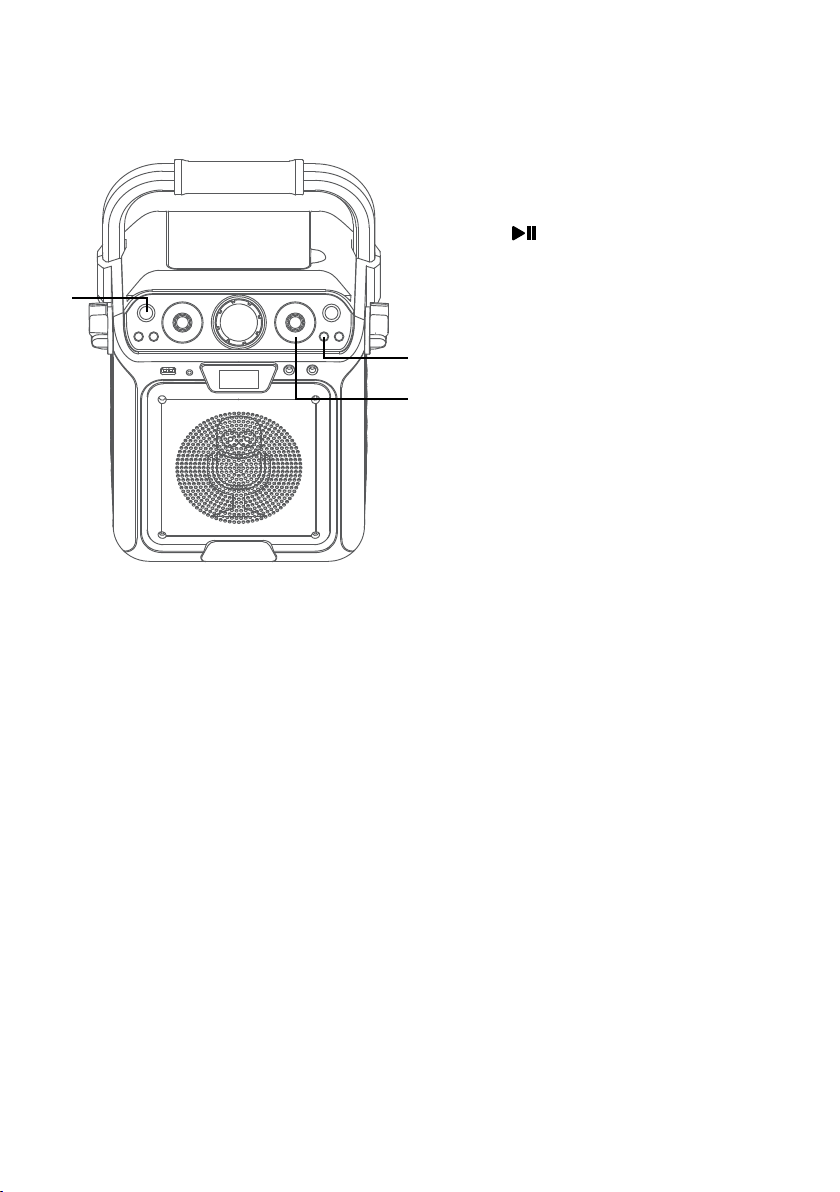
Operation
Playing Songs from the USB (Continued)
ap
ao
14
PAUSE: During playback, if
you wish to pause the music
momentarily, press the ENTER/
button; the Play/Pause
indicator will blink. Press again to
resume normal playback.
an
15
16
Press the STOP button to stop
playback.
Press the ON/OFF button to turn
the unit off.
— E16 —
Page 18
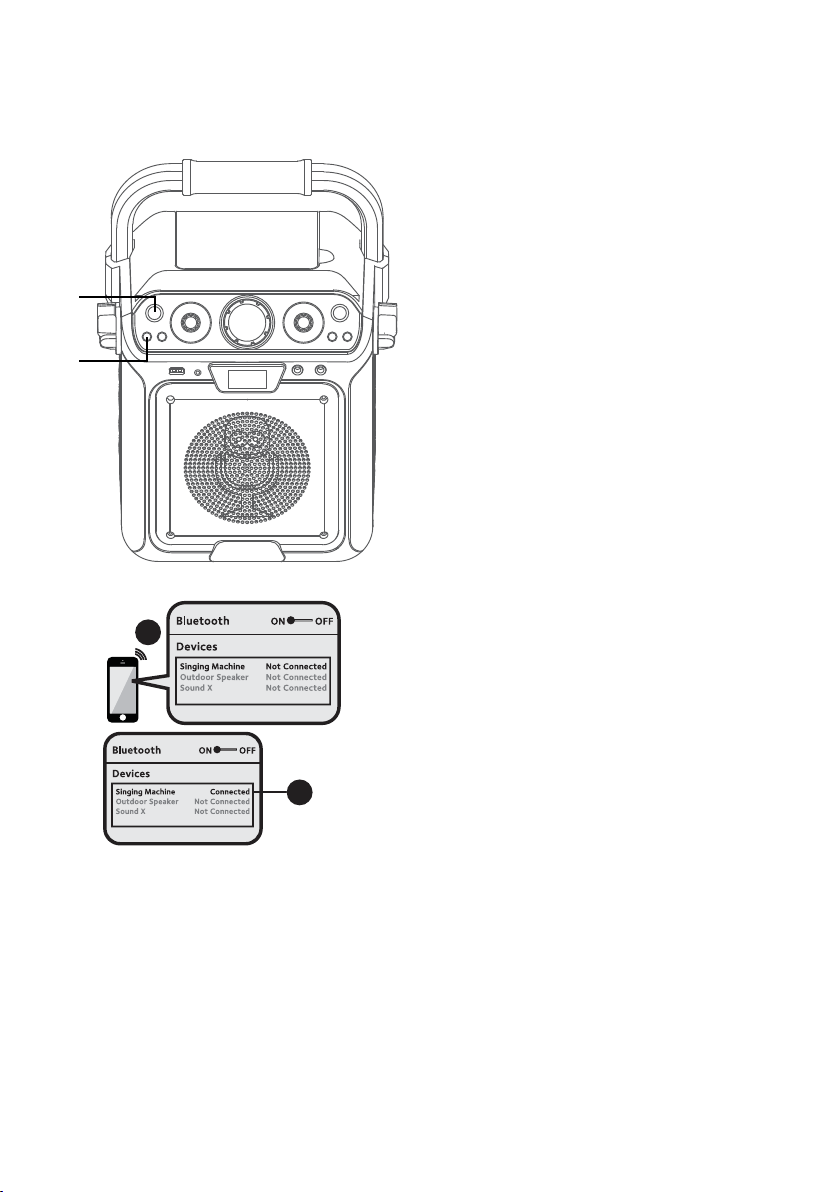
Operation
Please connect your Music Device
Your Music Device is connected
Please connect your Music Device
Your Music Device is connected
Using a Bluetooth Device
u
v
3
Connect the unit as described
1
2
Note: You can also press the PAIR button
to disconnect any paired devices in order
to pair another device.
3
Note: Also refer to the user manual
of your Bluetooth device for detailed
instructions.
previously. Press the ON/OFF
button to turn the unit on.
Repeatedly press the FUNCTION
button to select the Bluetooth;
“bt” will appear in the display. The
unit automatically searches for and
pairs a previously paired Bluetooth
device (if previously paired). If
no previously paired devices are
present, connect as shown in the
next step.
Turn on your device’s Bluetooth
option in settings to search for
a discoverable device with a
Bluetooth signal. Select “Singing
Machine” from the device results
on the Bluetooth menu.
4
— E17 —
The Bluetooth indicator will light
4
Notes:
• If your Bluetooth prompts you for a
• On some Bluetooth devices, once pairing
• If connection is lost after successful
solid and a chime will sound.
passcode during the pairing process,
please enter “0000” to connect.
is complete, select your Bluetooth
device as “Use as Audio Device” or
similar.
pairing, check to make sure the distance
between speaker and Bluetooth-enabled
device does not exceed 30 feet/10
meters.
Page 19
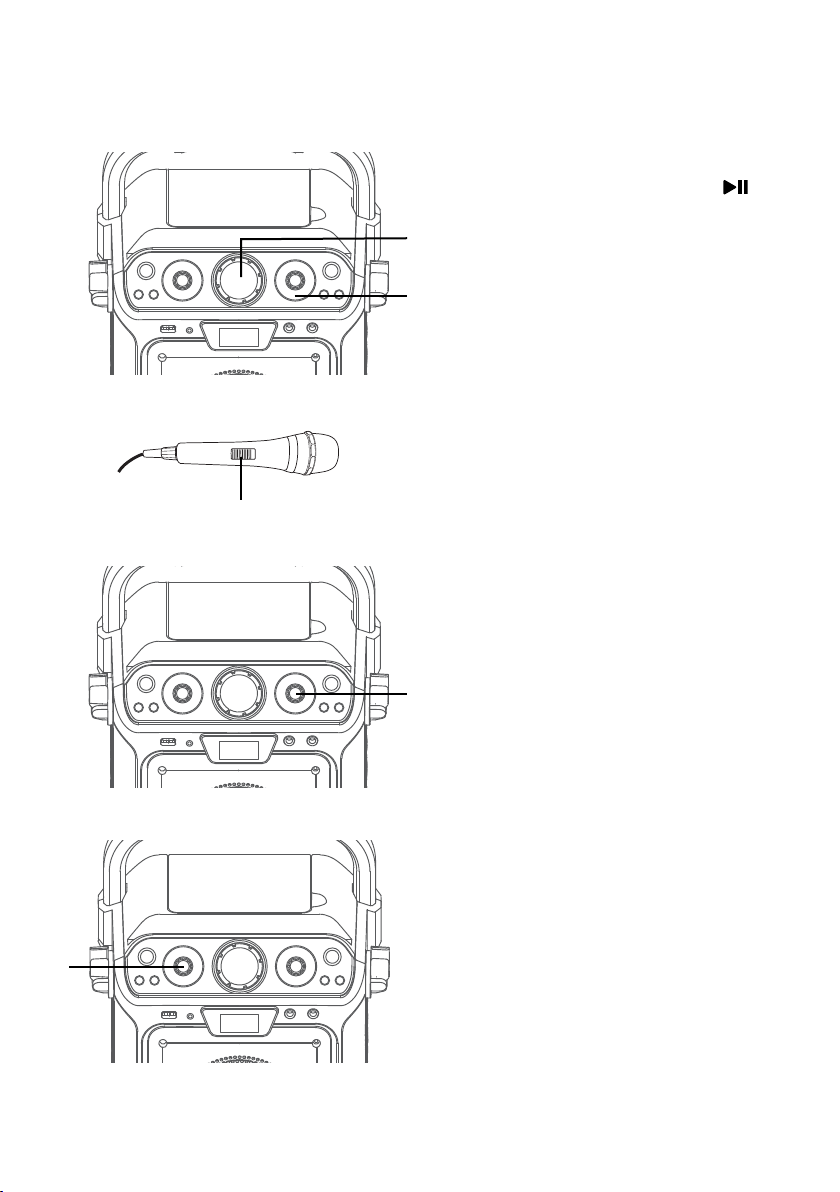
Operation
Using a Bluetooth Device (Continued)
U
Start playback of your bluetooth
5
device. Press the ENTER/
button during playback to pause
the song.
X
V
y
6
7
8
W
9
— E18 —
Adjust the volume to a
comfortable level using the
MASTER VOLUME control on this
unit as well as the volume on your
Bluetooth device.
Connect microphone(s) and
slide the ON/OFF switch on the
microphone to the ON position.
Adjust the MIC VOLUME control
as desired. Increasing this control
will increase the volume of both
microphones.
SING-ALONG WITH BUILT-IN
VOICE CHANGERS
There are 6 built-in voice changers
EF0 - NONE,
EF1 - ECHO,
EF2 - FEMALE,
EF3 - MALE,
EF4 - CHIPMUNK,
EF5 - ROBOT, or
EF6 - RADIO.
in this unit. Adjust the VOICE
EFFECT control the voice will
change when the singer starts to
sing through the microphone.
Page 20
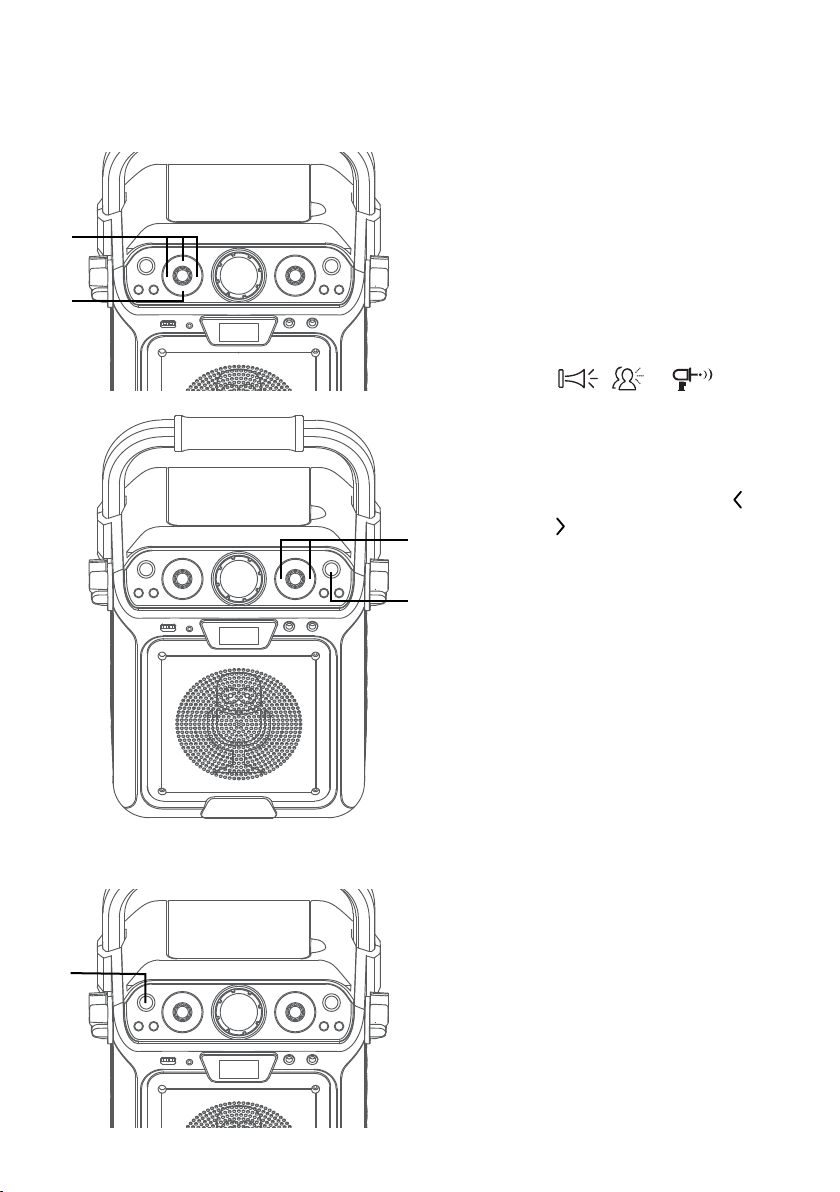
Operation
Using a Bluetooth Device (Continued)
ak
at
SING-ALONG WITH BUILT-IN
1 0
There are 3 built-in loop songs.
1 1
12
al
LOOP SONGS
Repeatly press SONGS buttons
to play the 3 different songs. The
loop song will stop when pressing
fourth time.
PLAYING BUILT-IN EFFECTS
Press , or button
to play three different built-in
sound effects.
SKIP: Advance or go back one
track by pressing the SKIP
buttons.
SKIP
and
an
am
13
14
— E19 —
RECORD YOUR VOCAL
PERFORMANCE:
To record your singing as well as
the music, press the REC button.
Recording will begin and the light
around the REC button will light
solid.
When done recording, press the
RECORD button again; the light
around the REC button will turn
off.
Notes:
• The recorded audio file will record onto
the USB drive.
• See section “
USB“
Press the ON/OFF button to turn
Playing Songs from the
to play back your recorded files.
the unit off.
Page 21
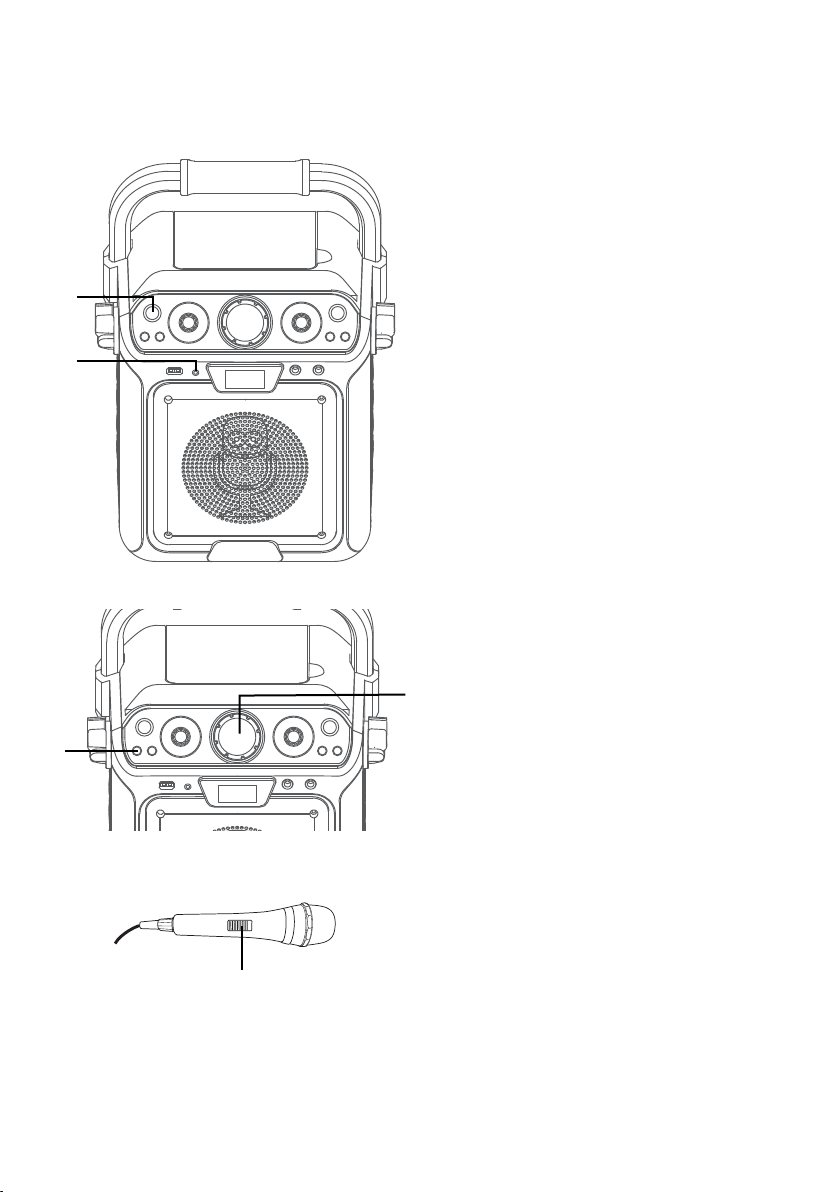
Operation
Using the LINE IN Jack
Connect the unit as described
1
previously. Press the ON/OFF
button to turn the unit on.
u
v
w
Connect the external unit to the
2
Notes:
• It is highly recommended to set the
• Skipping files/tracks is not possible in this
3
LINE IN Jack on the front of this
unit. Connecting an external unit
will allow the audio to be played
through your Singing Machine.
volume on the auxiliary unit to 1/3 or
lower to avoid distortion.
unit when using an external device.
Repeatedly press the FUNCTION
button to select the LINE IN mode;
“AU” will appear in the display.
x
Adjust the volume using the
4
MASTER VOLUME control on
this unit or your external device’s
volume control.
y
5
— E20 —
Connect microphone(s) and
slide the ON/OFF switch on the
microphone to the ON position.
Page 22
Operation
Using the LINE IN Jack (Continued)
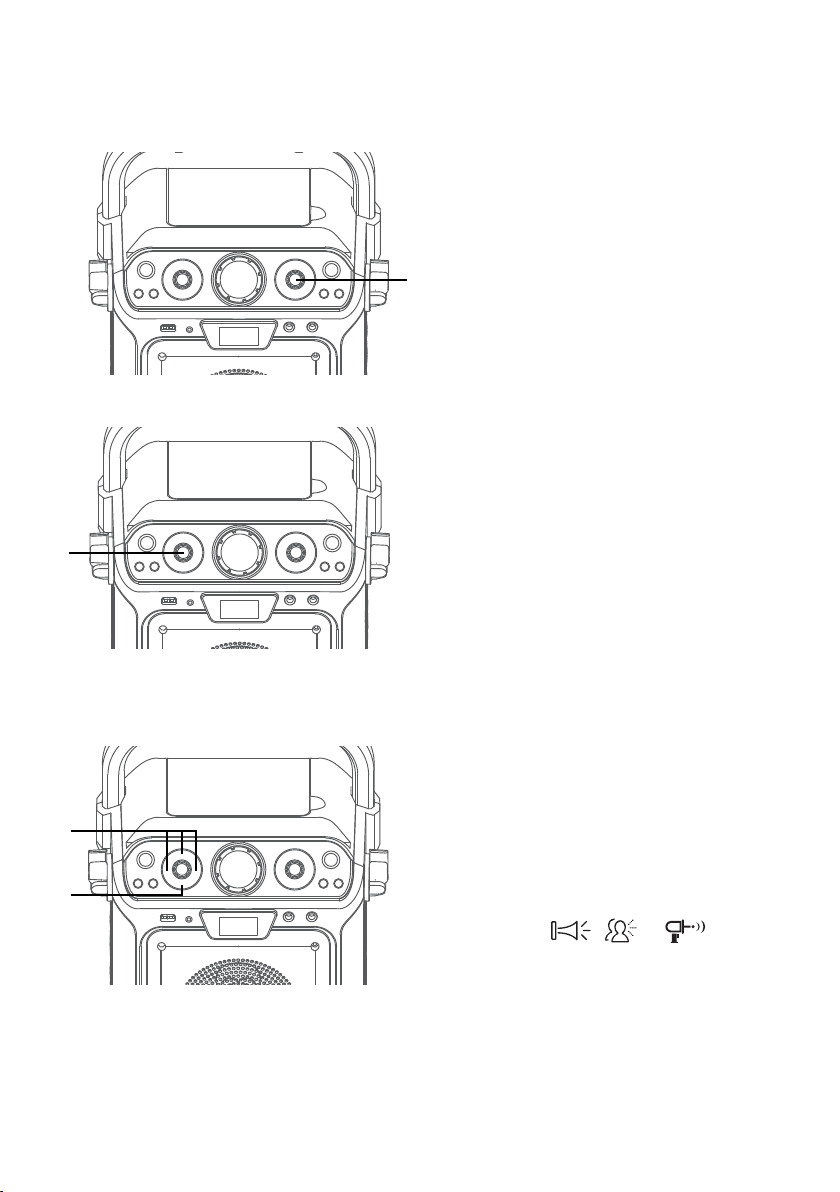
V
Adjust the MIC VOLUME control
6
U
7
EF0 - NONE,
EF1 - ECHO,
EF2 - FEMALE,
EF3 - MALE,
EF4 - CHIPMUNK,
EF5 - ROBOT, or
EF6 - RADIO.
as desired. Increasing this control
will increase the volume of both
microphones.
SING-ALONG WITH BUILT-IN
VOICE CHANGERS
There are 6 built-in voice changers
in this unit. Adjust the VOICE
EFFECT control the voice will
change when the singer starts to
sing through the microphone.
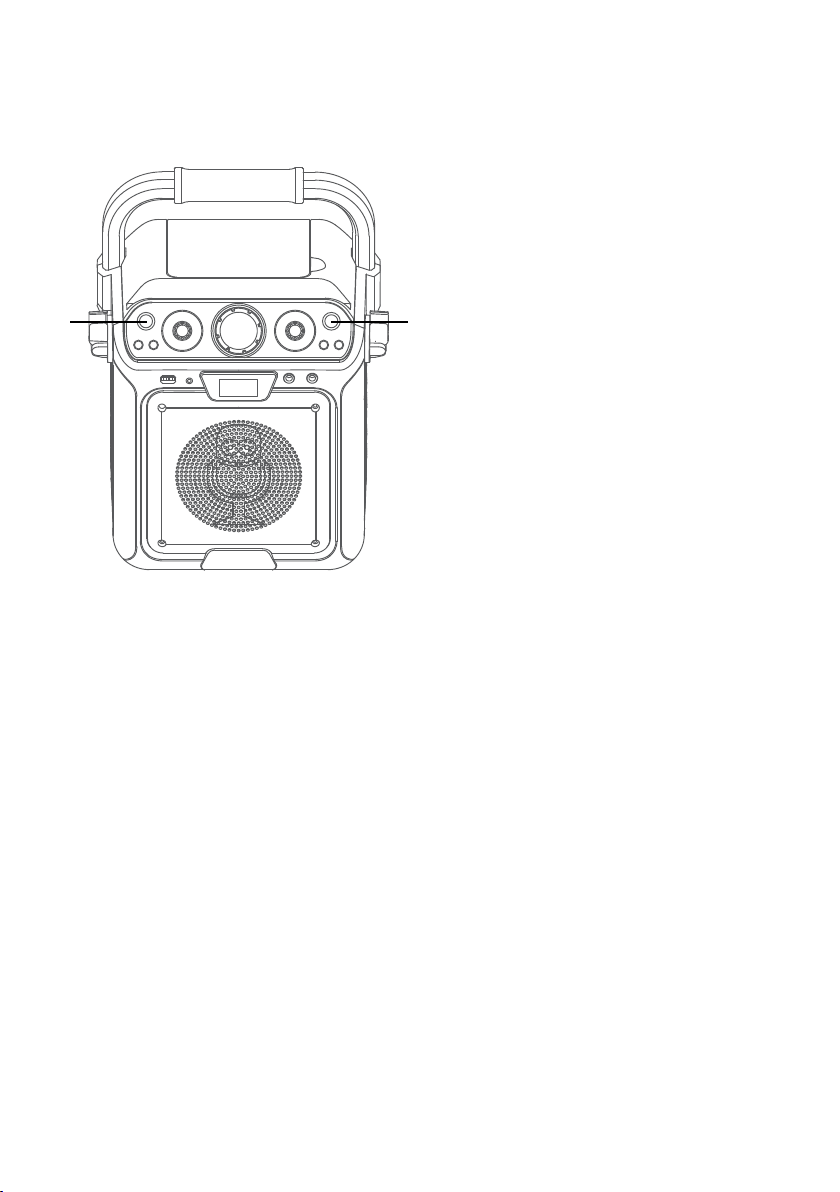
X
W
SING-ALONG WITH BUILT-IN
8
There are 3 built-in loop songs.
9
— E21 —
LOOP SONGS
Repeatly press SONGS buttons to
play the 3 different songs. The loop
song will stop when pressing fourth
time.
PLAYING BUILT-IN EFFECTS
Press , or button to
play three different built-in sound
effects.
Page 23
Operation
Using the LINE IN Jack (Continued)
ak
RECORD YOUR VOCAL
10
To record your singing as well as
at
Notes:
• The recorded audio file will record onto
• See section “
11
PERFORMANCE:
the music, press the REC button.
Recording will begin and the light
around the REC button will light
solid.
When done recording, press the REC
button again; the light around the REC
button will turn off.
the USB drive.
Playing Songs from the
to play back your recorded files.
USB“
Press the ON/OFF button to turn
the unit off.
— E22 —
Page 24
Operation
Where to Download MP3+G Files
Helpful Hints:
The .mp3 and .cdg files are delivered for download in
a single, compressed MP3+G.zip file. The MP3+G file
cannot be played as a .zip file on a USB flash drive.
To play karaoke songs using a USB flash drive, the
MP3+G .zip file must be unzipped as follows:
• Connect a USB flash drive to your computer.
• Download the MP3+G file from your Digital
Locker and save the .zip* file to a folder on your
computer.
• Double click the .zip file to open the .zip (you
will see the .mp3 and .cdg files).
• Drag and drop the .mp3 and .cdg files to the
USB flash drive.
• Remove (eject) the USB flash drive from your
computer.
Turn on the Singing Machine and connect the USB
flash drive.
FAQ
• Where can I get additional help with the
file formats?
Visit http://singingmachine.com/smc-
music/ to get additional resources about
the right type of FILE FORMAT for your
system.
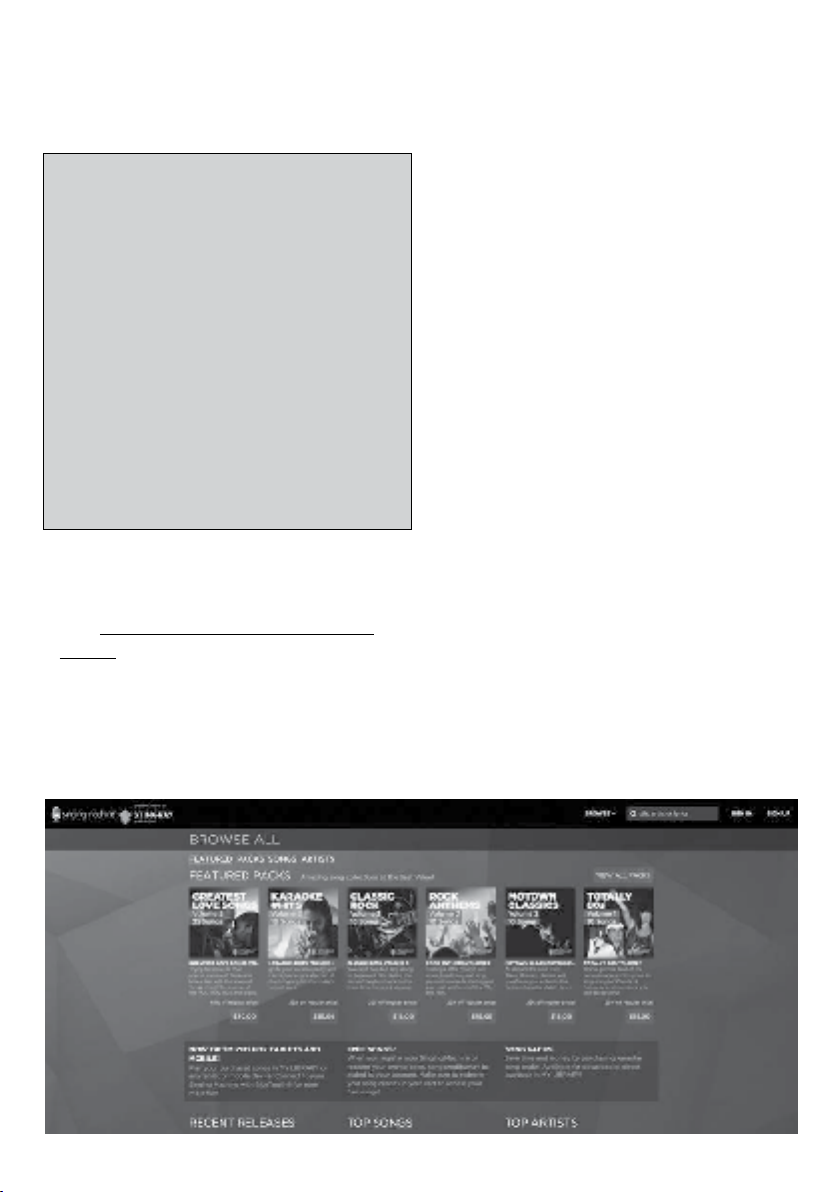
To purchase and download karaoke music,
please visit http://store.singingmachine.
com to access over 13,000+ of your
favorite karaoke songs. You will need a USB
flash drive (not included) to transfer the
downloads to this unit.
Follow these easy steps:
Go to http://store.singingmachine.com
1
using your internet browser, and then
register.
Select and purchase your favorite
2
karaoke music from the Singing
Machine Download Store.
Download your selected purchase(s)
3
from the Singing Machine Digital
Locker to your USB flash drive.
Insert the USB flash drive as shown on
4
page E13 and enjoy!
Note: Your downloaded songs can also be
burned to a blank CDR/CDRW.
— E23 —
Page 25

Troubleshooting Guide
Should this unit exhibit a problem, check the following before seeking service:
No Power
• Power is not on; press the
• Confirm the AC adapter is connected securely to the back of the unit.
• Connect the unit to a different outlet.
• If using batteries, replace with new ones.
No Sound – General
• MASTER VOLUME is set to minimum; raise volume.
• Correct Function was not selected; select using the FUNCTION button.
• If using an external device, raise the volume.
.
No Sound – If connected to a TV
• Volume on the TV is muted or too low.
• Correct source (usually AV) was not selected on the TV’s menu.
Lyrics do not appear on the TV screen
• If connected to a TV, Video plug is not connected properly; see page E5.
• If connected to a TV, select the correct source on the TV (usually AV).
• The file/track being played is not a track recording with lyrics. These are the only files
that allow you to view the lyrics on the TV screen.
• Nothing will appear on the TV screen when using Line In or Bluetooth.
ON/OFF
button to turn power on.
No sound from the microphone
• Make sure the microphone is firmly connected to the MIC 1 or MIC 2 jack.
• Make sure the Mic’s ON/OFF switch on the Mic is set to the ON position.
• Make sure the mic’s volume is not set too low.
• MASTER VOLUME is set to minimum; raise volume.
File(s) on USB jack not playing
• The file is corrupted; replace the file.
• The file is not in a format this unit will play.
• The connected USB device is not supported by the product.
The Bluetooth device cannot be paired or connected with the unit
• You have not activated the Bluetooth function of your device; see page E17 or refer to
the Bluetooth device user’s manual.
• The system is not in pairing mode; press the PAIR button to restart pairing.
The Music is not available on the unit after successfully connecting the Bluetooth
• Ensure your Bluetooth device can support the A2DP Bluetooth profile.
• The volume on the external Bluetooth device is set to low or muted; raise as desired.
— E24 —
Page 26

Specifications
AUDIO
Output Power ..............................................................................................8 Watts (RMS) 10% THD
Output Impedance ........................................................................................................................4 Ohms
CD SECTION
Frequency Response..................................................................................................... 100Hz - 20kHz
Signal-to-Noise Ratio ...................................................................................................50dB (A-WTD)
Number of Programs ..........................................................20 Step Random Access Programming
BLUETOOTH
Bluetooth Version ...............................................................................................................................V5.0
Working Distance ..........................................Up to 30 feet/10 meters measured in open space
USB
Format ................................................................................................................................................FAT32
Maximum Compatibility ..................................................................................................................32GB
GENERAL
Power .................................................................................................................... DC9V Positive Center
Dimensions - Main Unit ........................................... 340 mm (W) x 378 mm (H) x 216 mm (D)
Weight - Main Unit .......................................................................................................................2.56 Kg
Microphone ....................... -74 dB 600 Ohms impedance with 6.3 mm Dynamic Microphone
Aux In ..........................................................................................................................3.5mm Stereo Jack
Specifications are subject to change without notice.
The Bluetooth® word mark and logos are registered trademarks
owned by Bluetooth SIG, Inc. and any use of such marks by The
Singing Machine Company, Inc. is under license. Other trademarks
and trade names are those of their respective owners.
— E25 —
Page 27
Mises en Garde
MISE EN GARDE
RISQUE DE CHOC ÉLECTRIQUE
NE PAS OUVRIR
MISE EN GARDE: AFIN DE RÉDUIRE LE RISQUE D’ÉLECTROCUTION, NE PAS
RETIRER LE COUVERCLE (OU LE DOS DU BOÎTIER). AUCUNE PIÈCE POUVANT
ÊTRE RÉPARÉE PAR L’UTILISATEUR NE SE TROUVE À L’INTÉRIEUR. POUR TOUTE
RÉPARATION, CONTACTER UN TECHNICIEN COMPÉTENT.
TENSION DANGEREUSE: Le symbole de l’éclair dans un
triangle équilatéral a pour but d’avertir l’utilisateur du danger
présenté par des pièces non isolées à l’intérieur de l’appareil,
dont la tension est suffisante pour provoquer des décharges
électriques dangereuses.
ATTENTION: Le point d’exclamation à l’intérieur d’un triangle
équilatéral a pour but d’avertir l’utilisateur de la présence
de consignes importantes sur le fonctionnement et
l’entretien (réparation) de l’appareil dans la documentation
accompagnant ce produit.
AVERTISSEMENT D’ÉGOUTTEMENT: Ce produit ne doit pas être exposé à
l’égouttement ni aux éclaboussures et aucun objet rempli de liquide, tel qu’un
vase, ne doit être placé sur le produit.
AVERTISSEMENT D’AÉR ATION: L’aération normale du produit ne doit pas
être entravée pour l’usage prévu.
Ce produit est conforme aux règles 21 CF, chapitre 1 du ministère de la sante et
des services sociaux, sous-chapitre J applicable à partir de la date de fabrication
Mise en garde:
• Ce lecteur de CD est muni d’un faisceau de lumière au laser. Seul un
technicien qualifié devrait retirer le couvercle et tenter toute réparation
ou entretien sur cet appareil afin d’éviter tout risque de blessure aux yeux.
• L’utilisation de commandes, de réglages ou de procédures autre que ceux
spécifiés dans le présent document peut causer un risque d’exposition aux
radiations.
• Cet appareil doit être utilisé dans un endroit aéré.
ATTENTION!
Vous risquez d’être exposé à un rayonnement laser dangereux et invisible en
ouvrant ce produit et en désactivant ou rendant inopérant le dispositif de
verrouillage. Évitez toute exposition directe au faisceau.
MISE EN GARDE : AFIN D’ÉVITER TOUT RISQUE D’ÉLECTROCUTION,
JUMELER LA LARGE BROCHE DE LA FICHE À LA FENTE LA PLUS LARGE
ET L’INSÉRER COMPLÈTEMENT.
AVERTISSEMENT: AFIN D’ENRAYER TOUT RISQUE D’ÉLECTROCUTION
OU D’INCENDIE, NE PAS EXPOSER CET APPAREIL À LA PLUIE OU À
L’HUMIDITÉ.
MISE EN GARDE DE LA FCC: Cet appareil peut générer ou utiliser des
fréquences radio. Les modifications ou changements peuvent causer des
interférences nuisibles, à moins que ces modifications ne soient approuvées
expressément dans ce mode d’emploi. L’utilisateur pourrait perdre l’autorité
de faire fonctionner cet équipement en cas de modification non autorisée.
Cet appareil répond aux exigences de l’alinéa 15 des règlementations FCC.
Son utilisation est soumise aux deux conditions suivantes : 1) Cet appareil
ne peut pas causer d’interférence nuisible et 2), Cet appareil doit accepter
toute interférence reçue, incluant les interférences qui pourraient affecter
son fonctionnement.
REMARQUE: Suite aux tests effectués, il est établi que cet appareil numérique
de Classe B répond aux exigences de l’alinéa 15 des réglementations FCC. Ces
normes sont élaborées pour vous protéger contre toute interférence nuisible
en installation résidentielle. Cet appareil génère, utilise et peut émettre des
fréquences radio. Par conséquent, s’il n’est pas installé et utilisé en suivant les
instructions, il peut causer des interférences nuisibles aux communications
radio. Cependant , aucune garantie n’est donnée concernant la possibilité
d’interférence avec une installation spécifique. Si une interférence se
produisait en réception radio et/ou de télédiffusion, lors de l’activation et la
désactivation de l’appareil, nous vous recommandons
• Réorientez ou déplacez l’antenne de réception.
• Éloignez l’appareil du récepteur.
• Branchez l’appareil à une prise de courant différente de celle utilisée par
le récepteur.
• En cas de problème, contactez le vendeur ou un technicien spécialisé en
réception radio/TV.
Le régime nominal est indiqué dans la partie inférieure de l’appareil.
INDUSTRIE CANADA REMARQUE::
L’émetteur/récepteur exempt de licence contenu dans le présent appareil
est conforme aux CNR d’Innovation, Sciences et Développement
économique Canada applicables aux appareils radio exempts de licence.
L’exploitation est autorisée aux deux conditions suivantes :
(1) L’ appareil ne doit pas produire de brouillage;
(2) L’ appareil doit accepter tout brouillage radioélectrique subi, même si le
brouillage est susceptible d’ en compromettre le fonctionnement.
CAN ICES-3(B)/NMB-3(B)
Renseignements Importants de Sécurité
1. Lisez ces instructions.
2. Conservez ces instructions.
3. Respectez toutes les mises en garde.
4. Suivez toutes les consignes.
5. N’utilisez pas cet appareil à proximité de l’eau.
6. Nettoyez l’appareil uniquement avec un chiffon sec.
7. Ne bloquez pas les ouvertures d’aération. Installez conformément
selon les consignes du fabricant.
8. N’installez pas à proximité de sources de chaleur telles que les
radiateurs, registres d’air chaud, cuisinières, ou autres appareils
(notamment des amplificateurs) produisant de la chaleur.
9. Ne nuisez pas à la fonction de sécurité de la fiche polarisée ou
de mise à la terre. Une fiche polarisée est dotée de deux broches
dont l’une est plus large que l’autre. Une fiche de mise à la terre
est dotée de deux broches et d’une troisième broche de mise à
la terre. La broche la plus large ou la troisième broche est conçue
pour votre sécurité. Lorsque la broche fournie ne convient pas
à la prise, consultez un électricien afin de remplacer la prise
désuète.
10. Protégez le cordon d’alimentation afin que personne ne marche
dessus ou le pince, particulièrement au niveau des broches, de la
prise et du point où ils sortent de l’appareil.
11. Utilisez seulement les accessoires spécifiés par le fabricant.
12. Utilisez seulement avec un chariot, une sellette, un trépied,
— F1 —
un support ou une table. Lorsqu’un
chariot est utilisé, prenez garde de ne pas
déplacer la combinaison chariot/appareil
pour éviter toute blessure causée par un
renversement.
13. Débranchez cet appareil durant un orage
ou lorsqu’il n’est pas utilisé pendant de
longues périodes.
14. Confiez toutes les réparations à un
technicien compétent. La réparation s’avère nécessaire
lorsque l’appareil a été endommagé, par exemple, si le cordon
d’alimentation ou la fiche a été endommagé, du liquide a
été renversé ou des objets sont tombés dans l’appareil, ou si
l’appareil a été exposé à la pluie ou à l’humidité, ne fonctionne
pas normalement, ou a été échappé.
15. AVERTISSEMENT : Pour réduire le risque d’électrocution, évitez
d’exposer l’appareil à la pluie ou à l’humidité. Ne déposez pas
d’objets remplis d’eau, tels qu’un vase, sur l’appareil.
16. La fiche de secteur c.a. est utilisée pour débrancher l’appareil et
doit être facilement accessible et utilisable durant l’usage prévu.
Afin de couper complètement l’alimentation de l’appareil, la fiche
de secteur doit être complètement débranchée de la prise c.a.
17. MISE EN GARDE : Afin de réduire le risque d’incendie ou
d’explosion, n’exposez pas les piles à une source de chaleur
excessive telle que le soleil, le feu ou autre.
AVERTISSEMENT RELATIF
AU CHARIOT PORTATIF
(Symbol fourni par RETAC)
Page 28

Visit Our Website: www.singingmachine.com
Visite nuestro sitio web: www.singingmachine.com
Visitez notre site Internet au: www.singingmachine.com
Copyright © 2019 - All Rights Reserved.
Derechos de autor © 2019 Todos los derechos reservados.
Droit d’auteur © 2019 Tous Droits Réservés.
The Singing Machine Company, Inc.
4060 E Jurupa Street, Unit B
Ontario, CA 91761-1413 USA
The Responsible Party
Company Name : The Singing Machine Company, Inc.
Address : 6301 NW 5th Way, Suite 2900, Fort Lauderdale,
FL33309, USA
Telephone : 954 -596-1000
Website : www.singingmachine.com
PRINTED IN CHINA
IMPRESO EN CHINA
IMPRIMÉ EN CHINE
712-xxxx-ESF01-US
 Loading...