

Page 1
Electronic Drum Set
Batterie Electronique
Batería Electrónica
Instruction Manual
Manuel d’Instruction
Manual de Instruciones
Volume
SMI-1460
tempo/tap
Page 2

Congratulations!
ThankyouforpurchasingyourElectronicDrumSet.ThisDrumSethasbeendevelopedtoperformsimilartoan
acoustic drum set but with greaterease.Priortousing this instrument, we recommend thatyoureadthrough
thismanual.
English
Taking care of your Electronic Drum Set
LOCATION
• Do not expose the unit to the following conditions
to avoid deformation, discoloration, or more
serious damage.
•
Direct sunlight.
High temperature (near a heat source, or in a
•
car during the daytime).
Excessive humidity.
•
POWER SUPPLY
•
Please use the AC adapter included with this
product. Insure the AC outlet voltage in the
country it is being used matches the input voltage
specified on the AC adapter’s label.
•
Turn the power switch OFF when the instrument
isnotinuse.
•
The AC adapter should be unplugged from the AC
outlet if the instrument is not in use for an
extended period of time.
•
Unplug the AC adapter during electric storms.
•
Avoid plugging the AC adapter into the same AC
outlet as an appliance with high power
consumption, such as electric heaters or ovens.
Also avoid using multi-plug adapters since this
can result in reducing the sound quality,
operation errors, and possible damage.
HANDLING AND TRANSPORT
•
Never apply excessive force to the controls,
connectors or other parts of the instrument.
Always unplug cables by gripping the plug firmly,
•
but not pulling on the cable.
Disconnect all cables before moving the
•
instrument.
Physical shocks caused by dropping, bumping, or
•
placing heavy objects on the instrument can
result in scratches and more serious damage.
CLEANING
•
Clean the unit with a dry soft cloth.
•
A slightly damp cloth may be used to remove
stubborn grime and dirt.
•
Never use cleaners such as alcohol or thinner.
Avoid placing vinyl objects on top of the unit (vinyl
•
can stick to and discolor the surface).
ELECTRICAL INTERFERENCE
This instrument contains digital circuitry and may
•
cause interference if placed to close to radio or
television receivers. If this occurs, move the
instrument further away from the affected
equipment.
TURN POWER OFF WHEN MAKING CONNECTIONS
•
To avoid damage to the instrument and other
devices to which it is connected, turn the power
switches of all related devices OFF prior to
connecting or disconnecting cables.
E02
Page 3

CONTENTS
Panel Controls
- Front panel .................................................................................................. 4
- Rear Panel................................................................................................... 5
- Side Panel ................................................................................................... 5
Setup
- Connect the Pads and the Pedal ..................................................................... 6
- Connect a MIDI device................................................................................... 7
- Connect audio equipment............................................................................... 7
- Connect a CD player, etc. (Aux. in jack)............................................................ 7
- Connect Headphones .................................................................................... 7
- Connect the Power supply jack........................................................................ 7
Functions
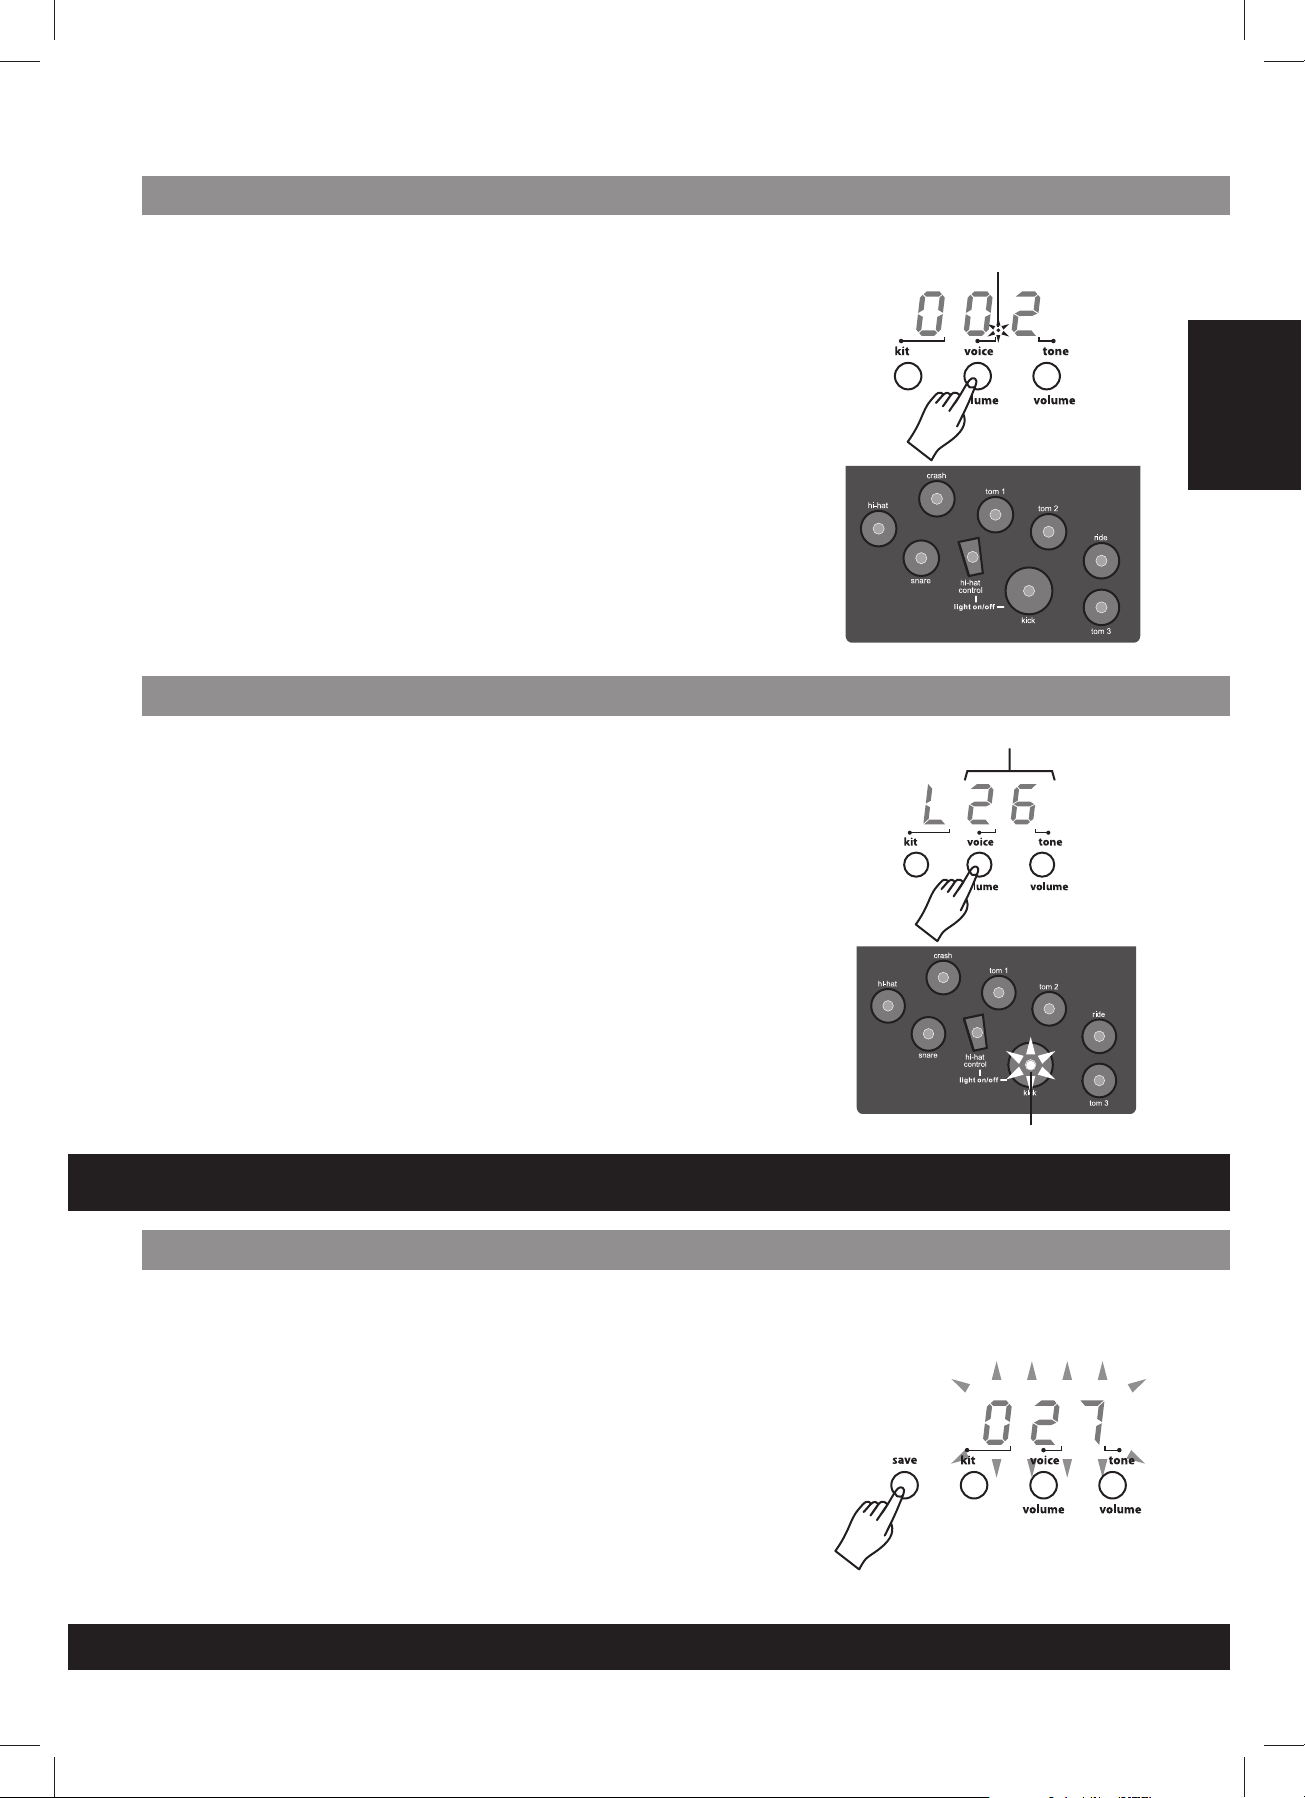
- Switch the power ON .................................................................................... 8
- Set the main volume ..................................................................................... 8
- Select a drum kit ......................................................................................... 8
- Play with a Metronome ................................................................................. 8
Play a Tone
- Select a Tone .............................................................................................. 9
- Listen to the Tone ........................................................................................ 9
- Adjust Tone’s volume .................................................................................... 9
- Adjust Tone’s tempo ..................................................................................... 9
- Tap tempo function .................................................................................... 10
- Mute a Drum part ..................................................................................... 10
- Play with the Click voice .............................................................................. 10
- Use the lighting guide function ..................................................................... 10
Create a user Drum Kit
- Set a drum voice ....................................................................................... 11
- Adjust the volume ...................................................................................... 11
- Save your drum kit voices ............................................................................ 11
Specifications
Voice list
Preset kit list
Tone list
MIDI implementation chart
........................................................................................................... 6
..................................................................................................... 8
................................................................................................... 13
.................................................................................................... 14
............................................................................................. 4
.................................................................................................. 9
............................................................................. 11
............................................................................................ 12
............................................................................................ 14
........................................................................ 15
English
E03
Page 4
PANEL CONTROL
Front Panel
English
1
1
3 4
2
5
6 7 8
9
10
tempo/tap
Volume
11 13
1
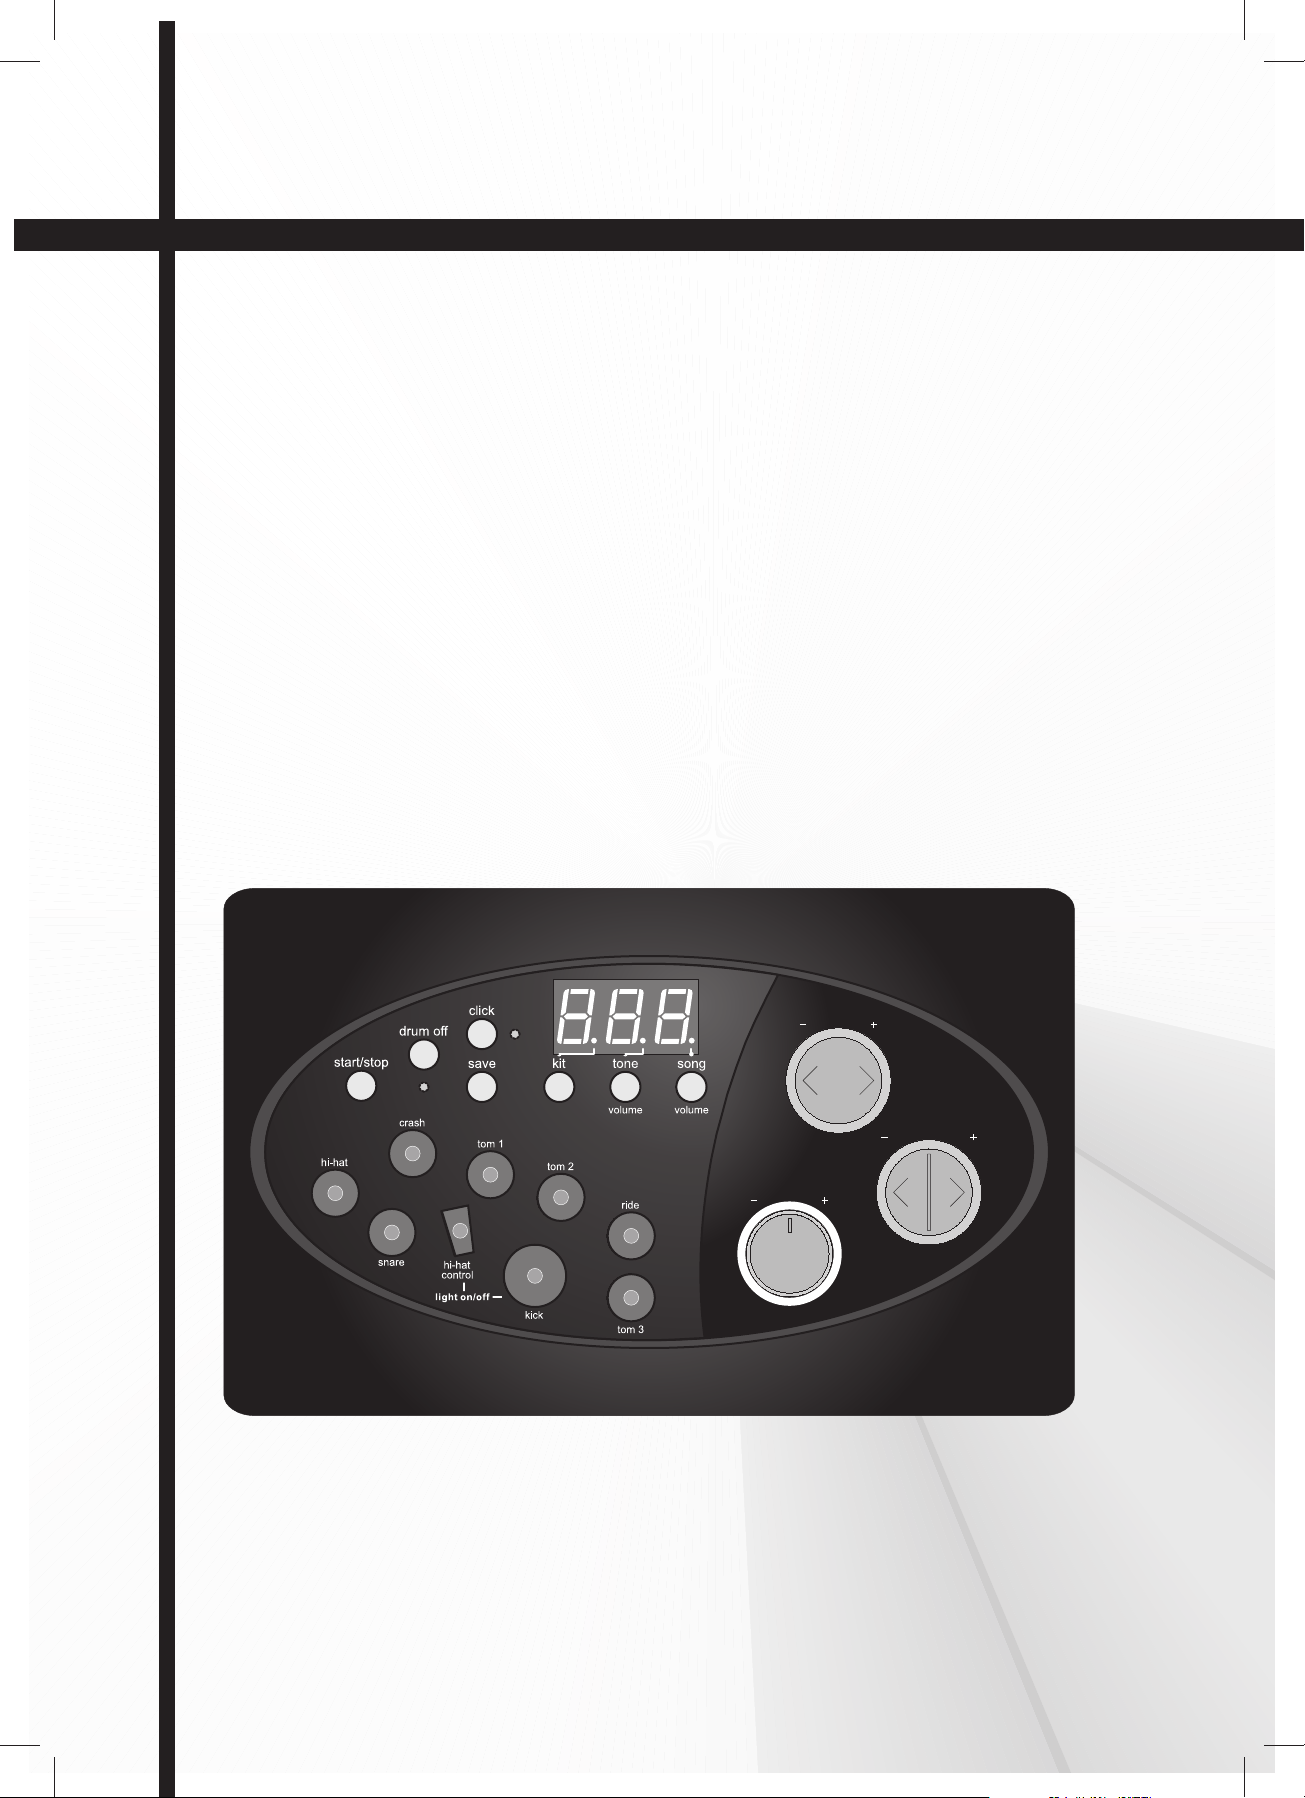
[ start / stop ] button
Start or stop song playing.
2
[ drum off ] button indicator
This button is used to turn on or turn off
the percussion of tone.
3
[ save ] button
Save the current kit setting to a user kit.
4
[ click ] button
Turn on / off the metronome.
5
Beat indicator
Beat of metronome or a tone that is
playing.
6
[ kit ] button
Display the drum kit number.
7
[ tone / volume ] button
Display the song number or
accompaniment volume value.
8
[ voice / volume ] button
Display the voice number or volume value.
12
9
3-Digit LED display
Display the parameters of the current
menu mode.
[+]and[-]buttons
10
These buttons are used to change the
setting number of the kit, voice, song and
adjusts the Pad volume.
11
Pad select buttons and indicators
Select current pad and adjust the pad
volume.
When you press them, the corresponding
indicator lights up.
[ tempo -/+ ] and [ tap ] buttons
12
Change current tempo.
13
Volume Knob
To control the volume of the headphone and
line output, turn the knob clockwise to
increase the volume and counterclockwise
to decrease the volume.
E04
Page 5
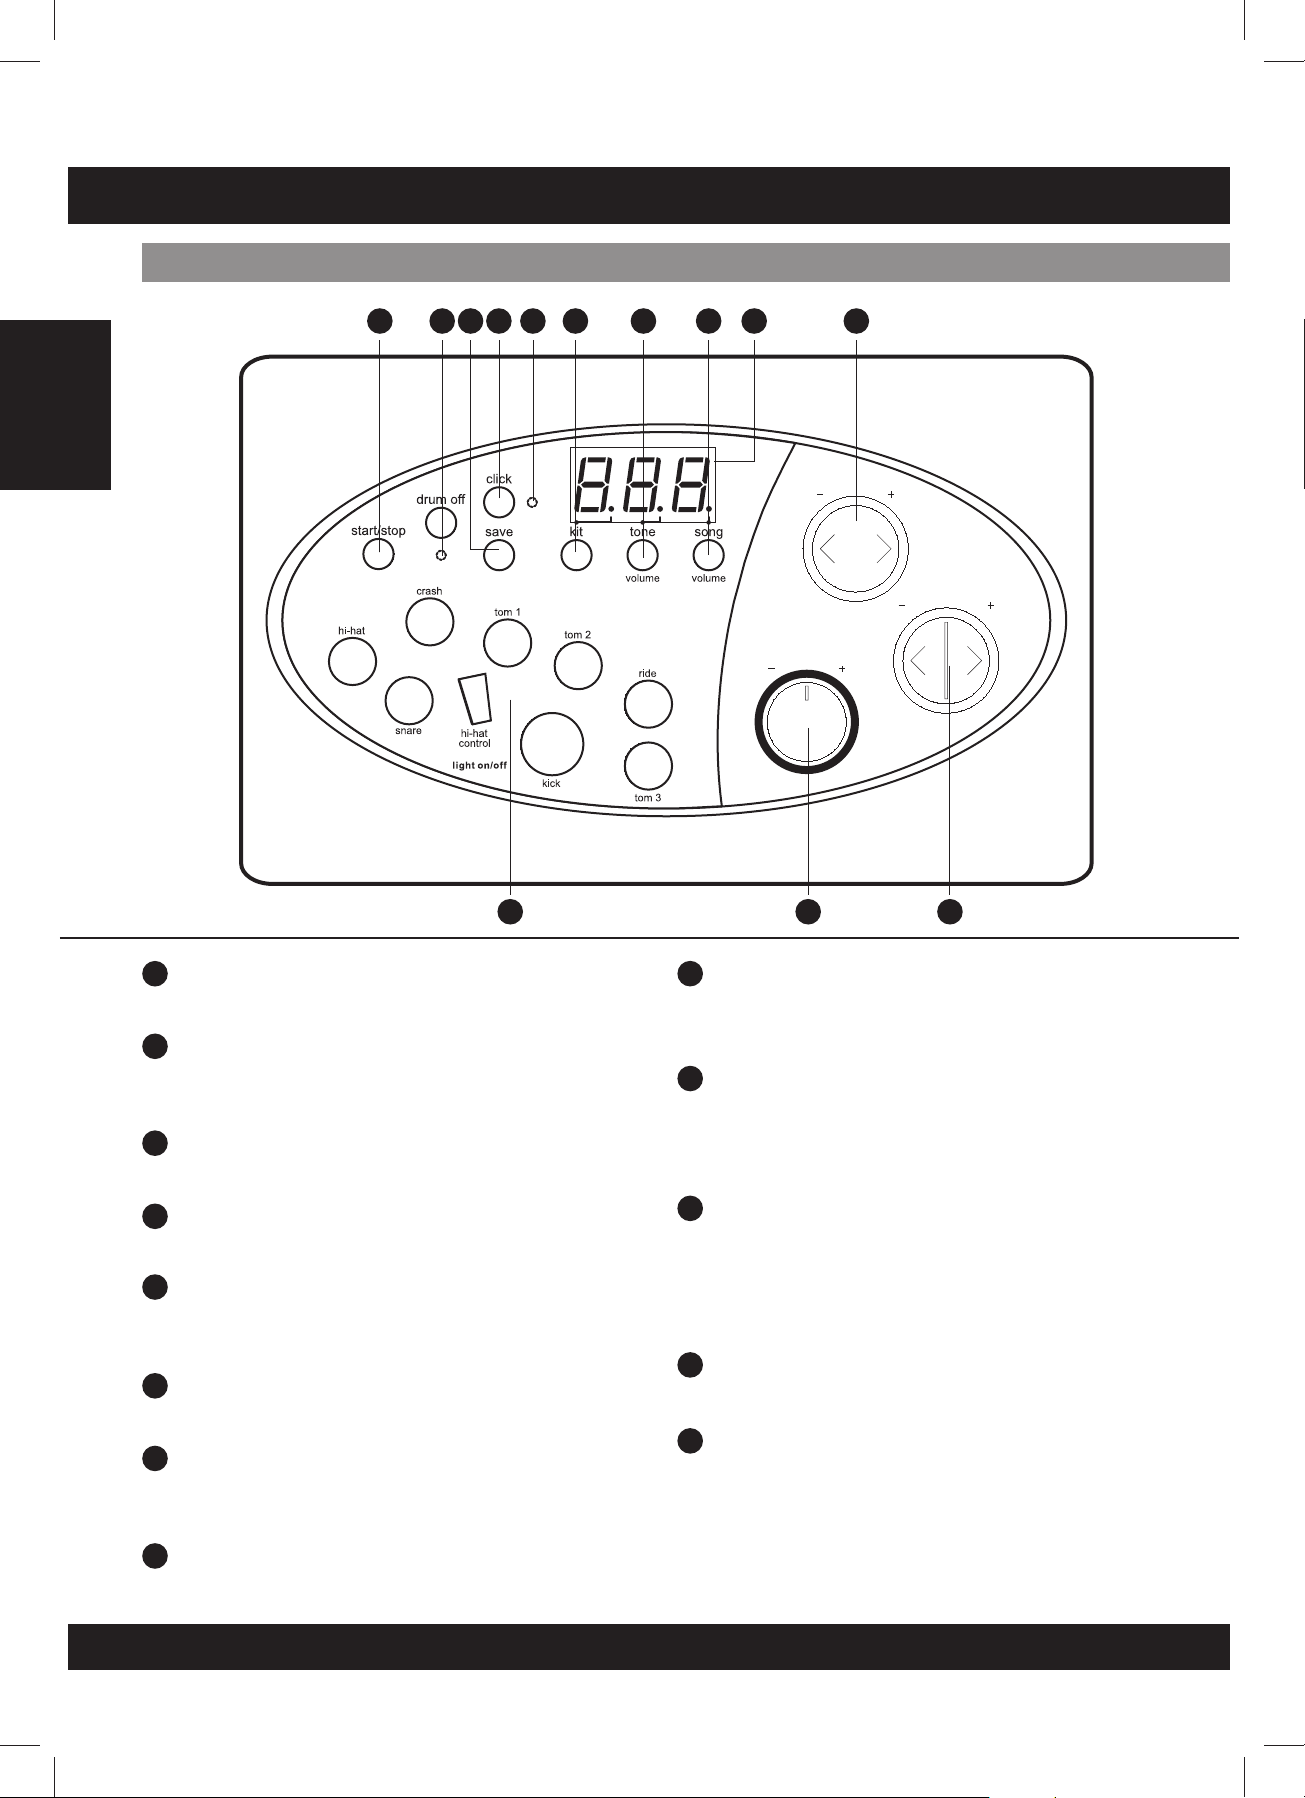
PANEL CONTROL
Rear Panel
hi-hat
control
Crash ride tom 3 tom 1tom 2 Snare kick R Aux.in
14
MIDI out jack
midi out hi-hat
14
Connect to an external sound module.
15
Trigger input jacks
Connect to pads, cymbals, hi-hat control,
kick trigger.
Output jacks (R - L/mono)
Connect to an amplifier or an audio system.
For monaural output, use the L/mono jack.
15
output
L/mono dc 9v.
17
Aux.in Jack
16
ON
17 18
OFF
Connect to an external sound source.
18
Power supply jack (dc 9v.)
Connect the supplied AC adapter to this
jack.
1916
Power switch
Turn the power ON/OFF.
19
English
Side Panel
20
Phones Jack
Connect headphones to this jack.
(Connecting the headphones will not mute the output jacks).
20
E05
Page 6
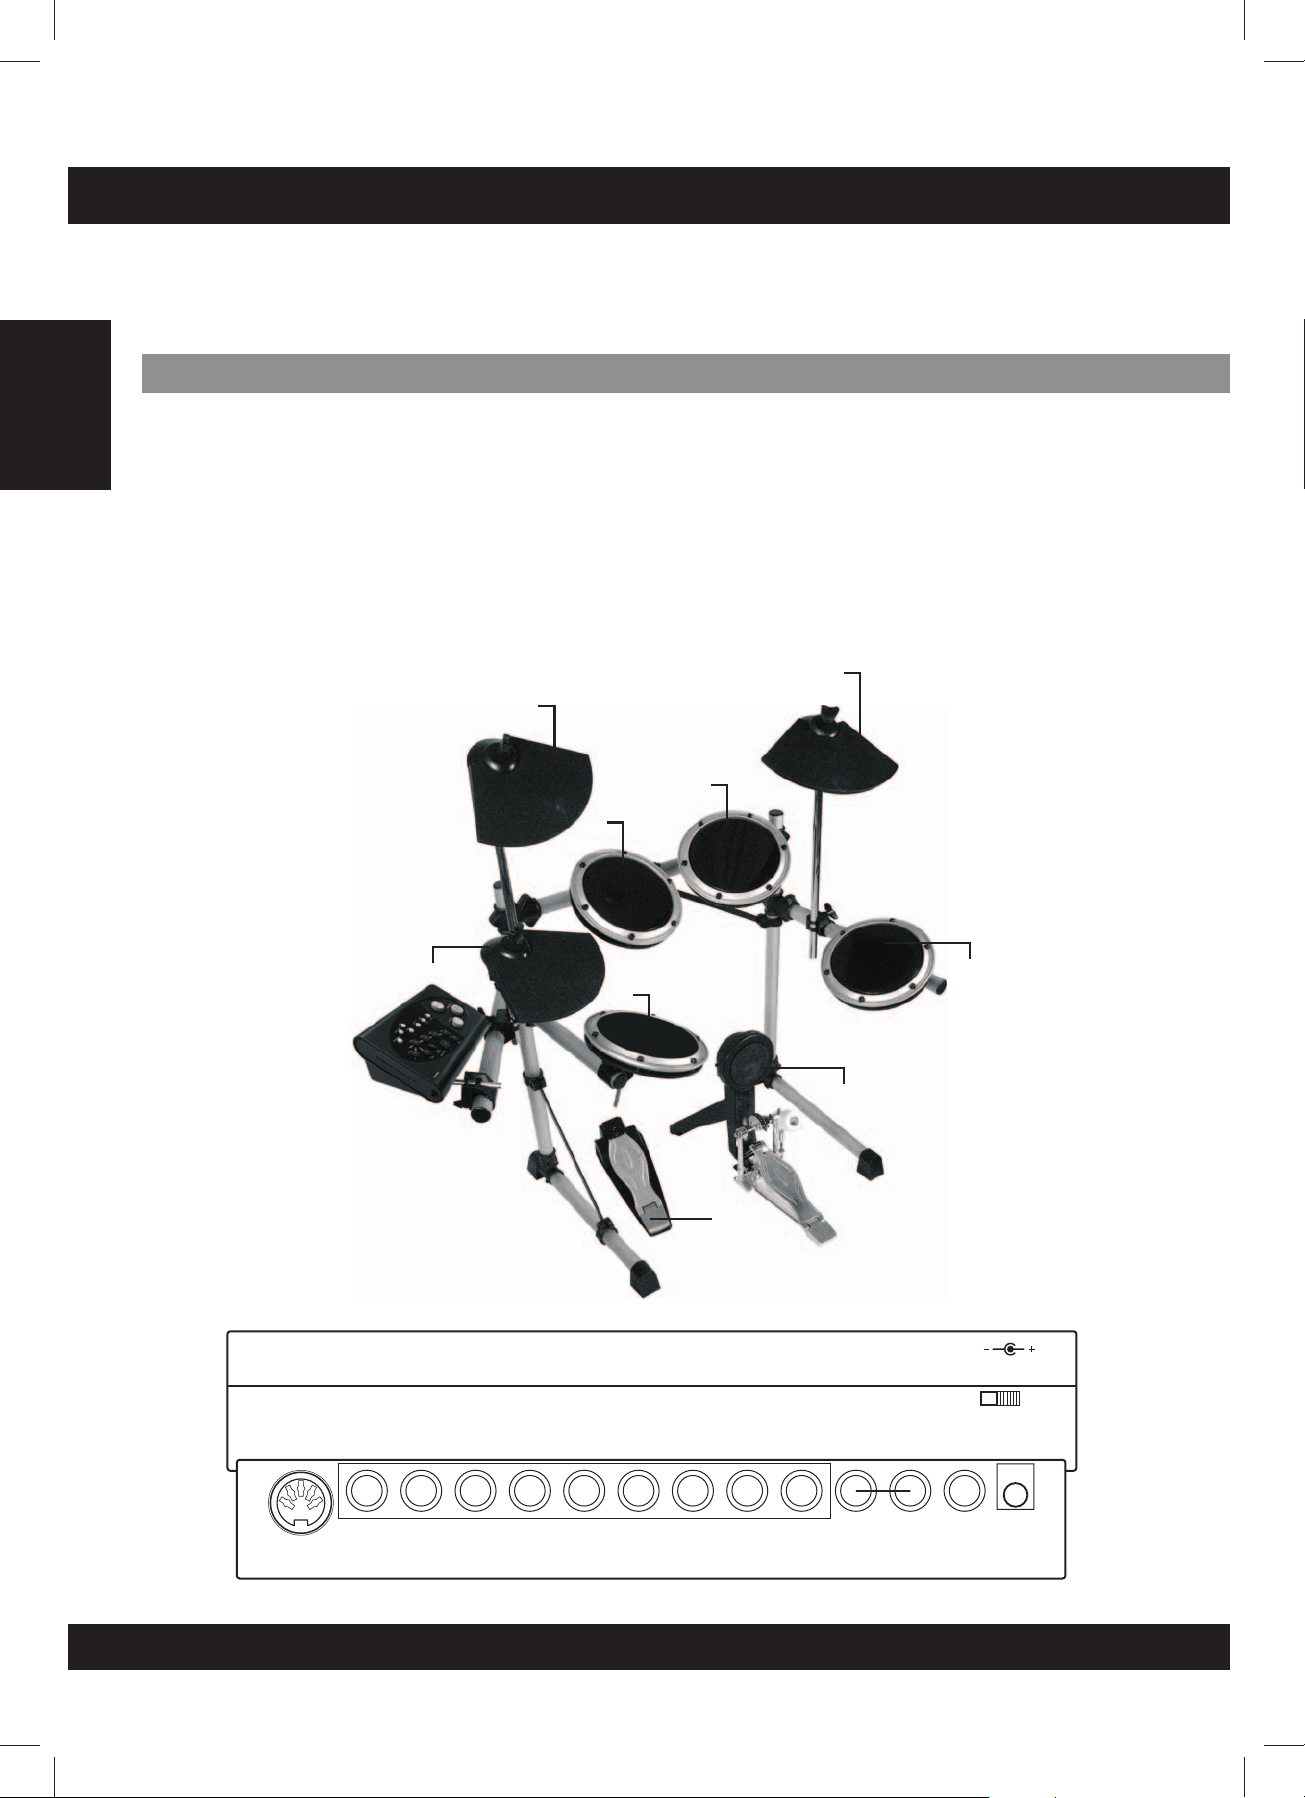
SETUP
CAUTION!
To prevent electric shock and damage to the device, make sure the power is switched OFF
on the drum and all related devices before making any connection.
Connectthe Pads and the Pedals
English
Using the provided cables, connect each trigger input jack on the rear panel of the module, and
make sure each pad is connected to its corresponding trigger input jack.
NOTE
1. The sound of the hi-hat pad is controlled by the hi-hat pedal. Similar to an acoustic drum, the hihat pad functions as an “open hi-hat” when the pedal is released. When the pedal is depressed, it
functions as a “closed hi-hat”.
2. By striking areas of the cymbal pad (ride, crash or hi-hat) near the edge of the pad, the sounds
produced are different from the other pads.
ride
crash
tom 2
tom 1
hi-hat
snare
tom 3
hi-hat
midi out hi-hat
control
kick
hi-hat
control
Crash ride tom 3 tom 1tom 2 Snare kick R Aux.in
output
L/mono dc 9v.
E06
ON
OFF
Page 7
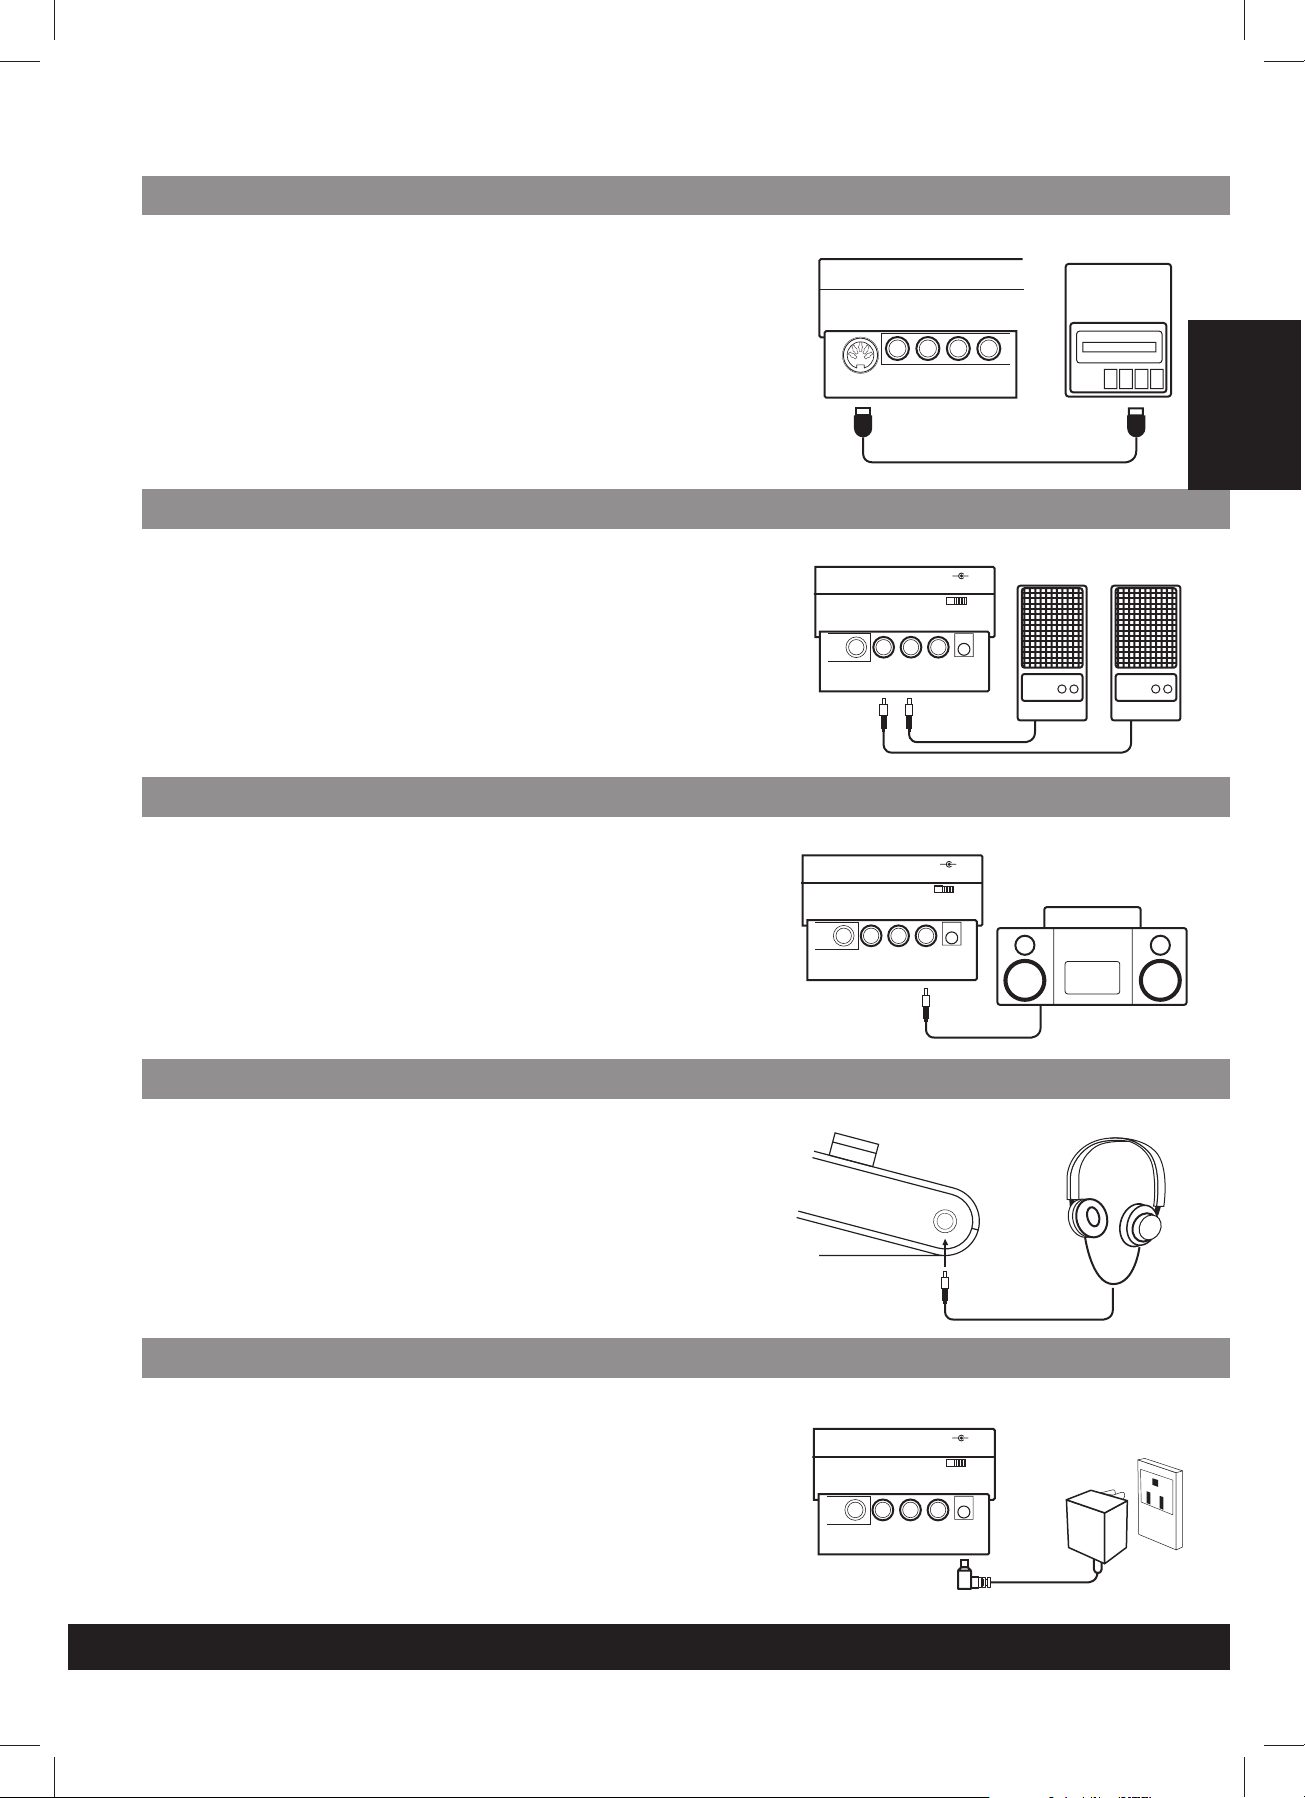
Connecta MIDI device
This is for use of an external sound module or MIDI sequencer.
Transmit MIDI data
1.
Use a MIDI cable to connect the MIDI OUT jack on the drum module
with the MIDI IN jack on the external MIDI device.
2. This drum is designed to output all the MIDI codes generated by
pads striking or pedal stepping via MIDI output connector. Please
note, clicking and the MIDI codes in songs are excluded.
Connectingaudio equipment
1. When connecting an amplifier please follow steps listed bellow:
a.
Connect the amplifier to the Output L/MONO and R jacks on the
rear panel.
b. For monaural playback, use the L/MONO jack.
c. For stereo playback, connect both L/MONO and R jacks.
2. The volume is adjusted with the VOLUME knob.
Connecta CD player, etc (Aux. Injack)
midiout
MIDI IN
kick
hi-hat
hi-hat ridecrash
control
output
R L/m on o au x .in
MIDI Data
dc9v.
ON OFF
MIDI Device
MIDI OUT
English
Amplifer Amplifer
1. The audio output of a CD player or another audio source must be
connected to AUX IN jack on the rear panel which can be mixed
with the sound of the drum. This is a function that allows you to
play along with your favorite song.
2. The volume of the external signal is adjusted with the VOLUME
knob.
ConnectHeadphones
An optional set of stereo headphones can be connected to the
PHONES jack located on the side of the drum module.
* Adjust the volume to a comfortable level.
Connectthe power supply
Make sure the power is switched OFF and connect the power adapter
totheDCINjackontherearpanel.
Note:
1. To protect the speakers, amplifier and the drum module from
damage, rotate the volume knob to the minimum volume level
before powering ON.
2. Make sure the power is switched OFF when connecting the drum
module to an external device.
kick
kick
output
R L/m on o au x .in
output
R L /m on o au x .in
dc9v.
ON OFF
dc9v.
ON OFF
E07
Page 8
FUNCTION
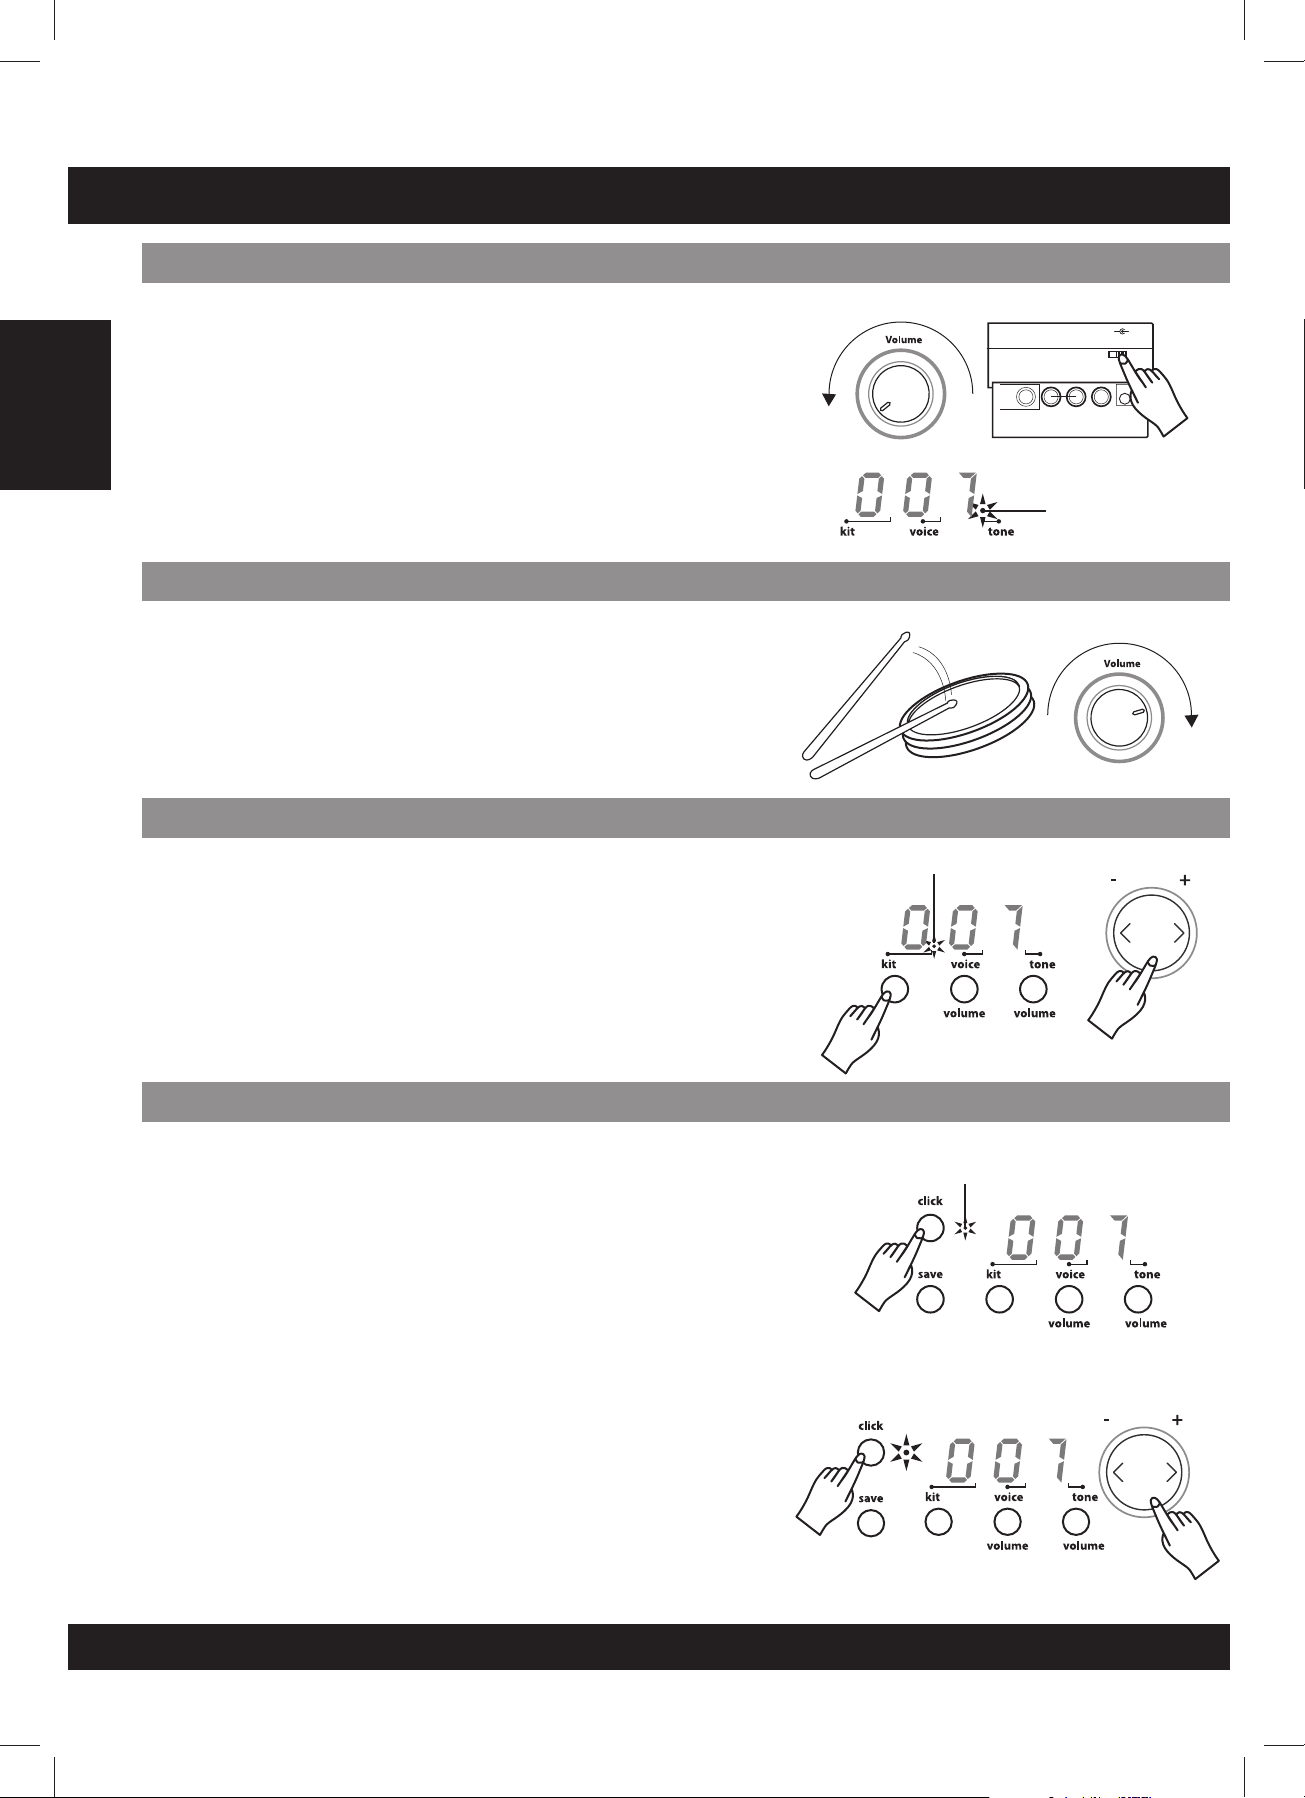
Setthe power switch
English
Setthe main volume
Connecta CD player, etc (Aux. Injack)
After confirming all connections have been completed, rotate the
volume knob to the left (minimum volume level) before switching the
power ON.
Set the power switch to the ON position. The tone indicator will display
the tone being played.
While striking a pad, gradually rotate the volume knob until a
comfortable volume level is reached.
The unit comes with 20 (001-020) preset drum kits and 10 user kits
(021-030). Reference tone list: page E14
-+
Kit indicator
output
kick
R L /mo n o aux .in
Tone indicator
-+
dc9v.
ON OFF
1.Pressthe[kit]button
The current kit number appears and the Kit indicator will display.
2.Press[+]or[-]buttonstoselectthedrumkitnumber(001-020)
you want to access.
Playwith a Metronome
1. Press the [ click ] button to initiate the Metronome. The beat
indicator will flash and the click sound begins to play.
2. Press the [ tempo + ] or [ tempo - ] buttons to set the metronome
beat.
3.Pressthe[click]buttonagaintostopthemetronome.
4. To adjust the volume of the click sound, hold down the [click] button
andpressthe[+]or[-]buttonstoadjustthevolume of the click
sound, the metronome automatically plays.
When playing the metronome:
The metronome stops immediately when holding down the [ click ]
*
buttonandpressingthe[+]or[-]buttonsontheclick sound.
Volume of the click sound will be reset to default once the power is
*
on.
Beat indicator
E08
Page 9
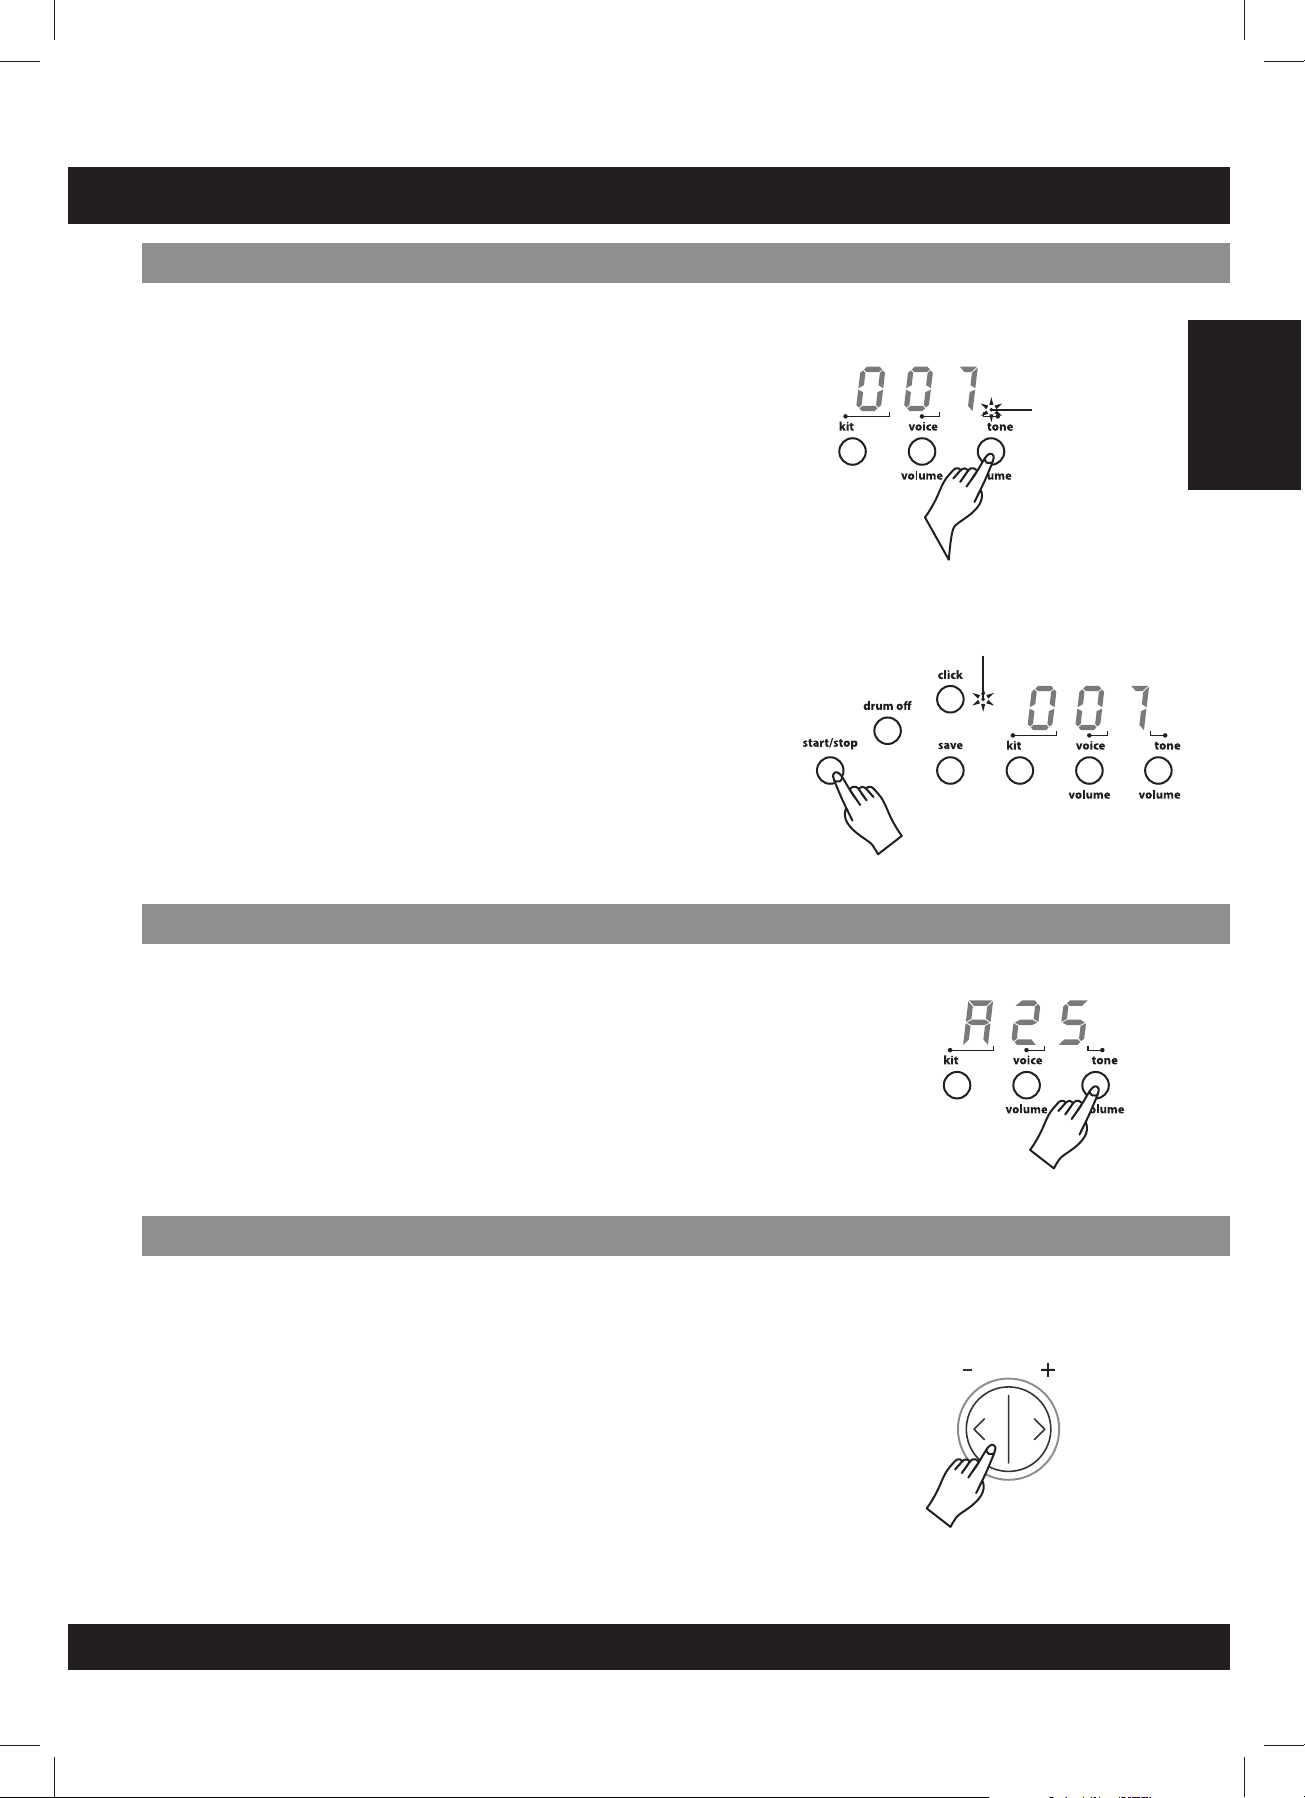
PLAY A TONE
Listento the tone
This drum module has a total of 50 preset tones.
Note: The preset tone setting is 001 once powered on.
1. Press [ tone / volume ] button.
The tone indicator lights and the current tone number will appear.
2.Press[+]or[-]buttontoselectoneofthetonesandlistentothe
the Tone number 001-050, which are, preset tones.
(Reference tone list: page E14)
3. Press [ start - stop ] button and the beat indicator will flash.
The tone will start playback from the beginning.
4. The tone will stop when it reaches the end.
You can stop the tone during playback by pressing the [ start /
stop ] button.
The ASSIGN pad’s indicator flashes at the first beat of each measure.
Note: The ASSIGNED pad’s indicator will not illuminate when both [ hihat]and[kick]buttonsarepressedatthesametime.
Selectthe tone volume
Beat indicator
English
Beat indicator
1. Press the [tone/volume] button to select the volume of the tone,
which will display “AXX”. XX = Level value 00 to 31
2.Press[+]or[-]buttontoadjustthevolume of the tone
accompaniment.
Volume of the tone will not reset to default when power is ON.
*
Adjustthe tones tempo
1. Pressing the [ tempo + ] or [ tempo - ] button will display the
current tempo value.
2. Press the [ tempo + ] or [ tempo - ] button to increase or decrease
the tempo. The tempo value will range from 30 to 280.
- Hold down either the [ tempo + ] or [ tempo - ] button to change
the setting from high to low speed.
-Pressingthe[tempo+]and[tempo-]buttonsatthesametime
will reset the tempo to the default value.
Note: Approximately 2 seconds after you stop pressing the [ tempo ]
button, the display will change to your selected song or kit number
instead of the tempo value.
tempo/tap
E09
Page 10
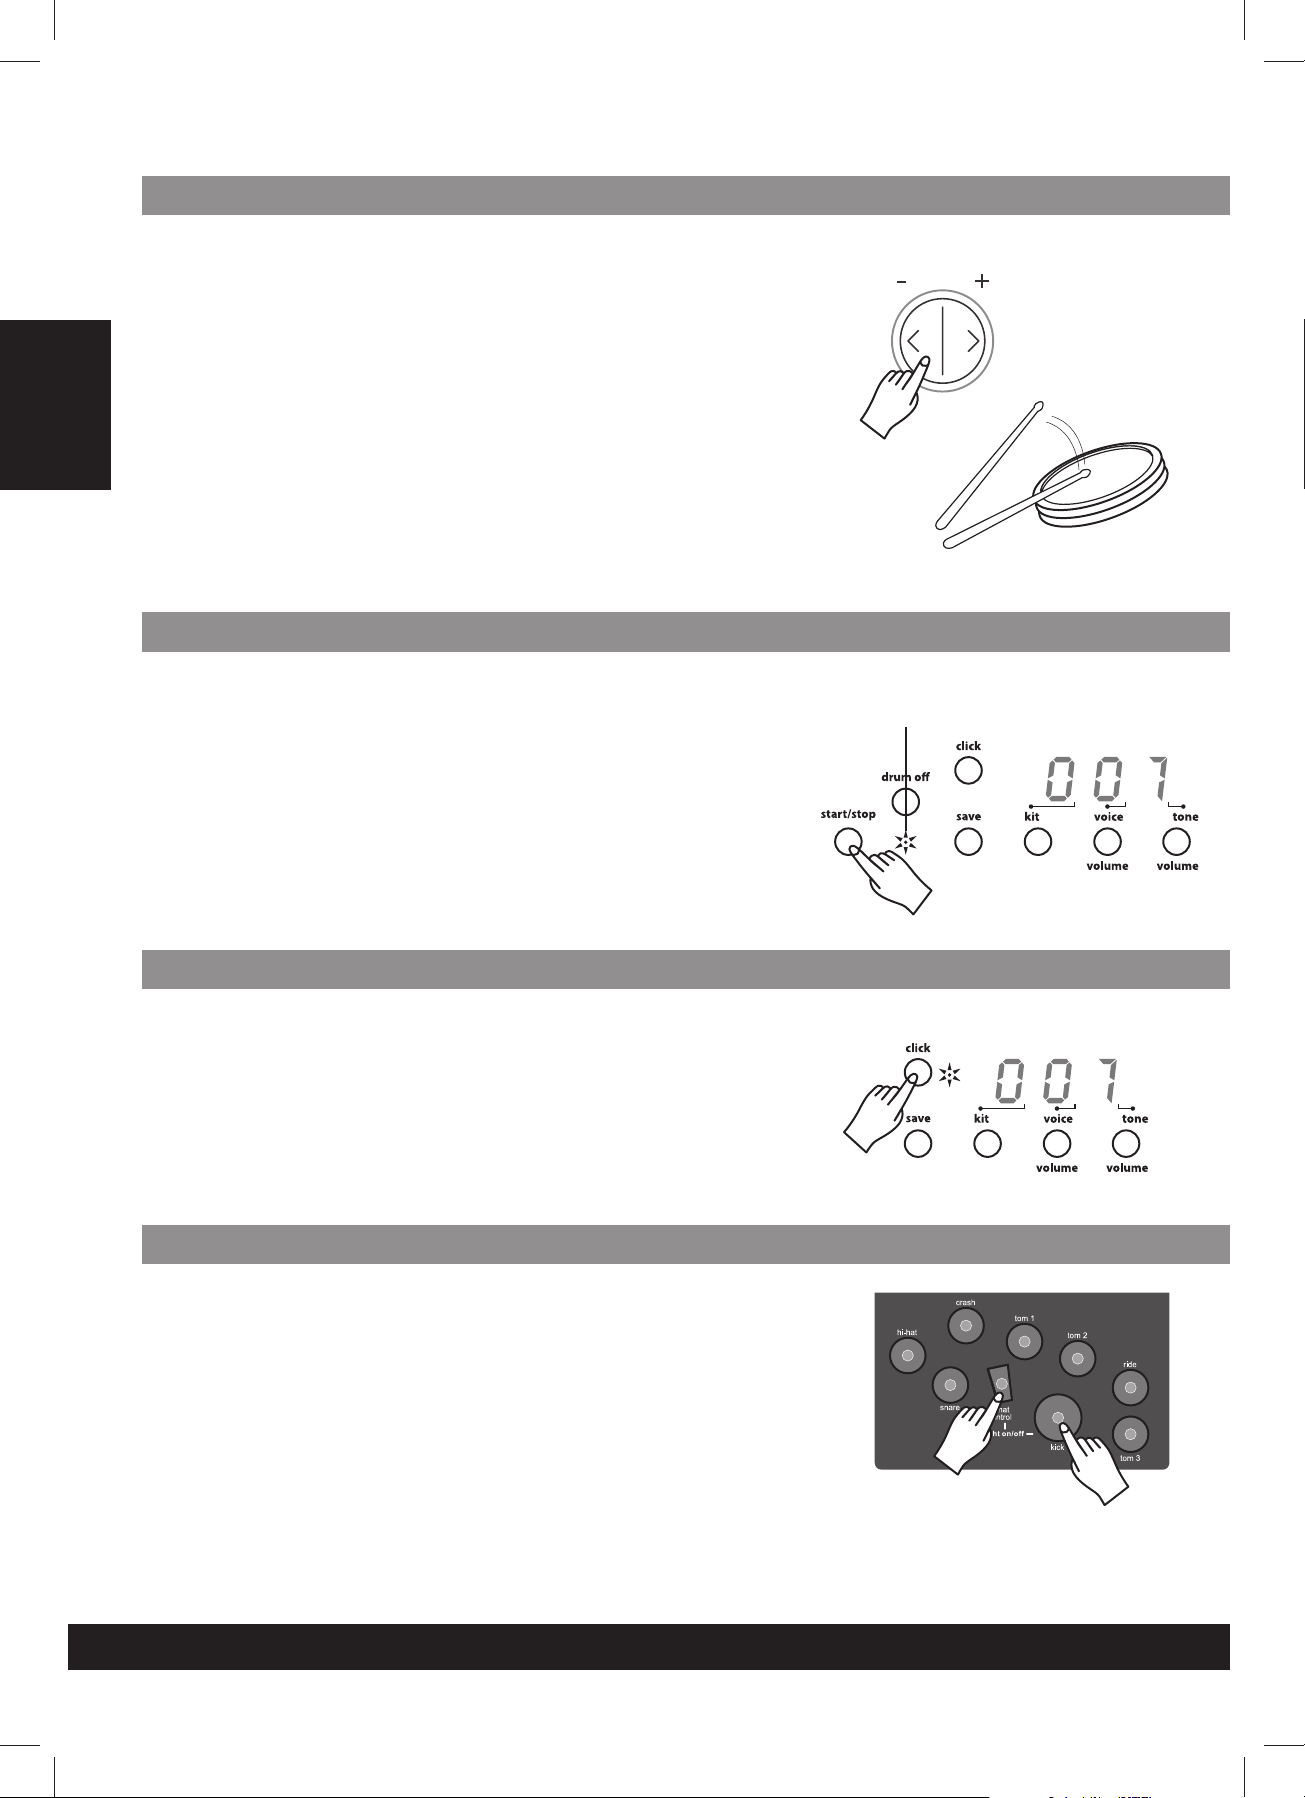
Taptempo function
English
Mutea Drum part
This function allows you to set the song’s tempo by tapping in tempo
onapad.
1. Press the [ tap ] button. This will display the current tempo value.
2. Tap on the pad in the tempo that you prefer. Tap on the pad 4
times and the last two beats are detected and are set as your
desired speed.
3. The tone will be played at desired tempo you set. When the tone is
playing, you are not able to change the tempo with the tempo
function.
Any pad will activate the tap tempo function.
*
1. Press [ drum off ] button. The drum off indicator will illuminate.
The drum mute function is active.
2. Press [start / stop ] button to playback the song.The drum part in
the song will be muted.
3. To cancel the drum mute function, press the [ drum off ] button
again. The drum indicator will not illuminate.
tempo/tap
Drum off indicator
The drum mute function can be used during the tone play.
*
Playwith the Click sound
1. Press the [ click ] button to start the metronome. It will be played
with tempo.
2.Pressthe[click]buttonagaintostopthemetronome.
Note: The click sound will not stop automatically once the song ends
untilyoupressthe[click]button.
Usingthe lighting guide function
The lighting guide function provides a valuable lesson to practice or
learn the drum kit while playing the preset tones.
1. Select the tone number you choose to practice.
2. Press [ drum off ] button.
3.Press[start/stop]buttontostarttoneplay.
4. Strike the pad in accordance with the lighting of the pad’s indicators
or press the hi-hat pedal and kick the bass drum pad exactly when
their indicators light.
*
During the tempo play, you can change the Tempo (speed), or use
the tap tempo function to set your desired tempo.
E10
Press the [ hi-hat control ] + [ kick ] buttons
to turn off all the pad’s indicators.
Press the [ hi-hat control ] + [ kick ] buttons
again to turn on all the pad’s indicators.
Page 11
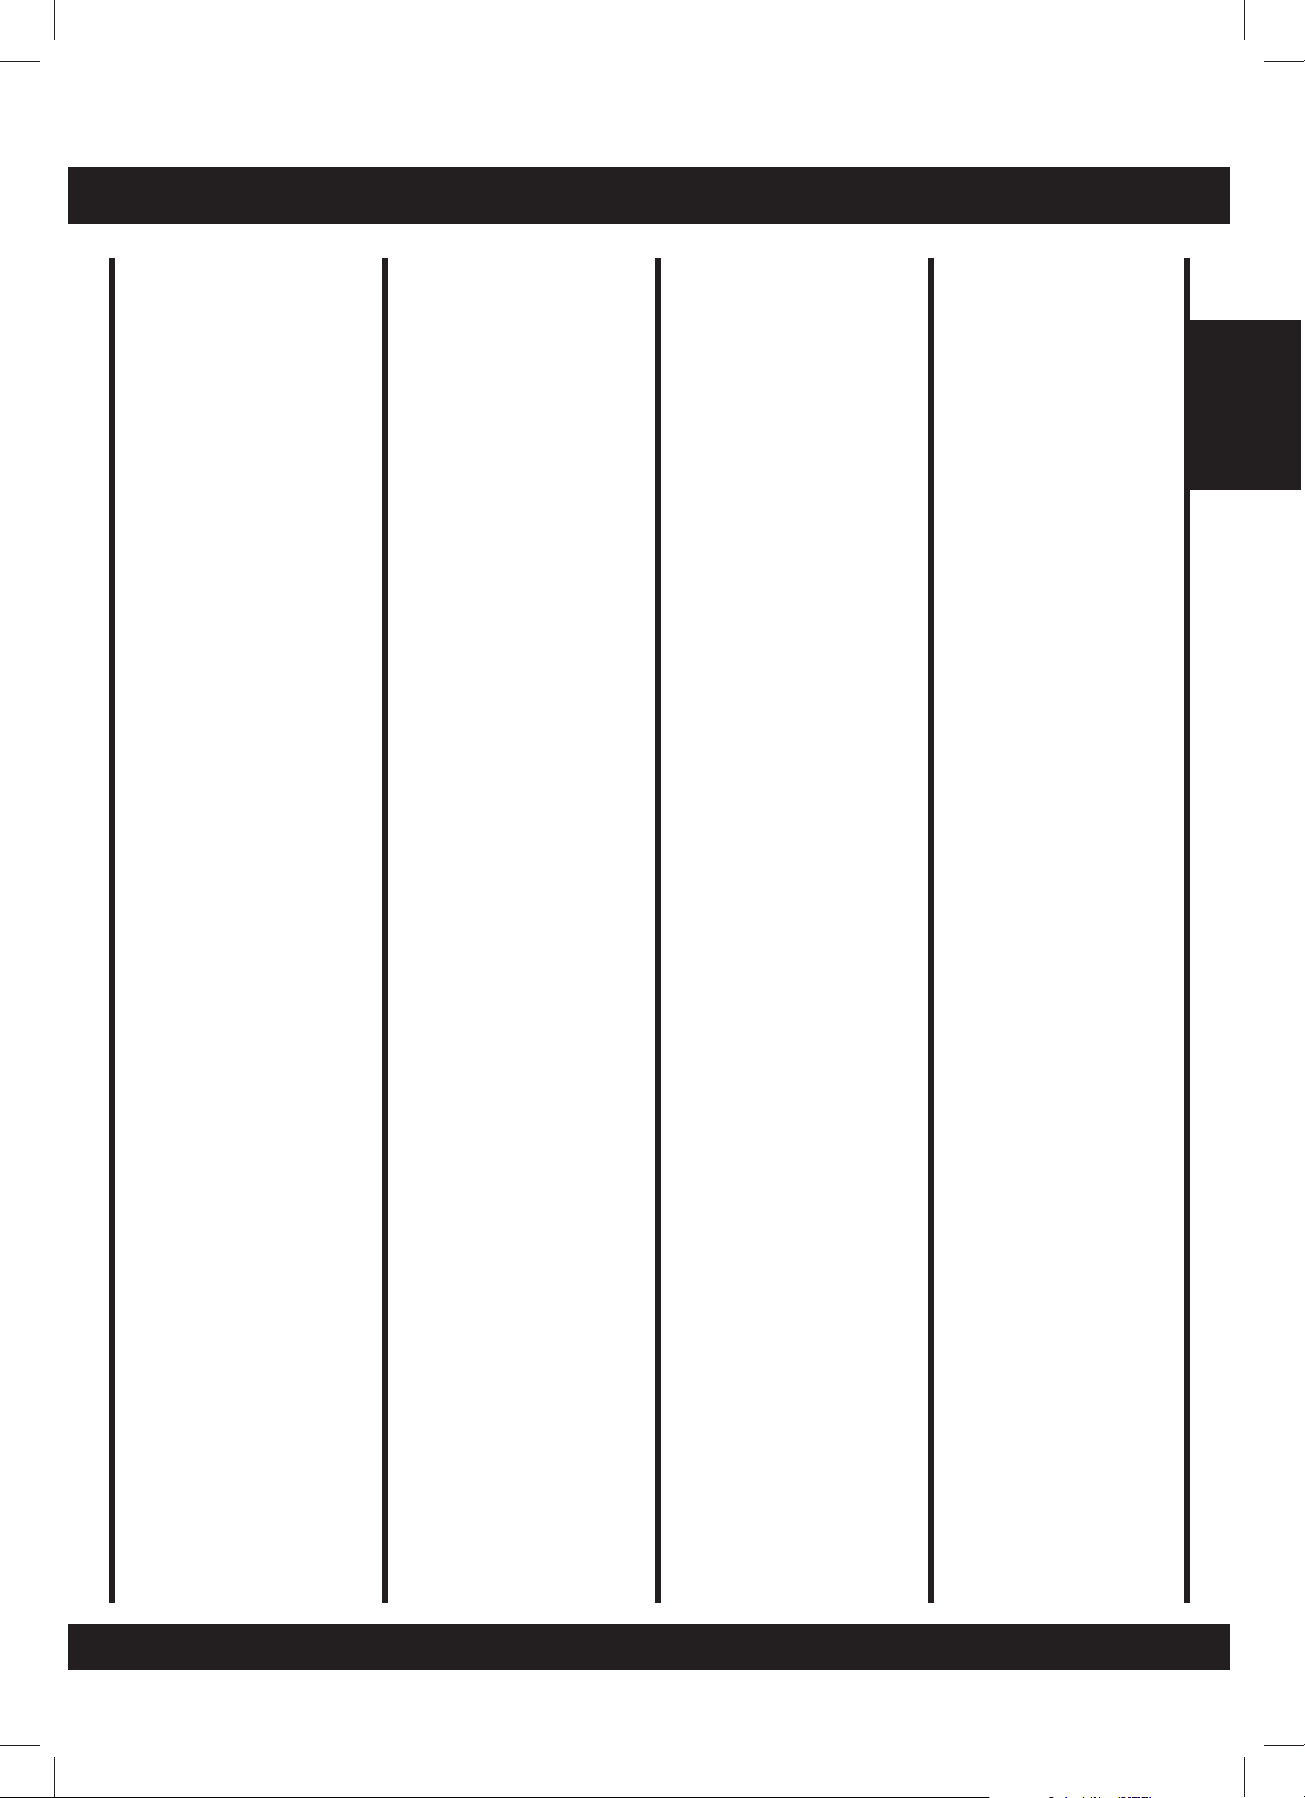
Seta Drum voice
This unit includes 215 high quality percussion sounds, which you can
assign to any of the drum pads, 3 cymbals, hi-hat control and bass
drum. This allows you to create your own drum kit, which consists of
the voice you choose. Reference voice list: page E13.
The kit number 021-030 are used for saving your own drum kit.
1.Press[voice]button.
The voice indicator illuminates and displays the number of the pad.
2. Press [ pad ] button or hit the pad you want to set. The pad
indicator will illuminate and display the current voice number of the
lit pad.
3.Press[+]or[-]buttonstoselectthevoice number you want to
assign.
4. Repeat step 2 and 3 to set the voice for another pad or bass drum.
All settings will be reset to default once power is ON.
*
Adjustthe volume of the Pad
This unit allows you to adjust the volume of every voice in the kit and
also will control the individual level (volume) of the pads or bass drum.
1. Press the [ voice / volume ] button to view the volume level setting.
Level settings run from 00 to 31 The pad button indicator
illuminates and will display the current volume level of the lit pad.
Voice indicator
English
Pad buttons
Volume level value
2. Press the [ PAD ] button or kit the percussion pad you want to
adjust.
3.Pressthe[+]or[-]toincreaseordecreasethevolume. While
you are adjusting the corresponding pad, listen carefully to the
sound level until reaching the level you desire.
4. Repeat step 2 and 3 to adjust the volume of other pad voices.
Volume of the pad will be reset to default once power is ON.
*
CREATE A USER DRUM KIT
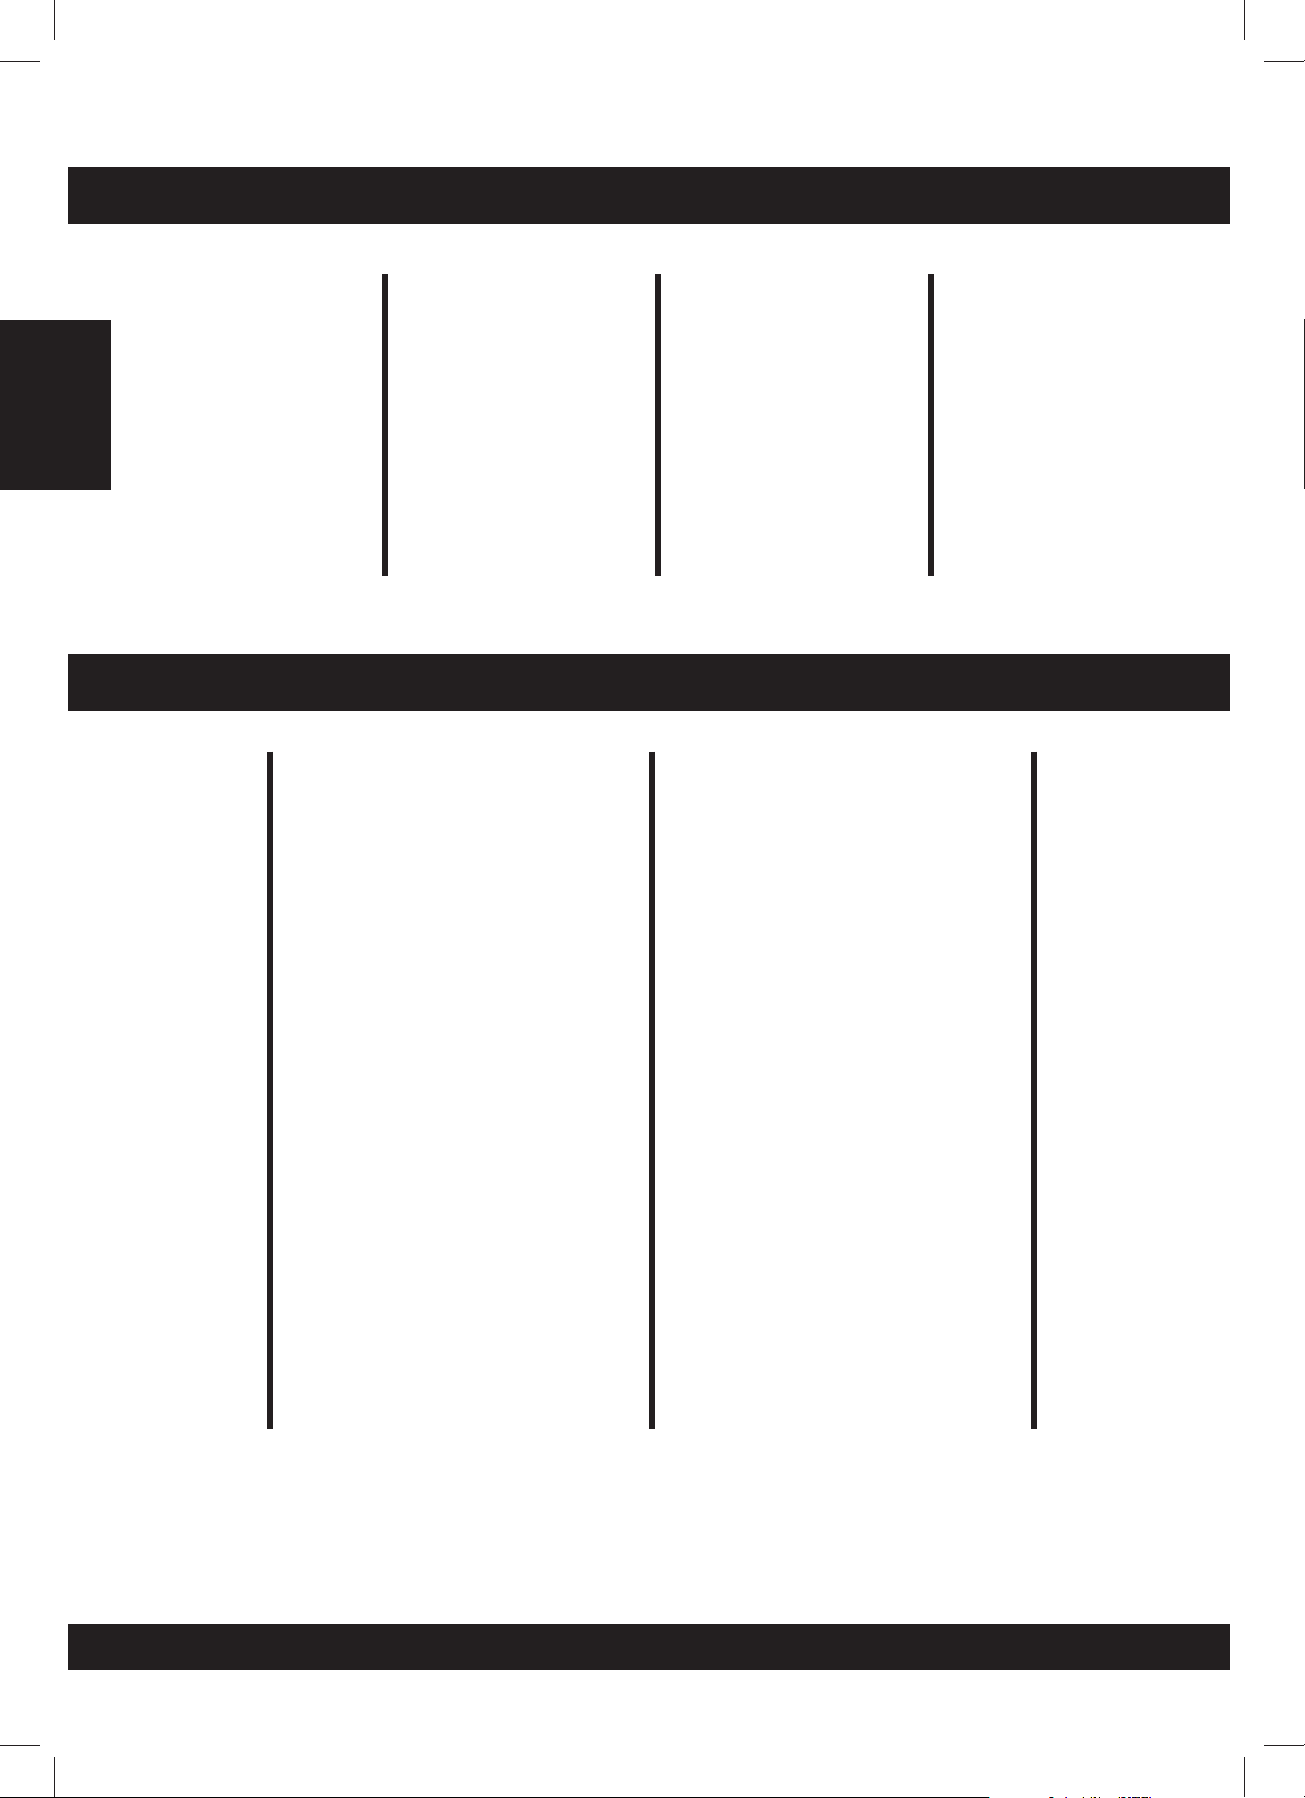
Saveyour drum kit voices
Upon completion of your personalized drum kits please follow the steps
below to save them:
1.Press[save]button.
The kit number 021 appears and is flashing.
2.Press[+]or[-]buttontosetthekitnumber(021-030) for saving
your drum kit.
Pad indicator
3. Press [ save ] button again. The flashing kit number stops.
Note: To cancel the save operation, press the voice button. If
there is an error “Err” will be displayed.
E11
Page 12

SPECIFICATIONS
English
Drum Pad:
Voices:
Drum Kits:
Song:
Controls:
Display:
Connections:
4 drum pads, 3 cymbal pads, 1 hi-hat control pedal,
1 kick trigger.
215 voices
20 preset kits, 10 user kits
50 preset songs
POWER SWITCH, START / STOP, SAVE, KIT, VOICE /
VOLUME, SONG / VOLUME, DRUM OFF, CLICK, HI-HAT,
CRASH, RIDE, HI-HAT CONTROL, SNARE, TOM 1, TOM 2,
TOM 3, KICK, VOLUME, + / - TEMPO, TAP
LED display
MIDI OUT
Hi-hat control
Hi-hat
Crash
Ride
Snare
Tom 1
Tom 2
Tom 3
Kick
Output(R&L/MONO)
Aux in
Power Supply:
AC adapter (DC 9V.)
E12
Page 13
VOICE LIST
No. Name
Acoustic Base Drum
001 BD head
002 Real BD1
003 Real BD 2
004 Real BD 6
005 BD Std 1
006 BD Std 2
007 Room BD 1
008 Room BD 2
009 Lo BD
010 Rock BD 1
011 Rock BD 3
012 Rock BD 4
013 BD-Var 3
014 BD-Var 5
015 Big Drum 1
016 Big Drum 2
Electronic Base Drum
017 BD-Analg
018 MrDance 1
019 MrDance 2
020 MrDance 5
021 Lo-BD 1
022 Lo-BD 2
023 Hard BD 3
Acoustic Snare Drum
024 SD-Std 1
025 SD-Std 2
026 SD-Std 3
027 SD-Std 4
028 SD-Std 5
029 SD-R 1
030 SD-R 2
031 SD-R 5
032 Snare 1
033 Snare 2
034 Snare 4
035 Snare 5
036 Snare 6
037 SD-Std 21
038 SD-Std 22
039 SD-Std 23
040 SD-Std 24
041 SD-Std 25
042 SD-Std 26
043 SD-Std 27
044 SD-Std 28
045 SD-Std 29
046 SnareDr 1
047 SnareDr 5
048 SnareDr 6
049 SnareDr 7
050 SnareDr 8
051 SidStik 1
052 SidStik 2
053 SnarTimb
054 RowDrum 1
055 RowDrum 2
056 RowDrum 3
Electronic Snare Drum
057 SD-Ana 2
058 SD-Ana 6
059 SD-Ana 7
060 SD-Ana 11
061 SD-Danc 5
062 SD-Danc 6
063 SD-Elec
064 Syn-SD 1
065 Syn-SD 7
066 Syn-SD 8
067 Syn-SD 11
068 Cool SD 1
069 HD-SD 1
070 Brush 1
071 Brush 2
072 Brush 3
073 Brush 5
074 Brush 7
075 Brush 8
076 Brush 10
077 Brush 13
Acoustic Tom
078 Tom-Std 5
079 Tom-Std 3
080 Tom-Std 2
081 Tom-Std 1
082 Tom-Jaz M
083 Tom-Jaz F
084 Tom-Brs H
085 Tom-Brs M
086 Tom-Brs L
087 Tom-Brs F
088 Tom-BRK H
089 Tom-BRK M
090 Tom-BRK L
091 Tom-BRK F
092 Tom-Rom 6
093 Tom-Rom 5
094 Tom-Rom 4
095 Tom-Rom 3
096 Tom-Rom 2
097 Tom-Rom 1
098 Tom-Rm 2L
099 Tom-Rm 2F
Electronic Tom
100 TomH-A
101 Tom-A 5
102 Tom-A 4
103 Tom-A 3
104 Tom-A 2
105 Tom-A 1
106 Tom-T 1M
107 Tom-T 3L
108 Tom-T 3F
109 Tom-El 4
110 Tom-El 3
111 Tom-El 2
112 Tom-El 1
Cymbal
113 CrashStd
114 CrashBrt
115 CrashSt 2
116 SftCrash
117 CrashSt3
118 CrashSht
119 CrashThin
120 CrashRev
121 CrashRol
122 CrashSt 4
123 RideBel 1
124 RK Ride 2
125 RideBStd
126 Splash C 1
127 Cymbal 2
128 Cymbal 3
129 BigGong 1
130 BigGong 2
131 B.Cymbl 1
132 B.Cymbl 2
133 S.Cymbl 2
134S.Cymbl 2 M
135 SmalGong
Acoustic Tom
136 H.H.Cls 1
137 H.H.Cls 3
138 H.H.Cls 4
139 H.H.Opn 1
140 H.HCNor 1
141 RK HHcls
142 H.H Opn 3
143 Open HH 2
144 Open HH 3
145 Open HH 4
146 RK HHOpn
147 Open HH 7
148 HH pedl 1
149 HH pedl 2
150AnaHh1
Percussion
151 Agogo-1
152 Agogo-2
153 Bell tre
154 Bongo Hi
155 Bongo Lo
156 Cabasa 1
157 Cabasa 2
158 Castanet
159 ClapA
160 Claves 1
161 Claves 2
162 Conga-Hi
163 Conga-M 1
164 Conga-M 2
165 Conga-3
166 Conga-4
167 Conga-5
168 CowBell 1
169 CowBell 2
170 Cuica H
171 Cuica L
172 Fsnap
173 Guiro 1
174 Guiro 2
175 HiQ
176 JingBell
177 Maracas 1
178 Maracas 2
179 MetroBell
180 MetroClk
181 Scrach
182 Shake
183 Surdo 1
184 Surdo 2
185 Tabla 1
186 Tabla 2
187 Tabla 3
188 Tabla 4
189 TalkD
190 TalkDrD
191 TalkDrU
192 TalkDrV
193 Tambouri
194 TimbleH
195 TimbleL
196 TimblePH
197 TimblePL
198 Triangle
199 TriagMut
200 VibrSlap
201 Whistal
202 XfadeTri
203 Smallwood
204 BoardDr 1
205 BoardDr 2
206 Lotus Brd
207 BanbuBrd
208 SouthBan
209 B.WdFish
210 S.WdFis 1
211 S.WdFis 2
212 S.WdFis 3
213 S.WdFis 4
214 ImpacBel
215 ImpaBel M
English
E13
Page 14
DRUM KIT LIST
English
TONE LIST
No. Name
001 Standard 1
002 Standard 2
003 Dance 1
004 Jazz Latin
005 Room 1
006 Electric
007 Brush
008 Room Stick
009 Latin 1
010 Latin 2
No. Name
001 Guitar
002 Accordion Fussion
003 Folk Pop
004 Rock
005 Blues
006 New Age
007 Reggae Funk
008 Drum & Bass
009 Pop & Beat
010 Dance
011 Drk-2
012 Pop 3
013 Pop 5
014 Jazz 1
015 Rhythm & Blues 4
016 Ballad 1
017 Ballad 2
018 Ballad 4
019 Ballad 5
020 Ballad 6
021 Waltz
022 Slow Rock
023 Rock Pop 4
024 Latin 4
025 Latin 5
Beat
4/4
4/4
4/4
4/4
4/4
4/4
4/4
4/4
4/4
4/4
4/4
4/4
4/4
4/4
6/8
4/4
4/4
4/4
4/4
4/4
3/4
6/8-9/8
4/4
4/4
4/4
No. Name
011 Jazz
012 Brush 2
013 Dance Stick
014 Orchestra
015 Drum & Bass
016 House
017 Rhythm & Blues
018 Ungle
019 China LuoGu
020 Oriental 1
No. Name
026 Reggae
027 Shuffle 1
028 Rhythm & Blues 3
029 Rock N’ Roll 1
0308Beat4
0318Beat2
032 16 Beat
033 March
034 Latin 6
035 Funk 3
036 Fusion 2
037 Rock N’ Roll 2
038 Hard Rock 3
039 Rock Pop 2
040 Funk 1
041 Funk 4
042 Jazz 3
043 Dance 1
044 Dance 2
045 Mambo
046 Rhythm & Blues 1
047 Rhythm & Blues 2
048 Ballad 3
049 Jing Opera
050 Chinese Rhythm
Beat
4/4
4/4
4/4
4/4
4/4
4/4
4/4
4/4
4/4
4/4
4/4
4/4
4/4
4/4
4/4
4/4
6/8
4/4
4/4
4/4
4/4
4/4
4/4
4/4
2/4
E14
Page 15

MIDI IMPLEMENTATION CHART
Basic
Channel
Mode
Note
Number
Velocity
After
Touch
Pitch Bend
Control Change
FUNCTION
Default
Changed
Default
Messages
Altered
True Voice
Note On
Note Off
Key’s
Channel’s
0
1
5
6
7
10
11
64
65
66
67
80
81
91
93
120
121
123
TRANSMITED
10 ch
X
X
X
*****
0-127
*****
O 9NH, V=1 -127
X (9NH V=0)
X
X
X
X
X
X
X
X
X
X
X
X
X
X
X
X
X
X
X
X
X
English
Bank Select
Modulation
Portamento Time
Data Entry
Volume
Pan
Expression
Sustain Pedal
Portamento ON / OFF
Sostenuto Pedal
Soft Pedal
Rear Program
Chorus Program
Rear Level
Chorus Level
All Sound OFF
Reset All Controller
All Notes OFF
Program Change
System
System
Common
System
Real Time
Aux
Messages
True #
Exclusive
Song Position
Song Select
Tune
Clock
Comands
LocalON/OFF
All notes OFF
Active Sense
Reset
X
X
X
X
X
X
X
X
X
X
X
KEY = O:Yes
X: NO
E15
Page 16

Félicitation!
Nous vous remercions de l’achat de votre Batterie Electronique. Cette Batterie Electronique a été
conçue pour jouer comme une batterie acoustique avec plus de facilité. Avant d’utiliser cet instrument,
nousvousrecommandons de lire ce manuel.
Utilisation de votre ensemble de Batterie Electronique:
LIEU D’EMPLACEMENT
• Ne pas exposer le matériel à ces différentes
conditions pour éviter toute déformation,
Français
décoloration ou de plus sérieux dommages.
•
Exposition au soleil.
Températures hautes (près d’une source de
•
chaleur ou dans une voiture la journée).
Humidité excessive.
•
SOURCE D’ÉNERGIE
•
V
euillez utiliser l’adaptateur AC fourni avec
l’appareil. Vérifiez que le voltage de la prise AC
dans votre pays correspond au voltage d’entrée
indiqué sur l’étiquette de l’adaptateur AC.
•
M
ettre le bouton power sur OFF lorsque
l’instrument n’est pas utilisé.
•
L
’adaptateur AC doit être débranché de la prise
de courant AC si l’instrument n’est pas utilisé
pendant une période prolongée.
•
D
ébrancher l’adaptateur AC pendant les orages.
•
E
viter de brancher l’adaptateur AC sur la même
prise. de courant que des appareils de haute
consommation d’énergie comme les chauffages
électriques ou les fours. Eviter aussi d’utiliser des
prises multiples car cela conduit à réduire la
qualité du son, à des erreurs d’opération et à de
possibles dommages du matériel.
METTRE LE BOUTON POWER SUR OFF AVANT
DE BRANCHER L’APPAREIL
MANIEMENT ET TRANSPORT
•
Ne pas exercer de pression aux parties de
contrôle, de connections ou d’autres éléments de
l’instrument.
•
Toujours débrancher en tenant la prise
fermement et non en tirant sur le câble.
•
Débrancher tous les câbles avant de déplacer
l’instrument.
Des coups physiques causés par des chutes, ou
•
en plaçant des objets lourds sur l’instrument il
pourrait se produire des éraflures ou des dégâts
plus importants.
NETTOYER
Nettoyer l’ensemble avec un chiffon sec et doux.
•
Utilisez un chiffon légèrement humide pour ôter
•
les saletés et poussières persistantes.
Ne jamais utiliser de produits de nettoyage tel
•
que de l’alcool ou un diluant.
Evitez de placer des objets en vinyl sur l’appareil
•
(Le vinyl pourrait coller et décolorer la surface).
INTERFÉRENCE ÉLECTRIQUE
L’instrument contient des circuits électroniques
•
et cela peut causer des interférences si il est
proche d’une radio ou d’une télévision. Si cela
arrive, éloigner l’instrument de l’équipement
affecté par les interférences.
•
Pour éviter tout dommage de l’instrument et des
autres elements auquel il est connecté, mettre le
bouton power de tous les éléments liés sur OFF
avant de brancher ou de débrancher les
câbles.débrancher les câbles.
F02
Page 17

CONTENU
Tableau de Contrôle
- Tableau de Contrôle Avant ............................................................................. 4
- Tableau de Connexion Arrière......................................................................... 5
- Tableau de Connexion Sur le Coté ................................................................... 5
Installation
- Brancher les Pads et Les Pédales................................................................... 6
- Brancher un Appareil MIDI ............................................................................. 7
- Brancher un Équipement Audio....................................................................... 7
- Brancher un Baladeur CD .............................................................................. 7
- Brancher un Casque ..................................................................................... 7
- Brancher la Prise de Courant ......................................................................... 7
Fonctions
- Mettre en Marche ........................................................................................ 8
- Régler le Volume .......................................................................................... 8
- Sélectionner un Kit de Batterie ....................................................................... 8
- Jouer Avec un Metronome............................................................................. 8
Jouer une Timbres
- Sélectionner une Timbres .............................................................................. 9
- Ecouter une Timbres..................................................................................... 9
- Ajuster le Volume d’une Timbres ..................................................................... 9
- Ajuster le Tempo D’une Timbres ..................................................................... 9
- Régler le Tempo en Frappant Sur un Pad ....................................................... 10
- Rendre la Batterie D’une Chanson Muette...................................................... 10
- Fonction Metronome ................................................................................... 10
- Utiliser la Fonction Guide Lumière ................................................................. 10
Créer un Kit D’utilisateur
- Régler L’enregistrement de la Batterie........................................................... 11
- Ajuster le Volume ....................................................................................... 11
- Sauvegarder Vos Sons de Kit de Batterie ....................................................... 11
Caractéristiques Techniques
Liste des Sons
Liste des Kits de Batteries
Liste des Timbres
MIDI Graphique du Mode D’exécution
................................................................................................... 6
..................................................................................................... 8
............................................................................................ 13
...................................................................................... 4
.........................................................................................9
............................................................................ 11
....................................................................... 12
......................................................................... 14
....................................................................................... 14
.......................................................... 15
Français
F03
Page 18

TABLEAU DE CONTRÔLE
Tableaude contrôle avant
Français
11
1
3 4
2
5
6 7 8
9
10
tempo/tap
Volume
11 13
Le bouton [ start/stop ]
1
Débuterouarrêterlachanson.
2
Le bouton et indicateur [ drum off ]
Ce bouton est utilisé pour allumer ou
éteindre les percussions de la chanson.
3
Le bouton [ save ]
Sauvegarder les enregistrements des kits
en cours pour l’utilisateur.
4
Le bouton [ click ]
Allumer ou éteindre le metronome.
5
L’indicateur de tempo
Tempo du métronome ou d’une Timbres jouée.
6
Le bouton [ kit ]
Afficher le numéro du kit de batterie.
7
Le bouton [ tone/volume ]
Afficher le numéro de la chanson et
l’intensité du volume d’accompagnement.
12
9
Affichage du [ 3digit LED ]
Afficher les paramètres du mode en cours.
10
Lesboutons[+]et[-]
Ces boutons sont utilisés pour modifier les
numéros des kits, des sons et ajuster le
volume du Pad.
11
Les boutons et indicateurs de sélection des Pad.
Sélectionner les Pad et ajuster le volume du
Pad. Une pression sur le bouton permettra à
l’indicateur correspondant de s’allumer.
12
Bouton du volume
Contrôle du volume du casque et de la
sortie. Tournez le bouton dans le sens des
aiguilles d’une montre pour augmenter le
volume et dans le sens contraire pour le
baisser.
13
Lesboutons[tempo+/-]et[tap]
Changer le tempo en cours.
8
Le bouton [ voice/volume ]
Afficher le numéro du son ou l’intensité du
volume.
F04
Page 19

TABLEAU DE CONTRÔLE
Tableaude connexion arrière
hi-hat
midi out hi-hat
14
14
MIDI hors du cric
control
Crash ride tom 3 tom 1tom 2 Snare kick R Aux.in
Branchez à un module de son externe.
15
Crics d'entrée de déclenchement
Brancher avec les Pad, les cymbales, le
contrôle hi-hat et les branchements rapides.
16
Crics de rendement
Brancher avec l’ampli ou le système audio.
Pour des sorties monophonique utiliser le
L/mono jack.
15
output
L/mono dc 9v.
Aux. dans le cric
17
16
ON
17 18
OFF
Branchez à une source de son externe.
18
Cric d'alimentation d'énergie (C.C dans 9V)
Branchez l’adaptateur AC fourni à cette
prise jack.
19
Le bouton Power
Mettre le bouton sur ON/OFF.
19
Français
Tableaude connexion sur le cotéa
20
Jack pour le casque ou écouteur
Branchez l’écouteur à cette prise jack.
20
F05
Page 20

INSTALLATION
ATTENTION!
Pour éviter un choc électrique et des dommages sur le matériel, assurez vous que le
bouton power est bien sur OFF sur la batterie et le matériel relié avant de faire les
branchements.
Brancherles Pads et les pédales
A l’aide des câbles fournis, branchez chaque prise jack sur le panneau arrière du module. Pad est
connecté à son « trigger input jack » correspondant.
1. Le son du pad hi-hat est contrôlé par la pédale hi-hat. Comme une batterie acoustique, le pad hihat fonctionne comme “hi-hat ouvert” quand on relâche la pédale. Quand on appuie sur la pédale,
il fonctionne comme un “hi-hat fermé”.
2. En frappant sur le pad de cymbales (ride, crash ou hi-hat) qui se trouve au bord du pad. Les sons
produits sont différents des autres pads.
Français
hi-hat
ride
crash
tom 2
tom 1
tom 3
snare
kick
hi-hat
midi out hi-hat
control
hi-hat
control
Crash ride tom 3 tom 1tom 2 Snare kick R Aux.in
output
L/mono dc 9v.
F06
ON
OFF
Page 21

Brancherun appareil MIDI
Ceci doit être utilisé pour un module de son externe ou un séquenceur MIDI.
Transmettre les informations DATA
1.
Utiliser un câble MIDI pour relier la sortie MIDI à l’entrée MIDI du matériel
MIDI externe.
2. Cette batterie est conçue pour produire tous les codes MIDI générés en
frappant les pads ou pédales par la sortie du connecteur MIDI. Veuillez
remarquer que les clics et codes MIDI sont exclus des chansons.
Brancherun équipement audio
1. Pour brancher un amplificateur veuillez suivre les étapes suivantes.
a.
Branchez l’amplificateur aux jacks de sortie L/MONO et R sur le
panneau arrière.
b. Pour une lecture monaurale, utilisez le jack L/MONO.
c. Pour une lecture stéréo, branchez les deux jacks L/MONO et R.
2. The volume is adjusted with the VOLUME knob.
Brancherun baladeur CD
midiout
MIDI IN
kick
hi-hat
hi-hat ridecrash
control
output
R L/m on o au x .in
MIDI Data
dc9v.
ON OFF
MIDI Device
MIDI OUT
Amplifer Amplifer
Français
1. La sortie audio d’un lecteur de CD ou autre source audio doit être
branchée au jack AUX IN sur le panneau arrière pour pouvoir être
mixé avec le son de la batterie.
2. Le volume est ajusté avec le bouton volume de la batterie.
Brancherun casque ou des écouteurs
L’installation d’écouteurs ou de casque stéréo peut être faite avec la
prise PHONES située sur le coté du module de batterie.
Ajuster le volume a un niveau confortable.
*
Brancherà l’alimentation
Assurez vous que le bouton power est sur OFF et branchez l’adaptateur
sur la prise DC IN située sur le tableau de connexion arrière.
Note:
1. Pour protéger les haut parleurs, les amplis et le module de la
batterie, Tournez le bouton de volume sur minimum avant
d’ALLUMER.
2. Assurer vous que le bouton power soit sur OFF quand vous
branchez le module de batterie sur du matériel externe.
kick
kick
output
R L/m on o au x .in
output
R L /m on o au x .in
dc9v.
ON OFF
dc9v.
ON OFF
F07
Page 22

FUNCTIONS
Tournezle bouton
Après que l’ensemble des branchements ait été effectué, tournez le
bouton du volume de la batterie vers la gauche (au niveau minimum)
avant d’allumer l’instrument.
Mettre le bouton de power sur la position ON pour allumer
l’instrument. L’indicateur de tonalité affiche le ton qui est joué.
Réglerle volume
Français
Pendant que vous frappez un pad, tourner graduellement le bouton du
volume jusqu’à ce que le niveau de volume soit confortable.
Configurezleskits de tambur
L’ensemble est fourni avec 20 kits pré programmés de batterie 20
(001-020) et 10 kits réservés à vos programmations personnelles
(021-030) (voir liste de référence des Timbre: page F14)
1.Appuyersurlebouton«kit».
Le kit actuel apparaît et l’indicateur de kit est affiché.
-+
Kit indicator
output
kick
R L /mo n o aux .in
Tone indicator
-+
dc9v.
ON OFF
2.Appuyersur«+»ou«-»poursélectionner le numéro du kit de la
batterie (001-020) que vous souhaitez utiliser.
Joueravec le métronome
1. Appuyer sur le bouton [click] pour démarrer le Métronome.
L’indicateur de battement clignote et le son de clic commence.
2. Appuyer sur le bouton [tempo +] ou [tempo –] pour régler le tempo
du métronome.
3. Appuyer sur le bouton [click] une nouvelle fois pour arrêter le
métronome.
4. Pour régler le volume de son de clic. Rester appuyé sur le bouton
[click] et appuyer en même temps sur les boutons [+] et [ - ] pour
ajuster le volume du son du métronome, ce dernier se met
automatiquement à jouer.
Pendant que le métronome est en marche:
Ce dernier s’arrête immédiatement lorsque l’on reste appuyé sur le
*
bouton click et que l’on appuie en même temps sur les boutons [ + ]
et[-].
Le volume du métronome se remet à 0 une fois l’instrument allumé.
*
Beat indicator
F08
Page 23

JOUER UNE TIMBRES
Ecouterune Timbres
Le module de batterie contient 50 Timbres.
Note :la chanson pré installée est la 001 après avoir allumer le
mat riel.
1.éAppuyer sur le bouton [tone/volume]. L’indicateur de la Timbre
s’allume et le numéro de la Timbre en cours apparaît.
2.Appuyersur[+]ou[-]poursélectionner une des chansons et
l’écouter. Les chansons de 001 à 050 sont des chansons prés
installés. (liste des références des chansons: page F14)
3. Appuyer sur le bouton [start/stop] et l’indicateur du rythme
clignote. Après le décompte, le play-back commence.
4. La Timbre s’arrête quand elle arrive à sa fin. Vous pouvez arrêter la
chanson pendant le play-back en appuyant sur le bouton
[start/stop].
L’indicateur de tempo clignote au premier temps de chaque mesure.
Note: L’indicateur du pad ATTRIBUE ne s’allume pas quand les deux
boutons (hi-hat) et (kick) sont pressés en même temps.
Sélectionnerle volume d’une Timbre
1. Appuyer sur le bouton [tone/volume] pour sélectionner le volume
d’une chanson. L’affichage montre : «AXX » (XX= niveau, 00 to
31).
2. Appuyer sur les boutons [+] ou [ - ] pour ajuster le volume de la
Timbre d’accompagnement.
Beat indicator
Beat indicator
Français
Le volume du ton ne peut être remis à zéro quand l’appareil est
*
ALLUME.
Ajusterle tempo d’une Timbre
1. Appuyer sur les boutons [tempo +] ou [tempo -]. L’affichage montre
le tempo en cours.
2. Appuyer sur les boutons [tempo +] ou [tempo -] pour augmenter ou
baisser le tempo (intervalle de 30 à 280 à la noire)
- Maintenez l’un des deux boutons (tempo +) ou (tempo -) pour
changer de grande à petite vitesse.
- Appuyer sur les boutons [tempo +] ou [tempo -] simultanément
pourremettreà0leréglage.
Note: Environ 2 secondes après avoir arrêté d’appuyer sur le bouton
[tempo], l’affichage se modifie et montre votre chanson sélectionnée
ou le numéro du kit à la place du niveau du tempo.
F09
tempo/tap
Page 24

Réglerle tempo en frappant sur unpad
Cette fonction vous permet de régler le tempo en frappant sur un Pad.
1. Appuyer le bouton [ tap ]. Affiche la valeur actuelle du tempo.
2. Frappez sur le pad au tempo que vous préférez. Frappez 4 fois sur
3. La timbre sera jouer dans le tempo que vous avez réglé, vous ne
*
Français
Rendrela batterie d’une chanson muette
1. Appuyer sur le bouton [drum off]. L’indicateur de tambour éteint
2. Appuyer sur le bouton [start/stop] pour rejouer la chanson. Le son
3. Pour annuler la fonction muette de la chanson, appuyer sur le bouton
le pad et les deux derniers battements sont détectés et configurés
àlavitessedésirée.
pouvez pas modifier le tempo avec cette fonction.
N’importe quel pad peut servir à cette fonction.
s’allume. La fonction muette de la batterie est activée.
de la batterie dans la chanson sera muet.
[drum off] une nouvelle fois. L’indicateur du [drum off] s’éteindra.
tempo/tap
Drum off indicator
La fonction muette de la batterie peut être utilisé pendant que la
*
chanson joue.
Fonctionmétronome
1. Appuyer sur le bouton [click] pour débuter le métronome.
2. Appuyer sur le bouton [click] une nouvelle fois pour arrêter le
métronome.
Note: Le son de clic ne s’arrête pas automatiquement à la fin de la
chanson tant que vous n’appuyez pas sur le bouton (click).
Utiliserla fonction guide lumi eè
La fonction de guide avec illumination donne une bonne leçon pour
pratiquer ou apprendre à utiliser les kits tambours pendant que les
musiques préréglées jouent.
1. Sélectionner le numéro d’une chanson sur laquelle vous souhaitez vous
entraîner.
2. Appuyer sur le bouton [drum off].
3. Appuyer sur le bouton [start/stop] pour débuter une chanson.
4. Frapper les Pads et appuyer sur la pédale de grosse caisse et de
charleston exactement au même moment que les indicateurs
s’allument.
Pendant que la chanson joue, vous pouvez changer la vitesse du tempo
*
ou utiliser la fonction « réglage du tempo en frappant sur un pad ».
Appuyer sur les boutons « hi-hat » et « kick »
pour éteindre tous les indicateurs des Pad.
Appuyer les boutons « hi-hat control » et
« kick » une nouvelle fois pour rallumer tous
les indicateurs de Pad.
F10
Page 25

Réglerun son de batterie
L’appareil comprend 215 sons de percussion de haute qualité que vous
pouvez attribuer à n’importe quel pad, 3 cymbales, hi-hat control et
ensemble de grosse caisse. Cela vous permet de créer votre propre kit
de tambour qui est la voix que vous avez choisie.
Voir liste de référence des voix : page F13.
Le numéro du kit 021-030 est utilisé pour l’enregistrement de
votrepropre kt de batterie.
1. Appuyer sur le bouton [ Voice ].
L’indicateur de voix s’allume et affiche le numéro de la voix du
tambour.
2. Appuyer sur le bouton Pad ou frapper le Pad que vous souhaitez
régler. L’indicateur de pad s’allume et affiche le numéro de la voix
actuelle du pad éclairé.
3. Appuyer sur les boutons[+]ou[-]pour sélectionner le numéro du
son que vous souhaitez attribuer.
4. Répéter les instructions 2 et 3 pour installer le son pour un autre
Pad ou pour la grosse caisse.
Toutes les configurations sont remises à défaut une fois que
*
l’appareil est ALLUME.
Ajusterle volume du PAD
Le matériel vous permet d’ajuster le volume de chaque son et vous
permet de régler le niveau individuel du volume des pads ou de la grosse
caisse.
1. Appuyez sur le bouton [ voice / volume ] pour voir le niveau de
volume réglé. Les niveaux de réglage varient de 00 à 31.
L’indicateur du bouton du Pad s’allume et l’affichage montre le niveau
du volume actuel du Pad allumé.
2. Appuyer sur le bouton [ Pad ] ou taper sur le Pad que vous souhaitez
ajuster.
3.Appuyersurlebouton[+/-]pouraugmenter ou baisser le volume.
Pendant que vous ajustez, frapper le Pad correspondant et écouter
attentivement le niveau du son jusqu’à ce qu’il atteigne celui que vous
désirez.
4. Répéter les instructions 2 et 3 pour ajuster le volume des sons des
autres Pads.
Voice indicator
Pad buttons
Volume level value
Français
Volume du Pad sont remises à défaut une fois que l’appareil est
*
ALLUME.
Pad indicator
CRÉER UN KIT D’UTILISATEURA USER DRUM KIT
Sauvegardervos kits de batterie
Une fois votre propre kit de batterie complété, vous devez le
sauvegarder sinon il sera effacé quand vous éteindrez la batterie.
1. Appuyer sur le bouton [ save ]. Le numéro du kit 021 apparaît et
clignote.
2.Appuyersurlebouton[+]ou[-]pourréglerlenumérodukit
[ 021-030 ] et sauvegarder votre kit de batterie.
3. Appuyer sur le bouton [save] une nouvelle fois. Le numéro du kit
arrête de clignoter.
Note: Pour annuler l’enregistrement de l’opération, appuyer sur le
bouton [ voice ]. En cas d’erreur, l’affichage montre « Err ».
F11
Page 26

CARACTÉRISTIQUES TECHNIQUES
Français
Pad des
batteries:
Voices:
Kits de
batteries:
Sons:
Bouton de
contrôle:
Affichage:
Connexions:
4 pads de batteries, 3 cymbales, 1 pédale de
charleston, 1 pédale de
215 sons
20 kits pré installés, 10 kits d’utilisateur
50 chansons pré installées
POWER SWITCH, START / STOP, SAVE, KIT, VOICE /
VOLUME, SONG / VOLUME, DRUM OFF, CLICK, HI-HAT,
CRASH, RIDE, HI-HAT CONTROL, SNARE, TOM 1, TOM 2,
TOM 3, KICK, VOLUME, + / - TEMPO, TAP
LED display
MIDI OUT
Hi-hat control
Hi-hat
Crash
Ride
Snare
Tom 1
Tom 2
Tom 3
Kick
Output(R&L/MONO)
Aux in
Alimentation:
Adaptateur AC (DC 9V.)
F12
Page 27

LISTE DES SONS
No. Name
Acoustc Base Drum
001 BD head
002 Real BD1
003 Real BD 2
004 Real BD 6
005 BD Std 1
006 BD Std 2
007 Room BD 1
008 Room BD 2
009 Lo BD
010 Rock BD 1
011 Rock BD 3
012 Rock BD 4
013 BD-Var 3
014 BD-Var 5
015 Big Drum 1
016 Big Drum 2
Electronic Base Drum
017 BD-Analg
018 MrDance 1
019 MrDance 2
020 MrDance 5
021 Lo-BD 1
022 Lo-BD 2
023 Hard BD 3
Acoustic Snare Drum
024 SD-Std 1
025 SD-Std 2
026 SD-Std 3
027 SD-Std 4
028 SD-Std 5
029 SD-R 1
030 SD-R 2
031 SD-R 5
032 Snare 1
033 Snare 2
034 Snare 4
035 Snare 5
036 Snare 6
037 SD-Std 21
038 SD-Std 22
039 SD-Std 23
040 SD-Std 24
041 SD-Std 25
042 SD-Std 26
043 SD-Std 27
044 SD-Std 28
045 SD-Std 29
046 SnareDr 1
047 SnareDr 5
048 SnareDr 6
049 SnareDr 7
050 SnareDr 8
051 SidStik 1
052 SidStik 2
053 SnarTimb
054 RowDrum 1
055 RowDrum 2
056 RowDrum 3
Electronic Snare Drum
057 SD-Ana 2
058 SD-Ana 6
059 SD-Ana 7
060 SD-Ana 11
061 SD-Danc 5
062 SD-Danc 6
063 SD-Elec
064 Syn-SD 1
065 Syn-SD 7
066 Syn-SD 8
067 Syn-SD 11
068 Cool SD 1
069 HD-SD 1
070 Brush 1
071 Brush 2
072 Brush 3
073 Brush 5
074 Brush 7
075 Brush 8
076 Brush 10
077 Brush 13
Acoustic Tom
078 Tom-Std5
079 Tom-Std 3
080 Tom-Std 2
081 Tom-Std 1
082 Tom-Jaz M
083 Tom-Jaz F
084 Tom-Brs H
085 Tom-Brs M
086 Tom-Brs L
087 Tom-Brs F
088 Tom-BRK H
089 Tom-BRK M
090 Tom-BRK L
091 Tom-BRK F
092 Tom-Rom 6
093 Tom-Rom 5
094 Tom-Rom 4
095 Tom-Rom 3
096 Tom-Rom 2
097 Tom-Rom 1
098 Tom-Rm 2L
099 Tom-Rm 2F
Electronic Tom
100 TomH-A
101 Tom-A 5
102 Tom-A 4
103 Tom-A 3
104 Tom-A 2
105 Tom-A 1
106 Tom-T 1M
107 Tom-T 3L
108 Tom-T 3F
109 Tom-El 4
110 Tom-El 3
111 Tom-El 2
112 Tom-El 1
Cymbal
113 CrashStd
114 CrashBrt
115 CrashSt 2
116 SftCrash
117 CrashSt3
118 CrashSht
119 CrashThin
120 CrashRev
121 CrashRol
122 CrashSt 4
123 RideBel 1
124 RK Ride 2
125 RideBStd
126 Splash C 1
127 Cymbal 2
128 Cymbal 3
129 BigGong 1
130 BigGong 2
131 B.Cymbl 1
132 B.Cymbl 2
133 S.Cymbl 2
134S.Cymbl 2 M
135 SmalGong
Acoustic Tom
136 H.H.Cls 1
137 H.H.Cls 3
138 H.H.Cls 4
139 H.H.Opn 1
140 H.HCNor 1
141 RK HHcls
142 H.H Opn 3
143 Open HH 2
144 Open HH 3
145 Open HH 4
146 RK HHOpn
147 Open HH 7
148 HH pedl 1
149 HH pedl 2
150AnaHh1
Percussion
151 Agogo-1
152 Agogo-2
153 Bell tre
154 Bongo Hi
155 Bongo Lo
156 Cabasa 1
157 Cabasa 2
158 Castanet
159 ClapA
160 Claves 1
161 Claves 2
162 Conga-Hi
163 Conga-M 1
164 Conga-M 2
165 Conga-3
166 Conga-4
167 Conga-5
168 CowBell 1
169 CowBell 2
170 Cuica H
171 Cuica L
172 Fsnap
173 Guiro 1
174 Guiro 2
175 HiQ
176 JingBell
177 Maracas 1
178 Maracas 2
179 MetroBell
180 MetroClk
181 Scrach
182 Shake
183 Surdo 1
184 Surdo 2
185 Tabla 1
186 Tabla 2
187 Tabla 3
188 Tabla 4
189 TalkD
190 TalkDrD
191 TalkDrU
192 TalkDrV
193 Tambouri
194 TimbleH
195 TimbleL
196 TimblePH
197 TimblePL
198 Triangle
199 TriagMut
200 VibrSlap
201 Whistal
202 XfadeTri
203 Smallwood
204 BoardDr 1
205 BoardDr 2
206 Lotus Brd
207 BanbuBrd
208 SouthBan
209 B.WdFish
210 S.WdFis 1
211 S.WdFis 2
212 S.WdFis 3
213 S.WdFis 4
214 ImpacBel
215 ImpaBel M
Français
F13
Page 28

LISTE DES KITS DE BATTERIES
No. Name
001 Standard 1
002 Standard 2
003 Dance 1
004 Jazz Latin
005 Room 1
006 Electric
007 Brush
008 Room Stick
009 Latin 1
010 Latin 2
Français
LISTE DES TIMBRES
No. Name
001 Guitar
002 Accordion Fussion
003 Folk Pop
004 Rock
005 Blues
006 New Age
007 Reggae Funk
008 Drum & Bass
009 Pop & Beat
010 Dance
011 Drk-2
012 Pop 3
013 Pop 5
014 Jazz 1
015 Rhythm & Blues 4
016 Ballad 1
017 Ballad 2
018 Ballad 4
019 Ballad 5
020 Ballad 6
021 Waltz
022 Slow Rock
023 Rock Pop 4
024 Latin 4
025 Latin 5
Beat
4/4
4/4
4/4
4/4
4/4
4/4
4/4
4/4
4/4
4/4
4/4
4/4
4/4
4/4
6/8
4/4
4/4
4/4
4/4
4/4
3/4
6/8-9/8
4/4
4/4
4/4
No. Name
011 Jazz
012 Brush 2
013 Dance Stick
014 Orchestra
015 Drum & Bass
016 House
017 Rhythm & Blues
018 Ungle
019 China LuoGu
020 Oriental 1
No. Name
026 Reggae
027 Shuffle 1
028 Rhythm & Blues 3
029 Rock N’ Roll 1
0308Beat4
0318Beat2
032 16 Beat
033 March
034 Latin 6
035 Funk 3
036 Fusion 2
037 Rock N’ Roll 2
038 Hard Rock 3
039 Rock Pop 2
040 Funk 1
041 Funk 4
042 Jazz 3
043 Dance 1
044 Dance 2
045 Mambo
046 Rhythm & Blues 1
047 Rhythm & Blues 2
048 Ballad 3
049 Jing Opera
050 Chinese Rhythm
Beat
4/4
4/4
4/4
4/4
4/4
4/4
4/4
4/4
4/4
4/4
4/4
4/4
4/4
4/4
4/4
4/4
6/8
4/4
4/4
4/4
4/4
4/4
4/4
4/4
2/4
F14
Page 29

GRAPHIQUE DU MODE D’ÉXÉCUTION
Canal
normal
Mode
Numéro de note
Vélocité
Après
Lien
Pitch Bend
Contrôle
Changement
Programe
Changement
FONCTION
Par défaut
Modifié
Par défaut
Messages
Altéré
Vrai son
Note On
Note Off
Clé
Canal
0
1
5
6
7
10
11
64
65
66
67
80
81
91
93
120
121
123
True #
TRANSMISSION
10 canaux
X
X
X
*****
0-127
*****
O 9NH, V=1 -127
X (9NH V=0)
X
X
X
X
X
X
X
X
X
X
X
X
X
X
X
X
X
X
X
X
X
X
X
REMARQUES
Français
Sélection de banc
Modulation
Temps portamento
Entrée de données
Volume
Pan
Expression
Pédal enfoncé
Portamento ON/OFF
Pédale de Sostenuto
Pédale douce
Programme Sostenuto
Programme chorus
Niveau reverb
Niveau chorus
Tout son OFF
Misà0ducontrôle
Toute note OFF
Système
Système
commun
Système en temps
réel
Aux
Messages
Exclusive
Position d’une chanson
Sélection d’une chanson
Tune
Horloge
Commande
Local ON/OFF
Tout note OFF
Actif
Reset
KEY=O:Oui
X
X
X
X
X
X
X
X
X
X
X: Non
F15
Page 30

¡FELICIDADES!
Gracias por comprar su Batería Electrónica. Esta Batería Digital ha sido desarrollada para funcionar
de forma semejante a una batería acústica con más facilidad en su uso. Antes de usar este
instrumento, le recomendamos leer completamente este manual para obtener el máximo rendimiento
delmismoy garantizar que este le proporcione muchos años de servicio y diversión.
Conserve este Instructivo en un lugar seguro para futuras
consultas.
ALMACENAJE
•
No deje la unidad en condiciones y lugares como
los descritos a continuación.
Expuesta a los rayos directos del sol.
•
En lugares con altas temperaturas o cerca de
•
una fuente calorífica.
En lugares con humedad y/o polvo excesivos.
•
FUENTE DE PODER
Español
Use el adaptador AC incluido con este producto.
•
Asegúrese de que el voltaje de salida AC en el
país en que está siendo usado, corresponda al
voltaje de entrada especificado en la etiqueta del
adaptador AC.
Asegúrese de que el voltaje y tensión de la fuente
•
de poder o adaptador de corriente de su batería
digital correspondan a los de la corriente local.
•
Apague el instrumento cuando no lo use y
desconecte su fuente de poder de la toma de
corriente de AC si no lo va a utilizar por un largo
periodo de tiempo.
•
Desconecte la fuente de poder de la toma de
corriente de AC en el caso de una fuerte
tormenta eléctrica.
•
Evite conectar la fuente de poder en la misma
toma de corriente donde están conectados otros
aparatos de alto consumo de electricidad.
TRANSPORTE Y MANEJO
•
Jamás aplique fuerza excesiva sobre los
conectores o sobre cualquier otra parte del
instrumento.
•
Para desconectar un cable, sostenga el cuerpo
de la clavija y tire, no tire del cable.
•
No coloque objetos pesados sobre la batería, o
colocar objetos pesados en el instrumento puede
resultar en arañones y daños más serios.
LIMPIEZA
•
Limpie la unidad con un paño suave y seco.
•
Use un paño levemente húmedo para remover
suciedades más resistentes.
•
Nunca use limpiadores como alcohol o solvente.
Evite colocar objetos de vinilo en cima de la
•
unidad (el vinilo se puede adherir a la superficie y
descolorirla).
•
INTERFERENCIA ELÉCTRICA
•
Este instrumento contiene circuitos digitales que
pueden originar interferencias si este se
encuentra cerca de un aparato de radio o
televisor, Si eso ocurriese, aleje el modulo de
dichos aparatos.
DESCONECTE LA FUENTE DE PODER AL
EFECTUAR LAS CONEXIONES
•
Antes de conectar o desconectar cualquier
cable, apague la fuente de poder inactiva
colocando el interruptor de encendido (POWER)
en la posición de 0FF (apagado).
S02
Page 31

CONTENIDO
Paneles de control
- Panel Frontal................................................................................................ 4
- Panel Posterior ............................................................................................ 5
- Panel Lateral................................................................................................ 5
Ensamblado
- Conectar los pads y los pedales ...................................................................... 6
- Conectar un dispositivo MIDI .......................................................................... 7
- Conectar a un equipo de audio........................................................................ 7
- Conectar un reproductor de CD’s, etc. (AUX. in) ............................................... 7
- Conectar un audífono .................................................................................... 7
- Conectar la fuente de poder ........................................................................... 7
Funciones
- Encender el modulo....................................................................................... 8
- Ajustar el volumen ........................................................................................ 8
- Seleccionar un “Drum Kit”.............................................................................. 8
- Tocar con metrónomo................................................................................... 8
Tocar una timbre
- Elegir una Timbre.......................................................................................... 9
- Escuchar una Timbre .................................................................................... 9
- Ajustar el volumen de una Timbre ................................................................... 9
- Ajustar el tempo de una Timbre...................................................................... 9
- Función de TAP tempo................................................................................. 10
- Silenciar el acompañamiento de baterìa ......................................................... 10
- Tocar con un click ( Metrónomo ).................................................................. 10
- Utilizar luces guías ...................................................................................... 10
Crear sonidos para una batería
- Armar un grupo de sonidos.......................................................................... 11
- Ajustar el volumen de un pad........................................................................ 11
- Guardar en la memoria los sonidos de una batería .......................................... 11
Especificaciones
Lista de voces
Lista de los sonidos de las baterias
Listadelastimbre
Utilización de MIDI
.................................................................................................. 6
..................................................................................................... 8
........................................................................................ 4
.......................................................................................... 9
................................................................... 11
......................................................................................... 12
............................................................................................ 13
............................................................. 14
..................................................................................... 14
...................................................................................... 15
Español
S03
Page 32

PANELES DE CONTROL
PanelFrontal
1
11
1
3 4
2
5
6 7 8
9
10
tempo/tap
Volume
Español
1
2
3
4
5
6
7
11 13
Botón [ start / stop ]
Presione este botón para arrancar /
detener un timbre.
Botón [ drum off ]
Este botón activa o desactiva las baterías y
las percusiones del timbre.
Botón guardar [ save ]
Almacena en la memoria un grupo de
sonidos personalizados.
Botón [ click ]
Enciende y apaga el metrónomo.
LED indicador del tempo
Indica el tiempo de un timbre y cual timbre
esta sonando.
Botón [ kit ]
Ajusta el número del sonidos del set de
batería.
Botón [ tone / volume ]
Muestra el número de la canción o el
volumen del acompaniamiento.
12
8
Botón [ voice / volume ]
Muestra el número del sonido, o el valor del
Volumen.
9
Pantalla de leds de 3 digitos
Muestra los parámetros del menú elegido.
10
Perilla[+]/[-]
Esta perilla sirve para cambiar el número
de los kits, los sonidos de las canciones o
para ajustar el volumen de los pads.
11
Botones selectores e indicadores de los
pads
Oprima estos botones para seleccionar los
pads y ajustar el volumen. Al hacerlo, estos
se iluminarán.
12
Perilla de volumen
Esa perilla controla el volumen de los. gire
la perilla en el sentido horario para
aumentar el volumen y en el sentido
contrario para disminuir el volumen.
13
Perilla [ tempo - /+]y[tap]
Gire esta perilla para modificar el tempo.
S04
Page 33

PanelPosterior
hi-hat
midi out hi-hat
14
14
Conector de salida MIDI (MIDI out jack)
control
Crash ride tom 3 tom 1tom 2 Snare kick R Aux.in
Conecte a un módulo de sonido externo.
15
Entradas de los pads (trigger)
Conecta los pads de los toms, tarola, hihats, platillos y bombo.
Conectordesalida[R-L/mono]
Conecte este a un amplificador o sistema
de audio. para una salida monoaural
emplee el conector l (salida izquierda).
15
output
L/mono dc 9v.
ON
16
17
Conector de entrada auxiliar (aux in)
17 18
OFF
Conecte a una fuente de sonido externa.
18
Conexión de la fuente de poder [ dc 9v. ]
Conecte el adaptador AC suministrado a
este conector.
1916
Interruptor
Enciende / Apaga el módulo de su batería
digital.
19
Español
Panellateral
20
Conector de los audifonos
Conecte los auriculares a este conector
(Al conectar los audífonos no se interrumpirán
las salidas de audio).
20
S05
Page 34

ENSAMBLADO
¡TENGA CUIDADO!
Para evitar una descarga eléctrica o fuego con los consecuentes daños a su integridad
personal y a su instrumento, cerciórese de que la fuente de poder de la unidad se encuentre
desconectada de la toma de corriente de AC de la pared ANTES DE ENSAMBLAR SU DE
GREGGS PERCUSSION y que esta no esté conectada a otro dispositivo que opere con
corriente eléctrica.
Conectarlos pads y los pedales
Emplee los cables incluidos con su batería digital para conectar cada una de las entradas
(inputs) ubicadas en el panel posterior con los pads o pedales correspondientes.
Nota:
1. El sonido del pad hi-hat es controlado por el pedal hi-hat. Semejante a una batería acústica, el
pad hi-hat funciona como un “hi-hat abierto” cuando el pedal es liberado. Cuando el pedal está
presionado, funciona como un “hi-hat cerrado”.
2. Al golpear el área del pad de platillos (ride, crash o hi-hat) que está próximo al borde del pad,
los sonidos producidos son distintos de los otros pads.
Español
hi-hat
crash
ride
tom 2
tom 1
tom 3
snare
kick
hi-hat
control
hi-hat
midi out hi-hat
control
Crash ride tom 3 tom 1tom 2 Snare kick R Aux.in
output
L/mono dc 9v.
S06
ON
OFF
Page 35

Conectarun dispositivo MIDI
Esta función es para ser usado por un módulo de sonido externo o
secuenciador MIDI
Transmisión de Datos MIDI
1. Emplee un cable MIDI para conectar la entrada MIDI IN del módulo
a la salida MIDI OUT de la unidad externa.
2. Esta batería fue diseñada para dar salida a todos los códigos MIDI
generados por golpes en los pads o presión en el pedal a través de
un conector de salida MIDI. Observe que los clics y los códigos
MIDI en las canciones son excluídos.
Conectara un equipo de audio
1. Al conectar un amplificador, siga los pasos indicados a
continuación.
a.
Conecte el amplificador a los conectores de Salida L / MONO y
R en el panel posterior.
b. Para reproducción monoaural, use el conectorL/MONO.
c. Para reproducción estéreo, conecte ambos conectores L /
MONO y R.
2. Ajuste el nivel (volumen) girando la perilla “Volume”.
Conectarun reproductor de cd’s
midiout
MIDI IN
kick
hi-hat
hi-hat ridecrash
control
output
R L/m on o au x .in
MIDI Data
dc9v.
ON OFF
MIDI Device
MIDI OUT
Amplifer Amplifer
La salida de audio de un reproductor de CD u otra fuente de audio,
debe ser conectada al conector AUX IN en el panel posterior, que
puede ser mezclado con el sonido del bombo. permitiéndole
acompañar sus canciones favoritas.
Conectarun audífono
Conecte sus audífonos estereofónicos en la entrada PHONES ubicada
sobre el panel lateral del módulo.
* Ajuste el volumen a un nivel confortable.
Conectarla fuente de poder
Cerciórese de que el interruptor de encendido / apagado se
encuentre en la posición OFF. Conecte la fuente de poder en el
receptáculo correspondiente situado en el panel posterior del módulo.
Note:
1. Para proteger los altavoces o audífonos conectados al módulo,
antes de encender la unidad, rote la perilla de volumen al nivel
mínimo de volumen antes de encender en ON.
2. Asegurese de the poner la perilla en OFF cuando este conectando
el módulo de la batería a equipo externo.
kick
kick
output
R L/m on o au x .in
output
R L /m on o au x .in
Español
dc9v.
ON OFF
dc9v.
ON OFF
S07
Page 36

FUNCIONES
Enciendeel interruptor
Ajustarel volumen principal
Configureel conjunto de bombos
Español
Una vez verificado que el botón del volumen este totalmente girado al
mínimo, encienda el módulo accionando el interruptor ON / OFF hacia
la posición de encendido ON.
Al hacer esto, El indicador de tono mostrará el tono que está siendo
reproducido.
Al golpear un pad, ajuste el volumen hasta alcanzar a un nivel
deseable.
El module viene con 20 (001-020) presets pre-determinados de
fábrica DRUM KlT (BATERÍA) y 10 presets de usuario para que usted
programe sus propias baterías personales.
-+
Kit indicator
output
kick
R L /mo n o aux .in
Tone indicator
-+
dc9v.
ON OFF
1. Presione el botón DRUM KIT. El número del conjunto actual
aparece y el indicador de conjunto será mostrado.
2.Oprimaelbotón[+]o[–]paraseleccionar la batería o DRUM KIT
deseada. Puede elegir desde el 001 hasta el 020.
Tocarcon metrónomo
1. Presione el botón [ CLICK ] y para iniciar el Metrónomo. El indicador
de tiempo destellará y el sonido de clic empezará a ser
reproducido.
2. Presione el botón [ tempo + ] o [ tempo - ] para establecer el tempo
requerido.
3. Presione de nuevo el botón [ CLICK ] para detener el metrónomo.
Para ajustar el volumen del sonido de clic, presione y mantenga
oprimido el botón [ CLICK ] y gire al mismo tiempo la perilla [+]o[–]
para ajustar el volumen. El metrónomo se escuchará
automáticamente.
Cuando el Metrónomo esté operando:
El metrónomo se detendrá inmediatamente al mantener
*
presionadoelbotón[CLICK]ygirar la perilla[+]o[-].
Beat indicator
El volumen del [ CLICK ] reestablecerá su valor original al encender
*
de nuevo el módulo.
S08
Page 37

TOCAR UN TIMBRE
Ecucharun timbre
Ese modulo cuenta con 50 canciones pregrabadas.
Nota: La configuración programada de tono es 001 cuando es
encendido.
1. Presione el botón [ timbre / volume ].
El indicador luminoso de timbre se iluminará y el número de la
timbre se mostrará en la pantalla numérico.
2.Presionar[+]/[-]paraseleccionar una timbre. Las canciones
pre-grabadas van del 001 al 050.
3. Presionar el botón [ start / stop ] y el indicador luminoso
parpadeará. Después de la cuenta la timbre tocara desde el
principio.
4. La timbre se detendrá al llegar a su fin. Usted puede detener la
timbre en cualquier momento, presionando el botón [ start / stop ].
Los indicadores de los pads parpadearan en el primer beat de cada
compás.
Nota : El indicador de pad ATRIBUIDO no se iluminará cuando ambos
botones [hi-hat]y[kick]sonpresionadosalmismotiempo.
Ajustarel volumen de un timbre
1. Presione el botón [ tone / volume]ylapantalla mostrará los
valores de A01 a A31.
Beat indicator
Beat indicator
Español
2.Oprima[+]/[-]paraajustarelvolumen de la timbre.
Ajustarel tiempo de una timbre
1. Presione el botón [ tempo + ] o [ tempo - ], la pantalla mostrara el
valor del tempo.
2. Presione el botón [ tempo + ] o [ tempo - ] se establecerá el tempo
al valor deseado. El valor del TEMPO inicia desde 030 hasta 280.
- Mantenga presionado el botón [ tempo + ] o [ tempo - ] para
alterar la configuración de velocidad alta para baja.
- Presionando simultáneamente las [ tempo +]y[tempo-]del
botón TEMPO, este valor volverá a su valor original.
Nota: Aproximadamente Dos segundos después de presionar la tecla
TEMPO ( + o - ), la pantalla volverá a mostrar ya sea el sonido del KIT
elegidooelnúmerodelatimbre.
tempo/tap
S09
Page 38

Funcionde tap tempo
Silenciarel acompañamiento de batería
Español
Esta función le permite programar el tempo en tiempo real.
1. Presione el botón TAP TEMPO, Esto mostrará el valor actual de
tiempo.
2. Golpee en el pad en el tiempo de su preferencia. Golpee en el pad 4
vez y las últimas dos pulsaciones serán detectadas y definidas
como la velocidad deseada.
3. El timbre será reproducido a la velocidad o tempo elegido. No es
posible aplicar esta función cuando el timbre está ya sonando.
Cualquier PAD puede ser usado para determinar el TAP TEMPO.
*
1. Presione el botón [ drum off ]. El LED indicador de batería apagada
se iluminará.
2. Presione el botón [ start / stop ] y la canción será reproducida sin
el acompañamiento de batería.
3. Para restablecer el sonido de la batería, oprima de nuevo el botón
[ drum off ], El LED indicador se apagará.
tempo/tap
Drum off indicator
Esta función puede utilizarse en cualquier momento.
*
Tocarcon un clic
1. Presione el botón CLIC y el metrónomo sonará en tiempo.
2. Presione una vez más el botón CLICK y el metrónomo se detendrá.
Nota: El sonido de clic no parará automáticamente una vez que la
canción termine hasta que usted presione el botón [ clic ].
Utilizarluces guías
La función de guía por iluminación proporciona una lección valiosa
para practicar o aprender a tocar el conjunto de batería mientras
reproduce los tonos programados.
1. Seleccione la timbre sobre la cual usted desea practicar.
2. Presione el botón [ drum off ].
3. Presione el botón [ start / stop ] para que el timbre de inicio.
4. Toque sobre los PADS y PEDALS siguiendo las indicaciones luminosas.
Para facilitar la práctica puede reducir la velocidad del tempo del
*
timbre.
S10
Presione simultáneanente los botones
HI-HAT y KICK para apagar los
indicadores luminosos. Presiónelos
nuevamente para restablecer la función.
Page 39

Armarun grupo de sonidos
Esta unidad incluye 215 sonidos de percusión de alta calidad que
usted puede atribuir a cualquiera de los pads de la batería PEDALS,
PADS o CYMBALS. Esto le permite crear su propio conjunto de
batería, que consistirá de las voces que usted elija.
Los números de presets 021 – 030 sirven para almacenar los kits
personales o de usuario. Listado de referencia: pagina 13.
Los grupos numerados 021-030 son utilizados para grabar sus
propios sonidos.
1. Presione el botón [ voice ].
El indicador de voz se ilumina y muestra el número de voz del pad.
2. Presione el botón del [ pad ] o golpee el PAD que desea incorporar.
El indicador de pad se iluminará y mostrará el número de voz
actual del pad encendido.
3. Oprima [ + o – ] para seleccionar el sonido que desea asignar a
dicho PAD.
4.Repitalospasos2y3paraasignarotrossonidosaotrosPADS,HI
HATS etc...
Todas las configuraciones serán restauradas al valor inicial una vez
*
queseenciendaenON.
Ajustarel volumen de un pad
Usted puede determinar el volumen del sonido de cada PAD en un kit
de batería personalizado o de usuario.
1. Presione el botón [ voice / volume ] para ver la configuración del
nivel de volumen. Las configuraciones de nivel van desde 00 hasta
31 El LED indicador se iluminará y la pantalla mostrará el valor del
volumen del PAD.
2. Oprima el botón del [ PAD ] o golpee el PAD al cual Usted desea
ajustar el volumen.
3.Presioneelbotón[+]o[–]paraincrementar o reducir el
volumen. Golpee el PAD correspondiente para comprobar el ajuste,
escuche atentamente el nivel de sonido hasta que alcance el nivel
deseado.
4.Repitalospasos3y3paraajustarelvolumen de los otros Pads.
*
El volumen del pad sera reseteado a la configuración inicial cuando
presione ON.
Voice indicator
Pad buttons
Volume level value
Español
Pad indicator
CREAR SONIDOS PARA UNA BATERÍA
Guardaren la memoria los sonidos deunabatería
Una vez establecidos los sonidos de su batería personal, guárdelos en
el módulo para poder utilizarlos después:
1.Presioneelbotón[save].
El grupo número 021 aparecerá iluminado.
2.Presione[+]o[–]paraelegirelnúmero[021-030 ] en el cual
usted desea guardar dicha batería.
3. Presione [ save ] una vez más y el LED dejará de parpadear. Los
sonido de su batería personalizada han sido memorizados.
Nota: Para cancelar el guardado de la operación presione el botón
Voice. Si se produce un error “Err” se iluminará en la pantalla.
S11
Page 40

ESPECIFICACIONES
Español
Pads de
batería:
Voces:
Baterías:
Canciones:
Controles:
Pantalla:
Conexiones:
4 drum pads, 3 pads de platillo, 1 hi-hat control pedal,
1 pedal de control.
215 voces
20 preseteados de batería, 10 baterias para el usuario.
50 canciones preseteadas
POWER SWITCH, START / STOP, SAVE, KIT, VOICE /
VOLUME, SONG / VOLUME, DRUM OFF, CLICK, HI-HAT,
CRASH, RIDE, HI-HAT CONTROL, SNARE, TOM 1, TOM 2,
TOM 3, KICK, VOLUME, + / - TEMPO, TAP
Pantalla de LEDs
MIDI OUT
Hi-hat control
Hi-hat
Crash
Ride
Snare
Tom 1
Tom 2
Tom 3
Kick
Output(R&L/MONO)
Aux in
Fuente de
poder:
Adaptador de corriente de AC (DC 9V)
S12
Page 41

LISTADO DE VOCES
No. Nombre
Base de batería acústica
001 BD head
002 Real BD1
003 Real BD 2
004 Real BD 6
005 BD Std 1
006 BD Std 2
007 Room BD 1
008 Room BD 2
009 Lo BD
010 Rock BD 1
011 Rock BD 3
012 Rock BD 4
013 BD-Var 3
014 BD-Var 5
015 Big Drum 1
016 Big Drum 2
Base de batería electrónica
017 BD-Analg
018 MrDance 1
019 MrDance 2
020 MrDance 5
021 Lo-BD 1
022 Lo-BD 2
023 Hard BD 3
Tambor acústico
024 SD-Std 1
025 SD-Std 2
026 SD-Std 3
027 SD-Std 4
028 SD-Std 5
029 SD-R 1
030 SD-R 2
031 SD-R 5
032 Snare 1
033 Snare 2
034 Snare 4
035 Snare 5
036 Snare 6
037 SD-Std 21
038 SD-Std 22
039 SD-Std 23
040 SD-Std 24
041 SD-Std 25
042 SD-Std 26
043 SD-Std 27
044 SD-Std 28
045 SD-Std 29
046 SnareDr 1
047 SnareDr 5
048 SnareDr 6
049 SnareDr 7
050 SnareDr 8
051 SidStik 1
052 SidStik 2
053 SnarTimb
054 RowDrum 1
055 RowDrum 2
056 RowDrum 3
Tambor electrónico
057 SD-Ana 2
058 SD-Ana 6
059 SD-Ana 7
060 SD-Ana 11
061 SD-Danc 5
062 SD-Danc 6
063 SD-Elec
064 Syn-SD 1
065 Syn-SD 7
066 Syn-SD 8
067 Syn-SD 11
068 Cool SD 1
069 HD-SD 1
070 Brush 1
071 Brush 2
072 Brush 3
073 Brush 5
074 Brush 7
075 Brush 8
076 Brush 10
077 Brush 13
Tom acústico
078 Tom-Std 5
079 Tom-Std 3
080 Tom-Std 2
081 Tom-Std 1
082 Tom-Jaz M
083 Tom-Jaz F
084 Tom-Brs H
085 Tom-Brs M
086 Tom-Brs L
087 Tom-Brs F
088 Tom-BRK H
089 Tom-BRK M
090 Tom-BRK L
091 Tom-BRK F
092 Tom-Rom 6
093 Tom-Rom 5
094 Tom-Rom 4
095 Tom-Rom 3
096 Tom-Rom 2
097 Tom-Rom 1
098 Tom-Rm 2L
099 Tom-Rm 2F
Tom electrónico
100 TomH-A
101 Tom-A 5
102 Tom-A 4
103 Tom-A 3
104 Tom-A 2
105 Tom-A 1
106 Tom-T 1M
107 Tom-T 3L
108 Tom-T 3F
109 Tom-El 4
110 Tom-El 3
111 Tom-El 2
112 Tom-El 1
Cimbal
113 CrashStd
114 CrashBrt
115 CrashSt 2
116 SftCrash
117 CrashSt3
118 CrashSht
119 CrashThin
120 CrashRev
121 CrashRol
122 CrashSt 4
123 RideBel 1
124 RK Ride 2
125 RideBStd
126 Splash C 1
127 Cymbal 2
128 Cymbal 3
129 BigGong 1
130 BigGong 2
131 B.Cymbl 1
132 B.Cymbl 2
133 S.Cymbl 2
134S.Cymbl 2 M
135 SmalGong
Tom acústico
136 H.H.Cls 1
137 H.H.Cls 3
138 H.H.Cls 4
139 H.H.Opn 1
140 H.HCNor 1
141 RK HHcls
142 H.H Opn 3
143 Open HH 2
144 Open HH 3
145 Open HH 4
146 RK HHOpn
147 Open HH 7
148 HH pedl 1
149 HH pedl 2
150 Ana Hh 1
Percusión
151 Agogo-1
152 Agogo-2
153 Bell tre
154 Bongo Hi
155 Bongo Lo
156 Cabasa 1
157 Cabasa 2
158 Castanet
159 ClapA
160 Claves 1
161 Claves 2
162 Conga-Hi
163 Conga-M 1
164 Conga-M 2
165 Conga-3
166 Conga-4
167 Conga-5
168 CowBell 1
169 CowBell 2
170 Cuica H
171 Cuica L
172 Fsnap
173 Guiro 1
174 Guiro 2
175 HiQ
176 JingBell
177 Maracas 1
178 Maracas 2
179 MetroBell
180 MetroClk
181 Scrach
182 Shake
183 Surdo 1
184 Surdo 2
185 Tabla 1
186 Tabla 2
187 Tabla 3
188 Tabla 4
189 TalkD
190 TalkDrD
191 TalkDrU
192 TalkDrV
193 Tambouri
194 TimbleH
195 TimbleL
196 TimblePH
197 TimblePL
198 Triangle
199 TriagMut
200 VibrSlap
201 Whistal
202 XfadeTri
203 Smallwood
204 BoardDr 1
205 BoardDr 2
206 Lotus Brd
207 BanbuBrd
208 SouthBan
209 B.WdFish
210 S.WdFis 1
211 S.WdFis 2
212 S.WdFis 3
213 S.WdFis 4
214 ImpacBel
215 ImpaBel M
Español
S13
Page 42

LISTA DE GRUPOS DE BATERIA
LISTA DE TONOS
No. Nombre
001 Guitar
Español
002 Accordion Fussion
003 Folk Pop
004 Rock
005 Blues
006 New Age
007 Reggae Funk
008 Drum & Bass
009 Pop & Beat
010 Dance
011 Drk-2
012 Pop 3
013 Pop 5
014 Jazz 1
015 Rhythm & Blues 4
016 Ballad 1
017 Ballad 2
018 Ballad 4
019 Ballad 5
020 Ballad 6
021 Waltz
022 Slow Rock
023 Rock Pop 4
024 Latin 4
025 Latin 5
No. Nombre
001 Standard 1
002 Standard 2
003 Dance 1
004 Jazz Latin
005 Room 1
006 Electric
007 Brush
008 Room Stick
009 Latin 1
010 Latin 2
Beat
4/4
4/4
4/4
4/4
4/4
4/4
4/4
4/4
4/4
4/4
4/4
4/4
4/4
4/4
6/8
4/4
4/4
4/4
4/4
4/4
3/4
6/8-9/8
4/4
4/4
4/4
No. Nombre
011 Jazz
012 Brush 2
013 Dance Stick
014 Orchestra
015 Drum & Bass
016 House
017 Rhythm & Blues
018 Ungle
019 China LuoGu
020 Oriental 1
No. Nombre
026 Reggae
027 Shuffle 1
028 Rhythm & Blues 3
029 Rock N’ Roll 1
0308Beat4
0318Beat2
032 16 Beat
033 March
034 Latin 6
035 Funk 3
036 Fusion 2
037 Rock N’ Roll 2
038 Hard Rock 3
039 Rock Pop 2
040 Funk 1
041 Funk 4
042 Jazz 3
043 Dance 1
044 Dance 2
045 Mambo
046 Rhythm & Blues 1
047 Rhythm & Blues 2
048 Ballad 3
049 Jing Opera
050 Chinese Rhythm
Beat
4/4
4/4
4/4
4/4
4/4
4/4
4/4
4/4
4/4
4/4
4/4
4/4
4/4
4/4
4/4
4/4
6/8
4/4
4/4
4/4
4/4
4/4
4/4
4/4
2/4
S14
Page 43

IMPLEMENTACION SISTEMA MIDI
Básico
Canal
Modo
Nota
Número
Velocidad
Despues
Toque
Pitch Bend
Cambio de control
FUNCION
Defecto
Cambiado
Defecto
Mensajes
Alterado
Voz real
Notas activadas
Notas desactivadas
LLaves
Canales
0
1
5
6
7
10
11
64
65
66
67
80
81
91
93
120
121
123
TRANSMITIDO
10 ch
X
X
X
*****
0-127
*****
O 9NH, V=1 -127
X (9NH V=0)
X
X
X
X
X
X
X
X
X
X
X
X
X
X
X
X
X
X
X
X
X
REMARCADO
Bank Select
Modulation
Portamento Time
Data Entry
Volume
Pan
Expression
Sustain Pedal
Portamento ON /OFF
Sostenuto Pedal
Soft Pedal
Reverb Program
Chorus Program
Reverb Level
Chorus Level
All Sound OFF
Reset All Controller
All Notes OFF
Español
Cambio de
programa
Sistema
Sistema
Común
Sistema
Tiempo real
Aux
Mensajes
Verdaadero #
Exclusivo
Posición de la canción
Selector de canción
Tono
Reloj
Comandos
LocalON/OFF
Todas las notas OFF
Sensores Activos
Resetear
LLAVE = O: Si
X
X
X
X
X
X
X
X
X
X
X
X: No
S15
Page 44

The Singing Machine Company, Inc.
1460-0609-ENG-SPA-FRE01
6601 Lyons Road, Bldg. A7,
Coconut Creek, FL 33073-9902 USA
TEL. (954) 596-1000
FAX. (954) 596-2000
VISIT OUR WEBSITE > www.singingmachine.com
VISITE NOTRE SITIO INTERNET > www.singingmachine.com
VISITE NUESTRO SITIO DE INTERNET > www.singingmachine.com
Printed in China / Imprimé en Chine / Impreso en China
 Loading...