

Page 1
7 Pad Electronic
Drum Set
Sistema Electrónico del Tambor de
Ensemble Électronique de Tambour de
7 Cojines
7 Garnitures
SMI-1452
Page 2
Congratulations!
Thank you for purchasing your SOUNDX Portable Digital Drum Set. This Digital Drum Set has been developed to
perform with ease. Before using this instrument, we recommend that you to read through this manual.
Taking care of your Portable Digital Drum Set
please follow the maintenance instructions listed below:For optimum use of your Digital Drum Set,
English
LOCATION
• Do not expose the unit to the following conditions
to avoid deformation, discoloration, or more
serious damage.
•
Direct sunlight.
High temperature (near a heat source, or in a
•
car during the daytime).
Excessive humidity.
•
Excessive dust.
•
Strong vibration.
•
POWER SUPPLY
•
Turn the power switch OFF when the instrument
isnotinuse.
•
The AC adapter should be unplugged from the AC
outlet if the instrument is not in use for an
extended period of time.
•
Unplug the AC adapter during electric storms.
•
Avoid plugging the AC adapter into the same AC
outlet as an appliances with high power
consumption, such as electric heaters or ovens.
Also avoid using multi-plug adapters since this
can result in reducing the sound quality,
operation errors, and possible damage.
TURN POWER OFF WHEN MAKING CONNECTIONS
HANDLING AND TRANSPORT
•
Never apply excessive force to the controls,
connectors or other parts of the instrument.
Always unplug cables by gripping the plug firmly,
•
but not pulling on the cable.
Disconnect all cables before moving the
•
instrument.
Physical shocks caused by dropping, bumping, or
•
placing heavy objects on the instrument can
result in scratches and more serious damage.
CLEANING
•
Clean the unit with a dry soft cloth.
•
A slightly damp cloth may be used to remove
stubborn grime and dirt.
•
Never use cleaners such as alcohol or thinner.
•
Avoid placing vinyl objects on top of the unit (vinyl
can stick to and discolor the surface).
ELECTRICAL INTERFERENCE
•
This instrument contains digital circuitry and may
cause interference if placed too close to a radio
or television receiver. If this occurs, move the
instrument away from the affected equipment.
•
To avoid damage to the instrument and other
devices to which it is connected, turn OFF the
power switches of all related devices prior to
connecting or disconnecting cables.
THIS DEVICE COMPLIES WITH PART 15 OF THE FCC RULES.
OPERATION IS SUBJECT TO THE FOLLOWING TWO CONDITIONS:
(1) THIS DEVICE MAY NOT CAUSE HARMFUL INTERFERENCE, AND
(2) THIS DEVICE MUST ACCEPT ANY INTERFERENCE RECEIVED,
INCLUDING INTERFERENCE THAT MAY CAUSE UNDESIRED OPERATION.
E02
Page 3

CONTENTS
Panel Controls
- Front panel .................................................................................................. 4
- Rear Panel................................................................................................... 5
Setting Up
- Using the AC - Adaptor .................................................................................. 6
- Using Batteries ............................................................................................ 6
- Using Headphones ........................................................................................ 6
Present Pad Number and Drum Kit
Functions
- Playing the Demo Song ................................................................................. 8
Pads / Pedals
- Assigning a Drum Kit to the Pads and Pedals .................................................. 9
- Assigning a voice to Individual Pads and Pedals (”CU” Custom Kit) ..................... 10
Operation
- Adjust Reverb Function ............................................................................... 11
- Metronome ............................................................................................... 11
Playing A Song
- Selecting a Song ........................................................................................ 12
- Super Bass ............................................................................................... 13
- Adjust Tempo Function ............................................................................... 13
- Track ON/OFF ........................................................................................... 13
- Tap Start .................................................................................................. 14
- Learning Function ...................................................................................... 14
Recording
- Record Function ........................................................................................ 15
- Playback Function ....................................................................................... 15
Making The Connection
- MIDI ......................................................................................................... 16
- What is MIDI? ........................................................................................... 16
- What you can do with MIDI? ........................................................................ 16
- Pedals ...................................................................................................... 17
- Phones Output .......................................................................................... 17
Specifications
Voice List
Drum Kit List
Song List
MIDI Implementation Chart
..................................................................................................... 8
................................................................................................... 21
............................................................................................. 4
.................................................................................................... 6
............................................................... 7
.............................................................................................. 9
.................................................................................................. 11
.......................................................................................... 12
.................................................................................................. 15
.............................................................................. 16
............................................................................................ 18
.................................................................................................. 19
............................................................................................ 20
....................................................................... 22
English
E03
Page 4
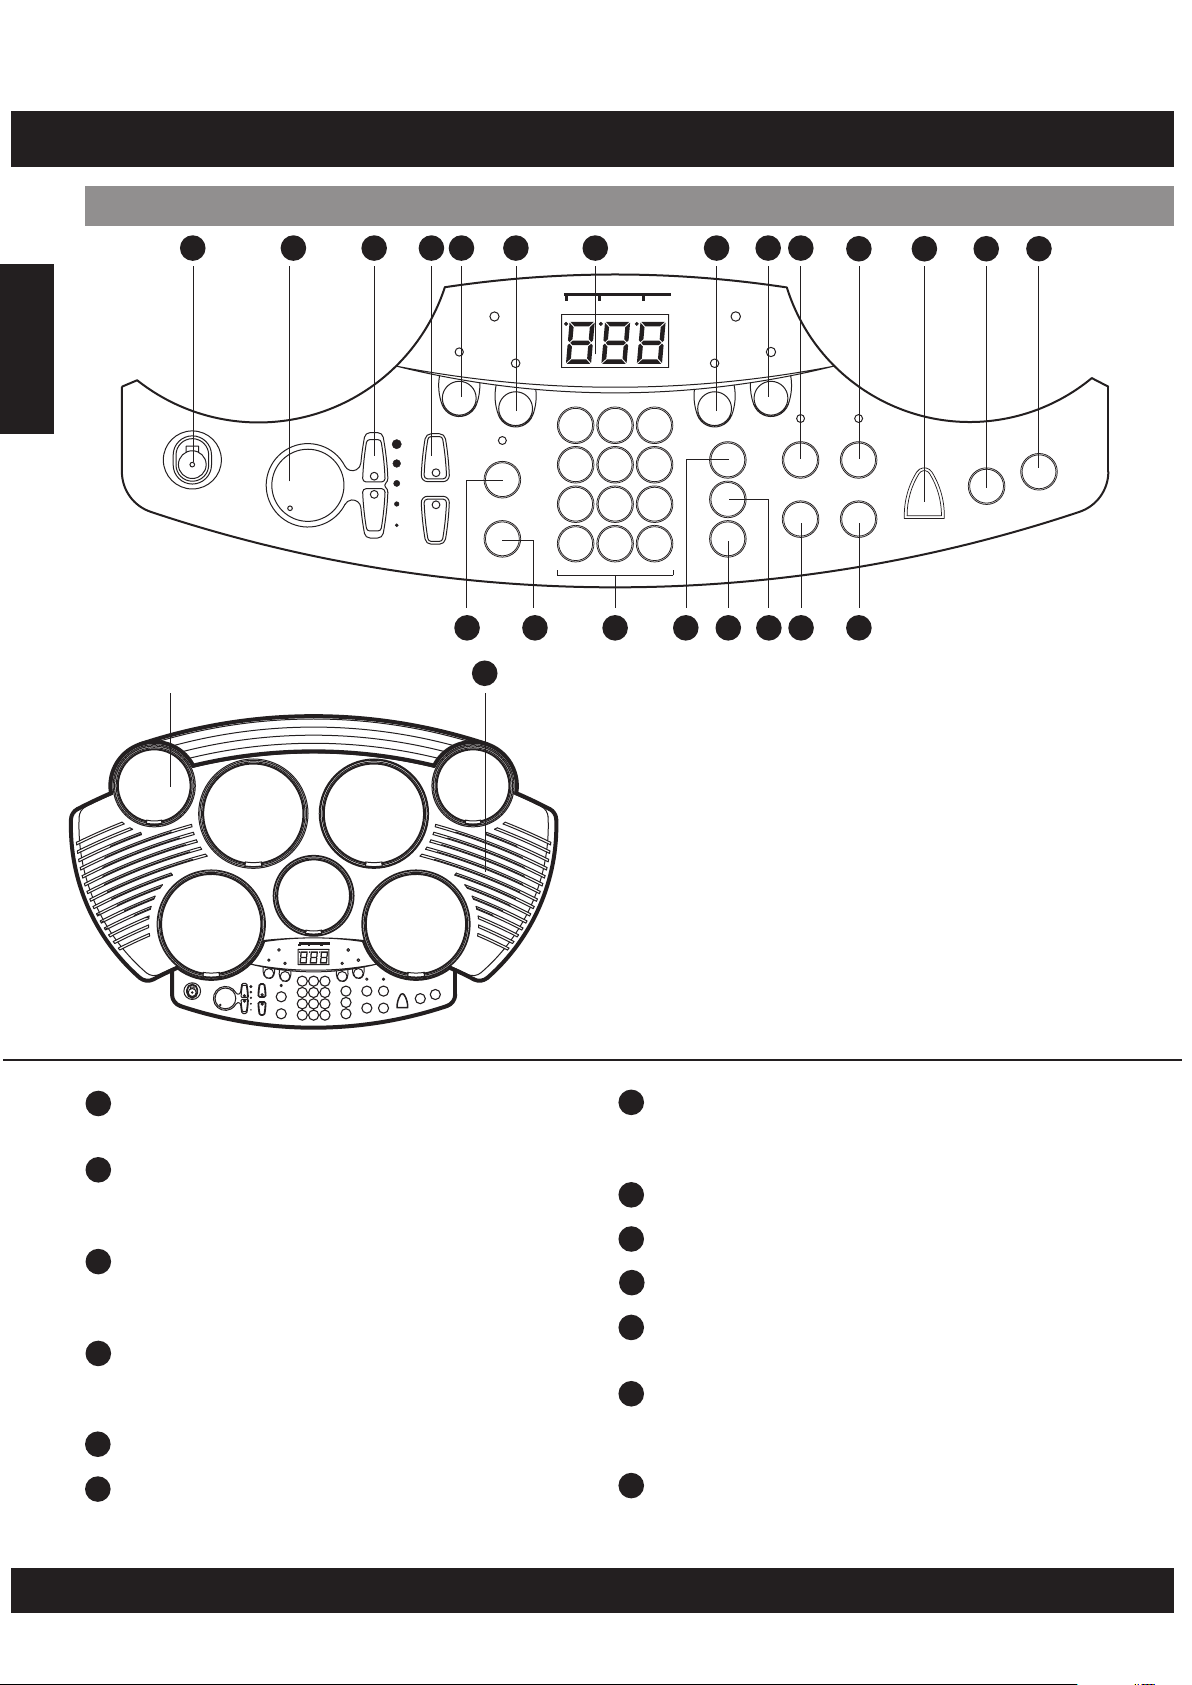
PANEL CONTROL
Front Panel
English
1
ON
OFF
POWER
DRUM PAD (x7)
2
M
-+
A
S
T
E
R
V
3 4
TEMPO
E
M
U
L
O
SONG
VOLUME
1
5
DRUM
+
-
6 7 8
SONG KITS PAD ASS.
PEDAL 1
1
DRUM
2
123
TAP S TART
START/STOP
456
789
- 0 +
BEAT
ASSIGN
SONG
KITS
PAD
PEDAL 2
BASS
9
10
CHORD
LEARNING RECORD
SUPER BASS PLAY/STOP
15 16 17 191820 21 22
23
11
12
METRONOME REVERB
13
14
DEMO
BEAT
SONG KITS PADASS.
PEDAL1
DRUM
1
DRUM
ON
OFF
POWER
M
-+
A
[Poweron–off]switch
1
TAPSTAR T
+
TEMPO
-
START/STOP
E
S
M
T
U
E
L
R
O
V
SONG
VOLUME
2
123
456
789
- 0 +
PEDAL2
CHORD
BASS
LEARNING RECORD
SONG
SUPERBASS PLAY/STOP
KITS
PAD
ASSIGN
METRONOME REVERB
DEMO
This switch turns power on / off.
[MasterVolume+&-]knob
2
This knob can be used to change the master
volume UP or DOWN.
[ Song Volume + & - ] button
3
These buttons can be used to change the
song volume UP or DOWN.
[ Tempo + & - ] buttons
4
These buttons are used to change the current
tempo.
5
[ Drum 1 ] button
6
[ Drum 2 ] button
7
3-Digit LED
This LED is the main display device, which will
show the parameters of the current menu.
8
[ BASS ] button
9
[ CHORD ] button
10
[ Learning ] button
[ Record ] button
11
This button is used to start or stop recording.
[ Metronome ] button
12
This button is used to turn on or off the
metronome.
[ Reverb ] button
13
This button is used to change the reverb level.
E04
Page 5
PANEL CONTROL
Front Panel
[ Demo ] button
14
This button is used to start or stop a demo
song.
15
[ Tap Start ] button
[ Start / Stop ] button
16
This button can be used to start or stop
playing all songs.
17
Number keys
[ Song ] button
18
This button is used to enter song menu.
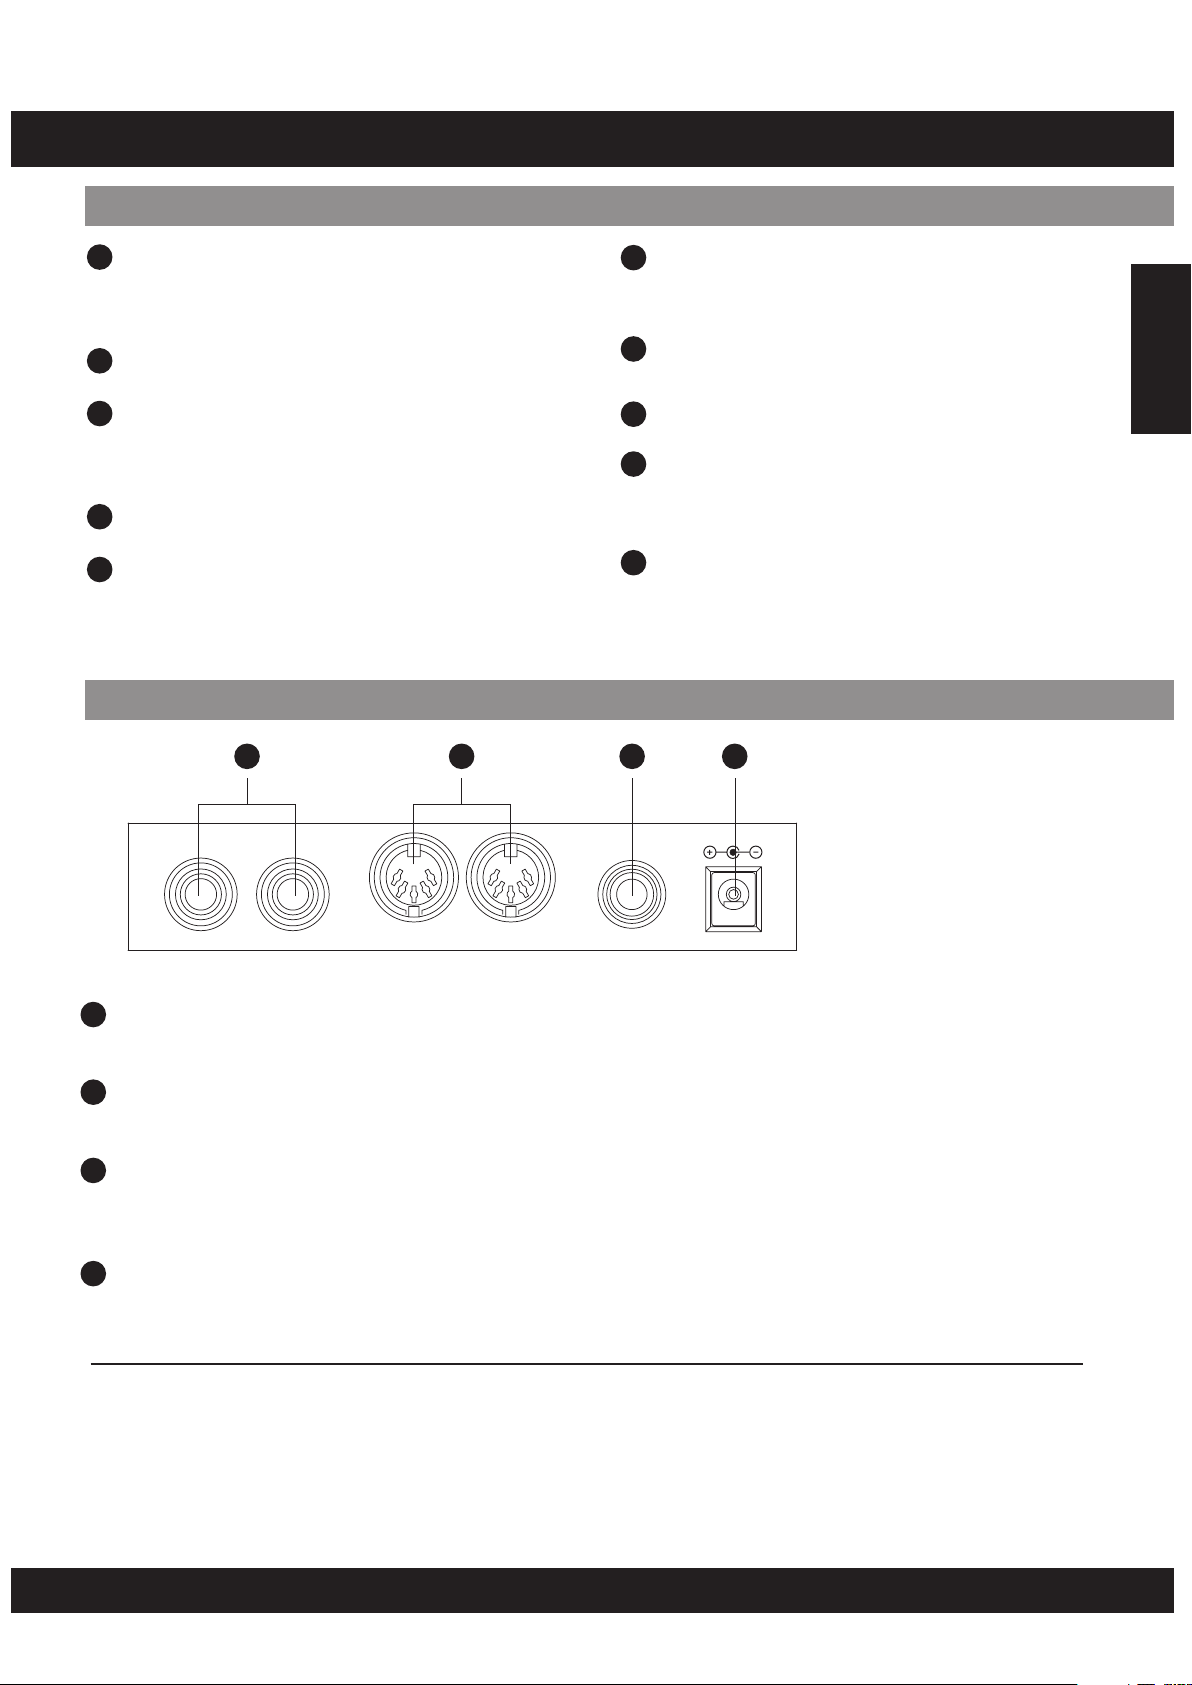
Rear Panel
24 25 26 27
PEDAL
21
[ Pad Assign ] button
19
This button is used to enter voice or volume
menu.
[ Kit ] button
20
This button is used to enter kit menu.
21
[ Super Bass ] button
[ Play / Stop ] button
22
This button is used to start or stop recording
replay.
23
Speakers
PHONES/
OUTPUT
DC-12V
English
MIDI
IN OUT
24
[ BASS DRUM / HI-HAT ] Pedal Input Jacks
Kick and Hi-Hat pedal input jacks.
25
MIDI IN/OUT Jacks
This port is used to connect all MIDI cables and devices.
26
Phones Jack
This jack is used to connect the headphones.
(Connecting the headphones will not mute the output jacks).
27
DC Jack
Connect to a DC 12V power adaptor.
(AsspecifiedonPAGEE06)
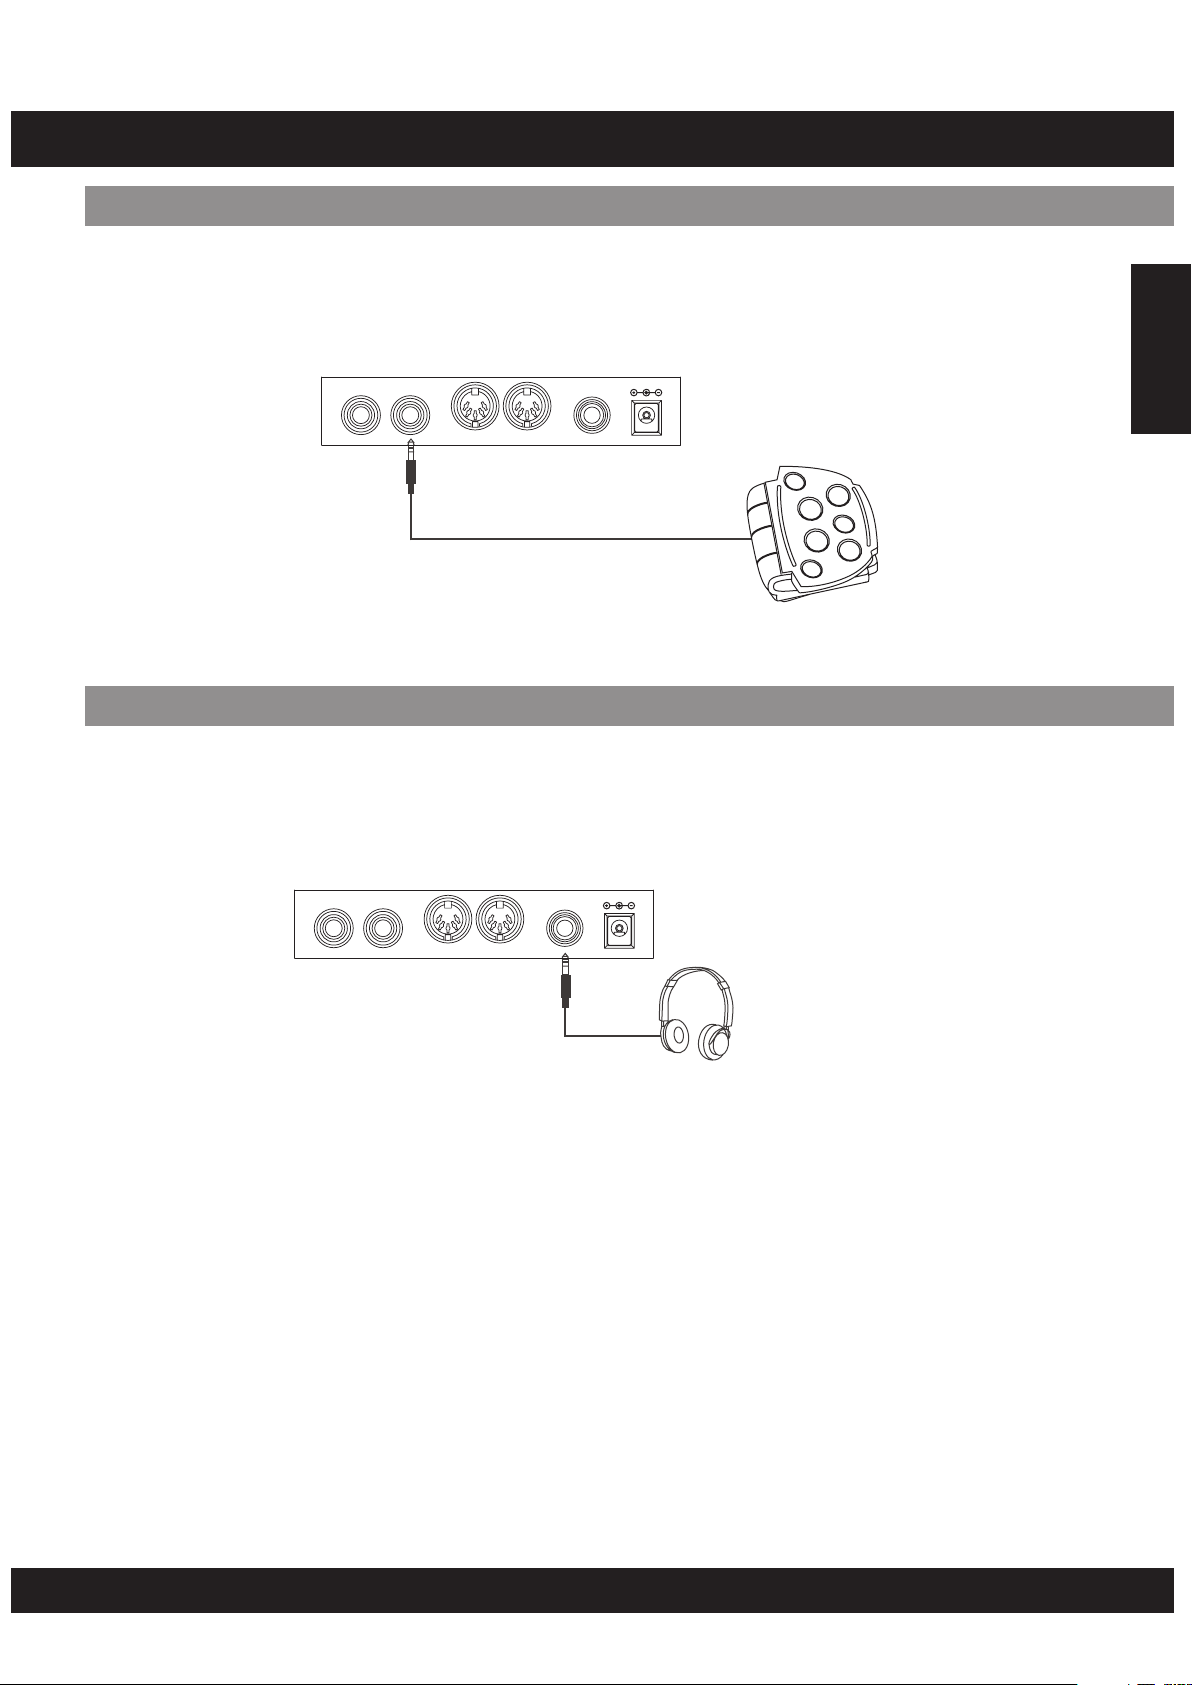
Connecting the Foot Pedals (1&2)
The supplied foot pedals can be connected to the unit to simultaneously play the drum
set’s hi-hat or bass drum voices. They can also be assigned to play other voices.
Note:
Do not press the pedal while connecting it to the unit or while turning on the power.
(Connecting in this manner with the power on, the pedal’s function may be reversed.)
E05
Page 6
SETTING UP
Power Supply
Your digital drum set will operate on either batteries or the supplied power adaptor. Follow the
instructions below according to the power source you intend to use.
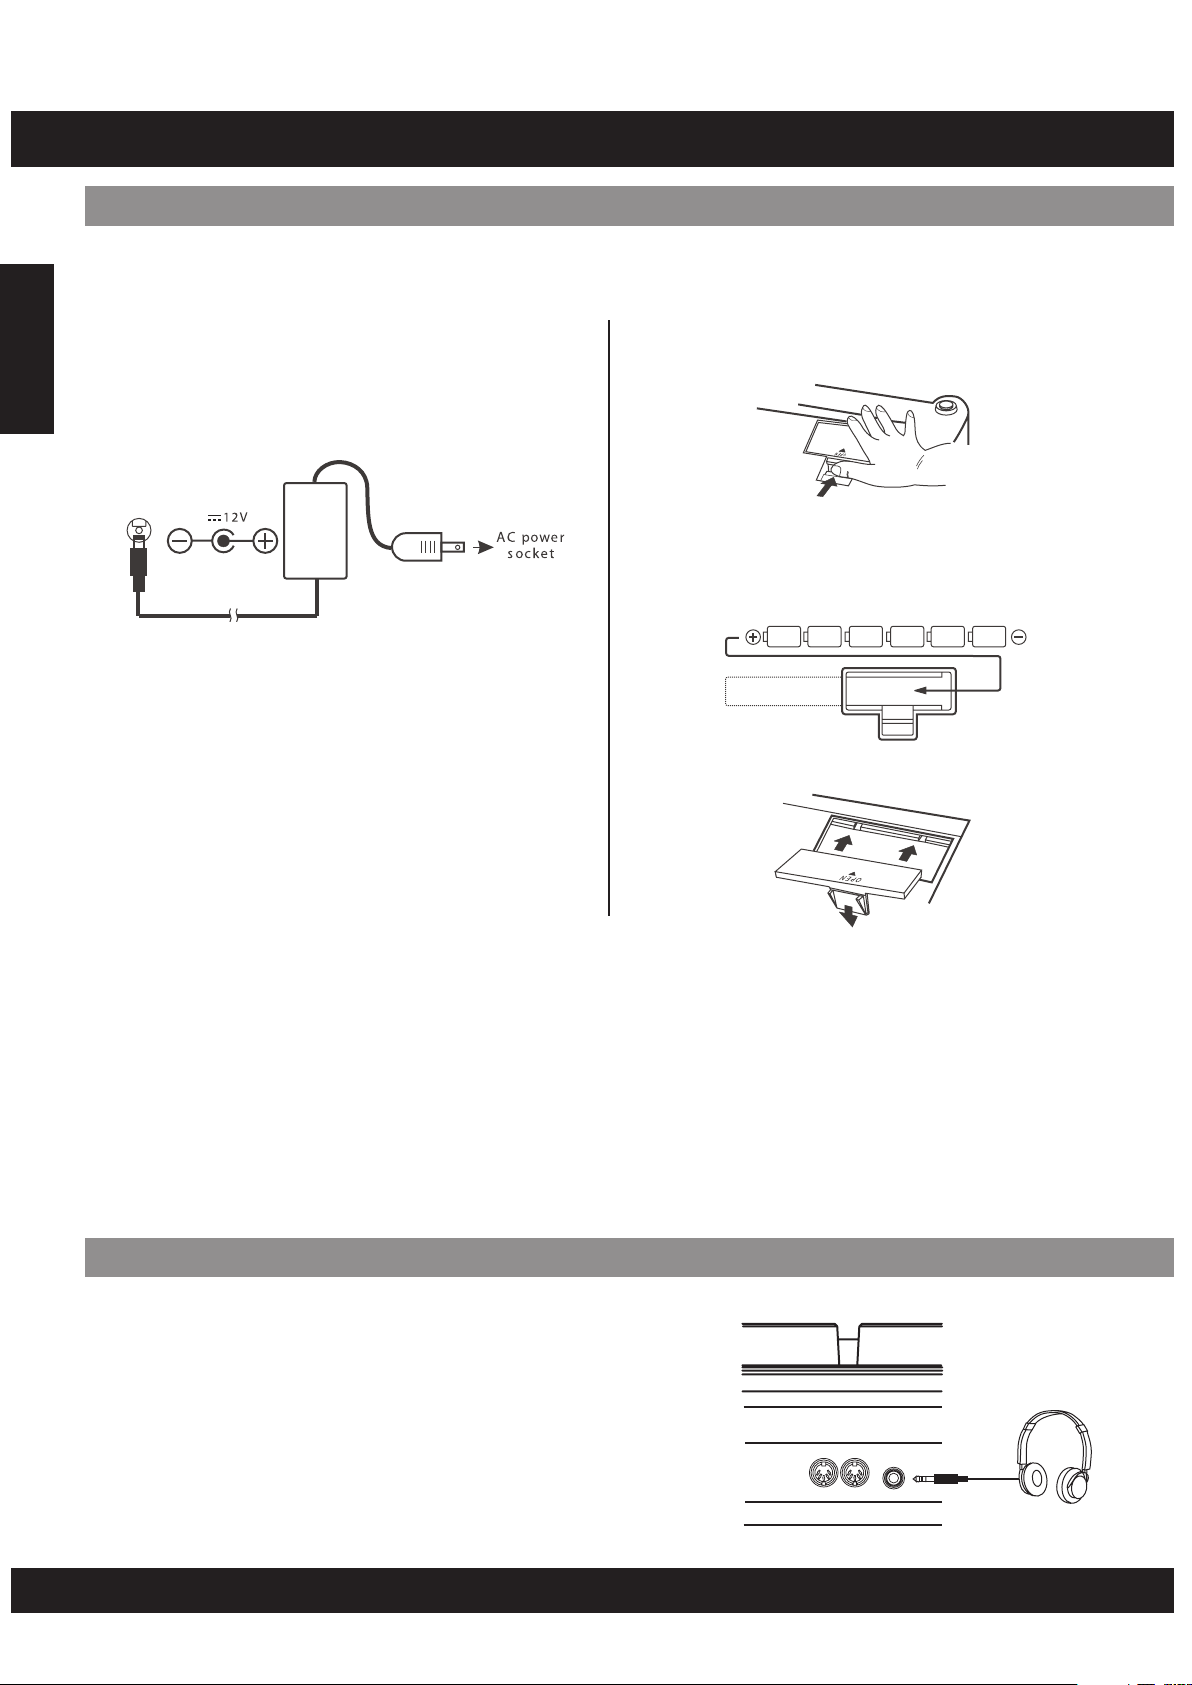
Using the AC-Adaptor
Connect the power adaptor to the DC IN jack
English
located on the rear panel of the unit, and plug the
AC power adaptor into an AC power outlet.
Do not use adaptors other than the one specified.
The technical specification of the adaptor is DC
12V output, center positive type.
Using Batteries
1. Open the battery compartment cover under
the unit.
2. Insert six “C” size, R14 SUM-2 or equivalent
batteries. When inserting the batteries, follow
the polarity markings in the illustration.
Note: We suggest using alkaline batteries.
3. Close the battery compartment securely.
NOTE:
•
Power will be automatically drawn from the AC adaptor if an optional AC adaptor is connected while batteries are
installed in the instrument.
CAUTION:
•
It is recommended that you replace worn batteries as soon as possible. When battery voltage drops, the display will
dim and / or the sound will become distorted, when this occurs, replace the batteries with a complete set of six new
batteries of the same type.
•
NEVER mix old and new batteries, different types of batteries (alkaline, magnesium, etc.), Different brand batteries or
batteries from the same brand but of different types. Misuse may cause the instrument to become hot, result in fire,
or battery leakage.
•
Also, to prevent damage due to battery leakage, remove all the batteries from the instrument when it is not to be
used for an extended period of time.
•
If batteries are installed in this instrument, and the instrument is unused for a long period, they will loose their power.
Using Headphones
An optional set of stereo headphones can be connected
to the PHONES/OUTPUT jack located on the rear panel.
When headphones are connected to the jack, the
internal speakers of the unit will switch off automatically
(Perfect for private practice or late night playing). If you
would prefer to use an external sound system, the
headphone jack can also be used to connect the digital
drum set to a stereo system or mixing console.
Note:
making any connections.
Turn off the power on all equipment before
E06
Page 7
PRESENT PAD NUMBER AND DRUM KIT
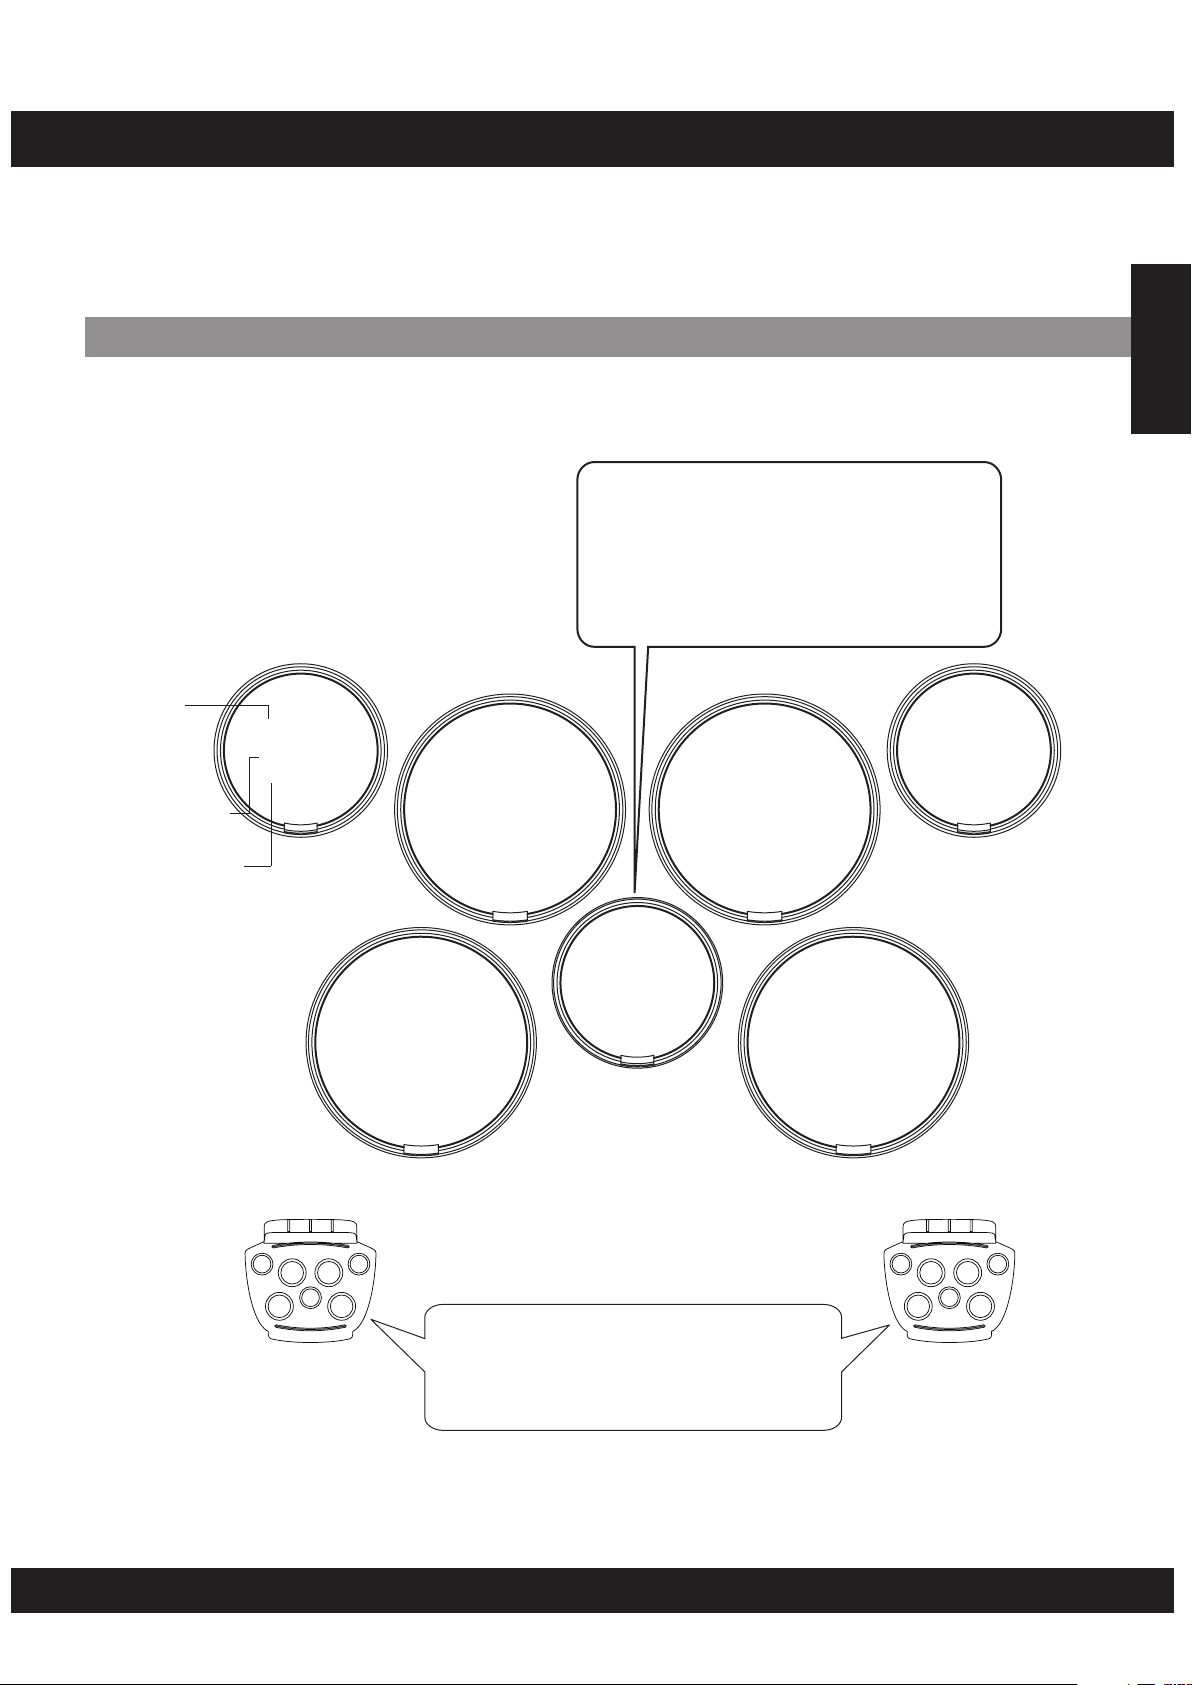
Strike the pad with the supplied drum sticks to play the drum voices. Drum Kit “001” is automatically
chosen whenever the power is turned on and the [KITS] button is pressed.
Striking the pads with different forces results in relatively loud or soft sounds accordingly.
Loudness of the sound may vary depending on which part of the pad is struck.
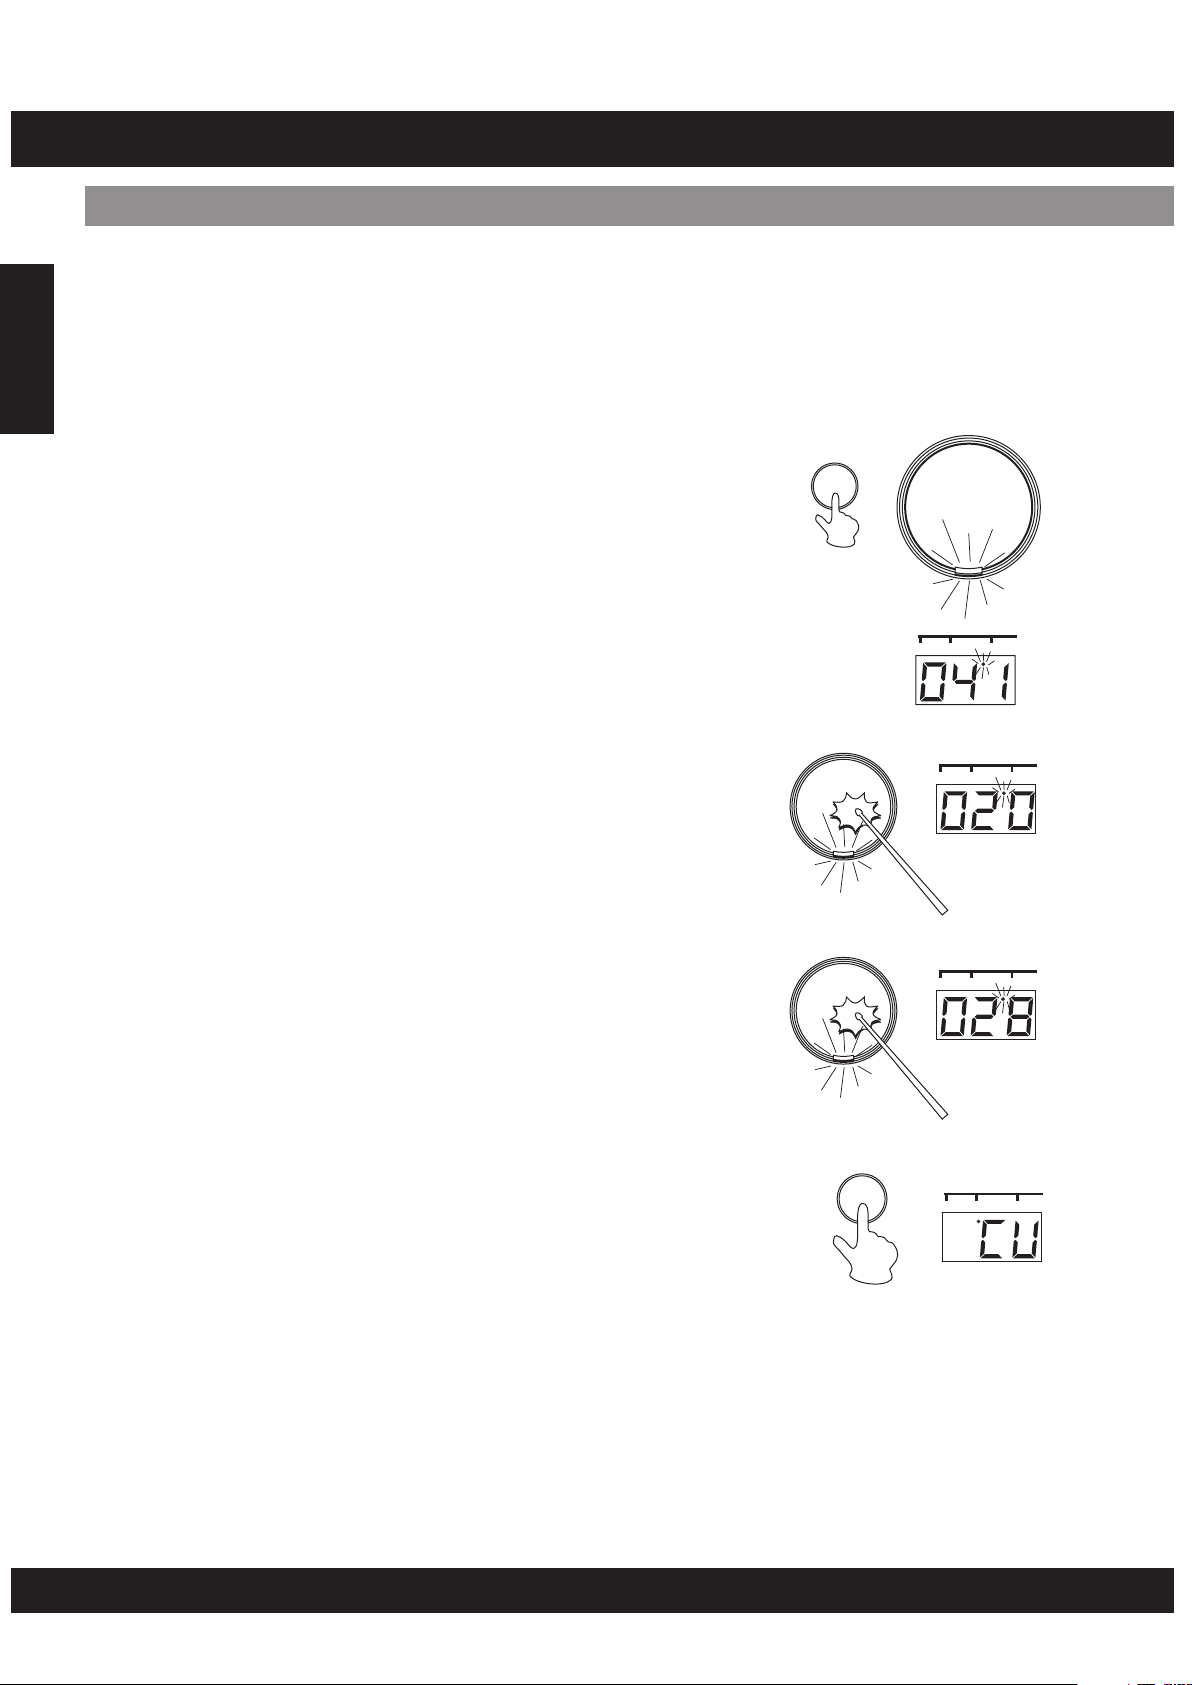
PadNames
A Hi-Hat sound is assigned to the Pad
6 (Drum Kit 001). Striking the Pad 6
while pressing on Pedal 2 produces a
closed hi-hat sound. Striking the pad
without pressing the pedal produces an
open hi-hat sound.
PAD No.
PAD Assign No.
Pad 1
41: Crash
Cymbal 1
Pad 2
16: High Tom 1
Pad 3
18: Mid Tom 1
Pad 4
43: Ride Cymbal
English
Percussion
7: Snare Drum High
Pedal 1
40: Hi-Hat Pedal
Pad 6
40: Hi-Hat
Open/Close
(Pedal 2 Off/On)
Pad 5
Use Pedal 1 to control the Hi-Hat.
The Bass Drum voice is control led by
pressing Pedal 2.
(This is in the case of Drum Kit 001)
Pad 7
20: Low Tom 1
Pedal 2
1: Bass Drum Low
E07
Page 8
FUNCTION
The Digital Drum Set includes a demo song to demonstrate performance of the drums. To play the
demo song, follow the instruction below:
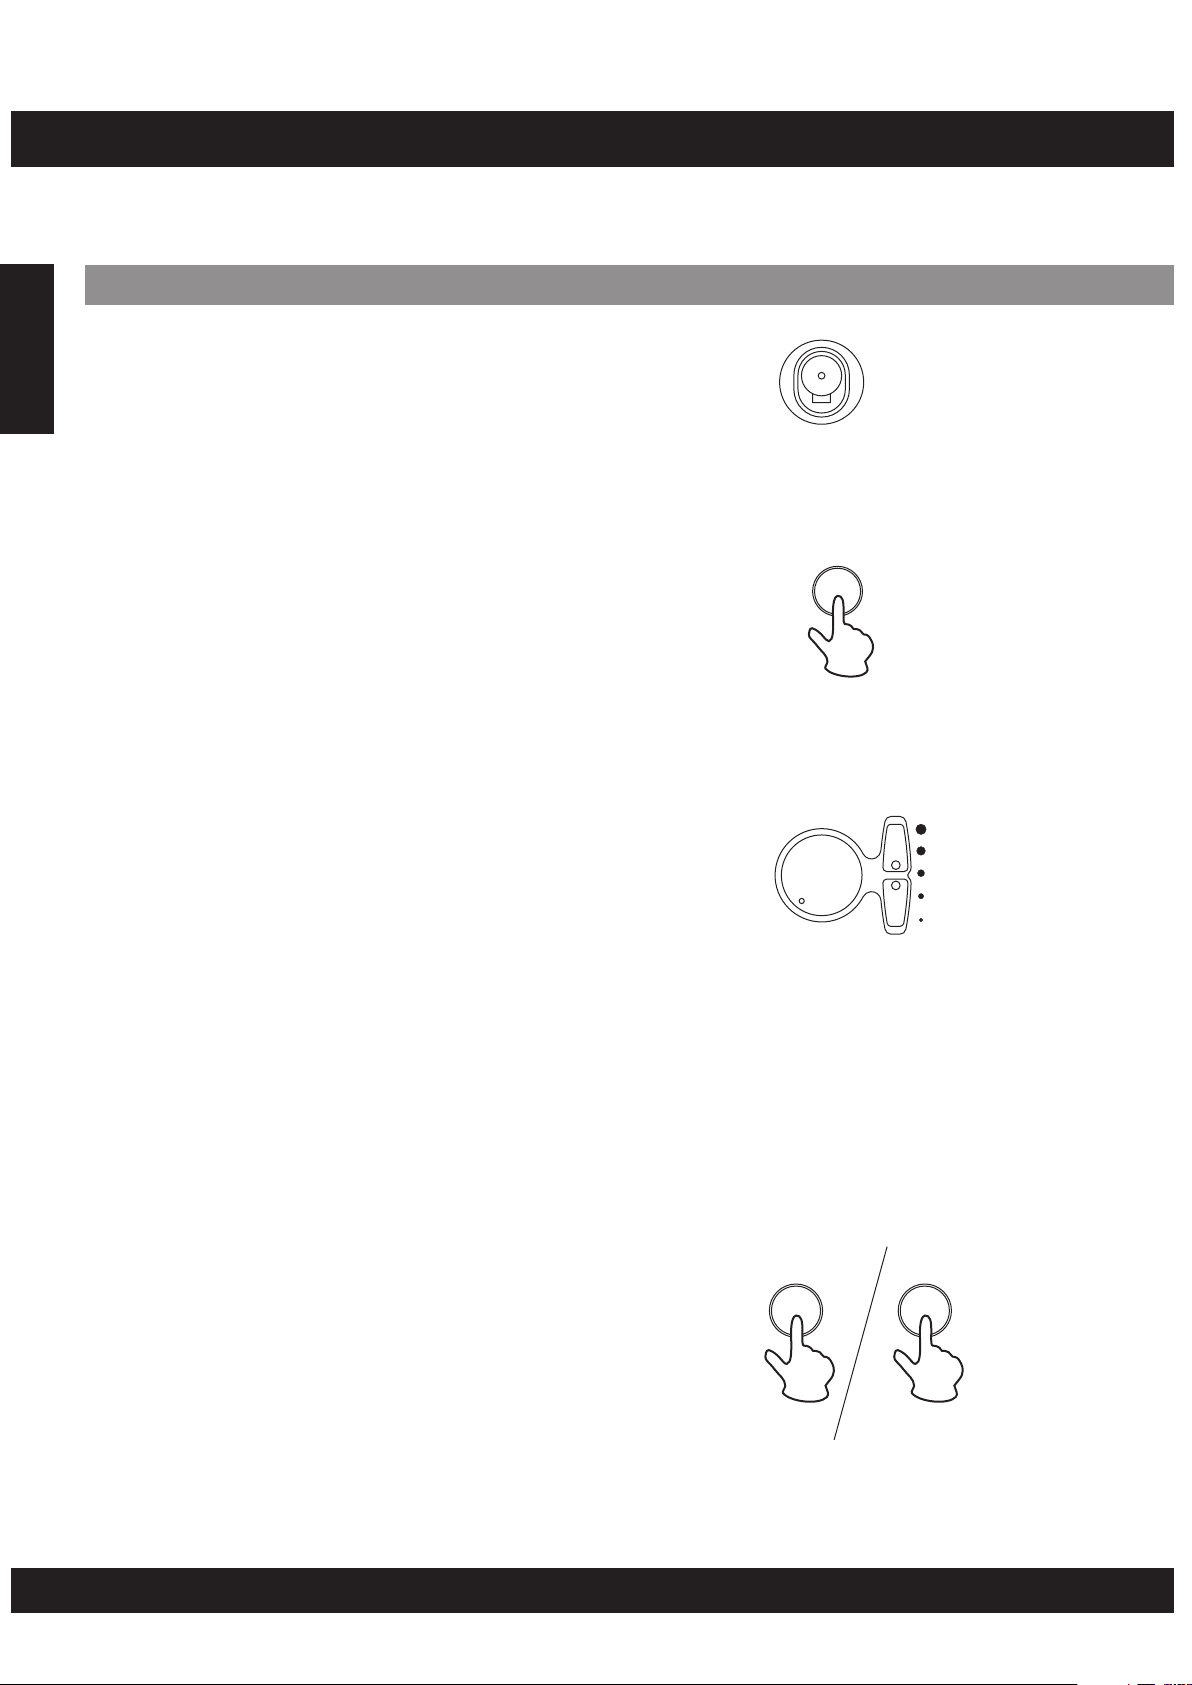
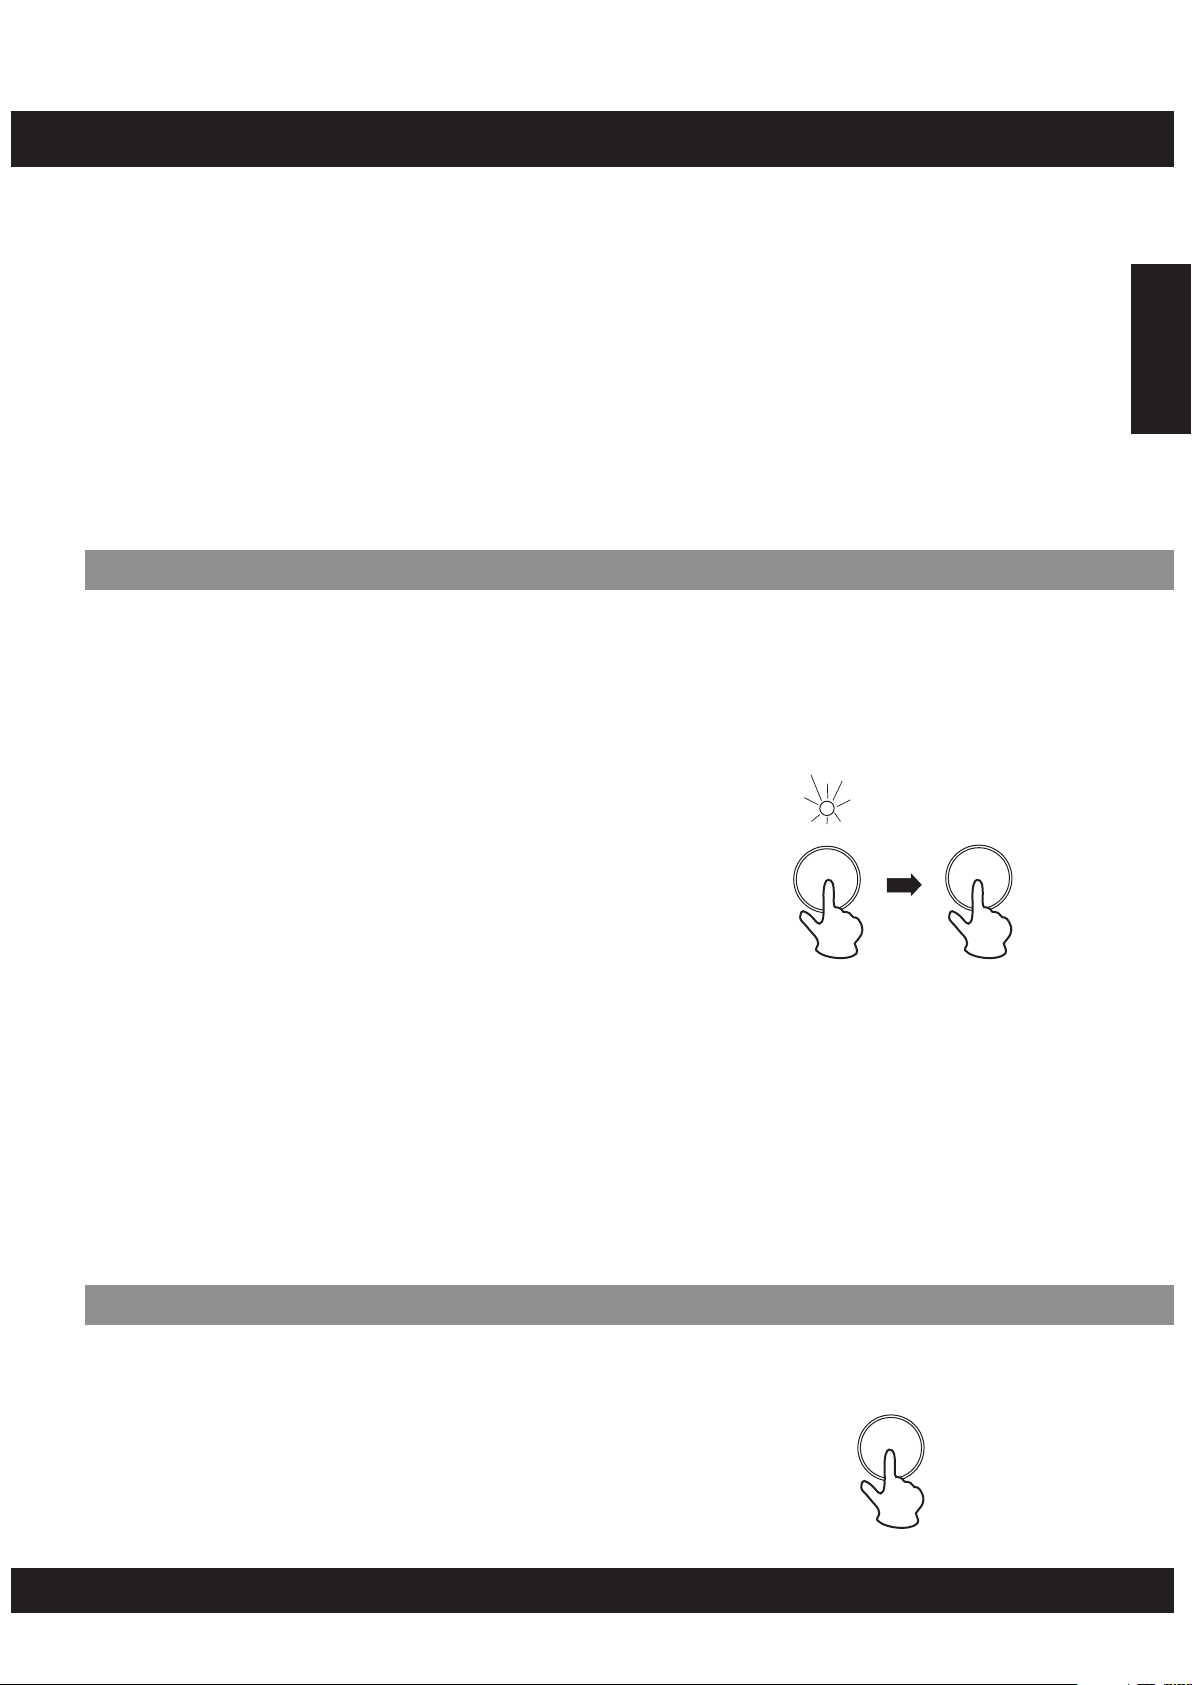
Playingthe Demo Song
[1]Turnonthepower
English
Turn the [POWER] switch ON.
The LED Display will light up.
[2] Start the Demo Song
ON
OFF
POWER
Press the [DEMO] button, the demo song will start and
the LEARNING indicator will illuminate at the same time.
At this time the demo song is starting in learning mode,
the LED of the drum pads will flash by following the rhythm
of the demo song. To exit the learning mode, press
[LEARNING] button again.
•
MASTER VOLUME
The overall volume level of the instrument is controlled by
a [MASTER VOLUME] knob.
Turn the [MASTER VOLUME] knob clockwise to increase
the overall volume. To decrease the volume, turn the knob
counter-clockwise.
•
SONG VOLUME
The song volume level is controlled by two [SONG
VOLUME] buttons (volume levels 0-9)
The SONG VOLUME can be used to adjust the balance
between the song accompaniment and your own
performance on the pads.
Press the top [SONG VOLUME] button to increase the
song volume by one level. Press the bottom [SONG
VOLUME] button to decrease the song volume by one
level. Holding either of the buttons increase or decrease
the song volume level rapidly.
DEMO
M
-+
A
S
E
M
T
U
E
L
R
O
V
SONG
VOLUME
[3] Stop the Demo Song
To stop playback, press either the [DEMO] button again
or the [START/STOP] button.
E08
DEMO START/STOP
Page 9
PADS / PEDALS
Assigninga Drum Kittothe Pads andPedals
The Digital Drum allows you to choose from 20 different Drum Kits plus one custom kit (1 - 20:
see "Drum Kit List" on page 20) quickly and easily. 20 of the kits have preset voice
combinations that will be set to the pads and pedals when the kit is selected. Select some
different kits and try playing them.
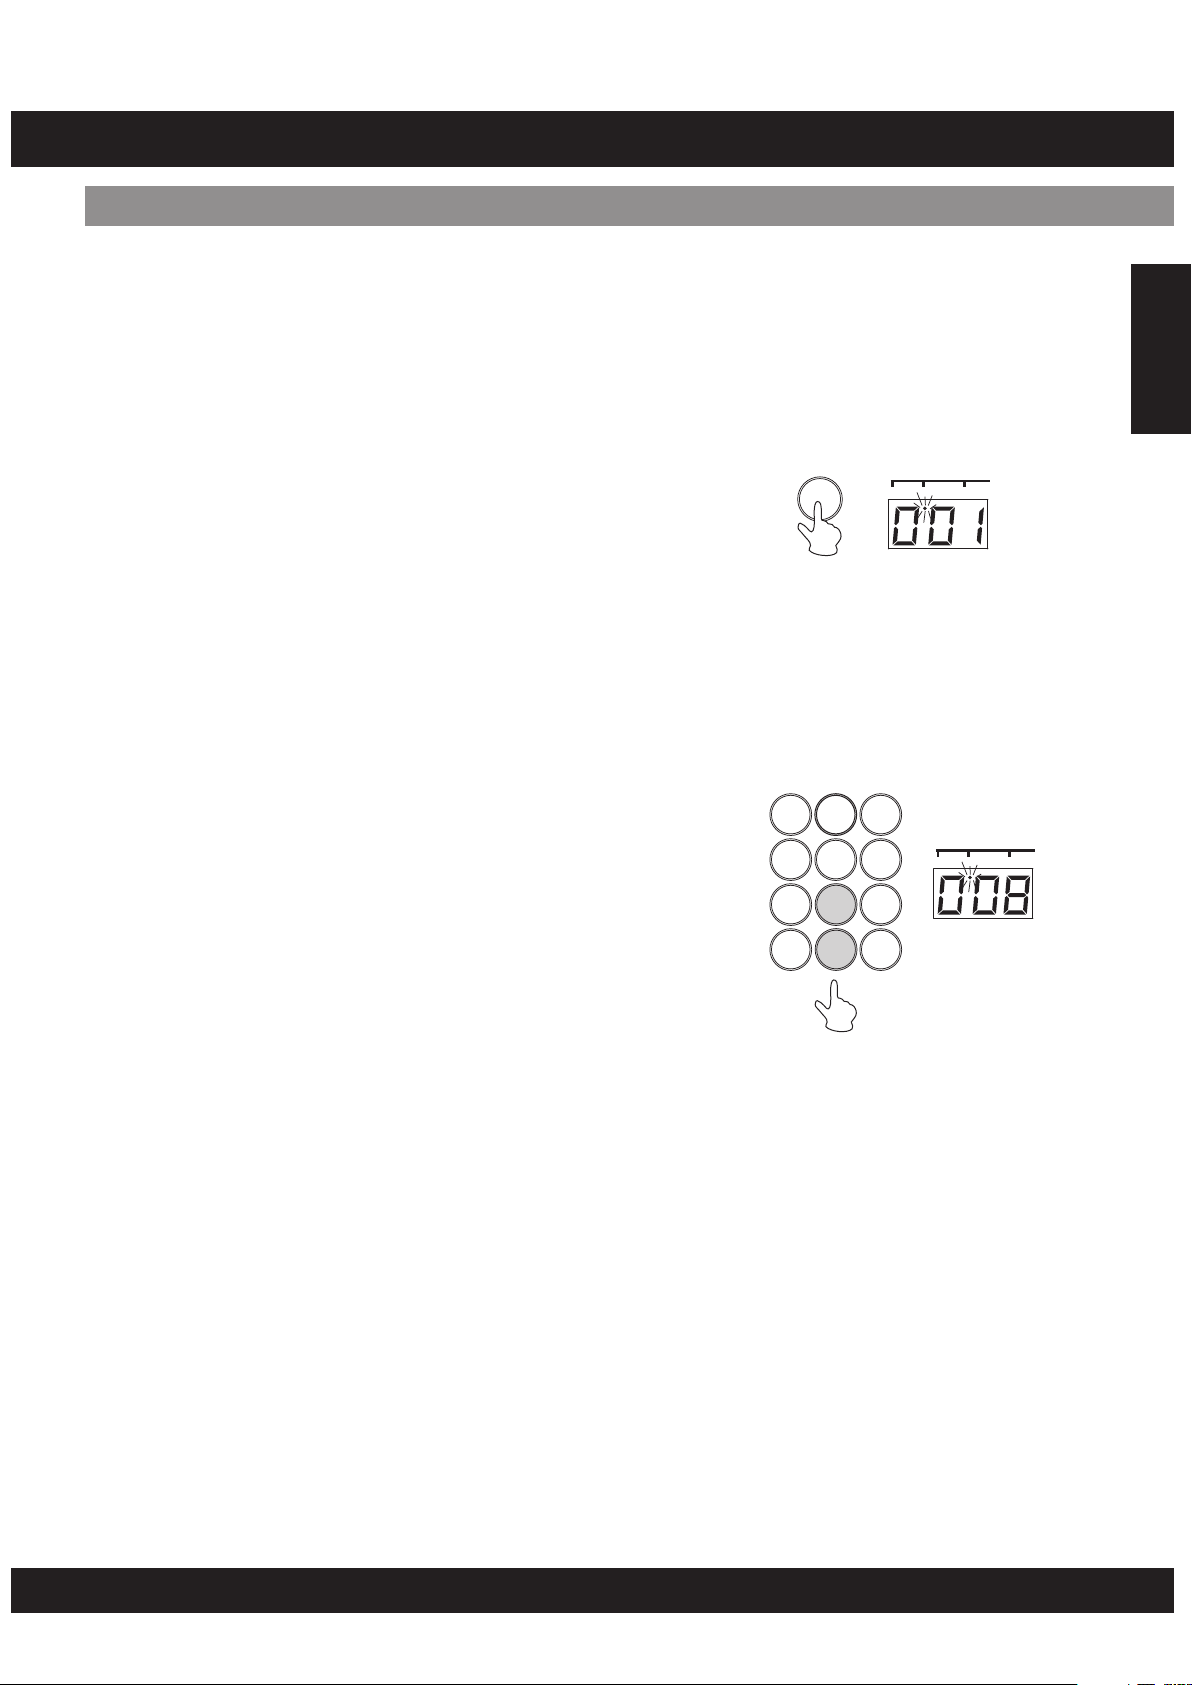
[1] Press the [KITS] button
When pressing the [KITS] button, the KITS's
indicator will illuminate and the current selected
Drum Kit will appear on the display.
Note:
You are unable to select the Drum Kits when you are
playing the digital drum in learning mode.
[2] Select a Drum Kit Number
You can select the Drum Kit by pressing the number
keys, for example, when you want to select Drum Kit
08, press "0" and "8" correspondingly, "08" appears
on the display.
Note:
Drum Kit number 01 is normally selected when the
•
"KITS" is turned ON.
Enter two DIGITS to select the Drum Kit.
•
KITS
123
456
789
- 0 +
SONG KITS PAD ASS.
English
SONG KITS PAD ASS.
There are 20 Drum Kits (01-20) that can be
•
selected. If you enter number other than 01-20,
the unit will not accept and the drum kit number
fails to change.
E09
Page 10
PADS / PEDALS
Assigninga Voice toIndividualPads and Pedals(”CU”Custom Kit)
The Digital Drum Set has a total of 76 high quality percussion sounds (see the "Drum Voice
List" page 19) that can be assigned to each of the 7 drum pads and 2 foot pedals. Try
assigning some different voices to the "CU" Custom Drum Kit.
Note:
•
English
Any change made to one of the preset drum kits will
automatically be saved in the “CU” Custom Drum
Kit.
Both the Custom and “001” drum kit contents are
•
the same until modified (see the “Drum Kit List” on
page 20).
[1] Press the [PAD ASSIGN] button
By pressing the [PAD ASSIGN] button, the PAD
ASSIGN indicator will appear on the display and the
indicator light below PAD 1 will illuminate. PAD 1 is
currently assigned.
[2] Select a Pad/Pedal
PAD
ASSIGN
SONG KITS PADASS.
Strike the Drum Pad that you want to assign once,
for example, Drum Pad 7, the indicator on PAD 7 will
illuminate, the display will illustrate the current
percussion number.
[3] Select a Percussion Voice
You can select the voice by repeatedly striking the
pad, repeatedly pressing the pedal (while listening to
the voice) or by pressing the number keys.
1. Strike the Drum Pad until you reach the voice that
you desired.
OR
2. Enter the percussion number by pressing the
number keys a shown on the Drum Voice List on
page 19.
[4] Press the KITS Button
When you press the [KITS] button, “CU” (Custom Kit)
appears on the display and the DRUM KIT indicator
lights up instead of PAD ASSIGN indicator.
[5] Play the Pads and Pedals
SONG KITS PADASS.
SONG KITS PADASS.
KITS
SONG KITS PADASS.
Now you can play your drum with the custom drum kits.
Repeat steps 2-4 if you want to assign another drum pad.
Note:
Your "CU" Drum Kit will be saved after powering the
set “OFF”. To recall the "CU" Drum Kit, press the
[KITS] button to enter the "Kits" mode, then press "-"
or "+" button on the numeric keypad until "CU"
appear on the display.
E10
Page 11
OPERATION
AdjustReverb Function
Different depths of the Digital Drum's reverb effect can be selected to the instrument's overall
sound.
The REVERB effect is turned on automatically every time you turn the power on and the default
level is set to [r-2].
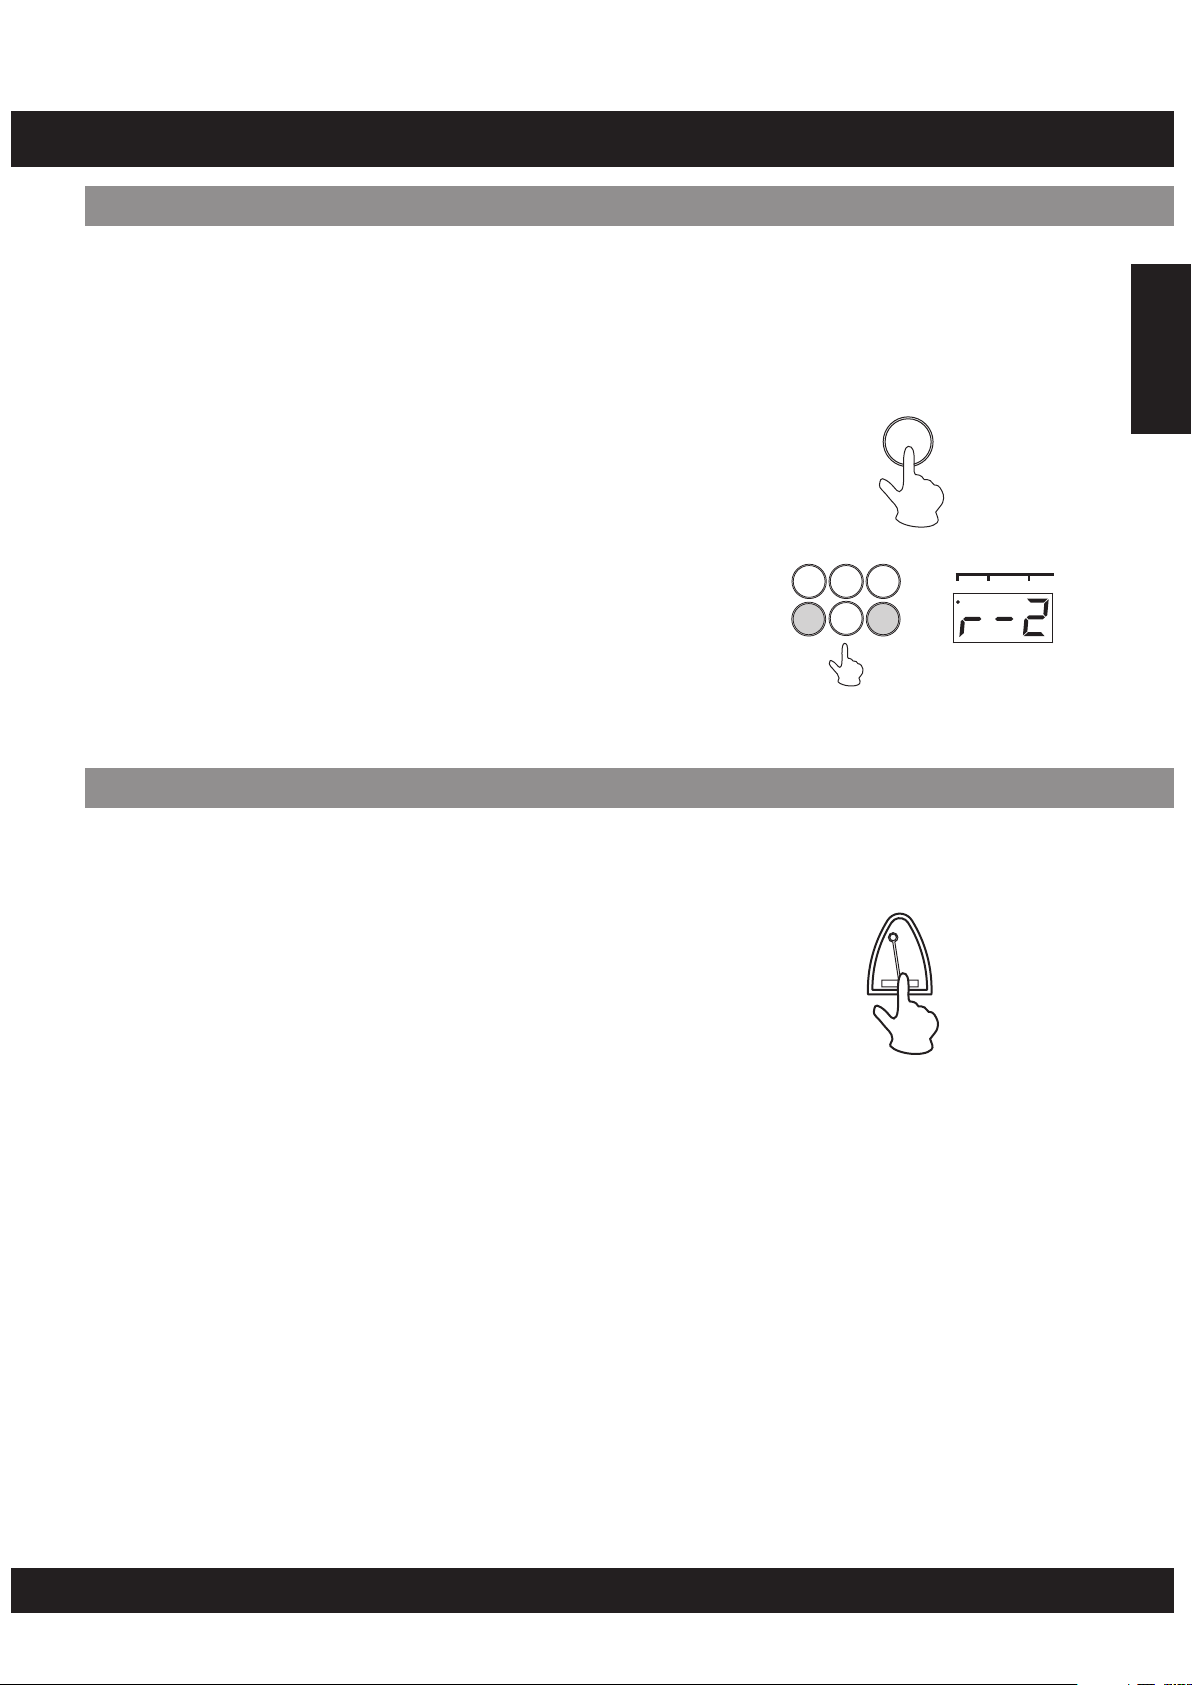
Select the REVERB Depth
Press the reverb button to display the current
setting, use the “-” or “+” button on the keypad to
select one of the four reverb depths that appear in
display. [r-0], [r-1], [r-2], [r-3]; [r-0] means reverb
off.
Select [r-3] adds the most reverb depth to the effect.
Note:
You are able to adjust the level of Reverb while
•
reverb level appears on the display.
REVERB Depth data is not transmitted or received
•
via MIDI.
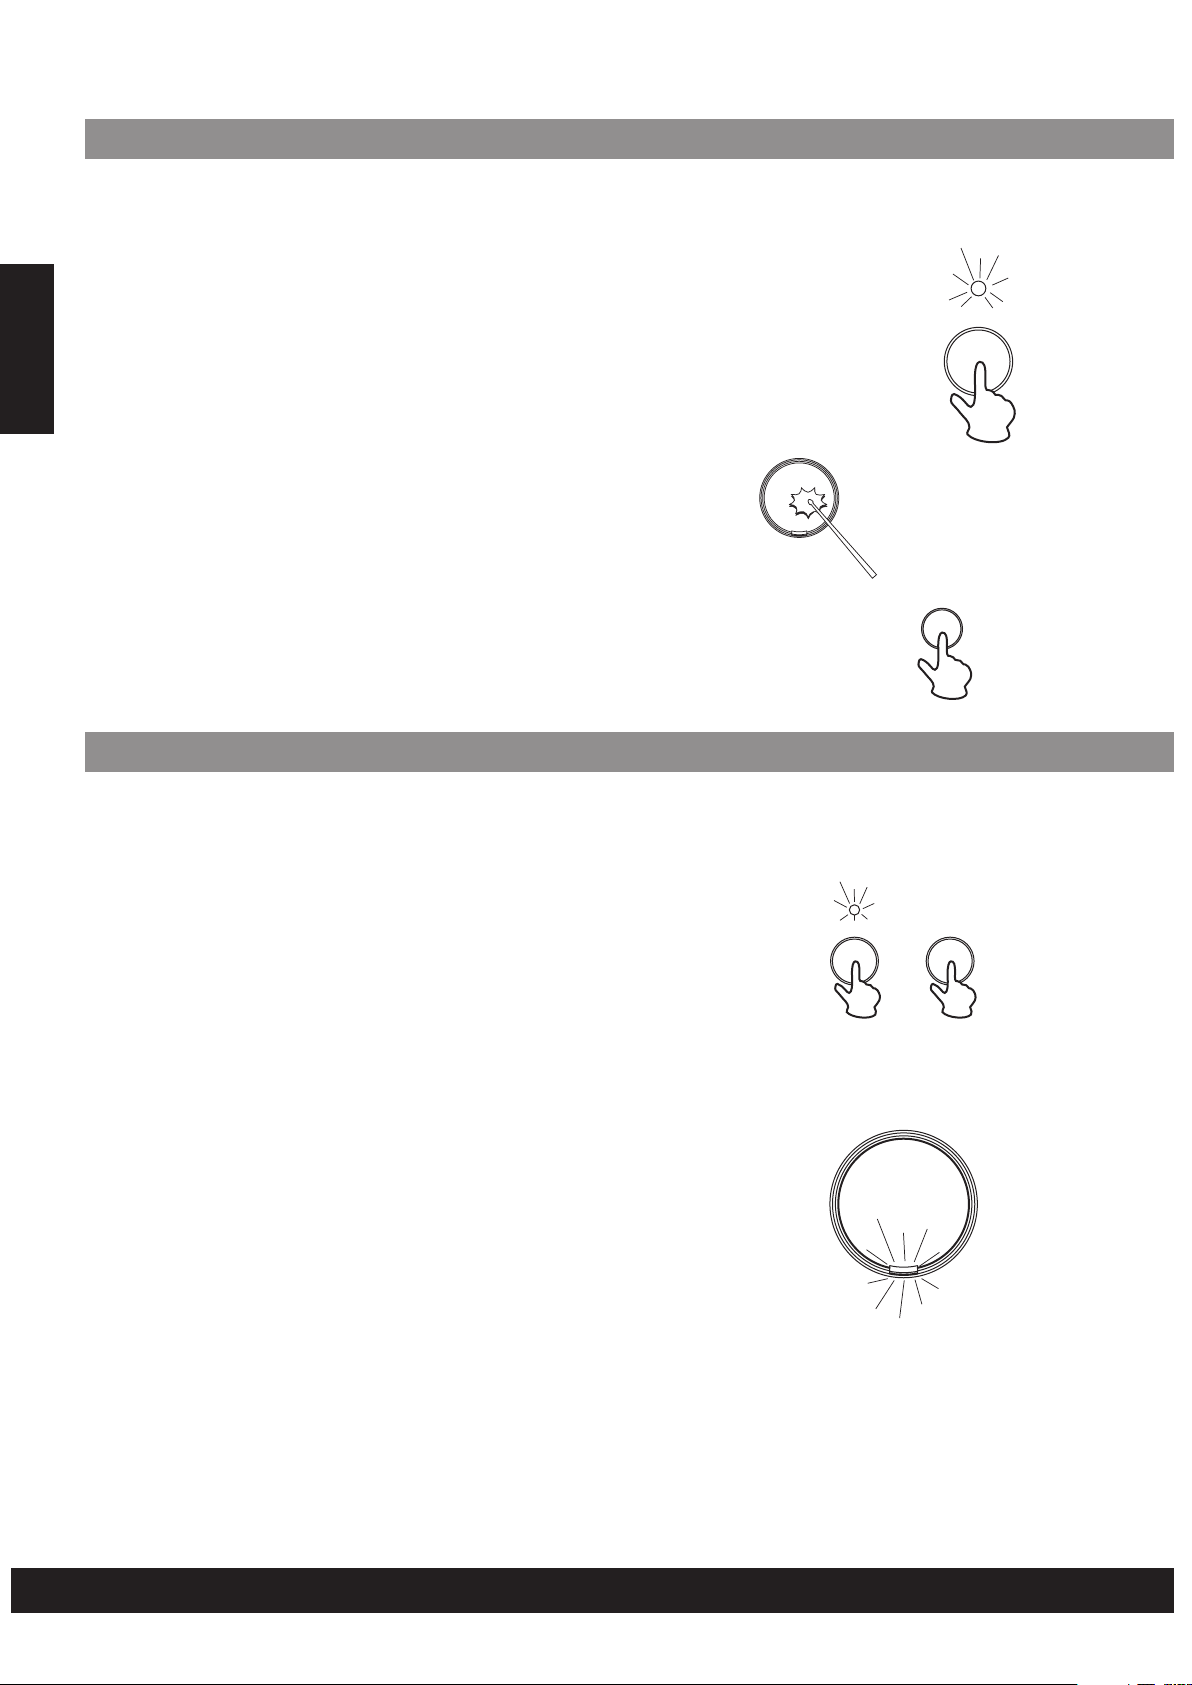
Metronome
The Digital Drum's METRONOME feature produces a
metronome to make the tempo easier to follow and
improve your timing while playing the pads.
To hear the metronome vocal sound, press the
[METRONOME] button once, to hear the click sound,
press the [METRONOME] button twice. To turn off,
press the button again.
Press [TEMPO +] or [TEMPO -] to adjust the speed of
metronome.
Press the [SONG VOLUME] buttons to adjust the
sound level or metronome.
REVERB
789
0 +
-
METRONOME
English
SONG KITS PADASS.
E11
Page 12

PLAYING A SONG
The Digital Drum Set features 100 ( 00 - 99 ) different songs that can be used to provide
accompaniment (see the "Song List" on page 21). Select one of the songs for your listening
pleasure.
Selectinga Song
English
[1] Press the [SONG] button
Press the [SONG] button, and this LED indicator will
illuminate. The currently selected song number will
appear in the display.
[2] Selecting a Song
The Song number will increase when the “+” button
on the key pad is pressed, and the “-” button is
decrease. You can also select a song by inserting
numbers by using the number keys. (See the “Song
List” on page 21)
Note:
Song number “00” is automatically selected
•
whenever the power is turned on.
Enter a two digit number whenever you select a
•
song.
[3] Press the [START/STOP] button
Press the [START/STOP] button, after a count-in,
the song will playback.
As the song is playing, the song’s current measure
will be shown in the display. Try playing the pads and
pedals along with the song.
To stop playback of the song, press the
[START/STOP] button again.
SONG
SONG KITS PAD ASS.
123
456
789
- 0 +
START/STOP
Note:
You are also able to use the TAP START function to
•
start song (see page 14)
The Digital Drum's songs consists of loop type and
sequence type (see the "Song List" on page 21) Loop
type songs (00-79)will continuously play from the
time the [START/STOP] button is initially pressed,
until the button is pressed again. Sequence type
songs (80-99)will automatically stop when the song
reaches its end.
E12
Loop
Sequence
Page 13
SuperBass
The Super Bass option have been created to make the voices deeper, and also for a more
powerful bass.
The Super Bass is turned ON at the time you power
the Digital Drum Set ON. Pressing the [SUPER BASS]
SUPER BASS
SONG KITS PAD ASS.
button once will power it off. Press the [SUPER
BASS] button again to turn on the Super Bass.
SONG KITS PAD ASS.
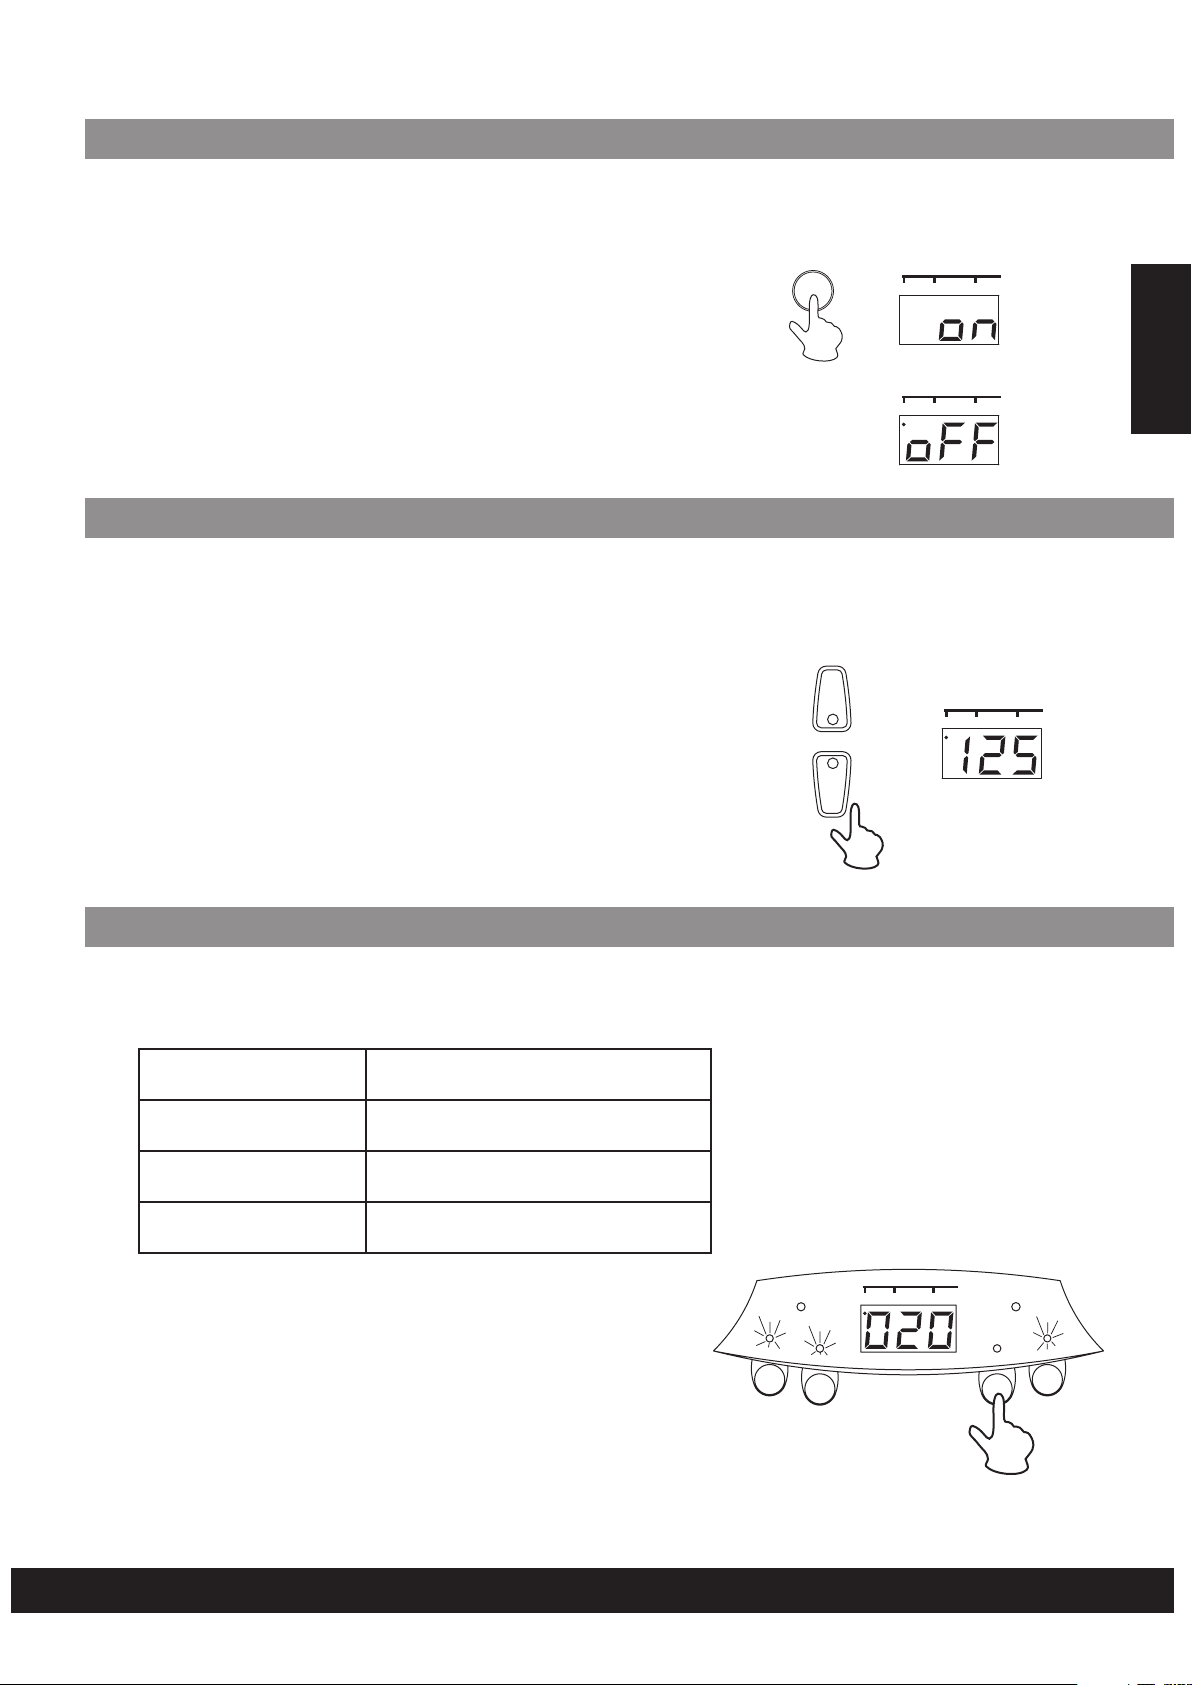
AdjustTempo Function
The song tempo can be set anywhere from 40 to 240 beats per minute. As tempo numbers
increase, the tempo will become faster.
Use the [TEMPO +] and [TEMPO -] to increase and
decrease tempo value correspondingly. (Tempo
values ranges from 40 to 240)
Note:
If you select another song, your preset Tempo will
•
retain.
Press and hold both the [TEMPO+] and [TEMPO-]
•
buttons to return to the default tempo.
+
TEMPO
-
SONG KITS PAD ASS.
English
TrackON/OFF
The Digital Drum’s song accompaniment consists of 4 tracks: DRUM1, DRUM2, BASS and
CHORD tracks.
DRUM 1
DRUM 2
BASS
CHORD
Pressing a Track button ([DRUM 1], [DRUM 2],
[BASS], [CHORD]) will mute the corresponding track
and its indicator lamp will turn off.
Muting DRUM 1 and DRUM 2 tracks allows you
to practice your technique in Karaoke mode.
Main Drum track
Main Percussion track
Bass track
Main Chord track
DRUM
1
PEDAL 1
DRUM
2
SONG KITS PADASS.
BEAT
BASS
PEDAL 2
9
CHORD
11 13
E13
Page 14
TapStart
English
The TAP START function allows you to set the song's overall tempo as well as start the
accompaniment. The accompaniment will playback at the tempo with which the pads are
struck or the pedals are pressed.
[1] Press the [TAP START] button
TAP STAR T
Pressing the [TAP START] button, and the indicator will
illuminate.
[2] Tap Start
Strike any pad press any pedal four times, the
accompaniment will start at the desired tempo. When
the song is played back, the TAP START indicator will turn
off.
[3] Stop the Song Playback
To stop playback, press the [START/STOP] button.
START/STOP
LearningFunction
The Digital Drum’s Learning feature allows a beginner to learn and play a song (00-99) from
the song list easily.
[1] Press the [LEARNING] button and play the song
When you are in SONG mode, choose a song from the
Song List, then press the [LEARNING] button, the
[LEARNING] button indicator will illuminate.
Note:
When you have started LEARNING, the KITS and PAD
ASSIGN buttons will not respond.
[2] Start Learning
Press the [START/STOP] button, the indicator light below
the drum pad and pedal indicator on the display panel will
start flashing, strike the pad or press the pedal with
flashing light.
LEARNING START/STOP
Note:
When you are playing the song, you can shift the
Learning mode between “on” and “off” at any time by
pressing the [LEARNING] button.
E14
Page 15
RECORDING
The Digital Drum’s recording feature allows you to record and playback a song (approximately
1000 notes).
•
Data that can be recorded in the recording mode.
•
Drum pad and pedal data.
•
Song data (the number cannot be changed while in
the RECORD mode).
•
Track ON/OFF setting.
•
Tempo setting (The tempo cannot be changed while
in the RECORD mode).
•
Song Volume setting.
•
Reverb ON/OFF setting.
MIDI data cannot be recorded to the memory.*
RecordFunction
[1] Prepare to Record
Select the desired song, drum kit, tempo, track
on/off setting, and reverb settings.
English
[2] Start Recording
•
Press the [RECORD] button, the light starts
flashing.
•
Press the [START/STOP] button, the light stops
flashing and the recording process starts.
•
The recording process also starts once you strike a
drum pad.
Note:
•
When you begin recording, the vocal metronome
starts to count. But the sound of the vocal will not
be record. To stop the metronome, press the
[METRONOME] button.
[3] Stop Recording
To stop recording, press the [START/STOP] or
•
[RECORD] button. The record indicator will turn off.
When the memory becomes full, “FL” will appear on
•
the display and the recording process stops
automatically.
RECORD
START/STOP
PlaybackFunction
The recorded song can be played back by pressing
the [PLAY/STOP] button. To stop the playback,
press [PLAY/STOP] again.
Note:
When you record a new song, this song will replace
the previous recording.
The song recorded most recently will remain in
memory? If even you turn the power off.
E15
PLAY/STOP
Page 16

MAKING THE CONNECTIONS
MIDI
The MIDI IN and MIDI OUT terminals, located on the rear panel of the unit, offer broadened
musical possibilities through the use of MIDI. The following shows the description of MIDI and
How you can use MIDI with the Digital Drum Set.
Whatis MIDI?
English
MIDI is the abbreviation for Musical Instrument Digital Interface. MIDI is a world wide standard
that makes it possible for various electronic musical instruments and other devices, such as
computers, to "communicate with each other. For example, by connecting a MIDI tone
generator to the Digital Drum's MIDI OUT terminal, you can play the tone generator's voices
from the drum's pads and pedals.
The Digital Drum is equipped with two types of MIDI
terminals, both are located on the rear panel.
•
MIDI IN
Data transmitted from other MIDI instruments via
MIDI, is received at this terminal.
•
MIDI OUT
Data produced by the Digital Drum, is transmitted
to other MIDI instruments via MIDI from this
terminal.
MIDI IN/OUT
Terminals
Whatyou can dowithMIDI?
•
Connect the Digital Drum Set MIDI OUT jack to
a MIDI keyboard’s MIDI IN terminal.
This setup allows you to use the drum pad to
control another MIDI instrument. Playing the drum
pads will result in the other MIDI instrument’s voice
sounding simultaneously, creating a thicker overall
sound.
Connect the Digital Drum Set MIDI IN jack to a
•
MIDI keyboard’s MIDI OUT terminal.
In this setup, the digital drum can be used as a tone
generator and its voices can be played from a MIDI
keyboard. Using a keyboard as a controller, it is
possible to play the drum voices that are not
assigned to the pads/pedals.
•
Connect the Digital Drum Set MIDI OUT jack to
a MIDI sequencer’s MIDI IN terminal.
Data produced by the Digital Drum can be recorded
to a MIDI sequencer. Data can also be recorded to
computers or other sequencer as well.
Digital Drum
MIDI Keyboards
Digital Drum
MIDI OUT
MIDI OUT
MIDI OUT
MIDI IN
MIDI IN
MIDI IN
MIDI Keyboards
Digital Drum
Sequencer
•
Connect the Digital Drum Set MIDI IN jack to a
MIDI sequencer’s MIDI OUT terminal.
The sequencer’s data can be used to drive the
drum’s sound.
E16
Sequencer
Digital Drum
MIDI OUT
MIDI IN
Page 17
MAKING THE CONNECTIONS
Pedals
This appliance supports 1 hi-hat pedal and 1 kick pedal as input devices.
PHONES/
OUTPUT
DC-12V
PhonesOutput
PEDAL
21
MIDI
IN OUT
English
The phones output supports a stereo headphones as an output device.
PHONES/
PEDAL
21
MIDI
IN OUT
OUTPUT
DC-12V
E17
Page 18

SPECIFICATIONS
English
Drum Pad:
Voices:
Drum Kits:
Song:
Display:
Connections:
Metronome:
Power Supply:
Dimension:
(WxDxH)
7 drum pads with touch sensitivity and two pedals (bass
drum and hi-hat)
76 PCM drum voices
20presetdrumkits+1customdrumkits
100 preset songs (include 80 styles and 20 songs)
3-digit LED display
Headphones Output
MIDI IN/OUT Jacks
2 different voices
AC adapter (DC 12V.)
23.6x15.2x5.1inches/6
0.0x38.5x13.0cm
Weight:
Accessories:
Specifications are typical, individual units might vary. They are subject to continuous
improvement without notice and without incurring any obligation.
7.26 lbs / 3.3 kgs
AC Adaptor (DC 12V)
1 x Kick pedal
1 x Hi-Hat pedal
2 x Drum Stick
1xHeadphone
E18
Page 19
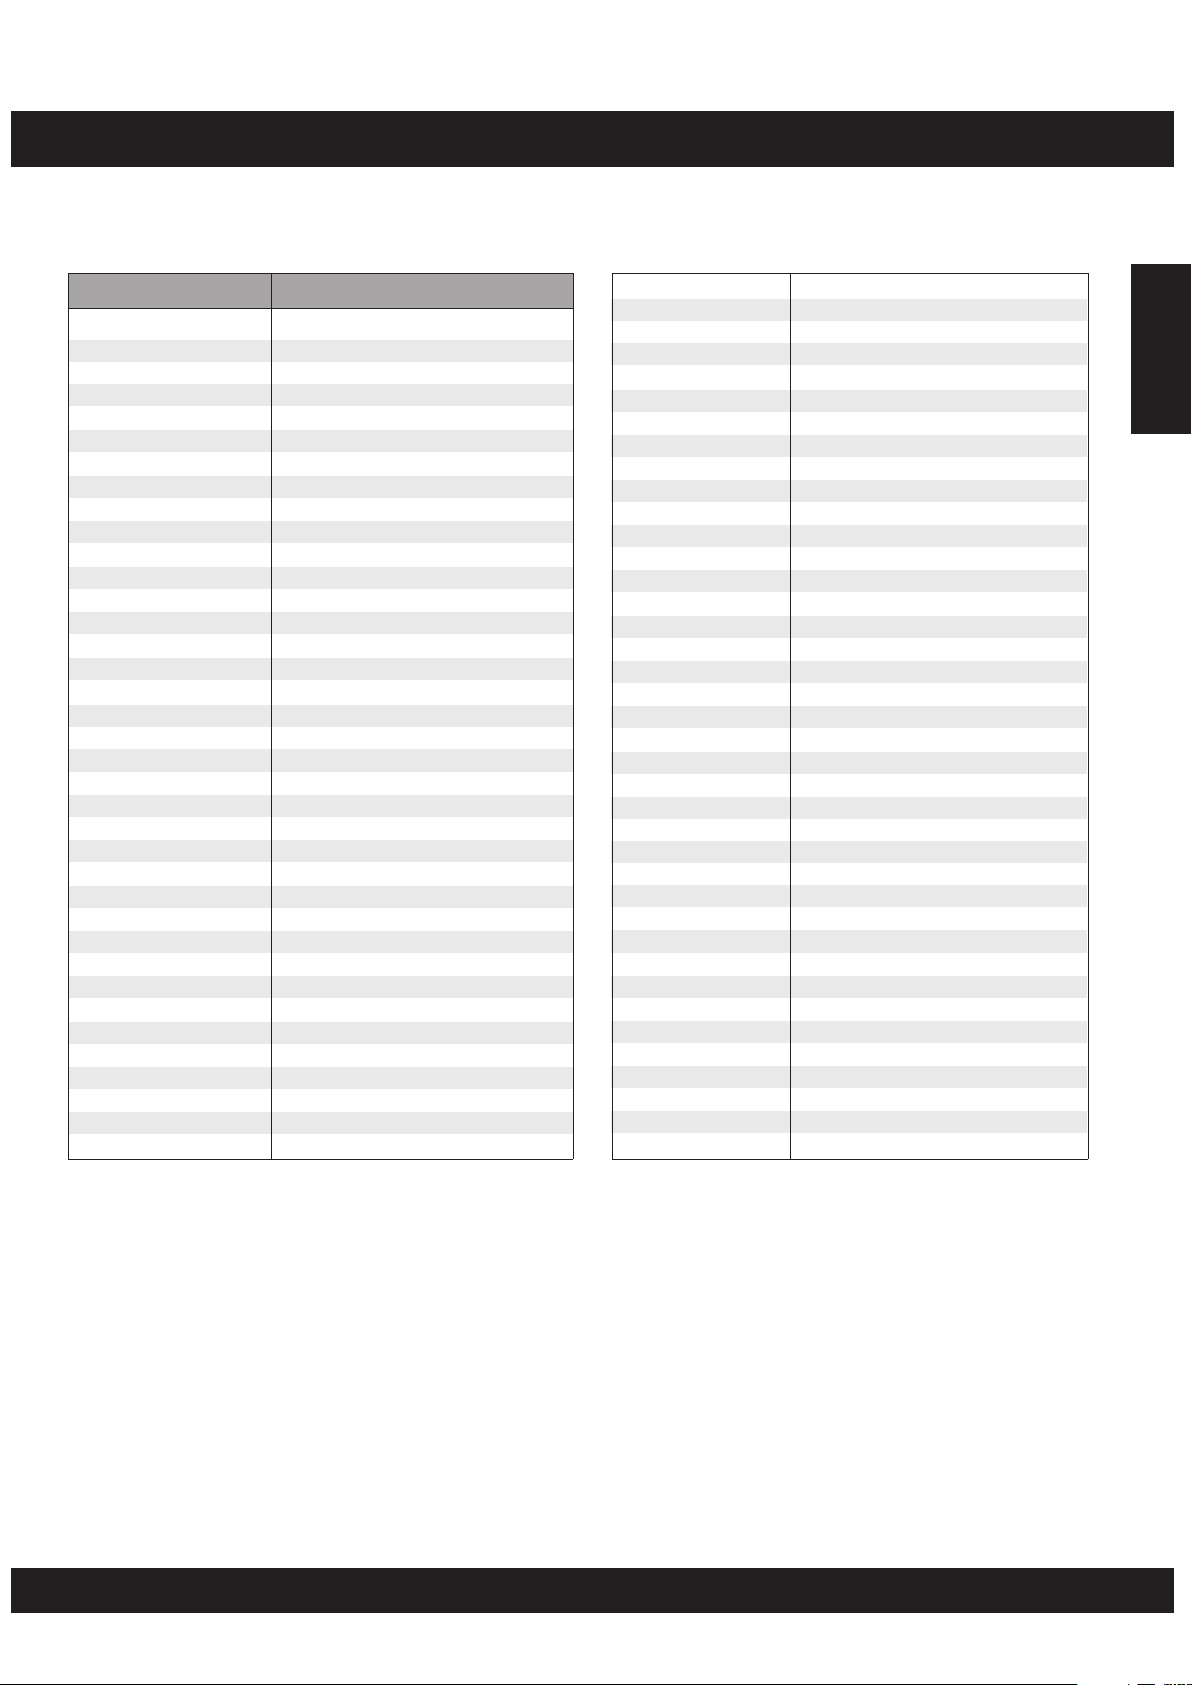
VOICE LIST
Pad Assign No. Percussion
1
2
3
4
5
6
7
8
9
10
11
12
13
14
15
16
17
18
19
20
21
22
23
24
25
26
27
28
29
30
31
32
33
34
35
36
37
Kick Drum 2
Kick Drum 1
Power Kick
Electronic Bass Drum
TR-808 Bass Drum
Snare Drum 1
Snare Drum 2
Gated Snare Drum
Electronic Snare Drum Low
Electronic Snare Drum High
TR-808 Snare Drum
Brush Tap
Brush Swirl
Side Stick
Sticks
High Tom
High Mid Tom
Low Mid Tom
Low Tom
High Floor Tom
Low Floor Tom
Rock High Tom 1
Rock High Tom 2
Rock Mid Tom 1
Rock Mid Tom 2
Rock Low Tom 1
Rock Low Tom 2
Electronic High Tom 1
Electronic High Tom 2
Electronic Mid Tom 1
Electronic Mid Tom 2
Electronic Low Tom 1
Electronic Low Tom 2
TR-808 High Tom 1
TR-808 High Tom 2
TR-808 Mid Tom 1
TR-808 Mid Tom 2
38
39
40
41
42
43
44
45
46
47
48
49
50
51
52
53
54
55
56
57
58
59
60
61
62
63
64
65
66
67
68
69
70
71
72
73
74
75
76
TR-808 Low Tom 1
TR-808 Low Tom 2
*Hi-Hat Open/Closed
Crash Cymbal 1
Crash Cymbal 2
Ride Cymbal
Ride Bell
Chinese Cymbal
Splash Cymbal
Vibra-slap
Hand Clap
Tambourine
Cowbell
TR-808 Cowbell
Mute High Conga
Open High Conga
Low Conga
High Bongo
Low Bongo
High Timbale
Low Timbale
High Agogo
Low Agogo
Cabasa
Shaker
Claves
Mute Triangle
Open Triangle
Short Guiro
Long Guiro
Mute Cuica
Open Cuica
Mute Surdo
Open Surdo
Maracas
High-Q
Slap
Scratch Pull
Scratch Push
English
* By assigning Closed and Open Hi-Hat voices to both the Pad and Pedal, those voices can
be controlled with the foot pedal as follows:
Strike the pad while pressing the Foot Pedal, the “Closed” Hi-Hat voice will sound.
•
Strike the pad without pressing the Foot Pedal, the “Open” Hi-Hat voice will sound.
•
•
Press the Foot Pedal without striking the pad, the Hi-Hat “Pedal” voice will sound.
E19
Page 20
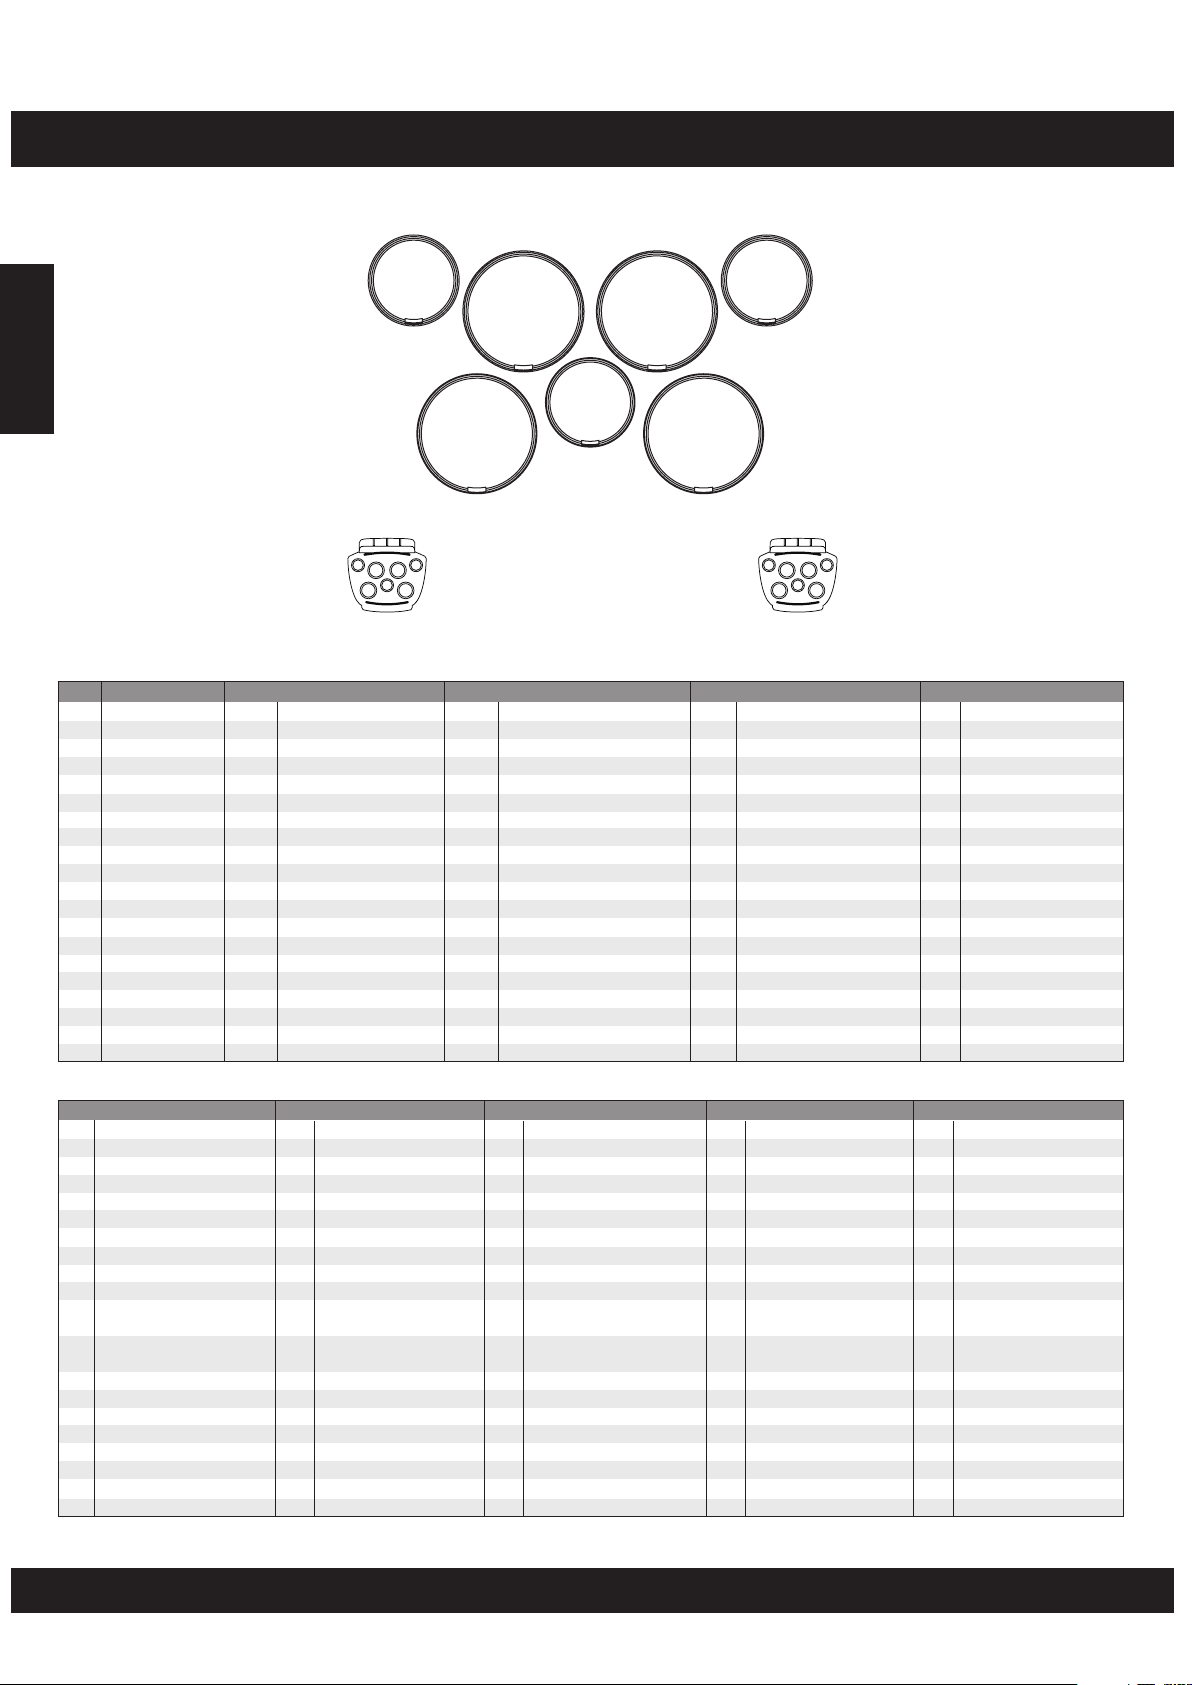
DRUM KIT LIST
English
No
001
002
003
004
005
006
007
008
009
010
011
012
013
014
015
016
017
018
019
020
Kit Name
Standard 1
Standard 2
Standard 3
Standard 4
Standard 5
Standard 6
Standard 7
Standard 8
Rock
Heavy Metal
Dance 1
Dance 2
Samba Perc.
Timbales
Conga
TR-808
Brush
Jazz
Ballad Perc.
Cymbal
Crash Cymbal 1
41
HH Open/Closed
40
Crash Cymbal 1
41
HH Open/Close
40
Crash Cymbal 1
41
Splash Cymbal
46
HH Open/Close
40
HH Open/Close
40
Crash Cymbal 1
41
Crash Cymbal 1
41
HH Open/Close
40
Chinese Cymbal
45
Mute Cuica
68
Crash Cymbal 1
41
High Bongo
55
Crash Cymbal 2
42
Ride Cymbal
43
HH Open/Close
40
Shaker
62
HH Open/Close
40
Pad 1
Pad 5
Pedal 1
Pad 2
Pad 3
Pad 6
Pad 7
Pad 4
Pedal 2
Pad1 Pad2 Pad3 Pad4
High Tom 1
16
High Tom 2
17
High Tom 1
16
High Tom 1
16
High Tom 2
17
High Tom 2
17
High Tom 1
16
Side Stick
14
Rock High Tom 1
22
Rock High Tom 2
23
Electronic High Tom 1
28
Electronic High Tom 2
29
High Agogo
59
Splash Cymbal
46
Mute High Conga
52
TR-808 High Tom 1
34
High Tom 2
17
High Tom 1
16
Claves
63
Crash Cymbal 1
41
Mid Tom 1
18
Mid Tom 2
19
Mid Tom 1
18
Mid Tom 1
18
Mid Tom 2
19
Mid Tom 2
19
Mid Tom 1
18
Mid Tom 1
18
Rock Mid Tom 1
24
Rock Mid Tom 2
25
Electronic Mid Tom 1
30
Electronic Mid Tom 2
31
Low Agogo
60
Maracas
72
Open High Conga
53
TR-808 Mid Tom 1
36
Mid Tom 2
19
Mid Tom 1
18
Tambourine
49
Ride Cymbal
43
Ride Cymbal
43
Crash Cymbal 1
41
Cowbell
50
Crash Cymbal 1
41
Cowbell
50
Tambourine
49
Ride Cymbal
43
Ride Bell
44
Tambourine
49
Cowbell
50
Splash Cymbal
46
High-Q
73
Open Cuica
69
Snare Drum High
7
Low Bongo
56
808 Cowbell
51
Crash Cymbal 1
41
Ride Cymbal
43
Cabasa
61
Ride Bell
44
Pad5 Pad6 Pad7 Pedal 1
Snare Drum High
7
Snare Drum Low
6
Snare Drum High
7
Snare Drum High
7
Snare Drum High
7
Snare Drum High
7
Snare Drum Low
6
Snare Drum Low
6
Snare Drum High
7
Gated Snare Drum
8
Electronic Snare
10
Drum High
Electronic Snare
9
Drum Low
Mute Surdo
70
Low Timbale
58
Snare Drum High
7
808 Snare Drum
11
Brush Tap
12
Brush Swirl
13
Mute Triangle
64
Snare Drum High
7
HH Open/Close
40
Cowbell
50
HH Open/Close
40
Side Stick
14
HH Open/Close
40
HH Open/Close
40
Crash Cymbal 1
41
Crash Cymbal 1
41
HH Open/Close
40
HH Open/Close
40
Hand Clap
48
HH Open/Close
40
Cabasa
61
Cowbell
50
Low Timbale
58
HH Open/Close
40
HH Open/Close
40
Shaker
62
Splash Cymbal
46
Splash Cymbal
46
Low Tom 1
20
Low Tom 2
21
Low Tom 1
20
Low Tom 1
20
Low Tom 2
21
Low Tom 2
21
Low Tom 1
20
Low Tom 1
20
Rock Low Tom 1
26
Rock Low Tom 2
27
Electronic Low
32
Tom 1
Electronic Low
33
Tom 2
Open Surdo
71
High Timbale
57
Low Conga
54
TR-808 Low Tom 1
38
Side Stick
14
Low Tom 1
20
Open Triangle
65
Chinese Cymbal
45
E20
40
40
40
40
40
40
40
40
40
40
40
40
49
63
50
40
40
40
74
40
HH Pedal
HH Pedal
HH Pedal
HH Pedal
HH Pedal
HH Pedal
HH Pedal
HH Pedal
HH Pedal
HH Pedal
HH Pedal
HH Pedal
Tambourine
Claves
Cowbell
HH Pedal
HH Pedal
HH Pedal
Slap
HH Pedal
Pedal 2
Bass Drum Low
1
Bass Drum Low
1
Bass Drum High
2
Bass Drum Low
1
Bass Drum Low
1
Bass Drum Low
1
Bass Drum Low
1
Bass Drum Low
1
Bass Drum High
2
MONDO Bass Drum
3
Electronic Bass
4
Drum
Electronic Bass
4
Drum
Cowbell
50
Bass Drum Low
1
Bass Drum Low
1
TR-808 Bass Drum
5
Bass Drum Low
1
Bass Drum Low
1
Cowbell
50
Bass Drum Low
1
Page 21
SONG LIST
No
00
01
02
03
04
05
06
07
08
09
10
11
12
13
14
15
16
17
18
19
20
21
22
23
24
25
26
27
28
29
30
31
32
33
34
35
36
37
38
39
40
41
42
43
44
45
46
47
48
49
50
Song Name
8 Beat
8 Beat 1
8 Beat 2
8 Beat 3
8 Beat 4
8 Beat 5
8BeatBallad1
8BeatBallad2
8BeatBallad3
Soft Rock
Rock 1
Rock 2
Rock 3
Rock 4
Rock 5
Hard Rock 1
Hard Rock 2
16 Beat
16 Beat 1
16 Beat 2
16 Beat 3
16 Beat 4
16 Beat 5
16 Beat 6
16 Beat 7
16 Beat Ballad 1
16 Beat Ballad 2
16 Beat Ballad 3
16 Beat Ballad 4
16 Beat Ballad 5
16 Beat Funk 1
16 Beat Funk 2
Dance
Dance 1
Dance 2
Dance 3
Dance 4
Dance 5
Dance 6
Rap
Rap 1
Rap 2
Rap 3
Bounce
Bounce 1
Bounce 2
Bounce 3
Shuffle
Shuffle 1
Shuffle 2
Shuffle 3
Shuffle 4
Shuffle 5
Shuffle 6
Shuffle 7
Slow Rock
Slow Rock 1
Slow Rock 2
51
52
53
54
55
56
57
58
59
60
61
62
63
64
65
66
67
68
69
70
71
72
73
74
75
76
77
78
79
80
81
82
83
84
85
86
87
88
89
90
91
92
93
94
95
96
97
98
99
Slow Rock 3
Slow Rock 4
Latin
Reggae 1
Reggae 2
Bossa Nova 1
Bossa Nova 2
Samba
Salsa
Latin Rock
Cha-Cha
Mambo
Rhumba 1
Rhumba 2
Afro Cuban
Tango
Swing
Swing 1
Swing 2
Swing 3
Others
Waltz
3/4 Ballad
Swing Blues
Blues
March 1
March 2
R&B
Hip-Hop
Funk
Country
Big Band
8 Beat
8 Beat 1
8 Beat 2
Ballad
Hard Rock 1
Hard Rock 2
Hard Rock 3
PopDance1
PopDance2
R&B
16 Beat
16 Beat
Fusion
Funk
Funk 1
Funk 2
Shuffle
Shuffle 1
Shuffle 2
16 Beat Shuffle
16 Beat Triplet
Others
Reggae
Bossa Nova
Big Band
English
E21
Page 22

MIDI IMPLEMENTATION CHART
English
Function
Basic
Channel
Mode
Note
Number
Velocity
After
Touch
Pitch Bend
Control
Default
Changed
Default
Messages
Altered
True voice
Note on
Note off
Key s
'
Ch s
'
0
1
7
10
11
64
66
67
80
81
91
93
120
121
123
Transmitted
10ch
X
X
X
**********
1-76
**********
O 9nH,V=1-127
X (9nH,V=0)
X
X
X
X
X
X
X
X
X
X
X
X
X
X
X
X
X
X
Recognized
1-16ch
X
X
X
X
0 - 127
0 - 127
O 9nH,V=1-127
X (9nH,V=0;
8nH,V=0 -127)
X
X
0
0
0
0
0
0
0
0
0
0
0
0
0
0
0
0
Remarks
Bank select
Modulation
Volume
Pan
Expression
Sustain Pedal
Sostenuto Pedal
Soft Pedal
Reverb Program
Chorus Program
Reverb level
Chorus level
All Sound Off
Reset all controllers
All notes off
Program
Change
System Exclusive
System
Common
Clock
Real Time
Aux
Messages
Mode 1: OMNI ON, POLY Mode 2: OMNI ON, MONO 0 : YES
Mode 3: OMNI OFF, POLY Mode 4: OMNI OFF, MONO X : NO
True
Song Position
Song Select
Tune
Clock
Commands
LOCAL ON/OFF
All Notes Off
Active Sense
Reset
**********
0
X
X
X
X
X
X
X
X
X
X
0
0 - 127
0
X
X
X
X
X
X
0
0
0
E22
Page 23

NOTE
English
Page 24

¡Felicitaciones!
Gracias por haber comprado su equipo de Batería Digital Portátil SOUNDX. Esta Batería Digital ha sido elaborada
para poderse usar con facilidad. Antes de usar este instrumento, le recomendamos que lea este manual
cuidadosamente.
El cuidado de su Batería Digital Portátil
Para el mejor uso de su Batería Digital, por favor siga las instrucciones para el mantenimiento a continuación.
POSICIÓN
No exponga la unidad a las siguientes
•
situaciones para evitar la deformación,
decoloración o daños más graves.
Luz del sol directa.
•
Temperatura alta (cerca de un aparato que
•
Español
produce calor, o dentro de un auto por el día).
Humedad excesiva.
•
Polvo excesivo.
•
Vibraciones fuertes.
•
MÓDULO DE ALIMENTACIÓN
Ponga el interruptor en OFF cuando no se esté
•
usando el instrumento.
El adaptador de AC debe estar desconectado
•
del tomacorriente de AC si es que el
instrumento no se va a usar por un largo
período de tiempo.
Desconecte el adaptador de AC durante las
•
tormentas de relámpagos.
Evite enchufar el adaptador de AC en el mismo
•
tomacorriente que un aparato de alto consumo
de electricidad, tales como calentadores
eléctricos y hornos. Evite también el uso de
adaptadores de enchufes múltiples, ya que eso
puede resultar en reducción de la calidad del
sonido, en errores de operación y daños
posibles.
DESCONECTAR (OFF) CUANDO SE HAGA
CONEXIÓN
TRANSPORTE Y MANEJO
•
Jamás aplique fuerza excesiva a los controles,
conectores u otras partes del instrumento.
Siempre desconecte los cables tomando el
•
enchufe de una manera firme, sin jalar el cable.
Desconecte todos los cables antes de mover el
•
instrumento.
Golpes fuertes al instrumento ocasionados por
•
caída, o por haber colocado objetos pesados
encima del instrumentó, puede resultar en
graves daños.
LIMPIEZA
Limpie la unidad con un paño suave y seco.
•
Un paño poco húmedo se podría usar para
•
remover torpe grasitud o mugre.
Nunca use solventes / limpiadores como
•
alcohol o thinner.
Evite poner objetos de vinyl encima de la unidad
•
(el vinyl puede pegarse y decolorar la
superficie).
INTERFERENCIA ELECTRÍCA
Este instrumento contiene un sistema de
•
circuitos digitales que pueden causar
interferencias sí este se encuentra cerca al
radio o televisor. Si esto ocurre, coloque el
instrumento lejos del equipo afectado.
•
Para evitar da os a la unidad y a otros
electrodomésticos a los cuales esté conectada,
apague (OFF) todos los switches antes de
conectar o desconectar los cables.
ñ
ESTE DISPOSITIVO ESTÁ EN CONFORMIDAD CON LA PARTE 15 DE LAS REGLAS DE
FCC. EL FUNCIONAMIENTO ESTA SUJETO A LAS SIGUIENTES DOS CONDICIONES:
(1) ESTE DISPOSITIVO NO PUEDE CAUSAR INTERFERENCIA DAÑINA, Y
(2) ESTE DISPOSITIVO DEBE ACEPTAR CUALQUIER INTERFERENCIA RECIBIDA,
INCLUSO INTERFERENCIA QUE PUEDA CAUSAR MAL FUNCIONAMIENTO.
S02
Page 25

ÍNDICE DE MATERIAS
Tablero de control
- ......................................................................................... 4
Tablero delantero
- .......................................................................................... 5
Tablero de atrás
Configuración
- .............................................................................. 6
Uso con el Adaptador AC
- .............................................................................................. 6
Uso con Pilas
- ...................................................................................... 6
Uso de Auriculares
Número Actual de Pads y Drum Kits
Funciones
- ................................................................................. 8
Tocar la Canción Demo
Pads / Pedales
- .............................................. 9
CómoasignarunDrumKitalosPadsyPedales
- .................... 10
Asignar una voz a los Pads y Pedales individuales (CU Custom Kit)
Operación
- ........................................................................... 11
Ajustar la Función Reverb
- ............................................................................................... 11
Metrónomo
Tocar una Canción
- ............................................................................. 12
Seleccionar una Canción
- Super Bass ............................................................................................... 13
- ............................................................................ 13
Ajustar la Función Tempo
- ........................................................................................... 13
Pista ON/OFF
- .................................................................................................. 14
Tap Start
- .................................................................................. 14
Función de Aprender
Grabar
- ..................................................................................... 15
Función de Grabar
- ................................................................................. 15
Función de Reproducir
Cómo Hacer las Conexiones
- MIDI ........................................................................................................ 16
- .......................................................................................... 16
¿Qué es MIDI?
- .................................................................. 16
¿Que se puede hacer con MIDI?
- .............................................................................................. 17
Los Pedales
- ............................................................................... 17
Salida para Auriculares
Detalles Técnicos
ListadeVoces
ListadeDrumKits
ListadeCanciones
Tabla de Ejecución de MIDI
.................................................................................................... 8
.................................................................................................. 11
...................................................................................................... 15
........................................................................................ 4
.............................................................................................. 6
............................................................ 7
............................................................................................. 9
..................................................................................... 12
....................................................................... 16
....................................................................................... 18
........................................................................................... 19
.................................................................................... 20
..................................................................................... 21
......................................................................... 22
Español
S03
Page 26

TABLERO DE CONTROL
Tablero Delantero
Español
1
ON
OFF
POWER
DRUM PAD (x7)
2
M
-+
A
S
T
E
R
V
3 4
TEMPO
E
M
U
L
O
SONG
VOLUME
1
5
DRUM
+
-
6 7 8
SONG KITS PAD ASS.
PEDAL 1
1
DRUM
2
123
TAP S TART
START/STOP
456
789
- 0 +
BEAT
ASSIGN
SONG
KITS
PAD
PEDAL 2
BASS
9
10
CHORD
LEARNING RECORD
SUPER BASS PLAY/STOP
15 16 17 191820 21 22
23
11
12
METRONOME REVERB
13
14
DEMO
BEAT
SONG KITS PADASS.
PEDAL1
DRUM
1
DRUM
ON
OFF
POWER
M
-+
A
1
Interruptor [ Power on off ]
TAPSTAR T
+
TEMPO
-
START/STOP
E
S
M
T
U
E
L
R
O
V
SONG
VOLUME
2
123
456
789
- 0 +
PEDAL2
CHORD
BASS
LEARNING RECORD
SONG
SUPERBASS PLAY/STOP
KITS
PAD
ASSIGN
METRONOME REVERB
DEMO
Este interruptor enciende / apaga la unidad.
2
Perilla[MasterVolume+&-]
Esta perilla se puede usar para SUBIR O
BAJAR el volumen principal.
3
Botón [ Song Volume+&-]
Estos botones se pueden usar para SUBIR O
BAJAR el volumen de la canción.
4
Botones [ Tempo+&-]
Estos botones se usan para cambiar el ritmo
actual.
5
Botón [ Drum 1 ]
Botón [ Drum 2 ]
6
3-Digit LED
7
Este LED es el dispositivo principal de visualización
que le mostrará los parametros del menú actual.
8
Botón [ BASS ]
9
Botón [ CHORD ]
10
Botón[Learning]
11
Botón [ Record ]
Este botón se usa para empezar o parar de
grabar.
12
Botón [ Metronome ]
Este botón se usa para encender o apagar el
metrónomo.
13
Botón[Reverb]
Este botón se usa para cambiar el nivel de
reverberación.
S04
Page 27

TABLERO DE CONTROL
Tablero Delantero
14
Botón [ Demo ]
Este botón se usa para empezar o parar
una canción de demostración
15
Botón [ Tap Start ]
16
Botón [ Start Stop ]
.
Este botón se puede usar para empezar o
parar de tocar todas las canciones
17
Teclas de Números
18
Botón [ Song ]
.
Este botón se usa para entrar en el menú de
canciones
.
Tablero de Atrás
24 25 26 27
19
Botón [Pad Assign ]
Este botón se usa para entrar en el menú de
vozovolumen
20
Botón [ Kit ]
.
Este bótón se usa para entrar en el menú de
kits
.
21
Botón [ Super Bass ]
22
Botón [ Play / Stop ]
Este botón se usa para empezar o parar de
tocar la grabación
23
Altoparlantes
.
Español
PEDAL
21
MIDI
IN OUT
Terminales de entrada del pedal [BASS DRUM / HI-HAT]
24
Terminales de entrada de pedales Kick y Hi-Hat
25
Terminales MIDI IN/OUT
PHONES/
OUTPUT
.
DC-12V
Este puerto se usa para conectar todos los cables y dispositivos
MIDI
.
26
Terminal de Auriculares
Este terminal se usa para conectar los auriculares
Conectar los auriculares no silenciará los terminales de salida
().
27
Terminal DC
Se conecta a un adaptador de corriente DC 12V
Tal como se indica en la PÁGINA S06
()
Para conectar los pedales de control para el pie [ 1 & 2 ]
Los pedales que se incluyen se pueden conectar a la unidad para tocar las voces hi-hat o bass
drum de la batería simultáneamente. También se les puede asignar que toquen otras voces
.
.
.
Nota
:
No presione el pedal mientras lo está conectando a la unidad o mientras enciende la corriente.
[Al conectarlo de esta manera con la unidad encendida, la función del pedal pudiera invertirse
S05
.)
Page 28

CONFIGURACIÓN
Módulo de Alimentación
Su batería digital trabajará con pilas o con el adaptador de corriente que está incluido. Siga las
instruccionesa continuación deacuerdo conel tipo decorriente quepiensa usar
.
Uso con el Adaptador AC
Conecte el adaptador de corriente al terminal DC
IN situado en el tablero de atrás de la unidad, y
enchufe el adaptador de corriente AC en el
tomacorriente de AC
Español
No use otro adaptador excepto el que está indicado.
La descripción técnica del adaptador es DC 12V de
salida, de tipo centro positivo
Uso con Pilas
Abra la tapa del compartimiento de las pilas
1.
debajo de la unidad
.
Introduzca seis pilas de tamaño “C”, R14
2.
SUM-2, o su equivalente. Al poner las pilas,
siga las marcas de polaridad en la ilustración
Nota:
.
3.
Le sugerimos que use pilas alcalinas
Cierre firmemente el compartimiento de las
pilas
.
.
.
.
:
NOTA
•
La alimentación eléctrica automáticamente pasará por el adaptador AC, si se conecta un adaptador AC opcional
mientras hay pilas instaladas en el instrumento
PRECAUCIÓN
•
Se le recomienda que cambie las pilas gastadas tan pronto como sea posible. Cuando baja el voltaje de las pilas, se
oscurece el visualizador y / o el sonido se distorsiona. Cuando esto ocurra, cambie las pilas por un juego completo
de seis pilas nuevas, todas del mismo tipo
•
NUNCA mezcle las pilas nuevas con las viejas; tampoco use tipos diferentes de pilas [alcalinas, de magnesio, etc.], o
pilas de marcas distintas, o las que son de la misma marca pero de tipos distintos. El uso incorrecto pudiera causar
recalentamiento del instrumento, resultar en un incendio, o causar que las pilas suelten sustancias químicas
•
También para evitar daños causados por pilas echadas a perder, saque todas las pilas del instrumento cuando no lo
va a usar por un largo tiempo
•
Si se instalan las pilas en este instrumento y éste no se usa por un período largo, perderán su potencia
:
.
.
.
.
.
Uso con Auriculares
Unos auriculares estereofónicos opcionales pueden
conectarse al terminal PHONES/OUTPUT, situado en el
tablero de atrás. Cuando los auriculares estén conectados al
terminal, los altoparlantes internos de la unidad se apagarán
automáticamente [perfecto para practicar en privado o para
tocar por la noche si es tarde]. Si usted prefiere usar el
sistema externo de sonido, el terminal para auriculares
también se puede usar para conectar la batería digital a un
sistema estereofónico o una consola mezcladora
.
Nota:
hacer cualquier conexión
Corte la corriente a todos los equipos antes de
.
S06
Page 29

NÚMERO ACTUAL DE PADS Y DRUM KITS
Debe golpear en el pad con las baquetas que acompañan la unidad para tocar las voces de la
batería. El Drum Kit “001” se selecciona automáticamente cuando se enciende la unidad y se
oprimeel botón [KITS]
Darles a los pads con más o menos fuerza resulta en sonidos relativamente altos o suaves,
como corresponde. El volumen del sonido puede variar según la parte del pad que se golpea
Nombres de pads
Núm. de PAD
Pad 1
41: Platillo
Crash 1
Núm de
PAD Asignado
.
Un sonido Hi-Hat está asignado al Pad 6
[Drum Kit 001].l Darle al Pad 6 a la vez
que se presiona el Pedal 2 produce un
sonido hi-hat cerrado. Darle al pad sin
presionar el pedal produce un sonido hihat abierto.
Pad 2
16: TomAlto 1
Pad 3
18: Tom Medio 1
.
Español
Pad 4
43: Platillo Ride
Percusión
Pedal 1
40: Pedal Hi-Hat
Pad 5
7: Tambor con
bordón Alto
UsePedal 1 paracontrolar elHi-Hat.
Lavoz Bombo se controlapresionando
Pedal2.
[Estoes en elcaso deDrum Kit 001]
Pad 6
40: Hi-Hat
Abierto/Cerrado
[Pedal Off/On]
Pad 7
20: Tom Bajo 1
Pedal 2
1: Bombo Bajo
S07
Page 30

FUNCIONES
La Bateria Digital Drum Set incluye una canción de demostración para demostrar el
funcionamiento de los tambores. Para tocar lacanción dedemostración, siga las instrucciones a
continuación
Tocar la Canción Demo
[1]
Encender la unidad
Pongaelinterruptor[POWER]enON
El visualizador LED se encenderá
[2]
Iniciar la Canción Demo
Oprima el botón [DEMO]; la canción de demostración
empezará, y el indicador LEARNING se iluminara a la
misma vez. En este momento la canción demo
Español
empieza en el modo de aprender, y el visualizador de
cada drum pad brillará siguiendo el ritmo de la
canción demo. Para salir del modo de aprender,
oprima el botón [LEARNING] otra vez
•
MASTER VOLUME
El nivel de volumen global del instrumento está
controlado por una perilla [MASTER VOLUME]
:
ON
.
.
OFF
POWER
DEMO
.
.
Haga girar la perilla [MASTER VOLUME] en el sentido
de las agujas del reloj para aumentar el volumen
global. Para disminuir el volumen, haga girar la
perilla en dirección contraria
•
SONG VOLUME
.
El volumen de la canción se controla mediante dos
botones de [SONG VOLUME], [niveles de volumen 09]
El SONG VOLUME se puede usar para regular el
balance entre el acompañamiento de la canción y la
actuación propia de usted con los pads
.
Oprima el botón superior [SONG VOLUME] para
aumentar el volumen de la canción un nivel. Oprima
el botón inferior [SONG VOLUME] para disminuir el
volumen de la canción un nivel. Si mantiene oprimido
cualquiera de los dos botones, el nivel de volumen de
la canción aumentará o disminuirá rapidamente
[3]
Como Parar la Canción de Demostración
.
M
-+
A
S
DEMO START/STOP
E
M
T
U
E
L
R
O
V
SONG
VOLUME
Para parar la reproducción, presione otra vez uno de los
dos botones, bien el botón [DEMO] o el botón
[START/STOP]
.
S08
Page 31

PADS / PEDALES
Como asignar un Drum Kit a los Pads y Pedales
El Digital Drum le permite escoger rápida y fácilmente de entre 20 Drum Kits distintos más un
custom kit de su preferencia [1 -20: vea la “Lista de Drum Kits” en la página 20]. Veinte de los kits
tienen combinaciones de voces preseleccionadas que se activarán en los pads y los pedales
cuandose seleccione esekit. Seleccionevarios kits distintosy pruebetocarlos
[1]
Oprima el botón [KITS]
Cuando oprima el botón [KITS], el indicador de KITS
se iluminará, y la selección actual de Drum Kit
aparecerá en el visualizador
.
KITS
Nota:
Usted no podrá seleccionar los Drum Kits cuando
esté tocando la batería digital en el modo de
aprender
[2]
.
SeleccioneunnúmerodeDrumKit
Usted puede seleccionar el Drum Kit mediante
oprimir las teclas numerales, por ejemplo, cuando
usted quiera seleccionar el Drum Kit 08, oprima “0”y
“8” como corresponde, y “08” aparecerá en el
visualizador
.
123
.
SONG KITS PAD ASS.
Español
Nota:
El Drum Kit número 01 normalmente está
•
selecionado cuando “KITS” se enciende [ON]
Oprima dos DIGITS para seleccionar el Drum Kit
•
Hay 20 Drum Kits [01-20] que se pueden
•
.
seleccionar. Si usted oprime otro número que no
sea del 01-20, la unidad no lo aceptará y el número
del drum kit no se cambiará.
456
789
- 0 +
SONG KITS PAD ASS.
.
S09
Page 32

PADS / PEDALES
Cómo asignar una voz a Pads y Pedales individuales[“CU” Custom Kit]
El Drum Set Digital tiene en total 76 sonidos de percusión de alta calidad [vea la “Drum Voice
List” en la página 19] que se pueden asignar a cada uno de los 7 drum pads y 2 pedales.
Pruebe asignarle varias voces distintas al “CU” Custom Drum Kit
Nota:
•
Cualquier cambio que se le haga a uno de los
drum kits preprogramados se guardará
automáticamente en el “CU”Custom Drum Kit
El contenido del Custom drum kit y del “001” son
•
iguales hasta que se les modifica [vea la lista
“Drum Kit List” en la página 20]
[1]
Oprima el botón [PAD ASSIGN]
Español
Al oprimir el botón [PAD ASSIGN], el indicador PAD
ASSIGN aparecerá en el visualizador y la luz
indicadora debajo de PAD 1 se encenderá. PAD 1
estará actualmente asignado
[2]
Seleccione un Pad/Pedal
.
.
PAD
ASSIGN
.
SONG KITS PADASS.
.
Golpée el Drum Pad que desea asignar una vez, por
ejemplo, el Drum Pad 7; el indicador de PAD 7 se
encenderá y el visualizador mostrará el actual
número de percusión
[3]
Seleccione una Voz de Percusión
.
Se puede seleccionar la voz dándole al pad
repetidamente, presionando el pedal repetidamente
[mientras escucha la voz] o presionando las teclas
de los números
Golpée el Drum Pad hasta que alcance la voz que
1.
desea
.
.
OBIEN
Entre el número de percusión oprimiendo las
2.
teclas de números como se ven en la lista “Drum
Voice List”en la página 19.
Oprimir el botón KITS
[4]
Cuando oprima el botón [KITS], “CU” [Custom Kit]
aparece en el visualizador y la luz señaladora/indicadora
delDRUMKITseenciendeenvezdeladePADASSIGN
[5]
Toque los Pads y los Pedales
SONG KITS PADASS.
SONG KITS PADASS.
KITS
SONG KITS PADASS.
.
Ahora puede tocar su batería con los drum kits hechos
asugusto.
Repita los pasos 2-4 si desea asignar otro drum pad
.
Nota:
Su Drum Kit “CU” será guardado después de apagar la
unidad en OFF. Para recuperar el Drum Kit “CU”,
oprima el botón [KITS] para entrar en el modo “Kits”,
después oprima el botón “-” o el “+” en el teclado
numérico hasta que “CU” aparezca en el visualizador
.
S10
Page 33

FUNCIONAMIENTO
Ajustar la Función Reverb
Se pueden seleccionar diferente grados de intensidad del efecto de reverberación del Digital
Drumen el sonidoglobal delinstrumento
El efecto REVERB se enciende automáticamente cada vez que usted enciende la unidad y el
niveldeopciónpordefectosefijaa[r-2]
Seleccionela intensidad deREVERB
Oprima el botón de reverberación para desplegar la
configuración actual; use el botón “-” o “+” en el
teclado para seleccionar una de las cuatro
intensidades de reverberación que aparecen en el
visualizador. [r-0], [r-1], [r-2], [r-3]; [r-0] significa
que la función reverb está apagada
.
.
REVERB
.
Seleccionar [r-3] añade la mayor intensidad de
reverb al efecto
Nota:
Usted puede ajustar el nivel de Reverb mientras el
•
nivel de reverb aparece en el visualizador
Los datos de intensidad de REVERB ni se
•
transmiten ni se reciben por MIDI
.
.
.
Metrónomo
La característica de METRÓNOMO del Digital Drum
produce un metrónomo para que el tempo le sea más
fácil de seguir y para que mejore su sincronización
mientrasestá tocando lospads.
Para oír el sonido vocal del metrónomo, oprima el
botón [METRONOME] una vez; para oír el sonido de
click, oprima el botón [METRONOME] dos veces. Para
apagarlo,oprima el botónuna vezmás.
Oprima [TEMPO +] o [TEMPO-] para ajustar lavelocidad
delmetrónomo
Oprima los botones [SONG VOLUME] para ajustar el
nivel de sonido o el metrónomo
.
.
789
0 +
-
METRONOME
SONG KITS PADASS.
Español
S11
Page 34

TOCAR UNA CANCIÓN
El Digital Drum Set tiene 100 [ 00 - 99 ] canciones que se pueden usar para dar acompañamiento
[vea la lista “Song List” en la página 21]. Seleccione una de las canciones para escuchar y
disfrutarla.
Seleccionar una Canción
[1]
Oprima el botón [SONG]
Oprima el botón [SONG], y este indicador LED se
encenderá. El número de la canción que ha sido
seleccionada aparecerá en el visualizador.
Seleccione una Canción
[2]
.
SONG
SONG KITS PAD ASS.
Español
El número de la canción aumentará cuando se
oprima el botón “+” en el teclado, y disminuirá con el
botón “-“. También puede usted seleccionar una
canción poniendo números usando las teclas de
números. [Vea la lista “Song List” en la página 21]
Nota:
La canción número “00” es seleccionada
•
automáticamente cuando usted enciende la
unidad
Entre un número de dos dígitos cada vez que
•
seleccione una canción
[3]
.
.
Oprima el botón [START/STOP]
Oprima el botón [START/STOP]. Después de un
conteo, la canción tocará.
Mientras la canción está tocando, el compás actual de
la canción se verá en el visualizador. Trate de tocar los
padsy pedales juntocon lacanción
.
Para detener la reproducción de la canción, oprima
de nuevo el botón [START/STOP]
.
Nota:
También puede usted usar la función TAP START
•
para empezar la canción [vea la página 14]
123
456
789
- 0 +
START/STOP
Las canciones del Digital Drum consisten en el tipo
bucle y el tipo secuencia [vea la lista “Song List” en la
página 21]. Las canciones de tipo bucle [00-79]
tocan continuamente a partir del momento en que se
oprime el boton [START/STOP], hasta que el botón
se vuelve a oprimir. Las canciones tipo secuencia
[80-99] paran automáticamente cuando la canción
se acaba
.
S12
Loop
Sequence
Page 35

SuperBass
La opción Super Bass se ha generado para hacer más graves las voces, y también para obtener
gravesde mayor potencia
.
El Super Bass se enciende [ON] en el momento que
usted enciende el Digital Drum Set [ON]. Oprima el
SUPER BASS
SONG KITS PAD ASS.
botón [SUPER BASS] una vez y se apagará. Oprima el
botón [SUPER BASS] de nuevo para encender el Super
Bass
.
SONG KITS PAD ASS.
Ajustar la Función Tempo
El tempo de la canción se puede fijar entre 40 y 240 golpes (tiempos) por minuto. Según los
númerosde tempo aumenten,el ritmose pondrá másrápido
Use [TEMPO +] y [TEMPO -] para aumentar y disminuir
el valortempo que corresponda. [Los valoresde tempo
oscilande 40 a240]
Nota:
Si usted selecciona otra canción, el Tempo
•
preconfigurado se mantendrá
•
Oprima y sostenga ambos botones, [TEMPO +] y
.
[TEMPO -] para regresar al tempo default (la opción
por defecto)
.
.
+
TEMPO
SONG KITS PAD ASS.
-
Español
Pista ON/OFF
El acompañamiento de canción del Digital Drum consiste en 4 pistas: las pistas DRUM1, DRUM2,
BASSy CHORD
DRUM 1
DRUM 2
BASS
CHORD
Oprimir un botón de Pista [DRUM 1], [DRUM 2],
[BASS],[CHORD] silenciarála pistaque corresponde y
suluz indicadora seapagará
Silenciar las pistas DRUM 1 y DRUM 2 le permitirá
practicar su técnica en modo Karaoke
.
Pista Principal Batería
Pista Principal Percusión
Pista Graves
Pista Principal Acordes
BEAT
BASS
PEDAL 2
9
CHORD
11 13
DRUM
2
SONG KITS PADASS.
PEDAL 1
.
DRUM
1
.
S13
Page 36

TapStart
Español
La función TAP START le permite fijar el tempo global de la canción a la vez que empieza el
acompañamiento. El acompañamiento tocará al ritmo con que se golpéen los pads o con que se
presionenlos pedales
[1]
Oprima el botón [TAP START]
Oprima el botón [TAP START], y el indicador se
alumbrará
[2] Tap Start
Golpée cualquier pad, presione cualquier pedal
cuatro veces, el acompañamiento empezará al
tempo que desea. Cuando la canción se reproduzca,
el indicador TAP START se apagará.
Detener la Reproducción de la Canción
[3]
Para parar la reproducción, oprima el botón
[START/STOP]
.
.
.
TAP STAR T
START/STOP
La función de Aprender
La característica de Aprender del Digital Drum le permite al principiante aprender y tocar fácilmente una
canción [00-99] de la lista de canciones
[1]
Oprima el botón [LEARNING] y toque la
canción
Cuando usted está en el modo SONG, seleccione una
canción de la Song List, luego oprima el botón
[LEARNING]; el indicador del botón [LEARNING] se
alumbrará
Nota:
Cuando usted ha empezado con LEARNING, los
botones KITS y PAD ASSIGN no funcionarán
Empiece a Aprender
[2]
Oprima el boton [START/STOP]; la luz indicadora
debajo del drum pad y el indicador del pedal en el
panel de visualización comenzará a parpadear;
golpée el pad o presione el pedal cuya luz está
parpadeando
.
.
.
LEARNING START/STOP
.
Nota:
Cuando se está tocando la canción, se puede
cambiar el modo Learning entre “on” y “off” en
cualquier momento, al oprimir el botón [LEARNING]
.
S14
Page 37

GRABAR
Lacaractéristica de grabacióndel Digital Drumle permite a usted grabar y reproducir una canción
(aproximadamente1,000 notas)
•
Datos que se pueden grabar en el modo de
grabación
•
Datosdedrumpadypedales
•
Datos de la canción [el número no se puede
cambiar mientras se está en el modo RECORD]
•
Configuración de pista ON/OFF
•
Configuración de tempo [el tempo no se puede
cambiar mientras se está en modo RECORD]
•
Configuración de Song Volume
•
Configuración de reverb ON/OFF
.
.
.
.
.
.
.
.
Datos MIDI no se pueden grabar en la memoria
Función de Grabar
[1]
Preparación para Grabar
Seleccione la canción, drum kit, tempo,
configuración de pista on/off, y configuración de
reverb que desea
[2]
Empezar a Grabar
Oprima el botón [RECORD] y la luz empieza a
•
parpadear
Oprima el botón [START/STOP], la luz deja de
•
parpadear y el proceso de grabación empieza
•
El proceso de grabación también empieza una vez
queustedgolpeaundrumpad
Nota:
•
Cuando usted empiece a grabar, el metrónomo
vocal empieza a contar. Pero el sonido del vocal no
se grabará. Para detener el metrónomo, oprima el
botón [METRONOME]
Parar de Grabar
[3]
.
.
.
.
.
.*
Español
RECORD
START/STOP
Para parar de grabar, oprima el botón [START
•
/STOP] o [RECORD]. El indicador de grabación se
apagará
Cuando la memoria esté llena, aparecerá “FL” en el
•
visualizador, y el proceso de grabación se detendrá
automáticamente
.
.
Función de Reproducir
La canción grabada se puede tocar de nuevo al oprimir
el botón [PLAY /STOP]. Para parar la reproducción,
oprimael botón [PLAY/STOP] otravez
Nota:
Cuando usted grabe una nueva canción, esta canción
va a sustituir la grabación anterior.
La canción que ha sido grabada más recientemente
permanecerá en la memoria aunque usted apague el
instrumento
.
.
S15
PLAY/STOP
Page 38

CÓMO HACER LAS CONEXIONES
MIDI
Los terminales MIDI IN y MIDI OUT, situados en el panel de atrás de la unidad, le ofrecen
posibilidades musicales más amplias mediante el uso de MIDI. A continuación se verá la
descripciónde MIDI ycómo sepuede usar MIDIcon elDigital Drum Set
¿Qué es MIDI?
MIDI es la abreviatura de Musical Instrument Digital Interface (Interfaz de Instrumento Musical
Digital). MIDI es un estándar mundial que posibilita que varios instrumentos musicales
electrónicos, y otros dispositivos tales como computadoras, se “comuniquen” entre sí. Por
ejemplo, al conectar un generador de tonos MIDI al terminal MIDI OUT del Digital Drum, usted
puedentocar las vocesdel generadorde tonos mediantelos padsy pedales dela batería
ElDigital Drum está provistode dos tiposde terminales
MIDI;ambos están localizadosen eltablero de atrás
Español
•
MIDI IN
Los datos transmitidos de otros instrumentos MIDI
mediante MIDI, se reciben en este terminal
•
MIDI OUT
Los datos producidos por el Digital Drum son
transmitidos a otros instrumentos MIDI mediante
MIDI desde este terminal
.
.
.
.
.
MIDI IN/OUT
Terminals
¿Qué se puede hacer con MIDI?
•
Conectar el enchufe MIDI OUT de la batería Digital
Drum Set al terminal MIDI IN de un teclado MIDI
Esta configuración le permite a usted usar el drum pad
para controlar otro instrumento MIDI. Tocar los drum pads
hará que la voz del otro instrumento MIDI suene
simultáneamente, así creando un sonido global más denso
Conectar el enchufe MIDI IN de la batería Digital
•
Drum Set al terminal MIDI OUT de un teclado MIDI
En esta configuración, se puede usar la batería digital
como un generador de tonos, y sus voces se pueden
tocar desde un teclado MIDI. Usando un teclado como
el controlador, es posible tocar las voces de la batería
que no han sido asignadas a los pads/pedales
Conectar el enchufe MIDI OUT de la batería
•
Digital Drum Set al terminal MIDI IN de un
secuenciador MIDI.
Los datos producidos por la batería Digital Drum se
pueden grabar a un secuenciador MIDI. Los datos
también se puden grabar en computadoras u otro
secuenciador
.
.
.
Digital Drum
MIDI Keyboards
MIDI OUT
MIDI IN
.
.
MIDI Keyboards
Digital Drum
MIDI OUT
MIDI IN
MIDI OUT
MIDI IN
Digital Drum
Sequencer
Conectar el enchufe MIDI IN de la batería
•
Digital Drum Set al terminal MIDI OUT de un
secuenciador MIDI
.
Los datos del secuenciador se pueden usar para
hacer funcionar el sonido de la batería
.
S16
Sequencer
Digital Drum
MIDI OUT
MIDI IN
Page 39

COMO HACER LAS CONEXIONES
Los Pedales
Esteaparato soporta 1pedal hi-haty 1 pedalkick comodispositivos de entrada.
PHONES/
PEDAL
21
Salida Para Auriculares
MIDI
IN OUT
OUTPUT
DC-12V
Español
Lasalida para auricularessoporta auricularesestereofónicos como dispositivode salida.
PHONES/
PEDAL
21
MIDI
IN OUT
OUTPUT
DC-12V
S17
Page 40

DETALLES TÉCNICOS
Español
Drum Pad:
Voces
Drum Kits:
Canciones
Visualizador
Conexiones
Metrónomo
Módulo de
alimentación
:
:
:
:
7 drum pads con sensibilidad al tacto y dos pedales
[bomboyhi-hat]
76 PCM voces de batería
20drumkitspreprogramados+1drumkithechoalaorden
100 canciones preprogramadas
[se incluyen 80 estilos y 20 canciones]
:
:
Visualizador LED de 3 dígitos
Enchufe de salida para auriculares
EnchufesMIDIIN/OUT
2 voces distintas
Adaptador AC [DC 12V.]
Dimensiones:
(WxDxH)
Peso
Accesorios
Los detalles técnicos son típicos; unidades individuales pueden tener variaciones. Están
sujetosa mejorías constantessin previoaviso y sinincurrir enninguna obligación.
:
:
23.6x15.2x5.1 /6
7.26 lbs / 3.3 kgs
Adaptador AC [DC 12V]
1x
pedal Kick
1x
pedal Hi-Hat
2x
baquetas
1x
auriculares
pulgadas
0.0x38.5x13.0cm
S18
Page 41

VOICE LIST
Pad Assign No. Percussion
1
2
3
4
5
6
7
8
9
10
11
12
13
14
15
16
17
18
19
20
21
22
23
24
25
26
27
28
29
30
31
32
33
34
35
36
37
Kick Drum 2
Kick Drum 1
Power Kick
Electronic Bass Drum
TR-808 Bass Drum
Snare Drum 1
Snare Drum 2
Gated Snare Drum
Electronic Snare Drum Low
Electronic Snare Drum High
TR-808 Snare Drum
Brush Tap
Brush Swirl
Side Stick
Sticks
High Tom
High Mid Tom
Low Mid Tom
Low Tom
High Floor Tom
Low Floor Tom
Rock High Tom 1
Rock High Tom 2
Rock Mid Tom 1
Rock Mid Tom 2
Rock Low Tom 1
Rock Low Tom 2
Electronic High Tom 1
Electronic High Tom 2
Electronic Mid Tom 1
Electronic Mid Tom 2
Electronic Low Tom 1
Electronic Low Tom 2
TR-808 High Tom 1
TR-808 High Tom 2
TR-808 Mid Tom 1
TR-808 Mid Tom 2
38
39
40
41
42
43
44
45
46
47
48
49
50
51
52
53
54
55
56
57
58
59
60
61
62
63
64
65
66
67
68
69
70
71
72
73
74
75
76
TR-808 Low Tom 1
TR-808 Low Tom 2
*Hi-Hat Open/Closed
Crash Cymbal 1
Crash Cymbal 2
Ride Cymbal
Ride Bell
Chinese Cymbal
Splash Cymbal
Vibra-slap
Hand Clap
Tambourine
Cowbell
TR-808 Cowbell
Mute High Conga
Open High Conga
Low Conga
High Bongo
Low Bongo
High Timbale
Low Timbale
High Agogo
Low Agogo
Cabasa
Shaker
Claves
Mute Triangle
Open Triangle
Short Guiro
Long Guiro
Mute Cuica
Open Cuica
Mute Surdo
Open Surdo
Maracas
High-Q
Slap
Scratch Pull
Scratch Push
Español
*
Al asignar voces Closed y Open Hi-Hat al Pad y al Pedal, esas voces pueden controlarse
con el pedal de la manera siguiente
•
Golpée el pad mientras presiona el pedal de control para el pie, y sonará la voz Hi-Hat
“Cerrada”
•
Golp e el pad sin presionar el pedal, y sonará la voz Hi-Hat “Abierta”
•
Presione el pedal sin golpear el pad, y sonará la voz Hi-Hat de “Pedal”
.
é
:
.
.
S19
Page 42

LISTA DE DRUM KITS
Español
No
001
002
003
004
005
006
007
008
009
010
011
012
013
014
015
016
017
018
019
020
Kit Name
Standard 1
Standard 2
Standard 3
Standard 4
Standard 5
Standard 6
Standard 7
Standard 8
Rock
Heavy Metal
Dance 1
Dance 2
Samba Perc.
Timbales
Conga
TR-808
Brush
Jazz
Ballad Perc.
Cymbal
Crash Cymbal 1
41
HH Open/Closed
40
Crash Cymbal 1
41
HH Open/Close
40
Crash Cymbal 1
41
Splash Cymbal
46
HH Open/Close
40
HH Open/Close
40
Crash Cymbal 1
41
Crash Cymbal 1
41
HH Open/Close
40
Chinese Cymbal
45
Mute Cuica
68
Crash Cymbal 1
41
High Bongo
55
Crash Cymbal 2
42
Ride Cymbal
43
HH Open/Close
40
Shaker
62
HH Open/Close
40
Pad 1
Pad 5
Pedal 1
Pad 2
Pad 3
Pad 6
Pad 7
Pad 4
Pedal 2
Pad1 Pad2 Pad3 Pad4
High Tom 1
16
High Tom 2
17
High Tom 1
16
High Tom 1
16
High Tom 2
17
High Tom 2
17
High Tom 1
16
Side Stick
14
Rock High Tom 1
22
Rock High Tom 2
23
Electronic High Tom 1
28
Electronic High Tom 2
29
High Agogo
59
Splash Cymbal
46
Mute High Conga
52
TR-808 High Tom 1
34
High Tom 2
17
High Tom 1
16
Claves
63
Crash Cymbal 1
41
Mid Tom 1
18
Mid Tom 2
19
Mid Tom 1
18
Mid Tom 1
18
Mid Tom 2
19
Mid Tom 2
19
Mid Tom 1
18
Mid Tom 1
18
Rock Mid Tom 1
24
Rock Mid Tom 2
25
Electronic Mid Tom 1
30
Electronic Mid Tom 2
31
Low Agogo
60
Maracas
72
Open High Conga
53
TR-808 Mid Tom 1
36
Mid Tom 2
19
Mid Tom 1
18
Tambourine
49
Ride Cymbal
43
Ride Cymbal
43
Crash Cymbal 1
41
Cowbell
50
Crash Cymbal 1
41
Cowbell
50
Tambourine
49
Ride Cymbal
43
Ride Bell
44
Tambourine
49
Cowbell
50
Splash Cymbal
46
High-Q
73
Open Cuica
69
Snare Drum High
7
Low Bongo
56
808 Cowbell
51
Crash Cymbal 1
41
Ride Cymbal
43
Cabasa
61
Ride Bell
44
Pad5 Pad6 Pad7 Pedal 1
Snare Drum High
7
Snare Drum Low
6
Snare Drum High
7
Snare Drum High
7
Snare Drum High
7
Snare Drum High
7
Snare Drum Low
6
Snare Drum Low
6
Snare Drum High
7
Gated Snare Drum
8
Electronic Snare
10
Drum High
Electronic Snare
9
Drum Low
Mute Surdo
70
Low Timbale
58
Snare Drum High
7
808 Snare Drum
11
Brush Tap
12
Brush Swirl
13
Mute Triangle
64
Snare Drum High
7
HH Open/Close
40
Cowbell
50
HH Open/Close
40
Side Stick
14
HH Open/Close
40
HH Open/Close
40
Crash Cymbal 1
41
Crash Cymbal 1
41
HH Open/Close
40
HH Open/Close
40
Hand Clap
48
HH Open/Close
40
Cabasa
61
Cowbell
50
Low Timbale
58
HH Open/Close
40
HH Open/Close
40
Shaker
62
Splash Cymbal
46
Splash Cymbal
46
Low Tom 1
20
Low Tom 2
21
Low Tom 1
20
Low Tom 1
20
Low Tom 2
21
Low Tom 2
21
Low Tom 1
20
Low Tom 1
20
Rock Low Tom 1
26
Rock Low Tom 2
27
Electronic Low
32
Tom 1
Electronic Low
33
Tom 2
Open Surdo
71
High Timbale
57
Low Conga
54
TR-808 Low Tom 1
38
Side Stick
14
Low Tom 1
20
Open Triangle
65
Chinese Cymbal
45
S20
40
40
40
40
40
40
40
40
40
40
40
40
49
63
50
40
40
40
74
40
HH Pedal
HH Pedal
HH Pedal
HH Pedal
HH Pedal
HH Pedal
HH Pedal
HH Pedal
HH Pedal
HH Pedal
HH Pedal
HH Pedal
Tambourine
Claves
Cowbell
HH Pedal
HH Pedal
HH Pedal
Slap
HH Pedal
Pedal 2
Bass Drum Low
1
Bass Drum Low
1
Bass Drum High
2
Bass Drum Low
1
Bass Drum Low
1
Bass Drum Low
1
Bass Drum Low
1
Bass Drum Low
1
Bass Drum High
2
MONDO Bass Drum
3
Electronic Bass
4
Drum
Electronic Bass
4
Drum
Cowbell
50
Bass Drum Low
1
Bass Drum Low
1
TR-808 Bass Drum
5
Bass Drum Low
1
Bass Drum Low
1
Cowbell
50
Bass Drum Low
1
Page 43

LISTA DE CANCIONES
No
00
01
02
03
04
05
06
07
08
09
10
11
12
13
14
15
16
17
18
19
20
21
22
23
24
25
26
27
28
29
30
31
32
33
34
35
36
37
38
39
40
41
42
43
44
45
46
47
48
49
50
Song Name
8 Beat
8 Beat 1
8 Beat 2
8 Beat 3
8 Beat 4
8 Beat 5
8BeatBallad1
8BeatBallad2
8BeatBallad3
Soft Rock
Rock 1
Rock 2
Rock 3
Rock 4
Rock 5
Hard Rock 1
Hard Rock 2
16 Beat
16 Beat 1
16 Beat 2
16 Beat 3
16 Beat 4
16 Beat 5
16 Beat 6
16 Beat 7
16 Beat Ballad 1
16 Beat Ballad 2
16 Beat Ballad 3
16 Beat Ballad 4
16 Beat Ballad 5
16 Beat Funk 1
16 Beat Funk 2
Dance
Dance 1
Dance 2
Dance 3
Dance 4
Dance 5
Dance 6
Rap
Rap 1
Rap 2
Rap 3
Bounce
Bounce 1
Bounce 2
Bounce 3
Shuffle
Shuffle 1
Shuffle 2
Shuffle 3
Shuffle 4
Shuffle 5
Shuffle 6
Shuffle 7
Slow Rock
Slow Rock 1
Slow Rock 2
51
52
53
54
55
56
57
58
59
60
61
62
63
64
65
66
67
68
69
70
71
72
73
74
75
76
77
78
79
80
81
82
83
84
85
86
87
88
89
90
91
92
93
94
95
96
97
98
99
Slow Rock 3
Slow Rock 4
Latin
Reggae 1
Reggae 2
Bossa Nova 1
Bossa Nova 2
Samba
Salsa
Latin Rock
Cha-Cha
Mambo
Rhumba 1
Rhumba 2
Afro Cuban
Tango
Swing
Swing 1
Swing 2
Swing 3
Others
Waltz
3/4 Ballad
Swing Blues
Blues
March 1
March 2
R&B
Hip-Hop
Funk
Country
Big Band
8 Beat
8 Beat 1
8 Beat 2
Ballad
Hard Rock 1
Hard Rock 2
Hard Rock 3
PopDance1
PopDance2
R&B
16 Beat
16 Beat
Fusion
Funk
Funk 1
Funk 2
Shuffle
Shuffle 1
Shuffle 2
16 Beat Shuffle
16 Beat Triplet
Others
Reggae
Bossa Nova
Big Band
Español
S21
Page 44

TABLA DE EJECUCIÓN DE MIDI
Español
FUNCION
Básico
Canal
Modo
Nota
Número
Velocidad
Despues
Toque
Pitch Bend
Control
Defecto
Cambiado
Defecto
Mensajes
Alterado
Voz real
Notas activadas
Notas desactivadas
Llaves
Canales
0
1
7
10
11
64
66
67
80
81
91
93
120
121
123
TRANSMITIDO
10ch
X
X
X
**********
1-76
**********
O 9nH,V=1-127
X (9nH,V=0)
X
X
X
X
X
X
X
X
X
X
X
X
X
X
X
X
X
X
Recognized
1-16ch
X
X
X
X
0 - 127
0 - 127
O 9nH,V=1-127
X (9nH,V=0;
8nH,V=0 -127)
X
X
0
0
0
0
0
0
0
0
0
0
0
0
0
0
0
0
REMARCADO
Banco Selecto
Modulación
Volumen
Cacerola
Expresión
Sostener el Pedal
Pedal de Sostenuto
Pedal Suave
Programa de Reverb
Programa del Estribillo
Nivel de Reverb
Nivel del Estribillo
Todo el Sonido Apagado
Reajustar Todos los Reguladores
All Notes Off
Cambio de
Programa
Exclusiva del Sistema
Sistema
Común
Reloj
Tiempo Real
Aux
Mensajes
Mode 1: OMNI ON, POLY Mode 2: OMNI ON, MONO 0 : SI
Mode 3: OMNI OFF, POLY Mode 4: OMNI OFF, MONO X : NO
Verdadero
Posición de la canción
Selector de canción
Tono
Reloj
Comandos
Local ON / OFF
Todas las notas OFF
Sensores Activos
Resetear
**********
0
X
X
X
X
X
X
X
X
X
X
0
0 - 127
0
X
X
X
X
X
X
0
0
0
S22
Page 45

NOTA
Español
Page 46

Félicitation!
Nous vous remercions de l'achat du Batterie Electronique Portable SOUNDX. Afin d'obtenir les
meilleurs résultats avec votre clavier, veuillez suivre les étapes expliquées dans cemanuel quand vous
commencerez à le tester. Nous vous garantissons que vous l'apprécierez et vous découvrirez toutes
lespossibilités de votrenouveau clavier.
Prendre Soin De Votre Ensemble Portatif De Tambour De Digital
Afin d'obtenir les meilleurs résultats avec votre Clavier Electronique, veuillez suivre les instructions
suivantes:
LIEU D’EMPLACEMENT
Ne pas exposer le matériel à ces différentes
•
conditions pour éviter toute déformation,
décoloration ou de plus sérieux dommages.
Exposition au soleil.
•
Températures hautes (près d’une source de
•
chaleur ou dans une voiture la journée).
Humidité excessive.
•
•
Polvo excesivo.
•
Vibración fuerte.
SOURCE D’ÉNERGIE
MANIEMENT ET TRANSPORT
Ne pas exercer de pression aux parties de
•
contrôle, de connections ou d’autres
éléments de l’instrument.
Toujours débrancher en tenant la prise
•
fermement et non en tirant sur le câble.
Débrancher tous les câbles avant de
•
déplacer l’instrument.
Des coups physiques causés par des chutes,
•
ou en plaçant des objets lourds sur
l’instrument il pourrait se produire des
éraflures ou des dégâts plus importants.
Mettre le bouton power sur OFF lorsque
•
Français
l’instrument n’est pas utilisé.
L’adaptateur AC doit être débranché de la
•
prise de courant AC si l’instrument n’est pas
utilisé pendant une période prolongée.
Débrancher l’adaptateur AC pendant les
•
orages.
Eviter de brancher l’adaptateur AC sur la
•
même prise. de courant que des appareils de
haute consommation d’énergie comme les
chauffages électriques ou les fours. Eviter
aussi d’utiliser des prises multiples car cela
conduit à réduire la qualité du son, à des
erreurs d’opération et à de possibles
dommages du matériel.
METTRE LE BOUTON POWER SUR OFF
AVANT DE BRANCHER L’APPAREIL
Pour éviter tout dommage de l’instrument et
•
des autres elements auquel il est connecté,
mettre le bouton power de tous les éléments
liés sur OFF avant de brancher ou de
débrancher les câbles.débrancher les
câbles.
NETTOYER
Nettoyer l’ensemble avec un chiffon sec et
•
doux.
Utilisez un chiffon légèrement humide pour
•
ôter les saletés et poussières persistantes.
Ne jamais utiliser de produits de nettoyage
•
tel que de l’alcool ou un diluant.
Evitez de placer des objets en vinyl sur
•
l’appareil (Le vinyl pourrait coller et décolorer
la surface).
INTERFÉRENCE ÉLECTRIQUE
L’instrument contient des circuits
•
électroniques et cela peut causer des
interférences si il est proche d’une radio ou
d’une télévision. Si cela arrive, éloigner
l’instrument de l’équipement affecté par les
interférences.
CET APPAREIL EST CONFORME A LA SECTION 15 DU REGLEMENT DE LA FCC
AMERICAINE (FEDERAL COMMUNICATIONS COMMISSION).
SON UTILISATION OBEIT AUX DEUX CONDITIONS SUIVANTES :
[1] CET APPAREIL NE DOIT PAS PROVOQUER D'INTERFERENCES NUISIBLES
[2] IL DOIT ACCEPTER TOUTE INTERFERENCE REÇUE, Y COMPRIS LES
INTERFERENCES RISQUANT DE PROVOQUER UN FONCTIONNEMENT NON SOUHAITE.
F02
Page 47

CONTENU
Tableau de Contrôle
- ............................................................................ 4
Tableau de Contrôle Avant
- ........................................................................ 5
Tableau de Connexion Arrière
Installation
Avec Adaptateur AC
- ..................................................................................... 6
Avec Piles
- ................................................................................................... 6
Utilisation D'écouteurs
- .................................................................................. 6
Numero Tambour Actuel Et Kit Batterie
Fonction
- Jeu de la Chanson de .......................................................................... 8
Tambours / Pédales
Assigner Un Kit Batterie Aux Tambours Et Pédales
- ........................................... 9
Assigner un son aux tambours et pédales individuels (kit personnalisé "CU")
- ....... 10
Fonctionnement
Ajuster La Fonction De Reverb
- ..................................................................... 11
Métronome
- ............................................................................................... 11
Jeu D'une Chanson
Choix D'une Chanson
- .................................................................................. 12
- Super Basse ............................................................................................. 13
Ajuster La Fonction De Tempo
- ..................................................................... 13
Voie "MARCHE/ARRÊT"
- .............................................................................. 13
Taper Le Début
- ......................................................................................... 14
Fonction De Étude
- ...................................................................................... 14
Enregistrement
Fonction Record
- ........................................................................................ 15
Fonction De Playback
- .................................................................................. 15
Pour Faire Les Connections
- MIDI ......................................................................................................... 16
Quel est le MIDI?
- ....................................................................................... 16
Que pouvez-vous faire avec le MIDI?
- ............................................................. 16
Pédale
- ...................................................................................................... 17
Sortie Phono
- ............................................................................................. 17
Details Techniques
ListeDeVoix
Liste De Kit De Tambour
Liste De Chanson
Graphique Du Mode D’éxécution
.................................................................................................. 6
...................................................................................................... 8
............................................................................................. 19
..................................................................................... 4
....................................................... 7
Démo
.................................................................................... 9
......................................................................................... 11
.................................................................................... 12
......................................................................................... 15
........................................................................ 16
..................................................................................... 18
............................................................................ 20
....................................................................................... 21
................................................................. 22
Français
F03
Page 48

CONTRÔLES
VueDeFace
BATTERIE (x7)
Français
DRUM
TEMPO
5
6 7 8
SONG KITS PAD ASS.
PEDAL 1
1
DRUM
2
123
TAP S TART
+
-
START/STOP
456
789
- 0 +
BEAT
ASSIGN
SONG
KITS
PAD
1
POWER
2
ON
OFF
M
-+
A
S
T
E
R
V
3 4
E
M
U
L
O
SONG
VOLUME
PEDAL 2
BASS
9
10
CHORD
LEARNING RECORD
SUPER BASS PLAY/STOP
11
12
METRONOME REVERB
13
14
DEMO
15 16 17 191820 21 22
1
23
BEAT
SONG KITS PADASS.
PEDAL1
DRUM
1
DRUM
ON
OFF
POWER
M
-+
A
[]
Allume - Eteint
1
TAPSTAR T
+
TEMPO
-
START/STOP
E
S
M
T
U
E
L
R
O
V
SONG
VOLUME
PEDAL2
CHORD
BASS
2
123
456
789
- 0 +
LEARNING RECORD
SONG
SUPERBASS PLAY/STOP
KITS
PAD
ASSIGN
commutateur
METRONOME REVERB
DEMO
Cet interrupteur active/désactive l'appareil.
Volume Principal
[+&-]
2
bouton
Cette molette permet d'augmenter ou
réduire le volume maître.
[Volume +&-]
3
Chanson
bouton
Ces boutons permettent d'augmenter ou
réduire le volume d'un morceau.
[Tempo+&-]
4
bouton
Ces boutons sont utilisés pour changer le
tempo en cours.
5
[ Batterie 1 ]
6
[ Batterie 2 ]
bouton
bouton
7
3-Digit LED
Ce LED est l'affichage principal indiquant
les paramètres du menu courant.
8
[ BASSE ]
9
[ CHORD ]
10
[Learning]
Enregistre
[]
11
bouton
bouton
bouton
bouton
Ce bouton permet de démarrer ou arrêter
un enregistrement.
12
Métronome
[]
bouton
Ce bouton permet d'activer ou désactiver
le métronome.
13
[ Reverb ]
bouton
Ce bouton permet de changer le niveau
d'amplification.
F04
Page 49

CONTRÔLES
VueDeFace
[]
Démonstration
14
bouton
Ce bouton permet de démarrer ou arrêter
une musique de démo.
15
[ Tap Start ]
DE DÉBUT / DE FIN bouton
[]
16
bouton
Ce bouton permet de démarrer ou arrêter
la lecture des morceaux.
17
Number keys
Chanson
[]
18
bouton
Ce bouton permet d'entrer dans le menu
morceaux.
Panneau Arrière
24 25 26 27
PEDAL
21
[]
La Garniture Assignent bouton
19
Ce bouton permet d'entrer dans le menu
vocal ou volume.
20
[ Kit ]
bouton
Ce bouton permet d'entrer dans le menu kit.
21
[]
Basse Superbe
[ Lecture / Arrêt ]
22
bouton
bouton
Ce bouton permet de démarrer ou arrêter
la lecture d'un enregistrement.
23
Hauts-parleurs
PHONES/
OUTPUT
DC-12V
Français
MIDI
IN OUT
24
Fiches d'entrée Pédale [ BASS DRUM / HI-HAT ]
( TAMBOUR BASSE / HI-HAT )
Fiches d'entrée pédale kick et Hi-Hat.
25
MIDI D'ENTRÉE / SORTIE Jacks
Ce port permet de connecter tous les câbles et appareils MIDI.
26
D'écouteurs Jack
Cette fiche permet de connecter les écouteurs.
(La connexion d'écouteurs ne coupe pas les fiches de sortie).
27
DC Jack
Connexion à un adaptateur DC 12V.
()
Comme indiqué sur la PAGE F06
Connexion Des Pédales (1&2)
Les pédales fournies peuvent être connectées à l'appareil pour jouer simultanément les sons de
hi-hat ou de basse de la batterie. Elles peuvent également être réglées pour jouer d'autres sons.
:Remarque
Ne pas appuyer sur les pédales au moment de les connecter à l'appareil ni au moment d'allumer.
(En cas de connexion de cette manière avec l'appareil activé, la fonction des pédales peut être
inversée.)
F05
Page 50

INSTALLATION
Alimentation
Votre clavier électronique peut fonctionner avec des piles ou avec l'adaptateur fourni. Suivez les
instructionsci-dessous selon l'alimentationque vousutiliserez.
AvecAdaptateur AC
Branchez l'adaptateur à l'entrée DC IN située à
l'arrièrede l'appareil et l'adaptateurAC à laprise
ACcorrespondante.
N'utilisez pas d'autres adaptateurs que ceux qui
sontrecommandés.
Les spécifications techniques de l'adaptateur
sont:sortie DC 9V500mA, aveccentre positif.
Français
Avec Piles
Ouvrez le couvercle du compartiment des
1.
piles situé au-dessous de l'appareil.
Placez six piles «C» ou piles équivalentes.
2.
Respectez la polarité en suivant l'illustration.
Remarque:
alcalines.
Refermez le compartiment des piles.
3.
On conseille l'utilisation de piles
REMARQUE:
•
L'alimentation sera automatiquement faite par l'adaptateur AC s'il est branché pendant que vous installez les
piles dans cet appareil.
ATTENTION:
•
Il est recommandé de changer les piles usagées le plus tôt possible. Quand le voltage baisse, l'affichage
commence à faiblir et / ou le son est distordu; si cela arrive, changez le jeu complet des six piles en utilisant
le même type.
•
NE JAMAIS mélanger des piles vieilles avec des neuves, différents types de piles (alcaline, magnésium, etc.)
différentes marques ou même différents types de piles de la même marque. Cela pourrait occasionner une
surchauffe, un incendie ou une fuite des piles.
•
De la même façon, pour éviter que les problèmes dus à la fuite des piles, retirez-les de l'appareil quand vous
ne vous en servez pas pendant une période prolongée.
• Si les piles sont installées dans l'appareil et que vous ne vous en servez pas pendant un certain temps, elles
perdront leur puissance.
Utilisation D'écouteurs
Un jeu optionnel d'écouteurs stéréo peut être branché à
l'entrée PHONES / INPUT situé sur le panneau arrière.
Quand on branche les écouteurs à la prise jack, les hautparleurs internes de l'appareil sont automatiquement
coupés (Parfait pour jouer seul ou tard dans la nuit). Si vous
préférez utiliser un dispositif sonore externe, l'entrée
PHONES / INPUT peut être utilisée pour brancher
l'appareil sur un appareil stéréo ou une console de mixage.
Remarque:
connexion.
éteignez l'appareil avant de faire toute
F06
Page 51

NUMERO TAMBOUR ACTUEL ET KIT BATTERIE
Frapper le tambour avec les baguettes fournies pour jouer les sons de tambour. Le kit batterie
“001” est autommatiquement choisi dès que l'appareil est activé et que le bouton [KITS] est pressé.
Le son sera plus ou moins fort selon la force de frappe sur le tambour.
La force du son peut varier selon les parties du tambour qui son frappées.
Nom De Garniture
Un son Hi-Hat est assigné au
tambour 6 (Kit batterie 001). Si le
tambour 6 est frappé en même
temps que la pédale 2 est enfoncée,
le son hi-hat est fermé. Si le tambour
est frappé sans appuyer sur la
pédale, le son hi-hat est ouvert.
PAD No.
PAD Assign No.
Pad 1
41: Crash
Cymbal 1
Pad 2
16: High Tom 1
Pad 3
18: Mid Tom 1
Pad 4
43: Ride Cymbal
Français
Percussion
7: Snare Drum High
Pedal 1
40: Hi-Hat Pedal
Pad 6
40: Hi-Hat
Open/Close
(Pedal 2 Off/On)
Pad 5
Utiliser la pédale 1 pour contrôler le HiHat.Une pression sur la pédale 2 permet
de contrôler le son de Tambour Basse.
(Danslecasdekitbatterie001)
Pad 7
20: Low Tom 1
Pedal 2
1: Bass Drum Low
F07
Page 52

FONCTION
L'ensemble batterie numérique inclut une musique de démo pour montrer la performance des
batteries. Pour lire la musique de démo, suivre les instructions ci-dessous:
Jeu De La Chanson De Démo
[1]
Rétablir le courant
ON
Tourner l'interrupteur [POWER] (MARCHE) sur ON.
L'affichage LED s'allume.
Commencer La Chanson De Démo
[2]
Appuyer sur le bouton [DEMO], la musique de démo
commence et l'indicateur LEARNING
(APPRENTISSAGE) s'allume en même temps. A ce
moment, la musique de démo est en mode learning
(apprentissage), le LED des tambours s'allume
suivant le rythme de la musique. Pour quitter le
mode learning, appuyer une nouvelle fois sur le
bouton [LEARNING].
OFF
POWER
DEMO
•
Le volume d'ensemble de l'instrument est contrôlé
Français
par la molette [VOLUME MAITRE].
Tourner la molette [VOLUME MAITRE] dans le sens
des aiguilles d'une montre pour augmenter le volume
d'ensemble. Pour diminuer le volume, tourner la
molette dans l'autre sens.
•
Le volume des morceaux est contrôlé par les
boutons [VOLUME MORCEAU] (niveaux de 0 à 9).
Le bouton VOLUME MORCEAU permet d'ajuster la
balance entre l'accompagnement et votre propre jeu
sur les tambours.
Appuyer sur le bouton [VOLUME MORCEAU]
supérieur pour augmenter le volume du morceau
d'un degré. Appuyer sur le bouton [SONG VOLUME]
du bas pour diminuer d'un degré. Appuyer
longuement sur l'un au l'autre bouton pour
augmenter ou diminuer le son rapidement.
[3]
VOLUME MAITRE
VOLUME MORCEAU
ArrêterLaChansonDeDémo
M
-+
A
S
DEMO START/STOP
E
M
T
U
E
L
R
O
V
SONG
VOLUME
Pour arrêter la lecture, appuyer sur [DEMO] ou sur
[DEMARRAGE/ARRET].
F08
Page 53

TAMBOURS / PÉDALES
AssignerUn Kit BatterieAuxTambours Et Pédales
La batterie numérique propose 20 kits batterie différents plus un kit personnalisé (1-20: voir
"Liste kits batterie" page 20) rapidement et facilement. Les 20 kits comprennent une
combinaison de sons préréglés ajustés aux tambours et pédales lorsque le kit est sélectionné.
Sélectionner différents kits et les essayer.
[1]
Appuyer sur [le bouton de KITS]
Une pression sur le bouton [KITS] allume l'indicateur
KIT et le kit batterie sélectionné apparaît sur
l'affichage.
KITS
SONG KITS PAD ASS.
Remarque
Il n'est pas possible de sélectionner un kit batterie en
mode de lecture learning.
[2]
Choisir un nombre de kit de tambour
Un kit batterie peut être sélectionné en appuyant sur
les touches numériques, par exemple pour
sélectionner le kit batterie 08, appuyer sur "0" et
"8", "08" apparaît sur l'écran.
Remarque
Le kit batterie 01 est normalement sélectionné au
•
moment où "KITS" est activé.
Entrer deux CHIFFRES pour sélectionner le kit
•
batterie.
20 kits batterie (01-20) peuvent être sélectionnés.
•
Si un autre nombre que 01 à 20 est entré,
l'appareil ne l'accepte et le numéro de kit ne
change pas.
:
:
123
456
789
- 0 +
Français
SONG KITS PAD ASS.
F09
Page 54

TAMBOURS / PÉDALES
Assignerun son auxtambourset pédales individuels(kitpersonnalisé "CU")
La batterie numérique comprend au total 76 sons de percussion de haute qualité (voir la "Liste
des sons de batterie" page 19) pouvant être assignés à chacun des 7 tambours et aux 2
pédales. Essayer d'assigner les différents sons au kit batterie personnalisé "CU".
Remarque:
•
Tout changement effectué sur l'un des kits préréglés sera automatiquement sauvegardé dans le
kit batterie personnalisé "CU".
Les kits personnalisé et "001" sont identiques
•
jusqu'à modification (voir "Liste kit batterie page
20).
PAD
ASSIGN
[1]
ASSIGNENT] le bouton
Une pression sur le bouton [PAD ASSIGN] affiche
l'indicateur PAD ASSIGN (ASSIGNER TAMBOUR) sur
l'écran et l'indicateur sous PAD 1 s'allume. PAD 1
est alors assigné.
[2]
Frapper une fois le tambour à assigner, par exemple
le tambour 7, l'indicateur du PAD 7 s'allume,
Français
l'affichage illustre le numéro de percussion courant.
[3]
Sélectionner un son en frappant à plusieurs reprises
le tambour, en appuyant plusieurs fois sur la pédale
(tout en écoutant le son) ou en utilisant les touches
numériques.
1. Frapper le tambour jusqu'à atteindre le son
2. Entrer le numéro de percussion en appuyant sur
Appuyer sur [la GARNITURE
SONG KITS PADASS.
Choisir Une Garniture/Pédale
SONG KITS PADASS.
Choisir Une Voix De Percussion
SONG KITS PADASS.
souhaité.
OU
les touches numériques comme indiqué sur la
Liste sons tambours page 19.
[4]
Appuyer sur le bouton de KITS
Une pression sur le bouton [KITS] affiche "CU" (kit
personnalisé) sur l'écran et l'indicateur DRUM KIT
(KIT BATTERIE) s'allume à la place de l'indicateur
PAD ASSIGN.
Jouer les Garnitures et les Pédales
[5]
Vous pouvez maintenant jouer votre tambour avec
les kits personnalisés. Répéter les étapes 2 à 4 pour
assigner un autre tambour.
Remarque
Votre kit batterie "CU" sera sauvegardé une fois
l'appareil désactivé. Pour rappeler le kit "CU",
appuyer sur [KITS] pour entrer en mode "Kits", puis
appuyer sur "-" ou "+" sur le clavier numérique
jusqu'à ce que "CU" s'affiche.
:
F10
KITS
SONG KITS PADASS.
Page 55

FONCTIONNEMENT
Ajuster La Fonction De Reverb
Différentes profondeurs d'effet d'amplification de la batterie numérique peuvent être
sélectionnées pour le son général de l'instrument.
L'effet REVERB (AMPLIFICATION) est automatiquement activé à chaque fois que l'appareil est
activé et le niveau par défaut est sur [r-2].
Choisir la profondeur de REVERB
Appuyer sur le bouton Reverb pour afficher le
réglage en cours, utiliser les touches "-" ou "+" sur le
clavier pour sélectionner l'un des quatre niveaux
d'amplification affichés sur l'écran. [r-0], [r-1], [r2], [r-3]; [r-0] signifie amplification désactivée.
Sélectionner [r-3] pour avoir le maximum d'effet
d'amplification.
Remarque
Le niveau d'amplification peut être ajusté lorsqu'il
•
est affiché sur l'écran.
Les données de niveau de REVERB ne sont pas
•
transmises ni reçues via MIDI.
:
789
-
REVERB
SONG KITS PADASS.
0 +
Métronome
La fonction METRONOME de la batterie numérique
produit un métronome permettant de suivre plus
facilement le tempo et d'améliorer votre précision au
jeu des tambours. Pour entendre le son vocal du
métronome, appuyer une fois sur [METRONOME],
pour entendre le son click, appuyer deux fois dessus.
Pour désactiver, appuyer une nouvelle fois.
Appuyer sur [TEMPO +] ou [TEMPO -] pour ajuster la
vitesse du métronome.
Appuyer sur [SONG VOLUME] pour ajuster le niveau
de son du métronome.
Français
METRONOME
F11
Page 56

JEU D'UNE CHANSON
La batterie numérique comprend 100 (00 à 99) morceaux d'accompagnement (voir la "Liste
des morceaux" page 21). Sélectionner l'un des morceaux pour écouter ce qui vous semble
jouable.
Choix D'une Chanson
[1]
Appuyer sur [le bouton de CHANSON]
Appuyer sur le bouton [MORCEAU], l'indicateur LED
s'allume. Le numéro du morceau en cours s'affiche
sur l'écran.
[2]
Choix d'une chanson
SONG
SONG KITS PAD ASS.
Appuyer sur "+" pour augmenter les numéros des
morceauxs et sur "-" pour diminuer. Un morceau
peut aussi être sélectionné avec les touches
numériques. (Voir "Liste des morceaux" page 21)
Remarque
•
•
Français
[3]
Appuyer sur [START/STOP], après un décompte, le
morceau commence.
Pendant que la musique joue, la mesure s'affiche sur
l'écran. Essayer de manier les tambours et pédales
en même temps que la musique.
Pour arrêter le morceau, appuyer à nouveau sur
[START/STOP].
Remarque
•
:
Le morceau numéro "00" est automatiquement
sélectionné dès que l'appareil est activé.
Entrer un nombre à deux chiffres pour sélectionner
un morceau.
Appuyer sur le bouton [DE DÉBUT ET DE FIN]
:
La fonction TAP STRAT permet également de
démarrer un morceau (voir page 14)
123
456
789
- 0 +
START/STOP
Les morceaux de la batterie numérique sont
composés de types boucle et types séquence (voir
"Liste des morceaux" page 21). Les morceaux de
type boucle (00 à 79) jouent en continu à partir du
moment où le bouton [START/STOP] est pressé une
première fois et jusqu'à ce qu'il soit de nouveau
pressé. Les morceaux de type séquence (80 à 99)
s'arrêtent automatiquement à la fin du morceau.
F12
Loop
Sequence
Page 57

SuperBasse
L'option Super basse a été créée pour rendre le son plus profond et la basse plus puissante.
La Super basse est activée au moment où la batterie
numérique est activée. Une pression sur [SUPER
SUPER BASS
SONG KITS PAD ASS.
BASSE] désactive cette option. Une nouvelle
pression réactive l'option.
SONG KITS PAD ASS.
Ajuster La Fonction De Tempo
Le tempo du morceau peut être réglé de 40 à 240 temps par minute. Le tempo accélère
lorsque le numéro de tempo augmente.
Utiliser les touches [TEMPO +] et [TEMPO -] pour
augmenter ou décroître la valeur du tempo. (Valeurs
de tempo de 40 à 240)
Remarque
Si un autre morceau est sélectionné, le tempo
•
:
précédemment réglé est retenu.
Appuyer sur les deux touches [TEMPO +] et [TEMPO
•
-] pour revenir au tempo par défaut.
+
TEMPO
-
SONG KITS PAD ASS.
Français
Voie "MARCHE/ARRÊT"
L'accompagnement musical de la batterie numérique comporte 4 pistes: DRUM1, DRM2,
BASS et CHORD (TAMBOUR 1, TAMBOUR 2, BASSE, ACCORD).
TAMBOUR 1
TAMBOUR 2
BASSE
CHORD
Une pression sur un bouton de piste ([DRUM 1],
[DRUM 2], [BASS], [CHORD]) coupe la piste
correspondante et son indicateur lumineux s'éteint.
Si DRUM 1 et DRUM 2 sont coupés, vous pouvez
ainsi pratiquer en mode karaoké.
Piste tambour principal
Piste percussion principale
Piste basse
Piste accord principal
DRUM
1
PEDAL 1
DRUM
2
SONG KITS PADASS.
BEAT
BASS
PEDAL 2
9
CHORD
11 13
F13
Page 58

Taper Le Début
La fonction TAP START permet de régler le tempo général des morceaux et de démarrer
l'accompagnement. L'accompagnement jouera au tempo auquel sont frappés les tambours ou
enfoncées les pédales.
Appuyer sur [le bouton de DÉBUT de
[1]
ROBINET]
Une pression sur [TAP START] allume l'indicateur.
Taper Le Début
[2]
Frapper un tambour ou appuyer sur une pédale 4
fois, l'accompagnement démarrre au tempo
souhaité. Lorsque le morceau est joué, l'indicateur
TAP START s'éteint.
Arrêterleplaybackdechanson
[3]
Pour arrêter la lecture, appuyer sur [START/STOP].
TAP STAR T
START/STOP
Fonction De Étude
Français
La fonction Learning de la batterie numérique permet aux débutants d'apprendre facilement
avec un morceau de la liste (00-99).
[1]
En mode SONG, choisir un morceau dans la liste puis
appuyer sur [LEARNING], l'indicateur [LEARNING]
s'allume.
Remarque
Lorsque LEARNING est activé, les touches KITS et
PAD ASSIGN ne répondent pas.
[2]
Appuyer sur [START/STOP], l'indicateur sous le
tambour et celui des pédales sur l'écran
commencent à clignoter, frapper les tambours ou
appuyer sur les pédales en même temps que les
indicateurs lumineux.
Appuyer sur le bouton [de ÉTUDE] et jouer la
chanson
LEARNING START/STOP
:
Commencer à apprendre
Remarque
Pendant le jeu d'un morceau, le mode Learning peut
être activé ou désactivé à tout moment en appuyant
sur [LEARNING].
:
F14
Page 59

ENREGISTREMENT
La fonction d'enregistrement de la batterie numérique permet d'enregistrer puis écouter une
musique (environ 1000 notes).
•
Les données peuvent être enregistrées en mode
enregistrement.
Données tambour et pédales.
•
•
Données morceau (le numéro ne peut pas être
changé en mode RECORD).
•
Réglage ON/OFF des pistes.
•
Réglage tempo (le tempo ne peut pas être changé
en mode RECORD).
•
Réglage volume morceau.
•
Réglage ON/OFF amplification.
Les données MIDI ne peuvent pas être
*
enregistrées dans la mémoire.
Fonction Record
[1]
Préparer Pour Enregistrer
Sélection des réglages morceau, kit batterie, tempo,
piste et amplification.
[2]
Commencer à Enregistrer
Appuyer sur [ENREGISTREMENT], l'indicateur
•
commence à clignoter.
Appuyer sur [START/STOP], l'indicateur cesse de
•
clignoter et l'enregistrement commence.
L'enregistrement peut démarrer également
•
lorsque les tambours sont frappés.
Remarque
Au moment où commence l'enregistrement, le
•
métronome vocal commence également. Mais le
son du métronome n'est pas enregistré. Pour
arrêter le métronome, appuyer sur [METRONOME].
[3]
Cesser L'enregistrement
Pour arrêter l'enregistrement, appuyer sur
•
[START/STOP] ou [RECORD]. L'indicateur
d'enregistrement s'éteint.
Lorsque la mémoire est pleine, "FL" s'affiche sur
•
l'écran et l'enregistrement s'arrête
automatiquement.
:
Fonction De Playback
RECORD
Français
START/STOP
La musique enregistrée peut être écoutée en
appuyant sur [PLAY/STOP]. Pour arrêter la lecture,
appuyer sur [PLAY/STOP] à nouveau.
:Remarque
Lorsqu'une nouvelle musique est enregistrée, elle
remplace la précédente.
Le dernier enregistrement reste dans la mémoire
lorsque l'appareil est éteint.
F15
PLAY/STOP
Page 60

POUR FAIRE LES CONNECTIONS
MIDI
Les terminaux MIDI IN et MIDI ON, situés à l'arrière de l'appareil, offrent de plus larges
possibilités musicales grâce à l'utilisation de la MIDI. Ci-dessous est décrit la MIDI et comment
l'utiliser avec la batterie numérique.
Quel est le MIDI?
MIDI est l'abréviation de Musical Instrument Digital Interface (Interface numérique pour
instruments de musique). La MIDI est un standard international permettant à différents
instruments de musique électroniques et autres appareils, tels que des ordinateurs, de
"communiquer" entre eux. Par exemple, en connectant un générateur de ton MIDI au terminal
MIDI OUT dela batterie numérique, les sons du générateur de ton peuvent être jouées avec les
tambours et pédales de la batterie.
La batterie numérique est équippée de deux types de
terminaux MIDI, tous les deux situés sur le panneau
arrière.
•
MIDI IN
Les données transmises d'autres instrumenst MIDI
via la MIDI sont reçues sur ce terminal.
•
MIDI OUT
Les données produites par la batterie numérique
sont transmises aux autres instruments MIDI via la
MIDI par ce terminal.
Français
Que pouvez-vous faire avec le MIDI?
MIDI IN/OUT
Terminals
•
Connexion de la fiche MIDI OUT de la batterie
numérique vers le terminal MIDI IN d'un clavier MIDI.
Ce réglage permet d'untiliser le tambour pour
commander un autre instrument MIDI. Au moment
où vous jouerez sur les tambours, le son de l'autre
instrument jouera en même temps, créant un son
d'ensemble plus épais.
Connexion de la fiche MIDI IN de la batterie
•
numérique vers le terminal MIDI OUT d'un
clavier MIDI.
Dans cette configuration, la batterie numérique
peut être utilisée comme générateur de ton et le
son peut être commandé depuis un clavier MIDI. En
utilisant le clavier comme commande, il est
possible de jouer les sons de batterie qui ne sont
pas assignés aux tambours/pédales.
•
Connecter la fiche MIDI OUT de la batterie numérique
au terminal MIDI IN d'un séquenceur MIDI.
Les données produites par la batterie numérique
peuvent être enregistrées sur le séquenceur MIDI.
Les données peuvent également être enregistrées
sur un ordinateur ou un autre séquenceur.
Connecter la fiche MIDI IN de la batterie
•
numérique au terminal MIDI OUT d'un
séquenceur MIDI.
Les données du séquenceur peuvent être utilisées
pour conduire le son de la batterie.
Digital Drum
MIDI Keyboards
Digital Drum
Sequencer
MIDI OUT
MIDI OUT
MIDI OUT
MIDI IN
MIDI IN
MIDI OUT
MIDI IN
MIDI IN
MIDI Keyboards
Digital Drum
Sequencer
Digital Drum
F16
Page 61

POUR FAIRE LES CONNECTIONS
Pédale
Cet appareil accepte 1 pédale hi-hat et 1 pédale kick comme appareils d'entrée.
PHONES/
OUTPUT
DC-12V
Sortie Phono
PEDAL
21
MIDI
IN OUT
La sortie phono accepte des écouteurs stéréo comme appareil de sortie.
PHONES/
PEDAL
21
MIDI
IN OUT
OUTPUT
DC-12V
Français
F17
Page 62

DETAILS TECHNIQUES
Français
Garniture De
Tambour
Voix:
Kits De
Tambour
Song:
Affichage:
Connections:
Métronome:
Alimentation:
Dimensions:
(WXDXH)
:
:
7 garnitures de tambour avec la sensibilité de contact et deux
pédales (tambour bas et salut-chapeau)
76 voix de tambour de PCM
20 kits préréglés de tambour
Kits faits sur commande de 1 tambour
100 chansons préréglées
(inclure 80 modèles et 20 chansons)
Affichage à LED De 3 chiffres
Rendement d'écouteurs
Crics du MIDI IN/OUT
2 voix différentes
Adaptateur AC
23.6x15.2x5.1 /
0.0 x 38.5 x 13.0 centimètres
6
(DC 12V.)
pouces
+
Poids:
Accessoires:
Un volume excessif dans les écouteurs ou casques peut produire des pertes d'audition. La
prise de COURANT est utilisée comme sert à débrancher l'appareil, le système de
débranchementdoit continuer àfonctionner.
7.26 lbs / 3.3 kgs
Adaptateur AC
1x
Pédale de coup-de-pied
1x
Pédale de Bonjour-Chapeau
2x
Bâton de tambour
1x
Écouteur
(DC 12V)
F18
Page 63

LISTE DE VOIX
Pad Assign No. Percussion
1
2
3
4
5
6
7
8
9
10
11
12
13
14
15
16
17
18
19
20
21
22
23
24
25
26
27
28
29
30
31
32
33
34
35
36
37
Kick Drum 2
Kick Drum 1
Power Kick
Electronic Bass Drum
TR-808 Bass Drum
Snare Drum 1
Snare Drum 2
Gated Snare Drum
Electronic Snare Drum Low
Electronic Snare Drum High
TR-808 Snare Drum
Brush Tap
Brush Swirl
Side Stick
Sticks
High Tom
High Mid Tom
Low Mid Tom
Low Tom
High Floor Tom
Low Floor Tom
Rock High Tom 1
Rock High Tom 2
Rock Mid Tom 1
Rock Mid Tom 2
Rock Low Tom 1
Rock Low Tom 2
Electronic High Tom 1
Electronic High Tom 2
Electronic Mid Tom 1
Electronic Mid Tom 2
Electronic Low Tom 1
Electronic Low Tom 2
TR-808 High Tom 1
TR-808 High Tom 2
TR-808 Mid Tom 1
TR-808 Mid Tom 2
38
39
40
41
42
43
44
45
46
47
48
49
50
51
52
53
54
55
56
57
58
59
60
61
62
63
64
65
66
67
68
69
70
71
72
73
74
75
76
TR-808 Low Tom 1
TR-808 Low Tom 2
*Hi-Hat Open/Closed
Crash Cymbal 1
Crash Cymbal 2
Ride Cymbal
Ride Bell
Chinese Cymbal
Splash Cymbal
Vibra-slap
Hand Clap
Tambourine
Cowbell
TR-808 Cowbell
Mute High Conga
Open High Conga
Low Conga
High Bongo
Low Bongo
High Timbale
Low Timbale
High Agogo
Low Agogo
Cabasa
Shaker
Claves
Mute Triangle
Open Triangle
Short Guiro
Long Guiro
Mute Cuica
Open Cuica
Mute Surdo
Open Surdo
Maracas
High-Q
Slap
Scratch Pull
Scratch Push
Français
* Lorsque des sons Hi-Hat fermées et ouvertes sont assignées aux tambours et pédales,
ces sons peuvent être contrôlés avec la pédale de pied comme suit:
Frapper le tambour en appuyant sur la pédale pour obtenir le son Hi-Hat "fermé".
•
Frapper le tambour sans appuyer sur la pédale pour obtenir un son Hi-Hat "ouvert".
•
•
Appuyer sur la pédale sans frapper le tambour pour obtenir le son Hi-Hat "pédale".
F19
Page 64

LISTE DE KIT DE TAMBOUR
Kit Name
No
Standard 1
001
Standard 2
002
Standard 3
003
Standard 4
004
Standard 5
005
Français
006
007
008
009
010
011
012
013
014
015
016
017
018
019
020
Standard 6
Standard 7
Standard 8
Rock
Heavy Metal
Dance 1
Dance 2
Samba Perc.
Timbales
Conga
TR-808
Brush
Jazz
Ballad Perc.
Cymbal
Crash Cymbal 1
41
HH Open/Closed
40
Crash Cymbal 1
41
HH Open/Close
40
Crash Cymbal 1
41
Splash Cymbal
46
HH Open/Close
40
HH Open/Close
40
Crash Cymbal 1
41
Crash Cymbal 1
41
HH Open/Close
40
Chinese Cymbal
45
Mute Cuica
68
Crash Cymbal 1
41
High Bongo
55
Crash Cymbal 2
42
Ride Cymbal
43
HH Open/Close
40
Shaker
62
HH Open/Close
40
Pad 1
Pad 5
Pedal 1
Pad 2
Pad 3
Pad 6
Pad 7
Pad 4
Pedal 2
Pad1 Pad2 Pad3 Pad4
High Tom 1
16
High Tom 2
17
High Tom 1
16
High Tom 1
16
High Tom 2
17
High Tom 2
17
High Tom 1
16
Side Stick
14
Rock High Tom 1
22
Rock High Tom 2
23
Electronic High Tom 1
28
Electronic High Tom 2
29
High Agogo
59
Splash Cymbal
46
Mute High Conga
52
TR-808 High Tom 1
34
High Tom 2
17
High Tom 1
16
Claves
63
Crash Cymbal 1
41
Mid Tom 1
18
Mid Tom 2
19
Mid Tom 1
18
Mid Tom 1
18
Mid Tom 2
19
Mid Tom 2
19
Mid Tom 1
18
Mid Tom 1
18
Rock Mid Tom 1
24
Rock Mid Tom 2
25
Electronic Mid Tom 1
30
Electronic Mid Tom 2
31
Low Agogo
60
Maracas
72
Open High Conga
53
TR-808 Mid Tom 1
36
Mid Tom 2
19
Mid Tom 1
18
Tambourine
49
Ride Cymbal
43
Ride Cymbal
43
Crash Cymbal 1
41
Cowbell
50
Crash Cymbal 1
41
Cowbell
50
Tambourine
49
Ride Cymbal
43
Ride Bell
44
Tambourine
49
Cowbell
50
Splash Cymbal
46
High-Q
73
Open Cuica
69
Snare Drum High
7
Low Bongo
56
808 Cowbell
51
Crash Cymbal 1
41
Ride Cymbal
43
Cabasa
61
Ride Bell
44
Pad5 Pad6 Pad7 Pedal 1
Snare Drum High
7
Snare Drum Low
6
Snare Drum High
7
Snare Drum High
7
Snare Drum High
7
Snare Drum High
7
Snare Drum Low
6
Snare Drum Low
6
Snare Drum High
7
Gated Snare Drum
8
Electronic Snare
10
Drum High
Electronic Snare
9
Drum Low
Mute Surdo
70
Low Timbale
58
Snare Drum High
7
808 Snare Drum
11
Brush Tap
12
Brush Swirl
13
Mute Triangle
64
Snare Drum High
7
HH Open/Close
40
Cowbell
50
HH Open/Close
40
Side Stick
14
HH Open/Close
40
HH Open/Close
40
Crash Cymbal 1
41
Crash Cymbal 1
41
HH Open/Close
40
HH Open/Close
40
Hand Clap
48
HH Open/Close
40
Cabasa
61
Cowbell
50
Low Timbale
58
HH Open/Close
40
HH Open/Close
40
Shaker
62
Splash Cymbal
46
Splash Cymbal
46
Low Tom 1
20
Low Tom 2
21
Low Tom 1
20
Low Tom 1
20
Low Tom 2
21
Low Tom 2
21
Low Tom 1
20
Low Tom 1
20
Rock Low Tom 1
26
Rock Low Tom 2
27
Electronic Low
32
Tom 1
Electronic Low
33
Tom 2
Open Surdo
71
High Timbale
57
Low Conga
54
TR-808 Low Tom 1
38
Side Stick
14
Low Tom 1
20
Open Triangle
65
Chinese Cymbal
45
F20
40
40
40
40
40
40
40
40
40
40
40
40
49
63
50
40
40
40
74
40
HH Pedal
HH Pedal
HH Pedal
HH Pedal
HH Pedal
HH Pedal
HH Pedal
HH Pedal
HH Pedal
HH Pedal
HH Pedal
HH Pedal
Tambourine
Claves
Cowbell
HH Pedal
HH Pedal
HH Pedal
Slap
HH Pedal
Pedal 2
Bass Drum Low
1
Bass Drum Low
1
Bass Drum High
2
Bass Drum Low
1
Bass Drum Low
1
Bass Drum Low
1
Bass Drum Low
1
Bass Drum Low
1
Bass Drum High
2
MONDO Bass Drum
3
Electronic Bass
4
Drum
Electronic Bass
4
Drum
Cowbell
50
Bass Drum Low
1
Bass Drum Low
1
TR-808 Bass Drum
5
Bass Drum Low
1
Bass Drum Low
1
Cowbell
50
Bass Drum Low
1
Page 65

LISTE DE CHANSON
No
00
01
02
03
04
05
06
07
08
09
10
11
12
13
14
15
16
17
18
19
20
21
22
23
24
25
26
27
28
29
30
31
32
33
34
35
36
37
38
39
40
41
42
43
44
45
46
47
48
49
50
Song Name
8 Beat
8 Beat 1
8 Beat 2
8 Beat 3
8 Beat 4
8 Beat 5
8BeatBallad1
8BeatBallad2
8BeatBallad3
Soft Rock
Rock 1
Rock 2
Rock 3
Rock 4
Rock 5
Hard Rock 1
Hard Rock 2
16 Beat
16 Beat 1
16 Beat 2
16 Beat 3
16 Beat 4
16 Beat 5
16 Beat 6
16 Beat 7
16 Beat Ballad 1
16 Beat Ballad 2
16 Beat Ballad 3
16 Beat Ballad 4
16 Beat Ballad 5
16 Beat Funk 1
16 Beat Funk 2
Dance
Dance 1
Dance 2
Dance 3
Dance 4
Dance 5
Dance 6
Rap
Rap 1
Rap 2
Rap 3
Bounce
Bounce 1
Bounce 2
Bounce 3
Shuffle
Shuffle 1
Shuffle 2
Shuffle 3
Shuffle 4
Shuffle 5
Shuffle 6
Shuffle 7
Slow Rock
Slow Rock 1
Slow Rock 2
51
52
53
54
55
56
57
58
59
60
61
62
63
64
65
66
67
68
69
70
71
72
73
74
75
76
77
78
79
80
81
82
83
84
85
86
87
88
89
90
91
92
93
94
95
96
97
98
99
Slow Rock 3
Slow Rock 4
Latin
Reggae 1
Reggae 2
Bossa Nova 1
Bossa Nova 2
Samba
Salsa
Latin Rock
Cha-Cha
Mambo
Rhumba 1
Rhumba 2
Afro Cuban
Tango
Swing
Swing 1
Swing 2
Swing 3
Others
Waltz
3/4 Ballad
Swing Blues
Blues
March 1
March 2
R&B
Hip-Hop
Funk
Country
Big Band
8 Beat
8 Beat 1
8 Beat 2
Ballad
Hard Rock 1
Hard Rock 2
Hard Rock 3
PopDance1
PopDance2
R&B
16 Beat
16 Beat
Fusion
Funk
Funk 1
Funk 2
Shuffle
Shuffle 1
Shuffle 2
16 Beat Shuffle
16 Beat Triplet
Others
Reggae
Bossa Nova
Big Band
Français
F21
Page 66

GRAPHIQUE DU MODE D’ÉXÉCUTION
Français
Fonction
Canal
ormalN
Mode
Numéro
de Note
Vélocité
Après
Lien
Pitch Bend
Contrôle
Par Défaut
Modifié
Par Défaut
Messages
Altéré
Vrai son
Note on
Note off
Clé
Canal
0
1
7
10
11
64
66
67
80
81
91
93
120
121
123
Transmission
10ch
X
X
X
**********
1-76
**********
O 9nH,V=1-127
X (9nH,V=0)
X
X
X
X
X
X
X
X
X
X
X
X
X
X
X
X
X
X
Reconnu
1-16ch
X
X
X
X
0 - 127
0 - 127
O 9nH,V=1-127
X (9nH,V=0;
8nH,V=0 -127)
X
X
0
0
0
0
0
0
0
0
0
0
0
0
0
0
0
0
Remarques
Sélection De Banc
Modulation
Volume
Pan
Expression
Pédal Enfoncé
Pédale De Sostenuto
Pédale Douce
Programme
Programme Chorus
Niveau Reverb
Niveau Chorus
Tout Son Off
MisÀ0DuContrôle
Toute Note Off
Reverb
Programe
Changement
Exclusivité de Système
Système
Commun
Horloge en
Temps Réel
Aux
Messages
Mode 1: OMNI ON, POLY Mode 2: OMNI ON, MONO 0 : OUI
Mode 3: OMNI OFF, POLY Mode 4: OMNI OFF, MONO X : NON
True
Position d’une
chanson
Sélection d’une
chanson
Tune
Horloge
Commande
Local ON/OFF
Tout note OFF
Actif
Reset
**********
0
X
X
X
X
X
X
X
X
X
X
0
0 - 127
0
X
X
X
X
X
X
0
0
0
F22
Page 67

REMARQUE
Français
Page 68

The Singing Machine Company, Inc.
6601 Lyons Road, Bldg. A7, Coconut Creek, FL33073-9902, USA.
TEL: (954) 596-1000 FAX: (954) 596-2000
VISIT OUR WEBSITE www.singingmachine.com
VISITE NUESTRO SITIO INTERNET
VISITE NOTRE SITE INTERNET
www.singingmachine.com
www.singingmachine.com
1452-0708-ESF02
PRINTED IN CHINA
IMPRESO EN CHINA
IMPRIMÉ EN CHINE
 Loading...