

Page 1
Electronic
Keyboard
Teclado
Clavier
Electronico
Electronique
SMI-1420
Page 2
Congratulations!
Thank you for purchasing your SOUNDX Portable Electronic Keyboard. In order to obtain maximum
performance and enjoyment from this keyboard, please follow the steps outlined in this manual while
actually testing its features. We are sure you will enjoy it and discover the limited possibilities of your
new keyboard.
Maintenance of your Electronic Keyboard
For optimum use of your Electronic Keyboard,
ENGLISH
below:
LOCATION
•
Do not expose the unit to the following
conditions to avoid deformation,
discoloration, or more serious damage.
•
Direct sunlight.
•
High temperature (near a heat source,
or in a car during the daytime).
•
Excessive humidity.
•
Excessive dust.
•
Strong vibration.
POWER SUPPLY
Turn the power switch OFF when the
•
instrument is not in use.
The AC adapter should be unplugged
•
from the AC outlet if the instrument is
not in use for an extended period of time.
Unplug the AC adapter during electric
•
storms.
Avoid plugging the AC adapter into the
•
same AC outlet as appliances with high
power consumption, such as electric
heaters or ovens. Also avoid using multiplug adapters since this can result in
reducing the sound quality, operation
errors, and possible damage.
TURN POWER OFF WHEN MAKING
CONNECTIONS
To avoid damage to the instrument and
•
other devices to which it is connected,
turn OFF the power switches of all
related devices prior to connecting or
disconnecting cables.
please follow the maintenance instructions listed
HANDLING AND TRANSPORT
•
Never apply excessive force to the
controls, connectors or other parts of
the instrument.
•
Always unplug cables by gripping the plug
firmly, but not pulling on the cable.
•
Disconnect all cables before moving the
instrument.
•
Physical shocks caused by dropping,
bumping, or placing heavy objects on the
instrument can result in scratches and
more serious damage.
CLEANING
Clean the unit with a dry soft cloth.
•
A slightly damp cloth may be used to
•
remove stubborn grime and dirt.
Never use cleaners such as alcohol or
•
thinner.
Avoid placing vinyl objects on top of the
•
unit (vinyl can stick to and discolor the
surface).
ELECTRICAL INTERFERENCE
This instrument contains digital circuitry
•
and may cause interference if placed too
close to a radio or television receiver. If
this occurs, move the instrument away
from the affected equipment.
THIS DEVICE COMPLIES WITH PART 15 OF THE FCC RULES.
OPERATION IS SUBJECT TO THE FOLLOWING TWO CONDITIONS:
(1) THIS DEVICE MAY NOT CAUSE HARMFUL INTERFERENCE, AND
(2) THIS DEVICE MUST ACCEPT ANY INTERFERENCE RECEIVED,
INCLUDING INTERFERENCE THAT MAY CAUSE UNDESIRED OPERATION.
E02
Page 3
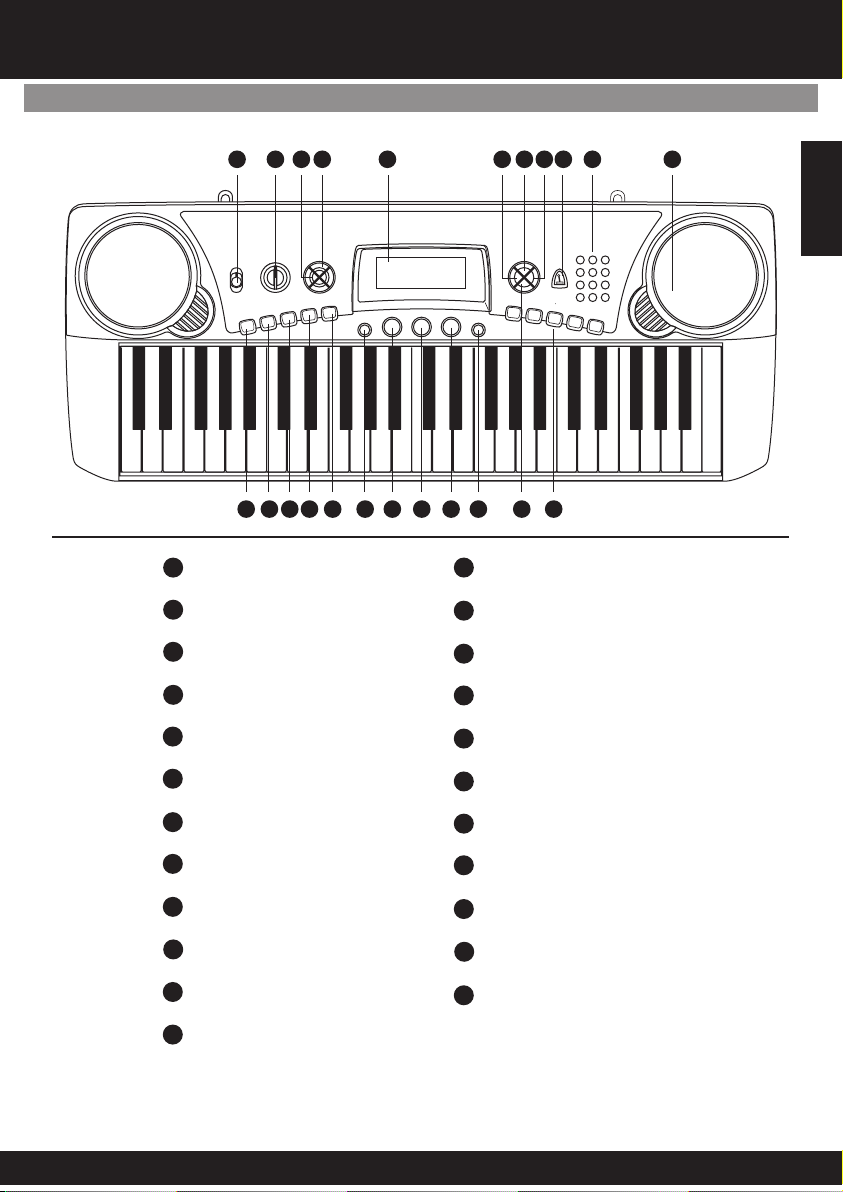
PANEL CONTROL
Front Panel
1122 3 4 5 6 7 8
13 14 15 16
1
POWER ON – OFF
2
VOLUME[+/-]
3
X’POSER [+/-]
4
TEMPO[+/-]
5
DISPLAY
18 19 20
17
21 22 23
13
SYNC / FILL-IN
14
CHORD
15
RECORD
16
PLAY
17
MIDI
9 10 11
ENGLISH
6
LEARN
7
DEMO
8
BEAT
9
METRONOME
10
NUMBER KEYS
11
SPEAKERS
12
START / STOP
E03
18
SONG
19
STYLE
20
VOICE
21
O.T.S.
22
SUSTAIN
23
PERCUSSION KEYS
Page 4
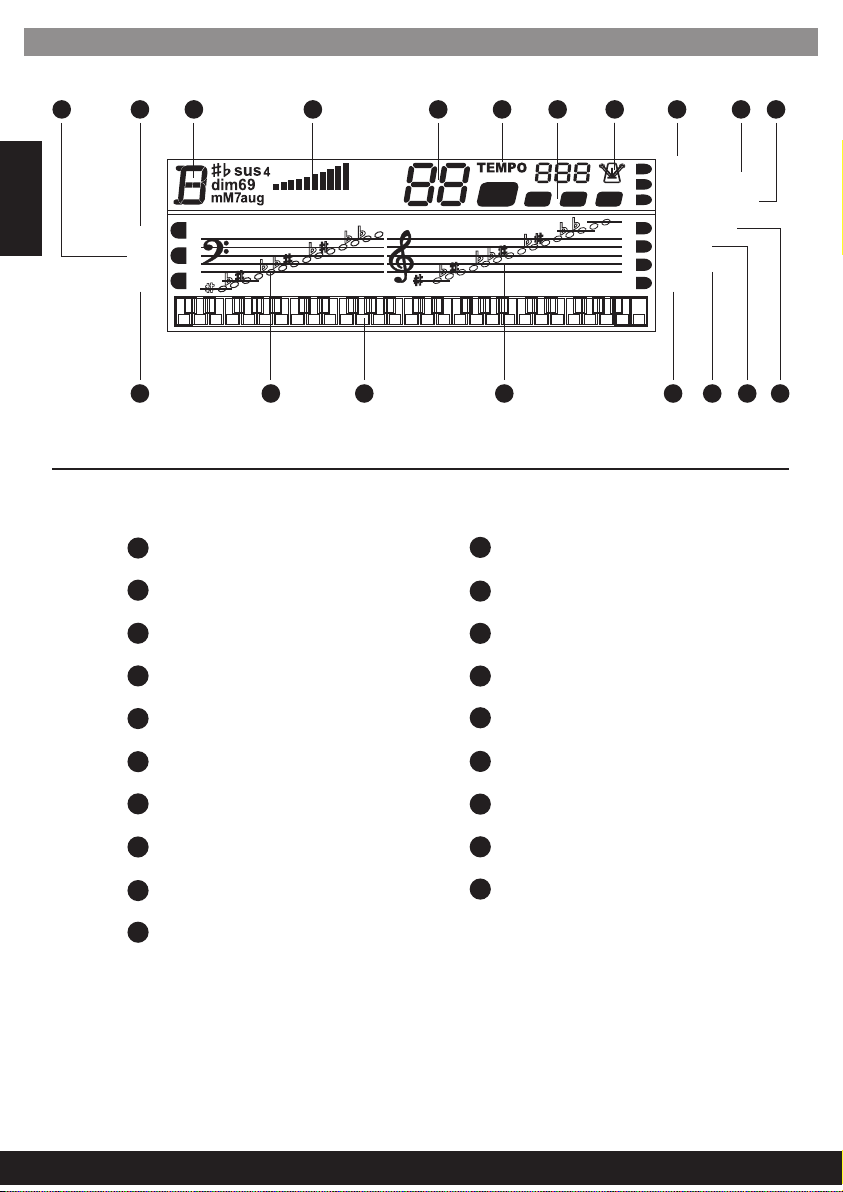
Display
24 25 26 27
NORMAL
ENGLISH
S.F.
FINGERED
35 36 37 38 39 40 41 42
SINGLE FINGERING
24
25
NORMAL
26
CHORD
27
VOLUME
VOLUME
VOICE
STYLE
SONG
28 29
34
35
36
37
30 3231 3433
ONEKEY
MELODY GUIDE
MELODY OFF
SUSTAIN
O.T.S.
RECORD
PLAY
MELODY OFF
FINGERED
LOW NOTES SCORE
KEYBOARD
28
VOICE/STYLE/SONG NUMBER
TEMPO
29
30
METRONOME
BEAT
31
ONE KEY
32
33
MELODY GUIDE
E04
38
HIGH NOTES SCORE
39
PLAY
40
RECORD
41
O.T.S.
42
SUSTAIN
Page 5
SETTING UP
Power Supply
Your electronic keyboard will operate on either batteries or the supplied power adaptor.
Follow the instructions below according to the power source you intend to use.
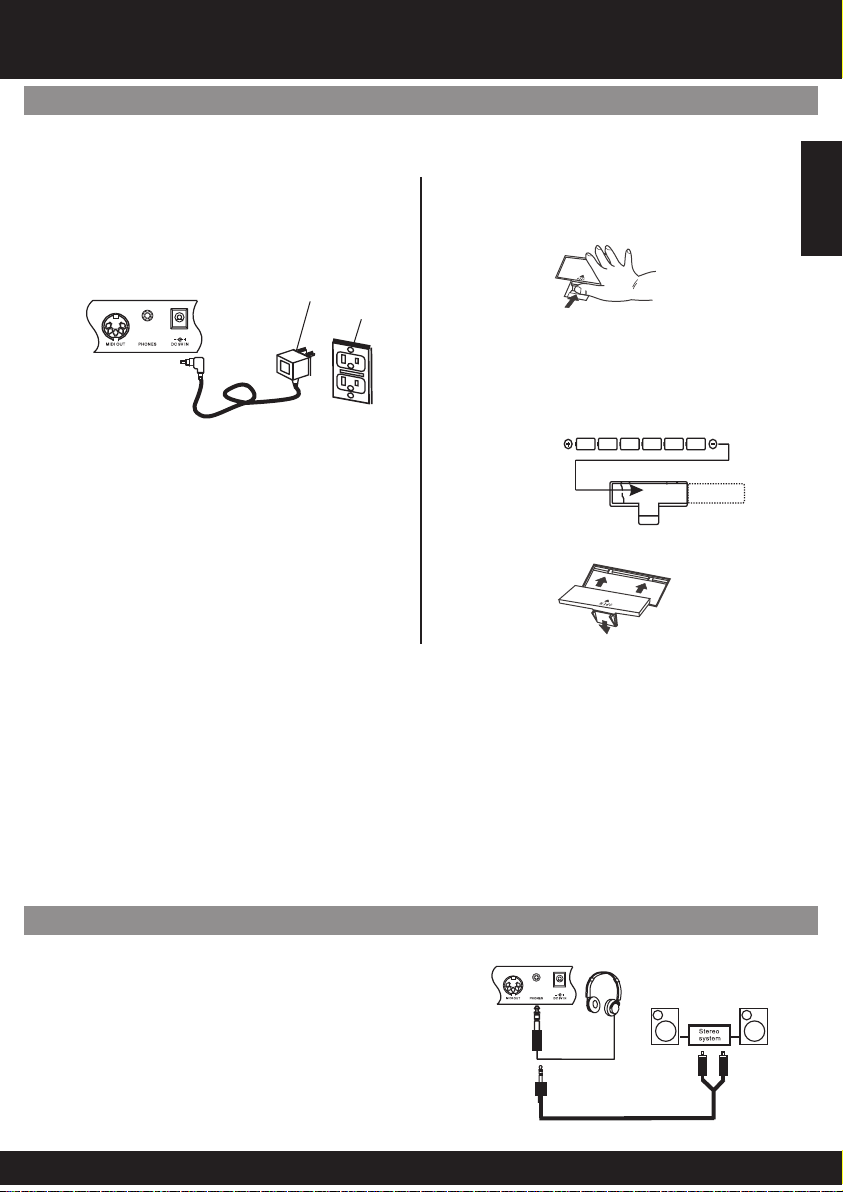
Using the AC-Adaptor
Connect the power adaptor to the DC IN
jack located on the rear panel of the unit,
and plug the AC power adaptor into an
AC power outlet.
AC Adapter
AC Outlet
Do not use adaptors other than the one
specified.
The technical specification of the adaptor
is DC 9V-12V 500mA output, center
positive type. Be sure to turn off the unit
before you connect the adapter into the
AC outlet and the cord into the unit. This
will automatically cut off the battery power
supply.
Using Batteries
1. Open the battery compartment cover
located on the bottom of the unit.
2. Insert six “C” size, or equivalent
batteries. When inserting the
batteries, follow the polarity markings
in the illustration.
Note: We suggest using alkaline
batteries.
3. Close the battery compartment
securely.
ENGLISH
NOTE:
•
Power will be automatically drawn from the AC adaptor if the optional AC adaptor is connected
while batteries are installed in the instrument.
CAUTION:
•
It is recommended that you replace worn batteries as soon as possible. When battery voltage
drops, the display will dim and / or the sound will become distorted, when this occurs, replace
the batteries with a complete set of six new batteries of the same type.
NEVER mix old and new batteries, different types of batteries (alkaline, magnesium, etc.), different
•
brand batteries or batteries from the same brand but of different types. Misuse may cause the
instrument to become hot, result in fire, or battery leakage.
Also, to prevent damage due to battery leakage, remove all the batteries from the instrument
•
when it is not to be used for an extended period of time.
If batteries are installed in this instrument, and the instrument is unused for a long period. They
•
will loose their power.
Using Headphones Or Connecting An Amplifier
An optional set of stereo headphones can be connected
to the PHONES/INPUT jack located on the rear panel.
When headphones are connected to the jack, the
internal speakers of the unit will switch off automatically
(Perfect for private practice or late night playing). If you
would prefer to use an external sound system, the
PHONE/INPUT jack can also be used to connect the
electronic keyboard set to a stereo system or mixing
console.
Turn off the power on all equipment before
Note:
making any connections.
E05
Page 6

OPERATION
PlaytheKeyboard
[1] To turn on the keyboard, set the POWER to ON. The display will illuminate.
Note:
To save power while unit is not in use, it will notify you with bell sound every 5 minutes.
ENGLISH
PlayingtheDemoSong
Adjust the volume to the desired level. Repeatedly press volume up or volume down to
[2]
increase or decrease the volume. The keyboard's volume ranges from 0 (no sound) to 10
(maximum), and the current volume level appears on the display.
Youcanlistentoanyofthe50songslistedontherightsideofthepanel.
Press . The display appears SONG along with the number of the current song.
[1] SONG
Note:
The keyboard pre-selects the tune “Canon” (No. 01) each time the powered ON.
Choose a song from the SONGS list and enter its two-digit number on the keypad, or,
[2]
press “ ” “ ” to move to the lower or higher numbered song.
-+
Press to start playing the song.
[3] START/STOP
A “score” to display the notes that are playing is located in the center of the display.
•
A “keyboard” is displayed fingering and which keys are pressed (bottom of the display)
•
The black dots next to the song number display the beat count in the measure.
•
The musical chord is displayed at the left corner of the display.
•
[4] TEMPO UP TEMPO DOWN
To change the tempo, repeatedly press or . The current
tempo setting appears.
[5] START/STOP
To select a different song, repeat step 2. To stop, press .
UsingDemo
To play a demo song one by one (in order from the selected starting point), press
.Tostopthedemo,press again.DEMO DEMO
E06
Page 7

Selecting/PlayingaPresetVoice
Your keyboard can sound like 50 different musical instruments. The list and the two-digit
number for each preset voice is listed on the voices list located on the keyboard’s left
top panel
Note:
The keyboard has 8-note (maximum) polyphonic sound. This means that you can play up
to 8 different notes at the same time with most of the keyboard’s preset voices.
Press . and the current voice number appears.
[1] VOICE VOICE
Note:
Each time you turn the keyboard on, it automatically selects the voice Grand PIANO (No.01).
To play a different voice, choose a preset voice from the VOICES list and enter its
[2]
two-digit number on the number pad. As you press the buttons, the selected digits
appear. For example, to select VIBRAPHONE (No. 06), press “ ” and “ ”, the “ ”
appear on the display.
Or, press “ ” or” ” to move to the next higher or lower numbered voice.
[3]
[4]
+-
Play the keyboard to hear the selected voice.
To select a different voice, repeat steps 1 and 2.
0606
Selecting/PlayinganAuto-Style
Your keyboard has 30 preset auto-styles that provide a steady beat for your music. The
name and two-digit number of each preset auto-style is noted on the styles list on the
keyboard’s top left panel.
ENGLISH
Press . and the current style’s number appear.
[1] STYLE STYLE
Note:
Each time you turn on the keyboard, it automatically selects the style DISCO 1(No.01).
To select a different style, choose a style from the STYLES list and enter its two-
[2]
digit number pad from the number button. Or, repeatedly press “ ” or “ ” to move to the
next higher or lower number style. For example, press 03 to select DANCE (No. 03),
press “ ” and “ ”, the style appears.
03 03
Press the button to start the selected Auto-Style.
[3] START/STOP
To change the tempo, repeatedly press or . The current
[4] TEMPO + TEMPO -
tempo setting appears.
To select a different style, repeat steps 1 and 2.
[5]
To stop the auto-style, press again.
[6] START/STOP
You can adjust the tempo to play an auto-style from 40 to 240 beats per minute.
•
To reset the tempo to its default (original) speed, press TEMPO + and TEMPO - at
•
thesametime.
E07
+-
Page 8

UsingSYNC
This feature allows you to synchronize the start of an auto-style with the beginning of
your music.
After selecting and entering an auto-style, press . The black dots below
the tempo and the metronome flash confirming the keyboard is in a standby mode.
Begin playing the keyboard. The keyboard automatically begins to play the style when you
press any key.
ENGLISH
SYNC/FILL-IN
UsingFILL-IN
This feature allows you to insert a short (1- to 2- measure) variation in the beat pattern
of a selected auto-style.
Simply press while the auto-style is playing. The keyboard inserts a
variation, then the original style automatically resumes at the end of the current
measure. Or to insert a longer variation, hold down . The keyboard plays
the variation until you release the button.
SYNC/FILL-IN
SYNC/FILL-IN
SYNC/FILL-IN
UsingAutoAccompaniment
The 19 keys on the left side of the keyboard with notes above them are called
accompaniment keys. The accompaniment keys you press determine the type of chord
that plays.
You can set the keyboard to play with no accompaniment or two different types of auto
accompaniment using the accompaniment keys.
•
Normal
select voice and style).
- [normal mode]. Chords are turned off in this mode (but you are able to
•
S. Finger
accompaniment keys using the standard chord formations (see “Single Fingering”).
•
Fingered
accompaniment keys using chord formations of three or more notes. The chord
name appears on the display. The number of keys you press determines the type of
chord that plays.
Note:
Your keyboard defaults to the normal mode. Follow the steps under “Single Fingering” or
“Standard Fingering” to set it to an accompaniment mode.
- [single fingering mode]. This mode allows you to play chords on the
- [standard fingering mode]. This mode allows you to play chords on the
E08
Page 9

SingleFingering
[1] CHORD
Repeatedly press until a black dot appears next to S. FINGER on the left
side of the display.
[2] STYLE
Press .
[3]
Enter a two-digit auto-style number.
[4] START/STOP
To begin the auto-style before the auto accompaniment, press . Or,
to synchronize the start of the selected auto-rhythm with your accompaniment, press
SYNC/FILL-IN
[5]
Begin the accompaniment at the desired interval by pressing the desired
accompaniment key(s).
[6]
To play a melody along with the accompaniment, press any key(s) to the right.
[7] TEMPO VOLUME
Adjust the and to the desired level.
[8]
To change chords without interrupting the style, simply press the auto
accompaniment key(s) required to form the new chord. The name of the chord appears
on the display. To stop auto accompaniment but not the auto-style, repeatedly press
CHORD NORMAL
accompaniment and the auto-style, press .
.
until the black dot appears next to on the display. Or, to stop auto
START/STOP
StandardFingering
The standard fingering method uses standard formations of three or more notes, and
lets the experienced musician play a wider variety of accompaniment chords.
ENGLISH
Follow these steps to start standard fingering auto accompaniment.
[1] Repeatedly press CHORD until a black dot appears next to FINGERED on the left
side of the display.
[2] Follow steps2-8orSingleFingering.
UsingtheMetronome
To turn on the keyboard’s metronome, press voice or style, then press . The
metronome’s bar swings along with the tempo you selected, and the corresponding
beat appears. Press again to turn the metronome off.
METRO
METRO
UsingBeat
When the metronome is on, repeatedly press BEAT until you hear the desired beat to
adjust it. 9 beats (00.02-09) are available and can be selected at regular intervals. The
beat number you selected appears.
E09
Page 10

LearningToPlay
Your keyboard’s learning feature allows a beginning keyboard player to easily learn and
play a prerecorded tune. You can select any of the following modes:
•
ONE KEY START/STOP
and a melody note. The note appears.
•
MELODY GUIDE
note. The next note of the song appears.
ENGLISH
•
MELODY OFF
Follow these steps to set the learning mode.
Press , then repeatedly press until black dots appear next to
[1] SONG LEARNING
ONE KEY on the right side of the display.
Select a song from the SONGS list and enter its two-digit number.
[2]
Press . The keyboard plays the first note of the tune you selected
[3] START/STOP
and the note appears. Press the corresponding key on the keyboard to continue
learning. The next note you need to press appears. The song will continue to play even if
youpressthewrongkey.
To stop learning, press again or press . If you press
[4] START/STOP LEARNING
LEARNING
Press the correct key to continue learning. The song doesn’t play until you press the
correct key.
If you want to play the tune with accompaniment in the learning mode, repeatedly press
LEARNING
learning mode. Repeatedly press until the black dot appears next to
NORMAL.
- in this mode, press and any key to play accompaniment
- in this mode, the melody does not play until you play a correct
- in this mode, you can play the melody with an accompaniment.
, a black dot appears next to the MELODY GUIDE and a note appears.
until a black dot appears next to MELODY OFF. If you want to quit the
LEARNING
E10
Page 11

SPECIAL FEATURES
Recording
You can record a sequence of notes up to 37 notes in length.
[1] RECORD
Press to start recording. RECORD appears.
[2]
Play the notes you want to record.
[3] PLAY
Press to play the notes you recorded. PLAY appears.
[4] RECORD
To turn off the recording mode, press again, RECORD disappears.
Note:
If the keyboard loses power the recording function is turned off and any recording you made
is erased.
UsingOne-TouchSetting
Your keyboard’s one touch setting feature allows you to automatically play a preset voice
to match a selected auto-style you have changed.
Follow these steps to activate one-touch setting.
Press
[1] STYLE.
Enter a two-digit auto-style number.
[2]
ENGLISH
Press , O.T.S. appears.
[3] One Touch Setting
Press . The preset voice that matches the selected auto-style appears.
[4] VOICE
Press the button to quit one touch setting, press , O.T.S.
[5] START/STOP O.T.S.
disappears.
UsingSustain
For added flexibility and control as you make music, you can set the keyboard, so it
SUSTAINS a sound.
To sustain notes you play, press . SUSTAIN appears and the keyboard
sustains the played note until you release SUSTAIN. Press again to turn off
sustain.
SUSTAIN
SUSTAIN
E11
Page 12

UsingPercussionPad
Your keyboard’s percussion pads follow sounds of 5 different percussion instruments,
(bass drum, snare drum, hi-hat open, high tom-tom, and hi-hat close) to play at your
finger tips.
To play a percussion pad sound, simply press the desired pad at any time. The keyboard
plays the selected percussion sound each time you press the pad.
Assigning a Percussion Pad Sound
ENGLISH
You can assign any of the available percussion sounds onto any of the percussion pads.
This allows you to quickly select and play any percussion sound that the keyboard can
make.
Note:
The keyboard clears any and sound you assign to a percussion pad each time you turn if off.
Follow these steps to record and play a percussion pad sound.
Press then enter “ ” and “ ” on the keyboard.
[1] VOICE 5 0
Select the voice you want by pressing any of the 16 white keys in the middle of the
[2]
keyboard until you hear the sound you want.
When you hear the voice you want to record, hold down the percussion pad you
[3]
wanttoassignthesoundtoandpressthewhitekey.
Play the percussion pad to hear the assigned voice.
[4]
Transposing
The keyboard automatically selects the key of middle C each time you turn it on. For
added flexibility, you can transpose (change) The keyboard’s key using as many as 12
steps (+6/-6). You can adjust the transposition freely by pressing the
buttons.
To transpose the keyboard’s key, press to raise a chromatic scale. Or
X’POSER -
To reset the keyboard’s key to its default, press and at the
same time.
to decrease a chromatic.
X’POSER +
X’POSER + X’POSER -
E12
X’POSER
Page 13
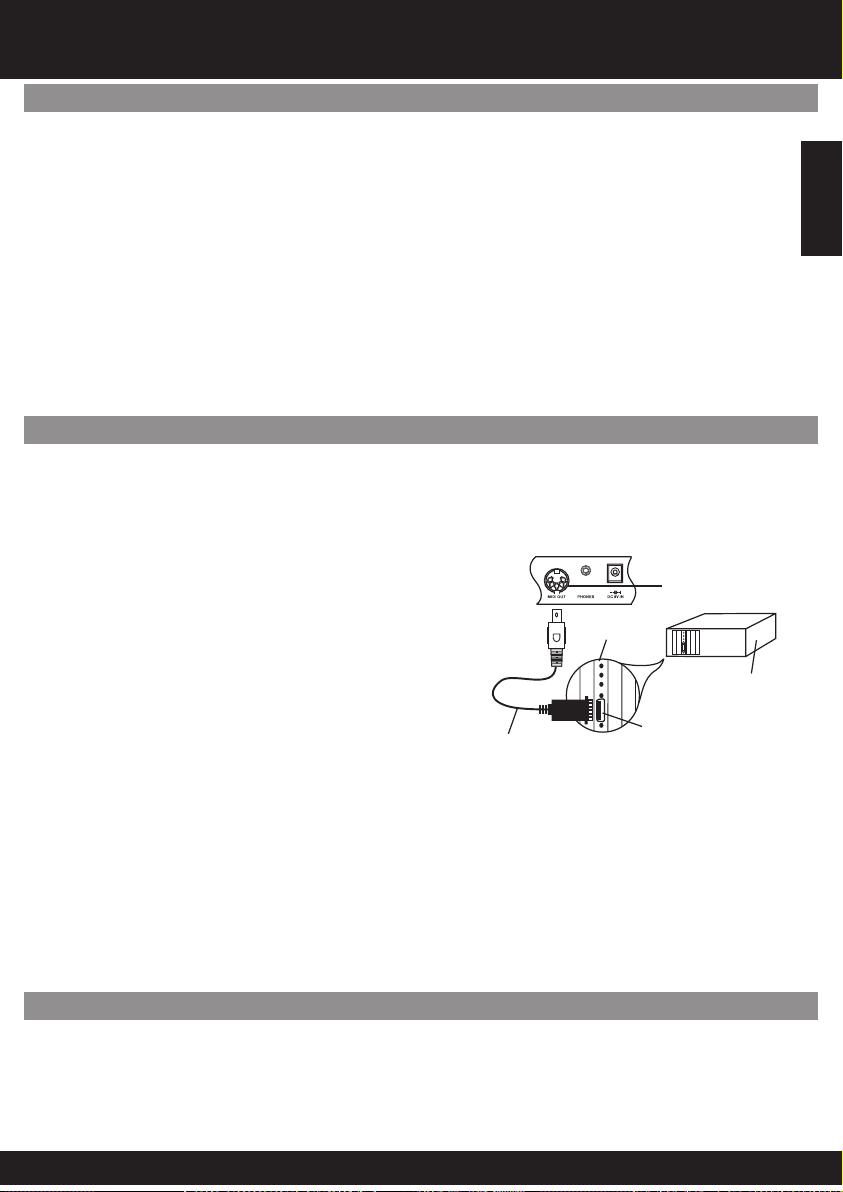
MAKING THE CONNECTIONS
MIDI
MIDI (Musical Instrument Digital Interface) is a world-standard digital communication
interface/language that allows multiple electronic instruments, computers, and other
related devices to communicate with each other within a connection.
The MIDI IN port receives MIDI data from an external MIDI device. The MIDI OUT port
transmits MIDI data to an external MIDI device. The instruments communicate with
each other by sending 'messages' or MIDI data. The sending instrument usually assigns
the data to one of the sixteen MIDI channels, then transmits it over the MIDI cable. The
cable itself, however, is not divided up into sixteen channels, just as with a television set
that receives programs on different channels, it is up to the receiving instrument to
'tune into' the proper MIDI channel. If the sending and receiving channels on the
respective instruments do not match, the receiving instrument may not understand or
respond to the one sending.
ConnectingToaPC(PersonalComputer)
[1]
Switch off both keyboard and PC.
[2]
Connect the keyboard and PC with a MIDI
adaptor (one end with a 5-pin plug and the other end
with a 15-pin plug).
[3]
Switch on both keyboard and PC. Make sure to
minimize the volume setting by pressing the
VOLUME -
[4]
.
To select your desired channel (01-16)
which is displayed on the LCD, press the MIDI button
on the keyboard.
[5]
You can play the keyboard by pressing the black
& white keys. Then, you can hear the music you play
from the speakers of your PC.
MIDI Cable
Sound Card
with MIDI port
MIDI OUT port
Plug MIDI Cable
into this port
Computer
(rear view)
Joy stick/MIDI port
Plug MIDI cable into this
port on the sound card
ENGLISH
Note:
•
Your PC must be equipped with a sound card, a set of speakers & in- stalled MIDI
software. [Not Included]
•
No information of auto-style, pre-re-corded songs, sustain and transpose could be sent
as MIDI data.
Connectingwith(ExternalDevice)
For two MIDI instruments to communicate, they must be connected by MIDI cables. In a
basic example, the MIDI OUT terminals of this keyboard could be connected to the MIDI OUT
and terminals of a sequencer, allowing you to record and play back performance data from
this keyboard.
E13
Page 14

SPECIFICATIONS
Number Of Keys:
ENGLISH
Polyphonic Sound:
Preset Voices:
Auto-Styles:
Prerecorded Songs:
Effect:
Style Controls:
Built-In Speakers:
Power Sources:
Connections:
Dimension:
(WxDxH)
Weight:
Accessories:
49
8-note (Max.)
50 preset voice
30 styles
50 prerecorded songs
TRANSPOSE
TEMPO, FILL-IN, START/STOP
4ohm / 3Wx2
AC adapter (DC 9V.)
6 x “C” size batteries
Headphones Output
MIDI OUT Jack
31.3x12.4x4.7inches/79.5
3.6kgs/7.9lbs
AC Adaptor (DC 9V)
x31.5x12.0cm
Specifications are typical, individual units may vary. This unit is subject to continuous
improvement without notice and without incurring any obligation.
E14
Page 15
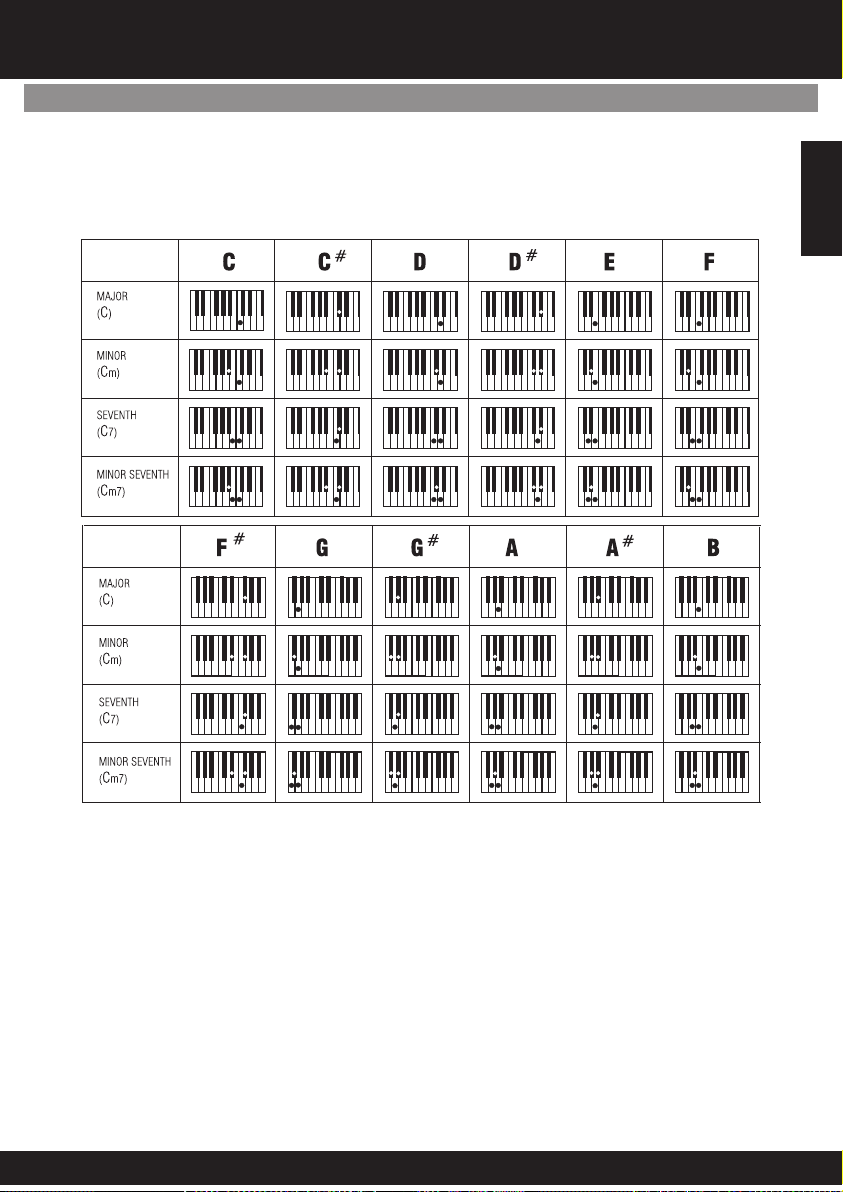
CHORD CHATS
SingleFinger
ENGLISH
E15
Page 16
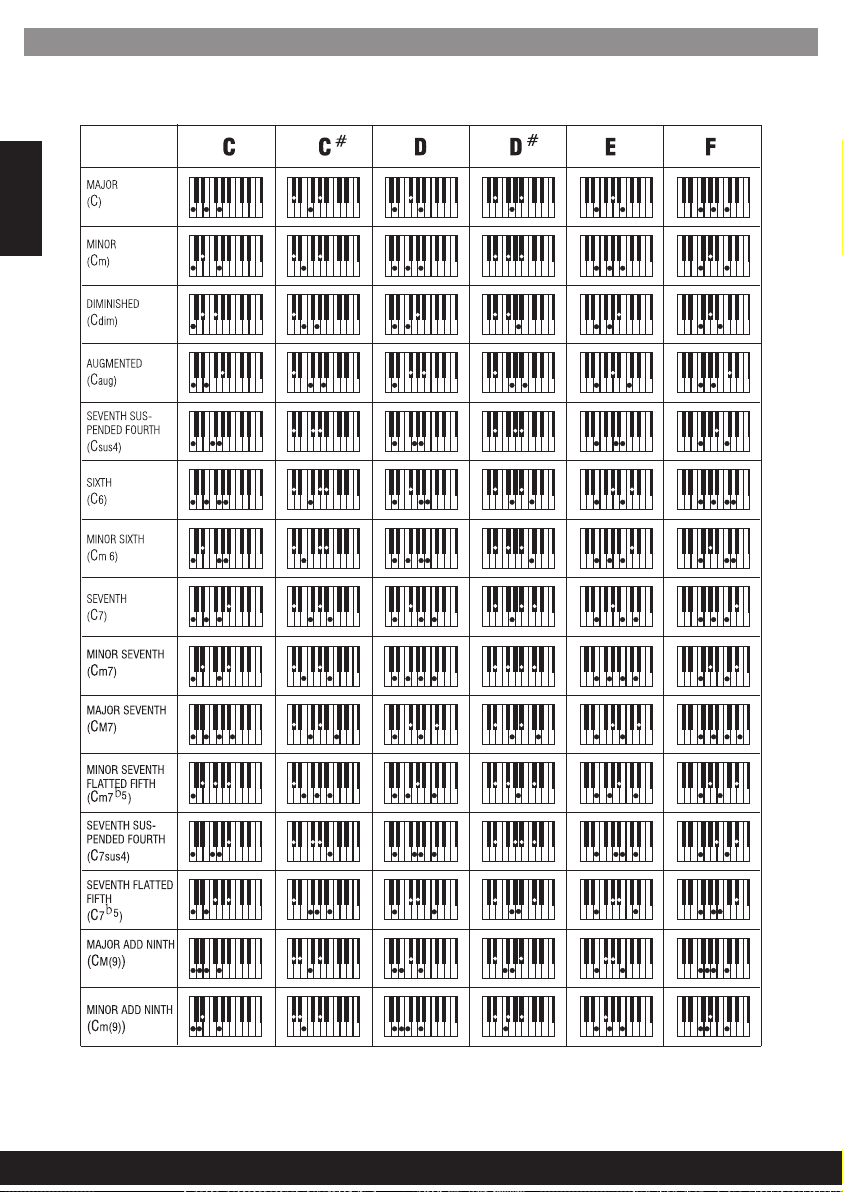
Fingered-A
ENGLISH
E16
Page 17

Fingered-B
ENGLISH
E17
Page 18

Felicitaciones!
Gracias por adquirir este teclado electronico de SoundX. Para obtener máximo resultado de este
teclado, por favor siga las instrucciones y modo de uso indicados en este manual para familiarizarse
con todas sus funciones disponibles y las secciones del manual que detalla el funcionamiento de su
nuevo teclado.
Mantenimiento de su Teclado Electrónico
Para uso optimo de su teclado, favor de seguir las instrucciones de mantenimiento de su
teclado.
ALMACENAJE
•
La unidad no debe exponerse a las
siguientes condiciones para prevenir
deformación, decoloración, o daños más
severos.
ESPAÑOL
•
No exponer a rayos directos del sol.
•
No exponer su equipo o temperaturas
extremas (dejar equipo dentro de un
automóvil expuesto al extremo sol).
•
No exponer a humedad excesiva.
•
No exponer a polvo excesivo.
•
No exponer a vibraciones fuerte.
FUENTE ELECTRÓNICA
Apagar el equipo (OFF) cuando no este
•
en uso.
El adaptador AC debe ser desconectado
•
del tomacorriente si la unidad no esta
utilizado por largo tiempo.
Desenchufe el aparato durante
•
tormentas o relampageos o cuando not
este en uso por largo período de tiempo.
Evite enchufar el adaptador A/C en el
•
mismo enchufe con sus
electrodomésticos de alto consumo de
voltaje como radiadores, estufas. Evite
usar adaptadores multiples ya que puede
causar una pobre calidad de sonido,
errores de operacion y posible daños al
equipo.
DESCONECTAR (OFF) CUANDO SE
HAGA CONEXIÓN
Para evitar Danos a la unidad y a otros
•
electrodomésticos a los cuales esté
conectado, apague (OFF) todos los
switches antes de conectar o
desconectar los cables.
ESTE DISPOSITIVO ESTÁ EN CONFORMIDAD CON LA PARTE 15 DE LAS REGLAS DE
FCC. EL FUNCIONAMIENTO ESTA SUJETO A LAS SIGUIENTES DOS CONDICIONES:
(1) ESTE DISPOSITIVO NO PUEDE CAUSAR INTERFERENCIA DAÑINA, Y
(2) ESTE DISPOSITIVO DEBE ACEPTAR CUALQUIER INTERFERENCIA RECIBIDA,
INCLUSO INTERFERENCIA QUE PUEDA CAUSAR MAL FUNCIONAMIENTO.
TRANSPORTE Y MANEJO
•
Jamás aplique fuerza excesiva a los
controles, conectores u otras partes del
instrumento.
•
Siempre desconecte los cables tomando
el enchufe de una manera firme, sin jalar
el cable.
•
Desconecte todos los cables antes de
mover el instrumento.
•
Golpes fuertes al instrumento
ocasionados por caída, o por haber
colocado objetos pesados encima del
instrumentó, puede resultar en graves
daños.
LIMPIEZA
Limpie la unidad con un paño suave y
•
seco.
Un paño poco húmedo se podría usar
•
para remover torpe grasitud o mugre.
Nunca use solventes / limpiadores como
•
alcohol o thinner.
Evite poner objetos de vinyl encima de la
•
unidad (el vinyl puede pegarse y decolorar
la superficie).
INTERFERENCIA ELECTRÍCA
Este instrumento contiene un sistema de
•
circuitos digitales que pueden causar
interferencias sí este se encuentra cerca
al radio o televisor. Si esto ocurre,
coloque el instrumento lejos del equipo
afectado.
S02
Page 19

CONTROL DEL PANEL
Panel Frontal
1122 3 4 5 6 7 8
13 14 15 16
1
ALIMENTACIÓN ON – OFF
2
VOLUME[+/-]
3
X’POSER[+/-]
4
TIEMPO[+/-]
18 19 20
17
9 10 11
21 22 23
13
SYNC / RELLENAR
14
CUERDA
15
GRABAR
16
TOCADAS
ESPAÑOL
5
PANTALLA
6
APRENDIZAJE
7
DEMOSTRACIÓN
8
BEAT
9
METRÓNOMO
10
NÚMERO DE BOTÓN
11
ALTO-PARLANTES
12
COMIENZO / PARADA
S03
MIDI
17
18
CANCIÓN
19
ESTILO
20
VOX
21
O.T.S.
22
SOSTENER
23
PERCUSIÓN DE BOTÓN
Page 20

Pantalla
24 25 26 27
NORMAL
S.F.
FINGERED
ESPAÑOL
35 36 37 38 39 40 41 42
SIMPLE DE UN DEDO
24
25
NORMAL
26
CUERDA
27
VOLUMEN
VOLUME
VOICE
STYLE
SONG
28 29
34
MELODIA OFF
ESTANDAR
35
CUENTA BAJA DE LAS NOTAS
36
TECLADO
37
30 3231 3433
ONEKEY
MELODY GUIDE
MELODY OFF
SUSTAIN
O.T.S.
RECORD
PLAY
28
VOZ/ESTILO/NÚMERO DE
SONG
TIEMPO
29
30
METRONÓMO
31
BEAT
32
UNA TECLA
33
GUÍA MELODÍCA
38
CUENTA ALTA DE LAS NOTAS
39
REPRODUCTOR
40
GRABAR
41
UN SOLO TOQUE
42
SOSTENER
S04
Page 21

CREACIÓN
Fuente de Alimentación
Su teclado electrónico opera con baterías o fuente de alimentación suplida por el adaptador.
Siga las intrusiones debajo de acuerdo al tipo de alimentación que usted escoja.
Uso de Adaptador de
CorrienteConecte la fuente de alimentación
al tomacorriente DC IN localizado en el
panel posterior de la unidad, y enchufe el
AC a un tomacorriente de AC.
AC Adapter
AC Outlet
No se debe de usar otros adaptadores que
no hallan sido especificados.
La especificación técnica del adaptador es
salida de la C.C. 9V 500mA, tipo del
positivo del centro. Ser seguro dar vuelta
apagado a la unidad antes de que conectes
el adaptador en el enchufe de la CA y la
cuerda en la unidad. Esto cortará
automáticamente la fuente de alimentación
de batería.
NOTA:
•
La alimentación eléctrica será automáticamente tomada del adaptador AC si el adaptador opcional
AC es conectadomientras las baterías estén instaladas al instrumento.
CUIDADO:
Se recomienda que usted reemplace las baterías viejas lo mas pronto posible. Cuando el voltaje de
•
baterías este bajo, la pantalla estará opaca y / o el sonido será distorsionado, cuando esto ocurra, reemplace las bateríascon un par nuevo del mismo tipo.
NUNCA mezcle baterías nueva con baterías viejas, diferente tipo de baterías (alkaline, magnesium,
•
etc.), diferente marca de baterías o baterías de la misma marca pero de diferente tipo. Mal uso
puede causar queel instrumento se caliente, y resulte en fuego, o perdidas de las baterias.
Para prevenir daños causados por perdidas de baterías, remueva todas las baterías del instrumento
•
cuando no seausado por un largo intervalo de tiempo.
Si las baterías son instaladas en este instrumento, y el instrumento no es usado por un largo tiempo,
•
ellas perderán suenergía.
Uso Deaudifonos O Conexión A Un Amplificador
Un par de audifonos de estereo opcional pueden ser
conectado al toma del PHONE/INPUT localizado en el panel
posterior de la unidad. Cuando audifonos son conectados al
toma correspondiente, las bocinas internas de la unidad se
apagan automáticamente (Perfecto para practícas privadas
o cuando de usa de noche. Si usted prefiere usar un
sístema de sonido externo, el toma PNONE/INPUT podría
también ser usado para conectar el teclado electrónico a un
sistema de estéreo o consola de mezcladora.
Apague la alimentación eléctrica en todos los equipos
Nota:
antes de hacer conexiones.
Uso de Baterías
1. Remueva la tapa de la cobertura de
las pilas localizada debajo de la unidad.
2. IColoque baterías tipo “C”, o
equivalentes. Al colocar las baterías,
siga la polaridad marcada en la
ilustración.
Sugerimos usar baterías Alkalinas.
Nota:
3. Recoloque la tapa de compartimiento
de pilas.
S05
ESPAÑOL
Page 22

OPERACIÓN
Tocar El Teclado
[1] Para prender el teclado fije el botón POWER a ON. La pantalla se iluminará.
Nota:
Para ahorrar energía mientras la unidad no esta en uso, le notificará con un sonido de
campana cada 5 minutos.
Ajuste el volumen en el teclado al nivel deseado. Repetidamente presione el botón de
[2]
volumen (subir o bajar) para aumentar o disminuir el volumen. El volumen de teclado tiene
una variación de 0 (sin sonido) hasta 10 (el máximo), el nivel del volumen actual aparece en
la pantalla.
ESPAÑOL
Sonar La Canción De Demostración
Usted puede escuchar cualquiera de las 50 canciones listada a la derecha del panel.
Presione . En la pantalla aparecerá SONG junto con él numero de la selección
[1] SONG
actual.
Nota:
EL teclado pre-selecciona la canción”Canon” (No.01) cada vez que la unidad esté prendida (ON).
Escoja una canción de la lista de SONGS y escoja los números de dos dígitos en el
[2]
teclado, o presione “ ” / ” ” para mover hacia arriba o abajo en el listado de canciones.
Presione para empezar a sonar la canción.
[3] START/STOP
Un “grado” A para mostrar las notas que están sonando está localizado en el centro de
•
la pantalla.
•
”Teclado” A muestra la pantalla apuntando que teclas se están usando (debajo de la
pantalla).
•
Los puntos negros al lado del número de la canción cuenta el ritmo y medida.
-+
Para cambiar el Tiempo, repetidamente presione el botón o
[4] TEMPO UP TEMPO
DOWN
[5]
presione el botón .
. El tiempo fijado aparece.
Para seleccionar una canción diferente, repita el paso numero 2. Para parar,
START/STOP
Uso de DEMO
Para reproducir las canciones DEMO una por una (en orden del punto de inicio elegido),
presione para tener la cancion de DEMO. Si desea parar/terminar, presione
DEMO
DEMO
.
S06
Page 23

Seleccionado/Reproduciendo Un Sonido Predeterminado
Su teclado puede sonar 50 instrumentos diferentes. El nombre y el numero de los digitos de
cada sonido/ voz pre-grabada está indicado en la lista de sonidos impresa sobre el panel
superior.
Nota:
El teclado posee un maximo de 8-notas (máximo) sonido Polifónico. Lo cual Significa que
usted puede tocar hasta 8 notas diferentes simultáneamente en la majoria de los
sonidos predeterminados de fabrica (PRESET).
[1] VOICE VOICE
Presione el botón . y él numero de voz aparece.
Nota:
Cada vez que prenda el teclado, el automáticamente selecciona el sonido GRAND PIANO
(No.01).
[2]
Para sonar una voz diferente, escoja una voz ya predeterminada de la lista de voz y
escoja sus 2 dígitos numéricos. A medida que usted va oprimiendo los botones, los
dígitos seleccionados aparecerán. Por ejemplo, para seleccionar VIBRAPHONE (No.06),
presione “ ” y “ ”, él numera “ ” se mostrara en la pantalla. O presione “ ” o “ “ para
seleccionar él numero que disminuye o aumenta el nivel de voz.
[3]
[4]
06 06 +-
Al usar el teclado se escucha la voz seleccionada.
Para seleccionar una voz diferente, repita los pasos1y2.
Seleccionar/ Tocar En Auto-Estilo
Su teclado tiene 30 estilos predeterminados de fabrica (peset) que permite un ritmo fijo
para su música. El nombre y 2 dígitos de cada auto estilo predeterminado es notado en la
lista de estilos en el teclado en el panel arriba a la izquierda.
ESPAÑOL
[1] STYLE STYLE
Presione el botón . y él número del estilo actual aparecerá.
Nota:
Cada vez que usted prende el teclado, este seleccionara automáticamente el estilo
DISCO 1(No.01).
[2]
Para seleccionar un estilo diferente, escoja un Auto-Estilo de la lista de STYLES y
incluya los dos dígitos del número de botón. O presione repetidamente “ ” o “ “ para
moverse a estilos altos o bajos. Por ejemplo, presione 03 para seleccionar DANCE
(No.03), presione “ ” y “ ” y el estilo aparecerá.
[3] START/STOP
Presione el botón de para empezar el auto estilo seleccionado.
[4] TEMPO + TEMPO -
Para cambiar el tiempo, repetidamente oprime o . El arreglo
actual aparece.
[5]
Para seleccionar un estilo diferente, repetir pasos1y2.
[6] START/STOP
Para parar el auto-estilo, presione de nuevo.
Usted puede ajustar el tiempo para tocar un auto-estilo de 40 hasta 240 golpes
•
por minutos.
Para resetear el tiempo a su omisión (original) velocidad, presione y
•
TEMPO -
03 03
alavez.
S07
+-
TEMPO +
Page 24

Uso de SYNC
Esta característica le permitirá sincronizar el inicíode auto- estilo con el comienzo de su
música.
Después de seleccionar e ingreso entrar él número de auto-estilo, presione
SUNC/FILL-IN
está en modo de STANDBY (espera).
Empieze a tocar el teclado. El teclado automáticamente empieza a sonar él estilo ya
escojido al presionar cualquier tecla.
. Los puntos negros debajo y la luz destellada confirmará que el teclado
Uso De FILL-IN (Rellenar)
Esta función le permitiría a usted insertar una (medida corta de 1 a 2) en el patrón de golpes
(beats)de un auto-estilo ya seleccionado.
ESPAÑOL
Simplemente presione mientras el auto-estilo esté sonando. EL teclado
inserta variación, después el estilo original automáticamente retoma al final de la
medida en uso. O, para insertar una variación mas larga, mantenga presionado el boton
SYNC/FILL-IN
SYNC/FILL-IN
. El teclado sonará la variación hastá que usted libere el botón de
.
SYNC/FILL-IN
Usando El Auto Acompañamiento
Las 19 teclas del lado izquierdo del teclado con nombres de notas sobre estas son son
llamadas teclas de acompañamiento. Las teclas de acompañamiento que usted presione
determinan el tipo de cuerda que sonará.
Usted puede fijar el teclado para sonar sin acompañamiento o con dos 2 tipos
diferentes de auto-acompañamiento empleando las teclas de acompañamiento.
•
Normal
puede seleccionar la voz y estilo).
•
S. Finger
las teclas de acompañamiento usando la cuerda de formación estándar. (Vea:
digitacion de Un Solo Dedo) SIMPLE FINGERING.
•
Fingered
las teclas de acompañamiento usando formaciones de acordes de 3 o má notas. El
nombre de la cuerda aparece en la pantalla. Él número de teclado que usted oprime
determina el tipo de cuerda que toque.
Nota:
Su teclado retorna a su modo original. Siga los pasos bajo “SINGLE FINGERING” o
“STANDARD FINGERING” para fijar al modo de acompañamiento.
modo normal]. Los acordes estan apagados en este modo (pero usted
-[
modo simple de un dedo]. Este modo le permite tocar acordes sobre
-[
-[
modo standard de un dedo]. Esta modo le permitirá tocar acordes sobre
S08
Page 25

Single Fingering
[1]
Repetidamente presione hasta que aparezca un punto negro al lado de la
indicacion S. FINGER en el lado izquierdo de la pantalla.
CHORD
Presione .
[2]
Ingrese un numero de auto-estilo de dos dígitos
[3]
Para empezar el auto-estilo antes del auto acompañamiento, presione
[4]
START/STOP
acompañamiento, presione .
Inicie el acompañamiento en intervalo deseado oprimiendo las teclas de
[5]
acompañamiento deseadas.
Para tocar una melodía junto con el acompañamiento, presione cualquier tecla (s)
[6]
a la derecha.
Ajuste el (TEMPO) y al nivel deseado.
[7]
Para cambiar las acordes sin interrumpir el estilo, simplemente presione la tecla
[8]
(s) de auto acompañamiento requerida para formar una nueva cuerda. EL nombre de
la cuerda aparece en la pantalla. Para parar el auto acompañamiento, pero no el auto
estilo, repetidamente presione hasta que el punto negro aparezca al lado de
NORMAL
presione .
STYLE
, o para sincronizar el inicio del auto-ritmo seleccionado con su
SYNC/FILL-IN
TIEMPO VOLUMEN
CHORD
en la pantalla, o para parar el auto acompañamiento y el auto estilo,
START/STOP
Digitación Estandar
El método de Digitacion Standard emplea formacion estándar de 3 o más notas, y le
permite al músico con experiencia tocar una variedad más amplia de acordes de
acompañamiento.
Siga los siguientes pasos para iniciar la Digitacion Estandar del auto- acompañamiento.
ESPAÑOL
[1]
Precione repetidamente hasta que un punto negro aparezca al lado de
FINGERED a la izquierda de la pantalla.
[2]
Sigalospasosde2-8comodigitacion de un solo dedo.
CHORD
Uso de Metronómo
Para activar la opción de metronomo, presione VOICE o ESTILO, después . La barra
del sonido ira de acuerdo a la velocidad (TEMPO) que usted selecciono y correspondera al
beat que aparece. Precione una vez mas para desactivar el metronomo.
METRO
METRO
UsodeBEAT
Cuando el METRONOME esté activado, presione presione BEAT hasta escuchar el ritmo
deseado para poderlo ajustar. Nueve ritmos (00.02-09) están disponibles y pueden ser
seleccionados en intervalos regulares. Aparecera el numero de beats que usted escojio.
S09
Page 26

Aprender A Tocar
La características de aprendizaje de su teclado le facilitará a un aprendiz aprender y
grabar fácilmente una cancion pre-grabada. Usted puede seleccionar cualquier de los
modos siguientes:
•
UNA TECLA START/STOP
acompañamiento y una nota melodiosa. La nota aparece.
GUÍA MELODÍCA
•
nota correcta. La siguiente nota aparecerá.
MELODIA OFF
•
Siga los siguientes pasos para fijar el modo de aprendizaje.
ESPAÑOL
Presione , después y oprima repetidamente hasta que los
[1]
puntos negros aparezcan al lado de “ON KEY” en el lado derecho de la pantalla.
Seleccione una canción de la lista de SONGS y entre sus 2 dígitos.
[2]
Presione . El teclado suena la primera nota del tono seleccionado y
[3]
la nota aparece. Presione la tecla correspondiente en el teclado para continuar el
aprendizaje. La próxima nota que usted necesita aprender aparece. La canción
continuará aunque usted presione la tecla equivocada.
Para detener el aprendisaje, presione de nuevo y presione
[4]
LEARNING LEARNING
GUIDE y una nota aparece. Presione la tecla correcta para continuar el aprendizaje. La
canción no sonará hasta que usted oprima la tecla correcta.
Si desea sonar la cancion con acompañamiento en el modo de aprendizaje,
repetidamente presione hasta que un punto negro aparezca al lado de
MELODY OFF. Si usted quiere salir del modo de aprendizaje, repetidamente presione
LEARNING
. Si usted presionó , un punto negro aparecerá junto a MELODY
hasta que el punto negro aparezca al lado de NORMAL.
n este modo, presione y cualquier tecla para sonar
-e
en este modo, la melodía no sonara hasta que usted toque la
-
en este modo, usted puede sonar la melodía con acompañamiento.
-
SONG LEARNING
START/STOP
START/STOP
LEARNING
S10
Page 27

CARACTERÍSTICAS ESPECIALES
Grabación (Recording)
Usted puede grabar una secuencia de notas hasta 37 notas en total.
[1]
Presione para empezar a grabar. RECORD aparece.
Toque las notas que usted quiere grabar.
[2]
Presione para sonar las notas ya grabadas. PLAY aparece.
[3]
Para apagar el modo de grabación presione de nuevo, RECORD desaparece.
[4]
RECORD
PLAY
RECORD
Nota:
Si el teclado pierde la alimentación eléctrica la función de grabacion es apagada y cualquier
grabación que usted haga será borrada.
Uso De Ajuste De “Un Solo Toque”
La característica de one touch de su teclado le permite a usted reproducir
automáticamente un voz pre-seteada para combinar un estilo auto-seleccionado que usted
modifico.
Siga los siguientes pasos para activar one-touch setting.
[1]
Presione .
[2]
Ingrese un número de estilo de 2 dígitos.
[3]
Presione , O.T.S. Aparecerá.
[4]
Presione . Aparecera el sonido determinado de fabrica (preset) que coincide
con el auto estilo seleccionado.
[5]
Presione el botón de para salir de one touch setting, presione ,
O.T.S. desaparece.
STYLE
One Touch Setting
VOICE
START/STOP O.T.S.
Uso De Sustain (Sostener)
Para flexibilidad adicional y control a medida que usted crea musica, usted puede fijar el
teclado, para que este sostenga el sonido SOSTENER (SUSTAIN) .
ESPAÑOL
Para sostener notas que usted toque, presione . SUSTAIN aparece y el
teclado sostiene las notas ya tocadas hasta que usted suelte SUSTAIN. Oprima
SUSTAIN
una vez mas para apagar esta funcion.
S11
SUSTAIN
Page 28

Uso de PERCUSSION PAD
El Percusión Pad en su teclado establecen los sonídos de 5 diferentes instrumentos y
percusiones (bombo, tarola,hi-hat abierto, tom agudo y hi-hat cerrado)para tocar al alcance
de sus dedos.
Para tocar un sonido de percusión, simplemente presione el pad deseado en cualquier
momento. El teclado reproducira el sonido de percusión elegido cada vez que usted lo
presione.
Asigne un Sonido de Percusión
Usted puede asignar cualquiera de los sonidos de percusión en cualquiera de los PAD
de percusión. Esto le permitirá rapidamente seleccionar y tocar cualquier sonido de
percusión que el teclado puede reproducir.
ESPAÑOL
Nota:
El teclado aclara cualquier sonido que usted asigne a al pad de percusión cada vez que
usted lo apague.
Siga los siguiente pasos para grabar y tocar un sonido de pad percusión.
Presione después entre “ ” y “ ” en el teclado.
[1] VOICE 5 0
Seleccione la voz deseada presionando cualquiera de las 16 teclas blancas de la
[2]
mitad del teclado hasta que usted escuche el sonido deseado.
Cuando usted escuche la voz que usted desea grabar, mantenga presionado el
[3]
pad de percusión que usted desea asignar el sonido y presione la tecla blanca.
Toque el pad de percusión para escuchar la voz asignada.
[4]
Transposición
El teclado automáticamente selecciona el tono de Do (C) la tecla de la C del medio cada vez
que usted lo prende. Para flexibilidad adicional, usted puede transponer las teclas usando
hasta 12 pasos (+6/-6). Usted puede ajustar la transposición libremente oprimiendo los
botones de .
Para transponer el tono de teclado, presione para aumentar una escala
cromática, o para disminuir la escala cromática.
Para reajustar la llave de teclado a tu defecto, presionar y al
mismo tiempo.
X'POSER
X'POSER +
X'POSER -
X'POSER + X'POSER -
S12
Page 29

HACER LAS CONEXIONES
MIDI
MIDI (Interferencia digital instrumental) es un estándar -mundial digital de comunicación
Interface/lenguaje entre múltiple instrumentos electrónicos, computadores, y otros
dispositivos para comunicarse el uno con el otro entre la conexión.
El puerto MIDI IN recibe datos MIDI de un dispositivo externo MIDI. El puerto MIDI OUT
transmite datos MIDI a una dispositivo externo. Los instrumentos se comunican uno
con otro enviando 'mensajes' o datos MIDI. Los instrumentos emisores usualmente
asigna los datos a uno de los 16 canales MIDI, después lo transmite al cable MIDI. El
cable en si, no esta dividido en 16 canales, como una televisión que recibe programas
en diferente canales, depende del instrumento receptor el ingresar al canal MIDI
apropiado Si los canales emisores y receptores de los instrumentos respectivos no
corresponden, el instrumento receptor,puede no entender o responder a la emisio.
Conexión A Un PC (computador Personal)
[1]
Apague ambos la computadora y el teclado.
[2]
Conecte el teclado y la computadora con un
adaptador MIDI (una Terminal con5 pins y otra con
15).
[3]
Prenda ambas, computadora y teclado.
Asegúrese de minimizar el ajuste del volumen
presionando el botón de .
VOLUMEN
Sound Card
with MIDI port
MIDI OUT port
Plug MIDI Cable
into this port
ESPAÑOL
[4]
Para seleccionar el canal deseado (01-16) el
cual esta demostrado en la pantalla de LCD,
presione el botón MIDI del teclado.
[5]
Usted puede tocar el teclado presionando las
MIDI Cable
Joy stick/MIDI port
Plug MIDI cable into this
port on the sound card
Computer
(rear view)
teclas blancas y negras. Después usted puede
escuchar la música que usted escuche atravez de su
PC.
Nota:
•
Su PC debe estar equipada con una tarjeta de sonido, un par de bocinas y un software
MIDI. (no incluido)
•
Ninguna información de auto-estilo, canciones pre-grabada, sostienes o transponga
pueden ser mandadas como data MIDI.
Conectandose A Un (Dispositivo Externo)
Para que dos instrumentos MIDI se comuniquen, tienen que ser conectados con cables
MIDI. En un ejemplo basico, las terminales MIDI OUT de este teclado puede ser conectadas
a la salida MIDI OUT y terminales de un secuenciador, permitiendole a usted grabar y
reproducir datos de este teclado.
S13
Page 30

DETALLES TÉCNICOS
Numero de teclas:
Sonido Polyfonico:
Voces Polifonicas:
Auto Estilos:
Canciones Pre-grabadad
ESPAÑOL
Efecto:
Controles de estilo
Built-In Speakers:
Sección De Alimentación
Conexiones
Dimensiones:
(Altura X Ancho X Profundidad)
Peso
Accesorios
:
:
:
49
8-note (Max.)
50 v
oces polifonicas
30 e
stilos
50 c
anciones pre-grabadad
TRANSPOSE
TEMPO, FILL-IN, START/STOP
4ohm / 3Wx2
:
CA a (DC 9V.)
daptador
6 x “C” size b
Fono de Oído/Output
MIDI OUT Jack
31.3x12.4x4.7p /
79.5x31.5x12.0centímetros
7.9lbs/3.6kgs
CA a (DC 9V)
daptador
aterías
ulgadas
Especificaciones son típicas, unidades individuales pueden tener variaciones. Ellos (ellas)
están sujetas a mejoría constante sin previo aviso y sin incurrir en ninguna obligación.
S14
Page 31

CHARLAS DEL ACORDE
SingleFinger
ESPAÑOL
S15
Page 32

Fingered-A
ESPAÑOL
S16
Page 33

Fingered-B
ESPAÑOL
S17
Page 34

Félicitation!
Nous vous remercions de l'achat du Clavier Electronique Portable SOUNDX. Afin d'obtenir les
meilleurs résultats avec votre clavier, veuillez suivre les étapes expliquées dans ce manuel quand
vous commencerez à le tester. Nous vous garantissons que vous l'apprécierez et vous découvrirez
toutes les possibilités de votre nouveau clavier.
Utilisation et entretien de votre Clavier Electronique
Afin d'obtenir les meilleurs résultats avec votre Clavier Electronique, veuillez suivre les
instructions suivantes:
LIEU D’EMPLACEMENT
•
Ne pas exposer le matériel à ces
différentes conditions pour éviter toute
déformation, décoloration ou de plus
sérieux dommages.
•
Exposition au soleil.
•
Températures hautes (près d’une source
de chaleur ou dans une voiture la journée).
•
Humidité excessive.
•
Polvo excesivo.
•
Vibración fuerte.
FRANÇAIS
SOURCE D’ÉNERGIE
•
Mettre le bouton power sur OFF lorsque
l’instrument n’est pas utilisé.
•
L’adaptateur AC doit être débranché de la
prise de courant AC si l’instrument n’est
pas utilisé pendant une période prolongée.
•
Débrancher l’adaptateur AC pendant les
orages.
•
Eviter de brancher l’adaptateur AC sur la
même prise. de courant que des
appareils de haute consommation
d’énergie comme les chauffages
électriques ou les fours. Eviter aussi
d’utiliser des prises multiples car cela
conduit à réduire la qualité du son, à des
erreurs d’opération et à de possibles
dommages du matériel.
METTRE LE BOUTON POWER SUR OFF
AVANT DE BRANCHER L’APPAREIL
•
Pour éviter tout dommage de l’instrument
et des autres elements auquel il est
connecté, mettre le bouton power de
tous les éléments liés sur OFF avant de
brancher ou de débrancher les
câbles.débrancher les câbles.
CET APPAREIL EST CONFORME A LA SECTION 15 DU REGLEMENT DE LA FCC
AMERICAINE (FEDERAL COMMUNICATIONS COMMISSION).
SON UTILISATION OBEIT AUX DEUX CONDITIONS SUIVANTES:
[1] CET APPAREIL NE DOIT PAS PROVOQUERD'INTERFERENCES NUISIBLES
[2] IL DOIT ACCEPTER TOUTE INTERFERENCE REÇUE, Y COMPRIS LES
INTERFERENCES RISQUANT DE PROVOQUER UN FONCTIONNEMENT NONSOUHAITE.
MANIEMENT ET TRANSPORT
•
Ne pas exercer de pression aux parties
de contrôle, de connections ou d’autres
éléments de l’instrument.
•
Toujours débrancher en tenant la prise
fermement et non en tirant sur le câble.
•
Débrancher tous les câbles avant de
déplacer l’instrument.
•
Des coups physiques causés par des
chutes, ou en plaçant des objets lourds
sur l’instrument il pourrait se produire
des éraflures ou des dégâts plus
importants.
NETTOYER
•
Nettoyer l’ensemble avec un chiffon sec
et doux.
•
Utilisez un chiffon légèrement humide
pour ôter les saletés et poussières
persistantes.
•
Ne jamais utiliser de produits de
nettoyage tel que de l’alcool ou un diluant.
•
Evitez de placer des objets en vinyl sur
l’appareil (Le vinyl pourrait coller et
décolorer la surface).
INTERFÉRENCE ÉLECTRIQUE
•
L’instrument contient des circuits
électroniques et cela peut causer des
interférences si il est proche d’une radio
ou d’une télévision. Si cela arrive, éloigner
l’instrument de l’équipement affecté par
les interférences.
F02
Page 35

CONTRÔLES
VUE DE FACE
1122 3 4 5 6 7 8
13 14 15 16
1
ALLUME - ETEINT
2
VOLUME[+/-]
3
X’POSER[+/-]
4
TEMPO[+/-]
18 19 20
17
21 22 23
13
SYNC / FILL-IN
14
CHORD
15
ENREGISTRER
16
LECTURE
9 10 11
FRANÇAIS
5
AFFICHAGE
6
LEARNING MODE
7
DÉMONSTRATION
8
BATTEMENT
9
MÉTRONOME
10
LLAVES DEL NÚMERO
11
HAUTS-PARLEURS
12
DE DÉBUT / DE FIN
F03
MIDI
17
18
CHANSON
19
STYLE
20
VOIX
21
O.T.S.
22
SUSTAIN
23
PERCUSSION ÉLECTRONIQUE
Page 36

Affichage
24 25 26 27
NORMAL
S.F.
FINGERED
35 36 37 38 39 40 41 42
FRANÇAIS
ACCORDS SIMPLES
24
25
NORMAL
26
CHORD
27
VOLUME
VOLUME
VOICE
STYLE
SONG
28 29
34
35
36
37
30 3231 3433
ONEKEY
MELODY GUIDE
MELODY OFF
SUSTAIN
O.T.S.
RECORD
PLAY
MELODY OFF
FINGERED
BAS POINTS DE NOTES
KEYBOARD
28
VOIX/STYLE/SONG NUMBER
TEMPO
29
30
MÉTRONOME
BATTEMENT
31
ONE KEY
32
33
MELODY GUIDE
F04
38
HAUTS POINTS DE NOTES
39
LECTURE
40
RECORD
41
O.T.S.
42
SUSTAIN
Page 37

INSTALLATION
Alimentation
Votre clavier électronique peut fonctionner avec des piles ou avec l'adaptateur fourni.
Suivez les instructions ci-dessous selon l'alimentation que vous utiliserez.
Avec Adaptateur AC
Branchez l'adaptateur à l'entrée DC IN
située à l'arrière de l'appareil et l'adaptateur
AC à la prise AC correspondante.
AC Adapter
AC Outlet
N'utilisez pas d'autres adaptateurs que
ceux qui sont recommandés.
Les spécifications techniques de
l'adaptateur sont: sortie DC 9V 500mA,
avec centre positif. Vérifiez bien que votre
appareil est éteint avant de brancher
l'adaptateur à la prise AC et le fil à
l'appareil. Cela coupera automatiquement
l'alimentation par piles.
REMARQUE:
•
L'alimentation sera automatiquement faite par l'adaptateur AC s'il est branché pendant que vous
installez les piles dans cet appareil.
ATTENTION:
•
Il est recommandé de changer les piles usagées le plus tôt possible. Quand le voltage baisse,
l'affichage commence à faiblir et / ou le son est distordu; si cela arrive, changez le jeu complet
des six piles en utilisant le même type.
NE JAMAIS mélanger des piles vieilles avec des neuves, différents types de piles (alcaline,
•
magnésium, etc.) différentes marques ou même différents types de piles de la même marque.
Cela pourrait occasionner une surchauffe, un incendie ou une fuite des piles.
De la même façon, pour éviter que les problèmes dus à la fuite des piles, retirez-les de l'appareil
•
quand vous ne vous en servez pas pendant une période prolongée.
Si les piles sont installées dans l'appareil et que vous ne vous en servez pas pendant un certain
•
temps, elles perdront leur puissance.
Utilisation D'écouteurs Ou Branchement À Un Amplificateur
Un jeu optionnel d'écouteurs stéréo peut être branché à
l'entrée PHONES / INPUT situé sur le panneau arrière. Quand
on branche les écouteurs à la prise jack, les haut-parleurs
internes de l'appareil sont automatiquement coupés (Parfait
pour jouer seul ou tard dans la nuit). Si vous préférez utiliser
un dispositif sonore externe, l'entrée PHONES / INPUT peut
être utilisée pour brancher l'appareil sur un appareil stéréo ou
une console de mixage.
Remarque:
connexion.
éteignez l'appareil avant de faire toute
Avec Piles
Ouvrez le couvercle du compartiment
1.
des piles situé au-dessous de l'appareil.
2.
Placez six piles «C» ou piles
équivalentes. Respectez la polarité en
suivant l'illustration.
Remarque:
On conseille l'utilisation de
piles alcalines.
3.
Refermez le compartiment des piles.
FRANÇAIS
F05
Page 38

FONCTIONNEMENT
Utilisation du Clavier
[1] Pour allumer le clavier, mettez POWER en position ON. L'affichage apparaîtra alors.
Remarque:
Pour faire des économies d'énergie quand vous n'utilisez pas l'appareil, vous en serez
averti par une sonnerie toute les cinq minutes.
[2]
Réglez le volume au niveau souhaité. Appuyez plusieurs fois de suite la touche
volume vers le haut ou vers le bas pour augmenter ou diminuer le volume. Le niveau de
volume du clavier varie de 0 (silencieux) à 10 (maximum) et le niveau en exécution est
affiché.
Mélodie de Démonstration
Vous pouvez choisir l'une des 50 mélodies présentées sur le côté droit de la console.
[1]
Appuyez sur . SONG est affiché avec le numéro de la mélodie qui est jouée.
SONG
Remarque
FRANÇAIS
Le clavier présélectionne la mélodie « Canon » (nº 1) à chaque fois qu'on le rallume.
[2]
appuyez sur « » « » pour choisir le numéro de la mélodie souhaitée.
[3]
•
•
•
•
[4]
DOWN
[5]
START/STOP
:
Choisissez une mélodie de la liste SONGS et composez le nombre à deux chiffres ou
-+
Appuyez sur pour commencer à jouer la mélodie.
« Score » affiche les notes qui sont jouées.
« Keyboard » affiche le doigté et les touches qui sont activées (en bas de l'affichage).
Les points noirs à côté du numéro de la mélodie affichent la mesure.
L'accord musical est affiché dans le coin gauche.
Pour changer le tempo appuyez plusieurs fois de suite ou
. Le tempo utilisé est affiché.
Pour choisir une autre mélodie répétez l'étape nº 2. Pour arrêter appuyez sur
START/STOP
TEMPO UP TEMPO
.
Utilisation de la Fonction Demo
Pour jouer une mélodie de démonstration une après l'autre (dans l'ordre de passage après
le point de départ) appuyez sur . Pour arrêter la démonstration appuyez sur à
nouveau.
DEMO DEMO
F06
Page 39

Sélection / Reproduction d'une Tonalité Présélectionnée
Votre clavier peut reproduire environ 50 types de tonalités d'instruments. La liste et les
codes de chaque instrument présélectionné se trouve dans la liste du côté droit de la
console.
Remarque:
Le clavier utilise un son polyphonique de 8 notes (maximum). Ceci signifie que vous
pouvez jouer jusqu'à 8 notes différentes en même temps avec la plupart des
instruments présélectionnés.
Appuyez sur et la tonalité d'instrument utilisée sera affichée.
[1]
Remarque:
A chaque fois que vous allumez votre clavier, la sélection par défaut est Grand PIANO
(Nº1).
Pour jouer un autre timbre, choisissez un timbre présélectionné de la liste VOICES
[2]
et composez le numéro à deux chiffres. En appuyant sur les boutons les chiffres sont
affichés. Par exemple pour sélectionner VIBRAPHONE (Nº06) appuyez sur « » et « »
et « » est affiché. Ou alors appuyez sur « » ou « » pour choisir le timbre.
06 + -
Jouez pour écouter le timbre choisi.
[3]
Pour choisir un timbre différent, répétez les opérations 1 et 2.
[4]
VOICE
06
Utiliser L'Auto-Style
Votre clavier a 30 Styles de rythmes programmés. Vous trouverez la liste et les numéros
sur la face avant du clavier.
Appuyez sur et le N0 du premier rythme s'affiche « 01 » DISCO.
[1]
Pour changer d'instrument, tapez son N°.
[2]
Appuyez sur pour jouer le STYLE.
[3]
[4]
Pour augmenter ou diminuer le TEMPO, appuyez sur les touches et
TEMPO -
.
STYLE
START/STOP
TEMPO +
FRANÇAIS
Pour arrêter de jouer appuyez sur .
[5]
Pour retrouver la valeur de tempo d'origine, appuyez en même temps sur les
[6]
touches et .
TEMPO + TEMPO -
START/STOP
F07
Page 40

Utilisation de la Fonction SYNC
Cette fonction vous permet de synchroniser le début d'un style avec votre musique.
Après avoir sélectionné un style automatique, appuyez sur . Les points
noirs sous le tempo et le métronome clignotent pour confirmer que le clavier est en mode
d'attente.
Commencer à jouer. Le clavier commencera alors à jouer automatiquement dans le style
choisi.
SYNC / FILL-IN
Fonction FILL-IN
Cette fonction permet d'insérer une petite variation (1 ou 2 mesures) dans le style de
battement d'un style présélectionné.
Appuyez tout simplement sur tandis que le style est joué. Le clavier insère
une variation, alors le style original recommence automatiquement à la fin de la mesure
actuelle. Pour insérer une variation plus longue, maintenez la touche
appuyée. Le clavier joue la variation tant que vous ne relâchez pas le bouton .
FRANÇAIS
Utiliser L'Accompagnement Automatique
Les 19 touches de gauche du clavier de piano, sont des touches d'accompagnement
et peuvent jouer seule, un accord d'accompagnement complet.
Les touches d'accompagnement vous permettent de sélectionner 3 modes:
•
Normal
•
S. Finger
Mode sans accompagnement.
-
Mode d'accompagnement avec des accords simples.
-
SYNC/FILL-IN
SYNC/FILL-IN
SYNC/FILL-IN
•
Fingered
Sélectionnez l'un de ces 3 modes en appuyant plusieurs fois sur la touche
[1]
CHORD
que vous désirez.
Appuyez sur et entrez le N° du stylede rythme que vous désirez.
[2] STYLE
Mode d'accompagnement avec des accords enrichis.
-
jusqu'à ce qu'un point noir apparaisse à gauche de l'écran, en face du mode
F08
Page 41

Accords Simples
[1]
Appuyez plusieurs fois de suite sur jusqu'à ce qu'un point noir apparaisse
près de FINGER du côté droit de l'affichage.
CHORD
Appuyez sur .
[2]
Composez un nombre de 2 chiffres.
[3]
Pour commencer un style automatique avant l'accompagnement, appuyez sur
[4]
START/STOP
avec votre accompagnement, appuyez sur .
Commencez l'accompagnement à l'intervalle désiré en appuyant la(les touche(s)
[5]
désirée(s).
Pour jouer une mélodie avec accompagnement, appuyez sur n'importe quelle
[6]
touche(s) à droite.
Réglez le et au niveau désiré.
[7]
Pour changer d'accord sans interrompre le style, appuyez tout simplement sur la
[8]
(les) touche(s) d'accompagnement automatique requise(s) pour le nouvel accord. Le
nom de l'accord est affiché. Pour arrêter l'accompagnement automatique sans arrêter
de jouer le style, appuyez plusieurs fois de suite jusqu'à ce qu'un point noir
apparaisse près de , ou alors pour arrêter l'accompagnement automatique et
le style, appuyez sur .
STYLE
. Ou alors pour synchroniser le début du rythme automatique sélectionné
SYNC/FILL-IN
TEMPO VOLUME
CHORD
NORMAL
START/STOP
Accords Habituels
Le mode d'accords habituels utilise des combinaisons de trois notes ou plus, donnant
ainsi au musicien plus averti une plus grande variété d'accords d'accompagnement.
Suivez ces étapes pour ces accords habituels.
FRANÇAIS
Appuyez plusieurs fois de suite sur CHORD jusqu'à ce qu'un point noir apparaisse
[1]
près de du côté gauche de l'affichage.
[2]
FINGERED
Suivez les étapes2-8précédentes.
Le MÉTRONOME
Appuyez sur le bouton TONE ou RHYTHM, puis appuyez sur le bouton .
Le métronome bat la mesure selon le tempo sélectionné et la tige du métronome graphique
marque chaque temps de la mesure.
Appuyez de nouveau sur lebouton pour arrêter le métronome.
METRONOME
METRONOME
Battement
Quand le métronome est utilisé, appuyez plusieurs fois de suite sur BEAT jusqu'à ce que
vous entendiez le battement désiré. 9 battements sont à votre disposition (00.02-09) et
peuvent être sélectionnés à intervalles réguliers. Le battement choisi est affiché.
F09
Page 42

Apprendre a Jouer
Vous disposez de 3 programmes pour apprendre le doigté, les notes et leur lecture.
•
ONE KEY
•
MELODY GUIDE
de la mélodie tant que vous ne la jouez pas correctement.
•
MELODY OFF
l'accompagnement.
-
pour apprendre pas à pas à lire et reconnaître les notes.
-
Dans ce mode, le clavier ne vous donne pas les notes suivantes
-i
Dans ce mode, vous pouvez jouer la mélodie avec
[1]
Appuyez sur et sélectionnez l'un de ces 3 modes en appuyant plusieurs fois
sur la touche jusqu'à ce qu'un point noir apparaisse à droite de l'écran, en
face du mode que vous désirez.
[2]
Sélectionnez une « SONG » de la liste et entrez son numéro
Pour commencer, appuyez sur .
[3]
Pour arrêter, appuyez sur .
[4]
SONG
LEARNING
.
START/STOP
START/STOP
FRANÇAIS
F10
Page 43

FONCTIONS SPECIALES
Enregistrer
[1]
Appuyez sur , l'écran affiche « RECORD ».
[2]
Jouez ce que vous désirez, le clavier enregistre.
[3]
Appuyez sur pour écouter ce que vous venez d'enregistrer.
[4]
Pour sortir du mode d'enregistrement, appuyez sur , le mot « RECORD » doit
disparaître de l'écran.
Remarque:
Si l'alimentation est basse la fonction enregistrement est coupée et tout enregistrement fait
est effacé.
Fonction Touche Unique
RECORD
PLAY
RECORD
La fonction de réglage à une touche de votre clavier permet de jouer automatiquement un
timbre correspondant au style automatique présélectionné choisi.
Suivez ces étapes pour activer la fonction touche unique.
Appuyez sur .
[1]
[2]
Composez un numéro de style à 2 chiffres.
[3]
Appuyez sur la . OTS est affiché.
[4]
Appuyez sur . Le timbre présélectionné qui correspond à votre style
automatique est affiché.
[5]
Appuyez sur pour quitter la fonction , appuyez sur OTS
et OTS disparaît.
STYLE
Touche Unique
VOICE
START/STOP Touche Unique
Fonction Sustain
Pour plus de flexibilité et de contrôle pendant que vous jouez, vous pouvez régler le clavier de
façon à ce qu'il SUSTAIN (prolonge) un son.
Pour prolonger des notes que vous jouez, appuyez sur . SUSTAIN est affiché et le
clavier prolonge la note jouée jusqu'à ce que vous relâchiez SUSTAIN. Appuyez à nouveau
sur pour arrêter.
SUSTAIN
SUSTAIN
FRANÇAIS
F11
Page 44

Percussion Électronique
La percussion électronique de votre clavier possède 5 instruments différents (grosse
caisse, caisse claire, hi-hat ouvert, tom, et hi-hat fermé) que vous pouvez jouer du bout des
doigts.
Pour jouer un son de percussion, appuyez tout simplement sur le coussinet désiré. Le
clavier joue le son de percussion choisi à chaque fois que vous appuyez dessus.
Attribution d’un Son de Percussion À Un Coussinet
Vous pouvez attribuer un des sons disponibles à un coussinet de votre choix. Ceci vous
permet de sélectionner rapidement une percussion existante.
Remarque
Le clavier efface le son attribué à chaque fois qu'il est éteint.
Follow these steps to record and play a percussion pad sound.
[1]
[2]
clavier jusqu'à obtenir le son désiré.
FRANÇAIS
[3]
coussinet de percussion choisi appuyé et appuyez sur la touche blanche.
[4]
:
Appuyez sur et composez « » et « » sur le clavier.
Choisissez le timbre en appuyant sur l'une des 16 touches blanches au milieu du
Quand vous entendrez le timbre que vous voulez enregistrer, maintenez le
Jouez sur le coussinet attribué pour entendre le timbre.
VOICE 5 0
Transposition
Le clavier se met en Do automatiquement à chaque fois qu'il est allumé. Pour plus de
flexibilité, vous pouvez transposer la clé. La touche de transposition possède 12 positions
(+6/-6). Vous pouvez la régler en appuyant sur les boutons .
Pour transposer, appuyez sur pour monter l'échelle chromatique ou
descendre dans l'échelle chromatique.
Pour remettre en Do appuyez sur et en même temps.
X'POSER + X'POSER -
X'POSER + X'POSER -
X'POSER
F12
Page 45

POUR FAIRE LES CONNECTIONS
MIDI
MIDI (Musical Instrument Digital Interface) est une norme mondiale pour la communication
numérique qui permet à de multiples instruments électroniques, ordinateurs et autres
types d'appareils de communiquer entre eux au travers d'une connexion.
L'entrée MIDI IN reçoit les informations MIDI d'un appareil externe. MIDI OUT transmet
les informations MIDI à un appareil externe. Les instruments communiquent entre eux
en envoyant des « messages » ou informations MIDI. L'instrument qui envoie attribue
normalement des fonctions à l'un des seize canaux MIDI et ensuite les repasse par le
câble MIDI. Le câble MIDI lui-même, cependant n'est pas divisé en seize canaux, comme
pour une télévision qui reçoit plusieurs chaînes. C'est l'instrument qui reçoit les
informations qui doit se syntoniser sur la chaîne MIDI. Si les chaînes qui envoient et
reçoivent les instruments respectifs ne correspondent pas, l'instrument qui reçoit
pourra ne pas comprendre ou répondre à celui qui envoie.
Connexion à un PC (Personal Computer)
[1]
Eteignez le clavier et le PC.
[2]
Connectez le clavier et le PC avec un
adaptateur MIDI (une extrémité à 5 fiches et l'autre à
15 fiches).
[3]
Allumez le clavier et le PC. Minimiser le volume
en appuyant sur .
[4]
Pour sélectionner le canal (01-16) qui est
VOLUME -
affiché, appuyez sur le bouton MIDI du clavier.
[5]
Vous pouvez jouer du clavier en appuyant sur
les touches blanches et noires. Vous entendrez alors
la musique que vous jouez dans les haut-parleurs de
votre PC.
MIDI Cable
Sound Card
with MIDI port
MIDI OUT port
Plug MIDI Cable
into this port
Computer
(rear view)
Joy stick/MIDI port
Plug MIDI cable into this
port on the sound card
FRANÇAIS
Remarque
•
Votre PC doit être équipé d'une carte de son, de haut-parleurs et d'un programme MIDI
:
(Non fourni).
•
Aucune information telle que style automatique, pré enregistrements, prolongation de
note et transposition ne peut être envoyée comme information MIDI.
Connexion Avec un Appareil Externe
Pou que deux appareils MIDI puissent communiquer entre eux, ils doivent être connectés
par des câbles MIDI. Comme exemple, les sorties MIDI OUT de ce clavier peuvent être
connectées aux MIDI OUT et sorties d'un séquenceur, vous permettant ainsi d'enregistrer
et reproduire ce que vous jouez sur ce clavier.
F13
Page 46

DETAILS TECHNIQUES
49
Nombre De Touches
Son Polyphonique
Tonalité
Présélectionnée
:
8-note (Max.)
:
50 t
:
onalité présélectionnée
L'Auto-Style
Mélodies
Préenregistrées
Effet
:
FRANÇAIS
Contrôle de Style
Haut-parleur Moulé:
Alimentation:
Connections:
Dimensions
(HxLxP)
Poids:
Accessoires:
Un volume excessif dans les écouteurs ou casques peut produire des pertes d'audition. La
prise de COURANT est utilisée comme sert à débrancher l'appareil, le système de
débranchement doit continuer à fonctionner.
:
:
30 styles
50 m
élodies préenregistrées
TRANSPOSE
TEMPO, FILL-IN, START/STOP
:
4ohm / 3Wx2
Adaptateur AC
6 x “C” size piles
D’écouteurs/Output
MIDI OUT Jack
31.3 x 12.4 x 4.7 pouces/
79.5x31.5x12.0centimètres
7.9lbs/3.6kgs
Adaptateur AC
(DC 9V.)
(DC 9V)
F14
Page 47

CAUSERIES DE CORDE
Accords Simples
FRANÇAIS
F15
Page 48

Digité - A
FRANÇAIS
F16
Page 49

Digité - B
FRANÇAIS
F17
Page 50

Note/Nota/Remarque
Page 51

Note/Nota/Remarque
Page 52

The Singing Machine Company, Inc.
6601 Lyons Road, Bldg. A7, Coconut Creek, FL33073-9902, USA.
TEL: (954) 596-1000 FAX: (954) 596-2000
1420-0707-ESF01
VISIT OUR WEBSITE www.singingmachine.com
VISITE NUESTRO SITIO INTERNET
VISITE NOTRE SITE INTERNET
www.singingmachine.com
www.singingmachine.com
PRINTED IN CHINA
IMPRESO EN CHINA
IMPRIMÉ EN CHINE
 Loading...