

The Singing Machine SMG-900 Instruction Manual

SMG-900
Please read before using this unit.
Semi-Pro Compact Disc + Graphic
Karaoke Center
Ò
The Singing Machine is a registered trademark of The Singing Machine Co., Inc.
WARNINGS
WARNING: TO REDUCE THE RISK OF
FIRE OR SHOCK HAZARD, DO NOT EXPOSE
THIS PRODUCT TO RAIN OR MOISTURE.
CAUTION: TO PREVENT THE RISK OF
ELECTRIC SHOCK, DO NOT REMOVE COVER
OR BACK. NO USER-SERVICEABLE PARTS
INSIDE. REFER SERVICING TO QUALIFIED
PERSONNEL.
CAUTION
RISK OF ELECTRIC SHOCK
DO NOT OPEN
This CD player is made and tested to meet
exacting safety standards. It meets FCC
requirements and complies with safety
performance standards of the U.S.
Department of Health and Human Services.
Warnings:
! This CD player employs a laser light beam.
Only a qualified service person should
remove the cover or attempt to service this
device, due to possible eye injury.
! The use of controls, adjustments, or
procedures other than those specified
herein might result in hazardous radiation
exposure.
! The apparatus shall be used in an open
area.
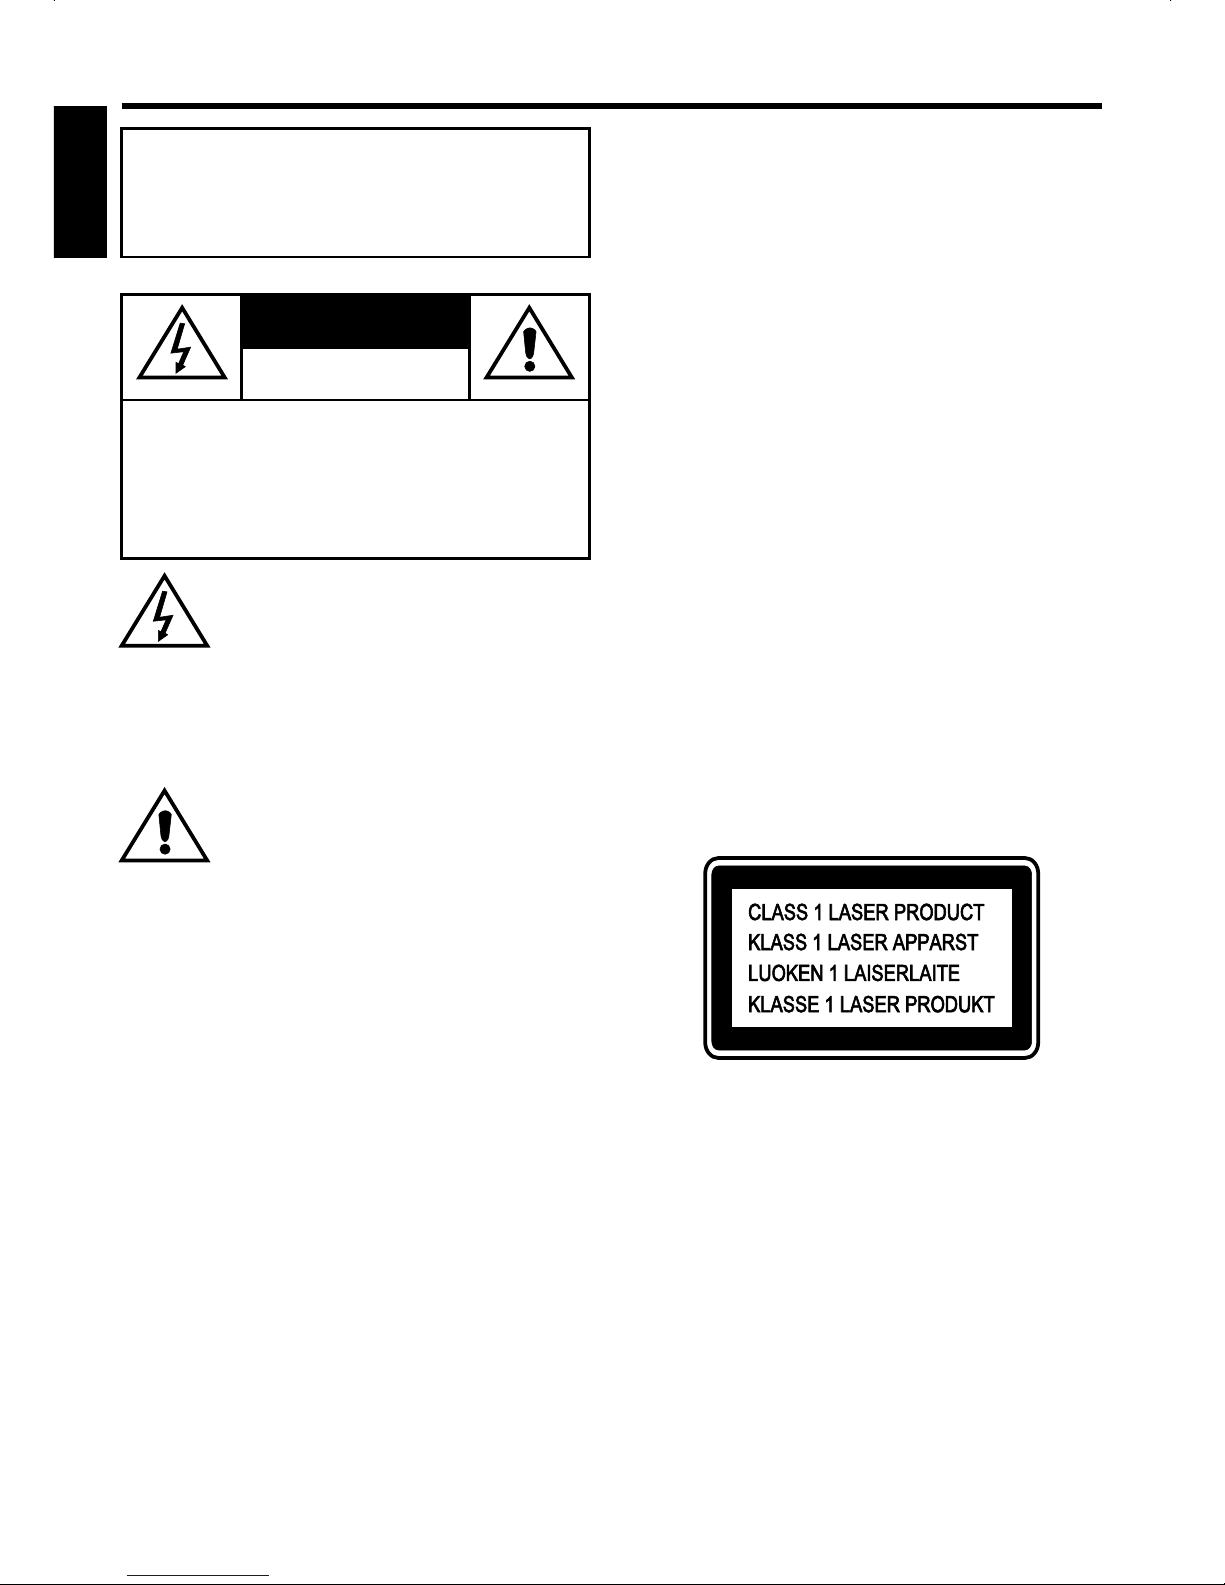
CAUTION
This compact disc player is classified as a
CLASS 1 LASER product.
The CLASS 1 LASER PRODUCT label is
located on the rear panel.
CAUTION!
Invisible laser radiation when open and inter
locks defeated. Avoid exposure to beam.
E1
ENGLISH
This symbol is intended to alert you
to the presence of uninsulated
dangerous voltage within the
product's enclosure that might be of
sufficient magnitude to constitute a
risk of electric shock. Do not open
the product's case.
This symbol is intended to inform
you that important operating and
maintenance instructions are
included in the literature
accompanying this product.
CAUTION
TO PREVENT ELECTRIC SHOCK, MATCH
WIDE BLADE OF PLUG TO WIDE SLOT,
FULLY INSERT.
ATTENTION:
POUR ÉVITER LES CHOC ÉLECTRIQUES,
INTRODUIRE LA LAME LA PLUS LARGE
DE LA FICHE DANS LA BORNE
CORRESPONDANTE DE LA PRISES ET
POUSSER JUSQU’ AU FOND.
DRIPPING WARNING
The product shall not be exposed to dripping
or splashing and that no objects filled with
liquids, such as vases, shall be placed on the
product.
VENTILATION WARNING
The normal ventilation of the product shall not
be impeded for intended use.
IMPORTANT SAFETY INSTRUCTIONS
1. Read Instructions - All the safety and operating instructions should be read before the product is operated.
2. Retain Instructions - The safety and operating instructions should be retained for future reference.
3. Heed Warnings - All warnings on the product and in the operating instructions should be adhered to.
4. Follow Instructions - All operating and use instructions should be followed.
5. Cleaning - Unplug this product from the wall outlet before cleaning. Do not use liquid cleaners or aerosol
cleaners. Use a damp cloth for cleaning the exterior only. Do NOT attempt to clean the inside.
6. Attachments - Do not use attachments not recommended by the product manufacturer as they may cause
hazards.
7. Water and Moisture - Do not use this product near water - for example, near a bath tub, wash bowl, kitchen
sink, or laundry tub; in a wet basement, or near a swimming pool, and the like.
8. Accessories - Do not place this product on an unstable cart, stand tripod, bracket, or table. The product may
fall, causing serious injury to a child or adult, and serious damage to the product. Use only with a cart, stand,
tripod, bracket, or table recommended by the manufacturer, or sold with the product. Any mounting of the
product should follow the manufacturer's instructions, and should use a mounting accessory recommended by
the manufacturer.
9. A product and cart combination should be moved with care. Quick stops, excessive force, and uneven surfaces
may cause the appliance and cart combination to overturn.
10. Ventilation - Slots and openings in the cabinet are provided for ventilation and to ensure reliable operation of
the product and to protect it from overheating, and these openings must not be blocked or covered. The
openings should never be blocked by placing the product on a bed, sofa, rug, or other similar surface. This
product should not be placed in a built-in installation such as a bookcase or rack unless proper ventilation is
provided.
11. Power Sources - This product should be operated only from the type of power source indicated on the marking
label. If you are not sure of the type of power supply to your home, consult your product dealer or local power
company. For products intended to operate from battery power, or other sources, refer to the operating
instruction.
12. Grounding or Polarization - This product may be equipped with a polarized alternating current line plug (a
plug having one blade wider than the other). This plug will fit into the power outlet only one way. This is a safety
feature. If you are unable to insert the plug fully into the outlet, try reversing the plug. If the plug should still fail to
fit, contact your electrician to replace your obsolete outlet. Do not defeat the safety purpose of the polarized
plug.
Alternate Warnings - This product may be equipped with a three-wire grounding-type plug, a plug having a
third (grounding) pin. This plug will only fit into a grounding-type power outlet. This is a safety feature. If you are
unable to insert the plug into the outlet, contact your electrician to replace your obsolete outlet. Do not defeat
the safety purpose of the grounding-type plug.
13. Power-Cord Protection - Power supply cords should be routed so that they are not likely to be walked on or
pinched by items placed upon or against them, paying particular attention to cords at plugs, convenience
receptacles, and the point where they exit from the product.
14. Protective Attachment Plug - The product is equipped with an attachment plug having overload protection.
This is a safety feature. See Instruction Manual for replacement or resetting of protective device. If
replacement of the plug is required, be sure the service technician has used a replacement plug specified by
the manufacturer that has the same overload protection as the original plug.
E2
ENGLISH
IMPORTANT SAFETY INSTRUCTIONS
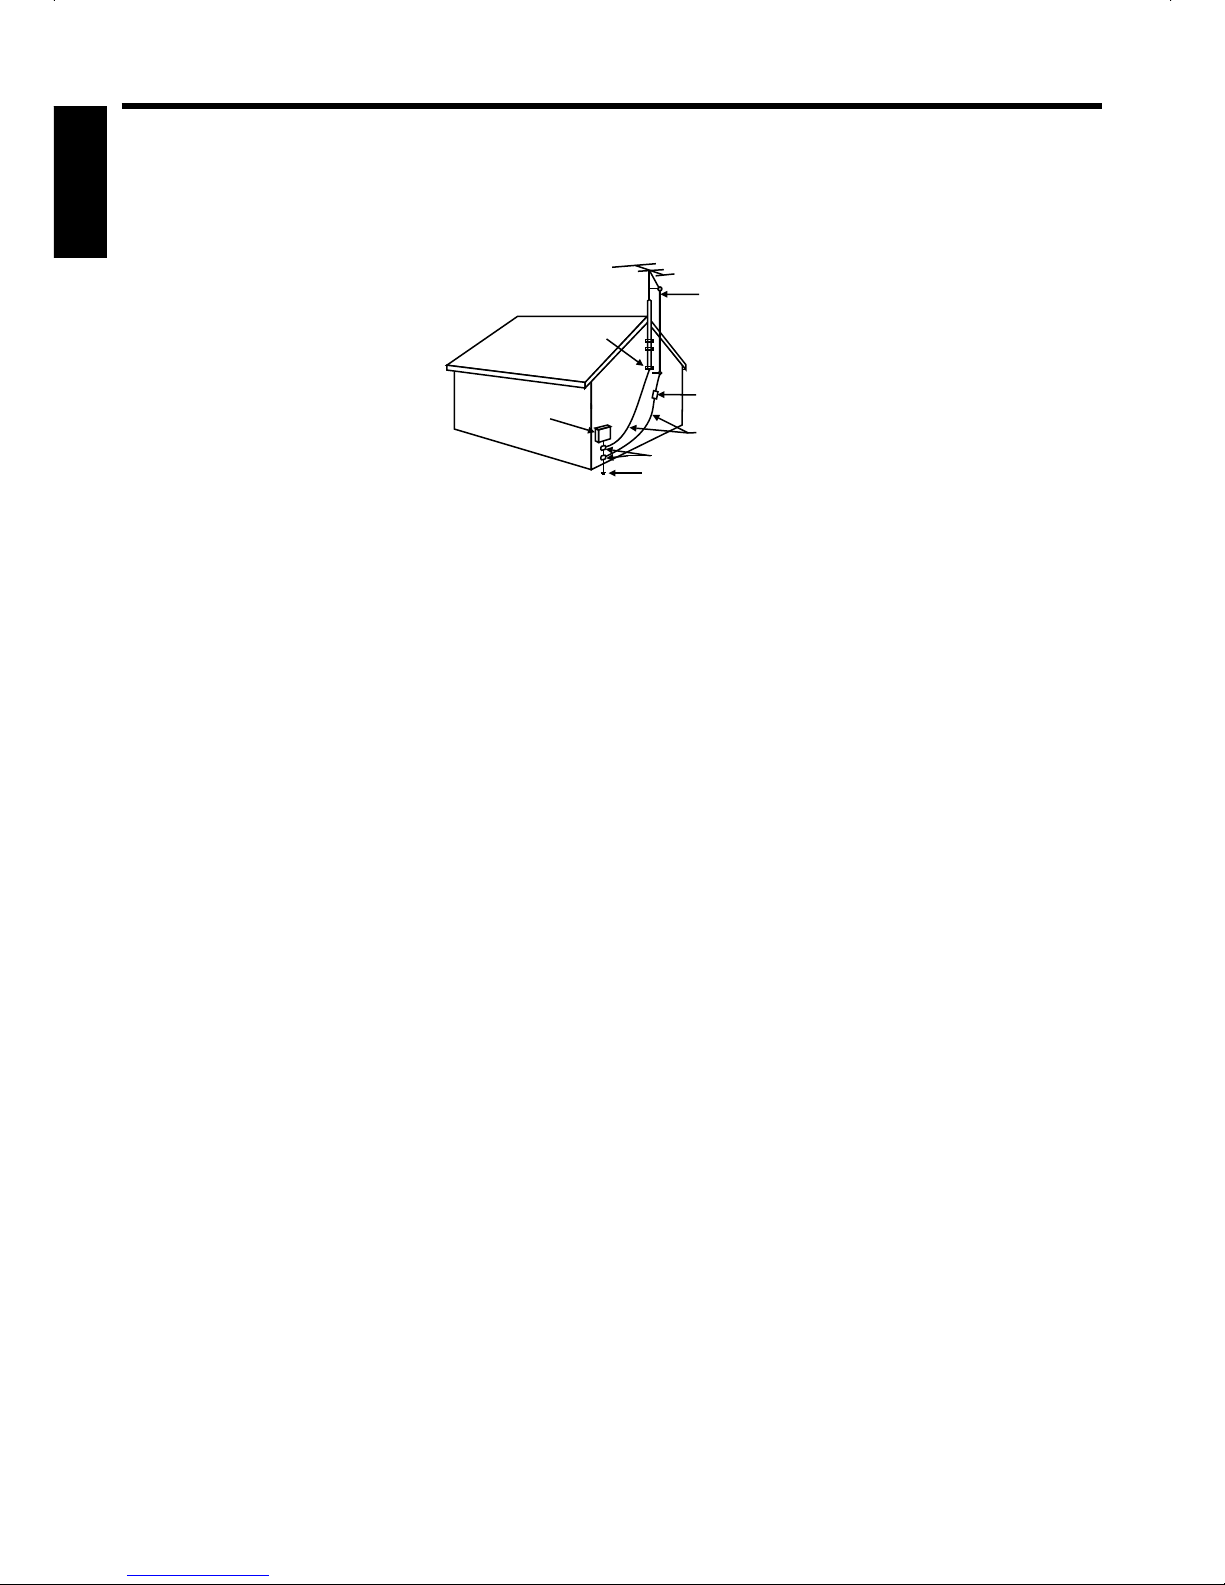
15. Outdoor Antenna Grounding - If an outside antenna is connected to the receiver, be sure the antenna system
is grounded so as to provide some protection against voltage surges and built-up static charges. Article 810 of
the National Electrical Code, ANSI/NFPA 70, provides information with regard to proper grounding of the mast
and supporting structure, grounding of the lead-in wire to an antenna-discharge unit, size of grounding
conductors, location of antenna-discharge unit, connection to grounding electrodes, and requirements for the
grounding electrode. See figure:
16. Lightning - For added protection for this product during a lightning storm, or when it is left unattended and
unused for long periods of time, unplug it from the wall outlet and disconnect the antenna or cable system. This
will prevent damage to the product due to lightning and power-line surges.
17. Power Lines - An outside antenna system should not be located in the vicinity of overhead power lines or other
electric light or power circuits, or where it can fall into such power lines or circuits. When installing an outside
antenna system, extreme care should be taken to keep from touching such power lines or circuits as contact
with them might be fatal.
18. Overloading - Do not overload wall outlets, extension cords, or integral convenience receptacles as this can
result in a risk of fire or electric shock.
19. Object and Liquid Entry - Never push objects of any kind into this product through openings as they may
touch dangerous voltage points or short-out parts that could result in a fire or electric shock. Never spill liquid of
any kind on the product.
20. Servicing - Do not attempt to service this product yourself as opening or removing covers may expose you to
dangerous voltage or other hazards. Refer all servicing to qualified service personnel.
21. Damage Requiring Service - Unplug this product from the wall outlet and refer servicing to qualified service
personnel under the following conditions:
a) When the power-supply cord or plug is damaged,
b) If liquid has been spilled, or objects have fallen into the product,
c) If the product has been exposed to rain or water,
d) If the product does not operate normally by following the operating instructions. Adjust only those controls
that are covered by the operating instructions as an improper adjustment of other controls may result in
damage and will often require extensive work by a qualified technician to restore the product to its normal
operation.
e) If the product has been dropped or damaged in any way, and
f ) When the product exhibits a distinct change in performance - this indicates a need for service.
22. Replacement Parts - When replacement parts are required, be sure the service technician has used
replacement parts specified by the manufacturer or have the same characteristics as the original part.
Unauthorized substitutions may result in fire, electric shock, or other hazards.
23. Safety Check - Upon completion of any service or repairs to this product, ask the service technician to perform
safety checks to determine that the product is in proper operating condition.
24. Wall or Ceiling Mounting - The product should be mounted to a wall or ceiling only as recommended by the
manufacturer.
25. Heat - The product should be situated away from heat sources such as radiators, heat registers, stoves, or
other products (including amplifiers) that produce heat.
ANTENNA
LEAD IN
WIRE
ANTENNA
DISCHARGE UNIT
(NEC SECTION 810-20)
GROUNDING CONDUCTORS
(NEC SECTION 810-21)
GROUND CLAMPS
POWER SERVICE GROUNDING
ELECTRODE SYSTEM
(NEC ART 250. PART H)
GROUND
CLAMP
ELECTRIC
SERVICE
EQUIPMENT
NEC-NATIONAL ELECTRICAL CODE
S2898A
E3
ENGLISH

INTRODUCTION
Your Semi-Pro Compact Disc + Graphics Karaoke Center will provide you with many years of
fun and entertainment. It can let you be the “star” as you sing along with your favorite recordings
and hear your voice with the music through the system’s speakers.
This Karaoke Center is easy to use, yet full of features with a compact design. Just a few simple
instructions and you will become an expert. Before you use your unit, please glance through this
manual to familiarize yourself with all the features available and the sections of the manual that
describe their operation. Next, go to the section for the specific operation you wish to perform.
For your easy reference, listed here are some of the main features of this Karaoke Center:
Lyrics on TV screen - displays the lyrics with the tempo of music when playing CD+G discs.
Auto Voice Control - lets you replace the original singer's voice with your own voice when any
prerecorded, multiplex karaoke disc or tape is played. To activate, just rotate Mic Volume to a
comfortable listening level, and Auto Voice Control for the best balance between playback and
microphone levels.
Balance Control - lets you adjust the balance between the prerecorded original singer's voice
and the music if you use a multiplex karaoke disc.
Reverb Control - lets you add an reverb to enrich your voice for a concert hall effect.
Multiple Karaoke music center - it plays audio Compact Discs, CD+Graphics discs.
Built-In Stereo Speaker - lets you share the music with your family or friends.
Auxiliary Input Jacks - lets you connect another audio input source, such as a stereo VCR or a
Radio Tuner, so you can sing along with another music source.
Auxiliary Output Jacks - lets you connect another audio output component, such as an
equalizer/booster or a PA system.
Extension Speaker Jack - allows extra speaker hook-up.
Three CDG Changer - allows up to 3 CDG Discs and/or audio Compact Discs to be played and
programmed continuously and automatically.
Tone - the TREBLE (high tone), MEDIUM (flat tone), and BASS (low tone) features enable you
to define the sound processor settings.
Guitar or Keyboard Jack - Guitar or Keyboard can be connected to this unit by using guitar or
keyboard jack. The volume of guitar or keyboard coming from the SMG-900 can be adjusted by
turning the guitar or keyboard’s volume control.
E4
ENGLISH
E5
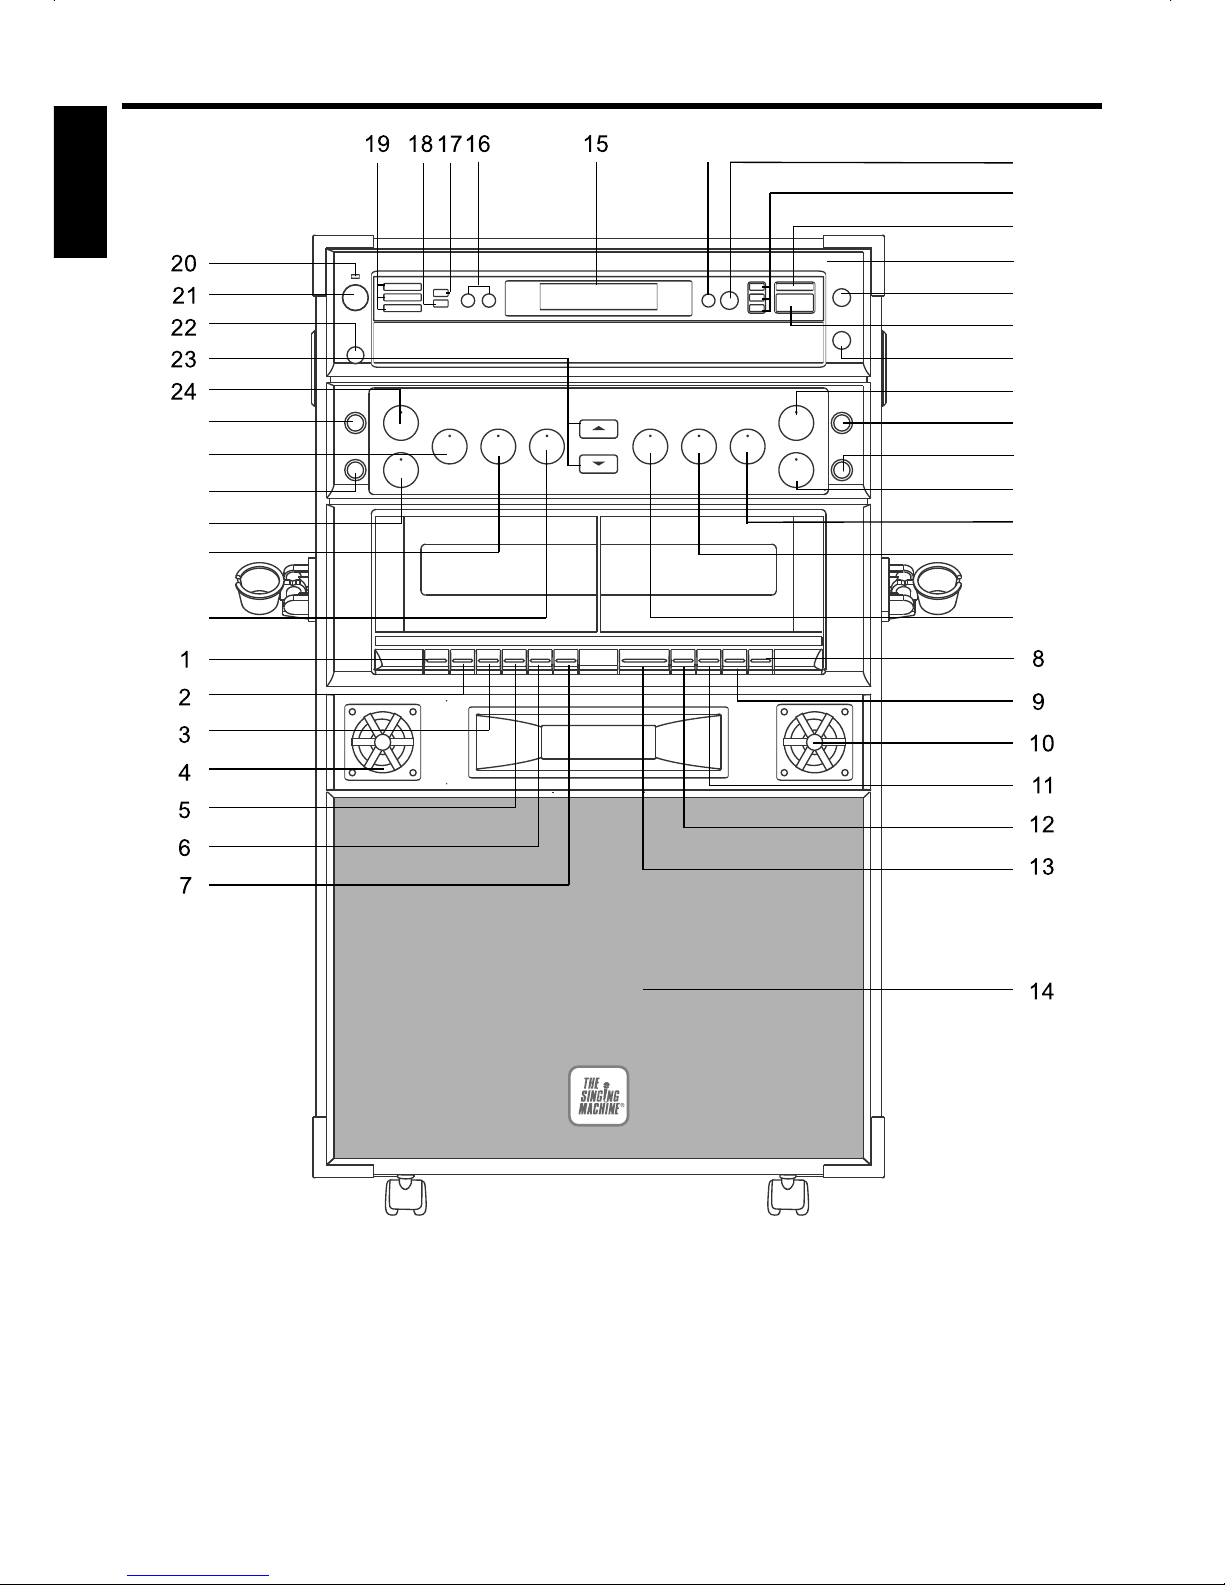
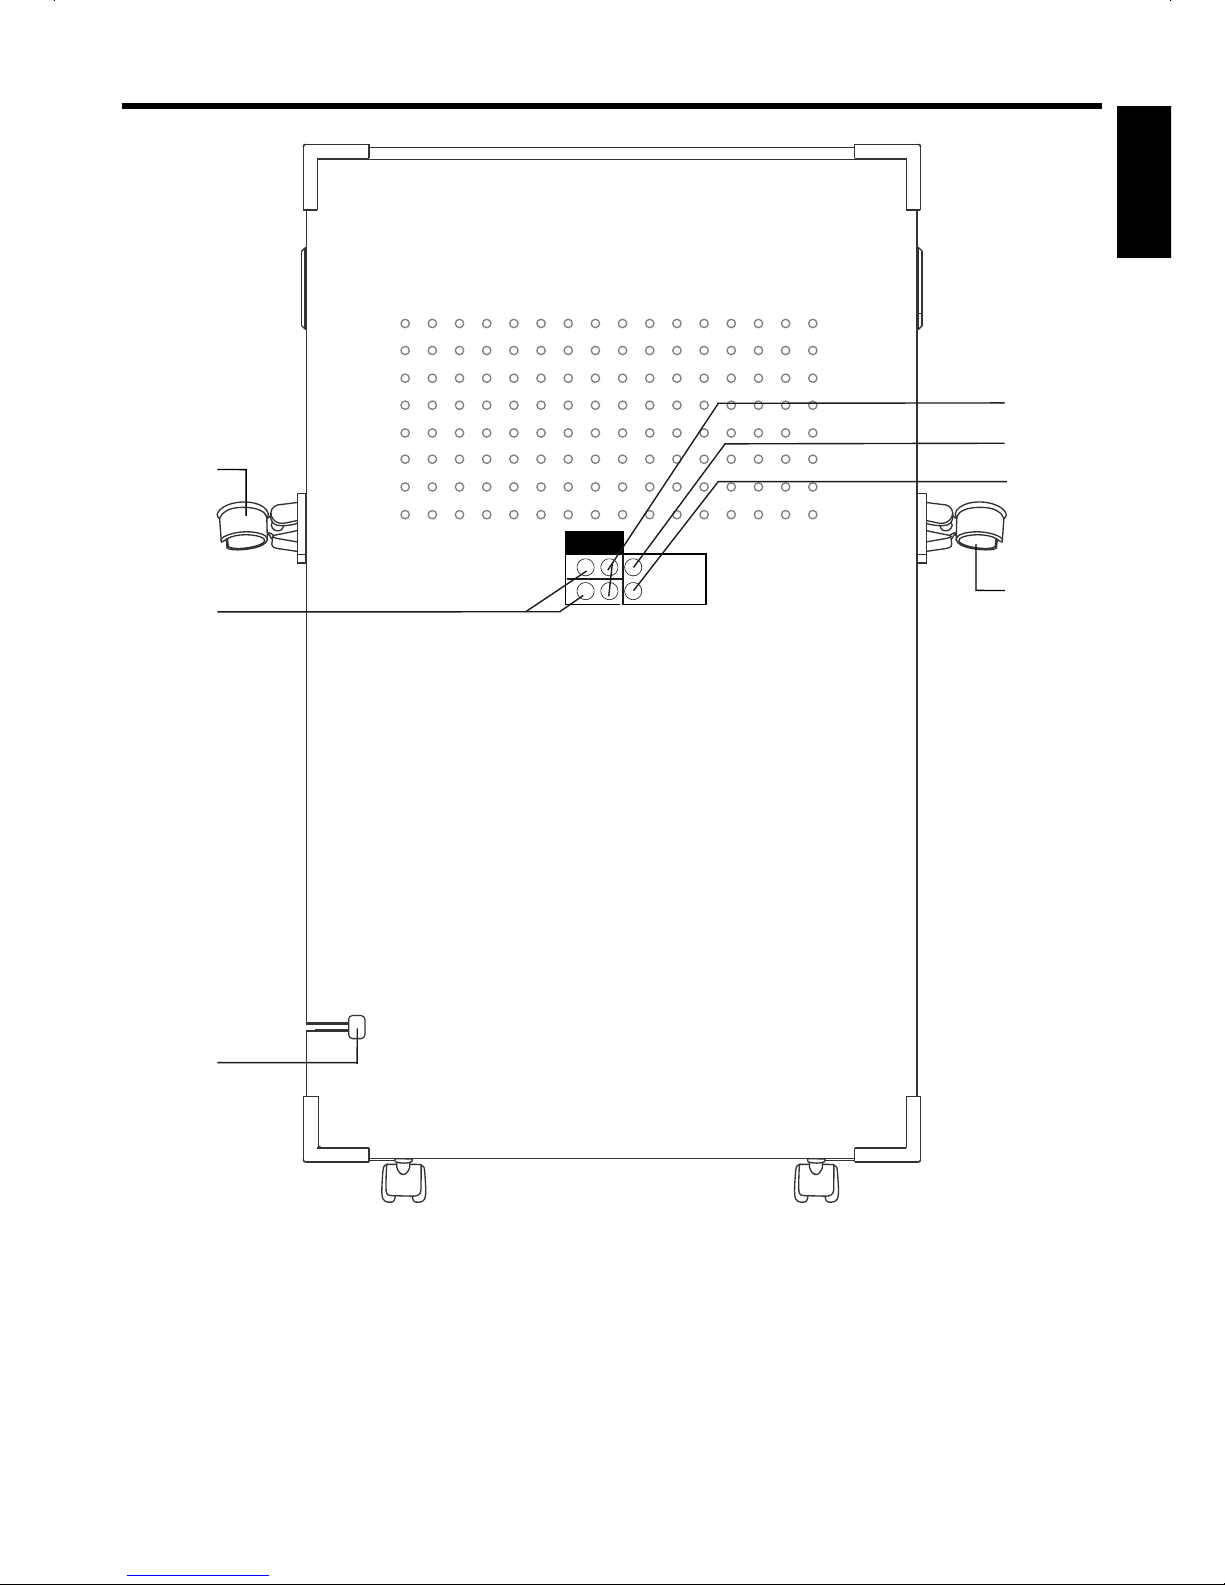
CONTROL LOCATIONS
ENGLISH
For Tape 1 10. Tweeter 21. STANDBY Button
1. RECORD Button 11. FAST FORWARD 22. FUNCTION SELECT
2. PLAY Button 23. MASTER VOLUME
(FFWD) Button
3. REWIND Button
12. REWIND Button Control
4. Tweeter
13. PLAY Butt on 24. GUITAR VOLUME
5. FAST FORWARD
14. Loudspeakers
Control
(FFWD) Button 15. VFD Di splay
25. GUITAR INPUT Jack
6. STOP/EJECT Button 16. SKIP Buttons
26. TREBLE Control
7. PAUSE Button 17. PROGRAM Button
27. KEYBOARD INPUT
For Tape 2 18. REPEAT Button
Jack
8. PAUSE Button 19. KEY Control Buttons
9. STOP/EJECT Button 20. STANDBY LED
25
32
33
34
35
36
37
38
40
39
SMG-900
26
28
29
27
30
41
42
43
44
31
45
E6
CONTROL LOCATIONS
ENGLISH
28. KEYBOARD 37. OPEN/CLOSE Button 44. REVERB Control
38. HEADPHONE Jack 45. BALANCE Control
VOLUME Control
39. MIC 1 VOLUME 46. MIC Holder
29. MEDIUM Control
47. AUX OUT Jack (L/R)
30. BASS Control Control
48. AC POWER Cord
31. STOP Button 40. MIC 1 Jack
49. AUX IN Jack (L/R)
32. PLAY/PAUSE Button 41. MIC 2 Jack
50. VIDEO OUT Jack
33. DISC 1,2,3 Buttons 42. MIC 2 VOLUME
51. EXT. SPEAKER Jack
34. DISC SKIP Button
Control
52. MIC Holder
35. Model Number
43. AUTO VOICE
36. MUTE Button
CONTROL
VIDEO OUT
EXT. SPEAKER
L
R
OUT
AUX
IN
49
52
50
51
47
48
46
E7
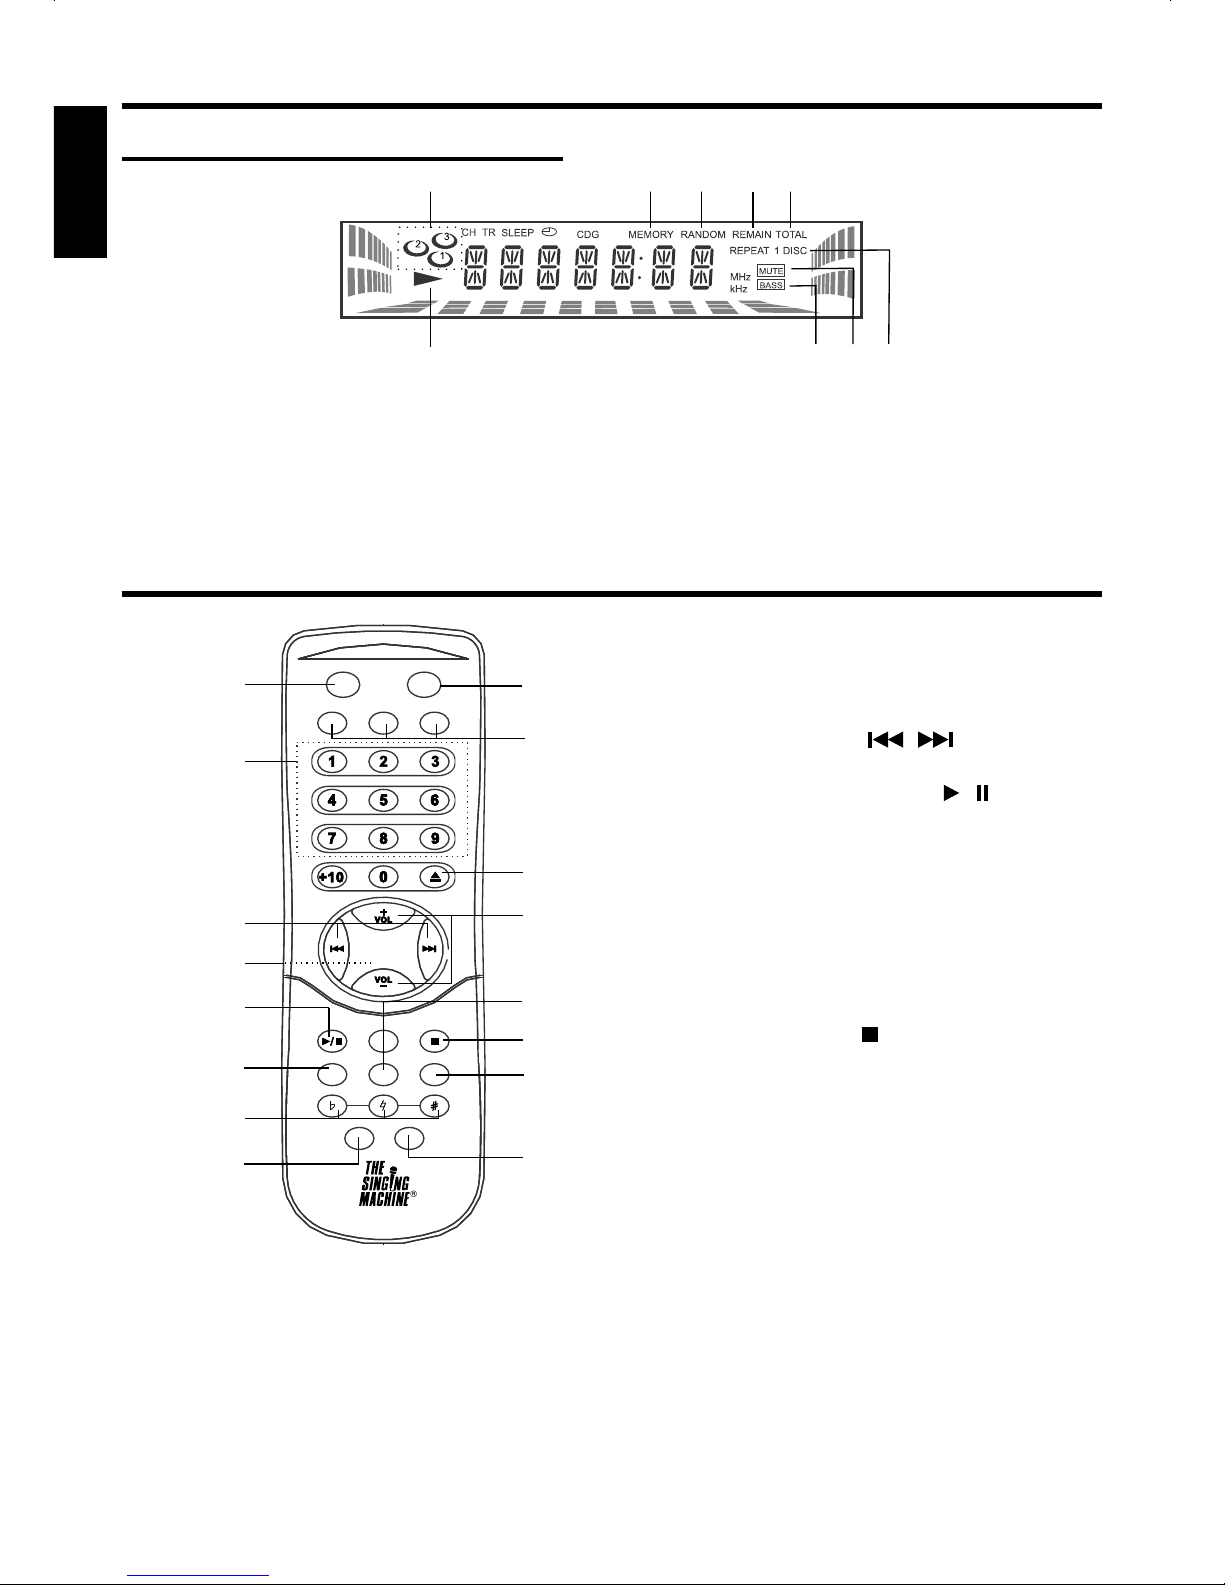
DISPLAY
VFD DISPLAY - ON THE UNIT
1. DISC Icons
2. MEMORY Icon
3. RANDOM Icon
4. REMAIN TRACK Icon
5. TOTAL TRACK Icon
6. DISC PLAY Icon
7. BASS Icon
8. MUTE Icon
9. REPEAT Icon
REMOTE CONTROL OVERVIEW
REMOTE CONTROL (BATTERIES NOT INCLUDED)
To operate
! Remove rear battery compartment lid, by sliding it away from the back cabinet.
! Install two alkaline AA batteries in the proper position with + & - polarities as indicated
in the battery compartment. Be sure to replace the compartment lid.
! For trouble free use, point remote control directly at the SMG-900.
! If remote fails to operate, change the batteries.
(This Remote Control is not compatible with universal remote controls.)
1. FUNCTION Button
2. NUMBER Buttons
3. SKIP Buttons
4. Battery Compartment Lid
4. PLAY/PAUSE Button
5. REPEAT Button
6. KEY CONTROL Buttons
7. MUTE Button
8. STANDBY Button
9. DISC 1,2,3 Buttons
10. OPEN/CLOSE Button
11. VOLUME Buttons
12. RANDOM Button
13. STOP Button
14. PROGRAM Button
15. DISPLAY Button
16. Battery Compartment Lid
/
/
ENGLISH
1 2 3 4 5
6 7 8 9
16
RC-900
4
7
8
9
10
11
12
13
15
14
1
2
3
6
5
 Loading...