

The Singing Machine SMG-137 Instruction Manual

SMG-137
Compact Disc + Graphic
Karaoke Center
CD + Diseños
Karaoke System
Compact Disque + Graphiques
Système De karaoké
Please read before using this unit.
Lea antes de usar esta unidad.
Veuillez lire avant d'utiliser cet appareil.
Instruction Manual
Manual De Instrucción
Manuel D'instruction
WARNINGS
WARNING: TO REDUCE THE RISK OF
FIRE OR SHOCK HAZARD, DO NOT EXPOSE
THIS PRODUCT TO RAIN OR MOISTURE.
CAUTION: TO PREVENT THE RISK OF
ELECTRIC SHOCK, DO NOT REMOVE COVER
OR BACK. NO USER-SERVICEABLE PARTS
INSIDE. REFER SERVICING TO QUALIFIED
PERSONNEL.
CAUTION
RISK OF ELECTRIC SHOCK
DO NOT OPEN
E1
ENGLISH
The CAUTION marking is located at the rear
panel.
The product shall not be exposed to dripping
or splashing and that no objects filled with
liquids, such as vases, shall be placed on the
product.
The normal ventilation of the productshallnot
be impeded for intended use.
DRIPPING WARNING
VENTILATION WARNING
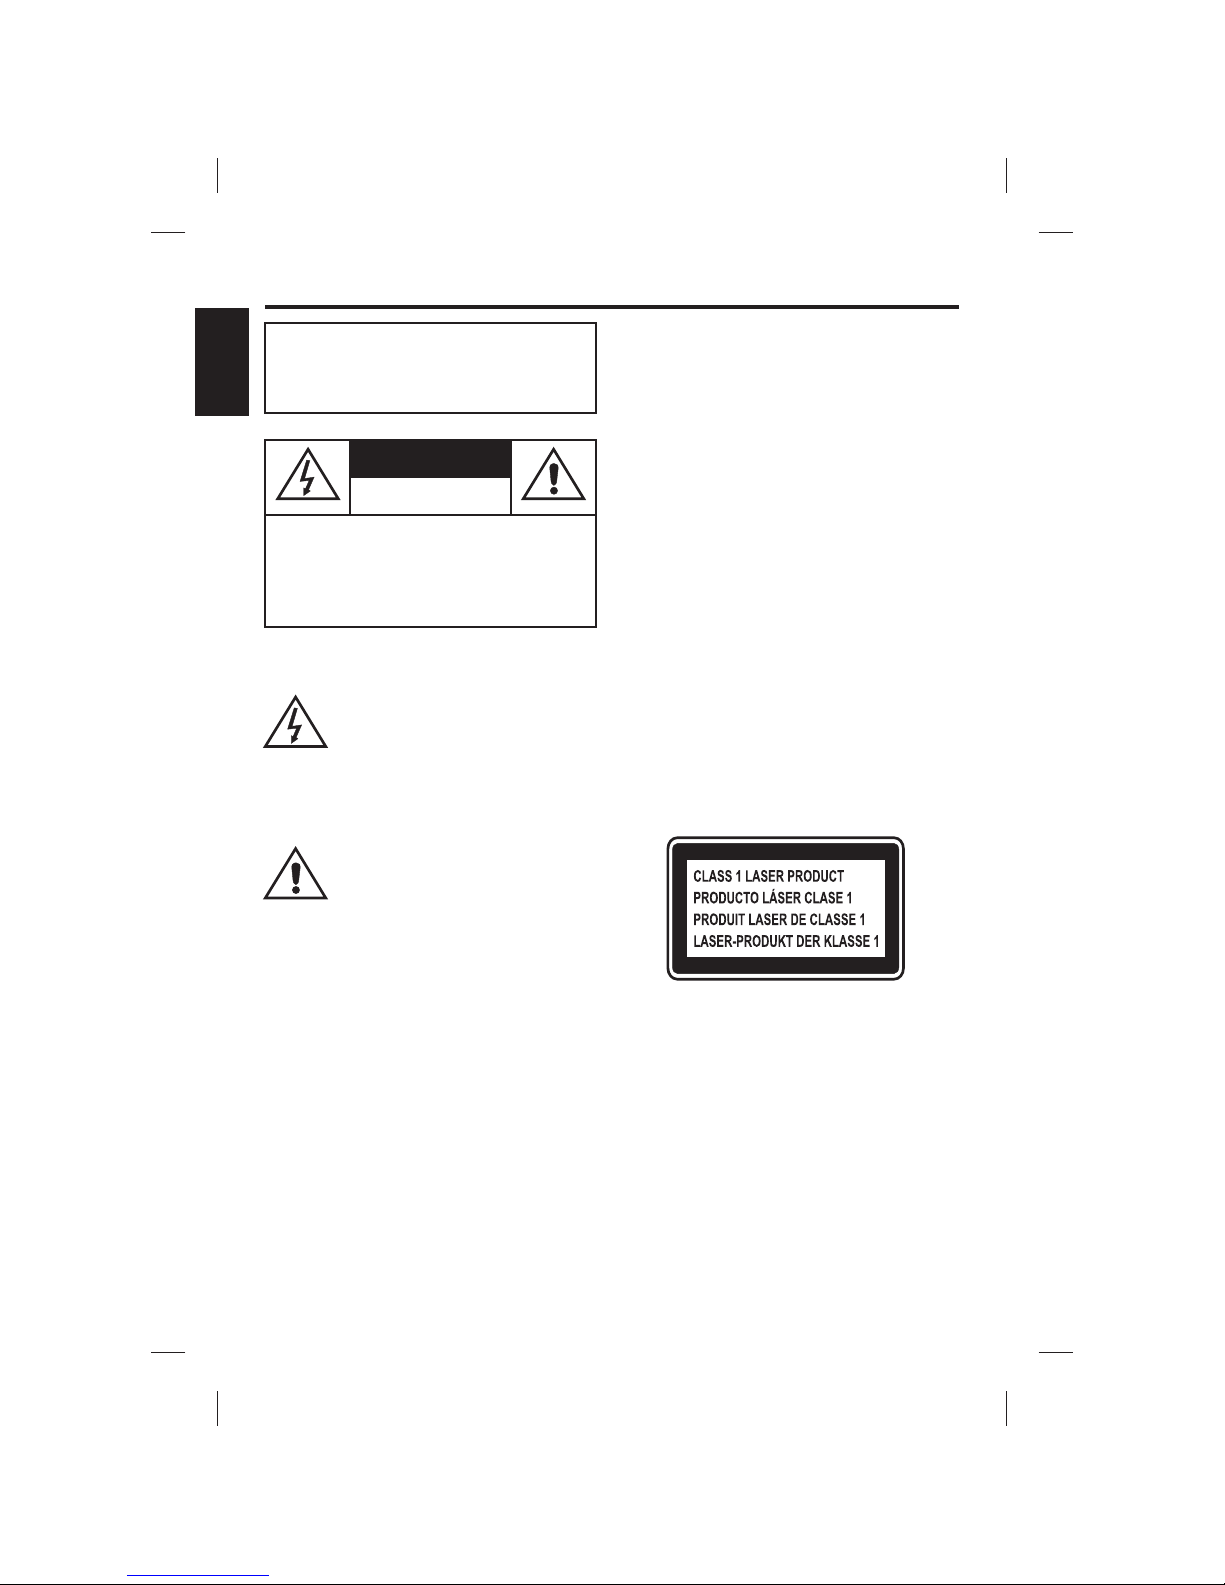
This symbol is intended to alert you
of the presence of un-insulated
dangerous voltage within the
product's enclosurethat might be of
sufficient magnitude to constitute a
risk of electric shock. Do not open
the product's case.
This symbol is intended to inform
you that important operating and
maintenance instructions are
included in the literature
accompanying this product.
CAUTION
TO PREVENT ELECTRIC SHOCK, MATCH
WIDE BLADE OF PLUG TO WIDE SLOT,
FULLYINSERT.
This CD player is made and tested to meet
exacting safety standards. It meets FCC
requirements and complies with safety
performance standards of the U.S.
Department of Health and Human Services.
This CD player employs a laser light beam.
Only a qualified service person should
remove the cover or attempt to service this
device, due to possible eye injury.
The use of controls, adjustments, or
procedures other than those specified
herein might result in hazardous radiation
exposure.
The apparatus shall be used in an open
area.
This compact disc player is classified as a
CLASS 1 LASER product.
The CLASS 1 LASER PRODUCT label is
located at the rear panel.
Invisible laser radiation when open and inter
locks defeated.Avoid exposuretobeam.
Warnings:
CAUTION!
!
!
!
CAUTION
IMPORTANT
Since CD circuitry may cause interference to
other radio tuners nearby, switch this unit off
when not in use or move it away from the
affected radio tuner.
This class[B] digital apparatus complies
with Canadian ICES-003.

WARNINGS
NOTE: This digitalapparatus does not exceed theClass Blimits for radio noise emissions from digitalapparatus as
set outin the Radio Interference Regulations of IndustryCanada. These limits are designed to provide reasonable
protection against harmfulNterference ina residential installation. This equipmentgenerates, usesand can radiate
radio frequency energy and, if not installed and used in accordance with the instructions, may cause harmful
interference to radio communications. However,there is no guarantee that interference will notoccur ina particular
installation. If this equipment does cause harmful interference to radio or television (which can be determined by
turning the equipment off), the user is encouraged to try to correctthe interference by one or more of the following
measures:
Reorient or relocatethe receivingantenna.
Increase the separationbetween the equipmentand receiver.
Connect the equipmentinto anoutlet ona circuitdifferent fromthat towhich thereceiver isconnected.
Consult the dealeror anexperienced radio/ TV technicianfor help.
!
!
!
!
E2
IMPORTANT SAFETY INSTRUCTIONS
1. Read Instructions
2. RetainInstructions
3. Heed Warnings
4 Follow Instructions
5. Cleaning
6. Attachments
7. Water and Moisture
8. Accessories
9.
10. Ventilation
11. Power Sources
-All the safetyand operatinginstructions should be readbefore the productis operated.
- The safetyand operating instructionsshould beretained forfuture reference.
-All warnings onthe productand in the operatinginstructions should beadhered to.
. -All operating anduse instructionsshould be followed.
- Unplug this product from the wall outlet before cleaning. Do not use liquid cleaners or aerosol
cleaners. Use adamp clothfor cleaningthe exterioronly. Do NOTattempt to cleanthe inside.
- Do not use attachments not recommended by the product manufacturer as they may cause
hazards.
- Do not use this product near water - for example, near a bath tub, wash bowl, kitchen
sink, or laundrytub; ina wetbasement, ornear a swimming pool,and the like.
- Do not place thisproduct on an unstable cart, stand, tripod, bracket, or table.The product may
fall, causing serious injury to a child or adult, and serious damage to the product. Use only with a cart, stand,
tripod, bracket, or table recommended by the manufacturer, or sold with the product. Any mounting of the
product should follow the manufacturer'sinstructions, and should use amounting accessory recommended by
the manufacturer.
Aproduct and cartcombination shouldbe moved with care.Quick stops, excessive
force, and unevensurfaces maycause theappliance andcart Combination to overturn.
- Slots and openings in the cabinet are provided for ventilation andto ensure reliable operation of
the product and to protect it from overheating, and these openings must not be blocked or covered. The
openings should never be blocked by placing the product on a bed, sofa, rug, or other similar surface. This
product should not be placed in a built-in installation such as a bookcase or rack unless proper ventilation is
provided.
- This productshould be operatedonly fromthe type of powersource indicated onthe marking
label. If you are not sure of the type of power supply to your home, consult your product dealer or local power
company. For products intended to operate from battery power, or other sources, refer to the operating
instruction.
12. Grounding or Polarization
Alternate Warnings
- This product may be equipped with a polarized alternating current line plug (a
plug havingone bladewider thanthe other).This plugwill fitinto the power outlet only one way. This is a safety
feature. If you are unableto insertthe plug fully into the outlet,try reversingthe plug. If theplug shouldstill fail to
fit, contact your electrician to replace your obsolete outlet. Do not defeat the safety purpose of the polarized
plug.
- This product may be equipped with a three-wire grounding-type plug, a plug having a
third (grounding)pin. This plug will only fit into a grounding-type poweroutlet. Thisis asafety feature. Ifyou are
unable to insert the plug into the outlet, contact your electrician to replace your obsolete outlet. Do not defeat
the safety purposeof thegrounding-type plug.
ENGLISH
IMPORTANT SAFETY INSTRUCTIONS
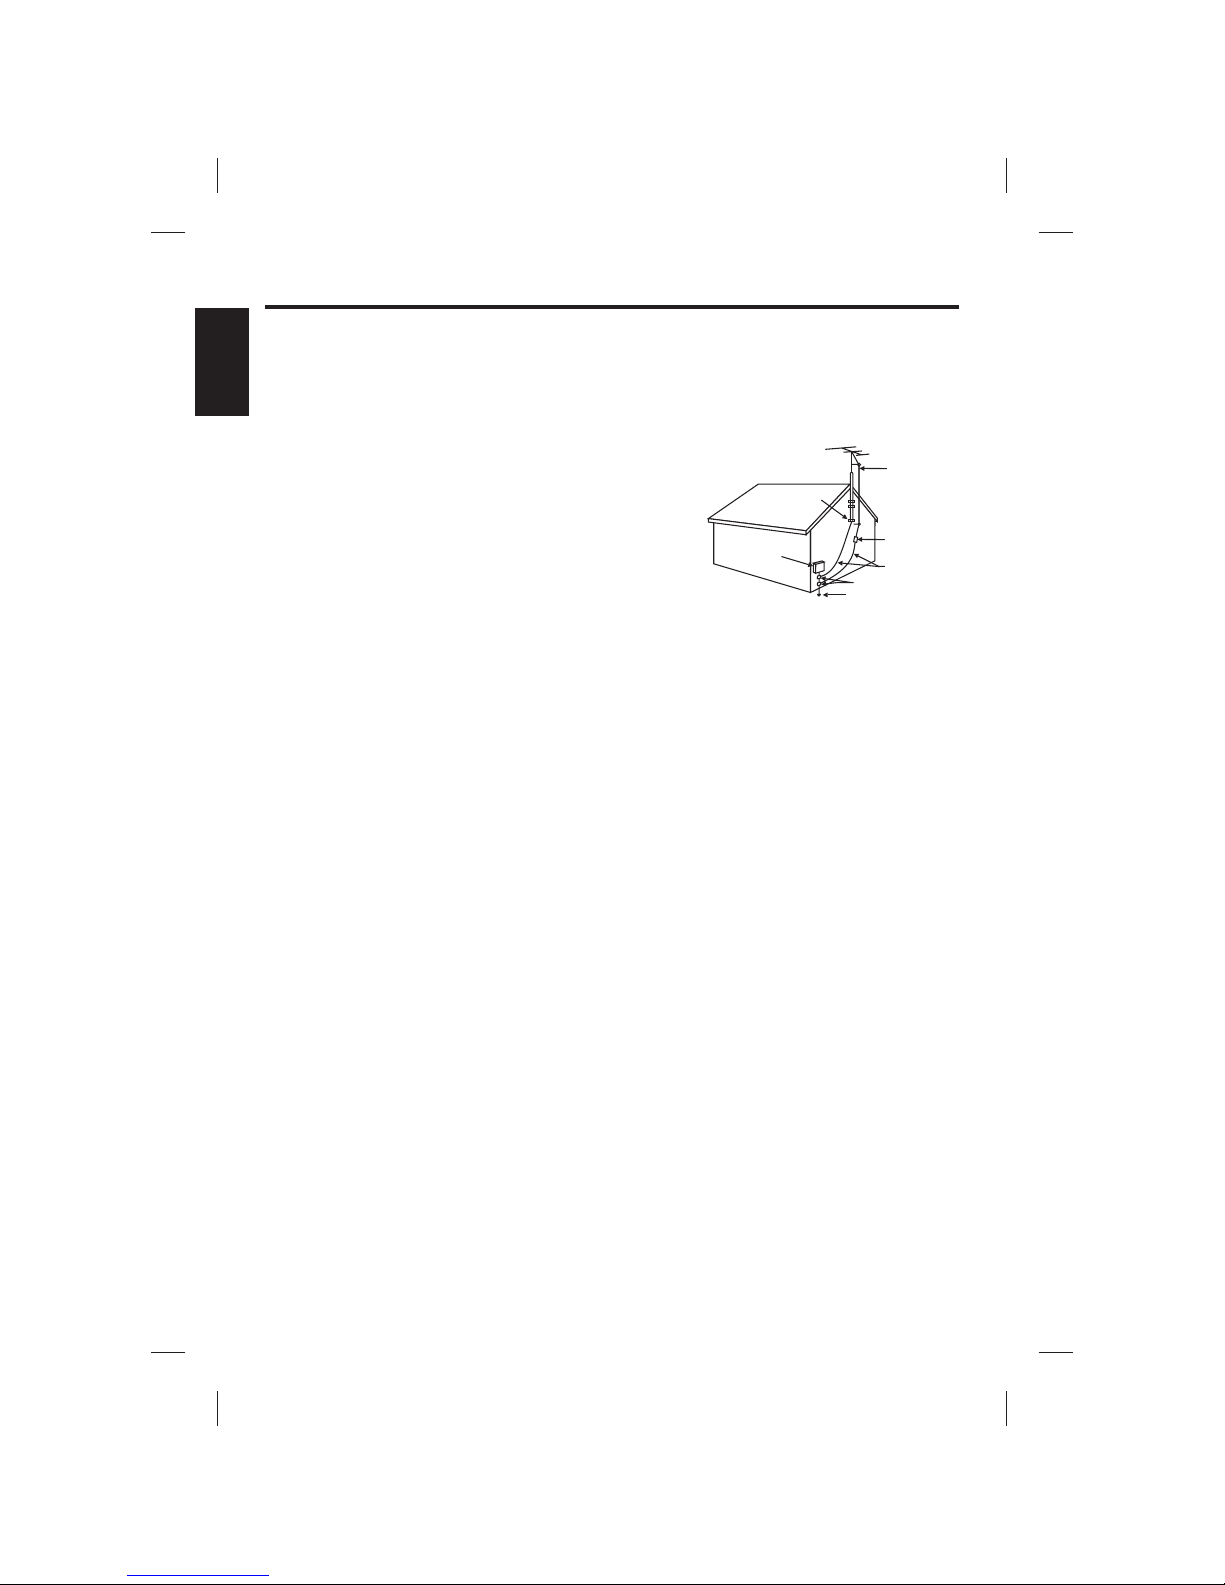
ANTENNA
LEAD IN
WIRE
ANTENNA
DISCHARGE UNIT
(NEC SECTION 810-20)
GROUNDING CONDUCTORS
(NEC SECTION 810-21)
GROUND CLAMPS
POWER SERVICE GROUNDING
ELECTRODE SYSTEM
(NECART 250. PART H)
GROUND
CLAMP
ELECTRIC
SERVICE
EQUIPMENT
NEC-NATIONALELECTRICAL CODE
S2898A
13. Power-Cord Protection
14. Protective Attachment Plug
16. Lightning
17. Power Lines
18. Overloading
19. Object and Liquid Entry
20. Servicing
21. Damage Requiring Service
22. Replacement Parts
23. Safety Check
24. Wall or Ceiling Mounting
25. Heat
- Power supply cords should be routed so that they are not likely to be walked on or
pinched by items placed upon or against them, paying particular attention to cords at plugs, convenience
receptacles, and thepoint where theyexit fromthe product.
- The product is equipped with an attachment plug having overload protection.
This is a safety feature. See Instruction Manual for replacement or resetting of protective device. If
replacement of the plug is required, be sure the service technician has used a replacement plug specified by
the manufacturer thathas thesame overloadprotection asthe original plug.
- For added protection for this product during a lightning storm, or when it is left unattended and
unused forlong periods oftime, unplug itfrom the walloutlet and disconnectthe antenna orcable system. This
will prevent damageto theproduct dueto lightningand power-line surges.
-An outside antennasystem shouldnot be located in thevicinity ofoverhead power lines orother
electric light or power circuits, or where it can fall into such power lines or circuits. When installing an outside
antenna system, extreme care should be taken to keep from touching such power lines or circuits as contact
with them mightbe fatal.
- Do not overload wall outlets, extension cords, or integral convenience receptacles as this can
result in arisk offire orelectric shock.
- Never push objects of any kind into this product through openings as they may
touch dangerous voltage points orshort-out parts thatcould resultin afire or electric shock. Never spill liquid of
any kind onthe product.
- Do not attempt to service this productyourself as openingor removing covers may expose you to
dangerous voltage orother hazards. Referall servicingto qualifiedservice personnel.
- Unplug this product from the wall outlet and refer servicing to qualified service
personnel under thefollowing conditions:
a) When the power-supplycord orplug isdamaged,
b) If liquid hasbeen spilled,or objectshave fallen intothe product,
c) If theproduct has beenexposed torain or water,
d) If the product does not operate normally by following the operating instructions. Adjust only those
controls that are covered by the operating instructionsas an improperadjustment of other controls may
result in damage and will often require extensivework by aqualified technician torestore the product to
its normal operation.
e) If the producthas beendropped ordamaged inany way, and
f) When the productexhibits a distinctchange inperformance -this indicatesa need for service.
- When replacement parts are required, be sure the service technician has used
replacement parts specified by the manufacturer or have the same characteristics as the original part.
Unauthorized substitutions mayresult infire, electricshock, orother hazards.
- Upon completion of any service orrepairs tothis product, ask the service technicianto perform
safety checks todetermine thatthe productis inproper operating condition.
- The product should be mounted to a wall or ceiling only as recommended by the
manufacturer.
- The product should be situated away from heat sources such as radiators, heat registers, stoves, or
other products (includingamplifiers) that produceheat.
15. Outdoor Antenna Grounding - If an outside antenna is
connected to the receiver, be sure the antenna system is
grounded so as to provide some protectionagainst voltagesurges
and built-up static charges. Article 810 of the National Electrical
Code, ANSI/NFPA 70, provides information with regard to proper
grounding of the mast and supporting structure, grounding of the
lead-in wire to an antenna-discharge unit, size of grounding
conductors, location of antenna-discharge unit, connection to
grounding electrodes, and requirements for the grounding
Electrode. See figure:
E3
ENGLISH

INTRODUCTION
Your Compact Disc + Graphics Karaoke Center will provide you with many years of fun and
entertainment. It can let you be the “star” as you sing along with your favorite recordings and
hear your voice with themusic throughthe system’s speaker.
This karaoke center is easy to use, yet full of features with a compact design. After just a few
simple instructions, youwill become an expert.
Next, go to the section for the specific operation you
wish to perform.
For your easy reference,listed hereare some of the main features of this Karaoke Center:
- displays the lyrics withthe tempoof music when playing CD+G discs.
- lets you replace the original singer's voice with your own voice when any
prerecorded, multiplex karaoke disc or tape is played. To activate, just rotate Mic Volume to a
comfortable listening level, and Auto Voice Control for the best balance between playback and
microphone levels.
- lets you adjust the balance between the prerecorded original singer's voice
and the music whenusing amultiplex karaoke disc.
- lets you addan echoto enrich your voice for aconcert halleffect.
- lets you turn the volume control clockwise or counter-clockwise until
desired volume level is obtained.
- lets you sharethe musicwith your family or friends.
-
Lyricson TVscreen
Auto Voice Control
Balance Control
Echo Control
Master Volume Control
Built-In Speaker
Auxiliary Output Jacks
Before you attemptto use your unit, please read
this manual thoroughly to familiarize yourself with all the features available and the sections of
the manual that describe their operation.
allows you to connect another audio output component, such as an
equalizer/booster or a PAsystem.
ENGLISH
E4
E5
CONTROL LOCATIONS
ENGLISHENGLISH
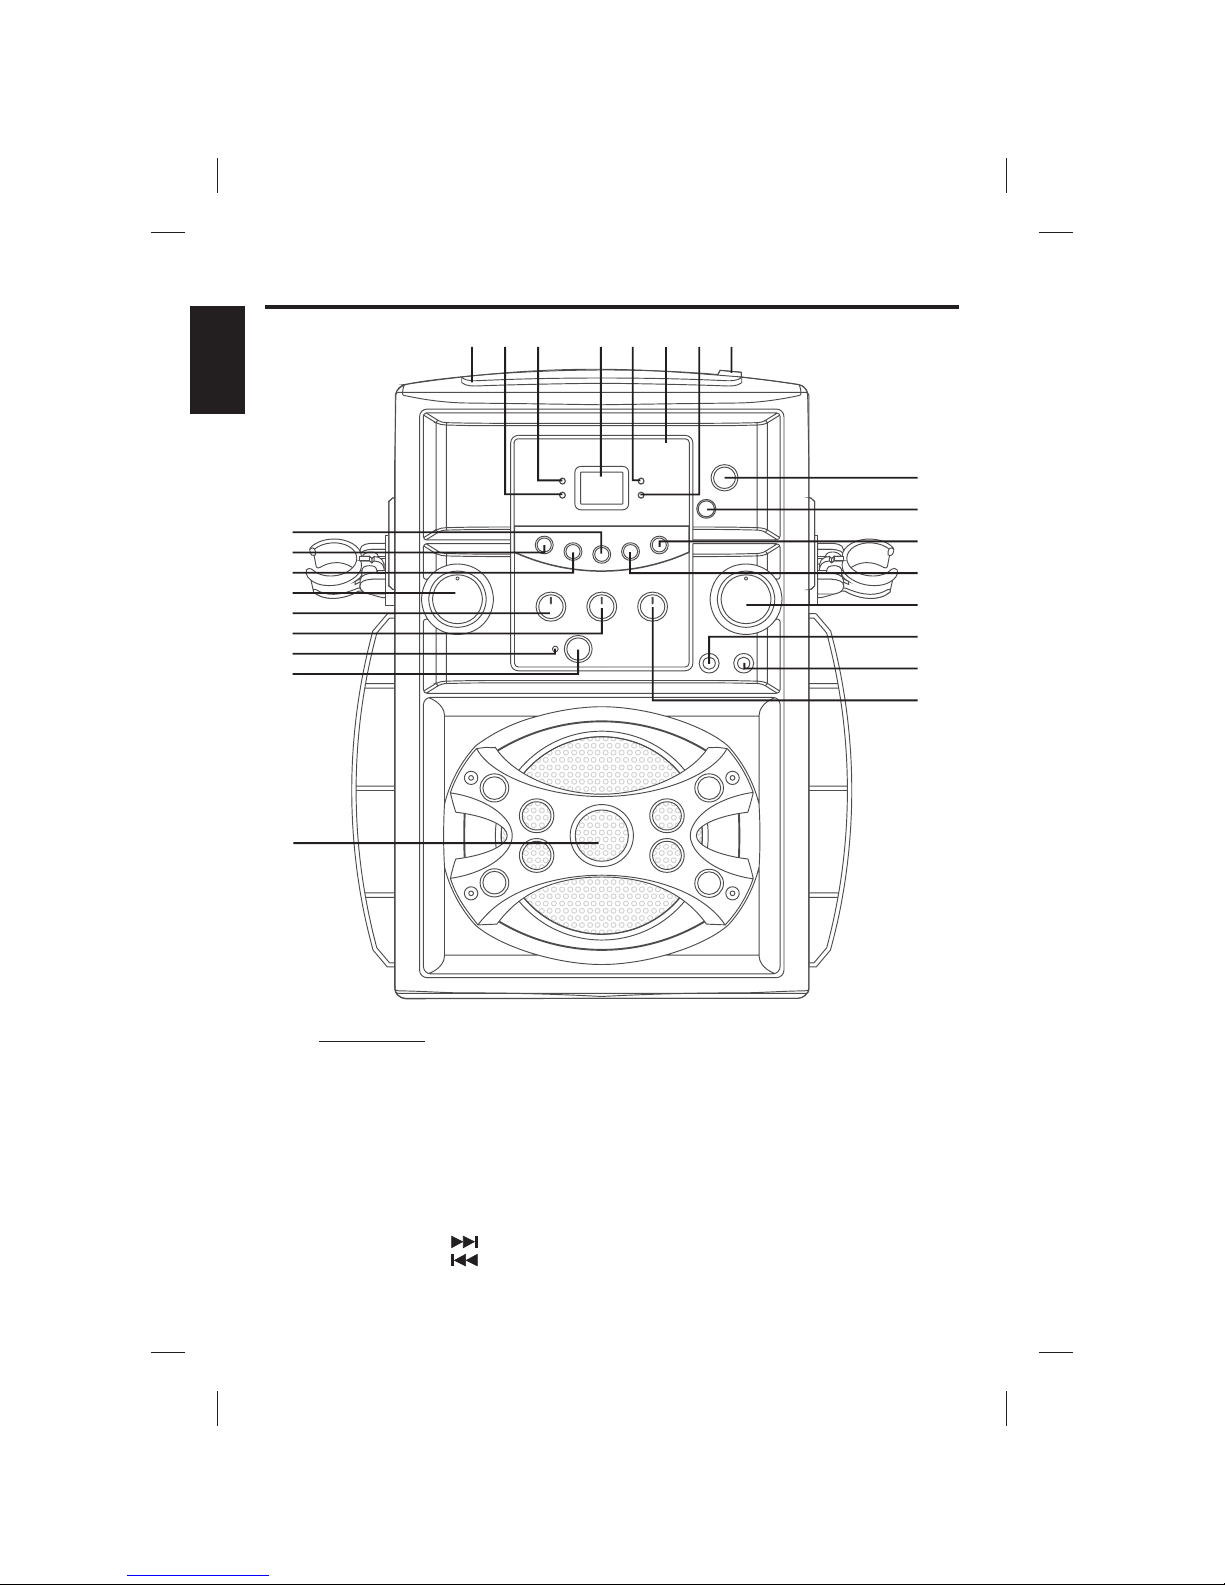
FRONT VIEW
1. CD Door
2.
3.
4. LED Display
5. PLAY/PAUSE LED Indicator
6. Model Number
7. CDG LED Indicator
8. CD Door OPEN Lid
9. PLAY/PAUSE Button
10. STOP Button
11. SKIP Button
12. SKIP Button
13. MIC Volume Control
14. MIC 1 Jack
15. MIC 2 Jack
16.
17.
18.
19.
20.
21.
22. BALANCE Control
23. ON/OFF
24. ON/OFF Button
25. Loudspeaker
REPEAT LED Indicator
PROGRAM LED Indicator ECHO Volume Control
REPEAT Button
INTRO Button
PROGRAM Button
MASTER Volume Control
AUTO VOICE CONTROL
LED
12
356
7
8
9
10
11
12
13
14
15
16
17
18
19
20
21
22
23
24
25
4
E6
ENGLISH
CONTROL LOCATIONS
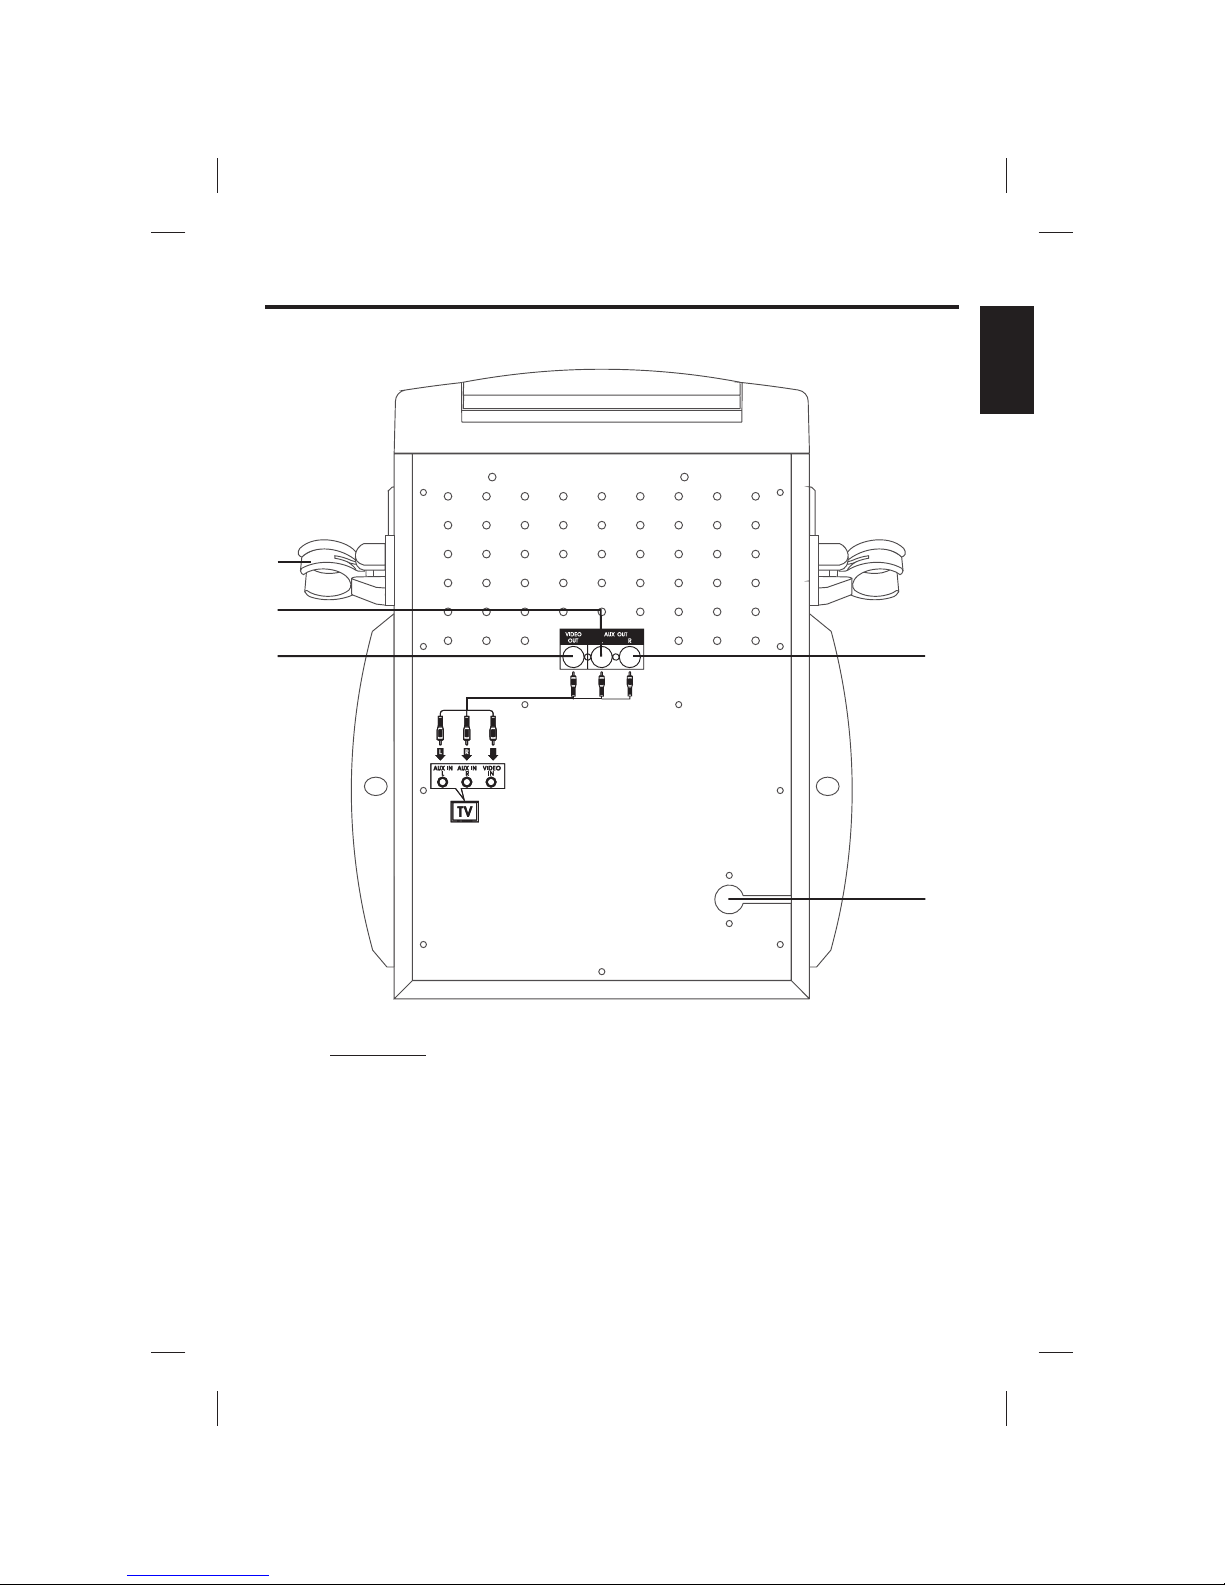
REAR VIEW
26. Mic Holder
27.
29. AUX OUT Jack (R)
30.AUX OUT Jack (L)
28. VIDEO OUT Jack
AC POWER Cord
27
28
29
30
26
MAKING THE CONNECTIONS
E7
ENGLISH
CONNECTING POWER
CONNECTING TOYOUR TV
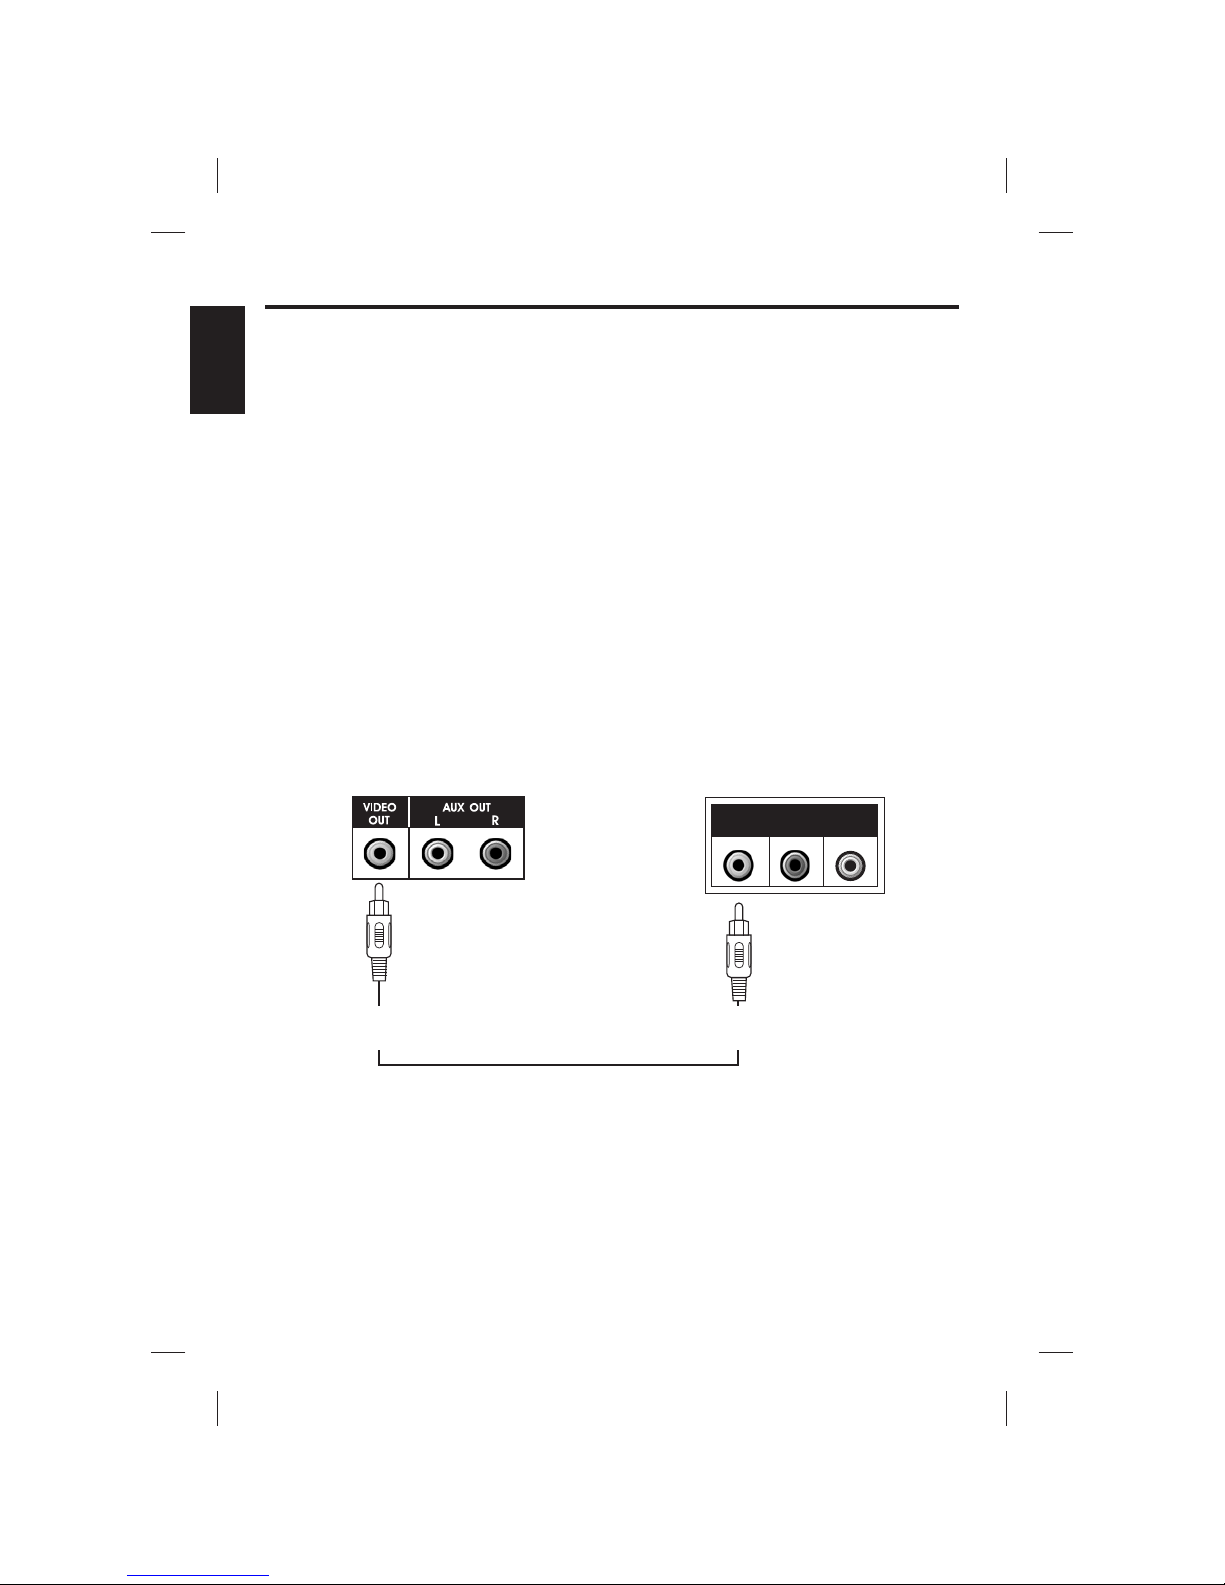
VIDEO CONNECTION
You can power the system from a standardAC outlet by using the supplied power cord.
CAUTION: The suppliedAC power cord hasa polarizedplug that fits into the wall outlet only one
way.If the plug does not fit properly, turn it over and try again. Donot forceit.
The Singing Machine includes a patch cord to provide the option of either connecting an
external audio/sound system and/or video device. The patchcord havethree RCA plugs ateach
end; the White and Red are for left and right audio connections, the Yellow is to connect the
video.
It is recommended that a CDG disc is playing while connecting your TV or VCR. The display of
the SingingMachine logo or lyricson your TV screen willinsure you have connectedyour TV or
VCR properly.
Please follow the steps belowto displayCDG lyrics on the TV screen:
(1) Locate themulticolored patch cords.
(2) Connect videocable (yellow) to the Video Out ofthe back of the Singing Machine.
(3) Connect theother end of the video cable (yellow)to theVideo Input on your TVor VCR.
REAR VIEW OF TV
VIDEO OUTPUT
(YELLOW JACK)
REAR VIEW OF
SINGING MACHINE
VIDEO
INPUT
AUDIO
INPUT
R
L
VIDEO INPUT
(YELLOW JACK)

If your television or VCR does not have the required Video Input, youwill need an RF Modulator
(Radio Frequency Modulator), which connects through your TV Antenna or cable line and
serves as Video Input.
An RF Modulator can be purchased at almost any consumer electronics retailer. If you are
connecting the video from the Singing Machine to either a television or a VCR video input jack,
you mustspecify the source the TV orVCR is to display.YourTV or VCR user guide cantell you
how to display thevideo signalfrom the ‘Video In’jack.
If you don’t have the manual for your TV or VCR, we suggest calling the TV or VCR,
manufacturer’s customerservice department. Onlythe manufacturerwill beable totell youvery
quickly how to configure your TV or VCR to display the video signal coming from the ‘Video
Input’jack.
Note: Some projection TV sets do not properly display the standard blue background when
using most CDGs.If thebackground coloris inconsistentor flashing, please try connecting your
Singing Machine to a standardtube television.
(1)
(2)
D
COMMON WAYSTO CONFIGUREYOUR TVOR VCR
Your Singing Machine is designed to connect to your TV the same way you would connect a
video camera, VCR or video game. The Singing Machine is constantly sending the video and
audio signals to the 'Video Out' and 'AUX OUT' jacks whenever you play a CDG. We
recommend playing a CDG on your Singing Machine prior to making these connections. Youwill
have the ability toview lyricson your TV screen assoon asyou complete the set up correctly.
We refer to TV/VCR because manufacturers use very similar ways to connect TVs and VCRs
and you can connect your Singing Machine to a TV, VCR or satellite system (contact your
satellite company forinstructions). The setup of your TV/VCR isthe most difficult part of making
the connection for displaying your Singing Machine lyrics. In most homes, the TV has either a
cable connected or antennae in use. Once you connect your Singing Machine to the TV/VCR,
choose the correct input on your TV/VCR to display lyrics from The Singing Machine instead of
the usual input from thecable orantennae.
Check your TV/VCR user manual for the easiest way to setup your particular entertainment
system. If you don't have your manual please contact your TV/VCR manufacturer for
information either by phoneor byviewing theirwebsite foronline assistance. We'velisted below
the most common waysof settingup a TV/VCR:
In the setup menu for configuring the TV/VCR there may be an option on 'Input Selection'
where you may choose between'Cable/Ant’, 'Video 1',or 'Video 2' etc.as theinput source.
Try looking for a 'Video' channel between the highest channel and the lowest channel on
your TV or VCR. (i.e. Between 99 and 2 also could be one of the following: 'VIDEO' or
'INPUT' or 'GAME')
(3) Look for a button on the remote control for the TV/VCR you are connecting to which notes
'VIDEO', 'VIDEO 1', ‘Game', 'AUX', 'EXT', 'LINE1', 'LINE-IN' or occasionally the 'VCR'
button will display the Videoinput source.
MAKING THE CONNECTIONS
E8
ENGLISH
MAKING THE CONNECTIONS
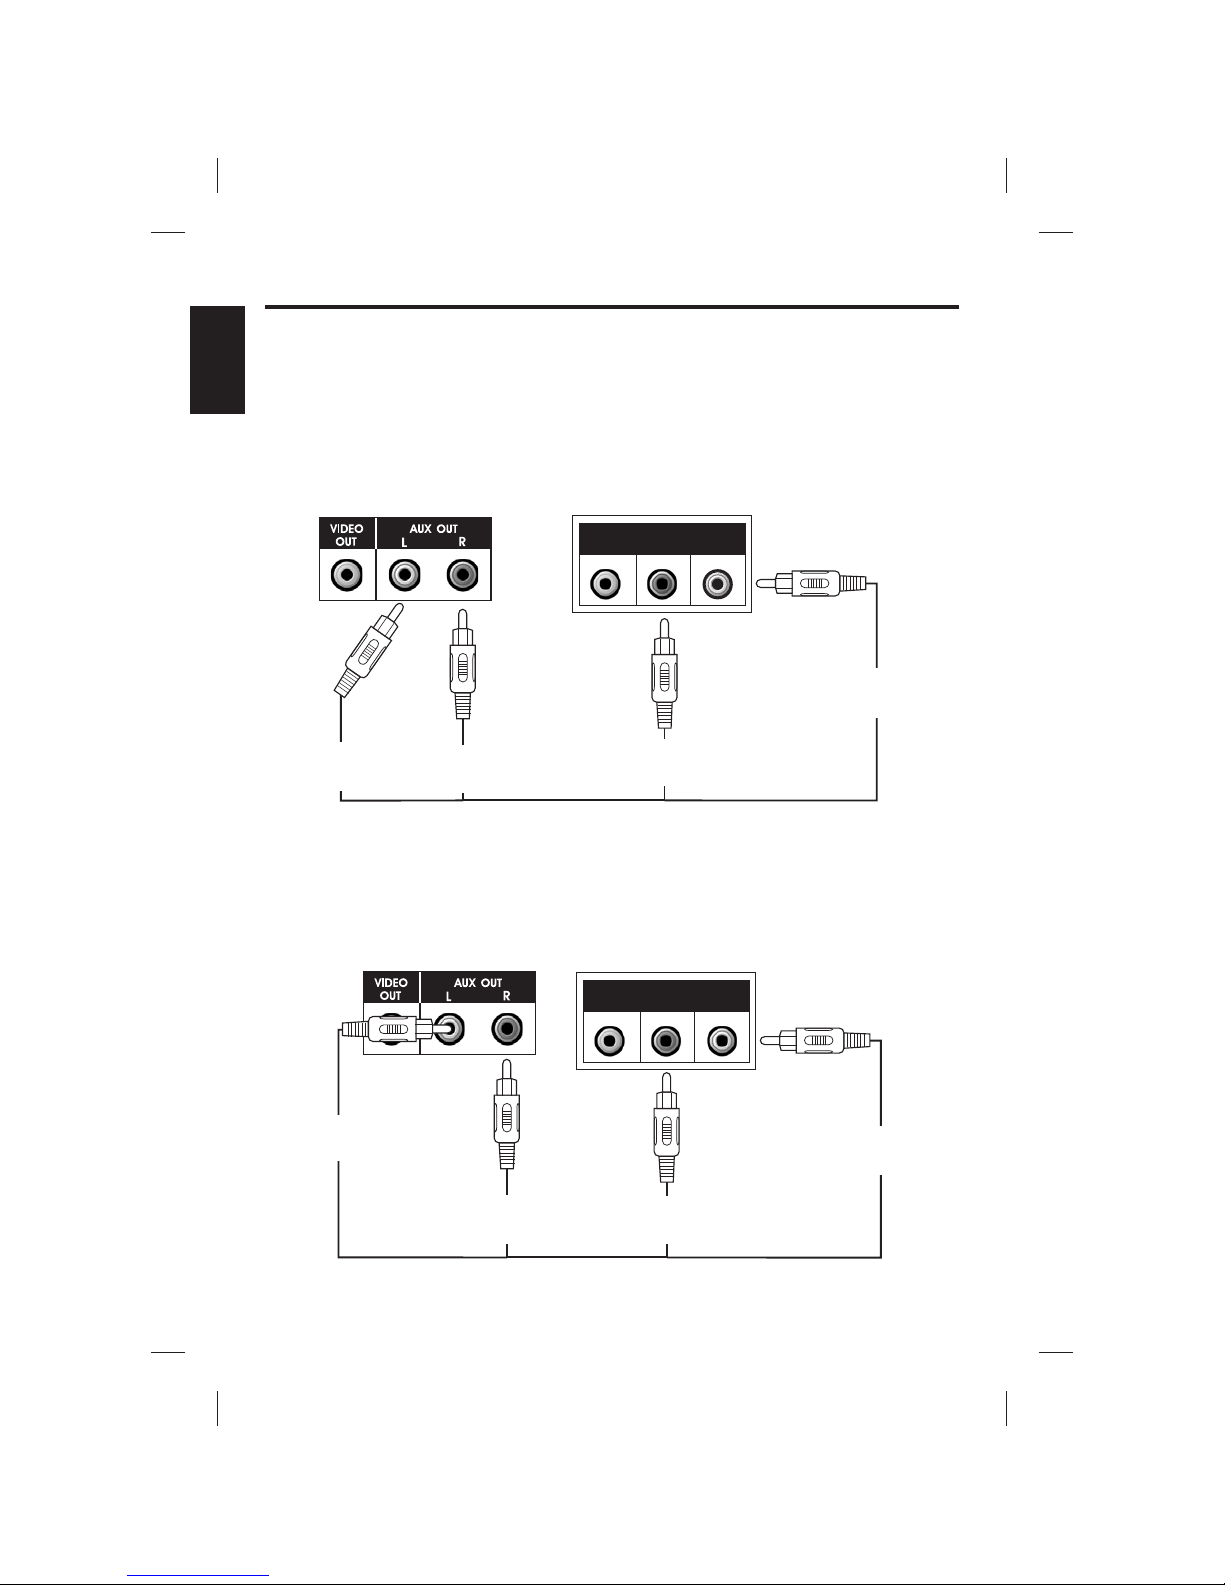
AUDIO CONNECTION
FOR CONNECTINGAN AUDIO COMPONENT FOR OUTPUT
Connect the unitto yourTV orhome stereosystem usingthe White and Red connections on the
supplied patch cord. Plug the white end of the patch cord into the white input jack on the unit.
Plug the red end ofthe patch cord into the red input jack on theunit. Now connect the other end
of the cable’s white (left channel) and red (right channel) plugs to your TV or home stereo
system’s ‘Audio In’or ‘Auxiliary In’ jacks.
To connect an audio component (such as a power amplifier or PA system amplifier) so you can
hear the system’s music& vocal through it, plug the audio component into theAUX OUT Jacks.
E9
ENGLISH
REAR VIEW OF TV
AUX OUTPUT
R
(RED JACK)
AUDIO INPUT
R
(RED JACK)
AUDIO INPUT
L
(WHITE JACK)
AUX OUTPUT
L
(WHITE JACK)
REAR VIEW OF
SINGING MACHINE
VIDEO
INPUT
AUDIO
INPUT
R
L
ANOTHER
AUDIO COMPONENT
VIDEO
INPUT
AUDIO
INPUT
R
L
AUDIO INPUT
R
(Red Jack)
AUDIO INPUT
L
(WHITE JACK)
AUX OUTPUT
R
(Red Jack)
REAR VIEW OF
SINGING MACHINE
AUX OUTPUT
L
(WHITE JACK)

CD OR CD+G OPERATION
D
Warning - Tapping ordropping themicrophone whileit ison canpermanently damage
your microphone. Resist theurge toswing the microphone around by the cord!
PREPARATION
PLAYING CD OR CD+G DISC
TURNING POWER ON/OFF
LOADINGA DISC
!
!
!
!
!
!
!
!
!
!
!
!
!
!
!
!
!
!
This unit is designed to play CD’s bearing the identification logo . If CD’s do not
conform to the CDstandard, theymay not play properly.
Fingerprints and dustshould be carefully wiped off with a soft cloth. Wipe in a straightmotion
from the center ofthe discto the outside edge.
Never usechemicals, such as record cleaning sprays, antistatic sprays orfluids, benzene or
thinner to clean compact discs. These chemicals will permanently damage the plastic
surface of the disc.
Always place the compact disc on the disc tray with the label facing upward. Compact discs
can be played ononly oneside.
To remove a disc fromits storage case, press down on thecenter of the case and lift the disc
out, holding it carefully bythe edges.
Discs should be returned totheir casesafter use to protect themfrom dustand scratches.
To prevent warping the disc, do not expose it to direct sunlight, high humidity or high
temperatures for extended periods oftime.
Do not applypaper or write anything on either sideof the disc. The inks used in somefelt-tips
pens, may damage thesurfaces ofthe disc.
Adjust MASTER VOLUME controlon yourunit, TV or audio systemto acomfortable level.
Adjust MIC/ECHO/BALANCE controls as needed to achieve the desired mix of music and
vocals through your TV orsound system.
Do not press thedisc coverof the CD compartment while it’splaying.
Never place anything except a compact disc on the disc tray. Foreign objects can damage
the unit.
Do not apply excessiveforce tothe disc cover.
Only place one disc onthe disctray at a time.
To power on the karaoke center,press the ON/OFF button, the ON/OFF LED will illuminate.
To turn off the system,press theON/OFF button again, the ON/OFF LED willturn off.
Lift up CD door toopen CD/CDGcompartment door.Place adisc in the compartment with the
printed side facing toward you.
Gently close the CD door to the CD compartment. After a few seconds, the LED will display
the total number oftracks. (Ifno disc is loaded, it willdisplay
""
" ").
(Refer to the Trouble Shooting Guide on page E13 if a disc is loaded but the total tracks
do not appear.)
E10
ENGLISH

E11
ENGLISH
PLAY/PAUSE MODE
STOPMODE
SKIP
SEARCH
REPEAT
PROGRAM
!
!
!
!
!
!
!
!
!
!
To start playing, press the PLAY/PAUSE button. The first track [ ] and the PLAY/PAUSE
LED will be lit.
To temporarily stop playing, press the PLAY/PAUSE button. The PLAY/PAUSE LED
Indicator will flash.
To resume play,press this button again.
If the STOP button is pressed in the course of playing, the disc it will cease to play. (The total
number of tracks will beshown onthe LED display.)
During STOP mode, you can skip up or down to your desired track number by pressing a
SKIP button( - SKIP - ).
To resume playing the selected song, press PLAY/PAUSEbutton.
When playing audio CD, press and hold the SKIP button ( -SKIP- ). The CDwill searchat
high speed in theforward or backwarddirection. Normalplay willcontinue whenyou releasethe
button.
To repeat the track currently playing, press the REPEAT button once. The REPEAT LED will
start to flash.
To repeat all tracks, press the REPEAT button twice. The REPEAT LED will remain
illuminated.
To clear the REPEAT function, press the REPEAT button again. The REPEAT LED will no
longer illuminate.
Use this button toprogram andplay back songs in a preselected order.
Step 1: Programming should be done in the stop mode only. Press the PROGRAM key
until the PROGRAM LED flashes, the track will read [ ].
Step 2: Press the double arrow keys ( -SKIP- ) to select a desired track.
Step 3: Press PROGRAM key to confirm entry. You can repeat the same steps up to a
maximum of 20 tracks.
Step 4: Press PLAY to activate PROGRAM.
Press the STOP buttonto clear all the programmed entries.
PLEASE NOTE: Pressing pause when a CDG is playing may cause distorted lyrics on the
monitor. Any distortion will remain until the whole screen is refreshed during
an instrumental break oryou stopthe song and start it fromthe beginning.
Press the INTRO button once,
of each track as an introduction.
Press the INTRO button again to stop intro scan play.
Note: The first few seconds of some tracks are silence.
(For both CD andCDG discs)
(For audio CD disconly)
INTRO
!
!
then press PLAY. The CD player will play up to 10 seconds
CD OR CD+G OPERATION
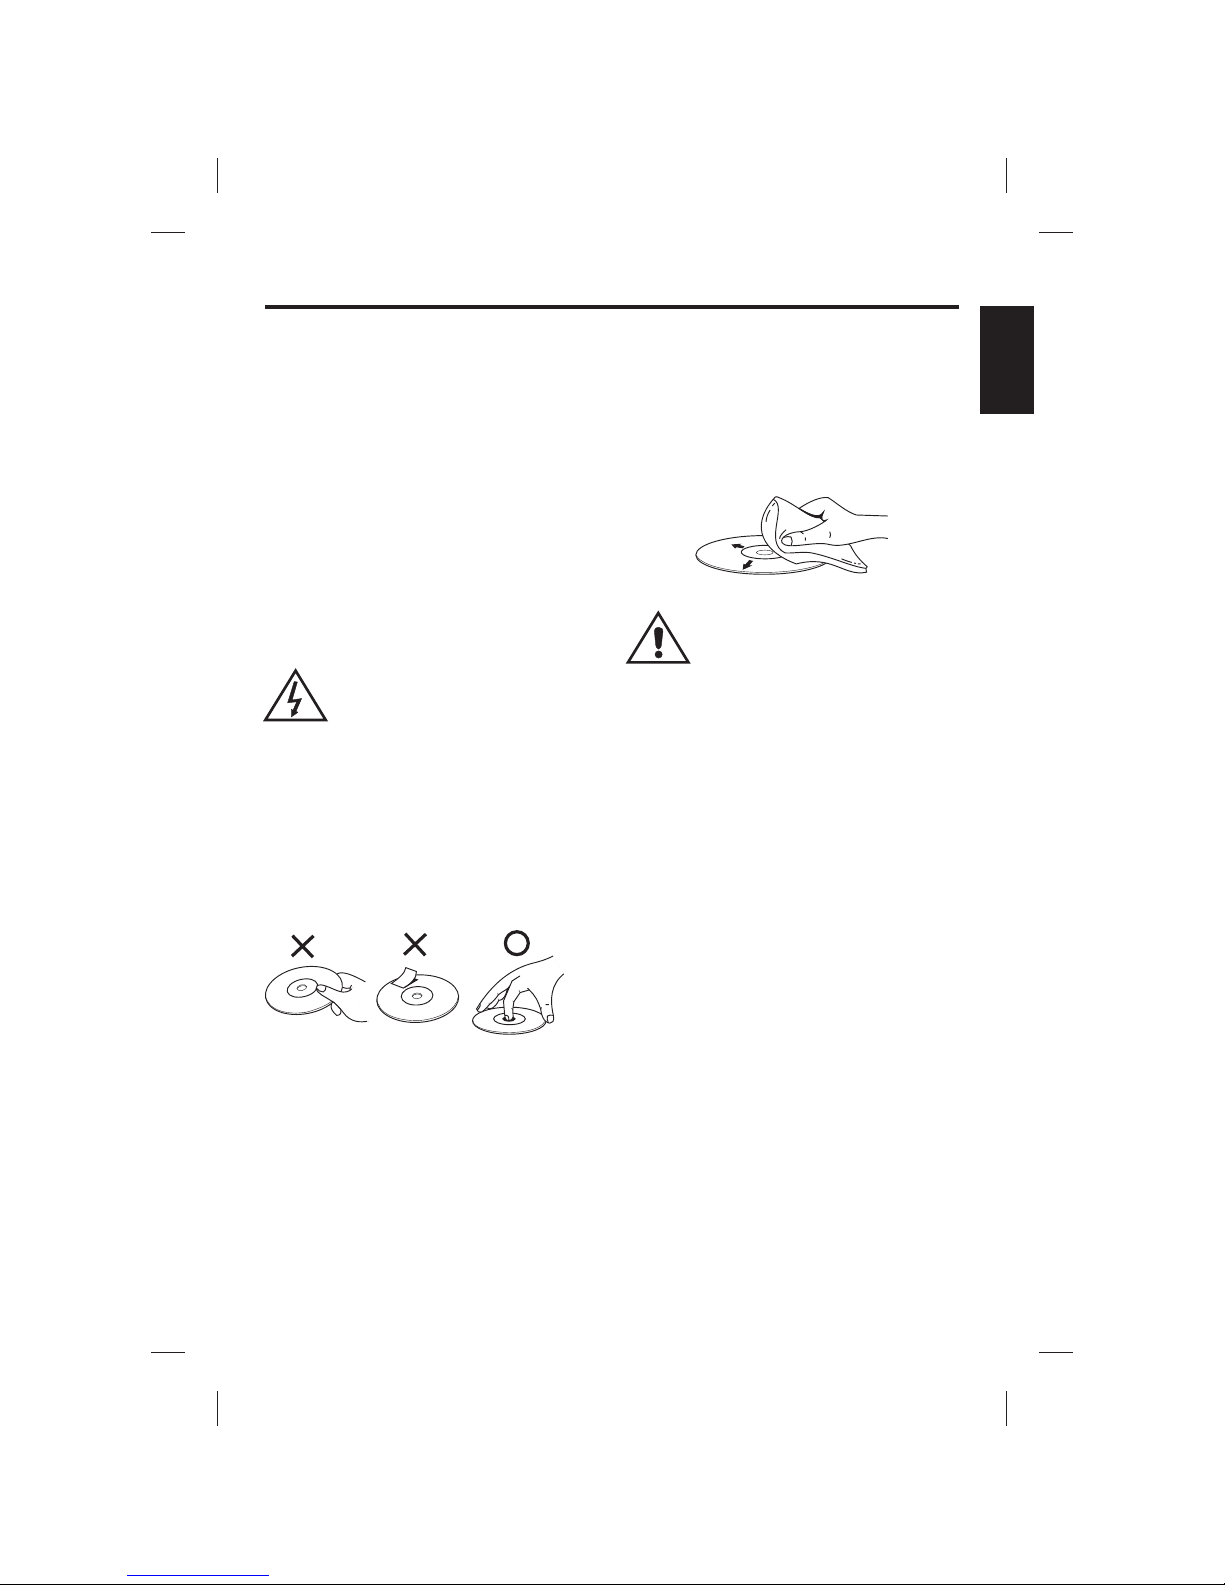
CLEANING DISC
NOTE: Do not use detergent
or abrasive cleaning agents,
for they can damage the
disc.
CD PLAYER
Cleaning will not normally be necessary.
However, should fingerprints, dust or
dirt appear, you can wipe them off with a
soft, lint-free cloth. Wipe the disc in a
straight line from center to edge. You
can moisten the disc first with ordinary
tap water if necessary.
The player mechanism is fitted with selflubricating bearings and must not be
oiled or greased.
POWER SWITCH
CLEANING THE UNIT
CLEANING THE CD LASERLENS
COMPACTDISC
Handling Disc
After using the unit, turn off the power by
pressing the ON/OFF button.
For Best Results: Use a CD-lens cleaning
disc according to the cleaning disc
manufacturer instructions.
If a lens cleaning disc is not available, use a
clean, soft, dry cotton cloth to gently wipe the
small, glass,fish-eye laser lens located in the
CD player.
Although the music tracks in the disc are
covered with a protective layer, it is still
advisable to treat the disc carefully. Ensure
that you always pick up discs by the edge,
and put them back in their holders
immediately after use.
To prevent fire or shock hazard,
disconnect your stereo system
from the AC power plug when
cleaning.
To clean the exterior of the unit, simply wipe
with a soft clean cloth moistened with plain
lukewarm water.
CARE AND MAINTENANCE
E12
ENGLISH
E13
ENGLISH
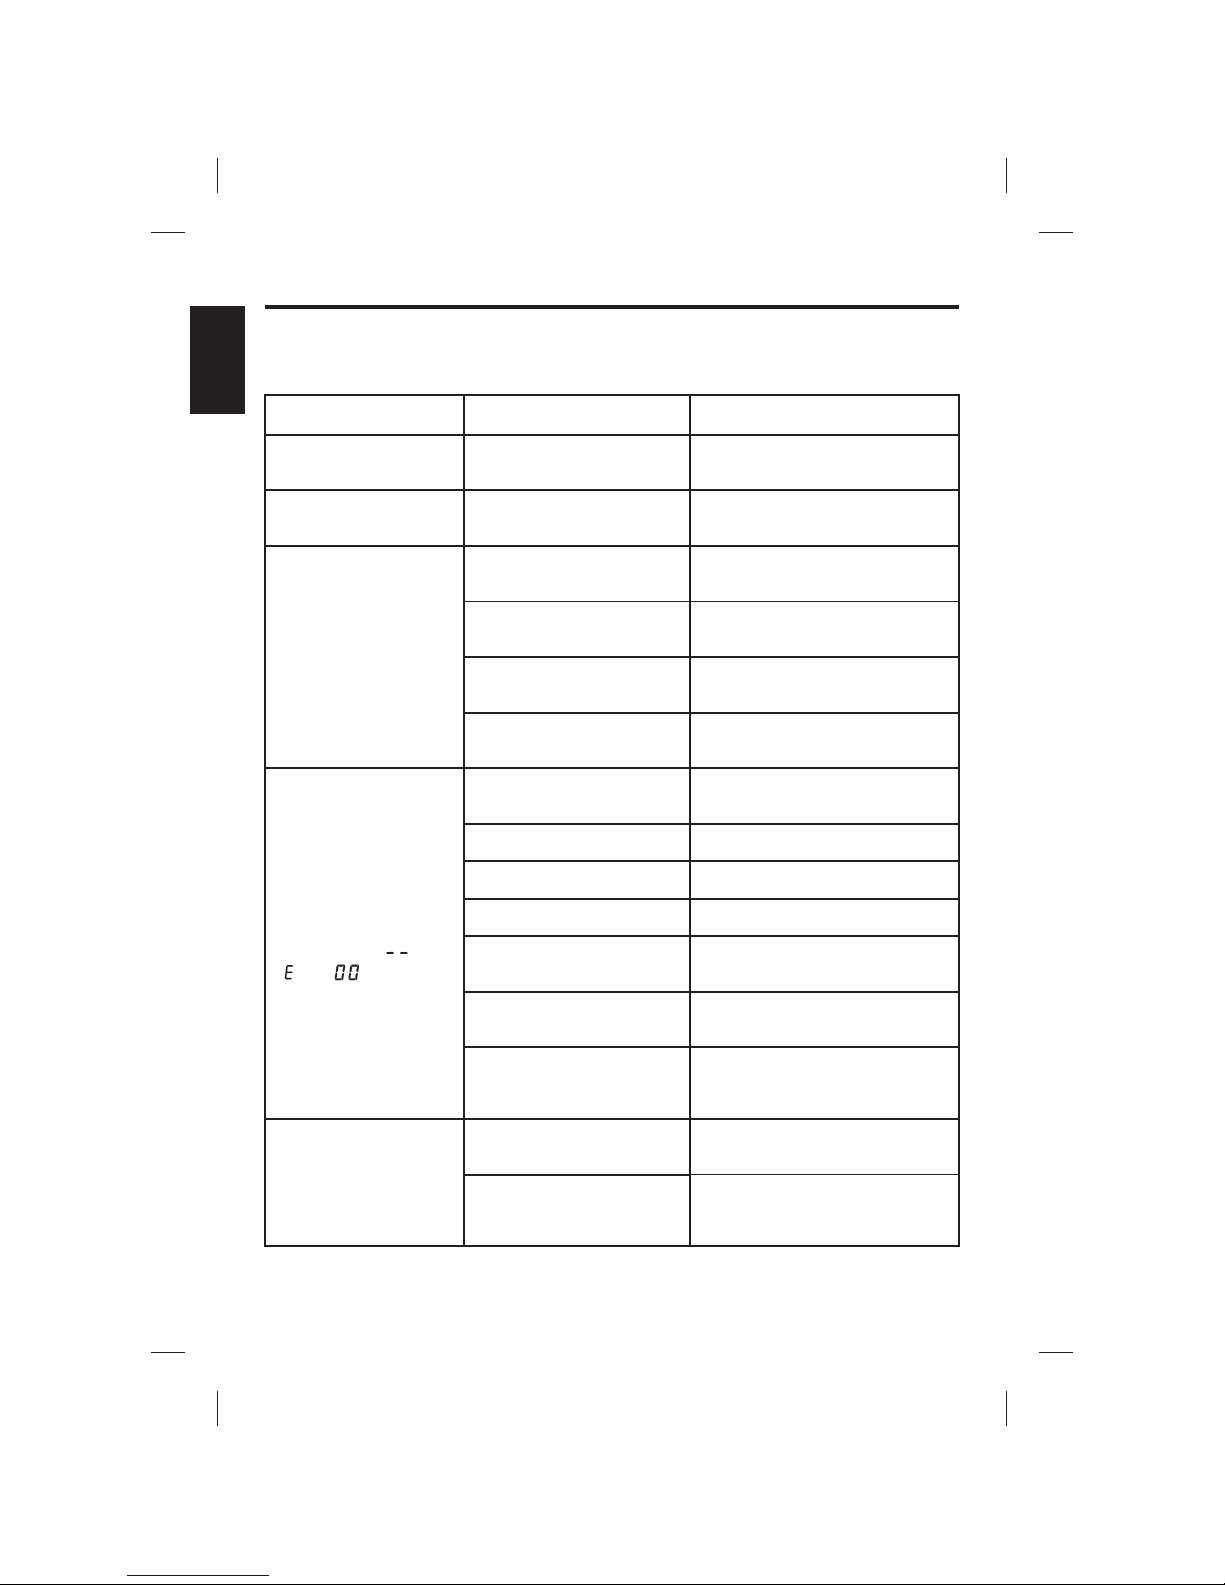
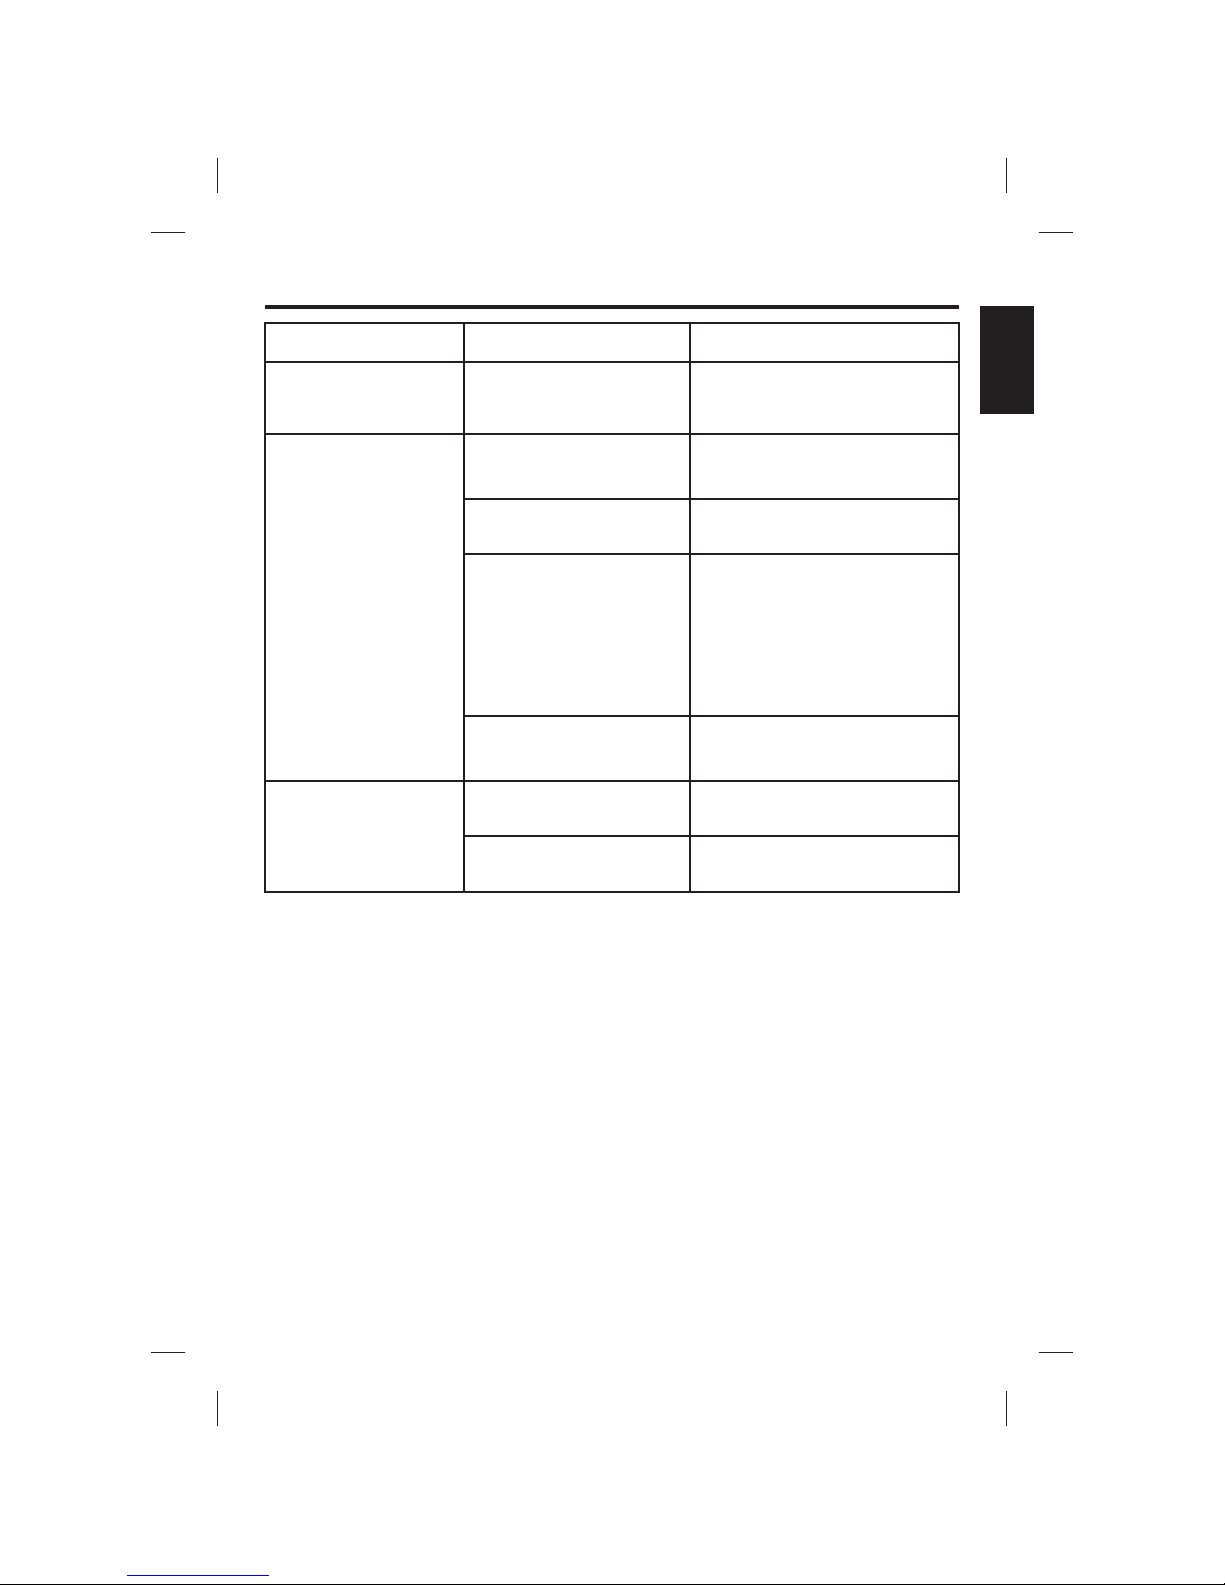
TROUBLE SHOOTING GUIDE
If you have followed the instructions and are having difficulty operating the unit, locate the
PROBLEM in the left column below. Check the corresponding POSSIBLE CAUSE column to
locate and remedy the problem.
SOLUTION
PROBLEM
POSSIBLE CAUSE
Insert the power plug into the AC
outlet.
No power when the unit
is on.
No power plug connection at
the AC outlet.
Turn up the volume.
Turn up the volume at TV/PA
system.
Turn on the power at TV/PA
system.
Follow directions on page E9 for
‘Audio Connection’.
No sound.
Volume control is set to
minimum.
Volume control on TV set/PA
system is set to minimum.
TV set/PA system power is
OFF.
AUX OUT jacks not
connected.
Connect power cord to machine
securely.
No power when plugged
in.
Power cord is not connected
to machine.
Insert disc correctly.
Wipe clean with soft cloth.
Use a new disc.
Use a new disc.
Only use discs bearing standard
logo as described on page E10.
Disc is inserted upside
down.
Disc is dirty.
Disc is scratched.
Disc is warped.
A nonstandard disc is
inserted.
Moisture has formed inside
the CD deck.
Wait about 20 to 30 minutes to let
it dry out.
CD Player does not
work normally or the
LED displays “ ”,
“ ” or “ ”.
ddd
dd ddd
Singing Machine needs to
be reset.
Disconnect the machine from the
power source for 30 seconds then
reconnect.
Select AUX IN as the source for
your home stereo.
Follow direction on page E9 for
connecting to a home stereo
system.
No sound - when audio
is connected to a home
stereo.
Source Selection on your
stereo is not set properly.
Improper Connection to
stereo system or PA.
E14
ENGLISH
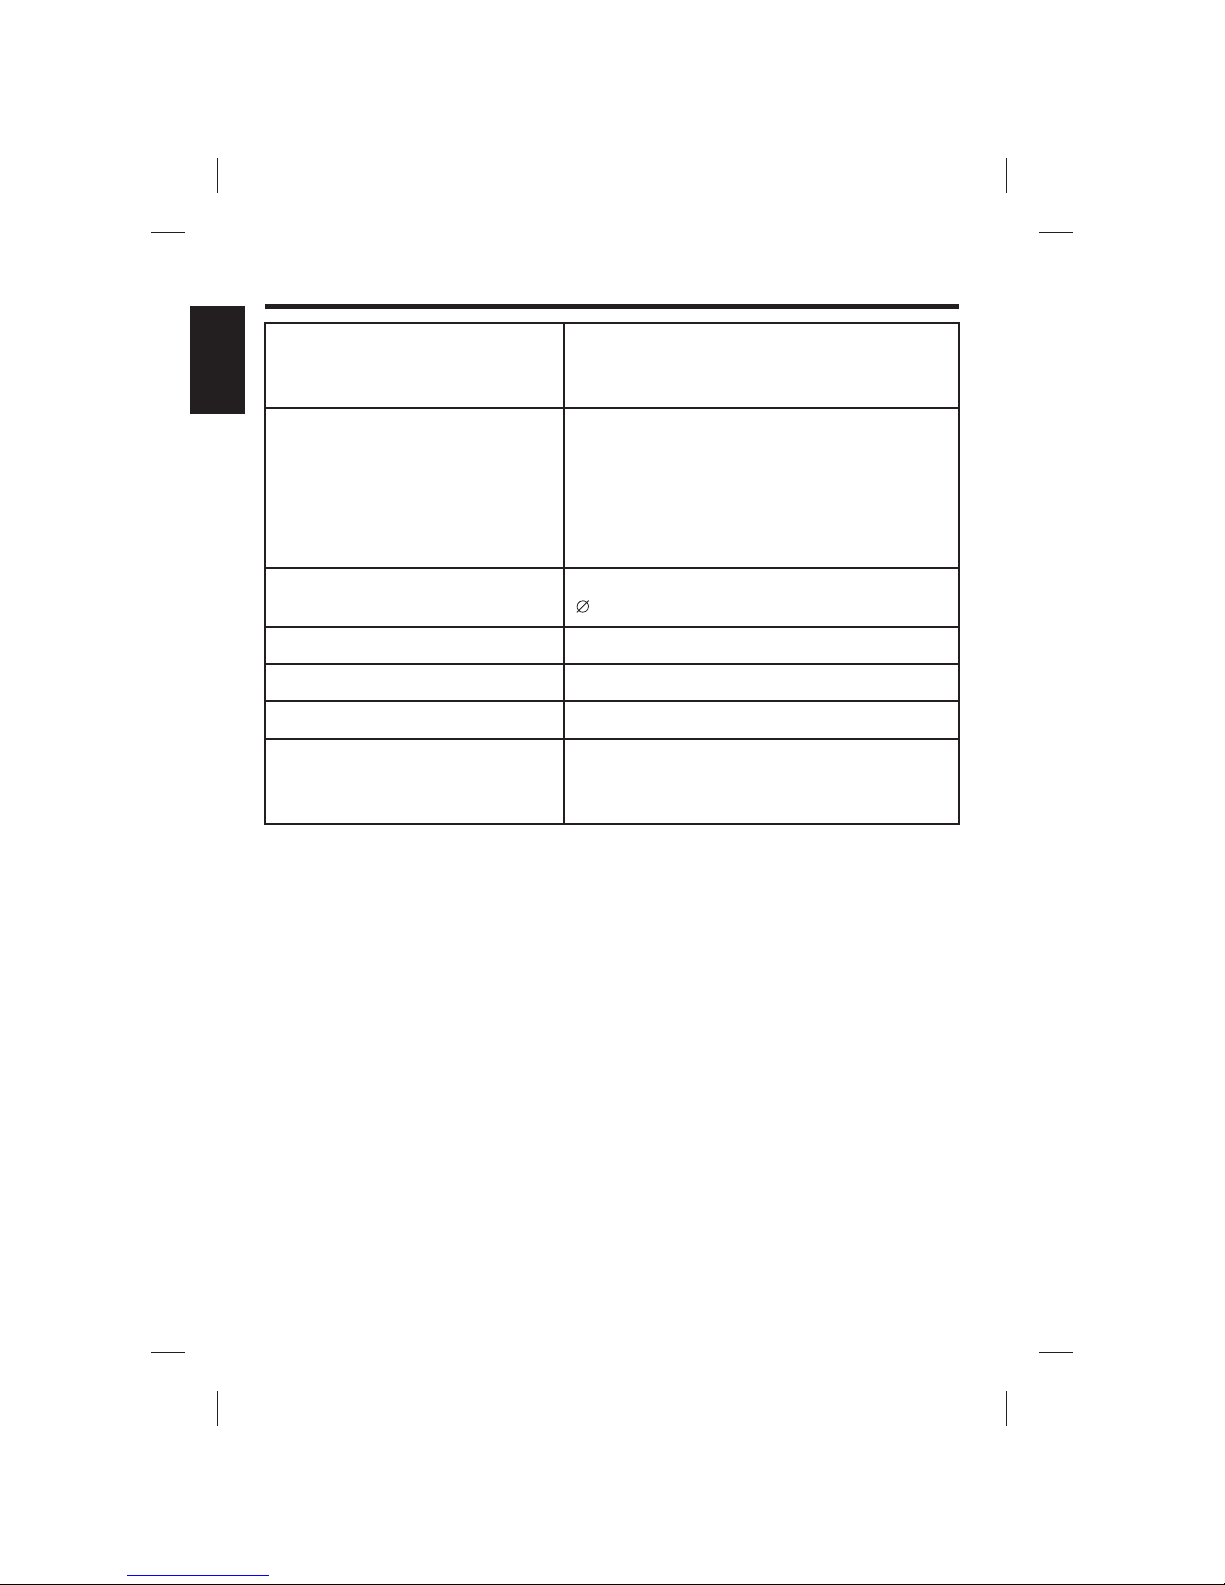
TROUBLE SHOOTING GUIDE
SOLUTION
PROBLEM
POSSIBLE CAUSE
No song lyrics appear
on the TV screen.
Connect the video cable to the
Singing Machine’s VIDEO OUT
and to the TVVIDEO IN.
Using your TV Remote to select
VIDEO input.
Connect from VIDEO OUT of the
system to the VIDEO IN on your
VCR or Connect to an RF
Modulator and then to the TV
cable input. Refer to “Making the
Connections” on page E7. Check
the disc to be sure it is a CDG.
Video cable is not connected
properly to the TV.
Source selector on TV is not
set to VIDEO.
Check disc to be sure it is clean.
(See page E12 for cleaning
instructions.)
A CDG is loaded but the
CDG indicator is not lit.
TV does not have video line
input.
Mic volume control.
Adjust mic volume to max. Then
back it off to a comfortable level.
No sound from mic.
Mic is off.
Turn on mic with the ON/OFF
switch located on the microphone.
Follow directions on page E7 for
‘Video Connection’.
No sound - If audio is
going through TV or
VCR.
Source Selection on TV or
VCR is not correct.
SPECIFICATIONS
AUDIO SECTION:
OUTPUT POWER (MAXIMUM)
OUTPUT IMPEDANCE
2 WATTS (RMS)
8 OHMS
CD PLAYER SECTION:
FREQUENCY RESPONSE
SIGNAL - TO - NOISE RATIO
WOW AND FLUTTER
D - A CONVERSION
NUMBER OF PROGRAMS
SAMPLING SYSTEM
100 Hz - 20 kHz
50 dB
IMMEASURABLE
1-BIT DAC
20 STEPS RANDOM ACCESS PROGRAMMING
8 TIMES OVER SAMPLING
MICROPHONE
-74dB 600 OHMS IMPEDANCE WITH
6.3mm DYNAMIC MICROPHONE
POWER SECTION AC 110V-120V~60Hz
DIMENSIONS (HXWXD) 13.3 x 10.4 x 8.7 x Inches / 34.0 x 26.7 x 22.2 cm
WEIGHT 7.7 lbs / 3.5 kgs
ACCESSORIES
1. PRE-RECORDED KARAOKE CD+G DISC
2. AV CABLE
3. DYNAMIC MICROPHONE
Specifications are typical, individual units might vary. They are subject to continuous
improvement without notice and withoutincurring anyobligation.
E15
ENGLISH
 Loading...