

The Singing Machine Bratz SMB-552 Instruction Manual
Instruction Manual
Manual De Instrucción
Manuel D'instruction
Please read before using this unit.
Lea antes de usar esta unidad.
Veuillez lire avant d'utiliser cet appareil.
SMB-552
552-0704-ENG-SPA-FRE02
6601 Lyons Road, Bldg. A7, Coconut Creek, FL33073-9902, USA.
TEL: (954) 596-1000 FAX: (954) 596-2000
The Singing Machine Company, Inc.
!
!
!
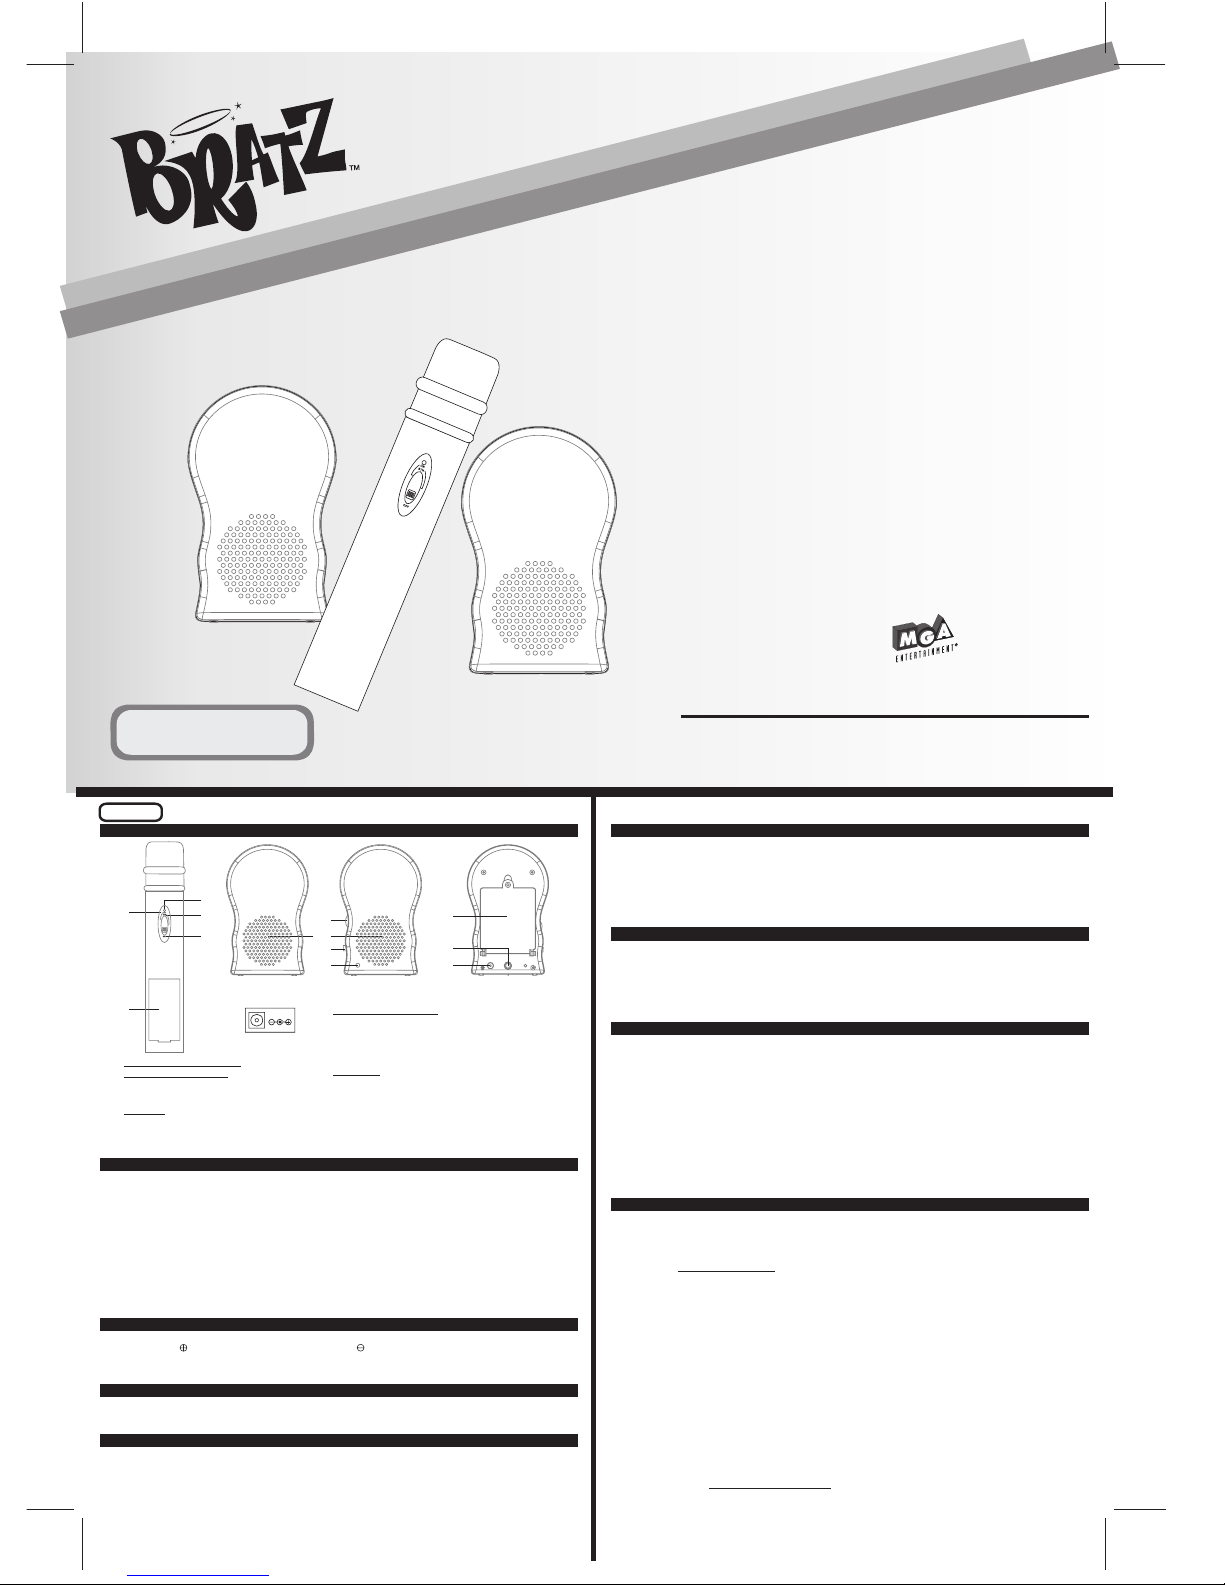
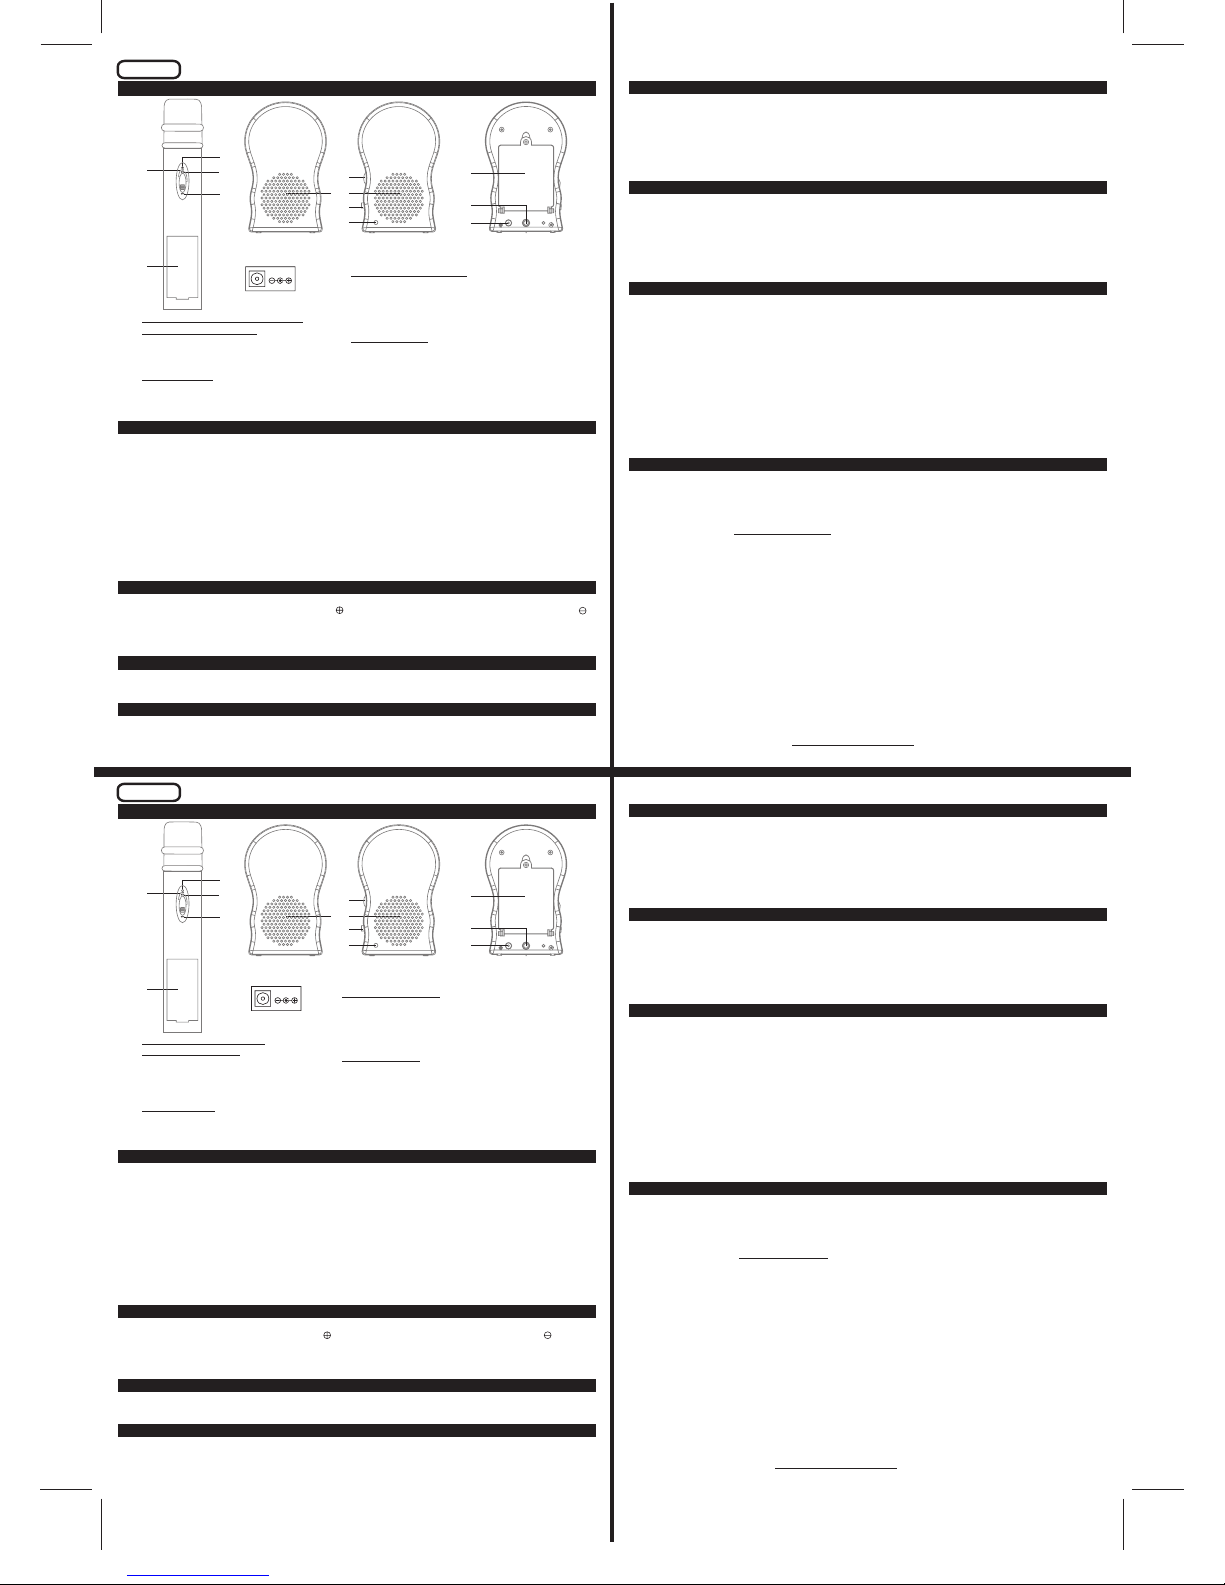
WIRELESS MICROPHONE AND SPEAKERS
MICRÓFONO INALÁMBRICO Y ALTO-PARLANTES
MICROPHONE SANS FIL ET HAUTS-PARLEURS
www.bratz.com
TM & MGA Entertainment, Inc.
All Right Reserved. Used under license by
The Singing Machine Co., Inc.
©
Toensure longbattery life; pleasemake sure that boththe microphoneand the speakersare set tothe OFF
position when not in use. To be absolutely certain, we advise you to remove the batteries from both the
microphone andthe speakerwhen they arenot inuse.
FUNCTION LIST
BATTERY PRECAUTIONS
The precautions below should be followed when using batteries in this device:
1. Use only the size and type of batteries specified.
2. Be sure to follow the correct polarity when installing the batteries as indicated in the battery compartment.
Reversed batteries may cause damage to the device.
3. Do not mix different types of batteries together (e.g. Alkaline and Carbon Zinc) or old batteries with fresh ones.
4. If the device is not to be used for a long period of time, remove the batteries to prevent damage or injury from
possible battery leakage.
5. Do not try to recharge batteries not intended to be recharged, they can overheat and rupture (Follow battery
manufacturer’s directions).
6. Rechargeable batteries are to be removed from the product before being charged.
7. Rechargeable batteries are only to be charged under adult supervision.
8. Exhausted batteries are to be removed from the product.
9. The supply terminals are not to be short-circuited.
10. The product must only be used with the recommended transformer.
11. The transformer is not a toy.
DC JACK
ENGLISH
VISIT OUR WEBSITE www.singingmachine.com
PRINTED IN CHINA
WIRELESS MICROPHONE
SPEAKERS
1. LED INDICATOR
2. ON POSITION
3. STANDBY POSITION
4. OFF POSITION
5. BATTERY COMPARTMENT
6. VOLUME CONTROL
7. SPEAKERS
8. FUNCTION SELECTOR (MIC+AUX/AUX/OFF)
9. ON/OFF LED
10. BATTERY COMPARTMENT
11. AUX IN JACK
12. DC JACK
MAINTENANCE
! A DC jack is provided for external DC power for use in a car, boat or RV. Please be sure that inside of the jack is
connected to 6V side andthe outsideof jack isconnected to ,negative sidebattery.Å
! Transformers used with the product are to be regularly examinedfor damage to the cord, plug, enclosure and other
parts, andthat, in theevent of suchdamage, the productsmust not beused with thistransformer until thedamage has
been repaired.
DC Jack
DC6V
BATTERY INSTALLATION
WIRELESS MICROPHONE
SPEAKER
1. Lift cover to reveal battery compartment.
2. Insert “9V” battery.
3. Replace cover tightlybefore operating.
1. Open the battery compartment cover by
unscrewing thescrew.
2. Insert 4 “AA”batteries.
3. Reinstall the coverand tightenthe screw.
10
6
7
8
9
1
2
3
4
5
11
12
MICROPHONE DETAILS
2. STANDBY - The switch is in the middle position. The microphone will not function. The red indicator light is on. The
microphone willuse batterypower.
The purpose of this setting is to maintain a connection between the microphone and the receiver when moving
around thearea inwhich it isbeing used.
3. OFF - Theswitch is located at the bottom position.
NOTE:
The microphone will notfunction. The red indicator light is off.The
microphone willnot usebattery power.
When the microphone switch is set to OFF, noise may be generated from the speakers. Please
make sure to reduce the volume control to the low level OR switch off the speakers before turning off the
microphone.
IMPORTANT NOTE:
1. PROBLEM:
2. PROBLEM:
3. PROBLEM:
a) Insure themicrophone is setto theON position.
b) Insure thespeaker function isset toMIC+AUX.
c) Adjust the volumecontrol ofthe speakers accordingly.
d) Confirm thespeaker battery compartmentcontains (4)“AA” size workingbatteries.
a) Confirm thespeaker function switchis setto MIC+AUX.
b) Adjust thespeaker volume accordingly.
c) Confirm the microphoneswitch isin the ONposition.
d) Confirm themicrophone contains (1)9V workingbattery.
a) Confirm themicrophone switch isset tothe ON position.
b) Confirm themicrophone contains (1)9V workingbattery.
c) Insure the speakerfunction isset to MIC+AUXor AUX.
d) Increase thespeaker volume accordingly.
e) Confirm thespeaker battery compartmentcontains (4)“AA” size workingbatteries.
f) Adjust the outputvolume ofthe audio sourceaccordingly.
The microphone indicator light is ON, but there is no sound when I sing.
The speaker indicator light is ON, but there is no sound when I sing.
The audio source input I am using is switched ON, but there is no sound from the speakers.
WIRELESS MICROPHONE INFORMATION
Warning: Changesor modifications not expressly approvedby the party responsiblefor compliance could void
the user’sauthority tooperate the equipment.
FOR RFEXPOSURE
SAFETYINFORMATION
IMPORTANT
NOTE:
“IMPORTANTNOTE: To comply with the FCCRF exposure compliance requirements, no change to the antenna or the
device is permitted. Any change to the antenna or the device could result in the system exceeding the RF exposure
requirements.”
Yourwireless microphonecontains a lowpower transmitter.When the EUTis poweredon and itsends outradio frequency
(RF) signals. In August 1996, the Federal Communications Commissions (FCC) adopted RF exposure guidelines with
safety levelsfor wirelessdevices.
To maintain compliance with the FCC's RF exposure guidelines hold the transmitter and antenna at least 1 inch (2.5
centimetres) fromyour face and speakin a normalvoice, with the antennapointed up andaway from the face.Insure that
the antennais atleast 1 inch(2.5 centimetres)from your bodywhen youusing your wirelessmicrophone.
Use onlythe supplied antenna. Unauthorizedantennas, modifications, or attachmentscould damage thetransmitter and
may violateFCC regulations.
THE MANUFACTURER IS NOT RESPONSIBLE FOR ANY RADIO OR TV INTERFERENCE CAUSED BY
UNAUTHORIZED MODIFICATIONS TO THIS EQUIPMENT. SUCH MODIFICATIONS COULD VOID THE USER’S
AUTHORITYTO OPERATETHE EQUIPMENT.
Operation of thisdevice is subject tothe following two conditions: (1)this device may not causeinterference, and (2) this
device mustaccept anyinterference, including interferencethat maycause undesired operationof thedevice.
FCC NOTICE
This wireless microphone system complies with Part 90 of the FCC Rules. There is one frequency available for the
system.You mustobtain alicense for thefrequency youplan to useprior tousing the system.
Please view to apply for the appropriate or phone the nearest FCC office to receive the
necessary application.Licensibility dependson how thesystem willbe used.
http://wireless.fcc.gov/uls/
TROUBLE SHOOTING
INSTRUCTION FOR USE
1. Set the switchon themicrophone to theSTANDBY position.
2. To connect anotheraudio source (such as aMp3 player, Discman orComputer) so you cansing along with its music,
simply connectthe audiooutput jack tothe auxin jack onthe backof the speakerunit.
3. Set the switchon yourspeaker unit tothe MIC+AUXposition, or tothe AUXposition ifthe microphone willnot beused.
4. Adjust the volumecontrol ofyour speaker unitto acomfortable level.
The wirethat connects to bothspeakers operates asan antenna for thewireless microphone reception. Itmay be
necessary toextend thewire to obtainthe bestreception.
Yourwireless microphone and speaker set is nowready for use!
NOTE:
MICROPHONE DETAILS
SETTINGS
The switchon thewireless microphone hasthree settings:
1. ON- Theswitch is inthe topposition. The microphonewill function.The red indicatorlight is on.The microphonewill use
battery power.
LISTA DE LAS FUNCIONES
PRECAUCIONES CON LA BATERÍA
Las precauciones abajo deben ser obedecidas, cuando usen baterías, en este dispositivo:
Use solamente baterías del tamaño y tipo especificados.
Esté seguro, de estar obedeciendo a las polaridades correctas de la batería al instalarlas, como indicado, en
su compartimiento.Invertir las baterías puede damnificar el aparato.
No mezcle pilas distintas (por ejemplo Alcalinas con Carbono-Zinc) ni pilas viejas con nuevas.
Sí el dispositivo no debe ser usado por un largo período de tiempo, remueva las baterías para evitar daños o
heridas debido un vaciamiento de la batería.
No intente recargar las baterías que no sean recargables. Ellos (ellas) pueden tener un súper-calentamiento y
romperse (Siga las instrucciones del fabricante de la batería).
Las pilas recargables deber ser retiradas del equipo antes de la recarga.
Las pilas recargables deben ser recargadas por un adulto.
Pilas descargadas deben ser retiradas del equipo.
Los terminales de alimentación de energía no deben ser colocados en corto circuito.
El equipo debe ser usado apenas con el transformador recomendado.
El transformador no es un juguete.
1.
2.
3.
4.
5.
6.
7.
8.
9.
10.
11.
TOMA CC
ESPAÑOL
IMPRESO EN CHINA
VISITE NUESTRO SITIO INTERNET www.singingmachine.com
! Existe una toma corriente de CC, para energía externa en CC de un auto, barco o carromato. Verifique sí el lado
interno del conectador está en contacto del lado 6V y la extremidad del conectador está con contacto al lado
negativo dela batería.
Å
Los transformadores usadoscon el equipo deben ser examinadosregularmente, buscando daños en elcable, en el
enchufe u otras partes yen la eventualidad de tales daños, los productos no debenusados con este transformador
hastaque el dañohaya sidoreparado!.
10
6
7
8
9
1
2
3
4
5
11
12
Toma CC
DC6V
INSTALACIÓN DELAS BATERÍAS
MICRÓFONO INALÁMBRICO
ALTO-PARLANTE
1.
2.
3.
1. Abra la tapa del compartimiento de las pilas,
soltandoo tornillo.
2.
3. Reinstale la tapay aprieteel tornillo.
Abra latapa delcompartimento delas pilas.
Vuelva a colocar la tapa firmemente antes de
ponerlo enfuncionamiento.
Insertabatería “9V”
Inserta4 baterías “AA”
MICRÓFONO INALÁMBRICO
ALTO-PARLANTES
1. INDICADOR DEL LED
2. POSICIÓN ON
3. POSICIÓN STANDBY
4. POSICIÓN OFF
5. COMPARTIMIENTO DE LAS PILAS
6. CONTROL DE VOLUMEN
7. ALTO-PARLANTES
8. FUNCIÓN SELECCIONAR (MIC+AUX/AUX/OFF)
9. LED DE ON/OFF
10. COMPARTIMIENTO DE LAS PILAS
11. TOMAAUX IN
12. TOMA CC
MANTENIMIENTO
Para garantir unaduración de vida mayor, verifiqueque el micrófono y losaltoparlantes esten en posición OFF cuando
usted noutiliza el aparato.Para estar absolutamente seguro,aconsejamos remover lapilas del ambos elmicrófono y los
altoparlantes,cuando no estuvierenen uso.
DETALLES DEL MICRÓFONO
2. STANDBY - Llave en la posición intermediaria.
3. OFF -
Cuando el interruptor del micrófono esté enOFF, puede haber sonido generado por la máquina
karaoké
NOTAIMPORTANTE:
El micrófono no funciona. La luz indicadora roja está prendida. El
micrófono usala energíade la batería.
El objetivo de este ajuste es mantener unaconexión entre el micrófono y el receptor, al moverse en la
área enque seestá usando.
El interruptor está en la posición inferior. El micrófono no funciona. La luz indicadora roja está apagada. El
micrófono nousa laenergía de labatería.
. No seolvide de reducir tanto el MASTER VOLUMENcuanto el MIC VOLUMEN, paraun nivel bajo O
desligue elreceptor, antesde desligarsu micrófono.
ANOTACIONE:
SOLUCIONANDO PROBLEMAS
1. PROBLEMA:
2. PROBLEMA:
3. PROBLEMA:
La luzdel indicadordel micrófono estáprendida yno hay sonidocuando yocanto.
a) Verifique queel micrófonoestá en posiciónON.
b) Verifique queel altoparlanteestá en posiciónMIC+AUX.
c) Ayuste el volumende sualtoparlante.
d) Verifique queel compartimientode pilas contiene(4) pilas“AA” que fucionan.
La luzdel indicadordel altoparlanteestá prendida yno hay sonidocuando yocanto.
a) Verifique queel altoparlanteestá en posiciónMIC+AUX.
b) Ayuste elvolumen de sualtoparlante.
c) Verifique queel micrófono estáen posiciónON.
d) Verifique queel compartimientode pilas contiene(1) pila“9V” que fuciona.
La enrtradade audio queyo utilizo estáconectada, pero nohay sonido enlos altoparlantes.
a) Verifique queel micrófonoestá en posiciónON.
b) Verifique queel compartimientode pilas contiene(1) pila“9V” que fuciona.
c) Verifique queel altoparlante estáen posiciónMIC+AUX oAUX.
d) Ayuste elvolumen de sualtoparlante.
e) Verifique queel compartimientode pilas contiene(4) pilas“AA” que fucionan.
f) Ayuste el nivelde salidaaudio.
INFORMACIONES DE MICRÓFONO INALÁMBRICO
Advertencia: Alteraciones o modificaciones no aprobadas expresamente por los órganos responsables por la
regulación delos equipamientos electrónicospodrán anular la autorizacióndel usuario para operarel equipamiento.
ADVERTENCIAFCC
PARAEXPOSICIÓN ARF
INFORMACIÓN DESEGURIDAD
IMPORTANTE
OBSERVACIÓN:
El sistema demicrófono inalámbrico está de acuerdocon la Parte 90 dela Reglamentaciones FCC. Hay una frecuencia
disponible parael sistema. Una licencia esnecesaria parala frecuencia queUsted intentausar antes deusar elsistema.
Consulte elsite Internet para pedirla licencia otelefonee para laoficina FCC máspróxima para
obtener elpedido necesario. La obtención dela licenciadepende de lautilización que Ustedva ahacer con elsistema.
NOTAIMPORTANTE:Para obedecer los requisitosde FCC paraexposición a RF, nose permite ningúncambio a laantena
o eldispositivo. Cualquier cambioa laantena o eldispositivo podría producirexceso de exposicióna los RFdel sistema.”
Su micrófonoinalámbrico contiene un transmisorde baja potencia. Cuandoel EUT está encendidoél manda señales de
radio-frecuencia (RF).En agosto del1996, la Comisión Federalde Comunicaciones (FCC)adoptó las reglamentaciones
de exposicióna losRF con niveles de seguridadpara losdispositivos inalámbricos.
Para respectarlas reglamentacionesFCC deexposición a lasRF sostiene el transmisory antenapor lo menos1 pulgada
(2,5 centímetros)de sucara y hablaen unavoz normal, conla antenaapuntada para arribay lejosde la cara.Asegure que
la antenaes porlo menos 1pulgada (2,5centímetros) de sucuerpo cuandousted usa sumicrófono inalámbrico.
Use sólo laantena proporcionada. Antenas desautorizadas,modificaciones, o accesorios podrían dañarel transmisor y
pueden violarlas regulacionesde FCC.
EL FABRICANTENO ES RESPONSABLE POR CUALQUIER INTERFERENCIAEN APARATOS DE
TV O RÁDIO CAUSADAPOR MODIFICACIONES NO AUTORIZADAS EN ESTE EQUIPAMIENTO. TALESCAMBIOS
PODRÁN CANCELARLAAUTORIZACIÓN DELUSUARIO PARAOPERAR ELEQUIPAMIENTO.
http://wireless.fcc.gov/uls/
La operación sesujeta a las. Siguientescondiciones: (1) este aparato nopuede causar interferencias dañinas y(2) este
aparatodebe aceptar todainterferencia incluyendointerferencias que puedencausar unaoperación no deseada.
DETALLES DEL MICRÓFONO
AJUSTES
1. -
El botóndel micrófonotiene três posiciones:
ON El interruptor está en la posición superior. El micrófono funciona. La luz indicadora roja está prendida. El
micrófono usala energíade la batería.
INSTRUCCIONES PARA USO
1. Ponga el interruptordel micrófonoen posición PAUSA.
2. Para conectar una otra fuente audio (MP3, Discman o Computer) para cantar con acompanamiento, conecte
simplesmente eljack desalida audio ala entradajack en laparte traseradel altoparlante.
3. Ponga el botónde sualtoparlante en MIC+AUXo enAUX seusted no utilizael micrófono.
4. Ayuste el volumende sualtoparlante a unnivel agradable.
El alambre de conexión a losaltoparlantes funciona como una antena para la recepción del micrófono
inalámbrico. Podráser necesarioalongar el alambrepara unamejor recepción delmicrófono inalámbrico.
Su micrófono y su sistema audio están ahora listos para utilizar!
ANOTACIONE:
LISTE DES FONCTIONS
PRÉCAUTIONS POUR LES PILES
Les précautions ci-dessous doivent être suivies quand vous utilisez des piles dans cet appareil:
1.
2.
3.
4.
5.
6.
7.
8.
9.
10.
11.
Utilisez seulement la taille et le type de piles spécifiées.
Ayez soin de respecter la polarité quand vous placez les piles comme indiqué dans le compartiment des piles.
Les piles inversées peuvent causer des dégâts à l'appareil.
Ne pas mélanger différents types de piles (par exemple Alcaline et Carbone-Zinc) ou de vieillespiles avec des neuves.
Si vous n'utilisez pas l'appareil pendant une longue période, retirez les piles pour éviter les dégâts ou blessures
qui pourraient être causés par la fuite des piles.
Ne pas essayer de recharger les piles qui ne sont pas rechargeables. Ils peuvent surchauffer et casser (Suivez
les instructions du fabricant des piles).
Retirez les piles rechargeables de l'appareil avant de les recharger.
Les piles rechargeables doivent être rechargées sous la surveillance d'un adulte.
Retirez les piles usées de l'appareil.
Ne pas court-circuiter les bornes d'alimentation.
L'appareil ne doit être utilisé qu'avec le transformateur recommandé.
Le transformateur n'est pas un jouet.
JACK DC
FRANÇAIS
IMPRIMÉ EN CHINE
VISITE NOTRE SITE INTERNET www.singingmachine.com
! Une prise jack Courant Direc (DC) est fournie pour utilisation externe en voiture, bateau ouCaravane. Vérifiez que
l'intérieur dela prise jackest connectée ducôté 6V et quel'extérieur de laprise jack estconnectée au pôle négatif
de lapile.
Å
Les transformateursutilisés avec l'appareildoivent être régulièrement examinéspour voir sile fil, laprise, le boîtier et
autres parties sont endommagés et dans le cas d'une telle avarie, l'appareil ne devra pas utilisé avec le
transformateur tantque leproblème n'aurapas été réparé.
!
MICROPHONE SANSFIL
HAUTS-PARLEURS
1. INDICATEUR DE LED
2. POSICIÓN ON
3. POSICIÓN STANDBY
4. POSICIÓN OFF
5. COMPARTIMIENTO DE LAS PILAS
6. BOUTON DE VOLUME
7. HAUTS-PARLEURS
8. SÉLECTEUR DE FONCTION (MIC+AUX/AUX/OFF)
9. LED DE ALLUMER / ETEINDRE
10. COMPARTIMIENTO DE LAS PILAS
11. JACK D'ENTRÉE AUXILIAIRES
12. DC JACK
DC Jack
DC6V
INSTALLATION DES PILES
MICROPHONE SANSFIL
HAUTS-PARLEUR
1.
2.
3. R
1. Ouvrez le couvercle du compartiment despiles
en dévissantla vis.
2.
3. Replacez le couvercleet serrezla vis.
Soulevez le couvercle pour avoir accès au
compartimentdes piles.
efermez le couvercle fermement avant
d'utiliser l'appareil.
Insérez pile« 9V».
Insérez 4piles «AA ».
10
6
7
8
9
1
2
3
4
5
11
12
ENTRETIEN
Pour garantir une durée de vie plus longue, vérifiez bien si le microphone et les hauts-parleurs sont en position OFF
quand vousne vous en servezpas. Pour enavoir la certitudeabsolue, nous conseillons deretirer les pilesmicrophone et
les hauts-parleursquand vousne vousen servez pas.
DÉTAILS DU MICRO
2. STANDBY- L'interrupteur esten position intermédiaire.
3. OFF-
Quand le microest en position ETEINT,il pourra y avoir un bruit venantde l'appareil de karaokéNOTE IMPORTANTE:
Le microne fonctionnera pas. L'indicateurlumineux rouge est
allumé. Lemicro utiliseral'alimentation despiles.
L'objectif de cette configuration est de garder la connexion entre le micro et le récepteur quand il est en
mouvement dansla zoneoù il estutilisé.
L'interrupteur esten position bas. Lemicro ne fonctionnera pas.L'indicateur lumineux rouge estéteint. Le micro
n'utilisera pasl'alimentation despiles.
.
Ayez soin de réduire le VOLUME PRINCIPAL et le VOLUME MICRO au plus bas OU BIEN d'éteindre le
récepteur avantd'éteindre votremicro.
NOTE:
LOCALISATION DE PROBLÈMES
1. PROBLÈME
2. PROBLÈME:
3. PROBLÈME:
: L’indicateur duMicro estallumé, mais iln'y apas deson quand jechante.
a) Vérifiez quele microphone esten positionON.
b) Vérifiez quele haut-parleur esten position MIC+AUX.
c) Réglez le volumedu haut-parleur.
d) Vérifiez quele compartiment despiles duhaut-parleur contient (4)piles “AA”qui fonctionnent.
L'indicateur duhaut-parleur estallumé, maisil n'y apas deson quand jechante.
a) Vérifiez quele haut-parleur esten position MIC+AUX.
b) Réglez levolume du haut-parleur.
c) Vérifiez que lemicrophone esten position ON.
d) Vérifiez quele compartiment despiles dumicrophone contient (1)pile “9V”qui fonctionne.
L`entrée desource audioque j’utilise estallumée, maisaucun son nesort deshauts-parleurs.
a) Vérifiez quele microphone esten positionON.
b) Vérifiez quele compartiment despiles dumicrophone contient (1)pile “9V”qui fonctionne.
c) Vérifiez que lehaut-parleur esten posiion MIC+AUX.ouAUX
d) Réglez levolume du haut-parleur.
e) Vérifiez quele compartiment despiles duhaut-parleur contient (4)piles “AA”qui fonctionnent.
f) Réglez le niveaude sortie audio.
INFORMATION POUR LE MICRO SANS FIL
Avertissement : toutes modifications ou changements non expressément approuvés par le fabricant de
l’appareilpourraient annuler l’autoritéde l’utilisateursur cet appareil.
AVISFCC
Le système de micro sans fil est en accord avec la Partie 90 des Réglementations FCC. Il y a une fréquence disponible pour le
système. Il vous fautune licence pour la fréquence quevous avez l’intention d’utiliser avant d’utiliserle système.
Veuillezvoir le site Internet pour demander lalicence ou téléphonez aux bureaux FCC les plusproches
et contactez-lespour obtenir la demande nécessaire. L’octroide la licence dépend del’utilisation que vous ferez du système.
http://wireless.fcc.gov/uls/
POUR L'EXPOSITIONAUX RF
INFORMATIONSDE SECURITE
IMPORTANT
REMARQUE :
"AVIS IMPORTANT":Afin d'obéir aux exigences de conformitéFCC concernant l'exposition aux RF,aucun changement
de l'antenne ou de l'appareil n'est autorisé. Tout changement apporté à l'antenne ou à l'appareil pourrait entraîner
l'augmentationd'exposition RF dusystème.
Votre micro sans fil contient un émetteur de basse puissance. Quand l' EUT est allumé il envoie des signaux de
radiofréquence (RF). En août 1966 La Commission Fédérale des Communications (FCC) a adopté des règles pour
l'exposition auxRadiofréquences avecdes niveaux desécurité pourles appareils sansfil.
Afin de respecterles règles FCC d'exposition aux RF, maintenez l'émetteuret l'antenne à au moins 1pouce (2,5 cm) du
visage et parlez normalement, l'antenne orientée vers le hautet loin du visage. Vérifiez que l'antenne est à au moins 1
pouce (2,5cm) devotre corpsquand vous utilisezle microsans fil.
N'utilisez quel'antenne fournie. Desantennes nonautorisées, des modificationsou accessoires pourraientendommager
l'émetteur etpourraient violerles règles FCC.
LE FABRICANT N’EST PAS RESPONSABLE DES INTERFERENCES DE RADIO OU TV CAUSEES
PAR DES MODIFICATIONS NONAUTORISEES APPORTEES A CET EQUIPEMENT.DE TELLES MODIFICATIONS
POURRAIENTANNULER L’AUTORITEDE L’UTILISATEUR SURCETAPPAREIL.
L’operation est sujetaux deux conditions suivantes : (1) cet appareil ne doit pas causerd’interference nocive, et (2) cet
appareildoit accepter touteinterference reçue,y compris cellesqui pourraientcauser une operationnon souhaitee.
DÉTAILS DU MICRO
CONFIGURATIONS
Le boutondu microphonesans fil atrois positions:
1. ON - L'interrupteur est en position haut. Le micro fonctionnera. L'indicateur lumineux rouge est allumé. Le micro
utilisera l'alimentationdes piles.
MODE D'EMPLOI
1. Placez le commutateurde microen position PAUSE.
2. Pour brancher une autre source audio (MP3,Discman ou Ordinateur) pour pouvoir chanteravec accompagnement,
branchez toutsimplement lejack de sortieaudio àl’entrée de jackau dosdu haut-parleur.
3. Mettez le boutonde votrehaut-parleur sur MIC+AUX,ou enposition AUXsi vous n'utilisezpas lemicrophone.
4. Réglez le volumede votrehaut-parleur à unniveau agréable.
Le filde connexion auxhauts-parleurs fonctionne commeune antenne pourla réception dumicrophone sans fil.Il
faudra peut-etreétirer lefil pour unemeilleure réception.
Votremicrophone et le système audioque vous allez utiliser sont maintenant prêts à l’emploi!
NOTE:
 Loading...