

The Shrunks Outdoor Tuckaire Kids Travel Bed User Manual [en, es, fr]

PULL
VALVE #2
VALVE #1
RUBBER FLAP
EN
PUMPS
Outdoor Inflatable Travel Bed
Instructions & Warnings
WARNING
Read these materials prior to assembling and using your Inflatable Bed, failure to
follow these instructions could result in serious injury or death.
- Set up and supervision must be done by a competent adult!
- The Inflatable Bed is not a life saving device!
- Ensure proper set up prior to use!
- Instruct children on proper use of this product!
- Over inflation is the major cause of leaks.
- Do not inflate with an air compressor or other high pressure pump.
This item is designed to be inflated with a high volume of air but at a low pressure.
- Read the instructions and warnings printed in this manual for proper inflation and safe use.
- Keep away from fire and other heat sources. Keep out of direct sunlight when
not in use.
- This unit is intended for domestic family use only and not for use in public areas or
as a rental.
- The Inflatable Bed should be inflated using any of the recommended pumps as indicated
on the following page.
SPECIFICATIONS
Set up and supervision must be done by a competent adult. Depending on the model, your
inflatable travel bed may come with one of the following pumps.
We recommend using either of the following
rapid foot pumps for proper inflation:
The Shrunks’ Jetaire™ Electric Pump is also
recommended for achieving maximum
performance of the Travel Beds:
(We do not recommend inflating the Inflatable Bed by mouth)
INFLATION
More information on proper inflation is available on our website. Please view the
short how-to videos at www.theshrunks.com
Please note: Keep in mind the temperature of the air going into the product and the outside
air. If your inflator is hot and sending warm air into the product, when it cools, it will seem
like your product is losing air. This is normal. The product should be firm when completely
inflated, but allow a small depression when pushed on with your hand while in use. This is a
good evaluation of proper inflation. Proper inflation should be checked often if the product is
left inflated for consecutive days.
Toddler Size - Manufacturer Item No. 88077
Kids Size - Manufacturer Item No. 88078
Parts included
1 - Repair Kit consisting of: 2pcs of self-adhesive repair patch
1 - Inflatable Mattress
1 - Sleeping Bag
1 - Pump
1 - Carrying Bag
Recommended Age: Toddler Bed 2+, Kids Bed 6+
Recommended Maximum Weight: 150lbs / 68kg
Recommended maximum number of persons: 1 child per bed
Valve #1 – Inflate this valve first
Valve #2 – Inflate this valve second
VALVE #2
VALVE #1
1
plug. Pull black rubber flap towards you to
close the air chamber. This allows air to
OPEN
enter, but does not allow air to escape.
For both valves 1 and 2: Open valve stem
2 Inflate with recommended pump. Begin by inflating Valve #1 until inner mattress is firm.
OPEN
PULL
VALVE #2
VALVE #1
VALVE #2
Inflate this valve second
VALVE #1
Inflate this valve first
RUBBER FLAP
RUBBER FLAP
Next, inflate Valve #2 until outer mattress is firm.
3 Close valve stem plugs on both valves. This will ensure the air stays
CLOSE
in place. Use extreme care when using an electric inflator anywhere
near water.
Beware of the dangers of electrocution when using electric powered inflators. Precautions
should be observed during use and handling to prevent shock. DO NOT inflate with an air
compressor or other high pressure pump! The travel bed is designed to be inflated with a
high volume of air but at a low pressure. DO NOT allow children to play on the product until
it is fully inflated! DO NOT OVER INFLATE! Product should be firm, but allow a small depression when pushed on with your hand. DO NOT drag across concrete, pavement or other
rough surfaces. Unfold inflatable flat on a clean surface free of debris and sharp objects.
2 Push black rubber flap inwards to open the air chamber.
This allows air to escape quickly. Flatten the bed by hand
RUBBER FLAP
to remove remaining air from the bed. You can also use
the recommended pump’s deflation function to speed up
the process.
PUSH
3 Roll or fold the bed to desired size, and place into carrying bag (included). Store until
next use.
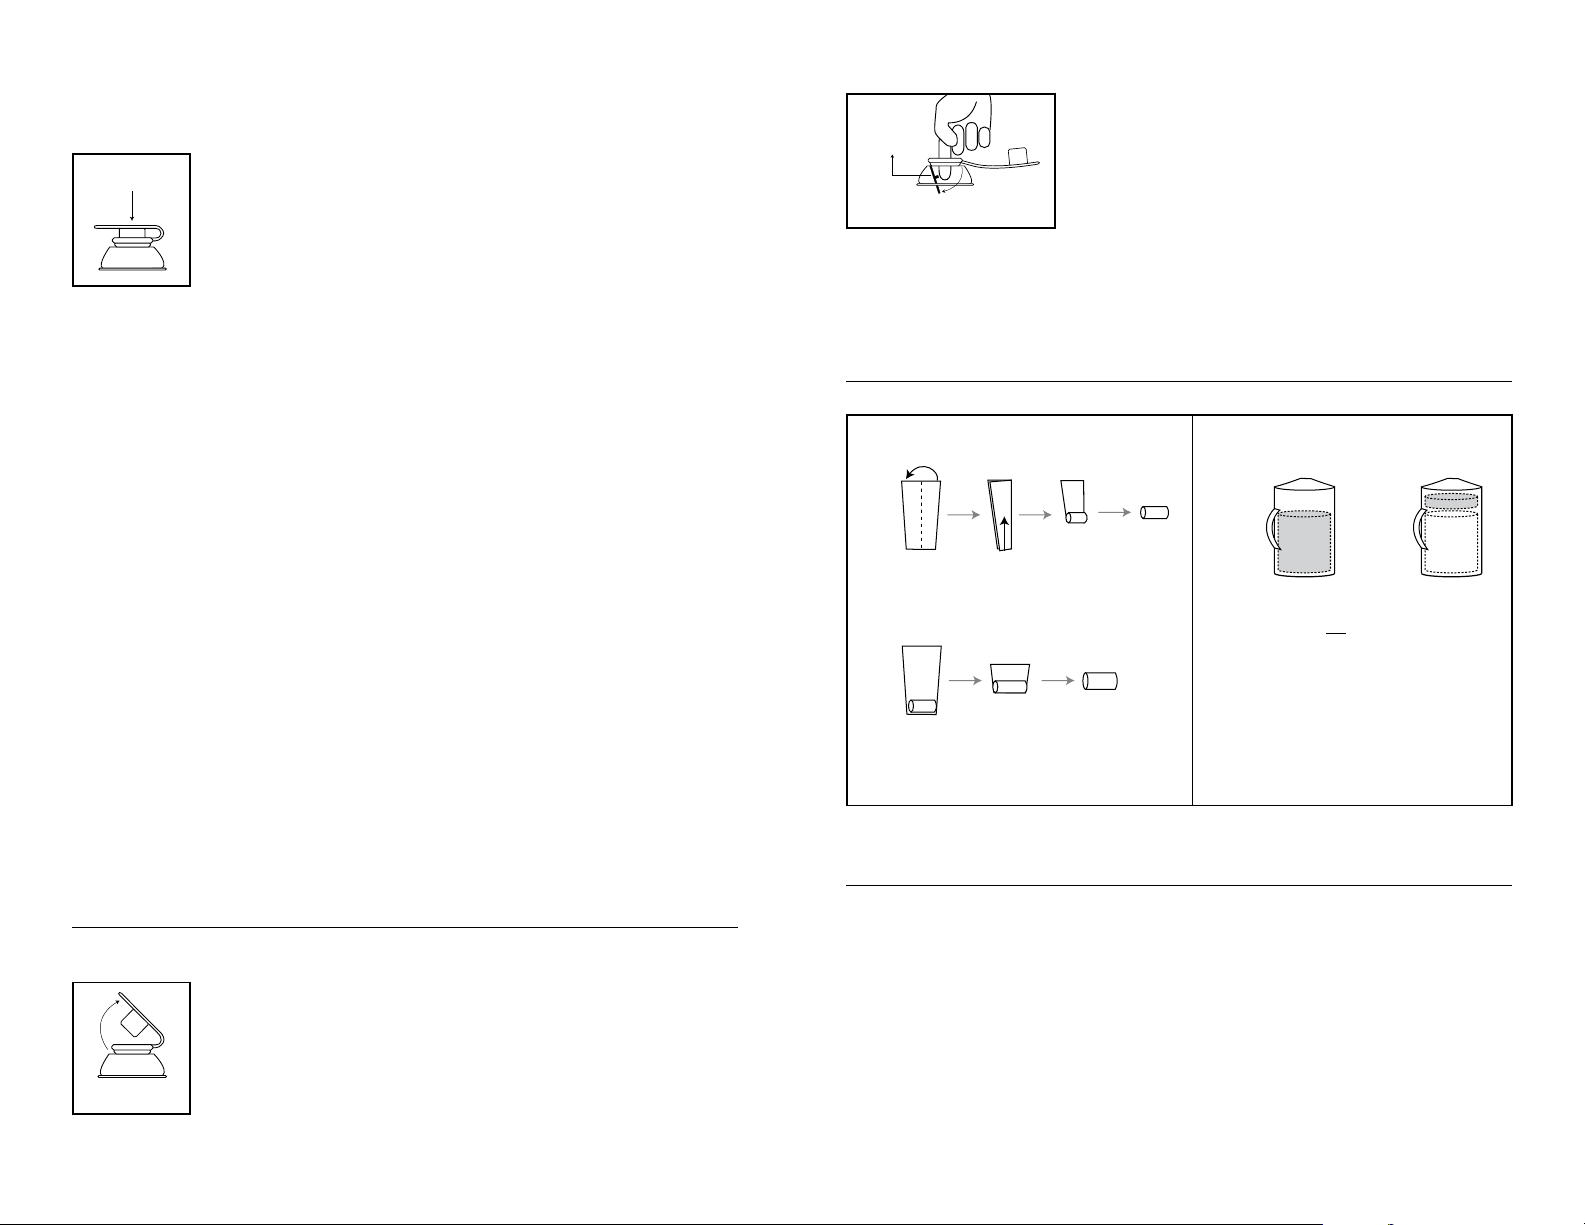
HOW TO PACK
Roll Inflatable Bed
1
3
Packing
Be aware of your temperatures! Weather will affect the air volume /pressure in your unit.
Variations of temperatures can make Inflatable seem to lose or gain air. This is normal.
Hot weather causes air to expand and the PVC might feel soft to the touch. If air is expanding and it feels like the unit is hard and does not allow a small depression when pushed on
with your hand, you will need to release some air to avoid over-inflation. If the air is warm
and PVC feels soft to the touch, do not add air. This will stretch the material and cause
seam problems and over-inflation.
Cold weather causes air to compress. When the sun is shining and the temperature rises,
the air will again expand in the unit. If you are experiencing a cool span you may want to
add additional air. Be careful when the temperature rises that the unit does not become
over-inflated. Damage due to over-inflation voids the warranty. All inflatables are sensitive to
cold, therefore never unfold or inflate in temperatures below 50 degrees.
DEFLATION
Prior to deflation, remove all children from the bed!
1 Open the valve stem plugs on both Valve #1 and Valve #2.
OPEN
Lay flat.
Fold bed in half.
Roll Sleeping Bag with Inflatable Bed inside
2
Lay Sleeping Bag
flat with rolled
Inflatable Bed
at small end.
Roll from
small end.
Roll both together
from small end.
Place rolled Inflatable Bed
and Sleeping Bag into
Carrying Bag first.
Tighten drawstring and away you go!
4
Next, place the
pump on top.
MAINTENANCE
Maintenance is essential to increase the life of your product. Please follow all maintenance
and repairs according to this manual. If you are unsure please contact the shrunks directly.
- Inspect product regularly for potentially unsafe conditions, particularly after storms, and
suspected misuse of product.
- Do not use product if repair is needed.
- Clean product regularly per the Cleaning section of manual.
- Check storage area. Make sure it is rodent free and dry.
- When disposing of product do so in such a manner that no hazardous conditions exist at
the time the product is discarded.

CLEANING
If your inflatable bed is used intensively, then it should be cleaned on a weekly basis. It is
also important to clean and dry the product before it is packed away.
- When cleaning your product never use strong detergents or silicone-based products.
- Also never use high pressure cleaning equipment such as a “pressure washer”.
This will result in damage to your product.
- Clean the outside surface only
- Clean your Inflatable Bed with soap and fresh water and check that the valves are clean
and not damaged.
STORAGE
When storing your Inflatable Bed, keep it in a clean and dry place that is not affected by
major variations in temperatures and other damaging factors. You can store your Inflatable
Bed deflated and rolled up or lightly inflated. Be careful never to stack anything on top of
Inflatable Bed.
REPAIRS
All of the inflatable products include repair kit patches. You can easily repair minor
punctures and cuts. This kit includes 2 round pieces of self-adhesive material to patch the
inflatable bed;
Conditions necessary for successful repair:
Relative humidity less than 65 % / Temperature Range between 63°-77° Fahrenheit (17°25°) Celsius. Avoid completing repairs in direct sunlight or rain and ensure that the material
is fully deflated and lies flat.
A. First, you need to locate the hole. The easiest way is to fully inflate the product and listen
for a leak, or to spray with soapy water and look for bubbles. You then need to deflate the
product.
B. Cut out a round patch to required size depending upon hole/puncture; at least
0.75’’ larger than the hole.
C. Clean the damaged part and surrounding area of the product with soap and water and
allow to dry thoroughly. Wipe the damaged part and surrounding area with fingernail polish
remover, or rubbing alcohol, and allow to dry thoroughly.
D. Apply the patch over the hole, covering the cut. Press out the air pockets which may
have formed under the patch. You can use any round object, such as a spoon, starting in
the center and then working outwards towards the edges.
E. Place heavy object on repaired area to keep patch firmly in place for 30 minutes – the
drying period.
F. Once dry, you can inflate the unit. Do not expose the repair to sun or rain until repair has
been completed.
WARNINGS
- This is not a lifesaving or personal flotation device!
- Only use under competent adult supervision!
- Never leave children unattended.
- Only use if you are willing to accept the risks!
- Always inspect product for any unsafe conditions before use!
- Always have sufficient distance between the inflatable and other objects!
- When using, keep in mind that tipping is possible!
- Never set up or use the product in or near a swimming pool!
- Always stay in control and no wild playing while using the inflatable!
- Do not use the inflatable while under the influence of alcohol or drugs!
- Remove any sharp objects such as a watch or chain before using the inflatable!
**While every attempt is made to embody the highest degree of protection in all equipment,
we cannot guarantee freedom from injury. The user assumes all risk of injury due to use. All
merchandise is sold on this condition, which no representative of the company can waiver
or change.
THE DO AND DO NOT’S
DO supervise children at all times while they are using the product.
DO retain instructions with the product.
DO inspect product before each use.
DO instruct children on the proper use of product.
DO require children to remove shoes before use.
DO allow only 1 child at a time to use the Inflatable Bed.
DO keep pets away from the product.
DO instruct children not to attach items to the product that are not specifically designed for
use with the equipment, such as but not limited to, jump ropes, clothesline, pet leashes,
cables and chains as they may cause a strangulation hazard.
DO NOT place product near fire.
DO NOT allow children to jump onto or off of the product.
DO NOT allow other toys on top of the product.
DO NOT allow helmets, headgear, loose clothing, scarves, hoods, or clothing containing
drawstrings when using this product.
Sleeping Bag
Assembly, Care, and Wash Instructions
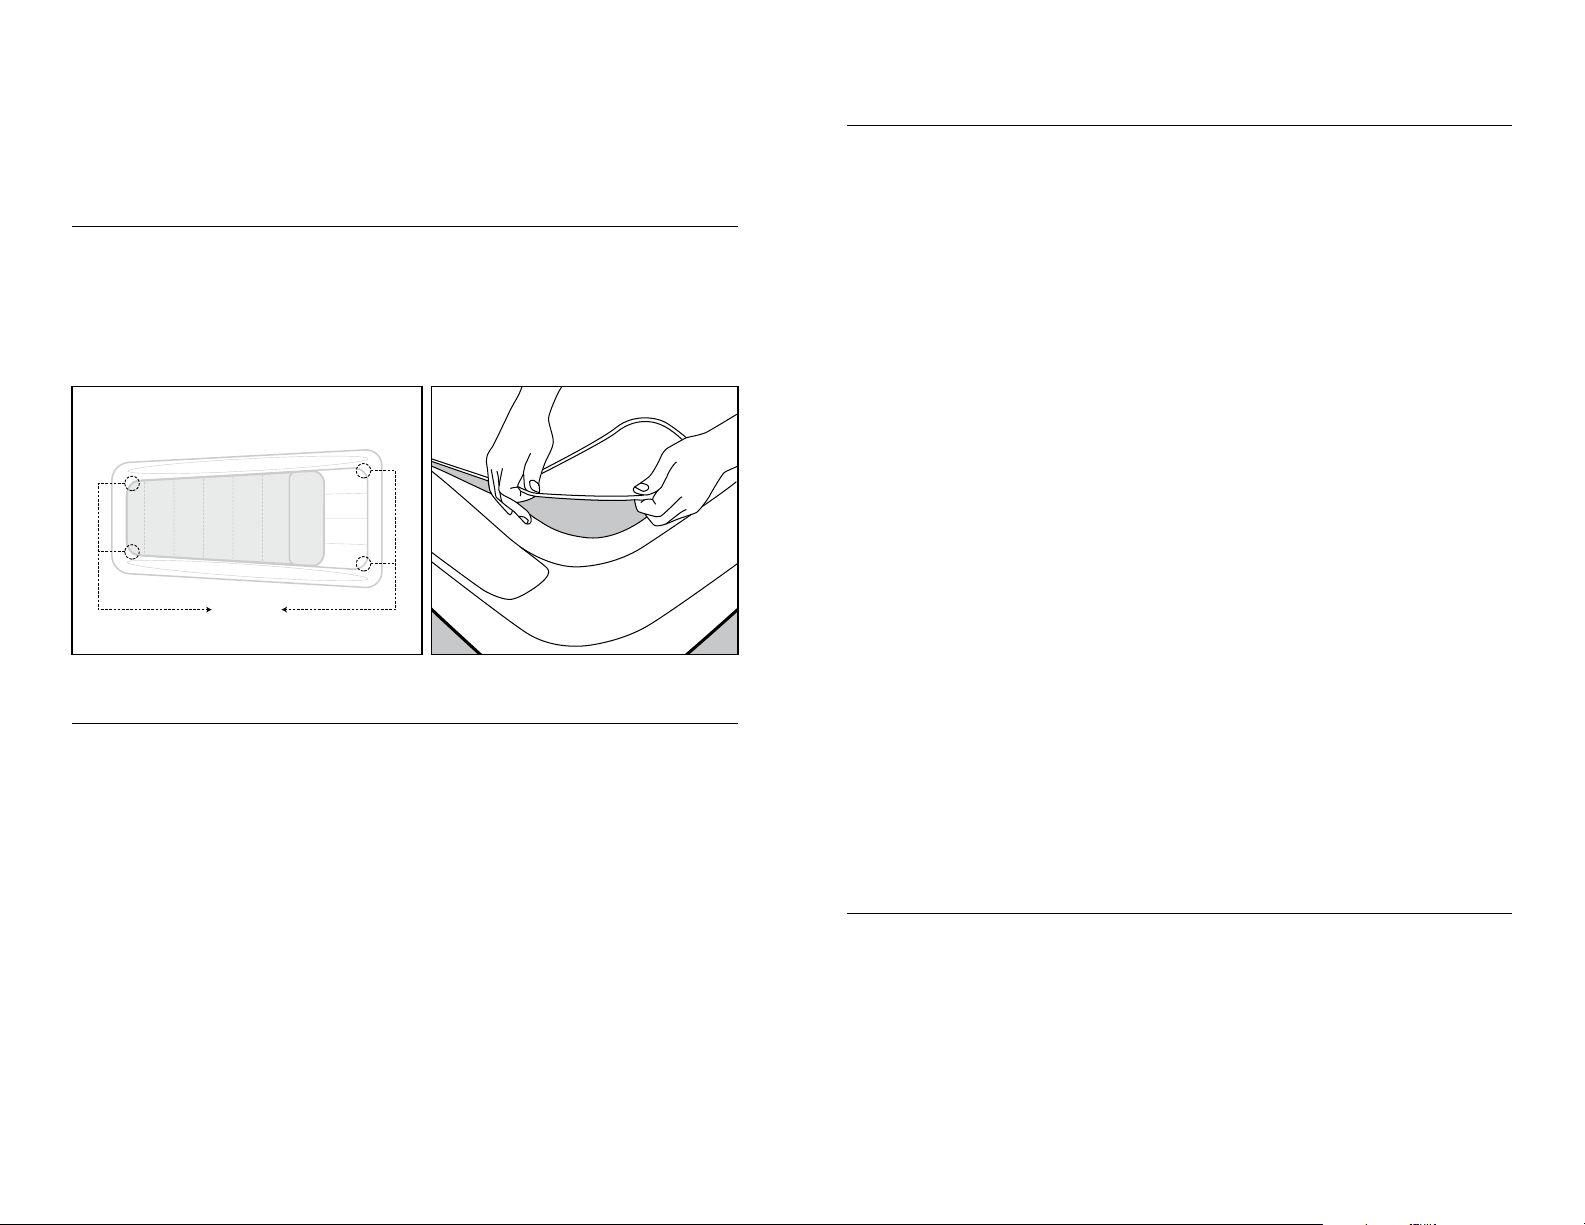
HOW TO ATTACH SLEEPING BAG TO BED
1. Once the inflatable bed is fully inflated, place the sleeping bag, face up and flat, on top of
the mattress part (with brown flocking) of the inflatable bed.
2. Locate the elasticized hems (on the bottom corners of the sleeping bag) and place each
hem over its corresponding corner on the mattress part of the inflatable bed.
TOP VIEW
TUCK CORNERS
SLEEPING BAG
INFLATABLE BED
CARE GUIDELINES
- Avoid sleeping inside the bag in hot conditions when heavy sweating may occur.
- The most effective way to care for your sleeping bag is by keeping it clean. You can
reduce the need to wash it by spot cleaning marks on the outside with a damp cloth.
- Open the bag and air it out every morning for at least 30 minutes. This will keep the bag
clean by allowing excess body moisture to evaporate.
TO HELP MAINTAIN THE PERFORMANCE OF YOUR SLEEPING BAG AND PROLONG
ITS LIFE:
- Store your sleeping bag loose when not in use for a long period of time.
- Only use the carrying bag provided.
- Lay out your sleeping bag as soon as you arrive at your destination to allow the bag to
fully loft. A fully lofted bag provides better insulation.
- It is important to keep your bag as dry as possible. Take any opportunity to air out your
bag during use, and always ensure that it is completely dry before storing.
- If your sleeping bag becomes wet it is important to treat it carefully as the weight of the
moisture may cause damage.
WASH INSTRUCTIONS
During washing, ensure all zippers are secured.
HAND WASH (RECOMMENDED):
1. Lay the sleeping bag flat in a bath tub and fill with warm water until covered. Add a pure,
mild soap or detergent.
2. Gently massage the water into the bag by adding pressure with your open hands until
the bag is saturated. IMPORTANT: Do not attempt to lift your bag while laden with
water.
3. Leave to soak for 1-3 hours, depending on cleaning required.
4. Release the water from the tub.
5. Add fresh water and massage into the bag again. Repeat this process until no suds are visible.
6. With the bath plug removed, continue to massage the bag until all water has been removed.
7. Fold the ends of the bag in towards the centre and press firmly again to express any
remaining water.
MACHINE WASH:
1. Wash in a large, front-loading washer on a gentle cycle, with a warm wash at 40°C, and
cold rinse setting. Use a mild soap or detergent to avoid damaging the filling.
2. When the wash cycle ends, roll up the bag and gently press out as much water as you
can without wringing it out.
DRYING YOUR BAG:
1. Once all the excess water has been released the sleeping bag can be air dried.
2. When air drying the bag it is best to place it directly on towels before placing it on a
drying rack. IMPORTANT: Dry in a shaded area out of direct sunlight, as excessive exposure
to UV will degrade the shell fabric. A hot, windy day provides the perfect conditions for air
drying your sleeping bag.
WARNING: DO NOT DRY CLEAN
RETURNS & EXCHANGES
For warranty and replacement issues, please go to www.theshrunks.com/warranty
for more information.
Head Office
5675 Goring Street Burnaby, BC
Canada V5B 0A3
T. 604-298-0588 F. 1-866-839-1624
Toll Free 1-866-354-2237
Email: info@theshrunks.com
Website: www.theshrunks.com
USA Logistics
925 Boblett Street
Blaine, WA, 98230
USA
Toll Free 1.866.354.2237
Fax 1.866.839.1624
European Logistics
Verbreepark 3
2731 BR Benthuizen
The Netherlands
T +385.99.8468449
F 1.866.354.2237
 Loading...