

Page 1

1PB Using Your Thermapen Your Thermapen - A Guide to Better Food
FRONT
PAGE
Your
Thermapen
TM
A guide to better food
by using and caring for your
SuperFast Thermapen
TM
Page 2

32 Using Your Thermapen Your Thermapen - A Guide to Better Food
4 Your Thermapen doesn't test doneness - it tests temperature
very accurately (see page 7).
4
The Thermapen doesn't lock in on a reading. It is accurate
enough to show the ever-changing temperature of your food
while it cooks (see page 7).
4Your Thermapen measures temperature at the tip of its
probe (see page 9). Penetrate your food with the probe tip
where you want to measure - usually the centre of the thickest
part of your food (see page 12).
4Never leave your Thermapen in an oven while cooking
(see page 20).
4In general, be sure to thaw meats thoroughly before cooking
(see page 10).
4Remember that the temperature of meat normally continues
to rise a little after you remove it from the oven or grill
(see page 13).
4Don't test the accuracy of a thermometer in food. Use a
properly made ice bath (see page 17).
4Be sure to clean your Thermapen probe after contact with
uncooked or undercooked meat (see page 19).
4Wipe your Thermapen regularly, but don't place it under the
tap, submerge it, or put it in the dishwasher (see page 19).
4The battery compartment cover is tight for water-resistance.
Be careful not to force it open (see page 22).
Guarantee
The Thermapen carries a two-year warranty against defects in
either components or workmanship. During this period, products
that prove to be defective will, at the discretion of ETI, be either
repaired or replaced without charge. This warranty does not
apply to probes, where a six-month period is offered. The product
warranty does not cover damage caused by fair wear and tear,
abnormal storage conditions, incorrect use, accidental misuse,
abuse, neglect, misapplication or modification. Full details of
liability are available within ETI's Terms & Conditions of Sale
at www.thermapen.co.uk/terms. In line with our policy of
continuous development, we reserve the right to amend our
product specification without prior notice.
Thermapen Handy Tips!
Page 3

32 Using Your Thermapen Your Thermapen - A Guide to Better Food
A guide to better food
by using and caring for your
Thermapen digital thermometer
SuperFast
Thermapen
™
Page 4

54 Using Your Thermapen Your Thermapen - A Guide to Better Food
Contents
Fifteen Minutes Well Spent ................................ 5
A Few Things Your Thermapen Does NOT Do
It doesn’t start at zero
..................................... 6
It doesn’t stop the cooking for you................... 6
It tests temperature not doneness .................... 7
It doesn’t lock in on a reading ........................ 7
Here’s What Your Thermapen DOES Do ............ 7
Measuring Temperatures ................................ 9
Special Considerations for
Cooking Meat, Poultry & Fish
1. Thawing ................................................. 10
2. Removing from Fridge .............................. 11
3. Low and Slow Versus Hot and Fast
............ 11
4. Choosing a Target Temperature ................ 11
5. Getting a Proper Reading with
Your Thermapen ...................................... 12
6. Resting ................................................... 13
Outdoor Grilling ......................................... 14
Using Oven Alarms with the Thermapen ........ 14
Food Safety & Temperature .............................. 15
The Accuracy of Your Thermapen
Ready, Set, Go ............................................ 16
Performing an Ice Bath Test ........................... 17
Performing a Boiling Water Test
..................... 18
Re-calibration ............................................. 19
Cleaning & Caring for Your Thermapen
Cleaning the Probe ...................................... 19
Cleaning the Thermapen Body...................... 19
Storing Your Thermapen
............................... 20
Avoid Overheating the Thermapen Body ....... 20
Customizing Your Thermapen
.......................... 21
Changing the Batteries
................................. 22
Frequently Asked Questions
............................ 23
Recommended Temperatures
............... Back Cover
Page 5

54 Using Your Thermapen Your Thermapen - A Guide to Better Food
Fifteen Minutes Well Spent…
Thank you for purchasing our SuperFast Thermapen
which is probably the fastest, most sensitive, and accurate
thermometer you will have ever owned. It will assist you to learn
things about the cooking process that you could not see using
other thermometers. It is, however, a tool and like all tools, it
requires proper use and care to be effective.
This booklet should only take fifteen minutes to read and will
help you get the most out of your Thermapen experience.
Your Thermapen was pre-calibrated by hand in our laboratory
and is guaranteed to be accurate to ±0.4 °C (-49.9 to
199.9 °C) and will display the temperature of food or liquid in
just three seconds! You are probably not used to that kind of
speed and accuracy in a thermometer.
Keep this in mind as you begin to take readings with your
Thermapen and learn to rely more and more on the information it
provides. It truly can change the way you cook and prepare food.
accurate temperature reading
in just three seconds!
Page 6

76 Using Your Thermapen Your Thermapen - A Guide to Better Food
A Few Things Your Thermapen
Does NOT Do
It doesn’t start at zero
The moment you swing open its probe, your Thermapen starts
displaying the current temperature at its tip. Your Thermapen
is not like a bathroom scale that starts at zero every time. As
soon as it comes on, it displays a temperature. If you touch the
tip of the probe, you can watch the temperature change (it will
probably go up, unless you are on a tropical island)*. Remove
your finger and watch the temperature fall again. Try it.
It doesn’t stop the cooking for you
It may seem like an obvious point, but the Thermapen is just
a tool that gives you highly accurate information about the
temperature of the food you are preparing. YOU have to make
the decisions about when to increase or decrease the heat and
about when things are done. It’s a learning process. You’ll learn
the most from just experimenting and keeping track of your
results. There are a lot of variables at play, such as how cold the
food was before cooking, your heat setting, the consistency of the
cooking surface, and much more. But with accurate information
from your Thermapen, you’ll learn quickly to account for such
variables to achieve just the right results.
* The Thermapen shows the temperature at its tip and works best when its
probe is inserted or immersed into something. It will read air temperature;
however, it can take a minute or two to get an accurate reading unless the air
is moving rapidly.
It doesn’t test doneness - it only
tests the current temperature!
reduced tip
Page 7

76 Using Your Thermapen Your Thermapen - A Guide to Better Food
It doesn't test doneness; it only tests the
current temperature
While temperature is the most effective indication of the doneness
of food while it is cooking, cooked food will eventually cool. For
example (although you might be tempted to try), it wouldn’t do
you much good to take your Thermapen
to a restaurant so you
can test your steak as it arrives at your table. Your Thermapen
would only tell you the temperature of the steak at the table, not
the highest temperature the steak reached in the kitchen - which
would be the temperature that determined its doneness. While
cooking, remember to look for the highest temperature reached
in the thickest part of the food to judge doneness (see 'Outdoor
Grilling' on page 14).
It doesn’t lock in on a reading
If you find that the digits on your Thermapen readout keep
changing after three seconds, that’s because the temperature at
the tip is changing. When you first penetrate meat on the grill,
for example, the Thermapen display will change very rapidly as it
moves from ambient temperature to the temperature of the meat
being probed. Within three seconds, the rate of change will slow
dramatically giving you an accurate reading, but it will not stop
changing completely. As the meat continues to cook and the
tip of your probe moves through the meat, your Thermapen will
continue to detect variations in the temperature of the meat itself.
Now…
Here’s What Your Thermapen
DOES Do
Quite simply, it gives you the fastest, most accurate temperature
information you can find in an affordable professional-grade
thermometer. It can be used to check the internal temperature
of the following…
u meats
u poultry
u fish/shellfish
u vegetables
u casseroles
u desserts
u confectionery
u breads
u doughs
u sauces
u drinks
u and much more...
Page 8

98 Using Your Thermapen Your Thermapen - A Guide to Better Food
…while you prepare foods in your…
…and anywhere else you work with food.
Some people even use their Thermapen to check the temperature
of their bath water! Get creative and think about ways that an
accurate temperature reading could improve your life.
Those who make a commitment to using their Thermapen
regularly achieve the best results over time. You have likely grown
accustomed to estimating the doneness of food through other
less scientific methods, such as…
u relying on a recommended cooking time from a recipe
u watching the colour of a bread while baking
u sticking a fork or toothpick into a cake to see if it comes
out clean
u stirring and watching the consistency of a sauce or
confectionery
u pressing against the top of meat to gauge resistance
u cutting open a fillet on the grill
Many recipes call for just these types of activities, but you now
have a highly accurate temperature instrument at your disposal.
Start taking readings on your favourite recipes and jotting them
down next to the recipes themselves. Make the food the same
way you always do and check doneness as you always have,
but start writing down the Thermapen readings for when things
turn out just the way you like them. That way you will be able to
replicate a perfect result using your Thermapen.
You may find that
you can gauge the
'hardball' stage of a
confectionery recipe
more accurately than
ever and start making
near-misses a thing
of the past, if you
just take the time to
u oven
u microwave
u fridge
u freezer
u deep fat fryer
u BBQ, grill or smoker
u hob
u worktop
Page 9

98 Using Your Thermapen Your Thermapen - A Guide to Better Food
record what is happening with your Thermapen. Keep in mind
that each type of meat or combination of ingredients will respond
to heat in different ways and be 'done' at different temperatures.
The table on the back cover of this guidebook gives basic
recommendations for different types of meat using common
terms like 'medium rare' or 'well done', but these are just
guidelines. The important thing is to start learning what the
temperatures are for your favourite foods when they are just
the way you like them.
Measuring Temperatures with
your Thermapen
There are no buttons on your Thermapen. It simply turns itself on
when you extend the probe* and shuts off when you close the
probe back against the Thermapen housing. There is also an
auto-off feature that turns the Thermapen off after 10 minutes of
continuous use to preserve battery power**.
Your Thermapen has a micro-thermocouple located at the very
tip of its probe shaft. A thermocouple is a pair of two heatsensitive wires that produce a voltage related to temperature
difference. This technology is typically found only in professionalgrade thermometers and is what sets your Thermapen apart
from other digital 'instant read' thermometers.
Because the micro-thermocouple is so small, your Thermapen
need only be inserted at least 3 mm to
get an accurate reading. Other cooking
thermometers may need 13 mm or more
of immersion.
To take a temperature reading with your
Thermapen, penetrate the food you are
checking with the probe and place the
very tip of the probe where you want
to measure. When testing doneness in most foods, the coldest
part will be the very centre of the thickest portion. With larger
foods, you can take quick readings with your Thermapen
in several locations to verify that the entire portion is done.
If you are chilling a food, the centre of the thickest part will be the
last to cool.
* The probe’s rotating hub can be a little tight at first but will loosen with use.
The probe extends to 180°, but be careful not to force it further.
** This feature can be disabled (see 'Customising your Thermapen' on
page 21).
Page 10

1110 Using Your Thermapen Your Thermapen - A Guide to Better Food
Do not 'stab' at the food being measured, and don’t immerse
the probe fully. Instead, use gentle, persistent force to insert
the probe into the food. The probe tip is sharp and should
penetrate meats or other foods with ease. Use care to avoid
bone, gristle or other hard substances. Also, don’t use the
Thermapen to turn or move your meat. The Thermapen probe
is durable and should last many years with proper care, but it is
hollow and could bend or break if mistreated.
Special Considerations for
Cooking Meat, Poultry & Fish
Getting good results when cooking or grilling meat, poultry or
fish takes a little bit of extra care. Here are some things to
consider when looking for just the right doneness.*
1. Thawing
It is generally never a good idea to put frozen meat over heat.**
Even if the outside of a piece of meat is thawed, if the centre
is still frozen, the outer parts of the meat will very likely get
overcooked while you are trying to bring the centre up to your
target temperature.
Take care to completely thaw your meat before putting it over
heat. Check the centre of your meat with your Thermapen and
compare it to a reading near the outside to be sure the meat is as
close as possible to uniform temperature before cooking.
The best way to thaw meat is the slow way - by putting it in your
fridge and waiting. If you need to speed the process up, you can
use a water bath, but be sure the water surrounding the meat
doesn’t get above 5 °C to avoid bacterial growth.
Check the temperature of the water regularly with your Thermapen
and refresh the bath as needed. Again, use your Thermapen to
check the meat for a uniform temperature to be sure it has thawed.
* Please note, that for the purposes of this discussion, we will use the word
'meat' to signify any meat, poultry, or fish.
** Some prepared poultry (like flash-frozen enhanced chicken breasts) can
cook better from frozen than thawed, depending on the cooking method, but
this is an exception to the rule.
Page 11

1110 Using Your Thermapen Your Thermapen - A Guide to Better Food
2. Removing from Fridge
Experienced grillers maintain that meat is best when allowed to
come near room temperature before being brought to heat. This
may be a great time to marinate or pre-season beef and allow
the flavours to penetrate the meat. Cold beef can generally be
left at a moderate room temperature for an hour or two before
cooking or grilling without any significant food safety risk.
DO NOT leave the meat at room temperature for extended
periods. Use extra care with poultry, pork and fish.
3. Low and Slow Versus Hot and Fast
Generally speaking, a low heat setting with a longer cooking time
will allow a larger piece of meat to cook more uniformly without
overcooking parts of it. However, many techniques rely on an
extremely high heat for a shorter period. Searing or browning
normally requires higher heat. A combination of methods is
sometimes recommended. Similarly, different techniques call for
indirect heat versus direct heat. Consult your favourite recipe for
advice on the cut of meat you’ve chosen to be sure you set up
your heat source properly.
4. Choosing a Target Temperature
Many modern recipe books include specific temperature
recommendations as part of their instructions, but many
still do not. We’ve printed a handy table of recommended
temperatures by type of meat and other foods on the back
cover of this booklet to get you started. Remember that these
temperatures are only a guide to your cooking and should not
be treated literally. The precise meaning of terms like 'medium'
and 'rare' is a matter of personal taste. Another important thing
you’ll need to keep in mind is that most meats will continue
to rise in temperature after you remove them from the heat from several degrees up to 6 °C or more. When choosing a
target internal temperature for removing your meat from
the hob, oven or grill, you will want to allow for at least a
3 °C rise in temperature while resting. For example, to cook a
steak to 'medium rare' or 54 °C, you should plan on pulling it off
the heat once the internal temperature in the thickest part reads
52 °C on your Thermapen (see 'Resting' on page 13).
Page 12
1312 Using Your Thermapen Your Thermapen - A Guide to Better Food
5. Getting a Proper Reading with
Your Thermapen
In poultry, pork and ground beef, there are health reasons to
reach safe temperatures before eating. You may be similarly
reluctant to eat 'undercooked' steak or fish. However, if you
overcook the outer parts or extreme ends of the meat while you
are trying to get the centre to reach your target temperature, the
result will be disappointing. Various cookbooks and TV shows
give advice on achieving a uniformly cooked piece of meat.
Different parts of a piece of meat will be at different temperatures
during the cooking process. It is not unusual for the internal
temperature of a large roast or turkey to vary by as much as
10 to 15 °C throughout the meat or bird. Even a steak or a
boneless chicken breast will show differences of many degrees
as you move the tip of your Thermapen probe from the surface
toward the centre of the piece or from end to end.
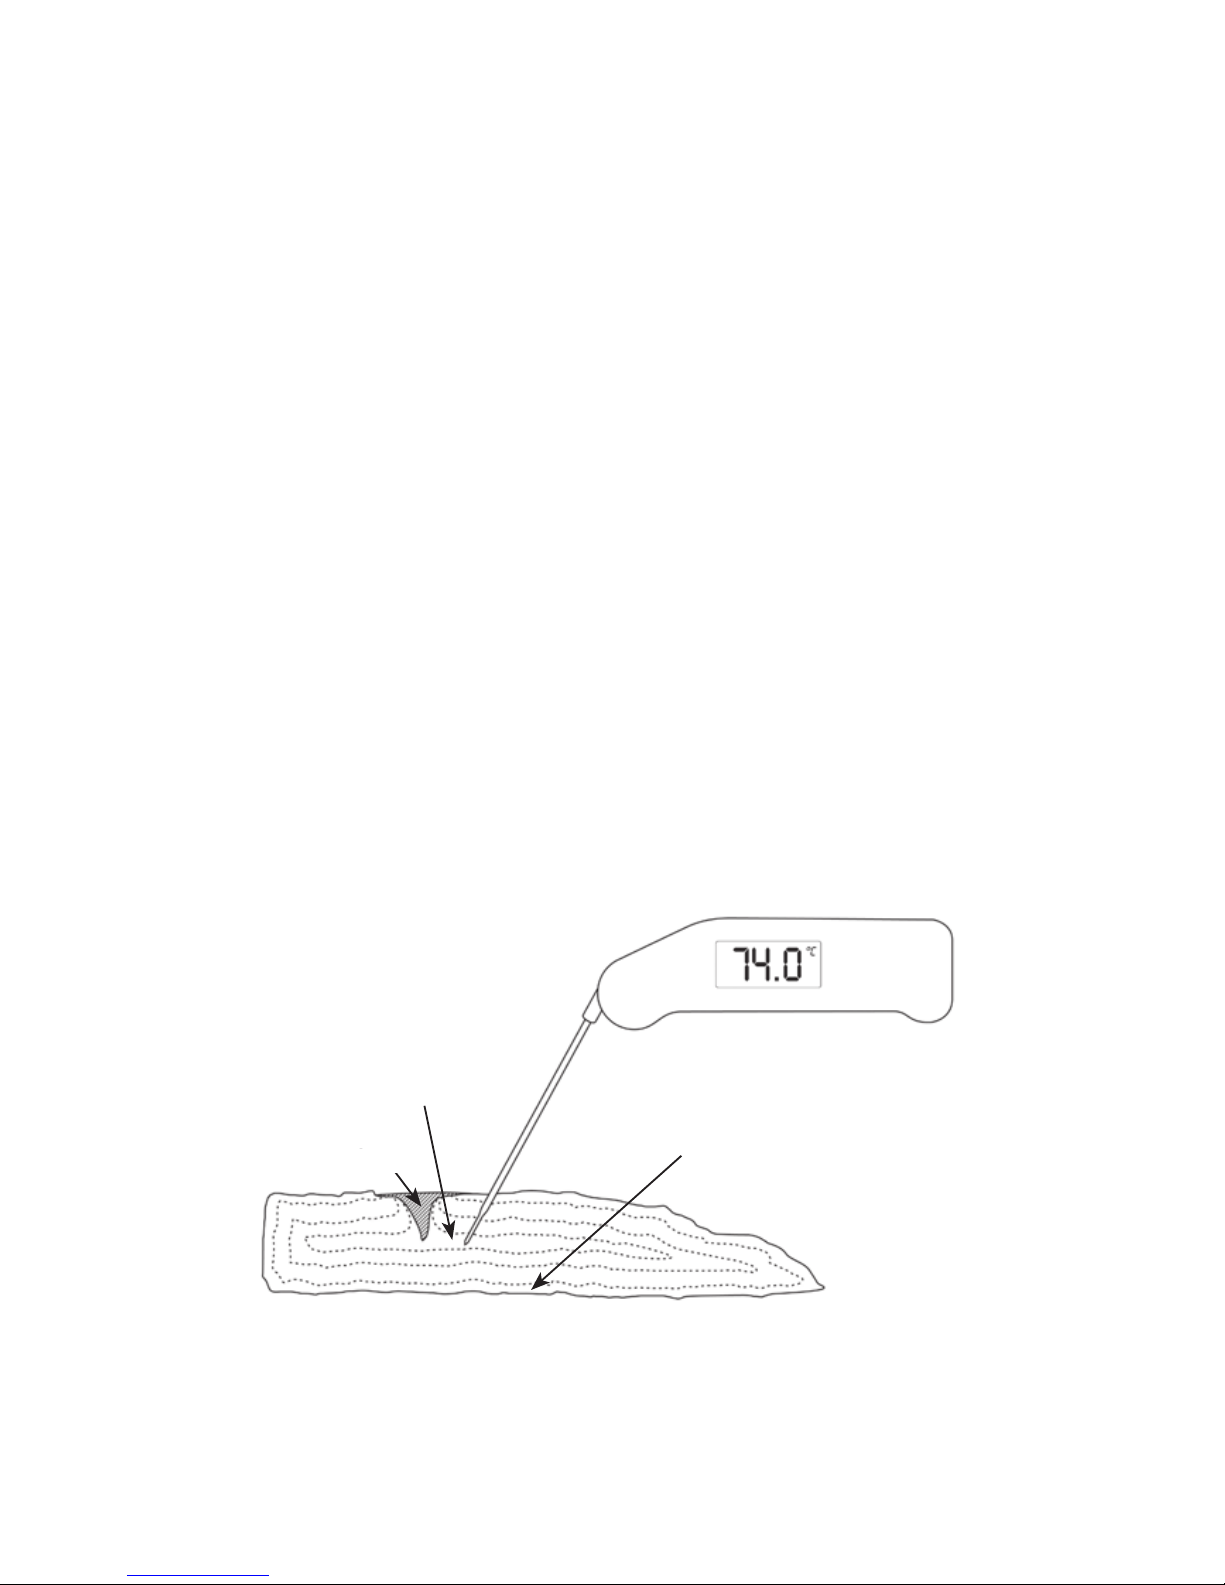
To get a proper reading with your Thermapen, insert the probe tip
into the thickest part of the meat from the top.* Make an effort to
avoid any obvious bone or gristle. Note the temperature. Slowly
push past the centre and you will see the temperature rise in 'real
time' at every depth in the piece of meat. Slowly withdraw the
probe and you will be able to see the temperature change in the
opposite direction.
Place the tip of the probe into
the centre of the thickest
part of the meat
coolest part of the meat
bone
hottest part of the meat
* Many experts recommend inserting your thermometer probe from the side of
a steak or pattie to ensure that you get the probe tip right in the centre, where
the temperature will be lowest. You can use a pair of tongs to gently lift the
piece of meat off the heat with one hand while you take a Thermapen reading
from the side with your other hand.
Page 13

1312 Using Your Thermapen Your Thermapen - A Guide to Better Food
If the meat has already been cooked on both sides, the very
centre of the thickest part should have the lowest reading. That is
the best place to gauge doneness.
As you experiment with your Thermapen and gain confidence,
you will learn to quickly check a piece of meat, a roast or a whole
bird in several places and depths to gauge your overall progress
during cooking. Lesser quality thermometers such as dial types
or slower digitals may not show as much temperature difference.
Only a very fast and sensitive thermometer like your Thermapen
can show you the exact temperature at its tip. This can be very
useful as you try to adjust your cooking methods to achieve a
more even cooking process.
6. Resting
Cooked meat should be allowed to 'rest' after cooking and before
cutting. This permits the juices to be re-absorbed into the fibres of
the meat. If you skip resting you risk losing flavourful juices when
the meat is cut. The temperature of the meat will continue to rise
a little during the resting period, so you should remove your meat
from the oven or grill prior to reaching your target doneness
temperature; otherwise, you risk overcooking your meat. The
amount of temperature increase is dependent on several factors.
Generally, larger cuts of meat will experience a greater increase
in temperature during the rest. This is due to the residual heat
flow that is still travelling toward the cooler centre even after the
meat has been pulled from the heat source
How you rest your meat will also affect the temperature rise.
If you leave the meat uncovered, or you remove it from its
roasting pan, or you place a hot steak on a cold surface, more
heat will escape into the room and less heat will reach the centre.
If too much heat escapes, the meat may grow cold before
serving. On the other hand, if you keep your meat in a warm
oven or under a heat lamp, there will be a larger heat rise and
you may overcook the centre unless you have allowed for this.
Loosely covering the meat with aluminium foil or 'tenting' will
conserve some heat and still allow some air circulation to avoid
steaming the meat surface; use extra care if you want to preserve
a crispy exterior on a turkey or roast. A warmed oven (with the
heat turned OFF) might be a better resting location for meats
with a crust.
Page 14

1514 Using Your Thermapen Your Thermapen - A Guide to Better Food
Typically, even a small steak or individually cooked piece of
chicken will rise at least two or three degrees during resting.
A larger roast or turkey can rise as much as five to ten degrees
depending upon conditions. Learn how much rise to expect by
taking readings before and after resting with your Thermapen.
Start deducting typical resting 'rises' from your final target
temperature when you remove your meat from the cooking
surface.
Outdoor Grilling
A word about grilling in wind or colder weather: A cooked piece
of meat can be exposed to drafts that might cool it before you
measure it with your Thermapen. This is particularly true when
you flip the meat over on the grill. Once cooked, meat does not
'un-cook' even though its temperature can drop.
Avoid this problem by keeping the grill covered as much
as possible and be aware of cold drafts when measuring
temperatures with your Thermapen. Remember that the centre
temperature is the most important in these types of conditions.
Take a centre reading right before you flip your meat, and then
again right after to see if there is any cooling taking place. The
highest temperature recorded is your guide, even if it drops
again.
Using Oven Alarms with your Thermapen
For oven or barbecue roasting, many people have great success
using an 'oven probe' or thermometer alarm in conjunction with
their Thermapen.
Remember that the Thermapen cannot be left inside the oven.
You have to actually open the oven door to get a reading with
your Thermapen, even though the Thermapen
is so fast that you
can typically close the door again very quickly with minimal loss
of heat.
Oven thermometers, on the other hand, have heat resistant probes
that can be placed in the food being cooked inside the oven and
relay that information by cable to a monitor outside the oven. The
problem with oven thermometers is that they can only monitor the
one location where you place the probe. They are also typically
slower and much less accurate than your Thermapen.*
Page 15

1514 Using Your Thermapen Your Thermapen - A Guide to Better Food
That’s why using the two together can be a real advantage the oven thermometer lets you know when you’re getting
close to your target, and the Thermapen confirms the actual
internal temperature in several locations.
To use an oven thermometer, place the oven probe so the tip
is at the thickest part of the food being cooked. Set the alarm
to sound at least ten to fifteen degrees below your final target
temperature. When the alarm sounds, open the door and test
your food in several different locations with your Thermapen to
accurately gauge doneness and allow for resting.
Food Safety & Temperature
You can use your Thermapen to check temperatures and minimise
food-borne illness in your kitchen. Bacteria thrive between the
temperatures of 5 and 60 °C. Food should not be stored
between these temperatures for extended periods of time. Some
left over foods must be reheated to minimum temperatures to
assure sufficient 'kill rates' of bacteria or parasites.
Holding hot foods
.......................................60 °C or higher
Holding cold foods
....................................... less than 5 °C
Fridge temperature
........................................5 °C or colder
Freezer temperature
...................................... -18 to -23 °C
The table of recommended temperatures on the back cover of
this booklet also provides critical food-safe temperatures as well
as chef-recommended temperatures for meats and other foods.
* Remember that different parts of the same large roast or turkey can vary by
as much as 10 to 15 °C during the cooking process.
Page 16

1716 Using Your Thermapen Your Thermapen - A Guide to Better Food
Ready, Set, Go…
The Thermapen is likely the most accurate, most sensitive, and
fastest thermometer you have ever owned. On the back of your
Thermapen packaging you will find the unique serial number for
your Thermapen.
Included with your Thermapen is a Certificate of Calibration
certifying that your Thermapen was calibrated in a laboratory
against a precision thermometer and found to be accurate at
0 °C (ice point) and 100 °C (boiling point).
This Certificate of Calibration is traceable, via International
agreement, to all major National Standards including UKAS
and NIST.*
The Thermapens have been
shown to exhibit very low
calibration drift over the
course of many years.
You can have
confidence that
your Thermapen
is accurate to
within 0.4 °C
and that it will
remain accurate.
Because the Thermapen is so much more sensitive and accurate
than almost all other digital, instant-read or dial thermometers,
side by side comparisons with other home thermometers will often
show dramatic differences. If you try to compare readings side by
side in food, in the air or in an uncontrolled liquid like running
water, you further compromise your test by failing to account for
the wide variation of temperatures throughout such substances.
That said, if you are determined to check the accuracy of your
Thermapen or any other probe thermometer, you can using the
following in-home procedures at any time.
* Only thermometers certified by a calibration laboratory traceable to UKAS
and an accuracy at least four times better than the Thermapen should be used
to do side by side testing and calibration of your Thermapen, only then in a
controlled liquid bath stable to better than ±0.1 °C. DO NOT use a home
thermometer to check your Thermapen. It's a waste of time. Instead use your
Thermapen to check your other thermometers.
NOT a stable
environment
for testing
Thermapen Accuracy
Page 17

1716 Using Your Thermapen Your Thermapen - A Guide to Better Food
Performing an Ice Bath Test
An ice bath test is the easiest way to test the accuracy of
any thermometer, but only if the ice bath is created properly.
An ice bath is NOT just a glass of iced water.** Follow this
four-step process carefully to create a proper ice bath:
Step 1:
Fill a large glass to the very top with ice
(crushed ice is preferred but not required).
Step 2:
Slowly add very cold water until the water
reaches about 10 mm below the top of the
ice.
Note: If the ice floats up off the very bottom of the
glass at all, the ice bath will likely be warmer than
0 °C (32 °F). Pour off any excess water.
Step 3: Gently stir the ice mixture and let it sit for a
minute or two.
Step 4:
Insert the probe of the thermometer being
tested about 50 mm into the ice mixture and
gently stir while you take your reading.
Note: Be sure to keep stirring gently. If the tip of
your thermometer probe comes to rest against a
chunk of ice, it will show a temperature below the
ice point and if it comes to rest against the sides or
bottom of the glass, it may read higher.
Your Thermapen will drop to 1 °C within 3 seconds and will
continue to approach 0.0 °C over the next 2 or 3 seconds. The
final resting temperature should be between -0.4 and 0.4°C
(worst case).
If your Thermapen is accurate in a proper ice bath, it will almost
certainly be accurate at all other temperatures.
** An improperly made ice bath can be off at the ice point by as much as
8 °C. See above illustration.
4
Page 18

1918 Using Your Thermapen Your Thermapen - A Guide to Better Food
Performing a Boiling Water Test
Boiling water tests are more difficult to conduct correctly than ice
bath tests and are unnecessary if the ice bath test is conclusive.
Water only boils at 100 °C at sea level. The change in
atmospheric pressure at elevations above or below sea level
alters the temperature at which water boils.
Once you have the target temperature written down, you are
ready to begin your boiling water test:
Step 1:
Fill a saucepan or pot at least 100 mm deep
with clean water.
Note: Impurities or salt in the water (say, from a
water softener) can significantly affect the boiling
temperature of water.
Step 2: Place the pot on a stove (DO NOT use the
microwave) and turn the heat to high.
Step 3: Wait until the water comes to a strong, rolling
boil that does not stop with stirring.
Step 4: As soon as the water reaches a rolling boil,
put the tip of the thermometer probe 50 mm
deep into the water and gently stir while you
take your reading.
Note: Be careful to keep your probe surrounded
by water. If the tip of your thermometer probe
comes in contact with the side or bottom of the
pot, it will show a higher temperature.
Your Thermapen will rise to within 0.5 °C of your target
boiling temperature within three seconds and continue to
approach your target over the next two or three seconds. The
final resting temperature should be between 0.4 °C above and
below the target temperature you wrote down at the beginning
of the procedure (worst case).
A Thermapen that reads correctly in either or both of these tests
will also be accurate over its entire range of temperatures in any
food or liquid. You can have confidence that the temperature
shown on the Thermapen display is the true temperature at the
tip of its probe.
Page 19

1918 Using Your Thermapen Your Thermapen - A Guide to Better Food
Re-calibration
In the unlikely event that your Thermapen needs re-calibration or
service, this can be performed and new certificates issued by our
in-house UKAS Calibration Laboratory.
Cleaning and Caring for
Your Thermapen
Cleaning the Probe
Each time you test meat that is not fully cooked, your Thermapen
probe may be exposed to harmful bacteria. You should wipe your
Thermapen probe clean every time it is exposed to uncooked
meat and particularly before probing cooked food that is ready
to eat. The same precautions that you use with a knife or a
cutting board apply to a thermometer probe.
Any non-tainting, anti-bacterial wipe or spray cleaner and
paper towels can effectively sanitize your Thermapen probe tip.
We offer a range of anti-bacterial Probe Wipes available to
purchase at www.thermapen.co.uk.
Cleaning the Thermapen Body
The Thermapen probe and body should be wiped clean after
each cooking session and before you put it away. Your
Thermapen is splash-proof and will resist exposure to wet hands
and splashes from cooking liquids, but the housing should never
be submerged in water or any other liquid. DO NOT put your
Thermapen in the dishwasher.
Your new Thermapen features a smooth, almost seamless design
with hardly any cracks or crevices where food can get caught
and spoil. It is easy to wipe clean. Take special care to fully wipe
clean the rotating hub at the top of the Thermapen housing and
the probe retention groove at the bottom. These can be cleaned
with the edge of your towel or wipe. As a general rule, try to
avoid getting moisture, flour or oil on the rotating hub.
Although there is an O-ring seal inside the hub, oils and
fine powders can work their way past the seal over time and
accumulate in the housing, causing problems with the electrical
components.
Page 20

2120 Using Your Thermapen Your Thermapen - A Guide to Better Food
Proper cleaning after each use will prolong the life of your
Thermapen and help keep you safe from harmful bacteria.
Storing Your Thermapen
Your Thermapen has been built to be compact and durable. It
can be stored anywhere. However, sharp knives or other kitchen
instruments can cause damage if left loose in a drawer together.
A variety of Thermapen pouches and wallets are available at
www.thermapen.co.uk.
Avoid Overheating the Thermapen
Never leave your Thermapen inside an oven, grill, smoker or
microwave while cooking. DO NOT leave it under heat lamps or
on a hot surface like a grill hood. When checking temperatures
above a grill or fire, be careful that the Thermapen body does
not get too hot. The Thermapen is very fast, so you can quickly
measure temperatures and then move out of the hot zone. If the
heat is too high for your hand (without a protective oven glove) it
is probably too hot for the Thermapen body.
Never put the Thermapen probe on a coal or into an open flame
as temperatures above 300 °C can cause internal damage to
the probe. Also, use care closing the Thermapen when the probe
has been inserted into a hot food or liquid. The probe is metal
and may be very hot to the touch. Allow it to cool before closing.
If you are likely to be using your Thermapen in high-heat
environments, you may want to consider purchasing a silicone
boot for your Thermapen. Silicone offers short-term protection
from radiant or contact heat. It will also cushion the Thermapen
from knocks and drops, even a drop to concrete. The boot fits
snugly and is easy to remove for cleaning.
rotating hub
probe retention
groove
Page 21

2120 Using Your Thermapen Your Thermapen - A Guide to Better Food
Customising Your Thermapen
You can customise your SuperFast Thermapen by changing the
factory default settings, including…
u changing the display units from °C to °F
u changing the display resolution from 0.1 to 1 °C
u disabling the auto-off feature
To make any of these changes, open the battery compartment
(see 'Changing the Batteries' on page 22) and using the tip of a
bent paper clip, flip the appropriate switch:
Switch 1: Display Units
The default setting for your Thermapen display is for °C. To
display °F, move the switch numbered '1' to the 'off' position away from the batteries.
Switch 2: Resolution
The default setting for
the Thermapen display is
to show temperatures at
a tenth of a degree (0.1°)
for both °C and °F. To
change to whole numbers
(1°), move the switch numbered '2' away from the batteries.
Switch 3: Disable Auto-Off
The default setting for your Thermapen is with the auto-off feature
enabled. This means your Thermapen will turn itself off ten minutes
after you extend the probe and turn it on, to preserve battery life.
Once off, you will have to close the probe and extend it again to
turn the Thermapen back on. To disable this auto-off feature while
taking lengthy readings, move the switch numbered '3' to the 'on'
position - away from the batteries.
*
Switch 4: Trim Adjust
This feature allows you to set an offset that will automatically add
or subtract a number of degrees from your Thermapen readings.
It should NOT be needed for normal use.
* Remember, with auto-off disabled, your Thermapen will stay on and continue
using battery power if you forget to close the probe.
Page 22

2322 Using Your Thermapen Your Thermapen - A Guide to Better Food
Changing the Batteries
The Thermapen comes with two CR2032 (3 volt) coin cell batteries
pre-installed - enough to power your Thermapen for about 1500
hours! An illuminated battery symbol will appear when it
is time to change the batteries. The accuracy of your Thermapen
will not be compromised, but the display will stop working when
battery power is gone.*
Start by carefully removing the battery cover. Insert a coin into
the slot and using firm but even pressure, rotate the battery
cover counter-clockwise about 6 mm.**
Lift the cover from the hole with the
edge of the coin or with your fingernail.
Remove the old batteries and set both
of the new ones in, one on top of the
other, with the positive sides up. Make
sure that the metal clip provided snaps
over the batteries to hold them in place.
Carefully replace the battery cover.
Alternatively, visit our website www.thermapen.co.uk for our
step-by-step video on how to change the batteries.
* Once the batteries are too low to power the display, the display will show
'Flat Bat' and then shut off. Replace both batteries to continue using your
Thermapen.
** The battery cover may be tight in order to maintain splash resistance, but
be careful not to over-rotate. The tabs that hold the battery cover in place are
made of molded plastic and can break if forced.
Page 23

2322 Using Your Thermapen Your Thermapen - A Guide to Better Food
Frequently Asked Questions
Q Why do I get different readings when I measure my
food in different places?
A
Because the temperature of the food can be different in
different places at the same time (see page 12).
Q Why did my steak come out medium/well done when
my Thermapen reading suggested medium?
A
Because meat will continue to cook after you take it off the
heat. You should allow for this rise (see pages 11 to 13).
Q Why is my chicken still bloody when my Thermapen
says its done?
A
Because the bone marrow in chicken bones can release blood
while cooking. It is safely done.
Q Why does my new Thermapen read 3 to 5 °C different
than my old thermometer when measuring food?
A
Because your old thermometer will not have been as accurate
as your new Thermapen (see page 16).
Q Why does my Thermapen show a reading higher than
0 °C (32 °F) when I put it in ice water?
A
Because the temperature is higher than the ice point unless
you take the time to create a proper ice bath (see page 17).
Q Why does my Thermapen take up to 6 seconds to get to
0.0 °C in a proper ice bath?
A
The Thermapen will get to within 0.5 °C (1 °F) within 3
seconds or less but may take 2 or 3 seconds longer for the
last few tenths of a degree to settle (see page 17).
Q Why doesn't my Thermapen seem to settle on a final
temperature in food? It keeps changing.
A
Because the temperature of food keeps changing while it is
cooking and your Thermapen is accurate enough to see it
(see page 7).
Q Am I supposed to clean my Thermapen? How and how
often?
A
You should wipe the probe clean any time it comes in contact
with raw meat and you should clean the whole Thermapen
after each use (see page 19).
23Your Thermapen - A Guide to Better Food
Frequently Asked Questions
Page 24

24 Using Your Thermapen
Know when your food is cooked
Beef
Fish
(llets)
Egg Dishes
Casseroles
Ham
(raw)
Lamb
71 °C
Pork
71 °C
Poultry
74 °C
60 °C 74 °C
74 °C 71 °C
Water Temperatures
(at sea level)
Other Food Temperatures
Bread 77 °C (170 °F) Rich Dough
Bread 88 - 93 °C (190 - 200 °F) Lean Dough
Water temp 41 - 46 °C (105 - 115 °F) to add to yeast
Butter 2 °C (35 °F) Chilled
Butter 18 - 19 °C (65 - 67 °F) Softened
Butter 29 - 32 °C (85 - 90 °F) Melted & Cooled
Sponge Cake 95 - 98 °C (203 - 208 °F)
Fruit cake 98 - 100 °C (208 - 212 °F)
Confectionery / Sugar Syrup Temperatures
Thread 110 - 112 °C (230 - 234 °F) Syrup
Soft Ball 112 - 116 °C (234 - 240 °F) Fondants, Fudge & Pralines
Firm Ball 118 - 120 °C (244 - 248 °F) Caramel
Hard Ball 121 - 130 °C (250 - 266 °F) Divinity & Nougat
Soft Crack 132 - 143 °C (270 - 290 °F) Tay
Hard Crack 149 - 154 °C (300 - 310 °F) Brittles, Lollipops & Hardtack
Caramel 160 - 177 °C (320 - 350 °F) Flan & Caramel Cages
Chef Recommended Temperatures
*
*the above temperatures are guidelines only - always check the core temperature
of food with an accurate thermometer such as a Thermapen!
Beef, Lamb & Veal 52 °C (125 °F) 60 °C (140 °F) 71 °C (160 °F)
Chicken, Turkey & Duck - - 74 °C (165 °F)
Pork Roasts, Steaks & Chops - 63 °C (145 °F) 71 °C (160 °F)
Fish - - 60 °C (140 °F)
Meat Rare Medium Well
Poach 71 - 82 °C (160 - 180 °F) Simmer 85 °C (185 °F)
Low Simmer 82 °C (180 °F) Slow Boil 96 °C (205 °F)
R
olling Boil 100 °C (212 °F)
71 °C
Signature steaks by
™
You!
 Loading...