

Page 1
OPERATION MANUAL
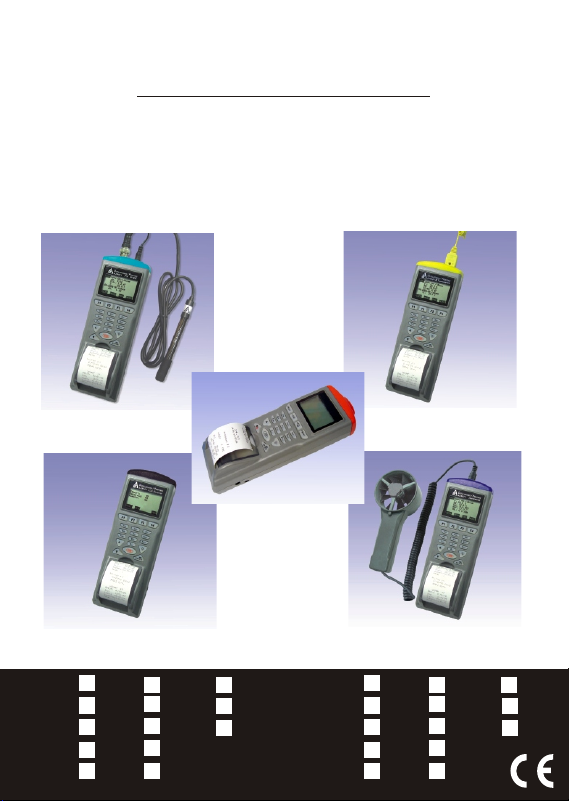
MULTI-FUNCTION DATALOGGER
WITH PRINTER
MULTI-FUNCTION DATALOGGER
WITHOUT PRINTER
WITH
PRINTER
9811
9812
9861
9871
9881
9882
9851
9680
9831
98315
9832
9833
9835
WITHOUT
PRINTER
9611
9612
9661
9671
9681
9682
9651
9660
9631
96315
9632
9633
9635
Page 2

INDEX
Introduction
Material Supplied
Features
Comparison table
Meter keypad - with printer
Meter keypad - without printer
Accessory photo
Top cover of meter
Meter setting
Single measurement
Multiple measurement
Automatic logging
...............................
.........................
...................................
.........................
..............
..........
..........................
........................
...............................
.......................
.....................
..........................
Diagram
9811/9611/9812/9612 IR thermometer
9871/9671 Anemometer +Psychrometer
9881/9882/9681/9682 Thermometer
9861/9661 pH/mV Meter
9680/9660 IrDA Receiver
983X /963X Manometers
9851 /9651 Hygo-thermometer
..................
...................
...................
.............
.....
....
........
Software
File
Mode
Port
Commad
Print
Specification sheet
Trouble shooting
........................................
.......................................
.......................................
...................................
...................................
.......................
..........................
1
1
1
2
5
6
7
8
10
11
12
13
14
20
22
24
30
35
40
44
45
46
46
47
48
51
Page 3
INTRODUCTION
Thank you for purchasing this multiple function printer! This unit
has been developed to meet your max.satisfaction by its userfriendly design. Please review the entire manual for a complete
overview of how to operate this meter.
MATERIAL SUPPLIED
Check for damaged or missing parts in your meter before starting.
The complete meter set should contain
1. Meter
2. 4pcs AA batteries
3. Printing Thermo-paper ( For printer models only)
4. Operation manual
5. Carry Case
6. PH probe & calibration solution (for 9861/9661) or fan (for 9871/
9671) or K Type thermo couple (for 9881& 9882/9681& 9682) or
RH probe (for 9851/9651) or tube ( for manometer meters)
7. RS232 cable
8. Software CD
Features
This meter designed with three measurement modes:
1)Single point measurement
2)Multiple points measurement ( Manually record)
3)Automatically Logging
Measuring/Programming ....Anywhere, anytime
User friendly interface
RS232 cable and software enable to link with PC to download
& upload
Backlight function
Tripod mountable for long time use
Power off time selectable
Big Dot matrix LCD
Powered by 4pcs AA (98X1) or AAA (96X1) batteries or 9V adaptor
Printing anywhere, anytime ( with printer models)
1
Page 4
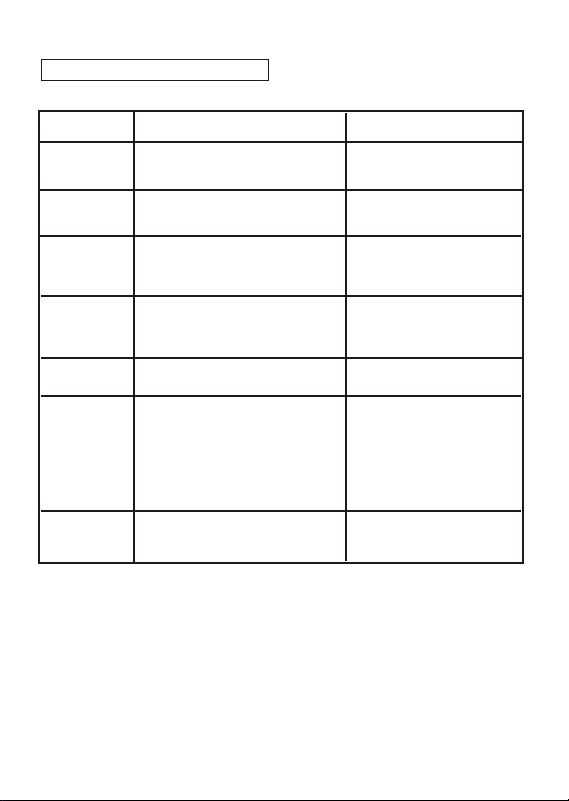
COMPARISON TABLE
Measured parameters of each meter:
MODEL
FUNCTION
PARAMETERS
9811/
9611
9812/ 6
9612
9861/
9661
9871/
9871
9681
9881/
9882/
9682
9851/ 9651
9832/
9632
9835/
9635
98315/
96315
9833/
9633
9831/
9631
9680/
9680
IR Thermometer
IR + external probe Meter
pH meter
Anemometer
Dual K Type Thermometer
Dual K.J.T.R.S E Type
Thermometer
Hygro-thermometer
+/- 2 psi Mamometer
+/- 5 psi Mamometer
+/- 15 psi Mamometer
+/- 30 psi Mamometer
+/- 100 psi Mamometer
IrDA receiver
Temperature
pH value, Voltage
Temperature
Velocity,
Temperature
Wet Bulb, Air Volume
Temperature
Temperature Diff.
Temperature, DP
Humidity, Wet Bulb
Pressure Differential
Compatible
with AZ IrDA products
Humidity
2
Page 5

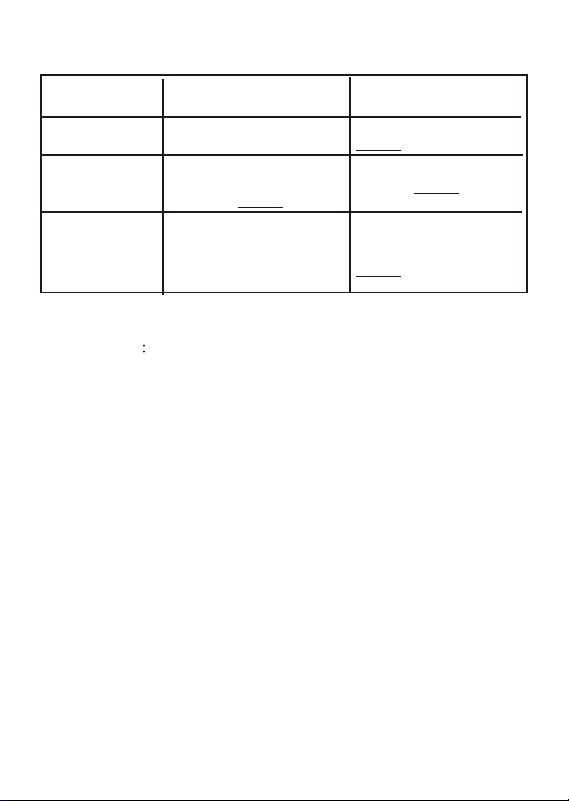
Please refer to below for the difference of each measurement mode.
MEASUREMENT
DESCRIPTION
MEMORY POINT
Single Point
Measurement
Multiple Point
Measurement
Automatic
Logging
Single point
measurement
File name editable
multiple point
measurement
Programmable
datalogging function
No Memory
99 points
12000 points(9811/9611)
6000 points (9812/9612)
4000 points(9861/9661)
2400 points(9871/9671)
4000 points(9881/9681)
4000 points(9882/9682)
3000 points(9851/9651)
12000 points(9832/9632)
12000 points(9835/9635)
12000 points(98315/96315)
12000 points(9833/9633)
12000 points(9831/9631)
12000 points(9680/9660)
(At most)
3
Page 6
Comparison table of multiple points and datalogging measurements
RECORD
FILE
NAME
MEASURING /
SAMPLING
MULTIPLE POINT
MEASUREMENT
99 points
Editable or
Default with date
and time (Note 1)
Press "ON/OFF" key to
measure and store
by pressing specified
keys
DATALOGGING
At most 12000 points
(Note 4)
Default (Note 2)
Automatically measure
and store according to
pre-set parameters
(Note 3)
Note 1: Each record is designed to show with current date and
time if user doesn't edit any.
For example if the file name is "05-06 09:21:51" means the date
is 6th May (or 5th June, based on your data mode
setting )and the time is 09:21:51.
Note 2: Each record is designed to show with the current date
and time.
Note 3: a)To set up Begin-Date,Start-Time,End-Date,Suspend time and sample rate from the meter.
b)Each meter starts to record from Begin-Date & time with
specified sample rate until Suspend-time.
c)Automatically start again next day from Start-Time until
End-Date.
d)Logging stops recording when End-Date or max.
memory points is achieved.
e)Logging can be stopped and start again with the same
setting.
Note4:The total logging memory size is 12000 points, different
available parameters for each meter:
Ex: 9871 has 5 parameters, the total logging record is
12000 .i.e. Each parameter's capacity is 2400.
4
Page 7
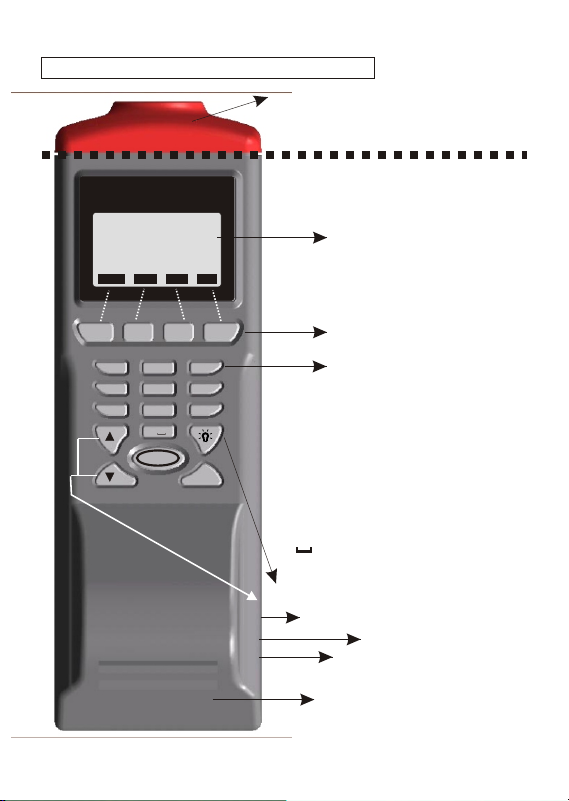
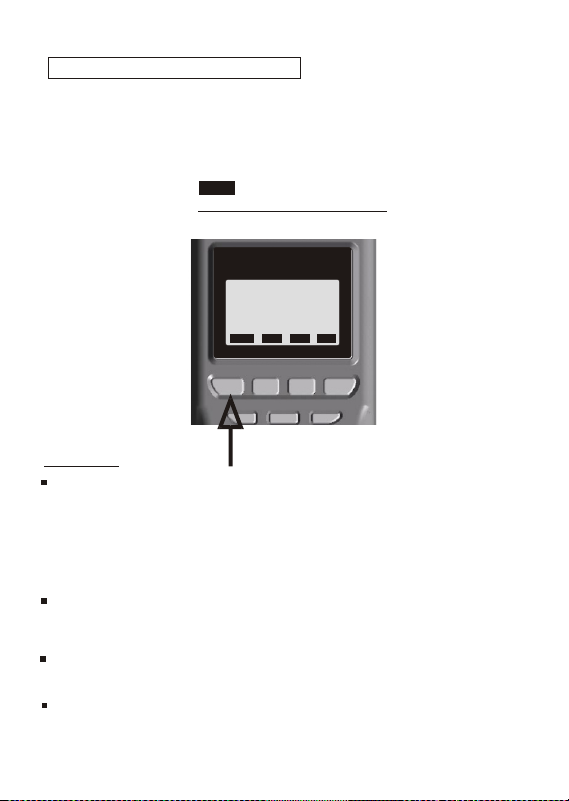
METER KEYPAD-WITH PRINTER
Top Cover
Based on different functions, the
top cover connector and color are
different.
Welcome
MEM
MEAS
F2 F3
ABC
SYM.
2
1
GHI
JKL
5
4
7
TUV
PQRS
8
0
ON/OFF
LOG
DEF
MNO
WXYZ
SET
LINE
FEED
LCD
F4F1
3
6
9
Corresponding
Function keys
Keypad
1SYM stands for"1,*,.,:,$,+,-,="
2ABC stands for"2,a,b,c,A,B,C"
3DEF stands for"3,d,e,f,D,E,F"
4GHI stands for"4,g,h,i,G,H,I"
5JKL stands for"5,j,k,l,J,K,L"
6MNO stands for"6,m,n,o,M,N,O"
7PQRS stands for"7,p,q,r,s,P,Q,R,S"
8TUV stands for"8,t,u,v,T,U,V"
9WXYZ stands for"9,w,x,y,z,W,X,
Y,Z"
0 stands for"0 and space"
Backlight
Up and Down keys
External Probe Port (9812 only)
RS232 Port
DC adaptor port
Paper Roll cover
5
Page 8
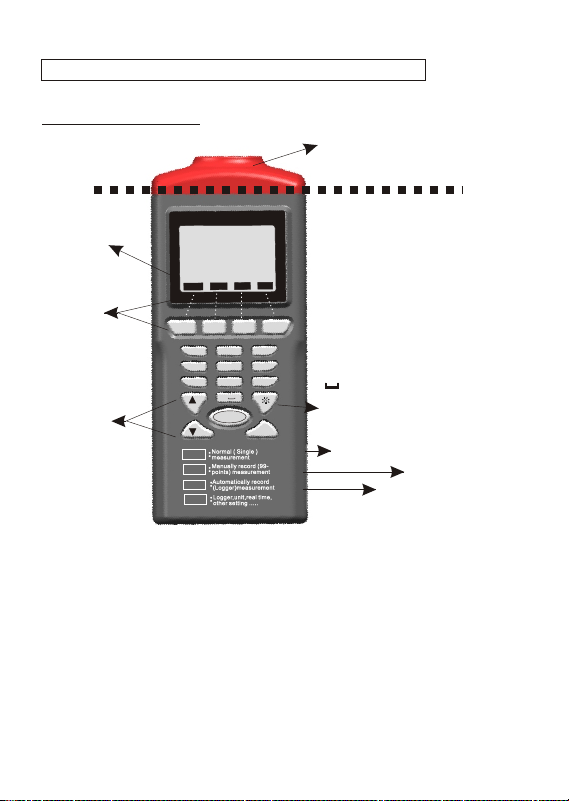
METER KEYPAD-WITHOUT PRINTER
W
e
l
co
m
e
M
E
A
S
M
E
M
LO
G
S
E
T
ON
/O
FF
1
2
5
8
0
3
6
9
4
7
F
2
F
3
F4
F
1
SYM
.
G
H
I
PQ
R
S
D
E
F
M
N
O
W
X
Y
Z
A
B
C
JK
L
TU
V
LINE
FE
ED
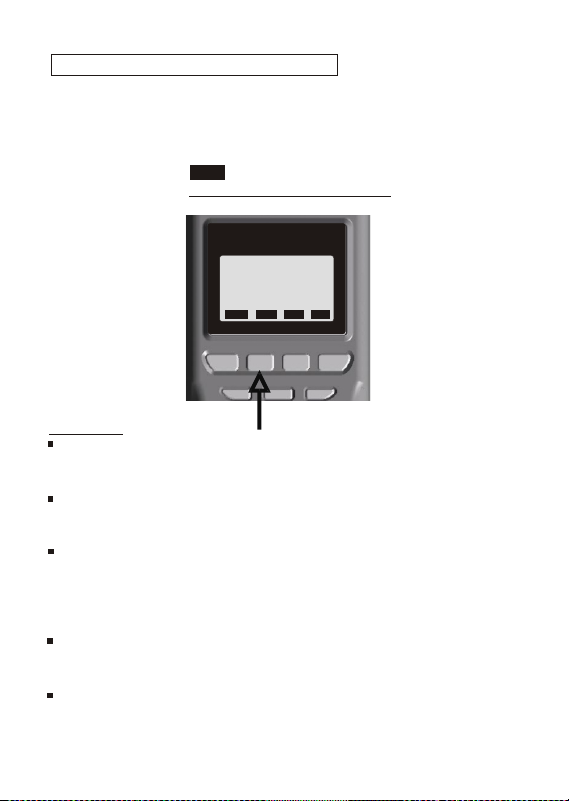
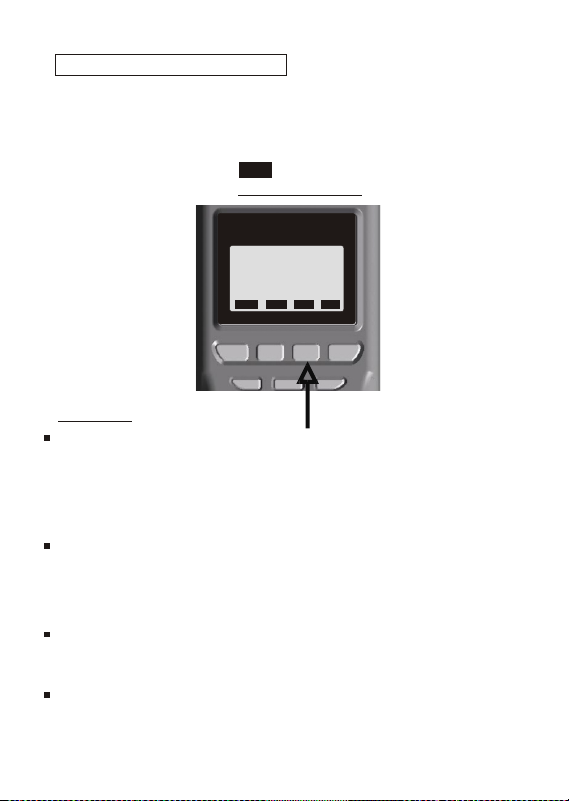
METER KEYPAD
Big dot
matrix LCD
Corresponding
Function keys
Press F1~
F4 key to select
the needed
function
To view
previous
/next record
MEAS
MEM
LOG
Top Cover
Based on diff. functions,
the top cover connector
and color are different.
Keypad
1SYM stands for"1,*,.,:,$,+,-,="
2ABC stands for"2,a,b,c,A,B,C"
3DEF stands for"3,d,e,f,D,E,F"
4GHI stands for"4,g,h,i,G,H,I"
5JKL stands for"5,j,k,l,J,K,L"
6MNO stands for"6,m,n,o,M,N,O"
7PQRS stands for"7,p,q,r,s,P,Q,R,S"
8TUV stands for"8,t,u,v,T,U,V"
9WXYZ stands for"9,w,x,y,z,W,X,
Y,Z"
0 stands for"0 and space"
Backlight
External Probe Port
(9612 only)
RS232 Port
SET
DC adaptor port
6
Page 9
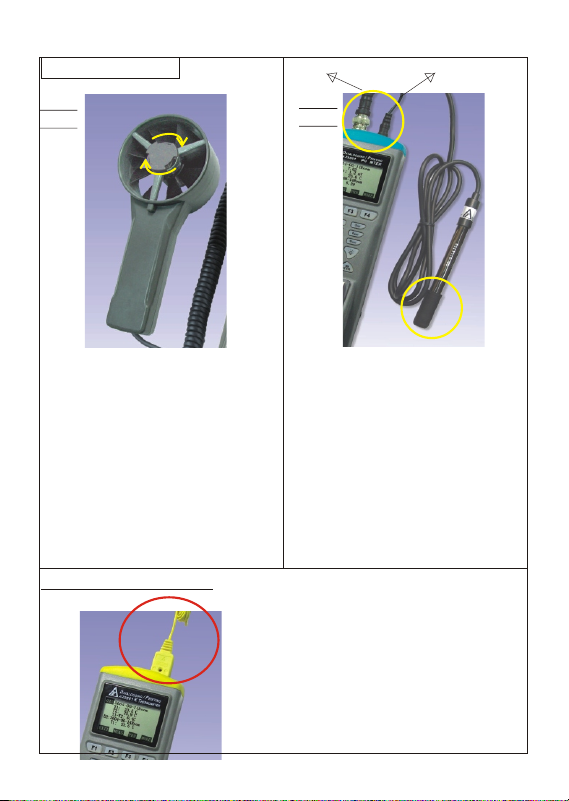
ACCESSORY
9871
9671
pH connector
9861
9661
Temp. connector
The temperature and humidity
sensors are built in the fan, so
remember to rotate the cover
before using to get accurate
reading.
9881/9882/9681/9682
9881/9882 both are dual-input
thermometers. Please plug the
thermocouple probe into the top
cover with correct polarity "+" / "-"
and T1/T2 symbols.
When first time using or the probe
hasn't been used for a long time,
please calibrate the probe first
by following the procedure in
page 20.
Please always keep the pH glass
bulb wet by using the cap to
protect and store the electrode.
Always rinse the pH eletrode in
de-ionized water or rinse solution
(tap water.....) before next use.
7
Page 10

TOP COVER -CONNECTOR
The following illustrations are the connectors for different
printers:
9871/9671 Anemometer
9851/9651
Hygro-thermometer
9832/9835/98315/9833/9831
9632/9635/96315/9633/9631
Manometer
9811/9812/9611/9612
Infrared Thermometer
9881/9681 K Thermometer
9882/9682 KJTRSE thermometer
9680/9660 IrDA printer9861/9661 pH meter
REMARKS:
Welcome any OEM for different kind of parameters .
9821 Sound Level Meter connector's illustration is provided
when require .
8
Page 11
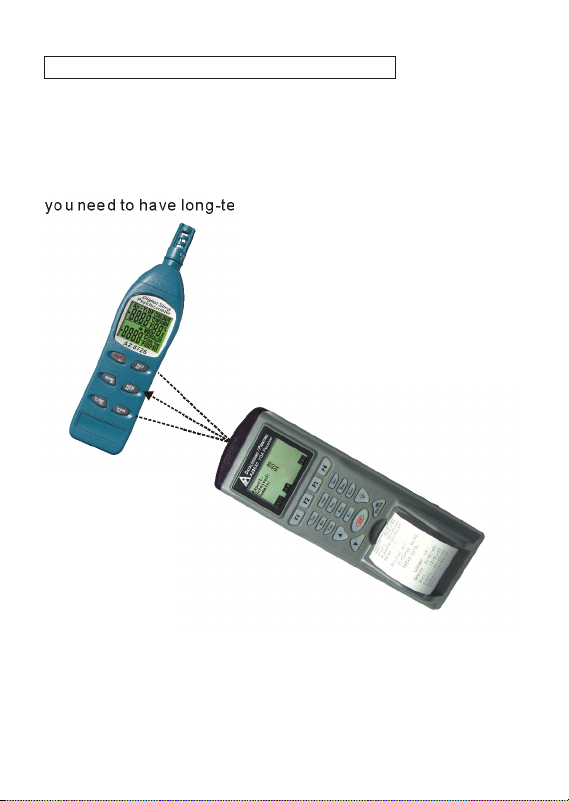
9680/9660 IrDA RECEIVING METER
An IrDA like module is built in the meter 9680/9660 at the top ,
better target the IrDA within 30 degree angle toward any
of AZ IrDA meters for receiving data .
Make sure you have disabled Auto power off from both
AZ IrDA meter (transmitter )and IrDA receiver when
you need to have long-term measurement.
IrDA port
IrDA port
IrDA meter
example:
8726 Psychrometer
9
Page 12

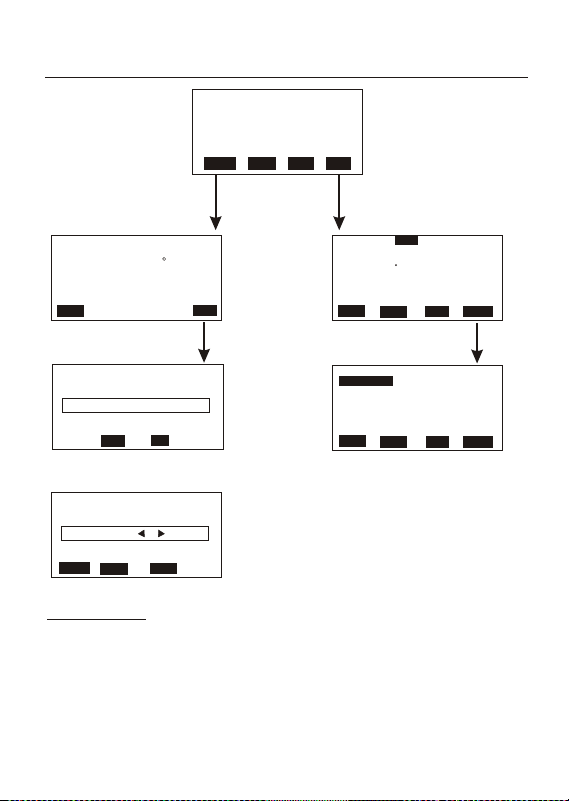
METER SETTING
Before measuring, please check the meter setting first to confirm
the basic settings of the meter are what you need.
To enter each command, just press the corresponding F1 to F4
key.
Welcome
MEM
MEAS
LOG
SET
F2 F3
F4F1
SET
F4 :Meter Setting
Pressing or key to shift the cursor.
Pressing EDIT to enter modification mode.
Pressing PRN to enter printing mode.
Pressing NEXT/BACK to enter next or previous page.
Pressing EXIT to return to main menu
Descriptions :
LCD Cont.(1-5): LCD brightness. From darkest 1 to brightest 5
Prn Cont. (1-9): Printing darkness. From lightest 1 to heaviest 9
Unit: The unit could be metric or imperial / or
F
C
Auto Off: The selectable time frame is 1 to 20 min.
Set Clock: To choose the date mode and set your local time.
Date mode:MM-DD-YY or DD-MM-YY or YY-MM-DD
Set ID: If choose "Disable", the ID will not be printed out.
ID: To edit an ID of this printer , the ID will be printed out at
printing mode.
Select item: To select which measured parameters need to be
showed on the LCD. The unit of each parameter
could be selected from here as well.
10
Page 13
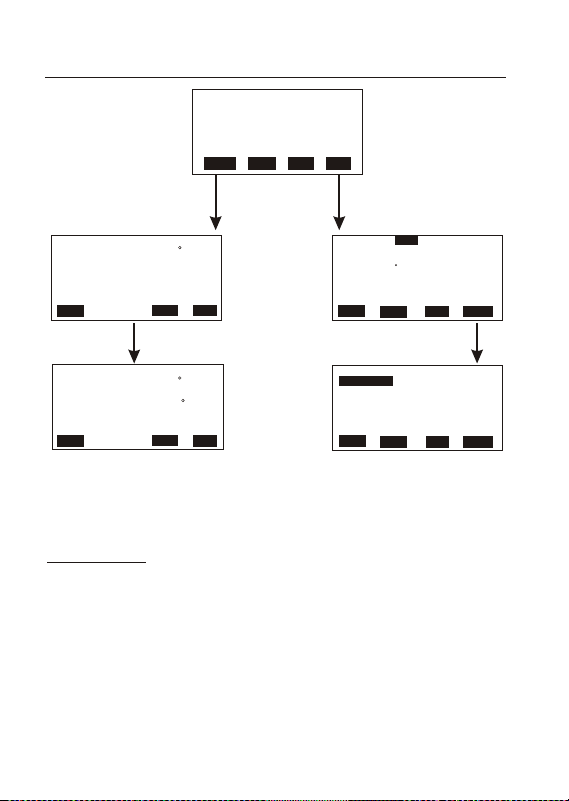
SINGLE MEASUREMENT
There are three measurement modes :
1. Single measurement(MEAS)
2. Multiple measurement(MEM) and 3. Auto logging (LOG).
Operating the single measurement as a general meter.
MEAS
F1 :Single Measurement
Welcome
MEM
LOG
MEAS
SET
F2 F3
F4F1
Definition
Press ON/OFF key to measure the temperature for 9811 and
9611( No printer function ).
Press F1 (MEAS) to proceed single measurement for other
meters .
On 9812/9612, the external probe temp. is displayed on LCD
once the probe is plugged.
After entering measurement mode , press F4 (PRN) to enter
printing mode. The printing can be stopped any time by press
F1(STOP or EXIT) key while it is printing .
The printing contrast can be changed by pressing HIGH or
LOW key .
PH & external probe calibration mode introduction are in the
mode of Single measurement .
11
Page 14
MULTIPLE MEASUREMENT
This is to manually record what you measured with real time
, and file name (a note or identification for the record ) is editable to memorize or recognize .
There are total 99 memorize capacities in this measurement.
MEM
F2 :Multiple measurement
Welcome
MEM
LOG
MEAS
SET
F2 F3
F4F1
Definition
Press ON/OFF ( IR models 9811/9611/9812/9612) or MEAS
(other models) to measure the parameters.
Select F1(ABORT) or F4(SAVE) to exit the measurement
or memory the record .
Press F3 ( Edit ) to edit the file name of recorded value .
While editing the file name, select from the keys 1SYM, 2ABC,
3DEF, 4GHI...., Press and hold one of the key to select from
the displayed letters by releasing the key .
Press CLR shortly to delete one data or press for over 2 seconds
to delete the whole memory.
Before printing, select the printing range by pressing EDIT
key,then press START to print.
12
Page 15
AUTOMATIC LOGGING
This is to automatically record what you set up before
measurement with real time, first to set records start/stop
date and time, sample rate , memory points. The screen
content shows Expect memory points and Remain memory
points while in setting.
LOG
F3 :Datalogging
Welcome
MEM
MEAS
LOG
SET
F2 F3
F4F1
Definition
Press SET to set needed setting first. The Date mode is
based on the mode you set under SET (see page 10). The
sampling rate is from 1 to 7200 seconds. "Expect" means
total memory of this meter, "Remain" means how many
memory left in meter.
Press START to begin the logging function. While logging:
Press VIEW to see the data ( more than one ) in the screen,
or press MEAS to see a real-time data,
or press STOP to quit logging.
Press P-PG or N-PG to review previous or next 100 points.
After stopping, press START to begin again. The sampling rate
and previous record are remained if the previous setting
has not been changed.
"Suspend" is the stop time of each day during setting date.
If you want to record 24 hours a day, you have to set :
00:00:00 as "Start" , and 23:59:59 as "Suspend" .
13
Page 16
9811/9611 Infrared thermometer Setting / Single measurement
Welcome
MEM
LOG
SET
Emi. Rate:
0.95
LCD Cont.(1-5):
Prn Cont. (1-9):
Unit:
Laser:
Auto Off:
EXIT
Set Clock:
MM-DD-YY HH:MM:SS
06
30
- - : :20
Set ID:
User Name
ID:
EXIT
3
5
C
Enable
20mins
Enable
EDIT PRN
05 18
29
Disable
EDIT PRN
NEXT
BACK
T:30.5
Press ON to Measure
EXIT PRN
C
Print?
Press ON to Measure
YES NO
5
Cont
Press ON to Measure
STOP
HIGH LOW
MEAS
Remarks:
1.No PRN function is existing for model 9611 IR meter.
2.Emi. Rate: Emissivity. The range is 0.30 to 1.00
3.Laser: To enable or disable laser targeting. While in
single /multiple measurement, user could also press
ON/OFF + F3 buttons to power on /off the laser.
14
Page 17
9812/9612 IR meter w/ probe Setting / Single measurement
Welcome
MEM
LOG
SET
Emi. Rate:
LCD Cont.(1-5):
Prn Cont. (1-9):
Unit:
Laser:
Auto Off:
EXIT
0.95
3
5
C
Enable
20mins
Enable
EDIT PRN
NEXT
Ext:30.5
Ir:
Press ON to Ir Meas
EXIT PRN
C
CALI
MEAS
Press on/off key
Set Clock:
Ext:30.5
Ir: 29.8
Press ON to Ir Meas
EXIT PRN
C
C
CALI
MM-DD-YY HH:MM:SS
06
30
- - : :20
05 18
Set ID:
User Name
ID:
EXIT
29
Disable
EDIT PRN
BACK
Remarks:
1.No PRN function is existing for model 9612 IR meter.
2.Emi. Rate: Emissivity. The range is 0.30 to 1.00
3.Laser: To enable or disable laser targeting. While in
single /multiple measurement, user could also press
ON/OFF + F3 buttons to power on /off the laser.
4. See page 19 for the external probe calibration.
15
Page 18

9811/9611 Infrared thermometer Multiple measurement
Welcome
MEM
LOG
SET
02:28:29
01:06-30
T:-0.3C
02:
T:
02:28:55
03:06-30
T:111C
Press ON to Measure
EXIT
EDIT CLR
From Point:
From Point:
ESC START
EDIT
PRN
1
99
Long press
02:28:29
01:06-30
T:-0.3C
02:
:USER name 1111
T:26.7C
Clear All?
Press ON to Measure
YES NO
02:28:29
01:06-30
T:-0.3C
02:28:45
02:06-30
T:26.7C
02:28:55
03:06-30
T:111C
Press ON to Measure
EXIT
EDIT CLR
02:28:29
01:06-30
T:-0.3C
02:USER name 1111
T:26.7C
02:28:55
03:06-30
T:111C
Press ON to Measure
EXIT
EDIT CLR
PRN
PRN
Short press
02:28:29
01:06-30
T:-0.3C
02:USER name 1111
T:26.7C
Clear?
Press ON to Measure
YES NO
MEAS
Remarks:
1.No PRN function is existing for model 9611 IR meter.
2.Short press CLR to clear the highlighted value and file
name. Long press CLR to clear all the data ( values and
file names ) in the meter. Make sure by pressing YES ,or
you won't be able to recall any data anymore .
16
Page 19

9812/9612 Infrared thermometer Multiple measurement
Welcome
MEM
LOG
SET
02:28:29
01:06-30
Ext:-0.3C
Ir: 15.0C
02:28:45
02:06-30
Ext:
Ir:
Press ON to Measure
EXIT
EDIT CLR
From Point:
From Point:
ESC START
EDIT
PRN
1
99
Long press
02:28:29
01:06-30
Ext:-0.3C
Ir: 15.0C
02:
:USER name 1111
Clear All?
Press ON to Measure
YES NO
02:28:29
01:06-30
Ext:-0.3C
Ir: 15.0C
02:28:45
02:06-30
Ext:
Ir:
Press ON to Measure
EXIT
EDIT CLR
02:28:29
01:06-30
Ext:-0.3C
Ir: 15.0C
02:
USER name 1111
Ext:
Ir:
Press ON to Measure
EXIT
EDIT CLR
PRN
PRN
Short press
02:28:29
01:06-30
Ext:-0.3C
Ir: 15.0C
02:USER name 1111
Clear?
Press ON to Measure
YES NO
MEAS
Remarks:
1.No PRN function is existing for model 9612 IR meter.
2. If the probe is not plugged, press ON/OFF key to get IR temp.
If the probe is plugged, press MEAS to get external probe only
or press ON/OFF key to get both IR and externaltemperature.
3.Short press CLR to clear the highlighted value and file
name. Long press CLR to clear all the data ( values and
file names ) in the meter. Make sure before pressing YES,or
you won't be able to recall any data back anymore .
17
Page 20

9811/9611/9812/9612 IR Thermometer Datalogging measurement
Welcome
MEM
LOG
SET
00001:
06-30 02:28:55
T:-0.3C
00002:
06-30 02:29:55
T:-0.5C
00003:
06-30 02:30:55
T:-0.6C
One Page = 100 points
EXIT
START
SET NEXT
00001:
06-30 02:28:55
T:-0.3C
00002:
06-30 02:29:55
T:-0.5C
00003:
06-30 02:30:55
T:-0.6C
One Page = 100 points
P-PG
Begin:
Start:
End:
Suspend:
Remain:
N-PG PRN
30-06-05
02:28:55
02-07-05
03:28:55
Clear All?
12000Point(s)
YES NO
BACK
(EX:9811)
Begin:
Start:
End:
Suspend:
Rate:
Expect:
Remain:
EXIT
Begin:
Start:
End:
Suspend:
Rate:
Expect:
Remain:
START
STOP
30-06-05
02:28:55
02-07-05
03:28:55
60Sec(s)
12000Point(s)
11997Point(s)
EDIT VIEW
30-06-05
02:28:55
02-07-05
03:28:55
60Sec(s)
12000Point(s)
11997Point(s)
CLR PRN
Logging...
MEAS
NEXT
BACK
VIEW
00004:
06-30 02:31:55
T:-0.3C
00005:
06-30 02:32:55
T:-0.5C
00006:
06-30 02:33:55
T:-0.6C
STOP
ESC
date during setting date.If you want to record 24 hours a day,
you have to set : 00:00:00 as "Start" , and 23:59:59 as
Remarks:
1.No PRN function is existing
for model 9611 IR meter.
2. "Start" is the start time of
each date during setting date.
3."Suspend" is the stop time of each
"Suspend" .
4."Begin" is the start date of automatically recording.
5."End" is the stop date of datalogging.
6. Ext. is valid for model #9812 & 9612.
18
Page 21

9812/9612 External Temp. Probe Calibration procedure
Welcome
MEM
MEAS
LOG
SET
Ext:30.5
Ir:
Press ON to Ir Meas
EXIT PRN
C
CALI
Long press
Probe Cali Data
Step 1 :0 at 5C
Step 2: -5 at 40C
Step 3: -6 at 85C
Note: Unit is 0.1C
LXW
EXIT
SAVE
EDIT
Input Cali Data
Step 2 :+
00
LXW
ABORT
+/-
SAVE
ENTER
Repeat until three points
value are saved
Input Cali Data
Step 1 :+
00
LXW
ABORT
+/-
SAVE
ENTER
Remarks:
1. Be sure to keep a calibration
note enclosed in the package
This's for future probe calibration
use
2. While input the calibration value, refer to the value indicated
on the note. There are three values for different temperature.
The value is unique for each probe.
3. To exit manual calibration mode, long press F1 anytime to
exit.
4. +/- of the calibration means positive value or negative value.
5. Use 10 number keys of the meter to input the calibration value.
19
Page 22

9871/9671 Anemometer +Psychrometer Setting/Single measurement
Welcome
MEM
MEAS
LOG
SET
T:
29.7C
V:
WBT:
EXIT
0.7MPS
26.1C
INPUT
Please select type
LXW
ESC
Range is 0 300cm
~
L: cm 000.0
ESC
Remarks:
1.To calculate Air Volume , first input the value of the Air
source area . There are three choices: length x width (Rectangle)
,Diameter (Round) and Area (Input the most accurate value).
2.The available range is shown on the LCD to remind user.
3.Rectangle and round setting range:0~300cm or 0~110inch
Outlet area setting range:0~90000sq.cm or 13000 sq.inch.
4. Printing function is not available for 9671.
RH:
73.7%
VOL:
0.1CMM
PRN
D
AREA
ENTER
T: RH:
29.7C
WBT:
26.1C
Print?
YES NO
LCD Cont.(1-5):
Prn Cont. (1-9):
Auto Off:
EXIT
Set Clock:
MM-DD-YY HH:MM:SS
06
30
- - : :20
Set ID:
User Name
ID:
EXIT
V
T
RH
WBT
VOL
EXIT
73.7%
VOL:
0.1CMM
3
5
20mins
Enable
EDIT PRN
05 18
29
Disable
EDIT PRN
Select Item
MPS
C
%
C
CMM
PRN
EDIT
NEXT
NEXT
BACK
20
Page 23

9871/9671 Anemometer +Psychrometer Multiple meas/Datalogging
Welcome
MEM
MEAS
LOG
SET
01:
V:
T:
RH:
WBT:
VOL:
EXIT
01:
T:
29.7C
WBT:
26.1C
ABORT
01:
06-30 23:56:49
V:
T:
RH:
WBT:
VOL:
EXIT
01:
06-30 23:56:49
V:
WBT:
VOL:
MEAS
V:
29.7C
73.7%
26.1C
CLR
Clear?
26.1C
YES
0.7MPS
0.7MPS
0.1CMM
0.7MPS
0.1CMM
EDIT
0.1CMM
PRN
NO
73.7%
SAVE
NEXT
RH:
VOL:
BACK
0001:
V:
T:
RH:
WBT:
VOL:
EXIT
Begin:
30-06-05
Start:
02:28:55
End:
02-07-05
Suspend:
03:28:55
Rate:
60Sec(s)
Expect:
2400Point(s)
Remain:
2400Point(s)
EXIT
EDIT VIEW
0023:
07-01 00:11:28
V:
T:
RH:
WBT:
VOL:
STOP
T:
29.7C
WBT:
26.1C
ESC
START
0.7MPS
29.7C
73.7%
26.1C
MEAS
V:
SET
0.1CMM
0.7MPS
NEXT
NEXT
ESC
73.7%
VOL:
0.1CMM
RH:
Remarks:
1.No PRN function is existing for model 9671 meter.
2. "Select Item" : There are 2,400points for each item, press
EDIT to cancel the item you don't want to record. Meter
will only record the items you checked off .
21
Press START
to begin
Page 24

9881/9882/9681/9682 Thermometer Setting/Single measurement
Welcome
MEM
MEAS
LOG
SET
T2:
29.7C
39.7C
T1:
WBT:
TYPE K
EXIT
T2: T1-T2::
29.7C
Print?
WBT:
YES NO
T2:
29.7C
39.7C
T1:
WBT:
TYPE K
EXIT
TYPE: T J R S EK
T1-T2::
10.0C
PRN
10.0C
T1-T2:
10.0C
PRN
9881
9882
Remarks:
LCD Cont.(1-5):
Prn Cont. (1-9):
Auto Off:
EXIT
Set Clock:
MM-DD-YY HH:MM:SS
06
- - : :20
Set ID:
User Name
ID:
EXIT
EXIT
EDIT PRN
30
05 18
EDIT PRN
Select Item
T1
T2
T1-T2
EDIT
20mins
Enable
Disable
3
5
29
C
C
C
PRN
NEXT
NEXT
BACK
1.In 9882, please select the
ESC
SAVE
thermocouple type by pressing
or . There are K,J,T,R,S,E.for
selection.
2. T1 and T2 need to be the same type,i.e. K and K, or E and
E type.
3. Printing function is not available for 9681/9682
22
Page 25

9881/9882/9681/9682 Thermometer Multiple measurement /Datalogging
Welcome
MEM
MEAS
LOG
SET
01:
T1:
T2:
T1-T2:
02:
T1:
T2:
EXIT
01:
T2:
86.1F
ABORT
06-30 23:56:49
01:
T1:
T2:
T1-T2:
02:
T1:
T2:
EXIT
06-30 23:56:49
01:
T1:
T2:
T1-T2:
02:
T1:
T2:
EXIT
MEAS
T1:
MEAS
86.1F
30F
CLR
56.1F
56.1F
86.1F
30F
56.1F
EDIT
EDIT
PRN
NEXT
T1-T2:
30F
SAVE
NEXT
BACK
0001:
T1:
T2:
T1-T2:
0002:
T1:
T2:
EXIT
Begin:
Start:
End:
Suspend:
Rate:
Expect:
Remain:
EXIT
EDIT VIEW
30-06 02:28:55
0001:
T1: 35.0C
T2: 25.0C
T1-T2:10.0C
0002:
T1:
T2:
EXIT
Logging...
MEAS
STOP
START
30-06-05
02:28:55
02-07-05
03:28:55
60Sec(s)
4000Point(s)
4000Point(s)
START
SET
NEXT
SET
Remarks:
1.No PRN function is existing for 9681/9682 meters.
2.While logging, press MEAS , you will see a real-time
data , press VIEW , you will see the logging status and
values. Press ESC if you don't want to stop logging.
23
NEXT
NEXT
VIEW
Page 26

9861/9661 pH/mV Setting / Single measurement
Welcome
MEM
MEAS
LOG
SET
Volt:
EXIT
-34.9mV
PH:
ATC
7.60
CAL
28C
Temp:
PRN
LCD Cont.(1-5):
Prn Cont. (1-9):
Unit:
Metric
Date:
YY-MM-DD
Auto Off:
20mins
Enable
EXIT
EDIT PRN
3
5
NEXT
Long press
"CALIBRATION"
Volt: -3.6mV
PH: 7.00
Auto Judging...
Last: 76 days ago
LXW
RST
SAVE
EXIT
ENTER
Set Clock:
MM-DD-YY HH:MM:SS
06
30
- - : :20
05 18
Disable
EDIT PRN
Select Item
PH
Volt
Temp
EDIT
29
PRN
Set ID:
User Name
ID:
EXIT
EXIT
NEXT
BACK
Remarks:
1.No PRN function is existing for model 9661 meter.
2.Press CAL to enter calibration mode , "Auto judging...Last
xx days " means it has been xx days after the last calibra tion .
3.If you see a minus days "...- xx days " means you haven't
set the real time. Set real time from the main screen page.
4.Calibration is necessary and should be done regularly, re commend everyday if the meter is used often.
5.Meter features automatic buffer recognition to avoid errors.
24
Page 27

9861/9661 pH/mV Probe Calibration procedure-1
Welcome
MEM
MEAS
LOG
SET
Volt:
EXIT
-34.9mV
PH:
ATC
7.60
CAL
28C
Temp:
PRN
Note This is to calibrate under
ATC( Temperature probe is
plugged side by pH probe )
To calibrate under NonATC,
please see procedure -3)
Long press
CALIBRATION
Volt: -3.6mV
PH: 7.00
Auto Judging...
Last: 76 days ago
LXW
RST
SAVE
EXIT
CALIBRATION
PH: 7.00
Selecting point
ATC
LXW
RST
SAVE
EXIT
ENTER
ENTER
CALIBRATION
PH: 7.00
Adj pH Value
LXW
EXIT
RST
CALIBRATION
Volt:-6.9mV
measuring....
LXW
EXIT
RST
ATC
ATC
SAVE
SAVE
ENTER
ENTER
To be continued..
1.PTS means the sensitivity of the probe, the acceptable slope
of electrode range is 85% to 105%.,please change the probe
to get correct reading.
2.The meter is capable of calibrating up to 5 points using USA
or NIST pH buffer standard. There are 1.68-4-7-10-12.45 five
points for selection.
3.It is recommended that you start with first buffer at 7.00 pH .
The meter may select pH buffer value by pressing or
to calibrate with correct calibration value. +/-0.5 of the selected
range.
25
Page 28

9861/9661 pH/mV Probe Calibration procedure-2
Continuing from last page
Ex. PTS's value is 75%
CALIBRATION
PTS: 100.0%
TEMP: 27.0C
ATC
LXW
EXIT
Quit without save?
( Quit with save? )
SAVE
RST
CALIBRATION
YES NO
ENTER
Back to
Auto judging
next point cal.
Press EXIT ,"Quit without save?"
CALIBRATION
PTS: 75.0%
TEMP: 27.0C
ATC
LXW
EXIT
RST
CALIBRATION
Quit with save?
YES NO
CALIBRATION
SAVE
ENTER
is appeared; Press SAVE,"Quit
EXIT
Failure !!!
LXW
RST
SAVE
ENTER
with save ?" is appeared.
Remarks:
1.When you see "PTS:xx.x% , TEMP: xx.xC" shows on the
screen , that means the calibration of the point is done .
Press Enter to next calibration point or SAVE to stop cal
and store the calibration value .
2.You will see "Failure !!!" after you press YES to try to
save an unacceptable PTS range after calibration.
Under "Failure!!!" , press EXIT to exit calibration mode ,or
press RST to normal mode ( seeremark 3 for the details) .
Inactivate when pressing SAVE or ENTER after "Failure!!!" is
appeared.
3. RST stands for Reset , while proceeding any step, you
may stop calibration by pressing RST (F2) to back to
default setting.
26
Page 29

9861/9661 pH/mV Probe Calibration procedure-3
Welcome
MEM
MEAS
LOG
SET
Note 1:
This is to calibrate under NonATC
Volt:
EXIT
-34.9mV
PH:
NonATC
TEMP
7.60
CAL
28C
Temp:
PRN
( No Temperature probe is plugged
side by pH probe )
Note 2:
If you always see "--.--" pH in autojuddge, please refer to trouble
shooting.
Note 3: Display turns to normal
mode if non-operation during
RANGE:-5.0~80.0C
Temp: 18.2 oC
LXW
EXIT
CLR
RANGE:-5.0~80.0C
Temp: -18.2 oC
OVER RANGE
LXW
EXIT
CLR
+ / -
+ / -
ENTER
ENTER
Temp. is flashing for editing.
Volt:
-34.9mV
PH:
7.60
NonATC
TEMP
EXIT
RANGE:-5.0~80.0C
Temp: -5.0 oC
LXW
EXIT
CLR
+ / -
CAL
28C
ENTER
Temp:
PRN
1.The meter is capable of adjusting temperature value to
get more accurate reading .
2.The adjustable temperature range is from -5 C to 80 C,
oo
enter a value out of the range, "OVER RANGE" will show on
the screen under Temp. Press ENTER under over range
,TEMP will show a default "-5 C".
o
3."+/-" key is for changing positive value to negative value.
27
Page 30

9861/9661 pH/mV Multiple measurement
Welcome
MEM
MEAS
LOG
SET
01:
PH:
Volt:
Temp:
02:
PH:
Volt:
MEAS
EXIT
01:
Volt:
-35.6mV
PH:
7.49
ABORT
01: 06-30 23:56:49
01:
PH:
7.49
-35.6mV
Volt:
86.1F
Temp:
02:
PH:
Volt:
MEAS
EXIT
EDIT
EDIT
Temp:
86.1F
NEXT
SAVE
NEXT
01:
PH:
Volt:
Temp:
02:
PH:
EXIT
Volt:
CLR
PRN
BACK
Note:
After saving #01 memory, press
for next measurement #02
with a cursor will be highlighted.
01: 06-30 23:56:49
01:
PH:
7.49
-35.6mV
Volt:
86.1F
Temp:
02:
PH:
Volt:
CLR
EXIT
PRN
BACK
Remarks:
1.No PRN function is existing for model 9661 meter.
2.Press MEAS to see a real-time measurement values,
then press ABORT without saving , press SAVE to store.
28
Page 31

9861/9661 pH/mV Datalogging
Welcome
MEM
MEAS
LOG
SET
0023:
PH: 4.88
Volt: 127.0mV
Temp:28.8C
0024:
PH:
Volt:
EXIT
Begin:
Start:
End:
Suspend:
Rate:
Expect:
Remain:
EXIT
Begin:
Start:
End:
Suspend:
Rate:
Expect:
Remain:
START
STOP
06-30 02:28:55
START
SET NEXT
30-06-05
02:28:55
02-07-05
03:28:55
60Sec(s)
4000Point(s)
3977Point(s)
EDIT VIEW
30-06-05
02:28:55
02-07-05
03:28:55
60Sec(s)
4000Point(s)
3977Point(s)
CLR PRN
Logging...
MEAS
NEXT
BACK
VIEW
0023:
PH: 4.88
Volt: 127.0mV
Temp:28.8C
0024:
PH:
Volt:
P-PG
0023:
PH: 4.88
Volt: 127.0mV
Temp:28.8C
0024:
PH:
Volt:
STOP
Volt:
ESC
06-30 02:28:55
N-PG PRN
06-30 02:28:55
MEAS
-37.5mV
PH:
7.53
BACK
ESC
Temp:
28.8 C
1.No PRN function is existing for model 9661 meter.
2.Before logging , make sure you have set up the parameters
by pressing SET key , or you will see a blank data .
29
Page 32

9680/9660 IrDA Setting and Single Data Receiving
Welcome
MEM
MEAS
LOG
NEXT
MEAS
Welcome
MEM
LOG
NEXT
PRN
Welcome
SET
BACK
(Take 8726 as an example)
C
RH:
60.1%
WBT:
19.5
RH:
60.1%
19.5
C
C
Air:
C
24.9
T1: 30.5
DP:
C
16.5
EXIT PRN
Air:
C
24.9
16.5
Print?
C
YES NO
DP: WBT:
LCD Cont.(1-5):
Prn Cont. (1-9):
Auto Off:
EXIT
Set Clock:
MM-DD-YY HH:MM:SS
06
- - : :20
Set ID:
User Name
ID:
EXIT
REMARKS:
EDIT PRN
30
05 18
EDIT PRN
20mins
Enable
29
Disable
3
5
NEXT
BACK
1. The IrDA data receiver features
Air:
C
24.9
Cont
DP: WBT:
C
16.5
STOP
HIGH LOW
RH:
60.1%
5
19.5
4 receiving modes :
a) Single data receiving
b) Multipoint data receiving
c) Datalogging receiving
C
d) Receiving up to 99 points
at one time
2. The IrDA data receiver may receive any AZ IrDA meters through
any of 4 receiving modes.
3. Set ID : Enable ( print with ID ) or Disable ( print without ID )
4. ID :The identification of the meter .
5. Above 8726 meter is an IrDA Psychrometer for example.
30
Page 33

9680/9660 IrDA Multiple and Datalogging data Receiving
Welcome
MEM
LOG
NEXT
01:
08-05 15:13:50
Air: 24.9C
RH: 60.1%
DP: 16.5C
WBT: 19.5C
T1: 30.5C
START
EXIT
Begin:
30-06-05
Start:
02:28:55
End:
02-07-05
Suspend:
03:28:55
Rate:
60Sec(s)
Expect:
4000Point(s)
Remain:
3977Point(s)
EXIT
EDIT VIEW
SET
NEXT
NEXT
01:
08-05 15:13:50
Air: 24.9C
RH: 60.1%
DP: 16.5C
WBT: 19.5C
T1: 30.5C
MEAS
EXIT
01:
08-05 15:13:50
Air: 24.9C
RH: 60.1%
DP: 16.5C
WBT: 19.5C
T1: 30.5C
CLR
EXIT
01:
08-05 15:13:50
Air: 24.9C
WBT: 19.5C
T1: 30.5C
YES
Print?
EDIT
PRN
NO
MEAS
NEXT
BACK
REMARKS:
1. The IrDA meter features transmitting data every
second though there might haven't set from
IrDA Receiver 9680 yet.
2.Once IrDA Receiver 9680 or 9660 is activated, users
manually receives data from single measurement, then
print the data (if needed) ; or manually receives multiple
data by pressing MEAS key and SAVE for later printing ;
or automatically receive data by pre-setting .
31
Page 34

9680 Receiving & Printing up to 99 points at one time
IrDA meter
example: 8726
Psychrometer
MEAS
PRN
Expect:
Received:
Remain:
EXIT
Welcome
MEM
LOG
Welcome
SET
99
0
99
NEXT
BACK
After receiving data from IrDA meter
Expect:
99
31
Received:
Remain:
68
EXIT
Automatically start to print
REMARKS:
1. To set the IrDA meter at
printing mode otherwise
above procedure could not
be processed. Please refer
to the manual of each IrDA
meter for the detail printing
mode setting method.
STOP
5
Cont
HIGH LOW
2. This function is not available
for 9660.
.
32
Page 35

9680/9660 IrDA Multiple data Receiving with IrDA meters
There is no problem for single data transmitted from IrDA
meter to IrDA receiver even you change the meter frequently.
However it might happen " Inconsistent " if you try to change
the IrDA meters from one model to the other model during the ]
Multiple and Datalogging IrDA receiving .
No IrDA meter is targeting to the IrDA data receiver.
(Press MEAS w/o IrDA meter) (Press MEM w/o IrDA meter)
RH :
Air :
WBT:
EXIT
Take 8726 as an example
01:
08-05 15:13:50
Air: 24.9C
RH: 60.1%
DP: 16.5C
WBT: 19.5C
T1: 30.5C
MEAS
EXIT
01:
Meter is inconsistent
, press F3 SYNC
ABORT
01:
RH :
56.5%
Air :
WBT:
18.0C
ABORT
24.9 C
DP :
T 1 :
PRN
Press
MEAS
EDIT
NEXT
Change with different IrDA meters
,press MEAS.
Press
DP :
15.5C
T 1 :
28.5C
SAVE
SYNC
Wait for few
seconds
SYNC
01:
Air:
RH:
DP:
WBT:
T1:
MEAS
EXIT
01:
RH :
60.1%
WBT:
19.5C
ABORT
01:
Clearing............
ABORT
01:
SYNC ............
ABORT
Air :
24.9 C
EDIT
NEXT
DP :
16.5C
T 1 :
30.5C
SAVE
SYNC
Wait for few
seconds
Above is the new IrDA meter's reading , it appears
automatically after SYNC...( In synchronizing)
33
Page 36

9680/9660 IrDA Datalogging Receiving with IrDA meters
No IrDA meter is targeting to the 9680/9660 data receiver.
(Press LOG w/o IrDA meter)
01:
08-05 15:13:50
Air: -------RH: -------DP: -------WBT: -------T1: --------
START
EXIT
SET
NEXT
Press
START
Logging ......
MEAS
STOP
VIEW
Though you might not target 9680 to an IrDA meter yet,
when you press START(F2), Logging will still be activated.
The IrDA receiver is proceeding receiving per presetting
sampling time.
Take 8726 as an example
00001:
08-05 15:13:50
Air: 24.9C
RH: 60.1%
DP: 16.5C
WBT: 19.5C
T1: 30.5C
START
EXIT
Begin:
30-06-05
Start:
02:28:55
End:
02-07-05
Suspend:
03:28:55
Rate:
60Sec(s)
Expect:
4000Point(s)
Remain:
3977Point(s)
EXIT
EDIT VIEW
Begin:
30-06-05
Start:
02:28:55
End:
02-07-05
Suspend:
03:28:55
Clearing............
Rate:
60Sec(s)
Expect:
4000Point(s)
Remain:
3977Point(s)
YES NO
Without pressing
Yes or No
SYNC ............
ESC
SET
Change with different IrDA meters
,press SET.
NEXT
NEXT
Press
START
Press
NEXT
Press
YES
Wait for few
seconds
34
Logging ......
MEAS
STOP
Begin:
30-06-05
Start:
02:28:55
End:
02-07-05
Suspend:
03:28:55
Rate:
60Sec(s)
Expect:
4000Point(s)
Remain:
3977Point(s)
START
CLR
Begin:
30-06-05
Start:
02:28:55
End:
02-07-05
SYNC ?
Suspend:
03:28:55
Rate:
60Sec(s)
Expect:
4000Point(s)
Remain:
3977Point(s)
YES NO
Begin:
30-06-05
Start:
02:28:55
RH :
End:
02-07-05
56.5%
Suspend:
03:28:55
Air :
Rate:
60Sec(s)
WBT:
Expect:
4000Point(s)
18.0C
Remain:
3977Point(s)
ESC
Press ESC to finish SET
then press START to log.
24.9 C
SYNC
VIEW
BACK
DP :
15.5C
T 1 :
28.5C
Page 37

983X /963X Manometers Setting / Single measurement
Welcome
MEM
MEAS
LOG
SET
P:
0.1psi
EXIT
REC
CALIBRATION
LXW
ESC
HI
Pressure
1.2psi
Max:
Min:
-1.2psi
Avg:
0.4psi
Curr.
0.1psi
EXIT
Remarks:
Cali
LOW
Temp:
PRN
ZERO
Temp:
LCD Cont.(1-5):
Prn Cont. (1-9):
Auto Off:
EXIT
Set Clock:
MM-DD-YY HH:MM:SS
06
30
- - : :20
Set ID:
User Name
ID:
EXIT
EXIT
20mins
Enable
EDIT PRN
05 18
Disable
EDIT PRN
Select Item
P
EDIT
3
5
29
PRN
NEXT
NEXT
psi
BACK
1.No PRN function is existing for model 963X manometer meter.
2.Press CAL to enter calibration mode. See Page36 for the details
3.Under the " REC" function. Curr. means the current value.
4.There are total 11 units could be selected under SET function.
The selectable units are psi/Inch of H2O/bar/mbar/mm of Hg/
Inch of Hg/oz/inch2/Kg/cm2/kPa/Ft of H2O/cm of H2O
35
Page 38

983X / 963X Manometer Calibration Procedure
Welcome
MEM
MEAS
LOG
SET
EXIT
P:
REC
0.1psi
Cali
Temp:
PRN
Range: xx ~ xx psi
Cali: PSI (remak3)
* * *
LXW
ESC
SAVE
ENTER
Long press
* * *
CALIBRATION
ESC
HI
LXW
LOW
ZERO
Cali: PSI (remak3)
Wait
After 5 seconds
Range: xx ~ xx psi (remark2)
* * *
Cali: PSI (remak1)
LXW
ESC
SAVE
ENTER
Cali: PSI (remak4)
* * *
OK ( or NG)
EXIT
Press up/down
or number keys to adjust
1.There are up to three calibration points. Please refer to below list:
Models
9832/9632
9835/9635
98315/96315
9833/9633
9831/9631
psi range
0~+/-2psi
0~+/-5psi
0~+/-15psi
0~+/-30psi
0~+/-100psi
Cali.(HI)
1.600psi
4.000psi
12.00psi
24.00psi
80.00psi
Cali. (LOW) Adjustable Range(psi)
-1.600psi
-4.000psi
-12.00psi
-24.00psi
-80.00psi
1.400~1.800 /
3.500~4.500 /
10.50~13.50 /
21.00~27.00 /
70.00~90.00 /
-1.400~-1.800
-3.500~-4.500
-10.50~-13.50
-21.00~-27.00
-70.00~-90.00
36
Page 39

While in calibration HI mode, the default HI value will be displayed
on LCD as 1.600 or 4.000... based on different models. While in the
calibration LOW mode, the default LOW value will be displayed as
well.
2. If your standard calibrator is not the same as meter default value,
press up/down or number keys to adjust. The adjustable range is
displayed on LCD as a reminder. Please refer to table in page 36
for the details. The ZERO calibration could not be adjusted and the
value always should be 0.000
3.After adjust the value to be complaint with calibrator, press F4 to
start the calibration.
4. While doing HI calibration, please connect positive end tube to
calibrator. While doing LOW calibration, please connect negative
end rube to calibrator. While doing ZERO calibration, no need to
connect tube to any calibrator.
5. After 5 seconds calibration, OK or NG will be displayed on the LCD
to indicate the calibration is successful or not. If OK, the actual
measured value which is displayed above the text "OK" Should be
within the specification.
6. If the NG displayed, try the calibration process again. If get three
time failure, the meter need to be returned for repair
7. While finishing one point calibration, press EXIT to back to main
calibration mode. Then, choosing to exit the calibration or entering
to next point calibration. Maximum three points calibration to have
accurate measurement.
37
Page 40

983X/963X Manometer Multiple measurement
Welcome
MEM
MEAS
LOG
SET
01:
P:
02:
P:
03:
P:
MEAS
EXIT
01:
P:
0.100psi
ABORT
01: 06-30 23:56:49
01:
P:0.100psi
02:
P:
03:
P:
MEAS
EXIT
EDIT
EDIT
NEXT
SAVE
NEXT
01:
P:
02:
P:
03:
P:
EXIT
CLR
PRN
BACK
Note:
After saving #01 memory, press
for next measurement #02
with a cursor will be highlighted.
01: 06-30 23:56:49
01:
P:0.100psi
02:
P:
03:
P:
CLR
EXIT
PRN
BACK
Remarks:
1.No PRN function is existing for model 963X manomenters.
2.Press MEAS to see a real-time measurement values,
then press ABORT without saving, press SAVE to store
3.Press CLR shortly to delete one data or press for over 2 seconds
to delete the whole memory.
38
Page 41

0023:
P: 0.1 psi
0024:
P:
0025:
P:
EXIT
Begin:
Start:
End:
Suspend:
Rate:
Expect:
Remain:
EXIT
983X/963X Manometer Datalogging
Welcome
MEM
LOG
0023:
0024:
0025:
P-PG
P: 0.1 psi
P:
P:
SET
06-30 02:28:55
06-30 02:28:55
START
SET NEXT
30-06-05
02:28:55
02-07-05
03:28:55
60Sec(s)
12000Point(s)
11977Point(s)
EDIT VIEW
MEAS
NEXT
N-PG PRN
BACK
Begin:
Start:
End:
Suspend:
Rate:
Expect:
Remain:
START
STOP
30-06-05
02:28:55
02-07-05
03:28:55
60Sec(s)
12000Point(s)
11977Point(s)
CLR PRN
Logging...
MEAS
BACK
VIEW
0023:
P: 0.100psi
0024:
P:
0025:
P:
STOP
ESC
06-30 02:28:55
MEAS
P:
0.100 psi
ESC
1.No PRN function is existing for model 963X manometers.
2.Before logging, make sure you have set up the parameters
by pressing SET key , or you will see a blank data .
39
Page 42

9851 /9651 Hygo-Thermometer Setting / Single measurement
Welcome
MEM
LOG
SET
LCD Cont.(1-5):
Prn Cont. (1-9):
Auto Off:
EXIT
Set Clock:
MM-DD-YY HH:MM:SS
06
- - : :20
Set ID:
ID:
EXIT
EDIT PRN
30
05 18
User Name
EDIT PRN
20mins
Enable
Disable
3
5
NEXT
29
NEXT
DP
Cali
MANUAL
Temp:
PRN
RH
60.8% 17.4C
Temp:25.5C
WBT
20.0C
EXIT
REC
RH Cali Mode Select
Input probe cali data
Press F2
Calibrate manually
Press F3
LXW
EXIT
INPUT
MEAS
Max : 20.5C
Min: 20.0C
Avg: 20.2C
Curr.: 20.3C
EXIT
Max : 60.5%
Min: 60.0%
Avg: 60.2%
Curr.: 60.3%
EXIT
Temp REC
RH REC
Temp:
NEXT
Temp:
NEXT
Select Item
EXIT
Temp
RH
DP
WBT
EDIT
PRN
C
%
C
C
BACK
Remarks:
1.No PRN function is existing for
model 9651 meter.
2.Press CAL to enter calibration
mode. See Page 41 for the details
3.Under the " REC" function. Curr. means the current value.
4.There are total 4 sub display under REC function. They are
temperature, humidity, dew point and wet bulb. Press F4 to
choose the display you need.
40
Page 43

9851/ 9651 Hygro-Thermometer Calibration Procedure
Note:
"Input cali.data" method is for RH
Welcome
MEM
MEAS
RH
60.8% 17.4C
Temp:25.5C
WBT
20.0C
EXIT
REC
RH Cali Mode Select
Input probe cali data
Press F2
Calibrate manually
Press F3
LXW
EXIT
No need to use
salt bottles
INPUT
View Cali Data
Zcal : -7340019 E-4
Scal : 5399497 E-5
LXW
EXIT
LOG
Cali
Long press
MANUAL
SAVE
EDIT
SET
DP
Temp:
PRN
probe replacement.
"Manual calibration" method is for
RH probe replacement & old probe
re-calibration.
(Need to plug probe into salt bottles)
RH Manual Calibration
RH 60.8%
Temp. 23.5 C
32.8
75.3
Flashing for 30 mins
Flashing for 30 mins
EXIT
(Put probe into corresponding salt bottles
for 30 mins before press F2 or F3)
RH Manual Calibration
RH 32.8 %
Temp. 23.5 C
Need to use
salt bottles
ABORT
RH Manual Calibration
RH 75.3 %
Temp. 23.5 C
ABORT
END
END
END
Remarks:
Input Cali Data
-7340019
Zcal : E-4
Scal : 5399497 E-5
LXW
ABORT
SAVE
ENTER
the note. The values are slope and offset value of each probes.
3. Press ABORT anytime to exit without save or press END to
save and exit if you don't want to wait for 30 minutes.
4. The LCD value will flash while doing manual 33% and 75%
calibration until the procedure finished.
5. Suggest to calibrate at stable room temp. environment.
1. Be sure to keep a calibration
note enclosed in the package
This's for future RH probe cali bration use
2. While keyin the calibration value,
refer to the value indicated on
41
Page 44

9851/9651 Hygro-Thermometer Multiple measurement
Welcome
MEM
MEAS
LOG
SET
01:
Temp:
RH:
DP:
WBT:
02:
MEAS
Temp:25.5C
MEAS
EDIT
EDIT
EXIT
01:
RH
60.8% 17.4C
WBT
20.0C
ABORT
01:
06-30 23:56:49
Temp: 25.5C
RH: 60.8%
DP: 17.4C
WBT: 20.0C
02:
EXIT
NEXT
DP
Temp:
SAVE
NEXT
01:
Temp:
RH:
DP:
WBT:
02:
EXIT
CLR
PRN
BACK
Note:
After saving #01 memory, press
for next measurement #02
with a cursor will be highlighted.
01:
ROOM1
Temp: 25.5C
RH: 60.8%
DP: 17.4C
WBT: 20.0C
4ghiGHI
CLR
ABORT
BACK
ENTER
Remarks:
1.No PRN function is existing for model 9651 Humidity Meter..
2.Press MEAS to see a real-time measurement values,
then press ABORT without saving, press SAVE to store
3.Press CLR shortly to delete one data or press for over 2 seconds
to delete the whole memory.
4.In Edit mode, press ENTER to save the description or press
abort to leave without save. Press CLR to clear the description
or press BACK to previous text.
42
Page 45

9851/9651 Hygro-Thermometer Datalogging
Welcome
MEM
MEAS
LOG
SET
0001:
Temp:
RH:
DP:
WBT:
0002:
EXIT
Begin:
Start:
End:
Suspend:
Rate:
Expect:
Remain:
EXIT
Begin:
Start:
End:
Suspend:
Rate:
Expect:
Remain:
START
STOP
START
SET NEXT
30-06-05
02:28:55
02-07-05
03:28:55
60Sec(s)
3000Point(s)
3000Point(s)
EDIT VIEW
30-06-05
02:28:55
02-07-05
03:28:55
60Sec(s)
3000Point(s)
3000Point(s)
CLR PRN
Logging...
MEAS
NEXT
BACK
VIEW
0001:
Temp:
RH:
DP:
WBT:
0002:
P-PG
N-PG PRN
06-30 02:28:55
0001:
Temp: 25.5C
RH: 60.8%
DP: 17.4C
WBT: 20.0C
0002:
STOP
MEAS
06-30 02:28:55
0001:
RH
60.8% 17.4C
Temp:25.5C
WBT
20.0C
ESC
BACK
DP
Temp:
ESC
1.No PRN function is existing for model 9651 humidity meter
2.Before logging, make sure you have set up the parameters
by pressing SET key , or you will see a blank data .
43
Page 46

SOFTWARE
The enclosed software is a quick tool for you to download the
memorized data to PC for further analysis or upload the pre-edited
file names to meters, this may save your setting time.
Material & O/S
Software CD and RS232 cable with D-sub plug are needed.
Operating system need to be WIN98/2000/NT/XP or above.
New
Save
Load
Print
Download
Memory
Download
Logger
Download
All
Upload
file names
FILE
New: To create a new file.
Load: To open a saved file.
Save: To save current file.
Save as: To save current file as new file name.
Print: To print all data or logging data or memory data.
Exit: To withdraw the software
File
44
Page 47

Print
Load
MODE
There are two data modes. One is Memory, the other one is
Logger.
To select the mode from main menu or quick selection window.
In logger mode, you may select from "Goto" to choose logged
data range. There are 100 points in one page.
Mode-Memory
Mode-Logger
45
Page 48

PORT
Select the correct Com. port to ensure the meter is
communicated with PC. I
will appear on the LCD and "COM #" & Edit will show
on the left bottom corner of screen.
For most PCs, the Com. port number is COM1.
There are 8 COM ports for selection in this software.
n connecting mode, "PC Mode"
Port
COMMAND
There are four commands in this software.
-Download measured logging data from meter to PC.
-Download measured memory data from meter to PC.
-Download measured logging & memory data from meter to PC.
-Upload pre-edited file names from PC to meter.
To edit the file names, click left key of mouse twice quickly
, then the cursor will flash to indicate the column is ready for
editing.
Before uploading or downloading, make sure you choose the
correct download mode . If you choose "Download memory
data" but execute downloading "Logger data ", you will have to
switch the mode to have the correct display.
Command
46
Page 49

Select the data you want to print : There are 3 selection :
1. Print only Logger Data
2. Print only Memory Data
3. Print all ( Both Logger Data and Memory Data in sequel )
Example: (If you choose Print all from 9811 IR meter )
Page1
<< DataLogging Printer Report Date:07-12-2005 TIME:17:26:30 >>
Memory Data:
STEP DESCRIPTION Temp
======= ============== ======
1 07-12 10:46:24 26.2 C
2 07-12 10:46:30 26.5 C
3 07-12 10:46:33 25.8 C
4 07-12 10:46:38 25.9 C
5 07-12 10:46:48 26.1 C
.............................
Logger Data:
STEP DESCRIPTION Temp
======== ============== ======
1 07-12 13:00:00 28.5 C
2 07-12 13:10:00 28.4 C
3 07-12 13:20:00 28.0 C
4 07-12 13:30:00 27.8 C
5 07-12 13:40:00 28.1 C
...............................
47
Page 50

98XX SERIES SPECIFICATION SHEET
48
50
10~90%RH
10~90%RH
Page 51

96XX SERIES SPECIFICATION SHEET
49
Page 52

MANOMETER SPECIFICATION SHEET
TYPE
9832/9632 9835/9635 98315/96315 9833/9633 9831/9631
Unit psi Resolution Resolution Resolution Resolution Resolution
psi 1 0.001 0.003 0.01 0.02 0.1
Inch of H2O 27.680517 0.01 0.1 0.3 0.5 2
bar 0.068948 0.001 0.001 0.001 0.002 0.004
mbar 68.948253 0.1 0.2 1 2 4
mm of Hg 51.712016 0.1 0.2 0.5 1 3
Inch of Hg 2.035907 0.01 0.01 0.02 0.04 0.2
oz/inch2 16.000844 0.02 0.05 0.2 0.3 1
Kg/cm2 0.070309 0.001 0.001 0.001 0.002 0.004
kPa 6.894859 0.01 0.02 0.1 0.2 0.4
Ft of H2O 2.306719 0.01 0.01 0.02 0.04 0.2
cm of H2O 70.309000 0.1 0.2 1 2 4
50
Page 53

TROUBLE SHOOTING
For all datalogging printers:
1. Power on but no display
a)Make sure the time of pressing "ON/OFF" key is more
than 200 mini seconds(ms).
b)Check the battery are in place and make sure they are
at good contact and correct polarity.
c)Replace with new batteries and try again .
d)Move the batteries for ten seconds ,then replace back
again.
2. Display disappear
a)Check whether the low battery indicator is displayed
on or before display disappears. If yes , replace with
new batteries .
For 9811/9611 IR datalogging printer
1) E2 . Problem : The value is underflow .
For 9812/9612 IR datalogging printer
1) E 2. Problem :The value is underflow.
2) E 3. Problem :The value is overflow
3) E 6. Problem: Measure module does not measure or
measure not completely
4) E 14. Problem: Temperature calibration error
5) E 31. Problem: ADC work error.
6) E 35. Problem: Measure module communication error.
For 9881/9882/9681/9682 K type / KJTRSE Thermometer
1) E1. Problem :Thermocouple is disconnected.
2) E4. Problem :Source data are error .
For 9861/9661 pH datalogging printer
1) pH Calibration failure.
a)Do not complete any point calibration before the
whole calibration is finished.
35
51
Page 54

b)PTS of some calibration points are out of 85%-105%.
c)Replace with new batteries and solution, then try again.
d)If it fails again, return the meter to the dealer for
repairing.
2) E2. Problem: The value is underflow.
3) E3. Problem: The value is overflow.
4) E4. Problem: The original data that relate to the value
is error.
5) E31. Problem: A/D measurement error.
For 9680/9660 IrDA receiver and printer
1) E5 . Problem : The value iis exceeding 999999 or less
than -99999.
For 9871/9671 Anemo Datalogging printer
1) E2. Problem : Meter value is under flow .
2) E3. Problem : Meter value is overflow.
3) E4. Problem: Calculated source value occurs error.
For 9851/9651 Humidity Datalogging printer
1)E 2. Problem :The value is underflow.
2)E 3. Problem : The value is overflow
3)E 4. Problem : Calculated source value occur error event
4)E11. Problem: RH calibration error
5)E33. Problem: Measure Hardware Error.
For 983X/963X Manometer Datalogging printer
1) E 2. Problem: The value is underflow.
2) E 3. Problem: The value is overflow
3) E 4. Problem: Calculated source value occur error event.
52
 Loading...