

Page 1
®
Saf-T-Log
Paperless HACCP Thermometer
Operating Instructions
Page 2

Saf-T-Log Paperless HACCP Thermometer
Contents
Introduction . . . . . . . . . . . . . . . . . . . . . . . . . . . . . . . . 3
Terminology . . . . . . . . . . . . . . . . . . . . . . . . . . . . . . . . 3
Saf-T-Log Basics . . . . . . . . . . . . . . . . . . . . . . . . . . . . . 3
Software . . . . . . . . . . . . . . . . . . . . . . . . . . . . . . . . . . 5
Before you Begin . . . . . . . . . . . . . . . . . . . . . . . . . . 8
Getting Started . . . . . . . . . . . . . . . . . . . . . . . . . . . 10
Recording Temperatures . . . . . . . . . . . . . . . . . . . . . 14
Downloading Readings and Print Reports . . . . . . . . . . 15
Exporting Data to Excel. . . . . . . . . . . . . . . . . . . . . .17
Maintenance . . . . . . . . . . . . . . . . . . . . . . . . . . . . . . .18
2
Page 3

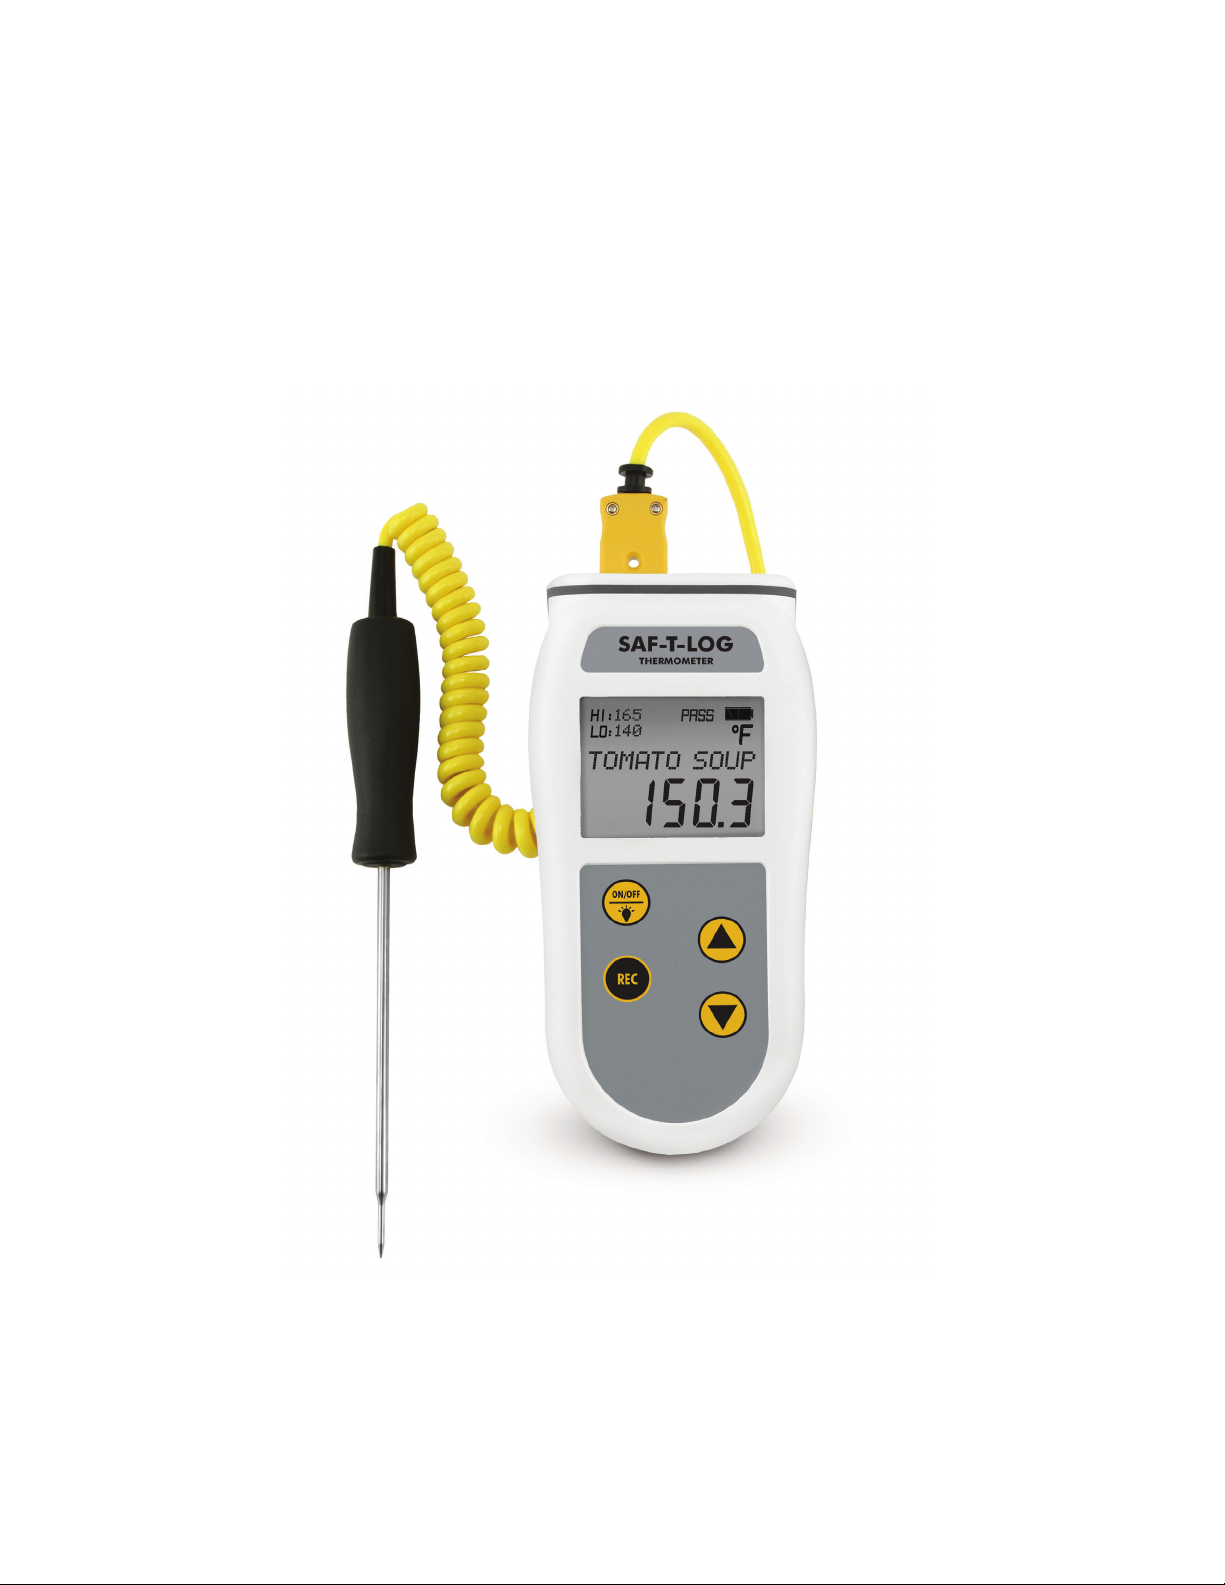
Introduction
The Saf-T-Log is a thermocouple meter which records temperature readings on demand for later download
to the PC. A list of items to be measured is created in checklist form using the Saf-T-Log software and
subsequently downloaded to the Saf-T-Log handheld meter. The Saf-T-Log is capable of storing up to 7
checklists on the device. Each reading that is stored on the Saf-T-Log includes the date, time, measured
value, high and low target values, Pass/Fail result, corrective action and user name of the person who
recorded the temperature reading. Checklists can include Yes/No questions in addition to temperature items.
Terminology
Checklist A list of up to 300* Items and up to 25 Users created in the computer (PC) software. The
checklist is stored in the Saf-T-Log during the ‘sync operation’.
Footnote Additional information can be typed into this section at the end of the report.
Item User definable checklist parameter which can have individual ‘high’ and ‘low’
temperature limit assigned. Includes temperature and Yes/No questions.
Corrective A pre-set action that a user can select on the Saf-T-Log device after a “failed” reading. Can be
Action a temperature or Yes/No corrective action.
Note A short message or corrective action that can be added against each individual measurement,
if required, to explain anomalies in data once downloaded to the PC.
Report The document created to store the readings sent back from the Saf-T-Log during the
‘sync’ operation. Can be customized by the user.
Sync Synchronization of the Saf-T-Log device to the PC and vice versa.
User A user definable checklist parameter to assign operators.
*Up to 250 items when using multiple checklist feature.
Saf-T-Log Basics
Power Button
The instrument is turned on by pressing the ‘On/Off’ (Backlight) button. The active checklist name will be
momentarily displayed. Pressing and holding the ‘On/Off’ (Backlight) button for 3 seconds at start-up shows
the date/time, user, Checklist name and Saf-T-Log name/ID. The instrument is turned off by pressing and
holding the ‘On/Off’ (Backlight) button for approximately 3 seconds or until the display blanks.
Backlight
The backlight is switched on by pressing the ‘On/Off’ (Backlight) button while the instrument is turned on. It
will automatically turn off after 20 seconds.
Probe
Connect a suitable type K temperature probe to the Saf-T-Log device noting the correct polarity (+ or – ).
‘Err’ will be displayed on the device if the probe becomes disconnected or the probe fails to work properly.
3
Page 4

Saf-T-Log Basics
Auto-Off
Auto-power off will occur 10 minutes after the last button press to conserve battery life. This may be disabled
by entering the Instrument Menu. The Instrument Menu is entered by simultaneously pressing the Up () and
Down () buttons and scrolling to the option “Change Auto-Off”. Press ‘Rec’ button to enter the function,
scroll to the desired option “AutoOff ENABLED” or “AutoOff DISABLED” and pressing ‘Rec’ button to select.
The Saf-T-Log will store this setting until changed by a user.
Battery Indicator
The battery indicator is located at the upper right corner of the instrument display. When the icon shows
almost empty it is recommended to change the batteries. See page 18 of this manual for instructions on
changing the batteries. When the Saf-T-Log instrument is connected to the PC and the desktop software is
open, the software will prompt the user to change the batteries if the battery power is low.
Selecting a Checklist
The Saf-T-Log is capable of storing up to 7 checklists on the device at a time. One checklist is active at a
time and can be switched for another one on the device. To view the current checklist, cycle the power and
on startup the name of the checklist that is active will be displayed. Alternatively, the active checklist can be
viewed in the Instrument Menu by simultaneously pressing the Up and Down buttons, scrolling to the ‘Change
Checklist’ menu and pressing the Record button. The active checklist will be displayed first. To change to
another checklist scroll to the desired checklist and press the Record button. Press record again to exit the
menu.
User List
The current user may be changed on the Saf-T-Log device without reconnecting to the PC. The ‘User’ list for
the current checklist stored on the Saf-T-Log is accessed by pressing the ‘Up’ () and ‘Down’ () buttons
simultaneously to enter the Instrument Menu. Scroll to the option “Change User” and press the ‘Rec’ button
to view the list of users that were setup in the Checklist stored on the Saf-T-Log device. Scroll to the desired
user to select and press the ‘Rec’ button to store the entry and exit the Instrument Menu. The new user is now
active. Alternatively, to display the current user selected on the Saf-T-Log device, press and hold the ‘ON /
OFF’ (Backlight) button for 3 seconds at startup. Note: When changing checklists on the handheld device, it is
important to know that the user list will also change with the active checklist. It is recommended to check the
current user when changing to a different checklist.
Temperature Unit Display
The temperature unit display (°F or °C) can be changed by use of the Saf-T-Log software. The device will
display temperature in the scale that the Checklist was set to display in. See section entitled ‘Changing Saf-TLog Temperature Units (°F or °C)’ for complete instructions (page 9). Note: When using multiple checklists,
the first checklist being loaded will set the default temperature scale for the rest of the checklists.
4
Page 5
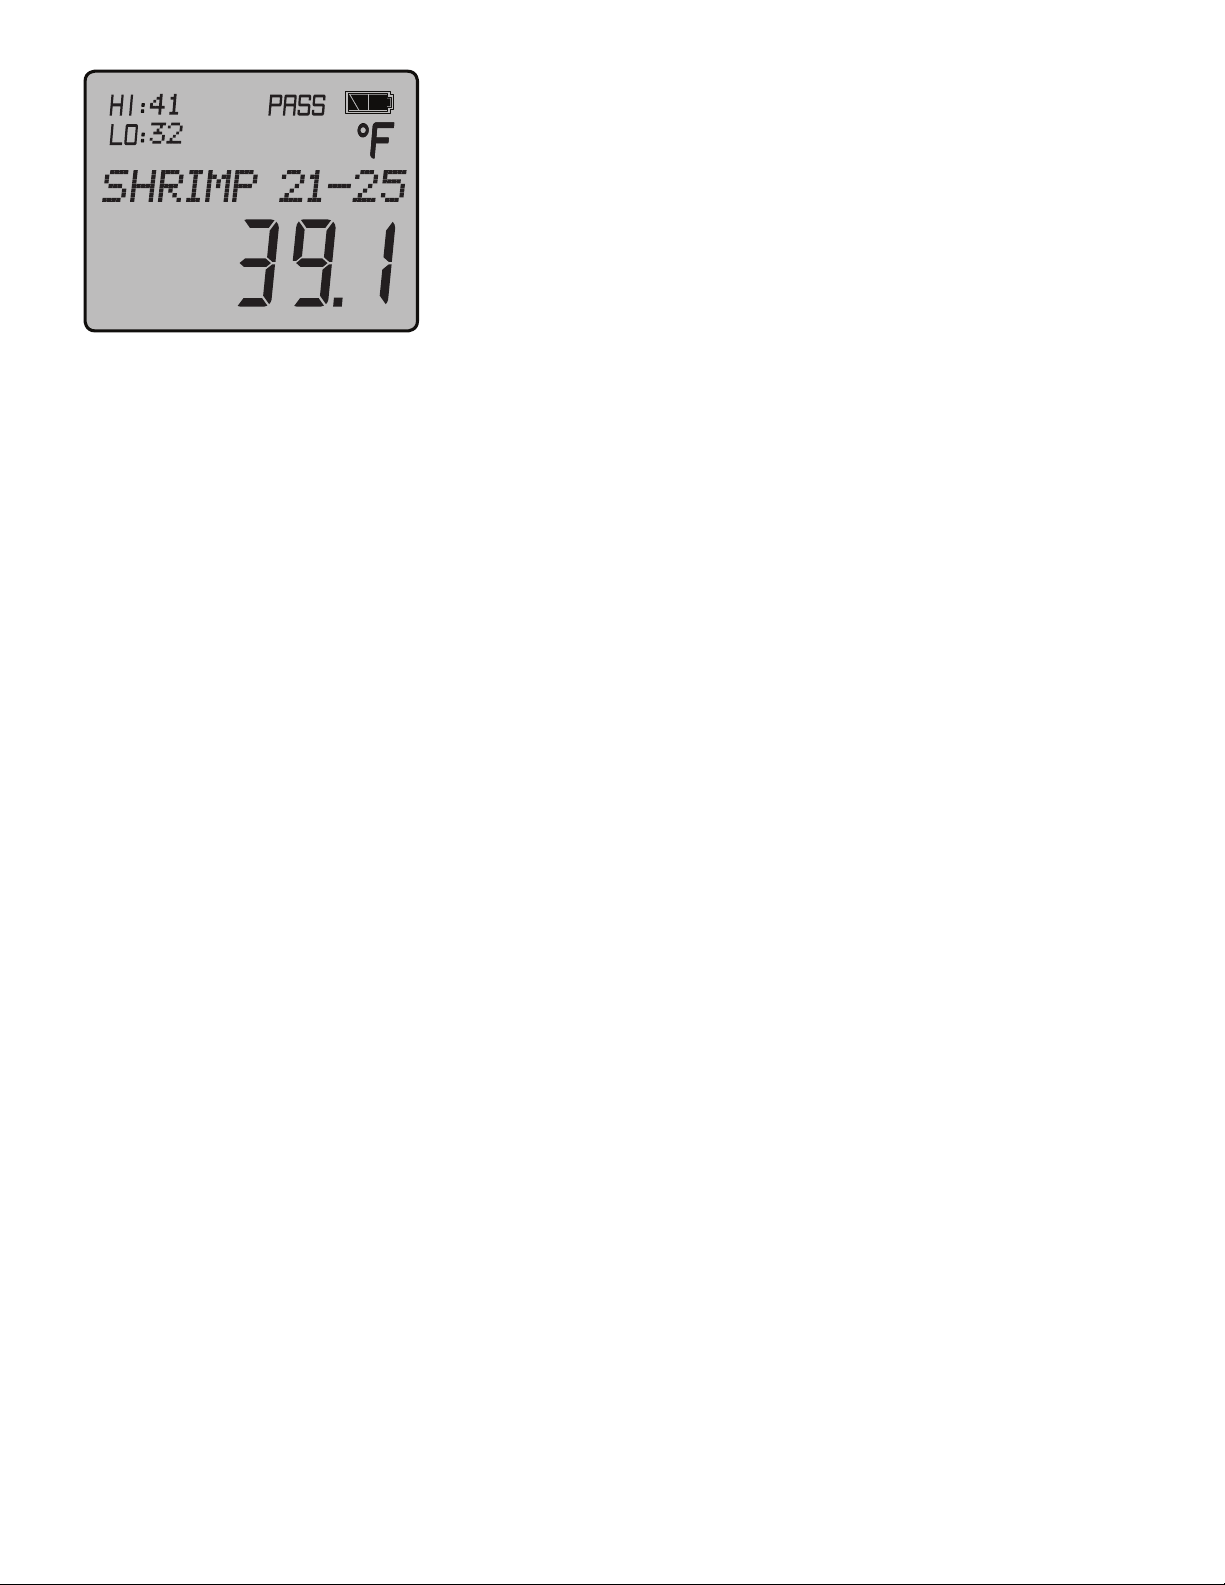
Selecting Items
In measurement mode, the Up () / Down () arrow buttons are
used to scroll through the ‘Checklist Items’. The current ‘item name’
will be displayed in the Alpha/numeric portion of the LCD display.
By holding down the Up () or Down () buttons the scrolling
speed will increase. The corresponding temperature limits (HI) and
(LO) are displayed in the upper left portion of the display. For Yes/
No items, ‘Yes or No’ will be displayed. ‘PASS’ will be displayed if
the temperature being measured is between the high and low limits. ‘FAIL’ will flash if the temperature being
measured is outside the high and low limits.
Record
For temperature items pressing the ‘Record’ button saves the current temperature reading, together with date
and time, user, item name that is currently displayed, checklist name, PASS/FAIL status and limits to memory.
If the reading falls outside of the acceptable limits, the user is prompted to store a corrective action.
For Yes/No items, pressing the ‘Rec’ button enters the Yes or No selection function in the lower display.
Scroll to either ‘Yes’ or ‘No’ to store the desired value. If ‘No’ is selected, the user is prompted to include a
corrective action from the list of Yes/No corrective actions that is stored for the current checklist. The unit can
store up to 1,000 readings. After reaching 1,000 readings, the unit will no longer save readings and display
‘Memory Full.’
Instrument Menu
To enter the Instrument Menu on the Saf-T-Log device, press and hold the Up () and Down () arrows
simultaneously. Within the Instrument Menu the user can: view saved readings, change checklists, change
the current user, access the instrument info menu to view date, time, firmware version, instrument name,
Checklist Name, calibration info, and TRIM value; and change the Auto-Off setting.
5
Page 6
Software
Synchronization
Install the Saf-T-Log software onto your PC following the instructions in the Quick Start Guide. The Saf-T-Log
software consists of two parts, the Saf-T-Log software and the Saf-T-Log Synchronization window. When the
software is installed 2 icons are added to the computer desktop.
An icon on the desktop is used to access the main Saf-T-Log software.
A synchronization icon is placed in the system tray on the right hand end of the Windows taskbar.
This may be in the ‘Hidden Icons’ section () on Windows 7 and above.
3 items are also installed in the ‘start menu’.
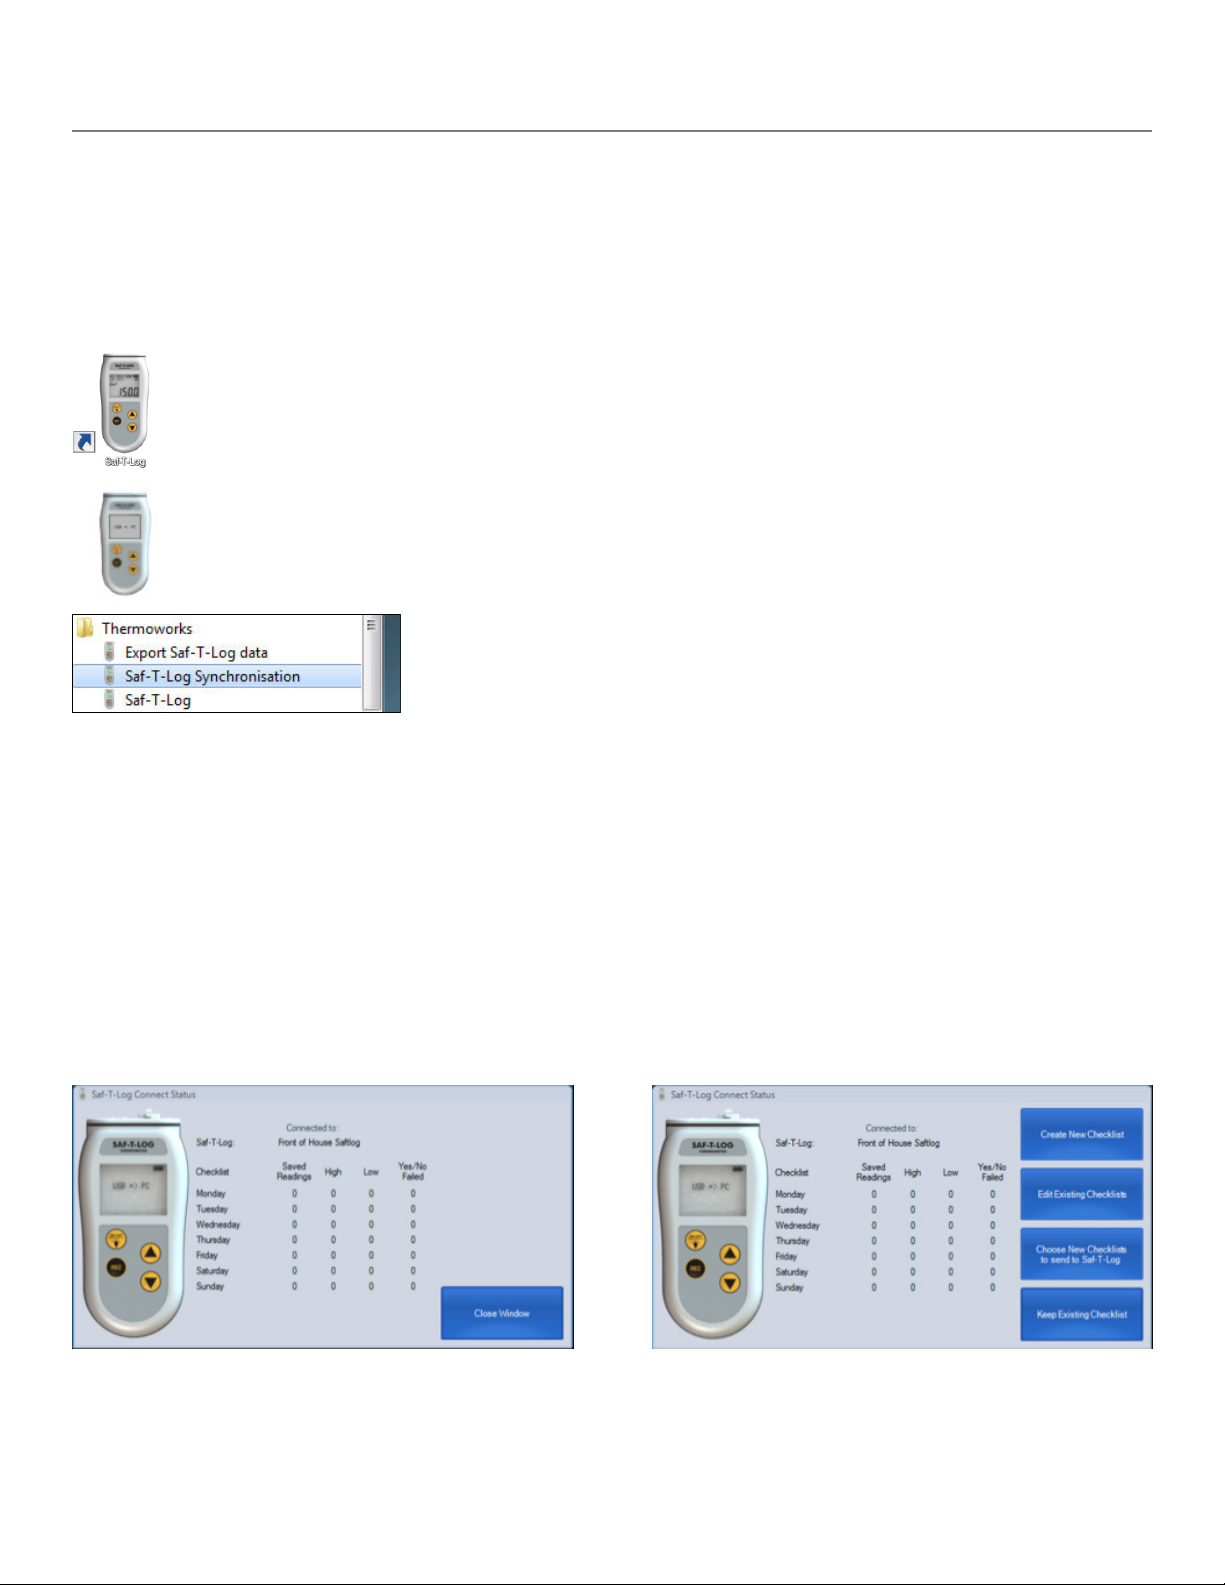
When the Saf-T-Log instrument is connected to the computer via the supplied USB cable the software
automatically starts the data transfer from the Saf-T-Log instrument to retrieve the data stored in the device.
The ‘Saf-T-Log Connect Status’ windows opens automatically and will update while the stored readings are
being transferred to the PC. In the status window, the user will see the Saf-T-Log name, Checklist names,
number of saved readings, the number of high and low alarms and number of failed Yes/No readings. Once
the download is complete, all readings may be erased from the Saf-T-Log memory and saved to the PC. The
user may select to either automatically erase all readings after download or purge readings at a later date
(see Settings on Page 8).
Note: The buttons ‘Create New Checklist’, ‘Edit Existing Checklist’, ‘Choose New Checklist to send to SafT-Log’, and ‘Keep Existing Checklist’ are only displayed on the ‘Saf-T-Log Connect Status’ window after the
‘Add Notes and Corrective Actions’ window is closed.
6
Page 7

Software
Main
The main Saf-T-Log software has the commands along the top menu bar and an area for editing the checklist
below:
The ‘New Checklist’ button opens a new Checklist.
The ‘Open Checklist’ button opens an existing checklist for review and editing.
The ‘Import Checklist from Saf-T-Log’ button imports all selected checklists from the Saf-T-Log.
The ‘Save Checklist’ button saves the current Checklist.
The ‘Save Checklist As’ button allows you to save the currently open Checklist with a different name.
The ‘Send Checklist to Saf-T-Log’ button prompts to send checklists to Saf-T-Log.
The ‘Settings’ button configures the application settings including where data files are saved.
The ‘Configure Saf-T-Log’ button configures the connected Saf-T-Log.
The ‘Open/Edit/Print Saved Data’ button allows you to open/edit/print a set of saved data.
The ‘Export Data’ button allows you to export data from a number of saved reports to a suitable Excel format.
The ‘Help’ button provides help and information including contact info and version number.
7
Page 8

Software
Before You Begin
Configure
Click ‘Configure Saf-T-Log’ to assign a name or ID tag to each Saf-T-Log device. The serial number of
the Saf-T-Log that is connected is displayed at the top of this window as well as the current instrument
firmware version. A password can be created by clicking the ‘Password Protection’ button to lock users from
accessing this window (call ThermoWorks for password reset instructions). Once the desired settings are
completed, click ‘Update’ to immediately update the connected Saf-T-Log. The Sensor Trim is also managed
from this screen and adjusts the Saf-T-Log at one temperature point if calibration is required. This function is
only active with a Saf-T-Log unit connected to the PC.
NOTE: It is NOT recommended to adjust the ‘Sensor Trim’ value without appropriate temperature
standards and experience. Call ThermoWorks technical support for more details.
Settings
In the settings section, the user can choose to automatically purge readings from the handheld device, store
reports to a specific directory and change defaults.
To automatically purge readings when the Saf-T-Log is connected check the purge readings box. With the
box checked, when a device is connected the readings will be deleted after they are downloaded. If left
unchecked readings remain on the device until the user is ready to purge them. To purge readings, select
the checkbox before connecting the device and readings will be deleted after downloaded. ‘Settings’ allows
the user to choose the location of the saved reports on the PC. Dragging and dropping the yellow boxes
containing ‘Day’, ‘Month’ etc. into the empty boxes above will create a sub file structure within the save
directory. Up to 3 levels of sub structure can be defined in this way. When the Saf-T-Log is reconnected to
the PC after readings are taken, the reports will be automatically saved into the folder structure created in the
‘Save Directory’ setting. Network drives and cloud storage locations can be used to save Saf-T-Log reports.
8
Page 9

Software
If for instance you select ‘Day’ (as seen left) to save reports, a
new sub folder will be created whenever a report is saved on
a new day. If ‘Checklist’ or ‘SAF-T device’ is used, the reports
will be filed according to matching checklists or Saf-T-Log
devices.
Defaults for UK or US time format, °C or °F temperature units
and time zone can also be adjusted here for new Checklists
that may be created. Click ‘Save Settings’ to keep the changes.
Click ‘Cancel’ to discard changes.
Before You Begin
Viewing Current Saf-T-Log Settings on Device
To view current settings on the Saf-T-Log Device without having to connect to the PC, turn the unit off. Press
and hold the ‘On/Off’ (Backlight) button for three seconds and the current status will scroll across the center
of the screen including: date, time, user, Checklist name, and Saf-T-Log name/ID. More information can be
viewed in the Instrument Menu (see pg 5 for more details).
Changing Saf-T-Log Temperature Units (°F or °C)
The Saf-T-Log will display temperature on the device according to the temperature scale chosen for the
Checklist in the ‘Format Report’ tab. To change the temperature units on the Saf-T-Log device, open the
Saf-T-Log software and open a Checklist to be saved to the Saf-T-Log device. In the editing window, click
the ‘Format Report’ tab along the left sidebar. Select ‘Reading (°F)’ or ‘Reading (°C)’ from the drop down
field in the center of the ‘Format Report’ screen to select the desired temperature scale. Before the Saf-T-Log
device is updated with the desired temperature units, the Checklist must be sync’d to the Saf-T-Log device
by connecting the Saf-T-Log to the PC and while the Checklist is open in the editing window, selecting ‘Send
Checklist to Saf-T-Log’. Note: If multiple checklists are stored on the device, the temperature units (°F or °C)
for all checklists will default to the scale used on the first checklist stored.
View Current Readings on the Saf-T-Log Device
To view saved readings on the Saf-T-Log device before download, enter the Instrument Menu by pressing
both arrow buttons simultaneously. Scroll to the ‘Saved Readings’ function and press the ‘Rec’ button. Scroll
up and down to view the readings. Press ‘Rec’ to exit.
9
Page 10

Software
Getting Started - Creating your checklist
Creating a New Checklist
Click the ‘New Checklist’ button to open the editing window. The
tabs on the left sidebar allow items and users to be added to
the checklist as well as format the data report from temperature
readings that will be downloaded.
Creating Users
In the ‘Users’ tab, click the plus (+) or double click ‘New User’
and type in the required name. Click the plus (+) to add another
User up to a maximum of 25. The User names can be sorted in
ascending or descending order by clicking the ‘A to Z’ or ‘Z to A’
buttons or moved up and down the list individually by pressing
the (a) or (e) arrows. The order in which the users appear in
the PC software is the order they will appear on the Saf-T-Log thermometer. To delete a User highlight the user
name in the list and click the minus (-) button.
Creating Items
In the ‘Items’ tab, double click ‘New Item’ and type in the required
name. Double click the High or Low Limit temperatures to type
in a new temperature value or use the up/down buttons in the
relevant box to scroll the temperature in one degree steps. The
High Limit cannot be set equal to or lower than the Low Limit and
vice versa.
Click the plus (+) to add another temperature item up to
a maximum of 300. Click the icon to add a Yes/No
question. If long item names are used (greater than 16 characters), the maximum number of items allowed
YES
NO
will decrease and be displayed at the top of the item list, i.e. “15 out of 295 items used”. To increase the
maximum number of items available, simply use item names less than 16 characters in length. For single
checklist users, a warning box will appear when trying to load a checklist with over 250 items. Continue to
load the checklist onto the Saf-T-Log device and it will load.
10
Page 11

Software
For multiple checklist users, the maximum number of items per checklist is 250 and will be reduced as well
by the length of characters for each item for a minimum of at least 125 items per checklist. A warning box
may appear when trying to load a checklist with too many items. Reduce the character length or number of
items and try to load the checklist again.
The Item names can be sorted in ascending or descending order by clicking the ‘A to Z’ or ‘Z to A’ buttons.
The Item names can also be moved up and down the list so that more commonly used items can be grouped
near each other using the up (a) and down (e) buttons. The order in which they appear in the PC software
is the order these items will appear on the Saf-T-Log thermometer. To delete an Item highlight the item name
in the list and click the minus (-) button.
Creating Corrective Actions
Corrective actions can be added to standard checklists and
selected on the handheld device when readings are outside of
Getting Started
acceptable limits (FAIL). Add up to 10 corrective actions for both
temperature and Yes/No questions in the respective sections, that
are displayed automatically when a Failed reading is recorded.
The user will be prompted to add a corrective action by using the
Up and Down arrows and pressing record to store the corrective
action to the specific reading. If no corrective actions are cre-
ated for a checklist, the user will not be prompted to enter one
upon a failed reading on the handheld device. Click the (+) to add the corrective action and the ordering keys
to order the list as preferred.
Formatting the Report
The Saf-T-Log software allows for some customization of the
data report. The report heading can be amended with some
user defined information to suit the individual application. Up
to 5 ‘Custom Information Lines’ can be used for appropriate
contact details. A company logo can be entered in the box at the
top right of the report by double clicking the box. Note: If mul-
tiple checklists are stored on the device, the logo used on all
reports saved from the download will default to the logo used
on the first checklist stored). Select an image (color or black
and white) and it will automatically be scaled to fit the box. A descriptive name can be added to the ‘Device
Location’ box.
11
Page 12

Software
By default the report will contain all the available columns. Unwanted columns can be removed from the
report by clicking and dragging to the ‘Columns NOT to include in report’ area. Column order may also be
changed to suit.
The temperature scale displayed on the Saf-T-Log will be the same scale that is selected in the column titled
“Reading (°F)” by selecting the appropriate temperature units, °F or °C. By clicking on the ‘Generate Exception Report’ box an extra page is added to the report showing which Items in the Checklist were not recorded.
When multiple checklists are stored to the Saf-T-Log, and the exception report is selected for a given checklist, an exception report is only generated if one or more readings has been recorded for a specific checklist.
Before the Checklist can be loaded onto the Saf-T-Log device it must be saved using the ‘Save Checklist’ or
‘Save Checklist As’ button.
Getting Started
Loading a Checklist onto the Saf-T-Log Device
After a Checklist has been created and is ready to store onto the Saf-T-Log device, open the Checklist so
it is currently displayed in the editing window. Next, click ‘Send Checklist to Saf-T-Log’ and a confirmation
window will appear. A checklist selection window will appear. Select checklists from the left column and
press ‘Add’ to move them to the right column to load them onto the Saf-T-Log, up to 7 total. The checklists
will be loaded onto the Saf-T-Log in the order they were added to the “going to Saf-T-Log” dialog box. Use
the arrows to change the checklist order. Note: the first checklist being loaded will set the default temperature
scale for the rest of the checklists. Once complete, select ‘OK’ to send the checklists.
For single checklist users, a warning box will
appear when trying to load a checklist with over
250 items. Continue to load the checklist onto
the Saf-T-Log device and it will load.
For multiple checklist users, the maximum
number of items per checklist is 250 and will
12
be reduced by the length of characters for each
item for a minimum of at least 125 items per
checklist. A warning box may appear when
trying to load a checklist with too many items.
Reduce the character length or number of items
and try to load the checklist again.
Page 13

Software
Getting Started
Importing a Checklist from the Saf-T-Log Device
To import an existing Checklist(s) that reside on the Saf-T-Log device, connect the Saf-T-Log unit to the PC
and click ‘Import Checklist from Saf-T-Log’ to import the Checklists into the editing window. A selection box
will appear to select the Checklists to import. The Checklists can now be edited and saved for future use.
Editing an existing Checklist
Click the ‘Open Checklist’ button to open the editing window to edit an existing Checklist. Select the Checklist
to be edited from the directory where it was previously saved to begin editing. Once all changes have been
made, save the Checklist by clicking the ‘Save Checklist’ button to keep the same Checklist name, or ‘Save
Checklist As’ to assign a new name to the Checklist. Multiple Checklists can be viewed and edited in the
editing window and displayed in tabs across the top of the edit box.
13
Page 14

Software
Recording Temperatures and Yes/No Questions
Once the appropriate Checklist has been stored onto the Saf-T-Log device, readings can be stored. Connect a
suitable type K temperature probe to the Saf-T-Log device noting the correct polarity (+ or – ). Power the unit
on. Using the ‘Up’ () and ‘Down’ () buttons, scroll to the desired item to be measured. For temperature
items insert the tip of the probe into the desired medium and select ‘REC’ to store
the reading. For Yes/No questions, select ‘REC’ to view the Yes or No choice,
scroll to the desired selection and press ‘REC’ again. If the stored reading falls
outside of the item’s hi/lo limits, a corrective action may be selected by the user
if the checklist was setup to include corrective actions. ‘Recorded # xx’ will
then flash momentarily on the display to confirm that the reading was stored. For
temperature items, note that a PASS or FAIL will be displayed in the upper display
based on the HI: and LO: settings of the item selected. Up to 1,000 readings can be stored on the Saf-T-Log
device. Once the maximum limit has been reached, a message will be displayed ‘Memory Full’ indicating
that the reading memory is full and should be downloaded. No other readings will be possible until the sync
process is completed.
NOTE: It is recommended to check that the appropriate user is selected before using the Saf-T-Log device or
when changing the active checklist on the unit. This is done within the Instrument Menu by pressing the ‘Up’
() and ‘Down’ () buttons simultaneously, scrolling to ‘Change User,’ and then pressing the ‘Up’ () and
‘Down’ () buttons to scroll to the appropriate user, and then pressing ‘REC’ to select.
14
Page 15

Software
Downloading Readings & Printing Reports
Downloading Readings from Saf-T-Log Device
After the Checklist readings are stored to the Saf-T-Log device for the current session, readings can be
downloaded to the PC and a report generated, and/or printed. Bring the unit back to the PC where the
Checklist file was created. Connect the Saf-T-Log to the PC using the supplied USB cable connected to
the USB port on the Saf-T-Log device. Once connected, the Saf-T-Log will display ‘USB – PC’ to indicate
that it is connected. The ‘Saf-T-Log Connect Status’ window will appear automatically and readings will
start to download. After all readings are downloaded, the ‘Add Notes and Corrective Actions’ window will
automatically open and display ALL readings from the current recording session. In addition, the report will
be automatically saved into the file directory that was setup in the ‘Settings’ section of the Saf-T-Log software
(see page 8) with a unique name which includes the date and time of download. Any corrective actions that
were stored during the temperature measurement session will be displayed. At this point the user can add
‘Notes’ or ‘Footnotes’ to the file, resave the file or save as a new file. When using multiple checklists, the SafT-Log software automatically creates a report for each checklist that contains recorded data. Each created
checklist file is stored to the desired file folder and only contains the data specific to the checklist that was
used when the readings were taken.
Once any Notes have been added, the report can be printed or resaved and stored electronically. If the user
desires to create a new Checklist, change to a different Checklist, or edit an existing Checklist, this can be
15
Page 16

Software
done by closing the ‘Add Notes and Corrective Actions’ window and the appropriate buttons will then be
visible on the ‘Saf-T-Log Connect Status Window’. A new Checklist can be sent to the Saf-T-Log device
without requiring the user to open the Saf-T-Log software.
Downloading Readings & Printing Reports
Editing and Printing Previously Downloaded Temperature Readings
Click ‘Open/Edit/Print Saved Data’ to open an existing data report in the editing window. Select the data report
from the file menu to open in the ‘Add Notes and Corrective Actions’ window. Notes or corrective actions
can be stored as well as a footnote before saving or printing. Click ‘Print’ to print a copy of the data report. A
PDF document will open and can be printed with suitable PDF reader software. ‘Save’ or ‘Save As...’ must be
selected to save any added information.
16
Page 17

Software
Downloading Readings & Printing Reports
Exporting Data to Excel
The ‘Export Data’ button creates an Excel spread sheet containing the data from selected Saf-T-Log reports.
The software takes the user through selection options using the ‘Next>’ button to progress through a series
of steps. The data from more than one Saf-T-Log report can be combined into one Excel file. The first step
is to select a directory where the report files are stored. Various options can be used to select the reports to
combine such as Checklists, Users, Items, Locations or reports with dates in a specified range as well as
filtering by Failed Readings only. The data can be sor ted by also selecting one of the options: Date, Checklist,
Users, Items or Locations. The user can also choose the temperature scale (°F/°C) to display the readings
in the export file. The final step is to select a directory for the saved export file. Note: all readings will be
displayed in the temperature scale that is set in the Settings window for default Checklists.
17
Page 18

Maintenance
Saf-T-Log Desktop Software & Firmware Updates
Saf-T-Log updates and enhancements to software and the handheld unit are offered to customers free of
charge and can be updated remotely for customer convenience. Updated features and instructions are found
on the Saf-T-Log webpage (www.thermoworks.com/saftlog).
Changing Batteries in Saf-T-Log Device
A battery power indicator is located in the upper right corner of the display. When the battery indicator shows
only one bar it is recommend to replace the batteries in the Saf-T-Log. When the batteries are completely
exhausted, the Saf-T-Log will power off and display ‘Flat – Shut down’ momentarily. Unscrew the six screws
on the back of the Saf-T-Log device and remove the back panel to replace the batteries with three AAA
batteries. Replace the back panel and screws being careful to fit the rubber gasket securely and not over
tighten the screws as they may strip.
After new batteries have been fitted, the instrument must be connected to a computer to configure the date
and time. The user will be prompted by the message ‘Configure via PC’ in the display until the USB cable is
plugged in and then by the following message on the PC screen. Click ok and then reload a suitable Checklist
file to the Saf-T-Log device.
Product Care
It is recommend to clean the Saf-T-Log instrument periodically with cleaning or sanitizing wipes. Do not submerse in liquid for cleaning. Keep water and liquids from collecting around connectors at the top end of the
instrument. Replace the batteries when indicated on the display.
Getting Technical Support
For technical questions regarding the Saf-T-Log device or software, contact ThermoWorks’ Technical Support
at 801-756-7705 or techsupport@thermoworks.com between the hours of 8:00 to 5:00 pm Mountain Time.
18
 Loading...