

Page 1
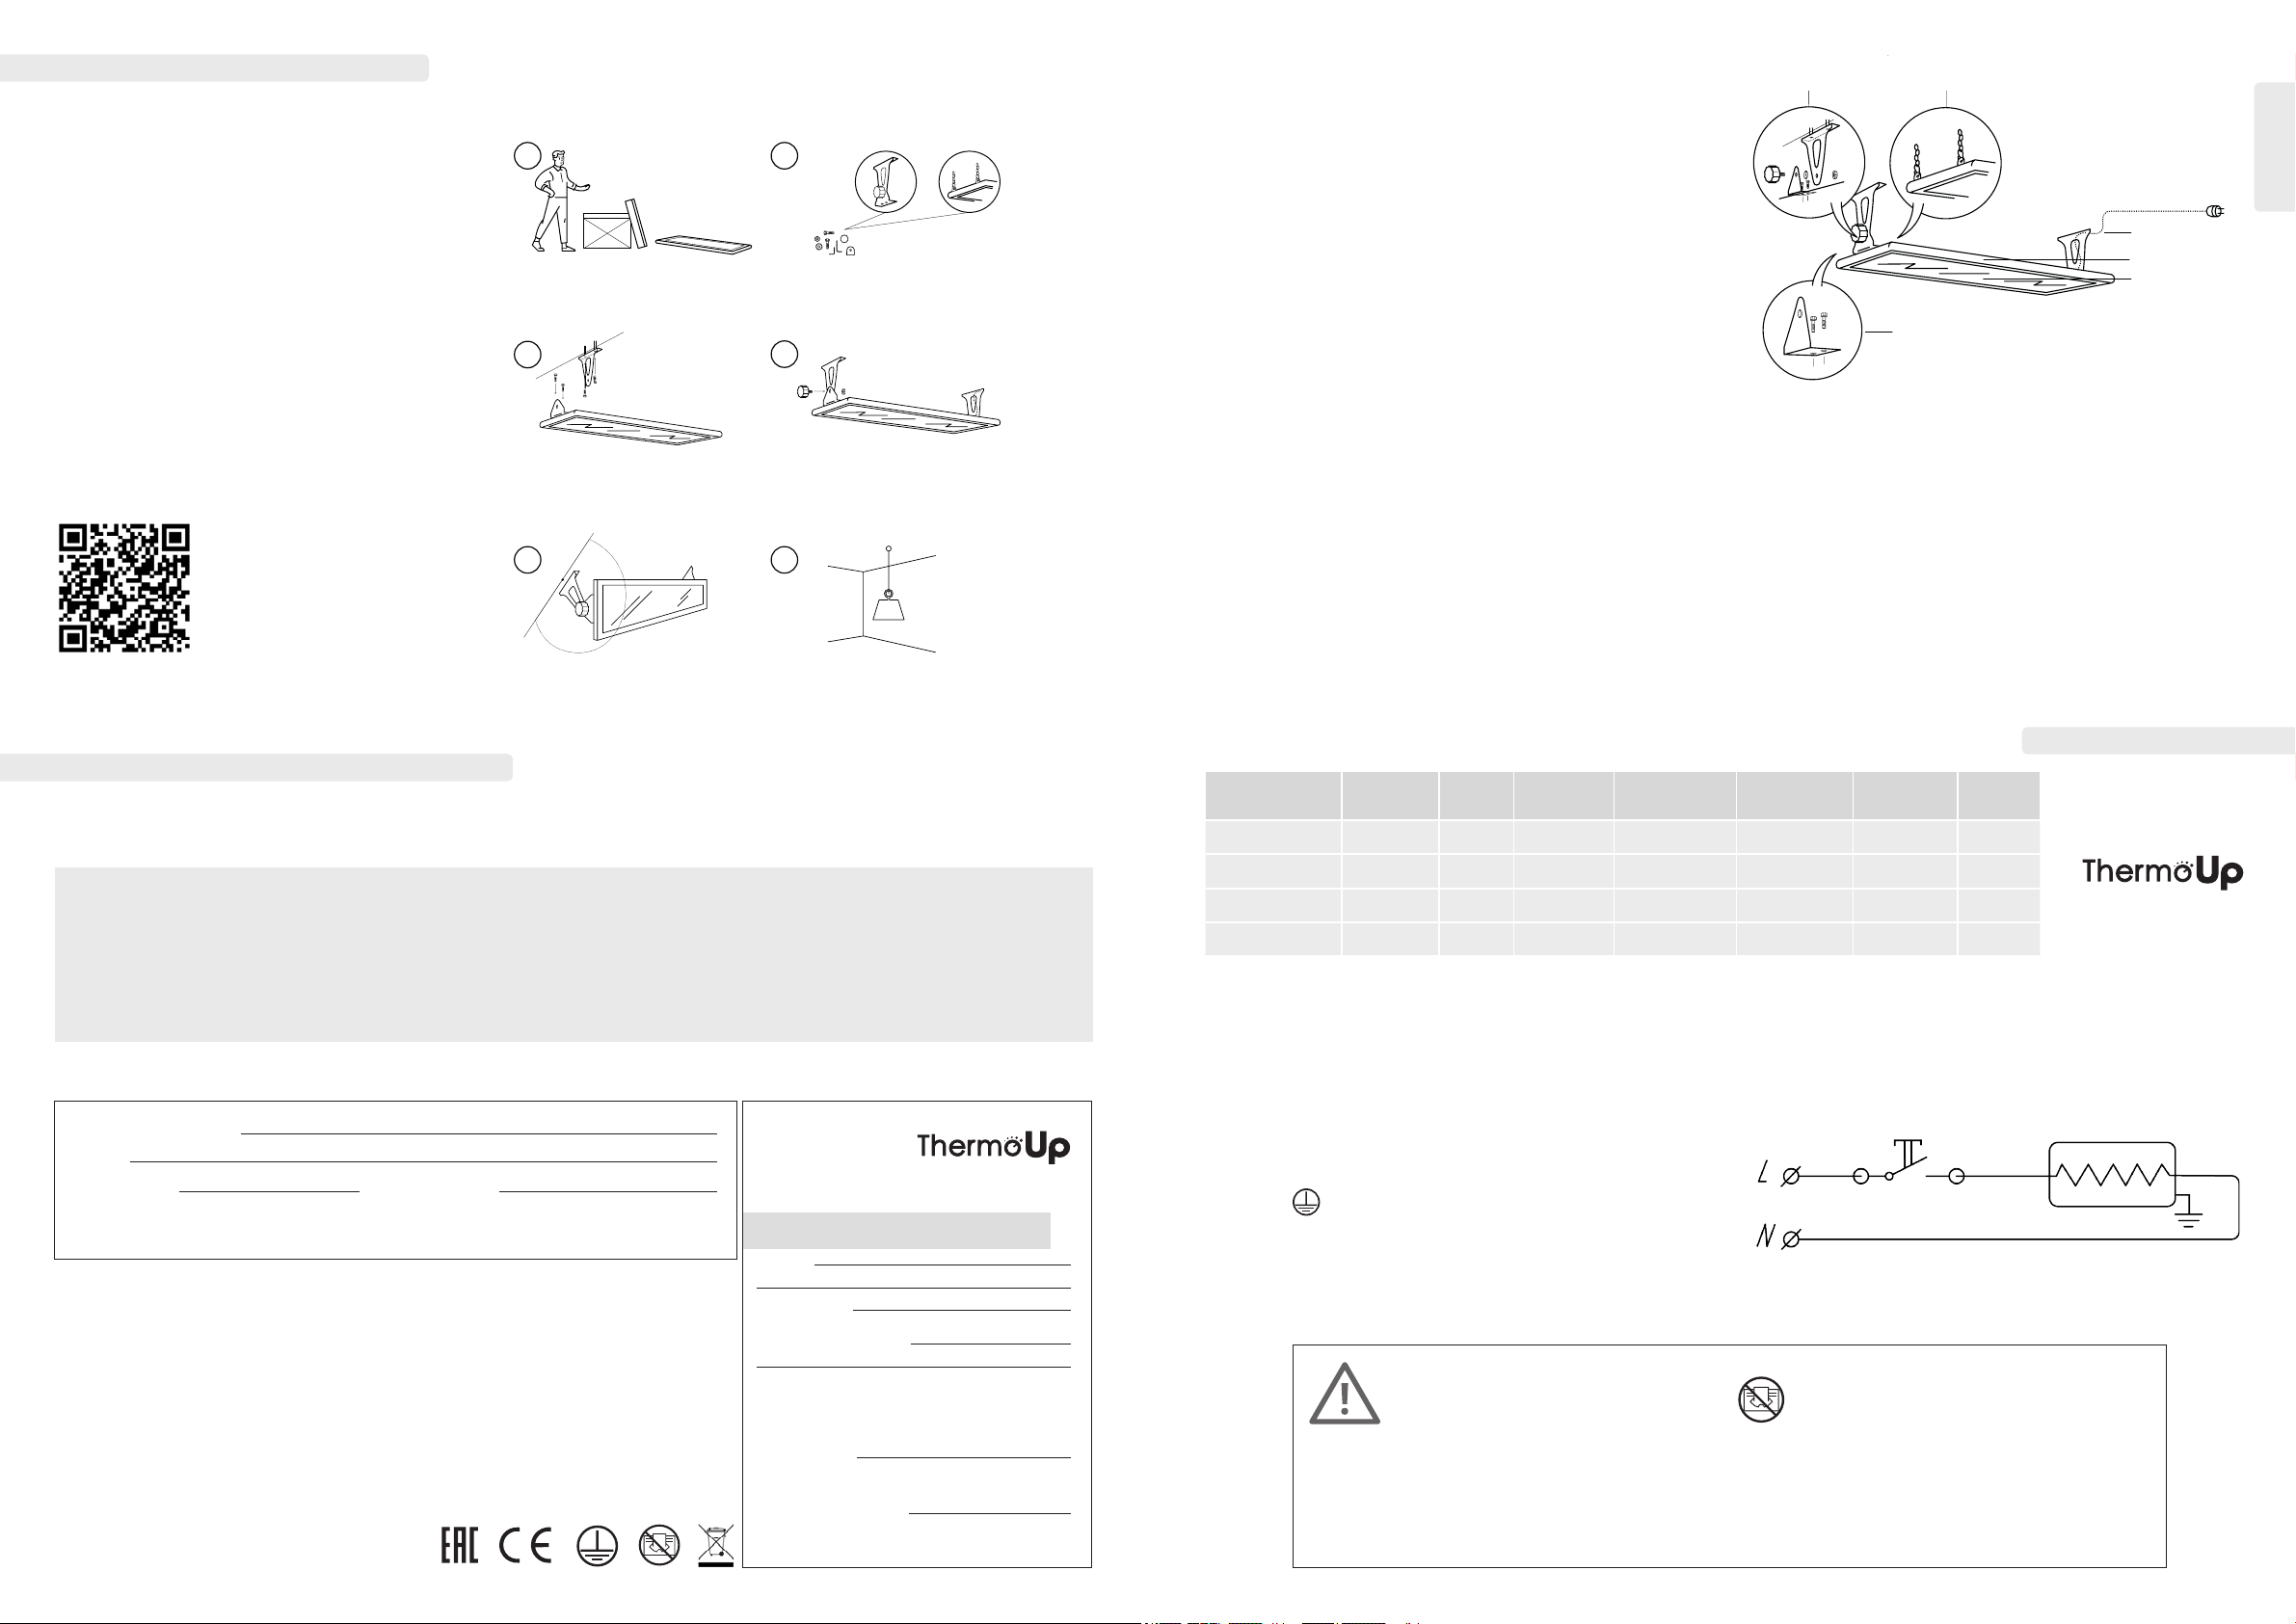
ермоэлемент (стекло)
2 комплекта креплений:
Determine where to install the heater consulting the
recommendations for the height of the suspension
heater (see table 1).
1 2
3
Remove the device from the box.
Select the fixation method that suits you best. Along with a heater,
two mounting options are supplied for fixing the device on the
ceiling - 2 prefabricated brackets with varying tilt angle and 4
corners for hanging the device on chains (chains are not included
in the kit.)
Please use four special nuts located in the corners of the
device to attach selected mounting unit (the corners or the
corresponding part of the bracket). Then fix the chains or
the second part of the bracket to the ceiling.
Bring the heater to the ceiling by connecting the two parts of the
bracket with a thumb screw or by attaching chains to the corners
on the heater.
When mounting with the help of standard brackets, you can
choose the angle of the heater. To do this, slightly loosen the
thumb bolts connecting the two parts of each bracket. Set the
required angle of the instrument and fix the brackets in the
selected position.
The strength of the ceiling or design for which the heaters are
mounted must be sufficient to withstand 5 times the weight of the
heater.
4
5 6
5x
INSTALLATION OF HEATERS THERMOUP TOP S
What’s included in the set
1. Heater
2. Mounting kit:
• 2 modular brackets with variable tilt angle;
• 4 corners (for hanging the device on chains, chains are not
included);
• 4 screws (for mounting brackets to the heater).
3. Manual and warranty guarantee
Installation of heaters ThermoUp TOP S 800/1100/1500/2000
Installation recommendations
• The distance from the floor to the device must be at least 1.8 m.
• The distance from the device to the ceiling must be at least 10 cm, to the
walls at least 50 cm.
• The distance to objects located in the area of the heater must be at least
50 cm.
• The distance from the device to people and animals during a long stay
You can find full version of the instruction «How to connect the heater to
the thermostat» on our website www.thermoup.com
The instruction is available in Russian, German, French, Italian.
WARRANTY OBLIGATIONS, PRODUCT CERTIFICATION
WARRANTY OBLIGATION
The manufacturer guarantees the correct operation of the heater for 1 year from the date of purchase.
This warranty is not valid in the event of:
• Changes in product design by the buyer;
• Improper use, use of the product for other purposes or not in accordance with the manufacturer’s instructions
for operation and maintenance, as well as installation or operation of the product in violation of technical
standards and safety standards;
• The presence of mechanical damage on the product (chips, cracks, etc.), effects of excessive force on the
product, chemically aggressive substances, high temperatures, high humidity/dust, concentrated vapors, if
any of the above has caused the product to malfunction;
• Repairs made by unauthorized service centers or dealers;
CERTIFICATE OF SALE
Seller Company
Address
Date of sale Seller signature
PRODUCT CERTIFICATION
• Accidents, lightning strikes, flooding, fire and other causes beyond the control of the manufacturer that have
caused damage to the product;
• Defects obtained during the transportation of the device by the customer (except for cases when it is
manufactured by authorized dealers or the manufacturer);
• Defects in the system in which this product was used;
• Operation at increased voltage (more than 10% of nominal) and humidity more than 80% at a temperature
of +25 °C.
М. P.
Filled by seller
WARRANTY CARD 1-1
Model
Инновационная система обогрева
2 сборных кронштейна,
барашковый болт
Уважаемый покупатель!
Спасибо, что купили обогреватель ThermoUp!
Обогреватели ThermoUp работают по принципу комбинированной теплоотдачи:
вместе с тепловым излучением обогреватель создает конвекционный поток,
распространяющий теплый воздух по заданной площади.
МЕРЫ БЕЗОПАСНОСТИ
1. Используйте прибор только по назначению и оберегайте от ударов, попадания пыли и влаги.
2. Прибор может использоваться детьми от 8 лет и старше и лицами с ограниченными физическими,
сенсорными или умственными способностями, если они находятся под контролем лица,
ответственного за их безопасность или были проинструктированы по безопасному использованию
прибора и понимают возможные опасности. В остальных случаях, использование обогревателя
детьми и уязвимыми лицами возможно только под наблюдением взрослых. Дети не должны играть с
прибором.
3. Обогреватели должны располагаться с учетом требований к монтажу, указанных в разделе «Монтаж
и подключение» полной версии инструкции. Запрещается размещать обогреватель непосредственно
под розетками.
4. Категорически запрещается прикасаться к рабочей поверхности обогревателя во время его работы,
во избежание травм и ожогов!
5. Запрещается использовать прибор без заземления, а также без электрической защиты от
повышенных токов и токов короткого заземления (УЗО). Подключать обогреватели должны
квалифицированные специалисты в соответствии с разделом «Монтаж и подключение» данной версии
инструкции.
6. Прибор должен находиться вдали от легко воспламеняющихся или легко деформируемых объектов.
Таблица 1. Технические данные обогревателей ThermoUp Top S
Название Размер, мм
ThermoUp TOP S 800
ThermoUp TOP S 1100
ThermoUp TOP S 1500
ThermoUp TOP S 2000
880х275х28 4.9 800 220-230 15-17 v 190
880х335х28 6 1100 220-230 20-22 2-3,5 190
1005х405х28 8.2 1500 220-230 20-34 2-3,5 190
1305х405х28 10,7 2000 220-230 32-37 2-3,5 190
Масса, кгМощность,
Вт
Напряжение,
7. Шнур питания не должен соприкасаться с горячими поверхностями обогревателя. Если шнур питания
повреждён, он должен быть заменен производителем, авторизованной сервисной службой или
другим квалифицированным специалистом, во избежание серьезных травм.
8. Запрещается накрывать обогреватель во время его работы и использовать его для сушки одежды и
любых других предметов — это может привести к перегреву и поломке прибора. Данный вид поломки
будет считаться не гарантийным случаем.
9. Не погружайте обогреватель в воду или другие жидкости. Прибор можно использовать во влажных
помещениях без прямого попадания воды на поверхность обогревателя.
10. Отсоедините обогреватель от электрической сети, когда он не используется, и перед тем, как его
мыть.
11. Удостоверьтесь, что обогреватель полностью остыл, прежде чем убирать его в упаковку для
длительного хранения.
12. Не разбирайте прибор самостоятельно. Не вносите изменения в конструкцию обогревателя! Любые
изменения приводят к потере гарантии.
13. В случае нарушения правильной работы прибора обратитесь в ближайший к вам авторизованный
сервисный центр производителя для консультации и ремонта.
В
Отапливаемая
площадь, м
Подключение обогревателей ThermoUp TOP S 800/1100/1500/2000
1. Подключение рекомендуется производить квалифицированными
специалистами.
2. Перед подключением необходимо снять напряжение с подводящего кабеля.
3. Соедините концы подводящего кабеля с проводом питания, выходящим
из обогревателя через клеммную колодку (в комплект не входит),
соблюдая полярность.
4. Произведите заземление прибора, используя предусмотренный для этого
винт заземления. Винт размещен на корпусе обогревателя и обозначен
знаком
5. Обогреватель может быть подключен к сети 220-230 В, имеющей защитный
заземляющий провод, при помощи 3-х жильного кабеля с сечением жил не
менее 1,5 мм2, а также через автоматический выключатель
и/или терморегулятор (не входят в комплект).
6. При монтаже двух и более обогревателей должно быть обеспечено их
параллельное подключение к стационарной проводке, установка кабелей и
выключателя на общий суммарный ток, а также установка соответствующего
автомата защиты.
4 уголка для цепей, (цепи
в комплект не входят)
Закладные гайки для элементов крепежа
(закреплены на корпусе обогревателя)
ТЕХНИЧЕСКИЕ ДАННЫЕ
2
Высота
подвеса, м
Схема 1. Схема подключения через выключатель
Max.оt нагрева
о
стекла
С
RU
Электрический шнур
Корпус
Т
The product is certied within the territory of the Customs Union by the
certication body RA.RU.10HА75.
LLC «Certication Protection System»
Address: 86/1, Building 1, 2nd oor, Room No. 212, Room 1A, Ryazansky
Avenue, Moscow, 117420, Russia
Phone: +79670037962
Email: [email protected]
The product complies with the requirements of the following regulatory
documents:
TR CU 004/2011 «On the Safety of Low-Voltage Equipment»
TR CU 020/2011 «Electromagnetic Compatibility of Technical Means»
4
Certicate number:
EAEU RU C-RU.НА75.В.02027/22
Series RU No. 0376461
Validity period: from April 8, 2022, to April 7, 2027.
Manufacturer: LLC «KLV LAB»
Address: Ofce 206, Building 3, 4a General Tyulenev Street,
Moscow, 117465, Russia.
Date of sale
Sales organization
Date of transfer
in SC for repair
Date of receipt from SC
М. P.
ВНИМАНИЕ!
Во избежание перегрева обогреватель не накрывать!
ВНИМАНИЕ!
Обогреватель не должен использоваться, если стеклянные панели повреждены!
ВНИМАНИЕ!
Прибор не снабжён устройством контроля комнатной температуры. Не используйте прибор в маленьких помещениях,
если они заняты людьми, которые не способны самостоятельно покинуть помещение и они не находятся под постоянным
присмотром.
1
Page 2
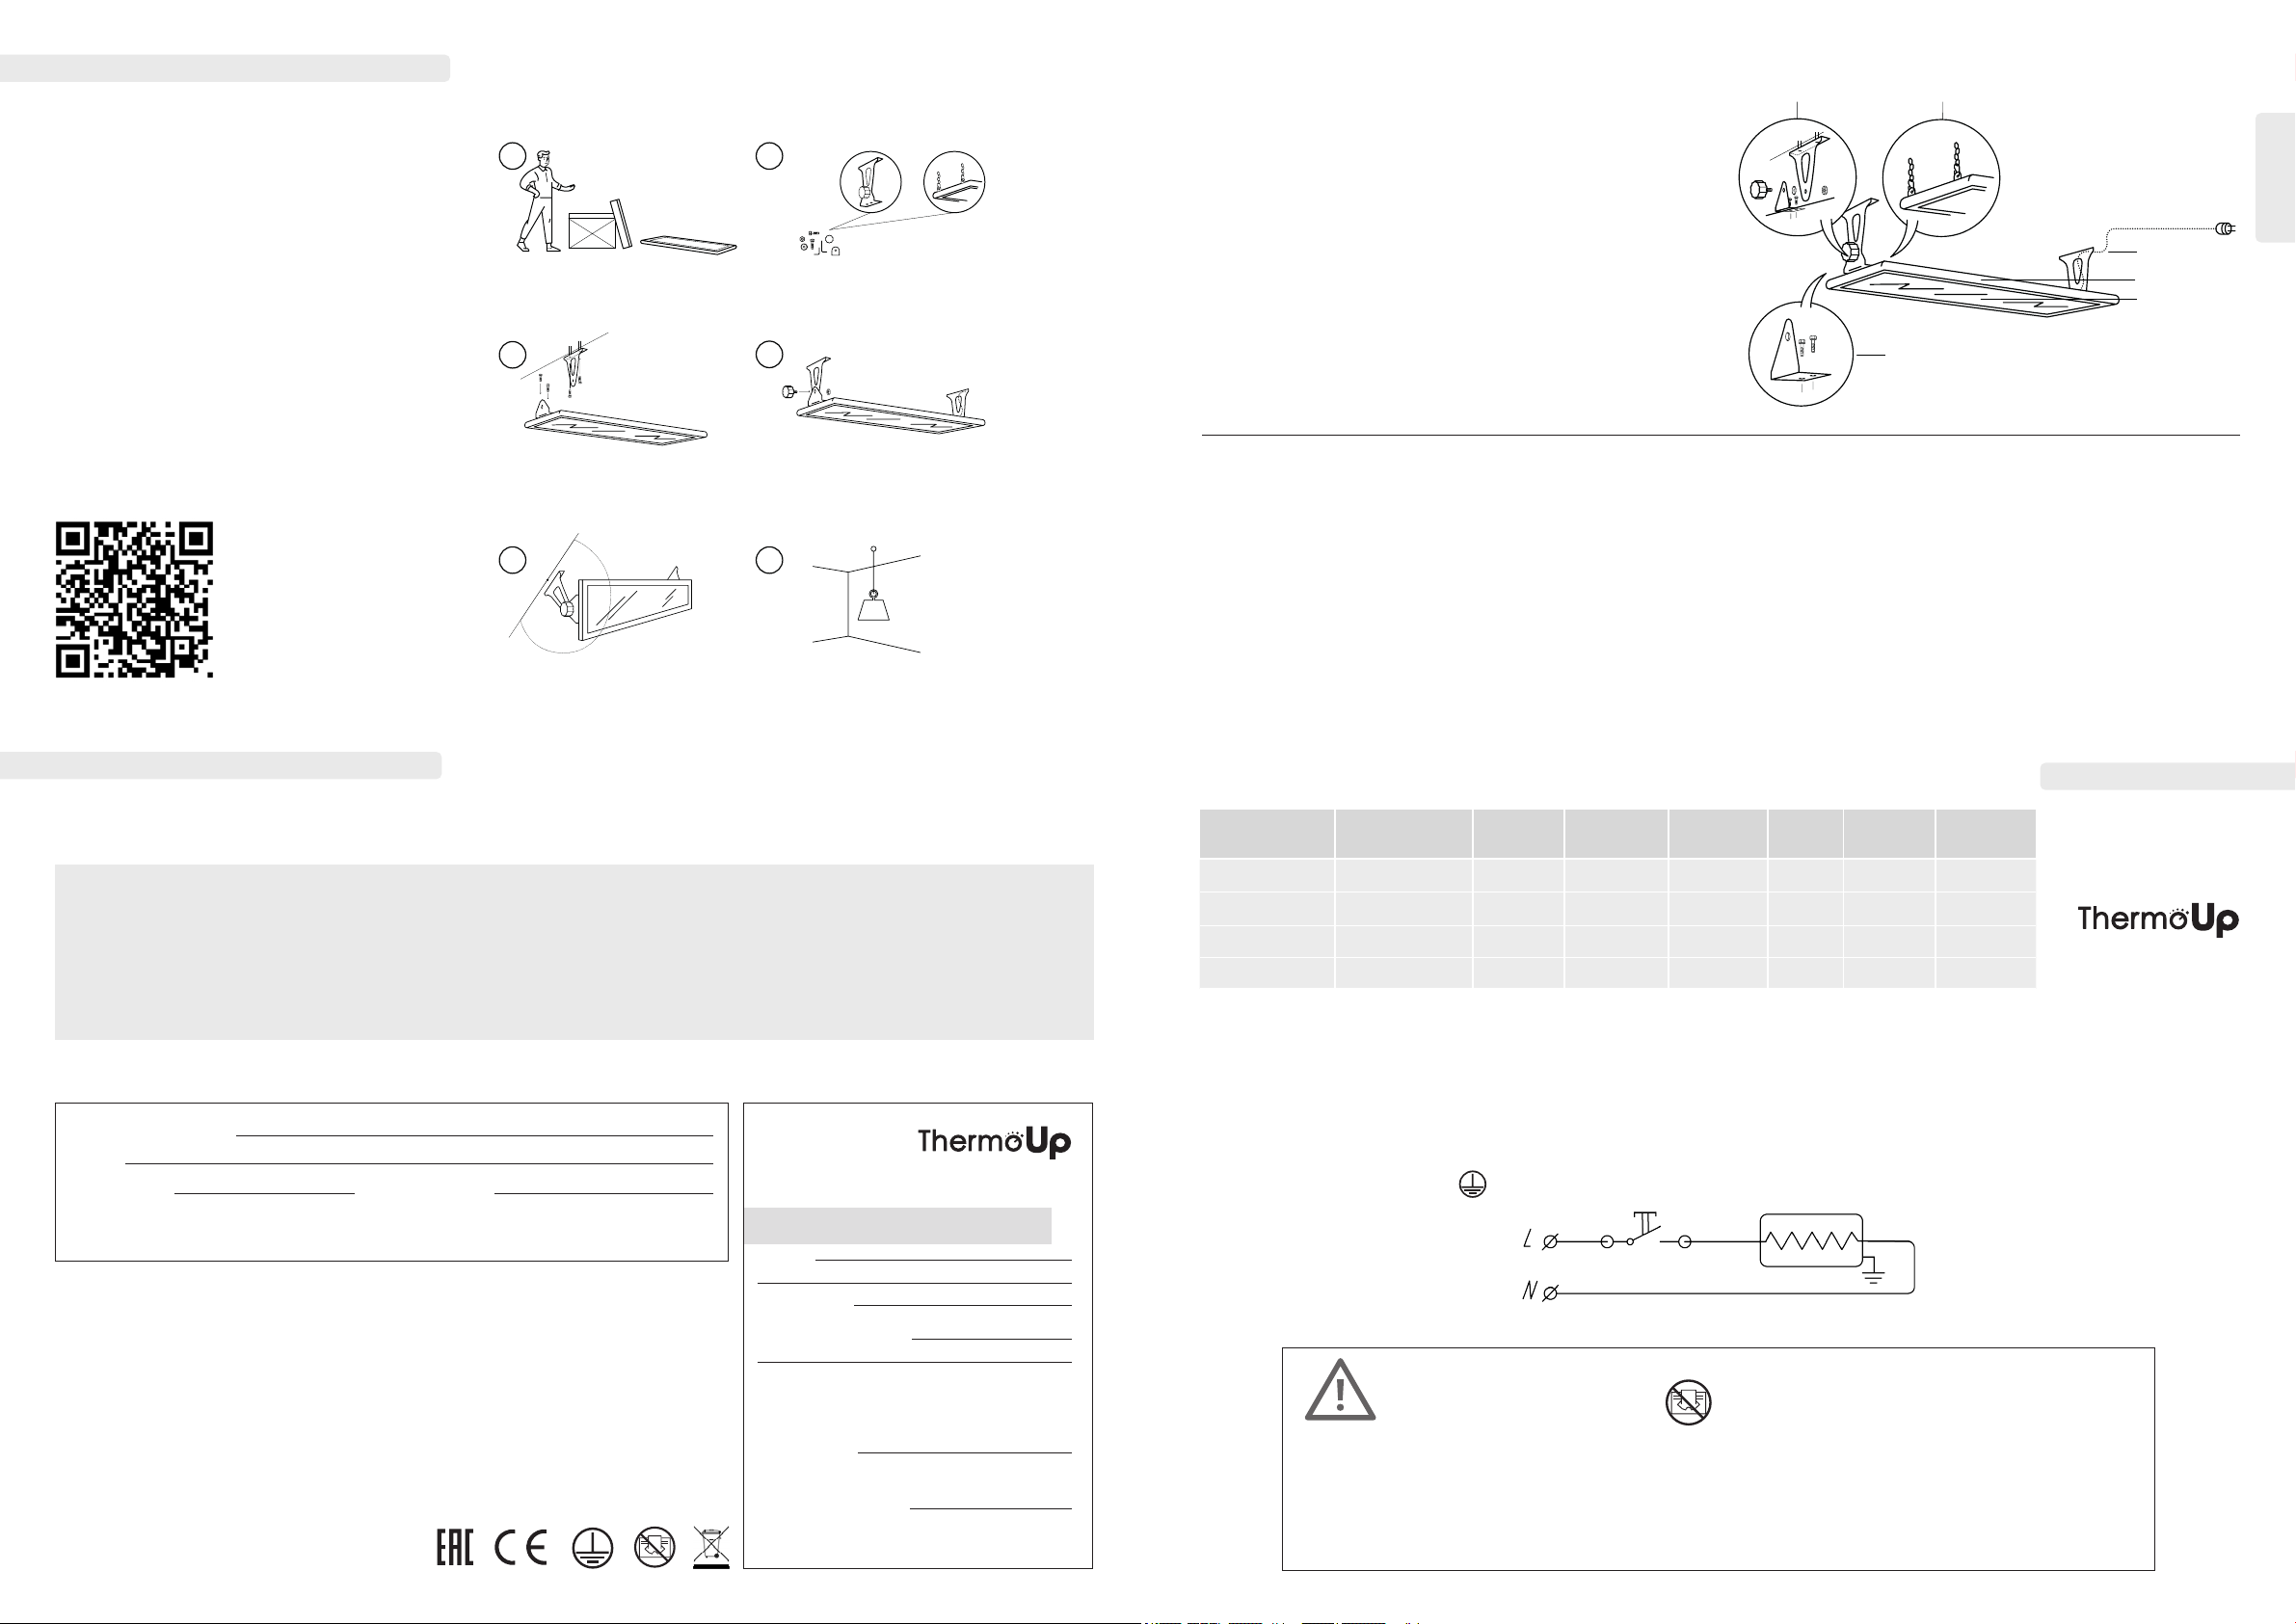
Determine where to install the heater consulting the
recommendations for the height of the suspension
heater (see table 1).
1 2
3
Remove the device from the box.
Select the fixation method that suits you best. Along with a heater,
two mounting options are supplied for fixing the device on the
ceiling - 2 prefabricated brackets with varying tilt angle and 4
corners for hanging the device on chains (chains are not included
in the kit.)
Please use four special nuts located in the corners of the
device to attach selected mounting unit (the corners or the
corresponding part of the bracket). Then fix the chains or
the second part of the bracket to the ceiling.
Bring the heater to the ceiling by connecting the two parts of the
bracket with a thumb screw or by attaching chains to the corners
on the heater.
When mounting with the help of standard brackets, you can
choose the angle of the heater. To do this, slightly loosen the
thumb bolts connecting the two parts of each bracket. Set the
required angle of the instrument and fix the brackets in the
selected position.
The strength of the ceiling or design for which the heaters are
mounted must be sufficient to withstand 5 times the weight of the
heater.
4
5 6
5x
МОНТАЖ ОБОГРЕВАТЕЛЕЙ THERMOUP TOP S
Two sets of fixings:
Комплект поставки
Монтаж обогревателей ThermoUp Top S 800/1100/1500/2000
The innovative heating system
2 modular brackets with
variable tilt angle
4 corners (for hanging the device
on chains, chains are not included);
1. Обогреватель
2. Монтажный комплект:
• 2 сборных кронштейна;
• 4 уголка для монтажа прибора на цепях (цепи в комплект не входят);
• 4 винта для крепления кронштейнов к прибору.
3. Руководство по эксплуатации и гарантийный талон
Рекомендации по установке
• Расстояние от пола до прибора должно быть не менее 1,8 м.
• Расстояние до потолка должно быть не менее 10 см, до стен не менее 50 см.
• Расстояние до объектов, находящихся в зоне действия обогревателя не менее 50 см.
• Расстояние до людей и животных при длительном нахождении в зоне обогрева
должно быть не менее 80 см.
Полную версию инструкции смотрите на сайте www.thermo-up.com
ГАРАНТИЯ, СЕРТИФИКАЦИЯ ПРОДУКЦИИ
ГАРАНТИЙНЫЕ ОБЯЗАТЕЛЬСТВА
Производитель гарантирует исправную работу обогревателя в течение 1 год с момента покупки.
Настоящая гарантия недействительна в случае:
• внесения изменений в конструкцию изделия со стороны покупателя;
• неправильной эксплуатации, использования изделия не по назначению или не в соответствии
с руководством производителя по эксплуатации и обслуживанию, также установки или эксплуатации
изделия с нарушением технических стандартов и норм безопасности;
• наличия на изделии механических повреждений (сколов, трещин и т.д.), воздействий на изделие
чрезмерной силы, химически агрессивных веществ, высоких температур, повышенной
влажности/запыленности, концентрированных паров, если что-либо из перечисленного стало
причиной неисправности изделия;
СВИДЕТЕЛЬСТВО О ПРОДАЖЕ
Организация-продавец
Адрес
Дата продажи Подпись продавца
СЕРТИФИКАЦИЯ ПРОДУКЦИИ
Товар сертифицирован на территории Таможенного Союза органом по
сертификации RA.RU.10HА75
ООО «Система Сертификационной Протекции»
Адрес: 117420, г. Москва, проспект Рязанский, дом 86/1, строение 1,
этаж второй, помещение № 212, комната 1А
Телефон: +79670037962
Email: [email protected]
Товар соответствует требованиям нормативных документов
ТР ТС 004/2011 «О безопасности низковольного оборудования»
ТР ТС 020/2011 «Электромагнитная совместимость технических средств»
2
№ сертификата
№ ЕАЭС RU С-RU.НА75.В.02027/22
Серия RU №0376461
Срок действия: с 08.04.2022 г. по 07.04.2027 г.
Изготовитель: ООО «КЛВ ЛАБ»
Адрес: 117465, Россия, г. Москва, ул. Генерала Тюленева, д. 4а, стр. 3,
офис 206
• ремонта, произведённого не уполномоченными на то сервисными центрами или дилерами;
• несчастных случаев, удара молнии, затопления, пожара и иных причин, находящихся вне контроля
• дефектов, полученных во время транспортировки прибора заказчиком (за исключением случаев,
• дефектов системы, в которой использовалось данное изделие;
• эксплуатации при повышенном напряжении (более 10% от номинального) и влажности более 80%
М. П.
производителя, которые причинили вред изделию;
когда она производится уполномоченными дилерами или производителем);
при температуре +25 °С.
Заполняется продавцом
ГАРАНТИЙНЫЙ ТАЛОН 1-1
Модель
Дата продажи
Организация-продавец
М. П.
Дата передачи
в СЦ для ремонта
Дата получения из СЦ
Dear Customer!
Thank you for purchasing the ThermoUp heater!
ThermoUp heaters function with a principle of combined heat irradiation: along with
thermal radiation, the heater is able to produce a convective airflow that distributes hot
air through a specific area.
SAFETY MEASURES
1. Use the heater for its designated purpose only. The heater it should be protected against shock, dust and
moisture.
2. The heater can be used by kids older than 8 years of age and people with mental and physical disabilities
in case they are in the presence of the person responsible for them and their safety, or if they have been
instructed on how to use the device safely and they understand the possible dangers that may occur if the
device is used in an improper way. In all other cases, kids and people with disabilities should use the device
only with the supervision of an adult. Kids must not play with the device.
3. Heaters should be placed in accordance with the installation requirements specified in the Installation and
Connection section of this manual. It is prohibited to place the heater directly under the sockets.
4. It is strictly forbidden to touch the working surface of the heater during its operation in order to avoid injuries
and burns!
5. Do not use heaters without grounding, as well as without electrical protection from high currents and shortcircuit currents (RCD). Connection of heaters must be made by qualified specialists in accordance with the
section «Installation and connection» of this manual.
6. The device must be located away from flammable or easily deformable objects.
Table 1. ThermoUp TOP S heaters technical data
Model Size, mm
ThermoUp TOP S 800
ThermoUp TOP S 1100
ThermoUp TOP S 1500
ThermoUp TOP S 2000
Weight,
kg
880х275х28 4.5 800 220-230 15-17 2-3,5 190
880х335х28 6,2 1100 220-230 20-22 2-3,5 190
1005х405х28 8,2 1500 220-230 30-34 2-3,5 190
1305х405х28 10,7 2000 220-230 32-37 2-3,5 190
Power,
W
Voltage, VHeated area,
Connection of ThermoUp TOP S 800/1100/1500/2000
1. Connection is recommended to be made by qualified specialists.
2. Before connecting, you must remove the voltage from the supply cable.
3. Connect the ends of the power supply cable to the power cord leaving the heater
through the terminal block (not included), respecting the polarity.
4. Ground the instrument using the provided grounding screw. The screw is placed on
the body of the heater and is labeled
Scheme 1. Connection scheme via switch
ATTENTION!
Do not cover the heater to avoid overheating!
ATTENTION!
The heater should not be used if the glass panels are damaged!
ATTENTION!
The device is not equipped with a room temperature control device. Do not use the device in small rooms if they are
occupied by people who are unable to leave the room on their own
and they are not under constant supervision.
Electric Cord
Case
Thermoelement (glass)
Fixed nuts for fasteners
(mounted on the heater case)
7. The power cord must not come into contact with the hot surfaces of the heater. If the power cord is damaged,
it must be replaced by the manufacturer, an authorized service technician, or other qualified person to avoid
serious injury.
8. It is forbidden to cover the heater during its operation and to use it to dry clothes and any other objects - this
can lead to overheating and damage to the device. This type of failure will be considered a non-warranty
case.
9. Do not immerse the heater in water or other liquids. Heaters ThermoUp Top can be used in wet areas without
direct contact with water on the surface of the heater.
10. Disconnect the heater when not in use and before washing it.
11. Make sure the heater is completely cold before putting it in its packaging for long-term storage.
12. Do not disassemble the device yourself. Do not make changes to the design of the heater! Any changes will
void the warranty.
13. In case of violation of the correct operation of the device, contact the authorized service center of the
manufacturer nearest to you for consultation and repair.
TECHNICAL DATA
2
m
5. The heater can be connected directly to a 220-230 V network that has a
protective earth conductor using a 3-wire cable with a core of at least 1.5 mm2, as
well as through an automatic switch and/or thermostat (not included in the set.)
6. When installing two or more heaters, the following must be insured: their parallel
connection, fixed wiring, installation of cables and a switch for the total current, as
well as the installation of an appropriate circuit breaker.
Height, mMax. temp. of glass
panel heating,
о
С
ENG
3
 Loading...