

Thermo Scientific Orion Star A212 Instruction Manual

English
Thermo Scientific Orion Star A211
Benchtop pH Meter
pH
Instruction Sheet
Preparation
Power Source
1. Power adapter (included with meter)
a. Select the appropriate wall socket plug plate.
b Slide off the clear plastic cover from the plug plate.
c. Slide the plug plate into the groove on the back of the
power adapter.
d. Connect the power adapter to the meter and power outlet.
2. Batteries (sold separately)
a. Select four AA alkaline batteries.
b. Confirm that the meter is powered off.
c. Remove the battery compartment cover – push down on
the battery compartment tab and lift the battery cover up.
d. Orientate the batteries as shown in the battery
compartment housing and insert batteries.
e. Replace the battery compartment cover.
Electrodes and Other Connections
1. Prepare the pH electrode and any other applicable electrodes
according to the directions in the electrode user guide.
2. Connect the appropriate items as labeled on the meter and
as shown in the figure on the right:
Electrode Arm
The electrode arm can be attached to either side of the
meter. Unpack the electrode arm and base. Choose the side
of the meter to attach the arm. Find a clean surface and turn
the meter over. Release the existing screw from the back
of the meter. Align the electrode arm base with the circles
at the bottom of the meter. The metal post on the electrode
arm base should be on the same side as the display. Take
the screw that was removed and use it to secure the
electrode arm base to the meter. Turn the meter over. Place
the hole at the base of the electrode arm onto the metal
post on the electrode arm base.
Orion Star A211 Benchtop
Push down on tab and lift the
battery cover
Ground Ref.
Power Stirrer USB RS232
BNCATC/CONDO/RDO
For additional information on meter setup and operation, refer to
the reference guide. The reference guide is on the included CD
and available at www.thermoscientific.com/water.
Orion Star A211 Benchtop pH Meters
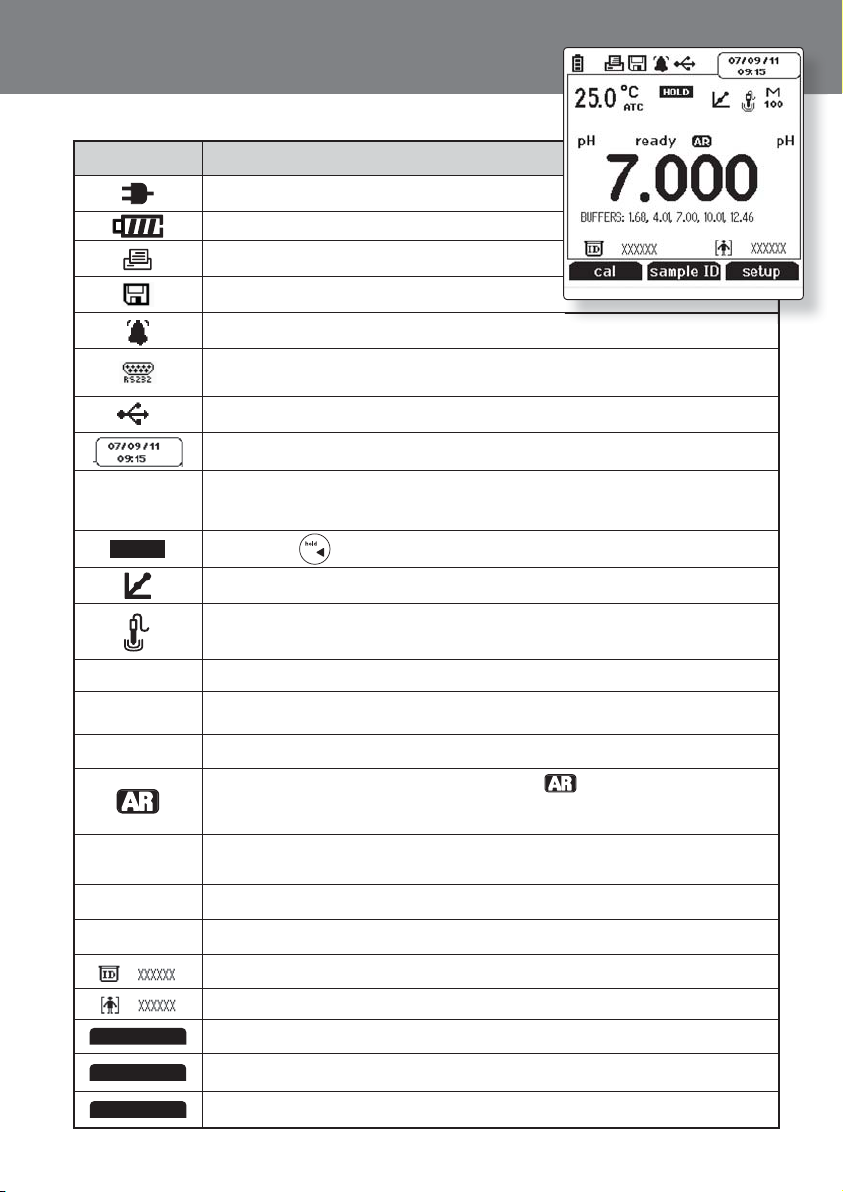
Display Information
Display Icon Description
Shown when the meter is running on AC power.
Shown when the meter has batteries installed.
Indicates data is being sent to a computer or printer.
Indicates data is being sent to the data log.
Shown when an alarm is set and the alarm value is reached.
Indicates the meter is set to be interfaced with a printer or computer via
the RS232 port.
Indicates the meter is set to be interfaced with a printer or computer via the USB port.
Displays the time and date entered in the setup menu.
C
25.0˚
ATC
HOLD
M
100
pH
ready
7.000 pH
0.0mV
BUFFERS: 1.68, …
Displays the current temperature based on the temperature probe reading or
entered temperature value. Shows the origin of the temperature as MAN
(entered temperature) or ATC (temperature probe).
Shown when is pressed and the displayed measurement is frozen.
Indicates a calibration was successfully completed.
Indicates the pH electrode condition as good (two bars), fair (one bar) or bad
(slash through it), based on the last saved calibration and measurement stability.
Indicates a method is in use and the number of the method being used.
Indicates the type of measurement and determines the type of calibration
that will be performed.
Specifies the stability of the electrode as stabilizing or ready.
Shown when the meter is in AUTO-READ mode. The icon will blink while
the reading is stabilizing and stop blinking when the reading is stable and the
measurement is locked on the display.
Displays the measurement value based on the last saved calibration and current
electrode reading. Units are shown to the right of the value.
Shows the raw millivolt reading of the electrode.
Shows the buffer values used for the last saved calibration.
Shows the operator assigned sample ID number.
Shows the operator assigned user ID number.
cal
sample ID
setup
2
Displays the action that will be performed when f1 is pressed.
Displays the action that will be performed when f2 is pressed.
Displays the action that will be performed when f3 is pressed.
Orion Star A211 Benchtop pH Meters
Keypad Display Information
Press the f1, f2 and f3 function keys to perform the action shown above each key
on the display.
Press to turn the meter on.
When the meter is on, press and quickly release to turn the display backlight on or
off or hold down to turn the meter off.
In the measurement mode, press to take a measurement.
In the setup, calibration and other menus, press to escape the current menu and
return to the measurement mode.
In the measurement mode, press to enter the setup menu.
In the setup, calibration and other menus, press to scroll up through a list of options.
In the continuous measurement mode, press to freeze the displayed measurement and
press again to unfreeze the measurement .
In the setup, calibration and other menus, press to scroll left through a lis t of options.
In the measurement mode, press to change the displayed measurement mode. Options
are pH, mV, RmV (relative mV ) and ORP.
In the setup, calibration and other menus, press to scroll right through a list of options.
In the measurement mode, press to log or print a measurement.
In the setup, calibr ation and other menus, press to scr oll down through a lis t of options.
Press to view the data log and calibration log.
Press to star t or stop the stirrer probe.
Keypad
1. Press to power the meter on. When the meter is on, press and quickly release to turn the
backlight on or off or press and hold
2. Press
to exit any meter function and return to the measurement mode.
3. The f1, f2, and f3 function keys perform a variety of meter operations. The menu-specific operation is
shown above each key. For example, press f1 in the measurement mode to start a calibration.
4. The
, , or keys are used as navigation keys (up, right, down, left) when selecting from
a fixed list or grid of meter options. In the measurement mode, these keys are used to access the setup
menu, change the measurement mode, manually log or print a measurement and hold (freeze) a displayed
measurement.
5. Press
6. Press
to turn on or off the stirrer probe (Cat. No. 096019).
to access the calibration log and data log.
for about three seconds to power the meter off.
3
 Loading...