

Thermo Scientific Orion Star A111, Star A121 Instruction Sheet
Display Information
English
Thermo Scientific Orion Star A111
Benchtop & Star A121 Portable pH Meters
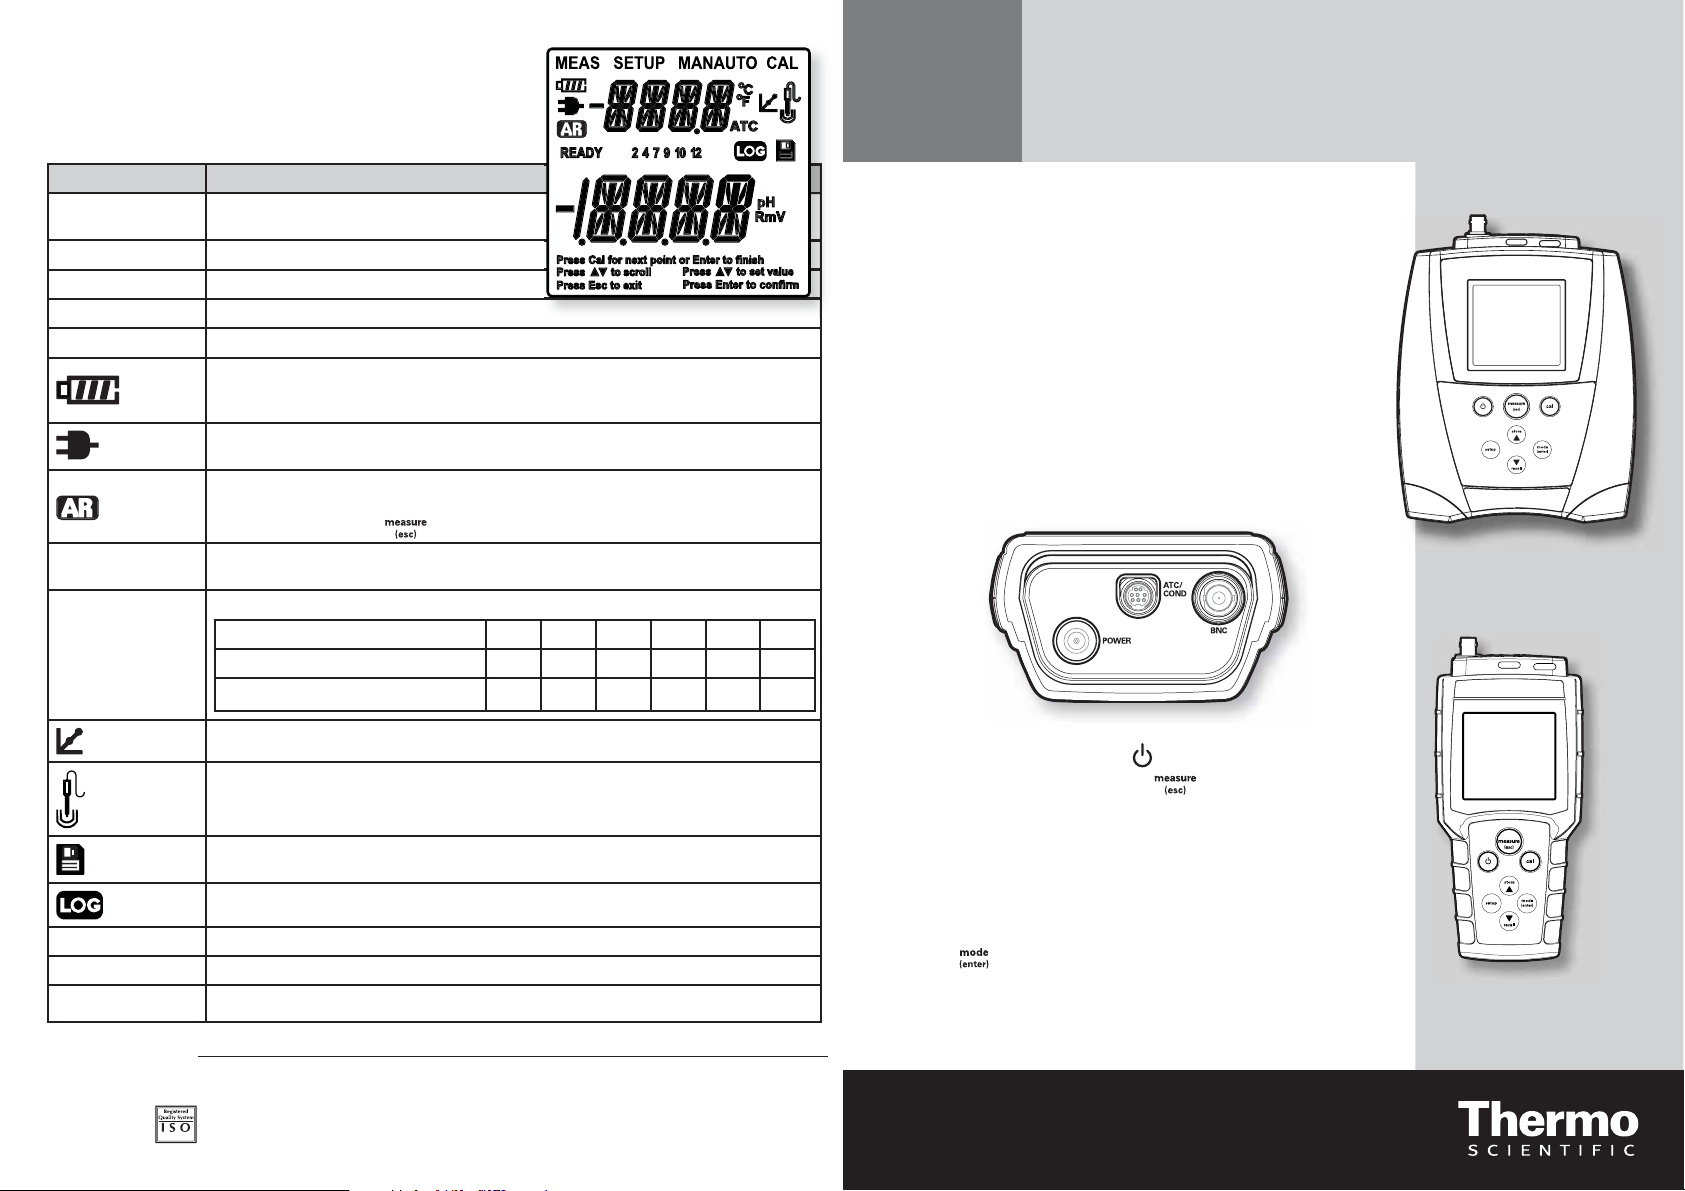
Display Icon Description
MEAS Indicates that the meter is in the
measurement mode.
SETUP Indicates that the meter is in setup mode.
CAL Indicates that the meter is the calibration mode.
MAN Shown when a manual calibration is being done.
AUTO Shown when using automatic buffer calibration. Default setting.
Shows the battery status (more bars = more power remaining).
Blinks when power is low and the battery needs to be changed.
(Batteries included with the portable meter Orion Star A121 pH meter.)
Shown when the meter is running on AC power.
(Adapter included with the benchtop meter Orion Star A111 pH meter.)
Shown when the meter is on AUTO-READ mode. Default setting. AR and unit of
measurements will blink until the reading is stable. When the reading is stable it is held on the
screen and AR is lit. Press
to take a new reading.
Ready Unit of measurement will blink until the reading is stable. When the reading is stable, READY
is lit.
2,4,7,9,10,12 Buffer points that have been calibrated are displayed as follows:
Displayed Buffer Value 24791012
Calibrated USA Buffer Value (at 25°C) 1.68 4.01 7.00 - 10.01 12.46
Calibrated DIN Buffer Value (at 25°C) 1.68 4.01 6.86 9.18 - -
pH
Instruction Sheet
Preparation
1. Power source:
a. Power adapter (included with Orion Star A111 benchtop pH
meters, sold separately for Orion Star A121 portable pH meters) –
Select the appropriate wall socket plug. Slide off the clear plastic
cover, and slide on the plug plate into the groove on the back of the
adapter.
b. Batteries (included with Orion Star A121 portable pH meters, sold
separately for Orion Star A111 benchtop pH meters) – Select four
AA batteries. Confirm that the meter is off and remove the battery
compartment cover. Insert batteries as shown in the battery
compartment housing.
2. Prepare the pH electrode according to the electrode instructions.
3. Connect the appropriate item as labeled on the meter and as
shown below:
Appears after a complete calibration.
Shows the electrode condition. If the icon is blinking, the electrode condition is bad. Consult
the electrode user guide.
Displayed when a reading is stored into the memory.
Displayed when viewing stored readings.
Secondary display Shows temperature reading in measurement mode and setup menu in setup mode.
Primary display Measured value in selected mode.
Instructions Located below the primary display. These phrases aid in the setup menu and calibration modes.
©2011 Thermo Fisher Scientific Inc. All rights reserved. All trademarks are the property of Thermo Fisher Scientific Inc. & its subsidiaries.
Water Analysis Instruments
www.thermoscientific.com/water
9 0 0 1 : 2 0 0 8
IS-267278-001 Rev. B 06-11
North America
166 Cummings Center
Beverly, MA 01915 USA
Toll Free: 1-800-225-1480
Tel: 1-978-232-6000
info.water@thermo.com
Netherlands
Tel: (31) 033-2463887
info.water.uk@thermo.com
China
Tel: (86) 21-68654588
wai.asia@thermofisher.com
India
Tel: (91) 22-4175-8800
wai.asia@thermofisher.com
Singapore
Tel: (65) 6778-6876
wai.asia@thermofisher.com
Japan
Tel: (81) 045-453-9175
wai.asia@thermofisher.com
Australia
Tel: (613) 9757-4300
in Australia (1300) 735-296
InfoWaterAU@thermofisher.com
Overview
1. To turn on or off the meter, press key.
2. To exit any meter function, press the
to return to the measurement mode.
3. The meter mode is shown at the top of the meter:
MEAS – for measurement mode
SETUP – for setup mode
CAL – for calibration mode
4. The meter can be calibrated using up to three pH buffers.
5. Press
to switch between reading pH, mV,
RmV or temperature.
For additional setup menu information, refer to the reference guide.
The reference guide is on the included CD and available at
www.thermoscientific.com/water.
key.
pH
Orion Star A111 Benchtop and Star A121 Portable pH Meters
English
Calibration
1. Prepare the pH electrode according to the electrode instructions.
2. Connect the electrode and ATC probe, if separate, to the meter. Press the
key to turn on the meter and press to display pH for pH measurement mode.
3. Select fresh pH buffers. If calibrating more than one point (highly
recommended), select pH buffers that bracket the expected sample pH and are
at least one pH unit apart.
4. Press
blot dry and place into the buffer.
5. Wait for “READY” to appear.
a. With automatic buffer recognition (default, AUTO CAL appears at the top of
b. With manual calibration (MAN CAL appears at the top of the display): press S
6. When finished, press
a. For one-point calibration, press S or T to edit the slope to match prior
b. For two- or three-point calibration, the average slope (SLP.A) will be
Rinse the electrode (and ATC probe, if separate) with distilled water,
the display): to calibrate additional points, repeat steps 4 and 5a.
or T keys to set value. To calibrate additional points repeats steps 4 and 5b.
to save and end calibration.
calibration (if desired) and press
displayed and the meter will automatically proceed to measurement mode.
to save and return to measurement mode.
Measurement
1. Prepare the pH electrode according to the electrode instructions. Press to
display pH for pH measurement mode.
2. Rinse the electrode (and ATC probe, if separate) with distilled water, blot dry
and place into the sample.
3. If the meter is in AUTO-READ mode (meter default) press
is in continuous read mode, the meter will immediately start taking readings.
Record the pH and temperature of the sample when “READY” is displayed and
“pH” stops blinking.
Note: If in AUTO-READ mode and memory storage is enabled, the reading will
automatically be stored when the “AR” appears. If in continuous read mode and
memory storage is enabled, press store to store into the meter’s memory.
4. Remove the electrode (and ATC probe, if separate) from the sample, rinse with
distilled water, and blot dry. To continue taking measurements , place electrode
(and ATC probe, if separate) into the next sample and repeat steps 3 and 4.
When finished measuring all samples, store electrode according to electrode
5.
instructions.
. If the meter
Reviewing pH Calibration Slope Data
1. In pH measurement mode, press setup. Press S five times so that “6.0” is on
the top, secondary display and “CAL” is on the larger, primary display.
2. Press
second slope segment, and S again to display the average slope (SLP.A).
3. Press
to view slope. If a 3-point calibration was done, press S to view the
to return to measurement mode.
pH Calibration Selection
1. In pH measurement mode, press setup.
2. Press
3. Press S to select automatic buffer recognition
(AUTO) or manual calibration (MAN).
4. If automatic buffer recognition was chosen, press
automatic buffer recognition.
Note: USA buffer points are: 1.68, 4.01, 7.00, 10.01
& 12.46. DIN buffer points are 1.68, 4.01, 6.86 &
9.18. The default buffer set is for USA buffers.
5. Press
return measurement mode.
twice.
. Press S to select USA or DIN buffer set for
to save configuration and to
Read Type Selection
1. In measurement mode, press setup .
2. Press S in setup until “4.0” is shown on the top
line and “READ” is shown on the lower line.
Press
3. Press S or T to select the measurement mode:
CONT = Continuous
AUTO = AUTO-READ™
4. Press
to measurement mode.
.
to save selection. Press to return
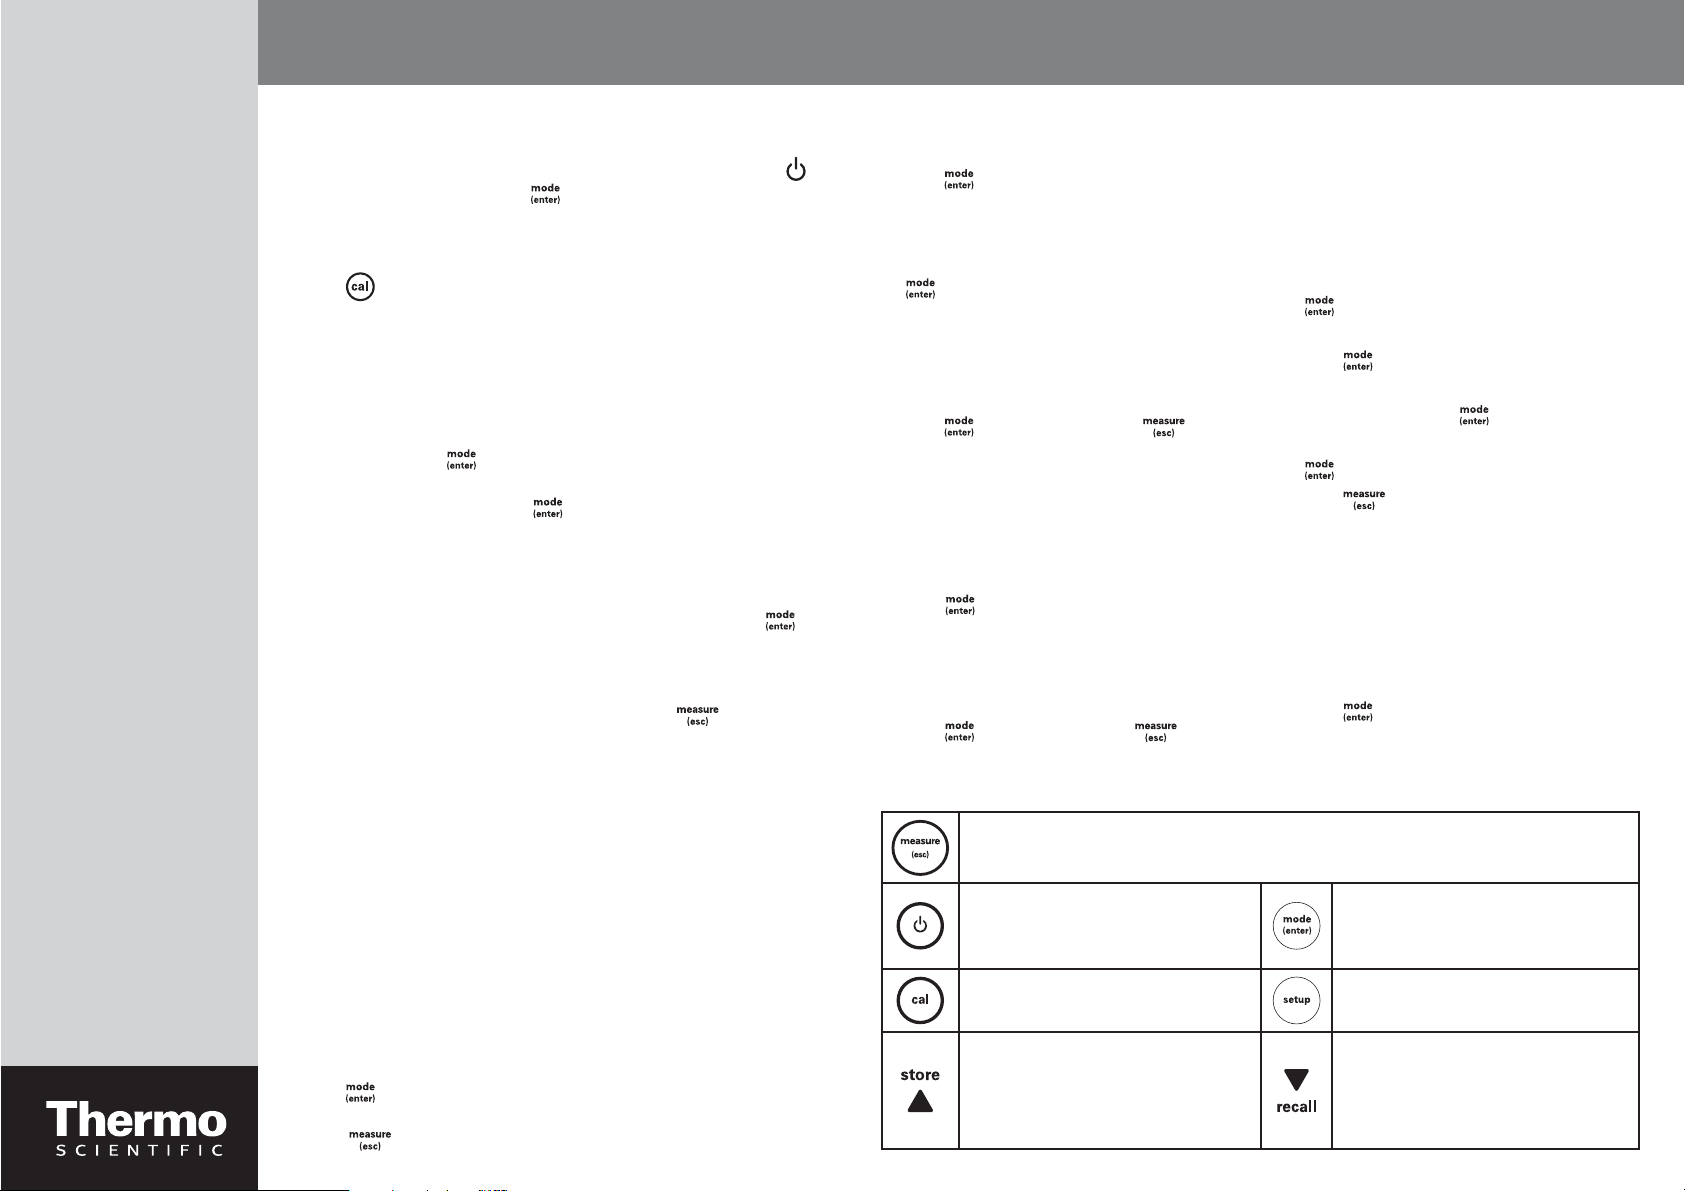
Keypad Information
In the measurement screen: Press to take a measurement.
In the setup screen: Press to escape the setup menu.
In the calibration screen: Press to abort calibration.
Press to turn the meter on or off.
Press to enter the calibration mode. Press to enter setup mode.
In the measurement screen:
Press to store the data on the screen
in continuous read mode and with data
logging on.
In the setup screen:
Press to scroll up in the list of options.
Storing Readings into Memory
This meter stores up to 50 readings.
To automatically store readings into memory after each
stable reading:
1. In measurement mode, press setup .
2. Press S in setup until “4.0” is shown on the top
line and “READ” is shown on the lower line. Press
.
3. Press S or T to show “AUTO” on the second line.
Press
4. Press S to show “5.0” on the top line and “LOG”
on the lower line. Press
5. Press S to show “ON” on the second line. Press
6. Press
time the reading is locked onto the screen with the
“AR” icon. The reading will automatically be stored
in the datalog.
to save selection.
.
to save selection.
to return to measurement mode. Each
Viewing Stored Readings
1. In measurement mode, press recall.
2. Press S or T to scroll through the memory points.
3. Press
point.
to review the reading stored at that
In the measurement screen:
Press to switch between modes.
In the setup screen:
Press to confirm the selection.
In the measurement screen:
Press to see the stored data.
In the setup screen:
Press to scroll down in the list of options.
 Loading...