

Page 1
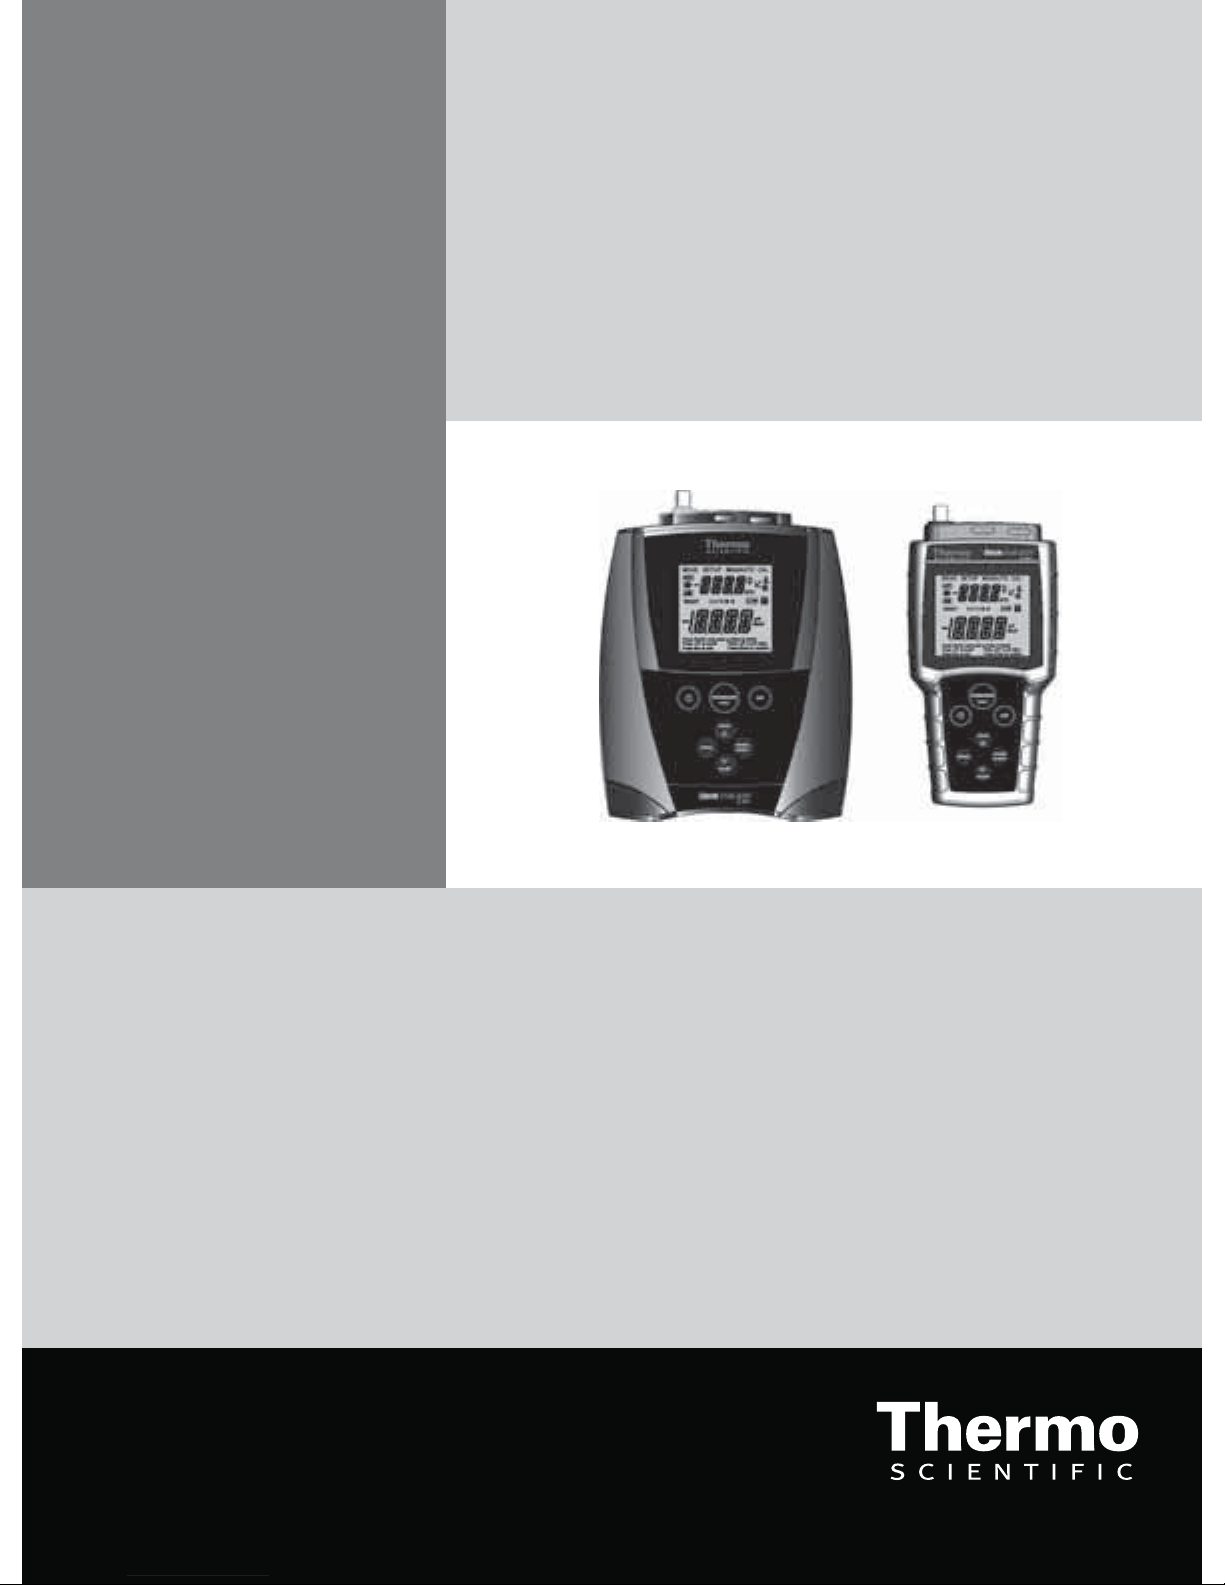
Thermo Scientific Orion Star A111 Benchtop and
Star A121 Portable pH Meters
Reference Guide
Page 2

Ross and the COIL trade dress are trademarks of Thermo Fisher Scientific, Inc. and
its subsidiaries.
AQUAfast, AQUASensors, BOD AutoEZ, ionplus, KNIpHE, LogR, No Cal, ORION, perpHect,
PerpHecT, pHISA, pHuture, Pure Water, Sage, ROSS, ROSS Ultra, Sure-Flow, Titrator PLUS, and
TURBO2 are registered trademarks of Thermo Fisher Scientific, Inc. and its subsidiaries.
A+, All in One, Aplus, AUTO-BAR, AUTO-CAL, Auto-ID, AUTO-READ, AUTO-STIR,
Auto-Test, AutoTration, CISA, digital LogR, DuraProbe, EZ Startup, ISEasy,
Low Maintenance Triode, Minimum Stir Requirement, MSR, NISS, Optimum Results, Orion Dual
Star, Orion Star, SAOB, SMART AVERAGING, SMART STABILITY, Star LogR, Star Navigator 21,
Stat Face, Triode are trademarks of Thermo Fisher Scientific, Inc. and its subsidiaries.
Guaranteed Success and The Technical Edge are service marks of Thermo Fisher Scientific, Inc.
and its subsidiaries.
© 2011 Thermo Fisher Scientific Inc. All rights reserved. All trademarks are the property of
Thermo Fisher Scientific, Inc. and its subsidiaries.
The specifications, descriptions, drawings, ordering information and part numbers within this
document are subject to change without notice.
This publication supersedes all previous publications on this subject.
Page 3

Thermo Scientific Orion Star A111 Benchtop and Star A121 Portable pH Meters
Table of Contents
Chapter 1 Introduction ..........................................................1
Chapter 2 Meter Overview ......................................................3
Connections.......................................................... 3
Display Information ................................................... 4
Keypad Information ................................................... 5
Meter Maintenance ................................................... 5
Chapter 3 Meter Setup ..........................................................7
Navigating the Setup Menu ............................................ 7
Setup Examples...................................................... 10
Automatic pH Buffer Recognition Selection............10
Read Type Selection ..............................10
Reviewing pH Calibration Slope Data .................10
Chapter 4 Calibration and Measurement .........................................11
pH Calibration and Measurement ...................................... 11
pH Calibration...................................11
pH Measurement ................................11
mV Measurement and RmV & ORP Calibration and Measurement.......... 12
mV Measurement................................12
RmV and ORP Calibration..........................12
RmV and ORP Measurement .......................12
Temperature Measurement and Calibration ............................. 13
Temperature Measurement.........................13
Temperature Calibration ...........................13
Chapter 5 Data Storage and Review .............................................15
Manual Datalog with Continuous Read Mode ........................... 15
Automatic Datalog with AUTO-READ
™
Mode............................ 15
Viewing the Data from the Last Calibration ............................. 16
Viewing Stored Readings (the Data Log)................................ 16
Chapter 6 Customer Services ................................................... 17
Meter Error Codes.................................................... 17
Troubleshooting Guide................................................ 18
Assistance . . . . . . . . . . . . . . . . . . . . . . . . . . . . . . . . . . . . . . . . . . . . . . . . . . . . . . . . . . 18
Warranty and Registration ............................................ 18
WEEE Compliance ................................................... 18
Declaration of Conformity ............................................. 19
Meter Specifications................................................. 20
Ordering Information ................................................. 21
Chapter 7 Appendix ...........................................................23
Notes...............................................................24
Automatic pH Buffer Recognition Feature..............23
Electrode Condition Icon...........................23
Page 4

This page intentionally left blank.
Page 5

Chapter 1 Introduction
Thank you for your purchase of the Orion Star A111 benchtop pH or Star A121 portable pH meter. These meters
are capable of measure pH, raw millivolts (mV), relative millivolts (Rmv), oxidation-reduction potential (ORP) and
temperature.
The Orion Star A111 benchtop pH meters are IP54-rated. The Orion Star A121 portable pH meters feature a
waterproof, IP67-rating.
Please read this reference guide thoroughly. Any use outside of these instructions may invalidate your warranty and
cause permanent damage to the meter.
Thermo Scientific Orion Star A111 Benchtop and Star A121 Portable pH Meters
1
Page 6

This page intentionally left blank.
Page 7
Chapter 2 Meter Overview
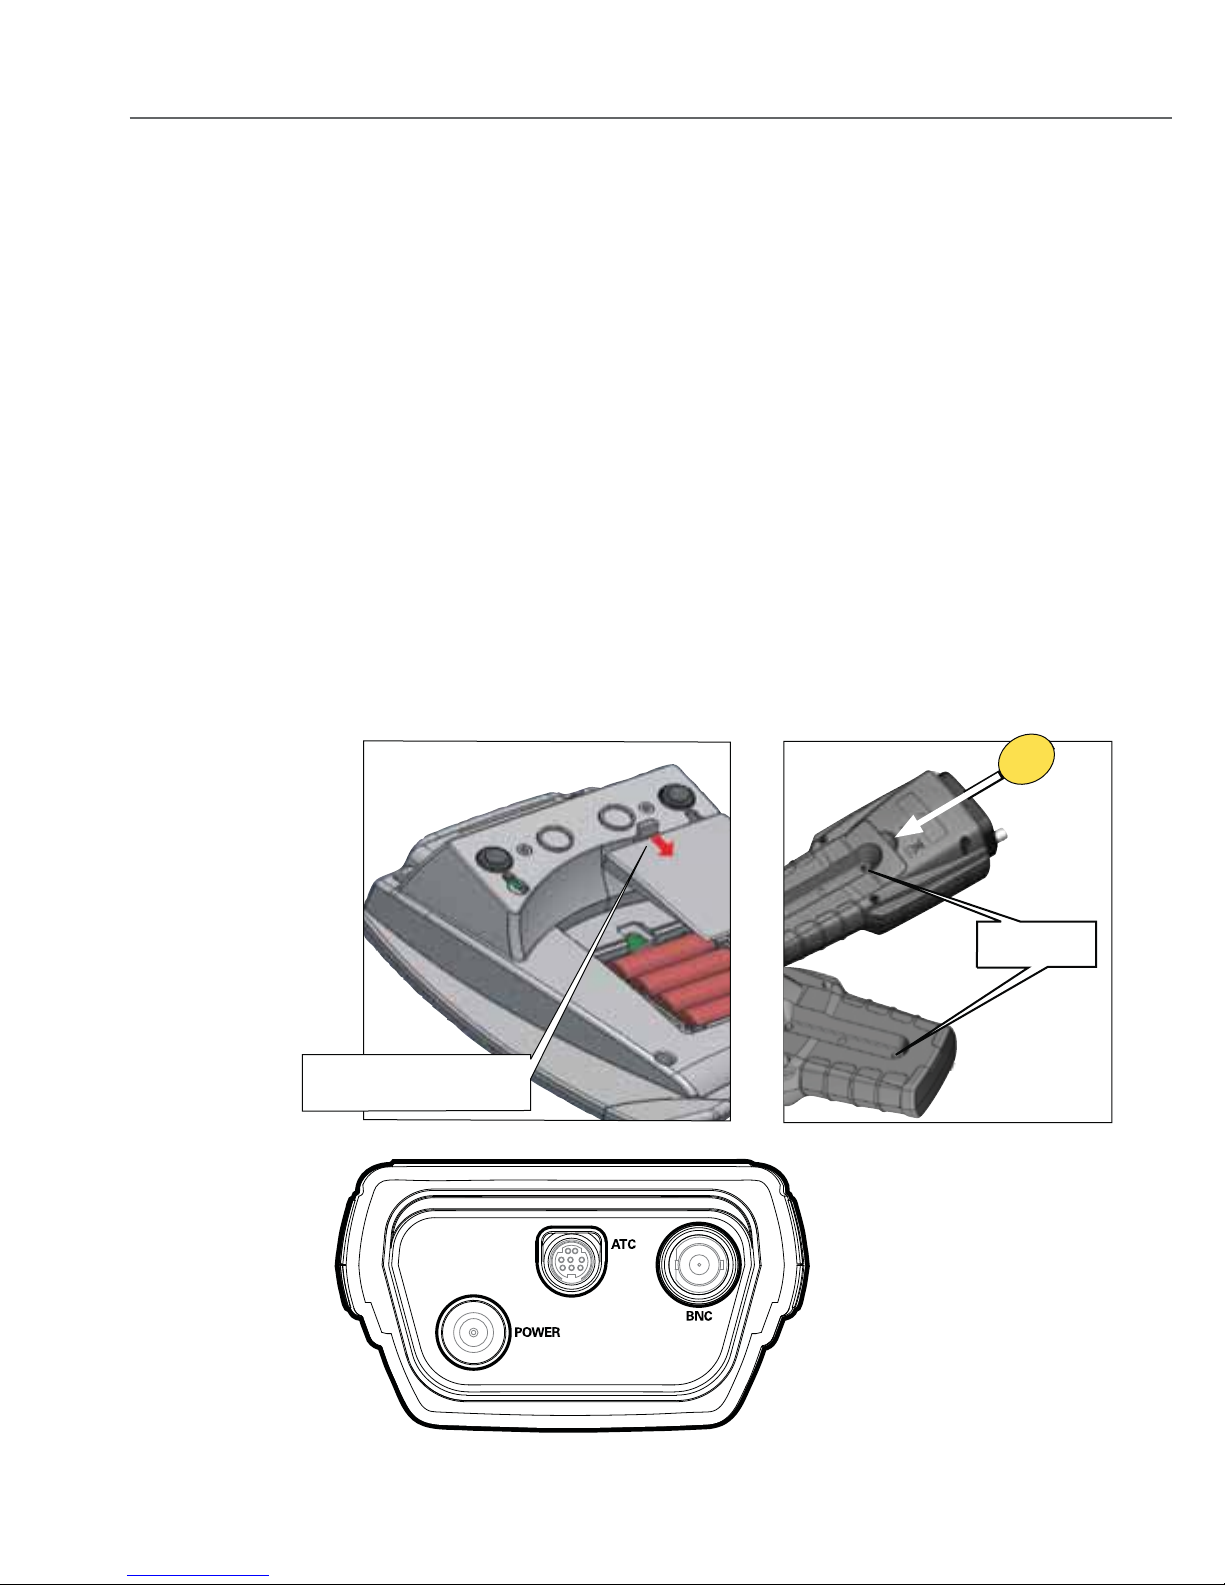
Connections
1. Power source:
a. Power adapter (included with Orion Star A111 benchtop pH meters, sold separately for Star A121
portable pH meters) – Select the appropriate wall socket plug. Slide off the clear plastic cover, and slide
on the plug plate into the groove on the back of the adapter.
b. Batteries (included with and factory installed on Star A121 portable meters, sold separately for Star
A111 benchtop meters) – Select four AA batteries. Confirm that the meter is off and remove the battery
compartment cover.
To remove the battery compartment cover:
Insert batteries as shown in the battery compartment housing.
i. Loosen the screws.
ii. Release the top portion of the battery compartment from the meter (using a coin
or your finger.)
iii. Release the bottom portion of the battery compartment (using a coin
or your finger).
Orion Star A111 Benchtop
Push down on tab and lift the
battery cover
Figure 1
Orion Star A121 Portable
Remove screws
2. Prepare the pH electrode according to
the electrode instructions.
3. Connect the appropriate items as
labeled on the meter and as shown in
figure 1.
Thermo Scientific Orion Star A111 Benchtop and Star A121 Portable pH Meters
3
Page 8
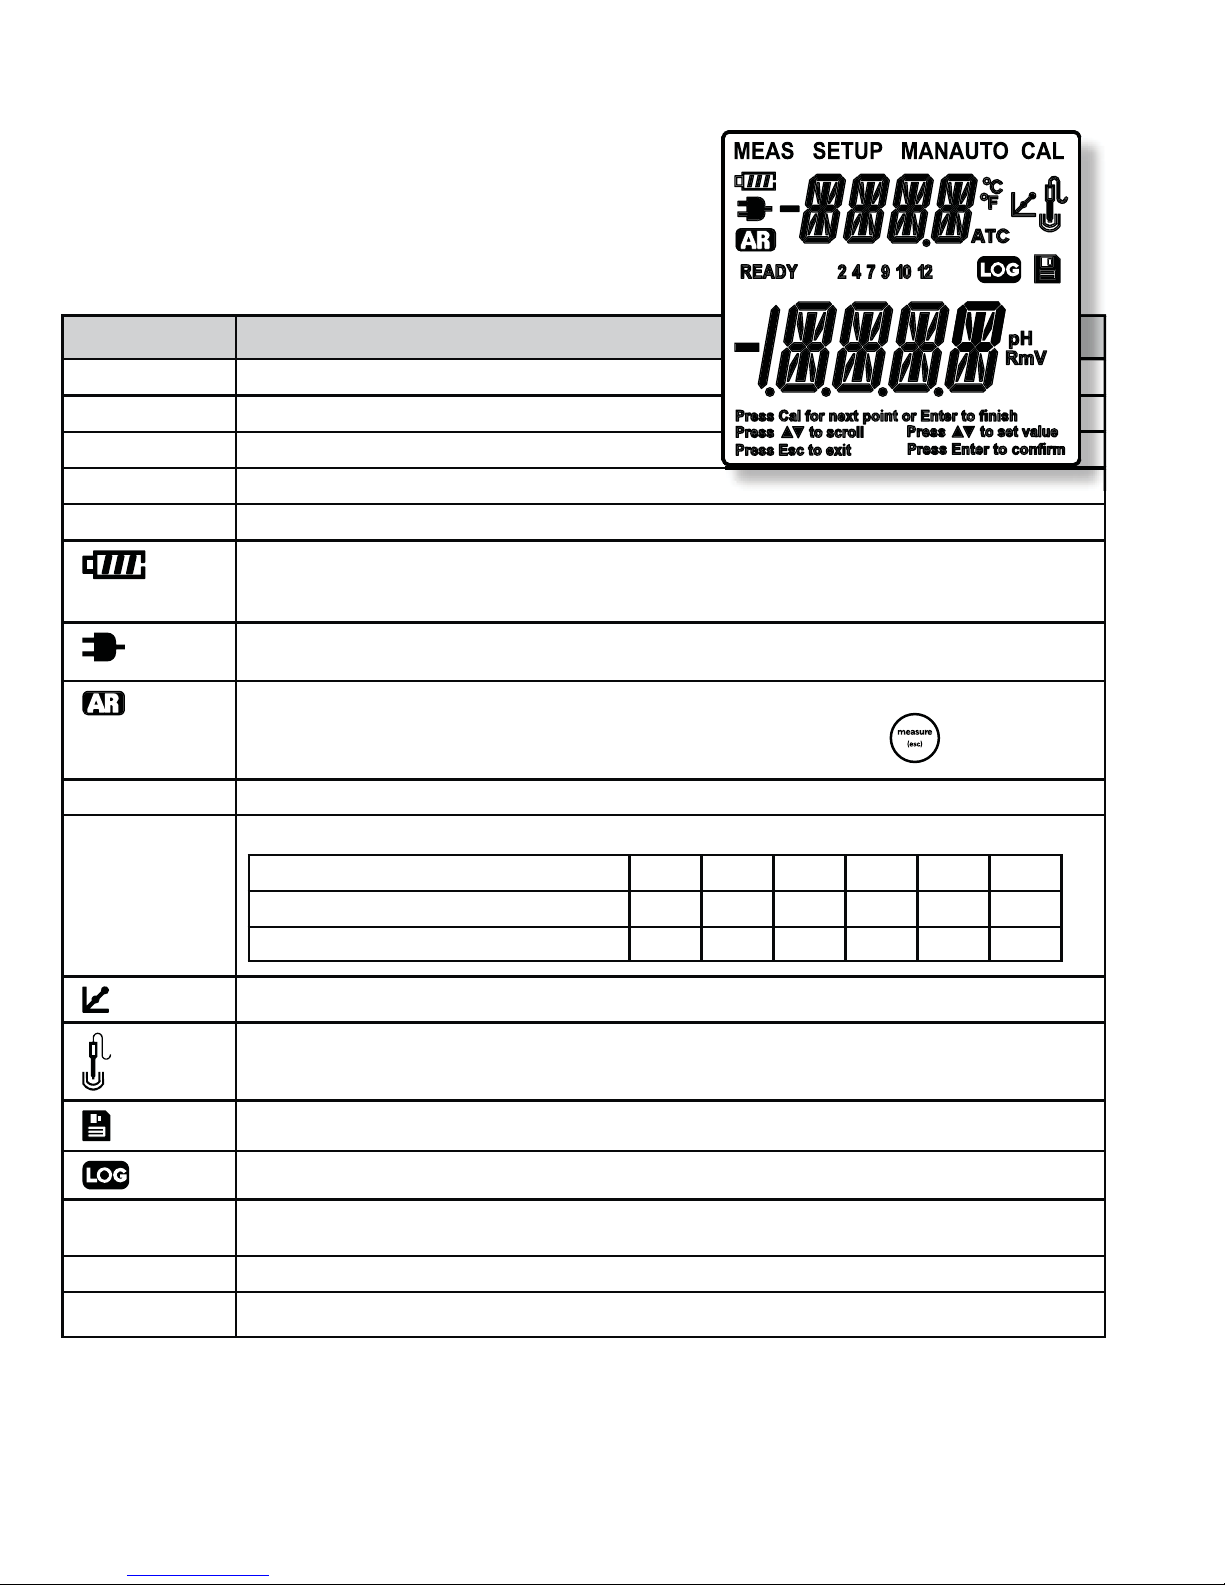
Display Information
Display Icon Description
MEAS
SETUP
CAL
MAN
AUTO
READY
2,4,7,9,10,12
Indicates that the meter is in the measurement mode.
Indicates that the meter is in setup mode.
Indicates that the meter is the calibration mode.
Shown when a manual calibration is being done and complete.
Shown when using automatic buffer calibration (default setting) and has been completed.
Shows the battery status (more bars = more power remaining).
Blinks when power is low and the battery needs to be changed.
Batteries included with and factory installed in the Orion Star A121 portable pH meter.)
Shown when the meter is running on AC power.
(Adapter included with the Orion Star A111 benchtop pH meter.)
Shown when the meter is on AUTO-READ mode. Default setting. AR and unit of measurement will blink until the
reading is stable. When the reading is stable it is held on the screen and AR is lit. Press to take a
new reading.
Unit of measurement will blink until the reading is stable. When the reading is stable, READY is lit.
Buffer points that have been calibrated are displayed as follows:
Displayed Buffer Value 24791012
Calibrated USA Buffer Value (at 25°C) 1.68 4.01 7.00 - 10.01 12.46
Calibrated DIN Buffer Value (at 25°C) 1.68 4.01 6.86 9.18 - -
Appears after a complete calibration.
Shows the electrode condition. If the icon has a slash through it, the electrode condition is bad. Consult the
electrode user guide.
Displayed when a reading is stored into the memory.
Displayed when viewing stored readings.
Secondary
display
Primary display
Instructions
4
Shows temperature reading in measurement mode and setup menu in setup mode.
Larger, lower display shows measured value in selected mode.
Located below the primary display. These phrases aid in the setup menu and calibration modes.
Thermo Scientific Orion Star A111 Benchtop and Star A121 Portable pH Meters
Page 9
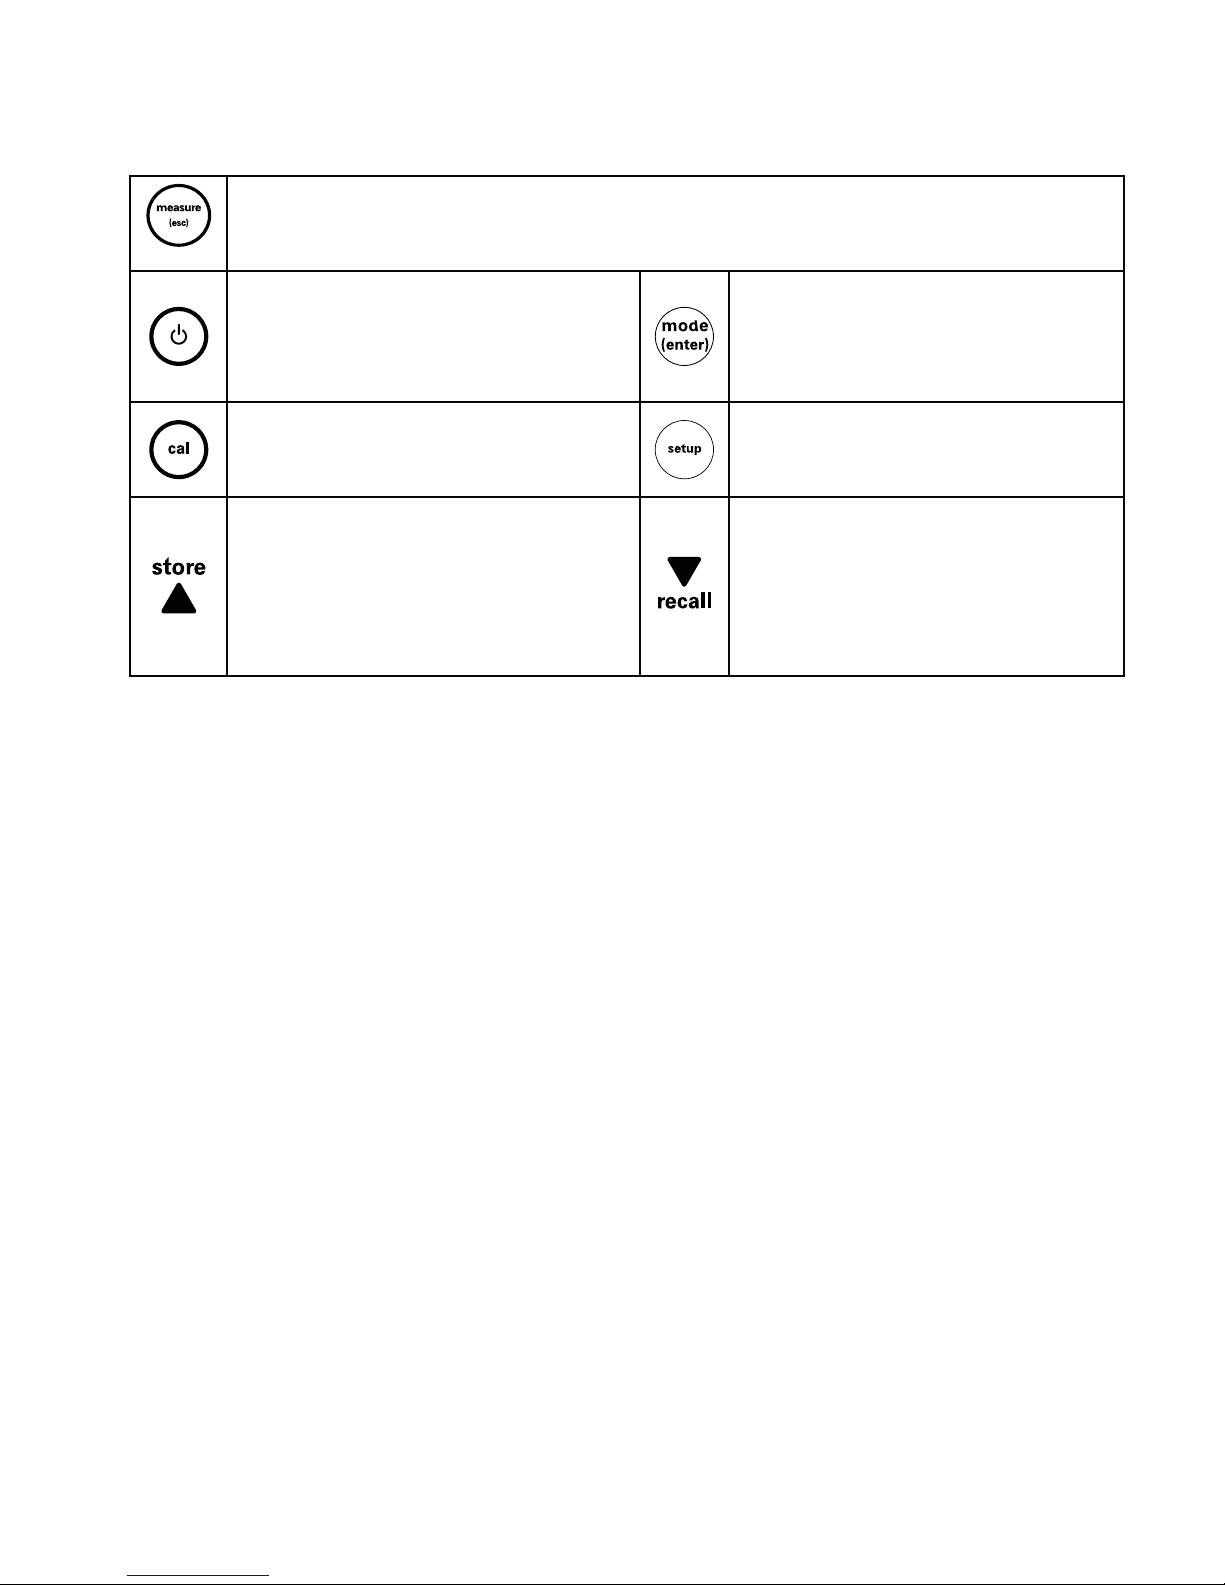
Keypad Information
In the measurement screen: Press to take a measurement.
In the setup screen: Press to escape the setup menu.
In the calibration screen: Press to abort calibration.
Press to turn the meter on or off.
Press to enter the calibration mode. Press to enter the setup mode.
In the measurement screen:
Press to switch between modes.
In the setup screen:
Press to confirm the selection.
In the measurement screen:
Press to store the data on the screen in continuous
read mode and with data logging on.
In the setup screen:
Press to scroll up in the list of options.
Meter Maintenance
For routine meter maintenance, dust and wipe the meter with a damp cloth. If necessary, warm water or a mild water-
based detergent can be used. Meter maintenance can be performed on a daily, weekly or monthly basis, as required by
the environment in which the meter is operated. Immediately remove any spilled substance from the meter using the
proper cleaning procedure for the type of spill.
In the measurement screen:
Press to see the stored data.
In the setup screen:
Press to scroll down in the list of options.
Thermo Scientific Orion Star A111 Benchtop and Star A121 Portable pH Meters
5
Page 10

This page intentionally left blank.
6
Thermo Scientific Orion Star A111 Benchtop and Star A121 Portable pH Meters
Page 11
Chapter 3 Meter Setup
Pressing will take you to the setup menu.
Navigating the Setup Menu
A complete chart showing the main setup levels and submenus is shown after these steps.
1. In the setup menu, press
or until the desired main setup level is shown on the top line.
2. Press to enter into the submenu options.
3. For main setup options with more than one submenu:
1.0 Configuration
3.0 Temperature Settings
6.0 Calibration Data
a. Press
b. Press
or until the desired submenu is shown.
to enter into the submenu.
c. Press or until the desired option is shown.
d. Press
to save your selection.
For main setup options with one submenu:
2.0 General Meter Setup
4.0 Read Type
5.0 Datalog Clear
7.0 Factory Reset
a. Press
b. Press
or until the desired option is shown.
to save your selection.
4. Press to exit the setup menu and return to measurement mode.
Thermo Scientific Orion Star A111 Benchtop and Star A121 Portable pH Meters
7
Page 12
Meter Setup
Setup
Menu
Secondary
Display
Primary Display Description Information
Level
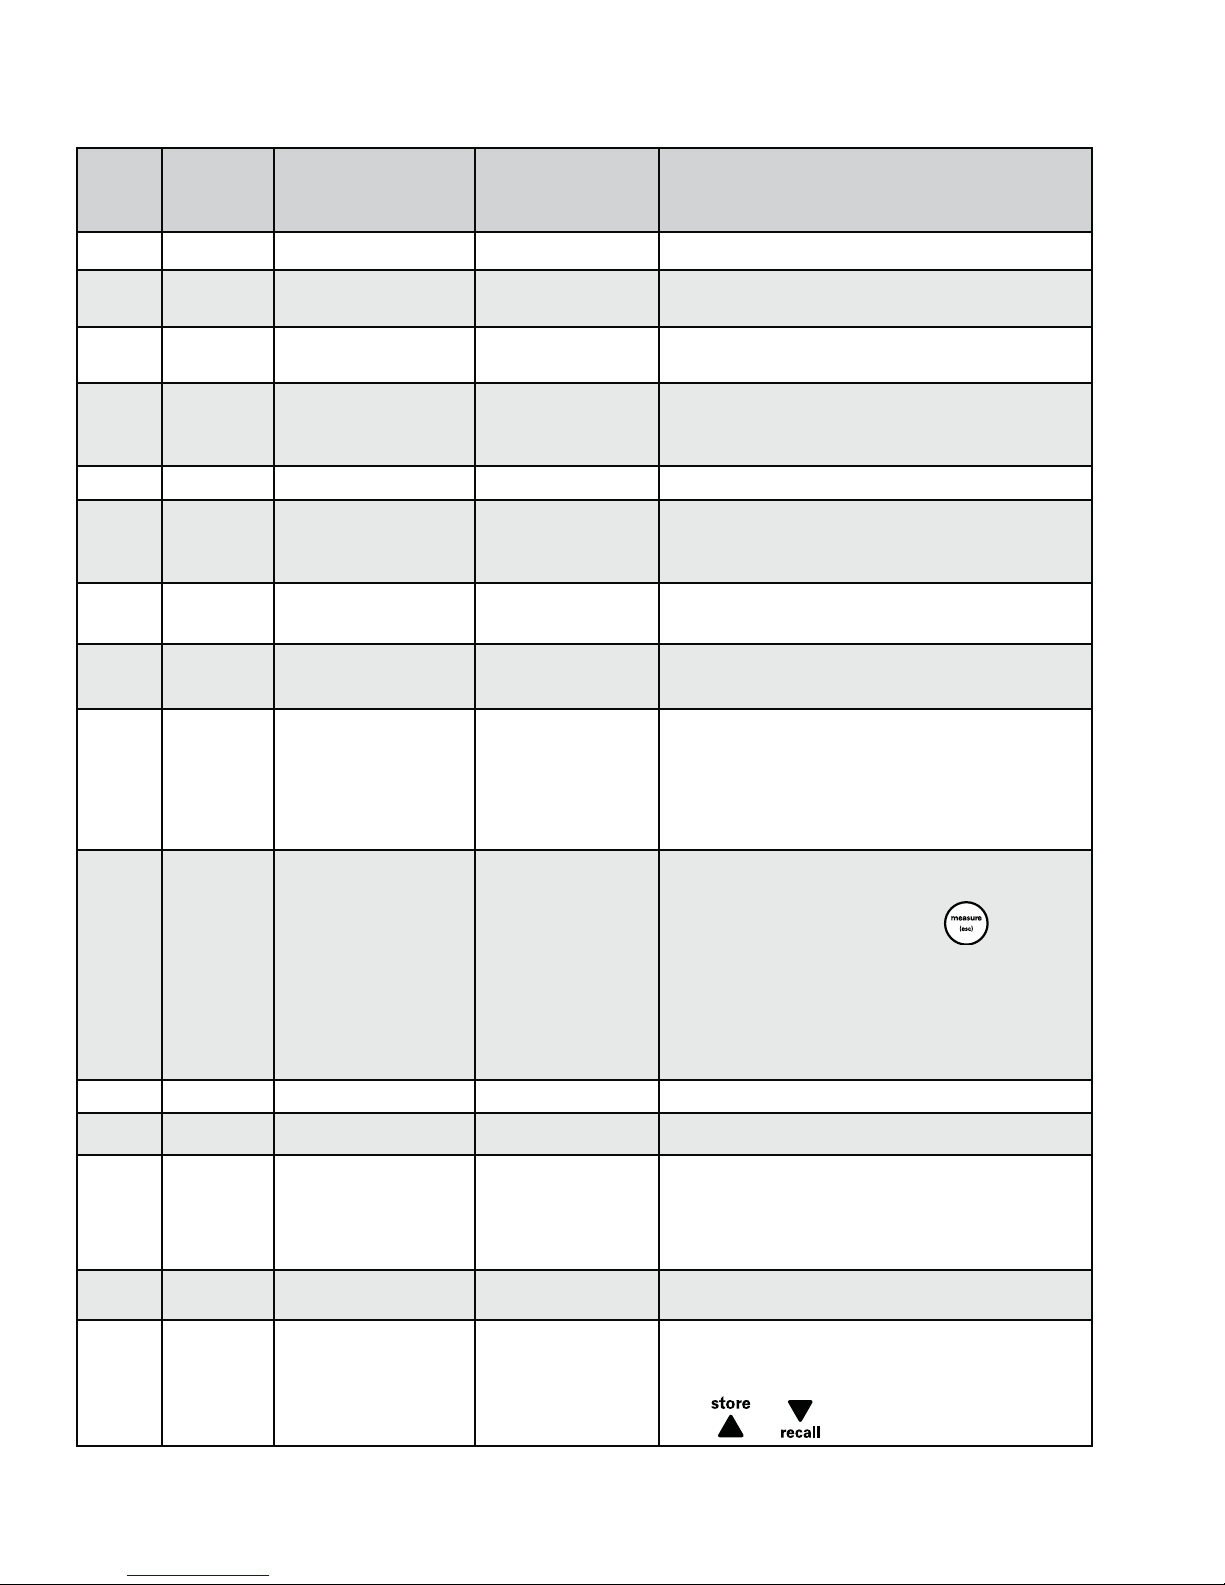
Main 1.0 CONF Configuration Select measurement resolution and buffer set
Submenu RES 0.1, 0.01 Measurement
Resolution
Submenu CAL AUTO, MAN To select AUTO or
MANUAL calibration
Submenu BUF USA, DIN Buffer Set for
Automatic pH Buffer
Recognition
Main 2.0 GEN General Meter Setup Automatic meter shut-off
Submenu AUTO ON, OFF Automatic Meter
Shut-Off
Main 3.0 TEMP Temperature Settings Select temperature units and the temperature used for
Submenu UNIT DEGC, DEGF Temperature Unit The default setting is for temperature readout to be
Submenu DEGC or
DEGF
-5.0 to 105.0 Manual Temperature
Compensation Value
0.01 is the default.
Note: If CAL AUTO is selected, then go to BUF submenu.
USA buffers are: 1.68, 4.01, 7.00, 10.01 & 12.46. DIN
buffers are 1.68, 4.01, 6.86 & 9.18. USA buffers are the
default.
To save battery life, the meter will turn off after 15
minutes without any key presses. On is the default
setting.
manual temperature compensation
displayed in °C.
This value is used when there is no ATC probe
connected, and can be set with the meter’s temperature
ranges. The temperature unit for this value will match
the temperature unit already selected. The default
setting is 25.0°C.
Submenu READ AUTO, CONT AUTO is for AUTO-
READ. CONT is for
continuous read.
Main 5.0 LOG Datalog Clear
Submenu DATA ON, OFF To enable data storage The default is off.
Submenu DEL NO, LAST, ALL Clears any stored
readings in the
datalog.
Main 6.0 CAL Calibration Data Allows for review and clearing of saved data.
Submenu SLP.1,
SLP.2,
SLP.A
80.0 to 120.0 Slope Information This is the slope data from the last calibration.
In AUTO-READ mode, the meter will display the
measurement as it stabilizes and lock and hold the
measurement when it is stable. Press
new measurement.
In Continuous read mode, the meter will continuously
measure and update the display. The unit of measure will
flash. When the reading has been stable, “READY” will
stop flashing. The default setting is AUTO-READ.
The default is no.
"NO" does not delete any readings.
"LAST" deletes only the last reading.
"ALL" deletes all of the logged data.
SLP.2 and SLP.A (average slope) will only show
if 3 points are calibrated.
Press
and to scroll between them.
to take a
8
Thermo Scientific Orion Star A111 Benchtop and Star A121 Portable pH Meters
Page 13

Meter Setup (continued)
Setup
Menu
Secondary
Display
Primary Display Description Information
Level
Submenu BUF.1,
BUF.2,
BUF.3
Submenu CLR NO, YES Clears the
Main 7.0 RST Factory Reset
Submenu RST NO, YES Returns all meter
Varies according to
buffers used.
Calibrated pH Buffer
Values
calibration data.
settings to the
factory defaults and
deletes all stored
data (calibration and
datalog).
Shows the buffer values used in the last calibration.
Press the and arrows to scroll between
them.
Note: It will only show the values used. For example,
if there was only one calibrated value, BUF.2 and
BUF.3 will not show.
The default is no.
The default is no. Before selecting yes, please make
sure any data that you would like to keep has been
recorded.
Thermo Scientific Orion Star A111 Benchtop and Star A121 Portable pH Meters
9
Page 14
Setup Examples
Automatic pH Buffer Recognition Selection
1. In pH measurement mode, press .
2. Press
twice.
3. Press to select automatic buffer recognition (AUTO) or manual calibration (MAN).
4. If automatic buffer recognition was chosen, press . Press to select USA or DIN buffer set
for automatic buffer recognition.
5. Press
to save configuration and to return measurement mode.
Read Type Selection
1. In measurement mode, press .
2. Press
Press .
3. Press
CONT = Continuous
AUTO = AUTO-READ™
4. Press
in setup until “4.0” is shown on the top line and “READ” is shown on the lower line.
or to select the measurement mode:
to save selection. Press the key to return to measurement mode.
Note: In AUTO-READ mode, the meter will display the measurement as it stabilizes and lock and hold the
measurement when it is stable. AR and unit of measure will blink until the reading is stable. When the
reading is stable it is held on the screen and AR is lit. Press
to take a new measurement.
In Continuous read mode, the meter will continuously measure and update the display. The unit of
measure will flash. When the reading is stable, “READY” will appear. This read type is useful when
performing an experiment that requires continuous measurements to be taken, regardless of the
measurement stability.
Reviewing pH Calibration Slope Data
1. In pH measurement mode, press . Press five times so that "6.0" is on the top, secondary
display and "CAL" is on the larger, primary display.
2. Press
segment, and
3. Press to return to measurement mode.
to view slope. If a 3-point calibration was done, press to view the second slope
again to display the average slope (SLP.A).
10
Thermo Scientific Orion Star A111 Benchtop and Star A121 Portable pH Meters
Page 15

Chapter 4 Calibration and Measurement
pH Calibration and Measurement
pH Calibration
1. Press to display pH for pH measurement mode.
2. Select fresh pH buffers. If calibrating more than one point (highly recommended), select pH buffers that bracket the
expected sample pH and are at least one pH unit apart.
3. Press
4. Wait for “READY” to appear.
5. When finished, press to save and end calibration.
. Rinse the electrode (and ATC probe, if separate) with distilled water, blot dry and place into the buffer.
a. With automatic buffer recognition (default, AUTO CAL appears at the top of the display): to calibrate
additional points, repeat steps 3 and 4a.
b. With manual calibration (MAN CAL appears at the top of the display): press
To calibrate additional points repeats steps 3 and 4b.
a. For one-point calibration, press
return to measurement mode.
b. For two- or three-point calibration, the slope will be displayed and the meter will automatically proceed
to measurement mode.
or to edit the slope and press the enter key to save and
or to set value.
pH Measurement
1. Prepare the pH electrode according to the electrode instructions. Press to display pH for pH measurement mode.
2. Rinse the electrode (and ATC probe, if separate) with distilled water, blot dry and place into the sample.
3. If the meter is in AUTO-READ mode (meter default) press
will immediately start taking readings. Record the pH and temperature of the sample when “READY” is displayed and
“pH” stops blinking.
Note: If in AUTO-READ mode and memory storage is enabled, the reading will automatically be stored when the “AR”
appears. If in continuous read mode and memory storage is enabled, press
4. Remove the electrode (and ATC probe, if separate) from the sample, rinse with distilled water, and blot dry. To continue
taking measurements , place electrode (and ATC probe, if separate) into the next sample and repeat steps 3 and 4.
5. When finished measuring all samples, store electrode according to electrode instructions.
Thermo Scientific Orion Star A111 Benchtop and Star A121 Portable pH Meters
. If the meter is in continuous read mode, the meter
to store into the meter’s memory.
11
Page 16

mV Measurement and RmV & ORP Calibration and Measurement
mV Measurement
1. In the measurement mode, press
to display mV.
2. Rinse the electrode (and ATC probe, if separate) with distilled water, blot dry and place into the sample.
3. If the meter is is AUTO-READ mode (meter default), press
.
If the meter is in continuous read mode, the meter will immediately start taking readings.
Record the mV reading and temperature of the sample when “READY” is displayed and “mV” stops blinking.
Note: If in AUTO-READ mode and memory storage is enabled, the reading will automatically be stored when the
"AR" icon appears. If in continuous read mode and memory storage is enabled, press
to store the reading
into the meter's memory.
4. Remove the electrode (and ATC probe, if separate) from the sample, rinse with distilled water, blot dry. To continue
taking measurements repeat steps 2 through 4.
5. When finished measuring all samples, store electrode according to electrode instructions.
RmV and ORP Calibration
1. In the measurement mode, press
2. When the electrode(s) are ready, press
blot dry and place into the standard.
to display RmV.
Rinse the electrode (and ATC probe, if separate) with distilled water,
.
3. Wait for “READY” to stop flashing. Press
4. When finished, press
to save and end calibration.
or
keys to set the value.
RmV and ORP Measurement
1. In the measurement mode, press
2. Rinse the electrode (and ATC probe, if separate) with distilled water, blot dry and place into the sample. If the meter
is is AUTO-READ mode (meter default), press
immediately start taking readings.
3. Record the RmV reading and temperature of the sample when “READY” is displayed and “RmV” stops.
Note: If in AUTO-READ mode and memory storage is enabled, the reading will automatically be stored when
the "AR" icon appears. If in continuous read mode and memory storage is enabled, press
into the meter's memory.
3. Remove the electrode (and ATC probe, if separate) from the sample, rinse with distilled water, blot dry. To continue
taking measurements repeat steps 2 through 4.
4. When finished measuring all samples, store electrode according to electrode instructions.
to display RmV.
. If the meter is in continuous read mode, the meter will
to store the reading
12
Thermo Scientific Orion Star A111 Benchtop and Star A121 Portable pH Meters
Page 17

Temperature Measurement and Calibration
Temperature Measurement
The meter ATC temperature display is automatically shown for at the top, secondary display on the meter. To read only
temperature and see the temperature on the primary, lower display, follow the instructions below.
1. In the measurement mode, press
to display the temperature value on the primary display. (The temperature
value at the top of the meter will match that of the lower, larger display field.)
2. Rinse the ATC probe with distilled water, blot dry and place into the sample. If the meter is is AUTO-READ mode
(meter default), press
. If the meter is in continuous read mode, the meter will immediately start taking
readings.
3. Record the temperature of the sample when “READY” stops .
Note: If in AUTO-READ mode and memory storage is enabled, the reading will automatically be stored when
the "AR" icon appears. If in continuous read mode and memory storage is enabled, press
to store the reading into
the meter's memory.
4. Remove the ATC probe from the sample, rinse with distilled water, blot dry. To continue taking measurements repeat
steps 2 through 4.
5. When finished measuring all samples, store electrode according to electrode instructions.
Temperature Calibration
The meter ATC temperature display has a relative accuracy of ± 0.1 °C. ATC probes have varying temperature accuracies,
usually ± 0.5 °C to ± 2 °C. Use this function only if it is necessary to calibrate the temperature readings. Since the
temperature offset calculated during the calibration is applied to all future temperature measurements, recalibrate if a
different ATC probe is used.
1. In the
2. When the ATC probe is ready, press
, press to display the temperature reading.
Rinse the ATC probe and NIST-traceable thermometers with distilled water,
blot dry and place into a solution with a known, stable temperature. It is recommended that two NIST-traceable
thermometers be used to measure and verify the temperature of the solution.
3. Wait for the readings to stabilize (about 5 to 10 minutes) and “READY” to stop flashing. The meter will display the
original temperature read by the ATC probe. Press
or keys to enter the temperature value read by the
thermometer.
Note: The calculated offset will be applied to all future temperature readings. To abort, press
saving and return to the measurement mode.
4. When finished, press
Thermo Scientific Orion Star A111 Benchtop and Star A121 Portable pH Meters
to save and end calibration.
to end without
13
Page 18

This page intentionally left blank.
14
Thermo Scientific Orion Star A111 Benchtop and Star A121 Portable pH Meters
Page 19

Chapter 5 Data Storage and Review
Orion Star A111 benchtop pH and Star A121 portable pH meters have a 50 point datalog.
Manual Datalog with Continuous Read Mode
1. In measurement mode, press .
2. Press three times until “4.0” is shown on the top line and “READ” is shown on the lower line. Press .
3. Press
4. Press to show “5.0” on the top line and “LOG” on the lower line. Press .
5. Press
6. Press
7. In the measurement mode, press to store the reading into the meter’s memory.
or key to show “CONT” on the second line. Press to save selection.
to show “ON” on the second line. Press to save selection.
to return to measurement mode.
Automatic Datalog with AUTO-READ™ Mode
1. In measurement mode, press .
2. Press three times until “4.0” is shown on the top line and “READ” is shown on the lower line. Press .
3. Press
4. Press
5. Press to show “ON” on the second line. Press to save selection.
or to show “AUTO” on the second line. Press to save selection.
to show “5.0” on the top line and “LOG” on the lower line. Press .
6. Press to return to measurement mode. Each time the reading is locked onto the screen with the “AR” icon.
The reading will automatically be stored in the datalog.
Thermo Scientific Orion Star A111 Benchtop and Star A121 Portable pH Meters
15
Page 20
Viewing the Data from the Last Calibration
1. In measurement mode, press .
2. Press
until “6.0” is shown on the top, secondary display and "CAL" is shown on the larger, primary display.
a. To view the slope, press
be on the larger, primary display. If a 3-point calibration was done, press to view the second slope
segment (SLP.2), and again to display the average slope (SLP.A).
b. To view the calibration points press
shown at the top of the display. The corresponding buffer value will be shown in the lower, primary
display.
Note: It will only show the values used. For example, if there was only one calibrated value, BUF2 and
BUF3 will not show.
3. Press
to exit the setup menu and return to measurement mode.
Viewing Stored Readings (the Data Log)
1. In measurement mode, press .
2. Press
3. Press to review the reading stored at that point.
or to scroll through the memory points.
. SLP.1 will be on the top, secondary display. The slope percentage will
and then, press or until BUF1, BUF2 or BUF3 is
16
Thermo Scientific Orion Star A111 Benchtop and Star A121 Portable pH Meters
Page 21
Chapter 6 Customer Services
Meter Error Codes
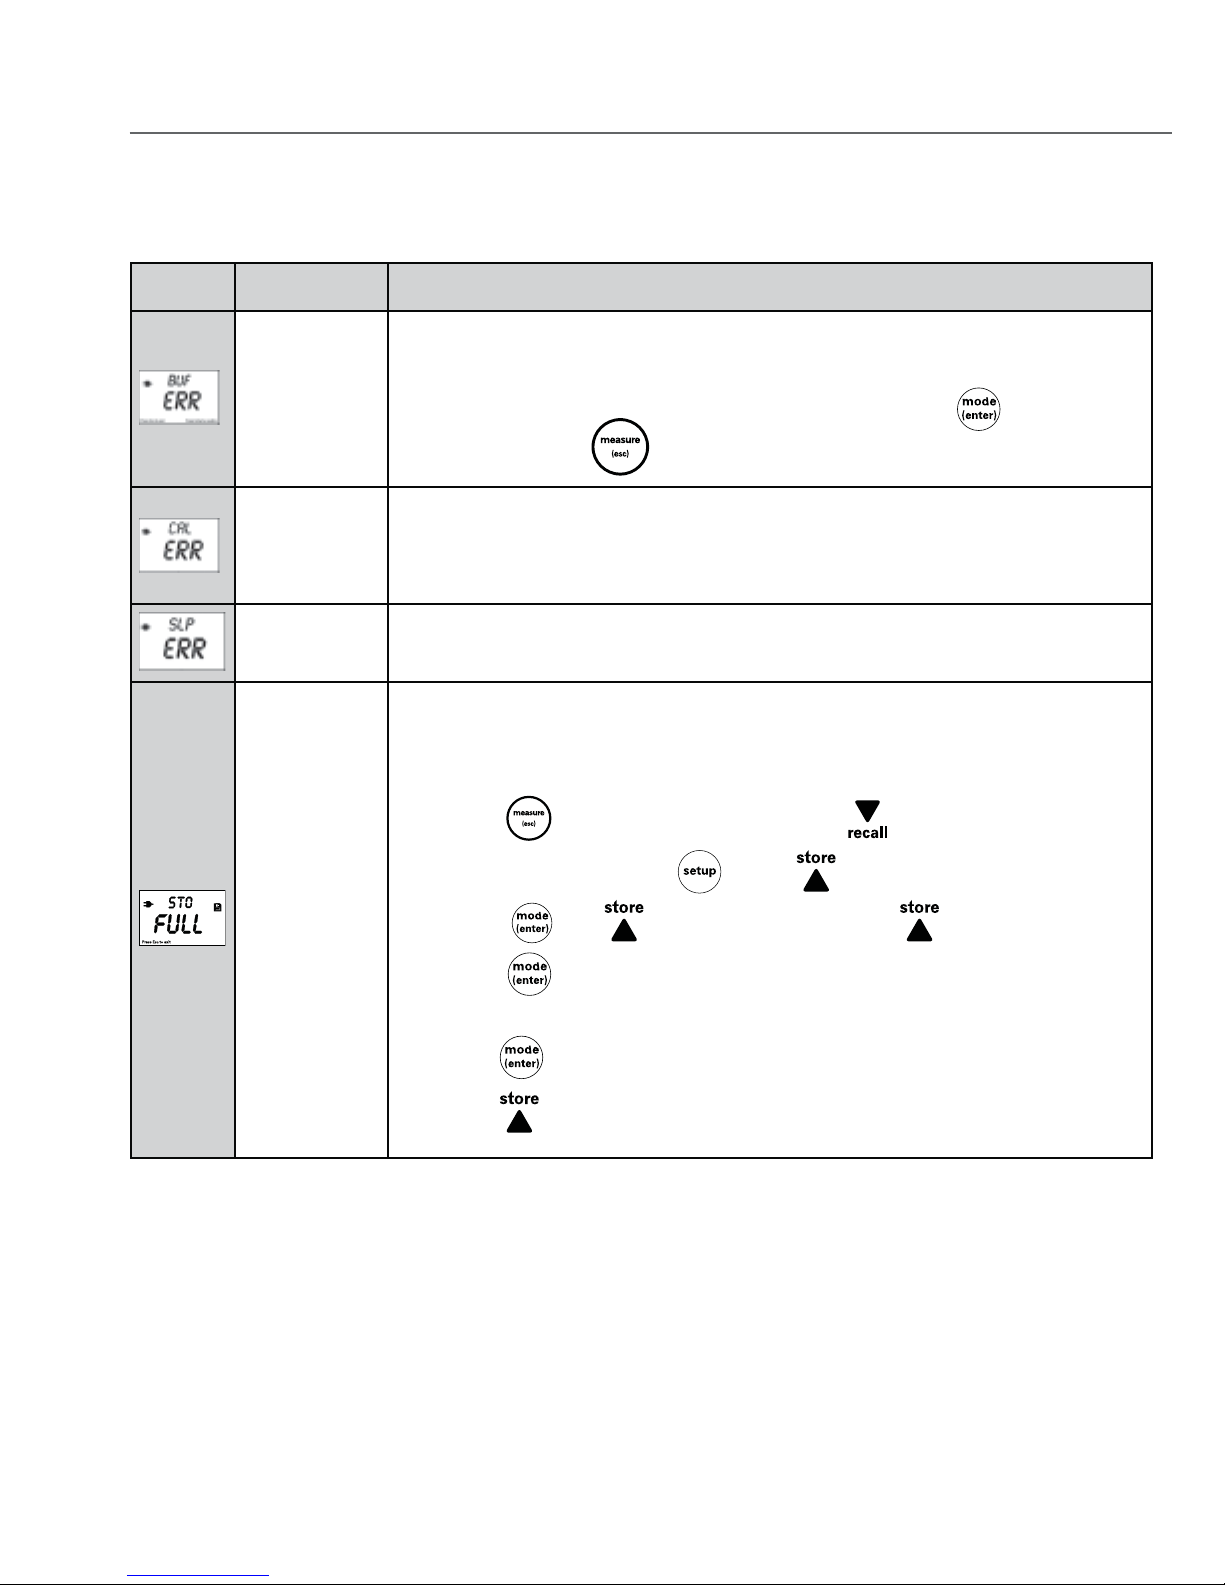
Display Reason Solution
No buffer found
during automatic
buffer calibration
The buffer is not recognized or a recognized value for the automatic buffer calibration. Verify that
the buffers you are using are the fresh and recognized values (see Appendix for the listing). Remove
the electrode (and ATC probe if separate) from the solution, rinse and press
to re-scan for the
buffer standards or press to escape without saving and return to the measurement mode.
The same buffer
is calibrated
twice
The millivolts measured during calibration are the same for two buffers.
Review the calibration procedure and verify that the electrode was placed in the correct buffers at
the appropriate time. Clean the electrode according to the electrode user guide. Re-calibrate the
electrode with fresh buffers.
Calibration
slope error
Clean the electrode according to the electrode user guide. Re-calibrate the electrode with
new buffers.
Memory is full The meter will automatically change to the submenu to clear the datalog (“CLR” on the top line,
“NO” on the second).
If the existing memory’s data is still needed:
1. Press
to return to the measurement mode and . Record the memory’s data.
2. In measurement mode, press and then 4 times. (“5.0” appears on the top line.)
3. Press
. Press to delete the last reading or press to delete all readings.
4. Press to save the change and delete the data accordingly.
If the existing memory’s data can be deleted:
1. P r es s
change to “YES”.
2. Press to clear the datalog.
Thermo Scientific Orion Star A111 Benchtop and Star A121 Portable pH Meters
17
Page 22

Troubleshooting Guide
Problem: The display freezes and the measurement values will not change.
Solution: The meter is in the AUTO-READ measurement mode (the AR icon appears solid on the left of the display).
Press
Problem: How do I abort a calibration?
Solution: Press
Problem: The meter does not recognize the pH buffer value during calibration.
Solution: Verify that the correct buffer set was selected in the setup menu. The meter uses the raw mV reading of the
electrode to recognize a buffer during calibration. As the electrode ages or becomes dirty, its mV readings
will drift and you will need to manually enter the pH buffer value when calibrating.
Assistance
After troubleshooting all components of your measurement system, contact Technical Support. Within the United States
call 1.800.225.1480 and outside the United States call 978.232.6000 or fax 978.232.6031. In Europe, the Middle East
and Africa, contact your local authorized dealer. For the most current contact information, or the latest application and
technical resources for Thermo Scientific Orion products, visit www.thermoscientific.com/water.
Warranty and Registration
To register your new meter and for the most current warranty information,
visit www.thermoscientific.com/water.
to start a new reading or select continuous read mode to have readings update constantly.
abort any meter operation and return to the measurement mode.
WEEE Compliance
This product is required to comply with the European Union’s Waste Electrical & Electronic Equipment (WEEE) Directive
2002/96/EC. It is marked with the symbol above.
Thermo Fisher Scientific has contracted with one or more recycling/disposal companies in each EU Member State and
this product should be disposed of or recycled through them. Further information on compliance with these directives,
the recyclers in your country, and information on Thermo Scientific Orion products that may assist the detection of
substances subject to the RoHS Directive are available at www.thermoscientific.com.
18
Thermo Scientific Orion Star A111 Benchtop and Star A121 Portable pH Meters
Page 23

Declaration of Conformity
Manufacturer: Thermo Fisher Scientific Inc.
Address: Ayer Rajah Crescent
Hereby declares that the following products:
Blk 55 #04-16/24
Singapore 139949
Singapore
Benchtop meters are rated 100 to 240 VAC, 50/60 Hz, 0.5A.
Handheld meters use four non-rechargeable AA batteries.
Benchtop Meters Portable Meters
Orion Star A111 pH Orion Star A121 pH
Orion Star A112 Conductivity Orion Star A122 Conductivity
Orion Star A113 DO Orion Star A123 DO
Equipment Class:
Measurement, control and laboratory
Orion Star A-series meters are EMC Class A
Conforms with the following directives and standards:
EN61326-1:2006 Electromagnetic Compatibility (EMC Directive)
Electrical equipment for measurement,
control and laboratory use - EMC requirements
EN61010-1:2001 Safety Standards
UL61010-1:2004 Safety requirements for electrical equipment for measurement,
CAN/CSA C22.2 No. 61010-1-04 control and laboratory use - general requirements
Cheow Kwang Chan
QA/Regulatory Manager
Place and Date of Issue:
June 15, 2011
Singapore
Thermo Scientific Orion Star A111 Benchtop and Star A121 Portable pH Meters
19
Page 24

Meter Specifications
Meter Operating Conditions
Operating Ambient Temperature 5 to 45 °C
Operating Relative Humidity 5 to 85 %, non-condensing
Storage Temperature -20 to +60 °C
Storage Relative Humidity 5 to 85 %, non-condensing
Pollution Degree 2
Overvoltage Category II
Weight Portable: 450g
Benchtop: 850g
Size Portable: 5.9cm (H) x 10.5cm (W) x 23.1cm (D)
Benchtop: 9.3cm (H) x 18.0cm (W) x 23.6cm (D)
Regulatory and Safety CE, TUV 3-1, FCC Class A
Power Rating DC Input: 9 VDC 1A
Battery: 4 x AA
Shock and Vibration Vibration, shipping/handling per ISTA #1A Shock, drop test in packaging per ISTA #1A
Enclosure (designed to meet) Portable: IP67
Benchtop: IP54
Universal Power Adapter Operating Conditions
Operating Ambient Temperature 0 to 50 °C
Operating Relative Humidity 0 to 90 %, non-condensing
Storage Temperature -20 to +75 °C
Storage Relative Humidity 0 to 90 %, non-condensing
Pollution Degree 2
Overvoltage Category II
Meter Parameter Specifications
pH
Range -2.00 to 16.00
Resolution 0.1, 0.01
Relative Accuracy ±0.01
Calibration Points up to 3
mV/RmV
Range mV:±1600.0 mV ;
RmV: ±1999.9 mV
Resolution 0.1
Relative Accuracy ±0.2 mV or ±0.05 % of reading whichever
is greater
Tem perature
Range -5 to 105°C
Resolution 0.1
Relative Accuracy ±0.1
Offset Calibration 1 point
20
Thermo Scientific Orion Star A111 Benchtop and Star A121 Portable pH Meters
Page 25

Ordering Information
Benchtop meters include electrode arm. Kits contain meter, probe and appropriate calibration and fill solutions.
CML # Description
STARA1110 Orio n STA R A111 Bencht op pH Meter
STARA1115 Orio n STA R A111 Bencht op pH Meter Kit
STARA1120 Orion STAR A112 Benchtop Conductivity Meter
STARA1125 Orion STAR A112 Benchtop Conductivity Meter Kit
STARA1130 Orion STAR A113 Benchtop Dissolved Oxygen Meter
STARA1135 Orion STAR A113 Benchtop Dissolved Oxygen Meter Kit
STARA1210 Orion STAR A121 Portable pH Meter
STARA1215 Orion STAR A121 Portable pH Meter Kit
STARA1220 Orion STAR A122 Portable Conductivity Meter
STARA1225 Orion STAR A122 Portable Conductivity Meter Kit
STARA1230 Orion STAR A123 Portable Dissolved Oxygen Meter
STARA1235 Orion STAR A123 Portable Dissolved Oxygen Meter Kit
STARA-BEA Benchtop electrode arm for Orion Star A-series meters
STARA-HB Freestanding Base for use with Orion Star A-series benchtop electrode arm
STARA-CS Hard Carrying Case for Orion Star A-series Portable Meters
STARA-AR Armor for Orion Star A-series Portable Meters, includes electrode holders for
STARA-ESPH pH Electrode Holder for Orion Star A-series Armor
STARA-ESCD Conductivity and DO Probe Holder for Orion Star A-series Armor
9157BNMD Orion Triode 3-in-1 pH/ATC Probe, Refillable, epoxy body
9107BNMD Orion Triode 3-in-1 pH/ATC Probe, Gel-filled, epoxy body
011050MD Orion 2-Electrode Conductivity Cell, K=1.0
083005MD Orion Polarographic DO probe , 1.5m cable
pH, conductivity and DO probes
Thermo Scientific Orion Star A111 Benchtop and Star A121 Portable pH Meters
21
Page 26

This page intentionally left blank.
22
Thermo Scientific Orion Star A111 Benchtop and Star A121 Portable pH Meters
Page 27
Chapter 7 Appendix
Automatic pH Buffer Recognition Feature
The Orion Star A111 benchtop pH and Star A121 portable pH meters are capable of automatically recognizing pH 1.68,
4.01, 7.00, 10.01 and 12.46 buffers or pH 1.68, 4.01, 6.86, and 9.18 buffers during a pH calibration, depending on the pH
buffer set that is selected in the setup menu. During a calibration, the meter uses the selected buffer set and the raw mV
reading of the pH electrode in the buffer to recognize and display the buffer value at the measured temperature. The raw
mV reading of the pH electrode in the buffer must be about ± 60 mV from the theoretical mV reading of the buffer in order
for the meter to automatically recognize the buffer.
USA pH Buffer Set DIN pH Buffer Set
Buffer mV Range Buffer mV Range
1.68 +255 to +375 1.68 +255 to +375
4.01 +117 to +237 4.01 +117 to +237
7.00 -60 to +60 6.86 -52 to +68
10.01 -237 to -117 9.18 -189 to -69
12.46 -383 to -263
Electrode Condition Icon
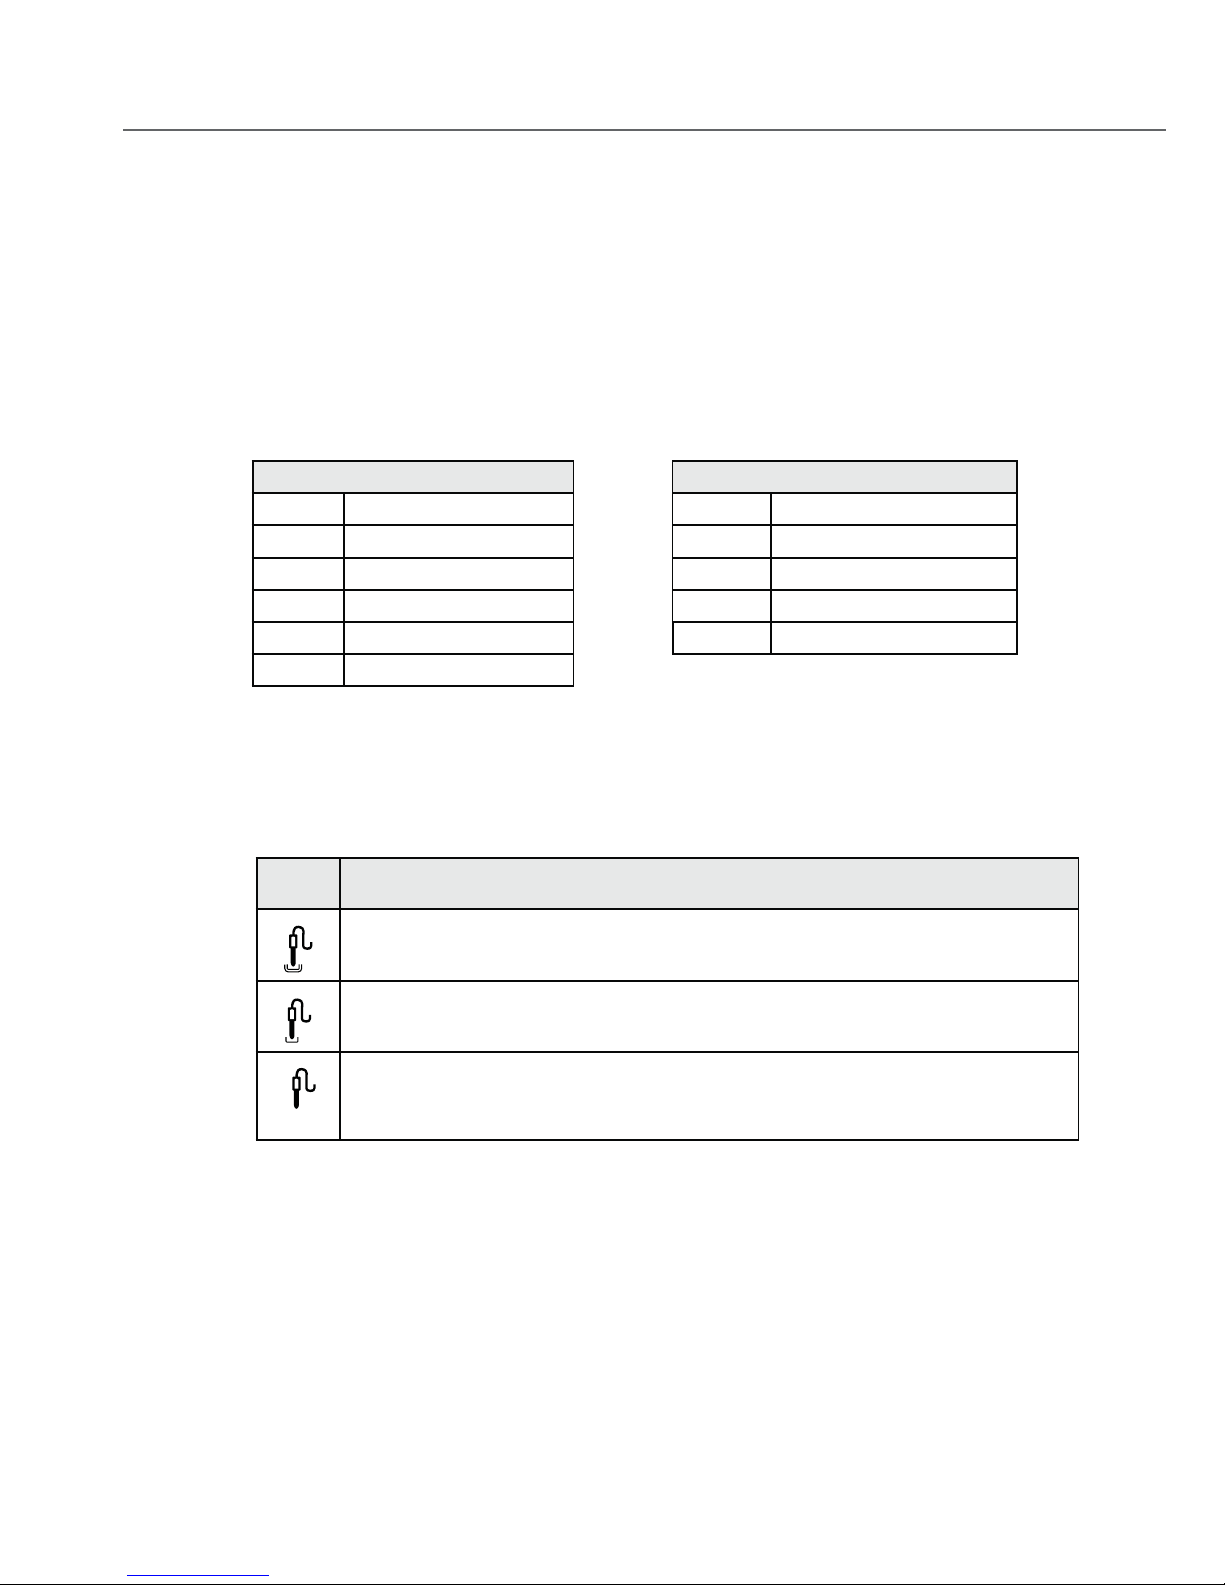
The electrode condition icon indicates the performance of the pH electrode, based on the last saved calibration and
electrode measurement stability.
Icon Definition of Icon
Electrode condition is good and the electrode slope is 95 to 105 %.
Electrode condition is fair and the electrode slope is 85 to 115 %.
Electrode condition is bad and the electrode slope is less than 85 % or greater than 115 %.
Consult the electrode user guide for instructions on how to clean, condition and
Blinking
troubleshoot the electrode.
Thermo Scientific Orion Star A111 Benchtop and Star A121 Portable pH Meters
23
Page 28

Notes
24
Thermo Scientific Orion Star A111 Benchtop and Star A121 Portable pH Meters
Page 29

This page intentionally left blank.
Page 30

Water Analysis Instruments
North America
166 Cummings Center
Beverly, MA 01915 USA
Toll Free: 1-800-225-1480
Tel: 1-978-232-6000
[email protected]
Netherlands
Tel: (31) 033-2463887
[email protected]
India
Tel: (91) 22-4157-8800
wai.asia@thermofisher.com
Japan
Tel: (81) 045-453-9175
wai.asia@thermofisher.com
China
Tel: (86) 21-68654588
wai.asi@thermofisher.com
Singapore
Tel: (65) 6778-6876
wai.asia@thermofisher.com
9 0 0 1 : 2 0 0 8
Australia
Tel: (613) 9757-4300
in Australia (1300) 735-296
InfoWaterAU@thermofisher.com
www.thermoscientific.com/water
© 2011 Thermo Fisher Scientific Inc. All rights reserved.
267275-001 Rev. C 07-11
 Loading...