

Page 1

QuantStudio™ 1 Real-Time PCR System
INSTALLATION, USE, AND MAINTENANCE
Firmware v1.0.x
Publication Number MAN0017853
Revision A.0
For Research Use Only. Not for use in diagnostic procedures.
Page 2

Life Technologies Holdings Pte Ltd | Block 33 | Marsiling Industrial Estate Road 3 | #07-06, Singapore 739256
For descriptions of symbols on product labels or product documents, go to thermofisher.com/symbols-definition.
The information in this guide is subject to change without notice.
DISCLAIMER: TO THE EXTENT ALLOWED BY LAW, THERMO FISHER SCIENTIFIC INC. AND/OR ITS AFFILIATE(S) WILL NOT BE LIABLE FOR SPECIAL,
INCIDENTAL, INDIRECT, PUNITIVE, MULTIPLE, OR CONSEQUENTIAL DAMAGES IN CONNECTION WITH OR ARISING FROM THIS DOCUMENT,
INCLUDING YOUR USE OF IT.
Revision history: Pub. No. MAN0017853 (English)
Revision Date Description
A.0 10 October 2018 New document.
Important Licensing Information: These products may be covered by one or more Limited Use Label Licenses. By use of these products, you accept
the terms and conditions of all applicable Limited Use Label Licenses.
Trademarks: All trademarks are the property of Thermo Fisher Scientific and its subsidiaries unless otherwise specified. TaqMan is a registered
trademark of Roche Molecular Systems, Inc., used under permission and license. Cy is a registered trademark of GE Healthcare. Microsoft and
Windows are trademarks of Microsoft Corporation. Pentium is a trademark of Intel Corporation. Google and Chrome are trademarks of Google, Inc.
©2018 Thermo Fisher Scientific Inc. All rights reserved.
Page 3

Contents
About this guide ............................................................ 8
■
CHAPTER 1 Product information ....................................... 9
Instrument hardware description ................................................. 9
Instrument overview ........................................................ 9
Parts of the instrument ..................................................... 11
Parts of the home screen ................................................... 12
Software description ........................................................... 14
Instrument, desktop, and cloud software features ............................. 14
Folders, templates, experiments, and projects ................................ 15
Third-party software ....................................................... 16
Supported options for instrument and computer connections ........................ 16
Experiment types .............................................................. 18
■
CHAPTER 2 General procedures to operate the instrument ........ 20
Precautions for use ............................................................ 20
Power on the instrument ........................................................ 21
Power off the instrument ....................................................... 21
Sign in ........................................................................ 21
Sign out ....................................................................... 21
Load and unload a plate in the QuantStudio™ 1 Real-Time PCR Instrument ............ 22
Transfer, view, or manage files and results ........................................ 23
Transfer EDS files from the instrument home screen ........................... 23
View run history and delete or transfer files from the instrument ................ 23
Manage templates (EDT files) ............................................... 23
■
CHAPTER 3 Configure the instrument and manage
instrument profiles ....................................................... 25
Initial start‑up ................................................................. 25
Installation and instrument verification ........................................... 26
Use the instrument without signing in ............................................ 26
Create an administrator instrument profile during initial start-up .................... 27
Create a new instrument profile ................................................. 27
QuantStudio™ 1 Real-Time PCR System Installation, Use, and Maintenance Guide
3
Page 4

Contents
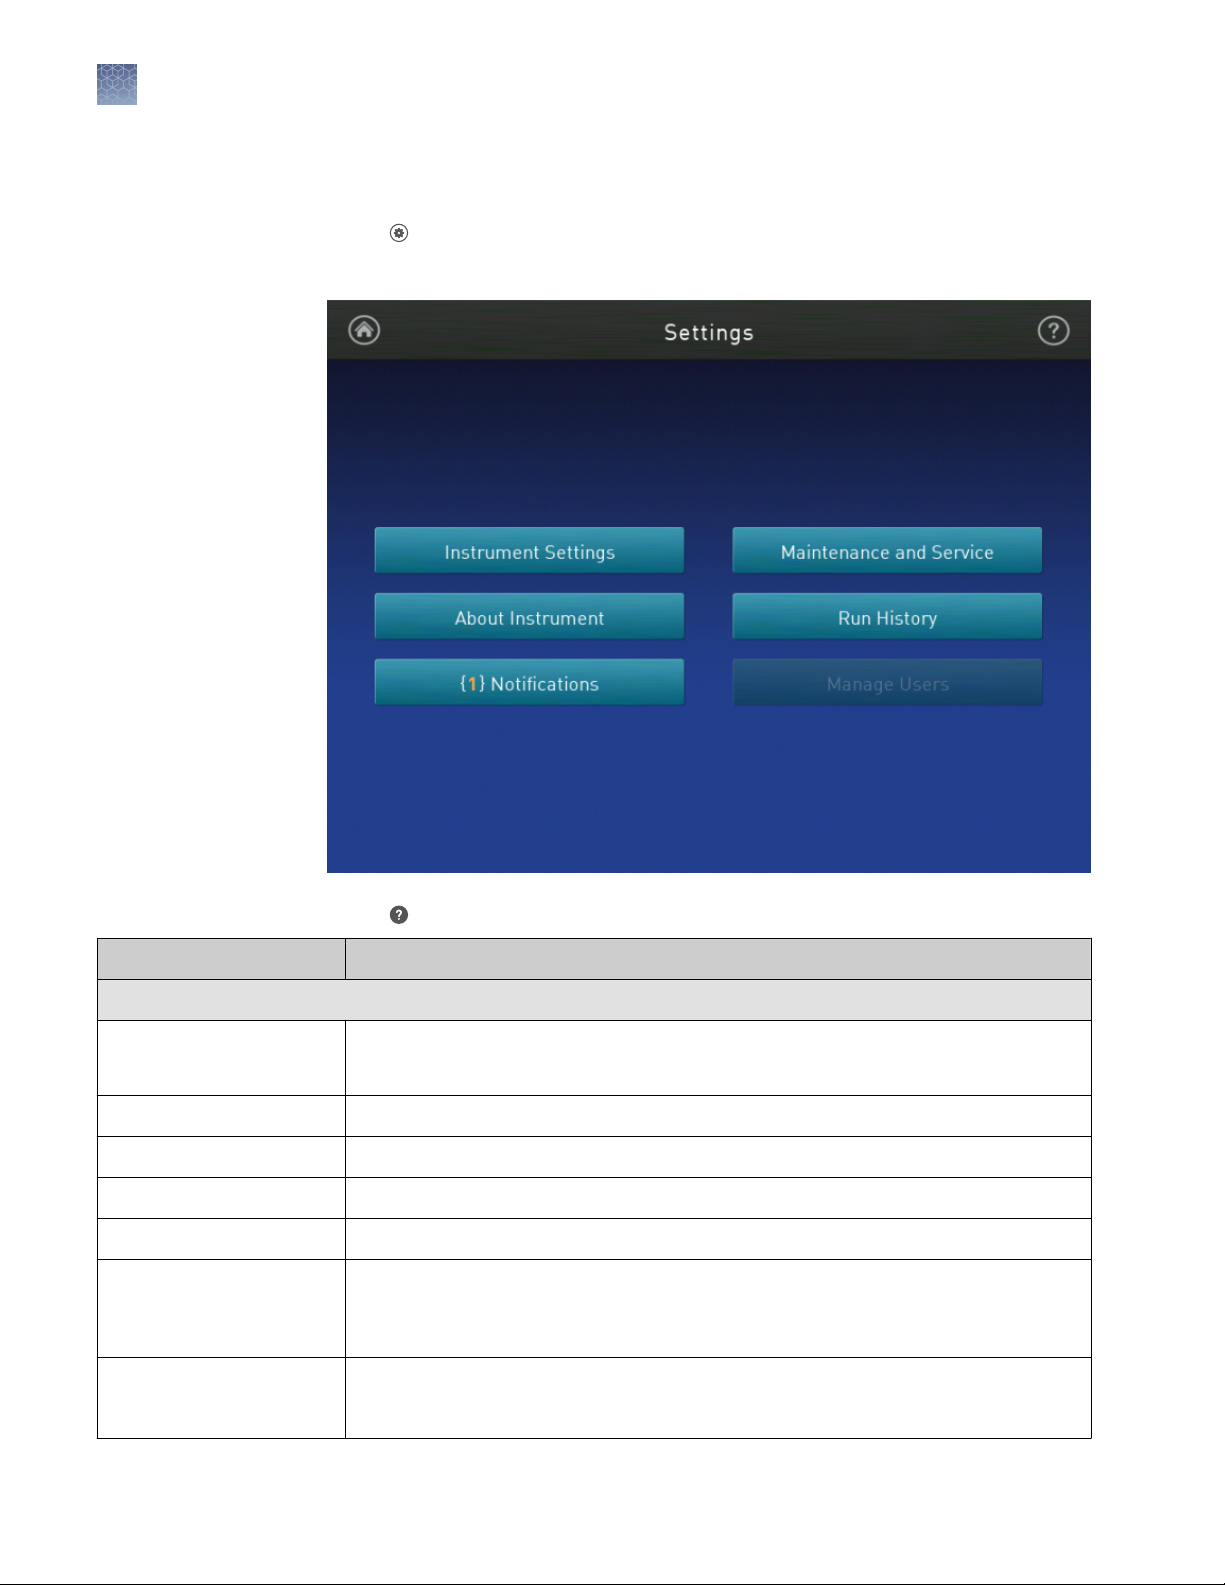
Overview of Settings ............................................................ 28
Manage instrument settings ..................................................... 30
Manage the instrument name (Administrator only) ............................. 31
Enable Sleep Mode ........................................................ 31
Set the idling temperature for the heated cover ................................ 31
Configure the network drive ................................................. 31
OEM connection only (Administrator only) ..................................... 31
Select a Cloud region (Administrator only) .................................... 32
Set the date and time (Administrator only) .................................... 32
Configure the network ...................................................... 32
Restore factory defaults .................................................... 34
Select a language .......................................................... 34
Learn about the instrument ..................................................... 34
View instrument specifications .............................................. 34
View and export the License Agreement ...................................... 35
Manage home screen notifications ............................................... 35
Manage maintenance, service, and calibrations .................................... 35
Update instrument software (Administrator only) .............................. 35
Enable remote instrument monitoring (Administrator only) ..................... 36
View instrument statistics .................................................. 36
View instrument logs ....................................................... 36
Manage Users ................................................................. 36
Require instrument profile sign-in (Administrator only) ......................... 37
Manage the Sign Out Timer (Administrator only) ............................... 37
Manage instrument profiles ................................................. 37
Link an instrument profile with the Thermo Fisher Cloud ........................... 38
Link an existing instrument profile with the Thermo Fisher Cloud ................ 38
Create a new instrument profile and link with the Thermo Fisher Cloud .......... 38
■
CHAPTER 4 Create and run experiments on the instrument ....... 39
Workflow ..................................................................... 39
Run an experiment ............................................................. 40
Create and run an experiment from a template ................................ 40
Run an experiment from a saved file ......................................... 40
Repeat the last instrument run .............................................. 41
Edit an experiment before starting a run .......................................... 41
Enter or edit template properties ............................................ 41
Edit the run method ........................................................ 43
Define, assign, and view well details ......................................... 45
4
QuantStudio™ 1 Real-Time PCR System Installation, Use, and Maintenance Guide
Page 5

View, pause, or stop a run ....................................................... 46
View real-time data and plots on the instrument touchscreen ................... 46
Adjust the display of real-time plots on the instrument touchscreen .............. 47
Pause or stop an instrument run ............................................. 47
Lock the touchscreen during a run ........................................... 47
Transfer EDS files from the instrument home screen ............................... 48
■
CHAPTER 5 Calibrate and verify instrument performance ......... 49
Calibration and verification schedule ............................................. 49
Calibration descriptions ........................................................ 50
View the calibration status and set reminders ..................................... 51
View calibration status and set reminders in the instrument .................... 51
View calibration status and set reminders in the Cloud ......................... 51
Perform ROI/uniformity, background, and dye calibrations .......................... 52
Workflow: Calibration ...................................................... 52
Prepare a calibration plate .................................................. 52
Perform calibrations ....................................................... 53
View calibration images and transfer results to USB ........................... 54
Troubleshoot calibration failure ............................................. 55
Identify contamination ...................................................... 56
Create a background plate
Perform instrument verification using RNase P plates .............................. 57
Instrument verification description .......................................... 57
RNase P instrument verification plate ........................................ 58
Performance specifications pass criteria ..................................... 58
Prepare an RNase P plate ................................................... 58
Perform RNase P verification ............................................... 59
Troubleshoot verification failure ............................................. 61
Calibrate custom dyes .......................................................... 62
Custom dyes overview ...................................................... 62
Use a dilution series to determine an optimal custom dye concentration .......... 62
Calibrate the custom dye ................................................... 65
Calibrate for a custom melt curve experiment ..................................... 68
(optional)
......................................... 56
Contents
QuantStudio™ 1 Real-Time PCR System Installation, Use, and Maintenance Guide
5
Page 6

Contents
■
CHAPTER 6 Maintain the instrument ................................. 70
Backup or restore the instrument ................................................ 70
Decontaminate the sample block ................................................. 71
Materials required ......................................................... 71
Clean the sample block ..................................................... 71
Detailed procedures for cleaning the sample block ............................. 73
Replace the instrument fuses .................................................... 73
Materials required ......................................................... 73
Replace the fuses .......................................................... 74
Prepare the instrument to store, move, or ship .................................... 74
Move the instrument ....................................................... 75
Return the instrument for service ............................................ 75
■
APPENDIX A Install and connect the instrument to a network ..... 77
Workflow: Install and connect to a network ........................................ 77
Before you begin ............................................................... 78
Instrument and computer connections ............................................ 78
Unpack and install the instrument ............................................... 79
Power on and follow the startup wizard ........................................... 80
Connect the instrument and the computer directly or to a LAN ....................... 80
Networking ................................................................... 81
Supported options for instrument and computer connections .................... 81
Control and monitor networked instruments .................................. 82
Ethernet port overview ..................................................... 83
Firewall ports that must be open ............................................ 83
Networking guidelines and best practices ..................................... 83
■
APPENDIX B Troubleshooting ......................................... 84
■
APPENDIX C Instrument specification and layout ................... 86
Configured system dimensions .................................................. 87
Instrument clearances ..................................................... 88
Electrical requirements ......................................................... 88
Environmental requirements .................................................... 89
Network requirements .......................................................... 90
6
QuantStudio™ 1 Real-Time PCR System Installation, Use, and Maintenance Guide
Page 7

■
APPENDIX D Parts and materials ..................................... 91
Kits, consumables, accessories, and reagents ..................................... 91
Consumables (96‑well, 0.2‑mL format) ............................................ 91
Accessories ................................................................... 92
General-use materials and consumables ......................................... 92
■
APPENDIX E Safety ..................................................... 93
Symbols on this instrument ..................................................... 94
Conformity symbols ........................................................ 95
Safety alerts on this instrument .................................................. 96
Location of safety labels on the instrument ................................... 97
Safety information for instruments not manufactured by Thermo Fisher Scientific ..... 97
Instrument safety .............................................................. 97
General .................................................................. 97
Physical injury ............................................................ 98
Electrical safety ........................................................... 98
Cleaning and decontamination ............................................... 98
Safety and electromagnetic compatibility (EMC) standards .......................... 98
Safety compliance ......................................................... 99
EMC ...................................................................... 99
Environmental design ..................................................... 100
Chemical safety ............................................................... 100
Biological hazard safety ........................................................ 101
Contents
■
Documentation and support ........................................... 102
Related documentation ........................................................ 102
Obtain information from the Help system ........................................ 102
Customer and technical support ................................................ 102
Limited product warranty ...................................................... 103
Index ..................................................................... 104
QuantStudio™ 1 Real-Time PCR System Installation, Use, and Maintenance Guide
7
Page 8

About this guide
This guide provides information about installing, using, and maintaining the
QuantStudio™ 1 Real-Time PCR System. For information and instructions on
performing experiments on this system, refer to QuantStudio™ Design and Analysis
Desktop Software User Guide (Pub. No. MAN0010408).
8
QuantStudio™ 1 Real-Time PCR System Installation, Use, and Maintenance Guide
Page 9
1
■
Instrument hardware description ........................................ 9
■
Software description .................................................. 14
■
Supported options for instrument and computer connections .............. 16
■
Experiment types ..................................................... 18
Instrument hardware description
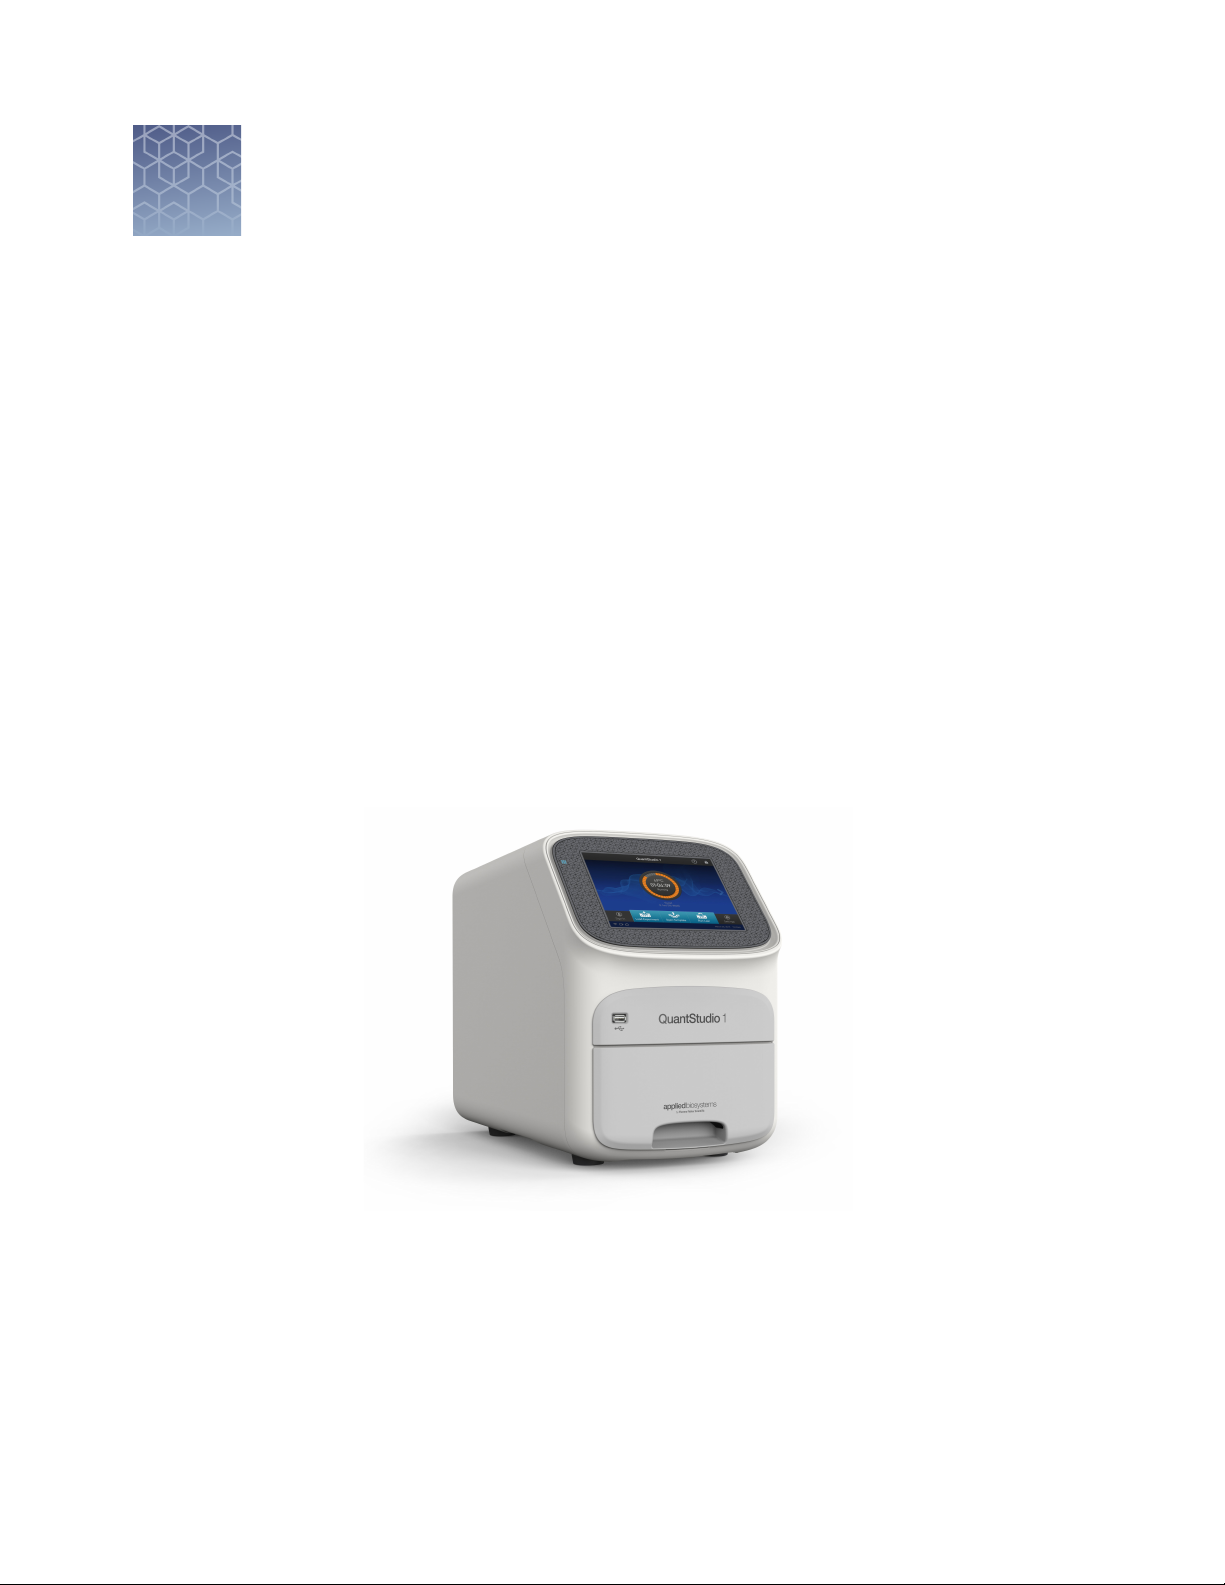
Product information
Instrument overview
The QuantStudio™ 1 Real-Time PCR System uses uorescence-based polymerase
chain reaction (PCR) reagents to perform the following types of experiments.
• Quantitative detection of target nucleic acid sequences (targets).
• Qualitative detection of targets.
• Qualitative analysis of the PCR product.
For more information, see “Experiment types“ on page 18.
The instrument is congured with a 96-well 0.2-mL xed block and a 3-color coupled
lter set.
The instrument can be run directly from the touchscreen to create and start
experiments. To design experiments or to analyze data, the instrument can be
integrated with the QuantStudio™ Design and Analysis Software.
An optional barcode scanner and optional wireless adapter can be ordered separately.
QuantStudio™ 1 Real-Time PCR System Installation, Use, and Maintenance Guide
9
Page 10
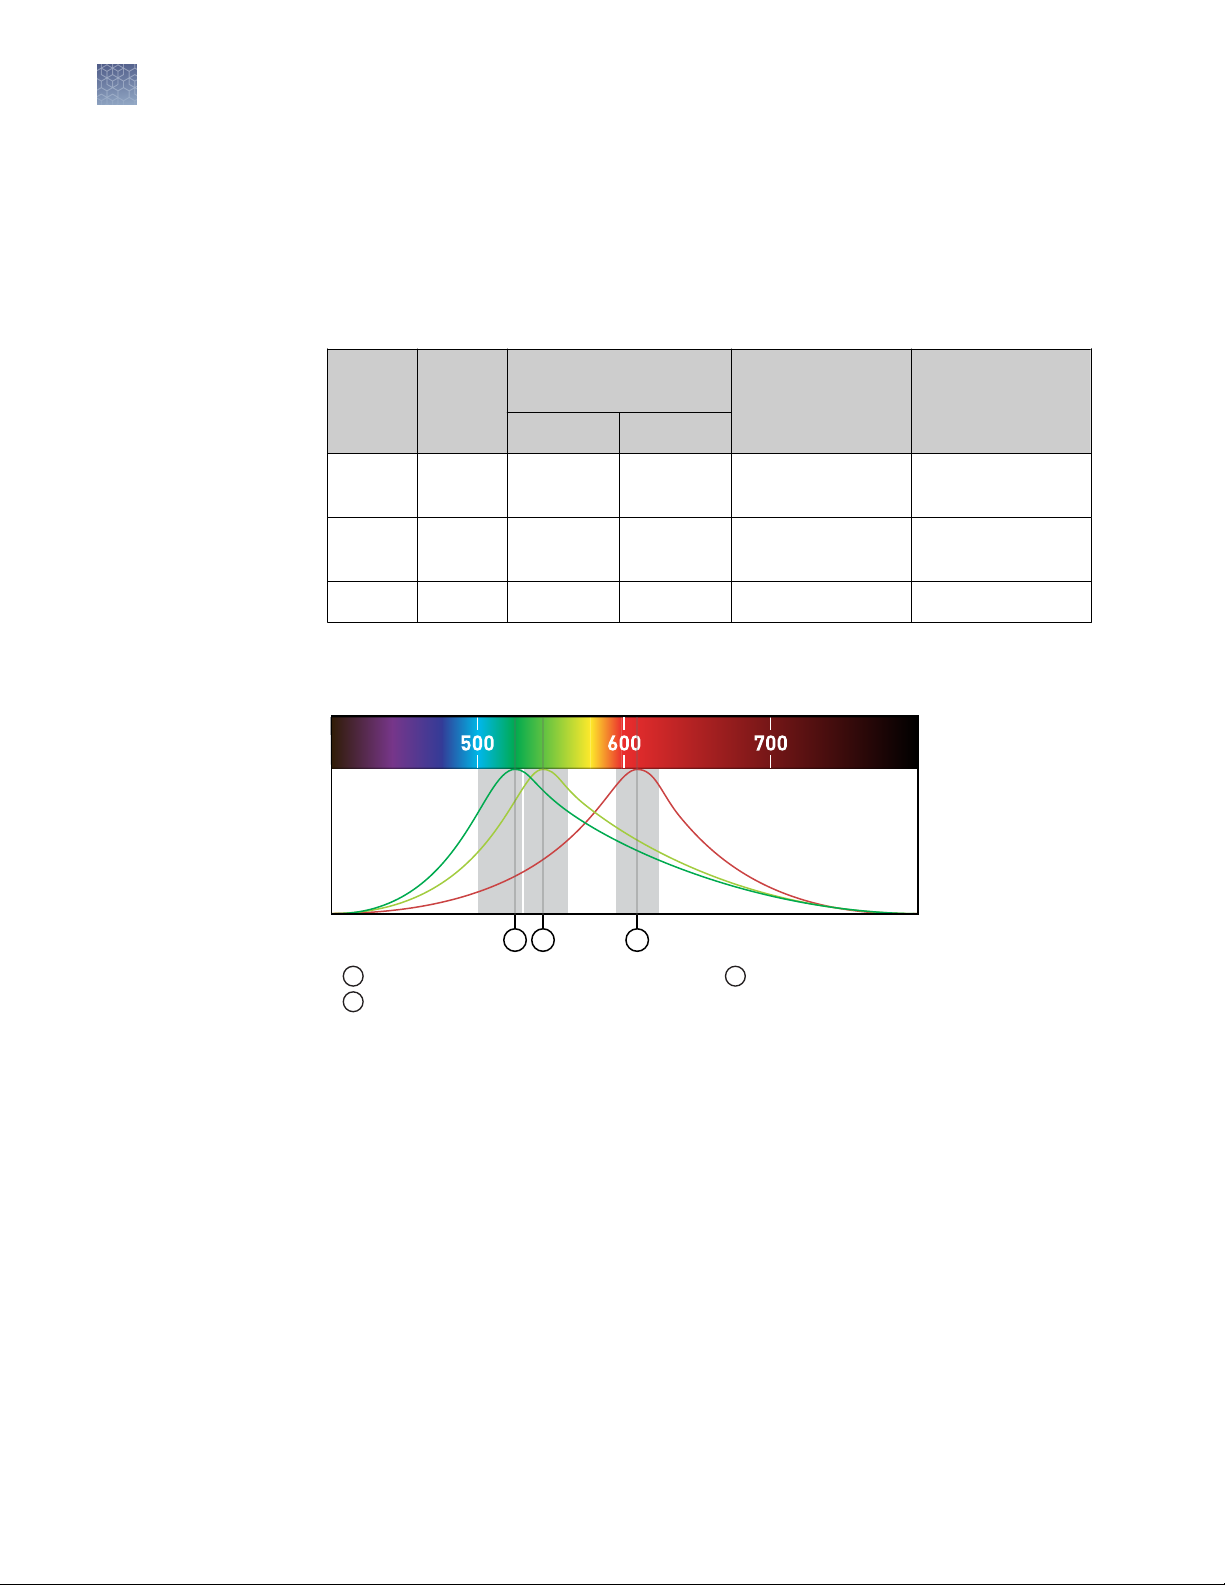
Filters
Wavelength
(nm)
1
2
3
x1-m1 x2-m2 x4-m4
Emission
Spectra
Chapter 1
1
Instrument hardware description
Product information
Instrument filters and supported dyes
System dyes
The instrument use a coupled three-color lter set that supports the dyes shown in the
following table and gure. For more information about available spectral dye
calibration kits, contact Support.
Filter wavelength
Peak
filter
Color
(nm)
[1]
Factory-calibrated
dyes
Example
custom dyes
Excitation Emission
x1-m1 Blue 470 ± 15 520 ± 15
x2-m2 Green 520 ± 10 558 ± 12 VIC
x4-m4 Orange 580 ± 10 623 ± 14 ROX™, JUN
[1]
The central wavelengths are the optimized wavelengths.
[2]
The HEX™ and TET™ dyes from Thermo Fisher Scientific fall within the emission wavelength range of the
system, therefore they can be added and adapted for use on the instrument.
FAM™,
SYBR™ Green
™
SYT09
JOE™,
HEX™, TET™
™
Texas Red
[2]
™
10
1
x1-m1 — FAM™, SYBR™ Green
2
x2-m2 — VIC
™
3
x4-m4 — JUN™, ROX™, Texas Red
™
Custom dyes
The instrument can run assays designed with custom dyes. Custom dyes include the
following:
• Dyes that are not supplied by Thermo Fisher Scientic.
• Dyes or formulations of dyes that are not system dyes for the instrument.
To use a custom dye on the instrument, review the following requirements.
• Calibrate the instrument for the custom dye (see “Calibrate custom dyes“ on
page 62).
• Ensure that the custom dye excites and emits within the wavelength range of the
lters (see the lter-wavelength table in “System dyes“).
• Select a custom dye that does not overlap with other dyes used in the run (see the
lter-wavelength table in “System dyes“).
QuantStudio™ 1 Real-Time PCR System Installation, Use, and Maintenance Guide
Page 11

1
2
3
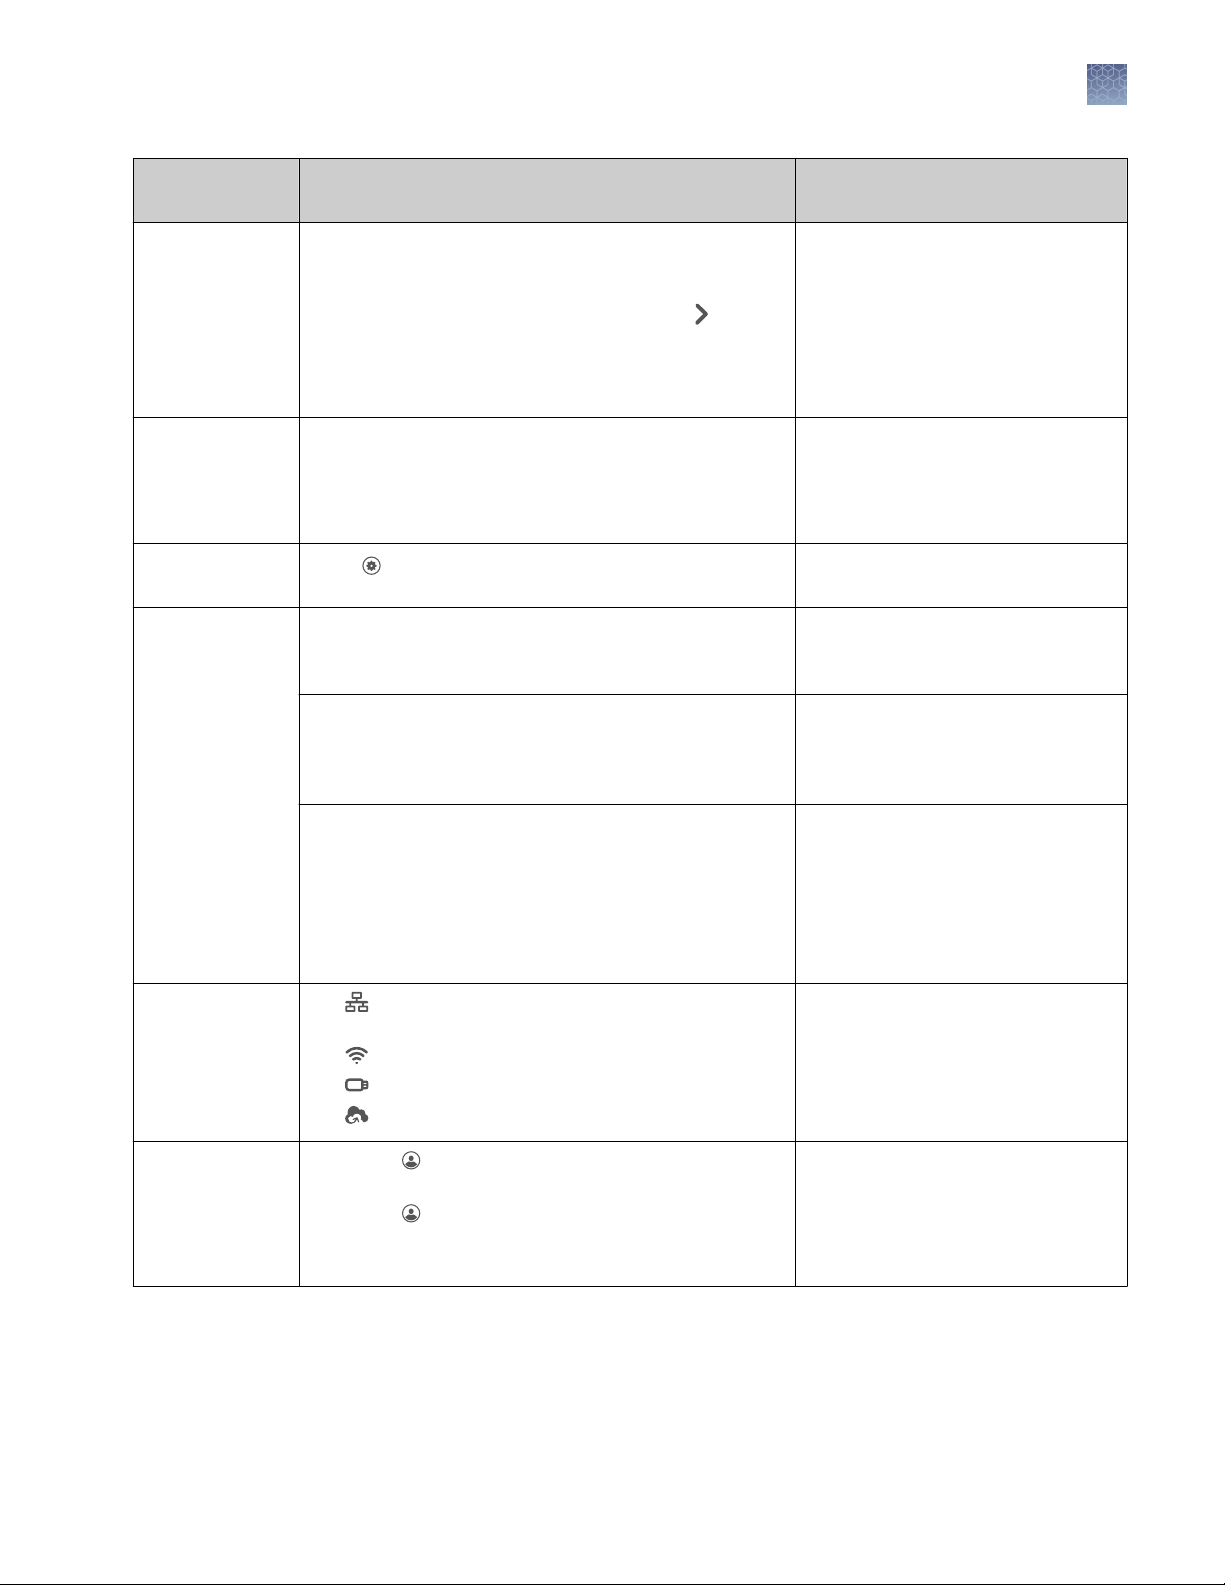
Parts of the instrument
Chapter 1 Product information
Instrument hardware description
1
Touchscreen – Controls the instrument.
2
USB port – For connection to an external network drive or external data storage device.
3
Instrument drawer – Contains sample plate.
The instrument includes three additional USB ports on the back of the instrument.
Note: The instrument recognizes only one external storage device at a time for data
transfer.
1
QuantStudio™ 1 Real-Time PCR System Installation, Use, and Maintenance Guide
11
Page 12

4
3
9
1
5
6
8
7
2
Chapter 1 Product information
1
Instrument hardware description
Parts of the home screen
1
Avatar and Instrument name
2
Help icon
3
Drawer status
4
Status dial
5
Current user name; instrument block type
Table 2 Parts of the home screen
Element of the
home screen
Avatar and
Function For more information, see...
Set by the administrator to uniquely identify instrument. “Manage the instrument name
Instrument name
Help icon Touch to launch the touchscreen Help system to access
step-by-step instructions.
Drawer status
• — The drawer is locked. The drawer locks during
experiment runs, calibration runs, and self
verification test runs. The drawer automatically
unlocks when a run is complete.
• — The drawer is unlocked.
• Drawer is open — The drawer is open. No message
displays when the drawer is closed.
6
Settings button
7
Buttons for accessing Experiment
Template files (EDT)
8
Connectivity icons
9
Sign In (or My Profile) button
(Administrator only)“ on page 31.
—
—
12
QuantStudio™ 1 Real-Time PCR System Installation, Use, and Maintenance Guide
Page 13
Chapter 1 Product information
Instrument hardware description
1
Element of the
home screen
Status dial
Current user
name and block
type
Settings button Touch Settings to configure, calibrate, or learn about
Buttons for
accessing
experiment and
template files
• When the instrument is in use — Displays the
sample block temperature, the elapsed run time,
and the run status.
You can swipe the dial to the left or touch to
access real-time views of the run.
• When the instrument is not in use — Displays Set up
run. You can start a run by touching the status dial.
Displays the user name of the current signed-in user and
the instrument block type.
Note: If no user is signed-in, the instrument defaults to
the Guest profile.
the instrument.
Load Experiment — Touch to open a user-created EDT
file from a Cloud account, USB, instrument folder, or
network drive.
Open Template — Touch to open a system EDT template
file.
Function For more information, see...
—
—
Chapter 3, “Configure the instrument
and manage instrument profiles“.
“Run an experiment from a saved
file“ on page 40 .
“Create and run an experiment from
a template“ on page 40“Run an
experiment from a saved file“ on
page 40 .
Connectivity icons
Sign In button
(My Profile button
when a user is
signed in)
Run Last — Touch to open the last EDT file run on the
instrument.
• If you are signed-in, the file opened will be the last
file you ran when signed-in.
• If you are not signed-in, the file opened will be the
last file the guest profile ran.
• — The instrument is connected to a wired
network.
• — The instrument is wirelessly connected.
• — A USB drive is plugged into the instrument.
• — The instrument is linked to a Cloud account.
• Touch Sign In to sign into an instrument profile
and link to a Cloud account.
• Touch My Profile to change instrument profile
settings, link to a Cloud account, or lock the
instrument during a run.
“Repeat the last instrument run“ on
page 41.
—
“Sign in“ on page 21.
QuantStudio™ 1 Real-Time PCR System Installation, Use, and Maintenance Guide
13
Page 14
Chapter 1 Product information
1
Software description
Software description
Instrument, desktop, and cloud software features
The instrument and the software (desktop and cloud) include the features described
in the following table.
Feature Instrument Desktop Cloud
Use as guest (no sign in) 3 3 —
Create templates (unlocked or locked) — 3 3
Edit unlocked templates 3 3 3
Edit locked templates (password
assigned by template creator required)
Load system or user-created templates
(EDT file) to instrument
Change experiment settings in template
(EDT file) loaded on the instrument
Settings that can be changed in a locked
template (no password required):
• Properties: All settings
• Method: No changes allowed
• Plate: Sample names
Settings that can be changed in an
unlocked template:
• Properties: All settings
• Method: All settings
• Plate: Sample names
— 3 3
3 3 —
3
— —
14
Load plate in instrument 3 — —
Start run 3 3 —
View real-time data during a run 3 3 3
View instrument status (running,
calibration needed, and so on)
Analyze results — 3 3
Set calibration reminders 3 — 3
Review exported calibration or RNase P
verification results
QuantStudio™ 1 Real-Time PCR System Installation, Use, and Maintenance Guide
3 — 3
— 3 3
(
only RNase P
)
Page 15

Chapter 1 Product information
Software description
1
Folders, templates, experiments, and projects
Term
Folders in Load
Experiment
Experiment
Template File (EDT)
Experiment Run
File (EDS)
Definition Supported in
Location in which you can store templates (EDT
files) on the instrument:
• My Instrument – Displayed if you are signed in
• Public – Location in which all experiments run
by guest users are stored
• USB – USB for manual transfer to and from a
computer
• Post Read – If you run an endpoint experiment,
the pre-read experiment is automatically saved
in this folder for post-read analysis
Default settings for an instrument run, can be
modified before instrument run.
Two types:
• Factory-provided, accessed from Open
Template (instrument) or Create Experiment
(desktop or cloud)
• User-created, accessed from Load Experiment
Settings and data for a completed instrument run. Instrument
Instrument
Instrument
Desktop
Cloud
Desktop
Template and
experiment
components
Properties
Method
Project Function in the Cloud Data Manager that is used for
secondary analysis applications. Does not apply to
the cloud software, which is a primary analysis
application.
Instrument Desktop Cloud
• Experiment file name
• Reagent information (Reagent
barcode, Lot#)
• Plate barcode
• Data destination (location for
auto-transfer of data)
• Comments (Tags are not used
at this time)
Thermal cycling conditions Thermal cycling conditions
• Experiment file name
• Plate barcode
• User name
• Instrument type
• Block type
• Experiment type
• Chemistry (reagent information)
• Run mode
• Comments
• (
Cloud software only
) Notifications
Cloud
Cloud
QuantStudio™ 1 Real-Time PCR System Installation, Use, and Maintenance Guide
15
Page 16

Chapter 1 Product information
1
Supported options for instrument and computer connections
Template and
experiment
components
Instrument Desktop Cloud
Plate Sample names
You cannot edit targets/SNP assays
or tasks on the instrument.
Run Start and monitor a run in progress
View: Time remaining and
Temperature, Method, Plots
Pause, Resume, Stop a run
Results Not applicable Review plots
Export Not applicable Export results
Third-party software
Before installing third-party software on the computer running QuantStudio™ Design
and Analysis Desktop Software, conrm that the third-party software will not do the
following:
• Restrict Ethernet communication.
• Interfere with instrument or computer operation.
Define and assign samples, targets or SNP assays, and
tasks in the Quick Setup and Advanced Setup panes of the
Plate tab.
Start and monitor a run in
progress
View: Time remaining and
Temperature, Method, Plots
Monitor a run in progress
(link to Thermo Fisher Cloud
Instrument Details)
View: Time remaining and
Temperature, Method, Plots
Supported options for instrument and computer connections
We support the following direct, networked (LAN– local area network), or Cloud
congurations. Congurations other than those listed are not recommended. Select a
conguration that meets the needs of your laboratory's instrument, software, and
workow requirements.
IMPORTANT! Do not connect both an Ethernet cable and the Wi-Fi module
(Cat. No. A26774) to the instrument. Conguring the instrument for both wired and
wireless connection can interfere with instrument operation.
16
QuantStudio™ 1 Real-Time PCR System Installation, Use, and Maintenance Guide
Page 17

LAN
LAN
LAN
Supported options for instrument and computer connections
Chapter 1 Product information
Note: For detailed information about networking your instrument, see the
QuantStudio™ 1 Real-Time PCR System IT Checklist (Pub. No. MAN0018164).
Direct configuration option
• A computer provided by Thermo Fisher Scientific with the QuantStudio™ Design and Analysis Desktop Software
• Computer‑to‑instrument connection:
– Direct, wired connection between the computer and the instrument
using an Ethernet cable
1
IMPORTANT! A direct instrument‑to‑computer connection
with the LAN or the Cloud configurations.
Networked configuration option
• A computer provided by Thermo Fisher Scientific with the QuantStudio™ Design and Analysis Desktop Software
• The computer and instrument must be on the same subnet mask.
• Computer‑to‑LAN connection
– Wired connection to the network using an Ethernet cable –
– Wireless connection to the network
• Instrument‑to‑LAN connection
– Wired connection to the network using an Ethernet cable –
– Wireless connection to the network using the instrument Wi‑Fi module
Thermo Fisher Cloud configuration option
• Internet access and a computer with the Chrome™ web browser to access the Cloud
• Computer‑to‑Cloud connection
– Wired connection to the internet using an Ethernet cable –
– Wireless connection to the internet
(select an option)
(select an option)
(select an option)
:
cannot
:
:
be combined
or
–
or
–
or
–
• Instrument‑to‑Cloud connection
– Wired connection to the network using an Ethernet cable –
– Wireless connection to the network using the instrument Wi‑Fi module
QuantStudio™ 1 Real-Time PCR System Installation, Use, and Maintenance Guide
(select an option)
:
or
–
17
Page 18

Chapter 1 Product information
1
Experiment types
Experiment types
Purpose
Standard curve experiment
Determines absolute
target quantity in
samples.
Relative standard curve experiment
Determines relative
target quantity in
samples.
Description
1. The software measures amplification of the target in a standard dilution series and in
test samples.
2. The software generates a standard curve using data from the standard dilution series.
3. The software uses the standard curve to interpolate the absolute quantity of target in
the test samples.
1. The software measures amplification of the target of interest and of an endogenous
control target in a standard dilution series, in a reference (calibrator) sample, and in
test samples.
The endogenous control is a target that is expressed equally in all samples; examples of
endogenous controls are β‐actin, GAPDH, and 18S ribosomal RNA. The software can
algorithmically incorporate multiple endogenous control targets in relative
quantification calculations.
The reference sample is used as the basis for relative quantification results (or
1× sample). For example, in a study of drug effects on gene expression, an untreated
control is an appropriate reference sample.
2. The software generates standard curves for the target of interest and the endogenous
control using data from the corresponding standard dilution series.
3. The software uses the standard curves to interpolate the quantities of the target of
interest and the endogenous control in each sample. The target quantity in each sample
is then normalized to the sample's endogenous control quantity.
4. To determine the relative quantity of the target in test samples, the software divides the
normalized target quantity in the sample by the normalized target quantity in the
reference sample.
Comparative C
Determines relative
target quantity in
samples.
(DDCt) experiment
t
18
1. The software measures amplification of the target of interest and of an endogenous
control target in a reference (calibrator) sample and in test samples.
The endogenous control is a target that is expressed equally in all samples; examples of
endogenous controls are β‐actin, GAPDH, and 18S ribosomal RNA. The software can
algorithmically incorporate multiple endogenous control targets in relative
quantification calculations.
The reference sample is used as the basis for relative quantification results (or
1× sample). For example, in a study of drug effects on gene expression, an untreated
control is an appropriate reference sample.
2. The measurements for the target of interest are normalized to the endogenous control.
3. To determine the relative quantity of the target in test samples, the software compares
the normalized ΔCq (ΔCt or ΔCrt) for the sample to the normalized ΔCq (ΔCt or ΔCrt) for
the reference sample.
QuantStudio™ 1 Real-Time PCR System Installation, Use, and Maintenance Guide
Page 19

Chapter 1 Product information
Experiment types
1
Purpose
Genotyping experiment
Detects single
nucleotide
polymorphism (SNP)
variants of a target
nucleic acid
sequence.
Presence/absence experiment
Determines the
presence or absence
of a target nucleic
acid sequence in a
sample.
Description
Genotyping experiments use preformulated TaqMan® SNP Genotyping Assays that include
the following components:
• Two sequence-specific primers for amplification of sequences containing the SNP of
interest
• Two allele-specific TaqMan® probes for Allele 1 and Allele 2
1. The software normalizes the fluorescence of the reporter dyes to the fluorescence of
2. The software plots the normalized reporter dye signal of each sample well on an Allelic
3. The software algorithmically clusters the sample data, and assigns a genotype call to
The software calls the target present or absent based on an algorithmically determined call
threshold. (The call threshold is different from the Ct threshold; the Ct threshold is not used
to make calls.)
the passive reference dye in each well.
Discrimination Plot, which contrasts the reporter dye intensities of the allele-specific
probes.
the samples of each cluster according to its position on the plot.
Melt curve experiment
Determines the
melting temperature
(Tm) of the
amplification
products of a PCR
that used
intercalating dyes.
In the software, melt curve analysis is included in the default run method for any experiment
type that uses intercalating dyes.
1. The software plots a melt curve based on the fluorescence of the dye with respect to
change in temperature.
2. Using the melt curve, the software calculates the melting temperature (Tm).
QuantStudio™ 1 Real-Time PCR System Installation, Use, and Maintenance Guide
19
Page 20

2
■
Precautions for use ................................................... 20
■
Power on the instrument .............................................. 21
■
Power o the instrument .............................................. 21
■
Sign in .............................................................. 21
■
Sign out ............................................................. 21
■
Load and unload a plate in the QuantStudio™ 1 Real-Time PCR Instrument .. 22
■
Transfer, view, or manage les and results ............................... 23
Precautions for use
General procedures
to operate the instrument
CAUTION! PHYSICAL INJURY HAZARD. Do not remove the instrument
cover. There are no components inside the instrument that you can safely
service yourself. If you suspect a problem, contact technical support.
CAUTION! FIRE HAZARD. For continued protection against the risk of re,
replace fuses only with listed and certied fuses of the same type and rating as
those currently in the instrument.
CAUTION! PHYSICAL INJURY HAZARD. During instrument operation, the
sample block temperature can reach 100°C. Allow it to cool to room
temperature before handling.
CAUTION! Before using a cleaning or decontamination method other than
those recommended by Thermo Fisher Scientic, conrm with Thermo Fisher
Scientic that the proposed method will not damage the instrument.
CAUTION! Use at caps for tubes. Rounded caps can damage the heated cover.
20
QuantStudio™ 1 Real-Time PCR System Installation, Use, and Maintenance Guide
Page 21

Power on the instrument
Touch anywhere on the touchscreen to determine if the instrument is in sleep
1.
mode. If the home screen is displayed, the instrument is already powered on.
If the home screen does not display,
2.
power on the instrument by pressing the
switch on the rear panel.
If left unaended (for about two hours), the
instrument automatically enters sleep mode
(enabled by default) to conserve power.
Note: To customize the sleep mode seing,
touch
Seings4Sleep Mode.
Seings4Instrument
Power off the instrument
Chapter 2
General procedures to operate the instrument
Power on the instrument
2
Sign in
The instrument operates in low-power mode when not in use. However, the
instrument can be powered o completely so that the components use no power.
Note: To power o the instrument for >1 week, see “Prepare the instrument to store,
move, or ship“ on page 74.
Power o the instrument using the power switch on the back of the instrument.
1.
Power o the computer.
2.
Create an instrument prole before signing into the instrument. See “Create a new
instrument prole“ on page 27.
Note: An instrument prole is a user account specically for the instrument. It is not
related to any other user account for the system or software.
In the home screen, touch Sign In.
1.
Touch Sign In, then select your username.
2.
Enter your PIN, then touch Enter.
3.
Sign out
In the home screen, touch
1.
Touch Sign Out.
2.
QuantStudio™ 1 Real-Time PCR System Installation, Use, and Maintenance Guide
My Prole.
21
Page 22

Chapter 2 General procedures to operate the instrument
2
Load and unload a plate in the QuantStudio™ 1 Real-Time PCR Instrument
Load and unload a plate in the QuantStudio™ 1 Real-Time PCR
Instrument
CAUTION! Use at caps for 0.2-mL tubes. Rounded caps can damage the
heated cover.
Load the plate.
1.
Open the instrument drawer.
a.
Load the plate onto the plate adapter so that the following criteria are met.
b.
• Well A1 of the plate is in the top-left corner of the plate adapter.
• The barcode faces the front of the instrument.
Note: Do not remove the black plate adapter before loading a plate or tube
strips. If used, tube strips can t loosely in the adapter, but the heated cover
will apply the appropriate pressure to seat the tube strips securely in the
adapter.
Close the instrument drawer.
c.
When the run ends, unload the plate.
2.
Open the instrument drawer.
a.
Remove the plate.
b.
Close the instrument drawer.
c.
CAUTION! PHYSICAL INJURY HAZARD. During instrument operation,
the plate temperature can reach 100°C. Allow it to cool to room
temperature before handling.
22
QuantStudio™ 1 Real-Time PCR System Installation, Use, and Maintenance Guide
Page 23

Chapter 2 General procedures to operate the instrument
Transfer, view, or manage files and results
In the home screen, when a run ends, touch Transfer File.
Transfer EDS
files
from the
instrument home
screen
1.
Select the data destination for the EDS le.
2.
Navigate to and select a folder.
3.
Touch OK.
4.
Touch Transfer.
5.
Transfer, view, or manage files and results
2
View run history
and delete or
transfer files from
the instrument
Manage templates
(EDT files)
Note: Touch
In the home screen, touch Seings4Run History.
• Touch an individual run record to view its details, then complete one of the
following actions:
– Touch Delete to delete the run record.
– Touch Transfer to export the run data.
• Touch Manage to select multiple run records for simultaneous viewing, deletion,
or transfer.
Note:
Guests (users not signed-in) can only view guest run records.
·
Users signed into their instrument proles can also view their own run records.
·
Administrators can view all run records.
·
Note: If the connection between the instrument and the desktop software is
interrupted during the run, the instrument still completes the run. However, the run
data (EDS le) must be transferred from the instrument to the desktop software using
a USB drive or a network drive.
This feature applies to templates (EDT les) on a
manage run results les (EDS les), see “Transfer EDS les from the instrument home
screen“ on page 23.
Seings4Run History to transfer EDS les at any time.
USB or in My Instrument. To
In the home screen, touch Load Experiment.
1.
Touch USB or My Instrument.
2.
Touch Manage Files.
3.
(Optional) Navigate through the My Instrument, Public, USB, and Post Read
4.
folders to access an EDT le. Folder availability depends on your sign-in status.
Touch one or more les to select for managing.
5.
QuantStudio™ 1 Real-Time PCR System Installation, Use, and Maintenance Guide
23
Page 24

Chapter 2 General procedures to operate the instrument
2
Transfer, view, or manage files and results
Delete or copy the les.
6.
• Touch Delete Files, then conrm deletion.
• Touch Copy Files, select a le destination, then touch Paste Files.
Touch Done.
7.
24
QuantStudio™ 1 Real-Time PCR System Installation, Use, and Maintenance Guide
Page 25

3
Configure the instrument and
manage instrument profiles
■
Initial start-up ....................................................... 25
■
Installation and instrument verication ................................. 26
■
Use the instrument without signing in .................................. 26
■
Create an administrator instrument prole during initial start-up ........... 27
■
Create a new instrument prole ........................................ 27
■
Overview of Seings .................................................. 28
■
Manage instrument seings ........................................... 30
■
Learn about the instrument ............................................ 34
■
Manage home screen notications ...................................... 35
■
Manage maintenance, service, and calibrations ........................... 35
Initial start‑up
■
Manage Users ....................................................... 36
■
Link an instrument prole with the Thermo Fisher Cloud ................. 38
Perform these tasks during initial instrument start-up or after you restore factory
defaults (see “Restore factory defaults“ on page 34).
(Optional) Select one of the following options.
1.
• Congure the instrument for either wired connection or wireless network
connection (see “Congure the network“ on page 32).
• Touch Neither/Decide Later.
(Optional) Enter an instrument name (see “Manage the instrument name
2.
(Administrator only)“ on page 31).
Set the date and time (see “Set the date and time (Administrator only)“ on
3.
page 32).
Select one of the following options.
4.
• Select a Cloud region (see “Select a Cloud region (Administrator only)“ on
page 32).
• Touch Next to continue.
QuantStudio™ 1 Real-Time PCR System Installation, Use, and Maintenance Guide
25
Page 26

Chapter 3 Configure the instrument and manage instrument profiles
3
Installation and instrument verification
Create an administrator prole (see “Create an administrator instrument prole
5.
during initial start-up“ on page 27).
Select one of the following options.
6.
• Link the instrument prole to the Thermo Fisher Cloud (see “Link an existing
instrument prole with the Thermo Fisher Cloud“ on page 38).
• Touch Skip.
Installation and instrument verification
Before the rst use of the instrument, complete the following tasks:
• Install the instrument (see “Unpack and install the instrument“ on page 79).
• Verify instrument performance (see “Perform instrument verication using
RNase P plates“ on page 57).
Note:
Instruments are factory calibrated, so no calibration is necessary at installation.
·
However, we recommend that you verify instrument performance before using
the instrument.
Regular calibration and verication should be performed according to the
·
calibration and verication schedule (see “Calibration and verication
schedule“ on page 49).
Use the instrument without signing in
If the instrument is congured by an Administrator to allow guest access
( Seings4Manage Users4Sign In Required set to o), you can use the
instrument without signing in.
The following limits are in place if you do not sign in to the instrument:
• All actions are recorded to Guest user prole.
• You have access only to the Public folder for selecting and storing experiments.
• You cannot transfer data to the Cloud (only to USB or network drive).
26
QuantStudio™ 1 Real-Time PCR System Installation, Use, and Maintenance Guide
Page 27

Chapter 3 Configure the instrument and manage instrument profiles
Create an administrator instrument profile during initial start-up
Create an administrator instrument profile during initial start-up
During initial start-up, the user is automatically prompted to create an administrator
instrument prole. See “Initial start-up“ on page 25.
• The rst instrument prole that is created during installation is given
administrator privileges.
• Administrators can grant administrative privileges to other users. See “Manage
all instrument proles (Administrator only)“ on page 37.
Touch Name, enter a username, then touch Done.
1.
Touch PIN, enter a four-digit numerical password, then touch Enter.
2.
Note: Touch the Show PIN checkbox to switch PIN display on or o.
Touch Conrm PIN, then repeat step 2.
3.
Touch Create prole.
4.
3
Create a new instrument profile
In the home screen, touch
1.
Touch Name, enter a username, then touch Done.
2.
Touch PIN Code, enter a four-digit numerical password, then touch Enter.
3.
Note: Touch the Show PIN checkbox to switch PIN display on or o.
Touch Conrm PIN, then repeat step 2.
4.
Touch Create prole.
5.
Sign in to the prole you just created. See Sign in.
6.
Note: To enable access to the Thermo Fisher Cloud, see “Link an instrument prole
with the Thermo Fisher Cloud“ on page 38.
Sign In, then touch Get Started.
QuantStudio™ 1 Real-Time PCR System Installation, Use, and Maintenance Guide
27
Page 28
Chapter 3 Configure the instrument and manage instrument profiles
3
Overview of Settings
Overview of Settings
Touch Seings in the home screen to congure seings as needed.
Access to many seings are restricted to administrator instrument proles.
Touch for step-by-step instructions on conguring seings.
Options
Instrument Settings
Instrument Name
(Administrator only)
Sleep Mode Enable the instrument to enter a standby mode after a set length of inactivity.
Heated Cover Temperature Set the idling temperature for the heated cover (before it enters sleep mode).
Network Drive
Insert Plate Reminder Enable a reminder to insert a plate before starting a run from the instrument.
OEM Connection Only
(Administrator only)
Cloud Region
(Administrator only)
[1]
Description
Enter a unique instrument name, and
Specify a default network drive for transferring files from the instrument.
Required for API access to the instrument. When enabled, the software (desktop and
cloud) cannot connect to the instrument.
API access to the instrument is exclusive to authorized OEM partners.
Specify the regional server location to access the Thermo Fisher Connect Dashboard.
Note: Once you set a Cloud region, restore factory defaults to change the region.
(optional)
set an instrument avatar.
28
QuantStudio™ 1 Real-Time PCR System Installation, Use, and Maintenance Guide
Page 29

Chapter 3 Configure the instrument and manage instrument profiles
Options Description
Date/Time Set time zone and date and time formats.
Network Connection Set wired or wireless network connection for the instrument.
Restore Factory Defaults Restore the instrument to the factory settings.
IMPORTANT! Back up the instrument before restoring factory defaults (see “Backup
or restore the instrument“ on page 70).
Note: Restoring an instrument to the factory defaults results in the following setting
changes:
Instrument profiles and files stored on the instrument are deleted, including all EDS
·
files and any custom dye calibrations.
The most recent valid ROI/Uniformity, Background, and system dye calibrations are
·
not deleted.
Language Specify the language to display on the touchscreen.
About Instrument
Overview of Settings
3
About Instrument Displays the instrument Model Name, Block Serial Number, and Firmware Version.
License Agreement Displays the End User Software License Agreement and the Limited Product Warranty.
You can export the License Agreement to a USB drive.
Notifications
— Enable home screen notifications of instrument errors and software updates. This
function is not related to the Notifications function in the cloud software.
The number of new, unviewed notifications displays over Settings in the home screen.
Maintenance and Service
Software Update
(Administrator only)
Monitoring
(Administrator only)
Instrument Statistics Displays instrument usage information including Block Cycle Count and LED Life.
Calibrations
Update the instrument software.
Enable the Remote Monitoring Service to automatically notify Thermo Fisher Scientific
support teams in real-time of potential instrument problems.
The service monitors and sends general
monitor or send
• Perform calibrations
– ROI and Uniformity
– Dye
– Custom (including Background calibration)
• View calibration history and set calibration reminders in History and Reminders
customer
data.
instrument
data, but the service does not
RNase P Verification Perform instrument performance verification using an RNase P plate.
Self Verification Test Check the instrument hardware functions.
Log View and export Instrument Run Log.
QuantStudio™ 1 Real-Time PCR System Installation, Use, and Maintenance Guide
29
Page 30

Chapter 3
3
Manage instrument settings
Options Description
Backup / Restore
Ship Prep Mode Place the instrument in a safe state for moving or long term storage.
Run History
— Displays the instrument runs and whether the EDS file for the run was transferred.
Manage Users
Configure the instrument and manage instrument profiles
• Backup the instrument
• Restore an instrument backup
Touch a run to view the details or to transfer or delete (Administrator only) the EDS file.
[1]
Sign In Required
(Administrator only)
Sign Out Timer
(Administrator only)
Manage Profiles
(Administrator only)
[1]
Also available to standard and guest instrument profiles.
Enable only signed-in users to access the instrument for any task, including accessing
Settings. Enabling this feature disables the guest profile access to the instrument.
Note: Instrument runs must be started from the desktop software, and actions during
an instrument run are automatically logged to the guest instrument profile (even if a
user was signed into the instrument).
Set the time length of inactivity before a user is automatically signed out.
Access the profile information for the instrument.
Manage instrument settings
In the home screen, touch Seings4Instrument Seings to access the following
functions.
“Manage the instrument name (Administrator only)“ on page 31
“Enable Sleep Mode“ on page 31
“Set the idling temperature for the heated cover“ on page 31
30
“Congure the network drive“ on page 31
“OEM connection only (Administrator only)“ on page 31
“Select a Cloud region (Administrator only)“ on page 32
“Set the date and time (Administrator only)“ on page 32
“Congure the network“ on page 32
“Restore factory defaults“ on page 34
“Select a language“ on page 34
QuantStudio™ 1 Real-Time PCR System Installation, Use, and Maintenance Guide
Page 31

Manage the instrument name (Administrator only)
Chapter 3 Configure the instrument and manage instrument profiles
In the home screen, touch Seings4Instrument Seings4Instrument
1.
Name.
Touch the Instrument Name eld, enter an instrument name, then touch Done.
2.
(Optional) Touch Add Avatar to associate an avatar with the instrument.
3.
Insert a USB drive with image les to use this option.
Touch OK.
4.
Manage instrument settings
3
Enable Sleep Mode
Set the idling temperature for the heated cover
Configure the
network drive
In the home screen, touch
1.
Slide the control On to enable sleep mode.
2.
Touch Edit Time, then enter the time length of inactivity before the instrument
3.
enters sleep mode.
Touch Enter, then touch OK.
4.
In the home screen, touch
1.
Idle Temperature.
Slide the control On to set the idling temperature for the heated cover.
2.
Touch the Edit Temperature eld, then enter the desired idling temperature.
3.
Touch Enter, then touch OK.
4.
In the home screen, touch Seings4Instrument Seings4Network Drive.
1.
Note: Contact a representative from your information technologies department
for the IP address.
Enter a Drive Location.
2.
Seings4Instrument Seings4Sleep Mode.
Seings4Instrument Seings4Heated Cover
Enter a Domain Name, User Name, and Password, if required.
3.
Touch Connect.
4.
OEM connection
only
(Administrator
This seing is required for API access to the instrument. When enabled, the desktop
software cannot connect to the instrument. Do not access unless instructed to do so by
a service representative.
only)
QuantStudio™ 1 Real-Time PCR System Installation, Use, and Maintenance Guide
31
Page 32

Chapter 3 Configure the instrument and manage instrument profiles
3
Manage instrument settings
Select a Cloud region (Administrator only)
Set the date and time (Administrator only)
During the initial startup, you will be automatically prompted to select a Cloud
region. Return to the selection through Seings, if necessary.
In the home screen, touch Seings4Instrument Seings4Cloud Region.
1.
Touch a region.
2.
The server used to store your data is located in this region.
Touch OK.
3.
In the home screen, touch
1.
Select a time zone from the dropdown list.
2.
Select a date format.
3.
Touch Date Format, then select the preferred date format.
a.
Touch Next, touch the date eld, then enter the date.
b.
Touch Enter, then touch Done.
c.
Select a time format.
4.
Touch Time Format.
a.
Seings4Instrument Seings4Date/Time.
Configure the
network
Slide the control to select a 12-hour or 24-hour clock.
b.
Touch Next, touch the time eld, then enter the time.
c.
Touch Enter, then touch Done.
d.
Touch Done.
5.
IMPORTANT! Congure the instrument for either wired connection or wireless
connection but not both.
“Set up a wired connection“ on page 33
“Set up a wireless connection“ on page 33
32
QuantStudio™ 1 Real-Time PCR System Installation, Use, and Maintenance Guide
Page 33

Chapter 3 Configure the instrument and manage instrument profiles
Manage instrument settings
Set up a wired connection
In the home screen, touch Seings4Instrument Seings4Network
1.
Connection4 Wired.
In the Network Conguration screen, touch a radio buon to connect to a
2.
network either by DHCP or by a Static IP address.
Option Action
Automatic Touch DHCP.
3
Manual
Note:
dynamically. For static addresses, you need to know the IP address for the
instrument, the Subnet Mask, and the Default Gateway.
Touch OK.
3.
1. Touch Static IP.
2. Enter the IP address for the instrument, the Subnet Mask, the
Default Gateway, and
Secondary DNS Server.
Addresses are in the form of X.X.X.X, where each X is a number
from 0 to 255.
Ask your system administrator if the IP address is assigned statically or
(optional)
the Primary DNS Server and the
Set up a wireless connection
In the home screen, touch
1.
Connection4 Wireless to display a list of the available networks.
Select a network or touch Join other network, enter the network password, then
2.
touch Enter.
If you select Join other network, enter the network name and security type.
Touch Join to continue.
3.
Seings4Instrument Seings4Network
In the Network Connection Complete screen, touch Next.
4.
Touch OK.
5.
In the Network Conguration screen, edit the Network details or touch Done.
6.
QuantStudio™ 1 Real-Time PCR System Installation, Use, and Maintenance Guide
33
Page 34

Chapter 3 Configure the instrument and manage instrument profiles
3
Learn about the instrument
Restore factory defaults
Select a language
IMPORTANT! Back up the instrument before restoring factory defaults (see “Backup
or restore the instrument“ on page 70).
In the home screen, touch Seings4Instrument Seings4Restore Factory
1.
Defaults.
Touch Restore Factory Defaults.
2.
Power O, then power On the instrument to apply the change.
3.
• Instrument proles and les stored on the instrument are deleted, including
all EDS les and any custom dye calibrations.
• The most recent valid ROI/Uniformity, Background, and system dye
calibrations are not deleted.
After restoring factory defaults, perform initial start-up tasks. See “Initial start-up“ on
page 25.
In the home screen, touch Seings4Instrument Seings4Language.
1.
Touch the desired language selection.
2.
Touch OK.
3.
Learn about the instrument
In the home screen, touch Seings4About Instrument to access the following
information.
“View instrument specications“ on page 34
“View and export the License Agreement“ on page 35
View instrument
specifications
In the home screen, touch Seings4About Instrument4About Instrument to
access the following information.
• Model Name
• Wired IP Address
• Wireless IP Address
• Instrument Serial Number
• Block Serial Number
• UUID
• Firmware Version
• Thermal Block Controller
• Instrument Server
• User Interface
34
QuantStudio™ 1 Real-Time PCR System Installation, Use, and Maintenance Guide
Page 35

Chapter 3 Configure the instrument and manage instrument profiles
In the home screen, touch Seings4About Instrument4License Agreement
View and export the License Agreement
1.
to view the license agreement.
Touch Export to export the license agreement.
2.
Touch Done.
3.
Manage home screen notifications
Manage home screen notifications
3
In the home screen, touch
1.
Screen Notications.
Slide the control On or O to enable or disable individual notications, or touch
2.
Clear All to remove all notications.
Touch Close.
3.
Seings4Notications to view and manage Home
Manage maintenance, service, and calibrations
In the home screen, touch
following functions.
“Update instrument software (Administrator only)“ on page 35
“Enable remote instrument monitoring (Administrator only)“ on page 36
“View instrument statistics“ on page 36
Chapter 5, “Calibrate and verify instrument performance“
“View instrument logs“ on page 36
“Backup or restore the instrument“ on page 70
“Prepare the instrument to store, move, or ship“ on page 74
Seings4Maintenance and Service to access the
In the home screen, touch Seings4Maintenance and Service4Software
Update
instrument
software
1.
Update.
Touch USB or Cloud to select the location of the update les.
2.
(Administrator
only)
QuantStudio™ 1 Real-Time PCR System Installation, Use, and Maintenance Guide
When prompted, conrm your request to update the software.
3.
35
Page 36

Chapter 3 Configure the instrument and manage instrument profiles
3
Manage Users
Enable remote instrument monitoring (Administrator only)
In the home screen, touch Seings4Maintenance and Service4Monitoring.
1.
Congure the instrument monitoring seings.
2.
Option Description
Remote
Monitoring
Service
Slide the control On to enable the Remote Monitoring Service.
Enabling the Remote Monitoring Service allows the instrument
to automatically notify Thermo Fisher Scientific support teams in
real time of potential instrument issues. The service monitors
and sends general
monitor or send
instrument
customer
data, but the service does not
data.
View instrument statistics
View instrument logs
Thermo Fisher
Cloud Monitor
Touch OK.
3.
In the home screen, touch Seings4Maintenance and Service4Instrument
Statistics to view the following statistics.
• Disk Space Remaining (MB)
• Block Cycle Count
• Block Degrees Climbed
• LED Life
• RNase P Status
In the home screen, touch Seings4Maintenance and Service4Log.
1.
Touch Instrument Run Log to view the log records.
2.
(Optional) Touch a category on the left to lter the log table by event type.
3.
(Optional) Touch an individual log record to view details.
4.
Slide the control On to enable users to access real‑time
monitoring of amplification plots from the Thermo Fisher Cloud
dashboard.
Manage Users
36
(Optional) Export log records:
5.
• Touch Export4
• Touch Export4 Cloud, then touch Export.
• Touch Export4 Network.
In the home screen, touch Seings4Manage Users to access the following
functions.
“Require instrument prole sign-in (Administrator only)“ on page 37.
“Manage the Sign Out Timer (Administrator only)“ on page 37.
“Manage all instrument proles (Administrator only)“ on page 37.
QuantStudio™ 1 Real-Time PCR System Installation, Use, and Maintenance Guide
USB.
Page 37

Require
instrument profile
sign-in
(Administrator
only)
Chapter 3 Configure the instrument and manage instrument profiles
In the home screen, touch Seings4Manage Users4Sign In Required.
1.
Slide the control On.
2.
Only signed-in users are allowed to access the instrument for any task, including
access to Seings.
Touch Done.
3.
Manage Users
3
Manage the
Sign Out Timer
(Administrator
only)
Manage
instrument
profiles
To
Create a profile
Configure a profile
View or manage all
profiles
In the home screen, touch Seings4Manage Users4Sign Out Timer.
1.
Touch the Edit Time eld, then enter the desired duration of inactivity before
2.
automatic user sign out.
Touch Enter, then touch Done.
3.
Note: An instrument prole is a user account specically for the instrument. It is not
related to any other user account for the system or software.
See
• “Create an administrator instrument profile during initial start-up“ on page 27
• “Create a new instrument profile“ on page 27
• “Link an instrument profile with the Thermo Fisher Cloud“ on page 38
• “Edit an instrument profile“ on page 37
• “Manage all instrument profiles (Administrator only)“ on page 37
Edit an instrument profile
In the home screen, touch
1.
Note: Administrators can also navigate to this screen by touching
Seings4Manage Users4Manage Proles.
Touch Edit.
2.
Select the elds to edit, then make changes.
3.
Touch Done.
4.
My Prole.
Manage all instrument profiles (Administrator only)
In the home screen, access the All Proles tab.
1.
• Touch My Prole4All Proles.
• Touch Seings4Manage Users4Manage Proles4All Proles.
A list of users, the date the prole was created, and the user type displays.
Select the instrument prole to edit.
2.
QuantStudio™ 1 Real-Time PCR System Installation, Use, and Maintenance Guide
37
Page 38

Chapter 3 Configure the instrument and manage instrument profiles
3
Link an instrument profile with the Thermo Fisher Cloud
Edit the prole.
3.
• To delete the prole, touch Delete prole4Delete.
• To reset the PIN, touch Reset PIN4Reset.
– The user will be directed to enter a new PIN at the next sign in.
• To enable or disable administrative privileges, slide the control to
Administrator or Standard, respectively.
Touch Done.
4.
Link an instrument profile with the Thermo Fisher Cloud
Linking your instrument prole with the Thermo Fisher Cloud allows you to access
the following functions:
• View an instrument status from the Cloud.
• Download templates from your Cloud storage to the instrument.
• Transfer run data from the instrument to your Cloud storage.
Link an existing
instrument profile
with the Thermo
Fisher Cloud
Create a new
instrument profile
and link with the
Thermo Fisher
Cloud
To link an instrument prole with the Thermo Fisher Cloud, see the following
sections:
• “Link an existing instrument prole with the Thermo Fisher Cloud“
• “Create a new instrument prole and link with the Thermo Fisher Cloud“
Sign in to your instrument prole. See “Sign in“ on page 21.
1.
Touch
2.
Touch Cloud.
3.
Enter your username and password, then touch Link Account.
4.
Touch Done.
5.
Your instrument prole is linked with the Thermo Fisher Cloud.
Select an option to create a new instrument prole.
1.
• Create an administrator prole (see “Create an administrator instrument
• Create an instrument prole (see “Create a new instrument prole“ on
My Prole.
prole during initial start-up“ on page 27).
page 27).
38
In the Get Started – Cloud screen, enter your username and password.
2.
Touch Link Account.
3.
Your instrument prole is linked with the Thermo Fisher Cloud.
QuantStudio™ 1 Real-Time PCR System Installation, Use, and Maintenance Guide
Page 39

4
Workflow
Create and run experiments on the
instrument
■
Workow ........................................................... 39
■
Run an experiment ................................................... 40
■
Edit an experiment before starting a run ................................. 41
■
View, pause, or stop a run ............................................. 46
■
Transfer EDS les from the instrument home screen ...................... 48
Start the instrument
▼
(Optional)
Load an existing experiment template (EDT file)
Create an experiment template (EDT file)
Start the run from the instrument or the desktop software
(Optional)
Transfer results (EDS file) to the desktop or cloud software and analyze
Sign in to your instrument profile
(Optional)
Modify experiment settings as needed
Load the plate in the instrument
Link to your Cloud account
▼
▼
▼
▼
▼
Monitor the run from the cloud software
▼
or
QuantStudio™ 1 Real-Time PCR System Installation, Use, and Maintenance Guide
39
Page 40

Chapter 4 Create and run experiments on the instrument
4
Run an experiment
Run an experiment
Create and run an experiment from a template
1.
2.
3.
4.
5.
6.
In the home screen, touch Open Template.
(Optional) Touch a category in the left column.
Touch the le name.
(Optional) Enter or edit template properties, including Run File Name (EDS le
name), Plate Barcode, Reagent Information, and Data Destination (see “Enter
or edit template properties“).
(Optional) Edit the run method (see “Edit the run method“ on page 43).
• Add, remove, or edit a step, stage, melt curve, or data collection point.
• Adjust the heated cover temperature, sample volume, or number of cycles.
• Congure ramp rate and pause seings.
(Optional) Dene plate wells with sample names and view Well ID, Targets, or
Dyes (see “Dene, assign, and view well details“).
Run an
experiment from a
saved file
Load a plate into the instrument (see “Load and unload a plate in the
7.
QuantStudio™ 1 Real-Time PCR Instrument“ on page 22).
Touch Start Run.
8.
When prompted, conrm that you inserted a plate.
Note: To disable this reminder, select Do not show again or select
Seings4Insert Plate Reminder in the home screen.
In the home screen, touch Load Experiment.
1.
Touch the appropriate icon to navigate to your le location.
2.
• For les saved to the guest prole, touch My Instrument4Public.
• For pre and post read les, touch My Instrument4Post Read.
Touch the le name.
3.
(Optional) Manage templates in either USB or My Instrument (see
4.
“Manage templates (EDT les)“).
(Optional) Enter or edit template properties, including Run File Name (EDS le
5.
name), Plate Barcode, Reagent Information, and Data Destination (see “Enter
or edit template properties“).
40
(Optional) Edit the run method (see “Edit the run method“ on page 43).
6.
• Add, remove, or edit a step, stage, melt curve, or data collection point.
• Adjust the heated cover temperature, sample volume, or number of cycles.
• Congure ramp rate and pause seings.
QuantStudio™ 1 Real-Time PCR System Installation, Use, and Maintenance Guide
Page 41

Chapter 4 Create and run experiments on the instrument
(Optional) Dene plate wells with sample names and view Well ID, Targets, or
7.
Dyes (see “Dene, assign, and view well details“).
Load a plate into the instrument (see “Load and unload a plate in the
8.
QuantStudio™ 1 Real-Time PCR Instrument“ on page 22).
Touch Start Run.
9.
When prompted, conrm that you inserted a plate.
Note: To disable this reminder, select Do not show again or select
Seings4Insert Plate Reminder in the home screen.
Edit an experiment before starting a run
4
Repeat the last instrument run
This feature applies only to runs started from the instrument and is not available for
runs started from the desktop software. If you are signed-in, this feature applies to the
last run from your instrument prole.
In the home screen, touch Run Last.
1.
(Optional) Enter or edit template properties, including Run File Name (EDS le
2.
name), Plate Barcode, Reagent Information, and Data Destination (see “Enter
or edit template properties“).
(Optional) Edit the run method (see “Edit the run method“ on page 43).
3.
• Add, remove, or edit a step, stage, melt curve, or data collection point.
• Adjust the heated cover temperature, sample volume, or number of cycles.
• Congure ramp rate and pause seings.
(Optional) Dene plate wells with sample names and view Well ID, Targets, or
4.
Dyes (see “Dene, assign, and view well details“).
Load a plate into the instrument (see “Load and unload a plate in the
5.
QuantStudio™ 1 Real-Time PCR Instrument“ on page 22).
Touch Start Run.
6.
When prompted, conrm that you inserted a plate.
Note: To disable this reminder, select Do not show again or select
Seings4Insert Plate Reminder in the home screen.
Edit an experiment before starting a run
Enter or edit template properties
QuantStudio™ 1 Real-Time PCR System Installation, Use, and Maintenance Guide
Access a template (EDT le). For more information, see the following sections.
• “Create and run an experiment from a template“ on page 40.
• “Run an experiment from a saved le“ on page 40.
• “Repeat the last instrument run“ on page 41.
In the Properties screen, touch Edit to enter or edit template properties.
• Edit the le name for the EDS le for the run.
Touch the Run File Name eld.
a.
41
Page 42

Chapter 4
4
Edit an experiment before starting a run
Create and run experiments on the instrument
Enter the name for the EDS le, then touch Done.
b.
• Enter a plate barcode.
Touch the Plate Barcode eld.
a.
Enter or scan the plate barcode, then touch Done.
b.
• Record reagents and their expiration dates.
Touch
a.
Touch Add, or touch an existing reagent, then touch Edit or Delete.
b.
Touch the Name, Type, Lot #, Reagent Barcode, Part #, or Expiration Date
c.
eld to enter individual reagent information.
Touch Done.
d.
• Automatically transfer run data (EDS le) when an instrument run ends.
Touch Data Destination.
a.
Reagent Information.
Touch the appropriate icon to select a data destination.
b.
Under the desired data destination, select Automatically transfer
c.
experiment.
Touch Done.
d.
• Enter a comment.
Touch Comments.
a.
Enter text, then touch Done.
b.
Scan a barcode using the optional barcode scanner
The instrument is compatible with an optional Handheld Barcode Scanner
(Cat. No. 4488442, purchased separately). The barcode scanner reads
Code 128 (alphanumeric), which supports 128 ASCII character barcodes.
Click the Barcode eld.
1.
Hold the scanner 20–30 cm away from a plate or container label and aim at the
2.
center of the barcode, then press the trigger.
Slowly move the scanning beam across the barcode until the scanner emits a
3.
high-pitched tone.
42
When the scanner scans a barcode, it automatically transmits the following
information:
• Transmits the alphanumeric equivalent of the barcode to the barcode eld.
• Transmits other reagent information (Lot #, Part #, Expiration Date, etc.)
For more information about the hand-held barcode scanner, see the user
documentation provided with the barcode scanner.
QuantStudio™ 1 Real-Time PCR System Installation, Use, and Maintenance Guide
Page 43

2
3
1
4
5
9
8
7
6
Chapter 4 Create and run experiments on the instrument
Edit an experiment before starting a run
4
Edit the run method
Access a template (EDT le). For more information, see the following sections.
• “Create and run an experiment from a template“ on page 40.
• “Run an experiment from a saved le“ on page 40.
• “Repeat the last instrument run“ on page 41.
For an overview of the method as it is graphically represented on the touchscreen, see
“Method elements“ on page 43.
In the Method screen, touch Edit.
1.
Touch a eld, enter changes, then touch Enter.
2.
Note: Touch–drag to quickly increase or decrease a step temperature.
Touch “Manage steps, stages, melt curves, and data collection points“ to add or
3.
remove a step, stage, melt curve, or data collection point.
Note: The Manage Steps screen also provides access to conguring Ramp Rates
and Add Pause seings. See “Congure ramp rates and pause seings“ on
page 45.
Method elements
1
Method tab
2
Heated cover temperature
3
Reaction volume
4
Stage of thermal protocol
5
Step within a stage
6
Number of cycles for the stage
7
Temperature for the step
8
Hold time for the step
9
Data collection point
Manage steps, stages, melt curves, and data collection points
Add or remove a step, stage, melt curve, or data collection point using the Manage
Steps option. You can also congure ramp rates and pause seings from the Manage
Steps screen (see “Congure ramp rates and pause seings“ on page 45).
QuantStudio™ 1 Real-Time PCR System Installation, Use, and Maintenance Guide
43
Page 44

Chapter 4 Create and run experiments on the instrument
4
Edit an experiment before starting a run
• In the Method screen, touch Edit4Manage Steps.
Option Procedure
Add a step
1. Touch Add/Remove steps4Add steps.
2. Touch on the left or right border of a step to add a step
before or after the step, respectively.
3. Enter parameters for the new step, then touch Enter.
4. Touch Done.
Remove a step
Add a stage
Remove a stage
Add a melt curve
Remove a melt
curve
1. Touch Add/Remove steps4Remove steps.
2. Touch on the step to be removed, then touch Done.
1. Touch Add/Remove stages4Add stages.
2. Touch on the left or right border of a stage to add a
stage before or after the stage, respectively.
3. Edit parameters of the new stage in the Method screen.
See “Edit the run method“ on page 43.
4. Touch Done.
1. Touch Add/Remove stages4Remove stages.
2. Touch on the stage to be removed, then touch Done.
1. Touch Melt curves4Add melt curve.
2. Touch on the left or right border of a step to add a
melt curve before or after the step, respectively.
3. Select Continuous or Step and hold.
4. Touch melt curve parameters to edit, then touch Done.
5. Touch Done.
Note: Depending on the experiment type, there can be
restrictions on the addition or placement of melt curves.
1. Touch Remove melt curve.
2. Touch on the melt curve to be removed, then touch
Done.
44
Add or remove data
collection points
QuantStudio™ 1 Real-Time PCR System Installation, Use, and Maintenance Guide
1. Touch Data collection location.
2. Touch to switch data collection on or off.
Page 45

Chapter 4 Create and run experiments on the instrument
Edit an experiment before starting a run
Configure ramp rates and pause settings
• In the Method screen, touch Edit4Manage Steps4Advanced Options.
Option Procedure
1. Touch Ramp Rates.
Edit Ramp Rates
Add a pause
2. Touch the ramp rates fields.
3. Touch Enter.
4.
(Optional)
1. Touch Add Pause.
2. Touch in a stage.
3. Enter the pause temperature, and the cycle after which
the pause will occur.
4. Touch Enter.
5. The pause is represented by a P in the corner of the
stage.
6. Touch Done.
Edit additional steps, then touch Done.
4
Define, assign,
and view well
details
Access a template (EDT le). For more information, see the following sections.
1.
• “Create and run an experiment from a template“ on page 40.
• “Run an experiment from a saved le“ on page 40.
• “Repeat the last instrument run“ on page 41.
In the Plate screen, dene, assign, and view well details.
2.
Option Procedure
Define and assign samples
in the plate layout view
1. Touch .
2. Touch Manage or touch an individual well.
3. Touch the Samples subtab.
4. Select one or more wells, then touch Edit.
5. Enter sample names for the selected wells, then
touch Done.
QuantStudio™ 1 Real-Time PCR System Installation, Use, and Maintenance Guide
45
Page 46

Chapter 4 Create and run experiments on the instrument
4
View, pause, or stop a run
Option Procedure
Define and assign samples
in the well table view
View target information
Touch Done to return to the Plate tab.
3.
View, pause, or stop a run
Do any of the following actions during an instrument run.
• View real-time data and plots (see “View real-time data and plots on the
instrument touchscreen“ on page 46).
• Adjust the display of real-time plots (see “Adjust the display of real-time plots on
the instrument touchscreen“ on page 47).
– Touch or swipe left once to view real-time run method information or to
edit the number of cycles.
– Touch or swipe left twice to view real-time data and plots.
• Pause or stop an instrument run (see “Pause or stop an instrument run“ on
page 47).
1. Touch .
2. Touch Edit to edit sample names for individual
wells.
3. Touch a sample name field, enter a new name,
then touch Done.
1. Touch .
2. Touch Manage or touch an individual well.
3. Touch the Targets subtab.
4. Touch Details to view target information, then
touch Done.
View real-time data and plots on the instrument touchscreen
46
In the instrument home screen, during an instrument run, touch or swipe left
1.
twice.
Touch Well details.
2.
Touch Samples, Targets, or Tasks to select a graphical representation of each
3.
selection.
Touch Close to return to the home screen.
4.
QuantStudio™ 1 Real-Time PCR System Installation, Use, and Maintenance Guide
Page 47

Adjust the display of real-time plots on the instrument touchscreen
Chapter 4 Create and run experiments on the instrument
In the instrument home screen, during an instrument run, touch or swipe left
1.
twice to view real-time data and plots.
Touch Zoom.
2.
Touch
3.
Touch the arrows to pan left, right, up, or down on the graph.
4.
Touch Close to return to the default view.
5.
or to zoom in or out.
View, pause, or stop a run
4
Pause or stop an instrument run
Lock the touchscreen during a run
In the home screen, during an instrument run, touch
1.
real-time run method information.
Stop or pause the run.
2.
• Touch Stop Run.
• Touch Pause, then enter a pause temperature.
(Optional) After pausing a run, touch Edit to change the number of cycles.
3.
(Optional) After pausing a run, touch Unlock drawer to access the plate.
4.
or swipe left once to view
CAUTION! PHYSICAL INJURY HAZARD. During instrument operation,
the plate temperature can reach 100°C. If you want to access the plate
during a run pause, enter room temperature as the pause temperature and
allow the plate to cool to room temperature before handling.
After you have started a run, you can lock the touchscreen so that other users cannot
interfere with instrument operation.
Note: You must be signed-in to use this feature.
Lock the touchscreen.
1.
In the home screen, touch My Prole.
a.
Touch Lock Screen, then touch Lock.
b.
Unlock the touchscreen.
2.
Touch anywhere on the touchscreen.
a.
Touch the PIN Code eld, then enter your PIN.
b.
Note: The touchscreen automatically unlocks when the run is complete.
QuantStudio™ 1 Real-Time PCR System Installation, Use, and Maintenance Guide
47
Page 48

Chapter 4 Create and run experiments on the instrument
4
Transfer EDS files from the instrument home screen
Transfer EDS files from the instrument home screen
In the home screen, when a run ends, touch Transfer File.
1.
Select the data destination for the EDS le.
2.
Navigate to and select a folder.
3.
Touch OK.
4.
Touch Transfer.
5.
Note: Touch Seings4Run History to transfer EDS les at any time.
48
QuantStudio™ 1 Real-Time PCR System Installation, Use, and Maintenance Guide
Page 49

Calibrate and verify instrument
5
■
Calibration and verication schedule ................................... 49
■
Calibration descriptions ............................................... 50
■
View the calibration status and set reminders ............................ 51
■
Perform ROI/uniformity, background, and dye calibrations ................ 52
■
Perform instrument verication using RNase P plates ..................... 57
■
Calibrate custom dyes ................................................ 62
■
Calibrate for a custom melt curve experiment ............................ 68
Calibration and verification schedule
performance
The instrument is factory-calibrated and does not require calibration at installation. To
ensure optimal performance, perform calibrations at the recommended frequency.
Note: After instrument installation, we recommend performing instrument
verication using the provided RNase P plate.
IMPORTANT! Perform calibrations and instrument runs under the environmental
conditions that are specied in “Environmental requirements“ on page 89. Exposure
to extreme temperatures can adversely aect the instrument performance and shorten
the life span of the instrument components.
To set the calibration frequency for the instrument, touch Seings4Maintenance
and Service4Calibrations4History and Reminders4Edit4Exp interval eld.
Calibration
ROI/Uniformity
• Every two years (recommended)
• Always perform new Background and Dye calibrations after
an ROI/Uniformity calibration.
Note: Performing an ROI/Uniformity calibration invalidates all
other calibrations.
Recommended frequency
QuantStudio™ 1 Real-Time PCR System Installation, Use, and Maintenance Guide
49
Page 50

Chapter 5 Calibrate and verify instrument performance
5
Calibration descriptions
Calibration Recommended frequency
Background
Dye
RNase P instrument
verification
• Every two years (recommended)
• Background calibration can also be performed, as needed:
– To check for contamination (depends on usage and
laboratory conditions).
– To obtain the most accurate data for the removal of
background fluorescence.
Note: Performing a Background calibration does
any other calibration.
• Every two years (recommended)
• During a Dye calibration, only the dyes on the given spectral
calibration plate are calibrated.
Note: Performing a Dye calibration for a given dye plate does
invalidate any other calibration.
• After installing or moving the instrument
• After performing instrument calibrations
• As needed to confirm instrument performance
not
invalidate
Note: To prepare custom dye plates and to perform custom calibrations, see
“Calibrate custom dyes“ on page 62.
not
Calibration descriptions
Calibration description and purpose
ROI/Uniformity
• The software captures images for each optical filter.
• The software uses calibration data to map the increase in fluorescence
to the plate wells during subsequent runs and to evaluate well-to-well
consistency of the signals.
Background
• The software captures background images for each optical filter in the
absence of sample and reagent, and it checks that the fluorescence from
each well is below a fluorescence threshold.
• The software uses calibration data to remove background fluorescence
during a run.
Note: You can also run this calibration to determine if contamination is
related to the sample block or the plate.
Pass Criteria
The image for each filter
distinguishes all wells of the plate.
Each well in the image is distinct.
The plate images for all filters are
free of abnormal fluorescence.
50
QuantStudio™ 1 Real-Time PCR System Installation, Use, and Maintenance Guide
Page 51

Chapter 5 Calibrate and verify instrument performance
View the calibration status and set reminders
5
Calibration description and purpose
Dye
• The software extracts a spectral profile for each dye standard, then
produces a set of spectral profiles plotted as fluorescence vs filter.
• The software uses calibration data to characterize and distinguish the
individual contribution of each dye in the total fluorescence signals
collected by the instrument.
View the calibration status and set reminders
In the home screen, touch Seings4Maintenance and
View calibration status and set reminders in the instrument
1.
Service4Calibrations4History and Reminders.
In the Calibration Reminders screen, view the status of each calibration type.
2.
(Optional) Touch a calibration row to view the history of that specic calibration
3.
type, then touch Done.
Touch Edit to set the calibration reminder seings. For each calibration type:
4.
Slide the control On to enable the calibration reminder.
a.
Pass Criteria
Dye spectra peak within the same
filter as their group.
View calibration status and set reminders in the Cloud
Edit the Exp interval and Remind me elds.
b.
Touch Save.
c.
(Optional) To transfer the calibration report, touch Export then follow the
5.
directions on the screen.
Touch Done.
6.
Note: The calibration reminders feature requires a connection between the
instrument and a computer network.
In the Thermo Fisher Cloud, click
1.
Select any of your registered instruments.
2.
In the Summary tab:
3.
• Click Calibrations to view the status of each calibration type.
• (Optional) Click Calibration Reminders to set the calibration reminder
time table and enter the notication email address(es).
Note: More than one email address can receive the calibration reminders.
Note: The seings are automatically saved.
• (Optional) In the Downloads section, click Maintenance Summary.pdf to
download the calibration status report.
for the Instrument Connect page.
QuantStudio™ 1 Real-Time PCR System Installation, Use, and Maintenance Guide
51
Page 52

Chapter 5 Calibrate and verify instrument performance
5
Perform ROI/uniformity, background, and dye calibrations
In the Calibrations History tab:
4.
• View the history of each calibration type.
• (Optional) Click to download the calibration history report.
Perform ROI/uniformity, background, and dye calibrations
Workflow:
Calibration
Prepare a calibration plate
Perform an ROI/uniformity calibration
You are automatically prompted to perform background calibration.
▼
Perform a background calibration
Perform any time that ROI/uniformity calibrations are current.
▼
Perform system dye calibrations
Perform any time that ROI/uniformity and background calibrations are current.
▼
(
Optional
Perform any time that ROI/uniformity and background calibrations are current.
) Perform custom dye calibrations (“Calibrate custom dyes“ on page 62)
Materials required for calibration plate preparation
• Plate(s) for the calibration that you are performing:
– ROI/Uniformity plate (one ROI plate needed)
– Background calibration plate
– Dye calibration plates
52
Note: We recommend calibrating with all Spectral Dye Calibrations Plates
available for your block conguration even if you are not using all the dyes
in the plates.
Note: Do not discard the packaging for the calibration plates. Each calibration
plate can be used up to 3 times if the following conditions are met:
The plate is stored in its packing sleeve at –15 to –25°C.
·
The plate is used within 6 months after opening.
·
The plate is used before the plate expiry date
·
• Centrifuge with plate adapter; buckets cleaned before use
• Powder-free gloves
• Safety glasses
QuantStudio™ 1 Real-Time PCR System Installation, Use, and Maintenance Guide
Page 53

Chapter 5 Calibrate and verify instrument performance
Perform ROI/uniformity, background, and dye calibrations
Thaw, vortex, and centrifuge a calibration plate
Remove the calibration plate from the freezer, then thaw the plate in its
1.
packaging. Keep plates protected from light until you perform the calibration.
• Thaw each plate for 30 minutes.
• Use each plate within 2 hours of thawing.
IMPORTANT! Do not remove the plate from its packaging until you are ready to
use it. The uorescent dyes in the wells of calibration plates are photosensitive.
Prolonged exposure to light can diminish the uorescence of the dyes.
While wearing powder-free gloves, remove the calibration plate from its
2.
packaging and retain the packaging. Do not remove the optical lm.
Vortex the plate for 5 seconds, then centrifuge at 750–1,000 × g for 2 minutes.
3.
Conrm that the liquid in each well is at the boom of the well and free of
4.
bubbles. If it is not, centrifuge the plate again.
5
Perform calibrations
IMPORTANT! Keep the boom of the plate clean. Fluids and other contaminants
on the boom of the plate can contaminate the sample block and cause an
abnormally high background signal.
In the home screen, select a calibration to perform.
1.
Calibration Touch
ROI/Uniformity
Background
Dye Settings4Maintenance and Service4Calibrations4Dye
[1]
Automatically followed by Background calibration.
[2]
Initiate via this route if performing Background calibration only.
Follow the instructions on the screen to start the calibration.
2.
[1]
[2]
Settings4Maintenance and Service4Calibrations4ROI and
Uniformity
Settings4Maintenance and
Service4Calibrations4Custom4Background
Note: Dye calibration only: Select the Dye Plate to run, then touch Next.
Load the plate into the instrument.
3.
Touch Start.
4.
QuantStudio™ 1 Real-Time PCR System Installation, Use, and Maintenance Guide
53
Page 54

Chapter 5 Calibrate and verify instrument performance
5
Perform ROI/uniformity, background, and dye calibrations
When the run is complete and the screen displays Calibration Complete, touch
5.
View Results to check the calibration status.
Calibration status Action
Passed Touch Next to proceed to the next required calibration.
Failed See “Troubleshoot calibration failure“ on page 55.
Note: You can view the calibration images only after the ROI/Uniformity and
Background calibrations pass.
Unload the plate from the instrument.
6.
CAUTION! PHYSICAL INJURY HAZARD. During instrument operation,
the plate temperature can reach 100°C. Allow it to cool to room
temperature before handling.
Return the plate to its original packaging.
7.
Note: Each calibration plate can be used up to 3 times if the following conditions
are met:
The plate is stored in its packing sleeve at –15 to –25°C.
·
The plate is used within 6 months after opening.
·
The plate is used before the plate expiry date
·
View calibration images and transfer results to USB
The instrument performs the ROI, Uniformity, and Background calibrations in
sequence. You can view the calibration images after the Background calibration is
complete.
In the Calibration Status screen, touch Details.
1.
In the Details screen, touch a calibration type to view its images and plots.
2.
Calibration Example results indicating successful calibration
ROI
Note: Select the desired
filter combination from the
Filter Set dropdown list.
Green circles around all wells and bright well centers.
54
QuantStudio™ 1 Real-Time PCR System Installation, Use, and Maintenance Guide
Page 55

Chapter 5 Calibrate and verify instrument performance
Perform ROI/uniformity, background, and dye calibrations
Calibration Example results indicating successful calibration
Uniformity Signals from each well following a uniform trend.
Background Few, if any, signals with abnormally high fluorescence.
Dye Signals from each well following a uniform trend, and
each dye peaks at the correct filter.
5
In the Calibration Status screen, touch Accept Results or Reject Results.
3.
Accepting the results saves the calibration data to the instrument and overwrites
existing data.
(Optional) Touch Transfer EDS to transfer the calibration data to a USB.
4.
Troubleshoot calibration failure
Observation
Calibration failed The plate was improperly
prepared.
The plate is damaged or
contaminated.
Possible cause Recommended action
Ensure the following:
• The correct plate was used for the
calibration performed.
• The plate was properly thawed.
• The plate was properly centrifuged.
• The plate was properly sealed.
Check for damage, improper plate seal, or
contamination.
Order a replacement plate. If the replacement
plate fails, contact Support.
QuantStudio™ 1 Real-Time PCR System Installation, Use, and Maintenance Guide
55
Page 56

Chapter 5 Calibrate and verify instrument performance
5
Perform ROI/uniformity, background, and dye calibrations
Observation Possible cause Recommended action
High fluorescence signal in
individual wells
Calibration failed but plate is
undamaged
Signals that exceed the limit of
normal fluorescence may
indicate fluorescent
contaminants on the plate or
the sample block.
The incorrect plate was used
for calibration performed.
The plate was improperly
prepared.
See “Identify contamination“ on page 56.
Use the plate that matches the calibration
performed.
Repeat the calibration with the plate properly
prepared.
If the calibration fails again, order a
replacement plate. If the replacement plate
fails, contact Support.
Identify contamination
Create a
background plate
(optional)
Signals that exceed the limit of normal
contaminants on the calibration plate or the sample block. Common contaminants
include ink residue from permanent pens, powder from disposable gloves, and dust.
View the calibration data and note the wells that failed the calibration.
1.
Remove the plate from the instrument, rotate the plate 180°, then perform the
2.
calibration again.
Determine the location of the failed wells again as in step 1.
3.
Position of failed wells Action
Identical The sample block is contaminated.
Reversed The plate is contaminated.
If the calibration fails after you decontaminate the sample block and replace the
4.
plate, contact Support.
Whenever possible, use a background plate listed in Appendix D, “Parts and
materials“. These plates contain a buer that accurately simulates the reagents used
for PCR, and, therefore, produces high-quality calibration data.
If a background plate is not available, you can create one as described below.
uorescence may indicate uorescent
Decontaminate the sample block (see page 71).
Discard the plate, then perform the calibration using a
new calibration plate.
56
Required materials:
• MicroAmp™ optical 96-well reaction plate
• Optical adhesive cover or optical at caps
• Pipeor, 200-µL (with pipee tips)
• Powder-free gloves
• Safety glasses
• Deionized water
QuantStudio™ 1 Real-Time PCR System Installation, Use, and Maintenance Guide
Page 57

Chapter 5 Calibrate and verify instrument performance
Perform instrument verification using RNase P plates
IMPORTANT! Wear powder-free gloves while creating the background plate.
Remove a reaction plate from its box and place it on a clean, dry surface.
1.
Aliquot 50 µL of deionized water to each well of the reaction plate.
2.
Seal the plate using an optical adhesive cover or optical at caps.
3.
Use the plate for background calibration.
4.
Perform instrument verification using RNase P plates
Instruments are factory-calibrated, so calibration is not necessary for initial
installation. However, perform instrument verication:
• After installation and before rst use of the instrument.
• After performing instrument calibrations.
• As needed to conrm instrument performance.
5
The instrument requires valid ROI/uniformity, background, and dye calibrations to
perform instrument verication.
Instrument verification description
Purpose
Confirms the
performance of the
instrument.
Quantifies the number of copies of
the human RNase P gene in samples
with known concentrations of the
corresponding DNA template.
Description Pass criteria
The instrument passes performance specifications
if the following inequality is true and the
instrument successfully distinguishes between
unknown populations A and B with a statistical
confidence level of 99.7%.
[(CtA) – 3(σ
where:
• CtA = Average Ct of unknown population A
• σ
CtA
population A
• CtB = Average Ct of unknown population B
• σ
CtB
population B
)] > [(CtB) + 3(σ
CtA
= Standard deviation of unknown
= Standard deviation of unknown
CtB
)]
QuantStudio™ 1 Real-Time PCR System Installation, Use, and Maintenance Guide
57
Page 58

1
4
2
5
76
3
8
Chapter 5 Calibrate and verify instrument performance
5
Perform instrument verification using RNase P plates
RNase P
instrument
verification plate
The RNase P plate contains the reagents necessary for the detection and quantitation
of genomic copies of the human RNase P gene (a single-copy gene encoding the
RNase moiety of the RNase P enzyme). Each well contains: PCR master mix, RNase P
primers, FAM™ dye-labeled probe, and a known concentration of human genomic
DNA template.
Figure 1 96-well RNase P plate
1
Unknown A (5,000)
2
NTC (no template control)
3
STD 1,250 copies
4
STD 2,500 copies
5
STD 5,000 copies
6
STD 10,000 copies
7
STD 20,000 copies
8
Unknown B (10,000)
Performance
specifications
pass criteria
Prepare an RNase P plate
After the run, the software calculates average copy number values and standard
deviation values. The instrument passes performance specications if the following
inequality is true and the instrument successfully distinguishes between unknown
populations A and B with a statistical condence level of 99.7%.
[(CtA) – 3(σ
)] > [(CtB) + 3(σ
CtA
CtB
)]
where:
• CtA = Average Ct of unknown population A
• σ
= Standard deviation of unknown population A
CtA
• CtB = Average Ct of unknown population B
• σ
= Standard deviation of unknown population B
CtB
The software automatically adjusts the threshold and omits a dened number of wells
from the unknown populations to meet the performance specications. To view any
omied wells, open the EDS le for the verication in the desktop software.
Materials required for RNase P plate preparation
• RNase P instrument verication plate
• Centrifuge with plate adapter; buckets cleaned before use
• Powder-free gloves
• Safety glasses
58
QuantStudio™ 1 Real-Time PCR System Installation, Use, and Maintenance Guide
Page 59

Chapter 5 Calibrate and verify instrument performance
Perform instrument verification using RNase P plates
Thaw, vortex, and centrifuge an RNase P plate
IMPORTANT! Expose the RNase P plate to room temperature for no more than
45 minutes, inclusive of thawing and preparation time.
After thawing, the RNase P plate cannot be refrozen.
Remove the RNase P plate from the freezer, then thaw the plate in its packaging.
1.
• Thaw the plate for approximately 5 minutes.
• Use the plate within 30 minutes of thawing.
Conrm that the bench, vortex, and centrifuge are clean. Before use, wipe the
2.
vortex and centrifuge using a lint-free tissue.
While wearing powder-free gloves, remove the plate from its packaging.
3.
Vortex the plate for 5 seconds, then centrifuge at 750–1,000 × g for 2 minutes.
4.
Conrm that the liquid in each well is at the boom of the well and free of
5.
bubbles. If it is not, centrifuge the plate again.
5
Perform RNase P
verification
IMPORTANT! Keep the boom of the plate clean. Fluids and other contaminants
on the boom of the plate can contaminate the sample block and cause an
abnormally high background signal.
In the home screen, touch Seings4Maintenance and Service4RNase P
1.
Verication.
Load the plate into the instrument.
2.
Touch Start.
3.
When the run is complete and the screen displays Verication Complete, touch
4.
View Results to conrm the status of the run.
Calibration status Action
Passed Instrument is ready for use.
Failed See “Troubleshoot verification failure“ on page 61.
QuantStudio™ 1 Real-Time PCR System Installation, Use, and Maintenance Guide
59
Page 60

Chapter 5 Calibrate and verify instrument performance
5
Perform instrument verification using RNase P plates
In the RNase P Verication Status screen, touch one of the following options:
5.
• Accept Results — Save the results to the instrument.
• Reject Results — Delete the RNase P verication results.
• Export Results — Export the calibration results to a USB.
Unload the plate from the instrument.
6.
CAUTION! PHYSICAL INJURY HAZARD. During instrument operation,
the plate temperature can reach 100°C. Allow it to cool to room
temperature before handling.
60
QuantStudio™ 1 Real-Time PCR System Installation, Use, and Maintenance Guide
Page 61

Troubleshoot
verification failure
Observation Possible cause Recommended action
Verification failed The plate was improperly
prepared.
The plate is damaged or
contaminated.
High fluorescence signal The reaction volume is not
correct.
Signals that exceed the limit of
normal fluorescence may
indicate fluorescent
contaminants on the plate or
the sample block.
Chapter 5 Calibrate and verify instrument performance
Perform instrument verification using RNase P plates
Ensure the following:
• The correct plate was used for the
verification performed.
• The plate was properly thawed.
• The plate was properly centrifuged.
• The plate was properly sealed.
Open the EDS file for the verification in the
desktop software or cloud software to view the
flags and troubleshooting details for failed
wells.
Check for damage, improper plate seal, or
contamination.
Order a replacement plate. If the replacement
plate fails, contact Support.
Ensure that reaction volumes in the plate are
correct and match the volume that is entered
in the Method tab.
Examine the bottom of the reaction plate. If
there is contamination, prepare a new plate
and run the experiment again.
Identify the location of contamination on the
plate or sample block.
5
Verification failed but plate is
undamaged
The incorrect plate was used
for verification.
The plate was improperly
prepared.
1. Obtain or prepare a background plate (see
page 56).
2. Follow the procedures that are described
in “Identify contamination“ on page 56.
Use the correct RNase P plate for verification.
Repeat the verification with a new properly
prepared plate.
Note: The verification procedure is an
experiment run, so each RNase P plate can
only be used once.
Open the EDS file for the verification in the
desktop software or cloud software to view the
flags and troubleshooting details for failed
wells.
If the verification fails again, order a
replacement plate. If the replacement plate
fails, contact Support.
QuantStudio™ 1 Real-Time PCR System Installation, Use, and Maintenance Guide
61
Page 62

Chapter 5 Calibrate and verify instrument performance
5
Calibrate custom dyes
Calibrate custom dyes
Custom dyes overview
The instrument can run assays designed with custom dyes. Custom dyes include:
• Dyes that are not manufactured by Thermo Fisher Scientic.
• Dyes or formulations of dyes that are not system dyes for the instrument.
• For custom dye requirements, see “Custom dyes“ on page 10.
Workflow: Custom dye calibration
For each custom dye, determine the optimal dye concentration. Use this concentration
to prepare all subsequent dye calibration plates.
Use a dilution series to determine an optimal custom dye concentration
“Prepare a custom dye dilution plate“ on page 63
▼
“Run the dilution plate as an experiment“ on page 64
▼
“Determine the optimal dye concentration“ on page 64
▼
Calibrate the custom dye using the optimal concentration
Create a custom dye calibration plate
Use a dilution
series to
determine an
optimal custom
dye concentration
▼
Add a custom dye to the instrument
▼
“Perform a custom dye calibration“ on page 66
Custom dye dilution guidelines
Prepare a dilution series for each custom dye.
• Target several dye concentrations within a range of 100–2,000 nM.
• Choose a 2- or 3-fold dierence in dilution points.
• Dispense 10–20 µL per well in a 96-well plate.
• Dilute the dye in buer compatible with your master mix.
• (Intercalating dyes only) Add the appropriate amount of amplied PCR product to
generate uorescence.
62
QuantStudio™ 1 Real-Time PCR System Installation, Use, and Maintenance Guide
Page 63

100 nM
200 nM
400 nM
800 nM
1600 nM
Chapter 5 Calibrate and verify instrument performance
Calibrate custom dyes
Prepare a custom dye dilution plate
IMPORTANT! Wear powder-free gloves throughout the procedure.
Prepare a 2- or 3-fold dilution series of the custom dye.
1.
Dispense aliquots of each dilution into the center of a reaction plate, then seal the
2.
plate.
A full plate is not needed. See the following gure for suggested replicates.
5
Vortex the plate for 5 seconds, then centrifuge at 750–1,000 × g for 2 minutes.
3.
Conrm that the liquid in each well is at the boom of the well and free of
4.
bubbles. If it is not, centrifuge the plate again.
IMPORTANT! Keep the boom of the plate clean. Fluids and other contaminants
on the boom of the plate can contaminate the sample block and cause an
abnormally high background signal.
QuantStudio™ 1 Real-Time PCR System Installation, Use, and Maintenance Guide
63
Page 64

Chapter 5
5
Calibrate custom dyes
Calibrate and verify instrument performance
Run the dilution plate as an experiment
Load the plate into the instrument.
1.
Set up a genotyping experiment on the instrument.
2.
• Load an experiment created in the desktop software.
a. In the home screen, touch Load Experiment.
b. Select the experiment location, then the experiment le.
• Create a new experiment on the instrument touchscreen.
a. In the home screen, touch Open Template4Genotyping4Genotyping
Post.
b. (Optional) In the Properties tab, edit the experiment properties.
c. In the Method tab, set the hold temperature to 60°C with a 2 minute hold
and enter the appropriate reaction volume.
d. In the Plate tab, enter the dilution series information for the appropriate
wells.
Touch Start Run.
3.
When the run is complete, download the results for analysis.
4.
Unload the plate from the instrument.
5.
CAUTION! PHYSICAL INJURY HAZARD. During instrument operation,
the plate temperature can reach 100°C. Allow it to cool to room
temperature before handling.
Determine the optimal dye concentration
Review the dye signal data and select the dilution to use for dye calibrate.
In the Results tab of the desktop software, select Raw Data Plot.
1.
This plot displays the raw uorescence signal of each optical lter, for individual
wells.
Note: The Raw Data Plot cannot be viewed on the instrument touchscreen.
For each replicate population of dilutions, select the wells in the Plate Layout to
2.
view in the plot.
Examine the raw data to identify the wells yielding signals in the 800,000 to
3.
3,200,000 range for the optical lter where the dye is brightest.
(Optional) Export the raw data, then calculate the average uorescence value for
4.
each concentration.
64
Select the lowest (optimal) dye concentration that falls within the acceptable
5.
signal range.
QuantStudio™ 1 Real-Time PCR System Installation, Use, and Maintenance Guide
Page 65

Chapter 5 Calibrate and verify instrument performance
Calibrate custom dyes
5
Calibrate the custom dye
Create a custom dye calibration plate
IMPORTANT! Wear powder-free gloves while creating the dye plate.
Create a full plate of the custom dye diluted to the optimal concentration:
Dilute the custom dye to the optimal concentration in buer.
1.
Prepare an adequate volume, using a volume range of 10–20 µL/well for a
96-well plate.
Pipet the appropriate volume of the diluted custom dye to the plate wells.
2.
Seal the plate.
3.
Vortex the plate for 5 seconds, then centrifuge at 750–1,000 × g for 2 minutes.
4.
Conrm that the liquid in each well is at the boom of the well and free of
5.
bubbles. If it is not, centrifuge the plate again.
IMPORTANT! Keep the boom of the plate clean. Fluids and other contaminants
on the boom of the plate can contaminate the sample block and cause an
abnormally high background signal.
Add a custom dye to the instrument
In the instrument home screen, touch
1.
Service4Calibrations4Custom4Custom Dye.
Touch Add Custom Dye.
2.
Seings4Maintenance and
QuantStudio™ 1 Real-Time PCR System Installation, Use, and Maintenance Guide
65
Page 66

Chapter 5 Calibrate and verify instrument performance
5
Calibrate custom dyes
Enter the dye information:
3.
Field/option Action
Custom Dye
Name
Type Select:
Touch Save.
4.
Enter a name for the custom dye.
IMPORTANT!
Do not use a system dye name for a custom dye name.
·
Dye names are spacing sensitive and cannot contain special
·
characters.
• Reporter—The dye works in conjunction with a quencher dye
to report an increase of PCR product.
• Quencher—The dye suppresses the fluorescence of a reporter
dye until amplification of PCR product.
• Both—The dye can be used as a reporter or quencher dye.
IMPORTANT! You must also add the custom dye to the desktop software dye library
before creating, running, or analyzing experiments that use custom dyes. For detailed
information, see the QuantStudio™ Design and Analysis Software help.
Perform a custom dye calibration
Load the plate into the instrument.
1.
In the instrument home screen, touch
2.
Service4Calibrations4Custom4Custom Dye.
Touch the custom dye to calibrate.
3.
Review the custom dye information, (optional) make changes, then touch Update.
4.
Enter the calibration temperature.
5.
(Optional) Touch Reagents, then enter reagent information.
6.
Touch Start.
7.
When the run is complete and the screen displays Calibration Complete, touch
8.
View Results4Details.
Seings4Maintenance and
66
QuantStudio™ 1 Real-Time PCR System Installation, Use, and Maintenance Guide
Page 67

Chapter 5 Calibrate and verify instrument performance
Review the plot. Passing calibration results show uniform signals with peaks that
9.
Calibrate custom dyes
are aligned with the dye wavelength.
Peak filter
x1-m1 470 ± 15 520 ± 15
x2-m2 520 ± 10 558 ± 12
x4-m4 580 ± 10 623 ± 14
[1]
The central wavelengths are the optimized wavelengths.
Figure 2 Example dye calibration plot
Note: The peaks for your dye may align with a different filter set.
Filter wavelength (nm)
Excitation Emission
[1]
5
Select an action depending on whether the custom dye calibration passed or
10.
failed.
Calibration status Action
Passed
Failed
Unload the plate from the instrument.
11.
• Touch Accept Results or Reject Results.
Note: Accepting the results saves the calibration data to
the instrument and overwrites existing data.
• (
Optional
data to a USB.
• Perform the calibration again using a new custom dye
plate. Create the plate using the next dye concentration
greater than the optimal dye concentration determined in
“Use a dilution series to determine an optimal custom dye
concentration“ on page 62
• See “Troubleshoot calibration failure“ on page 55.
) Touch Transfer EDS to transfer the calibration
CAUTION! PHYSICAL INJURY HAZARD. During instrument operation,
the plate temperature can reach 100°C. Allow it to cool to room
temperature before handling.
QuantStudio™ 1 Real-Time PCR System Installation, Use, and Maintenance Guide
67
Page 68

Chapter 5 Calibrate and verify instrument performance
5
Calibrate for a custom melt curve experiment
Calibrate for a custom melt curve experiment
Note: A custom melt calibration calibrates a custom dye and a melt calibration at the
same time.
Before running the custom melt calibration complete the following tasks:
• Ensure that all calibrations are current (touch Seings4Maintenance and
Service4Calibrations4History and Reminders).
• Add a custom dye to the instrument (see “Add a custom dye to the
instrument“ on page 65).
In the home screen, touch Seings4Maintenance and
1.
Service4Calibrations4Custom4Custom Melt.
Touch PCR + Melt or Melt only as appropriate for the kit you are using.
2.
Load the plate into the instrument.
3.
Select or add a dye, then select a lter set appropriate for your dye's wavelength
4.
(see lter-wavelength table below).
Note: Refer to your reagent kit documentation for dye name and wavelength
information.
[1]
Peak filter
x1-m1 470 ± 15 520 ± 15
x2-m2 520 ± 10 558 ± 12
x4-m4 580 ± 10 623 ± 14
[1]
The central wavelengths are the optimized wavelengths.
Excitation Emission
Filter wavelength (nm)
IMPORTANT! If the selected lter set does not match your reagent kit
documentation, then the incorrect wavelength may be collected during a run.
(Optional) Touch Reagents, then enter reagent information.
5.
Touch Start.
6.
When the run is complete and the screen displays Calibration Complete, touch
7.
View Results4Details.
68
QuantStudio™ 1 Real-Time PCR System Installation, Use, and Maintenance Guide
Page 69

Chapter 5 Calibrate and verify instrument performance
Review the plot. Passing calibration results show uniform signals with peaks that
8.
are aligned with the dye wavelength.
Figure 3 Example dye calibration plot
Note: The peaks for your dye may align with a different filter set.
Select an action depending on whether the custom dye calibration passed or
9.
failed.
Calibration status Action
Calibrate for a custom melt curve experiment
5
Passed
Failed
Unload the plate from the instrument.
10.
Note:
You must also add the custom dye to the QuantStudio™ Design and Analysis
·
Desktop Software dye library before creating, running or analyzing experiments
that use custom dyes.
To perform a custom melt experiment, you can either create a Standard Curve or a
·
Custom experiment with melt, then specify the data points per degree in the
method.
• Touch Accept Results or Reject Results.
Note: Accepting the results saves the calibration data to
the instrument and overwrites existing data.
• (
Optional
data to a USB.
• Perform the calibration again using a new custom dye
plate. Create the plate using the next dye concentration
greater than the optimal dye concentration determined in
“Use a dilution series to determine an optimal custom dye
concentration“ on page 62
• See “Troubleshoot calibration failure“ on page 55.
) Touch Transfer EDS to transfer the calibration
QuantStudio™ 1 Real-Time PCR System Installation, Use, and Maintenance Guide
69
Page 70

Maintain the instrument
6
■
Backup or restore the instrument ....................................... 70
■
Decontaminate the sample block ....................................... 71
■
Replace the instrument fuses ........................................... 73
■
Prepare the instrument to store, move, or ship ........................... 74
IMPORTANT! This chapter contains user maintenance procedures for the instrument.
Procedures other than those described in this document must be performed by a
qualied Thermo Fisher Scientic service representative.
Backup or restore the instrument
In the home screen, touch Seings4Maintenance and Service4Backup/Restore.
To Action
Backup
Restore
(Administrator only)
1. Touch Backup Instrument.
2. Select a location to store the backup settings for your
instrument.
3. If backing up to a USB, insert a USB into the front-panel USB
port.
4. Enter a backup file name, then touch Done.
5. Select the elements to backup, or leave them all selected.
6. Touch Backup.
1. Touch Restore a Backup.
2. Select the storage location of the backup settings.
3. If restoring from a USB, insert a USB into the front-panel
USB port.
4. Select the backup file, then touch Restore.
70
QuantStudio™ 1 Real-Time PCR System Installation, Use, and Maintenance Guide
Page 71

Decontaminate the sample block
Perform this procedure to eliminate uorescent contaminants from the instrument
sample block. Contamination is generally evident in failed background calibrations
where one or more wells consistently exhibit abnormally high signals.
CAUTION! PHYSICAL INJURY HAZARD. Do not remove the instrument
cover. There are no components inside the instrument that you can safely
service yourself. If you suspect a problem, contact Support.
CAUTION! PHYSICAL INJURY HAZARD. During instrument operation, the
sample block temperature can reach 100°C. Allow it to cool to room
temperature before handling.
CAUTION! Before using a cleaning or decontamination method other than
those recommended by Thermo Fisher Scientic, conrm with Thermo Fisher
Scientic that the proposed method will not damage the equipment.
Chapter 6 Maintain the instrument
Decontaminate the sample block
6
Materials required
Clean the sample block
• Safety glasses
• Powder-free gloves
• Tissue, lint-free
• Coon or nylon swabs and lint-free cloths
• Pipee (100-µL) with pipee tips
• Deionized water
• Ethanol, 95% solution
• Bleach, 10% solution
CAUTION! PHYSICAL INJURY HAZARD. During instrument operation, the
sample block temperature can reach 100°C. Allow it to cool to room
temperature before handling.
IMPORTANT!
Wear powder-free gloves when you perform this procedure.
·
Always use deionized water to rinse wells after cleaning with bleach or ethanol
·
solution.
Identify the contaminated wells of the sample block (see “Identify
1.
contamination“ on page 56).
Prepare the instrument and access the sample block.
2.
Power o and unplug the instrument, then allow it to cool for 15 minutes.
a.
Pull the instrument drawer forward to expose the sample block.
b.
QuantStudio™ 1 Real-Time PCR System Installation, Use, and Maintenance Guide
71
Page 72

Chapter 6
6
Decontaminate the sample block
Maintain the instrument
Rinse the contaminated wells with deionized water (see “Detailed procedures for
3.
cleaning the sample block“ on page 73).
Close the drawer and test the sample block for contamination.
4.
Push the instrument drawer back in to the instrument.
a.
Plug in, then power on the instrument.
b.
Perform a background calibration to conrm that you have eliminated the
c.
contamination.
If the contamination remains, clean the contaminated wells using a 95% ethanol
5.
solution.
Repeat step 2 – step 3.
a.
Clean the contaminated wells using a 95% ethanol solution (see “Detailed
b.
procedures for cleaning the sample block“ on page 73).
Repeat step 3 – step 4 to rinse the sample block with deionized water and to
c.
conrm that you have eliminated the contamination.
IMPORTANT! Always use deionized water to rinse wells after cleaning with
bleach or ethanol solution.
If the contamination remains, clean the contaminated wells using a 10% bleach
6.
solution.
Repeat step 2 – step 3.
a.
Clean the contaminated wells using a 10% bleach solution (see “Detailed
b.
procedures for cleaning the sample block“ on page 73).
Repeat step 3 – step 4 to rinse the sample block with deionized water and to
c.
conrm that you have eliminated the contamination.
72
IMPORTANT!
bleach or ethanol solution.
If the contamination continues to remain, contact Support.
7.
QuantStudio™ 1 Real-Time PCR System Installation, Use, and Maintenance Guide
Always use deionized water to rinse wells after cleaning with
Page 73

Chapter 6 Maintain the instrument
Replace the instrument fuses
6
Detailed procedures for cleaning the sample block
IMPORTANT! Use these cleaning procedures only in conjunction with the complete
decontamination procedure (see “Decontaminate the sample block“ on page 71).
• Rinse the sample block with deionized water.
Pipet a small volume of deionized water into each contaminated well.
a.
In each well, pipet the water up and down several times to rinse the well.
b.
Pipet the water to a waste beaker.
c.
Use a coon swab to scrub inside of each contaminated well.
d.
Use a lint-free cloth to absorb the excess deionized water.
e.
• Clean the sample block with 95% ethanol.
Pipet a small volume of 95% ethanol solution into each contaminated well.
a.
In each well, pipet the solution up and down several times to rinse the well.
b.
Pipet the ethanol solution to a waste beaker.
c.
IMPORTANT! Always use deionized water to rinse wells after cleaning with
bleach or ethanol solution.
• Clean the sample block with 10% bleach.
Pipet a small volume of 10% bleach solution into each contaminated well.
a.
In each well, pipet the solution up and down several times to rinse the well.
b.
Pipet the bleach solution to a waste beaker.
c.
IMPORTANT! Always use deionized water to rinse wells after cleaning with
bleach or ethanol solution.
Replace the instrument fuses
CAUTION! FIRE HAZARD. For continued protection against the risk of re,
replace fuses only with listed and certied fuses of the same type and rating as
those currently in the instrument.
Materials required
• Fuses (2) – 10A, Time-Lag T, 250VAC, 5 × 20mm
• Safety glasses
• Powder-free gloves
• Screwdriver, athead
QuantStudio™ 1 Real-Time PCR System Installation, Use, and Maintenance Guide
73
Page 74

Chapter 6 Maintain the instrument
6
Prepare the instrument to store, move, or ship
Replace the fuses
Power o and unplug the instrument, then allow it to cool for 15 minutes.
1.
Using a at-head screwdriver, unscrew and remove the fuse holder.
2.
Remove each fuse from its fuse holder and inspect it for damage. Carbon
3.
typically coats the inside of failed fuses.
Good Failed
Replace each failed fuse.
4.
Note: The voltage and amperage ratings are on the fuse holder.
Install the fuse holder back into the instrument.
5.
Plug in, then power on the instrument.
6.
The installation is successful if the instrument powers on.
Note: Fuse failure can result from uctuations in the supplied power to the system.
To prevent further failures, consider installing an electrical protective device, such as a
UPS or a surge protector. If issues with the fuse persist, contact Support.
Prepare the instrument to store, move, or ship
In the home screen, touch
1.
Mode4Next.
Open the instrument drawer.
2.
Load the packing plate or an empty plate, then close the drawer.
3.
Touch Lock Block.
4.
Seings4Maintenance and Service4Ship Prep
74
Power o the instrument using the power switch on the back of the instrument.
5.
The instrument is now ready to store, move, or ship.
QuantStudio™ 1 Real-Time PCR System Installation, Use, and Maintenance Guide
Page 75

Chapter 6 Maintain the instrument
Prepare the instrument to store, move, or ship
6
Move the instrument
CAUTION! PHYSICAL INJURY HAZARD. Do not aempt to lift the
instrument or any other heavy objects unless you have received related
training. Incorrect lifting can cause painful and sometimes permanent back
injury. Use proper lifting techniques when lifting or moving the instrument. At
least two people are required to lift it.
IMPORTANT! Moving your instrument can create subtle changes in the alignment of
the instrument optics. Recalibrate the instrument if necessary.
• Ensure that the surface on which you place the instrument can support at least
35 kg (77 lbs).
• Ensure that the path to transport the instrument is clear of obstructions.
• At least two people are needed to lift and carry the instrument.
• Keep your spine in a good neutral position.
• Bend at the knees and lift with your legs.
• Do not lift an object and twist your torso at the same time.
• Coordinate your intentions with your assistant before lifting and carrying.
IMPORTANT! After moving the instrument, perform an RNase P instrument
verication run. If the run fails, perform ROI/ uniformity, background, and dye
calibrations.
Return the instrument for service
The service process requires 2 to 3 weeks.
Before returning the instrument for service, perform the following tasks.
1. Back up the instrument (see “Backup or restore the instrument“ on page 70).
2. In the home screen, touch Seings4Instrument Seings4Reset Factory
defaults.
3. Set the instrument to Ship Prep Mode (see “Prepare the instrument to store,
move, or ship“ on page 74).
To return the instrument for service, perform the following tasks.
Contact your local customer care center or technical support group to obtain a
1.
copy of the Certicate of Instrument Decontamination, a service notication, a
service call number, and packaging materials (if required).
Follow the instructions in the form to decontaminate the instrument.
2.
IMPORTANT! The instrument must be decontaminated before packing it for
shipping.
Complete and sign a copy of the Certicate of Instrument Decontamination.
3.
Fax the Certicate of Instrument Decontamination to the customer care center.
4.
QuantStudio™ 1 Real-Time PCR System Installation, Use, and Maintenance Guide
75
Page 76

Chapter 6 Maintain the instrument
6
Prepare the instrument to store, move, or ship
Pack the instrument in the provided packaging and follow the instructions in the
5.
table below.
Prepare Include Exclude
1. Transfer any data
files from the
instrument.
2. Load an empty plate
in the sample block.
3. Use the touchscreen
to place the
instrument in ship
mode.
Note: The empty plate
and ship mode protects
the internal components of
the instrument during
transport.
Aach the postage provided with the Certicate of Instrument Decontamination
6.
• Instrument
• Completed and signed
Certificate of
Instrument
Decontamination
Note: The instrument will
not be accepted for service
without a hard copy of the
Certificate of Instrument
Decontamination.
Any accessories, including:
• Power cord
• Ethernet cable
• USB drive
• Wireless adapter
Note: If included with the
instrument, these items
will be disposed of during
service and not returned.
to the box, then ship the instrument to the designated facility.
76
QuantStudio™ 1 Real-Time PCR System Installation, Use, and Maintenance Guide
Page 77

Install and connect the instrument
A
■
Workow: Install and connect to a network .............................. 77
■
Before you begin ..................................................... 78
■
Instrument and computer connections .................................. 78
■
Unpack and install the instrument ...................................... 79
■
Power on and follow the startup wizard ................................. 80
■
Connect the instrument and the computer directly or to a LAN ............. 80
■
Networking ......................................................... 81
Workflow: Install and connect to a network
to a network
Perform all steps in “Before you begin“ on page 78
▼
“Unpack and install the instrument“ on page 79
▼
“Power on and follow the startup wizard“ on page 80
▼
“Perform instrument verification using RNase P plates“ on page 57
▼
“Connect the instrument and the computer directly or to a LAN“ on page 80
QuantStudio™ 1 Real-Time PCR System Installation, Use, and Maintenance Guide
77
Page 78

1
7
66
5
4
2
3
Appendix A Install and connect the instrument to a network
A
Before you begin
Before you begin
This section provides instructions for customer installation of the computer and the
instrument. For installation by a eld service engineer (FSE), contact Support to order
a service call.
Before starting the installation, complete the following tasks:
• Determine the conguration for your instrument and obtain the network
information you need (see “Networking“ on page 81).
• Review site requirements (see QuantStudio™ 1 Real-Time PCR System Site
Preparation Guide (Pub. No. MAN0017854).
• Review instrument and computer connections (see “Instrument and computer
connections“ on page 78).
Instrument and computer connections
Figure 4 Instrument back panel
1
USB ports
2
WiFi USB port—Connect USB wireless
adapter for wireless network access
(ordered separately)
3
Ethernet Port—RJ45 port for
100/1,000 Mbps Ethernet communication
with the instrument
78
QuantStudio™ 1 Real-Time PCR System Installation, Use, and Maintenance Guide
4
RS232 Port—For service use only
5
Fuse Cover
6
Power Switch
7
Power Port—100 to 240 VAC
Page 79

3
1 1
2
4
Appendix A
Figure 5 Instrument‑to‑computer connections (minitower configuration)
1
Detachable power supply cord compatible with local power supply receptacle.
2
Connection between the computer and the instrument.
3
Connection between the computer and the monitor, keyboard, and mouse.
4
Connection between the computer and the
Install and connect the instrument to a network
(optional)
Unpack and install the instrument
handheld barcode scanner.
A
Unpack and install the instrument
Prepare the installation site as described in the QuantStudio™ 1 Real-Time PCR
1.
System Site Preparation Guide (Pub. No. MAN0017854).
Follow the pre-printed instructions on the instrument box to unpack the
2.
instrument, accessories, and reference documentation. Save the packing material
for future use or recycle it.
The instrument box contains:
• Reference documentation: Welcome note, unpacking and set up instructions
card, system documentation insert
• One instrument
• Accessories: power cable, Ethernet cable, USB drive, reaction tube retainer
• Shipping plate
Note: Save the shipping plate but do not use it to operate the instrument.
If you ordered the wireless adapter, it is provided separately.
Place the instrument on the bench.
3.
Plug the power cable into the power port on the back panel of the instrument,
4.
then plug the cable into an electrical receptacle.
QuantStudio™ 1 Real-Time PCR System Installation, Use, and Maintenance Guide
79
Page 80

Appendix A
A
Power on and follow the startup wizard
Install and connect the instrument to a network
Connect your instrument as required by your network conguration (see
5.
“Supported options for instrument and computer connections“ on page 16 and
“Instrument and computer connections“ on page 78).
• Connect an Ethernet cable to the Ethernet port on the back panel of the
instrument, then connect the cable to a computer or a networking port.
or
• Connect wirelessly via the wireless adapter.
Note: Do not connect the High Power USB WiFi Module (Cat. No. A26774) to
the instrument if it is connected to a network by an Ethernet cable. Conguring
the instrument for both wired and wireless connection can interfere with
instrument operation.
Power on and follow the startup wizard
Power on the instrument.
1.
Follow the startup wizard through the following tasks:
2.
• Select the language for the instrument.
• Accept the license agreement.
• Select a Wired or Wireless networking option, as needed for your
conguration (see “Supported options for instrument and computer
connections“ on page 16).
• Congure the instrument date and time.
• Create an administrator instrument prole.
Note: You can perform any of the steps above at a later time if you do not have
the information needed to complete the startup screens. See Chapter 3,
“Congure the instrument and manage instrument proles“.
IMPORTANT! Before using the instrument for the rst time, we recommend that you
perform instrument verication using RNase P plates (see “Perform instrument
verication using RNase P plates“ on page 57).
Connect the instrument and the computer directly or to a LAN
This section describes direct wired connection of the computer provided by Thermo
Fisher Scientic to the instrument or to a LAN.
Do not connect a customer-provided computer to the instrument.
Connect an Ethernet cable from the instrument or a LAN to the computer.
1.
Power on the computer, then log in using a Windows™ Administrator account.
2.
In the Windows™desktop, right-click My Network Places4Properties.
3.
Right-click Local Area Connection, then select Properties.
4.
80
QuantStudio™ 1 Real-Time PCR System Installation, Use, and Maintenance Guide
Page 81

Appendix A Install and connect the instrument to a network
Select Internet Protocol (TCP/IP)4Properties.
5.
Set the Internet Protocol (TCP/IP) Properties for either DHCP or Static IP
6.
communication:
Networking
A
Network
configuration
DHCP
Static IP
If your network requires advanced TCP/IP setup (such as WINS), dene the
7.
seings:
Click Advanced in the Internet Protocol (TCP/IP) Properties dialog box.
a.
Dene the IP Seings, DNS, and WINS tabs as instructed by your systems
b.
administrator, then click OK.
Action
1. Select Obtain an IP address automatically.
2. Set the DNS address. If the computer obtains DNS
addresses:
• Automatically – Select Obtain DNS server address
automatically.
• Statically – Select Use the following DNS address,
then enter the address of the preferred and alternate
DNS servers (if available).
1. Select Use the following IP address.
2. In the IP Address field, enter the static IP address.
3. If necessary, enter a subnet mask.
4. If necessary, enter a static gateway address in the Default
Gateway field.
Close all dialog boxes by clicking OK, then re-start the computer.
8.
The computer is now visible to other computers on the network.
Networking
IMPORTANT! This section provides general networking information. It does not
provide adequate detail to integrate the instrument into all possible network
architectures. Because a network may contain advanced features (such as a rewall or
network domains), we recommend that you consult a network administrator before
connecting the instrument to your laboratory network.
Supported options for instrument and computer connections
QuantStudio™ 1 Real-Time PCR System Installation, Use, and Maintenance Guide
We support the following direct, networked (LAN– local area network), or Cloud
congurations. Congurations other than those listed are not recommended. Select a
conguration that meets the needs of your laboratory's instrument, software, and
workow requirements.
IMPORTANT!
(Cat. No. A26774) to the instrument. Conguring the instrument for both wired and
wireless connection can interfere with instrument operation.
Do not connect both an Ethernet cable and the Wi-Fi module
81
Page 82

LAN
LAN
LAN
Appendix A Install and connect the instrument to a network
A
Networking
Note: For detailed information about networking your instrument, see the
QuantStudio™ 1 Real-Time PCR System IT Checklist (Pub. No. MAN0018164).
Direct configuration option
• A computer provided by Thermo Fisher Scientific with the QuantStudio™ Design and Analysis Desktop Software
• Computer‑to‑instrument connection:
– Direct, wired connection between the computer and the instrument
using an Ethernet cable
IMPORTANT! A direct instrument‑to‑computer connection
with the LAN or the Cloud configurations.
Networked configuration option
• A computer provided by Thermo Fisher Scientific with the QuantStudio™ Design and Analysis Desktop Software
• The computer and instrument must be on the same subnet mask.
• Computer‑to‑LAN connection
– Wired connection to the network using an Ethernet cable –
– Wireless connection to the network
• Instrument‑to‑LAN connection
– Wired connection to the network using an Ethernet cable –
– Wireless connection to the network using the instrument Wi‑Fi module
Thermo Fisher Cloud configuration option
• Internet access and a computer with the Chrome™ web browser to access the Cloud
• Computer‑to‑Cloud connection
– Wired connection to the internet using an Ethernet cable –
– Wireless connection to the internet
(select an option)
(select an option)
(select an option)
:
cannot
:
:
be combined
or
–
or
–
or
–
• Instrument‑to‑Cloud connection
– Wired connection to the network using an Ethernet cable –
– Wireless connection to the network using the instrument Wi‑Fi module
Control and
monitor
networked
When the instrument is connected to a network:
• Computers on the network that are running the desktop software can control the
instruments
(select an option)
:
instrument. Networked instruments can be controlled by only one computer at a
time.
• Instruments linked to the Cloud cannot be controlled remotely. However, you
can:
– Remotely access the cloud software to create (and analyze) experiments.
– From the instrument, download the experiments and start a run.
– Monitor a run from the Cloud in real time.
82
QuantStudio™ 1 Real-Time PCR System Installation, Use, and Maintenance Guide
or
–
Page 83

Appendix A Install and connect the instrument to a network
Networking
A
Ethernet port overview
Firewall ports that must be open
The Ethernet port of the instrument supports:
• Static IP network service with subnet mask, primary and secondary data network
service (DNS), and default gateway seings, or dynamic host conguration
protocol (DHCP) network service.
• mDNS/DNS for local domains.
Note: Because mDNS is limited to direct network connections, an instrument
congured for mDNS may not be visible to other nodes that are separated by a
router, hub, or another network device.
• IPv4 linknlocal (IPV4LL) in the RFC (also known as Automatic Private IP
Addressing [APIPA] or Internet Protocol Automatic Conguration [IPAC]).
Note: When an instrument is set for DHCP, APIPA is automatically enabled, and
the instrument provides an IP address when no address is supplied by the DHCP
server.
Ports
80/443
mDNS, 7000 Instrument-to-computer connection
mDNS, 5353 Instrument discovery
instrument-to-Cloud and computer-to-Cloud connections
Condition
Standard ports for
Networking guidelines and best practices
• Consult a network administrator before connecting the instrument to a network.
• To enable the full functionality of the software, the computer requires a network
connection.
• Open the rewall port for the instruments to be discovered. See “Firewall ports
that must be open“ on page 83.
• Observe the restrictions to mDNS and Autodiscovery.
The instrument supports mDNS but only when the instrument and computer
share a direct network connection and are within the same subnet. Network
computers that are separated from the instrument by a router, hub, or another
network device may not be able to access the instrument by its host name.
• Conrm the uniqueness of the instrument name.
– The instrument name must be unique within the subnet. The desktop
software can automatically discover instruments on the link-local network.
– The instrument does not test the uniqueness of the instrument name within
the subnet when it is set.
QuantStudio™ 1 Real-Time PCR System Installation, Use, and Maintenance Guide
83
Page 84

B
Observation Possible cause Recommended action
Inconsistent communication
between instrument and
computer or instrument and
Cloud
The connection between the
instrument and the computer is
not recognized
Insufficient disk space message Insufficient disk space to save a
The touchscreen is black The instrument is in sleep
Forgot PIN for instrument
profile
The instrument is configured
for
both
wired and wireless
network connection.
Weak or unstable internet
connection, especially if
configured for wireless.
The connection is not fully
established.
If using a networked
configuration, the instrument
and computer are not on the
same subnet mask.
If using a networked
configuration, the instrument
or computer has an invalid IP
address.
run.
mode.
The instrument is not powered
on.
Non-administrator forgot
instrument profile PIN.
Administrator forgot
instrument profile PIN.
Troubleshooting
Ensure only one connectivity option is plugged
into the instrument (either an Ethernet cable
or
a wireless adapter, but not both).
Configure for wired or wireless network
connection.
Change the configuration to a wired
connection.
Use a wireless network with a stronger or
more consistent signal.
Power the instrument off, then power it on
again.
Contact your information technologies
department to have them ensure that the
instrument and computer are on the same
subnet mask.
Contact your information technologies
department to have them ensure that the IP
addresses are valid.
1. In the home screen, touch
Settings4Run History4Manage.
2. Delete or transfer experiments from the
instrument.
Touch anywhere on the instrument
touchscreen.
If you touch the instrument touchscreen and it
remains black, check if the instrument is
powered on. The power switch is located on the
rear panel of the instrument.
If the instrument does not power on, check
that the instrument is properly plugged in.
If the instrument does not power on and the
instrument is properly plugged in, contact
Support.
See “Manage all instrument profiles
(Administrator only)“ on page 37.
Have another administrator reset the PIN for
the forgotten-PIN profile (see “Manage all
instrument profiles (Administrator only)“ on
page 37).
84
QuantStudio™ 1 Real-Time PCR System Installation, Use, and Maintenance Guide
Page 85

Observation Possible cause Recommended action
Forgot PIN for instrument
profile
High fluorescence signal The reaction volume is not
correct.
Signals that exceed the limit of
normal fluorescence may
indicate fluorescent
contaminants on the plate or
the sample block.
Appendix B Troubleshooting
Networking
If there is not another administrator profile on
the instrument, you must restore factory
defaults (see “Restore factory defaults“ on
page 34).
Ensure that reaction volumes in the plate are
correct and match the volume that is entered
in the Method tab.
Examine the bottom of the reaction plate. If
there is contamination, prepare a new plate
and run the experiment again.
Identify the location of contamination on the
plate or sample block.
1. Obtain or prepare a background plate (see
page 56).
2. Follow the procedures that are described
in “Identify contamination“ on page 56.
B
QuantStudio™ 1 Real-Time PCR System Installation, Use, and Maintenance Guide
85
Page 86

C
Instrument specification and layout
■
Congured system dimensions ......................................... 87
■
Electrical requirements ................................................ 88
■
Environmental requirements ........................................... 89
■
Network requirements ................................................ 90
86
QuantStudio™ 1 Real-Time PCR System Installation, Use, and Maintenance Guide
Page 87

Configured system dimensions
27 cm (10.5 in.)
50 cm (20 in.)
15 cm (6 in.)
40 cm (16 in.)
30 cm (12 in.)
207 cm (81.5 in.)
Allow space for the congured instrument. A typical setup with a co-located
minitower computer is shown below.
Note: Dimensions are rounded to the nearest whole or half unit.
Appendix C Instrument specification and layout
Configured system dimensions
C
QuantStudio™ 1 Real-Time PCR System Installation, Use, and Maintenance Guide
87
Page 88

Appendix C Instrument specification and layout
C
Electrical requirements
Instrument clearances
During instrument installation and maintenance, it is necessary to access the back of
the instrument. If the back of the instrument faces a wall, ensure that there is sucient
clearance on the bench to rotate the instrument for access.
IMPORTANT! For safety, the power outlet for the instrument must be accessible.
Component Top Front Sides Back
Instrument 30 cm (12 in.) 30 cm (12 in.) 15 cm (6 in.) 15 cm (6 in.)
Computer
[1]
Co-locating the computer with the instrument is optional.
[1]
Electrical requirements
WARNING! For safety, the power outlet used for powering the instrument
must be accessible at all times. See “Instrument clearances“ on page 88 for
information about the space needed between the wall and the instrument. In
case of emergency, you must be able to immediately disconnect the main power
supply to all the equipment. Allow adequate space between the wall and the
equipment so that the power cords can be disconnected in case of emergency.
— 15 cm (6 in.) — 15 cm (6 in.)
• Electric receptacle with grounding capability
• Maximum power dissipation: ~960 W (not including computer and monitor)
• Mains AC line voltage tolerances must be up to ±10 percent of nominal voltage
[1]
Circuit
required
10 A 50/60 Hz 750 W
Device
Instrument 100–240 ±10% VAC
Computer (laptop) 100–240 ±10% VAC 10 A 50/60 Hz 90 VA
Computer (desktop)
Monitor 65 VA
[1]
If the supplied power fluctuates beyond the rated voltage, a power line regulator may be required. High or low
voltages can adversely affect the electronic components of the instrument.
Rated voltage
100–240 ±10% VAC 10 A 50/60 Hz
Rated
frequency
Rated
power
125 VA
88
QuantStudio™ 1 Real-Time PCR System Installation, Use, and Maintenance Guide
Page 89

Environmental requirements
Table 3 Environmental requirements
Condition Acceptable range
Installation site Indoor use only
Appendix C Instrument specification and layout
Environmental requirements
C
Electromagnetic
interference
Altitude Between sea level and 2000 m (6500 ft.) above sea level
Operating conditions
Storage and transport
conditions
Thermal output During operation, the net thermal output, based on the actual
Vibration Ensure that the instrument is not adjacent to strong vibration
Pollution degree The instrument has a Pollution Degree rating of II. The
Do not use this device in close proximity to sources of strong
electromagnetic radiation (for example, unshielded intentional
RF sources). Strong electromagnetic radiation may interfere
with the proper operation of the device.
• Humidity: 15–80% relative humidity (noncondensing)
• Temperature: 15 to 30°C (59 to 86°F)
Note: For optimal performance, avoid rapid or extreme
fluctuations in room temperature.
• Humidity: 20–80% relative humidity (noncondensing)
• Temperature: –30 to 60°C (–22 to 140°F)
current draw of the instrument, is expected to be
approximately 960 W (3275 Btu/h).
sources, such as a centrifuge, pump, or compressor. Excessive
vibration will affect instrument performance.
instrument may only be installed in an environment that has
nonconductive pollutants such as dust particles or wood chips.
Typical environments with a Pollution Degree II rating are
laboratories and sales and commercial areas.
The noise output of the instrument is £ 60 dB when running.
Other conditions Ensure the instrument is located away from any vents that
could expel particulate material onto the instrument
components.
Avoid placing the instrument and computer adjacent to
heaters, cooling ducts, or in direct sunlight.
QuantStudio™ 1 Real-Time PCR System Installation, Use, and Maintenance Guide
89
Page 90

Appendix C Instrument specification and layout
C
Network requirements
Network requirements
The instrument:
• Is factory-congured for IPv4 TCP/IP communication and includes an Ethernet
adapter (100/1,000 Mbps) with an RJ45-type connector for integrating the device
into a local area network (LAN).
• Can alternatively be congured for wireless networking (High Power USB WiFi
Module required, sold separately as an optional accessory).
The instrument can be congured for either wired or wireless networking, not both.
If a Thermo Fisher Scientic service representative is to install the instrument:
• If the instrument will be connected to a LAN, an active, tested network jack must
be in place before the scheduled installation date.
• A representative from your information technologies department must be
available during the installation to help connect the instrument to your network.
Required materials to network the instrument:
• Wired—Ethernet cable of sucient length with RJ45 connectors
– CAT5 cable for a 100 Mbps network connection
– CAT5e or CAT6 cable for a 1,000 Mbps network connection
–or–
• Wireless—High Power USB WiFi Module (Cat. No. A26774, sold separately)
90
QuantStudio™ 1 Real-Time PCR System Installation, Use, and Maintenance Guide
Page 91

Parts and materials
D
■
Kits, consumables, accessories, and reagents ............................. 91
■
Consumables (96-well, 0.2-mL format) .................................. 91
■
Accessories ......................................................... 92
■
General-use materials and consumables ................................. 92
Kits, consumables, accessories, and reagents
Unless otherwise indicated, all materials are available through thermosher.com.
Store all calibration and RNase P plates at –20°C. All other items can be stored
at 15–30°C. Use all materials by the expiration date on the packaging.
Consumables (96‑well, 0.2‑mL format)
Consumable
MicroAmp™ Optical 8-Cap Strips 300 strips 4323032
MicroAmp™ Optical 8-Tube Strip, 0.2 mL 125 strips 4316567
MicroAmp™ Optical Tube without Cap, 0.2 mL 2,000 tubes N8010933
MicroAmp™ Optical 96-Well Reaction Plate with Barcode
MicroAmp™ EnduraPlate™ Optical 96-Well Clear GPLE
Reaction Plates with Barcode
Instrument verification or calibration plate Cat. No.
TaqMan® RNase P Instrument Verification Plate, 96‑Well 0.2‑mL 4432382
Region of Interest (ROI) and Background Plates, 96‑Well 0.2‑mL (2 plates) 4432364
QuantStudio™ 3/5 Spectral Calibration Plate 1
(FAM™, VIC™, ROX™, and SYBR™ dyes), 96‑Well 0.2‑mL
QuantStudio™ 3/5 Spectral Calibration Plate 2, 96‑Well 0.2‑mL
(ABY™, JUN™, and MUSTANG PURPLE™ dyes)
[1]
Compatible with QuantStudio™ 1 Real-Time PCR System.
[1]
Amount Cat. No.
20 plates 4306737
500 plates 4326659
20 plates 4483348
500 plates 4483351
A26331
[1]
A26332
QuantStudio™ 1 Real-Time PCR System Installation, Use, and Maintenance Guide
91
Page 92

Appendix D Parts and materials
D
Accessories
Accessories
Item
MicroAmp™ 96-Well Tray/Retainer Set 10 trays 4381850
MicroAmp™ Multi Removal Tool 1 tool 4313950
MicroAmp™ Cap Installing Tool (handle style) 1 tool 4330015
MicroAmp™ Optical Adhesive Film 25 films 4360954
MicroAmp™ Adhesive Film Applicator 5 applicators 4333183
RT-PCR Grade Water 10 × 1.5 mL tubes AM9935
Handheld Barcode Scanner 1 scanner 4488442
High Power USB WiFi Module 1 module A26774
General-use materials and consumables
The following general-use materials and consumables are required to calibrate,
maintain, and operate the instrument. Unless otherwise indicated, all materials are
available through thermosher.com. MLS: Fisher Scientic (sherscientic.com) or
other major laboratory supplier.
Amount Cat. No.
100 films 4311971
Material/Consumable
Bleach, 10% solution MLS
Centrifuge with 96‑well plate buckets MLS
Cotton or nylon swabs and lint‑free cloths MLS
Ethanol, 95% solution MLS
Optical clear adhesive film for PCR MLS
Pipettors, 100‑µL and 200‑µL (with pipette tips) MLS
Powder‑free gloves MLS
Safety glasses MLS
Screwdriver, flathead MLS
Tissue, lint‑free MLS
Deionized water MLS
Source
92
QuantStudio™ 1 Real-Time PCR System Installation, Use, and Maintenance Guide
Page 93

E
Safety
■
Symbols on this instrument ............................................ 94
■
Safety alerts on this instrument ......................................... 96
■
Safety information for instruments not manufactured by Thermo
Fisher Scientic ...................................................... 97
■
Instrument safety ..................................................... 97
■
Safety and electromagnetic compatibility (EMC) standards ................ 98
■
Chemical safety ..................................................... 100
■
Biological hazard safety .............................................. 101
WARNING! GENERAL SAFETY. Using this product in a manner not specied
in the user documentation may result in personal injury or damage to the
instrument or device. Ensure that anyone using this product has received
instructions in general safety practices for laboratories and the safety
information provided in this document.
Before using an instrument or device, read and understand the safety
·
information provided in the user documentation provided by the
manufacturer of the instrument or device.
Before handling chemicals, read and understand all applicable Safety Data
·
Sheets (SDSs) and use appropriate personal protective equipment (gloves,
gowns, eye protection, and so on). To obtain SDSs, see the “Documentation
and Support” section in this document.
QuantStudio™ 1 Real-Time PCR System Installation, Use, and Maintenance Guide
93
Page 94

Appendix E Safety
E
Symbols on this instrument
Symbols on this instrument
Symbols may be found on the instrument to warn against potential hazards or convey
important safety information. In this document, the hazard symbol is used along with
one of the following user aention words:
• CAUTION! – Indicates a potentially hazardous situation that, if not avoided,
may result in minor or moderate injury. It may also be used to alert against
unsafe practices.
• WARNING! – Indicates a potentially hazardous situation that, if not avoided,
could result in death or serious injury.
• DANGER! – Indicates an imminently hazardous situation that, if not avoided,
will result in death or serious injury.
Symbol
English Français
Caution, risk of danger
Consult the manual for further safety
information.
Moving parts Parties mobiles
Caution, hot surface Attention, surface chaude
On On (marche)
Off Off (arrêt)
Protective conductor terminal (main
ground)
Attention, risque de danger
Consulter le manuel pour d’autres
renseignements de sécurité.
Borne de conducteur de protection
(mise à la terre principale)
94
QuantStudio™ 1 Real-Time PCR System Installation, Use, and Maintenance Guide
Page 95

Symbol English Français
Appendix E Safety
Symbols on this instrument
E
Conformity symbols
Do not dispose of this product in
unsorted municipal waste
Conformity mark
Ne pas éliminer ce produit avec les
déchets usuels non soumis au tri
sélectif.
CAUTION! To minimize
negative environmental
impact from disposal of
electronic waste, do not
dispose of electronic waste in
unsorted municipal waste.
Follow local municipal waste
ordinances for proper
disposal provision and
contact customer service for
information about responsible
disposal options.
Description
Indicates conformity with safety requirements for Canada and
U.S.A.
MISE EN GARDE ! Pour
minimiser les conséquences
négatives sur
l’environnement à la suite de
l’élimination de déchets
électroniques, ne pas
éliminer ce déchet
électronique avec les déchets
usuels non soumis au tri
sélectif. Se conformer aux
ordonnances locales sur les
déchets municipaux pour les
dispositions d’élimination et
communiquer avec le service
à la clientèle pour des
renseignements sur les
options d’élimination
responsable.
Indicates conformity with European Union requirements for safety
and electromagnetic compatibility.
Indicates conformity with Australian standards for
electromagnetic compatibility.
QuantStudio™ 1 Real-Time PCR System Installation, Use, and Maintenance Guide
95
Page 96

Appendix E Safety
E
Safety alerts on this instrument
Safety alerts on this instrument
Additional text may be used with one of the symbols described above when more
specic information is needed to avoid exposure to a hazard. See the following table
for safety alerts found on the instrument.
English Français
CAUTION! Hazardous chemicals.
Read the Safety Data Sheets (SDSs)
before handling.
CAUTION! Hazardous waste. Refer
to SDS(s) and local regulations for
handling and disposal.
MISE EN GARDE ! Produits
chimiques dangereux. Lire les
fiches signalétiques (FS) avant de
manipuler les produits.
MISE EN GARDE ! Déchets
dangereux. Lire les fiches
signalétiques (FS) et la
réglementation locale associées à la
manipulation et à l’élimination des
déchets.
96
QuantStudio™ 1 Real-Time PCR System Installation, Use, and Maintenance Guide
Page 97

1
2
1
2
Location of safety labels on the instrument
Safety information for instruments not manufactured by Thermo Fisher Scientific
Appendix E Safety
E
1
Moving parts
2
Physical injury hazard
Safety information for instruments not manufactured by Thermo
Fisher Scientific
Some of the accessories provided as part of the instrument system are not designed or
built by Thermo Fisher Scientic. Consult the manufacturer's documentation for the
information needed for the safe use of these products.
Instrument safety
General
QuantStudio™ 1 Real-Time PCR System Installation, Use, and Maintenance Guide
CAUTION!
protective instrument panels or disable interlock devices, you may be exposed
to serious hazards including, but not limited to, severe electrical shock, laser
exposure, crushing, or chemical exposure.
Do not remove instrument protective covers. If you remove the
97
Page 98

Appendix E Safety
E
Safety and electromagnetic compatibility (EMC) standards
Physical injury
Electrical safety
CAUTION! Moving Parts. Moving parts can crush, pinch and cut. Keep hands
clear of moving parts while operating the instrument. Disconnect power before
servicing.
WARNING! Do not aempt to lift or move the instrument without the
assistance of others. Use appropriate moving equipment and proper lifting
technique, improper lifting may result in serious injury.
WARNING! Ensure appropriate electrical supply. For safe operation of the
instrument:
Plug the system into a properly grounded receptacle with adequate current
·
capacity.
Ensure the electrical supply is of suitable voltage.
·
Never operate the instrument with the ground disconnected. Grounding
·
continuity is required for safe operation of the instrument.
WARNING! Power Supply Line Cords. Use properly congured and approved
line cords for the power supply in your facility.
WARNING! Disconnecting Power. To fully disconnect power either detach or
unplug the power cord, positioning the instrument such that the power cord is
accessible.
Cleaning and decontamination
CAUTION! Cleaning and Decontamination. Use only the cleaning and
decontamination methods specied in the manufacturer's user documentation.
It is the responsibility of the operator (or other responsible person) to ensure
the following requirements are met:
No decontamination or cleaning agents are used that could cause a
·
HAZARD as a result of a reaction with parts of the equipment or with
material contained in the equipment.
The instrument is properly decontaminated a) if hazardous material is
·
spilled onto or into the equipment, and/or b) prior to having the instrument
serviced at your facility or sending the instrument for repair, maintenance,
trade-in, disposal, or termination of a loan (decontamination forms may be
requested from customer service).
Before using any cleaning or decontamination methods (except those
·
recommended by the manufacturer), users should conrm with the
manufacturer that the proposed method will not damage the equipment.
Safety and electromagnetic compatibility (EMC) standards
The instrument design and manufacture complies with the standards and
requirements for safety and electromagnetic compatibility as noted in the following
table:
98
QuantStudio™ 1 Real-Time PCR System Installation, Use, and Maintenance Guide
Page 99

Safety and electromagnetic compatibility (EMC) standards
Appendix E Safety
E
Safety compliance
EMC
Reference
EU Directive
2014/35/EU
IEC 61010-1
EN 61010-1
UL 61010-1
CSA C22.2 No.
61010-1
IEC 61010-2-010
EN 61010-2-010
IEC 61010-2-081
EN 61010-2-081
European Union “Low Voltage Directive”
Safety requirements for electrical equipment for measurement,
control, and laboratory use – Part 1: General requirements
Safety requirements for electrical equipment for measurement,
control and laboratory use – Part 2-010: Particular requirements
for laboratory equipment for the heating of materials
Safety requirements for electrical equipment for measurement,
control and laboratory use – Part 2-081: Particular requirements
for automatic and semi-automatic laboratory equipment for
Description
analysis and other purposes
Reference
Directive 2014/30/EU European Union “EMC Directive”
Description
EN 61326-1/ IEC 61326-1
Electrical Equipment for Measurement, Control and
Laboratory Use – EMC Requirements – Part 1: General
Requirements
AS/NZS CISPR 11
Limits and Methods of Measurement of Electromagnetic
Disturbance Characteristics of Industrial, Scientific, and
Medical (ISM) Radiofrequency Equipment
ICES-001, Issue 4
Industrial, Scientific and Medical (ISM) Radio Frequency
Generators
FCC Part 15 Subpart B (47
CFR)
U.S. Standard Radio Frequency Devices
This equipment has been tested and found to comply with the limits for a Class A
digital device, pursuant to part 15 of the FCC Rules. These limits are designed to
provide reasonable protection against harmful interference when the equipment is
operated in a commercial environment. This equipment generates, uses, and can
radiate radio frequency energy and, if not installed and used in accordance with the
instruction manual, may cause harmful interference to radio communications.
Operation of this equipment in a residential area is likely to cause harmful
interference in which case the user will be required to correct the interference at his
own expense.
QuantStudio™ 1 Real-Time PCR System Installation, Use, and Maintenance Guide
99
Page 100

Appendix E Safety
E
Chemical safety
Environmental design
Chemical safety
Reference
Directive 2012/19/EU European Union “WEEE Directive” – Waste electrical and
electronic equipment
Directive 2011/65/EU European Union “RoHS Directive” – Restriction of hazardous
substances in electrical and electronic equipment
Directive 2006/66/EC European Union “Battery Directive”
WARNING! GENERAL CHEMICAL HANDLING. To minimize hazards,
ensure laboratory personnel read and practice the general safety guidelines for
chemical usage, storage, and waste provided below. Consult the relevant SDS
for specic precautions and instructions:
Read and understand the Safety Data Sheets (SDSs) provided by the
·
chemical manufacturer before you store, handle, or work with any chemicals
or hazardous materials. To obtain SDSs, see the “Documentation and
Support” section in this document.
Minimize contact with chemicals. Wear appropriate personal protective
·
equipment when handling chemicals (for example, safety glasses, gloves, or
protective clothing).
Minimize the inhalation of chemicals. Do not leave chemical containers open.
·
Use only with adequate ventilation (for example, fume hood).
Check regularly for chemical leaks or spills. If a leak or spill occurs, follow
·
the manufacturer's cleanup procedures as recommended in the SDS.
Handle chemical wastes in a fume hood.
·
Ensure use of primary and secondary waste containers. (A primary waste
·
container holds the immediate waste. A secondary container contains spills
or leaks from the primary container. Both containers must be compatible
with the waste material and meet federal, state, and local requirements for
container storage.)
After emptying a waste container, seal it with the cap provided.
·
Characterize (by analysis if necessary) the waste generated by the particular
·
applications, reagents, and substrates used in your laboratory.
Ensure that the waste is stored, transferred, transported, and disposed of
·
according to all local, state/provincial, and/or national regulations.
IMPORTANT! Radioactive or biohazardous materials may require special
·
handling, and disposal limitations may apply.
Description
100
QuantStudio™ 1 Real-Time PCR System Installation, Use, and Maintenance Guide
 Loading...