

Page 1
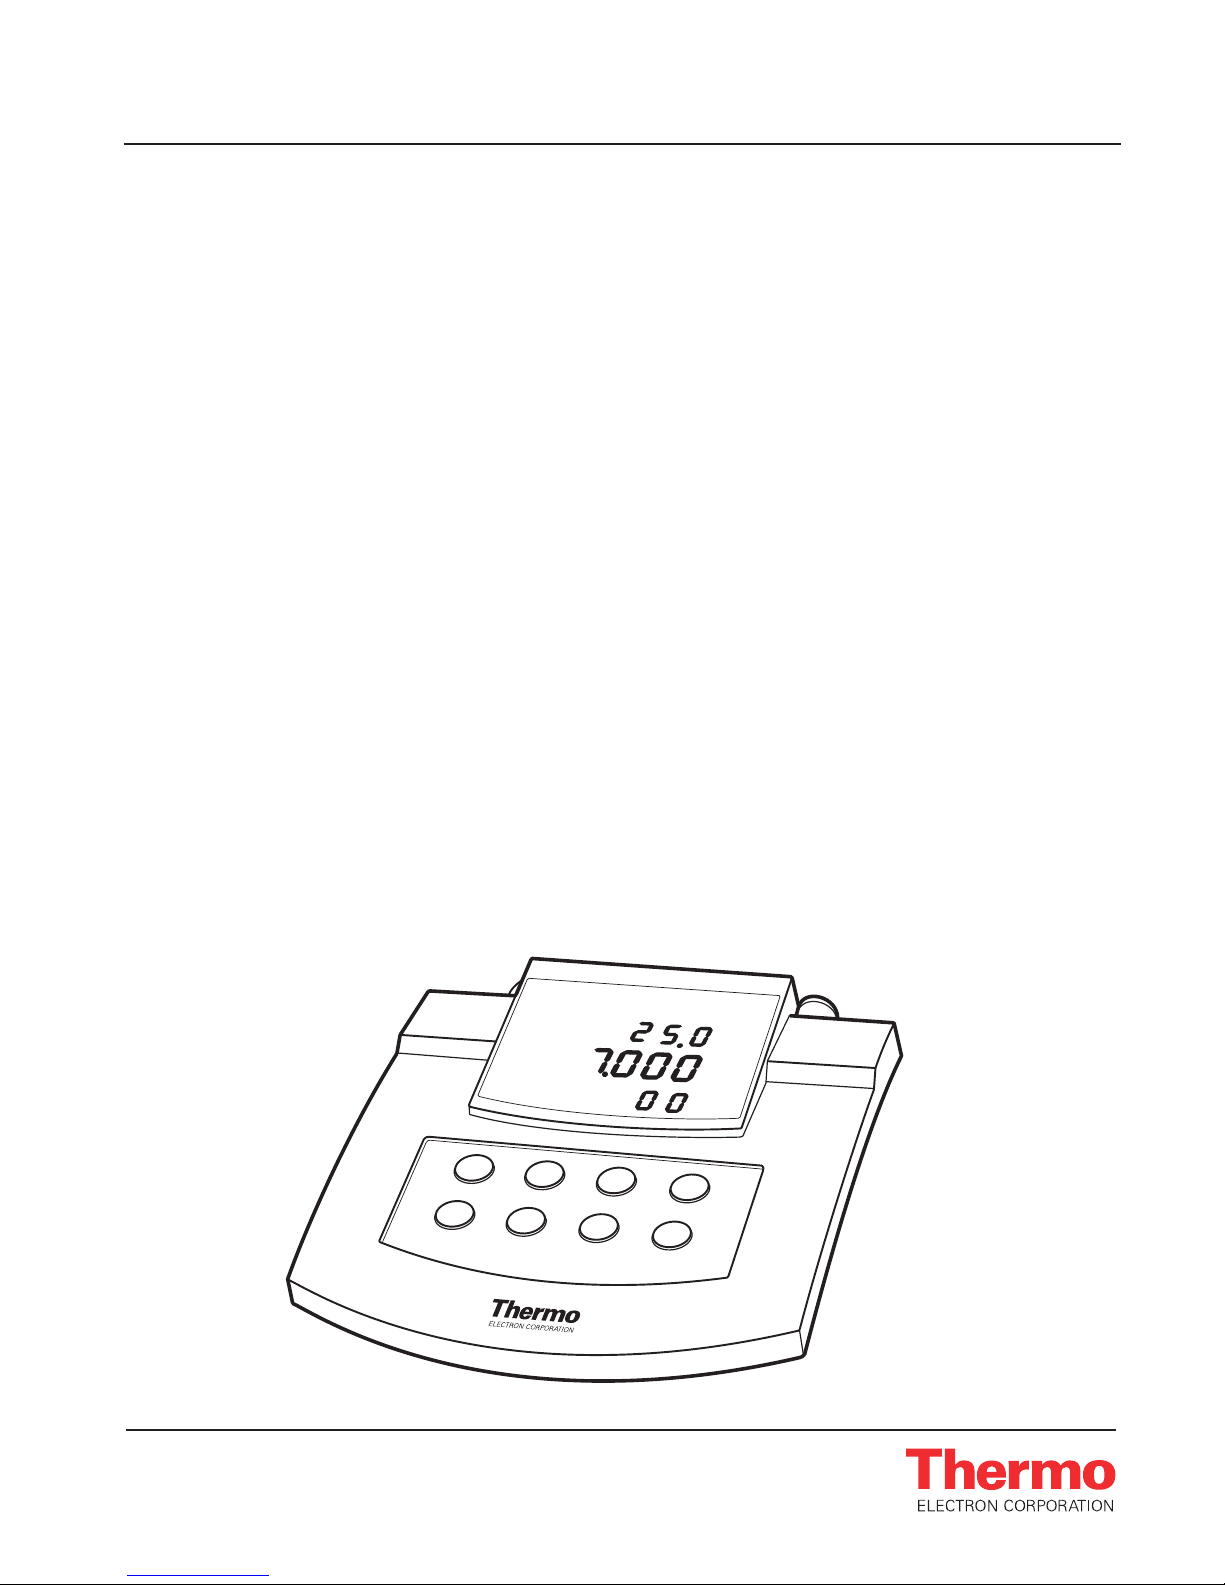
Orion PerpHect Meter
INSTRUCTION MANUAL
Orion 310,
320,
330
Analyze •Detect•Measure •Control
™
t
basic PerpH
s
e
ready
se
t
u
p
cT LogR pH
°C
pH
mV
yes
mo
res
d
e
O
rion 330
print
ca
l
Page 2

AQUAfast, Cahn, EZ Flash, Ionalyzer, ionplus, KNIpHE, No Cal, ORION, perpHect, PerpHecT, PerpHecTion, pHISA, pHix, pHuture, Pure Water, Sage, Sensing the Future,
SensorLink, ROSS Ultra, Sure-Flow, TEA Analyzer, Titrator PLUS, TURBO2 and Wine Master are registered trademarks of Thermo Electron Corporation.
1-888-pHAX-ION, A+, All in One, Aplus, AQUAsnap, AssuredAccuracy, AUTO-BAR, AUTO-CAL, AUTO DISPENSER, Auto-ID, AUTO-LOG, AUTO-READ, AUTO-STIR, Auto-Test,
BOD AutoEZ, Cable-Free, CERTI-CAL, CISA, DataCOLLECT, DataPLUS, digital LogR, DirectCal, DuraProbe, Environmental Product Authority, Extra Easy/Extra Value, FAST QC,
Flash Titration, Flash Titrator, GAP, GLPcal, GLPcheck, GLPdoc, ISEasy, KAP, LabConnect, LogR, Low Maintenance Triode, Minimum Stir Requirement, MSR, NISS, One-Touch,
One-Touch Calibration, One-Touch Measurement, Optimum Results, Pentrode, pHuture MMS, pHuture Pentrode, pHuture Quatrode, pHuture Triode, Quatrode, QuiKcheK,
rf link, ROSS, ROSS Resolution, SAOB, Smart CheK, Stacked, Stat Face, The Enhanced Lab, ThermaSense, Triode, TRIUMpH, Unbreakable pH, Universal Access are
trademarks of Thermo.
Guaranteed Success and The Technical Edge are service marks of Thermo.
PerpHecT meters are protected by U.S. patent 6,168,707.
PerpHecT ROSS are protected by U.S. patent 6,168,707.
ORION Series A meters and 900A printer are protected by U.S. patents 5,108,578, 5,198,093, and German patents D334,208 and D346,753.
Sure-Flow electrodes are protected by European Patent 278,979 and Canadian Patent 1,286,720.
ionplus electrodes and Optimum Results solutions are protected by US Patent 5,830,338.
ROSS Ultra electrodes have patents pending.
ORION ORP Standard is protected by US Patent 6,350,367.
ORION Series A conductivity meters are protected by US Patent 5,872,454.
© Copyright 2003, Thermo Electron Corporation. All rights reserved. Question everything, and Analyze. Detect. Measure. Control are trademarks of Thermo Electron
Corporation.
The specifications, descriptions, drawings, ordering information and part numbers within this document are subject to change without notice.
This publication supersedes all previous publications on this subject.
Page 3

PerpHecT Orion 310, 320, 330 Instruction Manual
Table of Contents
Chapter I General Information ................................................................ 1
Introduction ..................................................................................... 1
Chapter II Meter Description ................................................................... 3
A. Display ....................................................................................... 3
B. Keypad ....................................................................................... 5
Chapter III Orion 310 Meter Set-Up ........................................................... 7
A. Power Source ............................................................................. 7
B. Electrode Connection ................................................................. 7
Chapter IV Using the Orion 310 ................................................................ 9
A. Power-Up ................................................................................... 9
B. Meter Self-Test Procedure ......................................................... 9
Chapter V General Information on pH Calibration for Orion 310........ 11
A. Autocalibration with Two Buffers ........................................... 12
B. Autocalibration with One Buffer ............................................. 13
Chapter VI Introduction to Patented digital
LogR pH Measurement for Orion 310 .................................. 15
A. What is digital LogR? .............................................................. 16
B. Orion 310 Temperature Calibration Procedure ....................... 17
Chapter VII Temperature Measurement for Orion 310 ........................... 19
A. Temperature Compensation (Manual and Automatic) ............ 19
Chapter VIII Orion 320 Meter Set-Up ......................................................... 21
A. Power Source ........................................................................... 21
B. Electrode Connection ............................................................... 21
Chapter IX Using the Orion 320 .............................................................. 23
A. Power-Up ................................................................................. 23
B. Meter Self-Test Procedure ....................................................... 23
C. SETUP Mode for Orion 320 .................................................... 25
Chapter X General Information on pH Calibration for Orion 320........ 27
A. Autocalibration with Two Buffers ........................................... 28
B. Autocalibration with One Buffer ............................................. 29
C. Manual pH Calibration ............................................................. 30
Chapter XI Introduction to Patented digital
LogR pH Measurement for Orion 320 .................................. 31
A. What is digital LogR? .............................................................. 32
B. Orion 320 Temperature Calibration Procedure ....................... 33
Page 4

PerpHecT Orion 310, 320, 330 Instruction Manual
Chapter XII Orion 320 Other Measurement Modes................................. 35
A. mV/ORP Measurement Orion 320........................................... 35
B. Temperature Compensation ..................................................... 35
Chapter XIII Orion 330 Meter Set-Up ......................................................... 37
A. Power Source ........................................................................... 37
B. Electrode Connection ............................................................... 37
Chapter XIV Using the Orion 330 .............................................................. 39
A. Power-Up ................................................................................... 3
B. Meter Self-Test Procedure ....................................................... 39
C. SETUP Mode Orion 330 .......................................................... 40
Chapter XV General Information on pH Calibration for Orion 330........ 43
A. Autocalibration with Two Buffers ........................................... 44
B. Autocalibration with One Buffer ............................................ 45
C. Manual pH Calibration ............................................................. 46
Chapter XVI Introduction to Patented digital
LogR pH Measurement for Orion 330 .................................. 47
A. What is digital LogR? .............................................................. 48
B. Orion 330 Temperature Calibration Procedure ....................... 49
Chapter XVII Orion 330 Other Measurement Modes................................. 51
A. mV/ORP Measurement Orion 330........................................... 51
B. Temperature Compensation ..................................................... 51
Chapter XVIII Self-Test Definitions Orion 310, 320 and 330 ..................... 53
Chapter XIX Operator Assistance Codes Orion 310, 320 and 330 ......... 55
Chapter XX Troubleshooting Guide ......................................................... 59
Chapter XXI Repair and Service ................................................................ 61
Chapter XXII Warranty ................................................................................. 63
Chapter XXIII Notice of Compliance ............................................................ 67
Chapter XXIV Ordering Information ............................................................ 69
Chapter XXV Specifications For PerpHecT Meters ................................... 73
Appendix A LogR Temperature Accuracy Tables ................................... 75
Page 5
®
PerpHecT
Orion 310, 320, 330 Instruction Manual
Chapter I
General Information
Introduction
Orion provides pH and ISE meters for every application from basic pH
measurements to advanced Ion Selective Electrode work. This manual
describes the operation and use of the Orion PerpHecT™ meter line. The
PerpHecT meters consist of the following meters: the Orion 310 pH/
Temperature Meter, the Orion 320 pH/mV/ORP/Temperature Meter, and
the Orion 330 pH/mV/ORP/Temperature Meter.
All PerpHecT meters feature the Orion patented digital LogR™ technology
which allows fully temperature compensated measurements without the
need for a separate ATC probe.
LogR
ATC
set up
4
7
10
man
ready
yes
setup
basic PerpHecT LogR pH
res
mode
˚c
pH
mV
print
cal
Orion 330
Figure 1 — PerpHecT Orion 330
General Information
1
Page 6

PerpHecT® Orion 310, 320, 330 Instruction Manual
All meters are microprocessor-controlled and feature pH autocalibration,
patented digital LogR pH measurement mode, sealed keypads and large
easy-to-read LED displays.
These systems are ideal for busy, multi-user laboratories or plant
environments. pH measurements are easy with the help of advanced
features such as autocalibration, LogR mode, automatic temperature
compensation, choice of pH resolution and diagnostic operator
assistance codes.
The Orion 310 is a basic pH Meter which comes complete with a
PerpHecT combination glass pH temperature electrode. The choice of
a PerpHecT Ag/AgCl electrode (Orion 9202BN) or PerpHecT ROSS
™
electrode (Orion 8202BN) is available.
The Orion 320 is a pH/mV/ORP/Temperature Meter which comes
complete with a PerpHecT combination glass electrode. The choice of
a PerpHecT Ag/AgCl electrode (Orion 9202BN) or PerpHecT ROSS
electrode (Orion 8202BN) is available.
The Orion 330 is a pH/mV/ORP/Temperature Meter with RS232
interface for connections to a printer or a computer. It comes complete
with a PerpHecT combination glass electrode. The choice of a PerpHecT
Ag/AgCl electrode (Orion 9202BN) or PerpHecT ROSS electrode (Orion
8202BN) is available.
Using this Manual
Operating instructions for the Orion 310 are covered in Chapters III
through VII.
Operating instructions for the Orion 320 are covered in Chapters VIII
through XII.
Operating instructions for the Orion 330 are covered in Chapters XIII
through XVII.
2 General Information
Page 7

®
PerpHecT
Orion 310, 320, 330 Instruction Manual
Chapter II
Meter Description
A. Display
Orion 310
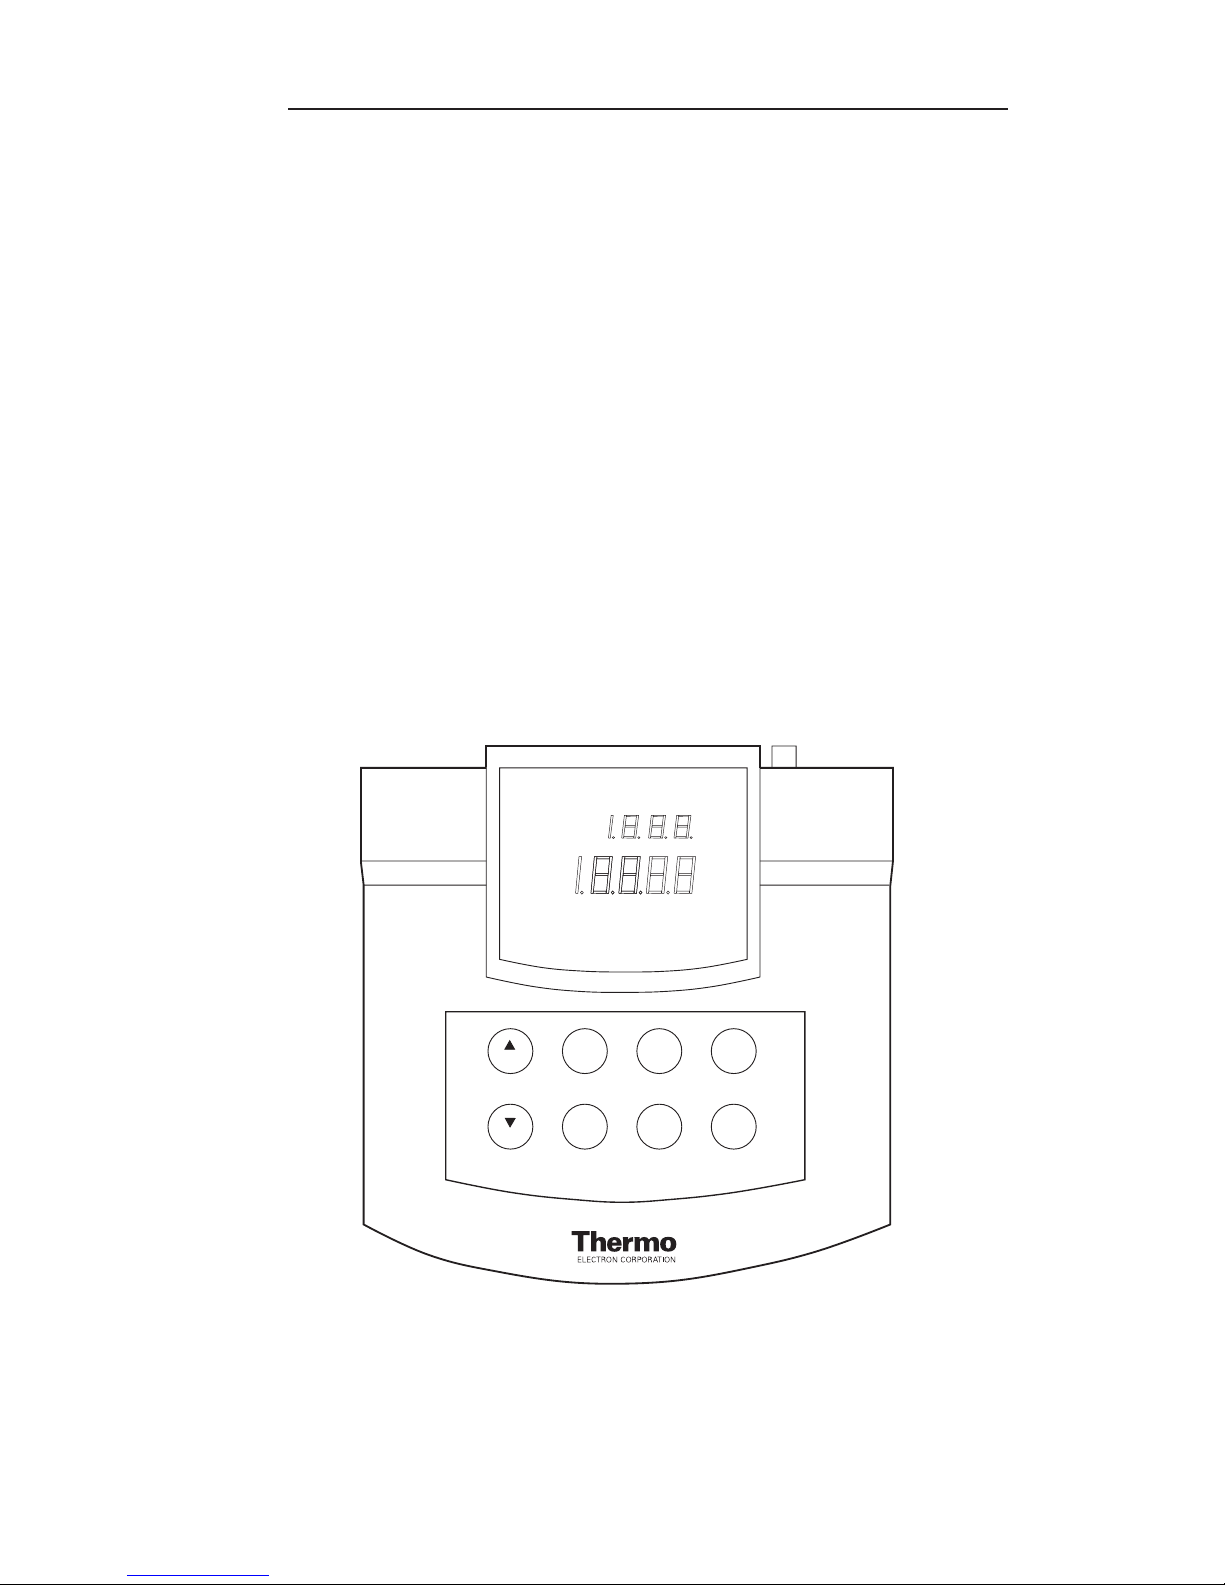
A large bright LED display shows pH results and temperature in the main
field. The current operation mode is indicated along the right side of the
display. “Ready” is designated by the indicator along the left side of the
display. See Figure 2.
Orion 320 and 330
A large bright LED display shows results in the main field. Temperature
is displayed in the upper field. The current operation mode is indicated
along the right side of the display. The buffers used during the last pH
calibration are designated by the indicators along the left side of the
display. See Figure 2.
LogR
set up
4
7
10
man
ready
Figure 2 — PerpHecT Orion 330 Display
ATC
˚c
pH
mV
Meter Description
3
Page 8

PerpHecT® Orion 310, 320, 330 Instruction Manual
SET UP (Orion 320 and 330)
Indicates that the meter is in the setup mode which is used to define or
view operating parameters.
LogR
Indicates that the meter is in the LogR temperature measurement or
calibration mode. LogR is activated in the setup mode (or with the temp
key Orion 310) and measured with the pH electrode. LogR function is
activated when the LogR icon appears in the upper display.
ATC
Indicates that an ATC probe is connected and operational. Manual
Temperature Compensation is activated when the ATC and LogR symbol
are not displayed.
READY
Displayed when the electrode signal has stabilized. Also displayed
when calibration standard input (pH and Temp) has stabilized.
°
C
The ATC icon in the upper display is lit when temperature is measured
with an ATC probe. The LogR icon is lit when LogR temperature
measurement is activated. If neither is on, manual temperature setting
is active. For the Orion 310, temperature is displayed by pressing
MODE key.
4 Meter Description
Page 9

®
PerpHecT
Orion 310, 320, 330 Instruction Manual
B. Keypad
Orion 310
The PerpHecT Orion 310 meter has a 6 button keypad used to control all
meter functions. Each keypress is acknowledged by the meter via a
positive feel response.
Key Function
mode Press to select MEASURE mode. Use to toggle display
between Temperature and pH.
yes Press to accept settings or calibration points.
scroll (▲,▼) Press to change a parameter before it is entered. Also used
to scroll Manual Temp settings in the Temperature mode.
cal Press button to initiate pH or LogR temperature calibration.
temp Press to enable or disable LogR Function.
Orion 320
The PerpHecT Orion 320 meter has a 6 button keypad used to control all
meter functions. Each keypress is acknowledged by the meter via a
positive feel response.
Key Function
mode Press to select MEASURE mode. Used to initiate LogR
temperature calibration when LogR function is enabled.
yes/res Press to accept settings, calibration points or to change
display resolution.
scroll (▲,▼) Press to change a parameter before it is entered. Also used,
in MEASURE mode, to scroll Manual Temp settings.
cal Press button to initiate pH calibration.
setup Press to enter Setup mode. Setup is entered to change
operating parameters and to enter manual calibration buffer
values.
Meter Description
5
Page 10
PerpHecT® Orion 310, 320, 330 Instruction Manual
Orion 330
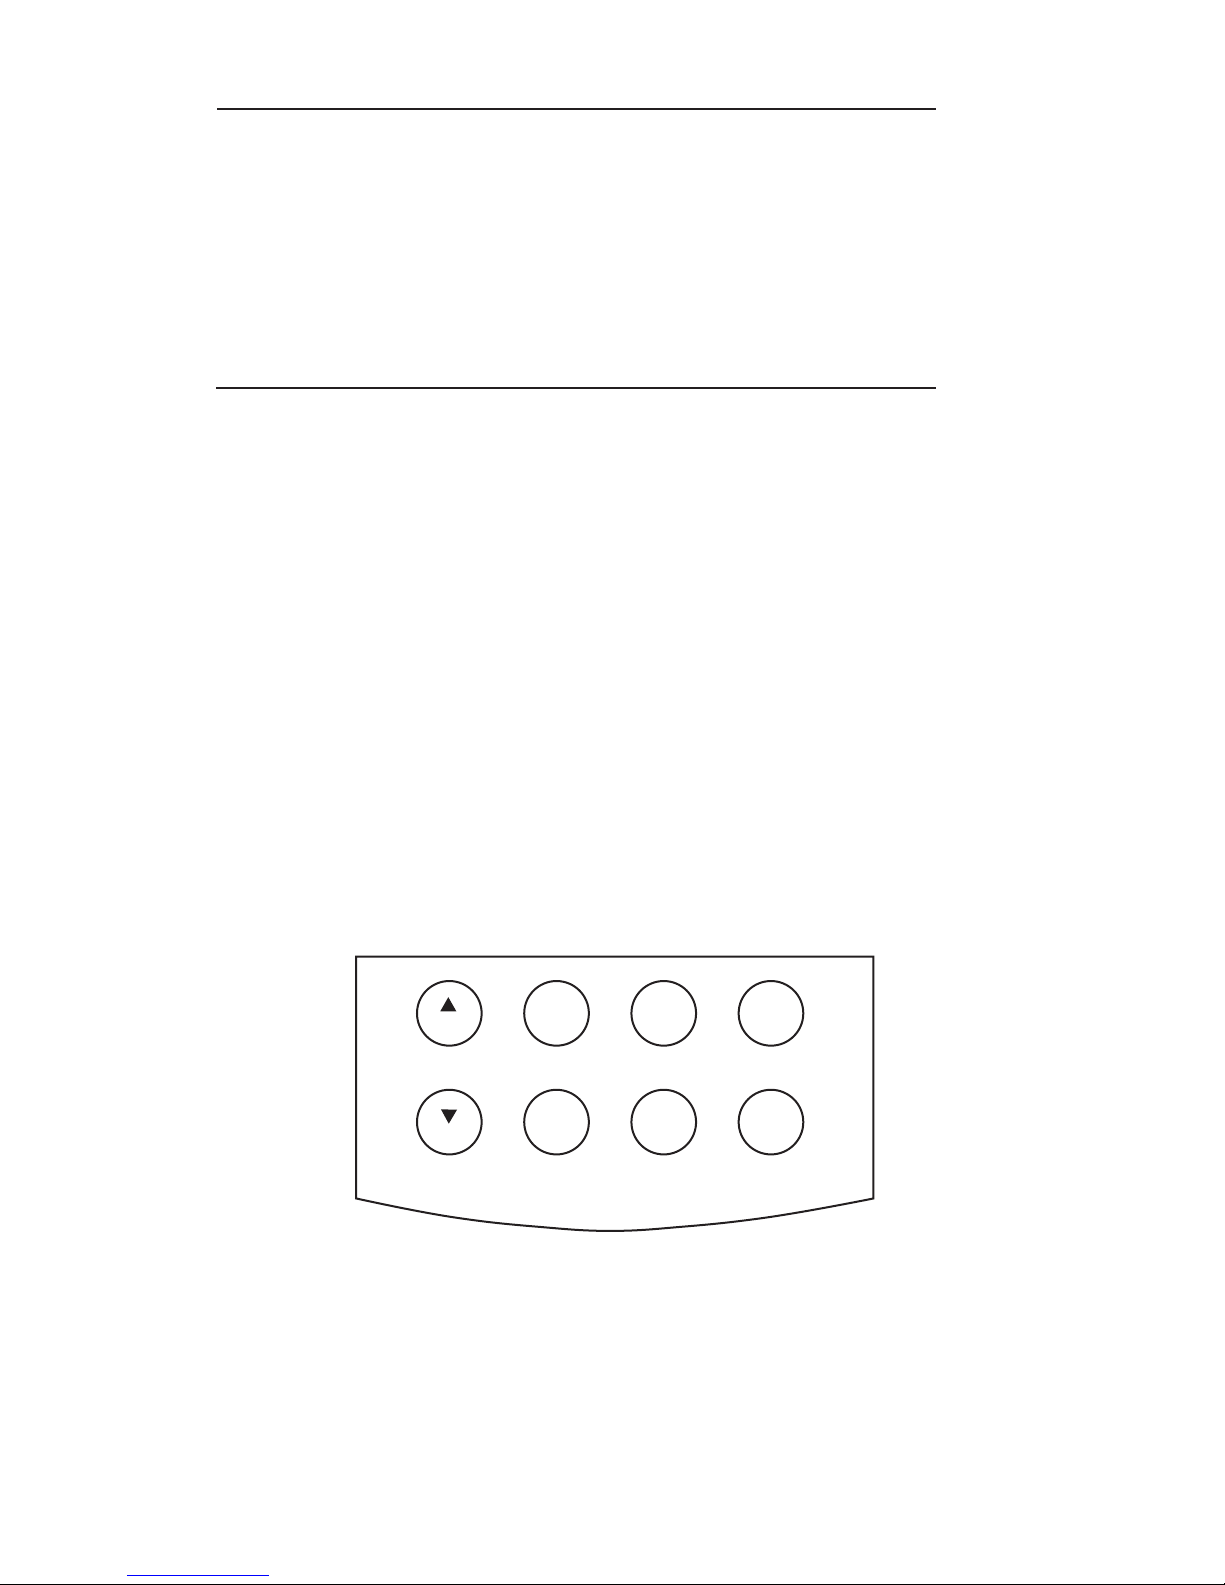
The PerpHecT Orion 330 meter has an 8 button keypad used to control all
meter functions. Each keypress is acknowledged by the meter via a
positive feel response.
Key Function
mode Press to select MEASURE mode. Used to initiate LogR
temperature calibration when LogR function is enabled.
yes Press to accept settings or calibration points. May also be
used to scroll through the setup menu without changing
any parameters.
scroll (▲,▼) Used to initiate a change in current setup parameters.
Press to change a parameter before it is entered. Also used
to scroll Manual Temp settings in MEASURE mode.
print Press to print measurement data.
cal Press button to initiate pH calibration.
setup Press to enter Setup mode. Setup is entered to change
operating parameters and to enter manual calibration
buffer values.
res Press to change display resolution.
yes
setup
basic PerpHecT LogR pH
res
mode
print
cal
Orion 330
Figure 3 — Orion PerpHecT Meter Keypad
6
Meter Description
Page 11
®
PerpHecT
Orion 310, 320, 330 Instruction Manual
Chapter III
Orion 310 Meter SetUp
A. Power Source
All PerpHecT meters are designed to operate with a line adaptor
(Orion 020125) for 110V operation or (Orion 020130) for 220V operation.
Plug the line adaptor securely into the meter’s Line Adapter Input, then
plug into an appropriate wall outlet.
B. Electrode Connection
1. Electrode
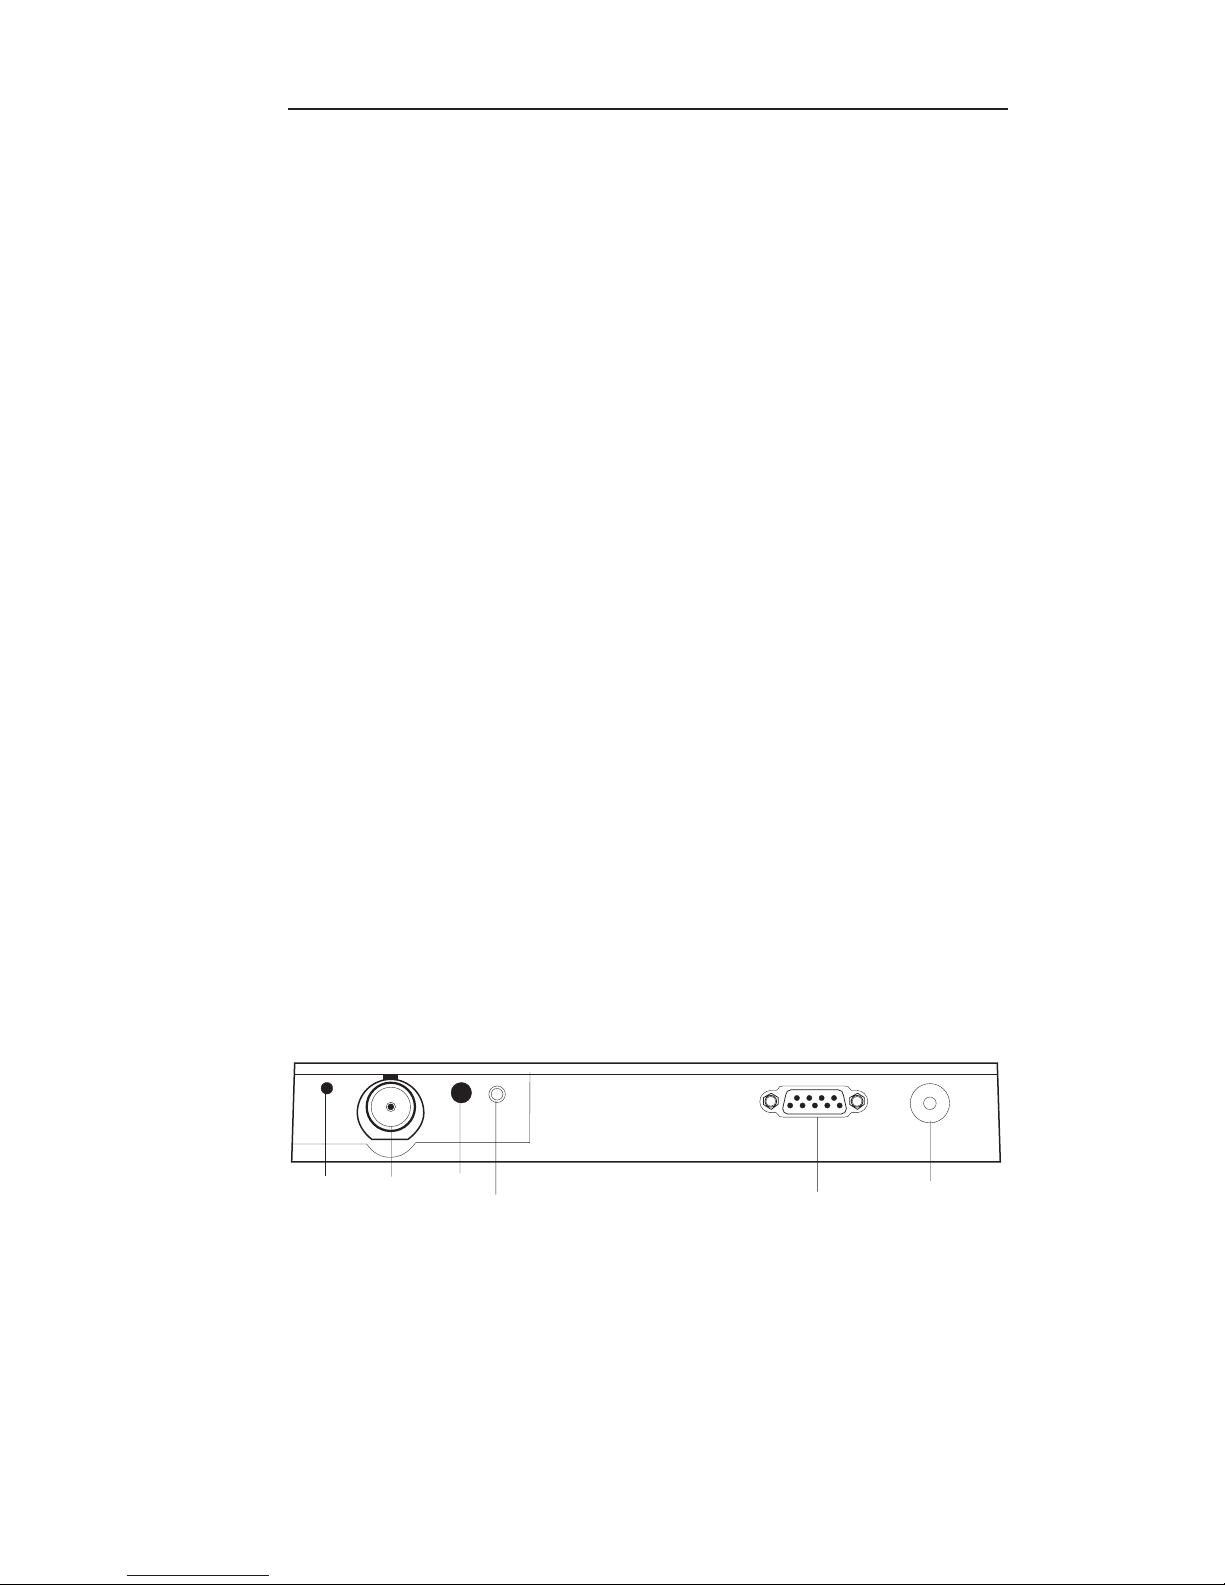
Attach the PerpHecT pH electrode or other pH electrode with BNC
connector to the BNC input on the meter by sliding the connector
onto the BNC input, then push in and turn clockwise to lock into position.
Electrodes with U.S. Standard connectors may be used with a an adaptor
(Orion 090033). Connect reference electrodes with pin tip connectors by
pushing connector directly into reference input.
See Figure 4.
2. ATC Probe
Attach ATC probe to the ATC input by sliding the connector straight in
until firmly in place. Use Orion ATC probes Orion 927006
or 927005 only.
Reference
Input
BNC
Input
ATC
Recorder
Figure 4 — PerpHecT Orion 330 Connections
RS232
Line Cord
Input
Orion 310 Meter SetUp
7
Page 12

PerpHecT® Orion 310, 320, 330 Instruction Manual
8
Page 13

®
PerpHecT
Orion 310, 320, 330 Instruction Manual
Chapter IV
Using the Orion 310
A. Power-Up
Plug meter into an approved wall outlet via the power line adaptor. The
entire display (all annunciators) will be displayed for 2 seconds. Once all
power-up procedures have been completed, the meter automatically
advances to measure mode.
NOTE:
been powered up, it is recommended that the SelfTest Procedure be performed before using the meter
for measurements.
If this is the first time that the meter has
B. Meter Self-Test Procedure
It is recommended that this procedure be performed when the meter is
operated for the first time or any time that operational problems arise.
For a description of the diagnostic tests, see Chapter XVIII Self-Test
Definitions pg 53.
This procedure verifies the proper operation of the PerpHecT meters.
Self-test:
1. Attach shorting cap to electrode BNC input.
2. Plug line adapter (Orion 020125) securely into meter Line Adapter
Input then into an appropriate wall outlet while pressing the YES
key (hold down for 3 seconds) to start the self-test. The meter will
automatically perform seven diagnostic tests.
3. When “0” appears in the display field, press each key once.
A numeric digit will be displayed upon each keypress.
4. After the self-test is completed, the meter will automatically go to
MEASURE mode.
5. If any problems are found during the self-test see Operator
Assistance Codes, page 55.
Using the Orion 310
9
Page 14

PerpHecT® Orion 310, 320, 330 Instruction Manual
Check Out:
After completing the self-test the meter will be in MEASURE mode.
1. Press the MODE key until the pH mode indicator is
displayed. Main display should read a steady 7.00 ± 0.02.
2. If not, press CAL key. Select a one-point calibration “7” to
change the pH reading. When READY lights up, press YES.
3. The main display should read 100.0 after the legend SLP is
displayed. If so, press YES. If not, use the SCROLL (▲,▼)
keys to change the value to 100.0 press YES.
4. The meter advances to pH mode and the display should now
read a steady 7.00 ± 0.02.
10
Using the Orion 310
Page 15

®
PerpHecT
Orion 310, 320, 330 Instruction Manual
Chapter V
General Information on
pH Calibration for Orion 310
A one or two-point calibration should be performed using fresh buffers
before pH is measured. It is recommended that a two buffer calibration,
using buffers that bracket the expected sample range, be performed at the
beginning of each day to determine the slope of the electrode. This serves
the dual purpose of determining if the electrode is working properly, and
storing the slope value in memory. For maximum accuracy, perform a
one-buffer calibration every two hours to compensate for electrode drift,
using a fresh aliquot of pH 7 buffer.
When operating in the LogR mode, the meter does not require the use of a
separate ATC probe. The PerpHecT meters measure the resistance of the
pH sensing glass and converts the value to temperature-compensated pH
measurements. For optimum results, PerpHecT electrodes or PerpHecT
ROSS electrodes should be used.
For best results, it is recommended that the unit be calibrated for
temperature in the LogR mode. Alternately, an ATC probe may be used.
If LogR or an ATC probe is not used, all samples and standards should
be at the same temperature or manual temperature compensation should
be used.
Stir all buffers and samples with a magnetic stirrer while a measurement is
being made.
NOTE:
heat to change solution temperature. To avoid this,
place a piece of cardboard, foam rubber, or other
insulating material between the stir plate and
beaker.
Always use a fresh aliquot of buffer whenever calibrating.
Some magnetic stirrers generate enough
General Information on pH Calibration for Orion 310
11
Page 16

PerpHecT® Orion 310, 320, 330 Instruction Manual
A. Autocalibration with Two Buffers
1. Attach the pH electrode to the meter.
2. Choose either pH 4.01 and pH 7.00, or pH 7.00 and pH 10.01
buffers; whichever will bracket your expected sample range.
3. Press CAL key to initiate calibration sequence. CAL is displayed
for two seconds. Press the YES key to accept the last calibration
range (7-4 or 7-10) or select one of these calibration ranges using
the SCROLL (▲,▼) keys. Press the YES key to accept. pH 7 will
be displayed for two seconds. Place electrode in pH 7.00 buffer.
Reading will be displayed and updated as calibration continues.
When the READY light comes on, indicating electrode stability,
press the YES key to accept.
4. pH 4 (or pH 10) will then be displayed for two seconds. Remove
electrode from pH 7.00 buffer. Rinse with deionized water and
place electrode in either pH 4.01 or 10.01 buffer (depending on
calibration range that was selected). When the READY light
comes on, press the YES key to accept buffer value. SLP will
be displayed for two seconds, then the calculated slope will be
displayed.
5. Meter will automatically go into the MEASURE mode. The
READY light will come on to indicate electrode stability.
6. If operating in the LogR mode or using an ATC probe, the
temperature-corrected pH reading is displayed.
7. Rinse electrodes with deionized water and place into sample.
Record pH directly from the main meter display when the READY
light is displayed or when electrode signal is stable.
NOTE:
When making measurements in LogR
mode, you must calibrate for temperature before
attempting a pH calibration. See page 17 for
temperature calibration procedure.
12
General Information on pH Calibration for Orion 310
Page 17

®
PerpHecT
Orion 310, 320, 330 Instruction Manual
B. Autocalibration with One-buffer
NOTE:
Autocalibration with one-buffer can only be
performed using pH buffer 7.00.
1. Attach the pH electrode to the meter.
2. Choose pH 7.00 Buffer.
3. Press CAL key to initiate calibration sequence. CAL is displayed
for 2 seconds. Select calibration range “7” using the SCROLL
(▲,▼) keys. Press the YES key to accept. pH 7 will be displayed
for two seconds. Place electrode in pH 7.00 buffer. Reading will be
displayed and updated as calibration continues. When the READY
light comes on, indicating electrode stability, press the YES key
to accept.
4. SLP will be displayed for two seconds. Then 100.0 (or previous
calibration slope value) will be displayed. This value can be edited
using the SCROLL (▲,▼) keys. Press the YES key to enter
the value.
5. Meter will automatically go into the MEASURE mode.
The READY light will come on to indicate electrode stability.
6. If operating in the LogR mode or using an ATC probe, the
temperature-corrected pH reading is displayed.
7. Rinse electrodes with deionized water and place into sample.
Record pH directly from the main meter display when the READY
light is displayed or when electrode signal is stable.
General Information on pH Calibration for Orion 310
13
Page 18

PerpHecT® Orion 310, 320, 330 Instruction Manual
14
Page 19

®
PerpHecT
Orion 310, 320, 330 Instruction Manual
Chapter VI
Introduction to Patented digital
LogR pH Measurement for
Orion 310
Obtaining accurate pH values depends on both correct measurement of
standard and sample temperatures and on compensation for any variations
in these temperatures. This thermal compensation has generally been
accomplished either manually (by measuring sample solution with a
thermometer and then dialing in the measured temperature on the meter),
or automatically (by placing a separate temperature probe together with
a pH electrode in the solution).
The temperature of a solution affects pH measurements in two principal
ways:
1. The pH of buffers and samples actually changes slightly with
temperature. For buffers, this change is known and is built into
the PerpHecT series of meters.
2. The slope of the calibration, which the meter uses to convert
millivolt readings to pH, changes with temperature. At 25° C,
a 10 degree change in temperature changes the slope by 3.4%.
How important is direct temperature compensation to pH measurement?
To see the effects of temperature, look up your approximate sample
temperature on the left side of Table 1. Read across the top to your
approximate pH value. The value shown at the intersection is the error
a 1° C change in temperature will cause in pH measurement without
compensation. Accurate temperature compensation is essential to accurate
pH measurement.
Introduction to Patented digital LogR pH Measurement for Orion 310
15
Page 20
PerpHecT® Orion 310, 320, 330 Instruction Manual
Table 1 pH Error due to 1° C Temperature Change (in pH units)
pH 12
or pH 2
0.018
0.017
0.017
0.016
0.015
0.015
0.015
0.014
0.014
10
20
30
40
50
60
70
80
90
pH 8
or pH 6TEMP. (° C)
0.004
0.003
0.003
0.003
0.003
0.003
0.003
0.003
0.003
pH 9
or pH 5
0.007
0.007
0.007
0.006
0.006
0.006
0.006
0.006
0.006
pH 10
or pH 4
0.011
0.010
0.010
0.010
0.009
0.009
0.009
0.008
0.008
pH 11
or pH 3
0.014
0.014
0.014
0.013
0.012
0.012
0.012
0.011
0.011
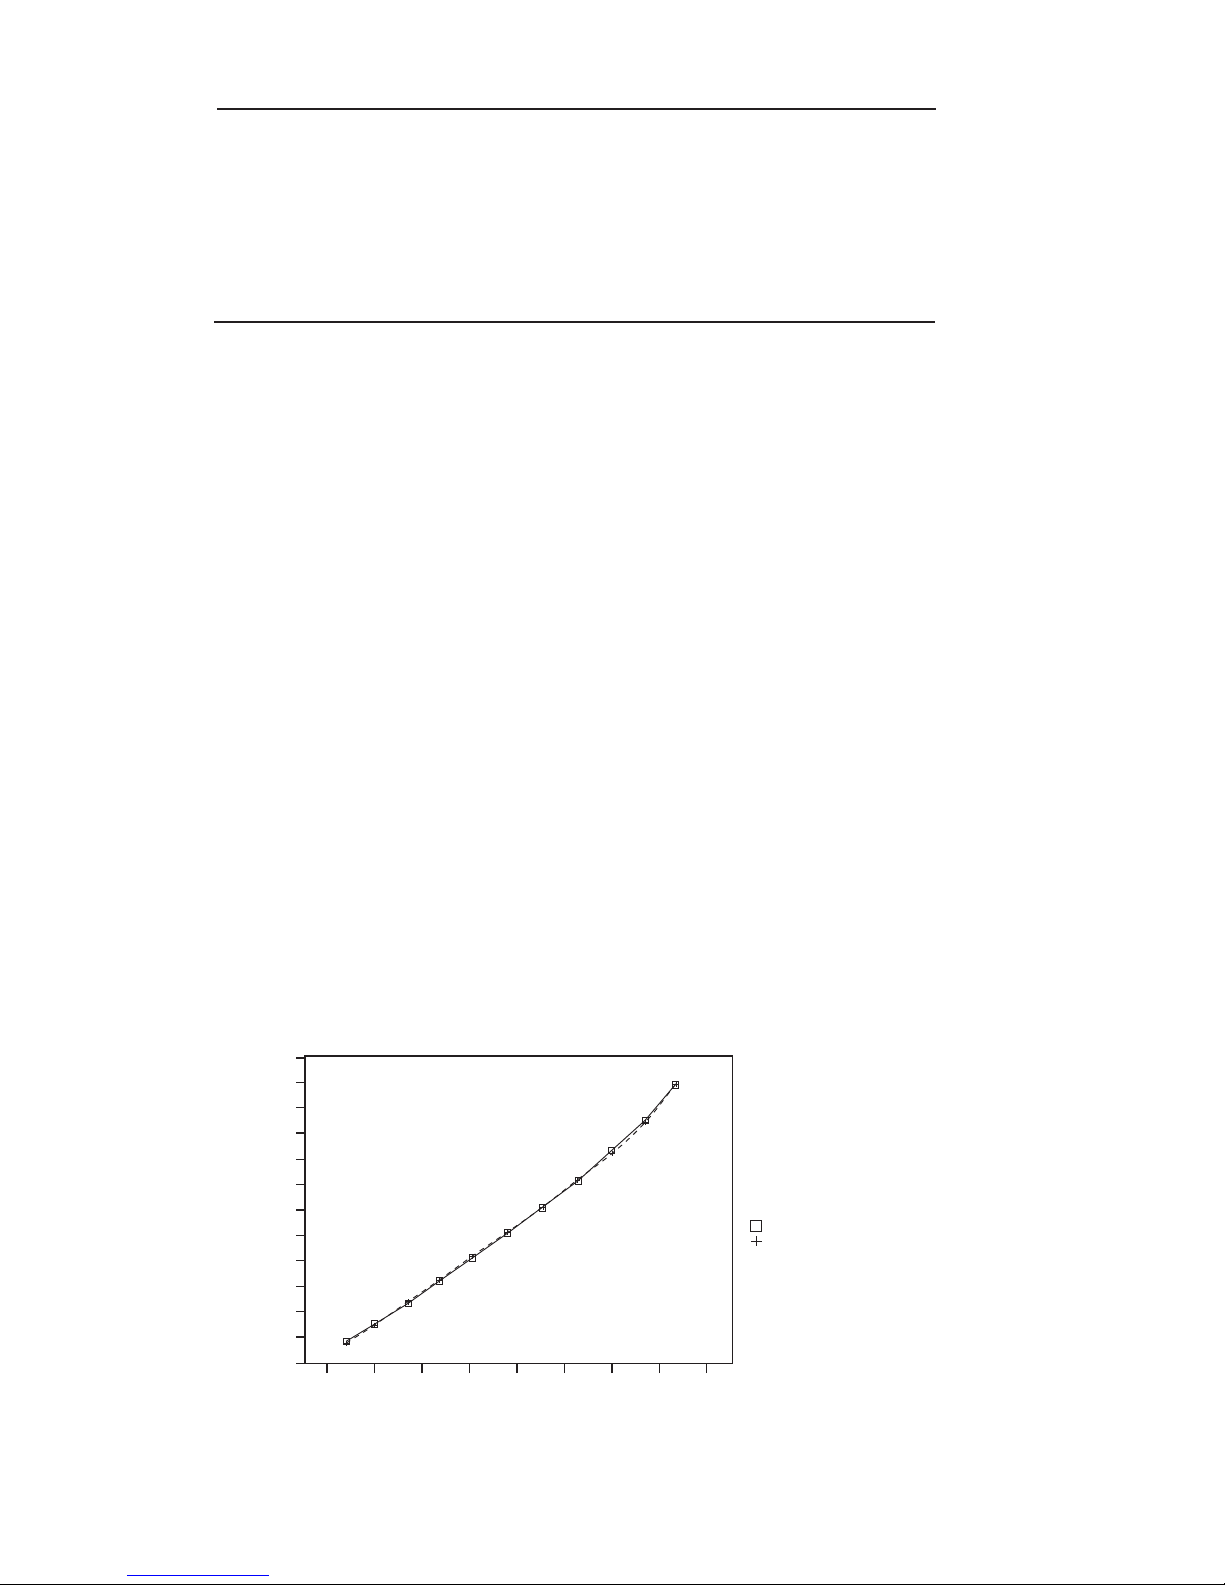
A. What Is digital LogR?
PerpHecT pH meters allow for direct temperature measurement and
temperature compensation from your pH electrode. With simultaneous
measurement of pH and temperature, the patented Orion digital LogR
technology makes it possible using most standard glass pH electrodes.
The system is based on using the electrical resistance of the glass sensing
bulb as the temperature probe. The name comes from the fact that the
logarithm of the resistance of the bulb varies almost linearly with the
reciprocal of the absolute temperature (See Figure 5). Almost all common
pH glasses show a similar decrease in resistance with increasing
temperature, and can be used with other types of meters. However,
only the exact shape of the curve for Orion PerpHecT electrodes
is in the meter’s memory.
To maximize system performance and accuracy, use PerpHecT ROSS and
PerpHecT pH electrodes.
3.8
3.7
3.6
3.5
3.4
3.3
3.2
3.1
3
2.9
2.8
2.7
Temperature (1000/Degrees Kelvin)
2.6
-1 01234567
16
Introduction to Patented digital LogR pH Measurement for Orion 310
Figure 5
Cal Point Values
Calculated Values
Log of Resistance
Page 21

®
PerpHecT
Orion 310, 320, 330 Instruction Manual
B. Orion 310 Temperature Calibration Procedure
This procedure should be performed at least once per week to ensure
accurate temperature compensation when operating in the LogR mode.
If the meter is powered down or the electrode disconnected, it is
recommended that you recalibrate the LogR temperature. See the
Appendix Section for accuracy specifications and recommended
calibration techniques.
Choose a temperature calibration range which is at least 5° C apart
depending on your expected operating range. Evenly bracket your
expected sample temperature range. A maximum 20° C range is
recommended for maximum accuracy. For example, for measurement
around 20° C calibrate at 10° C and 30° C. For temperature span greater
than 20° C, a three-point temperature calibration is recommended.
For many samples, a single-point calibration near the expected sample
temperature will yield adequate results. A constant temperature bath or
a hot plate is recommended to hold the temperature of calibrating solution.
For best results during temperature calibration, it is recommended
that pH buffer or tap water be used as the temperature calibrating solution.
Do Not Use deionized water because the conductivity is too low to obtain a
good calibration.
IMPORTANT:
When using the meter for the first
time or restarting in the LogR mode, you must
perform a LogR temperature calibration. It is
recommended that at least a two-point temperature
calibration be performed to meet optimum system
accuracy. See Appendix Section for additional
information.
Introduction to Patented digital LogR pH Measurement for Orion 310
17
Page 22

PerpHecT® Orion 310, 320, 330 Instruction Manual
Orion 310 Temperature Calibration Procedure (con’t)
1. LogR Function must be activated by pressing TEMP key, turning
LogR “ON” and pressing YES. Press the MODE key to display
temperature readout on the meter.
2. Initiate a calibration by pressing the CAL key. “CAL” will be
displayed. Then the last LogR calibration type (“1-PT”, “2-PT”
or “3-PT”) will be displayed in the main readout. “2-PT”
(2 point calibration) is the default.
3. Use the SCROLL (▲,▼) keys to change calibration type, then
press YES key to accept. CAL l will then be displayed in the main
readout. The measured CAL 1 temperature value, based upon the
last calibration, will then be displayed. When the LogR signal
stabilizes, the Ready annunciator will light.
4. Adjust the CAL l value using the SCROLL keys. Press YES key
to accept.
5. If a two-point calibration is selected, CAL 2 will then be displayed.
Follow steps 3 and 4 to set the second temperature value. Follow
the same steps if a three-pointcalibration is selected.
6. The meter will go to pH measure mode after accepting the final
calibration value.
NOTE:
A calibration may be aborted before
accepting the final calibration point by pressing
the MODE key. This will cause the system to
display “ESC”, proceed to Temperature mode and
retain to the previous LogR temperature calibration
and data.
18
Introduction to Patented digital LogR pH Measurement for Orion 310
Page 23

®
PerpHecT
Orion 310, 320, 330 Instruction Manual
Chapter VII
Temperature Measurement
for Orion 310
A. Temperature Compensation
(Manual and Automatic)
1. Use an ATC probe (Orion 927005 or Orion 927006) for automatic
temperature compensation. Disable the LogR function using the
TEMP key.
2. Attach ATC probe to 3.5 mm phone jack on rear panel of the
PerpHecT pH meter. See Figure 4.
3. For manual temperature compensation, disconnect the ATC probe.
Manual temperature may only be set when the LogR function is
disabled and there is no ATC probe connected:
Press the MODE key until the temp mode is entered. Use the
SCROLL (▲,▼) keys to manually set the temperature value. Press
the MODE key to return to pH mode. This temperature will now
be used to calculate temperature corrected pH values.
4. To return to ATC mode, attach the ATC probe to the ATC jack
(see Figure 4). Temperature compensation will now be automatic.
Temperature Measurement for Orion 310
19
Page 24

PerpHecT® Orion 310, 320, 330 Instruction Manual
20
Page 25

®
PerpHecT
Orion 310, 320, 330 Instruction Manual
Chapter VIII
Orion 320 Meter SetUp
A. Power Source
All PerpHecT meters are designed to operate with a line adaptor
(Orion 020125) for 110V operation or (Orion 020130) for 220V operation.
Plug the line adaptor securely into the meter’s Line Adapter Input, then
plug into an appropriate wall outlet.
B. Electrode Connection
1. Electrode
Attach the PerpHecT pH electrode or other pH electrode with BNC
connector to the BNC input on the meter by sliding the connector onto
the BNC input, then push in and turn clockwise to lock into position.
Electrodes with U.S. Standard connectors may be used with an adaptor
(Orion 090033). Connect reference electrodes with pin
tip connectors by pushing connector directly into reference input.
See Figure 4.
2. ATC Probe
Attach ATC probe to the ATC input by sliding the connector straight in
until firmly in place. Use Orion ATC probes Orion 927006 or 927005
only.
Orion 320 Meter SetUp
21
Page 26

PerpHecT® Orion 310, 320, 330 Instruction Manual
22
Page 27

®
PerpHecT
Orion 310, 320, 330 Instruction Manual
Chapter IX
Using the Orion 320
A. Power-Up
Plug meter into an approved wall outlet via the power line adaptor.
The entire display (all annunciators) will be displayed for 2 seconds.
Once all power-up procedures have been completed, the meter
automatically advances to measure mode.
NOTE:
been powered up, it is recommended that the
Self-Test Procedure be performed before using
the meter for measurements.
If this is the first time that the meter has
B. Meter Self-Test Procedure
It is recommended that this procedure be performed when the meter is
operated for the first time or any time that operational problems arise.
For a description of the diagnostic tests, see Chapter XVIII Self-Test
Definitions pg 53.
This procedure verifies the proper operation of the PerpHecT meters.
Self-test
1. Attach shorting cap to electrode BNC input.
2. Plug line adapter (Orion 020125) securely into meter Line Adapter
Input then into an appropriate wall outlet, while pressing the YES
key (hold down for 3 seconds) to start the self-test. The meter will
automatically perform seven diagnostic tests.
3. When “0” appears in the display field, press each key once.
A numeric digit will be displayed upon each keypress.
4. After the self-test is completed, the meter will automatically go
to MEASURE mode.
5. If any problems are found during the self-test, see Operator
Assistance Codes, page 55.
Using the Orion 320
23
Page 28

PerpHecT® Orion 310, 320, 330 Instruction Manual
Check Out:
1. After the self-test is completed, the meter will be in the
MEASURE mode.
a. Press the MODE key until the pH mode indicator is
displayed. Main display should read a steady 7.00 ± 0.02.
b. If not, press CAL key. Select a one-point calibration, “7”, to
change the pH reading. When READY lights up, press YES.
c. The main display should read 100.0 with the legend
SLP in the upper display. If so, press YES. If not, use the
SCROLL (▲,▼) keys to change the value to 100.0 press YES.
d. The meter advances to pH mode and the display should now
read a steady 7.00 ± 0.02.
e. Press the MODE key to enter millivolt mode. Display should
read 0 ± 1.
24
Using the Orion 320
Page 29

®
PerpHecT
Orion 310, 320, 330 Instruction Manual
C. SETUP Mode for Orion 320
Select SETUP mode by pressing SETUP key until SETUP light is
activated. This mode is used to define, change or view meter operating
parameters. While in the SETUP mode, the YES key is used to scroll
through the menu without changing parameters and to enter new
parameters into meter memory. The SCROLL (▲,▼) keys are used to
change the settings within each function. To exit the SETUP mode,
press the MODE key at any time.
NOTE:
If a parameter has been changed, the YES
key must be pressed to activate change.
The following parameters can be accessed in the SETUP mode:
Slope
The current pH electrode slope in meter memory will be displayed. The
value is displayed as a percent of theoretical slope. The default setting is
100%. This function is for display purposes only. The value cannot be
changed in the SETUP menu. To change the slope value, perform a twopoint calibration or set SLOPE during a one-point pH calibration. Press
the YES key to advance to next menu function.
LogR
When the LogR function is accessed, the LogR annunciator will light up
while the upper readout displays the current LogR setting (“OFF” for
disabled and “ON” for enabled). Press the YES key to accept the setting.
To change the current setting, press a SCROLL key. Press the YES key to
accept. The measured LogR temperature will be used to calculate
temperature-compensated pH values.
Manual Buffer Option
When the manual buffer option function is entered, the display will show
STD “57d” or SET “5E7”. To change the setting, press a SCROLL (▲,▼)
key. Press the YES key when the desired setting is displayed. When the
“STD” option is selected, calibration may only be performed with
standard buffers; pH 4.01, 7.00 and 10.01. When the “SET” option is
selected, calibration may be performed with user-defined buffers within
the 0 to 14 pH range. If SET is selected, the meter will advance to setting
the manual buffer values. Buffer values must be at least 1 and not more
than 4 pH units apart.
Using the Orion 320
25
Page 30

PerpHecT® Orion 310, 320, 330 Instruction Manual
26
Page 31

®
PerpHecT
Orion 310, 320, 330 Instruction Manual
Chapter X
General Information on
pH Calibration for Orion 320
A one or two buffer calibration should be performed using fresh buffers
before pH is measured. It is recommended that a two buffer calibration,
using buffers that bracket the expected sample range, be performed at the
beginning of each day to determine the slope of the electrode. This serves
the dual purpose of determining if the electrode is working properly and
storing the slope value in memory. For maximum accuracy, perform a
one-buffer calibration every two hours to compensate for electrode drift,
using a fresh aliquot of pH 7 buffer.
When operating in the LogR mode, the meter does not require the use of a
separate ATC probe. The PerpHecT meters measure the resistance of the
pH sensing glass and converts the value to temperature-compensated pH
measurements. For optimum results, PerpHecT electrodes or PerpHecT
ROSS electrodes should be used.
For best results, it is recommended that the unit be calibrated for
temperature in the LogR mode. Alternately, an ATC probe may be used.
If LogR or an ATC probe is not used, all samples and standards should
be at the same temperature or manual temperature compensation should
be used.
Stir all buffers and samples with a magnetic stirrer while a measurement is
being made.
NOTE:
heat to change solution temperature. To avoid this,
place a piece of cardboard, foam rubber, or other
insulating material between the stir plate and
beaker.
Always use a fresh aliquot of buffer whenever calibrating.
Some magnetic stirrers generate enough
General Information on pH Calibration for Orion 320
27
Page 32

PerpHecT® Orion 310, 320, 330 Instruction Manual
Calibration and Measurement
A. Autocalibration with Two Buffers
1. Attach the pH electrode to the meter.
2. Choose either pH 4.01 and pH 7.00, or pH 7.00 and pH 10.01
buffers; whichever will bracket your expected sample range.
3. Press CAL key to initiate calibration sequence. CAL is displayed
for two seconds. Press the YES key to accept the last calibration
range (7-4 or 7-10) or select one of these calibration ranges using
the SCROLL (▲,▼) keys. Press the YES key to accept. The 7
buffer annunciator will light up. Place electrode in pH 7.00 buffer.
Reading will be displayed and updated as calibration continues.
When the READY light comes on, indicating electrode stability,
press the YES key to accept.
4. The pH 4 (or pH 10) annunciator will light up. Remove electrode
from pH 7.00 buffer. Rinse with deionized water and place
electrode in either pH 4.01 or 10.01 buffer (depending on
calibration range that was selected). When the READY light
comes on, press the YES key to accept buffer value. SLP will be
displayed while the calculated slope is displayed.
5. The annunciators for the type of calibration performed will remain
lit until another calibration is performed.
6. Meter will automatically go into the MEASURE mode. The
READY light will come on to indicate electrode stability.
7. If operating in the LogR mode or using an ATC probe, the
temperature-corrected pH reading is displayed.
8. Rinse electrodes with deionized water and place into sample.
Record pH directly from the main meter display when the READY
light is displayed or when electrode signal is stable.
NOTE:
When making measurements in LogR
mode, you must calibrate for temperature before
attempting a pH calibration. See page 33 for
temperature calibration procedure.
28
General Information on pH Calibration for Orion 320
Page 33

®
PerpHecT
Orion 310, 320, 330 Instruction Manual
B. Autocalibration with One-buffer
NOTE
: Autocalibration with one-buffer can only be
performed using pH buffer 7.00.
1. Attach the pH electrode to the meter.
2. Choose pH 7.00 Buffer.
3. Press CAL key to initiate calibration sequence. CAL is displayed
for 2 seconds. Select calibration range “7” using the SCROLL
(▲,▼) keys. Press the YES key to accept. Place electrode in pH
7.00 buffer. Reading will be displayed and updated as calibration
continues. When the READY light comes on, indicating electrode
stability, press the YES key to accept.
4. SLP will be displayed in the upper field while 100.0 (or previous
calibration slope value) is displayed. This value can be edited
using the SCROLL (▲,▼) keys. Press the YES key to enter
this value.
5. Meter will automatically go into the MEASURE mode. The
READY light will come on to indicate electrode stability.
6. If operating in the LogR mode or using an ATC probe, the
temperature-corrected pH reading is displayed.
7. Rinse electrodes with deionized water and place into sample.
Record pH directly from the main meter display when the READY
light is displayed or when electrode signal is stable.
General Information on pH Calibration for Orion 320
29
Page 34

PerpHecT® Orion 310, 320, 330 Instruction Manual
C. Manual pH Calibration
NOTE:
Manual calibration can be performed
with any user-selected buffer(s). The difference
between manual buffer values must be between
1 and 4 pH units.
1. Attach electrode to meter.
2. Press the SETUP key. Press the YES key until SET or STD is
displayed. Choose the SET option and press the YES key.
3. P1 is displayed in the top readout. Using the SCROLL (▲,▼)
keys, set user-defined value for the first buffer and press the YES
key to accept new value.
4. Repeat for second buffer value (P2). Press the MODE key to return
to MEASURE mode.
5. Press the CAL key. CAL is displayed for 2 seconds. The last
calibration buffer range will be displayed. Use the SCROLL
(▲,▼) keys to select the SET option. Press the YES key to accept
this calibration. Pl is displayed. Place electrode into the first
calibration buffer. When READY light is displayed indicating
electrode stability, the user defined buffer value will be displayed.
Press the YES key to accept. P2 is displayed. Repeat for second
calibration buffer.
6. When the READY light comes on, press the YES key to accept
buffer value. SLP will be displayed for 2 seconds while the
calculated slope is displayed.
7. Rinse electrode with deionized water and place in sample.
8. Record pH directly from the main meter display and temperature
from upper field when the READY light is displayed or when
electrode signal is stable.
30
General Information on pH Calibration for Orion 320
Page 35

®
PerpHecT
Orion 310, 320, 330 Instruction Manual
Chapter XI
Introduction to Patented digital
LogR pH Measurement for
Orion 320
Obtaining accurate pH values depends on both correct measurement of
standard and sample temperatures and on compensation for any variations
in these temperatures. This thermal compensation has generally been
accomplished either manually (by measuring sample solution with a
thermometer and then dialing in the measured temperature on the meter),
or automatically (by placing a separate temperature probe together with a
pH electrode in the solution).
The temperature of a solution affects pH measurements in two principal
ways:
1. The pH of buffers and samples actually changes slightly with
temperature. For buffers, this change is known and is built into the
PerpHecT series of meters.
2. The slope of the calibration which the meter uses to convert
millivolt readings to pH, changes with temperature. At 25° C,
a 10 degree change in temperature changes the slope by 3.4%.
How important is direct temperature compensation to pH measurement?
To see the effects of temperature, look up your approximate sample
temperature on the left side of Table 1. Read across the top to your
approximate pH value. The value shown at the intersection is the error
a 1° C change in temperature will cause in pH measurement without
compensation. Accurate temperature compensation is essential to accurate
pH measurement.
Introduction to Patented digital LogR pH Measurement for Orion 320
31
Page 36
PerpHecT® Orion 310, 320, 330 Instruction Manual
Table 1 pH Error due to 1° C Temperature Change (in pH units)
pH 12
or pH 2
0.018
0.017
0.017
0.016
0.015
0.015
0.015
0.014
0.014
10
20
30
40
50
60
70
80
90
pH 8
or pH 6TEMP. (° C)
0.004
0.003
0.003
0.003
0.003
0.003
0.003
0.003
0.003
pH 9
or pH 5
0.007
0.007
0.007
0.006
0.006
0.006
0.006
0.006
0.006
pH 10
or pH 4
0.011
0.010
0.010
0.010
0.009
0.009
0.009
0.008
0.008
pH 11
or pH 3
0.014
0.014
0.014
0.013
0.012
0.012
0.012
0.011
0.011
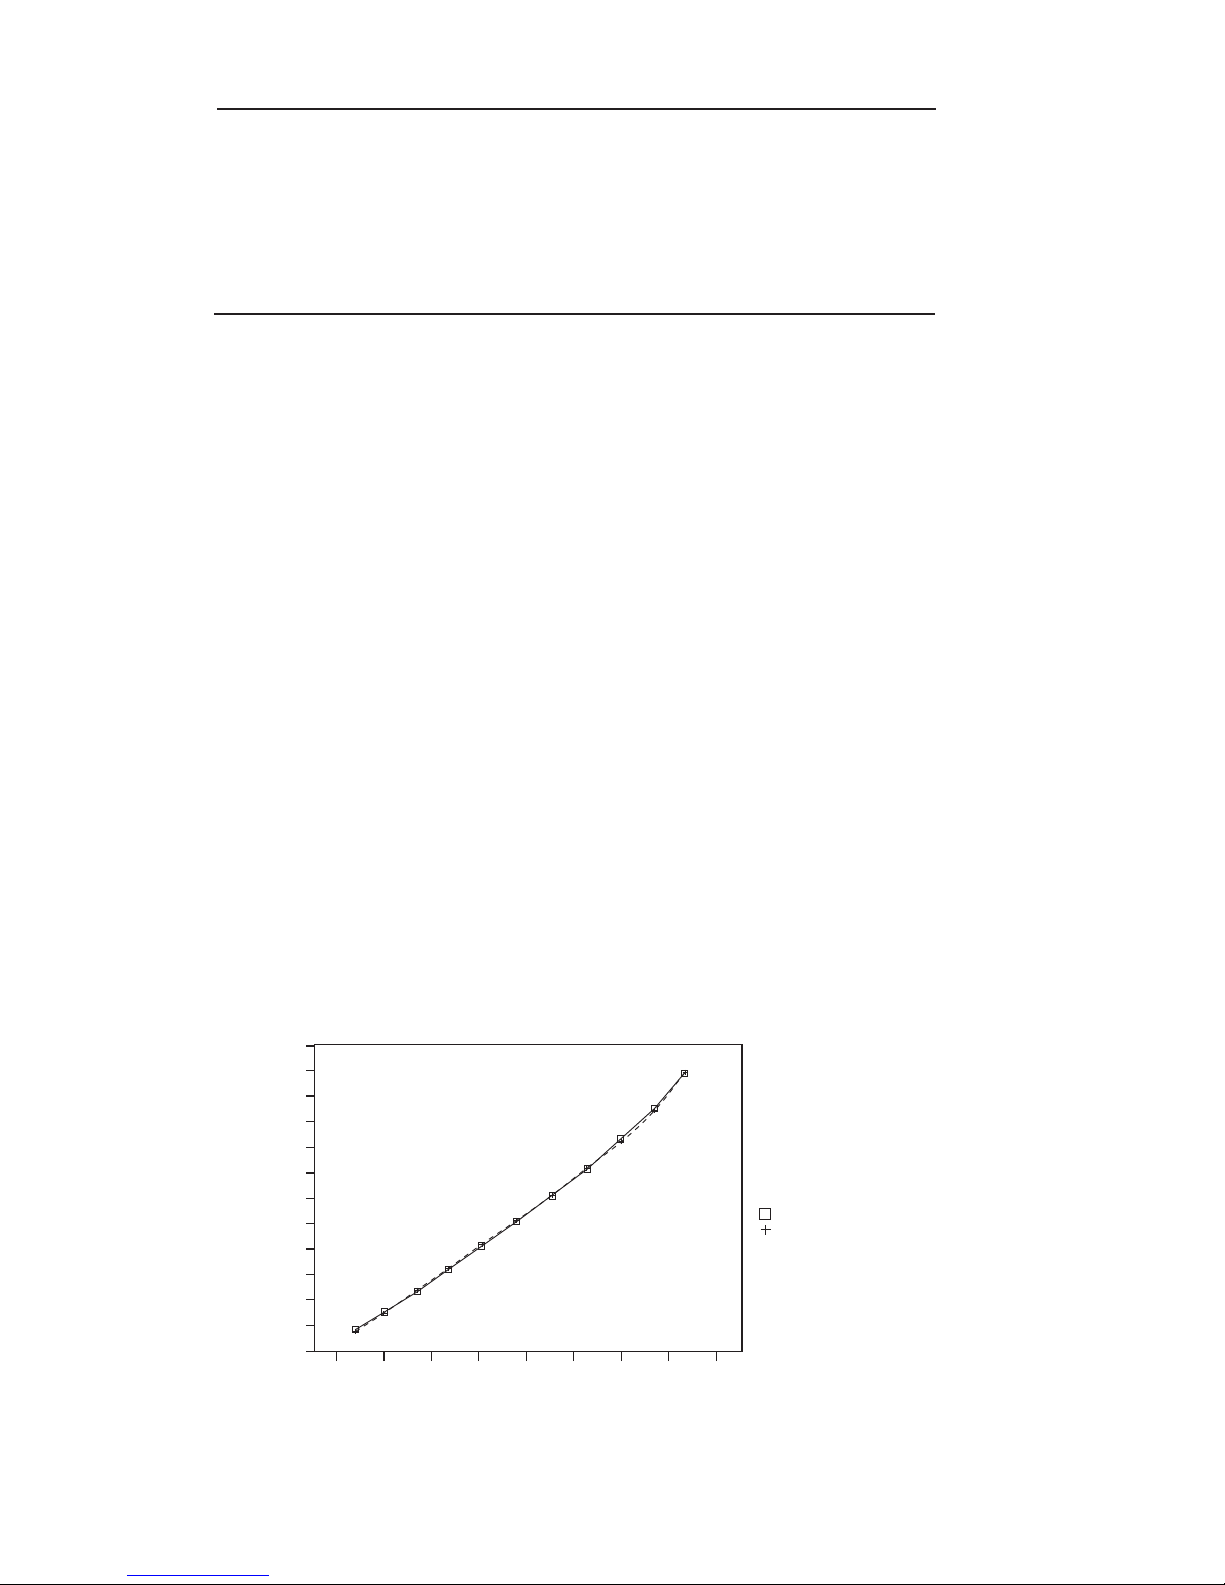
A. What Is digital LogR?
PerpHecT pH meters allow for direct temperature measurement and
temperature compensation from your pH electrode. With simultaneous
measurement of pH and temperature, the patented Orion digital
LogR technology makes it possible using most standard glass pH
electrodes. The system is based on using the electrical resistance of the
glass sensing bulb as the temperature probe. The name comes from the
fact that the logarithm of the resistance of the bulb varies almost linearly
with the reciprocal of the absolute temperature (See Figure 5). Almost all
common pH glasses show a similar decrease in resistance with increasing
temperature, and can be used with other types of meters. However, only
the exact shape of the curve for Orion PerpHecT electrodes is in the
meter’s memory.
To maximize system performance and accuracy, use PerpHecT ROSS and
PerpHecT pH electrodes.
3.8
3.7
3.6
3.5
3.4
3.3
3.2
3.1
3
2.9
2.8
2.7
Temperature (1000/Degrees Kelvin)
2.6
-1 01234567
32 Introduction to Patented digital LogR pH Measurement for Orion 320
Figure 5
Cal Point Values
Calculated Values
Log of Resistance
Page 37

®
PerpHecT
Orion 310, 320, 330 Instruction Manual
B. Orion 320 Temperature Calibration Procedure
This procedure should be performed at least once per week to ensure
accurate temperature compensation when operating in the LogR mode.
If the meter is powered down or the electrode disconnected, it is
recommended that you recalibrate the LogR temperature. See the
Appendix Section for accuracy specifications and recommended
calibration techniques.
Choose a temperature calibration range which is at least 5° C apart
depending on your expected operating range. Evenly bracket your
expected sample temperature range. A maximum 20° C range is
recommended for maximum accuracy. For example, for measurement
around 20° C calibrate at 10° C and 30° C. For temperature span
greater than 20° C, a three-point temperature calibration is recommended.
For many samples, a single-point calibration near the expected sample
temperature will yield adequate results. A constant temperature bath or
a hot plate is recommended to hold the temperature of calibrating solution.
For best results during temperature calibration, it is recommended that
pH buffer or tap water be used as the temperature calibrating solution.
Do Not Use deionized water because the conductivity is too low to
obtain a good calibration.
IMPORTANT:
When using the meter for the first
time or restarting in the LogR mode, you must perform
a LogR temperature calibration. It is recommended
that at least a two-point temperature calibration
be performed to meet optimum system accuracy.
See Appendix Section for additional information.
Introduction to Patented digital LogR pH Measurement for Orion 320
33
Page 38

PerpHecT® Orion 310, 320, 330 Instruction Manual
Orion 320 Temperature Calibration Procedure (cont'd)
To perform a LogR calibration, the LogR function must first be enabled in
SETUP mode.
1. Initiate the LogR mode using the SETUP key. Press Yes to
enter the LogR function. Press the scroll (▲,▼) keys until “On”
is displayed in the upper field. Press Yes to enable the LogR
function. When the LogR function is enabled, the LogR
annunciator will be lit while the meter is in the measure mode.
2. Press MODE key to access LogR temperature calibration
sequence. The LogR annunciator is on and the main readout will
display “CAL”. Press the YES key to begin the LogR temperature
calibration sequence. When the YES key has been pressed, the
last LogR calibration type (“1-PT”, “2-PT” or “3-PT”) will be
displayed in the readout. “2-PT” is the default.
3. Use the SCROLL (▲,▼) keys to change calibration type, then
press YES key to accept. CAL will then be displayed in the main
readout. The measured CAL value, based upon the last calibration,
will be displayed. When the LogR signal stabilizes, the “Ready”
annunciator will light up.
4. Adjust the CAL l value using the SCROLL keys. Press YES key
to accept.
5. If a two-point calibration is selected, CAL 2 will then be
displayed in the main readout. Follow steps 3 and 4 to set the
second temperature value. Follow the same steps if a three-point
calibration is selected.
6. The meter will go to pH measure mode after accepting the final
value.
NOTE:
A calibration may be aborted before
accepting the final calibration point by pressing
the MODE key. This will cause the system to display
“ESC”, proceed to pH mode and retain to the
previous LogR temperature calibration data.
34
Introduction to Patented digital LogR pH Measurement for Orion 320
Page 39

®
PerpHecT
Orion 310, 320, 330 Instruction Manual
Chapter XII
Orion 320 Other Measurement
A. mV/ORP Measurement Orion 320
1. Use the MODE key to select mV mode.
2. Connect ORP electrode to meter input.
3. Place electrode in sample. When reading stabilizes, record value.
B. Orion 320 Temperature Compensation
(Manual and Automatic)
1. Use an ATC probe (Orion 927005 or Orion 927006) for automatic
temperature compensation. Disable the LogR function in the Setup
mode.
2. Attach ATC probe to 3.5 mm phone jack on rear panel of the
meter. See Figure 4.
3. For manual temperature compensation, disconnect the ATC probe.
Manual temperature may only be set when the LogR function is
disabled and there is no ATC probe connected.
Use the SCROLL (▲,▼) keys in MEASURE mode to manually
set the temperature value. Temperature will be displayed in the
temperature field. This temperature will now be used to calculate
temperature-corrected pH values.
4. To return to ATC mode, attach the ATC probe to the ATC jack
(see Figure 4). Temperature compensation will now be automatic.
Orion 320 Other Measurement Modes
35
Page 40

PerpHecT® Orion 310, 320, 330 Instruction Manual
36
Page 41

®
PerpHecT
Orion 310, 320, 330 Instruction Manual
Chapter XIII
Orion 330 Meter SetUp
A. Power Source
All PerpHecT meters are designed to operate with a line adaptor
(Orion 020125) for 110V operation or (Orion 020130) for 220V operation.
Plug the line adaptor securely into the meter’s Line Adapter Input, then
plug into an appropriate wall outlet.
B. Electrode Connection
1. Electrode
Attach the PerpHecT pH electrode or other pH electrode with
BNC connector to the BNC input on the meter by sliding the connector
onto the BNC input, then push in and turn clockwise to lock into position.
Electrodes with U.S. Standard connectors may be used with an adaptor
(Orion 090033). Connect reference electrodes with pin tip connectors by
pushing connector directly into reference input.
See Figure 4.
2. ATC Probe
Attach ATC probe to the ATC input by sliding the connector straight in
until firmly in place. Use Orion ATC probes Catalog No. 927006
or 927005 only.
3. RS232
Attach RS232 connector to the RS232 input for use with printer or
computer.
Orion 330 Meter SetUp
37
Page 42

PerpHecT® Orion 310, 320, 330 Instruction Manual
38
Page 43

®
PerpHecT
Orion 310, 320, 330 Instruction Manual
Chapter XIV
Using the Orion 330
A. Power-Up
Plug meter into an approved wall outlet via the power line adaptor. The
entire display (all annunciators) will be displayed for 2 seconds. Once all
power-up procedures have been completed, the meter automatically
advances to measure mode.
NOTE:
been powered up, it is recommended that the SelfTest Procedure be performed before using the meter
for measurements.
If this is the first time that the meter has
B. Meter Self-Test Procedure
It is recommended that this procedure be performed when the meter is
operated for the first time or any time that operational problems arise.
For a description of the diagnostic tests, see Chapter XVIII Self-Test
Definitions pg 53.
This procedure verifies the proper operation of the PerpHecT meters.
Self-test
1. Attach shorting cap to electrode BNC input.
2. Plug line adapter (Orion 020125) securely into
meter Line Adapter Input, then into an appropriate wall outlet
while pressing the YES key (hold down for 3 seconds) to
start the self-test. The meter will automatically perform
seven diagnostic tests.
3. When “0” appears in the display field, press each key once.
A numeric digit will be displayed upon each keypress.
4. After the self-test is completed, the meter will automatically
go to MEASURE mode.
5. If any problems are found during the self-test, see Operator
Assistance Codes, page 55.
Using the Orion 330
39
Page 44

PerpHecT® Orion 310, 320, 330 Instruction Manual
Check Out:
1. After the self-test is completed, the meter will be in the
MEASURE mode.
a. Press the MODE key until the pH mode indicator is
displayed. Main display should read a steady 7.00 ± 0.02.
b. If not, press CAL key. Select a one-point calibration, “7”, to
change the pH reading. When READY lights up, press YES.
c. The main display should read 100.0 with the legend SLP
in the upper display. If so, press YES. If not, use the
SCROLL (▲,▼) keys to change the value to 100.0 press YES.
d. The meter advances to pH mode and the display should now
read a steady 7.00 ± 0.02.
e. Press the MODE key to enter millivolt mode.
Display should read 0 ± 1.
C. SETUP Mode Orion 330
Select SETUP mode by pressing SETUP key until SETUP light is
activated. This mode is used to define, change or view meter operating
parameters. While in the SETUP mode, the YES key is used to scroll
through the menu without changing parameters and to enter new
parameters into meter memory. The SCROLL (▲,▼) keys are used to
change the settings within each function. To exit the SETUP mode,
press the MODE key at any time.
NOTE:
key must be pressed to activate the change.
If a parameter has been changed, the YES
40 Using the Orion 330
Page 45

®
PerpHecT
The following parameters can be accessed in the SETUP mode:
Orion 310, 320, 330 Instruction Manual
Slope
The current electrode slope in meter memory will be displayed. In pH
mode, the value is displayed as a percent of theoretical slope. The default
setting is 100%. This function is for display purposes only. The value can
not be changed in the SETUP menu. To change the slope value, perform a
two-point calibration or set SLOPE during a one-point pH calibration.
Press the YES key to advance to next menu function.
LogR
When the LogR function is accessed, the LogR annunciator will light up
while the upper readout displays the current LogR setting (“OFF” for
disabled and “ON” for enabled). Press the YES key to accept the setting.
To change the current setting, press a SCROLL key. Press the YES key
to accept. The measured LogR temperature will be used to calculate
temperature-compensated pH values.
Print Function
The current print function setting will be displayed in the main field
and “PrT” will be displayed in the upper field. The default is manual
print, “00”. To change the setting to “print on Ready,” press SCROLL
(▲,▼) keys and “01” will be displayed. Press the YES key when the
desired setting is displayed.
Manual Buffer Option
When the manual buffer option function is entered, the display will
show STD “57d” or SET “5E7”. To change the setting, press a SCROLL
(▲,▼) key. Press the YES key when the desired setting is displayed.
When the “STD” option is selected, calibration may only be performed
with standard buffers; pH 4.01, 7.00 and 10.01. When the “SET” option is
selected, calibration may be performed with user-defined buffers within
the 0 to 14 pH range. If “SET” is selected, the meter will advance to
setting the manual buffer values. Buffer values must be at least 1 and
not more than 4 pH units apart.
Using the Orion 330
41
Page 46

PerpHecT® Orion 310, 320, 330 Instruction Manual
42
Page 47

®
PerpHecT
Orion 310, 320, 330 Instruction Manual
Chapter XV
General Information on
pH Calibration for Orion 330
A one or two buffer calibration should be performed using fresh buffers
before pH is measured. It is recommended that a two buffer calibration,
using buffers that bracket the expected sample range, be performed at the
beginning of each day to determine the slope of the electrode. This serves
the dual purpose of determining if the electrode is working properly and
storing the slope value in memory. For maximum accuracy, perform a
one-buffer calibration every two hours to compensate for electrode drift,
using a fresh aliquot of pH 7 buffer.
When operating in the LogR mode, the meter does not require the use of a
separate ATC probe. The PerpHecT meters measure the resistance of the
pH sensing glass and converts the value to temperature-compensated pH
measurements. For optimum results, PerpHecT electrodes or PerpHecT
ROSS electrodes should be used.
For best results, it is recommended that the unit be calibrated for
temperature in the LogR mode. Alternately, an ATC probe may be used.
If LogR or an ATC probe is not used, all samples and standards should
be at the same temperature or manual temperature compensation should
be used.
Stir all buffers and samples with a magnetic stirrer while a measurement
is being made.
NOTE:
heat to change solution temperature. To avoid this,
place a piece of cardboard, foam rubber, or other
insulating material between the stir plate and
beaker.
Always use a fresh aliquot of buffer whenever calibrating.
Some magnetic stirrers generate enough
General Information on pH Calibration for Orion 330
43
Page 48

PerpHecT® Orion 310, 320, 330 Instruction Manual
Calibration and Measurement of pH
A. Autocalibration with Two Buffers
1. Attach the pH electrode to the meter.
2. Choose either pH 4.01 and pH 7.00, or pH 7.00 and pH 10.01
buffers; whichever will bracket your expected sample range.
3. Press CAL key to initiate calibration sequence. CAL is displayed
for two seconds. Press the YES key to accept the last calibration
range (7-4 or 7-10) or select one of these calibration ranges using
the SCROLL (▲,▼) keys. Press the YES key to accept. The 7
buffer annunciator will light up. Place electrode in pH 7.00 buffer.
Reading will be displayed and updated as calibration continues.
When the READY light comes on, indicating electrode stability,
press the YES key to accept.
4. The pH 4 (or pH 10) annunciator will light up. Remove electrode
from pH 7.00 buffer. Rinse with deionized water and place
electrode in either pH 4.01 or 10.01 buffer (depending on
calibration range that was selected). When the READY light
comes on, press the YES key to accept buffer value. SLP will be
displayed while the calculated slope is displayed. If a printer is
attached, calibration data will be sent to the printer.
5. The annunciators for the type of calibration performed will remain
lit until another calibration is performed.
6. Meter will automatically go into the MEASURE mode.
The READY light will come on to indicate electrode stability.
7. If operating in the LogR mode or using an ATC probe, the
temperature-corrected pH reading is displayed.
8. Rinse electrodes with deionized water and place into sample.
Record pH directly from the main meter display when the READY
light is displayed or when electrode signal is stable.
NOTE:
When making measurements in LogR
mode, you must calibrate for temperature before
attempting a pH calibration. See page 49 for
temperature calibration procedure.
44
General Information on pH Calibration for Orion 330
Page 49

®
PerpHecT
Orion 310, 320, 330 Instruction Manual
B. Autocalibration with One-buffer
NOTE:
Autocalibration with one-buffer can only be
performed using pH buffer 7.00.
1. Attach the pH electrode to the meter.
2. Choose pH 7.00 Buffer.
3. Press CAL key to initiate calibration sequence. CAL is displayed
for 2 seconds. Select calibration range “7” using the SCROLL
(▲,▼) keys. Press the YES key to accept. Place electrode in pH
7.00 buffer. Reading will be displayed and updated as calibration
continues. When the READY light comes on, indicating electrode
stability, press the YES key to accept.
4. SLP will be displayed while 100.0 (or previous calibration slope
value) is displayed. This value can be edited using the SCROLL
(▲,▼) keys. Press the YES key to enter this value. If a printer is
connected to the meter, the calibration data will print.
5. Meter will automatically go into the MEASURE mode. The
READY light will come on to indicate electrode stability.
6. If operating in the LogR mode or using an ATC probe,
the temperature-corrected pH reading is displayed.
7. Rinse electrodes with deionized water and place into sample.
Record pH directly from the main meter display when the READY
light is displayed or when electrode signal is stable.
General Information on pH Calibration for Orion 330
45
Page 50

PerpHecT® Orion 310, 320, 330 Instruction Manual
C. Manual pH Calibration
NOTE:
Manual calibration can be performed with
any user-selected buffer(s). The difference between
manual buffer values must be between 1 and 4 pH
units.
1. Attach electrode to meter.
2. Press the SETUP key. Press the YES key until SET or STD is
displayed. Choose the SET option and press the YES key.
3. P1 is displayed in the top readout. Using the SCROLL (▲,▼)
keys, set user-defined value for the first buffer and press the YES
key to accept new value.
4. Repeat for second buffer value (P2). Press the MODE key to return
to MEASURE mode.
5. Press the CAL key. CAL is displayed for 2 seconds. The last
calibration buffer range will be displayed. Use the SCROLL
(▲,▼) keys to select the SET option. Press the YES key to accept
this calibration. Pl is displayed. Place electrode into the first
calibration buffer. When READY light is displayed indicating
electrode stability, the user defined buffer value will be displayed.
Press the YES key to accept. P2 is displayed. Repeat for second
calibration buffer.
6. When the READY light comes on, press the YES key to accept
buffer value. SLP will be displayed while the calculated slope is
displayed.
7. Rinse electrode with deionized water and place in sample.
8. Record pH directly from the main meter display and temperature
from upper field when the READY light is displayed or when
electrode signal is stable.
46
General Information on pH Calibration for Orion 330
Page 51

®
PerpHecT
Orion 310, 320, 330 Instruction Manual
Chapter XVI
Introduction to Patented digital
LogR pH Measurement for
Orion 330
Obtaining accurate pH values depends on both correct measurement of
standard and sample temperatures and on compensation for any variations
in these temperatures. This thermal compensation has generally been
accomplished either manually (by measuring sample solution with a
thermometer and then dialing in the measured temperature on the meter),
or automatically (by placing a separate temperature probe together with
a pH electrode in the solution).
The temperature of a solution affects pH measurements in two principal
ways:
1. The pH of buffers and samples actually changes slightly with
temperature. For buffers, this change is known and is built into
the PerpHecT series of meters.
2. The slope of the calibration, which the meter uses to convert
millivolt readings to pH, changes with temperature. At 25° C,
a 10 degree change in temperature changes the slope by 3.4%.
How important is direct temperature compensation to pH measurement?
To see the effects of temperature, look up your approximate sample
temperature on the left side of Table 1. Read across the top to your
approximate pH value. The value shown at the intersection is the error
a 1° C change in temperature will cause in pH measurement without
compensation. Accurate temperature compensation is essential to accurate
pH measurement.
Introduction to Patented digital LogR pH Measurement for Orion 330
47
Page 52
PerpHecT® Orion 310, 320, 330 Instruction Manual
Table 1 pH Error due to 1° C Temperature Change (in pH units)
pH 12
or pH 2
0.018
0.017
0.017
0.016
0.015
0.015
0.015
0.014
0.014
10
20
30
40
50
60
70
80
90
pH 8
or pH 6TEMP. (° C)
0.004
0.003
0.003
0.003
0.003
0.003
0.003
0.003
0.003
pH 9
or pH 5
0.007
0.007
0.007
0.006
0.006
0.006
0.006
0.006
0.006
pH 10
or pH 4
0.011
0.010
0.010
0.010
0.009
0.009
0.009
0.008
0.008
pH 11
or pH 3
0.014
0.014
0.014
0.013
0.012
0.012
0.012
0.011
0.011
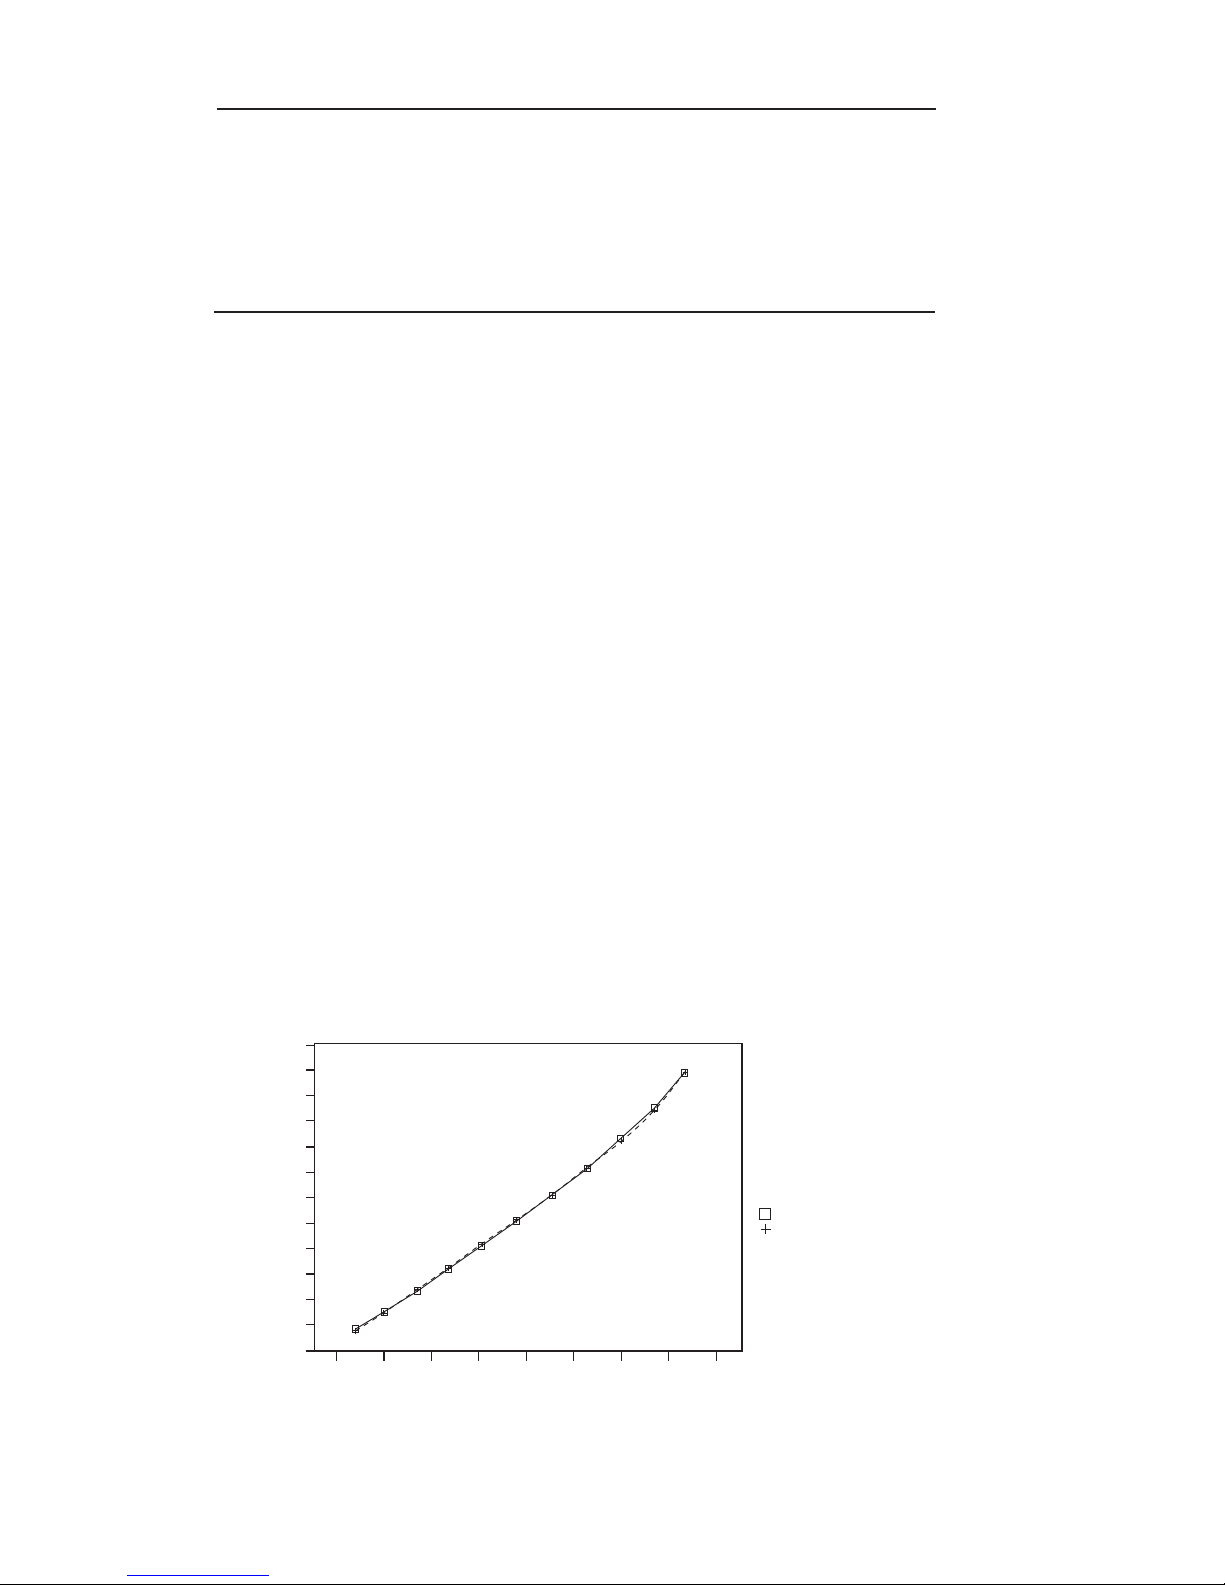
A. What Is digital LogR?
PerpHecT pH meters allow for direct temperature measurement and
temperature compensation from your pH electrode. With simultaneous
measurement of pH and temperature, the patented Orion digital
LogR technology makes it possible using most standard glass pH
electrodes. The system is based on using the electrical resistance of the
glass sensing bulb as the temperature probe. The name comes from the
fact that the logarithm of the resistance of the bulb varies almost linearly
with the reciprocal of the absolute temperature (See Figure 5). Almost all
common pH glasses show a similar decrease in resistance with increasing
temperature, and can be used with other types of meters. However, only
the exact shape of the curve for Orion PerpHecT electrodes is in the
meter’s memory.
To maximize system performance and accuracy, use PerpHecT ROSS
and PerpHecT pH electrodes.
3.8
3.7
3.6
3.5
3.4
3.3
3.2
3.1
3
2.9
2.8
2.7
Temperature (1000/Degrees Kelvin)
2.6
-1 01234567
Log of Resistance
48
Introduction to Patented digital LogR pH Measurement for Orion 330
Figure 5
Cal Point Values
Calculated Values
Page 53

®
PerpHecT
Orion 310, 320, 330 Instruction Manual
B. Orion 330 Temperature Calibration Procedure
This procedure should be performed at least once per week to ensure
accurate temperature compensation when operating in the LogR mode.
If the meter is powered down or the electrode disconnected, it is
recommended that you recalibrate the LogR temperature. See the
Appendix Section for accuracy specifications and recommended
calibration techniques.
Choose a temperature calibration range which is at least 5° C apart
depending on your expected operating range. Evenly bracket your
expected sample temperature range. A maximum 20° C range is
recommended for maximum accuracy. For example, for measurement
around 20° C calibrate at 10° C and 30° C. For temperature span
greater than 20° C, a three-point temperature calibration is recommended.
For many samples, a single-point calibration near the expected sample
temperature will yield adequate results. A constant temperature bath or
a hot plate is recommended to hold the temperature of calibrating solution.
For best results during temperature calibration, it is recommended that
pH buffer or tap water be used as the temperature calibrating solution.
Do Not Use deionized water because the conductivity is too low to obtain a
good calibration.
IMPORTANT:
When using the meter for the first
time or restarting in the LogR mode, you must
perform a LogR temperature calibration. It is
recommended that at least a two-point temperature
calibration be performed to meet optimum system
accuracy. See Appendix Section for additional
information.
Introduction to Patented digital LogR pH Measurement for Orion 330
49
Page 54

PerpHecT® Orion 310, 320, 330 Instruction Manual
Orion 330 Temperature Calibration Procedure (cont'd)
To perform a LogR calibration, the LogR function must first be enabled in
SETUP mode.
1. First, initiate the LogR mode using the SETUP key. When the
LogR function is enabled, the LogR annunciator will be lit.
2. Press MODE key to access LogR temperature calibration
sequence. The LogR annunciator is on and the main readout will
display “CAL”. Press the YES key tobegin the LogR temperature
calibration sequence. When the YES key has been pressed, the
last LogR calibration type (“1-PT”, “2-PT” or “3-PT”) will be
displayed in the main readout. “2-PT” is the default.
3. Use the SCROLL (▲,▼) keys to change calibration type, then
press YES key to accept. CAL will then be displayed in the
readout. The measured CAL value, based upon the last calibration,
will be displayed. When the LogR signal stabilizes, the Ready
annunciator will light up.
4. Adjust the CAL l value using the SCROLL keys. Press YES key
to accept.
5. If a two-point calibration is selected, CAL 2 will then be displayed
in the main readout. Follow steps 3 and 4 to set the second
temperature value. Follow the same steps if a three-point
calibration is selected.
6. The meter will go to pH measure mode after accepting the final
calibration value.
NOTE:
A calibration may be aborted before
accepting the final calibration point by pressing
the MODE key. This will cause the system to display
“ESC”, proceed to pH mode and retain to the
previous LogR temperature calibration data.
50
Introduction to Patented digital LogR pH Measurement for Orion 330
Page 55

®
PerpHecT
Orion 310, 320, 330 Instruction Manual
Chapter XVII
Orion 330 Other
Measurement Modes
A. mV/ORP Measurement
1. Use the MODE key to select mV mode.
2. Connect ORP electrode to meter input.
3. Place electrode in sample. When reading stabilizes, record value.
B. Temperature Compensation
(Manual and Automatic)
1. Use an ATC probe (Orion 927005 or Orion 927006) for automatic
temperature compensation. Disable the LogR function in the Setup
mode.
2. Attach ATC probe to 3.5 mm phone jack on rear panel of the
meter. See Figure 4.
3. For manual temperature compensation, disconnect the ATC probe.
Manual temperature may only be set when the LogR function is
disabled and there is no ATC probe connected.
Use the SCROLL (▲,▼) keys in MEASURE mode to manually
set the temperature value. Temperature will be displayed in the
temperature field. This temperature will now be used to calculate
temperature-corrected pH values.
4. To return to ATC mode, attach the ATC probe to the ATC jack
(see Figure 4). Temperature compensation will now be automatic.
Orion 330 Other Measurement Modes
51
Page 56

PerpHecT® Orion 310, 320, 330 Instruction Manual
52
Page 57

®
PerpHecT
Orion 310, 320, 330 Instruction Manual
Chapter XVIII
Self-Test Definitions
Orion 310, 320 and 330
During the self-test, the meter will display various codes corresponding
to the section of the instrument being checked. If any problems are found,
an operator assistance code corresponding to the test that failed will be
displayed. Note the code and press the YES key to continue. (See Table 2
under Operator Assistance Codes). If an operator assistance code appears
during self-test, check to make sure that the shorting cap is securely
attached, then repeat the test. If the problem persists, contact the The
Technical EdgeSM for Orion Products at 1-800-225-1480. During the selftest, the meter displays the number of the test in the main field. Additional
meter displays occur depending on the test being performed.
NOTE:
attached to the meter BNC input prior to self-test.
Ensure that the shorting cap is securely
Self-Test Definitions Orion 310, 320 and 330
53
Page 58

PerpHecT® Orion 310, 320, 330 Instruction Manual
Test Function\Display
Test #1 Segment Display checks meter display. Ensures that all
segments are lit.
Test #2 RAM Check verifies the proper operation of the Random
Access Memory.
Test #3 External Input checks the electrode-input channel.
Shorting cap must be plugged in for this test.
Test #4 Ground Reference checks the meter ground.
Test #5 Temperature Reference checks the ATC reference.
Test #6 Internal Reference checks the internal reference of
the meter.
Test #7 Keypad Test checks that the keypad is functioning
properly. During this test, all keys must be pressed at
the “0” prompt. As each key is pressed, a number
corresponding to the key is displayed. When all
keys have been pressed, READY will be displayed.
If no keys are pressed or there is a problem with a key the
meter will recognize an error and display E-07. Press the
YES key to continue.
54
Self-Test Definitions Orion 310, 320 and 330
Page 59

®
PerpHecT
Orion 310, 320, 330 Instruction Manual
Chapter XIX
Operator Assistance Codes
Orion 310, 320 and 330
Operator Assistance Codes are used to inform the user of an
out-of-range value or meter problem. The following tables outline the
operator assistance codes available in all Orion PerpHecT pH and
pH/ISE Meters.
The meter has a self-test circuit which verifies proper electronic
operation. During self-test a special series of codes, E-02 through E-07,
indicates a problem with the meter hardware. Should one of these codes
appear, check that shorting cap is securely attached. If problem persists,
contact The Technical EdgeSM for Orion Products at 1-800-225-1480.
Table 2
Code Function
E-02 RAM Check Error
E-03 Input Channel Error: ensure that the shorting cap is
securely attached to the meter and repeat self-test.
E-04 Ground Reference Error
E-05 Temperature Reference Error
E-06 Internal Reference Error
E-07 Internal Keypad Error: Press each key while in self-test.
If code persists, contact The Technical EdgeSM for Orion Products at
1-800-225-1480.
Operator Assistance Codes Orion 310, 320 and 330
55
Page 60

PerpHecT® Orion 310, 320, 330 Instruction Manual
The Operator Assistance Codes E-20 through E-36 alert the user to a
potential problem while calibrating or measuring. Several steps can be
taken to eliminate the problem in each case. If the code persists after
SM
trying the suggested remedies, contact The Technical Edge
for Orion
Products at 1-800-225-1480.
NOTE:
Press any key to clear an Error message
from the display
Code Description Causes / Suggestions
E-20 Out of Range 1. Occurs when electrode is out of
solution. Code will disappear when
electrode is returned to solution.
2. Sample may be out of range.
Check system using a buffer.
3. Recalibrate system using fresh buffers.
4. Refer to electrode instruction manual
for instructions on how to clean the
electrode.
E-21 ABR error/ Electrode voltage being measured is
pH AutoCal error > ± 0.5 pH units from the nominal value
for the pH buffer. Press key to
acknowledge clear error.
1. Verify buffer is pH 4.01, 7.00 or 10.01.
NOTE:
may be used only for manual calibrations.
56
Operator Assistance Codes Orion 310, 320 and 330
2. Recalibrate using fresh buffers.
3. Refer to pH electrode instruction
manuals for instructions on how to
clean the electrode.
4. Verify that the buffer the meter is
prompting for is being measured.
5. Perform manual calibration.
Non-standard calibration buffers
Page 61

®
PerpHecT
Orion 310, 320, 330 Instruction Manual
Code Description Causes / Suggestions
E-22 Calibration The pH values being measured
Standard Error are the same for two different buffers.
1. Press any key to acknowledge.
2. Check that two different buffers are
being used and that the correct one is
being measured.
3. Recalibrate using fresh buffers.
E-23 Bad Slope pH electrode slope not in the range
of 80% to 120%
1. Press any key to acknowledge.
2. Recalibrate using fresh buffers.
3. Refer to pH electrode instruction
manual for instructions on how to
clean the electrode.
E-29 Printer Error The meter is sending information to a
printer and there is no printer plugged
into the meter or printer is not turned on.
If a printer is being used check that the
printer is properly connected.
E-31 Bad Value A value has been entered which is not
within the acceptable range for that
function.
1. Press any key to acknowledge error.
2. Re-enter a new value within the
allowable range. Acceptable values
are as follows:
pH: 0.000 to 14.000
SLP: 80.0 to 120.0
TEMP: 0.0 to 100.0
Manual buffers: Must be greater than
1 and less than 4 pH units apart.
Operator Assistance Codes Orion 310, 320 and 330
57
Page 62

PerpHecT® Orion 310, 320, 330 Instruction Manual
Code Description Causes / Suggestions
E-35 Bad LogR Displayed when two calibration standards
Standard do not differ in temperature by the
minimum allowable differences in
LogR mode.
1. The difference between temperature
points must be at least 5° C.
E-36 No LogR Cal Displayed when the calibration
coefficients from a LogR calibration
are out-of-range. Incorrect temperature
value entered.
1. Recheck temperatures and recalibrate.
2. Check electrode and inputs
E-40 Serial Memory Displayed at power-up when an error
Error occurs accessing factory calibration data.
1. Unplug meter, plug in again after
10 seconds.
58
Operator Assistance Codes Orion 310, 320 and 330
Page 63

®
PerpHecT
Orion 310, 320, 330 Instruction Manual
Chapter XX
Troubleshooting Guide
Malfunction Possible Cause Remedy
No Display No power to meter Check that meter is plugged
in. Check that the proper line
converter is plugged in
securely.
Erratic Readings Meter or electrode Follow the meter check-out
or Reading failure procedure in this manual.
Out-of-Range
Check the electrode
operation by following the
instructions in the electrode
manual. Ensure proper
electrode connection to
the meter.
Troubleshooting Guide
59
Page 64

PerpHecT® Orion 310, 320, 330 Instruction Manual
60
Troubleshooting Guide
Page 65

®
PerpHecT
Orion 310, 320, 330 Instruction Manual
Chapter XXI
Repair and Service
After troubleshooting all components of your measurement system,
contact The Technical EdgeSM for Orion products. Within the United
States call 1.800.225.1480, outside the United States call 978.232.6000 or
fax 978.232.6031. In Europe, the Middle East and Africa, contact your
local authorized dealer. For the most current contact information, visit
www.thermo.com.
Repair and Service
61
Page 66

PerpHecT® Orion 310, 320, 330 Instruction Manual
62
Page 67

®
PerpHecT
Orion 310, 320, 330 Instruction Manual
Chapter XXIII
Warranty
For the most current warranty information, visit www.thermo.com.
The Thermo Electron Corporation, Orion products warranty covers
failures due to manufacturer’s workmanship or material defects from the
date of purchase by the user. User should return the warranty card and
retain proof of purchase. Warranty is void if product has been abused,
misused, or repairs attempted by unauthorized persons.
Warranties herein are for product sold/installed by Thermo or its
authorized dealers.
Any product sold by a U.S. or Canadian distributor must be returned to
Thermo for any warranty work. Please contact our Technical Service
department for further information. A Return Authorization Number must
be obtained from The Technical EDGESM for Orion Products before
returning any product for in-warranty repair or replacement.
In the event of failure within the warranty period, Thermo will at the
company’s option, repair or replace product not conforming to this
warranty. There may be additional charges, including freight, for warranty
service performed in some countries. For service, call Thermo or its
authorized dealer outside the United States and Canada. Thermo reserves
the right to ask for proof of purchase, such as the original invoice or
packing slip.
Field Service is available on Orion BOD AutoEZ™, EZ Flash® GC
Accessory and TEA Analyzer®. Contact our Field Service department for
details on quotations and service, other field service-related activities.
The following products are warranted to be free from defects in material
and workmanship in the period listed below from the date of purchase
from the user or from the date of shipment from Thermo, whichever is
earlier, provided use is in accordance with the operating limitations and
maintenance procedures in the instruction manual and when not having
been subjected to accident, alteration, misuse, abuse or breakage of
electrodes:
Warranty
63
Page 68

PerpHecT® Orion 310, 320, 330 Instruction Manual
Thirty-six months from date of purchase by the user (or forty-two
months from date of shipment from Thermo)
• Waterproof Meters (Orion 630, 635, 830A, 835A, 260A, 261S, 265A,
266S, 130A, 131S, 135A and 136S), Conductivity Meters (Orion
105Aplus, 115Aplus, 125Aplus, 145Aplus, 150Aplus and 162A),
®
PerpHect
pH/ISE Meters (Orion 310, 320, 330, 350, 370) pH/ISE
Meters (Orion 210Aplus, 230Aplus, 250Aplus, 290Aplus, 410Aplus,
420Aplus, 520Aplus, 525Aplus, 710Aplus, 720Aplus and 920Aplus),
pHuture MMS™ Meters (Orion 535A and 555A), pH/Conductivity
Meter (Orion 550A), Dissolved Oxygen Meters (Orion 805Aplus,
810Aplus, 850Aplus and 862A).
Twenty-four months from date of purchase by the user (or thirty-six
months from date of shipment from Thermo)
• Orion ROSS Ultra
®
Electrodes, Orion AQUAfast® IV Colorimeters,
Orion AQUAfast® IV Turbidimeter, Orion 925 Flash Titrator™, Series
100 DuraProbe™ Conductivity Cells and Series 800 Dissolved
Oxygen Probes.
Twelve months from date of purchase by the user (or eighteen months
from date of shipment from Thermo)
• Laboratory pH Meters, (Orion 301, 611 and 940), SensorLink®,
pHuture™ pH Meters (Orion 610 and 620), Sage® Pumps, Cahn
®
Balances, 930 Ionalyzer®, 950 ROSS™ FAST QC™ Titrator, 960
Titrator PLUS®, Karl Fischer Titrators, Autosamplers, Liquid
Handling Devices, Liquid Handling Automation Workstations (Orion
AS2000, AS2500 and AS4000), Pumps (Orion SP201, SP201-HR,
SP201-S, Peristaltic and Rinse), pHuture® Conversion Box, Wine
Master®, 607 Switchbox, rf link™, AQUAfast® II Colorimeters,
Vacuum Degasser and Flowmeter.
• Orion EZ Flash® GC Accessory, Orion TEA Analyzer® 610 and 510
excluding consumable items carry twelve months warranty only.
• Orion Ion Selective Electrodes, ionplus® Electrodes, ROSS™
Electrodes, Sure-Flow® Electrodes, PerpHecT® Electrodes, AquaPro
Professional Electrodes, No Cal™ pH electrodes, Standard Line pH
Electrodes, Tris pH Electrodes, KNIpHE® electrode, ORP Triode™
(Orion 9180BN), pHuture™ pH Probes (Orion 616500) and pHuture
MMS™ Quatrode™ and Triode™ (Orion 616600 and 617900), Orion
64
Warranty
Page 69

®
PerpHecT
Orion 310, 320, 330 Instruction Manual
97-08 DO Probe, Series 100 Conventional Conductivity Cells,
temperature probes and compensators (except those products noted).
• Orion 93 and 97 ionplus Series sensing modules are warranted to give
six months of operation if placed in service before the date indicated
on the package, except 93-07 and 97-07 Nitrate modules are warranted
to give ninety days of operation if placed in service before the date
indicated on the package.
Six months from date of purchase by the user (or twelve months from
date of shipment from Thermo)
• Orion Flash Titration™ Probe (Orion 092518), pHuture™ Electrode
(Orion 615700), pHuture MMS™ Pentrode™ (Orion 617500),
Quatrode™ (Orion 617800) and Triode™ (Orion 615800), Low
Maintenance Triode™ (Orion 9107BN), ORP Low Maintenance
Triode™ (Orion 9179BN), and PerpHecT® Low Maintenance
Triode™ (Orion 9207BN), Waterproof Triode™ (Orion 9107WP,
9107WL, 9109WL and 9109WP), QuiKcheK® Meters and Micro
Electrodes.
Three months from date of purchase by the user (or six months from
date of shipment from Thermo)
• Economy Line Electrodes, Orion 91-05, 91-06, 91-15, 91-16, 91-25,
91-26, 91-35, 91-36, 92-06. Warranty also includes failure for any
reason (excluding breakage), except abuse, provided the electrode is
not used in solutions containing silver, sulfide, perchlorate, or
hydrofluoric acid; or in solutions more than one (1) Molar in strong
acid or base at temperatures above 50 °C.
“Out-of-Box” Warranty - Should any of the following products fail to
work when first used, contact Thermo immediately for replacement.
• Orion Solutions, Standards, Reagents, Cables, Ferrules, Tubing, Line
adapters, Printers, Software, Cases, Stands, Probe Membranes,
AQUAfast® Test Strips, EZ Flash® columns, Liquid Handling Probes,
Adapter Plates and Racks and general accessories.
For products in the catalog not listed in this warranty statement, please
visit our website at: www.thermo.com
Warranty
65
Page 70

PerpHecT® Orion 310, 320, 330 Instruction Manual
THE WARRANTIES DESCRIBED ABOVE ARE EXCLUSIVE AND
IN LIEU OF ALL OTHER WARRANTIES WHETHER STATUTORY,
EXPRESS OR IMPLIED INCLUDING, BUT NOT LIMITED TO, ANY
IMPLIED WARRANTY OF MERCHANTABILITY OR FITNESS FOR
A PARTICULAR PURPOSE AND ALL WARRANTIES ARISING
FROM THE COURSE OF DEALING OR USAGE OF TRADE. THE
BUYER’S SOLE AND EXCLUSIVE REMEDY IS FOR REPAIR OR
REPLACEMENT OF THE NON-CONFORMING PRODUCT OR PART
THEREOF, OR REFUND OF THE PURCHASE PRICE, BUT IN NO
EVENT SHALL THERMO (ITS CONTRACTORS AND SUPPLIERS
OF ANY TIER) BE LIABLE TO THE BUYER OR ANY PERSON FOR
ANY SPECIAL, INDIRECT, INCIDENTAL, OR CONSEQUENTIAL
DAMAGES WHETHER THE CLAIMS ARE BASED IN CONTRACT,
IN TORT (INCLUDING NEGLIGENCE), OR OTHERWISE WITH
RESPECT TO OR ARISING OUT OF THE PRODUCT FURNISHED
HEREUNDER.
REPRESENTATION AND WARRANTIES MADE BY ANY PERSON,
INCLUDING ITS AUTHORIZED DEALERS, REPRESENTATIVES
AND EMPLOYEES OF THERMO WHICH ALTER OR ARE IN
ADDITION TO THE TERMS OF THIS WARRANTY SHALL NOT BE
BINDING UPON THERMO UNLESS IN WRITING AND SIGNED BY
ONE OF ITS OFFICERS.
66
Warranty
Page 71

®
PerpHecT
Orion 310, 320, 330 Instruction Manual
Chapter XXIV
Notice of Compliance
WARNING:
frequency energy and if not installed and used
properly, that is in strict accordance with the
manufacturer's instructions, may cause interference
to radio communications. It has been tested and
found to comply with the limits for a Class A
computing device pursuant to Subpart J of Part 15
of FCC Rules, which are designed to provide
reasonable protection against such interference in a
commercial environment. Operation of the meter in
a residential area may cause interference in which
case the user at his own expense will be required to
take whatever measures may be required to correct
the interference.
NOTE:
Orion-supplied line converters must be used.
This digital apparatus does not exceed the Class A limits for radio noise
emissions from digital apparatus set out in the Radio Interference
Regulations of the Canadian Department of Communications.
This meter may radiate radio
To meet or exceed FCC regulations the
Le présent appareil numérique n’ émet pas de bruits radioélectriques
dépassant les limites applicables aux appareils numériques (de la class A)
prescrites dans le Règlement sur le brouillage radioélectrique édicté par le
ministère des Communications du Canada.”
Notice of Compliance
67
Page 72

PerpHecT® Orion 310, 320, 330 Instruction Manual
Certificate of Conformity
Thermo Electron Corporation
Manufacturer: Thermo Electron Corporation
166 Cummings Center
Beverly, MA 01915-6110 U.S.A.
hereby declares that the products
Perphect LogR Orion
310, 320, 330, 350 and 370
from Serial No. 002000
conform with the following standards and documents
Safety: IEC 1010 Safety for Laboratory Equipment
UL 1262 Laboratory Equipment
CSA C22.2 No. 151 Laboratory Equipment
Emissions: EN 55022 Emissions
FCC Part 15 Class A
Immunity: EN50082-1 Generic Immunity
IEC 801-2 ESD Susceptibility
IEC 801-3 Radiated Susceptibility
IEC 801-4 Conducted Susceptibility
These Orion products have been manufactured in compliance with the
provisions of the relevent Thermo Electron manufacturing and test
documents and processes. Further, these documents and processes are
recognized as complying with ISO 9002:2000 by QMI, listed as File
# 001911.
Place and date of issue: _________________
Beverly, MA.
June, 2003 John Merseve
Q.A. Director
68
Notice of Compliance
Page 73

®
PerpHecT
Orion 310, 320, 330 Instruction Manual
Chapter XXIV
Ordering Information
Orion Description
031000 Orion 310 PerpHecT pH/Temperature meter, PerpHecT
Ag/AgCl electrode, 115V
031001 Orion 310 PerpHecT pH/Temperature meter, PerpHecT
Ag/AgCl electrode, 220V
0310A0 Orion 310 PerpHecT pH/Temperature meter, PerpHecT
ROSS electrode, 115V
0310A1 Orion 310 PerpHecT pH/Temperature meter, PerpHecT
ROSS electrode, 220V
032000 Orion 320 PerpHecT pH/mV/Temperature meter,
PerpHecT Ag/AgCl electrode, 115V
032001 Orion 320 PerpHecT pH/mV/Temperature
meter, PerpHecT Ag/AgCl electrode, 220V
0320A0 Orion 320 PerpHecT pH/mV/Temperature meter,
PerpHecT ROSS electrode, 115V
0320A1 Orion 320 PerpHecT pH/mV/Temperature
meter, PerpHecT ROSS electrode, 220V
033000 Orion 330 PerpHecT pH/mV/Temperature meter,
PerpHecT Ag/AgCl electrode, 115V
033001 Orion 330 PerpHecT pH/mV/Temperature
meter, PerpHecT Ag/AgCl electrode, 220V
0330A0 Orion 330 PerpHecT pH/mV/Temperature meter,
PerpHecT ROSS electrode, 115V
0330A1 Orion 330 PerpHecT pH/mV/Temperature
meter, PerpHecT ROSS electrode, 220V
035000 Orion 350 PerpHecT pH/ISE meter, PerpHecT
Ag/AgCl electrode, 115V
Ordering Information
69
Page 74

PerpHecT® Orion 310, 320, 330 Instruction Manual
Orion Description
035001 Orion 350 PerpHecT pH/ISE meter, PerpHecT
Ag/AgCl electrode, 220V
0350A0 Orion 350 PerpHecT pH/ISE meter, PerpHecT
ROSS electrode, 115V
0350A1 Orion 350 PerpHecT pH/ISE meter, PerpHecT
ROSS electrode, 220V
0350G0 Orion 350 PerpHecT pH/ISE meter, PerpHecT
ROSS electrode, Printer, 115V
0350G1 Orion 350 PerpHecT pH/ISE meter, PerpHecT
ROSS electrode, Printer, 220V
037000 Orion 370 PerpHecT pH/ISE meter, PerpHecT
Ag/AgCl electrode, 115V
037001 Orion 370 PerpHecT pH/ISE meter, PerpHecT
Ag/AgCl electrode, 220V
0370A0 Orion 370 PerpHecT pH/ISE meter, PerpHecT
ROSS electrode, 115V
0370A1 Orion 370 PerpHecT pH/ISE meter, PerpHecT
ROSS electrode, 220V
0370G0 Orion 370 PerpHecT pH/ISE meter, PerpHecT
ROSS electrode, Printer, 115V
0370G1 Orion 370 PerpHecT pH/ISE meter, PerpHecT
ROSS electrode, Printer, 220V
8202BN PerpHecT ROSS Glass combination pH electrode
8203BN PerpHecT ROSS Glass semi-micro combination
pH electrode
8235BN PerpHecT ROSS Epoxy flat surface combination
pH electrode
8256BN PerpHecT ROSS Epoxy combination pH electrode
8272BN PerpHecT ROSS Glass Sure-Flow combination
pH electrode
70
Ordering Information
Page 75

®
PerpHecT
Orion 310, 320, 330 Instruction Manual
Orion Description
9202BN PerpHecT Glass combination pH electrode
9203BN PerpHecT Glass semi-micro combination pH electrode
9206BN PerpHecT Epoxy gel-filled combination pH electrode
9207BN PerpHecT Epoxy gel-filled Triode pH electrode
9256BN PerpHecT Epoxy combination pH electrode
9272BN PerpHecT Glass Sure-Flow combination pH electrode
927005 PerpHecT Epoxy ATC probe
927006 PerpHecT Glass ATC probe
910410 perpHect® buffer 4 in trial size 10 pack
910710 perpHect buffer 7 in trial size 10 pack
911010 perpHect buffer 10 in trial size 10 pack
910425 perpHect buffer 4 in standard size 25 pack
910725 perpHect buffer 7 in standard size 25 pack
911025 perpHect buffer 10 in standard size 25 pack
Ordering Information
71
Page 76

PerpHecT® Orion 310, 320, 330 Instruction Manual
72
Page 77

®
PerpHecT
Orion 310, 320, 330 Instruction Manual
Chapter XXV
Specifications For
PerpHecT Meters
ORION 310 ORION 320 ORION 330 ORION 350 ORION 370
pH 0.00 - 14.00 0.00 - 14.00 0.00 - 14.00 0.000 - 14.000 0.000 - 14.000
RESOLUTION 0.01 0.1, 0.01 0.1, 0.01 0.1, 0.01, 0.001 0.1, 0.01, 0.001
ACCURACY +/- 0.02 +/- 0.02 +/- 0.02 +/- 0.005 +/- 0.005
mV NONE +/- 1999 +/- 1999 +/- 1999.9 +/- 1999.9
mV (in LogR mode) NONE +/- 1000 +/- 1000 +/- 1000.0 +/- 1000.0
RESOLUTION N/A 1 1 0.1 0.1
ACCURACY N/A +/- 1 +/- 1 +/- 0.2 +/- 0.2
REL mV NONE NONE NONE +/- 1999.9 +/- 1999.9
RESOLUTION N/A N/A N/A 0.1 0.1
ACCURACY N/A N/A N/A +/- 0.2 +/- 0.2
ATC TEMP 0.0 - 100° C 0.0 - 100° C 0.0 - 100° C 0.0 - 100° C 0.0 - 100° C
RESOLUTION 0.1 0.1 0.1 0.1 0.1
ACCURACY +/- 1.0 +/- 1.0 +/- 1.0 +/- 1.0 +/- 1.0
CONCENTRATION N/A N/A N/A N/A 0.000 - 19900
RESOLUTION N/A N/A N/A N/A 0.1, 0.01, 0.001
ACCURACY N/A N/A N/A N/A +/- 0.5% (reading)
Temperature Auto/Manual Auto/Manual Auto/Manual Auto/Manual Auto/Manual
Compensation
LogR Temp Accuracy +/- 0.5° C +/- 0.5° C +/- 0.5° C +/- 0.5° C +/- 0.5° C
(over a 20° C Cal Range)
DIGITAL N/A N/A RS232 Output RS232 Output RS232 Output
INTERFACE
RECORDER NO NO YES YES YES
CLOCK NO NO NO YES YES
BATTERY NO NO NO YES YES
BACK-UP
# OF CAL POINTS 1 or 2 1 or 2 1 or 2 1, 2, or 3 1, 2, or 3
(pH)
# OF CAL POINTS N/A N/A N/A N/A 2
(Concentration)
ELECTRODE 9202BN 9202BN 9202BN 9272BN 9272BN
PACKAGE PerpHecT PerpHecT PerpHecT PerpHecT Glass PerpHecT
Environmental Specifications (all meters):
• Indoor use only • Altitudes up to 2000 meters
• Temperature between 5° C and 45° C • Relative Humidity 5 - 85%
(at room temp.) (at room temp.) (at room temp.) (at room temp.) (at room temp.)
+/- 0.1 % +/- 0.1 % +/- 0.05 % +/- 0.05 %
(reading) (reading) (reading) (reading)
+/- 0.05% +/- 0.05%
(reading) (reading)
Glass Comb Glass Comb Glass Comb Comb Sure-Flow Glass Comb
or 8202BN or 8202BN or 8202BN or Sure-Flow or
8272BN 8272BN
Glass Comb Glass Comb
Sure-Flow Sure-Flow
Specifications
73
Page 78

PerpHecT® Orion 310, 320, 330 Instruction Manual
74
Page 79

®
PerpHecT
Orion 310, 320, 330 Instruction Manual
Appendix A
LogR Temperature
Accuracy Tables
Two-point LogR calibration average Temperature Compensation pH error
at 3 & 11 pH.
AVG TEMP AVG TEMP
AVG TEMP AVG TEMP COMP pH COMP pH
ERROR ERROR ERROR ERROR
0 - 25° C above 20° C* 0 - 25° C above 20° C*
ELECTRODE ° C ° C pH units pH units
8202 0.36 0.10 0.004 0.001
8203 0.13 0.02 0.002 0.000
8235 0.04 0.14 0.000 0.002
8256 0.22 0.06 0.003 0.001
8272 0.23 0.06 0.003 0.001
9202 0.21 0.06 0.003 0.001
9203 0.20 0.10 0.002 0.001
9206 0.29 0.06 0.003 0.001
9207 0.16 0.07 0.002 0.001
9256 0.27 0.07 0.003 0.001
9272 0.22 0.06 0.003 0.001
* For 20° C Temperature Compensation windows
Appendix A
75
Page 80

PerpHecT® Orion 310, 320, 330 Instruction Manual
Three-point LogR Calibration average Temperature Compensation
pH Error at 3 & 11 pH.
MAX TEMP MAX TEMP
MAX TEMP MAX TEMP COMP pH COMP pH
ERROR ERROR ERROR ERROR
0 - 25° C above 20° C* 0 - 25° C above 20° C*
ELECTRODE ° C ° C pH units pH units
8202 0.04 0.03 0.000 0.000
8203 0.04 0.01 0.000 0.000
8235 0.07 0.06 0.001 0.001
8256 0.04 0.06 0.000 0.001
8272 0.02 0.01 0.000 0.000
9202 0.02 0.04 0.000 0.000
9203 0.03 0.06 0.000 0.001
9206 0.06 0.05 0.001 0.001
9207 0.02 0.02 0.000 0.000
9256 0.07 0.07 0.001 0.001
9272 0.02 0.00 0.001 0.000
* For 20° C Temperature Compensation windows
76
Appendix A
Page 81

229048-001 Rev.D
Environmental Instruments
Analyze •Detect•Measure •Control
™
Water Analysis
North America
166 Cummings Center
Beverly, MA 01915 USA
Tel: 978-232-6000
Dom. Fax: 978-232-6015
Int’l. Fax: 978-232-6031
Europe
12-16 Sedgeway Business Park
Witchford, Cambridgeshire
England, CB6 2HY
Tel: 44-1353-666111
Fax: 44-1353-666001
Far East
Room 904, Federal Building
369 Lockhart Road
Wanchai, Hong Kong
Tel: 852-2836-0981
Fax: 852-2834-5160
Customer Support
Toll Free: 800-225-1480
www.thermo.com
Dom. e-mail: [email protected]
Int’l. e-mail: [email protected]
For updated contact information, visit www.thermo.com
 Loading...