

Thermo Scientific Jewett JBB1204, Jewett JBB2304, Jewett JBB404, Jewett JBB5004, Jewett JBB3004 Installation And Operation Manual

Installation and Operation Manual
Thermo Scientific Jewett®
Blood Bank Refrigerators

©
2010 Thermo Fisher Scientific. All rights reserved.
®
“Suva
” is a registered trademark of DuPont.
All other trademarks are the property of Thermo Fisher Scientific Inc. and
its subsidiaries.

Thermo Scientific Jewett Blood Bank Refrigerators Installation and Operation
Table of Contents
1 Introduction. . . . . . . . . . . . . . . . . . . . . . . . . . . . . . . . . . . . . . . . . . . . . . . . . . . . . . . . . . . . . . . . . . . . . . . 1
2 Safety Precautions . . . . . . . . . . . . . . . . . . . . . . . . . . . . . . . . . . . . . . . . . . . . . . . . . . . . . . . . . . . . . . . . . 1
3 Unpacking and Inspection. . . . . . . . . . . . . . . . . . . . . . . . . . . . . . . . . . . . . . . . . . . . . . . . . . . . . . . . . . . 2
4 Installation. . . . . . . . . . . . . . . . . . . . . . . . . . . . . . . . . . . . . . . . . . . . . . . . . . . . . . . . . . . . . . . . . . . . . . . . 2
4.1 Location . . . . . . . . . . . . . . . . . . . . . . . . . . . . . . . . . . . . . . . . . . . . . . . . . . . . . . . . . . . . . . . . . . . . . . . . . . . . . . .2
4.2 Wiring . . . . . . . . . . . . . . . . . . . . . . . . . . . . . . . . . . . . . . . . . . . . . . . . . . . . . . . . . . . . . . . . . . . . . . . . . . . . . . . . .2
4.3 Leveling . . . . . . . . . . . . . . . . . . . . . . . . . . . . . . . . . . . . . . . . . . . . . . . . . . . . . . . . . . . . . . . . . . . . . . . . . . . . . . .2
4.4 Door Operation. . . . . . . . . . . . . . . . . . . . . . . . . . . . . . . . . . . . . . . . . . . . . . . . . . . . . . . . . . . . . . . . . . . . . . . . . .2
4.4.1 Adjustable Hinged Glass Doors (Undercounter Models Only) . . . . . . . . . . . . . . . . . . . . . . . . . . . . . . . .2
4.5 Door Seal . . . . . . . . . . . . . . . . . . . . . . . . . . . . . . . . . . . . . . . . . . . . . . . . . . . . . . . . . . . . . . . . . . . . . . . . . . . . . .3
4.6 Final Checks. . . . . . . . . . . . . . . . . . . . . . . . . . . . . . . . . . . . . . . . . . . . . . . . . . . . . . . . . . . . . . . . . . . . . . . . . . . .3
5 Drawers . . . . . . . . . . . . . . . . . . . . . . . . . . . . . . . . . . . . . . . . . . . . . . . . . . . . . . . . . . . . . . . . . . . . . . . . . . 3
5.1 Removing the Drawers. . . . . . . . . . . . . . . . . . . . . . . . . . . . . . . . . . . . . . . . . . . . . . . . . . . . . . . . . . . . . . . . . . . .3
5.2 Reinstalling the Drawers. . . . . . . . . . . . . . . . . . . . . . . . . . . . . . . . . . . . . . . . . . . . . . . . . . . . . . . . . . . . . . . . . . .3
5.3 Changing Drawer Slide Position. . . . . . . . . . . . . . . . . . . . . . . . . . . . . . . . . . . . . . . . . . . . . . . . . . . . . . . . . . . . .3
5.4 Control Panel Features. . . . . . . . . . . . . . . . . . . . . . . . . . . . . . . . . . . . . . . . . . . . . . . . . . . . . . . . . . . . . . . . . . . .4
6 Control Panel . . . . . . . . . . . . . . . . . . . . . . . . . . . . . . . . . . . . . . . . . . . . . . . . . . . . . . . . . . . . . . . . . . . . . 4
6.1 Display Functions . . . . . . . . . . . . . . . . . . . . . . . . . . . . . . . . . . . . . . . . . . . . . . . . . . . . . . . . . . . . . . . . . . . . . . . .5
6.2 Programming Functions . . . . . . . . . . . . . . . . . . . . . . . . . . . . . . . . . . . . . . . . . . . . . . . . . . . . . . . . . . . . . . . . . . .5
6.3 Service Parameters . . . . . . . . . . . . . . . . . . . . . . . . . . . . . . . . . . . . . . . . . . . . . . . . . . . . . . . . . . . . . . . . . . . . . .5
7 Operation. . . . . . . . . . . . . . . . . . . . . . . . . . . . . . . . . . . . . . . . . . . . . . . . . . . . . . . . . . . . . . . . . . . . . . . . . 6
7.1 Start Up. . . . . . . . . . . . . . . . . . . . . . . . . . . . . . . . . . . . . . . . . . . . . . . . . . . . . . . . . . . . . . . . . . . . . . . . . . . . . . . .6
7.2 Product Loading Guidelines . . . . . . . . . . . . . . . . . . . . . . . . . . . . . . . . . . . . . . . . . . . . . . . . . . . . . . . . . . . . . . . .6
7.3 Automatic Defrost. . . . . . . . . . . . . . . . . . . . . . . . . . . . . . . . . . . . . . . . . . . . . . . . . . . . . . . . . . . . . . . . . . . . . . . .6
8 Temperature Control . . . . . . . . . . . . . . . . . . . . . . . . . . . . . . . . . . . . . . . . . . . . . . . . . . . . . . . . . . . . . . . 6
8.1 Setpoint Control . . . . . . . . . . . . . . . . . . . . . . . . . . . . . . . . . . . . . . . . . . . . . . . . . . . . . . . . . . . . . . . . . . . . . . . . .6
8.2 Sensor Bottles . . . . . . . . . . . . . . . . . . . . . . . . . . . . . . . . . . . . . . . . . . . . . . . . . . . . . . . . . . . . . . . . . . . . . . . . . .6
i

Thermo Scientific Jewett Blood Bank Refrigerators Installation and Operation
9 Alarm Systems . . . . . . . . . . . . . . . . . . . . . . . . . . . . . . . . . . . . . . . . . . . . . . . . . . . . . . . . . . . . . . . . . . . . 7
9.1 Operating the Alarm . . . . . . . . . . . . . . . . . . . . . . . . . . . . . . . . . . . . . . . . . . . . . . . . . . . . . . . . . . . . . . . . . . . . . .7
9.2 Local and Remote Alarms . . . . . . . . . . . . . . . . . . . . . . . . . . . . . . . . . . . . . . . . . . . . . . . . . . . . . . . . . . . . . . . . .7
9.3 Installing a Remote Alarm (Optional) . . . . . . . . . . . . . . . . . . . . . . . . . . . . . . . . . . . . . . . . . . . . . . . . . . . . . . . . .7
9.4 Alarm Test. . . . . . . . . . . . . . . . . . . . . . . . . . . . . . . . . . . . . . . . . . . . . . . . . . . . . . . . . . . . . . . . . . . . . . . . . . . . . .7
9.4.1 Theory of Operation . . . . . . . . . . . . . . . . . . . . . . . . . . . . . . . . . . . . . . . . . . . . . . . . . . . . . . . . . . . . . . . .7
9.4.2 Alarm Test Procedure . . . . . . . . . . . . . . . . . . . . . . . . . . . . . . . . . . . . . . . . . . . . . . . . . . . . . . . . . . . . . . . 7
10 Chart Recorders . . . . . . . . . . . . . . . . . . . . . . . . . . . . . . . . . . . . . . . . . . . . . . . . . . . . . . . . . . . . . . . . . . . 8
10.1 Set Up and Operation. . . . . . . . . . . . . . . . . . . . . . . . . . . . . . . . . . . . . . . . . . . . . . . . . . . . . . . . . . . . . . . . . . . . .8
10.2 Power Supply . . . . . . . . . . . . . . . . . . . . . . . . . . . . . . . . . . . . . . . . . . . . . . . . . . . . . . . . . . . . . . . . . . . . . . . . . . .8
10.3 Changing Chart Paper . . . . . . . . . . . . . . . . . . . . . . . . . . . . . . . . . . . . . . . . . . . . . . . . . . . . . . . . . . . . . . . . . . . .8
10.4 Calibration Adjustment . . . . . . . . . . . . . . . . . . . . . . . . . . . . . . . . . . . . . . . . . . . . . . . . . . . . . . . . . . . . . . . . . . . .8
11 Cleaning . . . . . . . . . . . . . . . . . . . . . . . . . . . . . . . . . . . . . . . . . . . . . . . . . . . . . . . . . . . . . . . . . . . . . . . . . 9
11.1 Cleaning the Drawers and Cabinet Interior . . . . . . . . . . . . . . . . . . . . . . . . . . . . . . . . . . . . . . . . . . . . . . . . . . . .9
11.2 Cleaning the Condenser. . . . . . . . . . . . . . . . . . . . . . . . . . . . . . . . . . . . . . . . . . . . . . . . . . . . . . . . . . . . . . . . . . .9
12 Troubleshooting . . . . . . . . . . . . . . . . . . . . . . . . . . . . . . . . . . . . . . . . . . . . . . . . . . . . . . . . . . . . . . . . . . 10
ii

Thermo Scientific Jewett Blood Bank Refrigerators Installation and Operation
1 Introduction
Blood bank refrigerators are designed to meet strict AABB,
ANRC and FDA requirements for stored product safety.
This manual provides installation and operation instructions for:
Undercounter models (4.7 ft3), Space Saver models (11.5 ft3) and
Upright models (23.3, 29.2 and 51.1 ft
determine the specifications that apply to your unit.
The control system, standard on all models, includes:
• Key-operated power and alarm switch
• Preset temperature setpoint
• Digital temperature display with 0.1ºC resolution
• Graphic temperature display
• Audible and visual power failure indicators
• Alarm silence, ringback, and automatic reset functions
• Pushbutton alarm test
Other standard features include:
• Keyed door locks
• Remote alarm contacts
• CFC-free refrigerant
• CFC-free foamed in-place urethane insulation
• Quiet, hermetically sealed refrigeration compressors
Upright models (23.3 ft
3
and larger) also have: fully extendable
stainless steel drawers; a sensor selection button (for upper and
lower cabinet temperature readings); and an independent switch
for interior cabinet lights.
Seven day chart recorders are standard on all models.
3
). Refer to Table 1 to
2 Safety Precautions
In this manual and on labels attached to this product, the words
WARNING and CAUTION mean the following:
• WARNING: a potentially hazardous situation which, if not
avoided, could result in serious injury or death.
• CAUTION: a potentially hazardous situation which, if not
avoided, may result in minor or moderate injury or damage to
the equipment.
Before installing, using or maintaining this product, please be sure
to read this manual and product warning labels carefully. Failure to
follow these instructions may cause this product to malfunction,
which could result in injury or damage.
Below are important safety precautions that apply to this product:
• Use this product only in the way described in the product
literature and in this manual. Before using it, verify that this
product is suitable for its intended use.
• Do not modify system components, especially the controller.
Use OEM exact replacement equipment or parts. Before use,
confirm that the product has not been altered in any way.
• Your unit must be properly grounded in conformity with
national and local electrical codes. Never connect the unit to
overloaded power sources.
• Disconnect the unit from all power sources before cleaning,
troubleshooting, or performing other maintenance on the
product or its controls.
Table 1. Blood Bank Refrigerator Specifications
Model
JBB404
JBB1204
JBB2304
JBB3004
JBB5004
a
Vol ta ge
Code
V, W 6.0/15
V, W 6.0/15
V, W 6.0/15
V, W 6.0/15
V, W 8.5/15
A = 115V, 60Hz; D = 208/230V, 60Hz; V = 220V, 50Hz; W = 240V, 50 Hz
Amps/
a
Breaker
A6.0/15
D6.0/15
A9.4/15
D6.0/15
A9.4/15
D6.0/15
A9.4/15
D6.0/15
A 15.0/20
D8.5/15
Cu. Ft./
Liters
4.7/
11.5 /
326
23.3
659
29.2/
826
51.1/
1447
Undercounter
Space Saver
Cabinet Door
Single
solid
Single
hinged
glass
Upright
Upright
Upright
Single
hinged
glass
Single
hinged
glass
Double
hinged
glass
Drawers/
450ml
bags
2/48
5/165
6/360
6/462
12/7 20
Dimensions H x F-B x W in. (cm) Net
Interior Exterior
20 x 20.5 x 20
(50.8 x 52 x 50.8)
52.4 x 21.75 x 20
(133.2 x 55.2 x 50.8)
58 x 29 x 24
(147.3 x 73.7 x 61.0)
58 x 29 x 30
(147.3 x 73.7 x 76.2)
58 x 29 x 52.5
(147.3 x 73.7 x 133.4)
34 x 26 x 24
(86.2 x 66 x 61)
71.9 x 28.75 x 24
(182.6 x 73 x 61)
77.5 x 36.2 x 28
(196.9 x 92.0 x 71.1)
77.5 x 36.2 x 34
(196.9 x 92.0 x 86.4)
77.5 x 36.2 x 56.5
(196.9 x 92.0 x 143.5)
Prod. Wt.
lbs (kg)
200
(91)
320
(146)
425
(193)
500
(227)
640
(290)
1
Thermo Scientific Jewett Blood Bank Refrigerators Installation and Operation
3 Unpacking and Inspection
At delivery, examine the exterior for physical damage while the
carrier’s representative is present. If exterior damage is present,
carefully unpack and inspect the unit and all accessories for
damage.
If there is no exterior damage, unpack and inspect the equipment
within five days of delivery. If you find any damage, keep the
packing materials and immediately report the damage to the
carrier. Do not return goods without written authorization.
When submitting a claim for shipping damage, request that the
carrier inspect the shipping container and equipment.
4 Installation
4.1 Location
Install the unit in a level area free from vibration with a minimum
of 6 inches of space on the sides and rear and 12 inches at the top.
Do not position the equipment in direct sunlight or near heating
diffusers, radiators, or other sources of heat. The ambient
temperature range at the location must be 59 to 90°F
(15to32°C).
4.2 Wiring
CAUTION! Connect the equipment to a separate,
dedicated, power source with the correct voltage.
Power fluctuations or incorrect voltage can result in
severe damage to the equipment.
4.3 Leveling
The unit must be level. Rotate the leveling screws, located under
the front corners of the unit, until the unit is level. If the floor is
seriously out of level, you may need to shim the corners with thin
sheets of metal.
Note: Use thin sheets of metal to level units equipped with
optional casters.
4.4 Door Operation
Standard glass doors for models larger than the undercounter
model stay open if opened 90 degrees. Door spring tension
cannot be adjusted.
If the self-closing doors do not work properly, make sure the unit
is level.
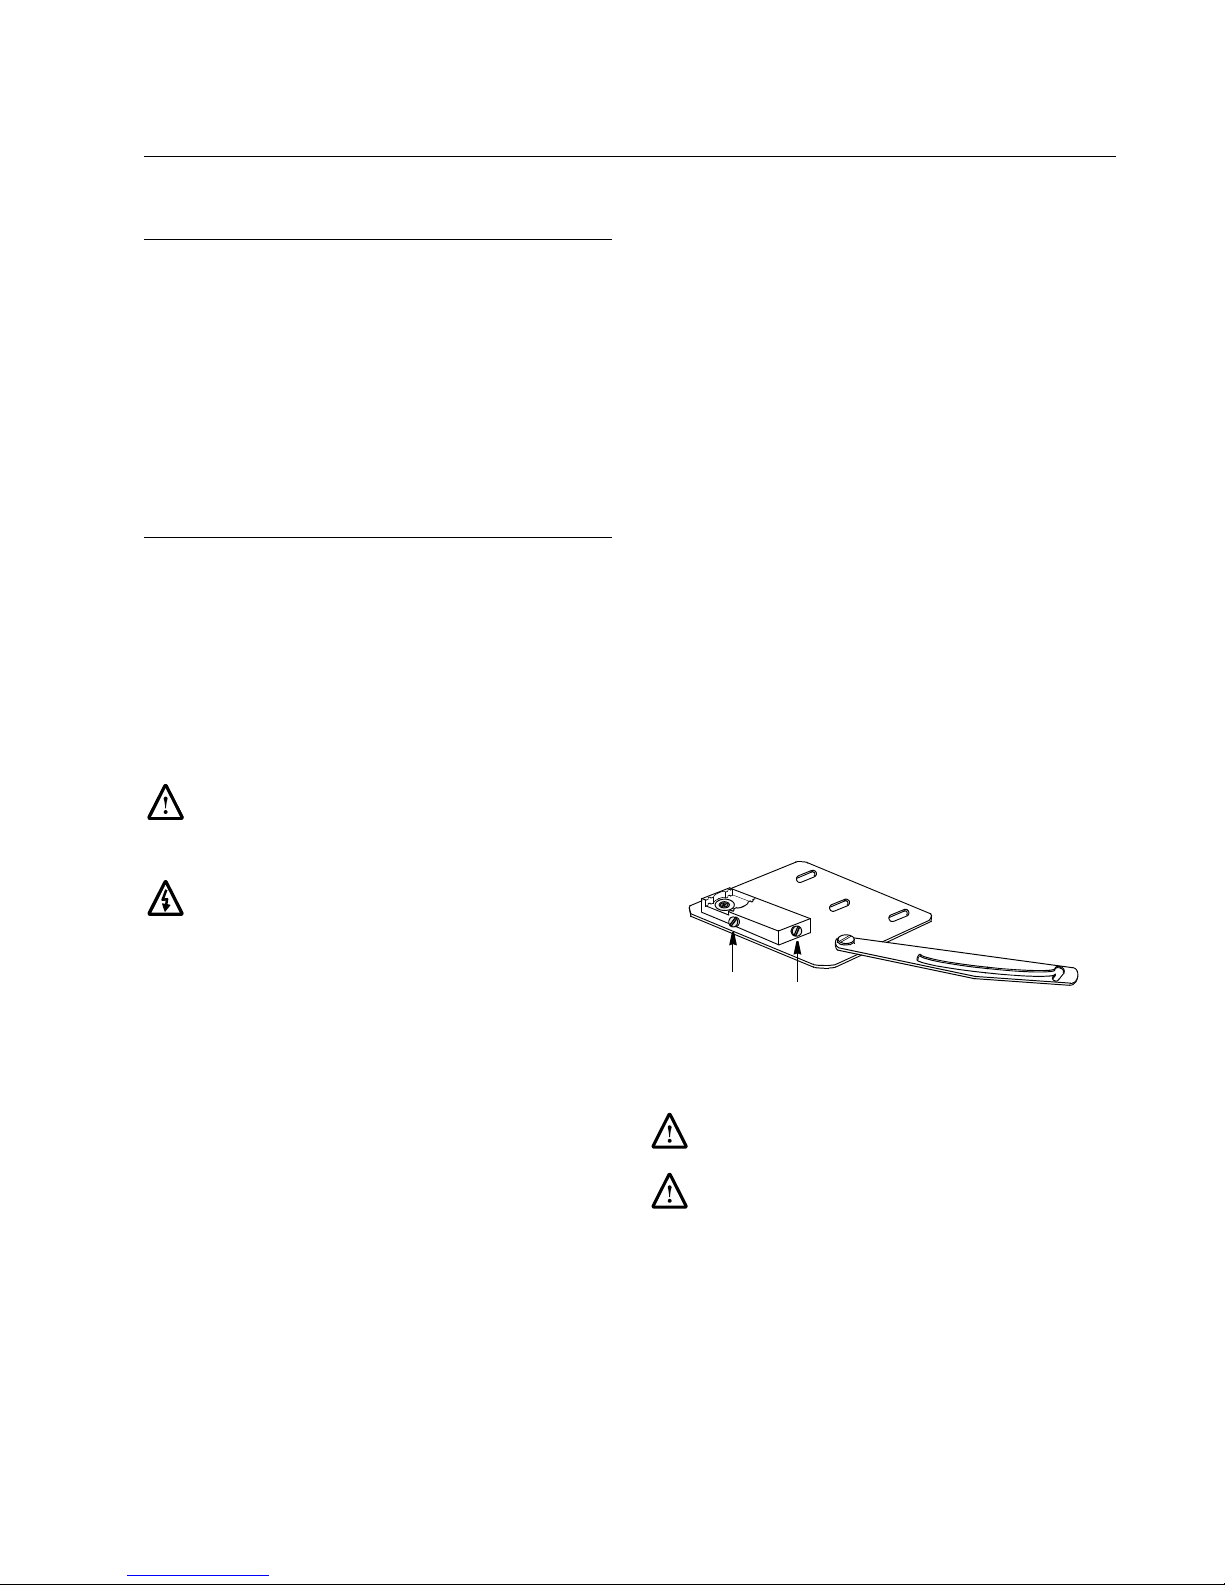
4.4.1 Adjustable Hinged Glass Doors (Undercounter
Models Only)
On Undercounter models with hinged glass doors, you can use a
regular screwdriver to adjust spring tension and center each door
on its frame. The adjustment screws (“torque” for tension and
“sag” for door placement) are located on the bottom hinge
bracket (shown below in Figure 1).
Hinged glass doors can be propped open with metal braces at the
bottom hinges. Open the door 90 degrees or until you feel some
resistance. Push the door open past the resistance and the metal
braces engage. To close the door, push it toward the unit (past the
resistance).
DANGER! For personal safety and trouble-free
operation, this unit must be properly grounded before
it is used. Failure to ground the equipment may cause
personal injury or damage to the equipment. Always
conform to the National Electrical Code and local
codes. Do not connect unit to already overloaded
power lines.
Always connect the equipment to a dedicated (separate) circuit.
Electrical codes require fuse or circuit breaker protection for
branch circuit conductors. Use time delay fuses for #12 AWG
circuits.
For all blood bank models, the wiring diagram is attached to the
back of the cabinet.
To rq u e
Sag
Figure 1. Undercounter Hinge Bracket for Glass Door
Adjustments
CAUTION! Do not overtighten the tension as
damage to the equipment can result.
WARNING! Disconnect equipment from main power
before attempting any maintenance to equipment or its
controls.
2
 Loading...