

Page 1
Ion GeneStudio™ S5 Food Protection
Instrument
USER GUIDE
Catalog Numbers A39513
Publication Number MAN0017965
Revision A.0
For testing of Food and Environmental samples only.
Page 2
Manufacturer: Life Technologies Corporation | 5781 Van Allen Way | Carlsbad, CA 92008
The information in this guide is subject to change without notice.
DISCLAIMER: TO THE EXTENT ALLOWED BY LAW, THERMO FISHER SCIENTIFIC INC. AND/OR ITS AFFILIATE(S) WILL NOT BE LIABLE FOR SPECIAL,
INCIDENTAL, INDIRECT, PUNITIVE, MULTIPLE, OR CONSEQUENTIAL DAMAGES IN CONNECTION WITH OR ARISING FROM THIS DOCUMENT,
INCLUDING YOUR USE OF IT.
Revision history: Pub. No. MAN0017965
Revision Date Description
A.0 18 October 2018 New document.
Trademarks: All trademarks are the property of Thermo Fisher Scientific and its subsidiaries unless otherwise specified.
©2018 Thermo Fisher Scientific Inc. All rights reserved.
Page 3

Contents
About this guide ............................................................ 5
Purpose of the guide ............................................................ 5
■
CHAPTER 1 Product information ....................................... 6
Contents ....................................................................... 6
Optional materials and equipment ................................................ 6
Instrument installation by trained personnel only ................................... 7
Nucleic acid contamination ....................................................... 7
Instrument vibration and clearances ............................................... 7
■
CHAPTER 2 System components ....................................... 8
Network configuration .......................................................... 8
Internet connectivity ............................................................. 9
Ion GeneStudio™ S5 Food Protection System component positions .................... 10
Ion GeneStudio™ S5 Food Protection Instrument input and output connections ......... 11
■
CHAPTER 3 Instrument operation .................................... 12
Power the Ion GeneStudio™ S5 Food Protection Instrument on or off .................. 12
Power on ................................................................. 12
Power off ................................................................. 12
Update the Ion GeneStudio™ S5 Food Protection System software .................... 12
Instrument run times ........................................................... 13
Maintain the Ion GeneStudio™ S5 Food Protection Instrument ........................ 14
Materials required ......................................................... 14
Clean or decontaminate the instrument ...................................... 14
Manually clean the instrument .............................................. 14
Perform an instrument reset run with an initialized, unused Ion S5™ Wash
Solution cartridge ......................................................... 16
Ion GeneStudio™ S5 Food Protection Instrument User Guide
3
Page 4

Contents
■
APPENDIX A Touchscreen reference ................................. 17
Clean, Initialize, and Run ........................................................ 17
Settings ....................................................................... 18
Network Settings .......................................................... 18
System Tools .............................................................. 21
Check for software updates ................................................. 26
Data Management ......................................................... 27
Manually delete run data ................................................... 29
Perform the instrument Clean operation ...................................... 30
Instrument settings ........................................................ 31
Touchscreen icons ............................................................. 33
Alarms, Notifications, and Events ................................................ 35
■
APPENDIX B Troubleshooting ......................................... 38
Instrument alarms and events ................................................... 38
Initialization fails ............................................................... 39
Troubleshooting using control libraries ........................................... 41
Solid-state buffer leak .......................................................... 41
Pulse clean the Ion GeneStudio™ S5 Food Protection Instrument ................. 42
■
APPENDIX C Instrument warranty .................................... 43
■
APPENDIX D Safety ..................................................... 45
Safety alerts on this instrument .................................................. 45
Location of safety labels on the instrument ................................... 46
Safety information for instruments not manufactured by Thermo Fisher Scientific ..... 46
Instrument safety .............................................................. 47
General .................................................................. 47
Cleaning and decontamination ............................................... 47
Electrical safety ........................................................... 48
Safety and electromagnetic compatibility (EMC) standards .......................... 49
Safety .................................................................... 49
EMC ...................................................................... 49
Environmental design ...................................................... 50
Chemical safety ................................................................ 51
■
Documentation and support ............................................. 53
Related documentation ......................................................... 53
Food Safety support ............................................................ 53
4
Ion GeneStudio™ S5 Food Protection Instrument User Guide
Page 5
IMPORTANT! Before using this product, read and understand the information in the
“Safety” appendix in this document.
Purpose of the guide
This Ion GeneStudio™ S5 Food Protection Instrument User Guide (Pub. No. MAN0017965)
provides reference information for using and maintaining the Ion GeneStudio™ S5
Food Protection System (Cat. No. A39513).
About this guide
CAUTION! ABBREVIATED SAFETY ALERTS. Hazard symbols and hazard
types specied in procedures may be abbreviated in this document. For the
complete safety information, see the “Safety” appendix in this document.
Ion GeneStudio™ S5 Food Protection Instrument User Guide
5
Page 6

1
Contents
Product information
The Ion GeneStudio™ S5 Food Protection System (Cat. No. A39513) contains the
following boxes and components.
Ion GeneStudio™ S5 Food Protection System (Cat. No. A39513)
Components
Ion GeneStudio™ S5 Food Protection
Instrument
Ion S5™ Installation Kit A27215
Ion S5™ Installation Kit (Part No. A27215; Not available for separate purchase.)
Contents
Ion 540™ Chip Kit A27766 4 pack 15°C to 30°C
Ion S5™ Sequencing Solutions A27767 1
Ion S5™ Sequencing Reagents A27768 1 –30°C to –10°C
Ion 540™ Control Ion Spheres A28195 1
Ion 540™ Loading Reagents OT2 A27897 1
Ion S5™ Cartridge Tool A28308 2 15°C to 30°C
Ion Chef™ S5 Series Chip Balance A29022 1
Part No. Quantity Storage
Part No.
A37904
Optional materials and equipment
Unless otherwise indicated, all materials are available through thermosher.com.
MLS: Fisher Scientic (sherscientic.com) or other major laboratory supplier.
(
Optional
[1]
[2]
) Non-interruptible Power Supply (UPS)
IMPORTANT! Thermo Fisher Scientific has verified the procedures in this user guide using these specific materials. Substitution may adversely
affect system performance.
For laboratories that experience frequent power outages or line voltage fluctuations, we recommend that you use a non-interruptible power
supply that is compatible with 2500 W output or higher.
6
Item
[1]
[2]
Source
MLS
Ion GeneStudio™ S5 Food Protection Instrument User Guide
Page 7

Instrument installation by trained personnel only
Chapter 1 Product information
Instrument installation by trained personnel only
1
IMPORTANT! The Ion GeneStudio
service personnel and must not be relocated without assistance from trained service
personnel. See “Food Safety support“ on page 53.
Nucleic acid contamination
IMPORTANT! A primary source of contamination is DNA fragments from previously
processed samples. Do not introduce amplied DNA into the library preparation
laboratory or work area.
Instrument vibration and clearances
IMPORTANT! Signicant vibration during sequencing may add noise and reduce the
quality of the measurements. The Ion GeneStudio™ S5 Food Protection System must
be installed on a bench that is free from vibrations or in contact with equipment that
can cause vibrations to the bench (freezers, pumps, and other similar equipment).
IMPORTANT! Place the instrument at least 40 in. (1 meter) away from major sources
of electronic noise such as refrigerators or microwaves.
™
S5 Food Protection System is installed by trained
Ion GeneStudio™ S5 Food Protection Instrument User Guide
7
Page 8
5
3
4
1
2
2
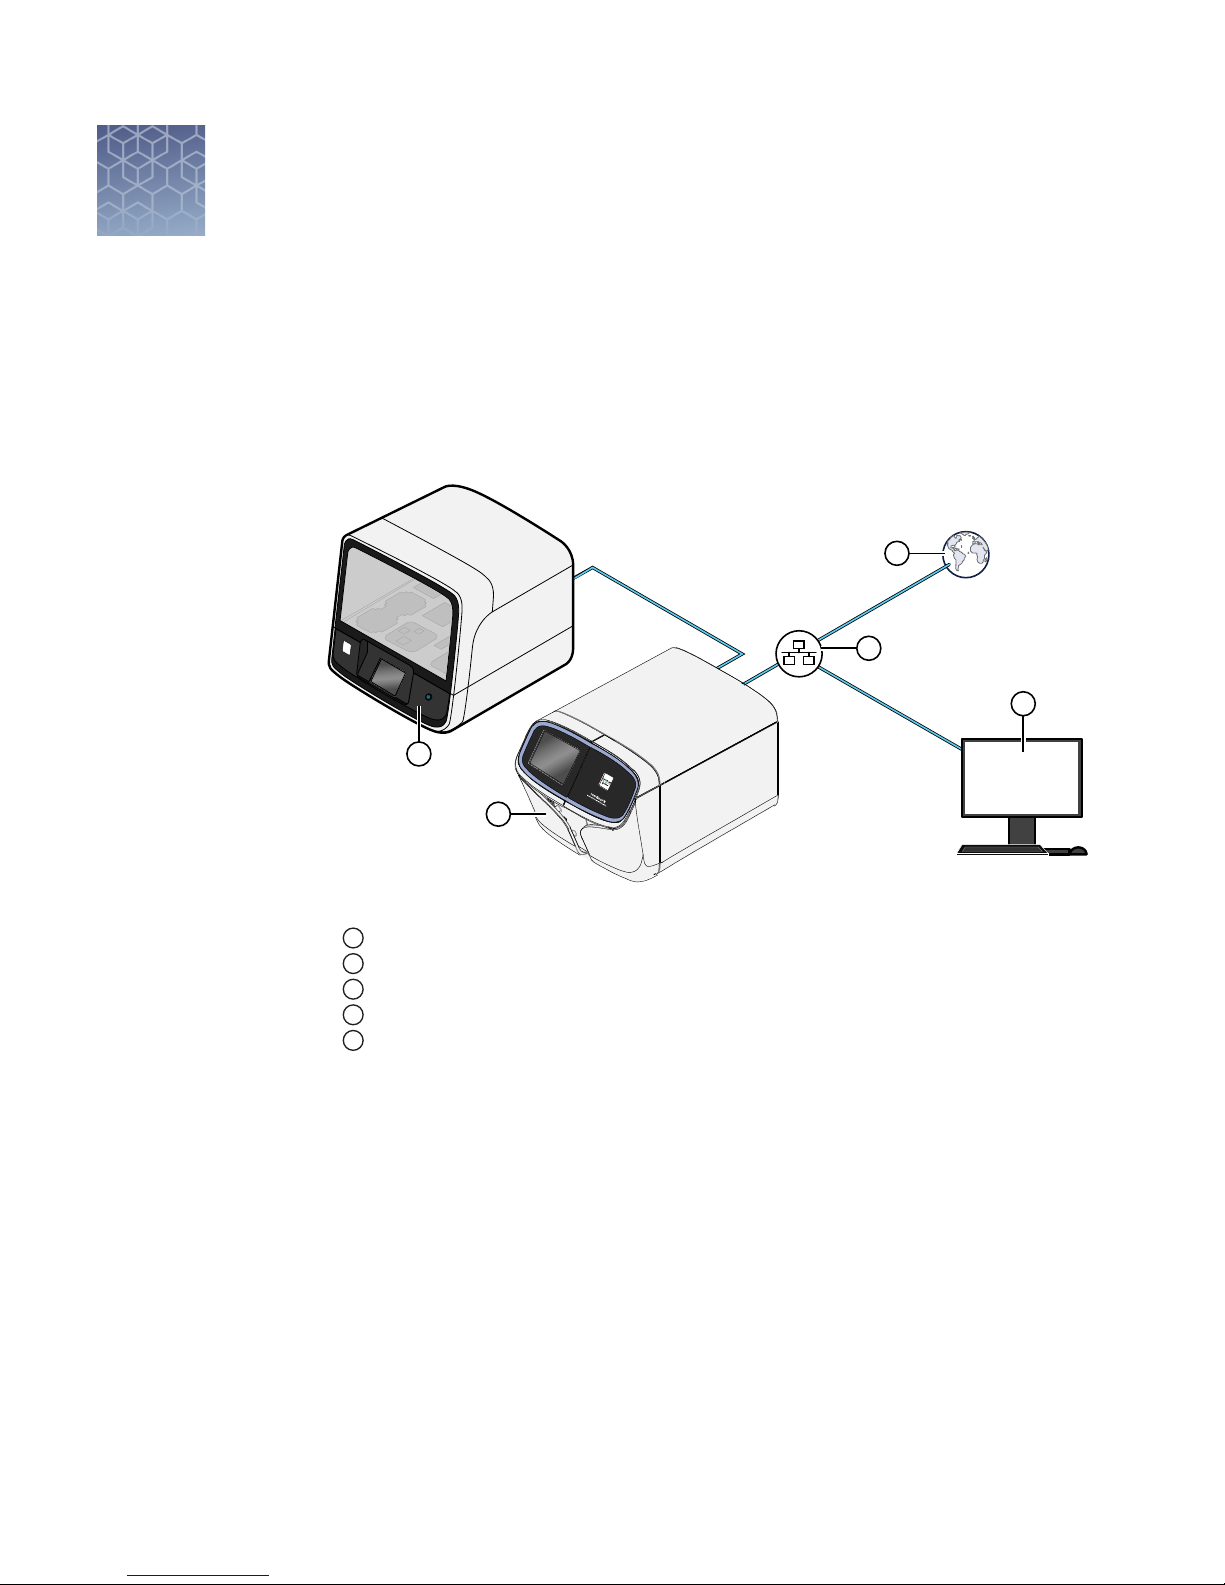
Network configuration
The Ion GeneStudio™ S5 Food Protection Instrument is not connected to an external
Torrent Server and requires connection only to a local area network (see gure).
System components
Figure 1 Network configuration
1
Ion GeneStudio™ S5 Food Protection Instrument
2
Ion Chef™ Food Protection Instrument
3
Local area network
4
Internet
5
Client computer
Note: The Ion Chef™ Food Protection Instrument must be connected to the Torrent
Server either directly using a category 6 Ethernet cable, or indirectly through a local
area network that has been congured to allow HTTP-443, SSH-22, and FTP-20/21
trac.
8
Ion GeneStudio™ S5 Food Protection Instrument User Guide
Page 9

Internet connectivity
The Ion GeneStudio™ S5 Food Protection Instrument should be connected to a
network with Internet access. Connecting to the Internet allows you to update your
software and access remote system support easily. Software updates through the
network/Internet are free. If you do not connect your instrument or server to a
network, software updates must be manually installed via USB.
IMPORTANT! Thermo Fisher Scientic does not support the USB method for
updating software.
Any problems (for example, le corruption, incomplete updates) resulting from
update of the instrument or server using a USB device that require correction of the
faulty update is not covered by your Ion GeneStudio™ S5 Food Protection System
warranty or any service contract you may have bought. You are required to schedule
an on-site Time and Materials visit by a eld service engineer to correct the problem
at your own expense.
In providing outbound access to the Internet from the server, you enable the support
team to provide inbound support. The Ion GeneStudio™ S5 Food Protection
Instrument runs a remote monitor agent that can provide service personnel with
critical system information, such as installed software versions and instrument
alarms. With your permission, the agent also allows service personnel to access
remotely the Ion GeneStudio™ S5 Food Protection Instrument, which is required for
system support. Without remote access, service personnel cannot access, view, and
troubleshoot problems regarding machine performance.
Chapter 2 System components
Internet connectivity
2
Ion GeneStudio™ S5 Food Protection Instrument User Guide
9
Page 10
7
2
3
5
6
4
1
Ion GeneStudio S5
Ion GeneStudio S5
Ion GeneStudio S5
Chapter 2 System components
2
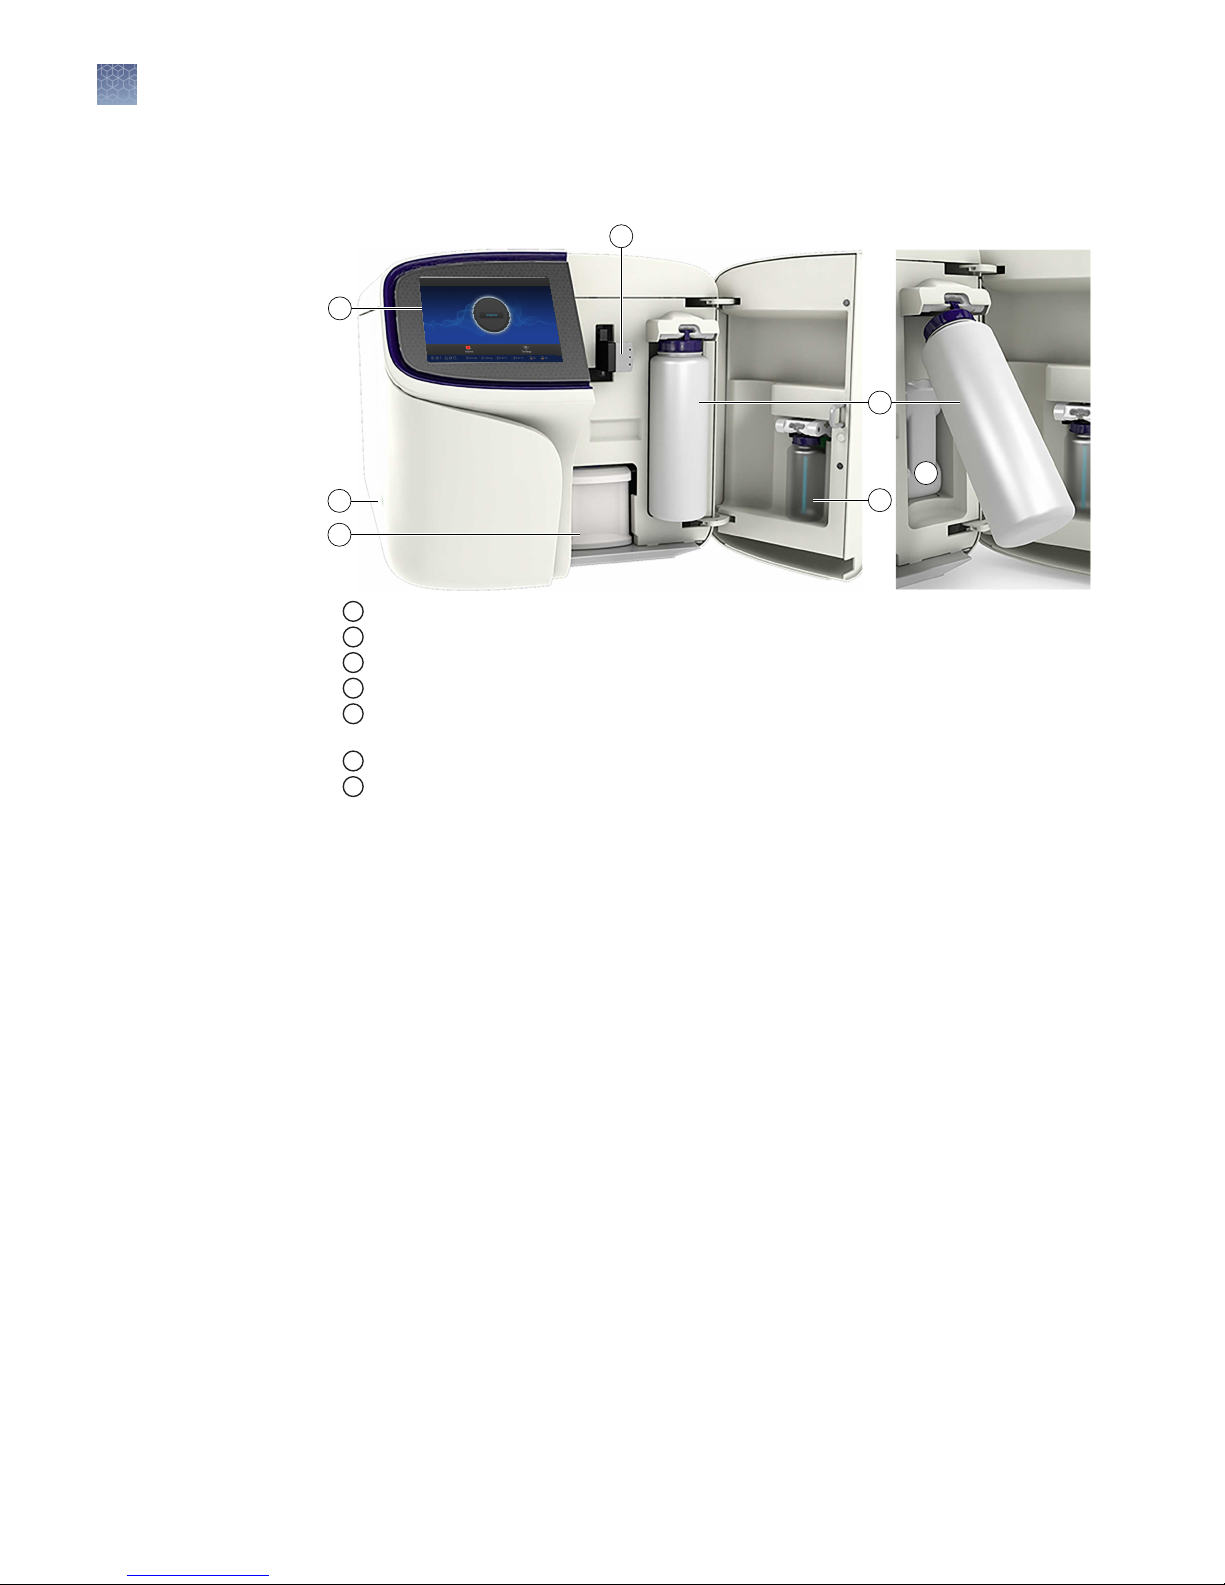
Ion GeneStudio™ S5 Food Protection System component positions
Ion GeneStudio™ S5 Food Protection System component positions
1
Touchscreen
2
Power button
3
Ion S5™ Sequencing Reagents cartridge
4
Chip clamp
5
Ion S5™ Wash Solution bottle. Waste reservoir located behind the Ion S5™ Wash Solution
bottle (shown on the right).
6
Ion S5™ Cleaning Solution bottle
7
Waste reservoir
Note: The system uses RFID technology to verify that the proper reagents are loaded
in positions 3, 5, and 6. Reagents that exceed their expiration date or usage count
generate an error message prompting the user to replace the reagent before
performing the run.
Note: RFID regulatory information can be found on the main screen under
Options4Regulatory info.
10
Ion GeneStudio™ S5 Food Protection Instrument User Guide
Page 11

5
4
2
1
3
1
Ion GeneStudio™ S5 Food Protection Instrument input and output connections
Chapter 2 System components
Ion GeneStudio™ S5 Food Protection Instrument input and output
connections
1
USB ports–Connects a USB device to the instrument.
2
Ethernet port—An RJ45 port that provides Ethernet (gigabit) communication between the
instrument and a local area network.
3
Ethernet port—An RJ45 port that provides Ethernet (gigabit) communication with the
Ion Chef™ Food Protection Instrument.
4
On/off switch—Power switch, where the states are on ( | ) or off ( O ).
5
Power port—100–240VAC port that provides power to the instrument.
2
Ion GeneStudio™ S5 Food Protection Instrument User Guide
11
Page 12

Instrument operation
3
Power the Ion GeneStudio™ S5 Food Protection Instrument on or off
Note: If the Ion GeneStudio™ S5 Food Protection Instrument is powered on, and the
touchscreen is blank, touch the screen to "wake" the touchscreen.
Power on
Power off
If the touchscreen is unresponsive, check the power switch on the back of the
instrument to ensure that the switch is in the on (|) position. If the power switch is in
the o (0) position, proceed with step 1. If the power switch is already in the on
position, proceed to step 2.
Turn the power switch on the back of the instrument to the on (|) position.
1.
Press the power buon on the left side of the instrument.
2.
The buon illuminates. When the instrument touchscreen Main Menu appears,
the instrument is ready for use.
It is not necessary to power o the instrument overnight or over the weekend. If
needed, the instrument can be powered o as follows:
In the Main Menu, press Seings4System Tools4Shut Down.
1.
Select either Shut Down or Reboot.
2.
Note: If you select Shut Down, a conrmation message appears. Select Yes to
power o the instrument.
Note: Do not press the power buon during a run. Interrupting power to the
instrument during a run may result in sequencing run failure and loss of sample.
Update the Ion GeneStudio™ S5 Food Protection System software
Note: An internet connection is required for the Ion GeneStudio™ S5 Food Protection
System to receive alerts that software updates are available.
If an update to the Ion GeneStudio™ S5 Food Protection Instrument software is
available, the Notications/Alarms buon illuminates red in the touchscreen Main
Menu. Press the red Alarms buon to see the detailed messages. If a message states
New Software Available, follow these steps to update the software:
In the Main Menu, press Seings4Check for Updates.
1.
Press Update to download and install the updates automatically.
2.
Press Done.
3.
12
Ion GeneStudio™ S5 Food Protection Instrument User Guide
Page 13
The instrument automatically restarts when the software update is complete.
Instrument run times
Approximate run times for the Ion GeneStudio™ S5 Food Protection Instrument for a
given chip type, read length, and number of reads are shown in the following table.
Run times indicate the typical time from run start to delivery of a BAM le
(1 run/initialization).
For the Food Authenticity application, a FASTQ le is created instead of a BAM le.
The instrument run time is shorter for this application.
Chip type Number of reads Read length/output
Chapter 3 Instrument operation
Instrument run times
Instrument run time
Ion GeneStudio™ S5 Food Protection
Instrument
3
Ion 510™ Chip 2–3 M
4–6 M
Ion 520™ Chip
3–4 M
15–20 M
Ion 530™ Chip
9–12 M
200 bases
4.5 hours
0.3–0.5 Gb
400 bases
10.5 hours
0.6–1 Gb
200 bases
7.5 hours
0.6–1 Gb
400 bases
12 hours
1.2–2 Gb
600 bases
12 hours
0.5–1.5 Gb
200 bases
10.5 hours
3–4 Gb
400 bases
21.5 hours
6–8 Gb
600 bases
21 hours
1.5–4.5 Gb
Ion 540™ Chip 60–80 M
Ion 550™ Chip 100–130 M
Ion GeneStudio™ S5 Food Protection Instrument User Guide
200 bases
19 hours
10–15 Gb
200 bases
—
20–25 Gb
13
Page 14

Chapter 3 Instrument operation
3
Maintain the Ion GeneStudio™ S5 Food Protection Instrument
Maintain the Ion GeneStudio™ S5 Food Protection Instrument
Materials required
Clean or
decontaminate the
instrument
Manually clean
the instrument
• Lint-free wipes
• 70% isopropanol
• (Optional) 10% bleach solution
In the event of a spill or leak on or inside the Ion GeneStudio™ S5 Food Protection
Instrument, perform the following steps.
Note: Dispose of all waste in appropriate liquid or solid waste containers.
Remove the Ion S5™ Wash Solution bole, then remove and empty the waste
1.
reservoir.
Remove the Ion S5™ Sequencing Reagents cartridge.
2.
Inspect the waste and nucleotide reagent bays for liquid.
3.
Using absorbent paper soak up as much liquid as possible, then wash the
4.
aected area with 10% bleach solution.
Wipe the aected surfaces with 70% isopropanol, then allow to air-dry.
5.
The Ion GeneStudio™ S5 Food Protection Instrument requires cleaning before
initialization. Cleaning is normally performed automatically at the completion of the
previous sequencing run. To enable two sequencing runs on a single initialization,
you must deselect the Enable post-run clean checkbox for the rst sequencing run.
The post-run cleaning is then performed normally after the second sequencing run.
However, if the Enable post-run clean checkbox is deselected for the second run, the
cleaning is not performed after either run. If the second sequencing run is not
performed, or the cleaning is not performed automatically after the second run, the
instrument will not allow the subsequent initialization to proceed until a manual
cleaning is performed.
Do not perform a manual cleaning if the Ion GeneStudio™ S5 Food Protection
Instrument is initialized and
• a sequencing run is not started within 24 hours, or
• a run is not started or completed due to a power failure or an abort
In these cases, an instrument reset run is required before reinitialization. See “Perform
an instrument reset run with an initialized, unused Ion S5™ Wash Solution
cartridge“ on page 16 for more information.
14
Ion GeneStudio™ S5 Food Protection Instrument User Guide
Page 15

1
2
3
Maintain the Ion GeneStudio™ S5 Food Protection Instrument
Chapter 3 Instrument operation
When a manual cleaning is necessary, use the following procedure:
On the home screen, press Seings4Clean Instrument.
1.
The instrument door unlocks allowing access to the consumables.
Remove the Ion S5™ Wash Solution bole to access the waste reservoir, then
2.
remove and empty the waste reservoir.
3
Reinstall the empty waste reservoir and a used Ion S5™ Wash Solution bole.
3.
Ensure that the Ion S5™ Sequencing Reagents cartridge and Ion S5™ Wash
4.
Solution bole are properly installed.
IMPORTANT! Perform the cleaning with a used reagent cartridge and wash
solution bole installed. The cleaning procedure pumps cleaning solution into
the wash solution bole and reagent cartridge making them unsuitable for
sequencing.
Place a used sequencing chip in the chip clamp, then push the chip clamp in all
5.
the way to engage.
Close the instrument door, then press Next.
6.
Cleaning takes ~35 minutes to complete. On completion, the instrument door
automatically unlocks and the chip and cartridge clamps disengage.
Ion GeneStudio™ S5 Food Protection Instrument User Guide
15
Page 16

Chapter 3 Instrument operation
3
Maintain the Ion GeneStudio™ S5 Food Protection Instrument
Perform an
instrument reset
run with an
initialized, unused
Ion S5™ Wash
Solution cartridge
Cleaning is normally performed automatically at completion of a sequencing run.
If the Ion GeneStudio™ S5 Food Protection Instrument is initialized and
• a sequencing run is not started within 24 hours after initialization, or
• a sequencing run is not completed due to a power failure or an abort, and <200
ows occurred before the stoppage
then an instrument reset run is required to ensure proper cleaning before
reinitialization
Do NOT perform a manual cleaning with an unused, initialized Ion S5™ Wash
Solution cartridge.
Note:
If a power failure or abort occurs during the second of two runs that are started
·
after a single initialization, a manual cleaning is sucient (see “Manually clean the
instrument“ on page 14).
If the number of ows that occurred before a power failure or abort is unknown,
·
perform an instrument reset run.
To perform an instrument reset run, use the following procedure before
reinitialization:
In the instrument touchscreen main menu, touch Run.
1.
The instrument door unlocks and the chip clamp disengages.
Ensure that a used sequencing chip is in the chip clamp, then push the chip
2.
clamp in all the way to engage.
Close the instrument door, then touch Next.
3.
When prompted, select Planned Run (none). Ensure that the Enable post-run
4.
clean checkbox is selected, then press Review.
In the Select Run screen, touch Edit, then in the Detail screen set the number of
5.
ows to 200. Ensure that the Post-Run/Clean checkbox is selected, then touch
Close.
Touch Start run, then touch Accept to conrm that Post-Run Clean is enabled,
6.
and to start the run.
When the instrument reset run completes, the instrument automatically performs the
cleaning procedure. After cleaning, the touchscreen returns to the main menu.
16
Ion GeneStudio™ S5 Food Protection Instrument User Guide
Page 17

Ion GeneStudio S5
A
Clean, Initialize, and Run
Touchscreen reference
In the Home screen, the Clean, Initialize, and Run programs lead you through the
necessary steps to prepare the instrument for sequencing and to start a sequencing
run. Press the main dial to start a program. Simple, easy to follow instructions are
provided on the touchscreen.
• Cleaning must be performed before each initialization to ensure that the reagents
from the previous run are cleared from the uid lines. The Clean program is
normally performed automatically at the completion of the previous sequencing
run. Perform a Clean if for any reason the sequencing run was not properly
completed. Follow the instructions that are provided on the touchscreen.
• The Initialize program must be performed before each run to load and prepare
the run reagents. The Initialize program walks you through:
– Emptying the waste reservoir
– Loading the reagent cartridge, wash solution, and cleaning solution
• The Run program walks you through steps leading up to and through
sequencing, including:
– Placing a loaded chip on the instrument
– Selecting a Planned Run created in the Torrent Suite™ Software
– Performing sequencing
Ion GeneStudio™ S5 Food Protection Instrument User Guide
17
Page 18

Appendix A Touchscreen reference
A
Settings
Settings
In the Seings menu, users can view and/or change instrument seings, manage data
and network congurations, and update the installed software.
Network Settings
Note: The Service tools option is for use by trained service personnel only.
Use the Network Seings menu to congure IP address, Torrent Server, and FTP
seings.
18
Ion GeneStudio™ S5 Food Protection Instrument User Guide
Page 19

Appendix A Touchscreen reference
Settings
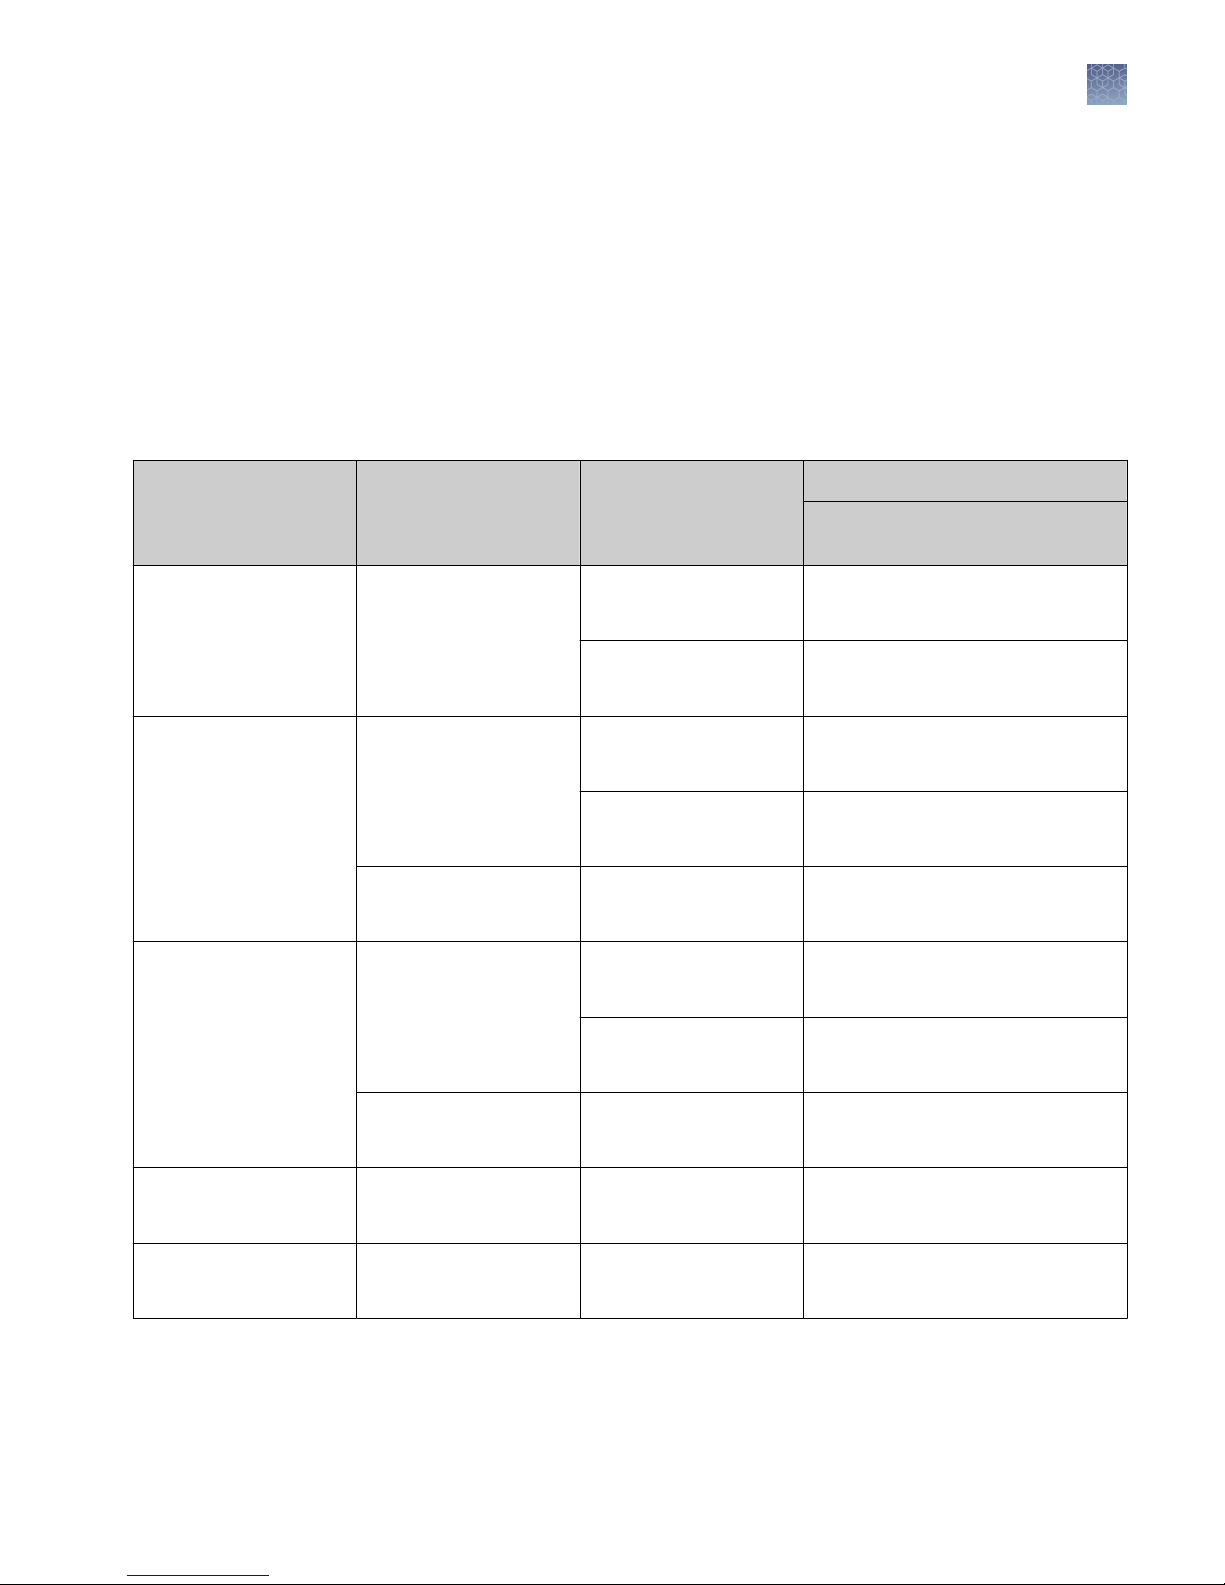
Item Description When/How to use
A
IP Address
Configuration
Torrent Server
Configuration
Set or change the IP configuration (DHCP or Static IP).
Change the Torrent Server IP address and user
information.
1. Select either the DHCP or
Static IP option.
2. Touch the screen in the field you
want to edit to activate the field. A
virtual keyboard appears.
3. Enter the new information, then
press Done.
When a change to the Torrent Server IP
address or user information is
required.
Enter the IP addresses in the
Ion GeneStudio™ S5 Food Protection Instrument User Guide
TSUrl field.
19
Page 20

Appendix A Touchscreen reference
A
Settings
Item Description When/How to use
FTP Server
Configuration
Update Server Update the software update server.
Change the FTP Server IP address and user information.
Enter the IP address in the FTPserver field.
When a change to the FTP Server IP
address or user information is
required.
When a change to the URL for the
software server update is required. The
values on this screen are set at
installation. Do not change the settings
except at the direction of Thermo
Fisher Scientific service staff.
Enter the IP address in the
20
UpdateUrl field.
Ion GeneStudio™ S5 Food Protection Instrument User Guide
Page 21

Appendix A Touchscreen reference
Settings
A
System Tools
The System Tools menu enables you to upload instrument diagnostics, manage data,
and shut down or reboot the instrument.
Item Description When/How to use
RFID Lists the product, product expiration date, and remaining
uses of the product.
To determine if reagents that were left
on an instrument during a period of
instrument shutdown have expired.
1. Press the screen within the row of
the product to view an RFID Tag
Detail page.
2. Press Done to return.
Ion GeneStudio™ S5 Food Protection Instrument User Guide
21
Page 22

Appendix A Touchscreen reference
A
Settings
Item Description When/How to use
Noise Test Provides real-time measurement of electrical noise
readings on the chip.
Chip Calibration Checks the status of a chip.
For troubleshooting if directed to do so
by Technical Support.
1. Insert a chip into the chip clamp.
2. Press Chip Calibration to start the
chip calibration.
3. In the dropdown lists, select the
Image to display and the type of
Calibration to perform.
4. Press Cancel to quit the chip
calibration.
22
Ion GeneStudio™ S5 Food Protection Instrument User Guide
Page 23

Appendix A Touchscreen reference
Settings
Item Description When/How to use
A
Reagent Check Reagent Check, performed by the instrument as part of
initialization, confirms that initialization passes by testing
reagent flow and signal detection.
If directed to do so by Technical
Support as part of a troubleshooting
procedure.
• Press Run to start the reagent
check.
• Press Last Trace to review the
most recent reagent check result
trace.
Note: Reagent Check confirms that
the chip calibration passes, and will
only fail if the chip is defective, or Ion
S5™ Wash Solution is not flowing.
Example Reagent Check for an Ion 540™ Chip
Example Reagent Check for an Ion 550™ Chip
Ion GeneStudio™ S5 Food Protection Instrument User Guide
23
Page 24

Appendix A Touchscreen reference
A
Settings
Item Description When/How to use
Filesystems
and disks
Provides real-time drive activity status and disk space
used.
Use if directed to do so as part of a
troubleshooting procedure:
1. In the System Tools menu, press
Disk Drives. The Filesystems
screen opens.
2. Press the screen within the row of
the Filesystem you want to view,
then press Details. The Disk
Drives in <Filesystem> screen
opens.
3. Press the screen within the row of
the Drive to view details of the
disk drive. The Details for <Drive>
screen opens.
4. Press Done to return to the
previous screen.
24
Ion GeneStudio™ S5 Food Protection Instrument User Guide
Page 25

Appendix A Touchscreen reference
Settings
Item Description When/How to use
A
Pulse clean Provides step by step instruction to perform a pulse clean
of the instrument if a solid‑state buffer leak occurs.
Upload
Diagnostics
Allows upload of instrument diagnostics files for review by
support personnel.
Use if directed to do so by Technical
Support as part of a troubleshooting
procedure:
1. Install consumables and a used
sequencing chip.
Note: Install Cleaning solution in
both the Wash solution (1) and
Cleaning solution (2) locations.
Use an empty Reagent cartridge.
2. Close the instrument door, then
press Next.
The pulse cleaning procedure starts
automatically.
For troubleshooting if directed to do so
by Technical Support.
Note: The system must be connected
to an active network port. If no network
is present, the file is pushed to the
Torrent Browser. You can then
download the file and email it to
Technical Support.
To retrieve the file using the Torrent
Browser, navigate to Help4Instrument
Diagnostics, then follow the on-screen
instructions.
Ion GeneStudio™ S5 Food Protection Instrument User Guide
25
Page 26

Appendix A Touchscreen reference
A
Settings
Item Description When/How to use
Shut Down Access to "Shut Down" and "Reboot" commands.
Note: It is not necessary/recommended to shut down the
instrument overnight or over the weekend. If needed to
shut down the instrument, see “Power off“ on page 12.
Check for
software updates
When software updates are available users will receive a Notication through the
home screen.
If directed to do so by Technical
Support as part of a troubleshooting
procedure.
In the Seings menu, press Check for Updates.
1.
The Software Update screen lists the available updates.
Press Update to automatically download and install the updates.
2.
26
Ion GeneStudio™ S5 Food Protection Instrument User Guide
Page 27

Appendix A Touchscreen reference
Settings
A
Data Management
The Data Management function allows users to manually delete run data, analyze the
data, or transfer the data to the Torrent Server. Under normal conditions, run data is
automatically transferred to the server, then deleted from the instrument hard drive.
Item Description When/How to use
Delete data Manually delete run data from the instrument. If the instrument hard drive becomes
full, see “Manually delete run data“ on
page 29.
Transfer data Transfer run data from the instrument
hard drive to the Torrent Server.
1. Touch the screen in the
Experiment Name row of the
individual experiment to be
transferred.
2. Press Transfer.
3. Select the radio button of the
action to be performed.
4. Select the radio button of the files
to be transferred.
5. Press OK.
Ion GeneStudio™ S5 Food Protection Instrument User Guide
27
Page 28

Appendix A Touchscreen reference
A
Settings
Item Description When/How to use
Analysis
Controls
Allows the user to stop or reanalyze the data of individual
runs.
1. Touch the screen in the
Experiment Name row of the
individual experiment to be
analyzed, then press Analysis.
2. Select the Stop Analysis or
Restart Analysis radio button,
then press OK.
3. If performing a re-analysis, follow
the on-screen instructions, then
press OK.
28
Ion GeneStudio™ S5 Food Protection Instrument User Guide
Page 29

Appendix A Touchscreen reference
Settings
A
Manually delete
run data
To troubleshoot data management issues the Data Management function allows users
to manually delete run data or transfer the data to the server. Under normal
conditions, run data is automatically transferred to the Torrent Server, then deleted
from the instrument hard drive.
In the Seings menu, press Data Management to access the Data Management
1.
screen, then press Manage.
Press Select All to select all the available experiments, or touch the screen in the
2.
Experiment Name row of the individual experiment to be managed.
Press Delete Selected.
3.
Ion GeneStudio™ S5 Food Protection Instrument User Guide
29
Page 30

Appendix A Touchscreen reference
A
Settings
Perform the
instrument Clean
operation
The Clean operation is normally performed automatically at the completion of the
previous sequencing run. Manually run the Clean operation under any of the
following conditions:
• The sequencing run was aborted or there was a power failure during the second
of two runs started after a single initialization.
• The sequencing run was not completed, and >200 ows occurred before the
stoppage.
• The post-sequencing Clean operation was not completed.
IMPORTANT! Do NOT perform a manual cleaning with an unused, initialized Ion
S5™ Wash Solution cartridge. Perform an instrument reset run instead. See “Perform
an instrument reset run with an initialized, unused Ion S5™ Wash Solution
cartridge“ on page 16 for more information.
In the Seings menu, press Clean Instrument.
1.
Follow the on-screen instructions (see “Manually clean the instrument“ on
2.
page 14 for more information), then press Next to start the Clean operation.
30
Ion GeneStudio™ S5 Food Protection Instrument User Guide
Page 31

Appendix A Touchscreen reference
Settings
The user interface returns to the Home screen when the cleaning is complete.
A
Instrument
settings
The Instrument Seings menu provides information about the instrument and allows
you to set the instrument name and calibrate the touchscreen.
Ion GeneStudio™ S5 Food Protection Instrument User Guide
31
Page 32

Appendix A Touchscreen reference
A
Settings
Item Description When/How to use
About Provides instrument details. To view instrument reference
information or access regulatory
information.
Regulatory Info Lists instrument-specific regulatory information. To view instrument regulatory
information.
Instrument
Name
32
To change the instrument name.
Ion GeneStudio™ S5 Food Protection Instrument User Guide
Page 33

1 432 5 6 7 8 9
Appendix A Touchscreen reference
Touchscreen icons
Item Description When/How to use
A
Screen
Calibration
Language To set the user interface language. Set to customer preference during
For troubleshooting if directed to do so
by Technical Support.
Touch the red cross with your finger or
a stylus each time it appears. In total,
you will touch the screen 4 times, one
time in each corner.
instrument installation.
Touchscreen icons
Ion GeneStudio™ S5 Food Protection Instrument User Guide
33
Page 34

Appendix A
A
Touchscreen icons
Touchscreen reference
Number
Icon Description
1 Network connectivity – connected
Network connectivity – not connected
2
Instrument idle
Sequencing in progress
Instrument ready
Error
3 Chip status – Absent
Chip status – Standby
Chip status – Connecting
Chip status – Ready
Chip status – Imaging
Chip status – Error
4 Manifold air pressure – Good
Manifold air pressure – Bad. If the icon reads "0" and
there is an alarm, contact Technical Support.
5 Regulator air pressure – Good
Regulator air pressure – Bad. If the icon reads "0" and
there is an alarm, contact Technical Support.
6 Manifold temperature – Good
Manifold temperature – Bad. Check for related alarms.
If the alarm persists contact Technical Support.
7 Chip block temperature – Good
Chip block temperature – Bad. If the icon reads "0" and
there is an alarm, contact Technical Support.
8 Instrument File System Space, the percent of file space
used is indicated.
[1]
The instrument checks for sufficient
disk space before each run and notifies the user if there
is not enough.
9 Torrent Server File System Space, the percent of file
space used is indicated.
Note: If the indicator turns red, archive data from the
server to free up disk space. Refer to the Torrent Suite
Software help for more information on archiving data.
[1]
Indicator turns yellow when disk space is ≥67% full, indicator turns red when ≥90% full.
™
34
Ion GeneStudio™ S5 Food Protection Instrument User Guide
Page 35

Alarms, Notifications, and Events
Ion GeneStudio S5
Ion GeneStudio S5
1
If the Alarms/Notications indicator appears, press the indicator to open the
Notications screen, then press Alarms or Events to see detailed messages.
Appendix A Touchscreen reference
Alarms, Notifications, and Events
A
1
Alarms and Notifications indicator.
Alarm Description Recommended Action
Fatal alarms
Fluidics Calibration Needed. — Contact Technical Support.
Chip Cooler can not reach desired
temperature.
Drive sdX failed smartctl health
check.
Failed to mount the results
filesystem.
System sensor check failed ipmi sensors.
System sensor check failed, CC.CC V
(LL.LL/HH.HH)
CPU temperature check failed,
Physical Id X.
Where X is the letter of the drive that
failed. Indicates that a drive is failing.
One or more drives are missing from
the RAID that makes up sw_results.
A component on the motherboard is
failing or has failed.
Where CC.CC = current voltage, LL.LL
= the low voltage threshold, HH.HH =
the high voltage threshold. Indicates
a voltage drop on the motherboard.
Where X is the processor number.
Indicates that the processor is
overheating.
—
Ion GeneStudio™ S5 Food Protection Instrument User Guide
35
Page 36

Appendix A Touchscreen reference
A
Alarms, Notifications, and Events
Alarm Description Recommended Action
Front/Rear FanX speed below
threshold YYYY.
FPGA failed to connect in emulate
mode.
Valve Link Failure.
OIA (On Instrument Analysis) is not
running.
FPGA temperature is above the
threshold of 70°C.
Boot drive exceeded 75%. The boot drive is unexpectedly full.
RAID degraded one disk has failed. One of the Torrent Server drives has
RAID failure detected, more than one
disk failed.
/sw_results directory not mounted. One or more of the drives used during
is the low threshold speed for the
system fan.
Internal error.
One or more of the system fans has
failed.
failed. System is still operational but
must be serviced soon.
More than one of the Torrent Server
drives has failed. System is no longer
operational.
data collection has failed.
Contact Technical Support.Where X is the fan number and YYYY
No GPU detected. GPU has failed.
No GPU Driver detected.
Air Compressor failure. Air compressor is either leaking or
has stopped working.
Nonfatal alarms
Instrument must be cleaned before
starting another run.
Ambient temperature is above the
threshold of 35°C.
RAID degraded one disk has failed. One of the Torrent Server drives has
No Connectivity to Torrent Server. Check that the Ethernet cable
No Connectivity to FTP server. Reconfigure the FTP server as
Maximum number of runs since last
clean has been exceeded.
Verify the temperature in the lab. Contact Technical Support if the
failed. System is still operational but
must be serviced soon.
connecting the instrument to the
server is properly connected. See
“Ion GeneStudio™ S5 Food Protection
Instrument input and output
connections“ on page 11 for the
Ethernet port location.
Perform an instrument cleaning (see
“Manually clean the instrument“ on
page 14).
temperature of the lab is within
normal operating temperature (20°C
to 30°C).
Contact Technical Support.
Reconfigure the Torrent Server as
needed (see “Network Settings“ on
page 18.
needed, see “Network Settings“ on
page 18.
36
Ion GeneStudio™ S5 Food Protection Instrument User Guide
Page 37

Appendix A Touchscreen reference
Alarms, Notifications, and Events
Alarm Description Recommended Action
A
Network Manager not connected. Check that the Ethernet cable
connecting the instrument to the
local area network is properly
connected. See “Ion GeneStudio™ S5
Food Protection Instrument input and
output connections“ on page 11 for
the Ethernet port location.
Newer Software Available Notification that software updates are
available.
If the problem persists, contact
Technical Support.
Update your software. See “Check for
software updates“ on page 26.
Ion GeneStudio™ S5 Food Protection Instrument User Guide
37
Page 38

Ion GeneStudio S5
B
Instrument alarms and events
Observation Possible cause Recommended action
Red "Alarms" and/or "Events" message in Main
Menu
• Available
software
updates were
detected.
• Connectivity
problems were
detected.
• Instrument did
not detect
required files
or hardware.
Troubleshooting
Press the red Alarms icon to see
detailed messages.
• If a message states "Newer
Software Available":
IMPORTANT! After updates are
installed, the instrument must be
restarted.
a. In the main menu, press
Settings4Check for Updates.
b. Select the Released Updates
checkbox, then press Update.
c. When installation is complete,
follow the onscreen prompts
to restart the instrument.
Note: Sometimes the
instrument restarts
automatically after software
installation.
• If a message states "No
Connectivity to Torrent Server", "No
Connectivity to ftp server", or
"Network Manager not connected",
disconnect and reconnect the
Ethernet cable, confirm that the
router is operational, and verify
that the network is up and running.
• For any other messages:
a. Power off the instrument: On
the home screen, press
Settings4System Tools4Shut
Down4Shut Down.
b. Wait 30 seconds, then press
the button on the side of the
instrument to power on the
instrument.
• If the red "Alarms" and/or "Events"
message still appears in the main
menu, contact Technical Support.
38
Ion GeneStudio™ S5 Food Protection Instrument User Guide
Page 39

Initialization fails
Observation Possible cause Recommended action
Chip Check fails • The chip clamp was not
closed.
• The chip was not
properly seated.
• The chip was damaged.
Reagent Check fails
A chip failure was detected. 1. Replace the used
Appendix B Troubleshooting
Initialization fails
1. Open the chip clamp,
remove the chip, and
look for signs of water
outside the flow cell.
2. If the chip appears
damaged, replace it with
a new one.
3. Close the clamp, then
repeat the Chip Check.
4. If the chip passes, click
Next. If the chip fails,
replace it with a new
chip, then press Chip
Check.
5. If Chip Check continues
to fail, there could be a
problem with the chip
socket. Contact
Technical Support.
sequencing chip used
during initialization with
a different used chip.
2. Press Retry.
3. If the initialization
completes without
failure, touch Home,
then continue with your
sequencing run.
4. If the Reagent Check
continues to fail, contact
Technical Support.
B
Ion GeneStudio™ S5 Food Protection Instrument User Guide
39
Page 40

Appendix B Troubleshooting
B
Initialization fails
Observation Possible cause Recommended action
Reagent Check fails A wash failure was detected. 1. Manually clean the
instrument (see
“Manually clean the
instrument“ on page 14.)
2. Replace the Reagents
cartridge, Wash Solution
bottle, and Cleaning
Solution bottle, then
repeat initialization of
the instrument.
3. If the initialization
completes without
failure, press Home,
then continue with your
sequencing run.
4. If the Reagent Check
continues to fail, contact
Technical Support.
Ensure that you install the Ion
S5™ Wash Solution bottle with
the instrument door fully
open. If you install the bottle
impeded by a partially closed
door, the port can be
obstructed, and a faulty
installation and wash failure
can result.
Bottle leak check fails • Bottle seal was not tight.
• Bottle was damaged or
defective.
1. Finger-tighten the
bottles.
2. If the bottle continues to
leak, replace the bottle.
3. If leak check continues
to fail, contact Technical
Support.
40
Ion GeneStudio™ S5 Food Protection Instrument User Guide
Page 41

Troubleshooting using control libraries
Observation Possible cause Recommended action
Ion Sphere™ Test Fragments
are not present in the Test
Fragment Report section of the
run report, and library
sequencing is poor
Control Ion Sphere™ Particles
are present in the run report,
but AQ20 throughput is poor
• Chip loading was poor.
• Control Ion Sphere
Particles were not added
to the sample
• The quality of the library
was poor.
• The quality of the template
preparation was poor.
™
Appendix B Troubleshooting
Troubleshooting using control libraries
1. Confirm that the Control Ion Sphere
Particles (included in the Ion S5
Installation Kit) were added.
2. If controls were added, contact Technical
Support.
Verify the quality of the library and template
preparations using quality assessment
procedures recommended in the appropriate
library and template preparation user guides.
1. Use the Human CEPH Genomic DNA
Control or Human CEPH Control 200
Library, included in the Ion S5™ Controls
Kit (Cat. No. A27760), to prepare
template-positive ISPs with the Ion Chef
Food Protection Instrument.
2. Use the ISPs in an Ion GeneStudio™ S5
Food Protection Instrument run.
3. If AQ20 throughput is still below
specification, verify the quality of
unenriched and enriched ISPs to identify
a problem in template preparation.
4. If ISP quality is good, but AQ20 throughput
is below specification, contact Technical
Support.
™
™
B
™
Solid-state buffer leak
Observation
Two or more of the following
observed
• Excessive read trimming
or the number of short
reads is significantly
higher than expected.
• Percentage of low quality
reads is significantly
higher than expected.
• Poor sequencing
performance or no Test
Fragments.
Ion GeneStudio™ S5 Food Protection Instrument User Guide
A solid-state buffer leak
occurred.
Possible cause Recommended action
Contact Technical Support.
Perform the pulse cleaning protocol if directed
to do so by Technical Support or your Field
Service Engineer (FSE).
41
Page 42

Appendix B Troubleshooting
B
Solid-state buffer leak
Pulse clean the
Ion GeneStudio
S5 Food
Protection
Instrument
You should pulse clean the Ion GeneStudio™ S5 Food Protection Instrument only if
™
directed by Technical Support, or your Field Service Engineer (FSE), to recover
instrument performance from a diagnosed solid-state buer leak.
Note: You must contact Technical Support, or your FSE, to diagnose whether a solidstate buer leak has occurred and obtain the required materials to perform the pulse
cleaning.
Ensure that the instrument has completed a normal post-run cleaning. In the
1.
main menu:
Display text Description
Run Instrument requires cleaning before a pulse cleaning can be
performed, see “Manually clean the instrument“ on page 14.
Clean Instrument requires cleaning before a pulse cleaning can be
performed, see “Manually clean the instrument“ on page 14.
Initialize Instrument is ready to be pulse cleaned. Proceed to step 2.
Press
2.
Follow the onscreen prompts to prepare the instrument.
3.
• Install new boles of Ion S5™ Cleaning Solution in both the Wash and
• Replace the Ion S5™ Sequencing Reagents cartridge with an empty used
• Install a used sequencing chip.
(Seings)4System Tools4Pulse clean.
Cleaning solution positions.
cartridge.
Close the instrument door, then touch Next.
4.
The pulse cleaning procedure begins automatically. The user interface returns to
the main menu when the cleaning is complete and the instrument is ready to be
initialized.
42
Ion GeneStudio™ S5 Food Protection Instrument User Guide
Page 43

C
Instrument warranty
For new Ion Torrent™ instruments, Life Technologies warrants to and only to buyer
for twelve (12) months from the date of shipping, that the Ion Torrent™ software and
Ion Torrent™ instruments are free from defects in material and workmanship and
conform to Life Technologies’ published specications in all material respects. Where
a valid and timely claim in respect of breach of Ion Torrent™ warranty is submied to
Life Technologies, Life Technologies may, at its discretion, replace, repair or modify
the Ion Torrent™ instrument. Any agreed replacement shall be at 1:1, like-kind basis,
at no cost to the buyer. For Ion Torrent™ chips or reagents reasonably determined by
Life Technologies to be defective, independent of user error, shall be replaced by Life
Technologies on a 1:1, like-kind basis at no cost to buyer, provided that such defective
Ion Torrent™ chips or reagents were used by buyer prior to their expiration date, or if
there is no expiration date, the Ion Torrent™ chips or reagents were used within six (6)
months of receipt, and the defect was promptly reported with appropriate detail to
Life Technologies’ technical support.
NO OTHER WARRANTIES SHALL BE APPLICABLE TO ION TORRENT
PRODUCTS (WHETHER OR NOT ANY FURTHER WARRANTY
DOCUMENTATION MAY BE INCLUDED IN THE SHIPMENT), WITH THE
EXCEPTION OF THIRD PARTY WARRANTIES WITH RESPECT TO THIRD PARTY
PRODUCT. ANY THIRD PARTY PRODUCTS ARE NOT COVERED BY THIS
SECTION AND ANY WARRANTIES FOR THIRD PARTY PRODUCTS ARE
PROVIDED BY THE ORIGINAL MANUFACTURER OF THE THIRD PARTY
PRODUCT. Warranties are made only to buyer purchasing the Ion Torrent™ Product
directly from Life Technologies, are not transferable and do not extend to the benet
of any other person or entity, unless otherwise expressly stated in writing by Life
Technologies. ANY PRODUCT NOT COVERED BY AN EXPRESS WRITTEN
WARRANTY IS SOLD AND PROVIDED “AS IS,” WITHOUT WARRANTY OF ANY
KIND, STATUTORY, EXPRESS OR IMPLIED. Any description of Ion Torrent
Product recited in Life Technologies’ quotation is for the sole purpose of identifying
Ion Torrent™ Product, and any such description is not part of any contract between
Life Technologies and buyer and does not constitute a warranty that Ion Torrent
Product shall conform to that description. Any sample or model used in connection
with Life Technologies’ quotation is for illustrative purposes only, and is not part of
any contract between Life Technologies and buyer and does not constitute a warranty
that Ion Torrent™ Product will conform to the sample or model. No armation of fact
or promise made by Life Technologies, whether or not in Life Technologies’ quotation,
shall constitute a warranty that Ion Torrent™ Product will conform to the armation
or promise. Unless otherwise specied in writing in documentation shipped with Ion
Torrent™ Product or otherwise agreed by Life Technologies in writing. Life
Technologies does not provide service or support for custom products or other
products made to buyer’s specications. THE WARRANTIES IDENTIFIED IN THIS
CLAUSE ARE LIFE TECHNOLOGIES’ SOLE AND EXCLUSIVE WARRANTIES
WITH RESPECT TO Ion Torrent™ PRODUCT AND ARE IN LIEU OF ALL OTHER
WARRANTIES, STATUTORY, EXPRESS OR IMPLIED, ALL OF WHICH OTHER
WARRANTIES ARE EXPRESSLY DISCLAIMED, INCLUDING WITHOUT
LIMITATION ANY IMPLIED WARRANTY OF MERCHANTABILITY, FITNESS FOR
™
™
Ion GeneStudio™ S5 Food Protection Instrument User Guide
43
Page 44

Appendix C Instrument warranty
C
Solid-state buffer leak
A PARTICULAR PURPOSE, NON-INFRINGEMENT, OR REGARDING RESULTS
OBTAINED THROUGH THE USE OF ANY PRODUCT (INCLUDING, WITHOUT
LIMITATION, ANY CLAIM OF INACCURATE, INVALID OR INCOMPLETE
RESULTS), WHETHER ARISING FROM A STATUTE OR OTHERWISE IN LAW OR
FROM A COURSE OF PERFORMANCE, DEALING OR USAGE OF TRADE.
44
Ion GeneStudio™ S5 Food Protection Instrument User Guide
Page 45

D
WARNING! GENERAL SAFETY. Using this product in a manner not specied
in the user documentation may result in personal injury or damage to the
instrument or device. Ensure that anyone using this product has received
instructions in general safety practices for laboratories and the safety
information provided in this document.
Before using an instrument or device, read and understand the safety
·
information provided in the user documentation provided by the
manufacturer of the instrument or device.
Before handling chemicals, read and understand all applicable Safety Data
·
Sheets (SDSs) and use appropriate personal protective equipment (gloves,
gowns, eye protection, and so on). To obtain SDSs, see the “Documentation
and Support” section in this document.
Safety alerts on this instrument
Safety
Additional text may be used with one of the symbols described above when more
specic information is needed to avoid exposure to a hazard. See the following table
for safety alerts found on the instrument.
English
CAUTION! Hazardous chemicals.
Read the Safety Data Sheets (SDSs)
before handling.
CAUTION! Hazardous waste. Refer
to SDS(s) and local regulations for
handling and disposal.
MISE EN GARDE ! Produits
chimiques dangereux. Lire les
fiches signalétiques (FS) avant de
manipuler les produits.
MISE EN GARDE ! Déchets
dangereux. Lire les fiches
signalétiques (FS) et la
réglementation locale associées à la
manipulation et à l’élimination des
déchets.
Français
Ion GeneStudio™ S5 Food Protection Instrument User Guide
45
Page 46

Made in USA
Ion Torrent S5™ XL Sequencer
1234987
00000000
Made in USA
INS0000000 Rev
A
Rated 100-240VAC 50/60Hz, 14.5-6.5A
Life Technologies Corp.
5791 Van Allen Way
Carlsbad, CA 92008
YYYY-MM-DD
EMC Class A
For Research Use Only.
Not for use in diagnostic procedures
Safety and
regulatory
symbols
Appendix D Safety
D
Safety information for instruments not manufactured by Thermo Fisher Scientific
Location of safety
labels on the
instrument
The Ion GeneStudio™ S5 Food Protection Instrument has warnings at the location
shown:
Ion GeneStudio™ S5 Food Protection Instrument label
Safety information for instruments not manufactured by Thermo
Fisher Scientific
Some of the accessories provided as part of the instrument system are not designed or
built by Thermo Fisher Scientic. Consult the manufacturer's documentation for the
information needed for the safe use of these products.
46
Ion GeneStudio™ S5 Food Protection Instrument User Guide
Page 47

Instrument safety
Appendix D Safety
Instrument safety
D
General
Cleaning and
decontamination
CAUTION! Do not remove instrument protective covers. If you remove the
protective instrument panels or disable interlock devices, you may be exposed
to serious hazards including, but not limited to, severe electrical shock, laser
exposure, crushing, or chemical exposure.
CAUTION! Cleaning and Decontamination. Use only the cleaning and
decontamination methods specied in the manufacturer's user documentation.
It is the responsibility of the operator (or other responsible person) to ensure
the following requirements are met:
No decontamination or cleaning agents are used that could cause a
·
HAZARD as a result of a reaction with parts of the equipment or with
material contained in the equipment.
The instrument is properly decontaminated a) if hazardous material is
·
spilled onto or into the equipment, and/or b) prior to having the instrument
serviced at your facility or sending the instrument for repair, maintenance,
trade-in, disposal, or termination of a loan (decontamination forms may be
requested from customer service).
Before using any cleaning or decontamination methods (except those
·
recommended by the manufacturer), users should conrm with the
manufacturer that the proposed method will not damage the equipment.
MISE EN GARDE ! Neoyage et décontamination. Utiliser uniquement les
méthodes de neoyage et de décontamination indiquées dans la documentation
du fabricant destinée aux utilisateurs. L’opérateur (ou toute autre personne
responsable) est tenu d’assurer le respect des exigences suivantes:
Ne pas utiliser d’agents de neoyage ou de décontamination susceptibles de
·
réagir avec certaines parties de l’appareil ou avec les matières qu’il contient
et de constituer, de ce fait, un DANGER.
L’instrument doit être correctement décontaminé a) si des substances
·
dangereuses sont renversées sur ou à l’intérieur de l’équipement, et/ou
b) avant de le faire réviser sur site ou de l’envoyer à des ns de réparation, de
maintenance, de revente, d’élimination ou à l’expiration d’une période de
prêt (des informations sur les formes de décontamination peuvent être
demandées auprès du Service clientèle).
Avant d’utiliser une méthode de neoyage ou de décontamination (autre que
·
celles recommandées par le fabricant), les utilisateurs doivent vérier auprès
de celui-ci qu’elle ne risque pas d’endommager l’appareil.
Ion GeneStudio™ S5 Food Protection Instrument User Guide
47
Page 48

Appendix D Safety
D
Instrument safety
Electrical safety
WARNING! Ensure appropriate electrical supply. For safe operation of the
instrument:
Plug the system into a properly grounded receptacle with adequate current
·
capacity.
Ensure the electrical supply is of suitable voltage.
·
Never operate the instrument with the ground disconnected. Grounding
·
continuity is required for safe operation of the instrument.
AVERTISSEMENT ! Veiller à utiliser une alimentation électrique appropriée.
Pour garantir le fonctionnement de l’instrument en toute sécurité :
Brancher le système sur une prise électrique correctement mise à la terre et
·
de puissance adéquate.
S’assurer que la tension électrique est convenable.
·
Ne jamais utiliser l’instrument alors que le dispositif de mise à la terre est
·
déconnecté. La continuité de la mise à la terre est impérative pour le
fonctionnement de l’instrument en toute sécurité.
WARNING! Power Supply Line Cords. Use properly congured and approved
line cords for the power supply in your facility.
AVERTISSEMENT ! Cordons d’alimentation électrique. Utiliser des cordons
d’alimentation adaptés et approuvés pour raccorder l’instrument au circuit
électrique du site.
WARNING! Disconnecting Power. To fully disconnect power either detach or
unplug the power cord, positioning the instrument such that the power cord is
accessible.
AVERTISSEMENT ! Déconnecter l’alimentation. Pour déconnecter
entièrement l’alimentation, détacher ou débrancher le cordon d’alimentation.
Placer l’instrument de manière à ce que le cordon d’alimentation soit accessible.
48
Ion GeneStudio™ S5 Food Protection Instrument User Guide
Page 49

Safety and electromagnetic compatibility (EMC) standards
Appendix D Safety
Safety and electromagnetic compatibility (EMC) standards
The instrument design and manufacture complies with the standards and
requirements for safety and electromagnetic compatibility as noted in the following
table:
D
Safety
EMC
Reference
EU Directive
2014/35/EU
IEC 61010-1
UL 61010-1
CSA C22.2 No.
61010-1
IEC 61010-2-010
Directive 2014/30/EU European Union “EMC Directive”
EN 61326-1
AS/NZS CISPR 22 2009+A1 2010
European Union “Low Voltage Directive”
Safety requirements for electrical equipment for measurement,
control, and laboratory use – Part 1: General requirements
Safety requirements for electrical equipment for measurement,
control and laboratory use – Part 2-010: Particular requirements
for laboratory equipment for the heating of materials
Reference
Description
Description
Electrical Equipment for Measurement,
Control and Laboratory Use – EMC
Requirements – Part 1: General
Requirements
Limits and Methods of Measurement of
Electromagnetic Disturbance
Characteristics of Industrial, Scientific, and
Medical (ISM) Radiofrequency Equipment
ICES-003, Issue 5
FCC Part 15 Subpart B (47 CFR)
Ion GeneStudio™ S5 Food Protection Instrument User Guide
Industrial, Scientific and Medical (ISM)
Radio Frequency Generators
U.S. Standard Radio Frequency Devices
49
Page 50

Appendix D Safety
D
Safety and electromagnetic compatibility (EMC) standards
Environmental
design
Waste and hazardous substances
Reference Description
Directive 2012/19/EU European Union “WEEE Directive” – Waste electrical and
electronic equipment
Directive 2011/65/EU European Union “RoHS Directive” – Restriction of hazardous
substances in electrical and electronic equipment
Radio compliance
Reference Description
Directive 2014/53/EU European Radio Equipment Directive (RED)
RFID
FCC Notice (for U.S. Customers):
This device complies with Part 15 of the FCC Rules.
Operation is subject to the following conditions:
1. This device many not cause harmful interference, and
2. This device must accept any interference received, Including
interference that may cause undesired operation
Changes and Modifications not expressly approved by
Thermo Fisher Scientific can void your authority to operate
this equipment under Federal Communications Commissions
rules.
Canada:
This device complies with Industry Canada licence-exempt RSS
standard(s).
(1) this device may not cause interference, and (2) this device must
accept any interference, including interference that may cause
undesired operation of the device.
Le présent appareil est conforme aux CNR d'Industrie Canada
applicables aux appareils radio exempts de licence. L'exploitation
est autorisée aux deux conditions suivantes : (1) l'appareil ne doit
pas produire de brouillage, et (2) l'utilisateur de l'appareil doit
accepter tout brouillage radioélectrique subi, même si le
brouillage est susceptible d'en compromettre le fonctionnement.
Operation is subject to the following two conditions:
50
Ion GeneStudio™ S5 Food Protection Instrument User Guide
Page 51

Chemical safety
Appendix D Safety
Chemical safety
WARNING! GENERAL CHEMICAL HANDLING. To minimize hazards,
ensure laboratory personnel read and practice the general safety guidelines for
chemical usage, storage, and waste provided below. Consult the relevant SDS
for specic precautions and instructions:
Read and understand the Safety Data Sheets (SDSs) provided by the
·
chemical manufacturer before you store, handle, or work with any chemicals
or hazardous materials. To obtain SDSs, see the “Documentation and
Support” section in this document.
Minimize contact with chemicals. Wear appropriate personal protective
·
equipment when handling chemicals (for example, safety glasses, gloves, or
protective clothing).
Minimize the inhalation of chemicals. Do not leave chemical containers open.
·
Use only with adequate ventilation (for example, fume hood).
Check regularly for chemical leaks or spills. If a leak or spill occurs, follow
·
the manufacturer's cleanup procedures as recommended in the SDS.
Handle chemical wastes in a fume hood.
·
Ensure use of primary and secondary waste containers. (A primary waste
·
container holds the immediate waste. A secondary container contains spills
or leaks from the primary container. Both containers must be compatible
with the waste material and meet federal, state, and local requirements for
container storage.)
After emptying a waste container, seal it with the cap provided.
·
Characterize (by analysis if necessary) the waste generated by the particular
·
applications, reagents, and substrates used in your laboratory.
Ensure that the waste is stored, transferred, transported, and disposed of
·
according to all local, state/provincial, and/or national regulations.
IMPORTANT! Radioactive or biohazardous materials may require special
·
handling, and disposal limitations may apply.
D
AVERTISSEMENT ! PRÉCAUTIONS GÉNÉRALES EN CAS DE
MANIPULATION DE PRODUITS CHIMIQUES. Pour minimiser les risques,
veiller à ce que le personnel du laboratoire lise aentivement et mee en œuvre
les consignes de sécurité générales relatives à l’utilisation et au stockage des
produits chimiques et à la gestion des déchets qui en découlent, décrites cidessous. Consulter également la FDS appropriée pour connaître les précautions
et instructions particulières à respecter :
Lire et comprendre les ches de données de sécurité (FDS) fournies par le
·
fabricant avant de stocker, de manipuler ou d’utiliser les matériaux
dangereux ou les produits chimiques. Pour obtenir les FDS, se reporter à la
section « Documentation et support » du présent document.
Limiter les contacts avec les produits chimiques. Porter des équipements de
·
protection appropriés lors de la manipulation des produits chimiques (par
exemple : lunees de sûreté, gants ou vêtements de protection).
Limiter l’inhalation des produits chimiques. Ne pas laisser les récipients de
·
produits chimiques ouverts. Ils ne doivent être utilisés qu’avec une
ventilation adéquate (par exemple, sorbonne).
Ion GeneStudio™ S5 Food Protection Instrument User Guide
51
Page 52

Appendix D Safety
D
Chemical safety
Vérier régulièrement l’absence de fuite ou d’écoulement des produits
·
chimiques. En cas de fuite ou d’écoulement d’un produit, respecter les
directives de neoyage du fabricant recommandées dans la FDS.
Manipuler les déchets chimiques dans une sorbonne.
·
Veiller à utiliser des récipients à déchets primaire et secondaire. (Le récipient
·
primaire contient les déchets immédiats, le récipient secondaire contient les
fuites et les écoulements du récipient primaire. Les deux récipients doivent
être compatibles avec les matériaux mis au rebut et conformes aux exigences
locales, nationales et communautaires en matière de connement des
récipients.)
Une fois le récipient à déchets vidé, il doit être refermé hermétiquement avec
·
le couvercle fourni.
Caractériser (par une analyse si nécessaire) les déchets générés par les
·
applications, les réactifs et les substrats particuliers utilisés dans le
laboratoire.
Vérier que les déchets sont convenablement stockés, transférés, transportés
·
et éliminés en respectant toutes les réglementations locales, nationales et/ou
communautaires en vigueur.
IMPORTANT ! Les matériaux représentant un danger biologique ou
·
radioactif exigent parfois une manipulation spéciale, et des limitations
peuvent s’appliquer à leur élimination.
52
Ion GeneStudio™ S5 Food Protection Instrument User Guide
Page 53

Related documentation
Documentation and support
Ion 510™ & Ion 520™ & Ion 530™ Food Protection Kit–Chef User
Guide
Ion GeneStudio™ S5 Food Protection System Site Preparation
Guide
Food Safety support
Website: thermoscientic.com/foodmicro or thermosher.com/foodsafety
Support email:
• Europe, Middle East, Africa: microbiology.techsupport.uk@thermosher.com
• North America: microbiology@thermosher.com
Phone: Visit thermosher.com/support, select the link for phone support, and select
the appropriate country from the dropdown menu.
Title
Pub. No.
MAN0017967
MAN0017966
Ion GeneStudio™ S5 Food Protection Instrument User Guide
53
Page 54

thermofisher.com/support | thermofisher.com/askaquestion
thermofisher.com
18 October 2018
 Loading...