

Thermo Scientific Finnpipette, 4510000, 4510020, 4510030, 4510010 Instructions For Use Manual
...Page 1
1
Instructions for Use
Bedienungsanleitung
Guide d´utilisation et d´entretien
Instrucciones de uso
Digital Multichannel
Finnpipette®
3 0 0
Thermo Fisher Scientific
P.O.Box 100, Fin-01621 Vantaa, Finland
Tel. +358-9-329 100, fax -358-9-3291 0414
www.thermo.com/finnpipette
Page 2
2
Finnpipette
R
3 0 0
Finnpipette
1 0 0 0
Finnpipette
3 0 0
R
A
C
B
1 2 3 4
A
C
B
1 2 3 4
5
4
A
C
B
1 2 3 4 5
A
C
B
1 2 3 4
6
7
2
3
8
10
1
9
Page 3
3
CONTENTS
PRODUCT DESCRIPTION 4
PIPETTE OPERATION 4
PIPETTING TECHNIQUES 5
CALIBRATION 6
MAINTENANCE 8
TROUBLE SHOOTING 10
PACKAGE 11
SPARE PARTS 39
ENGLISH
INHALT
PRODUKTBESCHREIBUNG 12
HANDHABUNG DER FINNPIPETTE 12
PIPETTIER-TECHNIKEN 13
KALIBRIEREN 15
WARTUNG 17
STÖRUNGEN BEHEBEN 19
VERPACKUNG 20
ERSATZTEILE UND ZUBEHÖR 39
DEUTSCH
SOMMAIRE
DESCRIPTION 21
UTILISATION DE LA PIPETTE 21
CONSEILS DE PIPETAGE 22
CALIBRATION 24
MAINTENANCE 26
ERREURS ET CAUSES 28
CONDITIONNEMENT 28
PIÈCES DÉTACHÉES 39
FRANÇAIS
CONTENIDO
DESCRIPCION DEL PRODUCTO 29
FUNCIONES 29
TECNICAS DE PIPETEO 30
CALIBRACION 31
MAINTENIMIENTO 33
PROBLEMAS Y SOLUCIONES 36
PRESENTACION 37
PIEZAS DE RECAMBIO 39
ESPAÑOL
13
C
11
12
A
B
Page 4

4
1
2
1
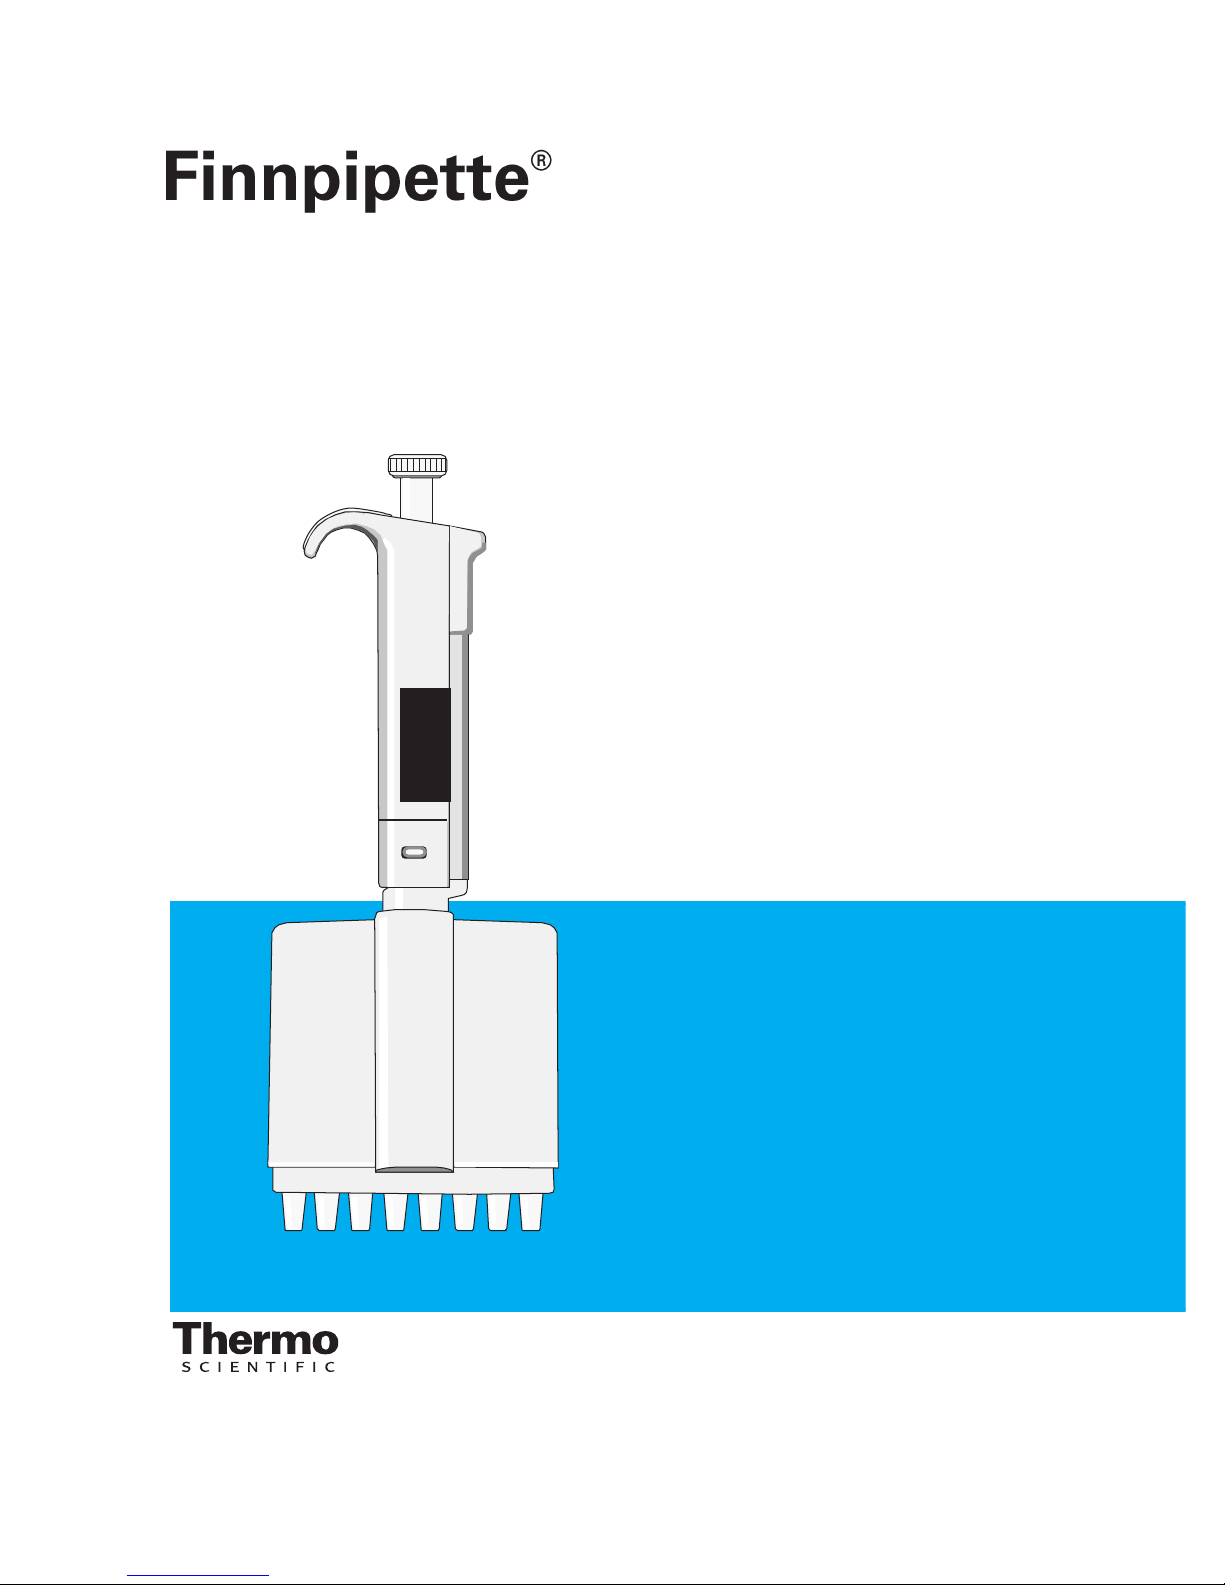
PRODUCT DESCRIPTION
The Finnpipette Digital Multichannel is an autoclavable digital pipette. It operates on the air
displacement principle (i.e. an air interface) and uses detachable, disposable tips.
The adjusted delivery volume is displayed digitally on a readout window on the handle.
The six different models of Finnpipette Digital Multichannel pipettes cover a volume range
from 0.5 µl to 300 µl.
Order No. Channel Volume Range Finntip
4510000 8 0.5 µl to 10 µl 10
4510010 12 0.5 µl to 10 µl 10
4510020 8 5 µl to 50 µl 250, 300
4510030 8 50 µl to 300 µl 250, 300
4510040 12 5 µl to 50 µl 250, 300
4510050 12 50 µl to 300 µl 250, 300
4510070 16 5 µl to 50 µl Finntip 50
DIGITAL DISPLAY
The adjusted delivery volume is clearly indicated in the large digital display on the
handle.
RAW MATERIALS
The Finnpipette Digital is made of mechanically durable and chemically resistant
materials which allow repeated autoclaving of the complete pipette at 121°C.
DESCRIPTION OF TIPS
Finntips are recommended for use with the Finnpipette Digital Multichannel.
They are made of natural colour polypropylene, generally regarded as the only
contamination free material suitable for tips. Finntips are also autoclavable (121°C).
PIPETTE OPERATION
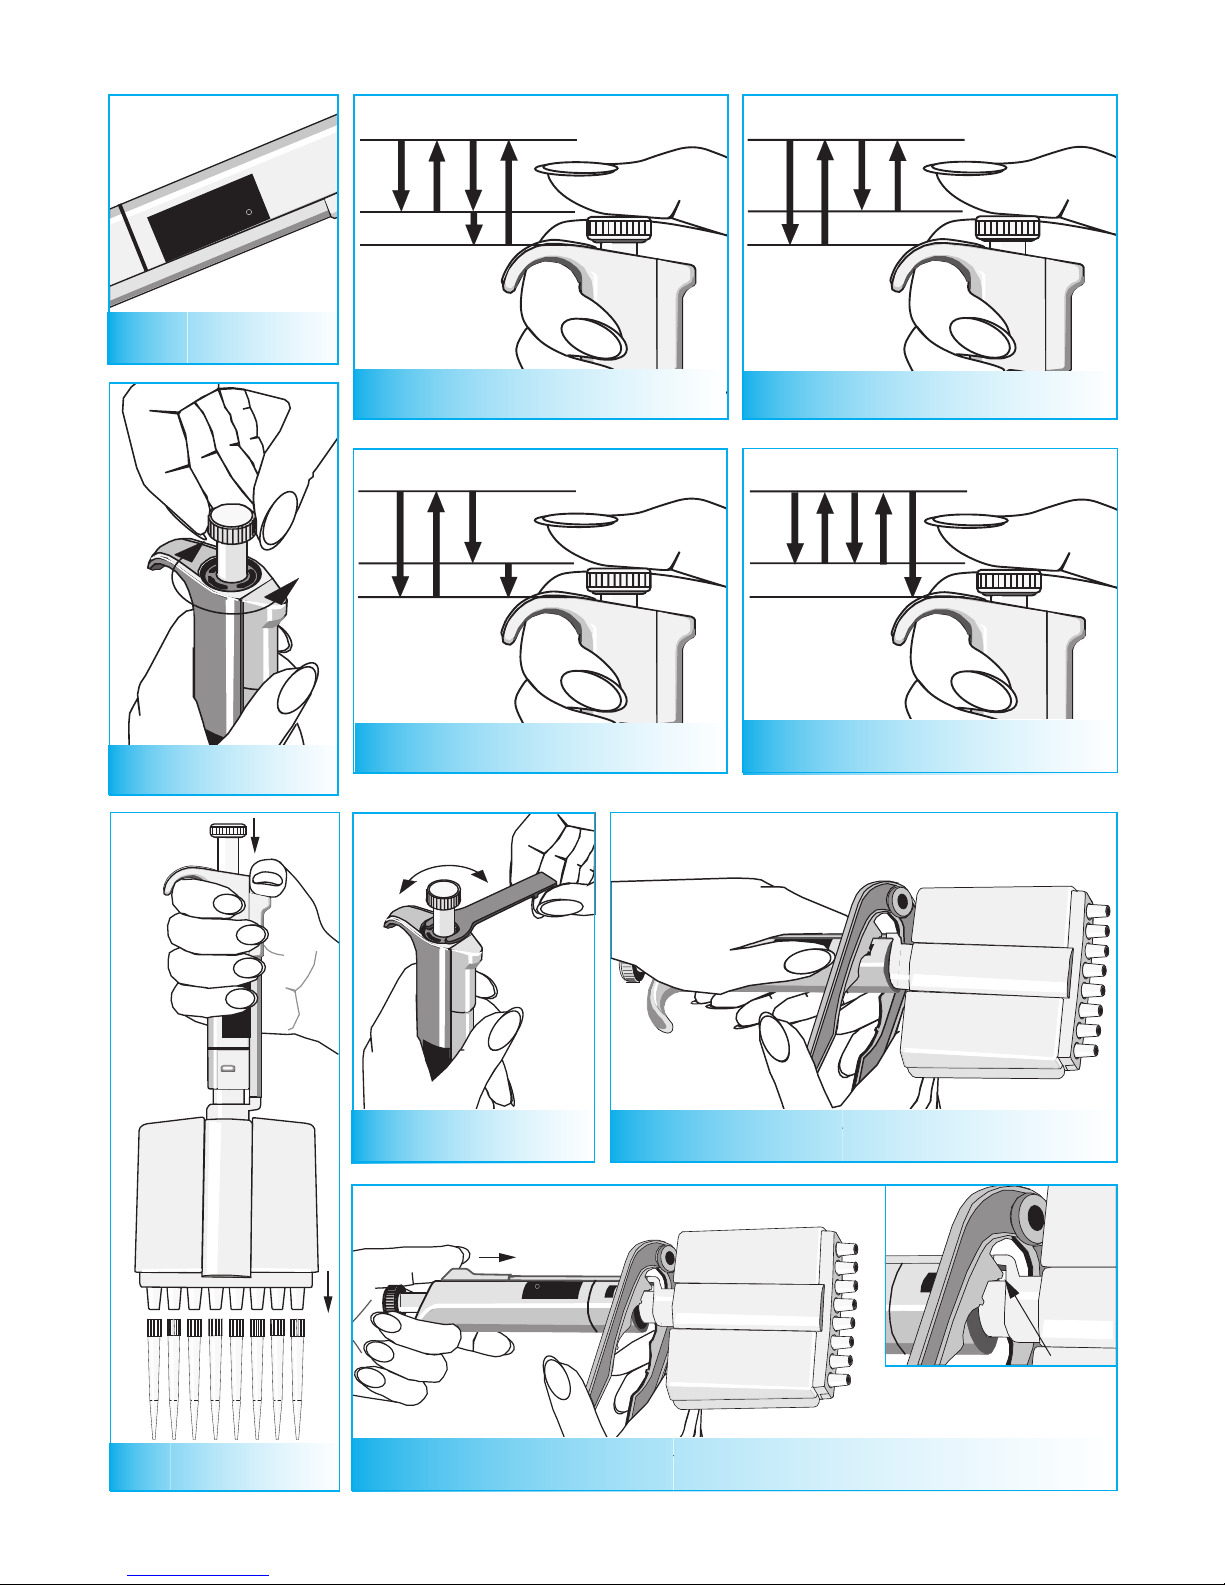
SETTING THE DELIVERY VOLUME
1. Set the delivery volume using the push button on the top of the pipette.
To increase the delivery volume, turn the push button counterclockwise.
To decrease the delivery volume, turn it clockwise.
2. Make sure that the desired delivery volume clicks into place and that the digits are
completely visible in the display window.
3. Do not set volumes outside the pipette´s specified volume range.
Using excessive force to turn the push button outside the range may jam the mechanism
and eventually damage the pipette.
ENGLISH
Page 5

5
13
TIP EJECTION
To help eliminate the risk of contamination, each pipette is fitted with a tip ejector system.
The tip ejector system consists of a soft-touch tip ejector and specially designed gearing
mechanism. To release the tip, point the pipette at suitable waste receptacle and press the
tip ejector with your thumb.
SAFETY LABEL
You can mark the pipette application your initials the calibration date, etc. on the safety
label.
Remove the clear plastic window on the edge closest to the push button (use the service
tool that comes with the pipette, or a screwdriver). Mark the adhesive label with a felttipped or other pen and snap the window back in place.
SHELF HANGER
You can attach the pipette shelf hanger on a counter, pipette stand or anywhere where
you want to hang your pipette.
Clean the area where you plan to attach the shelf hanger. Apply two stickers to the
underside of the shelf hanger. Press the shelf hanger firmly into place -- on a shelf,
countertop or pipette stand. To use, hang the grippy finger rest on the shelf hanger.
PIPETTING TECHNIQUES
Push and release the push button slowly at all times,
particularly when working with high viscosity liquids.
Never allow the push button to snap back.
Make sure that the tip is firmly attached to the tip cone.
Check for foreign particles in the tip.
Before you begin your actual pipetting work, fill and
empty the tip 2-3 times with the solution that you will be pipetting. Hold the pipette in an
upright position while aspirating liquid. The grippy should rest on your index finger. Make
sure that the tips, pipette and solution are at the same temperature.
FORWARD TECHNIQUE
Fill a clean reagent reservoir with the liquid to be dispensed.
1 Depress the push button to the first stop.
2. Dip the tip under the surface of the liquid in the reservoir to a depth of about 1 cm
and slowly release the push button. Withdraw the tip from the liquid touching it
against the edge of the reservoir to remove excess liquid.
3. Deliver the liquid by gently depressing the push button to the first stop. After a
delay of about one second, continue to depress the push button all the way to the
second stop. This action will empty the tip.
4. Release the push button to the ready position.
If necessary, change the tip and continue pipetting.
ENGLISH
12
4
Figures 4-7:
A = Ready position
B = First stop
C = Second stop
3
Page 6

6
5
6
7
REVERSE TECHNIQUE
The reverse technique is suitable for dispensing liquids that have a high viscosity or a
tendency to foam easily. The technique is also recommended for dispensing very small
volumes.
Fill a clean reagent reservoir with the liquid to be dispensed.
1. Depress the push button all the way to the second stop.
2. Dip the tip under the surface of the liquid in the reservoir to a depth of about 1 cm,
and slowly release the push button.
This action will fill the tip. Withdraw the tip from the liquid touching it against the
edge of the reservoir to remove excess liquid.
3. Deliver the preset volume by gently depressing the push button to the first stop.
Hold the push button at the first stop. Some liquid will remain in the tip and this
should not be included in the delivery.
4. The remaining liquid should either be discarded with the tip or pipetted back into the
container.
REPETITIVE TECHNIQUE
The repetitive technique offers a rapid and simple procedure for repeated delivery of the
same volume. Fill a clean reagent reservoir with the liquid to be dispensed.
1. Depress the push button all the way to the second stop.
2. Dip the tip under the surface of the liquid in the reservoir to a depth of about 1 cm,
and slowly release the push button. This action will fill the tip. Withdraw the tip from
the liquid touching against the edge of the reservoir to remove excess liquid.
3. Deliver the preset volume by gently depressing the push button to the first stop.
Hold the push button at the first stop. Some liquid will remain in the tip and this
should not be included in the delivery.
4. Continue pipetting by repeating steps 2 and 3.
PIPETTING OF HETEROGENEOUS SAMPLES
(deproteinization in blood glucose determination, for example)
Use steps 1 and 2 of the forward technique to fill the tip with blood.
Wipe the tip carefully with a dry clean tissue.
1. Immerse the tip into the reagent and depress the push button to the first stop,
making sure the tip is well below the surface.
2. Release the push button slowly to the ready position. This will fill the tip. Keep the
tip in the solution.
3. Depress the push button to the first stop and release slowly. Keep repeating this
procedure until the interior wall of the tip is clear.
4. Finally, depress the push button all the way to the second stop to completely empty the tip.
CALIBRATION
All Finnpipettes are factory calibrated and adjusted to give the volumes as specified with
distilled or deionized water. The pipettes are constructed to permit re-adjustment for liquids
of different temperature and viscosity.
ENGLISH
Page 7

7
8
DEVICE REQUIREMENTS AND TEST CONDITIONS
An analytical balance must be used. The scale graduation value of the balance should be
chosen according to the selected test volume of the pipette:
Volume range readable graduation
under 10 µl 0.00 1 mg
10-100 µl 0.01 mg
above 100 µl 0.1 mg
Test liquid: Water, distilled or deionized, “grade 3” water conforming ISO 3696. Tests are
done in a draft-free room at a constant (±0.5°C) temperature of water, pipette and air
between 15°C to 30°C.
The relative humidity must be above 50%. Especially with volumes under 50 µl the air
humidity should be as high as possible to reduce the effect of evaporation loss. Special
accessories, such as the evaporation trap, are recommended.
PROCEDURE TO CHECK CALIBRATION
The pipette is checked with the maximum volume (nominal volume) and with the
minimum volume. A new tip is first pre-wetted 3-5 times and a series of ten pipettings is
done with both volumes. A pipette is always adjusted for delivery (Ex) of the selected
volume.
Procedure:
1. Do 10 pipettings with the minimum volume.
2. Do 10 pipettings with the maximum volume.
3. Calculate the inaccuracy (A) and imprecision (cv) of both series.
4. Compare the results to the limits in the Table 1.
If the calculated results are within the selected limits, the adjustment of the pipette is correct.
TABLE 1: Maximum permissible errors according ISO8655
Range Channel Volume Inaccuracy Imprecision
µl µl % s.d.µl cv%
1-10 µl 8, 12 10 ±0.24 ±2.4 0.16 1.6
1 ±0.24 ±24 0.16 16
5-50 µl 8, 12, 16 50 ±1.0 ±2.0 0.4 0.8
5 ±1.0 ±20 0.4 8.0
30-300 µl 8, 12 300 ±8.0 ±2.7 3.0 1.0
30 ±8.0 ±26.7 3.0 10.0
ADJUSTMENT:
Adjustment is done with the service tool.
1. Place the service tool into the openings of the calibration nut at the top of the handle.
2. Turn the service tool clockwise to increase, or counterclockwise to decrease the
volume.
3. After adjustment check the calibration according to the instructions above.
ENGLISH
Page 8

8
FORMULAS FOR CALCULATING RESULTS
Conversion of mass to volume
V = (w + e) x Z V = volume (µl)
w = weight (mg)
e = evaporation loss (mg)
Z = conversion factor for mg/µl conversion
Evaporation loss can be significant with low volumes. To determine mass loss, dispense
water to the weighing vessel, note the reading and start a stopwatch. See how much the
reading decreases during 30 seconds (e.g. 6 mg = 0.2 mg/s).
Compare this to the pipetting time from taring to reading. Typically pipetting time might be
10 seconds and the mass loss is 2 mg (10 s x 0.2 mg/s) in this example. If an
evaporation trap or lid on the vessel is used the correction of evaporation is usually
unnecessary.
The factor Z is for converting the weight of the water to volume at test temperature and
pressure. A typical value is 1.0032 µl/mg at 22°C and 95 kPa. See the conversion table
on page 38.
Inaccuracy (systematic error)
Inaccuracy is the difference between the dispensed volume and the selected volume of a
pipette.
A = V - V
0
A = inaccuracy
V = mean volume
V0= nominal volume
Inaccuracy can be expressed as a relative value: A% = 100% x A / V
0
Imprecision (random error)
Imprecision refers to the repeatability of the pipettings. It is expressed as standard
deviation (s) or coefficient of variation (cv)
s = standards deviation
v = mean volume
n = number of measurements
Standard deviation can be expressed as a relative value (CV) CV = 100% x S / V
MAINTENANCE
When the Finnpipette Digital Multichannel is not in use, make sure it is stored in an upright
position. We recommend a Finnpipette stand for this purpose.
SHORT-TERM CHECKING
The pipette should be checked at the beginning of each day for dust and dirt on the outside
surfaces of the pipette.
Particular attention should be paid to the tip cone. No other solvents except 70 % ethanol
should be used to clean the pipette.
ENGLISH
1
)(
2
-
-
=
n
VV
S
i
S
i=1
n
Page 9

9
14
10
11
9
LONG-TERM MAINTENANCE
If the pipette is used daily it should be checked every three months. The servicing
procedure starts with the disassembly of the pipette.
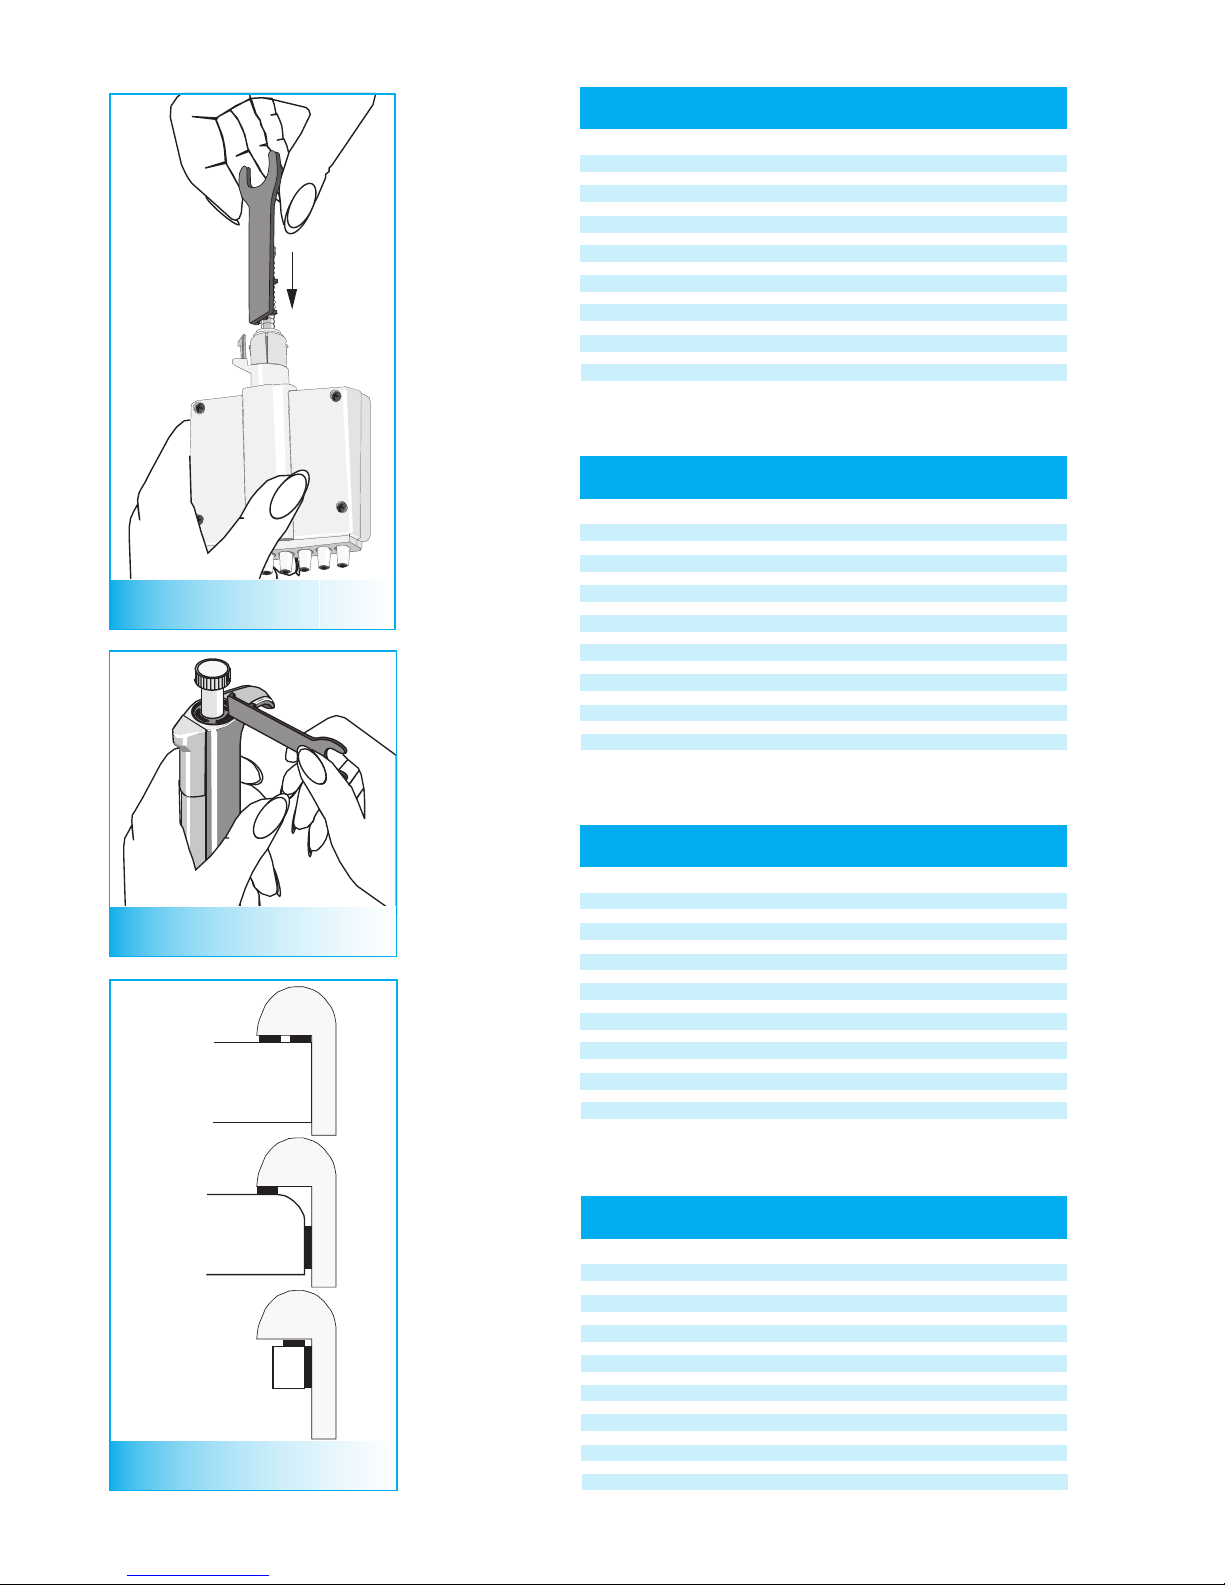
DISASSEMBLING ASSEMBLING MULTICHANNEL PIPETTES
1. Press down the tip ejector.
2. Insert the maintenance pliers under the tip ejector bar to release the tip ejector.
3. Remove the tip cone module by pressing it with the maintenance pliers
4. Press the spring and remove the locking pieces from the groove. Remove the
spring, spring support and o–ring.
5. Place the maintenance key in the adapter groove and pull off the adapter.
6. Pull out the tip ejector adapter. Lift the upper end of the tip ejector bar slightly and
push it back. Lift out the module spring.
7. Use a screwdriver to remove the four/six screws in the module cover and lift off
the cover.
8. Remove the piston bar and clean the pistons with a dry nap–free cloth.
9. Clean the tip cones.
10. If needed, replace the seal by carefully releasing the cover ring from its snap joint
with the screwdriver. Remove all the parts from the tip cone. Clean all the parts.
Reassemble the tip cone.
5–50 µl and 50–300 µl: Take one piston. Slide cover ring 32 (larger hole), spring 33,
support ring 35, (o–ring 37 bigger 5-50µl) and o–ring 36 (smaller) onto the piston.
Grease the o–ring with the lubricant provided in the pipette package. Slide all the parts
into the tip cone and close the snap joint of the cover ring.
0.5–10 µl: Take one piston. Slide cover ring 32 (larger hole), support 35, o–ring 36
(bigger), o–ring 37 (smaller) and o–ring support 38 onto the piston. Then slide
spring 39, spring support 40 (sharp edges first) and o–ring 41 onto the o–ring sup
port 38. Grease the o–rings with the lubricant provided in the pipette package. Slide
all the parts into the tip cone and close the snap joint of the cover ring.
11. Grease cleaned pistons with the lubricant provided in the pipette package.
12. Install the piston bar with pistons and tip cones in the cover and close the cover
with the four/six screws.
13. Place the tip ejector and module spring on the neck of the module. Press the spring
below the tip ejector. Close the tip ejector with the tip ejector adapter.
14. Use the maintenance key to slide the adapter to wider groove in the module neck.
15. Slide the o–ring, spring support and spring onto the piston bar and lock with the
locking pieces.
16. Attach the tip cone module to the handle and the tip ejector adapter to the tip ejector bar.
SERVICE INSTRUCTIONS FOR MULTICHANNEL PIPETTE TIP CONES
To ensure even performance between all channels in a multichannel pipette, all tip cones
have to be changed at the same time, if any of them needs to be changed. Don’t mix tip
cones of different packages, because one bag contains a matched set of tip cones.
ENGLISH
Page 10

10
Solution
Attach firmly
Clean tip cones attach
new tips
Clean and grease O-ring
and cylinder.
Grease accordingly
Change the O-ring
Follow instructions carefully
Attach firmly
Recalibrate according
to instructions
Recalibrate with
the liquids in question.
Defect
Leakage
Inaccurate dispensing
Inaccurate dispensing
with certain liquids
TROUBLE SHOOTING
The table below lists possible problems and their solutions.
Possible reason
Tip incorrectly attached
Foreign particles
between tip and tip cone
Foreign particles between the
piston, the O-ring and the cylinder
Insufficient amount of grease on
cylinder and O-ring
O-ring damaged
Incorrect operation
Tip incorrectly attached
Calibration altered: caused
by misuse, for example
Unsuitable calibration.
High viscosity liquids may
require recalibration.
STERILIZATION
The entire pipette can be sterilized by autoclaving it at 121°C (252°F) (minimum 20
minutes). No special preparations are needed for autoclaving. You can use steam
sterilization bags if needed.
After autoclaving the pipette must be cooled to room temperature for at least two hours.
Before pipetting, make sure that the pipette is dry. We recommend that you check the
calibration of after every 25th sterilization cycle.
ENGLISH
Page 11

11
PACKAGE
The Finnpipette Digital is shipped in a specially designed package containing the
following items:
1. The Finnpipette
2. Service tool
3. Maintenance pliers
4. Finntip sample
5. Tube of grease
6. Instruction manual
7. Calibration certificate
8. Shelf hanger
9. Two stickers
CAUTION!
The Finnpipette is designed to allow easy in-lab service. If you would prefer
to have us or your local representative service your pipette, please make
sure that the pipette has been decontaminated before you send it to us.
Please note that the postal authorities in your country may prohibit or
restrict the shipment of contaminated material by mail.
ENGLISH
Page 12

12
1
2
PRODUKTBESCHREIBUNG
Die Finnpipette Digital Mehrkanal ist eine autoklavierbare digitale Pipette.
Sie arbeitet nach dem Luftverdrängungsprinzip und verwendet abnehmbare Einmalspitzen.
Das eingestellte Pipettiervolumen wird digital in einem Fenster im Handgriff angezeigt.
Fünf verschiedene Modelle der Finnpipette Digital Mehrkanal decken einen Volumenbereich zwischen 0,5 und 300 µl ab.
Bestell-Nr. Kanal Volumenbereich Finntips
4510000 8 0,5 µl bis 10 µl 10
4510010 12 0,5 µl bis 10 µl 10
4510020 8 5 µl bis 50 µl 250, 300
4510030 8 50 µl bis 300 µl 250, 300
4510040 12 5 µl bis 50 µl 250, 300
4510050 12 50 µl bis 300 µl 250, 300
4510070 16 5µl bis 50 µl Finntip 50
DIGITALE ANZEIGE
Das eingestellte Pipettiervolumen erscheint als deutlich lesbare Digitalanzeige in einem
großen Sichtfenster.
MATERIALEIGENSCHAFTEN
Die Finnpipette Digital ist aus langlebigem, mechanisch und chemisch widerstandsfähigem
Material hergestellt. Es erlaubt wiederholtes Autoklavieren der kompletten Pipette bei
121°C.
BESCHREIBUNG DER PIPETTENSPITZEN
Als Pipettenspitzen für die Verwendung mit der Finnpipette Digital werden “Finntips”
empfohlen. Finntips sind aus ungefärbtem Polypropylen, allgemein anerkannt als das
einzige kontaminationsfreie und für Pipettenspitzen geeignete Material. Nahezu alle
Finntips sind überdies bei 121 °C autoklavierbar.
HANDHABUNG DER FINNPIPETTE
EINSTELLUNG DES PIPETTIERVOLUMENS
1. Stellen Sie das Pipettiervolumen ein: Blicken Sie von oben auf den Bedienungsknopf
und drehen Sie ihn im Uhrzeigersinn für ein geringeres Pipettiervolumen und gegen
den Uhrzeigersinn für ein größeres Pipettiervolumen
2. Die gewünschte Volumenanzeige muß deutlich einrasten und im Fenster vollständig
sichtbar sein.
3. Stellen Sie keine Volumina außerhalb des vom Hersteller vorgegebenen
Volumensbereichs ein. Bei Einstellung von Volumina unter erhöhtem Kraftaufwand
außerhalb des angegebenen Bereichs könnten Sie den Mechanismus überdrehen
und die Pipette beschädigen.
DEUTSCH
Page 13

13
13
12
3
DEUTSCH
ABWURF DER PIPETTENSPITZE
Zur Verringerung der Kontaminationsgefahr sind Finnpipetten mit einem System zum
Abwurf der Pipettenspitze ausgestattet. Dieses Abwurfsystem besteht aus einem
leichtgängigen Spitzenabwerfer und einem speziellen Getriebe. Um die Spitze
abzuwerfen, halten Sie die Pipette über einen geeigneten Abfallbehälter und drücken Sie
den Spitzenabwerfer mit dem Daumen hinunter.
SICHERHEITSETIKETT
Auf dem Sicherheitsetikett können Sie den Verwendungszweck der Pipette, Ihre Initialen,
das Kalibrierungsdatum o.ä. vermerken.
Entfernen Sie dazu das Klarsichtfenster, indem Sie es mit einem kleinen Schraubenzieher
oder dem mitgelieferten Service-Werkzeug an der dem Bedienungsknopf zugewandten
Seite ablösen. Beschriften Sie das Selbstklebe-Etikett mit Filzschreiber oder einem
anderen Stift, und lassen Sie das Klarsichtfenster wieder einrasten.
PIPETTENHALTER
Sie können den Pipettenhalter an einem Regalbrett oder an einem Pipettenständer
befestigen oder überall, wo Sie Ihre Pipette hinhängen wollen.
Reinigen Sie zuvor die Fläche, auf der Sie den Pipettenhalter befestigen wollen. Bringen
Sie zwei doppelseitige Klebeschildchen auf der Unterseite des Pipettenhalter an. Pressen
Sie den Pipettenhalter fest auf die Unterlage - an ein Regal, auf den Labortisch oder den
Pipettenständer. Zur Benutzung hängen Sie den Fingerbügel der Pipette über den
Pipettenhalter.
PIPETTIER-TECHNIKEN
Drücken Sie den Bedienungsknopf stets langsam hintunter und lassen Sie ihn langsam
wieder los, insbesondere wenn sie mit hochviskosen
Flüssigkeiten arbeiten. Lassen Sie den Knopf niemals
zurückschnappen.
Stellen Sie sicher, daß die Pipettenspitzen fest auf den
Spitzenkoni sitzt. Achten Sie darauf, daß sich keine
Fremdkörper in den Pipettenspitzen befinden.
Bevor Sie ihre aktuelle Pipettierarbeit aufnehmen,
füllen und leeren Sie die Pipettenspitze zwei- bis
dreimal mit der zu pipettierenden Flüssigkeit. Halten
Sie die Pipette senkrecht, während Sie Flüssigkeit ansaugen. Der Fingerbügel soll auf
Ihrem Zeigefinger liegen. Achten Sie auch darauf, daß Pipette, Pipettenspitzen und
Flüssigkeit dieselbe Temperatur aufweisen.
Abbildungen 4-7:
A = Ausgangsposition
B = Erster Haltepunkt
C = Zweiter Haltepunkt
Page 14

14
5
6
4
DEUTSCH
STANDARD-TECHNIK
Füllen Sie ein sauberes Reagenziengefäß mit der Flüssigkeit, die portioniert werden soll.
1. Drücken Sie den Bedienungsknopf bis zum ersten Haltepunkt hinunter.
2. Tauchen Sie die Spitzen ca. 1 cm unter die Flüssigkeitsoberfläche in den Behälter
ein. Lassen Sie den Bedienungsknopf langsam los. Ziehen Sie die Spitze aus der
Flüssigkeit. Streifen Sie außen an den Spitzen haftende Flüssigkeit am Rand des
GeFäßes ab.
3. Zum Dispensieren der Flüssigkeit drücken Sie den Bedienungsknopf leicht und
gleichmäßig bis zum ersten Haltepunkt. Nach einer kurzen Pause von ca. 1 Sekunde
drücken Sie den Knopf weiter bis zum zweiten Haltepunkt. So wird die Flüssigkeit
vollständig abgegeben.
4. Lassen Sie den Bedienungsknopf in die Ausgangsposition zurückgleiten. Falls
erforderlich, wechseln Sie die Pipettenspitzen und setzen das Pipettieren fort.
ÜBERHUB-TECHNIK
Die Überhubtechnik eignet sich zum Dispensieren stark schäumender oder viskoser
Flüssigkeiten. Sie empfiehlt sich auch zum Dispensieren sehr kleiner Flüssigkeitsmengen.
1. Drücken Sie den Bedienungsknopf bis zum zweiten Haltepunkt hinunter.
2. Tauchen Sie die Spitze ca. 1 cm unter die Flüssigkeitsoberfläche in den Behälter ein.
Lassen Sie den Bedienungsknopf langsam los. Ziehen Sie die Spitzen aus der
Flüssigkeit. Streifen Sie außen an den Spitzen haftende Flüssigkeit am Rand des
Gefäßes ab.
3. Zum Dispensieren der Flüssigkeit. drücken Sie den Bedienungsknopf leicht und
gleichmäßig bis zum ersten Haltepunkt. Die gewünschte Flüssigkeitsmenge wird
abgegeben. Der verbleibende Flüssigkeitsrest in den Spitzen wird nicht in das
Zielgefäß abgegeben.
4. Der Flüssigkeitsrest in den Spitzen wird verworfen.
ÜBERHUB-WIEDERHOLUNGS-TECHNIK
Die Wiederholungstechnik ist ein schnelles und einfaches Verfahren zur wiederholten
Abgabe des gleichen Volumens. Füllen Sie ein sauberes Reagenziengefäß mit der
Flüssigkeit, die pipettiert werden soll.
1. Drücken Sie den Bedienungsknopf bis zum zweiten Haltepunkt hinunter.
2. Tauchen Sie die Spitzen ca. 1 cm unter die Flüssigkeitsoberfläche in den Behälter
ein. Lassen Sie den Bedienungsknopf langsam los. Ziehen Sie die Spitzen aus der
Füssigkeit. Streifen Sie außen an den Spitzen haftende Flüssigkeit am Rand des
Gefäßes ab.
3. Zum Dispensieren der Flüssigkeit drücken Sie den Bedienungsknopf leicht und
gleichmäßig bis zum ersten Haltepunkt. Die gewünschte Flüssigkeitsmenge wird
abgegeben. Der verbleibende Flüssigkeitsrest in den Spitzen wird nicht in das
Zielgefäß abgegeben.
4. Wiederholen Sie nun die Schritte 2 und 3.
Nach der letzten Wiederholung wird der Flüssigkeitsrest in den Spitzen verworfen.
Page 15

15
DEUTSCH
PIPETTIEREN VON HETEROGENEN PROBEN
(z.B. für das Enteiweißen bei der Blutzucker-Bestimmung)
Gehen Sie nach den Punkten 1 und 2 der Standard-Technik vor.
Wischen Sie die Spitzen sorgfältig mit einem trockenen und sauberen Tuch ab.
1. Senken Sie die Spitzen in das Reagens und drücken Sie den Bedienungsknopf bis zum
ersten Haltepunkt hinunter. Achten Sie darauf, daß die Spitzen in der Flüssigkeit bleibt.
2. Lassen Sie den Bedienungsknopf langsam in die Ausgangsposition zurückgleiten.
Dabei füllt sich die Spitzen. Lassen Sie die Spitzen eingetaucht.
3. Drücken Sie den Bedienungsknopf bis zum ersten Haltepunkt und lassen dann
langsam wieder los. Wiederholen Sie diesen Vorgang so lange, bis die Innenwand
der Pipettenspitzen klar ist.
4. Abschließend drücken Sie den Bedienungsknopf bis zum zweiten Haltepunkt durch,
um die Pipettenspitzen vollständig zu entleeren.
KALIBRIERUNG
Alle Finnpipetten werden im Werk auf die spezifizierten Mengen an destilliertem oder
vollentsalztem Wasser kalibriert und justiert. Die Pipetten sind so konzipiert, dass eine
erneute Justierung für Flüssigkeiten vorgenommen werden kann, die eine
unterschiedliche Temperatur und Viskosität aufweisen.
Erforderliche Geräte und Prüfbedingungen
Zur Überprüfung wird eine Analysenwaage benötigt. Der Skalenwert der Waage muss
entsprechend der gewählten Testmenge der Pipette gewählt werden:
Menge Skala
unter 10 µl 0,001 mg
10-100 µl 0,01 mg
über 100 µl 0,1 mg
Testflüssigkeit: Destilliertes oder vollentsalztes Wasser der Klasse 3 gemäß ISO 3696.
Die Überprüfung wird in einem zugluftfreien Raum bei einer konstanten Temperatur von
15°C bis 30°C (±0,5°C) des Wassers, der Pipette und der Luft durchgeführt.
Die relative Luftfeuchtigkeit muss über 50% liegen. Insbesondere bei Mengen unter 50 µl
sollte die Luftfeuchtigkeit möglichst hoch sein, um Verdunstungsverluste zu vermeiden.
Die Verwendung von Spezialzubehörs, z.B. eines Verdunstungsschutzes, wird empfohlen.
Prüfen der Kalibrierung
Die Pipette wird mit der Höchstmenge (Nennvolumen) und der Mindestmenge geprüft.
Zuerst wird eine neue Spitze drei- bis fünfmal mit Flüssigkeit durchspült. Dann wird mit
beiden Mengen eine Serie von zehn Pipettierungen durchgeführt. Eine Pipette ist stets auf
den Ablauf (Ex) der gewählten Menge justiert.
Vorgang:
1. Nehmen Sie 10 Pipettierungen mit der Mindestmenge vor.
2. Nehmen Sie 10 Pipettierungen mit der Höchstmenge vor.
7
Page 16

16
8
DEUTSCH
3. Berechnen Sie die Unrichtigkeit (A) und die Unpräzision (cv) beider Serien.
4. Vergleichen Sie die Ergebnisse mit den Fehlergrenzen in Tabelle 1.
Wenn sich die berechneten Werte innerhalb der festgelegten Fehlergrenzen befinden, ist
die Kalibierung der Pipette korrekt.
TABELLE 1: Maximal zulässige Abweichungen gemäß ISO8655
Bereich Kanal Volume Unrichtigkeit Unpräzision
µl µl % s.d.µl cv%
1-10 µl 8, 12 10 ±0.24 ±2.4 0.16 1.6
1 ±0.24 ±24 0.16 16
5-50 µl 8, 12, 16 50 ±1.0 ±2.0 0.4 0.8
5 ±1.0 ±20 0.4 8.0
30-300 µl 8, 12 300 ±8.0 ±2.7 3.0 1.0
30 ±8.0 ±26.7 3.0 10.0
JUSTIERUNG
Zur Justierung wird das mitgelieferte Werkzeug verwendet.
1. Stecken Sie das Werkzeug in die Öffnungen der Eichungsschraube am oberen Ende
des Griffs.
2. Drehen Sie das Werkzeug im Uhrzeigersinn, um die Menge zu erhöhen, oder gegen
den Uhrzeigersinn, um die Menge zu verringern.
3. Überprüfen Sie nach der Justierung die Kalibierung gemäß der oben beschriebenen
Anleitung.
FORMELN ZUM BERECHNEN VON WERTEN
Umrechnung von Masse in Volumen
V = (w + e) x Z V = Volumen (µl)
w = Gewicht (mg)
e = Verdunstungsverlust (mg)
Z = Umrechnungsfaktor für mg/µl Umwandlung
Verdunstungsverluste können bei kleinen Mengen ausschlaggebend sein. Um den
Volumensverlust zu bestimmen, leeren Sie Wasser in die Waagschale, notieren Sie den
Anzeigewert und starten Sie eine Stoppuhr. Stellen Sie fest, um wie viel der angezeigte
Wert während 30 Sekunden abnimmt (z. B. 6 mg = 0,2 mg/s).
Vergleichen Sie dies mit der Pipettierzeit vom Austarieren bis zum Ablesen.
Normalerweise beträgt die Pipettierzeit 10 Sekunden. Der Volumensverlust beträgt in
diesem Fall deshalb 2 mg (10 s x 0,2 mg/s). Wird ein Verdunstungsschutz oder Deckel
für das Gefäß verwendet, ist ein Korrigieren der Verdampfungsmenge normalerweise
nicht nötig.
Der Faktor Z dient zur Umrechnung des Gewichts von Wasser auf sein Volumen bei
Prüftemperatur und Prüfdruck. Ein typischer Wert ist 1,0032 µl/mg bei 22°C und 95 kPa.
Siehe die Umwandlungstabelle auf Seite 38.
Page 17

17
10
11
9
DEUTSCH
Unrichtigkeit (systematischer Fehler)
Unrichtigkeit bezeichnet die Differenz zwischen der abgegebenen Menge und dem
gewählten Volumen einer Pipette.
A = V - V
0
A = Unrichtigkeit
V = Mittleres Volumen
V0= Nennvolumen
Unrichtigkeit kann als relativer Wert dargestellt werden: A% = 100% x A / V
0
Unpräzision (statistischer Fehler)
Unpräzision bezieht sich auf die Wiederholbarkeit der Pipettierung. Sie wird als
Standardabweichung (s) oder Variationskoeffizient (cv) angegeben.
s = Standardabweichung
v = Mittleres Volumen
n = Anzahl der Messungen
Die Standardabweichung kann als relativer Wert dargestellt werden (CV).
CV = 100% x S / V
WARTUNG
Wenn die Finnpipette Digital Mehrkanal nicht in Gebrauch ist, achten Sie darauf, daß Sie in
aufrechter Position gelagert wird.
EINSATZKONTROLLE
Das Äußere der Pipette sollte täglich vor Pipettierbeginn auf Staub und Schmutz
kontrolliert werden, insbesondere die Spitzenkoni. Zur Reinigung der Pipette ist
ausschließlich 70% Ethanol zu verwenden.
WARTUNG BEI DAUERGEBRAUCH
Bei täglichem Gebrauch sollte die Pipette alle drei Monate gewartet werden. Der
Wartungsvorgang beginnt mit dem Zerlegen der Pipette.
ZERLEGEN DER MEHRKANALPIPETTEN
1. Drücken Sie den Spitzenabwerfer hinunter.
2. Setzen Sie die Wartungszange unter den Riegel des Spitzenabwerfers, um den
Spitzenabwerfer zu lösen.
3. Entfernen Sie das Spitzenkonus-Modul durch Drücken mit der Wartungszange.
4. Drücken Sie die Feder zusammen und entfernen Sie die Verriegelungsstücke aus
der Vertiefung. Entfernen Sie die Feder, die Federstütze und den O-Ring.
5. Setzen Sie den Wartungsschlüssel in die Adaptervertiefung und ziehen Sie den
Adapter ab.
6. Ziehen Sie den Spitzenabwurf-Adapter heraus. Heben Sie vorsichtig das obere
Ende des Spitzenabwerfer-Riegels und schieben Sie ihn zurück. Heben Sie die
Feder heraus.
1
)(
2
-
-
=
n
VV
S
i
S
i=1
n
Page 18

18
14
DEUTSCH
7. Benutzen Sie einen Schraubenzieher, um die 4 bzw. 6 Schrauben im Deckel des
Pipettenkopfes zu lösen und heben Sie den Deckel ab.
8. Entfernen Sie den Kolbenriegel und reinigen Sie die Kolben mit einem trockenen,
nicht flusenden Tuch.
9. Reinigen Sie die Spitzenkoni.
10. Wenn notwendig, ersetzen Sie die Dichtung durch vorsichtiges Entfernen des
Halteringes aus seinem Sitz mit einem Schraubenzieher. Entfernen Sie alle Teile
des Spitzenkonus. Reinigen Sie alle Teile.
Zusammenbau des Spitzenkonus.
5-50 µl und 50-300 µl: Nehmen Sie einen Kolben. Schieben Sie nacheinander den
Cover-Ring 32 (großes Loch), die Feder 33,den Unterstützungring 35, (den größeren
O-Ring 37 5-50µl) und den kleineren O-Ring 36 auf den Kolben. Fetten Sie die ORinge mit Silikonfett, das Sie in der Verpackung der Pipette finden. Schieben Sie alle
Teile in den Spitzenkonus und positionieren Sie den Haltering in seinem Sitz.
0.5 - 10 µl: Nehmen Sie einen Kolben. Schieben Sie nacheinander den CoverRing 32 (großes Loch), die Unterstützung 35, den größeren O-Ring 36, den
kleineren O-Ring 37 und die O-Ring-Unterstützung 38 auf den Kolben. Schieben
Sie die Feder 39, die Federstütze 40 (scharfe Kante zuerst) und den O-Ring 41 auf
die O-Ring-Unterstützung 38. Fetten Sie die O-Ringe mit Silikonfett, das Sie in der
Verpackung der Pipette finden. Schieben Sie alle Teile in den Spitzenkonus und
positionieren Sie den Haltering in seinem Sitz.
11. Fetten Sie die gereinigten Kolben mit Silikonfett, das Sie in der Verpackung der
Pipette finden.
12. Bauen Sie den Kolbenriegel mit Kolben und Spitzenkoni in den Deckel ein und
schließen Sie ihn mit den 4 bzw. 6 Schrauben.
13. Plazieren Sie den Spitzenabwerfer und die Feder des Moduls auf dessen Stutzen.
Drücken Sie die Feder unterhalb des Spitzenabwerfers zusammen. Schließen Sie
den Spitzenabwerfer mit dem Spitzenabwerfer-Adapter.
14. Benutzen Sie den Wartungsschlüssel, um den Adapter in die große Vertiefung zu
schieben.
15. Schieben Sie den O-Ring, die Feder-Unterstützung und die Feder auf den
Kolbenriegel und fixieren Sie diese mit den Verschlußstücken.
16. Befestigen Sie das Spitzenkouns-Modul am Handgriff und den SpitzenabwerferAdapter am Spitzenabwerfer-Bügel.
WARTUNG DER MULTICHANNEL-PIPETTENSPITZENKONI
Um die gleichmäßige Funktion aller Kanäle der Multichannel-Pipette sicherzustellen,
müssen stets alle Spitzenkoni gleichzeitig ausgetauscht werden. Verwenden Sie
keinesfalls eine Kombination von Spitzenkoni aus verschiedenen Packungen, da die in
einer Packung enthaltenen Spitzenkoni jeweils genau aufeinander abgestimmt sind.
Page 19

19
DEUTSCH
STERILISIEREN
Die vollständige Pipette kann durch Autoklavieren bei 121°C (oder 252°F) sterilisiert
werden (Mindestdauer 20 Minuten). Zum Autoklavieren sind keine besonderen
Vorbereitungen nötig. Sie können Dampfsterilisationsbeutel benutzen, wenn erforderlich.
Nach dem Autoklavieren muß die Pipette mindestens 2 Stunden auf Raumtemperatur
abkühlen. Stellen Sie vor dem Pipettieren sicher, daß die Pipette trocken ist. Wir
empfehlen, die Kalibrierung der Mehrkanalpipetten nach jeder 25. Sterilisation zu
überprüfen.
Abhilfe
fest aufsetzen
Spitzenkonus reinigen,
neue Spitze anbringen
einfetten
O-Ring wechseln
genaue Beachtung
der Anleitung
fest aufsetzen
Kalibrieren nach Anweisung
O-Ring wechseln
Kalibrieren mit der
fraglichen Flüssigkeit
Störung
Pipette leckt
Ungenaues
Portionieren
Ungenaues
Portionieren
hochviskoser
Flüssigkeiten
Mögliche Ursache
Spitze nicht richtig befestigt
Fremdkörper zwischen Spitze
und Spitzenkonus
nicht genügend Fett auf
Zylinder/Kolben und O-Ring
O-Ring beschädigt
Fehlerhaftes Pipettieren
Spitze nicht richtig befestigt
Kalibrierung verändert (z.B.
durch falsche Anwendung)
O-Ring beschädigt
Ungeeignete Kalibrierung
hochviskose Flüssigkeiten
können eigene Kalibrierung
erfordern
STÖRUNGEN BEHEBEN
Page 20

20
DEUTSCH
ACHTUNG!
Die Finnpipette wurde konzipiert um eine einfache Verwendung im Labor zu
gewährleisten. Wenn Sie uns oder dem Vertreter vor Ort Ihre Pipette
zukommen lassen wollen, stellen Sie bitte sicher, dass die Pipette
dekontaminiert wurde, bevor Sie sie versenden.
Beachten Sie bitte, dass die Postbehörden in Ihrem Land den Transport von
verunreinigtem Material auf dem Postweg untersagen oder einschränken
könnten.
VERPACKUNG
Die Finnpipette Digital wird in einer Einzelverpackung verschickt, die folgende
Bestandteile enthält:
1. Die Finnpipette
2. Service-Werkzeug
3. Wartungszange
4. Finntip-Proben
5. Schmiermittel
6. Bedienungsanleitung
7. Kalibrierungsurkunde
8. Pipettenhalter
9. Zwei Sicherheitsetiketten
Page 21

21
2
FRANÇAIS
DESCRIPTION
La Finnpipette Multicanaux est une pipette à volume variable autoclavable. Elle
fonctionne sur le principe du déplacement d’air (volume d’air entre piston et liquide) et
utilise des cônes jetables en polypropylène.
Le volume sélectionné est affiché en clair sur le corps de la pipette.
6 modèles différents de Finnpipette Multicanaux couvrent une gamme de 0,5 µl à 300 µl
Référence Nombre de Volumes Finntips
canaux
4510000 8 de 0.5 µl à 10 µl 10
4510010 12 de 0.5 µl à 10 µl 10
4510020 8 de 5 µl à 50 µl 250, 300
4510030 8 de 50 µl à 300 µl 250, 300
4510040 12 de 5 µl à 50 µl 250, 300
4510050 12 de 50 µl à 300 µl 250, 300
4510070 16 de 5µl à 50µl Finntip 50
AFFICHAGE DIGITAL
Le volume sélectionné est numériquement affiché sur la poignée de la pipette.
MATERIAUX DE FABRICATION
La Finnpipette Multicanaux est constituée de matériaux à haute résistance mécanique et
chimique. Elle peut être autoclavée sans démontage à 121 °C.
(Tableau de compatibilité chimique disponible sur demande).
DESCRIPTION DES CÔNES
Il est recommandé d’utiliser les cônes Finntips avec la Finnpipette Multicanaux.
Ils sont en polypropylène incolore de haute qualité, seule matière considérée comme non
contaminante. Les Finntips sont également autoclavables (121 ° C).
UTILISATION DE LA PIPETTE
REGLAGE DU VOLUME
1. Le volume souhaité se règle en tournant le bouton-poussoir situé sur le haut de la
pipette. Pour augmenter le volume, tourner dans le sens inverse des aiguilles
d’une montre et pour le diminuer, dans le sens des aiguilles d’une montre.
2. S’assurer que les chiffres correspondants au volume désiré sont correctement
affichés dans la fenêtre.
3. Ne pas afficher un volume hors de la gamme spécifiée pour la pipette. Eviter de
tourner trop brusquement le bouton de réglage, ceci pouvant à la longue altérer la
précision du mécanisme.
1
1
Page 22

22
4
13
12
3
FRANÇAIS
EJECTION DES CONES
Chaque pipette est munie d’un nouveau système d’éjection des cônes pour éliminer les
risques de contamination.
Le système est composé d’un poussoir latéral à action douce et d’un mécanisme de
transmission spécialement étudié pour réduire les projections d’aérosol lors de l’éjection.
Diriger la pipette vers un réceptacle approprié et appuyer sur l’éjecteur avec le pouce.
Le cône sera éjecté en douceur.
ETIQUETTE DE SECURITE
Vous avez la possibilité de marquer la pipette de vos initiales, dunom de l’application ou
de la date de calibrage, etc...
Pour enlever la fenêtre transparente située sur le Grip-Index : remonter le bouton-poussoir
vers le haut (volume au maximum) et utiliser l’extrémité plate de la clé de calibrage
comme indiqué en figure 12 pour soulever la fenêtre (ou utiliser un petit tournevis en
faisant levier). Marquer l’étiquette adhésive avec un stylo feutre et remettre la fenêtre en
place.
SUPPORT-PIPETTE POUR ETAGERE
Vous avez la possibilité de fixer le Support-Pipette individuel sur un comptoir, une
étagère, un portoir à pipette ou tout autre endroit.
Nettoyer la surface où vous envisagez de fixer le Support-Pipette. Appliquez les 2
autocollants sur l’équerre du support. Presser fermement le Support-Pipette à
l’emplacement choisi.
Pour ranger votre Finnpipette, la suspendre par le Grip-Index sur le Support-Pipette.
CONSEILS DE PIPETAGE
Pousser et relâcher le poussoir avec douceur,
particulière-ment avec des liquides de forte viscosité.
Ne jamais relâcher le poussoir brusquement.
Les température de la pipette et du cône doivent être
équilibrée avec celle du liquide.
S’assurer qu’un cône propre a été fermement enfoncé sur l’embase porte-cône.
Humidifier le cône avec la solution à pipeter avant de procéder au pipetage définitif (en
remplissant et en vidant 2 à 3 fois le cône).
Tenir la pipette verticalement durant la manipulation (le “ Grip-Index ” prenant appui sur le
haut de la main).
METHODE DIRECTE
Remplir un réservoir propre avec le liquide à pipeter.
1. Appuyer sur le bouton poussoir jusqu’au premier cran.
2. Plonger d’environ 1 cm les cônes dans le liquide puis relâcher lentement le boutonpoussoir. Retirer les cônes du liquide en appuyant légèrement Leurs extrémité
contre la paroi du réservoir (pour éliminer le liquide accroché à l’extérieur de la
pointe).
Figures 4 à 7 :
A = position de repos
B = 1 er cran
C = 2 ème cran
Page 23

23
FRANÇAIS
3. Distribuer le liquide ainsi prélevé en appuyant doucement sur le bouton-poussoir
jusqu’au premier cran, marquer un temps d’arrêt d’1 seconde et appuyer jusqu’au
2 ème cran. Cette action videra complètement les cônes.
4. Relâcher le bouton jusqu’à sa position de repos.
Si nécessaire, changer les cônes et continuer le pipetage.
N.B. sur les modéles 8 et 12 canaux 0.5-10µl, un systéme exclusif de double piston
permet une distribution totale du liquide lorsque l’on appuie au 2éme cran (Super-Blow-Out)
METHODE INVERSEE
La méthode inversée est appropriée pour la distribution de liquides visqueux ou ayant
tendance à mousser facilement. Elle est aussi recommandée pour les faibles volumes.
Remplir un réservoir propre avec le liquide à distribuer.
1. Appuyer sur le bouton-poussoir jusqu’au 2 ème cran
2. Plonger d’environ 1 cm les cônes dans le liquide et relâcher lentement le boutonpoussoir. Les cônes se rempliront. Enlever l’excès de liquide à l’extérieur des cônes
en les effleurant sur le bord du réservoir.
3. Distribuer le liquide ainsi prélevé en appuyant jusqu’au 1 er cran. Maintenir le
poussoir dans cette position (une partie du liquide doit rester dans les cônes et ne
sera pas délivrée).
4. Le liquide restant est soit éliminé en éjectant les cônes, soit récupéré dans le réservoir
en appuyant jusqu’au 2 ème cran.
METHODE REPETITIVE
La technique répétitive est une méthode simple et rapide pour la distribution répétée d’un
même liquide.
Remplir un réservoir propre avec le liquide à distribuer.
1. Appuyer sur le bouton-poussoir jusqu’au 2 ème cran
2. Plonger d’environ 1 cm les cônes dans le liquide et relâcher lentement le boutonpoussoir.
Enlever l’excès de liquide à l’extérieur des cônes en les effleurant sur le bord du réservoir.
3. Distribuer le liquide ainsi prélevé en appuyant doucement sur le bouton-poussoir
jusqu’au premier cran, maintenir le poussoir à cette position, (une partie du liquide
restera dans les cônes et ne sera pas délivrée).
4. Continuer le pipetage en repartant de l’étape 2.
PIPETAGE D’ÉCHANTILLONS HÉTÉROGÈNES
(ex. : déprotéinisation du sang pour dosage de glucose)
Utiliser la méthode directe, étape 1 et 2 pour prélever l’échantillon de sang. Essuyer
soigneusement l’extérieur des cônes avec une serviette-papier.
1. Immerger les cônes dans le réactif et appuyer sur le bouton-poussoir jusqu’au 1er
cran, en s’assurant que les pointes soient bien dans le liquide.
2. Relâcher lentement le poussoir jusqu’à la position de repos, les cônes se remplissert
alors de réactif ; ne pas sortir les cônes de la solution.
3. Appuyer sur le poussoir jusqu’au 1 er cran puis relâcher lentement. Répéter cette
opération jusqu’à ce que l’intérieur des cônes soit propre (soit propre).
4. Enfin, appuyer sur le poussoir jusqu’au 2ème cran pour vider complètement les cônes.
5
6
7
Page 24

24
CALIBRAGE
Toutes les Finnpipettes sont réglées et calibrées en usine avec de l’eau distillée ou
déionisée. Les pipettes sont conçues de sorte à pouvoir utiliser des liquides de différentes
températures et viscosités.
MATÉRIEL UTILISÉ ET CONDITIONS DE CONTRÔLE
Utiliser une balance analytique. Les spécifications de la balance doivent être choisies en
fonction du volume contrôlé de la pipette :
Volumes Sensibilité de la balance
inférieur à 10 µl 0,00 1mg
10-100 µl 0,01 mg
supérieur à 100 µl 0,1 mg
Liquide test : eau distillée ou déionisée “grade 3”, conforme à la norme ISO 3696. Les
tests doivent être effectués dans une pièce climatisée avec une température d’eau, de
pipette et d’air constante à ±0.5°C (entre 15°C et 30°C).
L’humidité relative doit être supérieure à 50%. Pour les volumes inférieurs à 50µl en
particulier, l’humidité de l’air doit être la plus élevée possible pour réduire la perte par
évaporation. Des accessoires spécifiques, tels qu’un piège à évaporation, sont
recommandés.
PROCÉDURE DE VÉRIFICATION DU CALIBRAGE
La pipette est vérifiée au volume maximum (volume nominal) et au volume minimum.
Chaque nouveau cône est d’abord pré-humidifié 3 à 5 fois et une série de dix pipetages
est réalisée pour chacun des deux volumes. Une pipette est toujours réglée pour
distribuer le volume sélectionné.
Procédure :
1. Faire 10 pipetages au volume minimum.
2. Faire 10 pipetages au volume maximum.
3. Calculer la erreur de justesse (E) et la erreur de répétabilité (CV) de chacune des séries.
4. Comparer les résultats aux tolérances du tableau 1.
Si les résultats calculés se trouvent dans les limites de tolérance sélectionnées, c’est que
le réglage de la pipette est correct.
TABLEAU 1 : Erreurs tolérables maximales, selon la norme ISO 8655
Camme Conduit Volumes Erreur de Erreur de
Justesse Répétabilité
µl µl % s.d.µl cv%
1-10 µl 8, 12 10 ±0.24 ±2.4 0.16 1.6
1 ±0.24 ±24 0.16 16
5-50 µl 8, 12, 16 50 ±1.0 ±2.0 0.4 0.8
5 ±1.0 ±20 0.4 8.0
30-300 µl 8, 12 300 ±8.0 ±2.7 3.0 1.0
30 ±8.0 ±26.7 3.0 10.0
FRANÇAIS
Page 25

25
RÉGLAGE
Le réglage de la pipette s’effectue avec une clé spéciale fournie dans le coffret.
1. Placer la clé de calibrage dans les crans de la bague de calibrage située au-dessous
du bouton-poussoir.
2. Tourner la clé dans le sens des aiguilles d’une montre pour augmenter le volume ou
dans le sens contraire pour le diminuer.
3. Après le réglage, vérifier à nouveau le calibrage en fonction des instructions données
ci-dessus.
CALCULS
Conversion des poids en volume
V = (w + e) x Z V = volume (µl)
w = poids (mg)
e = perte par évaporation (mg)
Z = facteur de conversion pour mg/µl
Les pertes par évaporation peuvent être importantes pour les micro-volumes. Afin de
déterminer la perte de masse, verser de l’eau dans le bécher ou la fiole, noter le poids et
déclencher un chronomètre. Regarder de combien décroît le poids en 30 secondes (ex.:
6mg = 0,2mg/s).
Comparer ce résultat avec le temps de pipetage entre le tarage et la lecture. Dans cet
exemple, le temps de pipetage devrait être de 10 secondes et la perte de masse serait
donc de 2 mg (10s x 0,2mg/s). Lors de l’utilisation d’un piège à évaporation ou d’un
couvercle sur le bécher ou la fiole, l’erreur due à l’évaporation n’est pas prise en compte
car négligeable.
Le facteur Z permet de convertir le poids de l’eau en volume, à la température et à la
pression de contrôle. Z est égal à 1,0032µl/mg à 22°C et 95 kPa. Se référer à la table de
conversion page 38.
Erreur de justesse (erreur systématique)
La erreur de justesse correspond à la différence entre les volumes distribués et le volume
sélectionné de la pipette.
E = V - V
0
E = erreur de justesse
V = volume moyen
V0= volume nominal
La erreur de justesse peut être exprimée en valeur relative : E% = 100% x E / V
0
Erreur de répétabilité (erreur aléatoire)
La erreur de répétabilité des pipetages est exprimée par la déviation standard (s) ou le
coefficient de variation (cv).
s = déviation standard
v = volume moyen
n = nombre de mesures
La déviation standard peut être exprimée en valeur relative (CV) : CV = 100% x S / V
FRANÇAIS
8
1
)(
2
-
-
=
n
VV
S
i
S
i=1
n
Page 26

26
11
10
9
FRANÇAIS
MAINTENANCE
Quand la Finnpipette Digital Multicanaux n’est pas utilisée, il est recommandé de la ranger
en position verticale. Utiliser un portoir Finnpipette destiné à cet usage ou le SupportPipette individuel.
ENTRETIEN JOURNALIER
Il est recommandé de vérifier la propreté extérieure de la pipette avant l’utilisation. Une
attention toute particulière doit être accordée à l’embase porte-cône. Pour le nettoyage,
utiliser un chiffon imprégné d’une solution d’éthanol (50-70 %) à l’exclusion de tout autre
solvant.
ENTRETIEN BI-ANNUEL
Dans le cas d’une utilisation quotidienne, la pipette doit être vérifiée tous les 3 à 6 mois.
La procédure de contrôle nécessite le démontage de la pipette.
DEMONTAGE DES PIPETTES MULTICANAUX
1. Appuyer sur l’éjecteur de cône et le maintenir dans cette position.
2. Insérer la pince de maintenance (ergot N° 1 : près de la charnière) sous la partie
basse du poussoir de l’éjecteur et appuyer pour désolidariser le système
bague+coulisse de l’éjecteur.
3. Positionner la pince de maintenance (ergots N° 2) sur les 2 clips de fixation de
l’embase porte-cône (charnière de la pince du côté du Grip-Index) et appuyer
fermement. Les clips étant rétractés, retirer l’embase en la tirant avec précaution
vers le bas.
4. Appuyer sur le ressort vers le bas en le dégageant de la butée cylindrique située en
haut de la tige noire puis sortir cette butée (2 demi-bagues). Retirer le ressort, la
bague inférieure puis le joint O-ring.
5. Sortir la bague de fixation (pièce 14) en utilisant la clavette moulée à l’extrémité de
la clé de calibrage (glisser cette clavette dans la fente de la bague afin de l’écarter:
figure 11)
6. Sortir la bague d’éjecteur (pièce 15) -en la tirant en force vers le haut-, puis écarter
les 2 coulisses latérales de l’éjecteur pour pouvoir sortir l’ensemble
(coulisses+peigne éjecteur) vers le bas. Retirer le ressort.
7. Utiliser un petit tournevis cruciforme pour enlever les 4/6 vis du boîtier puis le clip
métallique en bas. Retirer le couvercle.
8. Retirer l’ensemble du mécanisme-pistons et porte-cônes du boîtier. Sortir les portecônes et nettoyer les pistons avec un chiffon sec sans peluche.
9. Nettoyer l’extérieur des porte-cônes.
10. Si nécessaire, démonter les pièces à l’intérieur des porte-cônes (sortir la bague-clips
en faisant levier avec un petit tournevis plat puis sortir toutes les pièces du portecône.)
Nettoyer chaque pièce.
Remontage des porte-cônes
Page 27

27
14
FRANÇAIS
Pour les modèles 5-50 et 50-300 µl : Prendre un piston. Monter sur le piston la
bague supérieure 32 (la plus large), le ressort 33, la bague presse-joint 35, (le joint
torique 37 est plus gros pour le modèle 5-50µl) et le joint torique 36 (plus petit).
Graisser le joint torique avec le lubrifiant contenu dans l’emballage de la pipette.
Monter toutes les pièces sur le porte-cône et fermer le clip de la bague supérieure.
Pour le modèle 0,5-10 µl : prendre un piston nu 31 et glisser les pièces
suivantes dans l’ordre : bague-clips 32 (la plus large), le support 35, le joint
O-Ring 36 (le plus gros), le joint O-ring 37 (le plus petit), la tige-support 38. Puis
glisser le ressort 39, la bague 40(angle vif contre le ressort) et le joint O-ring 41 sur
la tige support 38. Graisser les joints O-ring avec la graisse fournie. Glisser
l’ensemble piston+pièces dans un porte-cône et à l’aide du plat d’un petit tournevis,
appuyer sur la bague-clips 32 pour l’emboîter sur le haut du porte-cône. Sortir le
piston et répéter l’opération pour le montage des autres porte-cônes.
11. Le cas échéant, remettre les pistons en place sur le support en T (avec le ressort
34 côté étroit vers le haut), Graisser les pistons propres avec la graisse spéciale
fournie en accessoire.
12. Remettre les porte-cônes sur les pistons et installer l’ensemble dans le boîtier.
Remettre le couvercle, les 4/6 vis et le clip métallique en bas du boîtier (N.B.: les
2 vis courtes en bas.du boitier. Ne pas bloquer exagérément les vis).
13. Glisser le gros ressort de l’éjecteur sur le col du boîtier, puis remettre en place le
mécanisme éjecteur tout en poussant le ressort en dessous de l’éjecteur. Bloquer
les 2 moitiés du col de l’éjecteur à l’aide de la bague de fixation 15 en la poussant
à fond vers le bas.
14. Remettre en place la bague fendue 14 en la poussant à fond vers le bas (les 2
clips orientés vers le haut).
15. Remonter le O-ring 13 sur la bague 12 et glisser le tout sur l’embase. Graisser
légèrement la tige et glisser le ressort 11. Bloquer le ressort en haut de la tige avec
les 2 demi-butées cylindriques. Graisser également l’extérieur du ressort.
16. Remonter l’ensemble de l’embase porte-cônes sur la poignée en emboîtant les 2
clips latéraux en face des encoches au bas de la poignée et pousser à fond. Fixer
ensuite le guide latéral de l’éjecteur sur le crochet de la bague inférieure en
appuyant à fond sur le poussoir.
INSTRUCTIONS D’ENTRETIEN DES EMBOUTS POUR PIPETTES MULTICANAUX
Pour assurer des performances régulières entre les canaux d’une pipette multicanaux,
tous les embouts doivent être changés en même temps lorsque vous devez changer l’un
d’entre eux. Ne mélangez jamais les embouts de différents sachets, car chaque sachet
contient un ensemble d’embouts assortis.
STERILISATION
La pipette peut être entièrement stérilisée par autoclavage à 121 °C (maximum 20
minutes). Aucune préparation préliminaire de la pipette n‘est nécessaire. Si besoin est,
vous pouvez utiliser un sac de stérilisation à la vapeur. Après autoclavage, la pipette doit
être refroidie à la température ambiante pendant au moins 2 heures. Avant de pipeter,
s’assurer que la pipette est sèche. Nous vous recommandons de contrôler le calibrage
de vos pipettes tous les 25 autoclavages.
Page 28

28
ERREURS ET CAUSES
Le tableau ci-après énumère les différents problèmes que vous pouvez rencontrer et
leurs solutions.
Solution
Bien vérifier la mise en
place du cône
Nettoyer l’embase et
remettre un nouveau cône.
Nettoyer et regraisser (voir
maintenance bi-annuelle)
Nettoyer et regraisser (voir
maintenance bi-annuelle)
Suivre précisément les
instructions d’utilisation.
Nettoyer, regraisser et
calibrer.
Recalibrer avec le liquide
utilisé.
Problème
Fuite du cône après le
prélèvement
Volume incorrect
Volume incorrect avec
certains liquides.
Cause probable
Cône mal emboîté
Poussières ou cristaux entre
le cône et l’embase
Joint O-ring et piston encrassés.
Joint torique O-ring
insuffisamment graissé.
Utilisation incorrecte de la
pipette.
Calibrage incorrect ou piston
encrassé.
Calibrage incorrect pour le
liquide utilisé (ex : haute
viscosité)
CONDITIONNEMENT
La Finnpipette Digital est livrée dans une boîte anti-choc contenant :
1. La Finnpipette
2. Clé de calibrage
3. Pince de maintenance
4. Echantillons de cônes
5. Tube de graisse
6. Guide d’utilisation
7. Certificat de calibrage et de garantie
8. Support-Pipette pour étagère
9. 2 pastilles autocollantes
FRANÇAIS
ATTENTION !
Les Finnpipettes sont conçues pour permettre un entretien facile en
laboratoire. Toutefois, si vous préférez que nous ou notre représentant local
se charge de l’entretien de vos pipettes, assurez-vous que vous les avez
décontaminées avant de nous les envoyer.
Remarque: les services postaux de certains pays peuvent interdire ou
restreindre l’envoi par courrier de matériels contaminés.
Page 29

29
2
1
DESCRIPCION DEL PRODUCTO
La Finnpipette Digital Multicanal es una pipeta digital autoclavable. Trabaja según el
principio de desplazamiento de aire (volumen de aire entre el pistón y el líquido) y utiliza
puntas desechables. El volumen de dispensación es ajustado digitalmente y se indica en
la ventana lateral.
Los seis diferentes modelos de pipetas Multicanales Finnpipette Digital cubren un amplio
rango de volumen, de 0.5 µl a 300 µl.
No. Cat. Canales Rango de Volumen Puntas Finntip
4510000 8 0.5 µl to 10 µl 10
4510010 12 0.5 µl to 10 µl 10
4510020 8 5 µl to 50 µl 250, 300
4510030 8 50 µl to 300 µl 250, 300
4510040 12 5 µl to 50 µl 250, 300
4510050 12 50 µl to 300 µl 250, 300
4510070 16 5 µl to 50 µl Finntip 50
DISPLAY DIGITAL
El volumen de dispensación ajustado está claramente indicado en el display digital del
mango de la pipeta.
MATERIALES DE FABRICACION
Las Finnpipette Digital Multicanales están fabricadas con materiales resistentes
mecánica y químicamente, que permiten autoclavar completamente y repetidamente la
pipeta a 121°C.
DESCRIPCION DE LAS PUNTAS
Las puntas Finntips son las recomendadas para usar con la Finnpipette Digital.
Están fabricadas con polipropileno de color natural, que es el único material libre de
contaminación adecuado para las puntas. Las Finntips son también autoclavables
(121°C).
FUNCIONES
AJUSTE DEL VOLUMEN DE DISPENSACION
1. Ajuste el volumen de dispensación usando el botón pulsador de la pipeta.
Para incrementar el volumen, girar en el sentido contrario a las agujas del reloj.
Para disminuir el volumen, girar en el sentido de las agujas del reloj.
2. Asegúrese de que el volumen deseado queda fijado con un “click” y que todos los
dígitos son completamente visibles en el display de la ventana.
3. No intente ajustar volúmenes por encima o por debajo del rango de volúmenes
especificado en la pipeta.
Si se usa excesiva fuerza al girar el botón para ajustar volúmenes fuera del rango se
puede dañar la pipeta.
ESPAÑOL
1
Page 30

30
3
12
13
EXPULSION DE LAS PUNTAS
Para eliminar riesgos de contaminacion, todas las pipetas poseen un sistema de
expulsión de puntas. Este sistema consiste en un suave mecanismo de expulsión
especialmente diseñado para una mayor comodidad.
Para soltar la punta,apunte con la pipeta a un contenedor de desechos y oprima la
palanca de expulsión con el dedo pulgar.
ETIQUETA DE SEGURIDAD
Puede marcar en la pipeta la aplicación, sus iniciales, la fecha de calibración, etc. en la
etiqueta de seguridad.
Quitar el plástico que está al lado del botón pulsador (use la herramienta que viene con la
pipeta, o un destornillador ). Marque la etiqueta adhesiva con un rotulador o bolígrafo y
vuelva a colocar el plástico encima.
SOPORTE INDIVIDUAL PARA ESTANTES
Puede guardar la pipeta colgada de un estante, del mostrador, en el soporte de pipetas o
en cualquier lugar donde quiera colgar su pipeta.
Limpie bien la superficie donde piensa poner el soporte individual. Aplique dos adhesivos
en su parte posterior y presione contra el estante firmemente hasta que quede pegado en
el lugar elegido. Para usarlo, cuelgue la pipeta por el mango, y así estará siempre a su
disposición sin estorbar.
TECNICAS DE PIPETEO
Oprima y suelte el botón pulsador suavemente, particularmente
cuando trabaje con líquidos de alta viscosidad. Nunca deje
que el botón vuelva sólo a su posición.
Asegúrese de que la punta esté firmemente sujeta.
Compruebe que no haya particulas extrañas en la punta.
Antes de empezar a pipetear, llene y vacie la punta 2-3
veces con la solución que se va a pipetear. Sostenga la pipeta en posición vertical
mientras aspira el líquido. El mango se mantiene siempre sobre el dedo índice.
Aségurese de que las puntas, pipeta y solución están a la misma temperatura.
TECNICA DIRECTA
Llene un reservorio de reactivo limpio con el líquido a dispensar.
1. Presione el botón pulsador hasta el primer tope.
2. Sumerja la punta en el líquido del reservor alrededor de 1 cm y suavemente suelte el
botón pulsador hasta su posición inicial. Retirar la punta del líquido tocando las
paredes del recipiente para eliminar el líquido sobrante del exterior de la punta.
3. Dispensar el líquido presionando suavemente el botón pulsador hasta el primer
tope. Después de un segundo, seguir presionando el botón completamente hasta el
segundo tope. Esta acción vaciará totalmente la punta.
4. Dejar que el pulsador vuelva a su posición inicial o de reposo.
Si es necesario, cambie la punta y continue pipeteando.
Figures 4-7:
A = Posición inicial
B = Primer tope
C = Segundo tope
4
ESPAÑOL
Page 31

31
ESPAÑOL
5
6
7
TECNICA INVERSA
Esta técnica es la más adecuado cuando se trabaja con líquidos muy viscosos o con
tendencia a hacer espuma. Esta técnica se recomienda también para dispensar
volúmenes muy pequeños.
Llene un reservorio de reactivo limpio con el líquido a dispensar.
1. Presione el botón pulsador hasta el segundo tope.
2. Sumerja la punta en el líquido del reservorio alrededor de 1 cm y suavemente suelte
el botón pulsador hasta su posición inicial. Retirar la punta del líquido tocando las
paredes del recipiente para eliminar el líquido sobrante del exterior de la punta.
3. Dispensar el líquido presionando suavemente el botón pulsador hasta el primer tope.
El líquido que queda en las puntas es sobrante y no debe dispensarse.
4. El líquido sobrante se vacia apretando el pulsador hasta el segundo tope, o bién se
aspira de nuevo con la nueva secuencia de pipeteo.
TECNICA REPETITIVA
La técnica repetitiva ofrece una forma rápida y simple para dispensar repetidamente un
mismo volumen. Llene un reservorio de reactivo limpio con el líquido a dispensar.
1. Presione el botón pulsador hasta el segundo tope.
2. Sumerja la punta en el líquido del reservorio alrededor de 1 cm y suavemente suelte
el botón pulsador hasta su posición inicial. Retirar la punta del líquido tocando las
paredes del recipiente para eliminar el líquido sobrante del exterior de la punta.
3. Dispensar el líquido presionando suavemente el botón pulsador hasta el primer tope.
El líquido que queda en las puntas es sobrante y no debe dispensarse.
4. Continue pipeteando repitiendo los pasos 2 y 3.
PIPETEO DE MUESTRAS HETEREOGÉNEAS
(determinación de glucosa en sangre, por ejemplo)
Mediante los pasos 1 y 2 de la técnica directa, llene la punta con sangre.
Limpie la punta cuidadosamente con un pañuelo de papel.
1. Sumerja la punta en el reactivo y presione el botón hasta el primer tope,
Asegurándose de que la punta está debajo de la superficie.
2. Suelte el botón suavemente hasta la posición inicial. La punta se llenará.
Mantenga la punta en la solución.
3. Oprima el botón hasta el primer tope y suéltelo acompañándolo con el dedo.
Repita este procedimiento hasta que las paredes interiores de la punta estén limpias.
4. Finalmente, presione el botón hasta el segundo tope para vaciar la punta completamente.
CALIBRACIÓN
Todas las pipetas Finnpipettes se distribuyen ajustadas y calibradas de fábrica para
trabajar dentro de los volúmenes especificados con agua destilada o desionizada. Las
pipetas se fabrican para permitir el ajuste para trabajar con líquidos de temperatura y
viscosidad diferentes.
REQUISITOS DE LOS DISPOSITIVOS Y CONDICIONES DEL ENSAYO
Debe utilizar una balanza de laboratorio. Determine el valor de sensibilidad de la escala
de la balanza en función del volumen de ensayo seleccionado de la pipeta:
Page 32

32
8
ESPAÑOL
Rango volumétrico Sensibilidad
Menos de 10 µl 0,00 1mg
10-100 µl 0,01 mg
Más de 100 µl 0,1 mg
Líquido de ensayo: agua, destilada o desionizada, agua de “grado 3” conforme a la norma
ISO 3696. El ensayo se debe realizar en una habitación sin corrientes de aire, manteniendo
el agua, la pipeta y el aire a una temperatura constante (±0,5°C) entre 15°C y 30°C.
La humedad relativa debe situarse por encima del 50%. La humedad del aire,
especialmente cuando se trabaja con volúmenes inferiores a 50µl, debe ser lo más
elevada posible para reducir el efecto de la pérdida por evaporación. Se recomienda el
uso de accesorios especiales, tales como el concentrador de evaporación.
COMPROBACIÓN DE LA CALIBRACIÓN
Se debe comprobar el volumen máximo (volumen nominal) y el volumen mínimo de la
pipeta. Humedezca de 3 a 5 veces una nueva punta antes de usarla y realice una serie
de diez repeticiones a cada volumen. Las pipetas se ajustan siempre para dispensar
(Ex) el volumen seleccionado.
Procedimiento:
1. Realice 10 repeticiones al volumen mínimo.
2. Realice 10 repeticiones al volumen máximo.
3. Calcule la inexactitud (A) y la imprecisión (cv) de cada serie.
4. Compare los resultados con los límites de aceptación de la en la Tabla 1.
Si los resultados se encuentran entre estos límites, la calibración de la pipeta es correcta.
TABLA1: errores máximos permitidos según ISO8655
Rango Canal Volumen Inexactitud Imprecisión
µl µl % s.d.µl cv%
1-10 µl 8, 12 10 ±0.24 ±2.4 0.16 1.6
1 ±0.24 ±24 0.16 16
5-50 µl 8, 12, 16 50 ±1.0 ±2.0 0.4 0.8
5 ±1.0 ±20 0.4 8.0
30-300 µl 8, 12 300 ±8.0 ±2.7 3.0 1.0
30 ±8.0 ±26.7 3.0 10.0
AJUSTE
El ajuste se realiza con la herramienta de servicio.
1. Inserte la herramienta de servicio en las aberturas de la tuerca de calibración que se
encuentra en la parte superior del mango.
2. Gire la herramienta de servicio en el sentido de las agujas del reloj para aumentar el
volumen o en la dirección opuesta para disminuirlo.
3. Una vez ajustado el volumen compruebe la calibración siguien do las instrucciones
descritas anteriormente.
Page 33

33
ESPAÑOL
FÓRMULAS PARA EL CÁLCULO DE LOS RESULTADOS
Conversión de la masa a volumen
V = (w + e) x Z V = volumen (µl)
w = peso (mg)
e = pérdida por evaporación (mg)
Z = factor de conversión para la conversión mg/µl
La pérdida por evaporación puede ser un factor relevante cuando se trabaja con
volúmenes reducidos. Para determinar la pérdida de masa, llene de agua el recipiente
para pesar, observe la lectura obtenida y ponga en marcha un cronómetro. Compruebe
cómo disminuyen los valores al cabo de 30 segundos (p. ej., 6 mg = 0,2 mg/s).
Compare esta lectura con el tiempo de pipeteo transcurrido entre la acción y la lectura.
Normalmente, el tiempo de pipeteo es de 10 segundos y la pérdida de masa de 2 mg (10
s x 0,2 mg/s) en este ejemplo. Si cubre el recipiente con un concentrador de evaporación
o una tapa, no es preciso, por lo general, que corrija la evaporación.
El factor Z se utiliza para convertir el peso del agua en volumen a una temperatura y
presión de ensayo. Un valor típico es 1,0032 µl/mg a 22°C y 95 kPa. Consulte la tabla
de conversiones de la página 38.
Inexactitud (error sistemático)
La inexactitud es la diferencia entre el volumen dispensado y el volumen seleccionado
de una pipeta.
A = V - V
0
A = inexactitud
V = volumen medio
V0= volumen nominal
La inexactitud se puede expresar como un valor relativo: A% = 100% x A / V
0
Imprecisión (error aleatorio)
La imprecisión hace referencia a la repetibilidad del pipeteo. Se expresa en forma de
desviación estándar (s) o como coeficiente de variación (cv)
s = desviación estándar
v = volumen medio
n = número de mediciones
La desviación estándar se puede expresar como un valor relativo (CV) CV = 100% x S / V
MANTENIMIENTO
Cuando no use la Finnpipette Digital Multicanal, guárdela en posición vertical
Recomendamos utilizar el soporte de la pipeta para ello.
REVISION RAPIDA
La pipeta debería ser revisada cada día por la mañana para quitarle el polvo y la
suciedad exterior. Merece especial atención el cono porta-puntas, el cual debe lavarse
con etanol al 70 % y no con ningún otro solvente.
1
)(
2
-
-
=
n
VV
S
i
S
i=1
n
Page 34

34
14
11
10
9
MANTENIMIENTO A LARGO PLAZO
Si la pipeta se usa con asiduidad diariamente, debería ser revisada cada 3 meses. El
procedimiento empieza con el despiece de la pipeta.
DESMONTAJE/ MONTAJE DE PIPETAS MULTICANALES
1. Apretar el expulsor de puntas.
2. Insertar las tenazas bajo la barra del expulsor de puntas.
3. Quitar el módulo de conos porta-puntas presionando un poco.
4. Presionar el muelle y quitar las piezas por la ranura. Quitar el muelle, el soporte
del muelle y el o-ring.
5. Con la herramienta quitar el adaptador.
6. Subir la barra del expulsor de puntas y presionar otra vez hacia abajo. Sacar el
módulo del muelle.
7. Con un destornillador quitar los cuatro/seis tornillos de la cubierta y sacarla.
8. Quitar la barra de pistones y limpiar los pistones con un trapo seco.
9. Limpiar los conos porta-puntas.
10. Si es necesario, cambiar el cierre quitando con mucho cuidado el anillo de la
cubierta con un destornillador. Sacar todas las partes del cono porta-puntas.
Limpiar todas las piezas.
Volver a montar el cono.
5-50 µl y 50-300 µl: Coger un pistón. Deslizar el anillo 32, el muelle 33, el soporte 35,
(el o-ring 37 5-50µl) y el o-ring 36 por el pistón. Engrasar con el lubricante que viene
en la caja. Deslizar todas las partes en el cono porta-puntas y cerrar la junta del anillo
de cubierta.
0,5-10 µl: Coger un pistón. Deslizar el anillo 32, el soporte 35, el o-ring 36 ( el
más grande), el o-ring 37 ( el más pequeño) y el soporte del o-ring 38, por el
pistón. Después colocar el muelle 39, el soporte del muelle 40 y el o-ring 41 en el
soporte de o-ring 38. Engrasar los o-rings con el lubricante que viene en la caja.
Deslizar todas las partes en el cono porta-puntas y cerrar la junta del anillo de
cubierta.
11. Engrasar los pistones ya limpiados con el lubricante que viene en la caja.
12. Instalar la barra de pistones con los pistones y los conos porta-puntas en la
cubierta y cerrar con los cuatro/seis tornillos.
13. Colocar el expulsor de puntas y el módulo del muelle en el cuello del módulo.
Presionar el muelle por debajo del expulsor. Cerrar con el adaptador del expulsor
de puntas.
14. Usar la herramienta para deslizar el adaptador por la ranura del cuello del módulo.
15. Deslizar el o-ring, el soporte del muelle y el muelle en la barra de pistones y cerrar
con las piezas de cierre.
16. Fijar el módulo de conos porta-puntas al mango de la pipeta y el adaptador del
expulsor de puntas a la barra del expulsor.
ESPAÑOL
Page 35

35
Solución
Apretar la punta
Limpiar el cono y usar
puntas nuevas
Limpie y engrase el O-ring
y el cilindro
Engrase
Cambiar el O-ring
Lea las instrucciones
detenidamente
Aprete la punta
Recalíbrela siguiendo las
instrucciones
Calibración inadecuada.
Recalibre con el líquido
adecuado.
Defecto
Goteo
Dispensación inexacta
Dispensación inexacta
Posible razón
Punta mal situada
Partículas extrañas entre la
punta y el cono
Partículas extrañas entre el
pistón, el O-ring y el cilindro
Insuficiente cantidad de grasa
en el cilindro y el O-ring
O-ring dañado
Funcionamiento incorrecto
Punta mal puesta
Calibración altereda: causada
por el desuso, por ejemplo
Calibración inadecuada
Algunos líquidos de alta
viscosidad, pueden requerir una
recalibración.
POSIBLES PROBLEMAS Y SOLUCIONES
La siguiente tabla muestra algunos problemas y sus.
ESPAÑOL
INSTRUCCIONES DE SERVICIO TÉCNICO PARA CONOS PORTA-PUNTAS DE
PIPETAS MULTICANAL
Para garantizar un correcto funcionamiento de todos los canales de una pipeta multicanal,
debe reemplazar a la vez todos los conos porta-puntas siempre que deba reemplazar
uno de ellos. No combine conos porta-puntas de paquetes distintos, dado que cada bolsa
contiene un conjunto de conos porta-puntas que se corresponden exactamente.
ESTERILIZACION
La pipeta puede esterilizarse toda entera autoclavándola a 121°C (252°F) (minimo 20
minutos). No necesita preparación especial para el autoclave. Puede usar bolsas de
esterilización si es necesario.
Después la pipeta debe enfriarse hasta temperatura ambiente por lo menos durante dos
horas. Antes de pipetear, asegúrese de que la pipeta está seca. Recomendamos que
compruebe la calibración de las pipetas cada 25 esterilizaciones.
Page 36

36
ESPAÑOL
ADVERTENCIA
El mantenimiento de la pipeta Finnpipette se puede llevar a cabo
fácilmente en el laboratorio. Si desea que nosotros o su representante
local realicemos este servicio, envíenos la pipeta, asegurándose de
descontaminarla previamente.
Tenga en cuenta que las autoridades del servicio de correos de su país
pueden prohibir o limitar el envío de materiales contaminados.
PRESENTACION
La Finnpipette Digital viene presentada en una caja especialmente diseñada que contiene
lo siguiente:
1. La Finnpipette
2. Herramienta
3. Alicates
4. Muestras de Finntips
5. Tubo de grasa
6. Instrucciones
7. Certificado de Calibración
8. Soporte colgador
9. Dos adhesivos
Page 37

37
CONVERSION TABLE
Value of the conversion factor Z (µl/mg), as a function of temperature and pressure, for
distilled water.
UMRECHNUNGSTABELLE
Wert des Umrechnungsfaktors Z (µl/mg als eine Funktion von Temperatur und Luftdruck
bei destilliertem Wasser.
TABLEAU DE CONVERSION
Valeurs du facteur de conversion (µl/mg), en fonction de la température et de la pression,
pour l’eau distillée.
TABLA DE CONVERSION
Valor del factor de conversión Z (µl/mg) para agua destilada en función de la presión y la
temperatura.
Page 38

38
Temperature Air pressure
°C hPA (mbar)
800 853 907 960 1013 1067
15 1.0018 1.0018 1.0019 1.0019 1.0020 1.0020
15.5 1.0018 1.0018 1.0019 1.0020 1.0020 1.0021
16 1.0019 1.0020 1.0020 1.0021 1.0021 1.0022
16.5 1.0020 1.0020 1.0021 1.0022 1.0022 1.0023
17 1.0021 1.0021 1.0022 1.0022 1.0023 1.0023
17.5 1.0022 1.0022 1.0023 1.0023 1.0024 1.0024
18 1.0022 1.0023 1.0024 1.0024 1.0025 1.0025
18.5 1.0023 1.0024 1.0025 1.0025 1.0026 1.0026
19 1.0024 1.0025 1.0025 1.0026 1.0027 1.0027
19.5 1.0025 1.0026 1.0026 1.0027 1.0028 1.0028
20 1.0026 1.0027 1.0027 1.0028 1.0029 1.0029
20.5 1.0027 1.0028 1.0028 1.0029 1.0030 1.0030
21 1.0028 1.0029 1.0030 1.0030 1.0031 1.0031
21.5 1.0030 1.0030 1.0031 1.0031 1.0032 1.0032
22 1.0031 1.0031 1.0032 1.0032 1.0033 1.0033
22.5 1.0032 1.0032 1.0033 1.0033 1.0034 1.0035
23 1.0033 1.0033 1.0034 1.0035 1.0035 1.0036
23.5 1.0034 1.0035 1.0035 1.0036 1.0036 1.0037
24 1.0035 1.0036 1.0036 1.0037 1.0038 1.0038
24.5 1.0037 1.0037 1.0038 1.0038 1.0039 1.0039
25 1.0038 1.0038 1.0039 1.0039 1.0040 1.0041
25.5 1.0039 1.0040 1.0040 1.0041 1.0041 1.0042
26 1.0040 1.0041 1.0042 1.0042 1.0043 1.0043
26.5 1.0042 1.0042 1.0043 1.0043 1.0044 1.0045
27 1.0043 1.0044 1.0044 1.0045 1.0045 1.0046
27.5 1.0044 1.0045 1.0046 1.0046 1.0047 1.0047
28 1.0046 1.0046 1.0047 1.0048 1.0048 1.0049
28.5 1.0047 1.0048 1.0048 1.0049 1.0050 1.0050
29 1.0049 1.0049 1.0050 1.0050 1.0051 1.0052
29.5 1.0050 1.0051 1.0051 1.0052 1.0052 1.0053
30 1.0052 1.0052 1.0053 1.0053 1.0054 1.0055
Page 39

39
All Module 16-channel 5-50 µl
1. 10593480 8-ch 0.5-10 µl 2205900 5. 10592610
2. 2900510 12-ch 0.5-10 µl 2206910 6. 2205820
3. 10593050 8-ch 5-50 µl 2205910
4. 1527200 8-ch 50-300 µl 2205920
12-ch 5-50 µl 2205930
12-ch 50-300 µl 2205940
16-ch 5-50 µl 2207020
8-channel 12-channel 0,5-10 µl 5-50 µl 50-300 µl
10. 1058180 10. 1058180 5. 10592500 5. 10592510 5. 1059250
12. 10593260 12. 10593260 6. 2205810 6. 2205820 6. 2205830
13. 1030590 13. 1030590 11. 1131890 11. 1131890 8-ch 11. 1130720
14. 10593220 14. 10593220 24. 10593230 11. 1130680 12-ch
15. 10593210 15. 10593210 30. 10593240 30. 10589520 30. 10589160
16. 2205970 16. 2205980 31. 2205860 31. 2205950 31. 2205960
17. 10589270 17. 10590100 32. 10589490 32. 1061020 32. 10589490
18. 10589260 18. 10590090 33. 10593510 33. 1131400 33. 1131400
19. 1131430 19. 1131430 34. 1131790 34. 1131790 34. 1131790
20. 0202040 20. 0202040 35. 10593280 35. 10589500 35. 10589510
21. 0202020 21. 0202020 36. 1030380 36. 1030480 36. 1030140
22. 1131930 22. 1131930 37. 1030060 37. 1030160 42. 2207090 12 pcs
23. 10589280 23. 10590110 38. 10593290 42. 2209090 12 pcs
39. 1131900
40. 10593360
41. 1030170
42. 2207920 12 pcs
SPARE PARTS
ERSATZTEILE
PIECES DETACHEES
PIEZAS DE RECAMBIO
Figure 14 lists spare parts and reorder numbers
Abbildung 14 zeigt ersatzteile und bestellungs-nummer
Voir sur figure N° 14 la liste des pièces détachées et leurs références
La Figura 14 muestra una lista de piezas de recambio
14
SHELF HANGER
PIPETTEN-AUFHÄNGER
SUPPORT-PIPETTE POUR ÉTAGÈRE
SOPORTE COLGADOR
2206040
Page 40

40
22
22
21
21
2
4
5
6
1
12-channel
16
17
8-channel
10
12
13
14
15
11
3
19
18
16
10
12
13
14
15
11
19
17
18
20
20
20
Page 41

41
14
0,5-10 µl
5-50 µl
24
23
23
30
31
35
36
37
38
39
40
41
31
32
33
30
34
35
36
31
32
33
30
34
36
35
42
42
42
50-300 µl
33
32
34
37
Page 42

42
36
30
32
35
33
14
12
13
11
10
31
34
37
23
24
21
22
20
23
17
16
18
19
15
42
Module
16-ch 5-50 µl 2207020
10. 1058180
11. 1131890
12. 10593260
13. 1030590
14. 10593220
15. 10593210
16. 2205970
17. 10589270
18. 10589260
19. 1131430
20. 0202040
21. 0202020
22. 1131930
23. 10589285
24. 10593800
30. 10593810
31. 11071320
32. 10593840
33. 1132130
34. 1131790
35. 10593500
36. 1030170
37. 10593870
42. 2207950 8 pcs
Page 43

43
TIP ORDERING INFORMATION
BESTELLUNG VON FINNTIPS
POUR COMMANDER LES CONES FINNTIPS
INFORMACION PARA PEDIDOS DE PUNTAS
Finntip (sterile and non-sterile) Finntip Filter (sterile)
10 Micro
20 Micro
50 Micro
250 univ
200 ext
300
300 Flex
1000 Ext
1000
5 ml
10ml
10 Micro
10 Univ
20 Univ
20 Micro
30 Univ
50 Micro
100 Ext
100 Univ
200 Ext
200 Univ
300
1000 Ext
1000
5 ml
10ml
FP Digital 12-ch 0.5 - 10 µl
• • •
•
FP Digital 8-ch 5 - 50 µl
• •
• •
FP Digital 12-ch 5 - 50 µl
• •
• •
FP Digital 8-ch 50 - 300 µl
• • • •
• • •
FP Digital 12-ch 50 - 300 µl
• • • •
• • •
FP Digital 16-ch 5 - 50 µl
• •
•
Code Finntip Volume Qty
9400310 10 Micro 0,2-10 µl 1000/bag
9400300 10 Micro 0,2-10 µl 10x96/rack
9400303 10 Micro sterile 0,2-10 µl 10x96/rack
9400370 50 Micro 0,2-50 µl 10x384/rack
9400373 50 Micro sterile 0,2-50 µl 10x384/rack
9400130 200 Ext 5-200 µl 10x96/rack
9400133 200 Ext sterile 5-200 µl 10x96/rack
9400230 250 Univ. 0,5-250 µl 1000/bag
9400260 250 Univ. 0,5-250 µl 10x96/rack
9400263 250 Univ. sterile 0,5-250 µl 10x96/rack
9401250 300 5-300 µl 10x96/rack
9401253 300 sterile 5-300 µl 10x96/rack
94060510 Flex 300 0,5-300 µl 10x96/rack
9401030 1000 100-1000 µl 1000/bag
9401110 1000 100-1000 µl 10x96/rack
9401113 1000 sterile 100-1000 µl 10x96/rack
94060810 Flex 1200 100-1200 µl 10x96/rack
9402070 5 ml 1-5 ml 5x54/rack
9402073 5 ml sterile 1-5 ml 5x54/rack
9402160 10 ml 2-10 ml 5x24/rack
9402163 10 ml sterile 2-10 ml 5x24/rack
Code Finntip Filter Volume Qty
94052000 10 Micro sterile 0,2-10 µl 10x96/rack
94052020 20 Micro sterile 0,5-20 µl 10x384/rack
94052060 50 Micro sterile 0,2-50 µl 10x384/rack
94052100 10 Micro sterile 0,5-10 µl 10x96/rack
94052150 20 Micro sterile 0,5-20 µl 10x96/rack
94052200 100 µl sterile 0,5-100 µl 10x96/rack
94052310 100 µl Ext sterile 5-100 µl 10x96/rack
94052300 200 µl sterile 0,5-200 µl 10x96/rack
94052320 200 µl Ext sterile 5-200 µl 10x96/rack
94052350 300 µl sterile 5-300 µl 10x96/rack
94052410 1000 µl sterile 100-1000 µl 10x96/rack
94052430 1000 µl Ext sterile 100-1000 µl 5x96/rack
94052550 5 ml sterile 1-5 ml 5x54/rack
94052600 10 ml sterile 2-10 ml 5x24/rack
Page 44

44
Product specifications are subject to change without
prior notice. Finnpipette® and Finntip® are registered
trademarks of Thermo Scientific.
©
2007 Thermo Fisher Scientific Inc. All rights reserved.
Thermo Fisher Scientific
P.O.Box 100, Fi-01621 Vantaa, Finland
Tel. +358-9-329 100, fax -358-9-3291 0414
www.thermo.com/finnpipette
1506530-15
 Loading...