

Page 1

Thermo Scientific Orion
AQUAfast AQ4500 Turbidimeter
User Guide
Page 2

ROSS and the COIL trade dress are trademarks of Thermo Fisher Scientific Inc. U.S. patent 6,793,787.
AQUAfast, Cahn, ionplus, KNIpHE, No Cal, ORION, perpHect, PerpHecT, PerpHecTion, pHISA, pHuture, Pure Water, Sage, Sensing the Future, SensorLink,
ROSS, ROSS Ultra, Sure-Flow, Titrator PLUS and TURBO2 are registered trademarks of Thermo Fisher.
1-888-pHAX-ION, A+, All in One, Aplus, AQUAsnap, AssuredAccuracy, AUTO-BAR, AUTO-CAL, AUTO DISPENSER, Auto-ID, AUTO-LOG, AUTO-READ,
AUTO-STIR, Auto-Test, BOD AutoEZ, Cable-Free, CERTI-CAL, CISA, DataCOLLECT, DataPLUS, digital LogR, DirectCal, DuraProbe, Environmental Product
Authority, Extra Easy/Extra Value, FAST QC, GAP, GLPcal, GLPcheck, GLPdoc, ISEasy, KAP, LabConnect, LogR, Low Maintenance Triode, Minimum Stir
Requirement, MSR, NISS, One-Touch, One-Touch Calibration, One-Touch Measurement, Optimum Results, Orion Star, Pentrode, pHuture MMS, pHuture
Pentrode, pHuture Quatrode, pHuture Triode, Quatrode, QuiKcheK, rf link, ROSS Resolution, SAOB, SMART AVERAGING, Smart CheK, SMART STABILITY,
Stacked, Star Navigator 21, Stat Face, The Enhanced Lab, ThermaSense, Triode, TRIUMpH, Unbreakable pH, Universal Access are trademarks of
Thermo Fisher.
© 2009 Thermo Fisher Scientific Inc. All rights reserved. All trademarks are the property of Thermo Fisher Scientific Inc. and its subsidiaries.
The specific
ations, descriptions, drawings, ordering information and part numbers within this document are subject to change without notice.
This publication supersedes all previous publications on this subject.
Page 3

Table of Contents
Chapter 1
Chapter 2
Chapter 3
Introduction . . . . . . . . . . . . . . . . . . . . . . . . . . . . . . . . . . . . . . . . . . . . . . . . . . . 1
Principle of Operation. . . . . . . . . . . . . . . . . . . . . . . . . . . . . . . . . . . . . . 2
Display .
Keypad .
Meter Setup. . . . . . . . . . . . . . . . . . . . . . . . . . . . . . . . . . . . . . . . . . . . . . . . . . . 5
Battery Installation .
Vial Cover .
RS232 Connection .
Setup Menu
Setup Functions .
Cal Chek . . . . . . . . . . . . . . . . . . . . . . . . . . . . . . . . . . . . . . . . . . . . . . 9
Clock. . . . . . . . . . . . . . . . . . . . . . . . . . . . . . . . . . . . . . . . . . . . . . . . 10
S
P
A
D
B
S
. . . . . . . . . . . . . . . . . . . . . . . . . . . . . . . . . . . . . . . . . . . . . . . . 3
. . . . . . . . . . . . . . . . . . . . . . . . . . . . . . . . . . . . . . . . . . . . . . . . 4
. . . . . . . . . . . . . . . . . . . . . . . . . . . . . . . . . . . . . . . 5
. . . . . . . . . . . . . . . . . . . . . . . . . . . . . . . . . . . . . . . . . . . . . 6
. . . . . . . . . . . . . . . . . . . . . . . . . . . . . . . . . . . . . . . 8
. . . . . . . . . . . . . . . . . . . . . . . . . . . . . . . . . . . . . . . . . . . . . . . . . . . 9
. . . . . . . . . . . . . . . . . . . . . . . . . . . . . . . . . . . . . . . . . 9
et Baud . . . . . . . . . . . . . . . . . . . . . . . . . . . . . . . . . . . . . . . . . . . . . 10
rint. . . . . . . . . . . . . . . . . . . . . . . . . . . . . . . . . . . . . . . . . . . . . . . . . 11
uto Print . . . . . . . . . . . . . . . . . . . . . . . . . . . . . . . . . . . . . . . . . . . . 11
igits. . . . . . . . . . . . . . . . . . . . . . . . . . . . . . . . . . . . . . . . . . . . . . . . 11
attery . . . . . . . . . . . . . . . . . . . . . . . . . . . . . . . . . . . . . . . . . . . . . . . 12
elf Test . . . . . . . . . . . . . . . . . . . . . . . . . . . . . . . . . . . . . . . . . . . . . . 12
Chapter 4
Thermo Scientific Orion AQUAfast AQ4500 Turbidimeter User Guide
Calibration . . . . . . . . . . . . . . . . . . . . . . . . . . . . . . . . . . . . . . . . . . . . . . . . . . . 13
Preparing and Filling the Calibration Standard Vials . . . . . . . . . . . . . . 14
Calibration Check. . . . . . . . . . . . . . . . . . . . . . . . . . . . . . . . . . . . . . . . 15
Preparation of Low Turbidity Water .
Initial Calibration for EPA 180.1, ISO-NEPH or IR Ratio Modes . . . 17
aily Calibration Check for EPA 180.1, ISO-NEPH
D
and IR Ratio Modes .
Calibration of ISO-ABSB Mode .
Calibration of White %T Mode .
Calibration of IR %T Mode .
Refilling the Calibration Standard Vials with Fresh Standard. . . . . . . . 19
Preparation of Primary Calibration Standards
. . . . . . . . . . . . . . . . . . . . . . . . . . . . . . . . . . . . . 18
. . . . . . . . . . . . . . . . . . . . . . . . . 16
. . . . . . . . . . . . . . . . . . . . . . . . . . . . 18
. . . . . . . . . . . . . . . . . . . . . . . . . . . . 18
. . . . . . . . . . . . . . . . . . . . . . . . . . . . . . . 19
. . . . . . . . . . . . . . . . . . . 20
I
Page 4

Chapter 5
Measurement . . . . . . . . . . . . . . . . . . . . . . . . . . . . . . . . . . . . . . . . . . . . . . . . 21
Turbidity Sample Measurement. . . . . . . . . . . . . . . . . . . . . . . . . . . . . . 21
easurement of Low Level Turbidity Samples (< 1 NTU) . . . . . . . . 22
M
easurement Tips . . . . . . . . . . . . . . . . . . . . . . . . . . . . . . . . . . . . . . 23
M
EPA Interim Approval Letter. . . . . . . . . . . . . . . . . . . . . . . . . . . . . . . . 24
Chapter 6
Chapter 7
Chapter 8
Appendix A
Functions .
Log Functions . . . . . . . . . . . . . . . . . . . . . . . . . . . . . . . . . . . . . . . . . . . 25
Average Functions . . . . . . . . . . . . . . . . . . . . . . . . . . . . . . . . . . . . . . . . 26
Use with Printers and Computers . . . . . . . . . . . . . . . . . . . . . . . . . . . . . . . 27
Data Transmission Settings .
Customer Services . . . . . . . . . . . . . . . . . . . . . . . . . . . . . . . . . . . . . . . . . . . . 29
Turbidimeter Self Test . . . . . . . . . . . . . . . . . . . . . . . . . . . . . . . . . . . . . 29
Turbidimeter Maintenance .
Vial Maintenance .
Operator Assistance Codes .
Assistance .
Warranty . . . . . . . . . . . . . . . . . . . . . . . . . . . . . . . . . . . . . . . . . . . . . . . 30
Declaration of Conformity .
Ordering Information . . . . . . . . . . . . . . . . . . . . . . . . . . . . . . . . . . . . . 32
Specifications. . . . . . . . . . . . . . . . . . . . . . . . . . . . . . . . . . . . . . . . . . . . 33
ungsten vs. LED Discussion . . . . . . . . . . . . . . . . . . . . . . . . . . . . . . . . . . . 35
T
. . . . . . . . . . . . . . . . . . . . . . . . . . . . . . . . . . . . . . . . . . . . . . . . . . . 25
. . . . . . . . . . . . . . . . . . . . . . . . . . . . . . . . 27
. . . . . . . . . . . . . . . . . . . . . . . . . . . . . . . . 29
. . . . . . . . . . . . . . . . . . . . . . . . . . . . . . . . . . . . . . . 29
. . . . . . . . . . . . . . . . . . . . . . . . . . . . . . . . 30
. . . . . . . . . . . . . . . . . . . . . . . . . . . . . . . . . . . . . . . . . . . . . 30
. . . . . . . . . . . . . . . . . . . . . . . . . . . . . . . . 31
II Thermo Scientific Orion AQUAfast AQ4500 Turbidimeter User Guide
Page 5

Chapter 1 Introduction
The AQUAfast AQ4500 turbidimeter is the most advanced portable
microprocessor based LED turbidimeter on the market today. The
AQ4500 turbidimeter operates on the nephelometric and ratiometric
principles of turbidity measur
turbidity measurement based on EPA 180.1 and ISO 7027 as well as an
infrared ratio (IR ratio) mode that gives results in accordance with EPA
GLI method 2
based on percent transmittance (%T), American Society of Brewing
Chemists (ASBC) units or E
The AQUAfast AQ4500 turbidimeter is the only advanced completely
waterpr
data points that can later be downloaded to a printer or computer.
The AQUAfast AQ4500 turbidimeter has received interim approval
fr
om the EPA for wastewater turbidity reporting when in the EPA180.1
mode and following Thermo Orion Method AQ 4500, Revision 5. See
the EPA Interim Approval Letter section of this user guide and visit
www.
thermo.com/waterapps for updated information on EPA approval.
Until final approval from the EPA for turbidity reporting, please contact
your state or local regulatory agency for their requirements for interim
oval methods. Refer to Appendix A for information on the benefits
appr
of a white LED light sour
. The AQ4500 also allows the user to make measurements
oof turbidimeter with a rating of IP67. The AQ4500 can log 100
ement. The AQ4500 turbidimeter allows
uropean Brewing Chemists (EBC) units.
ce for turbidity measurements.
Thermo Scientific Orion AQUAfast AQ4500 Turbidimeter User Guide
1
Page 6

IR LED
Emitted Light
Light
Detector
90˚ Scattered
Light
Principle of
Operation
Figure 1
Pure Nephelometric
Turbidity
Measurement
without Color
Compensation
Figure 2
Color Compensation
in the Dual-beam
System with Two
Photo Detectors
Nephelometric turbidity is measured by determining the sidewardscattered light intensity. A light beam is passed through the flow cell and
the scattered light produced by the solid particles (turbidity) is detected
at a specific angle
. This measurement method ignores the light that passes
straight through the cell.
If the medium contains absorbent substances (such as colored
constituents), these can easily attenuate the light beam by factors ranging
om 2 to 10 and thus falsify the results. So it is absolutely necessary to
fr
eliminate the effect of the medium’s absorption in such cases. This is
achieved by using two light beams: a measurement beam and a reference
beam
. The turbidity is thus determined from their ratio.
2 Thermo Scientific Orion AQUAfast AQ4500 Turbidimeter User Guide
Page 7

Display
Figure 3
AQ4500 Display
Item Number Description
1 Calibrate Icon lit while AQ4500 is in calibration mode
2 Setup Icon lit while AQ4500 is in setup mode
3 Measure Icon lit during measurement
4 Avg Icon lit while AQ4500 performs zero
5 Units Icons for units of measurement
6 ? Icon lit when AQ4500 prompts a question
7 Time Icon lit while timer is active
8 Log Icon lit if data is in AQ4500 log
9 Battery Icon lit when battery in AQ4500 is low
10 Print Icon lit during print function
11 188 Not used
12
13 Numeric display
Alphanumeric display
Thermo Scientific Orion AQUAfast AQ4500 Turbidimeter User Guide
3
Page 8

Orion AQ4500
Keypad
Key Description
Turns the AQ4500 on or off
Initiates print mode or inputs number 0
Confirms an answer or inputs a decimal point
Allows selection of measurement units or inputs number 1
Initiates log mode or inputs number 2
Scrolls down, answers “NO” or inputs number 3
Initiates Average mode or inputs number 4
Displays Time/Date and Stopwatch or inputs number 5
Figure 4
AQ4500 Keypad
Scroll ups, answers “NO” or inputs number 6
Initiates Setup function or inputs number 7
Initiates a calibration or inputs number 8
Initiates a measurement or inputs number 9
4 Thermo Scientific Orion AQUAfast AQ4500 Turbidimeter User Guide
Page 9
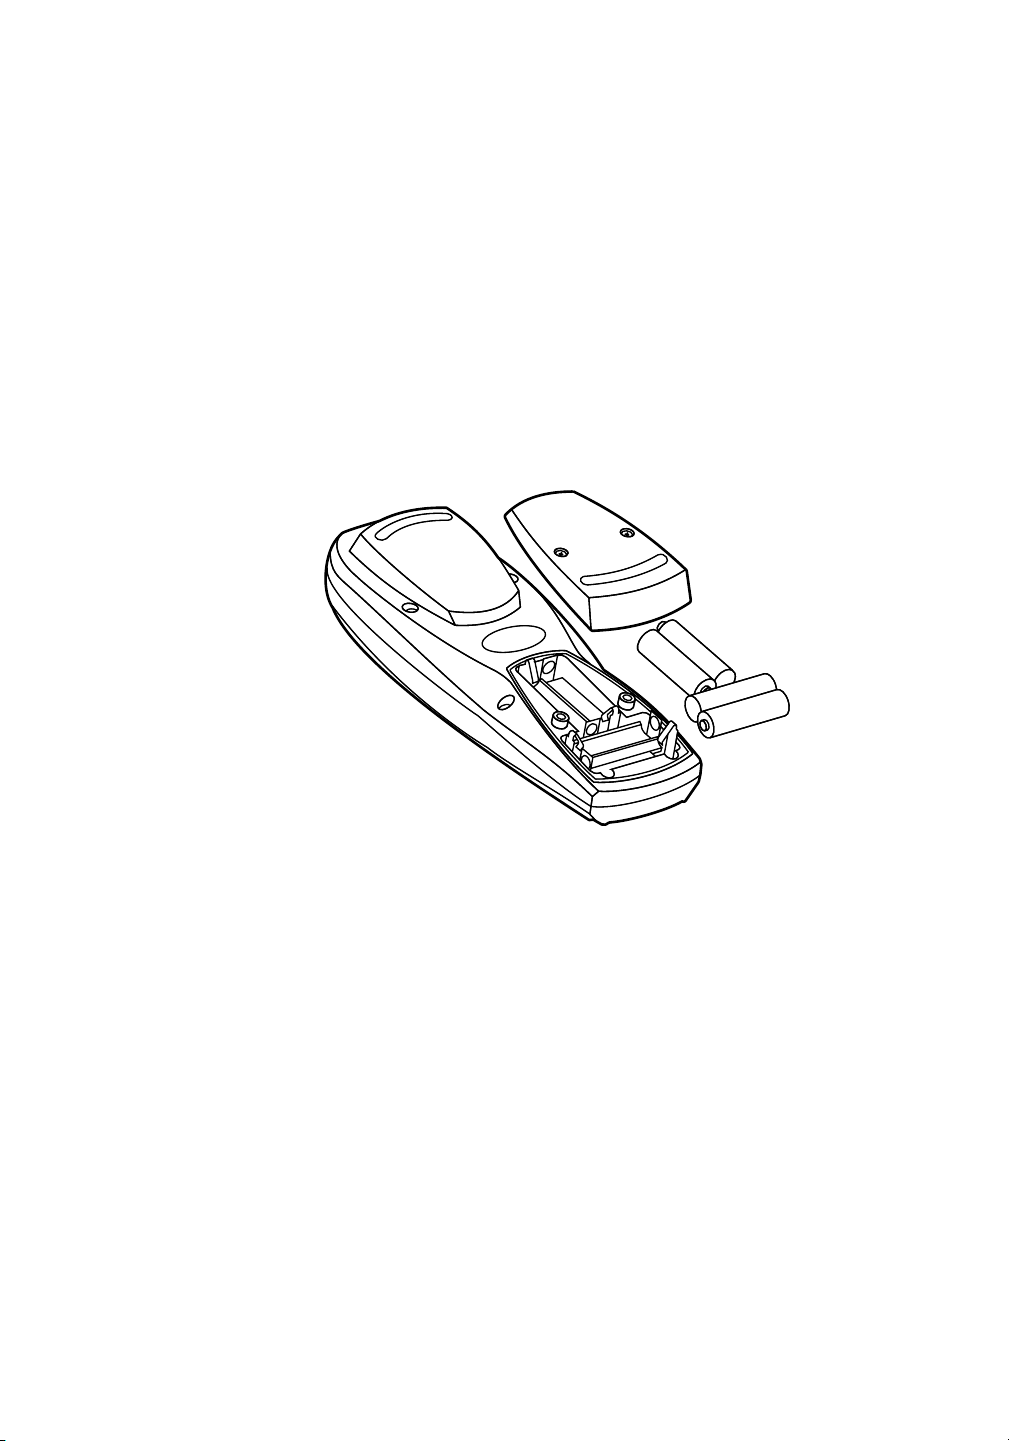
Chapter 2 Meter Setup
Battery
Installation
Figure 5
Battery Installation
The AQ4500 turbidimeter requires 4 AA alkaline or lithium batteries.
With 4 alkaline batteries, the expected life is 2,500 hours. With lithium
batteries the expected life is 10,000 hours.
To install batteries, carefully loosen the two captive screws on the bottom
of the batter
Figure 5.
Replace battery cover and tighten captive screws.
y cover. Remove the cover and insert batteries as shown in
The AQ4500 has an auto-shutoff feature to conserve battery life. The
auto-shutoff will turn the turbidimeter off if no keys have been pressed
for appr
When the battery gets low “battery” will be displayed. Also at power-up
an indication of battery life will be displayed.
Thermo Scientific Orion AQUAfast AQ4500 Turbidimeter User Guide
oximately 20 minutes.
5
Page 10

Vial Cover
Figure 6
The vial cover serves two functions; first, it keeps the optical well
covered so water, dirt and dust do not enter the well. Second, it covers
the vial during measurement to prevent stray light from affecting the
measur
AQ4500 is waterproof to IP67 standards.
The vial cover can be used in two ways. First for measurement when the
waterproof integrity of the meter is important, place the vial cover over
the vial and screw down as shown in Figure 6. To remove, unscrew and
lift up.
ement. When the vial cover is installed and screwed down the
Figure 7
If using turbidimeter in a lab where waterproof integrity is not a factor,
the co
ver can just be placed down over the vial. To remove vial cover, lift
cover straight up as shown in Figure 7.
6 Thermo Scientific Orion AQUAfast AQ4500 Turbidimeter User Guide
Page 11

Figure 8
During measurement it is important to place the vial into the AQ4500
aligning the white triangle (
turbidimeter. See Figure 8 aligning vial with tab on turbidimeter.
s) on the vial with the tab on the
Thermo Scientific Orion AQUAfast AQ4500 Turbidimeter User Guide
7
Page 12

RS232
Connection
Figure 9
AQ4500 RS232
Cable Connection
The AQ4500 has a bidirectional RS232 port located on the underside of
the turbidimeter. See Figure 9.
computer, use the optional RS232 cable, Cat. No. AQ4CBL. See the Use
With Printers and Computers section
To connect the AQ4500 to a printer or
.
8 Thermo Scientific Orion AQUAfast AQ4500 Turbidimeter User Guide
Page 13

Chapter 3 Setup Menu
setup
Setup
Functions
Cal Chek
The setup key allows the user to access all the user selectable functions in
the AQ4500 turbidimeter.
Cal Chek
Clock
Set Baud
Print
Auto Print
Digits
Battery
Self test
Allows the user to confirm the time and date of the last
calibration for the measurement mode selected.
Allows the user to set the date and time.
Allows the user to set the baud rate for the meter when using
it with a printer or computer.
Allows the user to set the print out format.
Allows the user to set the turbidimeter to automatically print
each measurement.
Allows the user to select the number of significant digits to be
displayed.
Allows the user to view remaining battery life.
Allows the user to initiate a self test to verify meter operation.
Allows the user to confirm the last calibration for the selected
measurement mode.
1. Press the
key.
2. Press the
3. Press the
or key until “CAL CHEK” is displayed.
key to accept.
4. The last calibration date and time will be displayed.
5. Press the
or key to return to the setup mode or press the
key to return to measurement mode.
Thermo Scientific Orion AQUAfast AQ4500 Turbidimeter User Guide
9
Page 14

setup
setup
Clock
Allows the user to set the time and date.
Set Baud
1. Press the
2. Press the
3. Press the
key.
or key until “CLOCK” is displayed.
key to accept.
4. “20_ _” will be displayed. Enter the year.
5. “_ _ MONTH” will be displayed. Enter the month.
6. “_ _ DAY” will be displayed. Enter the day.
7. “_ _:_ _ (24) HOUR” will be displayed. Enter the time.
8. The AQ4500 will proceed to next setup mode.
The default baud rate is 1200. The user may select a baud rate of 1200,
2400, 4800 or 9600.
1. Press the
key.
2. Press the
3. Press the
displayed.
4. Press the
5. Press the
or key until “SET BAUD” is displayed.
key to accept. 1200 or last baud rate selected will be
or key until the desired baud rate is selected.
key to accept.
10 Thermo Scientific Orion AQUAfast AQ4500 Turbidimeter User Guide
Page 15

setup
Print
setup
setup
Allows the user to select the printout format. The user can select between
a standard printout or a comma delimited format for importing data into
eadsheet.
a spr
Auto Print
1. Press the
2. Press the
3. Press the
4. Press the
key.
or key until “PRINT” is displayed.
key to accept. “STND PRN?” will be displayed.
or key to toggle between “STND PRN?” and
“CMA DELM?”.
5. Press the
key to accept.
Auto print “ON” will automatically send readings to the printer.
1. Press the
2. Press the
3. Press the
key.
or key until “AUTO PRT” is displayed.
key to accept. “AUTO OFF?” or “AUTO ON?” will be
displayed.
Digits
4. Press the
or key to toggle between “AUTO OFF?” and
“AUTO ON?”.
5. Press the
key to accept.
The digit selection allows the user to select the resolution of the
r
eading, from 0.000, 0.00, 0.0 and 0 or auto resolution. Default is auto
resolution.
1. Press the
2. Press the
key.
or key until “DIGITS”
is displayed.
3. Press the
4. Press the
5. Press the
key to accept.
or key until the desired resolution is selected.
key to accept.
Thermo Scientific Orion AQUAfast AQ4500 Turbidimeter User Guide
11
Page 16

setup
setup
Battery
1. Press the key.
Self Test
2. Press the
3. Press the
or key until “BATTERY” is displayed.
key to see remaining battery life.
Puts the turbidimeter into a self-diagnostic mode. See the Turbidimeter
Self Test section
.
12 Thermo Scientific Orion AQUAfast AQ4500 Turbidimeter User Guide
Page 17

Chapter 4 Calibration
Warning: Never pour liquid directly into the sample chamber
of the AQ4500 turbidimeter. Only use 24 mm diameter vials,
. No. AC2T24.
Cat
Note: Always use clean dry vials for calibration and measurement. See
the Measurement Tips section
The EPA approved SDVB primary standards in the meter kit are in
plastic bottles for impr
and labeled for each standard level.
The AQ4500 turbidimeter has been factory calibrated. Measure the
provided SDVB primary turbidity standards, as if they are samples, before
using the turbidimeter for the first time to verify the standards using the
meter factor
specification for the standard, according to the certificate of analysis for
that standar
For best accuracy and regulatory compliance, perform an initial
calibration with the SDVB turbidity standards after measuring them as
samples and whenever a calibration check standard exceeds ± 10% of
the expected value. The EPA 180.1, ISO-NEPH, and IR Ratio modes
may be calibrated in this manner. The EBC mode is automatically
calibrated when the ISO-NEPH mode is calibrated. The ASBC mode
is automatically calibrated when the EPA 180.1 mode is calibrated. The
ISO-ABSB, White %T, and the IR %T modes require calibration with
lo
w-turbidity water only.
y calibration. The standards should read within the accuracy
d.
oved precision and shelf life. Five vials are included
.
For EPA 180, ISO-NEPH, and IR Ratio modes, meter performance
checks should be performed on a daily basis using the primary standards
in the turbidity calibration kit, Cat
water.
For ISO-ABSB, White %T, and the IR %T modes, the meter should be
calibrated daily using lo
Thermo Scientific Orion AQUAfast AQ4500 Turbidimeter User Guide
w-turbidity water.
. No. AC45ST, and low-turbidity
13
Page 18

Preparing and
Filling the
Calibration
Standard Vials
The five bottles of calibration standards supplied with your meter are
more stable than Formazin, do not need to be shaken and have a shelf life
of 12 months
the instrument, review the expiration date (indicated on the bottle label)
to ensur
Note: It is important that the calibration standards are not violently
shaken or agitated because air entrapment in the fluid introduces an error
factor during calibration which subsequently will lead to an inaccurate
measur
irreversible shrinkage of the standards’ particles thus resulting to
inaccurate calibration and measur
Before using the meter for the first time, rinse the inside of the vial with a
small amount of the same NTU standar
1. Gently pour about 5 mL of the standard into the vial.
. If you use the supplied calibration standards to calibrate
e that the standards have not expired.
ement. Also, do not store in freezing temperatures which causes
ement.
d that will be used to fill that vial.
2. Cap and swirl the vial so the inside of the vial is fully rinsed with
the standar
3. Pour the standard out of the vial.
4. Repeat steps 1 through 3.
5. Gently pour the standard into the vial up to the mark on the vial and
cap the vial.
6. Repeat this rinse and filling procedure for the other three vials.
Note: The vial rinsing is most critical for precision with the lower
NTU standar
It is recommended to use the prepared calibration standard vials daily as
check standar
d.
ds.
ds prior to the measurement of samples.
14 Thermo Scientific Orion AQUAfast AQ4500 Turbidimeter User Guide
Page 19

Calibration
Check
1. Place the AQ4500 turbidity meter on a flat and level surface.
2. Insert the CAL 1 standard (0 NTU) into the sample chamber.
3. Press down the vial until it slides fully into the instrument. Cover the
vial using the vial cover.
4. Select the measurement mode.
5. Press the
6. The meter will display the results. Record the reading.
7. Repeat the calibration check for CAL 2, CAL 3, CAL 4 and CAL 5
calibration standards.
8. If the displayed results are within 10% of the nominal NTU
value of the standard or the precision criteria required by your
method, the calibration check passed and the meter is now ready
for measur
Note: If a standard no longer reads within 10% of the nominal NTU
alue for the standard, the standard has most likely degraded. The lower
v
level NTU standards will be less stable when stored in glass than the
higher NTU standar
periodically, especially if the value falls outside of the tolerance range.
See the Refilling the Calibration Standard Vials with Fresh Standard
section
.
key.
ement.
ds. The lower level standards may need to be replaced
Thermo Scientific Orion AQUAfast AQ4500 Turbidimeter User Guide
15
Page 20

Table 1
Primary Calibration
Standards
EPA 180.1 ISO-NEPH IR Ratio
1000 NTU 100 NTU 1000 NTU
100 NTU 10 NTU 100 NTU
10 NTU 1 NTU 10 NTU
1 NTU Low-turbidity water 1 NTU
Low-turbidity water Low-turbidity water
If desired, the meter may be calibrated at concentrations other than those
listed in Table 1.
Note: Preparing standards and calibrating at these concentrations may
yield reduced accuracy.
Table 2
Calibration Ranges
Preparation of
Low Turbidity
Water
Cal EPA 180.1 ISO-NEPH IR Radio
Standard Level
1 0.90 to 1.1 NTU 0.86 to 1.1 FNU 0.86 to 1.1 NTU
10 9.0 to 11 NTU 9.0 to 11.6 FNU 9.0 to 11.3 NTU
100 90 to 110 NTU 90 to 157 FNU 90 to 119 NTU
1000 900 to 1100 NTU N/A 654 to 1100 NTU
To obtain low-turbidity water for dilutions, nominal value 0.02 NTU,
pass laboratory reagent-grade water through a 0.1 micron (mm) filter.
Rinse the collecting flask at least twice with filtered water and discard
the next 200 mL
. Alternately, use laboratory reagent-grade water without
filtering, if turbidity values are similar to or lower than filtered water. Use
caution to avoid the introduction of dust and particulates.
16 Thermo Scientific Orion AQUAfast AQ4500 Turbidimeter User Guide
Page 21

Initial
Calibration
1. Select the measurement mode, EPA 180, ISO-NEPH or IR Ratio by
scrolling up or down until the desired mode is displayed.
for EPA 180.1,
ISO-NEPH or IR
Ratio Modes
2. Press the
3. Insert vial containing pure water and press the
4. “H2O WAIT” will be displayed and then “1.00 YES?”.
5. If the standard is 1.00, insert standard vial and press the
standard is another value, press the
will be displayed. Press the
Enter value of standard using numeric keypad. Press the
accept.
6. Repeat step 5 for each standard.
7. When the calibration is complete the AQ4500 will proceed to the
measure mode.
After performing the initial calibration with the primary calibration
standards, perform a meter performance check by measuring the
standar
when the blank reads less than 0.1 NTU and the standards read within ±
10 % of the expected values. If results are not within limits, reanalyze the
standards and blank. If the confirms that calibration is outside of limits,
discontinue analysis and determine the cause of error.
ds and a blank (turbidity-free water). The performance is good
key. “H2O INSERT” will be displayed.
key.
key. If
or key, “CHANGE?”
key. “STD VAL?” will be displayed.
key to
Notes for Handling
Cat. No. AC45ST Kit
Standards
Thermo Scientific Orion AQUAfast AQ4500 Turbidimeter User Guide
• Do not freeze kits
• Do not shake or agitate the sample
• Remove fingerprints and smudges with a soft wiper cloth
17
Page 22

Daily
Calibration
Check for EPA
180
.1, ISONEPH and IR
Ratio Modes
Check meter performance daily by analyzing the SDVB primary
standards and a blank before and after sample measurements. The
performance is good when the blank reads less than 0.1 NTU and the
standards read within ± 10% of the expected values. If results are not
within limits, pour fresh standards into the vials and reanalyze with the
fr
esh SDVB primary standards and blank. If the reanalysis confirms that
calibration is outside of limits, stop analysis and determine the cause of
or before proceeding. A new initial calibration may be required.
err
Calibration
of ISO-ABSB
Mode
Calibration
of White %T
Mode
1. Select the measurement mode ISO-ABSB using the or key.
2. Press the
3. Insert vial containing turbidity-free water and press the
“H2O WAIT” will be displayed.
4. When the calibration is complete the AQ4500 will proceed to the
measure mode.
After successful calibration, the low-turbidity water should read “0” FAU.
1. Select the measurement mode White %T using the
2. Press the
3. Insert vial containing low-turbidity water and press the
4. “WAIT” will be displayed.
key. “H2O INSERT” will be displayed.
key.
or key.
key. “W➞100?” will be displayed.
key.
5. When the calibration is complete the AQ4500 will proceed to the
measure mode.
After successful calibration, the low-turbidity water should read
“CAL DONE”
18 Thermo Scientific Orion AQUAfast AQ4500 Turbidimeter User Guide
.
Page 23

Calibration of
IR %T Mode
1. Select the measurement mode IR %T using the or key.
2. Press the
key. “IR➞100?” will be displayed.
Refilling the
Calibration
Standard Vials
with Fresh
Standard
3. Insert vial containing turbidity-free water and press the
4. “WAIT” will be displayed.
5. When the calibration is complete the AQ4500 will proceed to the
measure mode.
After successful calibration, the low-turbidity water should read
“CAL DONE”
1. Pour the old standard out of the vial.
2. Wash the vial with laboratory glassware detergent and water. Rinse
the vial with turbidity-free water to remove all laboratory detergent
om the vial.
fr
3. Rinse the vial with about 5 mL of the standard from the plastic bottle
with the matching NTU value.
.
key.
4. Cap and swirl the vial so the inside of the vial is fully rinsed with the
fresh standard.
5. Pour the standard out of the vial.
6. Pour the fresh standard into the vial up to the mark on the vial and
cap the vial.
7. Perform the procedure in the
containing the fr
If the fresh standard does not read with the 10% range of the nominal
value, or to the tolerance of your method, follow the steps in one of the
Calibration Mode sections.
esh standard.
Calibration Check section with the vial
Thermo Scientific Orion AQUAfast AQ4500 Turbidimeter User Guide
19
Page 24

Preparation
of Formazin
Calibration
Standards
Use the following procedure for EPA 180.1, ISO-NEPH, and IR Ratio
modes. A primary formazin stock standard at 4000 NTU is available as
Cat. No. AC45FZ. This formazin stock standard can be used to prepare
primary calibration standards for the EPA 180.1, ISO-NEPH, and IR
Ratio modes, as noted in Table 1.
For initial calibration, prepare the following primary calibration standards
by dilution of the 4000 NTU formazin stock standard with low-turbidity
Preparing standards at these concentrations yields the best accuracy.
water.
Note: When using the 4000 NTU formazin stock and preparing primary
calibration standards, it is important to keep the solutions well mixed
when handling
Note: It is well known that diluted Formazin is unstable. If you choose
to use Formazin to calibrate the instrument, ensure that you are using a
fresh stock suspension of Formazin to achieve the precision quoted for the
ument. It is very difficult to accurately pipet Formazin for low level
instr
NTU standards, due to the non-homogeneous nature of Formazin and
because these standar
to use good laboratory technique and accurate Class A pipets and refer
to ASTM Method 6855-03 for low level standard vial preparation when
using F
ormazin.
.
ds have very limited stability at low levels. Be sure
20 Thermo Scientific Orion AQUAfast AQ4500 Turbidimeter User Guide
Page 25

Chapter 5 Measurement
Warning: Never pour liquid directly into the sample chamber of the
AQ4500. Only use 24 mm diameter vials, Cat. No. AC2T24.
Below are general instructions for performing turbidity measurements.
For best results, always cover vial with vial cover whenever measuring
a sample
.
Turbidity
Sample
Measurement
1. Allow the sample to come to room temperature.
2. Mix the sample thoroughly to disperse the solids.
3. Wait until all visible air bubbles disappear (a few minutes at most).
4. Select the measurement mode.
5. Pour the sample into a clean, dry turbidity vial. If the sample has
settled, mix it gently to resuspend the solids before pouring it into
the sample vial
6. Cap the vial securely.
7. Wipe the vial free of liquid and fingerprints with a soft lint-free wipe
or cloth.
8. Place the vial into the AQ4500 sample chamber and cover it with the
vial cover.
9. Press the
.
key.
10. The AQ4500 will display the result. Record the value or log the data.
Proceed with the next sample.
Thermo Scientific Orion AQUAfast AQ4500 Turbidimeter User Guide
21
Page 26

Measurement
of Low Level
Turbidity Samples
(< 1 NTU)
Observe the following precautions to improve accuracy of low-level
turbidity sample measurements:
. Prepare the calibration samples with low-turbidity water that
1
has been filter
that has been demonstrated to be equivalent. Use care to avoid
introduction of dust and particulates into the water, calibration
standar
2. Use very clean vials that are free from scratches and imperfections.
3. Index the vials with the low-turbidity water to find the orientation
that produces the lowest background blank value. Mark the
orientation on the vials, above the marked line (so the orientation
k does not interfere with the meter light path).
mar
4. Apply a light coating of silicon oil to mask minor imperfections in
the glass vials. Spread the oil uniformly and remove excess oil by
polishing with a soft, lint-free cloth. (Silicone oil and cloth kit, Cat.
No. AC45SI)
ed through a 0.1 mm membrane filter or water
ds and samples.
5. Do not handle vials where the light path of the meter strikes them.
Hold vials above the marked line or by the cap, once the cap is on
the vial.
6. Use the same indexed vial for the 1 NTU calibration point and for
measurement of the low-level turbidity sample or samples. Clean
the vial carefully between the calibration and the sample
measur
reading to ascertain that there has been no significant carryover,
befor
7. Rinse the vial a few times with the sample before filling.
8. Degas the sample before measurement, even if no bubbles are visible.
Degas by immersing the sample cell in an ultrasonic bath for 1 to 2
seconds only or applying a par
Proceed with measurement steps.
ement. Fill with low-turbidity water and obtain a blank
e using for sample measurements.
tial vacuum.
22 Thermo Scientific Orion AQUAfast AQ4500 Turbidimeter User Guide
Page 27

Measurement
Tips
• Keep turbidity vials scrupulously clean both inside and out.
• Discard vials if they become scratched or etched and silicone oil does
not improve their performance.
• Do not handle vials in the light path area.
• Wash vials well with laboratory detergent, rinse repeatedly with
deionized water and allow to air dry.
• If condensation forms on the outside of the vial, warm sample to
room temperature, wipe off excess moisture and remix sample before
analysis
.
Thermo Scientific Orion AQUAfast AQ4500 Turbidimeter User Guide
23
Page 28

EPA Interim
Approval Letter
24 Thermo Scientific Orion AQUAfast AQ4500 Turbidimeter User Guide
Page 29

Chapter 6 Functions
setup
setup
Log Functions
The AQ4500 turbidimeter allows the user to store up to 100 points in
the log.
To Log Data
Once measurement is complete, press the
key to log point prior to
next measurement.
To Display Log
1
. Press and hold the
key for approximately 3 seconds.
2. “DISPLAY” will be displayed and last point in log will be displayed.
3. Use the
4. Press the
or key to scroll through log points.
key to escape log display mode.
To Clear Log
1
. Go into setup mode by pressing the
2. Press the
3. Press the
4. Press the
5. Press the
or key; “DEL LOG” will be displayed.
key; “CLR LOG?” will be displayed.
key to abort log clear.
key to clear log. “DELETED” will be displayed and
meter will return to measure mode.
Note: I
Thermo Scientific Orion AQUAfast AQ4500 Turbidimeter User Guide
t is recommended to print or download log prior to clearing.
key.
25
Page 30

To Print or Download Log
1. Plug serial cable, Cat. No. AQ4CBL, into AQ4500.
2. Connect AQ4CBL cable to printer or computer. See the Setup
Menu section
.
Average
Functions
To Activate
the Average
Function
3. Go to log display mode and press the
The average “AVG” function enables the meter to take into account
larger par
This situation is often encountered while testing environmental waters
om rivers and lakes. As these particles may not always be present in the
fr
measuring path, observing the sample for a longer period of time may
yield mor
on the meter takes a large number of consecutive readings, and then
displays the av
(approximately 15 seconds). The result is a better or truer reading of the
turbidity.
It is important to note that even if the AVG function is off, the meter
will perform a certain amount of signal averaging. This smart averaging
is most prominent when measuring samples of very low turbidity (<1.5
NTU approximately), and is not noticeable at higher turbidity (above
appr
1. Press the key in measure mode, showing icon on.
2. Press the
ticles that may be floating through the sample during analysis.
e accurate and reproducible readings. When AVG is turned
eraged result. The measurement will take slightly longer
oximately 5 NTU).
key.
key.
To Deactivate
1. Press the
key in measure mode, showing icon off.
the Average
Function
26 Thermo Scientific Orion AQUAfast AQ4500 Turbidimeter User Guide
2. Press the
key.
Page 31

Chapter 7 Use with Printers and
Computers
The AQ4500 allows communication to a printer or communication with
a computer. When connecting to a printer or a computer, use Cat. No.
AQ4CBL. This cable has a special 3 pin connector on one end for the
AQ4500. When used to connect to a computer, a serial adapter may be
required (a 25 pin to 9 pin adapter is included with Cat. No. AQ4CBL).
Data
Transmission
Settings
Baud Rate (Selectable) 1200 (default), 2400, 4800, 9600
Parity None
Data Bits 8
Start Bit 1
Stop Bit 1
Thermo Scientific Orion AQUAfast AQ4500 Turbidimeter User Guide
27
Page 32

28 Thermo Scientific Orion AQUAfast AQ4500 Turbidimeter User Guide
Page 33

Chapter 8 Customer Services
Turbidimeter
Self Test
Turbidimeter
1. To initiate self test, press the key.
2. Press the
3. Press the
4. When “PRESS 7” is displayed, press the
directions through the test.
5. When complete, unit should display “UNIT OK”.
6. Press any key to confirm display operation.
7. Press any key to exit the self test.
8. Press the
or
• Wipe the outside of the turbidimeter with a damp cloth.
or key until display reads “SELFTEST”.
key to initiate self test.
key and follow the
key to return to measurement mode or press the
key to proceed through setup menu.
Maintenance
• Use a lens tissue, a soft cloth, or clean compressed air can to remove
dust and dirt from the sample compartment.
Vial
• Always wipe moisture off any vial before inserting into the AQ4500.
Maintenance
• Always wipe fingerprints off any vial before inserting into the
AQ4500.
• To clean vials, wash vials well with laboratory detergent, rinse
repeatedly with deionized water and allow to air dry.
• Use a light coating of silicone oil (Cat. No. AC45SI) and lint-free
cloth to fill in tiny scratches and optimize the vial surface.
• Discard vials if they become scratched or etched and silicone oil does
not improve their performance.
Thermo Scientific Orion AQUAfast AQ4500 Turbidimeter User Guide
29
Page 34

Operator
Assistance
Codes
Operator assistance codes are used to inform a user of a problem during
operation. See Table 3 for these codes
. Contact the Technical Support
department for assistance.
Warning: Opening the meter enclosure (excluding the battery
compar
tment) will void the warranty.
Table 3
Error Codes
Assistance
Error Code Error Code Type
E1 Keyboard error
E2 Bad EPROM error
E4 RTC not detected
E8 RTC not running
E16 RTC not generating interrupts
E32 RTC interrupt pulse out of specification or missing
E64 Bad ADC or battery reading out of specification
E128 White LED, transmission detector or monitor failure
E256 IR LED, transmission detector or monitor failure
E512 Scatter detector reading out of specification
E1024 No signal scatter or transmission readings out of specification
E2048 No signal monitor readings out of specification
E4096 White ZDI scatter too high
E8192 IR DI scatter too high
OVERRNGE Measurement exceeded operation range
After troubleshooting all components of your measurement system,
contact Technical Support. Within the United States call 1.800.225.1480
and outside the United States call 978.232.6000 or fax 978.232.6031.
In Europe, the Middle East and Africa, contact your local authorized
For the most current contact information, visit
dealer.
thermo.com/contactwater.
www.
Warranty
30 Thermo Scientific Orion AQUAfast AQ4500 Turbidimeter User Guide
For the most current warranty information, visit www.thermo.com/water.
Page 35

Declaration of
Conformity
Manufacturer: Thermo Fisher Scientific
166 Cummings Center
everly, MA 01915 U.S.A.
B
Hereby declares that the AQ4500 turbidity meter conforms with the
following standards and documents:
EC Directive 72/23/EEC Low Voltage Directive
Safety
EMC EC 89/336/EEC Electromagnetic Compatibility
EN/IEC 61326:1997 + A1: 1998, Annex C
Emissions
Immunity
This Thermo Scientific Orion product has been manufactured in
compliance with the provisions of the relevant manufacturing and test
documents and pr
as complying with ISO 9001:2008 by QMI, listed as File # 001911.
Patrick Chiu Place and Date of Issue:
Senior Quality Engineer, Beverly, MA
egulatory Compliance April 16, 2009
R
EN 55011 (Class A) Emissions
FCC Part 15 Class A
Canadian Emissions (EMCAB-3 ISSUE 2)
DIN EN 50082-1 1994 Generic Immunity
IEC 61000-4-2 1999 ESD Susceptibility
IEC 61000-4-3 1998
ocesses. These documents and processes are recognized
Radiated Immunity
Thermo Scientific Orion AQUAfast AQ4500 Turbidimeter User Guide
31
Page 36

Ordering
Cat. No. Description
Information
AQ4500 AQUAfast IV advanced turbidimeter, with field kit,
primary standards, silicone oil cloth, standard vials,
sample vials and user guide
AC2T24 Turbidity measurement replacement vials, pack of 12
AQ4CBL AQUAfast IV RS232 cable
AC45ST AQ4500 calibration kit of primary standards
AC45FZ 4000 NTU formazin standard stock solution, 475 mL
AC45SI Silicone oil (15 mL) and cloth kit
32 Thermo Scientific Orion AQUAfast AQ4500 Turbidimeter User Guide
Page 37

Specifications
Measurement Method Range
EPA 180.1 0 to 2000 NTU
EPA GLI Method 2 0 to 40 NTU
ISO-NEPH (7027) 0 to 150 FNU
ISO-ABSB 40 to 4000 FAU
IR-RATIO 0 to 4000 NTU
EBC 0 to 24
ASBC 0 to 236 ASBC
WHITE %T 0 to 100 %T
IR %T 0 to 100 %T
AQ4500 Turbidimeter
.5 EBC
Resolution 0
Wavelength Selection Automatic
Repeatability ± 1% of r
Accuracy ± 2% of r
Source Lamp Light emitting diode (LED)
Detector Silicon Photodiode
Sample Size Approximately 12 mL
Environmental Conditions
Operating Temperature - 40
Humidity 90% r
Waterproof IP67
Inputs
Keypad 12 dual function keys with tactile
RS232 Yes
Sample Chamber 24 mm
Display Custom LCD
Units FNU, NTU, FAU, ASBC, EBC
Low Battery Indicator Yes
.01 NTU (0 to 9.99)
0.1 NTU (10 to 99.9)
1 NTU (100 to 1000)
eading or 0.01 NTU
eading plus 0.01 NTU
(0 to 500 NTU)
± 3% of reading (500 to 1000 NTU)
± 5% of reading (1000 to 2000 NTU)
.0 to 60.0 °C
elative humidity at 30.0 °C max
feedback
Thermo Scientific Orion AQUAfast AQ4500 Turbidimeter User Guide
33
Page 38

Software Features
Datalogging 100 points
Built-in Clock with Time
Yes
and Date Display
Auto Shut-off Yes
Electrical Features
Power 4 AA batteries
Battery Life 2,500 hours (alkaline) 10,000 hours
(lithium)
Non-volatile Memory Yes
34 Thermo Scientific Orion AQUAfast AQ4500 Turbidimeter User Guide
Page 39

Appendix A Tungsten vs. LED Discussion
Traditionally, tungsten lamps have been used as light sources in turbidity
measuring instrumentation. As such, they have been accepted by US EPA,
and widely used in all white light turbidity measuring instrumentation.
The primary characteristic, which made their use necessary, is the required
br
oadband spectral distribution. Tungsten bulbs have a measurable output
ranging from blue light all the way into infrared wavelengths.
At the time there had been no suitable alternatives to consider, so
tungsten bulbs were accepted despite the operating problems they
presented. Although LEDs were widely available for a very long time, they
were characterized by a relatively narrow spectral emission, unsuitable for
A 180.1 method.
US EP
Recently, high-powered white LEDs have become available. In essence,
these are blue (450 nm) LEDs with a phosphorus coating on the die. This
construction gives off a broadband light from deep blue into deep red
wavelengths and uses minimal power to accomplish this.
Thermo Scientific Orion products include a meter that uses this new
solid-state light sour
5 has been given interim EPA approval for wastewater reporting. The
EPA approval was through the ATP (Alternative Test Procedure) program
to allow new technologies to be accepted for use where applicable
methodologies meet or ex
thermo.com/waterapps for details. The following are some
www.
important considerations which characterize and compare this approach
to that of a traditional tungsten light sour
ce. The Thermo Orion AQ 4500 Method, Revision
ceed the original technology. Visit
ce.
Thermo Scientific Orion AQUAfast AQ4500 Turbidimeter User Guide
35
Page 40

Spectral
Distribution
Detector-LED
Combined
Responsivity
EPA 180.1 method describes a polychromatic measurement system. It
is based on a tungsten light source and a detector system with spectral
characteristics betw
In order to substitute a white LED light source, it is important to
consider the spectral emission and transmission characteristics of the
combined electr
As can be seen from the graph, the white LED – Si photo detector system
described her
of a tungsten bulb and a cadmium sulfide photo detector combination.
It also contains a narrow secondary peak at 460 nm. As the blue output
is very limited in tungsten bulbs, this peak can aid in better detection of
v
ery small particles. However, as the peak area is very small compared to
that of a main body, this enhancement is not very pronounced.
een 400 and 600 nm.
o-optical system.
e is quite broadband. Its appearance is very similar to that
36 Thermo Scientific Orion AQUAfast AQ4500 Turbidimeter User Guide
Page 41

Stability
As follows from the theory of operation, and has been observed in
practice, white LED meters exhibit high level of stability over a wide
range of operating conditions
calibration over a period of weeks of intensive use. In contrast, tungsten
bulb based instrumentation requires relatively frequent calibrations.
. The meters have been observed to hold
Ambient Light
and Electronic
Bias Rejection
Longevity
Voltage and
Temperature
Dependency
Unlike tungsten bulbs, LED light sources readily lend themselves to
rapidly pulsed operation
a technique by which the ambient light as well as other electronic
induced err
reduce the ambient light leakage errors when making very low turbidity
measur
LEDs have a very long operating life: typically 100,000 hours or more.
Thus, it is not necessary to include provisions for their replacement.
It is well known that the spectral output (color temperature) of tungsten
bulbs is v
can be easily regulated, the meter-to-meter reproducibility for certain
samples can v
This has a very significant effect on the color temperature, particularly in
view of the fact that the bulbs themselves are not as reproducible as the
LED sour
The operating voltage and ambient temperature have a very minimal
effect on LEDs, and are most pronounced on the intensity, not the
spectral output
by the meter electronics, for all practical purposes, these errors are nonexistent
ors are effectively cancelled out. In doing so it is possible to
ements.
ery dependent on the operating voltage. Although, this voltage
ary, as the typical voltage accuracy is on the order of 1%.
ces.
. As any minor intensity variations are easily corrected
.
. This enables the use of synchronous detection,
Thermo Scientific Orion AQUAfast AQ4500 Turbidimeter User Guide
37
Page 42

Warm-up
As the light sources are powered up, they all experience intensity and
spectral characteristic shifts until the operating equilibrium is reached.
This is commonly referred as the warm-up time. This parameter is a very
important consideration when measuring the turbidity. It is important to
have a spectrally and intensity stable light source. Although it is possible
to correct for intensity variations, it is not possible to do so for color
temperatur
Tungsten bulbs suffer from pronounced warm-up problems: both in
intensity and color temperatur
period. However, this is much shorter (1 second or so), and the only
parameter that significantly varies is the LED intensity.
e effects.
e. White LEDs also do have a warm-up
Aging
Shock
Resistance
Bulb
Replacement
Another well-known fact about the tungsten bulbs is that they change
their pr
mechanisms which contribute to this, and presently it is not possible to
eliminate these effects
measurements, the most significant being the need for very frequent
calibrations
signs.
Unlike tungsten bulbs, all LEDs have very high shock resistance. This is
particularly important for field instrumentation.
As mentioned earlier, the LED based instrumentation does not need
any provisions for bulb replacement. This not only results in cheaper
instrumentation, but since the light source focusing and positioning has
been pre-adjusted at the factory, it will be correct for the entire meter
operating life
operties through their life (aging). There are number of
. This has number of consequences on the turbidity
. In contrast, white LEDs do not exhibit any significant aging
.
38 Thermo Scientific Orion AQUAfast AQ4500 Turbidimeter User Guide
Page 43

Water Analysis Instruments
9 0 0 1 : 2 0 0 8
North America
166 Cummings Center
Beverly, MA 01915 USA
Toll Free: 1-800-225-1480
Tel: 1-978-232-6000
Dom. Fax: 1-978-232-6015
Int’l Fax: 978-232-6031
Europe
P.O. Box 254, 3860 AG Nijkerk
Wallerstraat 125K, 3862 CN Nijkerk,
Netherlands
Tel: (31) 033-2463887
Fax: (31) 033-2460832
Asia Pacific
Blk 55, Ayer Rajah Crescent
#04-16/24, Singapore 139949
Tel: 65-6778-6876
Fax: 65-6773-0836
www.thermo.com/water
© 2009 Thermo Fisher Scientific Inc. All rights reserved.
256473-001 Rev. A 06-09
 Loading...