

Thermo Savant FastPrep FP120, FastPrep FP220, FastPrep FP110 Instruction Manual

FastPrep
®
FP120
Cell Disrupter
INSTRUCTION MANUAL
Applies to FP100, FP120, and FP220 Models
Qbiogene, Inc. (North America)
2251 Rutherford Road
Carlsbad, CA 92008
Phone (800) 424-6101
Fax (760) 918-9313
104-3003-00 Rev. B
© 2001 Thermo Savant
Qbiogene, Inc (Europe)
Parc d’Innovation BP72
67042 Illkirch
Cedex, France
Phone +33 (0) 388-675-425
Fax +33 (0) 388-671-945
A Thermo Electron business

Table of Contents
Section Section Title — Introduction Page
1.0 Introduction 1
Section Section Title — Installation Page
2.0 Installation 1
Receiving 1
Unpacking 1
Inspection 1
Set-up 2
Section Section Title — Operation Page
3.0 Operation 2-3
3.1 Mode Selection 4
3.2 Setting Target Time 4
3.3 Example of Manual Run 5
3.4 Example of Auto Run 6
3.5 Drying Rate 6
3.6 Other Topics 7
Section Section Title — Specifications Page
4.0 Specifications 8
Section Section Title — Accessories Page
5.0 Accessories 9
Section Section Title — Warranty and Page
6.0 Warranty and Liability 9
FastPrep®is a registered trademark of Qbiogene.
©2000 Thermo Savant
Liability
Appendix 1:
Proper handling of hazardous exhaust vapors 10
Appendix 2:
Operating hints 10

1.0 DESCRIPTION
The FastPrep®FP120 is a high-speed, benchtop reciprocating device for efficient
disruption of cell membranes. The unit is designed for use with the FastPrep
Extraction Kits (Qbiogene, www.qbiogene.com). These kits are available for a
wide variety of extraction and purification applications. The FastPrep®sample
holder has the capacity to process 12 FastPrep®sample tubes simultaneously.
We do not recommend using any tubes other than those supplied with the
FastPrep®Kits.
The front control panel of the FastPrep®Instrument includes a digital display and
two control switches. Speed (4.0-6.5 m/sec) and run time (1-45 seconds) are fully
programmable. The microprocessor measures and displays time and speed during each programmed run.
®
For information on FastPrep®kits, other kits for use with the FastPrep
Instrument and their various applications, call Qbiogene at 800-424-6101 (North
America) or +33 (0) 388-675-425 (Europe) or visit the FastPrep®Users Resource
Group at http://www.qbiogene.com.
2.0 INSTALLATION
Unpacking. Carefully remove the FastPrep®Instrument and accessories from
the shipping carton. Compare the packing list to the box contents. If there is a
discrepancy, call Qbiogene, Inc.
Inspection. Inspect the unit for any damage that may have occurred during
shipment. Should there be damage, report it to the carrier and contact Qbiogene
immediately. Save the packaging material in the event a return is necessary.
Set-up. To assure safe operation and best results, read this manual in its entirety before operating the FastPrep®Instrument.
The FastPrep®Instrument comes fully assembled, requiring very little set-up.
Install the system on a clean, dry, level, stable surface within 4 feet (1.2m) of a
compatible electrical outlet.
Allow 1-2 inches (3-5 cm) of space around the FastPrep®Instrument for proper
motor ventilation.
®
This unit is “FOR INDOOR USE ONLY”. Avoid operating in areas of excessive
humidity or extremes of temperature.
IMPORTANT: Remove motor locking plate prior to use as per instructions included with the unit.
1
2.0 INSTALLATION (cont’d)
Connecting the power
WARNING: Before connecting the FastPrep®Instrument to an outlet. Make sure
that the voltage, frequency, and amperage are compatible with the requirements
indicated on the label on the instrument rear panel. If there are any questions,
please consult an electrician.
As a safety feature, this unit is equipped with a three-prong grounded plug that fits
a grounding-type power outlet. Consult an electrician to replace the outlet if necessary. Do not defeat this safety feature by modifying the plug. Make sure the power
switch, located on the rear panel, is OFF. Connecting the power cord to the instrument (power fixture is on the rear panel) and plug it into a compatible outlet.
Note: Asafety latch prevents the FastPrep®FP120 lid from opening when the main
power switch, located on the rear panel, is OFF. Before switching power ON, make
sure that the unit is properly set up, connected to a suitable power source, and the
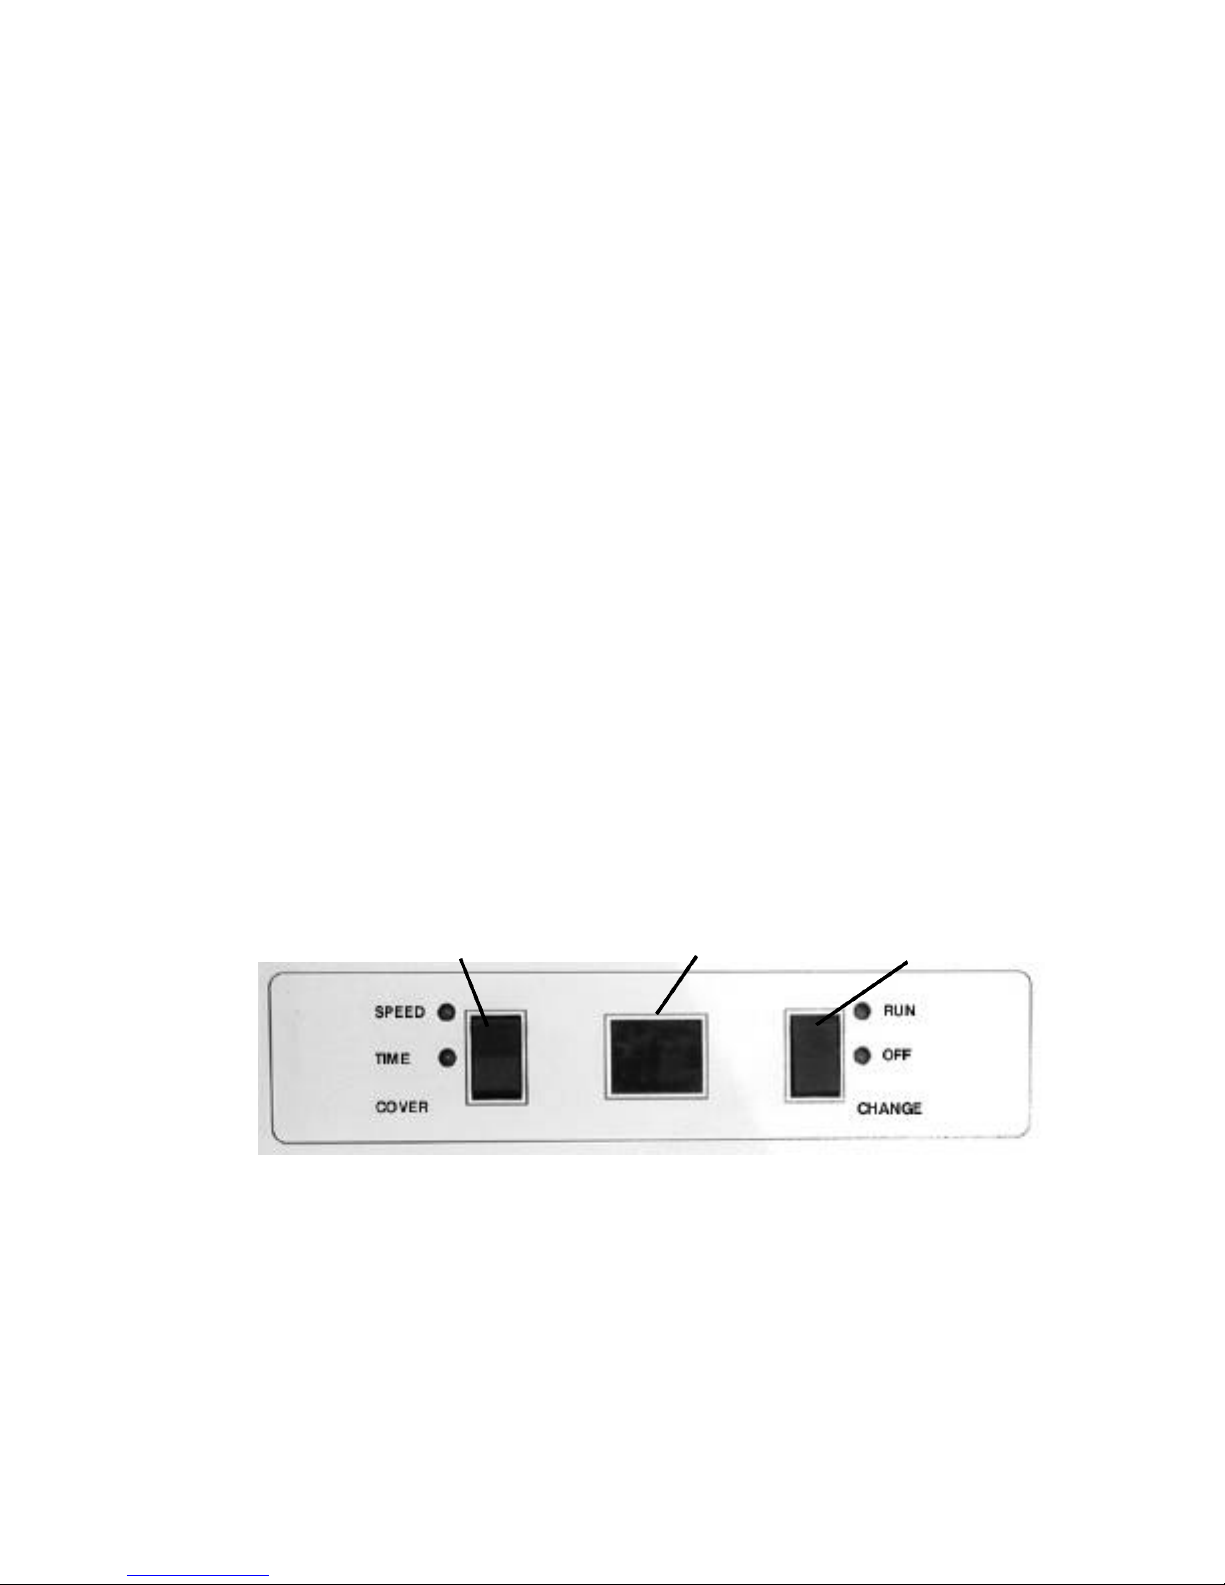
RUN/OFF/CHANGE switch on the front control panel is turned OFF (see Figure 1.
Below). Once the main power is ON, press COVER (SPEED/TIME/COVER switch)
to release the lid.
3.0 OPERATING INSTRUCTIONS
3.1 PREPARINGTHE FASTPREP®FP120 FOR OPERATING
Turn the main power switch ON.This switch is located on the rear panel of the instrument. When switched O N, factory-set default values automatically program
FastPrep to operate at speed 4.0 m/sec and run time 20 seconds (to override these
values, see section 3.2 below).
3.2 CONTROL PANEL
A
DISPLAY
Figure 1. FastPrep®FP120 Control Panel
There are two rocker switches on the instrument front panel (Figure 1). The
RUN/OFF/CHANGE switch on the right (switch B) allows the user to choose RUN,
for operation (cellular disruption) or CHANGE, to program the desired operating
parameters (speed or time). Setting the switch to the OFF (center) position opens
the lid after a run is completed. The OFF position can also be used, if necessary, to
terminate a run that is in progress.
B
Note: Run settings cannot be changed once the run is in progress.
2
 Loading...