

Page 1
GUIDE À CONSERVER PAR L’UTILISATEUR
Notice d’installation et d’utilisation
Sèche-serviettes soufflant
F
GB
NL
RU
Page 2
L’appareil que vous venez d’acquérir a été soumis à de nombreux tests et contrôles afin d’en assu-
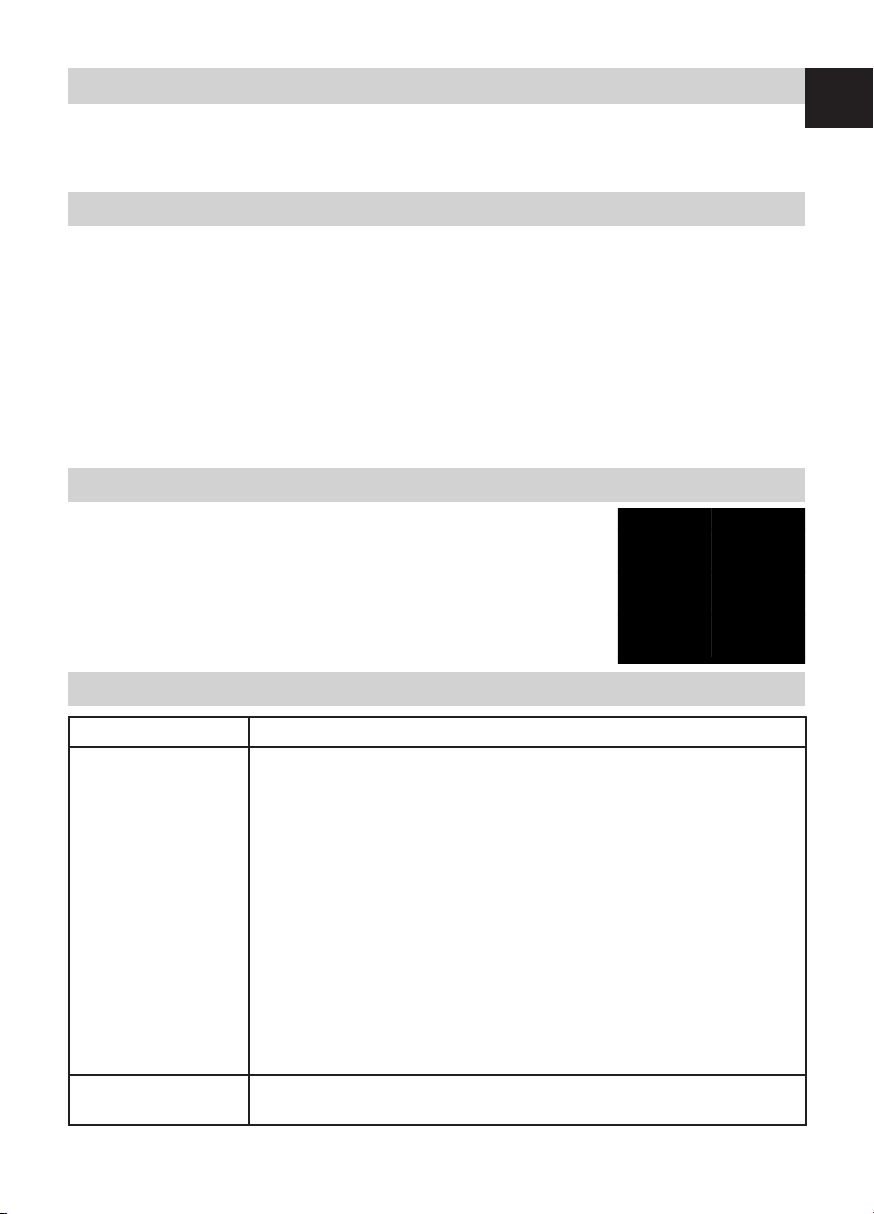
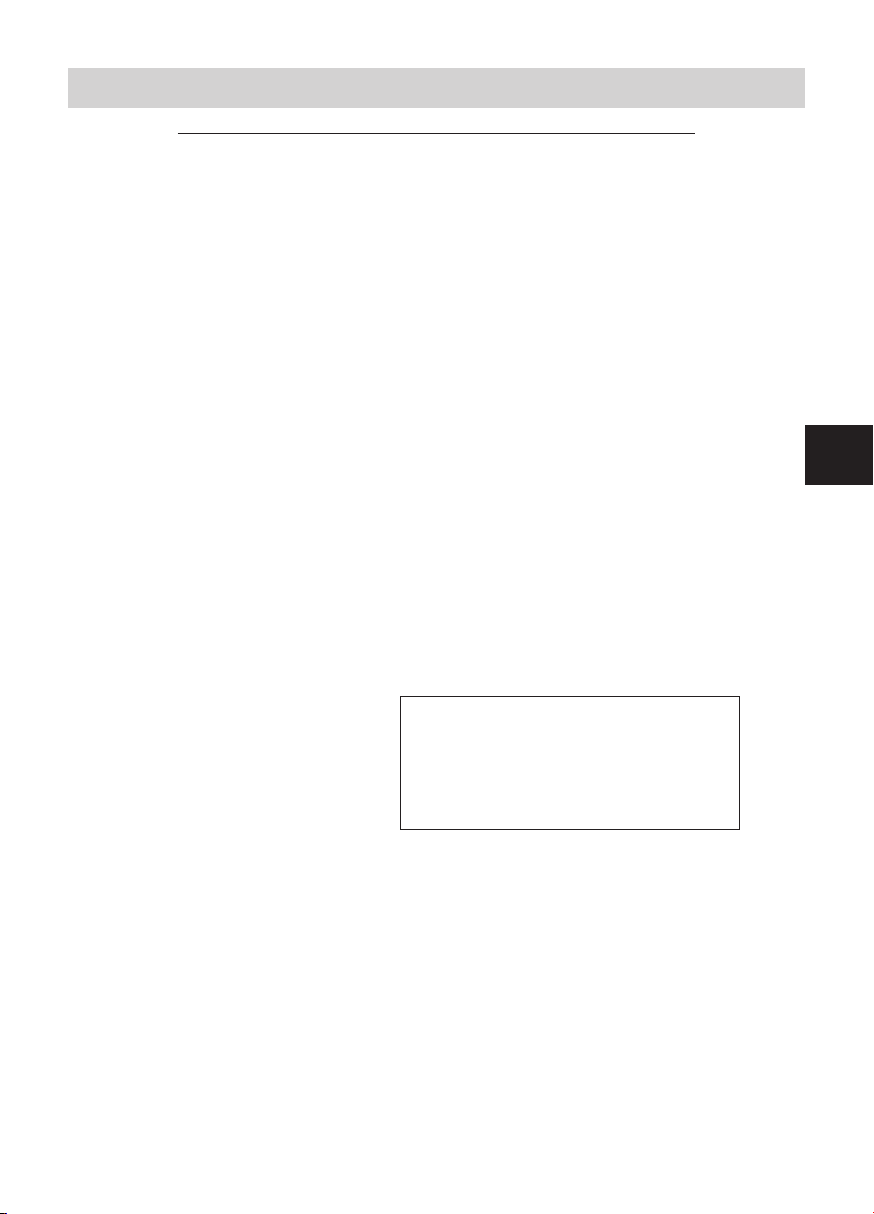
Volume
3
Volume
2
60 cm
60 cm
60 cm
3 m
2,25 m
Volume
1
50 cm mini
1 m mini
30 cm mini
Ce type d'appareil ne doit pas être utilisé sur la fonction minuterie comme chauffage
principal et permanent d'une pièce ou d'un local.
Il est interdit d'installer l'appareil au dessus d'une altitude de 1800 m (risque de mauvais
fonctionnement).
L'installation en altitude provoque une élévation de la température de sortie d'air.
rer la qualité. Nous vous remercions de ce choix et de votre confiance. Nous espérons qu’il vous
apportera une entière satisfaction.
Quelques conseils:
Lisez la notice avant de commencer l’installation de l’appareil.
Coupez le courant avant toute intervention sur l’appareil et vérifiez la tension d’alimentation.
Conservez la notice, même après l’installation de l’appareil.
Caractéristiques de l’appareil (indiquées sur l’étiquette signalétique de l’appareil):
Appareil satisfaisant à la norme NF Electricité
IP24 :Appareil protégé contre les projections d’eau.
Classe II : Double isolation.
INSTALLATION DE L’APPAREIL
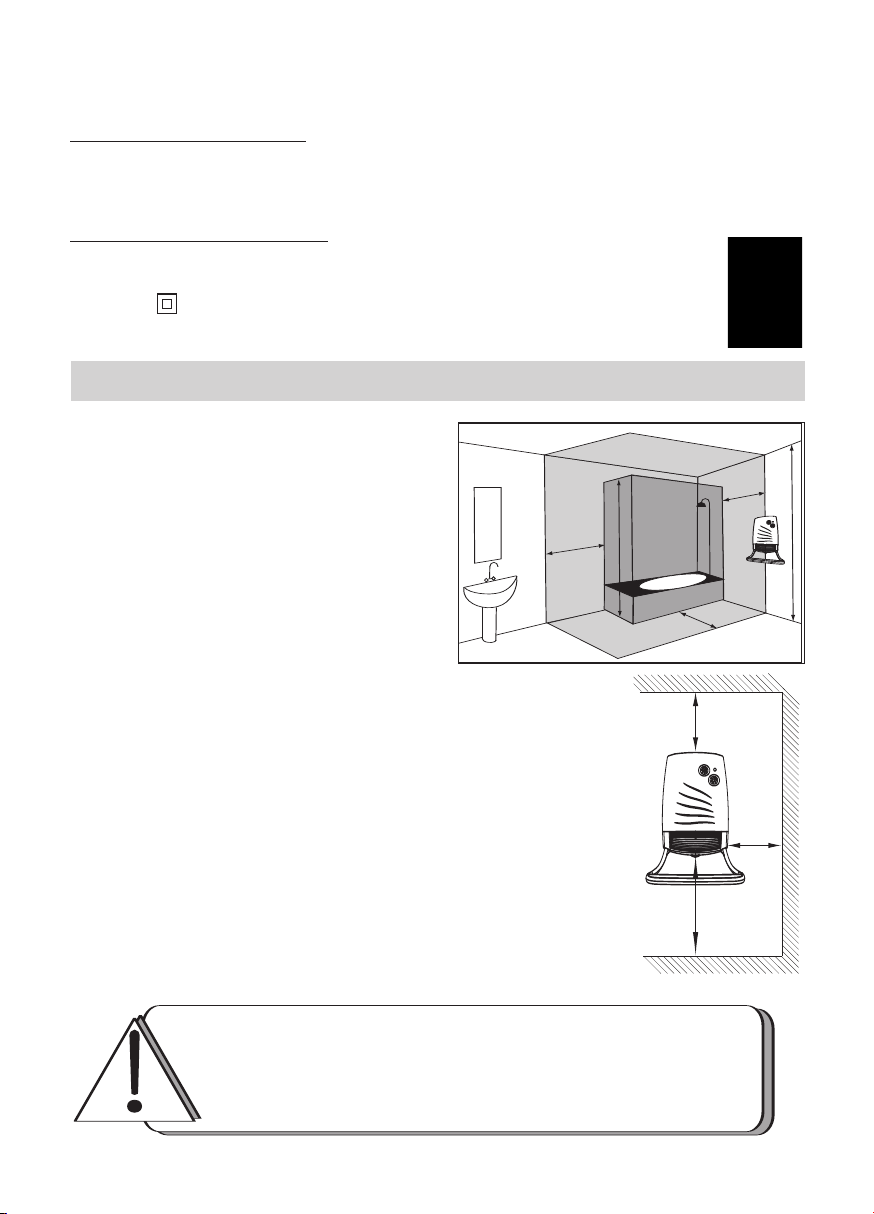
1) Où installer l’appareil ?
- Cet appareil a été conçu pour être installé dans un
local résidentiel. Dans tout autre cas, veuillez
consulter votre distributeur.
- L’installation doit être faite dans les règles de
l’art et conforme aux normes en vigueur dans
le pays d’installation (
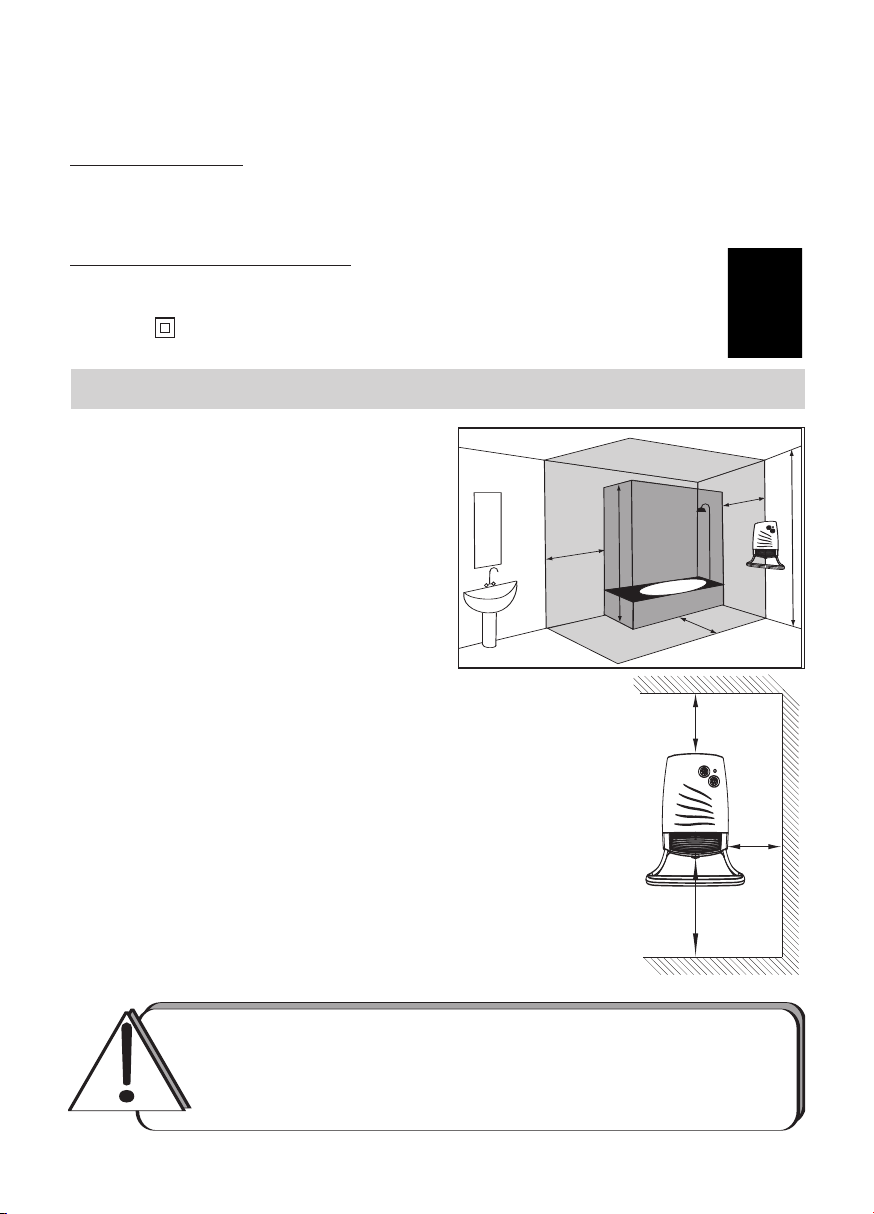
Ne pas installer l’appareil:
Ä Dans un courant d’air susceptible de
perturber sa régulation (
Centralisée,etc...).
Ä Sous une prise de courant fixe.
Ä Dans le volume 1 des salles de bains.
Ä Dans le volume 2 si la manipulation des commandes est possi-
ble par une personne utilisant la douche ou la baignoire.
NFC 15100 pour la France).
sous une Ventilation Mécanique
2) Comment installer l’appareil ?
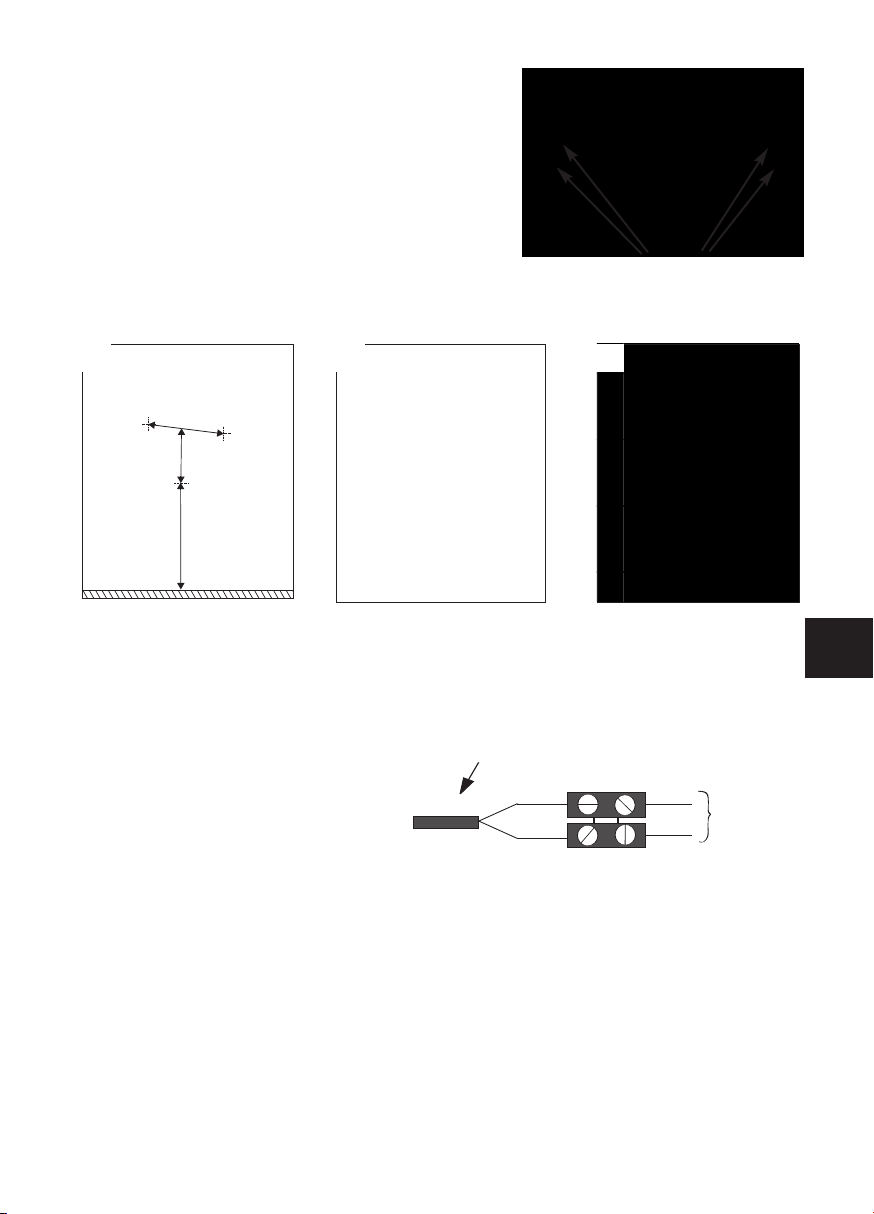
Pour fixer l’appareil au mur, respectez les distances indiquées ci-contre.
2
Page 3
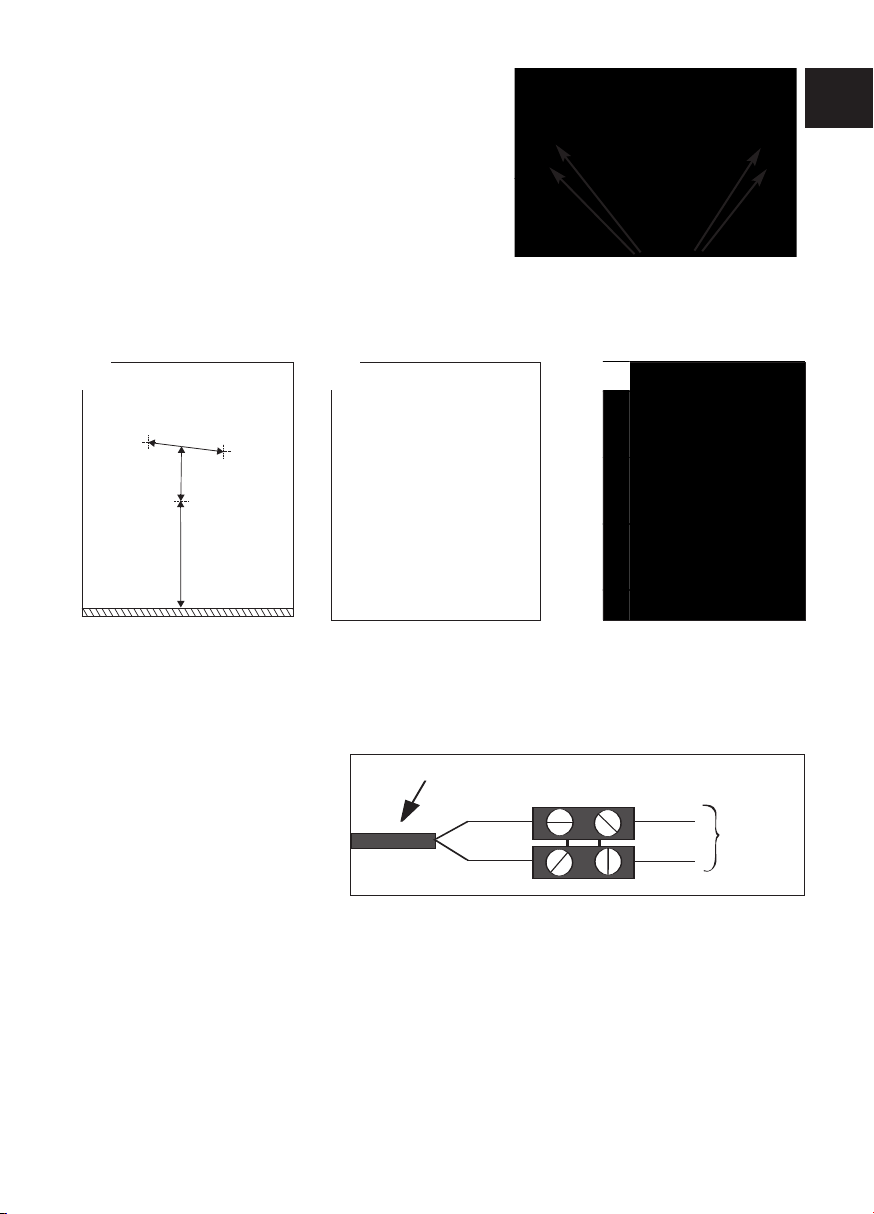
152 mm
390 mm
1m
Câble de l'appareil
Phase=marron
Neutre=bleu
PHASE
NEUTRE
Réseau
Electrique
2-1) Fixer la barre (version avec barre
- Procédez à l’installation de la
barre avant de fixer l’appareil
au mur.
- Posez votre appareil à plat et
vissez les quatres vis de fixation.
).
Vis de fixation de la barre
2-2) Fixer l’appareil au mur.
1 2 3
F
Pointez les 3 trous de fixation et placez les 3 chevilles.
Vissez les 2 vis supérieures
en laissant 8 mm mini entre
la tête de la vis et le mur.
Faites glisser l’appareil dans
les encoches des 2 vis
supérieures.
Immobilisez l’appareil avec
la vis du bas.
2-3) Raccorder l’appareil.
- L’appareil doit être alimenté en
230V 50Hz.
- Le raccordement au secteur se fera
à l’aide du câble de l’appareil par
l’intermédiaire d’un boîtier de raccordement. Dans des locaux humides comme les salles d’eau et les
cuisines, il faut installer le boîtier de raccordement au moins à 25 cm du sol.
- Afin d’éviter tout danger dû au réarmement intempestif du coupe circuit thermique, cet appareil ne
doit pas être alimenté par l’intermédiaire d’un interrupteur externe, comme une minuterie, ou être
connecté à un circuit qui est régulièrement mis sous tension et hors tension par le fournisseur d’électricité
- L’installation doit être équipée d’un dispositif de coupure omnipolaire ayant une distance d’ouver ture de contact d’au moins 3 mm.
- Le raccordement à la terre est interdit.
Si le câble d’alimentation est endommagé,
v
.
ente ou une personne de qualification similaire afin d’éviter un danger.
il doit êtr
e remplacé par le fabricant, son service après-
3
Page 4
UTILISATION DE L’APPAREIL
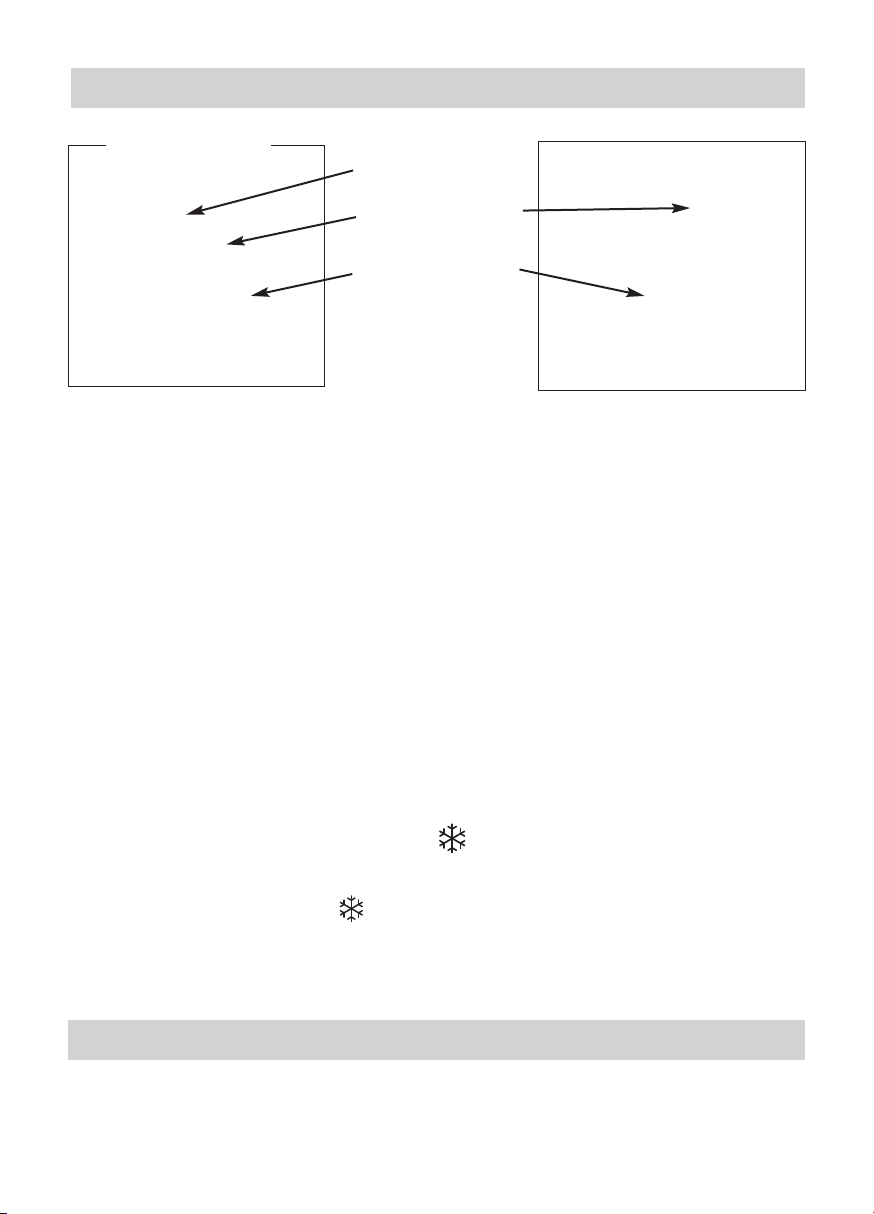
1) Description des commandes
Version Minuterie
Version Basique
Molette Minuterie
Témoin de chauffe
Molette Chauffage
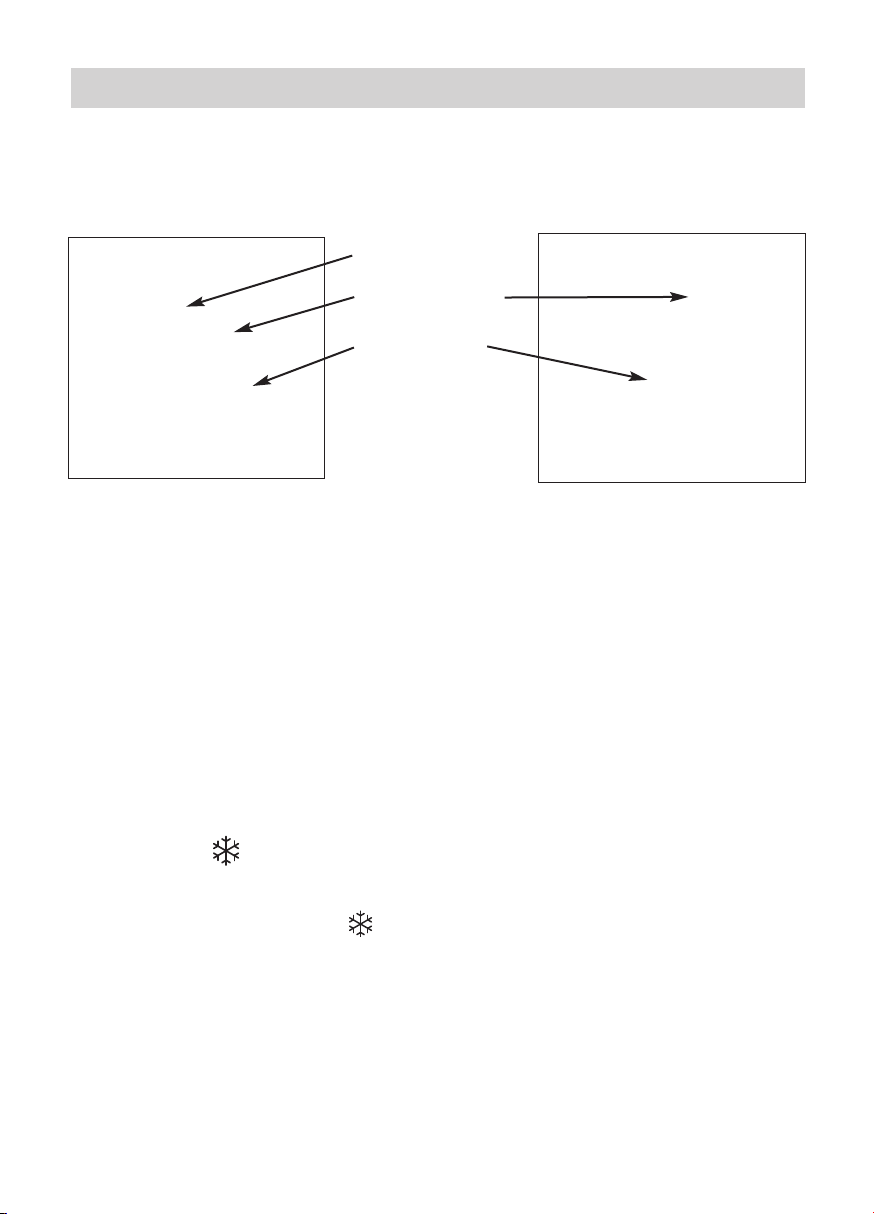
2) Chauffa
Afin de déterminer la position de la molette Chauffage correspondant à la température souhaitée, procédez comme suit :
- Tournez la molette
se dans la pièce.
- Tournez ensuite la molette
- Revenez légèrement dans l’autre sens, laissez l’appareil fonctionner.
- Il peut s’avérer nécessaire de corriger le réglage par la suite. Pour augmenter la température, tour-
nez légèrement la molette
molette dans l’autre sens. Procédez ainsi jusqu’à ce que la température vous convienne.
- Pour arrêter l’appareil, mettez la molette
ge d’ambiance
vers la droite au maximum et attendez que la température désirée s’établis-
vers la gauche jusqu’à entendre le clic du contact du thermostat.
dans le sens des aiguilles d’une montre. Pour la diminuer, tournez la
sur la position mini.
3) Chauffage rapide de la pièce ( version avec minuterie)
- Réglez la molette de chauffage en fonction de la température ambiante souhaitée.
- Réglez la molette de la minuterie
1800W). L’appareil fonctionnera alors en préchauffage accéléré avec 1800W pendant la durée sélectionnée, puis assurera avec 1000W la température d’ambiance correspondant au réglage du thermostat.
sur la durée de chauffage accélérée désirée (fonctionnement sur
4) Mode Hors Gel
C’est le mode qui permet de maintenir la température dans la pièce à environ 7°C lors d’une abscence prolongée de la maison (généralement plus de 24 heures).
Réglez la molette
sur la position .
5) Mise en place du filtre.
Le filtre peut être mis en place par le côté gauche ou droit de l’appareil, en fonction de votre installation.
4
Page 5
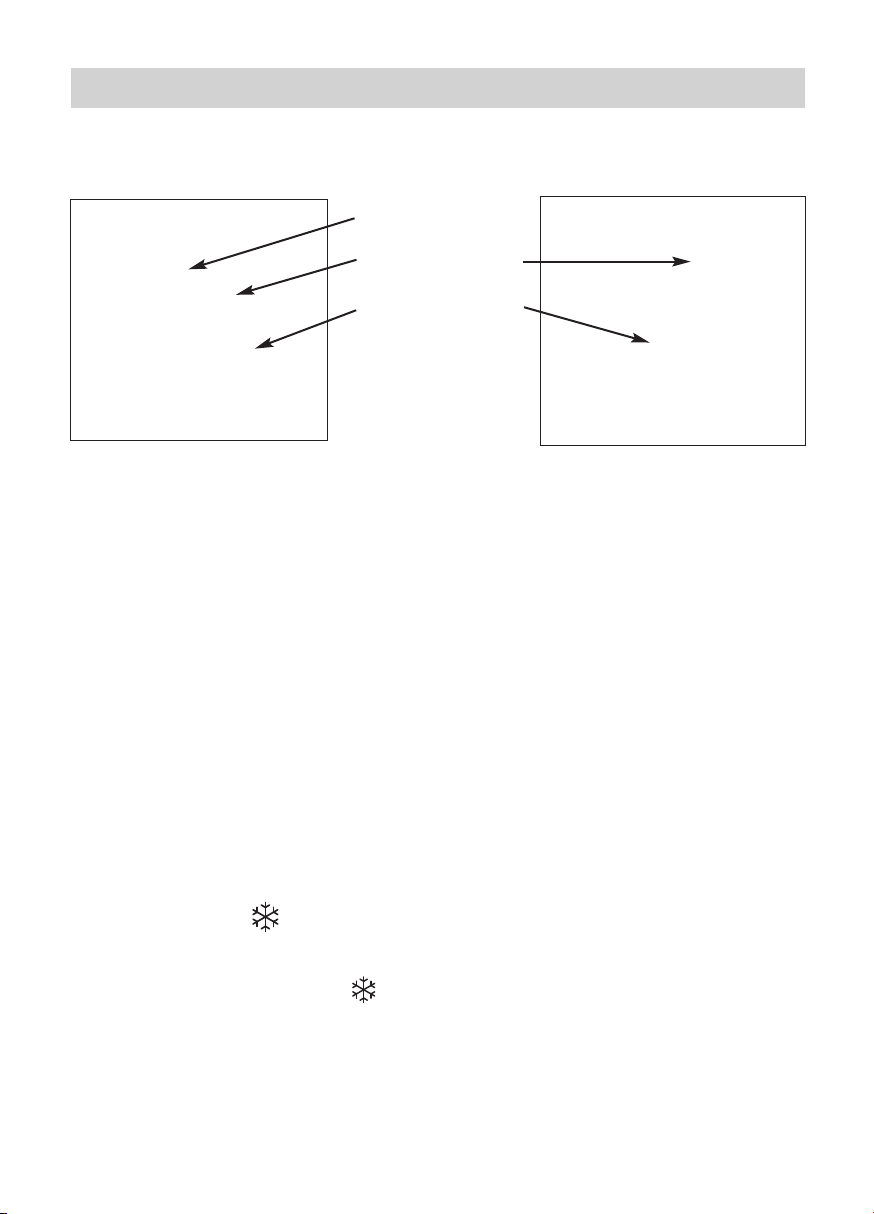
CONSEILS D’UTILISATION
- Il est inutile de mettre la molette de chauffage en position maxi, la température de la pièce ne
montera pas plus vite.
- Lorsque vous aérez la pièce, mettez la molette
en position mini.
MISE EN GARDE
- Evitez que les enfants s’appuient sur la façade et les barres de l’appareil.
- Cet appareil n’est pas prévu pour être utilisé par des personnes (
cités physiques, sensorielles ou mentales sont réduites, ou des personnes dénuées d’expérience ou
de connaissance, sauf si elles ont pu bénéficier, par l’intermédiaire d’une personne responsable de leur
sécurité, d’une surveillance ou d’instructions préalables concernant l’utilisation de cet appareil.
- Il convient de surveiller les enfants afin qu’ils ne jouent pas avec l’appareil.
- Pour éviter une surchauffe, ne pas couvrir l’appareil.
- Veillez à ne pas laisser introduire d’objets ou du papier dans l’appareil.
- Toutes interventions à l’intérieur de l’appareil doivent être effectuées par un professionnel qualifié.
- L’usage des barres doit être limité au séchage des serviettes.
y compris les enfants) dont les capa-
ENTRETIEN
- La façade de l’appareil peut être nettoyée avec un chiffon humide.
- Ne jamais utiliser de produits abrasifs.
- Pour conserver les performances de l’appareil, il est nécessaire d’effectuer le dépoussiérage des grilles de l’appareil,
à l’arrière de l’appareil.
en place le filtre par la droite ou par la gauche de l’appareil.Tirez sur le
filtre et nettoyez-le à l’aide d’un aspirateur.
Selon votre installation, vous pouvez mettre
ainsi que du filtre situé
F
EN CAS DE PROBLÈME
Problèmes rencontrés Vérifications à faire
- Vérifiez la température de l’air de la pièce et la position du thermostat.
- Assurez-vous que les disjoncteurs de l’installation sont enclenchés,ou bien
que le délesteur (si vous en avez un) n’a pas coupé l’alimentation de l’appareil.
- L’appareil est équipé d’une sécurité de surchauffe. Le limiteur de sécurité
coupera automatiquement son alimentation électrique afin d’éviter tout
L’appareil ne chauffe
pas.
L’appareil chauffe tout
le temps.
incident.
Pour remettre le chauffage en marche, procédez de la manière suivante :
- Coupez l’alimentation électrique de l’appareil.
- Supprimez les causes du fonctionnement anormal (
obstruant la grille de sortie d’air ou l’espace aménagé entre l’appareil et le
).
mur
- Vérifiez le filtre à l’arrière de l’appareil et le nettoyer si nécessaire (
aphe entr
agr
par
Attendez 15 min environ et remettez le chauffage en marche.
-
Vérifiez que l’a
ge de températur
etien
).
eil n’est pas situé dans un courant d’air ou que le régla
ppar
e n’a pas été modifié.
5
objets et salissures
voir
-
Page 6
The device you have just purchased was submitted to many tests and checks ensuring its quality.
Volume
3
Volume
2
60 cm
60 cm
60 cm
3 m
2,25 m
Volume
1
50 cm mini
1 m mini
30 cm mini
This type of device must not be used in timer mode as the primary
and permanent method of heating for a room or an area.
Installing a machine at altitude causes an increase in air output temperature.
We thank you for your choice and trust.We hope you will be fully satisfied.
A few recommendations:
Read the instructions before installing the device.
Power the device off before intervening on it, and check the power supply voltage.
Store the instructions, even after installing the device.
Classification of the device: (shown on the information label)
Cat C : Complies with EU standards for this category.
IP24 : Protected against water projections.
Classe II : Dual insulation.
INSTALLING THE DEVICE
Location of the device
- This device was designed to be installed in residential premises. In any other case, please call your
distributor.
- Installation must comply with the standards currently enforced in the country of use.
- Locate the device within minimum distances from
obstacles.
Do not install the device:
Ä In a draft likely to affect its control (under
centralised mechanical ventilation, etc…
Ä Under a fixed mains outlet.
Ä Inside zones 0 and 1 in bathrooms.
).
The heater is to be installed so that switches and other controls
cannot be touched by a person in the bath or shower.
In the UK, please refer to the IEE Regulations 601-06-01 and 60108-01 (BS 7671).
2) How to install the device ?
To fasten the device to the wall, observe the distances shown opposite.
6
Page 7

152 mm
390 mm
1m
2-1) Fastening the bar
Panel heater cable
Phase=brown
Neutral=blue
PHASE
NEUTRAL
Electricity
grid
version with the bar).
(
- Proceed to install the front bar
before fastening the device to
the wall.
- Lay your device flat and screw in
the four fixing screws.
Bar fixing screws
2-2) Fastening the device to the wall.
1 2 3
Mark out the 3 fixing holes
and insert the plugs.
Screw in the 2 upper
screws leaving a minimum
of 8 mm between the head
of the screw and the wall.
2-3) Connecting the device.
- The device must be supplied with
230/240V 50Hz.
- It is connected to the electricity
supply by means of a 2 core cable
(Brown= Live, Blue= Neutral) via a
connection box. In damp areas such
as bathrooms and kitchens, the
connection box must be installed at least 25 cm above the floor.
- To prevent hazards due to unintentional resetting of the thermal circuit breaker, this device should
not be powered through an external switch, such as a time switch, or connected to a circuit which
witched on and off on a r
is s
- The installation must include a double-pole cutout with a contact opening distance of at least 3mm.
- The device must not be earthed.
- If the supply cable is damaged, it must be replaced by the manufacturer, his after-sales service or a
similar person of qualification in order to avoid a danger.
egular basis by the electric power supplier.
Slide the device into the
niches created by the two
upper screws. Fasten the
device in place firmly with
the bottom screw.
GB
7
Page 8
USING THE DEVICE
1) Description of the control box
Timer version
Basic version
Timer knob
Heating indicator
Heating knob
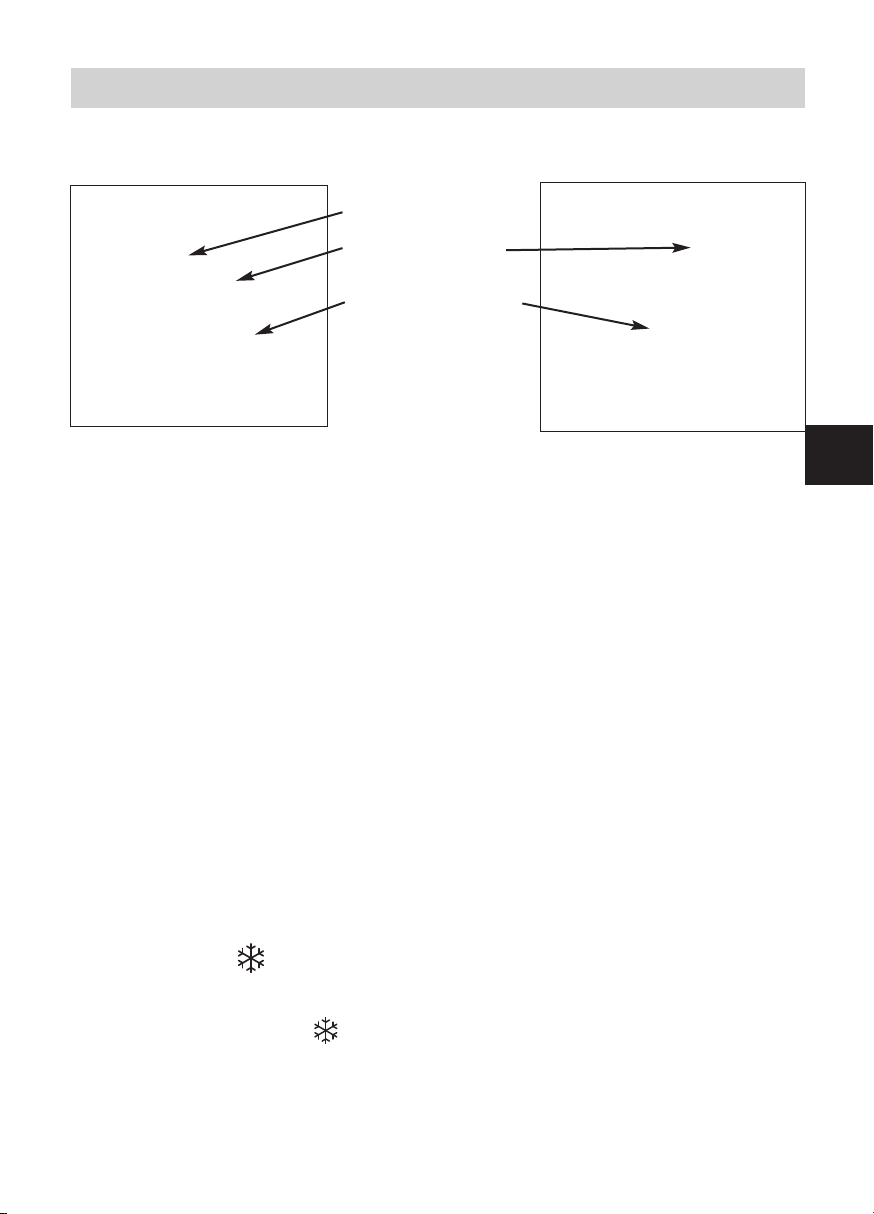
2) Ambient heating
To determine the position of the Heating knob for the desired temperature, proceed as follows:
- Turn the knob
- Then turn the knob
- Turn the knob back slightly and leave the device to run by itself.
- It may be necessary to correct the setting subsequently.To increase the temperature, turn the knob
slightly clockwise.To reduce the temperature, turn the knob anticlockwise. Continue in this way
until you are satisfied with the temperature setting.
- To stop the device, set the knob
3)Rapid room heating (version with timer)
- Set the heating knob to the ambient temperature desired.
- Set the timer’s knob to the period of rapid heating desired (operation at 1800W).The device will
then run at 1800W in accelerated pre-heating mode for the selected period of time and will then
operate at 1000W to maintain the ambient temperature according to the thermostat setting.
fully to the right and wait for the room to reach the desired temperature.
to the left until you hear the thermostat contact click.
to the minimum position.
4) Frost mode
This is the mode that enables you to maintain the temperature in the room at approximately 7°C
during a prolonged absence (
Set the heating knob to position .
generally for more than 24 hours).
5) Installing the filter.
The filter can be installed from the left or the right side depending on your installation.
8
Page 9

RECOMMENDATIONS OF USE
- It is useless to set the heating knob to the maximum position, the room will not heat up any faster.
- When you air the room, set the knob
to the minimum position.
WARNING
- Do not let children lean on the front and the bars of the device.
This device is not intended for use by persons (including children) with physical, sensory or mental
disability, or by persons lacking experience or knowledge, unless they have received from a person
in charge of their safety adequate supervision or preliminary instructions on how to use the device.
- Prevent children from climbing on the device.
- Do not cover the device: this can cause it to overheat.
- Ensure you do not let foreign objects or paper fall into the device.
- Any work inside the device must only be performed by a qualified technician.
- The bars must only be used for drying towels.
MAINTENANCE
- The front of the device can be cleaned with a damp cloth.
- Never use abrasive products.
- To maintain the device’s performance, you must remove the dust from the
device’s grills and the filter at the back of the device.The filter can be
installed from the left or the right side depending on your installation.Extract
the filter and clean it with a vacuum cleaner.
IN CASE OF PROBLEM
GB
Problems encountered Checks to make
- Check the air temperature in the room and the thermostat’s setting.
- Ensure that the installation’s circuit breakers are closed or that the
if you have one) has not cut off the power supply to
pproximately 15 minutes and then switch the device on
9
The device does not heat.
The device heats all the time.
cut-off switch (
the device.
- The device is fitted with an overheat safety device.The safety limit
switch will cut off the electrical power automatically to avoid any
problems.
Proceed as follows to switch the device on again:
- Switch off the power supply to the device.
- Eliminate the causes of the device operating abnormaly (
and/or dirt blocking the air outlet grill or the space left between the
device and the wall).
- Check the filter at the back of the device and clean it if necessasee the ‘Maintenance’ section).
ry (
ait a
W
-
again.
- Check that the device is not located in a draught or that the tempee setting has not been alter
ratur
objects
ed.
Page 10

WARRANTY CONDITIONS
KEEP THIS DOCUMENT IN A SAFE PLACE
(To be presented by the user only in the event of a claim)
- The guarantee period is two years from the date of installation or purchase and may not exceed 30
months from the date of manufacture in the absence of a receipt.
-The guarantee covers the replacement and supply of components recognised as being defective,
excluding any damages or interest.
- The user is responsible for any labour or transport costs.
- The guarantee does not cover any damage arising from improper installation,abnormal use or nonobservance of the requirements of the said instructions for installation and use .
- The stipulations of the present guarantee conditions do not exclude any of the purchaser’s legal
rights of guarantee against faults or hidden defects, which are applicable in all cases under the stipulations of Articles 1641 of the Civil Code.
- Present this certificate to your distributor or installer only in the event of a claim, together with
your purchase invoice.
TYPE OF DEVICE*: . . . . . . . . . . . . . . . . . . . . . . . . . . . . . . . . . . . . . . . . . . . . . . . . . . . .
SERIAL NUMBER*: . . . . . . . . . . . . . . . . . . . . . . . . . . . . . . . . . . . . . . . . . . . . . . . . . . . .
CUSTOMER’S NAME AND ADDRESS: . . . . . . . . . . . . . . . . . . . . . . . . . . . . . . . . . . . . . . . . . . . . . . . . . .
. . . . . . . . . . . . . . . . . . . . . . . . . . . . . . . . . . . . . . . . . . . . . . . . . . . .
* This information can be found on the information plate situated on the left-hand side of the device.
ATLANTIC INTERNATIONAL
Tel: (33) 146836000
Fax: (33) 146836001
10
Page 11

V
olume
3
V
olume
2
60 cm
60 cm
60 cm
3 m
2,25 m
Volume
1
50 cm mini
1 m mini
30 cm mini
Dit type apparaat mag niet in de tijdschakelaarfunctie worden gebruikt
als belangrijkste en permanente verwarming van een vertrek of een ruimte.
De installatie van een apparaat op grote hoogte zorgt voor een stijging van de
temperatuur bij de luchtuitgang.
Het apparaat dat u zojuist heeft gekocht is veelvuldig getest en gecontroleerd voor een optimale
kwaliteit.Wij danken u voor uw keuze en uw vertrouwen.Wij hopen dat u veel plezier zult beleven
aan het apparaat.
Enkele tips:
Raadpleeg de meegeleverde gebruiksaanwijzing alvorens het apparaat te installeren.
Sluit de stroom af voor elke ingreep of servicebeurt aan het apparaat en controleer de voedingsspanning.
Bewaar de handleiding, zelfs nadat u het apparaat hebt geïnstalleerd.
Eigenschappen van het apparaat (aangegeven op het typenplaatje van het apparaat):
Apparaat voldoet aan de norm NF Elektriciteit
IP24 :Apparaat beschermd tegen waterspatten.
Klasse II : Dubbele isolatie.
HET APPARAAT INSTALLEREN
1) Waar moet u het apparaat installeren?
- Dit apparaat is ontworpen om te worden geïnstalleerd in een woning. Raadpleeg uw distributeur in
alle andere gevallen.
- Het apparaat moet worden geïnstalleerd volgens
het boekje en de geldende normen in het land van
bestemming.
Het apparaat niet op de volgende plaatsen
installeren:
ÄIn de tocht, omdat hierdoor de tempera-
tuurregeling verstoord zou kunnen worden (
trale mechanische ventilatiesysteem enz.
ÄOnder een vaste contactdoos.
ÄIn volume 1 van de badkamer.
ÄIn volume 2 als het apparaat kan worden bediend door een per-
soon die gebruik maakt van douche of bad.
bijv. onder een cen-
).
NL
2) Hoe installeert u het apparaat?
Bij bevestiging van het apparaat op de muur, moeten de hiernaast aangegeven afstanden worden aangehouden.
11
Page 12

Kabel van het apparaat
Fase=Bruin
Nulleider=Blauw
FASE
NULLEIDER
Elektriciteitsnet
2-1) De stang bevestigen
152 mm
390 mm
1m
versie met stang).
(
- Installeer de stang voordat u
het apparaat op de muur
bevestigd.
- Plaats uw apparaat vlak en draai
de vier bevestigingsschroeven
aan.
Bevestigingsschroeven van destang
2-2) Bevestig het apparaat aan de muur.
1 2 3
Markeer de 3 bevestigingsgaten en zet de 3 pluggen
erin.
Schroef de 2 bovenste
schroeven en laat hierbij
minimaal 8 mm tussen de
schroefkop en de muur.
Laat het apparaat in de
gleuven van de 2 bovenste
schroeven glijden. Zet het
apparaat vast met de
schroef aan de onderkant.
2-3) Het apparaat aansluiten
- Het apparaat moet worden gevoed
met 230 V 50Hz.
- Het apparaat wordt aangesloten op de
netspanning met behulp van een 2aderige kabel door middel van een
aansluitkast. In vochtige ruimten zoals
badkamers en keukens,moet de aansluitkast op een hoogte van minstens 25 cm van de bodem worden geïnstalleerd.
- Om per ongeluk inschakelen van de thermische schakelaar te voorkomen, met alle risico’s vandien,
mag dit apparaat niet gevoed worden middels een externe schakelaar zoals bijvoorbeeld een tijdschakelaar, of aangesloten worden op een circuit dat regelmatig aan en uitgezet wordt door de
stroomleverancier.
- De installatie moet een omnipolair uitschakelsysteem bevatten met een contactopeningsafstand van
minstens 3mm.
- Het is verboden om het apparaat te aarden.
door een gekwalificeer
Indien de v
-
oedingskabel beschadigd is,
de persoon.
moet hij ter v
oorkoming van elk risico, worden vervangen
12
Page 13
GEBRUIK VAN HET APPARAAT
1) Beschrijving van het bedieningspaneel
Versie Tijdschakelaar
Wieltje
Tijdschakelaar
Verklikkerlampje
opwarming
WieltjeVerwarming
Basis versie
2)Verwarming op kamertemperatuur
Om te bepalen of de stand van het draaiwieltje van de verwarming overeenkomt met de gewenste temperatuur, moet als volgt te werk worden gegaan:
- Draai het wieltje
trek wordt bereikt.
- Draai vervolgens het wieltje
hoort.
- Draai het een klein beetje de andere kant op, laat het apparaat functioneren.
- Het kan nodig blijken te zijn om de instelling daarna nog te corrigeren. Om de temperatuur hoger
in te stellen,
in te stellen, moet u het wieltje de andere kant op draaien. Ga zo te werk totdat de voor u geschikte temperatuur is bereikt.
- Om het apparaat uit te doen, moet u het wieltje
zo ver mogelijk naar rechts en wacht tot de gewenste temperatuur in het ver-
naar links totdat u de klik van het contact van de thermostaat
moet u het wieltje
enigszins met de wijzers van de klok mee draaien.Om hem lager
op de laagste stand zetten.
3) Snel opwarmen van het vertrek ( versie met tijdschakelaar)
- Stel het verwarmingswieltje in afhankelijk van de gewenste kampertemperatuur.
- Stel het wieltje van de tijdschakelaar in op de gewenste duur voor versneld opwarmen (werking
op 1800W
op 1800W, en vervolgens op 1000 W zorgen voor de kamertemperatuur die is ingesteld op de
thermostaat.
). Het apparaat zal dan voor de geselecteerde duur werken in versnelde voorverwarming
4) Vorstvrij stand
Dit is de stand waarmee de temperatuur in het vertrek op ongeveer 7°C kan worden gehouden wanneer u langere tijd afwezig bent (over het algemeen meer dan 24 uur).
Stel het wieltje
in op stand .
NL
5) Filter plaatsen.
Het filter kan langs de linker of rechter kant van het apparaat worden geplaatst, afhankelijk van uw
installatie.
13
Page 14

TIPS VOOR GEBRUIK
- Het heeft geen zin om het verwarmingswieltje op de hoogste stand te zetten, de temperatuur
van het vertrek zal hierdoor niet sneller stijgen.
- Tijdens het luchten van het vertrek, moet u wieltje
op de laagste stand zetten.
WAARSCHUWING
- Voorkom dat kinderen leunen op de voorkant of de stangen van het apparaat.
- Dit apparaat is niet geschikt om te worden gebruikt door personen (kinderen inbegrepen) met ver-
minderde lichamelijke, zintuigelijke of geestelijke vermogens of door personen zonder ervaring of
kennis behalve in het geval zij door degene die voor hun veiligheid verantwoordelijk is, in het oog
worden gehouden of vooraf de nodige instructies hebben gekregen met betrekking tot het gebruik
van het apparaat.
- De kinderen moeten in het oog gehouden worden om te voorkomen dat zij met het apparaat gaan
spelen.
- Om oververhitting te voorkomen mag het apparaat niet worden bedekt.
- Let erop dat er geen voorwerpen of papier in het apparaat komen.
- Alle handelingen aan de binnenkant van het apparaat moeten door een gekwalificeerde professional
worden uitgevoerd.
- Het gebruik van de stangen moet beperkt blijven tot het drogen van handdoeken.
ONDERHOUD
- De voorkant van het apparaat kan worden gereinigd met een vochtige doek.
Nooit schuurmiddelen gebruiken.
- Om de prestaties van het apparaat te behouden, is het nodig om de roosters van het apparaat te onstoffen,
van het apparaat
linker dan wel de rechter kant van het apparaat plaatsen.Trek aan het filter
en maak het schoon met behulp van een stofzuiger.
. Afhankelijk van uw installatie, kunt u het filter langs de
net als het filter aan de achterkant
PROBLEMEN OPLOSSEN
Voorkomende problemen Uit te voeren controles
- Controleer de temperatuur van de lucht van het vertrek en de stand
van de thermostaat.
- Controleer of de zekeringen van de installatie zijn ingeschakeld, of dat
als u er een heeft) de voeding van het apparaat
ht uitgangsrooster of de ruimte tussen het apparaat
).
aaf onderhoud
agr
14
).
Het apparaat verwarmt
niet.
Het apparaat verwarmt
de hele tijd.
de belastingafschakeling (
niet heeft onderbroken.
- Het apparaat is uitgerust met een beveiliging tegen oververhitting. De
beveiligingsbegrenzer zal automatisch de elektrische voeding afzetten
om elk incident te voorkomen.
Om het apparaat aan te zetten, gaat u als volgt te werk:
- Zet de elektrische voeding van het apparaat af.
- Verhelp de oorzaken van de afwijkende functioneringswijze (
pen en vuil die het luc
en de muur verstoppen
- Controleer het filter aan de achterkant van het apparaat en reinig dit
zo nodig (
W
-
- Controleer of het apparaat niet in een tochtstroom staat of dat de temperatuursinstelling niet is gewijzigd.
zie par
acht onge
eer 15 min. en zet het apparaat weer aan.
v
voorwer-
Page 15
GARANTIEVOORWAARDEN
DOCUMENT DAT DE GEBRUIKER MOET BEWAREN
(de verklaring alleen overleggen in geval van een klacht)
- De garantie geldt voor een duur van twee jaar met ingang van de datum van installatie of aankoop.
- De duur kan de 30 maanden vanaf de fabricagedatum niet overschrijden indien er geen bewijs aan
wezig is.
- De garantie dekt de inruil of levering van als defect erkende onderdelen met uitsluiting van elke
schadevergoeding.
- De kosten voor arbeidsloon, reis- en transportkosten komen ten laste van de gebruiker.
- De beschadigingen die voortvloeien uit een niet-conforme installatie, een voedingsnet dat de
EN50160 norm niet naleeft, een abnormaal gebruik of de niet-naleving van de voorschriften van
genoemde gebruiksaanwijzing worden niet gedekt door de garantie.
- De verklaring alleen overleggen in geval van een klacht bij de distributeur of uw installateur. Doe
hier uw aankoopfactuur bij.
TYPE APPARAAT*: . . . . . . . . . . . . . . . . . . . . . . . . . . . . . . . . . . . . . . . . . . . . . . . . . . . .
SERIENUMMER*: . . . . . . . . . . . . . . . . . . . . . . . . . . . . . . . . . . . . . . . . . . . . . . . . . . . .
NAAM EN ADRES VAN DE KLANT: . . . . . . . . . . . . . . . . . . . . . . . . . . . . . . . . . . . . . . . . . . . . . . . . . . .
. . . . . . . . . . . . . . . . . . . . . . . . . . . . . . . . . . . . . . . . . . . . . . . . . . .
*Deze inlichtingen staan op het typenplaatje op de linker zijkant van het apparaat.
STEMPEL VAN DE INSTALLATEUR
Belgien : tél : 00 800 387 13 858
NL
15
Page 16

V
olume
3
Volume
2
60 cm
60 cm
60 cm
3 m
2,25 m
Volume
1
50 cm mini
1 m mini
30 cm mini
Аппарат, который ы приобрели, прошел многочисленные испытания и проверки для
обеспечения качества. ы благодарим ас за сделанный выбор и за аше доверие.
адеемся, что аппарат полностью удовлетворит ас.
есколько рекомендаций
режде чем приступать к установке аппарата, прочитайте инструкцию.
еред подключением аппарата проверьте напряжение сети и отключите электропитание.
охраните инструкцию, в том числе, после установки аппарата.
арактеристики аппарата (указаны на идентификационной этикетке на аппарате):
Аппарат соответствует французскому стандарту относительно электрических
характеристик в указанной категории.
IP24 : Аппарат защищен от попадания внутрь него брызг воды.
Classe II : Аппарат снабжен двойной электроизоляцией
IУАОА АААА
1) де установить аппарат?
- анный аппарат предназначен для установки в
жилом помещении. любом другом случае
обратитесь к поставщику.
- Установка должна выполняться в соответствии с
правилами и действующими в стране установки
стандартами (для ранции это стандарт NFC
15100).
е устанавливайте аппарат:
•
местах, где поток воздуха может помешать регулировке аппарата
(под отверстием централизованной механической вентиляции и т.
п.).
• од фиксированной электрической розеткой.
• зоне 1 ванной комнаты.
• зоне 2, если человек, находящийся в душе или ванне может
дотронуться до органов управления аппаратом.
2) одключение аппарата
ри креплении устройства на стене, соблюдайте указанные расстояния.
ен испо
анный тип у
времени как основное и постоянное устройство отопления комнаты или
помещения.
стройства не до
лж
16
льзоваться с функцией реле
Page 17
2-1) акрепите штангу
152 mm
390 mm
1m
(версия со штангой).
- еред установкой устройства на
стене необходимо установить
штангу.
- оложите ваше устройство
горизонтально и заверните
четыре винта крепления.
2-2) акрепите устройство на стене.
1 2 3
инт крепления штанги
аметьте 3 отверстия
крепления и установите 3
пробки.
аверните 2 верхних винта,
оставив, минимум, 8 мм
между головкой винта и
поверхностью стены.
2-3) одключение аппарата
- Аппарат должен питаться от сети 230 50
ц.
- одключение к сети выполняется при
помощи трехжильного провода
ровод аппарата
аза = коричневый
ейтраль = синий
Установите устройство на 2
верхних винтах и сдвиньте
его вниз в пазах устройства.
афиксируйте устройство
при помощи нижнего
АА
АЬ
Bинта.
Электрическая
сеть
(коричневый = фаза, синий = нейтраль)
через монтажный блок. о влажных
помещениях, например, в ванных комнатах и кухнях, монтажный блок следует устанавливать на
высоте не менее 25 см от пола.
- тобы предотвратить опасность вследствие несвоевременного повторного включения теплового
выключателя, на это устройство не должно подаваться питание от внешнего переключателя, такого
как реле времени. Оно также не должно быть подсоединено к цепи, подача напряжения на которую
регулярно включается и выключается поставщиком электричества.
- сети должен быть предусмотрен многополюсный выключатель с расстоянием между разомкнутыми
zонтактами не менее 3 мм.
- аземление аппарата запрещается.
- случае повреждения провода питания, во избежание опасности, его должен заменить изготовитель,
его служба послепродажного обслуживания или мастер соо
17
тветствующей квалификации.
RU
Page 18
ЭУААЯ АААА
1) Оание панели управления пис
ерсия с реле
учка реле
времени
ндикатор работы
отопления
Pегуляторотопления
2) Отопление помещения
ля определения положения регулятора "Отопление", соответствующего желаемой температуре в
помещении, выполните следующие действия:
- оверните регулятор вправо до максимума и дождитесь, когда в помещении установится желаемая
температура.
- атем поворачивайте регулятор влево до тех пор, пока вы не услышите щелчок контактов термостата.
- емного поверните регулятор в противоположную сторону и оставьте устройство работать.
- озможно, в последствии, вам придется откорректировать регулировку. ля повышения температуры
немного поверните регулятор по часовой стрелке. ля уменьшения температуры, поверните против
часовой стрелки. ыполняйте регулировку до тех пор, пока в помещении не установится необходимая
вам температура.
- ля выключения устройства установите регулятор в положение минимальной температуры.
азовая версия
3) ыстрый нагрев помещения (версия с реле времени)
- Отрегулируйте регулятор нагрева в зависимости от желаемой температуры в помещении.
- Установите реле времени на желаемое время быстрого подогрева (работа с мощностью 1800 т).
Устройство будет работать в режиме ускоренного подогрева на мощности 1800 т в течение
установленного вами времени, затем перейдет на работу с мощностью 1000 т для нагрева
помещения до температуры, установленной термостатом.
4) ежим поддержания плюсовой температуры
Этот режим позволяет поддерживать температуру помещений в доме в пределах 7°C во время
продолжительного отсутствия (
Установите регулятор в положение .
5) Установка фильтра.
зависимости от вашей установки, фильтр может быть установлен с левой или правой стороны
стройства.
у
обычно более 24 часов).
ОА О ЭУАА
е следует устанавливать регулятор нагрева в максимальное положение, температура в помещении
не будет подниматься быстрее. осле проветривания помещения установите регулятор в минимальное
положение.
18
Page 19

УЯ
- е позволяйте детям опираться на лицевую поверхность или штангу крепления устройства. о
избежание перегрева, не накрывайте устройство. е допускайте попадания внутрь устройства
инородных предметов или бумаги. юбые работы внутри устройства могут выполняться только
квалифицированным специалистом. спользование штанг должно ограничиваться только сушкой
полотенец.
- Это устройство не предусмотрено для использования лицами (
сенсорные или умственные способности которых сокращены, а также лицами, не имеющими опыта или
знаний, за исключением случаев, когда они находятся под наблюдением ответственного за их
безопасность лица или предварительно получили инструкции в отношении использования устройства.
ледует следить за детьми, чтобы они не играли с устройством.
в том числе детьми), физические,
УО
- ицевую поверхность устройства можно протирать влажной тканью.
- и в коем случае не следует использовать абразивные чистящие средства.
- ля поддержания эксплуатационных характеристик устройства необходимо периодически удалять
пыль с решеток устройства, а также из фильтра, установленного на задней панели устройства.
зависимости от вашей установки, вы можете расположить фильтр справа или слева от устройства.
отяните за фильтр и почистите его пылесосом.
УА АО
еисправность еобходимые проверки
- роверьте температуру помещения и положение термостата.
- Убедитесь, что все выключатели установки включены, и что прерыватель
если он у вас установлен) не отключил питание устройства.
сети (
- Устройство оборудовано системой защиты контура нагрева.
редохранительный выключатель автоматически отключает питание при
возникновении какой-либо аварийной ситуации. ля повторного включения
Аппарат не нагревает
воздух
Аппарат постоянно
нагревает воздух
устройства выполните следующие действия:
- Отключите электропитание устройства.
- Устраните причины возникновения аварийной ситуации (
загрязнения, препятствующие выходу воздуха через решетку, или
блокирование пространства между устройством и стеной).
- роверьте состояние фильтра, расположенного на задней стенке устройства
и, при необходимости, почистите его (
- одождите 15 минут и затем снова включите устройство.
- Убедитесь, что устройство не располагается в месте постоянного потока
воздуха, и что положение регулятора пературы не было изменено.
см. раздел обслуживания).
предметы и
RU
19
ME05
Page 20
CONDITIONS DE GARANTIE
DOCUMENT A CONSERVER PAR L’UTILISATEUR
(Présenter le certificat uniquement en cas de réclamation)
- La durée de garantie est de deux ans à compter de la date d’installation ou d’achat et ne saurait
excéder 30 mois à partir de la date de fabrication en l’absence de justificatif.
- La garantie s’applique en France uniquement.
- La garantie couvre l’échange ou la fourniture des pièces reconnues défectueuses à l’exclusion de
tout dommage et intérêts.
- Les frais de main d’œuvre, de déplacement et de transport sont à la charge de l’usager.
- Les détériorations provenant d’une installation non conforme, d’un réseau d’alimentation ne respectant pas la norme NF EN 50160, d’un usage anormal ou du non respect des prescriptions de la dite
notice ne sont pas couvertes par la garantie.
- Présenter le certificat uniquement en cas de réclamation auprès du distributeur ou de votre installateur, en y joignant votre facture d’achat.
- Les dispositions des présentes conditions de garantie ne sont pas exclusives du bénéfice au profit
de l’a-cheteur, de la garantie légale pour défauts et vices cachés qui s’appliquent en tout état de
cause dans les conditions des articles 1641 et suivants du code civil.
TYPE DE L’APPAREIL*: . . . . . . . . . . . . . . . . . . . . . . . . . . . . . . . . . . . . . . . . . . . . . . . . . . . .
N° DE SERIE*: . . . . . . . . . . . . . . . . . . . . . . . . . . . . . . . . . . . . . . . . . . . . . . . . . . . .
NOM ET ADRESSE DU CLIENT: . . . . . . . . . . . . . . . . . . . . . . . . . . . . . . . . . . . . . . . . . . . . . . . . . . . .
. . . . . . . . . . . . . . . . . . . . . . . . . . . . . . . . . . . . . . . . . . . . . . . . . . . .
* Ces renseignements se trouvent sur la plaque signalétique située sous l’appareil.
Prix d’un appel local à partir d’un poste fixe en France Métropolitaine
Pièces détachées
Conseils avant et après-vente
Fax: 02 38 71 38 89
Depuis l’étranger - tél: 33 2 38 71 38 58
CACHET DE L’INSTALLATEUR
ILLICOTOLE 140208
20
 Loading...