

Page 1
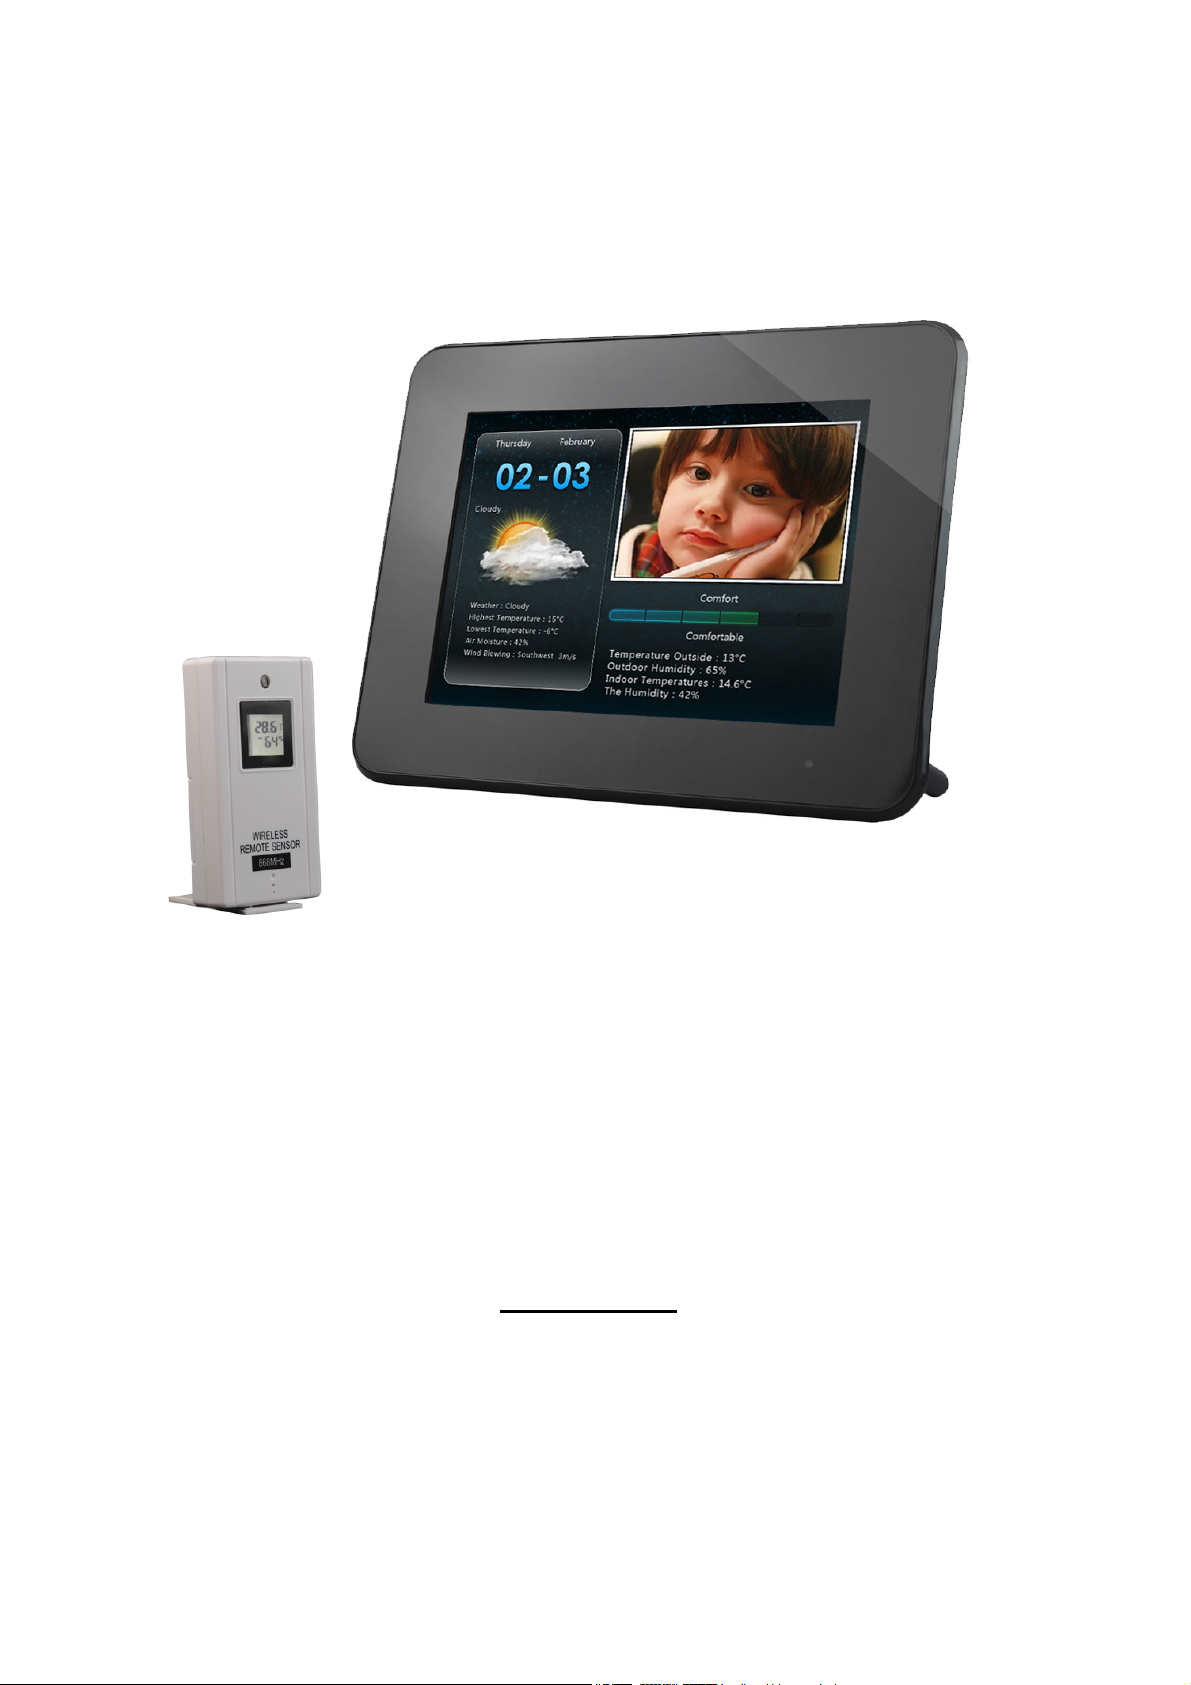
Digital Photo Frame
DPF-802C Series
USER MANUAL
1
Page 2

Table of Content
1. Introduction...........................................................................................................................3
2. Key Features.........................................................................................................................3
3. Maintance..............................................................................................................................3
3.1 Cleaning the Display.......................................................................................................4
3.2 Installing and Replacing the battery of CT…………………………………………….4
4. Apperance and Key Directions……………………………………………………………..5
4.1 Remote Control………………………………………………………………………...5
4.2 Connections and Keys………………………………………………………………….6
4.3 External Sensor……………………………………………………………………… 6
5. Command Summary………………………………………………………………………..7
5.1 Installing the unit……………………………………………………………………...7
5.2 Insert a Memory Card…………………………………………………………………7
5.3 Main Menu…………………………………………………………………………….7
5.3.1 Main Menu...................................................................................................7
5.3.2 Picture Menu................................................................................................8
5.3.3 Weather Menu…………………………………………………………….8
5.3.4 Calendar Menu…………………………………………………………..10
5.3.5 File Explorer..............................................................................................10
5.3.6 Setting........................................................................................................11
5.3.7 Light Sensor…………………………………………………………….12
5.3.8 Connecting to a Computer........................................................................12
6. Troubleshooting………………………………………………………………………… 12
7. FCC/IC Statement…………………………………………………………………………15
2
Page 3

Dear customer, thank you for choosing our product. For safety, please read this manual
carefully before connecting and adjusting the settings of the product.
FCC Statement:
This equipment has been tested and found to comply with the limits for Part 15 of the FCC rules. These limits are designed to
provide reasonable protection against harmful interference in a residential installation. This equipment generates, uses and
can radiate radio frequency energy and, if not installed and used in accordance with the instructions, may cause harmful
interference to radio communications.
However, there is no guarantee that interference will not occur in a particular installation. If this equipment does
cause harmful interference to radio or television reception, which can be determined by turning the equipment
off and on, the user is encouraged to try to correct the interference by one or more of the following measures:
• Reorient or relocate the receiving antenna.
• Increase the separation between the equipment and receiver.
• Connect the equipment to an outlet on a circuit different from that to which the receiver is connected.
This device complies with part 15 of the FCC rules. Operation is subject to the following two conditions: (1) This device may not
cause harmful interference, and (2) this device must accept any interference received, including interference that may cause
undesired operation.
Note: Modifications to this product will void the user’s authority to operate this equipment.
IC Statement :
This device complies with Industry Canada licence-exempt RSS standard(s). Operation is subject to the following two conditions: (1) this
device may not cause interference, and (2) this device must accept any interference, including interference that may cause undesired
operation of the device."
IC Déclaration:
Le présent appareil est conforme aux CNR d'Industrie Canada applicables aux appareils radio exempts de licence. L'exploitation est
autorisée aux deux conditions suivantes : (1) l'appareil ne doit pas produire de brouillage, et (2) l'utilisateur de l'appareil doit accepter tout
brouillage radioélectrique subi, même si le brouillage est susceptible d'en compromettre le fonctionnement.
Remarque: Toute modification de ce produit annule l'autorité de l'utilisateur à utiliser cet équipement.
1 Introduction
378NC is an intelligent digital photo frame for your stock image. The memory card reader and
USB Host can reproduce photos directly from flash memory cards and USB drive. The MiNi USB
port can also connect to PC for easy operation.
2 Key Features
Photo:
- Support JPEG photos
- Slide show function with various transition effects and durations.
- Zoom In & Out, Rotate 90 °, Previews
Weather:
- Equipped with internal and external sensor, measuring temperature and humidity up to 30 meters
away
- Show degrees Celsius / Fahrenheit
- Weather function with slideshow photos
Clock:
- Clock function, calendar clock
- Automatically turn on / off at preset time
-Specifications:
- Display: TFT 8 "LCD 4:3
800 x 600 LED Backlight
3
Page 4

- Power: AC adapter 110 ~ 240 V / 50 ~ 60 Hz - DC 5V / 1.0A
- Weight: approximately 460g (excluding power supply)
- Dimensions: 227 x 185 x 25mm (without stand).
- Operating temperature for outdoor : -20 ° C - 40 ° C
- Operating Humidity: 10% - 75%
- Supported Cards: Secure DigitalTM (SD), MultiMediaCardTM (MMC), Memory Stick ™ (MS)
- USB OTG: USB 2.0 / USB 1.1 Host
- Photo Formats: JPEG
- Slideshow: 8 transition effects
3 Maintance
• The 378NC is for internal use.
• To reduce the risk of fire or electric shock , please do not expose the unit to rain or moisture.
• Do not block ventilation holes on the back of the unit.
• Do not expose to direct action of sunlight.
• Do not open the 378NC, for there is a risk of electric shock. The opening of the unit involves
the termination of the guarantee.
• Do not use the Digital Album if environmental conditions can cause the creation of condensation,
for this could cause damage.
3.1 Cleaning the Display
• Treat the screen gently. Disconnect the device from the outlet before cleaning.
• If dust or fingerprints are deposited on the screen, we recommend using a soft non-abrasive to
clean the display.
• If you want to use cleaning kit on the market that are not spray liquid directly on the screen, use
a soft dry cloth.
3.2 Installing and Replacing the battery of CT
• Place the remote control face down
• Remove the battery cover
• Insert a battery "CR2025" into the compartment with the positive pole facing up
• Replace the battery cover
4
Page 5
4 Appearance and Key Directions
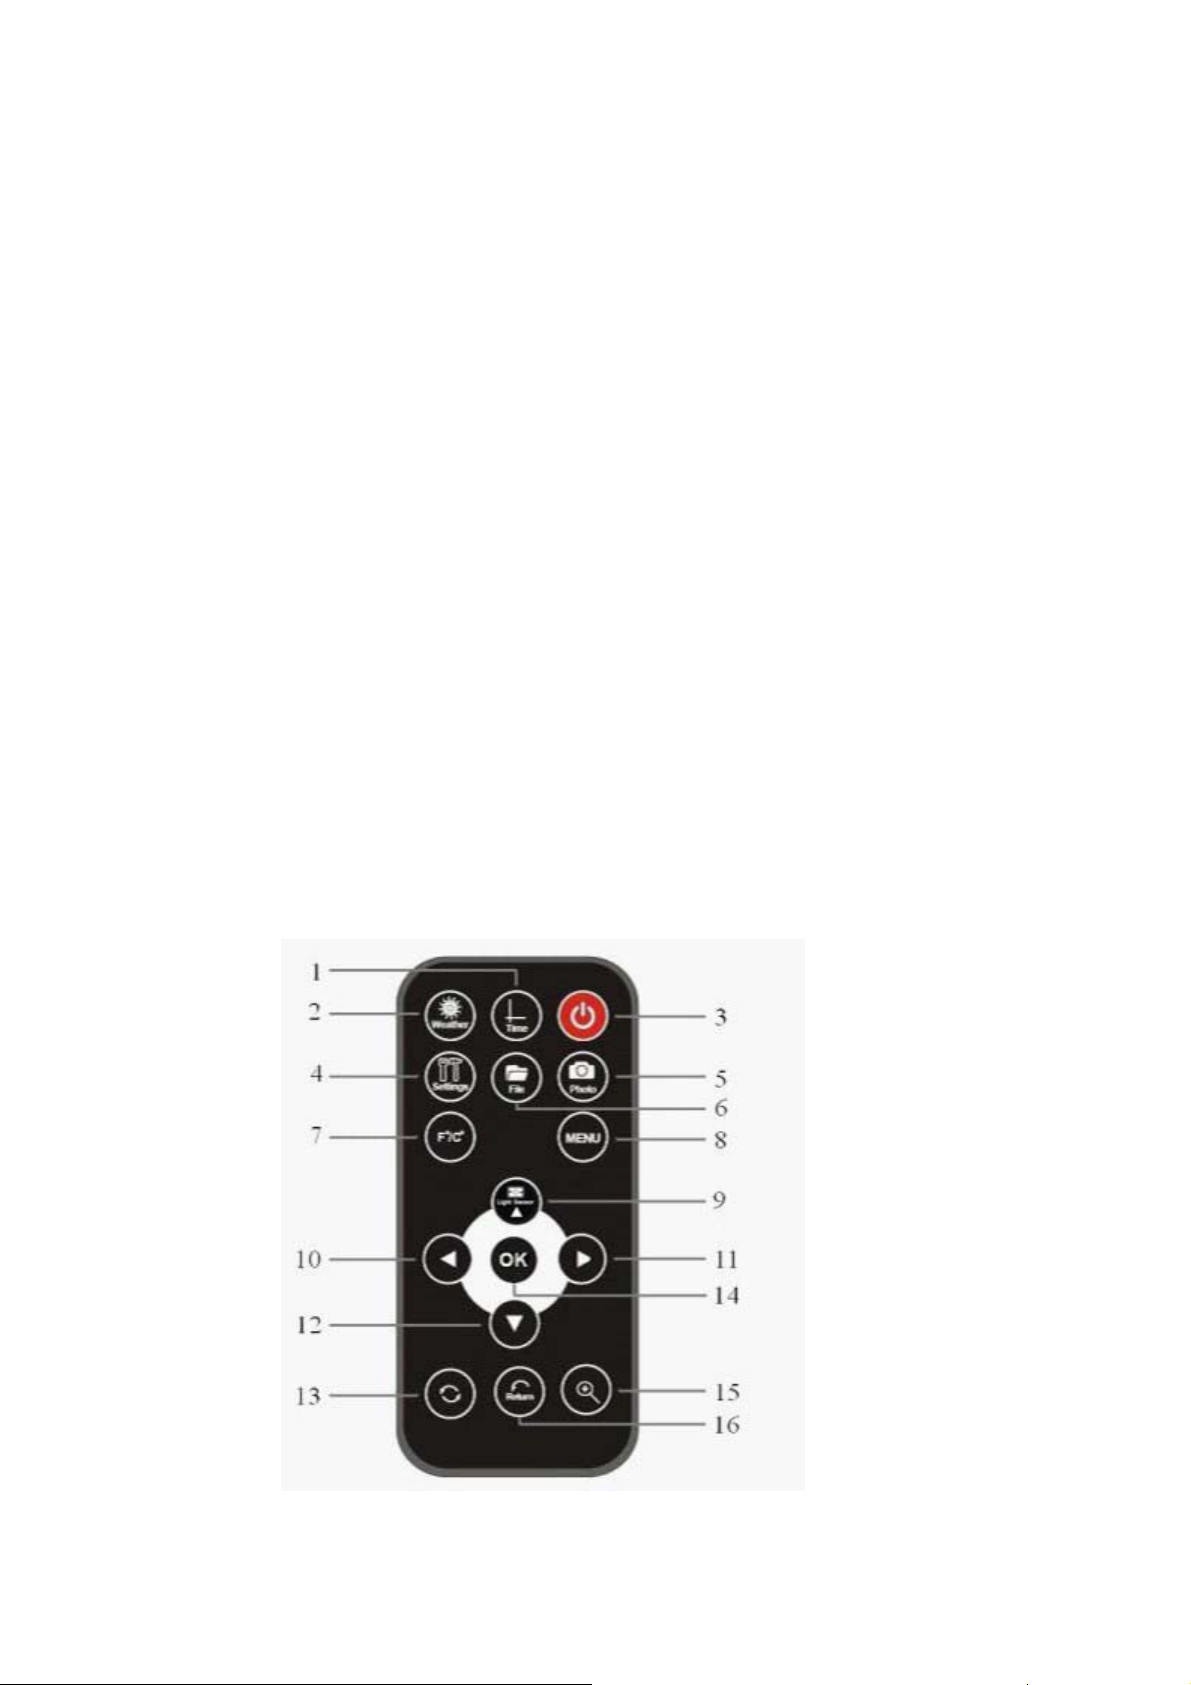
4.1 Remote control
1) Time ─ Start screen with clock and calendar
2) Weather ─ Start screen with weather situation
5
Page 6

3) ─ Turn on/off
4) Settings ─ Access the setup menu
5) Photo ─ Start playing photos
6) File ─ Explore file manager
7) F°/C° ─ Convert degrees Celsius to Fahrenheit and vice versa
8) MENU ─ Main Menu
9) ─ UP / Light Sensor
10) ─ Left / rotate images 90 ° counterclockwise
11)
12)
─ Right / rotate images 90 ° clockwise
─ DOWN
13) ROTATE ─ Rotate function. Then press the or buttons .
14) OK/ENTER ─ Confirm selection. Pause and restart photo playback
15) ZOOM ─ Picture enlargement function
16) Return ─ Back to the previous menu or screen
4.2 Connections and Keys
1) MENU ─ Confirm selection. Pause and restart photo playback
2) RETURN ─Press to return to main menu
3) ─ Down
4) ─ Up
5) ─ Left
─ Right
6)
7)
─ Turn on/off
8) MINI USB ─ Mini USB for PC connection
9) USB HOST─ USB slot for connecting USB media files
6
Page 7

10) SD/MMC/MS SLOT ─ To insert media files
11) Power ─ Power input
4.3 External Sensor
378NC uses a wireless outdoor sensor to measure temperature and
humidity in the room or outside.
Insert batteries in the sensor.
The sensor uses 2 AAA batteries (not included).
1. Remove the 2 screws holding the battery cover.
2. Remove the cover.
3. Insert 2 batteries.
4. Install the cover and screw.
5 Command Summary
5.1 Installing the unit
Remove the box and protective film on the display, then insert the adapter into the power hole on
the back and then insert the plug into the wall outlet.
Insert a memory card with photos, and the unit will start playback automatically.
5.2 Insert a Memory Card
The photo frame supports memory card MMC (Multimedia Card), SD (Secure Digital), SDHC
(Secure Digital High Capacity) and MS (Memory Stick).
To playback photos from a memory card, insert the memory card carefully, not to touch the
contact, and push gently until it stops.
Even if it is a multiple memory card slots, you can enter only one type of memory at a time.
It can also playback photos via USB hard drive and thumb drive by simply inserting a USB drive
into the USB HOST.
5.3 Navigating the Menu
Turn on the digital photo frame, and the main menu will present as below:
7
Page 8

Use the
and keys to move to the desired menu and press OK to confirm the selection.
To return to the main menu, press the MENU button on the remote control.
5.3.1 Main Menu
The main menu contains the following icons:
• Photo -- Play pictures stored in memory card or auto playback (slideshow)
• Weather -- Display weather information with the reproduction of images.
• Calendar -- Show Clock and Calendar with photos.
• File -- Explore and manage the files.
• Setting -- Set and change the parameters of the frame.
If the device does not receive a command within 30 seconds, it will automatically display the
weather information on the screen.
5.3.2 Picture Menu
From the main menu, select the icon
and press Enter to confirm.
Box with thumbnails of the photos will appear as below:
8
Page 9

USB device
SD card
If only insert an SD card, you will see photos of the SD card. If there is also USB drive
inserted, it will display with priority the images of USB drive and then display the images in
the SD card. Select the key or to switch.
In the preview mode, select your desire photo with and press ENTER to
confirm. The photo is displayed full screen. Then press to move to previous or next
image respectively .
Zoom
Press the key on the remote control to enlarge the image. Each time you press, the image
will be enlarged by 125%, 150%, 175%, 200% or 225%.
Rotate
Press the key on the remote, and then press the arrow keys to rotate the image
counterclockwise and clockwise respectively. Press OK to save or press RETURN to exit and
return to the playing rotation.
Note: Press the key on the remote to view your photos instantly.
5.3.3 Weather Menu
From the main menu, select the icon and press ENTER to confirm. You will
get the box with photo and weather information as below. If there are images in the memory
card or USB Drive, it will automatically display them in sequence (slideshow the pictures).
9
Page 10

Press the key on the remote control to change the unit of measure for degrees from Celsius
to Fahrenheit and vice versa. See image below:
Gradi Fahrenheit Gradi Centigradi
On the right side of the screen will show the degree of comfort besides the weather situation,
varying from comfortable, wet to dry.
Trend Forecast
The icons show the tendency of weather conditions in the next 8 hours within a radius of about
30km.
Sunny Rainy Cloudy Snowy
To display correct temperature via external sensor, make sure that the sensor is within 25 metres
near the digital photo frame and there are no barriers such as walls, doors or windows.
Note: Press the button
on the remote control to access the weather condition display
instantly.
10
Page 11

5.3.4 Calendar Menu
From the main menu, select the icon to enter the calendar menu directly. Box with
time, calendar and photo will appear as below. If there are images in the memory card or USB
Drive, it will automatically display in sequence (slideshow the pictures).
Note: Press the key on the remote control to access the time display screen.
5.3.5 File Explorer
From the main menu, select the icon on the remote control to enter file management
directly. The box will show as below:
If both USB and Memory Card are connected, the frame will display with priority the files in USB
Drive.
To view the images you want, scroll the list with / and press OK to confirm. It will start
playback the selected photos.
Files in USB device Files in SD card
Note: Press the key
on remote control to access file manager display instantly without going through the
main menu.
11
Page 12

5.3.6 Setting
From the main menu, select the icon and press ENTER to confirm. The screen
will show where you can adjust and modify the internal settings of the 378NC:
Note: Press the key on the remote control to access the setting display instantly.
Scroll through the list of settings on the left to a position of what you want, then press OK to
confirm.
Use the arrow keys to change value and press OK to confirm.
Press RETURN on the remote control or MENU to exit the setting screen or go directly to the main
menu
Table Options
Parametres Description
12
Page 13

Display Setting
Date Setting
Time Setting
Photo Setting
Language(OSD)
Light Sensor
Default setting
Brightness
Contrast
Saturation
Hue
Day
Month
Year
Hours
Minutes
AM/PM
Duration Set exposure time of
Transition Effects Set transition effect
English/French/German/Spanish
/Italian/Portuguese/Ploski/Russia
n
Off/ On
Yes or No Select YES to reset
Set the values for
brightness, contrast
and color saturationof
the screen
Set the date of the
calendar menu
Set the time schedule
of the menu
photos
of photos or
random
Select the OSD
language
Enable/disable the
function of the light
sensor
the factory
5.3.7 Light Sensor
From the main menu, long press the button on the remote control to activate or disable the
light sensor. There will be a gray gear-shaped icon in the upper left, indicating the function is
active. Press and hold to disable the icon in the upper left, and then it will be white.
This function turns on or off when the light in the room is turned on or off respectively.
5.3.8 Connecting to a Computer
The digital photo frame contains a small internal memory (4MB) where you can save some
images. Connect the frame to the computer via the mini USB port and drag files with mouse
into the removable disk (G: \, H: \, ...) associated in My Computer.
6 Troubleshooting:
13
Page 14

Problem Cause Corrective Action
The frame doesn’t
turn on
Start-up screen The memory card isn’t
No photo in
Memory Card
A photo is not
reproduced
The power adaptor is not
inserted properly
inserted properly
The memory card isn’t
inserted properly
The photo file format
isn’t supported
Make sure the cable is properly
inserted in the frame and the wall
socket, then press the power button
on the remote control. Even without
a memory card inserted, the frame
will turn on and show a white
screen.
Remove and properly insert the
memory card by pushing gently
until it stops
Remove and properly insert the
memory card by pushing gently
until it stops
Make sure there is at least a
compatible file in the memory card.
Compatible Photo format: JPEG
14
Page 15

7 FCC Statement:
This equipment has been tested and found to comply with the limits for Part 15 of the FCC rules. These limits are designed to
provide reasonable protection against harmful interference in a residential installation. This equipment generates, uses and
can radiate radio frequency energy and, if not installed and used in accordance with the instructions, may cause harmful
interference to radio communications.
However, there is no guarantee that interference will not occur in a particular installation. If this equipment does
cause harmful interference to radio or television reception, which can be determined by turning the equipment
off and on, the user is encouraged to try to correct the interference by one or more of the following measures:
• Reorient or relocate the receiving antenna.
• Increase the separation between the equipment and receiver.
• Connect the equipment to an outlet on a circuit different from that to which the receiver is connected.
This device complies with part 15 of the FCC rules. Operation is subject to the following two conditions: (1) This device may not
cause harmful interference, and (2) this device must accept any interference received, including interference that may cause
undesired operation.
Note: Modifications to this product will void the user’s authority to operate this equipment.
IC Statement :
This device complies with Industry Canada licence-exempt RSS standard(s). Operation is subject to the following two conditions: (1) this
device may not cause interference, and (2) this device must accept any interference, including interference that may cause undesired
operation of the device."
IC Déclaration:
Le présent appareil est conforme aux CNR d'Industrie Canada applicables aux appareils radio exempts de licence. L'exploitation est
autorisée aux deux conditions suivantes : (1) l'appareil ne doit pas produire de brouillage, et (2) l'utilisateur de l'appareil doit accepter tout
brouillage radioélectrique subi, même si le brouillage est susceptible d'en compromettre le fonctionnement.
Remarque: Toute modification de ce produit annule l'autorité de l'utilisateur à utiliser cet équipement.
15
 Loading...