

Page 1
User manual EN
取扱説明書
JP
Page 2
1
2
3
19 18 17
16
4
5
12
6
20
21
7 8 9 10 11
2829
15
14
13
27
22
23
24
26
25
2
Page 3

Ristretto
Espresso
Lungo
Espresso Macchiato
Cappuccino
Latte Macchiato
Iced Macchiato
Cortado Lungo
Ristretto Origin India
Ristretto Intenso
Ristretto
Espresso Forte
Espresso Leggero
Espresso Origin Brazil
Lungo Origin Guatemala
Lungo Forte
Espresso Decaffeinato
Lungo Leggero
Lungo Decaffeinato
Cortado
Flat white
Cappuccino Lungo
Cappuccino Chiaro
Cappuccino Freddo
Iced Cappuccino
Latte Grande
Latte
Latte Piccolo
Iced Latte
Macchiatissimo
3
Page 4

Content
EC-Declaration ................................................................................................................................................................4
Machine Overview
Packaging Contents
Operating Overview
General Information
Safety Warnings
General Safety Instructions
.........................................................................................................................................................................9
First Use
Energy Saving Mode
Maximum Energy Saving Mode
Coffee Preparation
Milk-Based Coffee Recipes
Milk Preparation
Hot Water Preparation
Daily Cleaning
Menu Settings
- Language setting ..............................................................................................................................................................................16
- Statistics
- Navigation
- Milk parameters
- Cup heater
- AGUILA+ button programming
..........................................................................................................................................................5
........................................................................................................................................................5
........................................................................................................................................................5
........................................................................................................................................................6
..............................................................................................................................................................7
.............................................................................................................................................8
.....................................................................................................................................................10
.....................................................................................................................................10
.........................................................................................................................................................11
............................................................................................................................................ 12
...........................................................................................................................................................13
..................................................................................................................................................13
...............................................................................................................................................................14
..............................................................................................................................................................16
............................................................................................................................................................................................16
........................................................................................................................................................................................16
................................................................................................................................................................................16
........................................................................................................................................................................................16
.........................................................................................................................................................17
Alarms / Notications ................................................................................................................................................... 17
Specications
Type Plate
Impressum
................................................................................................................................................................19
.....................................................................................................................................................................19
....................................................................................................................................................................19
EC-Declaration
EU DECLARATION OF CONFORMITY
We
Thermoplan AG, Thermoplan-Platz 1,
CH-6353 Weggis, Switzerland
declare under our sole responsibility that the product
Product
Model
Type
to which this declaration relates, is in conformity with the following standards.
CISPR 14-1(ed.5);am1;am2 61000-3-2(ed.4)
CISPR 14-2(ed.1;am1;am2 61000-3-3(ed.3)
60335-1(ed.5) 61000-6-2(ed.2)
60335-2-15(ed.5);am1;am2 61000-6-3(ed.2);am1
60335-2-75(ed.2);am1;am2 62233(ed.1)
60335-2-89(ed.2);am1
following the provisions of directives:
2011/65/EU (RoHS)
2004/108/EC (EMC)
2006/42/EC (MD)
1935/2004/EC (FCM)
2023/2006/EC (GMP)
This product also complies with essential safety requirements of the Low Voltage Directive:
2006/95/EC (LVD)
CH-6353 Weggis,
13.03.2015
Adrian Steiner, CEO
Automatic Coffee Machine
AGUILA
AG220PRO
Responsible for the technical documentation is:
Christian Huber
4
Page 5
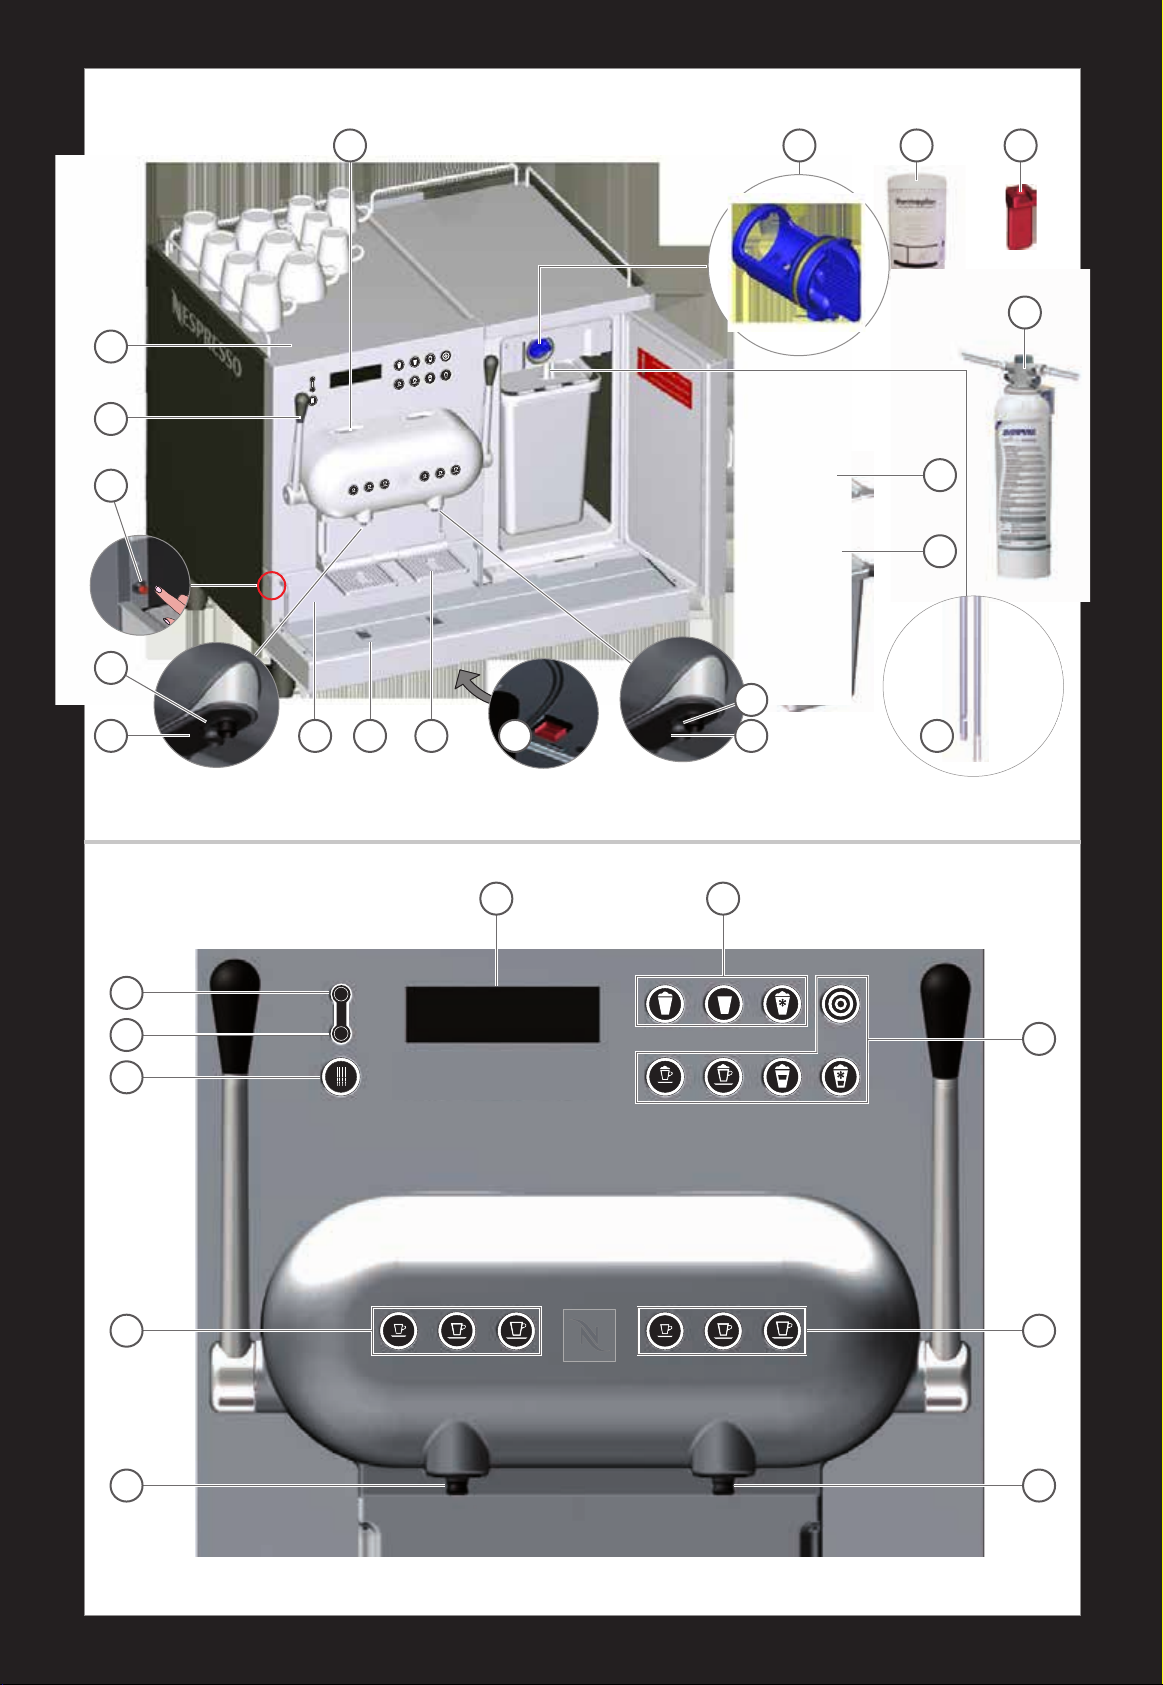
Machine Overview
See machine overview in: ►page
2.
Packaging Contents
The following components are included
in the delivery:
• Machine
• Milk container with cover
• User manual
• Thermoplan cleaning tablets
• Extraction tool for coffee outlets
• Water lter & head
• Water tube to connect main water
inlet
The machine can
communicate with a Cash
Management System.
Please contact your
Nespresso
further information.
representative for
1 Capsule insertion slots
2 Cup heater
3 Lever
4 Energy saving mode button
(behind capsule container)
5 Hot water outlet
6 Coffee outlet
7 Used capsules container
(capacity 130 capsules)
8 Drip grid / Drip tray
9 Drip grid for small cups
10 Main switch (underneath)
11 Coffee outlet
12 Milk outlet
13 Milk suction tube and
sensors (milk level and
temperature)
14 Milk container (max. 5 l)
EN
15 Milk container cover
16 Waterlter with head and
water tubes
17 Extraction tool for coffee
outlet
18 Thermoplan cleaning tablets
19 Cleaning key
20 System cleaning
21 System rinsing
22 Hot water
23 Coffee preparation buttons
24 Coffee / hot water outlets
25 Coffee / milk outlets
26 Coffee preparation buttons
27 Milk-based coffee recipes buttons
28 Milk & milk foam buttons
29 Display
Always ll milk container with
cold milk (below 5 °C).
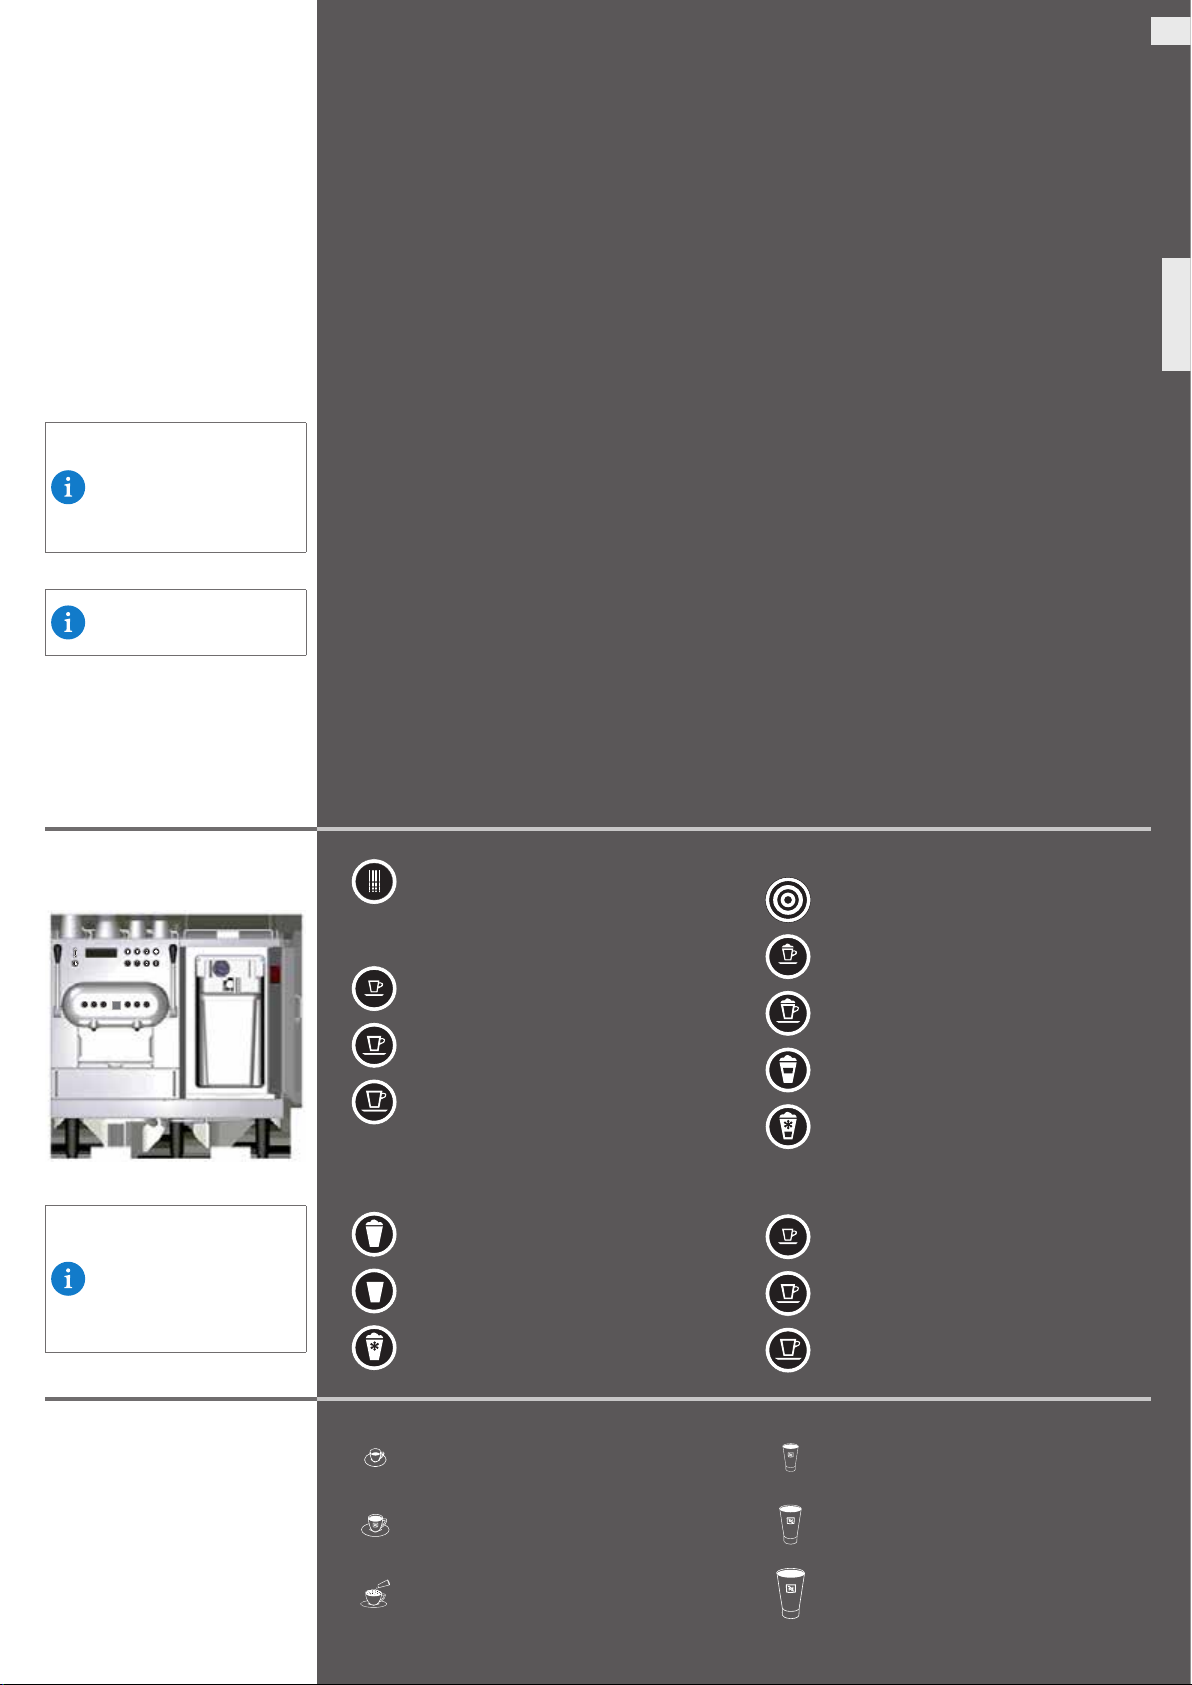
Operating Overview
Hot water
Coffee preparation buttons:
Ristretto
Espresso
Lungo
Milk and milk foam buttons:
Milk-based coffee recipes buttons:
AGUILA +
(refer to user menu settings)
Espresso Macchiato
Cappuccino
Latte Macchiato
Iced Macchiato
Coffee preparation buttons:
Beverage selection:
To view the name of the
product on the display, press
product button for 5 sec. To
exit, wait 10 sec. without
pressing any button.
Cup Description for
NESPRESSO Grand Cru
Recommendation
See
Nespresso
dation in: ►page
Grand Cru recommen-
3.
Hot milk foam
Hot milk
Cold milk foam
Espresso cup
Lungo cup
Cappuccino cup
Ristretto
Espresso
Lungo
300 ml recipe glass
350...400 ml recipe glass
500 ml take away cup
5
Page 6

General Information
Personnel Requirements
Only the listed personnel - if trained - is authorized to use the AGUILA 220 espresso coffee machine.
Service provider
• If you have any questions or problems, contact
Trained technician
• Trained technicians are employees trained and certied, who sell and maintain products.
Trained operator staff
• Trained operator staff are employees who were briefed and trained in the use of the coffee machine (reading of the
user manual) and who are able to operate the machine and execute the maintenance steps described in this manual.
Nespresso
representative.
Important!
Read these instructions carefully before
use and keep it in a safe place for
further reference.
Improper use of the machine releases
Nespresso
Summary
This user manual describes the
operating instructions for the
AGUILA 220 espresso coffee machine
and is delivered with the machine.
from any liability.
Operation
This machine is only suitable for producing coffee, milk and hot water products and is suitable for commercial use in the
catering trade. Therefore, please take note of the following instructions:
• This machine works with
• The milk container must only be used to store cold milk. Do not ll the milk container with any liquids other than milk
(e.g. syrup or alcohol). Please note that when pouring the milk into the milk container it must have a temperature of
below 5 °C, as the
refrigerator has been designed to keep the milk cool but not to lower its temperature.
• Carry out all necessary maintenance work as described in these instructions at regular intervals.
• The machine must only be operated by trained operator staff.
• All operations other than those mentioned in this manual must only be performed by authorized and trained service
providers of
• The capsules container must be emptied when the corresponding notication appears on the display. Rinse the con-
tainer with a solution of warm, soapy water.
Cleaning the machine
Cleaning the machine on a daily basis is an absolute must, as it
guarantees necessary hygiene and food safety, perfect
Please refer to chapter “Daily cleaning” for a complete guide to successfully clean your machine. Also take note of the
following instructions:
• Use only the Thermoplan milk cleaning tablets to perform the automatic cleaning process. Do not use any other cleaning detergent or disinfection agent for this purpose.
• When touching the coffee machine, in particular the spouts, bacterial contamination must be avoided.
• Cloths or sponges must be wrung out thoroughly to ensure that they are only moist, not wet, otherwise there is a risk
of electric shock.
• Plastic parts must not be dried in the microwave.
• Do not clean plastic parts with alcohol, ethanol, methanol,
methylated spirits or disinfectants. Detergents with strong acid agents such as acetic acid must also not be used.
• The machine must not be cleaned with water jets.
• The milk suction tube with temperature sensor and level sensor, as well as all internal parts of the refrigerator, cleaning
key, coffee outlets shall be cleaned only with single-use tissue or paper towel. Clothes used to clean external parts of
the machine shall be
properly treated to prevent possible bacterial contamination.
Machine hygiene
• Frequent automated rinsing (internally and externally) takes place to sustain high hygiene standards throughout the
machine life time.
Commercial use
• This machine is intended to be used by experts or trained users in shops, light industry and on farms.
Maintenance work
• A notication will appear on the coffee machine display if the machine needs to be serviced. The machine must be ser-
viced by authorized and trained service providers at least once every year or every 24’000 product beverages.
Disposal
• An authorized and trained service provider has to dispose of the machine and its packaging. Do not dispose of the
machine or its components yourself.
Nespresso
Nespresso
aftersales centers.
capsules, available exclusively through
Nespresso
Nespresso
grand cru taste as well as a longer life of the machine.
and its authorized distributors.
Limitations of liability
• The manufacturer accepts no liability for any injuries or accidents if the safety instructions covered in this manual are
not adhered to.
• The manufacturer cannot be held liable for any damage caused by misuse or inappropriate handling of the machine.
Warranty regulations
• The warranty provisions apply as agreed with
• Malfunctions due to misuse or connecting unsuitable connections shall not be compensated.
• Wear and tear parts are not covered by any warranty.
• All
Nespresso
domly on selected units. This can show traces of any previous use.
machines must pass stringent controls. Reliability tests under practical conditions are performed ran-
6
Nespresso
.
Page 7

General Notes:
Risk of material damage
• This equipment is to be installed to comply with the applicable federal, state or local plumbing codes.
• Wrong handling of the machine could lead to property damage.
• The machine is for indoor use only.
• Clean machine before taking out of service for a longer period of time. Remove and empty capsules container, disconnect machine from the mains. Remove and empty milk container, clean and store with lid open. Leave refrigerator door
open.
• Ambient temperature must be between 16 °C and 32 °C.
• Position machine on a at, horizontal, stable and heat-resistant surface.
• Do not position machine where a water jet could be used to clean.
• Leave a gap of at least 50 mm in front of air vents.
• Store machine in dust free and dry environment, always at a temperature above 0 °C.
• The top of the machine must be at least 1.5 m above the oor.
• Place machine 20 cm or further away from the user.
• Use Thermoplan cleaning accessories only.
• Never use the machine without drip grid.
• The manufacturer does not accept any liability for consequences arising from both internal and external modications
on the machine.
• Do not store explosive substances such as aerosol cans with a ammable propellant inside the appliance.
• Never use the cup heater for drying wet cups; risk of electric shock.
• Always place cups upside-down to ensure good heat transmission.
EN
Safety Warnings
Structure
The safety instructions in this document are structured as
following:
1
2 43
5
1 Safety sign 4 Impact
2 Safety signal word 5 Specied safety sign
3 Source 6 Prevention
Safety signal words
The following warning messages are used in the present
manual:
WARNING
6
CAUTION
NOTICE
indicates a hazardous situation
which, if not avoided, could
result in death or serious injury.
indicates a hazardous situation
which, if not avoided, could
result in minor or moderate
injury.
addresses practices that could
lead to property damage but
not to injury.
Safety signs
The following safety signs are used in this manual:
The warning triangle appears where nonadherence
to the safety instructions may result in risks to the
user or the machine.
Warning:
Electric shock
Warning:
Risk of scalding
Warning:
Risk of bruising
Instruction:
Wear gloves
Instruction:
Wear goggles
General information
Working Area
• Keep your workspace clean and tidy. Disorder and unlit
workspaces can lead to accidents.
• The machine must only be operated in a hygienic and
ergonomic environment. The user must have sufcient
space and the working area must be well lit.
Hint
adresses practices that help the reader to use the equipment properly.
7
Page 8

General Safety Instructions
General Safety Notes
• In the event of emergency, switch off the
machine using the main switch. Unplug
the machine or remove the fuse from the
fuse box. Contact your service provider.
• This appliance can be used by children
aged from 8 years and above and
persons with redu ced phys ical, se nsory or
mental capabilities or lack of experience
and knowledge if they have been given
supervision or instruction concerning
use of the appliance in a safe way and
understand the hazards involved. Children
shall n ot play wi th the appli ance . Chi ldren
are not permitted to clean and perform
maintenance on the machine without
supervision.
• The access to the se rvice area i s allowed to
trained service personnel and instructed
personnel only.
General Safety Messages
WARNING:
Risk of electric shock
Contact with electrical components during
operation of the machine could result in
death or serious injury.
• Do not open casing under any
circumstances.
• Keep the machine away from moisture.
• Never immerse the machine, cable or
plug in water or any other liquid.
• Immediately stop using the machine if
cable or plug are damaged.
• Do not position the machine or cable
near or on hot parts of the machine.
Using the machine near open ames is
strictly prohibited.
• Protect the cable from sharp edges.
• Do not reach up inside the inner casing
when the capsules container is removed.
• Have the machine installed, relocated,
removed, repaired or maintained by
authorized, trained service staff.
• The machine and its supply cables must
be positioned o ut of the rea ch of child ren.
CAUTION:
Risk of scalding
Contact with hot uids could result in minor
or moderate injury.
• Do not handle underneath the product
outlet.
• Avoid direct contact with hot uids.
• Do not touch any dispenser before or
after a beverage is being dispensed.
• Do not open the lever while a product is
being dispensed or the machine is being
cleaned.
• Empty the drip tray with caution.
Risk of bruising
Handling inside the machine could result in
minor or moderate injury.
• Do not open lever during preparation. To
stop prepar a t i o n , press the same produ ct
button again.
• Do not put ngers into the capsule
insertion slots.
• If a capsule is blocked in the capsule
insertion slot, switch off machine before
any operation.
Risk of food intoxication
Ingestion of c ontami nated f ood could re sult
in death or serious injury.
• Only use food with a sel l-by da te th at h as
not yet expired.
• Store food in suitable locations.
• Clean the machine periodically and in
accordance with the user manual.
• Only use heat tr e a t ed (e.g. pasteur i sed o r
ultra heat treated) milk.
• Observe hygiene stan da rds wh i le pour ing
milk into the container.
• Only pour milk that has already been
cooled down (below 5 °C) into the milk
container.
• Use opened milk containers within 24
hours.
8
Page 9

EN
First Use
CAUTION
Risk of bruising
Handling inside the machine
could result in minor or
moderate injury.
Do not put ngers into the
capsule insertion slots.
Switch-on facility main water
supply.
1 2
the machine.
4 5
Cold start
Close the lever
Close the lever
Close both levers.The main switch is located underneath
Heating up
Heating up
3
Press any button.
6
Ready
Ready
Up to 10 min.
CAUTION
Risk of food intoxication
Ingestion of contaminated
food could result in minor or
moderate injury.
Only use heat treated (e.g.
pasteurised or ultra heat
treated) milk.
Observe hygiene standards
while pouring milk into the
container.
Use opened milk container
within 24 hours.
CAUTION
Risk of food intoxication
Usage of non-disposable
tissue or sponge can lead to
bacterial contamination of
the milk.
Use only single-use disposable tissue or paper towel to
wipe milk suction tube with
temperature sensor and level
sensor.
To clean the outside of the
machine, refer to external
cleaning ►see page
14
.
Machine performs a cold start rinse
(display shows a time counter).
During rinsing the noise level
increases.
Open both levers.
10 11
max. 5 °C
max. 5 l
max. 24 h
Change the milk every
24 hours.
Machine heats up. All buttons ash in
white.
8 97
Thoroughly clean the milk container
and cover with a commercially available foodsafe household cleaner.
Insert milk suction tube with temperature sensor and level sensor through
cover into the milk container.
If the machine has heated up, all buttons will be permanently lit in white.
Carefully wipe milk suction tube with
temperature sensor and level sensor,
using only single-use disposable tissue
or paper towel.
The ideal temperature for
foaming milk is 5 °C.
The milk variety has an inuence on foam quality. When
switching from pasteurised to
UHT milk, it may be necessary
to adjust the milk foam settings ►see page
16
.
Most suitable quality for
foaming milk is UHT milk. Pas-
teurized milk is more difcult
to foam.
9
Page 10

Energy Saving Mode
The machine switches to
energy saving mode after
30 min. of non-use. All buttons appear white, boiler
heating is reduced, fridge is
still working.
Press any button to return the
machine to operating mode.
1
2
1 min.
Maximum Energy Saving
Mode
“Maximum energy saving
mode” can be activated by
pressing the button for 3 sec.
Energy Saving mode:
Press any button
1 2 3
up to 10 min.
Heating up
Heating up
After four hours of non-use, the
machine switches to maximum
energy saving mode. Boiler heating is
switched off, fridge is still working.
Press energy saving button to restart
the machine.
Ready
Heating up
Machine starts an automatic
rinse or may require a cold
start rinse. ►See First Use on
page
9
.
If required close both levers.
10
Page 11

EN
Coffee Preparation
Ristretto
Espresso
Lungo
Coffee heads can be used
simultaneously to prepare
coffee.
1 2 3
Pull down drip grid for small cups.
4 5 6
Insert a coffee capsule.
ESPRESSO
Ready
Top up / stop products
All product preparations can
be stopped by pressing the
product button again.
To top up your drink with
some more beverage, press
the product button within 1
min. after the end of product
preparation.
Press product button again
to stop.
Pull down lever to the lowest position. Choose cup size desired (example
Espresso).
►See
Nespresso
commendation on page
7 8 9
Grand Cru re-
3
Product name is displayed during
preparation.
.
Coffee preparation starts. Top up or stop product dispensing
within 1 min.
10 11 12
By pulling up the lever, the used capsule is ejected.
Ready
Ready
Machine is ready for next beverage.
11
Page 12

Milk-Based Coffee Recipes
Espresso Macchiato
Cappuccino
Latte Macchiato
Iced Macchiato
AGUILA+
For milk-based coffee recipes,
place your cup under the right
hand-side outlet.
1 2 3
Insert a coffee capsule. Pull down lever to the lowest position.
4 5 6
Do not remove your cup until
display shows “Ready” again.
Some products have a brief
pause between milk and coffee dispensing.
Sequence of dispensing
may vary depending on the
product.
Ready
CAPPUCCINO
Choose desired milk-based coffee
recipe (example Cappuccino).
7 8 9
Foaming milk preparation according to
chosen product.
By pulling up the lever, the used capsule is ejected.
Coffee preparation starts.
Milk system rinsing
The milk system is rinsed automatically in order to ensure high hygiene
standards.
CAUTION
Risk of scalding
The milk system will be rinsed
automatically 5 min. after the
preparation of a milk-based
beverage.
Duration approx. 10 sec.
Avoid direct contact with hot
water.
Protect hands from scalding.
12
10 11 12
Ready
Rinsing
Automatic internal rinsing: An approx.
3 sec. internal rinsing of the milk system will begin immediately after each
milk-based beverage preparation.
Automatic external rinsing: An approx. 10 sec. automatic rinsing of the milk
system will begin 5 min. after the last milk-based beverage preparation.
Rinsing in progress
Auto-start in 10s
Rinsing in progress
Please wait!
Page 13

EN
Milk Preparation
Hot milk foam
Hot milk
Cold milk foam
For milk preparations, place
your cup under the right handside outlet.
Milk system rinsing
The milk system is rinsed automatically in order to ensure high hygiene
standards.
CAUTION
Risk of scalding
The milk system will be rinsed
automatically 5 min. after the
preparation of a milk-based
beverage.
Duration approx. 10 sec.
Avoid direct contact with hot
water.
Protect hands from scalding.
1 2 3
Choose desired milk product (example
Hot Milk).
4 5
Automatic internal rinsing: An approx. 3 sec. internal rinsing of the milk system
will begin immediately after each milk-based beverage preparation.
Automatic external rinsing: An approx. 10 sec. automatic rinsing of the milk
system will begin 5 min. after the last milk-based beverage preparation.
Ready
HOT MILK
6
Rinsing in progress
Auto-start in 10s
Rinsing in progress
Please wait
Hot Water Preparation
Hot water
For hot water preparations,
place your cup under the left
hand-side outlet.
CAUTION
Risk of scalding
Contact with hot fluids could
result in minor or moderate
injury.
Avoid direct contact with hot
water.
Protect hands from scalding.
1 2 3
HOT WATER
Ready
4 5 6
Ready
Ready
Top up or stop product dispensing within 1 min.
13
Page 14

Daily Cleaning
(duration app. 30 minutes)
1
Empty capsule drawer
2 3
Ready
Ready
Press ‘cleaning’ button for
3s to start cleaning
The display will show a
reminder with a timer 2 hours
before mandatory daily cleaning is required.
The machine daily cleaning is mandatory for maintaining high hygiene
standards, ensuring neutral in-cup
taste throughout time and for prolonging the machine life-time.
External cleaning
Remember to regularly inspect and,
if necessary, clean the exterior of the
machine.
Use a damp cloth or sponge soaked in
a soap solution. Cloths and sponges
must be wrung out
thoroughly to ensure they are only
moist, not wet, otherwise there is a
risk of electric shock.
Only use mild detergents and nonscratch cloths.
Pay particular attention to the product
dispensing parts. The display and keyboard must be cleaned with particular
care.
Internal cleaning
Follow these instructions carefully to
run the automatic cleaning process.
Empty capsule container daily
or on display request (Capacity approx. 130 capsules per
container).
4
Drain milk container and
wipe suction tube
Carefully remove and drain the milk
container.
Press cleaning button.
5 6
Carefully wipe milk suction tube with
temperature sensor and level sensor,
using only single-use disposable tissue
or paper towel. Afterwards press any
button.
3 sec.
Press the button again and hold for 3
seconds to start the cleaning.
Press any other button to exit cleaning.
Rinse milk container and
place into refrigerator
Rinse milk container with potable
water.
Cleaning tablet insertion
CAUTION
Risk of corrosive injury
Direct contact with cleaning
detergent with eyes may cause
injury.
Clean your hands after handling cleaning tablets.
Wear gloves/goggles.
NOTICE
Cleaning solutions
The use of inappropriate cleaning
solutions may damage parts of the
machine or may lead to improper
cleaning efficiency.
Use only Thermoplan milk cleaning
tablets to perform the automatic
cleaning.
14
7 8 9
Place empty container back into the
refrigerator and guide the suction tube
Remove cleaning key and insert two
cleaning tablets.
Remove cleaning key
Insert cleaning tablets
with temperature sensor and level
sensor into the container. Press any
button.
10 11 12
Cleaning in progress: 28:15
Please wait
app. 28 min.
After cleaning process the machine
switches to maximum energy saving
mode.
To restart machine from
maximum energy saving mode,
►see page
10
.
After cleaning, carefully wipe milk
suction tube with temperature sensor
and level sensor, using only single-use
disposable tissue or paper towel. Usage of non-disposable tissue or sponge
can lead to bacterial contamination of
the milk.
Insert cleaning key
Cleaning procedure starts automatically after the cleaning
key is inserted.
Empty remaining water, clean milk
container with potable water and place
it back into the refrigerator.
Page 15

1
2
1
2
1
2
EN
CAUTION
Risk of scalding
After the cleaning procedure,
remaining hot water may drop
from product outlets.
Avoid direct contact with hot
water.
Protect hands from scalding.
13 14
outlets.
16
Remove both coffee outlets. Properly
rinse coffee outlets with fresh potable
water.
Clean milk outlets with damp singleuse tissue or paper towel.
17
15
Reinsert coffee outlets.Use extraction tool to pull down coffee
18
3 sec.
Pull out drip grids for small cups (only
in vertical position) and drip tray grill.
Clean all parts.
19
Remove the drip grid and wash it with
a soft cloth and mild detergent under
running water.
22
Reinsert the drip grids for small cups. Daily cleaning procedure completed
Drip grids for small cups can
only be removed when in
vertical position.
20 21
Remove the black plastic ‘plug’ found
in the plastic tray.
23
(machine in maximum energy saving
mode). If you need to reactivate the
machine, press the energy saving button as per ► page
Pull the metal frame towards you to
remove.
10
.
Remove and clean the black plastic
tray with a soap water solution.
Cleaning is complete.
Follow the above steps in reverse order
to assemble the drip tray.
15
Page 16

Menu Settings
- Language setting
- Statistics
• User product counter
• Products total
• Capsule counter
• User counter reset
Press rinse button for 3 sec.
USER MENU
GENERAL SETTINGS
Select menu “GENERAL SETTINGS”
Press rinse button for 3 sec.
USER MENU
STATISTICS
Select menu “STATISTICS”
Statistics: User counter resetLanguage setting Statistics: User product counter
Press rinse button for 3 sec.
USER MENU
STATISTICS
Select menu “STATISTICS”
- Navigation
2
3 4 5
1
2
3
4
5
1
Up next menu /
increase value
Down previous menu /
decrease value
Default load default value
Enter edit / conrm
Escape exit menu / cancel
Enter
GENERAL SETTINGS
Language = English
Select menu “Language”
Enter
Language = English
◄ English ►
Select desired language
Enter
Exit menu
Enter
STATISTICS
User product counter
Select “User product counter”
Enter
User product counter
◄ Select a product ►
Espresso
4 2
Exit menu
Check “Products total” or
or
“Capsule counter user“ (read
only parameters).
Enter
STATISTICS
User counter reset
Select “User counter reset”
Enter
User counter reset
◄ no ►
Select “yes” or “no”
Enter
Exit menu
Menu Settings
- Milk parameters
• Milk foam settings:
- Hot foam
- Cold foam
• Refrigerator settings
- Cup heater
Milk foam settings
To change the uidity of the
milk foam, simply change the
% of air in the milk foam as
shown on this page:
• -10%: more liquid foam
• 0%: installation setting
• +10%: more solid foam
Milk parameter: Milk foam
settings
Press rinse button for 3 sec.
USER MENU
MILK PARAMETERS
Select menu “MILK PARAMETERS”
Enter
MILK PARAMETERS
HOT FOAM = 0 %
Select “HOT FOAM = 0 %”
Enter
HOT FOAM = 0 %
[ -10.0 .. ◄ 0 % ► .. 10.0]
Increase or decrease the
amount of air in the hot milk
foam if required. Range: -10 %
to 10 % from default.
Enter
MILK PARAMETERS
HOT FOAM = 3 %
Milk parameter: Refrigerator
settings
Press rinse button for 3 sec.
USER MENU
MILK PARAMETERS
Select menu “MILK PARAMETERS”
Enter
MILK PARAMETERS
Cooling temperature = 5.0 °C
Select
“Cooling temperature = 5.0 °C”
Enter
Cooling temperature = 5.0 °C
[ 4.0 .. ◄ 5.0 °C ► .. 8.0]
Increase or decrease the cooling
temperature if required or set to
DEFAULT (recommended).
Enter
Exit menu
Cup heater
Press rinse button for 3 sec.
USER MENU
MACHINE PARAMETERS
Select menu “MACHINE PARAMETERS”
Enter
MACHINE PARAMETERS
Cup heater = On
Select
“Cup heater = On”
Enter
Cup heater = on
◄ On ►
Select “On” or “Off”
Enter
Exit menu
16
Repeat this procedure for
COLD FOAM if necessary.
Exit menu
Page 17

Menu Settings
- AGUILA+ button programming
AGUILA+ button programming
The AGUILA+ button offers
the choice of 13 one-touch
milk-based coffee recipes. To
select the one-touch recipe you
would like to be dispensed if
the AGUILA+ button is pressed,
follow the instructions below.
You can change your selection
at any time by repeating the
same steps.
Press rinse button for 3 sec.
USER MENU
GENERAL SETTINGS
Enter
GENERAL SETTINGS
AGUILA+
Enter
AGUILA+
◄ LATTE ►
AGUILA+ recipes
CORTADO LUNGO
CORTADO
FLAT WHITE
CAPPUCCINO LUNGO
CAPPUCCINO CHIARO
CAPPUCCINO FREDDO
ICED CAPPUCCINO
LATTE GRANDE
LATTE
LATTE PICCOLO
ICED LATTE
MACCHIATISSIMO
COLD MILK
►See
Nespresso
recommendation on page
Grand Cru
3
EN
.
Alarms / Notications
What to do if a “Call technician“ message appears?
Please call your
representative.
Nespresso
Select the desired product.
Enter
Exit menu
Description Display message LED status Remarks
Change water lter
Change water lter
Ready
Immediately call your
representative.
Nespresso
Alternating
Service required
Service required
Ready
Immediately call your
representative.
Nespresso
Alternating
Milk container empty
Ready
Top up milk
Milk products are locked.
Fill up milk container (in fridge).
Alternating
Milk level low
Ready
Milk level low
Indicates that the milk container will
soon be empty.
Fill up milk container (in fridge).
Alternating
Automatic rinsing
mode
(5 min. delay)
Cleaning required in
x.yy h.
Milk system cleaning
required
Rinsing in progress
Please wait
Ready
Cleaning required in x:yy h
Alternating
Ready
Cleaning required
Alternating
Automatic rinsing of internal milk
system starts 5 min. after last milkbased beverage preparation. “Rinsing
in progress” and “Please wait” appear
on display. LEDs start to ash 10 sec.
before rinsing.
When timer ends, machine will be
locked until cleaned.
Milk products not available.
Start cleaning procedure as described
on ► page
14
.
17
Page 18

Alarms / Notications
Description Display message LED status Remarks
Cleaning of milk
system
Press ‘cleaning’ button for
3s to start cleaning
Start cleaning procedure as described
on ► page
To quit menu, press any product button.
14
.
Milk system cleaning
mode
Milk temperature
high
(6...12 °C)
Replace milk with
cold milk
(over 12 °C)
Open lever
Preparation time too
long
Preparation time too
short
Heating up boiler
Energy saving mode
Cleaning in progress 28:15:
Please wait
Ready
Milk temperature too high
Alternating
Ready
Replace milk with cold milk
Alternating
Open the lever
Ready
Ready
Preparation too long
Ready
Preparation too short
Heating up
Ready
Alternating
Energy Saving mode:
Press any button
Display shows remaining cleaning time.
Normal operation.
Milk products are still available but
quality might be downgraded.
Replace milk with cold milk at 5 °C.
Milk products are locked.
Replace milk with cold milk at 5 °C.
Lift up the lever so that the used capsule is ejected.
Open lever and try to insert new
capsule.
Ensure facility main water supply is
switched on.
If message appears repeatedly, call your
Nespresso
representative.
Open lever and try to insert new
capsule. Message appears if no capsule
is inserted.
If message appears repeatedly, call your
Nespresso
representative.
Slow ashing during heating.
If message remains for more than 30
min., call your
Nespresso
representative.
Boiler temperature reduced.
Machine will be ready within 1 min.
after pressing any product button.
Maximum energy
saving mode
Brewing unit end
of life
CCI not connected
Brewing unit end of life!
Ready
CCI NOT CONNECTED
To reactivate machine press “Energy
saving” button.
For more info ►see page
Immediately call your
10
.
Nespresso
representative.
All products blocked. Rinsing and
cleaning still possible.
Check that the CCI connection is
properly installed. If the alarm remains
on, call your
Nespresso
representative.
18
Page 19

Specications
[mm]
EN
65
1
69350
640
110
293
53
3
41
Power supply: 220-240 VAC / 50/60 Hz / 3200-3800 W
380-415 VAC / 50/60 Hz / 4000-4800 W
200 VAC / 50/60 Hz / 2700 W
208 VAC / 60 Hz / 3200 W
220 VAC / 60 Hz / 3200 W
Dimensions:
651 x 693 x 640 mm (L / W / H)
Weight: 75 kg (empty)
90 kg (in operation)
Outlet height standard:
Outlet height drip grid:
Water supply:
Water supply pressure:
190 mm
92.5 mm
G 3/8” male
2...4 bar / 30...60 psi
Noise emission: <60 dBA
92,5
190165
258
330
613
Indicative maximum product capacity per
machine per hour
EU US JP
Ristrettos: 240 240 220
Espressos: 200 200 180
Lungos: 140 120 110
Cappuccinos: 50 45 42
Hot water: 70 70 70
Water supply minimum requirements
Chlorine: none
TDS: 70 to 200 ppm
Total hardness: 5-8 °dH (8-14 °fH)
pH 6.8 to 7.4
Alkalinity: less than 100 ppm
Iron: less than 0.25 ppm
Type Plate
Impressum
The type plate contains the following details:
Machine type: NESPRESSO PROFESSIONAL Coffee Machine
Model: AGUILA
Type: AG220PRO
Voltage: according to type plate
Power: according to type plate
Water Pressure: 0.2-0.4 MPa (2-4 bar)
Hydr. Boiler: 1.46 MPa (14.6 bar)
Class: 5
Refrigerant: 134 a
Charge: 55 g
Low Side Pressure: 88 psig
High Side Pressure: 285 psig
Serial Number: according to type plate
Production Date: according to type plate
Version: User Manual AGUILA 220
Original user manual
Manufacturer: Thermoplan AG
Thermoplan-Platz 1
CH-6353 Weggis
The capsule container must be
removed to see the type plate.
The type plate is located
beneath the capsule container
on the baseplate.
Service calls: For service calls, please contact
your country specic
representative on
www.nespresso.com
Nespresso
19
Page 20

OM_AG220_Zone 4 - 127.494 - A
38
EAGLE - 23.12.2010
 Loading...