

Thermoplan BW4c-CTM, Black&White4, BW4c-CTM-RS, BW4c-CTM-F, BW4c-CTM-F-RS Operating Manual
...Page 1
Operating Manual
CTM-P-F / CTM-P-F-RS
© Thermoplan AG | 29/03/2017
Page 2

Table of contents
2 © Thermoplan AG
Table of contents
1 Impressum.................................................................................................................................... 4
2 About this document .................................................................................................................. 5
2.1 Purpose............................................................................................................................ 5
2.2 Navigation........................................................................................................................ 5
2.3 Terms used....................................................................................................................... 5
2.4 Symbols and emphasized text ........................................................................................... 5
3 Introduction ................................................................................................................................. 7
3.1 Intended use..................................................................................................................... 7
3.2 Target audience................................................................................................................ 7
3.3 Limitation of liability ......................................................................................................... 7
3.4 Warranty conditions.......................................................................................................... 7
4 Safety............................................................................................................................................ 8
4.1 General safety instructions ................................................................................................ 8
4.2 Safety warnings ................................................................................................................ 9
4.3 General safety instructions for this coffee machine........................................................... 10
5 Overview .................................................................................................................................... 13
5.1 Coffee machine CTM-P-F RS / CTM-P-F ........................................................................... 13
5.2 Type plate....................................................................................................................... 14
5.3 Capacity information....................................................................................................... 14
5.4 Connections ................................................................................................................... 15
6 Scope of delivery....................................................................................................................... 16
7 Commissioning .......................................................................................................................... 17
7.1 Switch coffee machine on and off.................................................................................... 17
7.2 Switch refrigerator on and off.......................................................................................... 17
7.3 Still being container ........................................................................................................ 18
7.4 Filling the chocolate container......................................................................................... 18
7.5 Filling the milk container................................................................................................. 18
7.6 Top up syrup................................................................................................................... 19
7.7 Changing the syrup name ............................................................................................... 21
8 Operation ................................................................................................................................... 22
8.1 Dispensing the product ................................................................................................... 22
8.2 Product options .............................................................................................................. 23
8.3 Pre-selecting a product ................................................................................................... 23
8.4 Operation – refrigerator.................................................................................................. 24
Page 3

Table of contents
© Thermoplan AG 3
9 Settings in the user menu ........................................................................................................ 26
9.1 Overview – user menu .................................................................................................... 26
9.2 Calling up the user menu ................................................................................................ 26
9.3 Calling up the user menu in self-service mode ................................................................. 27
9.4 User login....................................................................................................................... 27
9.5 User logout..................................................................................................................... 28
9.6 Menu tab and access rights............................................................................................. 28
9.7 General settings.............................................................................................................. 29
9.8 Product settings.............................................................................................................. 34
9.9 Statistics......................................................................................................................... 36
9.10 System information......................................................................................................... 37
9.11 Error log ......................................................................................................................... 37
10 Cleaning ..................................................................................................................................... 38
10.1 Cleaning agents and accessories ..................................................................................... 38
10.2 Cleaning schedule........................................................................................................... 38
10.3 Cleaning prompt............................................................................................................. 39
10.4 Execute automatic cleaning............................................................................................. 39
10.5 Cleaning key................................................................................................................... 40
10.6 Clean exterior components.............................................................................................. 41
10.7 Clean the grounds container and drip tray....................................................................... 43
10.8 Clean product outlet ....................................................................................................... 43
10.9 Clean bean container...................................................................................................... 44
10.10 Clean the refrigerator...................................................................................................... 46
10.11 Clean chocolate system................................................................................................... 47
10.12 Cleaning the syrup system............................................................................................... 50
11 Troubleshooting ........................................................................................................................ 53
11.1 Overview ........................................................................................................................ 53
11.2 Possible indications and errors and their rectification....................................................... 53
12 Accessories and consumables .................................................................................................55
12.1 Cleaning agents.............................................................................................................. 55
12.2 Milk container ................................................................................................................ 55
12.3 Chocolate container........................................................................................................ 55
12.4 Cleaning container.......................................................................................................... 55
13 EU Declaration of Conformity.................................................................................................. 56
Page 4

Impressum
4 / 60 © Thermoplan AG
1 Impressum
Original Operating Manual
130.707_OM_BW4c-CTM-P-F-(RS)_EN-REV-A
Manufacturer
Thermoplan AG
Thermoplan-Platz 1
6353 Weggis, Switzerland
Tel. +41 (41) 392 12 00
Fax +41 (41) 392 12 01
thermoplan@thermoplan.ch
www.thermoplan.ch
Page 5

About this document
© Thermoplan AG 5 / 60
2 About this document
2.1 Purpose
This operating manual supports the user in his daily work; it is an integral component of the
coffee machine.
u Carefully read the operating manual all the way through before using the coffee machine.
u Take good care of the operating manual and keep it on hand in the vicinity of the coffee machine.
u The user must have read and understood work steps and instructions, particularly the points concerning
safety and hygiene.
2.2 Navigation
This document contains the following navigation aids in order to find specific information quickly:
• Table of contents
• Cross-references within the texts
• Symbols and emphasized text
2.3 Terms used
The following terms are used in this operating manual:
Term Explanation
Coffee machine Coffee machine with or without options (refrigerator, etc.)
Product Hot beverage that is produced with the coffee machine
Users Persons who operate the coffee machine (procure products) and in addition makes
settings and minor maintenance tasks cleaning, filling with beans/milk
Operators Persons who operate the coffee machine in self-service mode (procure products)
Touchscreen Operating screen with display in order to use the machine
Display Display on the touchscreen
Symbol Digital button on the touchscreen
Swipe To move the finger on the touchscreen to the left/right
Scrolling To move with the finger on the touchscreen upward/downwards
Barista Programmer and user level for the user (adjustment possibilities)
Manager Programmer and user level for the manager (extended adjustment possibilities)
2.4 Symbols and emphasized text
Symbol Name Function
u Action When the user must execute a work step, this is marked with an
action. For example:
u Activate main switch.
u
ð
Reaction This emphasis is used to indicate a reaction to a proceeding action.
For example:
u Activate main switch.
Page 6

About this document
6 / 60 © Thermoplan AG
Symbol Name Function
ð Coffee machine starts.
Scope of
delivery
Cross-reference This emphasis is used to refer to a page within this document. Cross-
references are linked and can be executed with a mouse click.
>
Menu
navigation
This emphasis is used to present the navigation in the user menu.
For example:
Product Settings > Edit View
Italics
Tap symbol Indicates a symbol/menu that should be tapped.
Example: Tap on symbol
Confirm
.
Page 7

Introduction
© Thermoplan AG 7 / 60
3 Introduction
3.1 Intended use
The coffee machine is only suitable for producing coffee, hot water, and milk products.
Coffee machine is suitable for commercial use in catering sector, canteens, offices, etc.
3.2 Target audience
This document is intended for the users of the coffee machine.
3.3 Limitation of liability
The manufacturer accepts no liability whatsoever for any injuries or accidents due to failure to
comply with the safety instructions contained in this operating manual. Moreover, any possible
liability applies exclusively within the coffee machine limits Scope of delivery. For problems, the
manufacturer is liable in accordance with the warranty conditions [Warranty conditions } 7].
The manufacturer accepts no liability for damage as the result of negligent or improper use of the
machine.
3.4 Warranty conditions
The manufacturer warranty is valid for 12 months after the installation or 15 months after
delivery ex-works for individual parts or components in the event of manufacturing or design
faults. For malfunctions resulting from negligent use or incorrect connections there will be no
replacement. Wear parts are not included in the guarantee performance. The work time for
guarantee tasks is not covered by the manufacturer guarantee.
NOTICE
Cancellation of the guarantee claim
Guarantee claim is void if the prescribed maintenance cycles are not complied with, or
if there is any resulting damage.
u Comply with the prescribed maintenance cycles.
u Only have qualified technicians perform maintenance.
Page 8

Safety
8 / 60 © Thermoplan AG
4 Safety
4.1 General safety instructions
4.1.1 Use of the coffee machine
• Only use the coffee machine if it is functioning faultlessly and there are no indications of
damage. If there is a fault or damage notify your service partner immediately.
• If there is a fault or an emergency switch off the coffee machine via the main switch. Then
unplug the mains plug or interrupt the power supply. Interrupt the water supply.
• Opening the housing is prohibited.
• Penetration into the coffee machine with an object or body part is prohibited.
• Modifying or manipulating the coffee machine is prohibited.
4.1.2 Coffee machines with milk system
• The refrigerator must only be used to store cool milk. Do not fill the milk container with other
fluids (e.g. syrup or alcohol).
• Always place the milk in the refrigerator at a maximum temperature of 5°C. The refrigerator is
designed for keeping the milk cool and not for cooling it down.
• The refrigerator must not be used for the storage of any explosive substances (e.g. aerosols
with flammable propellant gas).
• Electronic tools (e.g. thermometers) that are not approved by the manufacturer must not be
used in the interior of the refrigerator (danger of fire).
4.1.3 Prerequisites for use of the coffee machine
Service partner
The service partner is Thermoplan AG's local representative. If there queries or problems please
contact your service partner. The service partner will, depending on the situation dispatch
qualified technicians.
Qualified technicians
Qualified technicians are trained and certified Specialist that sell and maintain the Thermoplan
products. They have the knowledge and the practical experience with the coffee machine, in
particular with regard to safety and hygiene.
Users
Users are employees who have been instructed and trained in the use of the coffee machine (have
read the operating manual) and who operate the coffee machine and can perform the
maintenance steps in accordance with the operating manual.
Children
This coffee machine can be used by children from 8 years of age, as well as by persons with
reduced physical, sensory or mental capacities or who lack experience and knowledge, if they are
supervised or if they have been instructed relative to the safe use of the coffee machine, and the
dangers associated with the coffee machine. Children are not allowed to play with the coffee
machine. Cleaning and maintenance must not be performed by children without supervision.
Page 9
Safety
© Thermoplan AG 9 / 60
4.1.4 Installation and commissioning
• The coffee machine must only be set up, installed or repositioned by qualified technicians.
4.1.5 Maintenance
• Perform all necessary cleaning tasks on a regular basis and in accordance with the description
in this manual.
• The coffee machine must be maintained by a qualified technician at least once a year. An
appropriate message appears on the touchscreen.
4.1.6 Dismantling and disposal
• The coffee machine (incl. refrigerator) must only be dismantled by qualified technicians. The
same applies for disposal of the coffee machine (incl. refrigerator) and its packaging.
4.2 Safety warnings
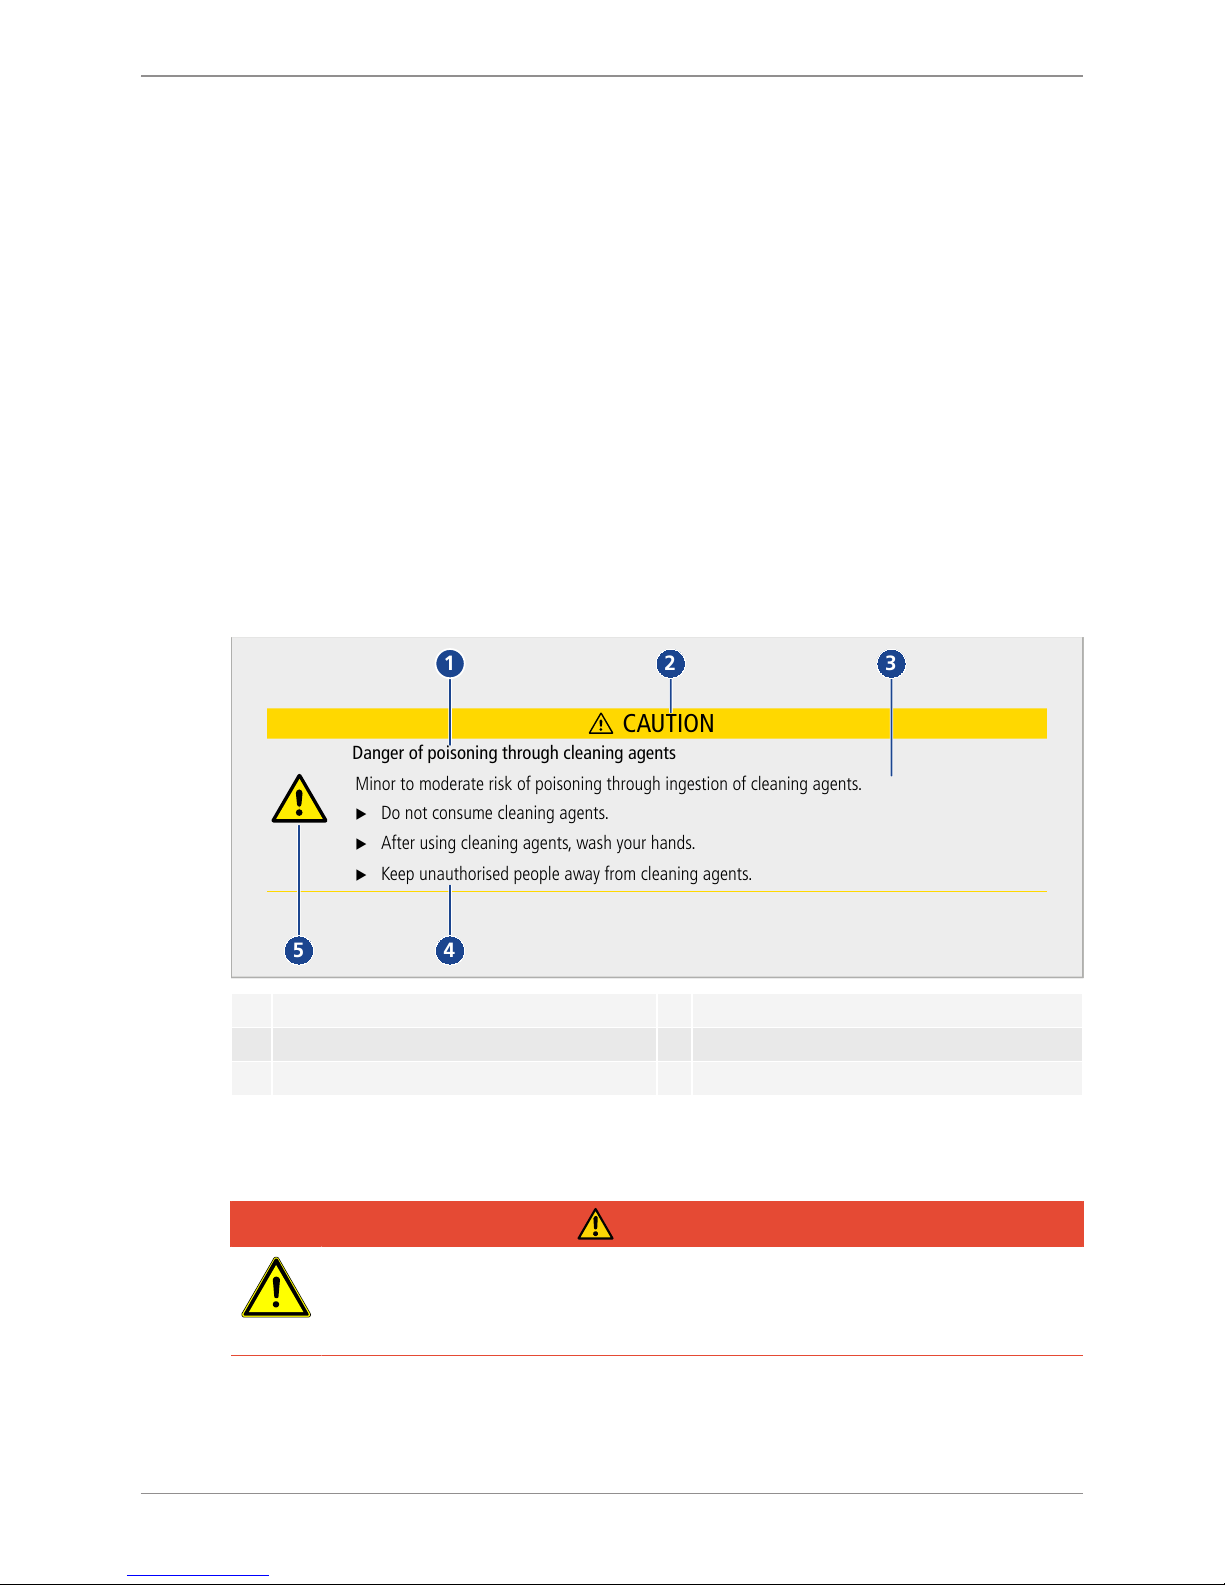
4.2.1 Structure
Sample safety notice
CAUTION
Danger of poisoning through cleaning agents
Minor to moderate risk of poisoning through ingestion of cleaning agents.
Do not consume cleaning agents.
After using cleaning agents, wash your hands.
Keep unauthorised people away from cleaning agents.
2
1
45
3
1 Source of danger 4 Risk prevention
2 Signal word 5 Safety symbol
3 Hazards
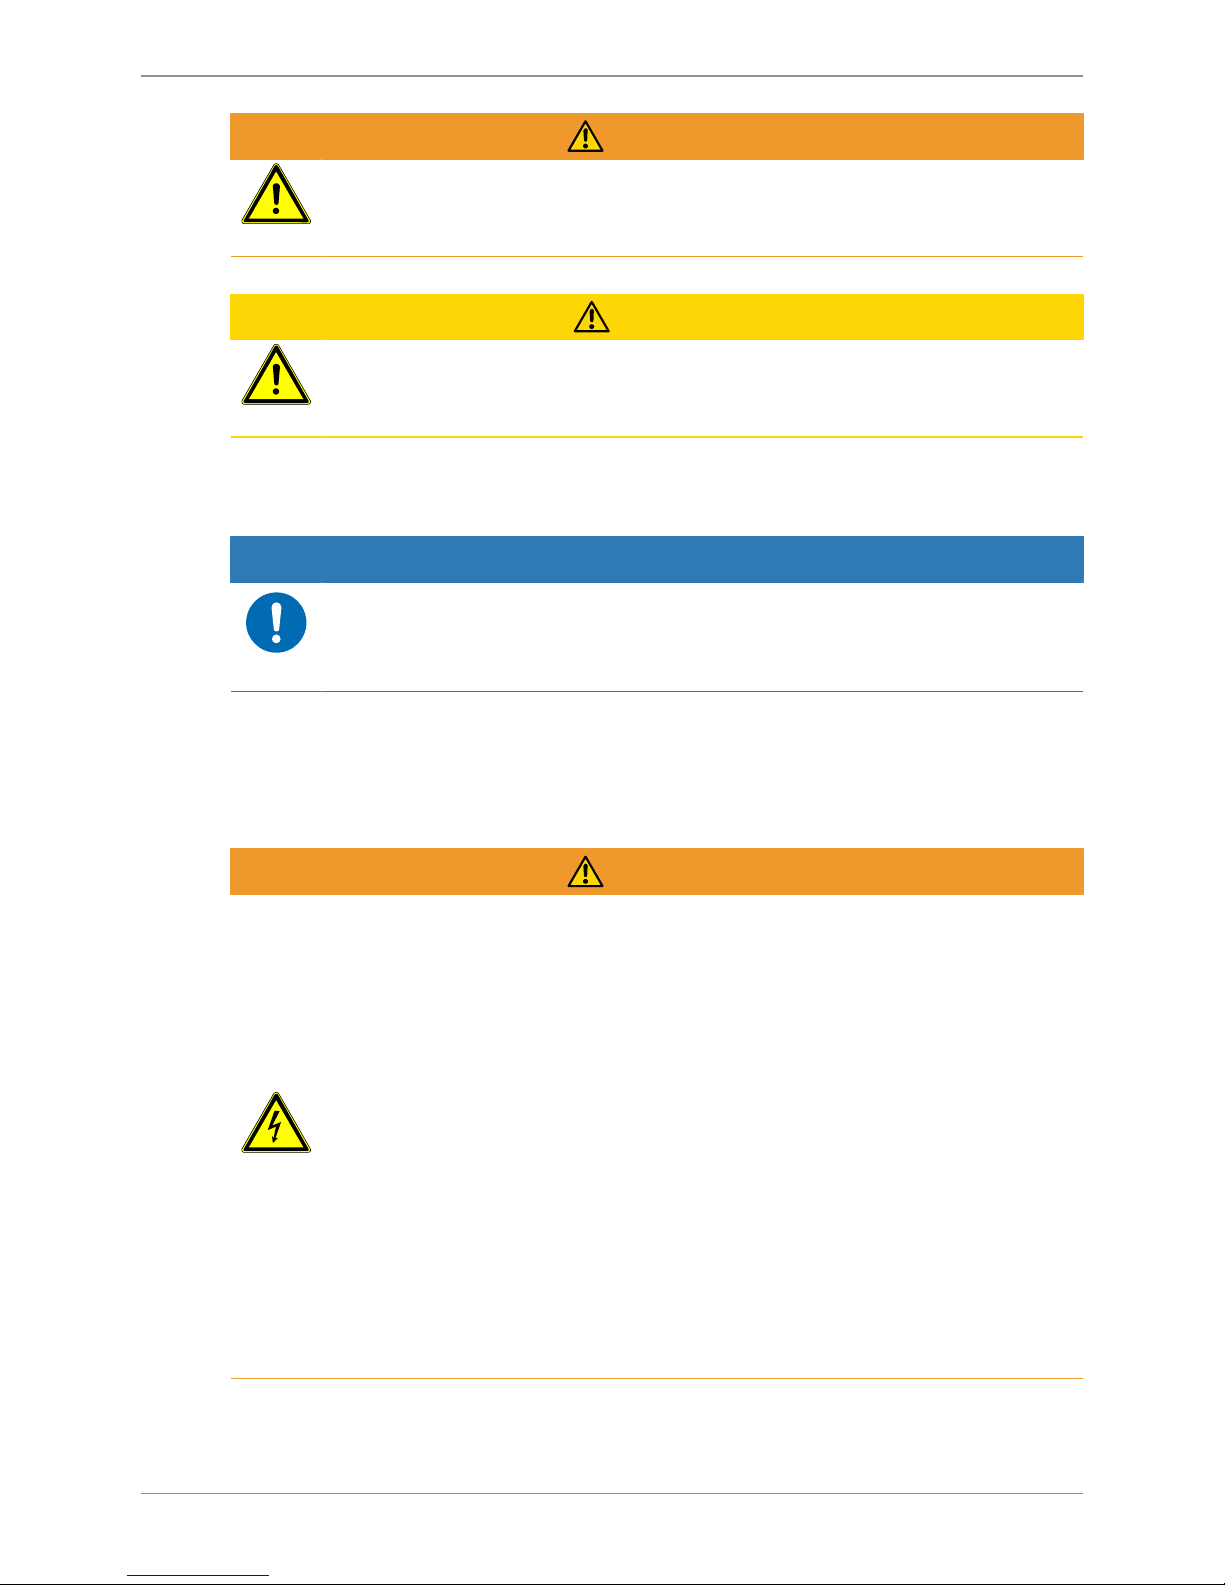
4.2.2 Conventions
Hazards for personnel
DANGER
Danger
The safety notice with the signal word "Danger" indicates a dangerous situation
which, if it is not avoided, will result in death or serious injury.
Page 10
Safety
10 / 60 © Thermoplan AG
WARNING
Possible, imminent danger
Indicates a possible threatening danger that can result in severe bodily injury or death.
CAUTION
Possible danger
Indicates a possible threatening danger that can result in minor bodily injury.
Material damage
NOTICE
Product damage
Indicates a situation, which if the instructions are not complied with, can damage the
coffee machine or its function.
4.3 General safety instructions for this coffee machine
4.3.1 Personal injury – WARNING:
WARNING
Electric shock
Contact with electrical components during operation of the coffee machine can result
in death or serious injury.
u Do not open the housing under any circumstances.
u Keep the coffee machine dry.
u Never immerse coffee machine, cable, or plug in water or or other liquids.
u Immediately stop using the coffee machine if cable or plug are damaged.
u Keep the coffee machine or cable away from hot machine parts. Use of the coffee
machine in the vicinity of open flame is strictly prohibited.
u Protect the cable from sharp edges.
u When removing the grounds container do not reach into the interior of the
housing.
u Only have the coffee machine installed, relocated, removed, repaired or
maintained by qualified technicians.
u Keep the coffee machine and the connecting cable out of the reach of children.
Page 11
Safety
© Thermoplan AG 11 / 60
WARNING
Danger of food poisoning
Consuming contaminated food can result in death or serious injury.
u Only use food products with a use-by date that has not yet expired.
u Store food products at suitable locations.
u Regularly clean the coffee machine as specified in the operating manual.
u Only use heat-treated (e.g. pasteurised or UHT) milk.
u Ensure hygiene standards when pouring milk into the container.
u Only fill the milk container with milk that is already refrigerated (under 5ºC).
u Use milk from opened milk containers within 24 hours.
u Only use high-quality coffee beans.
u Keep the being container closed.
u Do not fill the bean container before longer operating interruptions (night,
holiday, etc.).
u Keep the coffee supply in airtight containers where it is protected against light.
u Store the coffee supply in a cool and dry location. Through deep freezing
processes coffee can be stored for months without quality loss.
u Only use chocolate powder for vending machines.
u Keep the chocolate container closed.
u Do not fill the chocolate container before longer operating interruptions (night,
holiday, etc.).
u Store the chocolate powder air tight, in a dry and cool location.
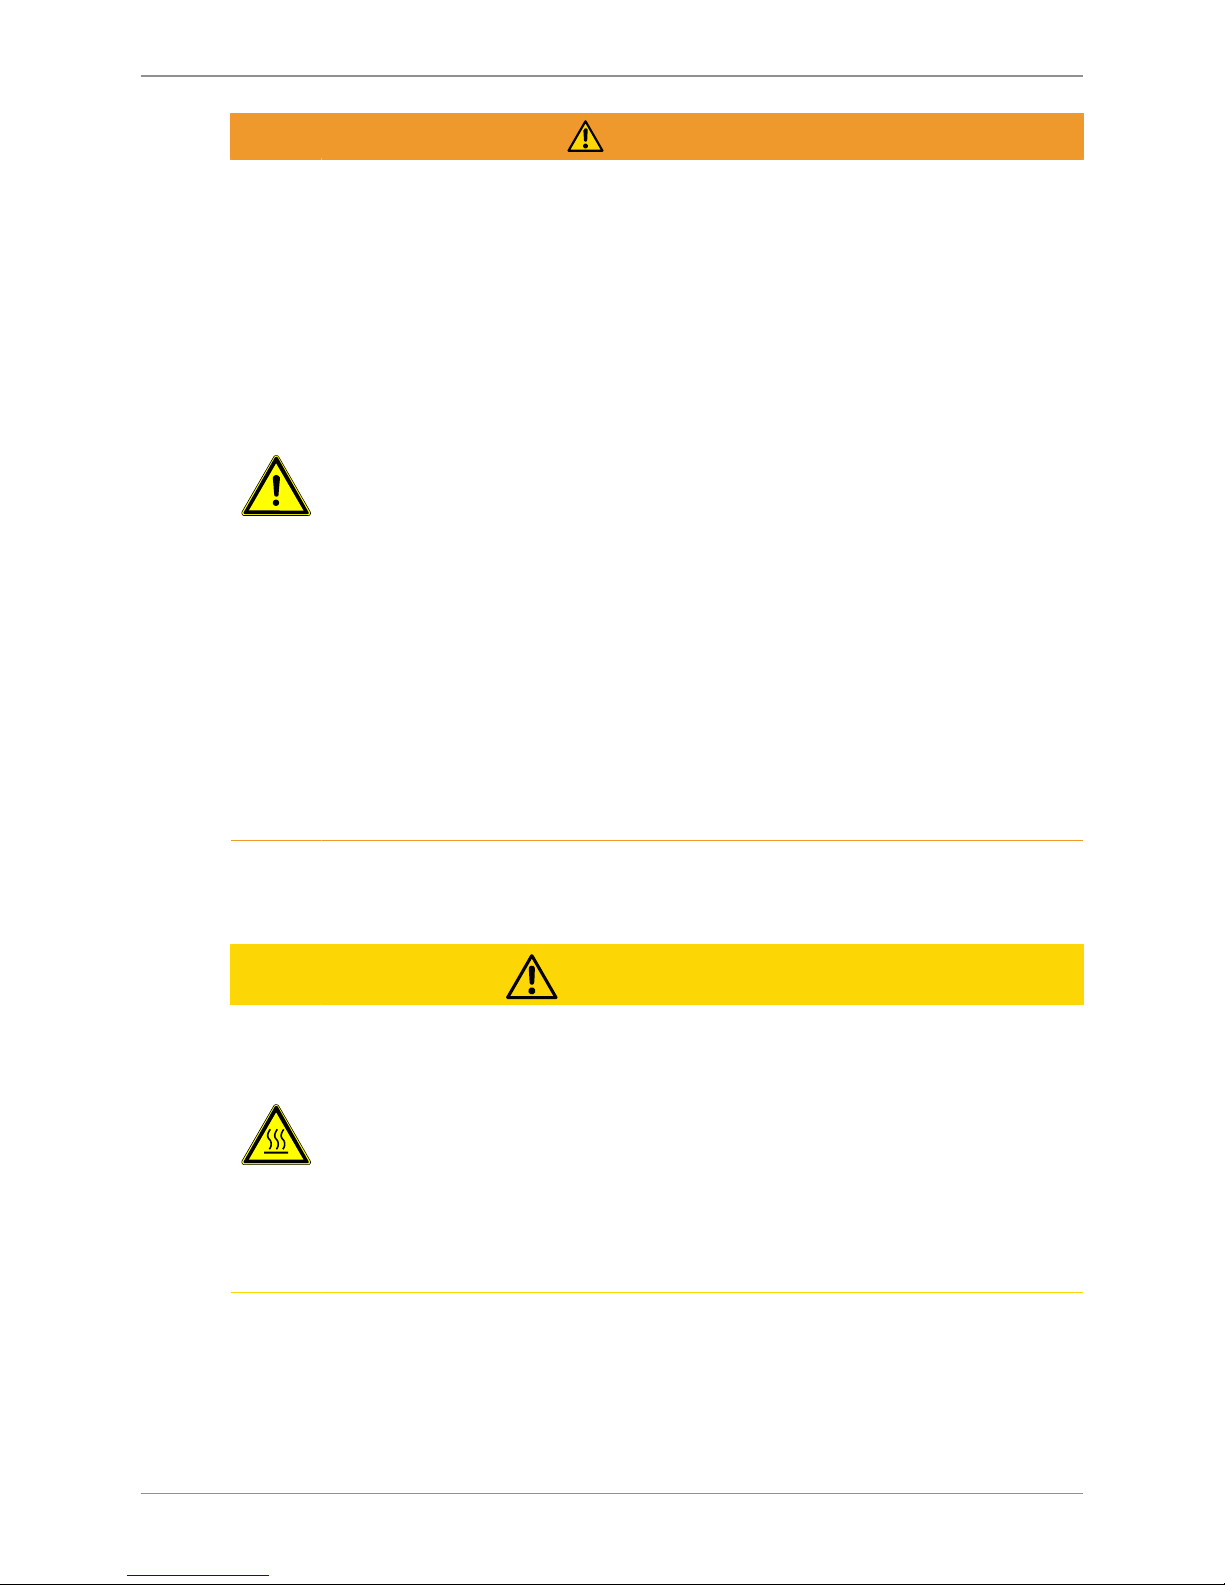
4.3.2 Personal injury – CAUTION:
CAUTION
Danger of scalding
Danger of minor or medium severity scalding injuries through contact with hot liquids.
u Keep your hands away from the product outlets.
u Avoid direct physical contact with hot liquids.
u Do not touch the product outlets for and after the beverage is dispensed or when
cleaning.
u Carefully emptied the drip tray, ensure that contact with hot liquids is not
possible.
Page 12

Safety
12 / 60 © Thermoplan AG
4.3.3 Material damage
NOTICE
Danger of material damage
Incorrect use of the coffee machine or the wrong, faulty spare parts can result in
material damage.
u Check whether the coffee machine to be installed complies with the applicable
federal, national, or municipal plumbing codes.
u The coffee machine is designed only for indoor use.
u Clean the coffee machine before longer periods of non-use. Remove and empty
the grounds container, and disconnect the copy machine from the mains supply.
Remove, empty and clean milk container; store it with the lid open.
u Leave the refrigerator door open.
u Only operate the coffee machine at an ambient temperature of 16°C to 32°C.
u Set up the coffee machine on a flat, horizontal, stable and heat-resistant surface.
u Do not position the coffee machine where a water jet could be used for cleaning.
u Leave a free space of at least 50 mm in front of air vents.
u Always store the coffee machine a temperature above 0°C in a dust-free and dry
environment.
u The upper edge of the coffee machine must be at least 1.5 m above the floor.
u Only use original Thermoplan cleaning accessories.
u Never operate the coffee machine without drip grid.
u Do not store explosive substances such as aerosol cans with a flammable
propellant in the interior of the coffee machine.
Page 13
Overview
© Thermoplan AG 13 / 60
5 Overview
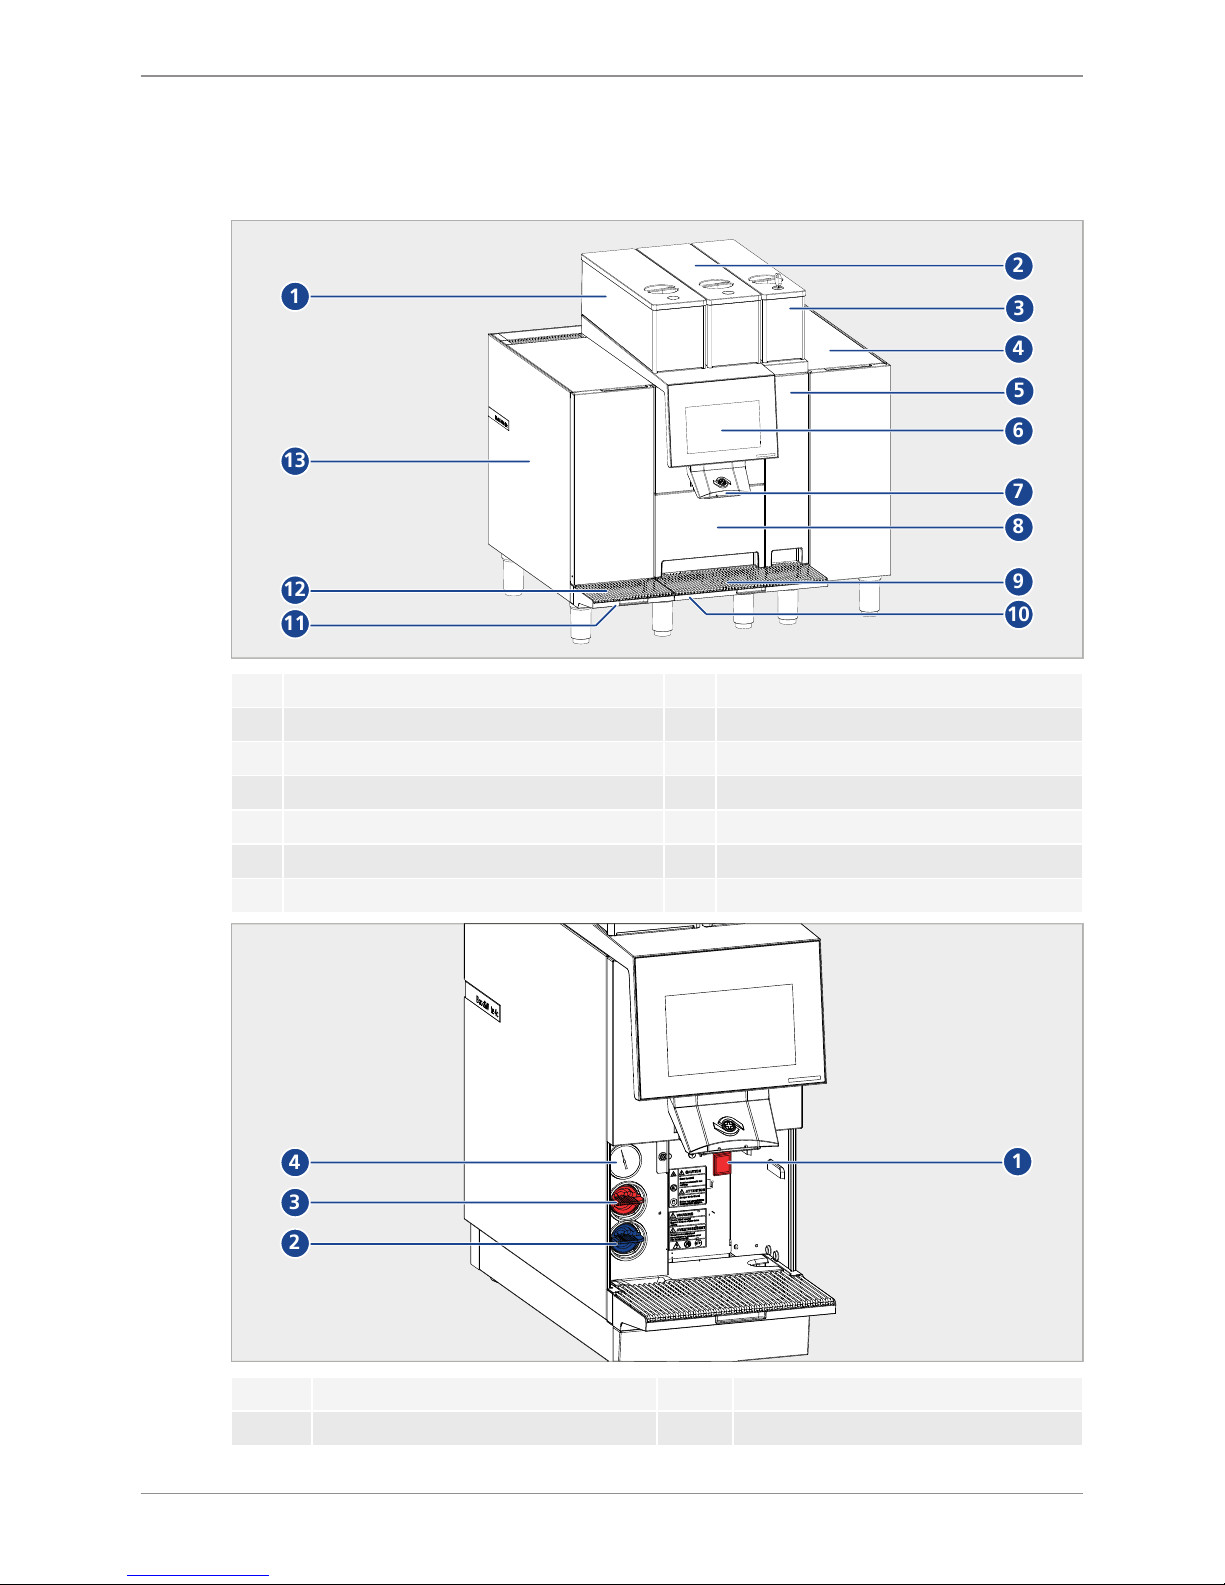
5.1 Coffee machine CTM-P-F RS / CTM-P-F
1
13
2
6
7
8
9
10
12
11
4
3
5
1 Bean container grinder1 8 Grounds container
2 Bean container grinder2 9 Cup tray – coffee machine
3 Chocolate container 10 Drip tray – coffee machine
4 Syrup module 11 Drip tray – refrigerator
5 Chocolate module 12 Cup grid – Refrigerator
6 Touchscreen with display 13 Refrigerator
7 Product outlet
1
4
3
2
1 Main switch 3 Coffee cleaning key (red)
2 Milk cleaning key (blue) 4 Pressure gauge
Page 14
Overview
14 / 60 © Thermoplan AG
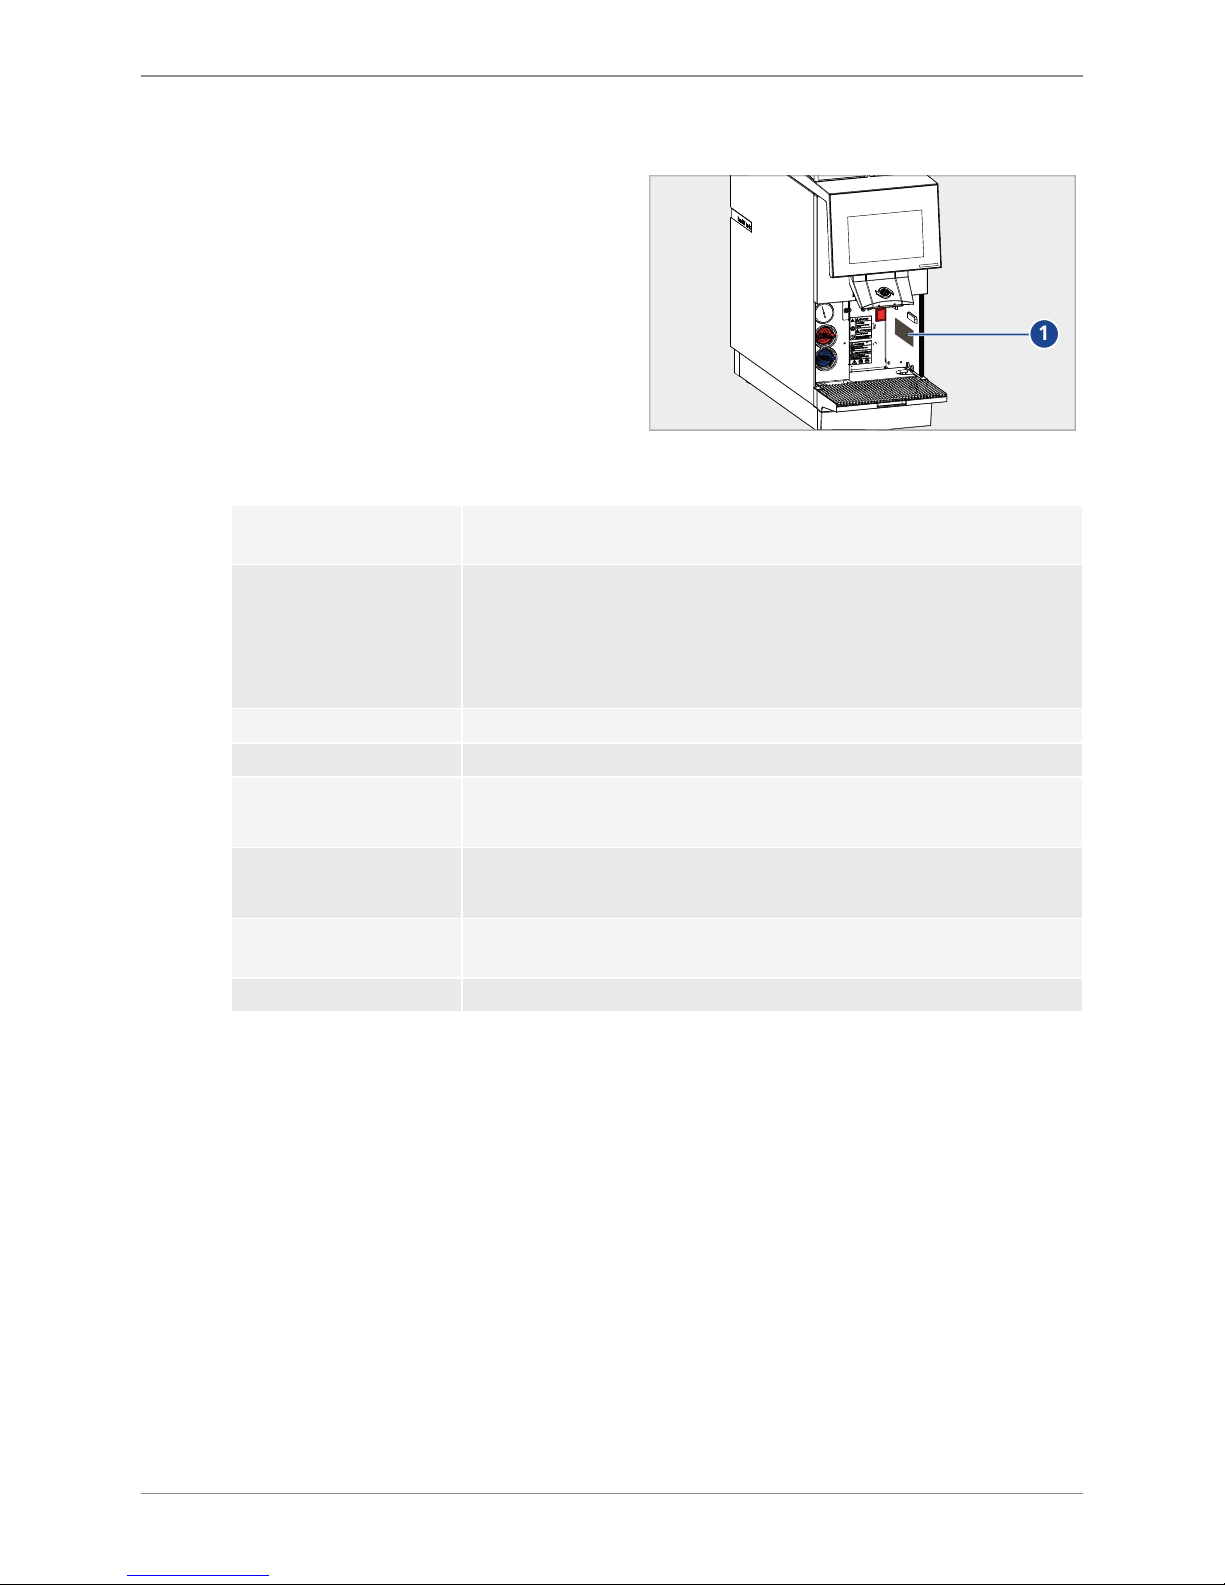
5.2 Type plate
u Slide outlet to the topmost position.
u Remove the grounds container.
ð The type plate is on the right side in the
interior.
1
5.3 Capacity information
Capacities – products (per
hour)
180 cups of espresso/140 cups of coffee/18 l hot water/120 cups of
cappuccino/120 cups of coffee
Electrical connection/power CTM-P-F (without refrigerator): 220-240VAC / 50/60Hz / 2700-3100W
CTM-P-F US (without refrigerator): 208VAC/60Hz/2700W
CTM-P-F RS (with refrigerator): 220-240VAC / 50/60Hz / 2750-3150W
CTM-P-F RS US (with refrigerator): 208VAC/60Hz/2750W
Water boiler pressure 1.17MPa (11.7bar)
Tap water pressure 0.2-0.4MPa (2-4bar)
Dimensions (W/D/H) CTM-P-F (without refrigerator): 490x600x645mm
CTM-P-F RS (with refrigerator): 660x600x645mm
Weight CTM-P-F (without refrigerator): 62kg
CTM-P-F RS (with refrigerator) 78kg
Climate class* –
refrigerator
5
Noise emission <70 dB
*The climate class indicates the room temperature at which the refrigerator may be operated to
achieve the full cooling capacity. The climate class is specified on the type plate [Type plate }
14]. Climate class 5 corresponds to a room temperature of 10°C to 43°C. Refrigerator must not
be operated outside of the specified room temperature.
Page 15
Overview
© Thermoplan AG 15 / 60
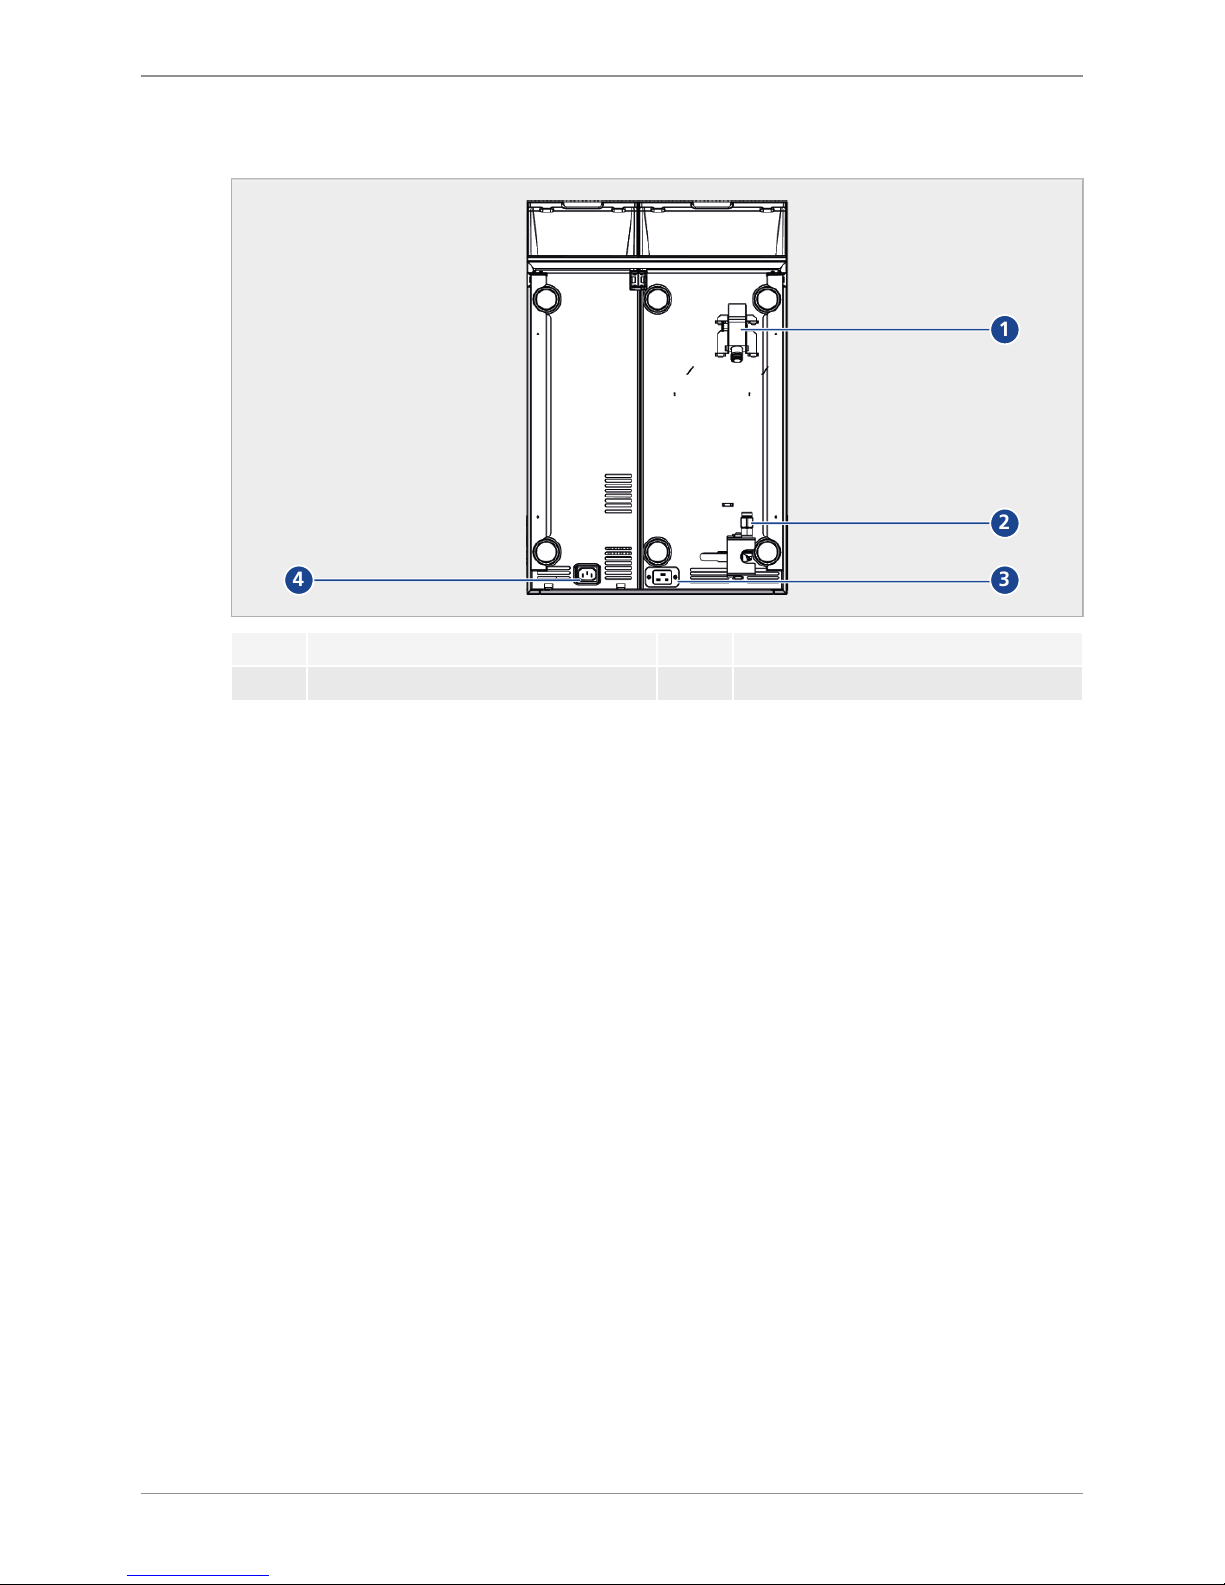
5.4 Connections
1
2
34
1 Drain connection – coffee machine 3 Mains cable connection – coffee machine
2 Water connection – coffee machine 4 Mains cable connection – refrigerator
Page 16

Scope of delivery
16 / 60 © Thermoplan AG
6 Scope of delivery
1
2
4
56
3
7
1 Coffee machine 5 Coffee cleaning tablets (red)
2 Operating manual 6 Water connection and drain water hoses
3 Mains cable 7 Cleaning container
4 Milk cleaning tablets (white)
Page 17
Commissioning
© Thermoplan AG 17 / 60
7 Commissioning
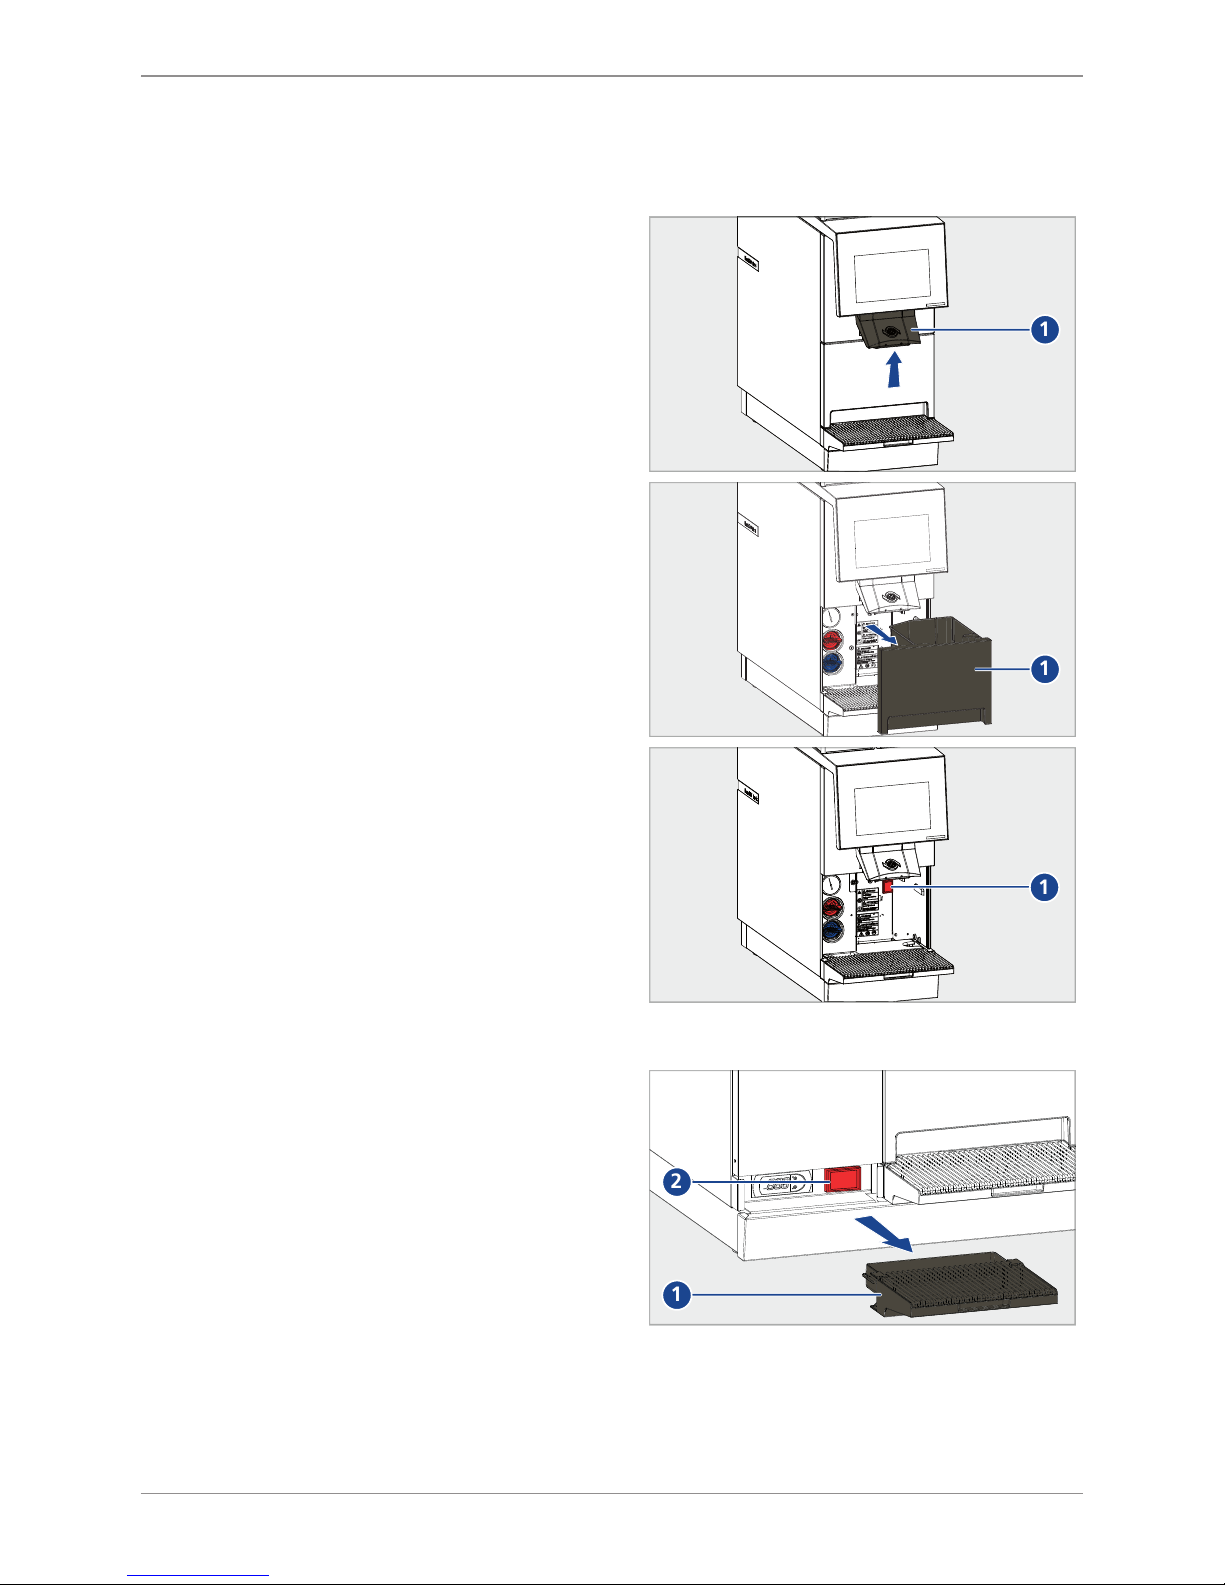
7.1 Switch coffee machine on and off
u Slide outlet (1) to the topmost position.
1
u Remove grounds container (1).
1
u Activate main switch (1).
1
7.2 Switch refrigerator on and off
u Remove drip tray (1).
u Activate main switch (2).
u Follow the instructions on the display.
1
2
Page 18
Commissioning
18 / 60 © Thermoplan AG
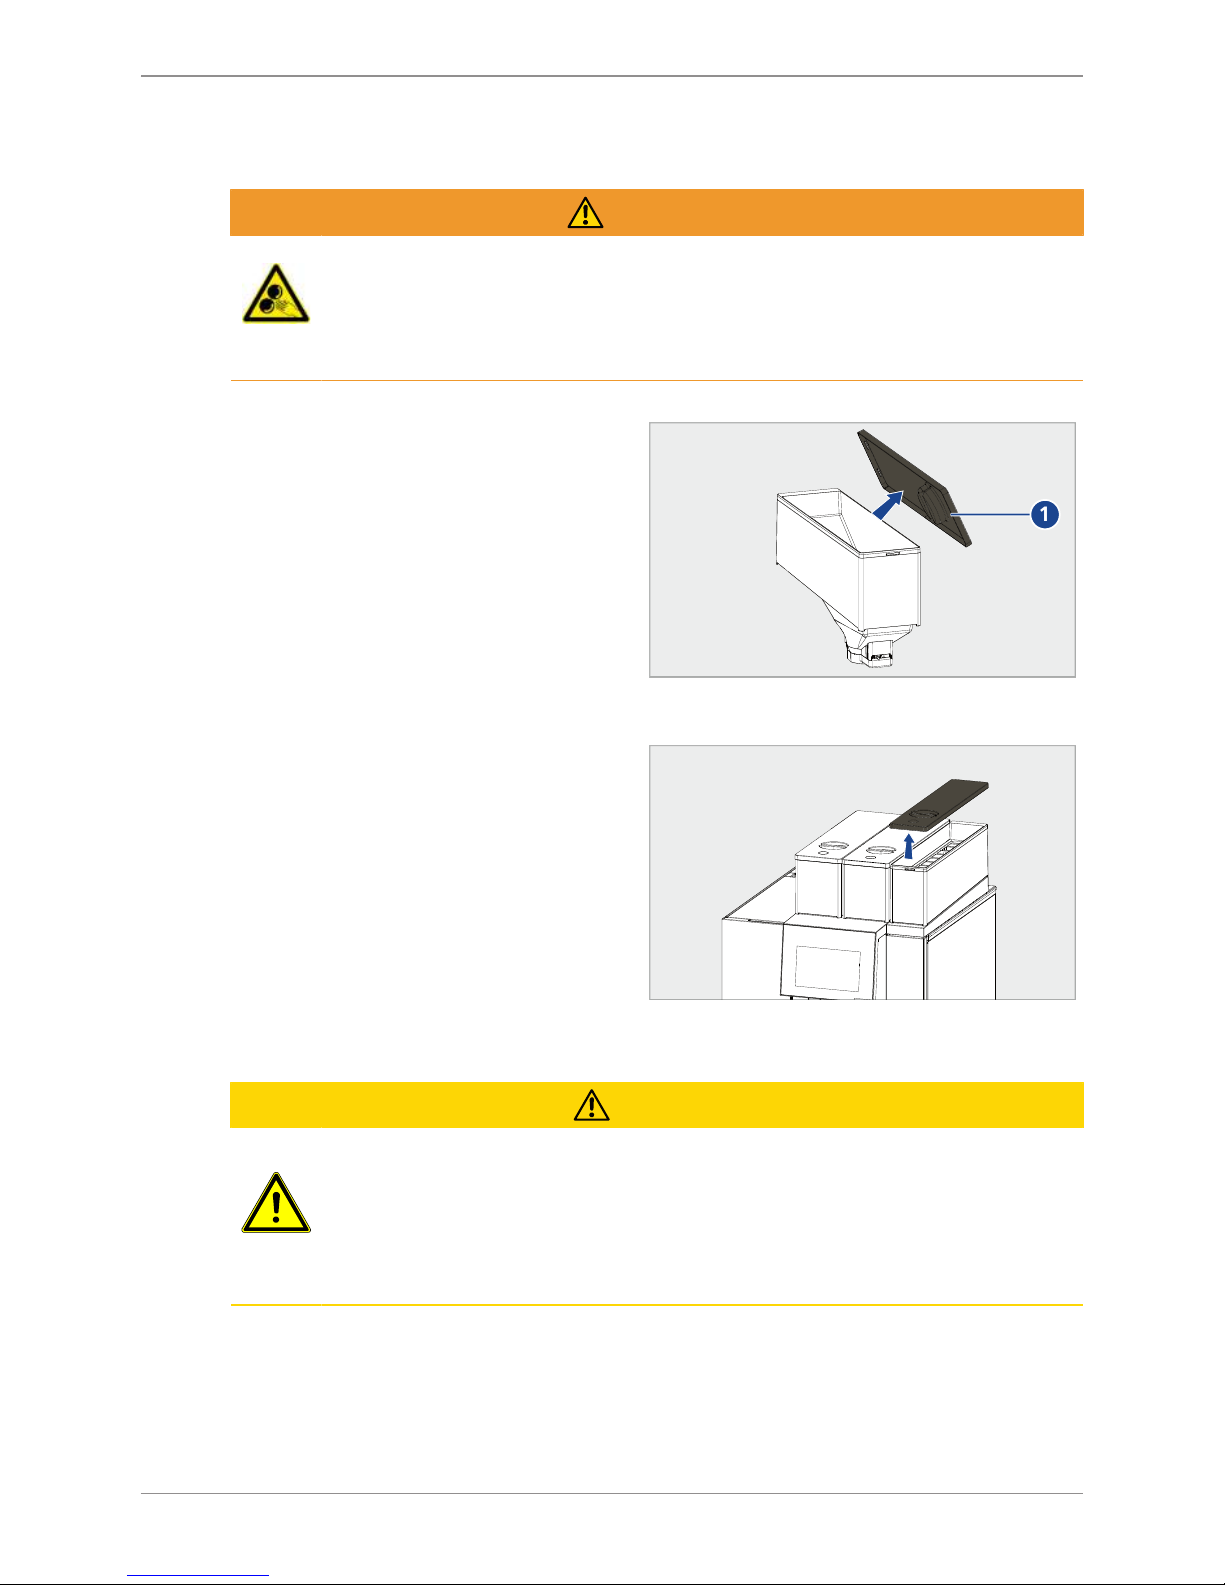
7.3 Still being container
WARNING
Danger of injury due to grinders
Danger of medium-severe or severe injuries when touching the grinders.
u Only instructed personnel are allowed to remove the being container.
u Never reach into the grinders.
u Remove the lid of the bean container (1).
u Feel the bean container with fresh coffee beans.
1
u Fit the lid back on the bean container (1).
ð Coffee products can now be served
[Dispensing the product } 22].
7.4 Filling the chocolate container
u Remove the lid of the chocolate container.
u Fill the chocolate container with fresh chocolate
powder.
u Fit the lid back on the chocolate container.
ð Chocolate products are now ready to be
dispensed.
7.5 Filling the milk container
CAUTION
Health risk
Danger of minor to medium severity illness through consumption of spoiled milk.
u Only use heat-treated (e.g. pasteurised or UHT) milk.
u Fill milk container with cooled milk (max.5°C).
u Use milk from opened milk containers within 24 hours.
Page 19

Commissioning
© Thermoplan AG 19 / 60
u Remove milk container from the refrigerator.
u Fill milk container with fresh, cooled milk.
u Insert milk container.
u Guide milk hose/sensor hose of the refrigerator
directly into the milk in the milk container.
ð Milk products can now be dispensed
[Dispensing the product } 22].
7.6 Top up syrup
u Select
Product Settings >Global Flavour
Settings
(1).
u For the syrup to be changed select
Empty
(2).
ð The syrup hose is emptied.
1
2
u Open syrup drawer.
u Uncouple the hose from the bottle.
Page 20

Commissioning
20 / 60 © Thermoplan AG
u Remove intake tube and bottle plug.
u Wipe off with a damp cloth.
u Place new bottle in the syrup drawer.
ð Note the position number of the bottle.
u Plug the intake tube and bottle plug onto the
new bottle.
u Couple the hose back on the bottle.
u Close syrup drawer.
u Select
Product Settings >Global Flavour
Settings
(1).
u For the changed syrup select
Fill
(2).
ð Products are ready to be dispensed.
1
2
Page 21

Commissioning
© Thermoplan AG 21 / 60
7.7 Changing the syrup name
u Insert syrup bottle [Top up syrup } 19].
ð Note the position number (1) of the bottle.
1
u Select
Global Flavour Settings
(1).
u For the appropriate position number, tap on the
symbol
Edit
(2) to change the name of the
syrup.
1
2
u Enter the name (1) of the syrup.
u Confirm the entry (2).
1
2
Page 22

Operation
22 / 60 © Thermoplan AG
8 Operation
8.1 Dispensing the product
CAUTION
Danger of scalding
Danger of minor or medium severity scalding injuries through contact with hot liquids.
u Avoid direct physical contact with hot liquids.
u Slide outlet upward or downward depending on
cup size.
u Place the cup under the outlet.
u Page to the left (2) or ride (3) or swipe to see
more products.
u Select product (1).
1
2
3
u Select desired product options [Product
options } 23].
1 2
u Confirm product selection (1) or cancel (2).
ð Selected product will be dispensed.
ð Display shows when the product has been
produced.
Page 23

Operation
© Thermoplan AG 23 / 60
u The symbol
Stop
(1) to stop product outlet
prematurely.
1
u Take the cup out of the cup rack.
ð Product is ready for consumption.
8.2 Product options
1
2
34
5
1 Select product size
small, medium
or
large
2 Select beans from grinder 1 or grinder 2 (e.g. if there are two types of coffee beans)
3 Cancel product selection
4 Confirm product dispensing
5 Select single or double product
8.3 Pre-selecting a product
If multiple products should be produced in succession, these can be preselected.
Page 24

Operation
24 / 60 © Thermoplan AG
u Tap the desired product symbols (1) one after
the other.
u Products will be displayed in the queue on the
left and the first product will start.
ð When the first product is finished, the next
product will start (2).
u Delete individual product from the queue (3).
u Delete all products from the queue (4).
2
111
1
3
4
8.4 Operation – refrigerator
The refrigerator is a component of the coffee machine and can only be operated in conjunction
with the coffee machine.
8.4.1 Operating element
AUX
set
1
2
3
4
1 Temperature display Shows the momentary temperature in the refrigerator
2 ON/OFF button Activate/deactivate the refrigerator
Increase value
3 COOLING button Decrease value
4 SET button Confirm value
Page 25

Operation
© Thermoplan AG 25 / 60
8.4.2 Adjusting the temperature
ü Refrigerator must be switched on.
u Remove drip tray (1).
ð Operating element (2) is inside on the left.
1
2
u Keep the SET button (3) depressed.
ð Numbers on the temperature display (1) are
flashing.
u With ON/OFF button (2) and the COOLING
button (4) set the desired temperature.
u Press the SET button (3).
ð Temperature will be saved.
AUX
set
2
3
4
1
Page 26

Settings in the user menu
26 / 60 © Thermoplan AG
9 Settings in the user menu
The user of the coffee machine can make various settings in the user menu. There are three
different user groups for controlling access authorization. The user groups are protected with a
number code via the login window. The number codes are transferred at installation and
instruction by the service partners qualified technician.
9.1 Overview – user menu
1
2
3
5
4
1 Menu tab 4 Events
2 Cleaning status 5 Product statistics
3 Service information
9.2 Calling up the user menu
u Tap the
user menu
symbol (1).
ð The start screen (dashboard) of the user
menu is displayed.
1
Page 27

Settings in the user menu
© Thermoplan AG 27 / 60
9.3 Calling up the user menu in self-service mode
If self-service mode is active the user menu can only be called up via a password. This function
protects the settings against undesired manipulation.
u Tap and hold
time
(1) until the login window
appears.
1
u Enter the appropriate code (1) and confirm (2).
ð The start screen (dashboard) of the user
menu is displayed.
1
2
9.4 User login
Variant 1: barista / manager active
u Tap and hold the
user menu
symbol (1).
u Enter the barista / manager code in the login
window and confirm.
ð The user menu is displayed.
1
Variant 2: self-service active
u Tap and hold
time
(1) until the login window
appears.
1
Page 28

Settings in the user menu
28 / 60 © Thermoplan AG
u Enter the barista / manager code in the login
window and confirm.
ð The start screen (dashboard) of the user
menu is displayed.
1
2
9.5 User logout
u Tap the
logout
symbol to logout the active user.
ð After logout the user group set as standard
user is automatically active.
9.6 Menu tab and access rights
1 2 3 4 5 6 7
Pos. Activity
Self-service Barista Manager
Manager
Comments
Dispensing of product [Dispensing the
product } 22]
Cleaning/rinsing [Execute automatic
cleaning } 39]
Page 29

Settings in the user menu
© Thermoplan AG 29 / 60
Pos. Activity
Self-service Barista Manager
Manager
Comments
1 Return to the product
screen
2 Call up user menu
(dashboard)
[User login } 27]
3 General settings
• Regional settings
• Screen settings
• Screen saver
• Energy management
• User settings/
standard user
settings
[General settings } 29]
4 Product settings
• Product list
• Edit products
• Edit views
[Product settings } 34]
5 Statistics
• Product ranking list
• Machine counters
[Statistics } 36]
6 System
• Information
• Recording
[System information }
37]
7 Errors
• Error log
[Error log } 37]
9.7 General settings
Manager
General settings can only be made by the user group manager.
Page 30

Settings in the user menu
30 / 60 © Thermoplan AG
9.7.1 Regional settings
u Select
General Settings > Regional Settings
(1).
u Make regional settings (2).
1
2
3
u Tap the
Logo
symbol (3) to return to the
product screen or to make other settings.
9.7.2 Screen settings
u Select
General Settings > Screen Settings
(1).
u Move the slider to
ON
(2).
1
2
u For
wait time
(1) specify the time (min) after
which the screensaver will be activated.
1
u Select
preview
(1) to test the screensaver.
1
Page 31

Settings in the user menu
© Thermoplan AG 31 / 60
u Move the slider to
OFF
(1) to deactivate the
screensaver.
1
u Tap the
Logo
symbol to return to the product
screen or to make other settings.
9.7.3 Screen saver
USB stick requirements
u Purchase branded goods.
ð Dimensions: Max. 10mmx26mm, length
min. 40mm.
ð Memory space: Max. 32GB.
u Format FAT32 (before use).
min. 40 mm
10 mm
26 mm
Photographic material requirements
• Size: 800x480 pixels, 50 px reserved for
information bar.
• Format: JPG
• < 5 MB
800 px
480 px
50 px
Installing screen saver
u remove the USB cover (1).
u Insert empty USB stick.
1
Page 32

Settings in the user menu
32 / 60 © Thermoplan AG
u Select
System > Data backup and recovery
(1).
u Select
Style files
(2).
u Tap the
Data backup
symbol (3).
ð Screen saver graphics are backed up.
1
2
3
u remove the USB stick.
u Open directory …\Backup\Style\ScreenSaver on
the USB stick.
u Replace or supplement the graphics in the
directory with your own graphics.
ð Attention: The ScreenSaver folder must
not be larger than 5 MB, otherwise it
cannot be uploaded to the machine.
u Insert the USB stick into the coffee machine
again.
u Select
System > Recovery
(1).
u Tap the
Update available articles
symbol (2).
u Select
Style files
(3).
u Tap the
Restore
symbol (4).
ð The screen saver is installed.
4
1
2
3
9.7.4 Energy management
u Select
General Settings > Energy
Management
(1).
u Adjust the screen brightness with the slider: To
the left (2) = darker, to the right (3) = brighter.
2
3
1
u Tap the
Logo
symbol to return to the product
screen or to make other settings.
9.7.5 User settings / standard user settings
The standard user is the user group that is automatically set after restarting the machine or
logging out of the user menu. The barista, self-service and the manager can be set as a standard
user. The standard user can only be specified by the manager user group.
Page 33

Settings in the user menu
© Thermoplan AG 33 / 60
u Select
General Settings > User Settings
(1).
u Set standard user (2).
1
2
u Tap the
Logo
symbol (3) to return to the
product screen or to make other settings.
9.7.6 Activating and deactivating self-service mode
u Select
General Settings > User Settings
(1).
u Change the standard user (2) to self-service.
u Tap the symbol
Logo
(3) to return to the
product screen).
ð Products will be distributed over the entire
screen.
1
2
3
Page 34

Settings in the user menu
34 / 60 © Thermoplan AG
9.8 Product settings
Manager
Product settings can only be made by the manager user group.
9.8.1 Product list
The coffee machine is delivered with preset product categories. These serve as the basis for
individual coffee recipes. Different product parameters influence the coffee recipes, such as the
quantity of water or coffee powder used. Only the manager user group can adapt existing
products.
u Select
Product Settings > Product List
(1).
ð All preprogramed products will be
displayed.
u Tap
Process
(2) to go directly to the menu
Process products
.
2
1
u Tap the
Logo
symbol to return to the product
screen or to make other settings.
9.8.2 Edit products
u Select
Product Settings > Edit Products >
Adaptations
(1).
u Use the slider to increase (2) or decrease (3)
product parameters.
2
3
1
2
3
u Tap the
test product
symbol (1) to test the
product.
u Click the
Change product
symbol (2) to change
to a different product.
u Click the
Save
symbol (3) to save the
configuration for the product. Click the
reset
symbol (4) to discard the configuration.
2
3
1
2
3 4
u Tap the
Logo
symbol to return to the product
screen or to make other settings.
Page 35

Settings in the user menu
© Thermoplan AG 35 / 60
9.8.3 Edit views
Create new product screen
u
Select Product Settings > Edit Views
(1).
u Tap the symbol
add
(2) to add a new product
screen.
2
3
1
2
u Select the desired user group (1).
u Activate or deactivate queue mode (2) (queue
mode active: In the product screen the product
queue is displayed).
u Activate the selection.
2
3
1
2
u Click the symbol
edit
(1) to adapt the created
product screen in the views editor.
u Click the symbol
delete
(2) to delete the product
screen.
2
3
1
2
u Adapt the name (1) in the views editor.
u Select dimensions(2).
1
Page 36

Settings in the user menu
36 / 60 © Thermoplan AG
u Tap the symbol
Add
(1) to place a product at
the desired location.
u Tap the symbol
delete
(2) to delete a product.
ð Products can be moved through
"drag&drop": Select product and drag to
the desired position (3).
1
2
3
u Tap the symbol
add
(1) to add a new page.
u Tap the symbol
close
(2) to accept the changes
and return to the
product settings
.
1
2
u Activate the new product screen (1).
1
u Tap the
Logo
symbol to return to the product
screen or to make other settings.
9.9 Statistics
u Select
Statistics > Product Ranking List
(1).
ð All products since the last reset will be
displayed.
ð The product ranking list can be sorted by
day, week, month and year.
u Tap the
Delete statistics
symbol (2) to reset the
statistics.
ð The statistics can only be deleted by the
manager user group.
1
2
Page 37

Settings in the user menu
© Thermoplan AG 37 / 60
u Select
Statistics > Machine Counters
(1).
ð The following counters will be displayed:
- Number of cleaning cycles
- Products counter
- Water.
ð These counters cannot be deleted.
1
u Tap the
Logo
symbol to return to the product
screen or to make other settings.
9.10 System information
System information can be viewed by the barista and manager user groups.
u Select
System > Information
(1).
ð The following information is displayed:
- Machine (serial number)
- Software (version/specifications)
- license (information concerning the
software license).
1
u Tap the
Logo
symbol to return to the product
screen or to make other settings.
9.11 Error log
Manager
The error logs can only be viewed by the manager user group.
u Select
Errors > Error Log
(1).
ð All previous events will be displayed.
1
u Tap the
Logo
symbol to return to the product
screen or to make other settings.
Page 38

Cleaning
38 / 60 © Thermoplan AG
10 Cleaning
10.1 Cleaning agents and accessories
CAUTION
Danger of poisoning through cleaning agents
Minor to moderate risk of poisoning through ingestion of cleaning agents.
u Do not consume cleaning agents.
u After using cleaning agents, wash your hands.
u Keep unauthorised people away from cleaning agents.
NOTICE
Machine damage through use of the wrong cleaning agents
The machine is damaged through the use of the wrong cleaning agents and
accessories.
u Only use the cleaning agents prescribed by Thermoplan.
u Cloths for cleaning should only be slightly moistened. Dripping cloths or sponges
can cause a short circuit.
u Cloths used to clean the machine components which come into contact with food
must be germ-free.
u Alcohol, ethanol, methylated spirits, disinfectants or acidic cleaning agents, such
as acetic acid must not be used for cleaning.
Additional accessories for cleaning:
• Warm soap solution
• Cloth for damp cleaning
• Cloth for dry cleaning
• Cleaning tablets for the coffee system
• Cleaning tablets for the milk system
10.2 Cleaning schedule
The cleaning schedule describes which cleaning steps must be executed daily or weekly. This
cleaning schedule must be strictly complied with to ensure hygiene and product quality.
Daily Weekly Cleaning step Comment
1x
Execute automatic cleaning
[Execute automatic cleaning } 39]
1x
Clean exterior components Clean exterior components
1x
Clean the grounds container and
drip tray
[Clean the grounds container and drip
tray } 43]
1x
Clean the product outlet block
[Clean product outlet } 43]
Page 39

Cleaning
© Thermoplan AG 39 / 60
Daily Weekly Cleaning step Comment
1x
Clean bean container
[Clean bean container } 44]
1x
Clean the milk system Only for coffee machines with milk
system [Clean the refrigerator } 46]
1x
Clean chocolate system
[Clean chocolate system } 47]
1x
Clean syrup system
[Cleaning the syrup system } 50]
10.3 Cleaning prompt
The cleaning prompt appears after a defined period or after a specific number of dispensed
products.
Execute the automatic cleaning as soon as possible. The products remain available. The message
appears 24 hours after the first dispensed milk product or 48 hours after the first dispensed coffee
product.
Execute the automatic cleaning immediately. The products are no longer available. The message
appears 26 hours after the first dispensed milk product or 50 hours after the first dispensed coffee
product.
10.4 Execute automatic cleaning
The automatic cleaning can be executed in three ways.
Variant 1: Via the user menu (possible any time)
u Call up the user menu [Calling up the user
menu } 26].
u Tap the symbol
cleaning
(1).
ð Cleaning starts.
u Follow the instructions on the display.
ð The cleaning process takes several minutes.
1
Variant 2: Note on the machine display
A cleaning prompt appears on the product screen
as soon as the predefined time after the first
dispensing of product has elapsed.
u Tap the symbol
cleaning
(1).
ð Cleaning starts.
u Follow the instructions on the display.
ð The cleaning process takes several minutes.
1
Page 40

Cleaning
40 / 60 © Thermoplan AG
Variant 3: Via the login window (possible any time)
22:00
u Tap and hold the
user menu
symbol.
ð The login window appears.
1
u Tap the symbol
cleaning
(1).
ð Cleaning starts.
u Follow the instructions on the machine display.
ð The cleaning process takes several minutes.
10.5 Cleaning key
Coffee cleaning key (red)
The coffee cleaning key (red) is used for cleaning
the coffee system. It is located inside the machine
behind the grounds container.
Milk cleaning key (blue)
The milk cleaning key (blue) is used for cleaning of
the milk system. It is located inside the machine
behind the grounds container.
u Remove grounds container (1).
1
Page 41

Cleaning
© Thermoplan AG 41 / 60
u Turn the cleaning key 90° anticlockwise and
then pull it out.
u Insert 2 milk cleaning tablets and/or 1 coffee
cleaning tablet in the respective cleaning key as
shown on the display.
u Insert the cleaning key and turn 90° clockwise.
u Re-insert the grounds container.
u Start cleaning via the display.
10.6 Clean exterior components
u Moisten a non-abrasive cloth with a soap water
solution.
u Carefully clean the outside of the coffee
machine.
Page 42

Cleaning
42 / 60 © Thermoplan AG
u Moisten a non-abrasive cloth with a soap water
solution.
u Carefully clean the touchscreen.
Page 43

Cleaning
© Thermoplan AG 43 / 60
10.7 Clean the grounds container and drip tray
NOTICE
Damage of the grounds container
The grounds container can be damaged if not cleaned properly.
u Do not remove coffee grounds from the grounds container by knocking/striking.
u Empty the grounds container (1) and wash out
with a soap water solution. Then dry.
1
u Empty drip grid (1) and wash out with a soap
water solution. Then dry.
1
10.8 Clean product outlet
u Slide product outlet upwards.
1
Page 44

Cleaning
44 / 60 © Thermoplan AG
u Press the retaining clips together and loosen the
product outlet.
u Pull the product outlet block out of the product
outlet.
1
u Thoroughly flush out the product outlet block
thoroughly with a soap water solution. Then
rinse out with clean water.
u Rub out product outlet with a small brush.
u Dry and re-insert product outlet block.
10.9 Clean bean container
u Remove the lid of the bean container (1).
1
Page 45

Cleaning
© Thermoplan AG 45 / 60
u Turn the lever in the bean container
anticlockwise to detach the bean container.
1
u Lift bean container with both hands and remove
it.
u Remove beans from the bean container.
u Store beans in cool and dry location.
u Remove the remaining beans from the grinders
with a hand vacuum.
u Thoroughly flush out bean container with a
warm soap solution. Then rinse out with clean
water.
u Thoroughly dry the bean container and re-insert
it.
Page 46

Cleaning
46 / 60 © Thermoplan AG
10.10 Clean the refrigerator
u Remove milk container from the refrigerator.
u Rinse out milk container with warm water and
then dry it.
u Moisten a non-abrasive cloth with a soap water
solution.
u Clean milk hoses.
u Moisten a non-abrasive cloth with a soap water
solution.
u Clean the interior of the refrigerator.
u Moisten a non-abrasive cloth with a soap water
solution.
u Clean the exterior of the refrigerator.
Page 47

Cleaning
© Thermoplan AG 47 / 60
u Place the milk container in the refrigerator.
u Guide milk hoses back into the milk container.
u Close the refrigerator door.
10.11 Clean chocolate system
u Start automatic cleaning.
u Pull the cover of the chocolate module away to
the front, and remove.
u Pull cover towards the front.
ð Chocolate container is released.
u Carefully lift the chocolate container upward
and out.
Page 48

Cleaning
48 / 60 © Thermoplan AG
u Remove hopper lid from above.
u Remove hopper from the front.
u Remove chocolate chute from the chocolate
container.
u Clean hopper lid (1), chocolate chute (2) and
hopper (3) with clean water and dry off.
1
3
2
u Remount chocolate chute on the chocolate
container.
Page 49

Cleaning
© Thermoplan AG 49 / 60
u Mount hopper (2).
u Mount hopper lid (3).
1
2
u Re-insert chocolate container(1).
u Press cover (2) to the rear.
ð Chocolate container is secured.
1
2
u Turn chocolate chute upward (prevents
chocolate powder from falling into the hopper
during the cleaning process.
u Remount cover of the chocolate module.
ð Cleaning process is running.
Page 50

Cleaning
50 / 60 © Thermoplan AG
After automatic cleaning
u Pull the cover of the chocolate module away to
the front, and remove.
u Turn chocolate chute downwards.
u Remount cover of the chocolate module.
ð Cleaning is concluded.
10.12 Cleaning the syrup system
CAUTION
Danger of scalding
Danger of minor or medium severity scalding injuries through contact with hot liquids.
u Avoid direct physical contact with hot liquids.
u Start automatic cleaning.
ð Syrup hoses are emptied.
Page 51

Cleaning
© Thermoplan AG 51 / 60
u Open syrup drawer.
u Uncouple intake hoses from the syrup tubes.
u Remove syrup bottles including syrup tubes.
u Place cleaning container under the beverage
outlet.
ð Hot water will be output.
u Place cleaning container with hot water (1) into
the syrup drawer.
u Place the reserve syrup tube (2) in the cleaning
container.
u Couple the syrup tube (2) to the intake hoses
(3).
u Close syrup drawer.
ð Automatic cleaning starts running.
3
1
2
Page 52

Cleaning
52 / 60 © Thermoplan AG
u Open syrup drawer.
u Uncouple syrup tube (2) with intake hoses (3).
u Remove cleaning container(1) with reserve
syrup tubes (2).
3
1
2
u Remove rubber mat and clean with a soap
water solution.
u Re-insert rubber mat.
u Place syrup bottles in the syrup drawer in the
right sequence:
4
1
3
2
u Couple the syrup tube to the intake hoses.
u Close syrup drawer.
ð Syrup hoses will be filled.
ð Products are ready to be dispensed.
Page 53

Troubleshooting
© Thermoplan AG 53 / 60
11 Troubleshooting
11.1 Overview
Indications and error messages appear on the product screen (4). Details concerning the
messages can either be shown by tapping the appropriate symbol or in the “error messages”
menu. If the error is rectified, the error message disappears.
3
5
2
1
4
1 Close message 4 Error symbol
2 Message details 5 Indication / error symbol / error no. / error time /
error category
3 Confirm message
11.2 Possible indications and errors and their rectification
The following indications and error messages can appear in the display:
Symbol Meaning / cause Rectification
information
e.g. "Machine starts"
Follow the display instructions
Warnings
e.g. "Excessive coffee quantity"
Follow the display instructions
Errors
e.g. "brewing piston error"
Follow the display instructions
Serious error
e.g. "general error"
Follow the display instructions
Page 54

Troubleshooting
54 / 60 © Thermoplan AG
Symbol Meaning / cause Rectification
Cleaning recommended Perform cleaning as soon as possible
Cleaning required Execute cleaning immediately
Grounds container almost full Empty grounds container as soon as possible
Grounds container full Empty grounds container
Grounds container is missing Insert grounds container
Bean container is missing Insert bean container
Bean container 1 is missing Insert bean container 1
Bean container 2 is missing Insert bean container 2
Milk level low Top up with fresh, cooled milk as soon as
possible
Milk temperature high Check refrigerator
Door correctly closed?
Milk temperature too high Empty milk container immediately
Top up fresh, cooled milk; check refrigerator
Door correctly closed?
Milk is empty Top up with fresh, cooled milk
Error chassis fan Follow the display instructions
Page 55

Accessories and consumables
© Thermoplan AG 55 / 60
12 Accessories and consumables
12.1 Cleaning agents
Thermoplan Coffee Cleaning Tablets
Art. no. Description
128.540 Tub Thermo Coffee Tabs (31 tabs)
Thermoplan Milk Cleaning Tablets
Art. no. Description
120,528 Tub Thermo Milk Tabs (62 tabs, Schulz)
120.259 Tub Thermo Milk Tabs (62 tabs, Urnex)
12.2 Milk container
Art. no. Description
127,148 Milk container 4.0 l, complete
127.181 Milk container 4.0 l, lid
12.3 Chocolate container
Art. no. Description
127.988 Chocolate container, complete
12.4 Cleaning container
Art. no. Description
100,728 Cleaning container – syrup module
Page 56

EU Declaration of Conformity
56 / 60 © Thermoplan AG
13 EU Declaration of Conformity
Page 57

Notes
© Thermoplan AG 57 / 60
Page 58

Notes
58 / 60 © Thermoplan AG
Page 59

Notes
© Thermoplan AG 59 / 60
Page 60

Your service partner Thermoplan AG
Thermoplan-Platz 1
6353 Weggis, Switzerland
Tel. +41 41 392 12 00
Fax +41 41 392 12 01
thermoplan@thermoplan.ch
www.thermoplan.ch
130.707_OM_BW4c-CTM-P-F-(RS)_EN-REV-A
 Loading...