

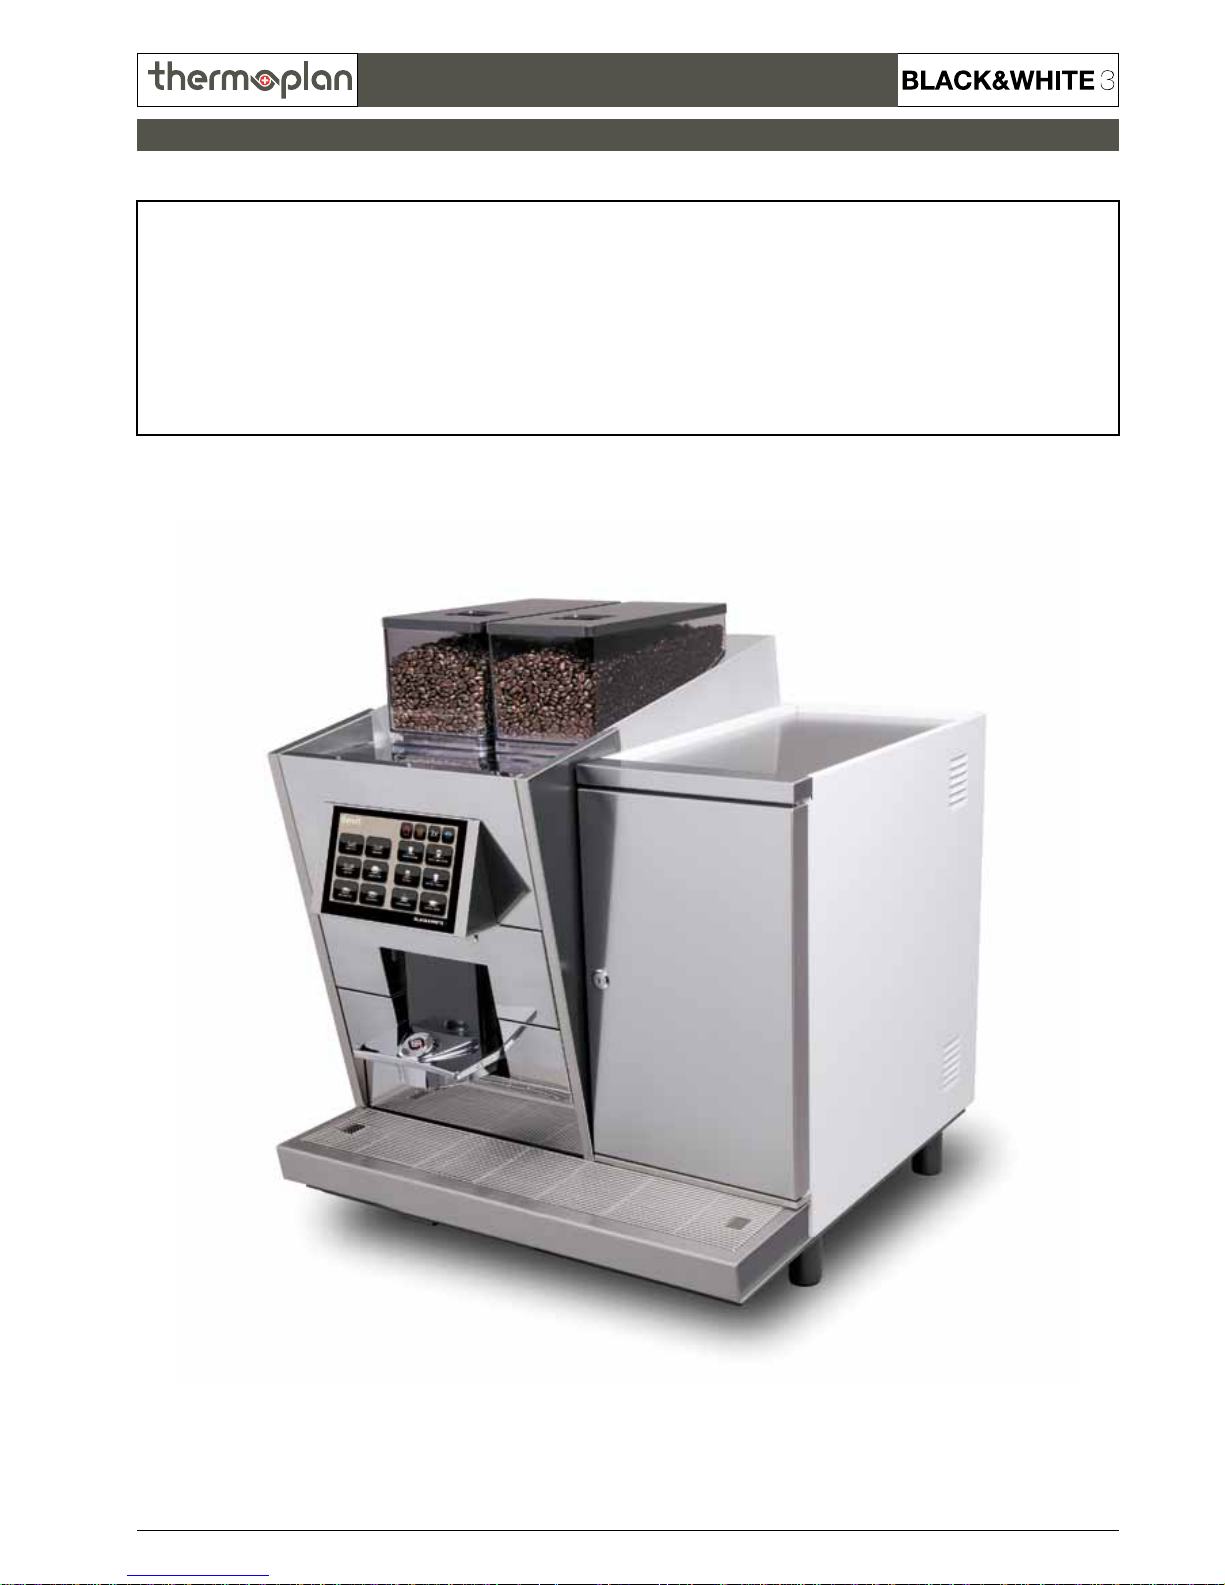
Thermoplan Black&White3 CT, Black&White3 CTS, Black&White3 CBTM, Black&White3 CBT, Black&White3 CTM Technical Manual
...Page 1
REV-4
3.1
CT / CTS / CTM / CTMS / CBT / CBTM
SECTION 3
© 2009 by Thermoplan AG, Subject to change
Technical Manual
PROGRAMMING
FOX1
Page 2

REV-4
3.2
0 1 2 3 4 5 6 7 8 9 10
1
X X
2
X X X
3
X X X
4
X X S
5
X X S
6
X X S
7
X X S
8
X X S
9
X X S
10
X X S
11
X X S
12
X X S
13
X X S
14
X X S
15
X X S
16
X X S
17
X X S
18
X X S
19
X X S
20
X X S
21
X X S
22
X S S
23
X S S
24
S S
25
S S
26
S S
27
S S
28
S S
29
S S
30
S S
31
S S
32
S S
33
S S
0 1 2 3 4 5 6 7 8 9 10
34
S S
35
S S
36
S S
37
S S
38
S S
39
S
40
S
0 1 2 3 4 5 6 7 8 9 10
© 2009 by Thermoplan AG, Subject to change
SECTION 3
Technical Manual
X Changes in content, corrections S New paging
Overview modications
Modications journal
Revision: Date: Modications Initials:
0 2009-04-24 Basic document, rst edition FC
1 2009-08-28 Complete revision MBO
2 2009-09-22 Added handling instructions BW3 Touchscreen RZ
3 2010-07-30 Adjustments to EPROM V1.91 / CBTM added RZ
4 2011-01-31 Various changes SO
5
6
7
8
9
10
Document: Programming
Page
REVISION
Page
REVISION
Page
REVISION
Page 3
REV-4
3.3
SECTION 3
© 2009 by Thermoplan AG, Subject to change
Technical Manual
Index
General handling 3.4 - 3.5
1. Basic settings 1.1 Set time and date 3.6 - 3.7
1.2 Change name of products 3.8 - 3.9
1.3 Check touchscreen for errors 3.10
2. Copy settings from machine to CompactFlash
®
-card 3.11 - 3.13
3. Copy settings from CompactFlash
®
-card to machine 3.14 - 3.16
4. Reset settings to default values 3.17 - 3.19
5. Replacing the EPROM 3.20 - 3.21
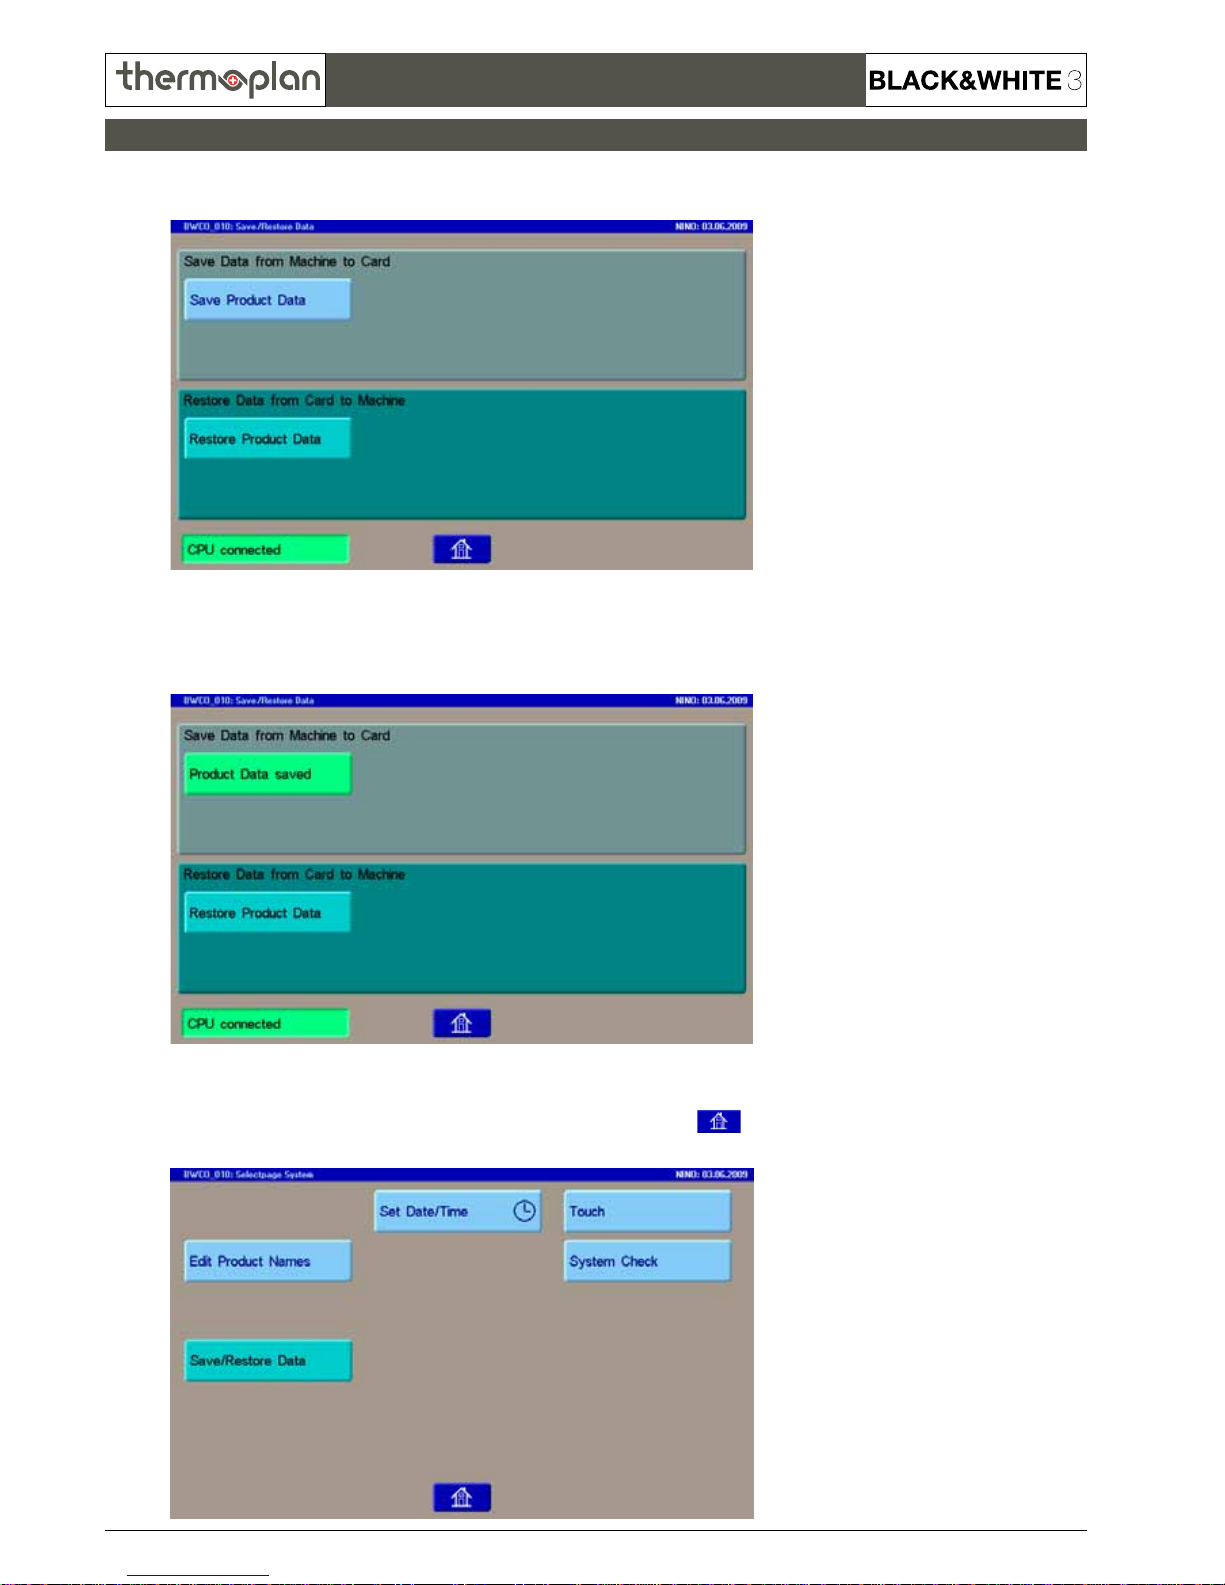
Menu navigation 3.22 - 3.28
General overview 3.29
Overview programming 3.30 - 3.40
Page 4

REV-4
3.4
© 2009 by Thermoplan AG, Subject to change
SECTION 3
Technical Manual
Using the different service codes the technician can
access and program the individual beverage settings.
The following pages explain how to navigate within the programming parameters.
Display Product keys Function keys
FUNCTION KEYS
Clear
Step
Back
Func1
Func2
+
-
Used to activate functions and clear counters in the diagnostic menu
Step forward in programming mode, enter submenus in diagnostic menu
Step backwards in programming mode
Set time and date
No function
Settings in programming mode, step forward and backwards in diagnostic menu
+
Clear
-
Step
Back
Func 1 Func 2
SERVICE CARD
General handling
Note:
The display pictures used in this section are from a CTMcool and may have minor differences depending on the used machine type.
Page 5
REV-4
3.5
SECTION 3
© 2009 by Thermoplan AG, Subject to change
Technical Manual
Service Levels
By entering different Service Codes you can enter different Service Levels:
Service Level 1: Code 1111
Enter the parameter menus to change settings on products and machine conguration for one access.
Service Level 2: Code 1112 (gets deactivated!!!)
Enter the parameter menus to change settings on products and machine conguration for several accesses.
Access is granted as soon as you push upper left corner (no code needed until machine is turned off and on again).
Service Level 4: Code 4444
Enter the FOX Touchscreen settings. In this menu you can change time and date or save your machine settings to a
CompactFlash
®
-card or vice versa.
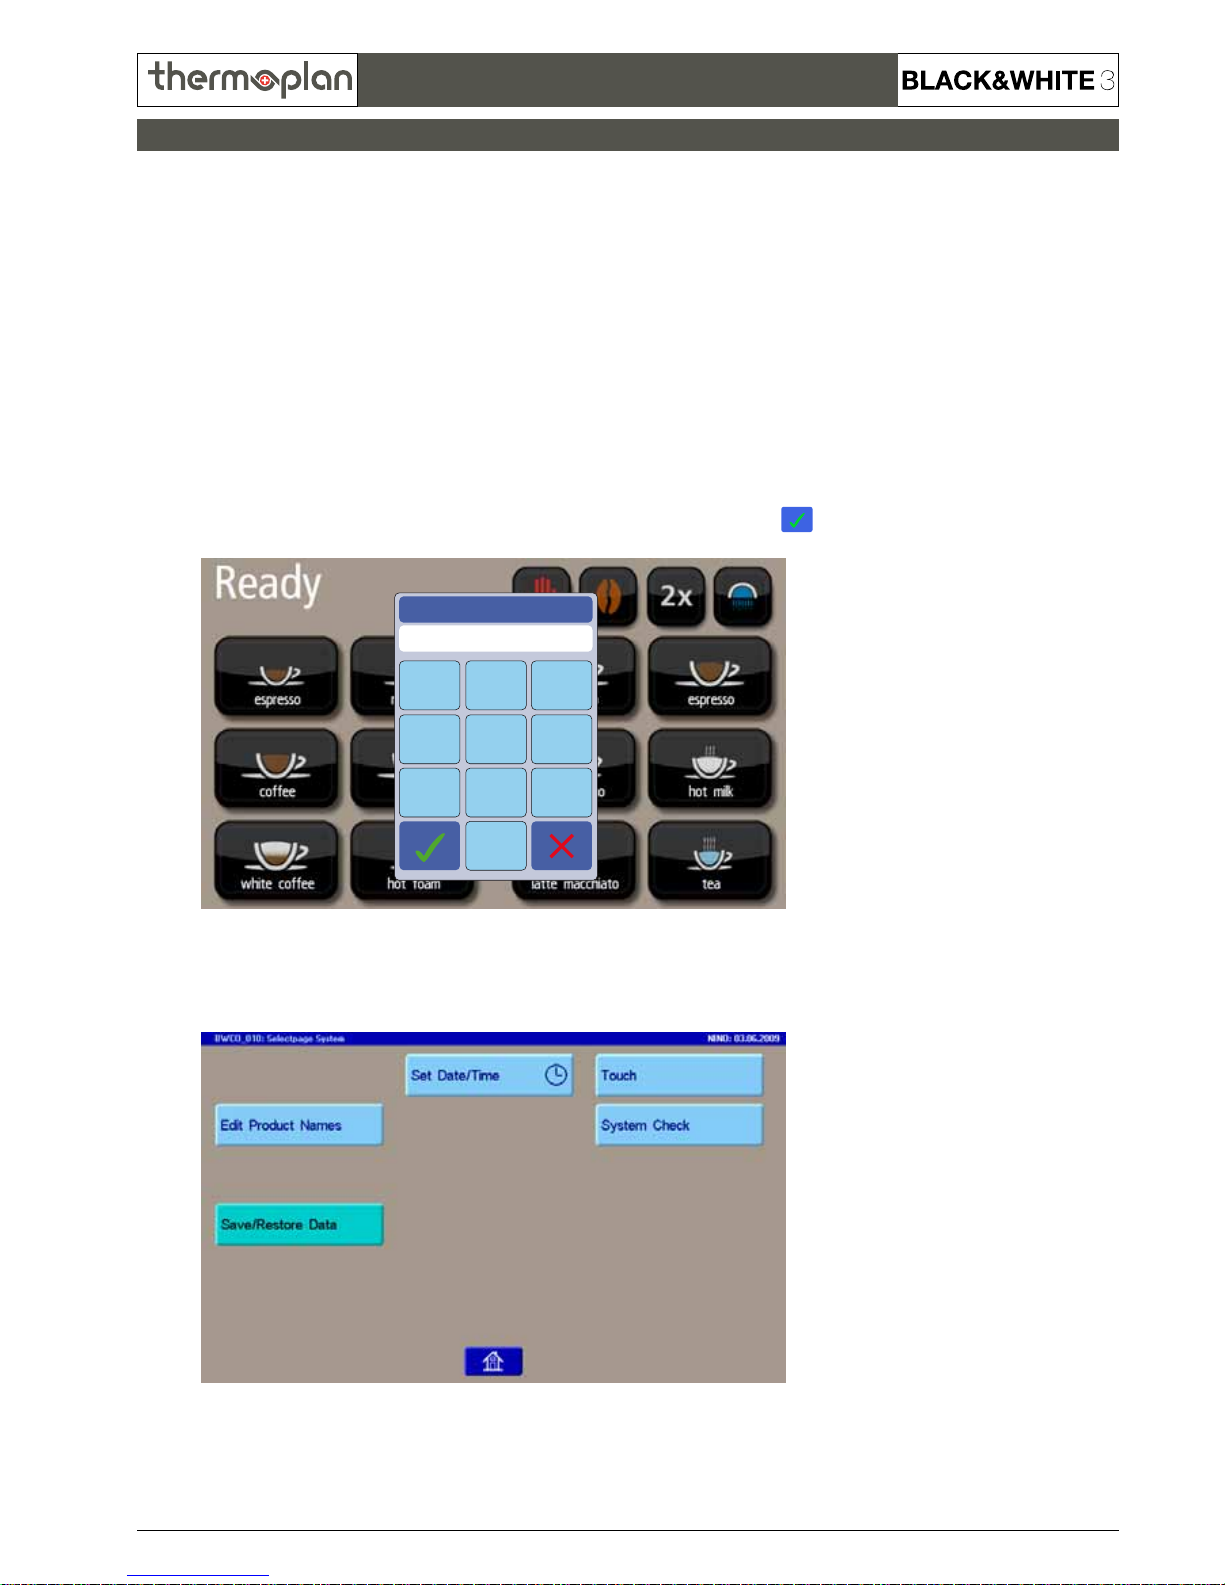
To access the different Service Levels do as follows:
To exit the different Service Levels do as follows:
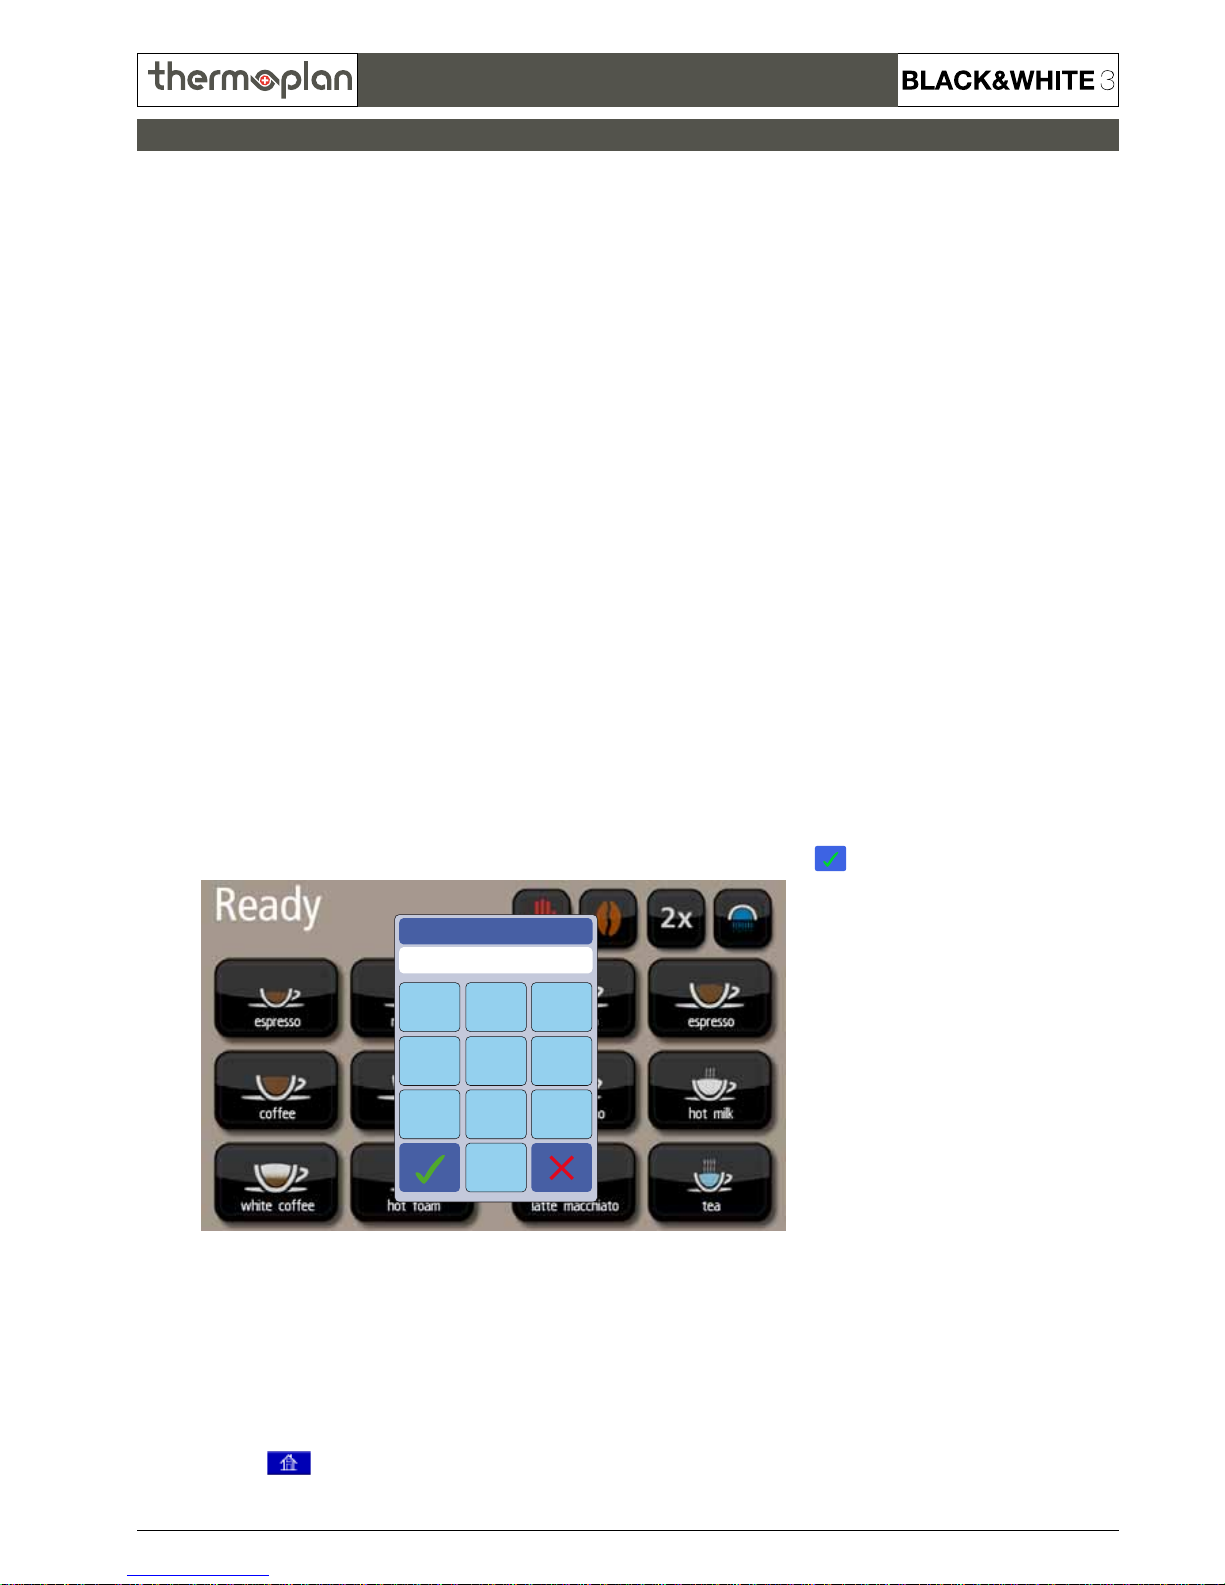
1. Tap on „Ready“ on the upper left display section.
2. The „Enter PIN“ window appears. Enter the desired PIN and conrm with .
Service Level 1 / 2:
As soon as you touch the upper left corner you will exit the Service Level.
Service Level 4:
By pressing the
-button you can step back to the previous screen. Step back until Service Level 1 (parameter menu)
appears, then touch the upper left corner to exit the Service Level.
General handling
23
1
56
4
89
7
Enter PIN
****
Page 6
REV-4
3.6
© 2009 by Thermoplan AG, Subject to change
SECTION 3
Technical Manual
1.1 Set time and date
To set time and date do as follows:
1. Tap on „Ready“ on the upper left display section.
2. The „Enter PIN“ window appears. Enter Code 4444 and conrm with .
3. The following screen appears:
Basic settings
23
1
56
4
89
7
Enter PIN
****
Page 7
REV-4
3.7
Zeiteinstellungen
Automatische Sommerzeitumschaltung
Aktuelle Uhrzeit
Automatik ist eingeschaltet
13:28:30
Datumseinstellungen
September 2009
Mo Di Mi Do Fr Sa So
1234 5 6
87910 11 12 13
1514 16 17 18 19 20
2221 23 24 25 26 27
2928 30
SECTION 3
© 2009 by Thermoplan AG, Subject to change
Technical Manual
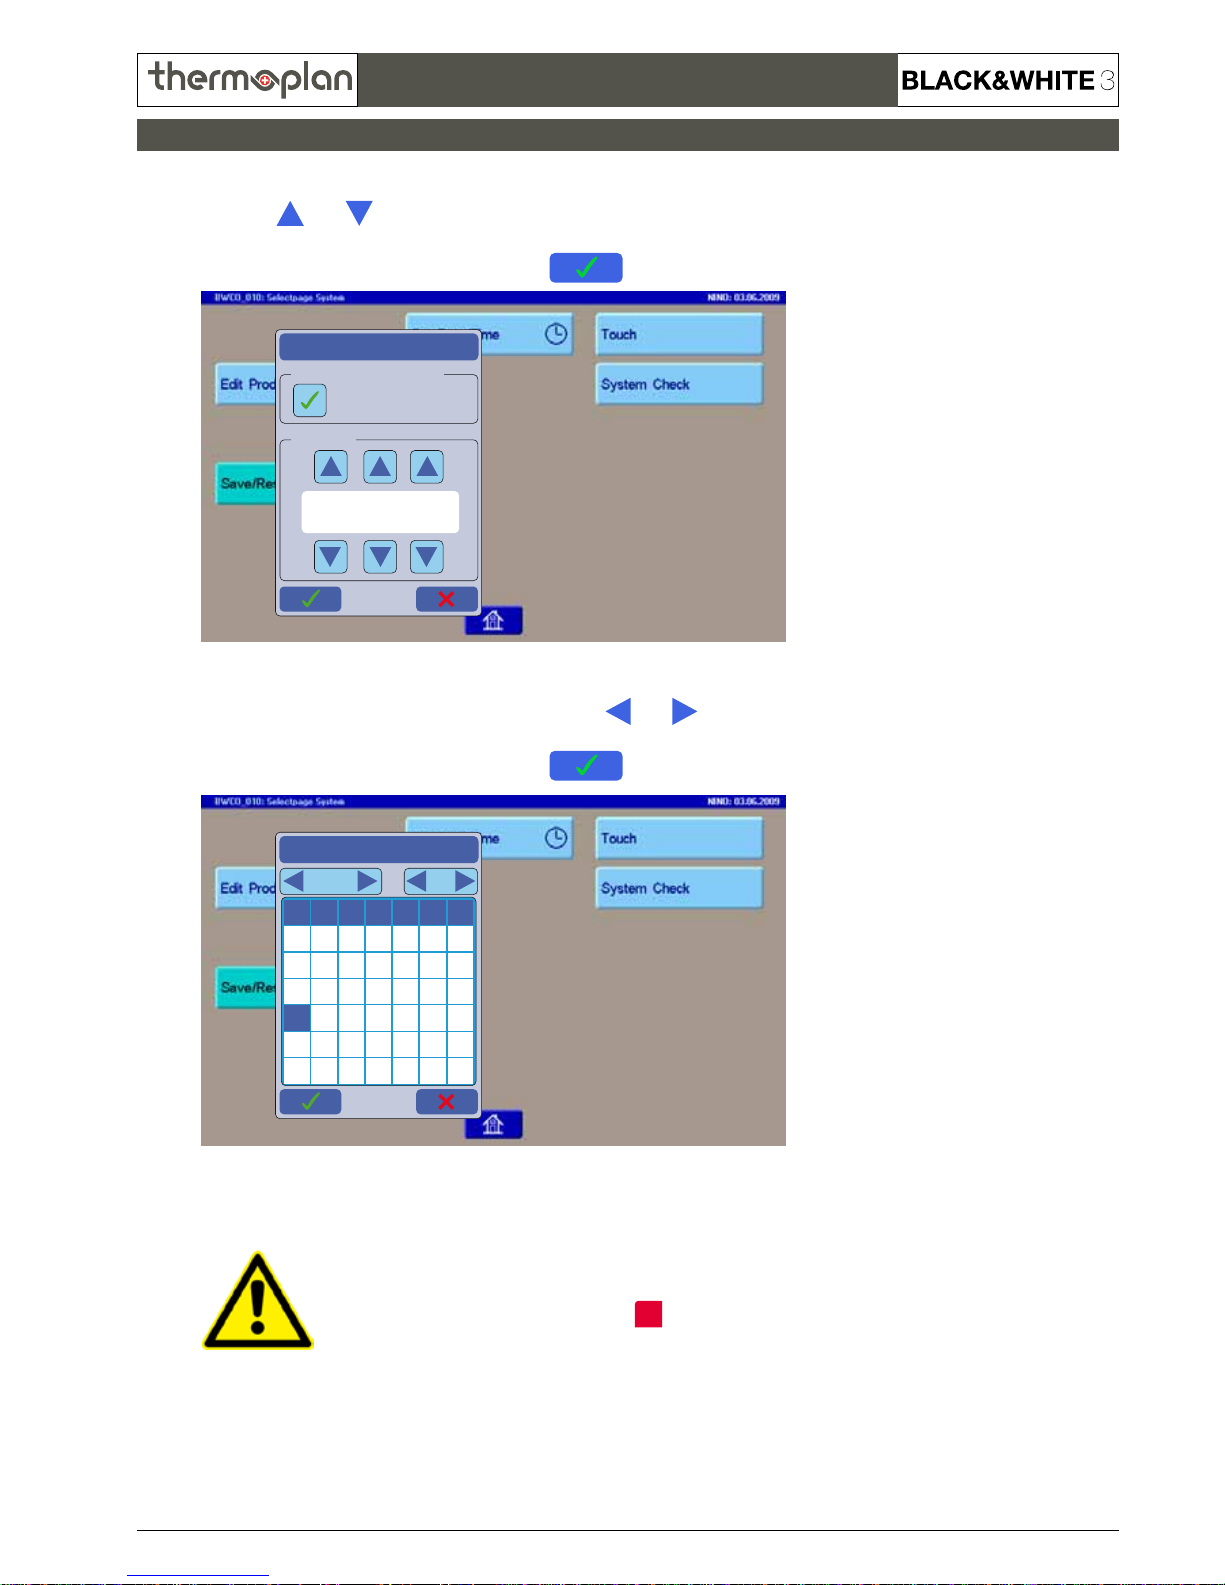
4. By pressing on „Set Date/Time“ a popup window appears to set the time. Use the arrow
buttons and to set the current hour, minute and second. Furthermore you can activate
the automatic change to daylight-saving time.
Conrm the new settings by pressing the -button.
5. A new window appears. Use the arrow buttons and to
set the current month and year. To set the current day simply tap it on the screen.
Conrm the new settings by pressing the -button.
It‘s also possible to set time and date in Service Level 1.
Enter with Code 1111 and press on
Func1
.
Basic settings
Page 8
REV-4
3.8
© 2009 by Thermoplan AG, Subject to change
SECTION 3
Technical Manual
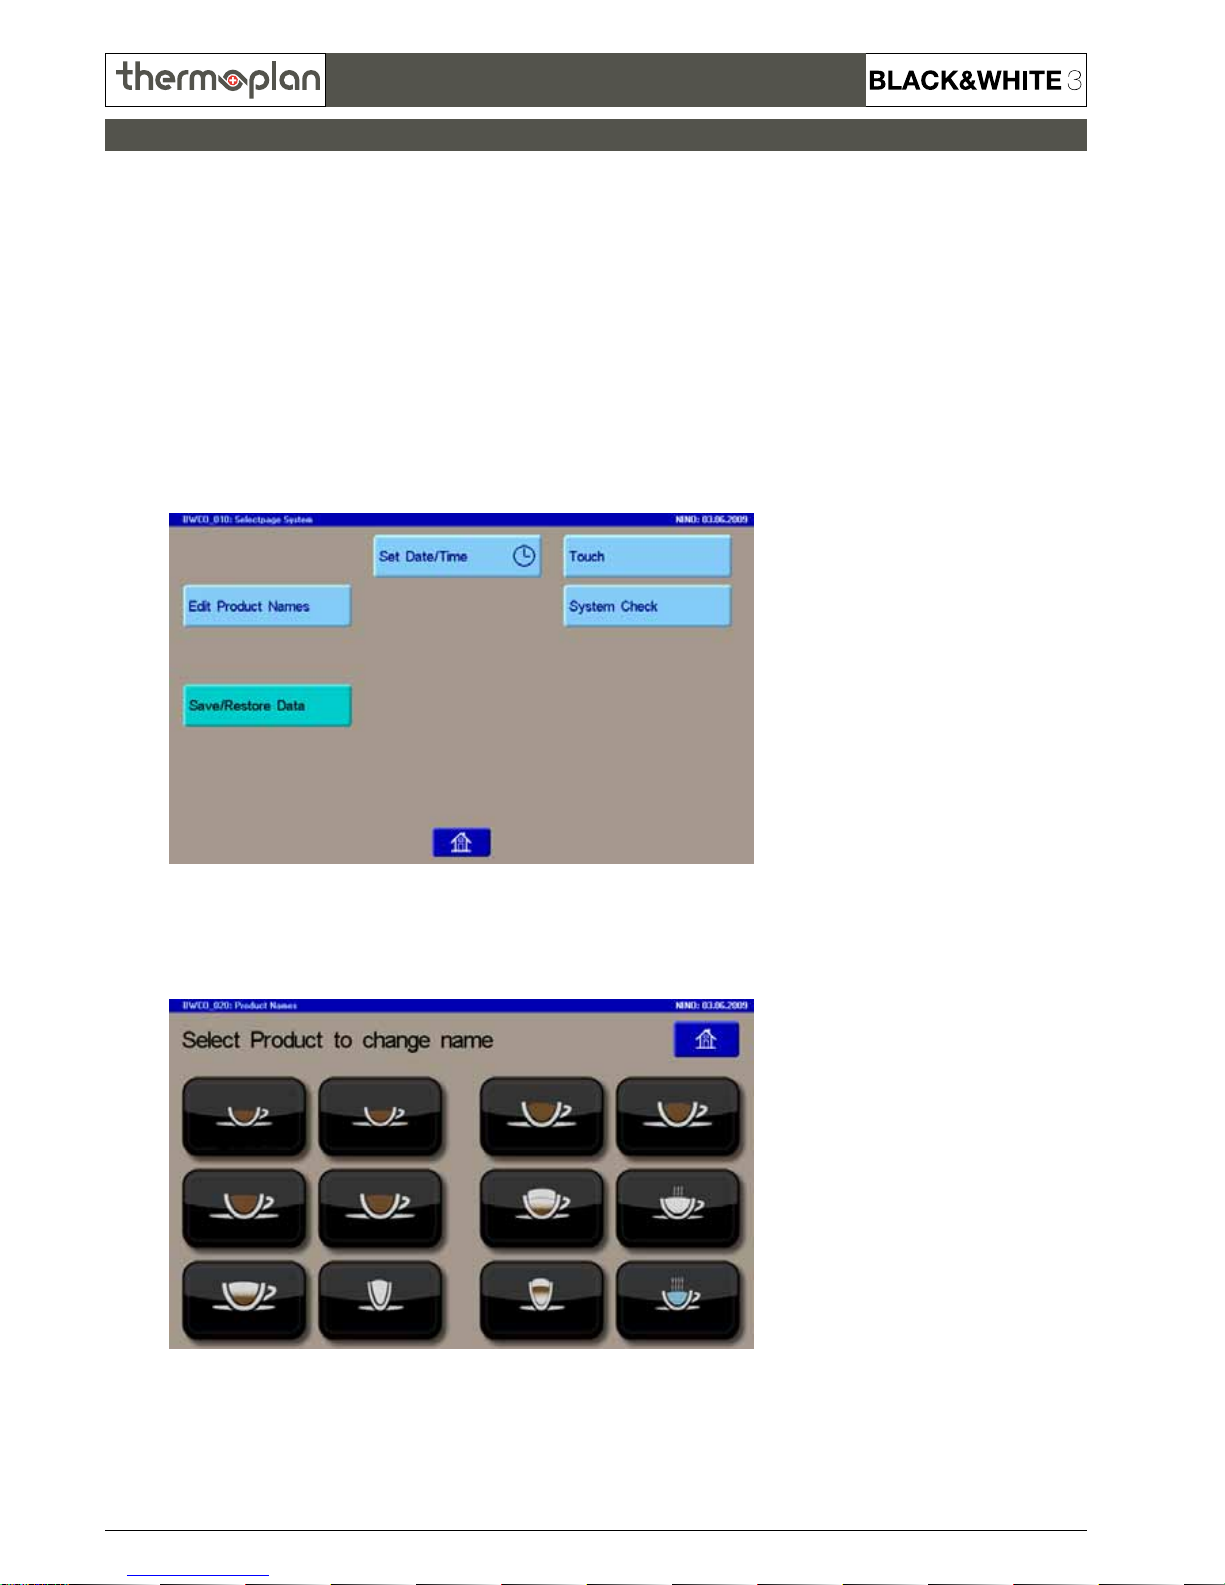
1.2 Change name of products
The displayed names of the products can be customized. To change the names do as follows:
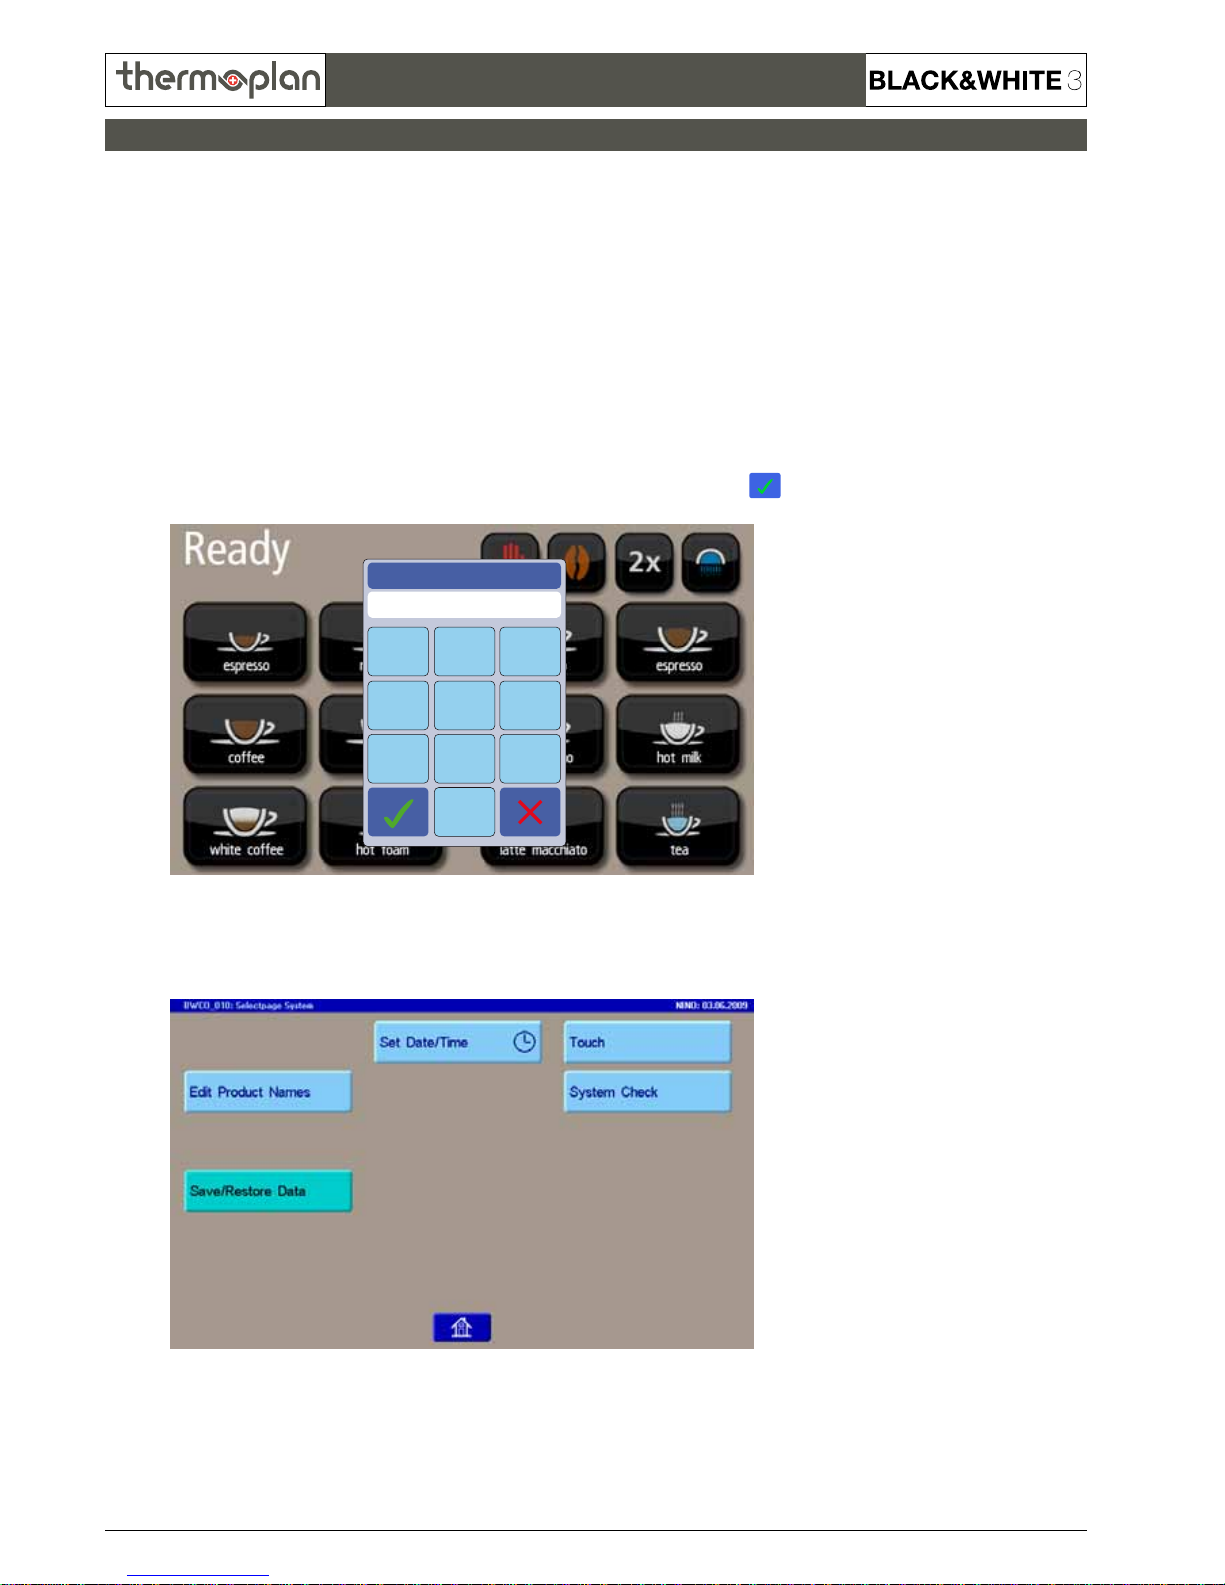
1. Enter Service Level 4. The following screen appears:
2. Press on „Edit Product Names“ to start customizing the names.
Tap on the product you wish to change:
Basic settings
Page 9
REV-4
3.9
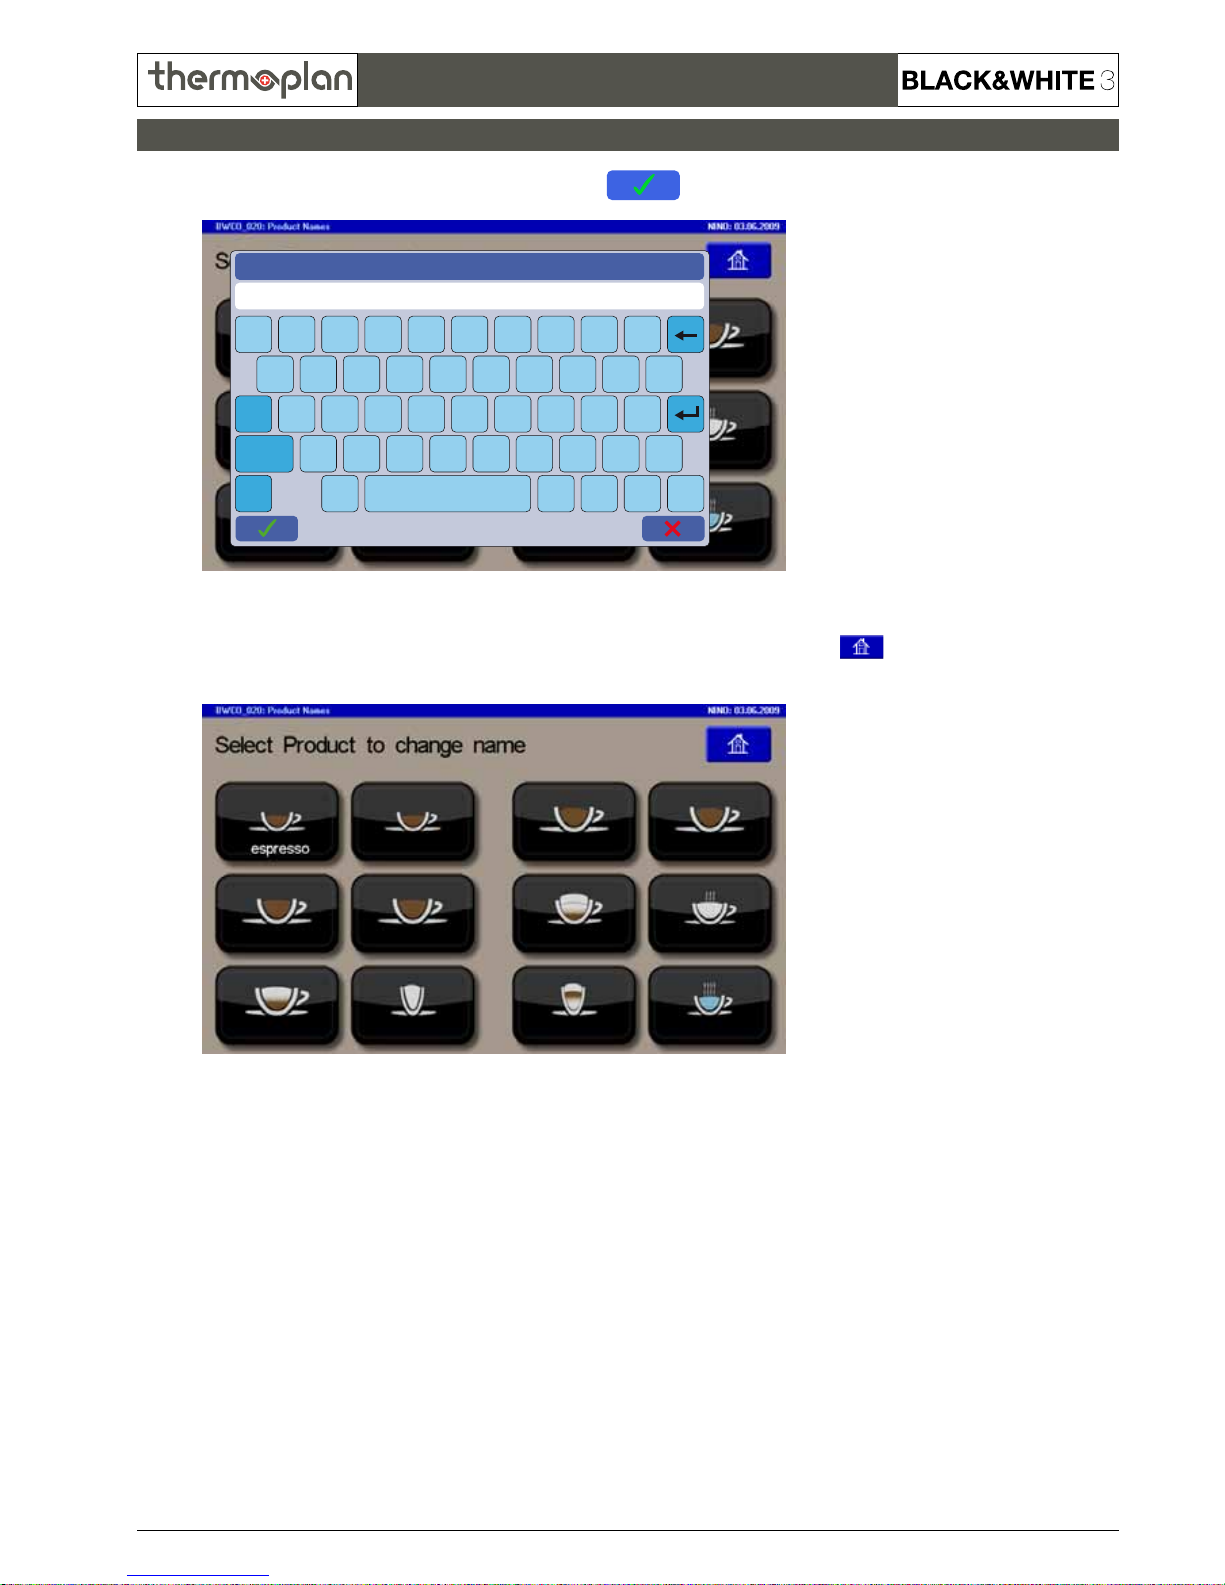
edit product name P01
espresso
12345 67890
a
CAPS
CTRL
SHIFT
sdfghjkl
@
qwertzuiop
yxcvbnm
è
é
Ä
ä
_
-
ÖöÜ
ü
,
.
SECTION 3
© 2009 by Thermoplan AG, Subject to change
Technical Manual
3. Enter the new name and conrm by pressing on .
4. Now you can see your changes. To save the new settings, exit by pressing on
and conrm the changes in the next window.
Basic settings
Page 10
REV-4
3.10
© 2009 by Thermoplan AG, Subject to change
SECTION 3
Technical Manual
1.3 Check the touchscreen for errors
If the touchscreen is not responding correctly, a program can be started
to check the functionality of the screen.
1. Enter Service Level 4. The following screen appears:
2. Press on „Touch“ to start the test-program.
After every touch on the screen a red „dot“ should appear on the same spot.
If the „dot“ does not appear or at the wrong position, the screen has to be either
repaired or replaced.
3. To exit the test-program touch the screen on any position for at least 2 seconds.
Basic settings
Page 11
REV-4
3.11
SECTION 3
© 2009 by Thermoplan AG, Subject to change
Technical Manual
2. Copy settings from machine to CompactFlash®-card
To save the customized product settings to a CompactFlash®-card do as follows:
1. Tap on „Ready“ on the upper left display section.
2. The „Enter PIN“ window appears. Enter Code 4444 and conrm with .
3. The following screen appears:
Copy settings from machine to CompactFlash®-card
23
1
56
4
89
7
Enter PIN
****
Page 12
REV-4
3.12
© 2009 by Thermoplan AG, Subject to change
SECTION 3
Technical Manual
4. Press on „Save/Restore Data“. The following screen appears:
5. By pressing „Save Product Data“ the settings will be copied to the card.
After some seconds the button turns green and reads „Product Data saved“.
6. The settings are saved successful. Exit the menu by pressing on .
The following screen appears:
Copy settings from machine to CompactFlash®-card
Page 13

REV-4
3.13
SECTION 3
© 2009 by Thermoplan AG, Subject to change
Technical Manual
Copy settings from machine to CompactFlash®-card
7. After pressing on again, the following screen appears:
8. Exit the menu by touching the upper left corner on the display.
The product selection screen appears, the process has nished successful.
Page 14

REV-4
3.14
© 2009 by Thermoplan AG, Subject to change
SECTION 3
Technical Manual
3. Copy settings from CompactFlash®-card to machine
To copy the previously saved data from a CompactFlash®-card back to the machine do
as follows:
1. Tap on „Ready“ on the upper left display section.
2. The „Enter PIN“ window appears. Enter Code 4444 and conrm with .
3. The following screen appears:
Copy settings from CompactFlash®-card to machine
23
1
56
4
89
7
Enter PIN
****
Page 15

REV-4
3.15
SECTION 3
© 2009 by Thermoplan AG, Subject to change
Technical Manual
4. Press on „Save/Restore Data“. The following screen appears:
5. By pressing „Restore Product Data“ the settings will be copied back to the machine.
After some seconds the button turns green and reads „Product Data restored“.
6. The settings are saved successful. Exit the menu by pressing on .
The following screen appears:
Copy settings from CompactFlash®-card to machine
Page 16

REV-4
3.16
© 2009 by Thermoplan AG, Subject to change
SECTION 3
Technical Manual
7. After pressing on again, the following screen appears:
8. Press once on
Step
to reach the parameter „Milk quantity“.
9. Exit the menu by touching the upper left corner on the display.
The product selection screen appears, the process has nished successful.
Copy settings from CompactFlash®-card to machine
Page 17

REV-4
3.17
SECTION 3
© 2009 by Thermoplan AG, Subject to change
Technical Manual
4. Reset settings to default values
Only reset your machine if theres no other option, as it will delete all customized settings!
Before performing the reset, save your settings on a CompactFlash
®
-card (s. page 11)!
To reset the settings do as follows:
1. Tap on „Ready“ on the upper left display section.
2. The „Enter PIN“ window appears. Enter Code 1111 and conrm with .
3. The following screen appears:
Reset settings to default values
23
1
56
4
89
7
Enter PIN
****
Page 18

REV-4
3.18
© 2009 by Thermoplan AG, Subject to change
SECTION 3
Technical Manual
4. Press once on
Step
to reach the parameter „Supplies“.
5. Press on
–
for 10 sec. until the display reads „Reset !!!“.
6. Release the
–
-button. The display reads „Machine Reset“ and „Please Wait“.
Reset settings to default values
Page 19

REV-4
3.19
SECTION 3
© 2009 by Thermoplan AG, Subject to change
Technical Manual
7. After a second the display reads again „Supplies“.
8. Exit the menu by touching the upper left corner on the display. The product selection screen appears,
the Display reads „Data saved“ for a second.
9. When the display reads „Ready“, turn off machine for 10 seconds.
Turn machine back on, the settings are successfully reset.
Exit menu on this way!
Do not turn off machine
before, data will be lost!
Reset settings to default values
Page 20

REV-4
3.20
© 2009 by Thermoplan AG, Subject to change
SECTION 3
Technical Manual
Replacing the EPROM
1. Preparation
1.1 Data Storage
Proceed the following steps:
a) Tap on „Ready“ on the upper left display section
b) The „Enter PIN“ window appears. Enter Code 4444 and conrm with
.
c) Press the button „Save/Restore Data“
d) Press the button „Save Product Data“ to save the parameters on the CF card
e) After downloading the parameters, the button color switches to green. Leave the menu by pressing the -key.
1.2 Eprom Change (refer to next page)
a) Switch off the unit
b) Remove the mechnical module
c) Remove the cover of the CPU
d) Remove carefully with a suitable tool the Eprom out of the holder
e) Put in carefully the new Eprom, ensure the right position. Refer to the mark on the Eprom and holder.
f) Mount the cover of the CPU
g) Push in the mechanical module
2. Restart
2.1 No RESET necessary
In case there are NO NEW parameters implemented, there is NO RESET necessary, proceed as follows:
a) Switch on the machine
b) The parameter are still kept on the CF card, there is no restore necessary
2.2 RESET necessary
In case when the Eprom is having a new menu included compared to the former version, you have to perform a RESET to ensure the correct initialization of
the parameters. Due to the menu did not exist on the former version when the storage was done, this specic parameter must be entered manually.
Proceed as follows:
2.2.1 Reset
a) Switch on the machine
b) Ensure you did the storage as decribed under 1.1
c) Tap on „Ready“ on the upper left display section
d) The „Enter PIN“ window appears. Enter Code 1111 and conrm with .
e) Press once on
Step
to reach the parameter „Supplies“
f) Press on – for 10 sec. until the display reads „Reset !!!“
g) Release the –-button. The display reads „Machine Reset“ and „Please Wait“
h) Exit the menu by touching the upper left corner on the display
i) Switch the unit off, wait for 10 seconds and switch the unit on again
2.2.2 Restorage Datas
a) Tap on „Ready“ on the upper left display section
b) The „Enter PIN“ window appears. Enter Code 4444 and conrm with .
c) Press the button “Save/Restore Data”
d) Press the button „Restore Product Data“ to restore the parameters
e) After downloading the parameters, the screen color switches to green. Leave the menu by pressing the -key.
f) Leave the storage level to the ready stage
g) Switch the unit off, wait for 10 seconds and switch the unit on again
2.2.3 Initialization new menu
a) Tap on „Ready“ on the upper left display section
b) The „Enter PIN“ window appears. Enter Code 4444 and conrm with .
c) Look for the new menu and enter the recommended parameter into this menu
d) Proceed the storage as shown under 1.1 to save the new parameters on the CF card
5. Replacing the EPROM
Follow these steps carefully to replace the EPROM inside the coffee machine.
For further assistance please refer to the separate chapters in this manual describing the data storage and reset function.
Page 21

REV-4
3.21
1
4
7
10
2
5
8
11
3
6
9
12
1.
1.
2.
SECTION 3
© 2009 by Thermoplan AG, Subject to change
Technical Manual
Replacing the EPROM
Turn the lever of the bean hopper
clockwise to unlock it. Do this with
both bean hoppers.
Use your ngertips to press the 2
locks on the mechanical module
inwards and pull out the whole
module
Disconnect all wires on the control
board. Carefully remove the EPROM
with the according tong and mount
the new EPROM.
Use both hands to pull out the 2
bean hoppers
Remove the screw located directly
under the CPU-cover
Take care that you mount the
EPROM in the correct position, and
all pins t in the right holes!
Disconnect the 2 tubes which lead
into the coffee outlet
Remove the CPU-cover
Do all the steps in reversed order to
build up your machine again. Save
your settings back from CF-Card to
machine (EPROM)!
Save your settings on a CF-Card!
Afterwards turn machine off.
Remove grounds drawer and turn
off machine. Use the appliance key
to remove the front panel of the
machine.
Use holes (left and right) to lift up
the front. Unhook the two locks with
your ngertips. Lift up the front to the
top position and release the locks.
Page 22

REV-4
3.22
DEUTSCH ENGLISH CT
V1.05
27.05.2009
CTS
V1.19
02.06.2009
CTMcool
V1.91
29.03.2010
CBTM
V1.08
25.07. 2010
Servicekarte Service Card
X X X X
1.
Bezüge
Total x
Supplies
Total x
X X
Bezüge Mühle 1
Total x
Supplies Grinder 1
Total x
X X
2.
Milchmenge
1 Tasse
Milk quantity
1 cup
X X
3.
Milchmenge
2 Tassen
Milk quantity
2 cups
X X
4.
Macchiato
Waittime: 12s
Macchiato
Waittime: 12s
X X
5.
Espr.Macchiato
Schaumver.: 3.2s
Espr.Macchiato
Foamdelay: 3.2s
X X
6.
Wassermenge
1 Tasse
Water quantity
1 cup
X X X X
7.
Wassermenge
2 Tassen
Water quantity
2 cups
X X X X
8.
Auslaufzeit Outlettime
X
9.
Auslaufventil Outletvalve
X
10.
Teezeit Teatime
X X
11.
Kaffeearoma
M1 1 Tasse
Coffee aroma
M1 1 cup
X X X X
12.
Kaffeearoma
M1 2 Tassen
Coffee aroma
M1 2 cups
X X X X
© 2009 by Thermoplan AG, Subject to change
SECTION 3
Technical Manual
Programming level
Page 23

REV-4
3.23
DEUTSCH ENGLISH CT
V1.05
27.05.2009
CTS
V1.19
02.06.2009
CTMcool
V1.91
29.03.2010
CBTM
V1.08
25.07. 2010
13.
Kaffeearoma
M2 1 Tasse
Coffee aroma
M2 1 cup
X X X X
14.
Kaffeearoma
M2 2 Tassen
Coffee aroma
M2 2 cups
X X X X
15.
Preis Produkt x
1 Tasse Mühle 1
x
Price Product x
1 cup Mill 1
x
X X X X
16.
Sprache
deutsch
Language
english
X X X X
17.
Kaffeetemperatur
90°C 194°F
Coffee temp.
90°C 194°F
X X X X
18.
Kaffeefreigabe
80 °C 176°F
Coffeereadylevel
80 °C 176°F
X X X X
19.
Produktewahl Key selection
X X X X
20.
Pulvermenge
M1 1 Tasse
Powder quantity
M1 1 cup
X X X X
21.
Pulvermenge
M1 2 Tassen
Powder quantity
M1 2 cups
X X X X
22.
Pulvermenge
M2 1 Tasse
Powder quantity
M2 1 cup
X X X X
23.
Pulvermenge
M2 2 Tassen
Powder quantity
M2 2 cups
X X X X
24.
Vorbrühzeit
M1 1 Tasse
Prebrew time
M1 1 cup
X X X X
25.
Vorbrühzeit
M1 2 Tassen
Prebrew time
M1 2 cups
X X X X
26.
Vorbrühzeit
M2 1 Tasse
Prebrew time
M2 1 cup
X X X X
SECTION 3
© 2009 by Thermoplan AG, Subject to change
Technical Manual
Programming level
Page 24

REV-4
3.24
DEUTSCH ENGLISH CT
V1.05
27.05.2009
CTS
V1.19
02.06.2009
CTMcool
V1.91
29.03.2010
CBTM
V1.08
25.07. 2010
27.
Vorbrühzeit
M2 2 Tassen
Prebrew time
M2 2 cups
X X X X
28.
Entspannzeit
M1 1 Tasse
Relax time
M1 1 cup
X X X X
29.
Entspannzeit
M1 2 Tassen
Relax time
M1 2 cups
X X X X
30.
Entspannzeit
M2 1 Tasse
Relax time
M2 1 cup
X X X X
31.
Entspannzeit
M2 2 Tassen
Relax time
M2 2 cups
X X X X
32.
Nachpressung
M1 1 Tasse
Press after
M1 1 cup
X X X X
33.
Nachpressung
M1 2 Tassen
Press after
M1 2 cups
X X X X
34.
Nachpressung
M2 1 Tasse
Press after
M2 1 cup
X X X X
35.
Nachpressung
M2 2 Tassen
Press after
M2 2 cups
X X X X
36.
Luftventil
1 Tasse
Air valve
1 cup
X X
37.
Luftventil
2 Tassen
Air valve
2 cups
X X
38.
Mühle wechseln Mill change
X X X X
39.
Milchsequenz Milksequence
X X
40.
Milchsorte Milk type
X X
© 2009 by Thermoplan AG, Subject to change
SECTION 3
Technical Manual
Programming level
Page 25

REV-4
3.25
DEUTSCH ENGLISH CT
V1.05
27.05.2009
CTS
V1.19
02.06.2009
CTMcool
V1.91
29.03.2010
CBTM
V1.08
25.07. 2010
41.
Bypass
1 Tasse
Bypass
1 cup
X X X X
42.
Bypass
2 Tassen
Bypass
2 cups
X X X X
43.
Mehrfachbezug Multiple
X X X
44.
Filter x
nicht aktiv
Filter x
not active
X X X X
45.
Servicezähler
x
Service counter
x
X X X X
46.
Wannentemperatur
74°C 165°F
Tubtemp
74°C 165°F
X
47.
Wannenfreigabe
59°C 138°F
Tubreadytemp
59°C 138°F
X
48.
Milchtemperatur
xx°C xxx°F
Milk temp
xx°C xxx°F
X
49.
Calibratesensor
xx°C xxx°F
Calibratesensor
xx°C xxx°F
X
50.
Kaffeesatz
800g
Grounds
800g
X X X X
51.
Kaffeedrehzahl
1800rpm (1/min)
Coffeerevolution
1800rpm (1/min)
X X
52.
Teedrehzahl
1300rpm (1/min)
Tearevolution
1300rpm (1/min)
X X
53.
Bypassdrehzahl
1000rpm (1/min)
Bypassrevolution
1000rpm (1/min)
X X
54.
Milchdrehzahl
900rpm (1/min)
Milkrevolution
900rpm (1/min)
X X
SECTION 3
© 2009 by Thermoplan AG, Subject to change
Technical Manual
Programming level
Page 26

REV-4
3.26
DEUTSCH ENGLISH CT
V1.05
27.05.2009
CTS
V1.19
02.06.2009
CTMcool
V1.91
29.03.2010
CBTM
V1.08
25.07. 2010
55.
Schaumdrehzahl
1800rpm (1/min)
Foamrevolution
1800rpm (1/min)
X X
56.
Heizung aus bevor
Milchbezugsende
2000 ms
Turn off Heater before
Milkbeverage end
2000 ms
X X
57.
Minimale Spülzeit
nach Milchbezug
3200 ms
Minimal Rinsetime
after Milkbeverage
3200 ms
X X
58.
Spülzeit nach
Milchbezug heiss
5000 ms
Rinsetime after
Milkbeverage hot
5000 ms
X X
59.
Spülzeit nach
Milchbezug kalt
3000 ms
Rinsetime after
Milkbeverage cold
3000 ms
X X
60.
Milchansaugzeit
normal
4500 ms
Milksuckintime
normal
4500 ms
X X
61.
Milchansaugzeit
nach Milchspülung
7500 ms
Milksuckintime
after milkrinse
7500 ms
X X
62.
Spülzeit
nach Milchprodukt
0 ms
Rinsetime after
milkproduct
0 ms
X X
63.
Rückspülzeit
bei 5min Spülung
1300 ms
Rinsetime after
milkproduct
1300 ms
X X
64.
Purgeventil
während Reinigung
not active
Purgevalve
during cleaning
not active
X X
65.
Milchniveau
Überwachung
Milk 1
Milkniveau
Control
Milk 1
X X
66.
Milchlevel Modus
Warnung
Milklevel Mode
Warning
X X
67.
Debit / Credit
Off
Debit / Credit
Off
X X X X
68.
Maschinentyp
normal
Machine type
normal
X X X X
© 2009 by Thermoplan AG, Subject to change
SECTION 3
Technical Manual
Programming level
Page 27

REV-4
3.27
DEUTSCH ENGLISH CT
V1.05
27.05.2009
CTS
V1.19
02.06.2009
CTMcool
V1.91
29.03.2010
CBTM
V1.08
25.07. 2010
69.
Keyboard
12 Key
Keyboard
12 Key
X X X X
70.
Serviceintervall
50000p
Service interval
50000p
X X X X
71.
Spülintervall
Kaffee Off
Rinse Interval
Coffee Off
X X X X
72.
Spülintervall
Milch 5min
Rinse Interval
Milk 5min
X X
73.
Reinigungsalarm
1000
Cleaning alarm
1000
X X X X
74.
Powermanagement
On
Powermanagement
On
X X
75.
Motorswitch
Switch
Motorswitch
Switch
X X X
76.
Mahlposition
358
Mill position
358
X X X X
77.
Spannungsüberwa.
nicht aktiv
Voltagecontrol
not active
X X X X
78.
Kaltstartspülung
1.5 Liter
Cold start rinse
1.5 Liter
X X X X
79.
Boilerspülung
Off
Boilerpurge
Off
X X
80.
Standby Temp.
nicht aktiv
Standby Temp.
not active
X X X X
81.
Wasseranschluss
Netzdruck
Water
normal
X X X X
82.
Option Zähler
On
Option counter
On
X X X X
SECTION 3
© 2009 by Thermoplan AG, Subject to change
Technical Manual
Programming level
Page 28

REV-4
3.28
DEUTSCH ENGLISH CT
V1.05
27.05.2009
CTS
V1.19
02.06.2009
CTMcool
V1.91
29.03.2010
CBTM
V1.08
25.07. 2010
83.
Energiesparmode
Off
Powersavemode
Off
X X X X
84.
KS-Temp. hoch
nicht aktiv
R-Temp. high
not active
X X
85.
KS-Temp. tief
nicht aktiv
R-Temp. low
not active
X X
86.
Satzbehälter
Zeit: 5s
Drawer
Time: 5s
X X X X
© 2009 by Thermoplan AG, Subject to change
SECTION 3
Technical Manual
Page 29

REV-4
3.29
SECTION 3
© 2009 by Thermoplan AG, Subject to change
Technical Manual
General Programming Hints
23
1
56
4
89
7
Enter PIN
****
Touch the upper left corner on the Touchscreen. The access window for the
Service-Code appears.
Service-Code for programming level: 1111
NAVIGATION
Press the „step“ key to enter the programming menus.
Step
Step forward
Press „step“-key.
Step
Step backwards
Press „back“-key.
Back
Settings
Set parameters with the „Plus“ or „Minus“ key.
+ -
Save settings
Press „step“ key.
Step
PRODUCTPARAMETER
To set the several productparameter select rstly the product and then set with
the „Plus“ or „Minus“ key.
Product Plus-/Minus
TEST-COFFEE
It is necessary to test the values, changed in the programming mode, immediately. By pressing the corresponding product key for 2sec., a test coffee
can be supplied without leaving the programming mode.
Function is only available in the menu:
Powder quantity, prebrew time, relax time and press after
For the test coffee, the waiter-, cash- and coin-systems are not active.
DOUBLE-PRODUCT KEYS
All models have 8 or 12 product keys.
With the „Double“ key two or more cups of the desried beverage can be
produced.
Double product: „X“ Double product in one brew cycle
Multiple product: „2“ - „9“ Multiple products with one brew cycle
for each product
2x
Important hint
Double products can also be programmed individually on one single button.
Please note that double-product settings or changes in the menus
- Water quantity
- Coffee aroma
- Powder quantity
- Bypass
are made in the program „1 cup“.
Page 30

REV-4
3.30
© 2009 by Thermoplan AG, Subject to change
SECTION 3
Technical Manual
Menu Description
Menu Description
CT
CTS
CTM cool
CBTM
Service Card
After entering the service level 1, the display reads „Service Card“.
The adjustments can now be made.
X X X X
1.
Supplies
Total x
Supplies Selectkey
Total x
The menu Supplies Total provides information on the number of products served. Press the desired
product selection key to show the corresponding number of servings. There are two different totals
available:
- Supplies
This appears automatically at rst. First the total of grinder 1 and by pressing the
individual product keys the product‘s total.
Reset totals as descibed below.
- Supplies Selectkey
Press the „decaf“ key and you will receive the total of grinder 2 and by pressing the
individual product keys the product‘s total.
Reset totals as descibed below.
Reset product totals to 0
Press the „clear“ key. Machine asks „clear counter?“. Press „clear“ key again and the
counter will be set to zero.
X X X X
2.
Milk quantity
1 cup
In this menu you can change the amount of milk and milk foam that will be dispensed. Use the
„Clean“ key to change between „Milk quantity“ (M) and „Milk foam quantity“ (F).
Use the Minus and Plus key to change the value (in seconds).
Instead of using the Minus- and Plus-key, you can dispense a test coffee, which the machine uses
as reference. To do so press the respective milk beverage key twice, the automatic dosing will be
started. As soon as the desired level is reached press the same product key once to stop and save
the amount of milk dispensed. Now milk foam is dispensed. As soon as the desired level is reached
press the same product key once to stop and save the amount of milk foam dispensed.
X X
3.
Milk quantity
2 cups
4.
Macchiato
Waittime: 12s
By pressing the Minus or Plus key in the parameter Macchiato Wait Time the waiting time between
the milk and coffee dispensing for the Latte Macchiato can be programmed.
Default-parameter is 12 seconds, i.e by pressing on one of the 2 Latte Macciato products milk will
be dispensed rst, then there will be a 12 second waiting time and subsequently the coffee will be
dispensed. During the waiting time the milk in the glass is able to settle. Once the coffee is ltered
through the milk it pushes the milk froth to the top creating the 3 layers between milk, coffee and
milk froth.
X X
5.
Espr. Macchiato
Foamdelay: 3.2s
By pressing the Minus or Plus key in the parameter „Espr. Macchiato“ the start time for the foam
for a Espresso Macchiato can be programmed. Default-parameter is 0 seconds, which means the
foam will be dispensed after this delay time wich will guarantee a higher product quality.
X X
Page 31

REV-4
3.31
SECTION 3
© 2009 by Thermoplan AG, Subject to change
Technical Manual
Menu Description
Menu Description
CT
CTS
CTM cool
CBTM
6.
Water quantity
1 cup
By pressing the Minus or Plus key in the product parameter Water Quantity the water quantity can
be programmed.
By pressing the individual coffee or tea product key twice the automatic dosing will be started.
As soon as the desired level is reached press the same product key once to stop and memorize the
amount of water dispensed. The maximum amount of water is 0.8 liters.
X X X X
7.
Water quantity
2 cups
8.
Outlettime
In the menu „Outlettime“ the beverage time (in sec.) for products dispensed from the tub can be
set.
Programming:
By pressing the product button twice, the automatic dosing will be started.
Another press on the product button will stop the beverage and memorize the time.
Adjust the Outlettime by pressing the Minus or Plus key.
X
9.
Outletvalve
In the menu „Outletvalve“ the outlet type for products dispensed from the tub can be set.
Options are „Coffee outlet“ or „Can outlet“.
X
10.
Teatime
By pressing the product Tea the water quantity can be programmed.
By pressing twice, the automatic dosing will be started.
As soon as the desired level is reached press the Tea key once to stop and memorize the amount of
water dispensed.
X X
11.
Coffee aroma
M1 1 cup
In the menu Coffee Aroma the coffee aroma of the individual beverage on both grinders can be
adjusted to personal taste. Therefore the brew cycle and the coffee powder quantity can be easily
adjusted.
• Press the desired coffee product key. The coffee aroma can be adjusted by pressing the
Minus key, (weaker taste), or the Plus key, (stronger taste).
Note:
The following parameters can be adjusted during the coffee aroma function:
- Preinfusion
- Relax Time
- After Press
- Powder Quantity
The parameters can also be adjusted in the respective menu parameter.
X X X X
12.
Coffee arome
M1 2 cups
13.
Coffee aroma
M2 1 cup
14.
Coffee aroma
M2 2 cups
15.
Price Product x
1 cup Mill 1
x
By pressing the „Minus“ or „Plus“ key in the parameter Price Product the price of each Product can
be set. Value range is from 0 - 2500 (cent or whatever currency is used). Pressing the Product key
more than once switches through the different combinations:
- „1 cup Mill 1“
- „2 cups Mill 1
- „1 cup Mill 2“
- „2 cups Mill 2“
- „1 cup POD“ (BW3 with POD only)
X X X X
16.
Language
english
Press the „Minus“ or „Plus“ key to select the display language.
Options: english, german, french, swedish
X X X X
Page 32

REV-4
3.32
© 2009 by Thermoplan AG, Subject to change
SECTION 3
Technical Manual
Menu Description
Menu Description
CT
CTS
CTM cool
CBTM
17.
Coffee temp.
90°C 194°F
By pressing the „Minus“ or „Plus“ key in the parameter „Coffee Temperature“ the water temperature in the coffee boiler can be programmed between 78 and 99 degrees.
X X X X
18.
Coffeereadylevel
80 °C 176°F
By pressing the „Minus“ or „Plus“ key in ther parameter Coffee Ready Level you can set the
temperature at minimum temperature the coffee output will be disabled. If the temperature in the
boiler is below the set temperature level the message „Please Wait“ appears on the display and
there will be a waiting time until the boiler has reached the programmed temperature level. The
temperature can be set between 70°C (158°F) and 91°C (195.8°F), however it will always be 8°C
(14.4°F), under the actual set temperature. The setting range changes proportionally to the preset
coffee temperature.
X X X X
19.
Key selection
In the parameter Key Selection by pressing the „Minus“ or „Plus“ key the beverage keys can be
changed or reallocated.
Press product key to be changed and press the Plus key until the desired product appears on the
display.
Note:
It is possible to assign 2 of the same beverage products to different product selection keys.
As an example if the milk key is not used a second Cappuccino, coffee or tea beverage can be
programmed.
Important:
If a new product is assigned the basic parameters will automatically default to the factoy setting.
The basic values, such as water quantity must be reprogrammed.
X X X X
20.
Powder quantity
M1 1 cup
In the menu Powder Quantity M1 1 cup you can change the powder quantity of grinder 1 by
pressing the „Minus“ or „Plus“ key.
Press the product key you wish to change. Then by pressing the Plus key you increase the
powder quantity, alternatively by pressing the „Minus“ key you reduce the powder .
Example to reduce the amount of ground coffee
If you adjust the Powder Quantity do not change value by more than 2 units at the time. For example if the value on the scale says 30, (appr. 12 gr), press the „Minus“ key back to 28. Exit program
parameter and pull 4 test coffees for tasting. If the taste is not satisfactory return to the parameter
Powder Quantityt and repeat the process, i.e decrease the value from 28 down to 26.
Test Product:
If you press and hold the respective product button for 2 seconds a test product will
automatically be produced to check the programmed values.
Note:
By double-clicking the respective product button it will automatically grind the amount of time
programmed to weigh out the ground coffee.
X X X X
21.
Powder quantity
M1 2 cups
22.
Powder quantity
M2 1 cup
23.
Powder quantity
M2 2 cups
Page 33

REV-4
3.33
SECTION 3
© 2009 by Thermoplan AG, Subject to change
Technical Manual
Menu Description
Menu Description
CT
CTS
CTM cool
CBTM
24.
Prebrew time
M1 1 cup
By pressing the „Minus“ or „Plus“ key the prebrew time can be increased, decreased or
deactivated.
X X X X
25.
Prebrew time
M1 2 cups
26.
Prebrew time
M2 1 cup
27.
Prebrew time
M2 2 cups
28.
Relax time
M1 1 cup
By pressing the „Minus“ or „Plus“ key the relax time can be increased, decreased or deactivated.
X X X X
29.
Relax time
M1 2 cups
30.
Relax time
M2 1 cup
31.
Relax time
M2 2 cups
32.
Press after
M1 1 cup
By pressing the „Minus“ or „Plus“ key the press after can be increased, decreased, relaxed or
deactivated.
X X X X
33.
Press after
M1 2 cups
34.
Press after
M2 2 cups
35.
Press after
M2 1 cup
36.
Air valve
1 cup
Press desired product key and set with „Minus“ or „Plus“ key in „Air valve“ menu the time when
air valve opens after pre-infusion. This setting is valid for every coffee-product.
Base setting is „not active“.
X X
37.
Air valve
2 cups
Page 34

REV-4
3.34
© 2009 by Thermoplan AG, Subject to change
SECTION 3
Technical Manual
Menu Description
Menu Description
CT
CTS
CTM cool
CBTM
38.
Mill change
In the parameter Mill Change by pressing the „Minus“ or „Plus“ key the beverage key can be
assigned to grinder 1 or grinder 2. Press the selected beverage button, then press the „Plus“ key
and the beverage will be produced from grinder 2. By pressing the „Minus“ key the beverage is
produced from grinder 1.
Note:
The factory default setting has all coffee beverages programmed to be pulled from grinder 1.
A beverage button that is programmed on grinder 2 is xed on grinder 2. The grinder default
change to grinder 1 is not possible.
However it is possible to pull a beverage from grinder 2 that is assigned to grinder 1.
X X X X
39.
Milksequence
In the parameter Milksequence by pressing the respective product beverage key with the „Minus“
or „Plus“ key, the sequence of the milk/coffee cycle can be programmed: „At begin“, „During“or
„At the end“ of the coffee beverage.
Note:
For an optimal milkfoam we reccomend the setting „At begin“.
X X
40.
Milk type
In the parameter Milk type you can set for every single milk product, whether it takes the milk
from „Milk 1“ or „Milk 2“. Choose a milk product and change between „Milk 1“ and „Milk 2“ by
pressing the „Minus“ or „Plus“ key.
Note:
„Milk 2“ only works if menu „Milklevel Control“ is set to „Milk 1+2“.
X X
41.
Bypass
1 cup
In the parameter Bypass by pressing the „Minus“ or „Plus“ key the percentage of the water can be
programmed to bypass the coffee cake.
Press the desired product key. By pressing the „Minus“, (less), or „Plus“, (more) key, the percentage
of the water passing the ground coffee compared to the total water quantity is programmed.
Adjustable range is 0-99% amount of water passing through the ground coffee, respectively no
Bypass.
Note:
For example if a percentage of 30% is programmed it means that 70% of the total amout of water
passes throught the ground coffee, where as 30% as hot water bypassing the ground coffee.
X X X X
42.
Bypass
2 cups
43.
Multiple
In the parameter Multiple by pressing the „Minus“ or „Plus“ key Mulitple beverages can be
produced.
The multiple feature can be programmed to each beverage.
Example: If you assign to a beverage product key 3 mulitple beverages, by pressing the product key
once it will automatically produce 3 beverages one after the other.
Multiple beverages can also be produced by using the default button Multiple.
Example: If one of the product keys is programmed with „Multiple“ it is possible by using the
Double Product key to multiply 2 - 9 products dispensed.
X X X
Page 35

REV-4
3.35
SECTION 3
© 2009 by Thermoplan AG, Subject to change
Technical Manual
Menu Description
Menu Description
CT
CTS
CTM cool
CBTM
44.
Filter x
not active
In the parameter Filter with the „Minus“ or „Plus“ key it is possible to program the amount of
water to be dispensed until the lter cartridge must be replaced.
Note:
Once the lter cartridge is replaced pressing the Double product key 3 times will reset the counter
to 0. The reset is conrmed by „OK“ shown on the display. The programmed credit is rest to 0 and
the amount of water is reconrmed before the next lter replacement is due.
X X X X
45.
Service counter
x
In the parameter „Service counter“ the total of all brew cycles will be displayed since the machine
was in operation. This counter cannot be reset.
X X X X
46.
Tubtemp
74°C 165°F
In the parameter „Tubtemp“ the temperature for products dispensed from the tub can be set.
X
47.
Tubreadytemp
59°C 138°F
By pressing the „Minus“ or „Plus“ key in ther parameter „Tubreadytemp“ you can set the
minimum temperature needed for product beverages. If the temperature in the tub is below the set
temperature level, the message „Please Wait“ appears on the display and there will be a waiting
time until the boiler has reached the programmed temperature level.
X
48.
Milk temp
xx°C xxx°F
In the parameter Milk Temperature by pressing the Minus or Plus key the milk temperature can be
programmed.
- CTS: 54 - 97°C (129 - 206°F)
- The default value is 74 °C
X
49.
Calibratesensor
xx°C xxx°F
In the parameter Calibrate Sensor the milk temperature can be calibrated. A digital thermometer is
needed for this process to make sure that the correct temperature is measured.
X
50.
Grounds
800g
By pressing the „Minus“ or „Plus“ key in the parameter Grounds the number of coffee pucks
can be programmed before the message Empty Drawer will be displayed. The basic value can be
programmed between Not Active up to 1600 gramms. The basic factory default value is set at 800
gramms.
Note:
Due to hygenic reason if the coffee machine is not used ofteen it is recommended to set the
parameter to a lower value to make sure the drawer is frequently emptied.
The setting Not Active is used when no puck drawer is used in Self-Service operation where the
used coffee grounds fall through the bottom opening of the coffee machine‘s chassis, directly into
a waste bin.
X X X X
51.
Coffeerevolution
1800rpm (1/min)
By pressing the „Minus“ or „Plus“ key you can change the revolution of the water pump during
coffee products.
X X X X
52.
Tearevolution
1300rpm (1/min)
By pressing the „Minus“ or „Plus“ key you can change the revolution of the water pump during tea
products.
X X X X
53.
Bypassrevolution
1000rpm (1/min)
By pressing the „Minus“ or „Plus“ key you can change the revolution of the water pump during
products with bypass.
X X X X
Page 36

REV-4
3.36
© 2009 by Thermoplan AG, Subject to change
SECTION 3
Technical Manual
Menu Description
Menu Description
CT
CTS
CTM cool
CBTM
54.
Milkrevolution
900rpm (1/min)
By pressing the „Minus“ or „Plus“ key you can change the revolution of the milk pump during milk
products.
X X
55.
Foamrevolution
1800rpm (1/min)
By pressing the „Minus“ or „Plus“ key you can change the revolution of the milk pump during milk
foam products.
X X
56.
Turn off heater before
Milkbeverage end
2000 ms
The heater turns off two (2) seconds before the milk product ends.
This secures, that the milk inside the „wendel“ system does not burn.
X X
57.
Minimal Rinsetime
after Milkbeverage
3200 ms
If during a coffee-milk product the coffee product runs longer than the milk product, the machine
shortly ushes the wendel, to ensure the milk does not burn inside the wendel. The pressure of the
coffee product will be reduced for the setted time.
X X
58.
Rinsetime after
Milkbeverage hot
5000 ms
After a hot milk product, rinse water ows through the milk system for the setted time to clean the
system (through the drain valve, not in the cup).
X X
59.
Rinsetime after
Milkbeverage cold
3000 ms
After a cold milk product, rinse water ows through the milk system (except the wendel) for the
setted time to clean the system (through the drain valve, not in the cup).
X X
60.
Milksuckintime
normal
4500 ms
After the start of a milk product, the drain valve stays closed to drain the remaining water (from the
rinse process) in the milk system.
This secures, that no water ows in the cup.
X X
61.
Milksuckintime
after milkrinse
7500 ms
If a „5 minute rinse“ was performed and you press a milk product, the drain valve stays closed
for the setted time to drain the remaining water in the milk system. This ensures, that only the
remaining water inside the milk pipe between the drain valve and the spout ows in the cup (this
water cannot be eliminated).
X X
62.
Rinstime after
milkproduct
0 ms
If the milk is empty during a milk product (machine demands to exchange milk bottle), a backrinse
of the milk system is initiated to serve the milk detection box with uid. If the operater now pushes
the „Continue“ key, the machine can nalize the started milk product.
X X
63.
Backrinsetime
5min rinse
1300 ms
This menu sets the time of the backrinse of the 5 minute rinse, cold start rinse or normal rinse.
X X
64.
Purgevalve
during cleaning
not active
This menu must not be changed (disappears in future)!
X X
65.
Milklevel
Control
Milk 1
In this menu the milk level control can be activated or deactivated. For two kinds of milk both can
be set individually. The value can be set to:
Milk 1: one kind of milk sort (default setting)
Milk 1+2: two kinds of milk sort
Milk 1 with level: one kind of milk sort with an additional level sensor (only in combination with fridge)
OFF: Milk level not controlled (never use this function, danger of milk burning in wendel system!)
X X
Page 37

REV-4
3.37
SECTION 3
© 2009 by Thermoplan AG, Subject to change
Technical Manual
Menu Description
Menu Description
CT
CTS
CTM cool
CBTM
66.
Milklevel Mode
Warning
In this menu the milklevel mode can be set to change the reaction of the machine when the milk
reaches a low level. The following 2 settings are available:
Warning: (Default setting)
By reaching the upper level the machine shows „Milk low“, the dispensed product will be nished
and milk products are still available.
By reaching the lower level the dispensed product is cancelled and all milk products are locked.
Milk has to be relled.
Lock:
By reaching the upper level the dispensed product will be nished, afterwards all milk products are
locked. Milk has to be relled.
X X
67.
Debit / Credit
Off
The machine has galvanically separated serial a connection. In the parameter Debit/Credit by
pressing the „Minus“ or „Plus“ key the following option can be selected:
Off: The machine shows product control through daily counter
KMI: Connection via interface in beverage systems in binary mode
KBOX: Aconnection via interface on cashier systems (CT & CTS: „CBOX“)
Card: Waiter Card
Saldo: Cash-Card
MDB-T: Connection via interface MDB2 on cashier systems, coin changer etc.
KMIpara: Connection via interface in beverage systems in parallel mode
The basic default value is Off.
X X X X
68.
Machine type
normal
By pressing the „Minus“ or „Plus“ key in the parameter Machine type the mode of operation
Normal or Self- Service can be programmed: The basic factory default is set to Normal.
- Normal
- Selfservice
Note:
In case a coin validator is connected to the coffee machine it makes sense to set the machine to
operation „Self-Servce“. With this selection the keys M2, 2X, Clean as well as the POD functions
will be disabled.
X X X X
69.
Keyboard
12 Key
By pressing the „Minus“ or „Plus“ key in the parameter „Keyboard“ the amount of active keys can
be programmed. You can choose between 12 (all) or 8 keys.
X X X X
70.
Service interval
50000p
By pressing the „Minus“ or „Plus“ key in the parameter Service Interval the service level can be
programmed in number of 1,000 cycles. The basic factory default is set at 50’000 cycles. After
the service on the coffee machine is performed the service counter must be reset by pressing the
Clear-Key 3 times rapidly. The display conrms that the counter has been reset to zero by display
the message “OK“.
Note:
The coffee machine must be serviced regularly. It must be descaled and checked for proper functionality as well as that it corresponds to all safety regulations. Basically the periodic maintenance of
the coffee machine depends on its use but must be done at least every six months by an authorized
service technician.
X X X X
Page 38

REV-4
3.38
© 2009 by Thermoplan AG, Subject to change
SECTION 3
Technical Manual
Menu Description
Menu Description
CT
CTS
CTM cool
CBTM
71.
Rinse interval
Coffee Off
By pressing the „Minus“ or „Plus“ key in the parameter Rinse Interval it can be programmed after
which standby time an automatic short rinse cycle should be activated. The adjustment range can
be set between Not Active up to 60 minutes. The basic factory default is
for coffee: „Off“
for milk: „5min“.
Note:
If no milk product is produced for 5 minutes starting from the last cycle an automatic quick rinsing
is activated. If another 5 minutes elapse a quick internal rinse is automatically activated before the
next following product is dispensed.
X X X
X
X
72.
Rinse interval
Milk 5min
73.
Cleaning alarm
1000
By pressing the „Minus“ or „Plus“ key in the parameter Cleaning Alarm it can be programmed
after how many coffee cycles the machine should prompt the Message Clean Appliance to perform
a cleaning cycle. The basic value can be set between Not Active up to 1‘000 cycles.
X X X X
74.
Powermanagement
On
By pressing the „Minus“ or „Plus“ key in the parameter Power Management the setting Power
Management can be activated.
„Powermanagement On“
The heating of the coffee boiler and the steam boiler/milk foamer is individually activated, i.e. the
coffee boiler heats up rst and when reaching the programmed temperature the steam boiler and
the foamer heating is activated.
„Powermanagement Off“
All heating elements of the coffee boiler, steam boiler and foamer are activated simultaneously,
(CTS automatic default setting)
X X
75.
Motorswitch
Switch
By pressing the „Minus“ or „Plus“ key in the parameter „Motorswitch“ you can choose between
„Switch“ (Default) and „Magnetic“. This function is applied for a future project and must not be
changed!
X X X
76.
Mill position
358
By pressing the „Minus“ or „Plus“ key in the parameter Mill Position the mill position of the brew
chamber can be adjusted. Range can be adjusted between 205 - 460. In order to verify the correct
Mill Position, press the Double Product Key and the brew chamber moves from the micro switch
to the grind position. The correct adjustement of the grind position can be veried if the markings
on the outside of the brew chamber and the grinder head are completely aligned. If the Double
Product Key is pressed again the brew chamber moves back to the home position, (micro switch)
X X X X
77.
Voltagecontrol
not active
By pressing the „Minus“ or „Plus“ key in the parameter Voltage Control the voltage control
0-30% can be adjusted. The operation will be interrupted if the voltage falls below or above the
set percentage. As soon as the voltage is back within the programmed tolerance the machine is
operational again and the display reads „Ready“. If the machine is not in Ready mode the display
reads either Voltage Too High or Voltage too Low, respectively, while showing the voltage difference
as a percentage.
If the voltage changes during a brew cycle out of the programmed tolerance level the cycle will be
completed before the machine will display the error message.
X X X X
Page 39

REV-4
3.39
SECTION 3
© 2009 by Thermoplan AG, Subject to change
Technical Manual
Menu Description
Menu Description
CT
CTS
CTM cool
CBTM
78.
Cold start rinse
1.5 Liter
By pressing thr „Minus“ or „Plus“ key in the parameter Cold Start Rinse the water quantity during
a cold start rinse can be programmed. The basic factory default value is 1.5 liter. The water quantity
can be adjusted between „not Active“ and „2.0 liter“.
Note:
1) The Cold Start Rinse is only activated after a Cold Start
2) It is possible to interrupt the Cold Start Rinse by pressing the „STOP“-key.
Once interrupted, the Cold Start Rinse has to be done again from the beginning.
3) It is not possible to cancel and skip the Cold Start Rinse.
X X X X
79.
Boilerpurge
Off
By pressing the „Minus“ or „Plus“ key in the parameter Boiler Purge “ON/OFF” it can be programmed whether the autoamtic boiler purge shall be activated.
On:
If the puck drawer needs to be emptied, (display will read Empty Drawer), every time after the
drawer is put back into the machine the dispaly will read „Boiler Purge /Press Clean Key. The water
in the steam boiler will be replenished with fresh water during 30 seconds running water out of the
hot water tap.
During the boiler purge function no coffee products can be produced.
This function is not active when the coffee grounds are set to Not-Active/OFF
The factory default setting is Off
X
80.
Standby Temp.
not active
In this parameter the Standby Temperature can be set from Not-Active to 15 degrees C.
If no coffee is dispensed for 3 minutes after the last coffee was produced the Standby Temperature
is activated, i.e the boiler temperature is increased by the value programmed to make sure the next
coffee beverage has the correct temperature.
X X X X
81.
Water
normal
By pressing the „Minus“ or „Plus“ key in the parameter Water normal/Tank the type of water
connection can be selected:
- Normal means that the tea and internal rinse is activated by line pressure
- Tank means that the line pressure will be supplied by an external booster water pump.
The factory default value is set at normal
Note:
The location of the water tank must not be below the level of the coffee machine.
X X X X
82.
Option counter
On
At the moment this menu has no function.
X X X X
83.
Powersavemode
Off
This menu must not be changed!
X X X X
84.
R-Temp. high
not active
In this menu you can set the maximum temperature of the refridgerator by pressing the „Minus“ or
„Plus“ key. If the value is reached, the display will show a warning message.
Note:
The temperature of the refridgerator cannot be set. This is only a warning message when the set
temperature is reached!
X X
Page 40

REV-4
3.40
© 2009 by Thermoplan AG, Subject to change
SECTION 3
Technical Manual
Menu Description
CT
CTS
CTM cool
CBTM
85.
R-Temp. low
not active
In this menu you can set the minimum temperature of the refridgerator by pressing the „Minus“ or
„Plus“ key. If the value is reached, the display will show a warning message.
Note:
The temperature of the refridgerator cannot be set. This is only a warning message when the set
temperature is reached!
X X
86.
Drawer
Time 5s
The factory default for the minimum time delay to empty the drawer is set to 5 seconds. By pressing
the „Minus“ or „Plus“ key the time delay can be selected between 5 to 60 seconds.
The factory default is set to 5 seconds.
X X X X
 Loading...