

Page 1
INSTALLATION
INSTRUCTIONS
FOR MINI MAKE-UP AIR
MODEL FER
May 2012
VERSION 1.3
Page 2
Please read instructions carefully before installation.
This unit is a complete fresh air make-up package with an integrated damper system, washable fi lter and fan
with adjustable speed control which allows an easy setup with a minimum of connections. Only one power
connection is required to power the entire unit. Please follow the wiring diagram included under the cover for
specifi c electrical wiring. Thermolec FER mini make up air units are available in sizes up to 20 kW of heat at
voltages ranging from 120V single phase to 600V three phase. Collar sizes range from 6” to 12” with fans ca-
pable of up to 600 CFM. Mini make up air models are specifi ed as follows: FER-collar-kW-voltage/phase, e.g.
a 20kW, 240V (single phase) unit with a 12” collar would be FER-12-20-240/1. For small 6” applications up to
3kW at 240/1 take a look at our THERMO-X-AIR units which include a room controller to control the operation
mode of the integrated fan.
Mechanical installation
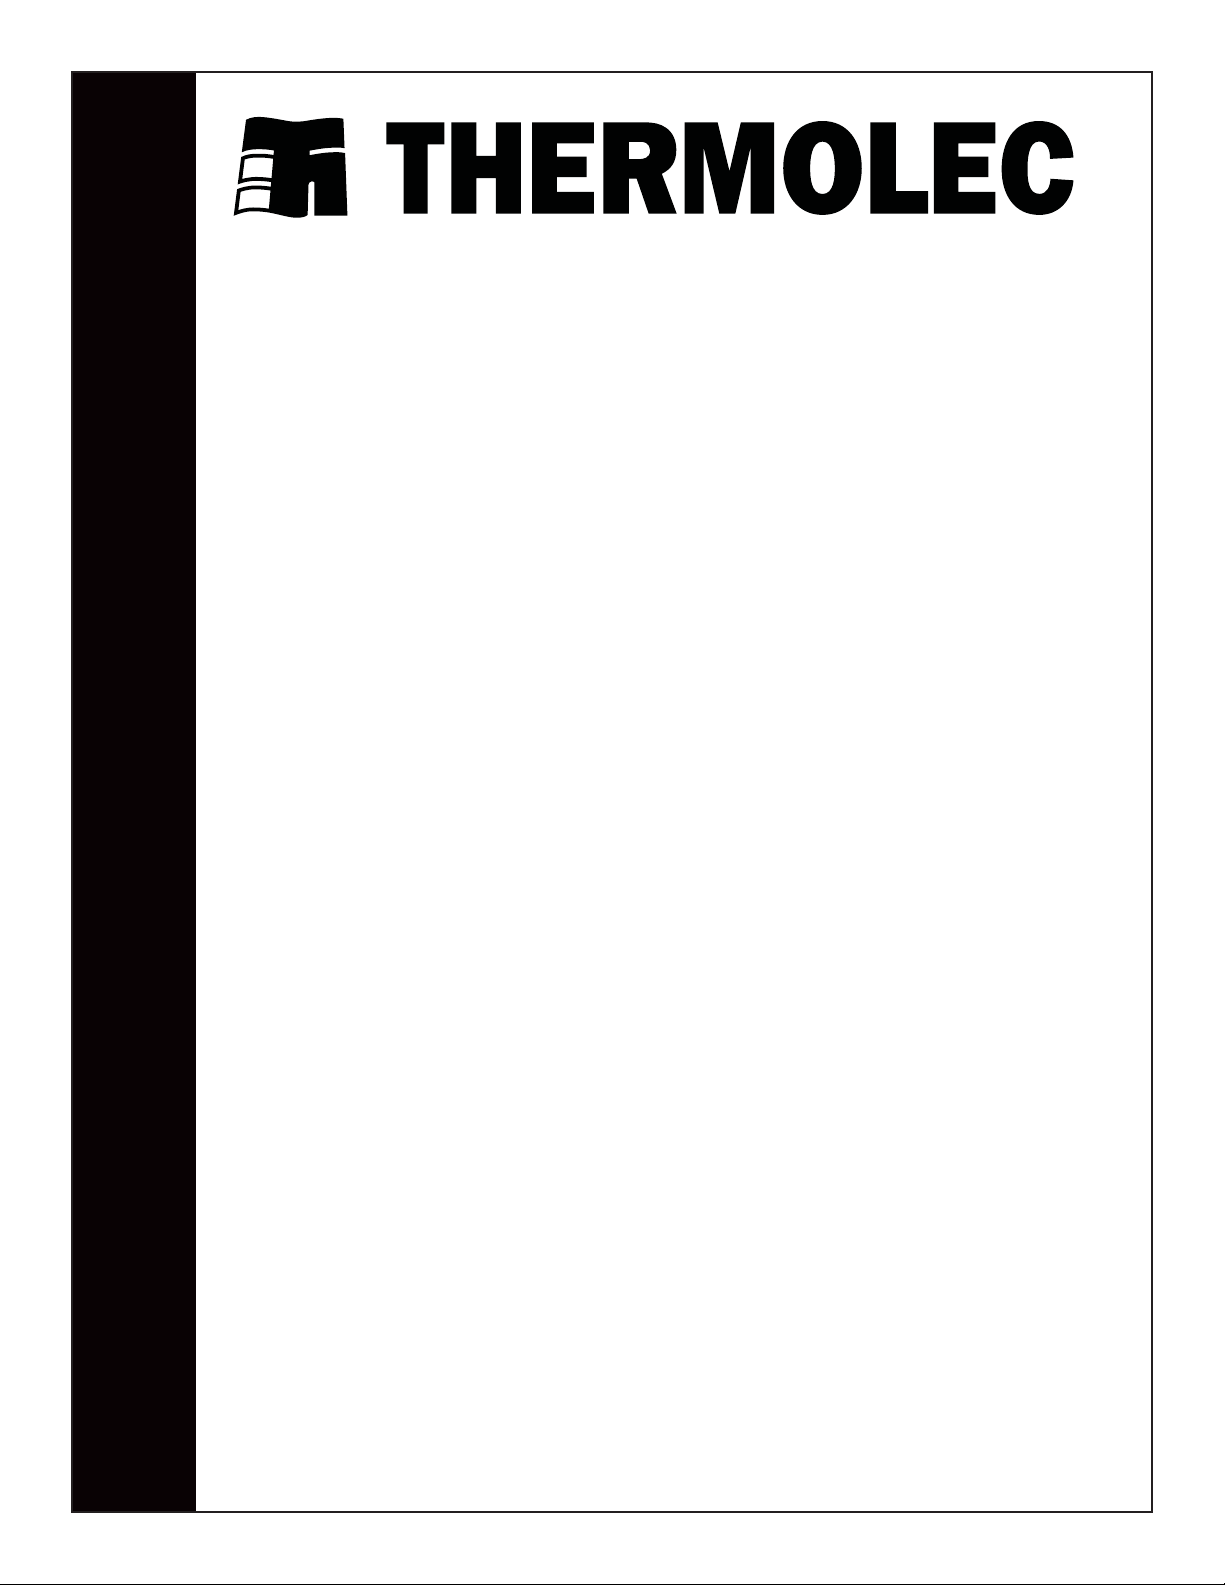
Thermolec FER heaters are designed to be installed for horizontal airfl ow only (fi g. 1). DO NOT install unit
vertically (fi g. 2). This unit is equipped with thermal cutouts on both the top and bottom of the unit which al-
lows it to simply be rotated 180º to change the direction of airflow with no modifications to the fan or wiring, as
seen in fig. 3. The direction of airflow from the fan itself is fixed and cannot be reversed. Before mounting the
unit, determine the direction of airflow required and rotate the unit accordingly.
NOTE: This unit is designed to preheat fresh air and not reheat ambient air.
Reversable Airflow
Thermal cutout
Controls
Air
O.K.
fig. 1
Thermal cutout
fig. 2
fig. 3
Controls
Air
Inlet
Inlet
For proper airflow, a minimum distance between the unit and any elbow must be observed. This distance
increases as the unit size increases. To determine the proper distance, multiply the collar size of the unit by a
factor of 1.5. For example a unit with a 12” collar would require elbows to be installed at a distance of not less
than 18” (fig. 4). Use round insulated duct for the inlet connection and uninsulated for the outlet while minimizing the use of elbows. When taking air directly from outside, install the inlet duct at an incline such that condensation or melted snow will not flow into the heater.
fig. 4
FER
D” x 1.5 D” x 1.5
Page 3
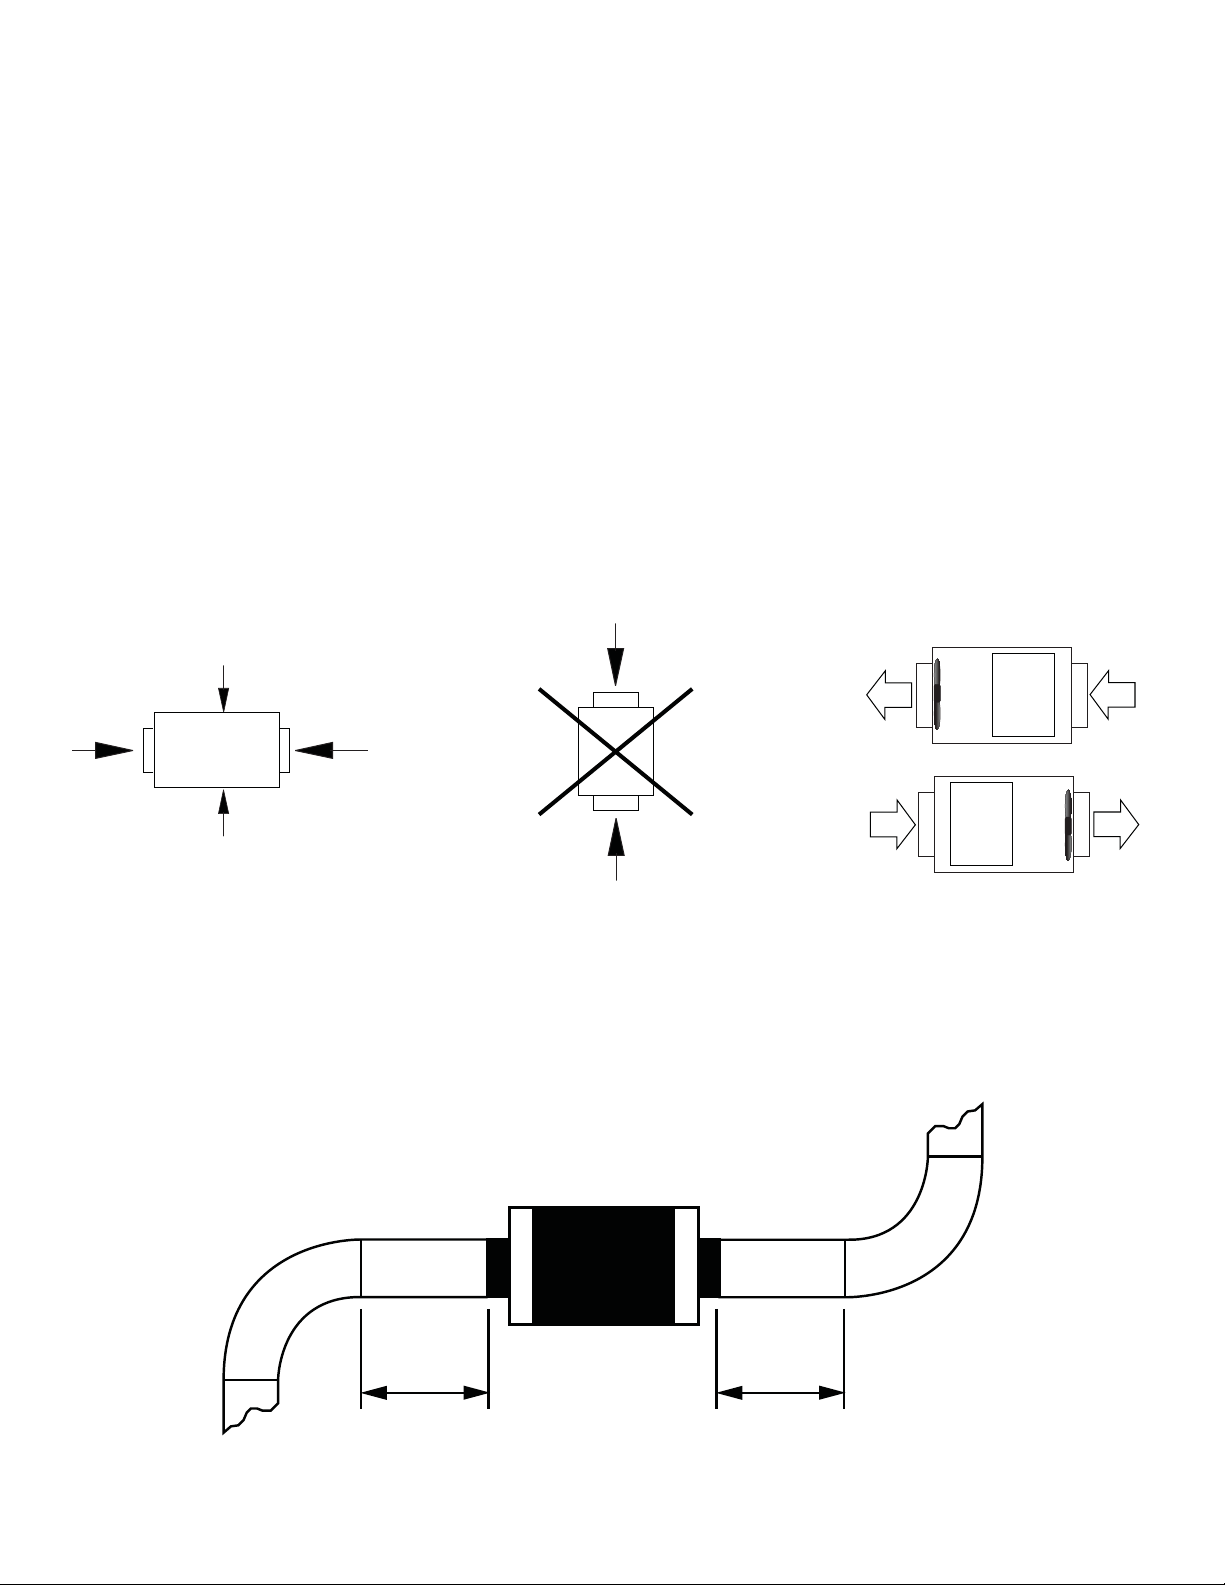
Attach the unit to a suitable support allowing a minimum 1/2” clearance above the heater. Always install the
unit such that there is sufficient space to remove the cover and the damper assembly if necessary as well as to
remove washable filter for cleaning (fig. 5). The hanger brackets provided (fig. 6) are designed to be used with
threaded rods (not included). Springs may be added to the rods as an option to reduce vibration (not included).
fig. 5
Fan
Heater
Damper
Filter
Rod
fig. 6
Duct sensor
Bracket
Cover opens
this way
Air Outlet
Controls
Air
Inlet
Bolt
Lock washer
Flat washer
Use supplied Current Sensor
or On/Off contact to start unit.
The minimum amount of air required (in cubic feet per minute) to operate
CFM
the unit is 30 CFM per kW. A 10 kW unit will require 300 CFM. The fan is
adjusted with the speed control knob located inside the control panel.
Rotating the knob clockwise from the off position starts the fan at maximum
speed and the speed reduces as the knob continues in a clockwise motion.
Actual CFM is based on the static pressure in the duct, for best results
measure the static pressure and then refer to the fan performance chart at
the end of the manual for more detail.
When there is a demand from the current sensor (or a dry contact), the
MAX
OFF
MIN
electronic controller will turn on the fan and start heating. The duct sensor
must be installed in the duct downstream from the mini make up air unit for proper operation. Adjust the blue
square potentiometer on the D23-TF electronic controller with a small screwdriver to control the output temperature. Use the chart below the potentiometer to convert the temperature from Celsius to Fahrenheit.
10°C 15
+-
+-
C2
10°C 15
30°C 25
°C 0 5 10 15 20 25 30 35
°F 32 41 50 59 68 77 86 95
A
C3 FR
COM
24
VAC
GD/OA
30°C 25
°C 0 5 10 15 20 25 30 35
°F 32 41 50 59 68 77 86 95
Duct
Sensor
SSR1
D23-TF
SST1L1
DF12W
The duct sensor must be wired to the ‘S’ ‘S’ terminals on the D23-TF. The controller monitors the outlet temperature and alerts of abnormal conditions with a fl ashing light (W) that can be seen on the D23-TF controller,
see Table A below. In the event of a heater failure, such as a tripped manual cutout, the controller will shutdown
the unit to avoid circulating unheated outside air and the warning LED will start fl ashing. If for some reason the
output temperature is too hot, to avoid a potentially dangerous situation, the controller will also shutdown the
unit and fl ash the warning LED accordingly.
Page 4

Table A
Number of Flashes Problem
one no heat or output temperature too low
two output temperature too hot
NOTE: Maximum discharge temperature for FER models is 90 ºF (32 ºC).
Mechanical dimensions and weights:
Collar size 6” (3 Ø) 8” 10” 12”
Weight (approx) 45 lbs 70 lbs 70 lbs 110 lbs
Width (X) 31.5” 35.5” 35.5” 43.5”
Height (Y) 10” 15” 15” 16”
Depth (Z) 13.75” 15” 15” 21”
Max. kW 3 6 10 20
Max. CFM 100 300 300 600
NOTE: Dimensions and specs are approximate and may change without notice.
FAN PERFORMANCE:
800
Max
700
X
Z
Y
600
500
400
CFM
300
200
100
0
Min
0.1 0.15 0.2 0.25 0.3 0.1 0.15 0.2 0.25 0.3 0.1 0.15 0.2 0.25
Max
Min
Max
STATIC PRESSURE
12” Collar 6” Collar8” & 10” Collar
Page 5

Fan specifi cations
Unit size
6” collar 263 115 50/60 46 60 70 Ball
8” collar 607 115 50/60 80 61 75 Ball
10” collar 607 115 50/60 80 61 75 Ball
12” collar 1100 115 60 175 73 50 Ball
Note: All data as supplied from fan manufacturer.
To convert CFM to liters/second multiply CFM value by 0.47.
CFM @ 0
VAC
Hertz
Power (W)
dBA
Max Amb. Temp C
Bearing Type
Electrical installation
Disconnect all power sources before opening the control box and working within. Please conform to all local
and national electrical codes for wiring. The system should be supplied by a separate cable, of appropriate
gauge, and with appropriate protection. Use only wires suitable for 75ºC. Wires shall be sized accordingly to
the Canadian Electrical Code requirements. All wires must be brought through knock-outs. Install a disconnect
switch close to the unit according to the code unless a disconnect switch is already built into the heater.
To quickly calculate the heater amperage use the following formulas:
Single phase: Amperage = Watts / Voltage.
e.g. 20 kW at 240V would be: 20,000/240 = 83.3 A
Three phase: Amperage = Watts / (1.732 x Voltage).
e.g. 10 kW at 600V/3 phase would be: 10,000/(1.732 x 600) = 9.6 A
After installing and wiring the system, use the potentiometer on the electronic controller to adjust the desired
temperature and the fan speed control to adjust the air volume. The fan speed should be adjusted according to
the application to compensate for the specifi c static pressure of the installation.
Current sensor instructions
Use the included current sensor to interlock the mini make up air with an exhaust fan. Simply run one of the
power wires of the exhaust fan through the hole in the current sensor (fi g. 7). Some fan amperages may be too
low to switch the current sensor and multiple loops may be required (fi g. 8). Run the fan and test the output of
the current sensor to determine if multiple loops are required. For information on connections refer to the wiring
diagram included with the mini make-up air.
EXHAUST
FAN
fig.7
CONNECT TO D23-TF ELECTRONIC
CONTROLLER IN UNIT ( T1 & L1 )
fig. 8
Page 6

TYPICAL WIRING DIAGRAMS:
240/1
600/3
Page 7

Maintenance
Even though Thermolec mini make up air units are designed to operate long term without problems we strongly
recommend a yearly visual inspection. This precautionary step will help to keep your installation operating well.
Note these eventual fi rst signs of problems: signs of overheating on the heater frame, traces of water or rust on
the control box.
A basic checklist would include:
- Check all fuses
- Check the resistance to ground for each circuit
- Check the resistance phase to phase for each circuit
- Check the tightening of connections at all contactors and heating elements
- Check all contactors
Any defective components should be replaced only with approved original parts.
Washable fi lter
Disconnect all power sources before doing any maintenance. This unit is equipped with a permanent fi lter that
should be washed at regular intervals. Check the fi lter after a month of operation. To remove the fi lter, simply
pull on the plastic tab (fi g. 9). If the fi lter is extremely dirty, increase the frequency of inspection. Make sure that
the fi lter is dry before replacing.
Filter
fi g. 9
Warranty
1 - THERMOLEC LTD guarantees it’s heater elements against any defect in workmanship and material for a period of two
years and other built-in components for a period of one year, starting from the date of shipment from it’s factory.
2 - THERMOLEC LTD will repair or replace without charge, in its factory or in the fi eld at its own discretion, the unit or
part, which upon manufacturer examination, is considered to be defective.
3 -Misuse of this product, or repairs made by others without THERMOLEC LTD’s authorization, will void this warranty.
4 - THERMOLEC LTD shall not be held responsible for damage or delay and shall not be held liable for any charges
resulting from the removal or replacement of the allegedly defective heater.
5 - THERMOLEC LTD shall not be held responsible for any incidental or consequential damage or delay due to
workmanship or material. No additional charge will be accepted for repair, replacement or modifi cation if prior written
authorization was not obtained from THERMOLEC LTD.
6 -Any control device or accessory, supplied with the unit, to be mounted or connected remotely, will only be guaranteed
by the manufacturer per conditions stated in paragraph 5.
Page 8

THERMOLEC LTD ● 2060 Lucien-Thimens, Montreal, Quebec, Canada H4R 1L1 ● Tel: 514-336-9130 ● Fax: 514-336-3270 ● www.thermolec.com
 Loading...