

ThermoFlow Elex 8.5, Elex 12, Elex 15, Elex 18, Elex 21 Installation Manual, User Manual, And Warranty Information
...Page 1
TM
Electrically Controlled Tankless Water Heater
Installa�on
uide, ser anual, and Warranty nforma�on
Electrically
Controlled
Tankless Water
Heater
Elex 8.5 / Elex 12 /
Elex 15 / Elex 18 /
Elex 21 / Elex 24
TM
Page 2
Contents
Use of the manual
Mounting instructions
User manual
Maintenance
................................................................................
...............................................................................
Trouble shooting
Warranty conditions
...................................................................
.........................................................
......................................................................
...............................................................
3
5
19
21
22
25
02
Electric Tankless Water heater - Installation Maunal and User Guide
TM
Page 3
Use of the manual
Congratulations and thank you for choosing our instant water heater.
The instruction contains important information about commissioning,
switching the device on and maintenance. To ensure your safety and
that of others we recommend you read through this safety manual carefully. Please refer to the back of the manual for details about thewarranty. Keep this manual for future reference.
If you lose the maunal, contact your local distributor or manufacturer.
When you call, please tell us the model number and the serial number of
your unit written on the rating plate of the water heater.
Symbols used in this maunal
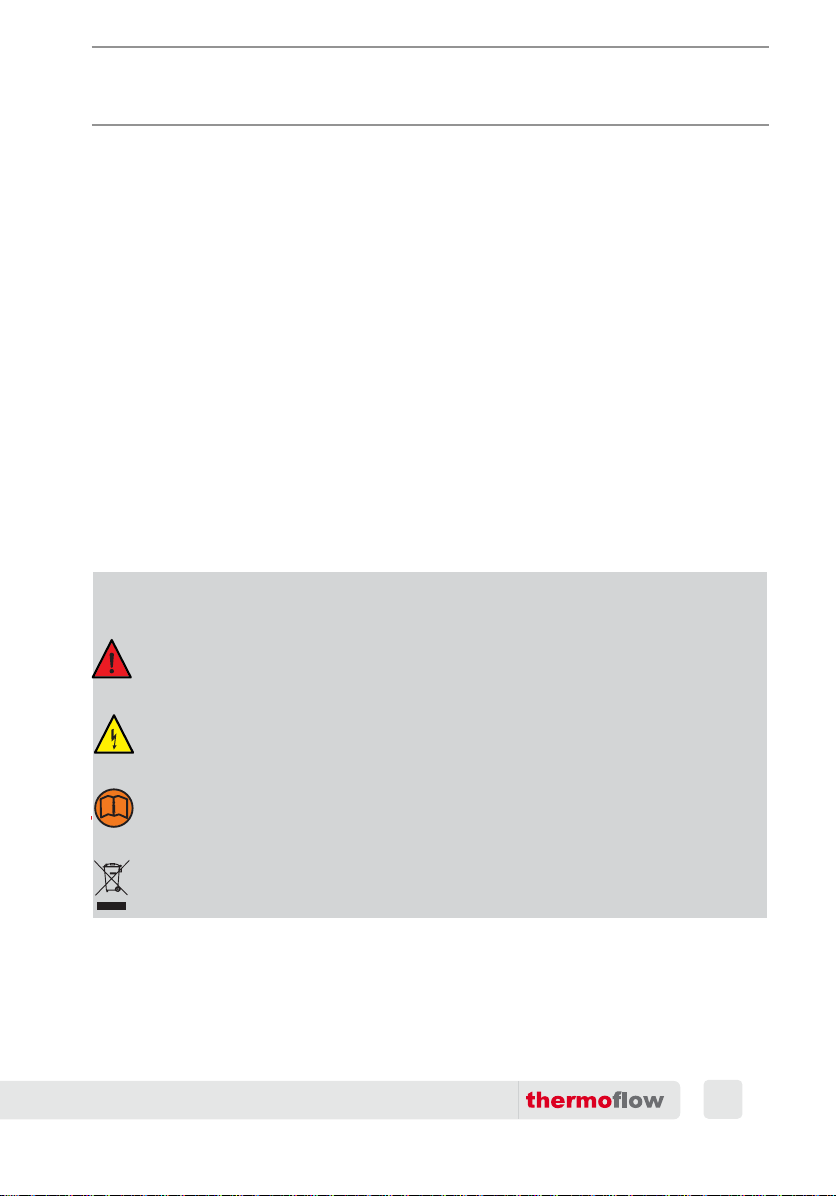
The following symbols are used in this maunal and on the appliance:
Fail to observe this instruction may expose you or others to danger.
Fail to observe this instruction may lead to damage to the device.
Indicates live parts.
Fail to observe this insturction may lead to damage to the device or damage
or others.
Please read the manual
Hazardous materials and waste electrical and electronic equipment
should be taken to a designated recycling location.
Electric tankless Water heater - Installation Maunal and User Guide
03
TM
Page 4

Use of the manual
This appliance can be used by children aged from 8 years and above
and persons with reduced physical, sensory or mental capabilities if
they are supervised during use of the appliance and under stand the
hazards involved.
This is not a toy. Children shall not play with this appliance.
Standards and regulations
The installation (plumbing and electrical work), commissioning and
maintenance of this appliance should only be undertaken by personnel with electrical qualifications and in accordance with the relevant
standards and codes and this manual.
Correct and reliable operation of this unit will only be ensured if the
original accessories and spare parts are used.
The following should also be observed:
the appliance name plate;
the technical specifications.
Connection to the water supply
Compatible cold water pipe material: steel, copper and plastic.
There is no need to install a relife valve.
Compatible hot water pipe material: copper, approved plastic piping
systems.
Electrical installation
This unit may only be connected to a fixed cable.
This appliance must be connected to a dedicated breaker.
04
Electric Tankless Water heater - Installation Maunal and User Guide
TM
Page 5
Mounting instructions
Contents
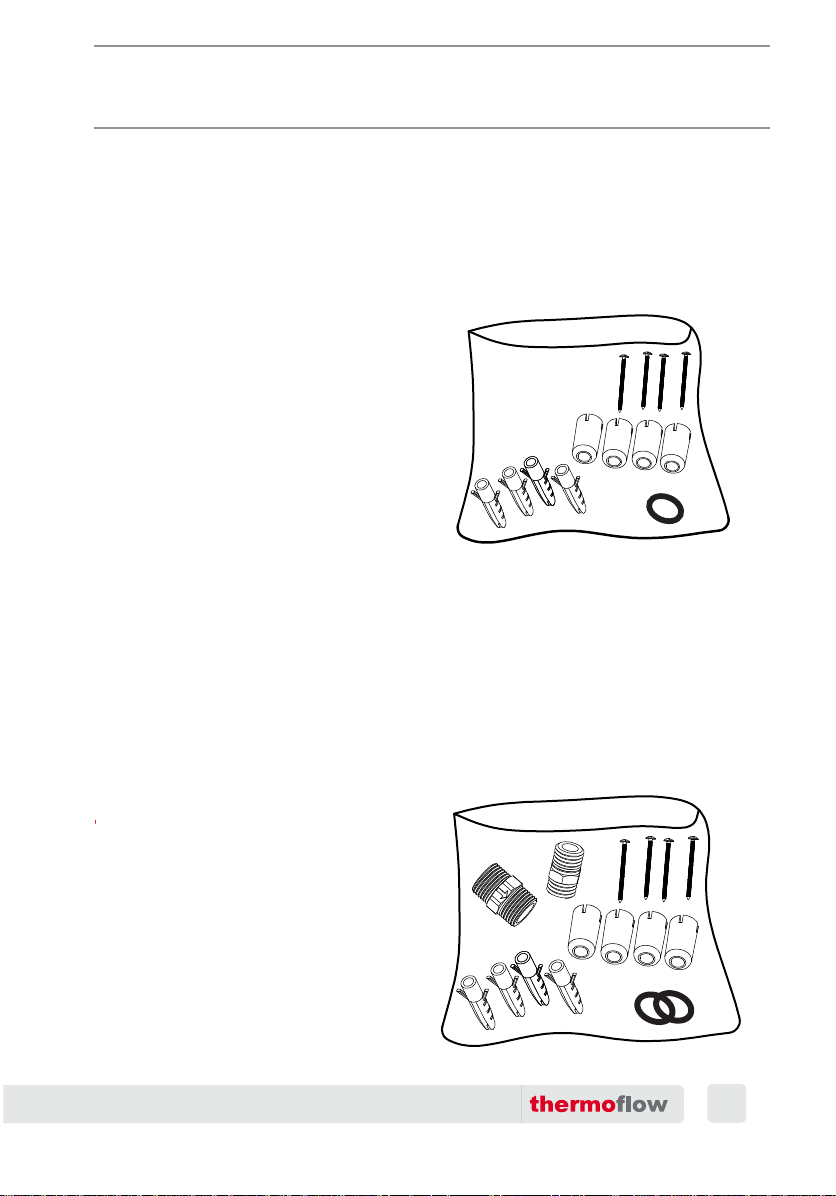
1 device (Elex 8.5 / Elex 12)
1 mounting template
1 bag of installation materials, contects:
1 filter mat
4 spacers
1 gasket
4 screws
4 anchors
Contents
1 device (Elex 15 / Elex 18 / Elex 21 / Elex 24)
1 mounting template
1 bag of installation materials, contects:
① 1 inlet connector kit (combined with filter mat)
② 1 outlet connector
③ 2 gaskets
④
⑤
⑥
4 spacers
4 anchors
4 screws
Electric tankless Water heater - Installation Maunal and User Guide
05
05
TM
Page 6
Mounting instructions
Unpacking
Check if the device has been damaged in any way.
Environment
To prevent damage during transport this unit is shipped in sturdy
packing. Please recycle the packaging where possible.
Disposal of the appliance
Old appliances must not be disposed of in your household waste!
Please bring old appliances to the appropriate recycling center nearest to
you.
Tools
You will require the following tools for installation:
• Phillips-head screwdriver
• Open-ended wrenches
• Teflon tape
• Drill
• Stone or concrete drilling bits
• Pencil
• Adhesive tape
• Wire strippers
All the devices require a single phase 220-240V supply .
If the electrical installation does not meet these requirements then it will
need to be modified. This should be done by a qualitied electrician in
accordance with the relevant regulations (IEC, NEC, etc.)
Preparing for installation
The water and electrical supply need to be available at the place where
the device is to be supplied. If the electricity cable is buried in the wall then
use the supplied spacers. If the electrical cable is fixed to the wall then the
device can also be fixed straight to the wall.
06
Electric Tankless Water heater - Installation Maunal and User Guide
TM
Page 7
Mounting instructions
Elex 8.5 / Elex 12
A1. A2.
2
1
Display plug
A3. A4.
Input electric cable
5/16”
Connection to wall
MOUNTING TEMPLATE
4”
Minimum distance to the ceiling
Mindestabstand zur Decke
Mindestabstand zur Wand
Mindestabstand zur Wand
4”
Minimum distance from wall
Minimum distance from wall
Mindestabstand zum Boden
5/16”
Connection to wall
Warm water connection Cold water connection
Minimum distance to the ground
8”
Electric tankless Water heater - Installation Maunal and User Guide
Connection to wallConnection to wall
5/16”
4”
5/16”
07
TM
Page 8
Mounting instructions
A5. A6.
max. 1”
08
A7.
A8.
6”
1”
Electric Tankless Water heater - Installation Maunal and User Guide
TM
Page 9
Mounting instructions
A9. A10
L1 L2
A11.
Push the button
to reset the switch
2
3
1
Display plug
outlet
Electric tankless Water heater - Installation Maunal and User Guide
gasket
filter mat
inlet
09
TM
Page 10
Mounting instructions
Elex 15 / Elex 18 / Elex 21 / Elex 24
B1. B2.
2
1
B3. B4.
1
Gasket
Inlet Connector
2
Gasket
Outlet Connector
2
Display plug
5/16” mm
Connection to wall Connection to wall
MOUNTING TEMPLATE
Minimum distance from wall Minimum distance from wall
5/16” mm 5/16” mm
Warm water connection Cold water connection
5/16” mm
4”
Minimum distance to the ceiling
4” mm
Input electric cable
4” mm
Screws, washers and anchors
8”
Minimum distance to the ground
1
4” mm
10
Electric Tankless Water heater - Installation Maunal and User Guide
TM
Page 11
Mounting instructions
B5. B6.
4”
2”
pipe wall
pipe wall
Max 18 Nm
Don’t over-tighten the connections!
Use a spanner!
Arrow on the inlet connector
must be installed outward
from the wall!
B7. B8.
max. 1”
Electric tankless Water heater - Installation Maunal and User Guide
11
TM
Page 12
Mounting instructions
B9.
B11.
B10.
6”
1”
L1 L2L1L2
Push the button
to reset the switch
B12.
2
12
Display plug
3
1
outlet
Electric Tankless Water heater - Installation Maunal and User Guide
TM
inlet
Page 13
Mounting instructions
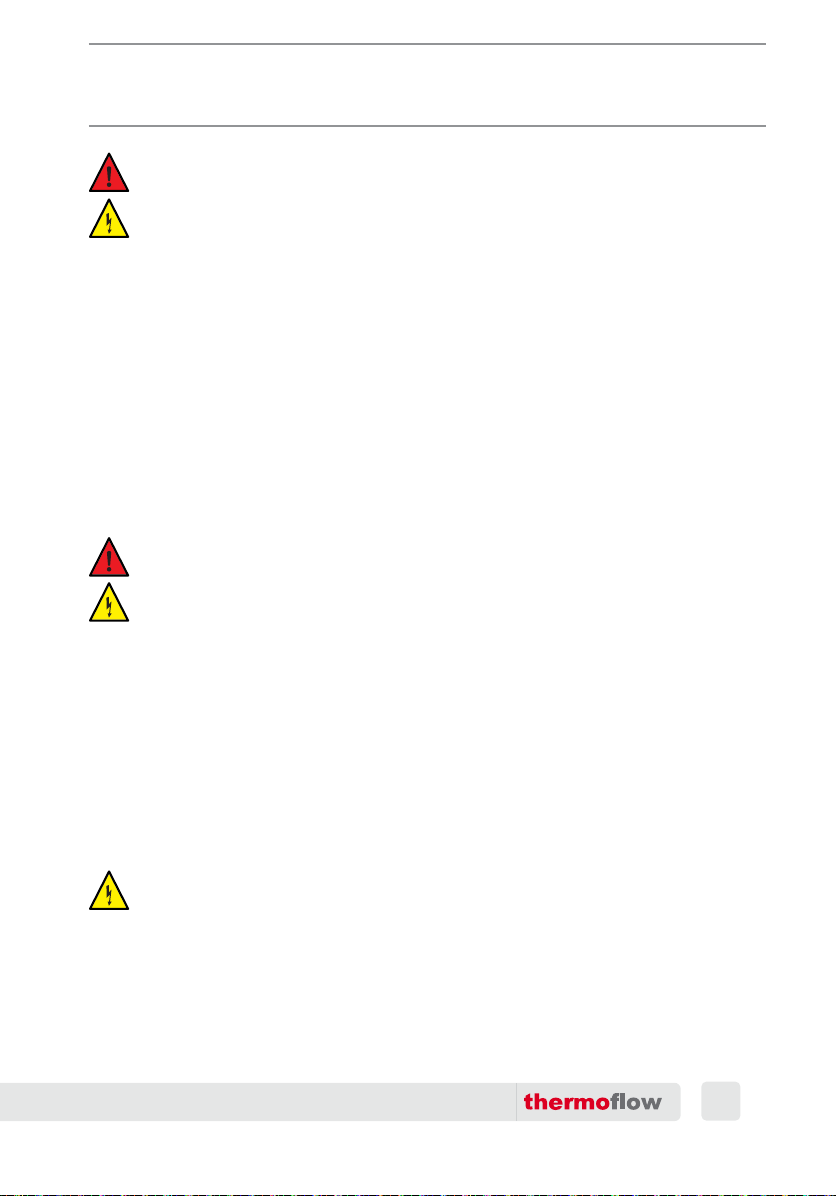
The appliance must be earthed properly!
The filter mat contained in accessory bag must be installed
when connecting with inlet(cold) water pipe or hose!
Circuit breaker must be installed with the appliance, please
take page.15 to 17 for the selection of circuit breaker.
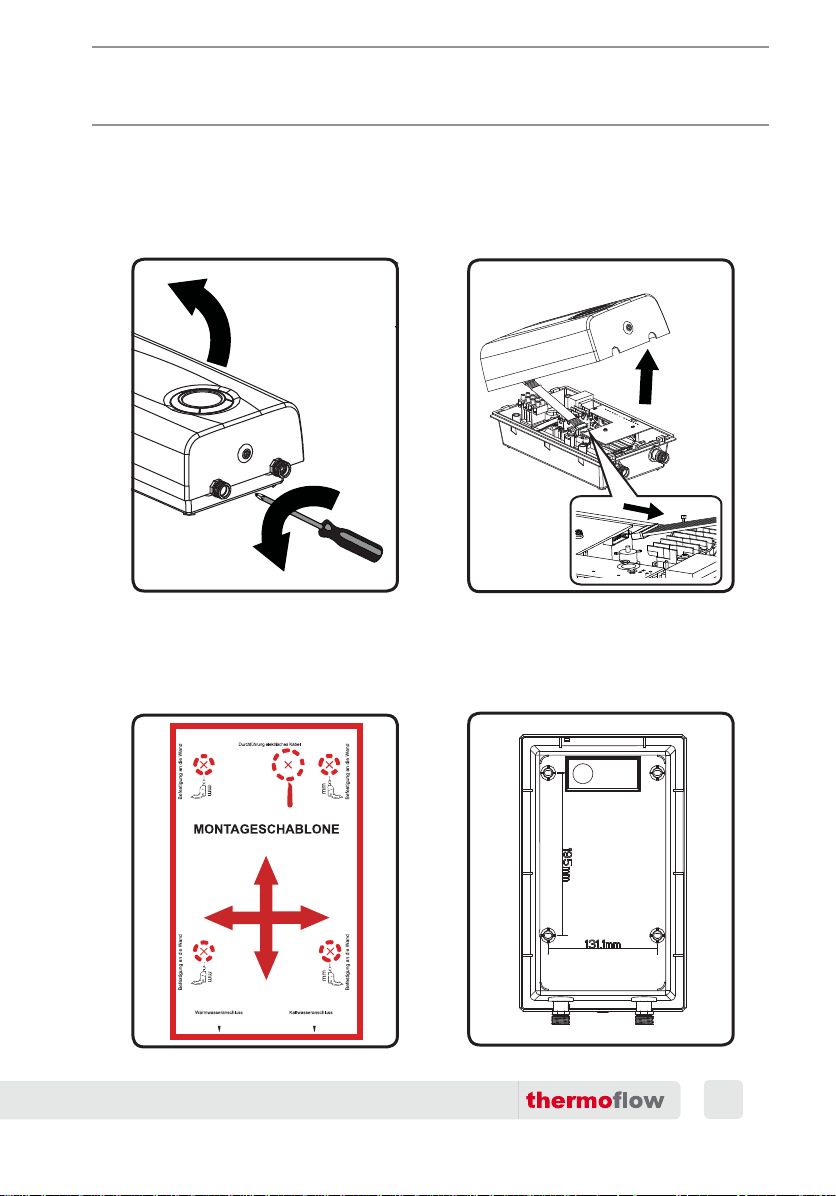
See image A1, A2
Remove the screw with a philips-head screwdriver and open the top
cover. Remove the display plug and remove the top cover and put
aside.
See image A3, A4
1. Use two pieces of tape to fix the template on the wall where the device
is to be installed.
2. Drill four 5/16” holes through the template, as indicated in A4.
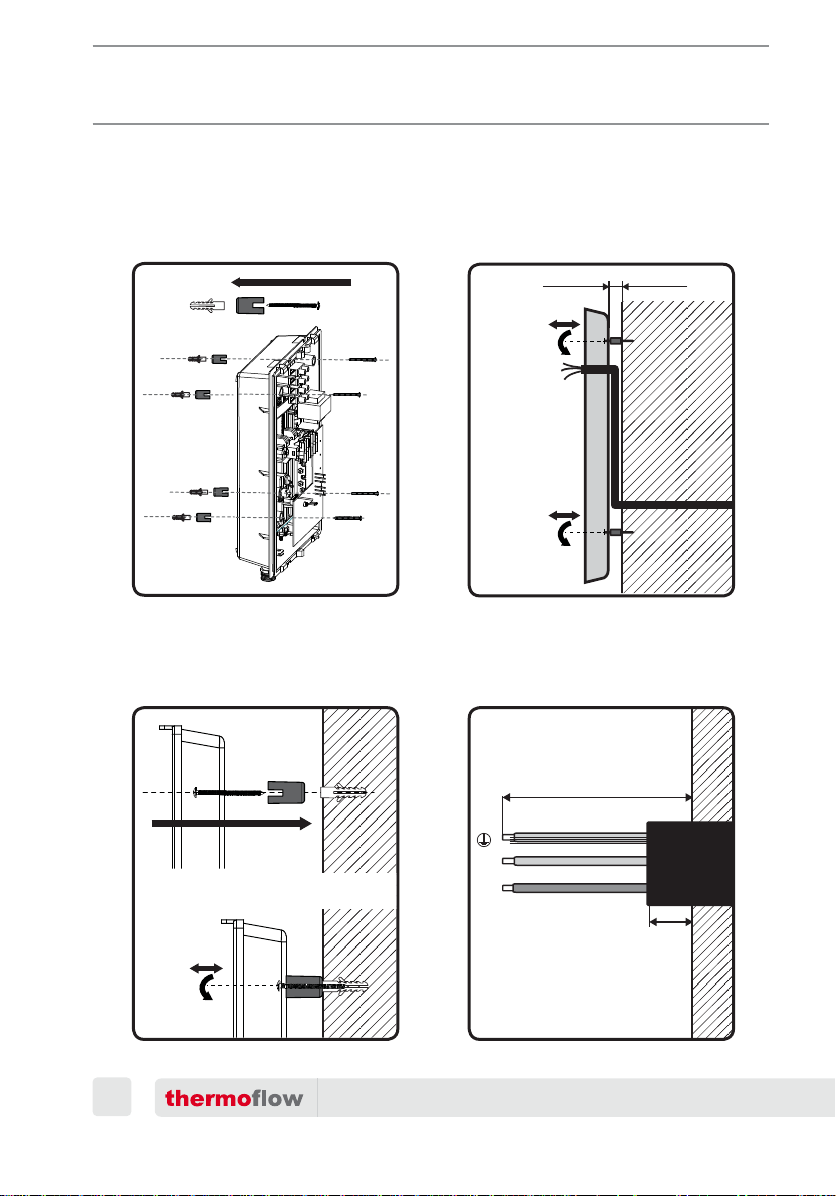
See image A5, A6, A7, A8, A9
1. Insert the anchors into the holes drilled at last step.
2. Install the appliance with the supplied screws and spacers.
3. Install the hot water pipe to the left, and install the cold water supply
to the right. Make sure the connections are watertight! To prepare the
connection to the water supply, Teflon tape must be used for sealing the
threads.
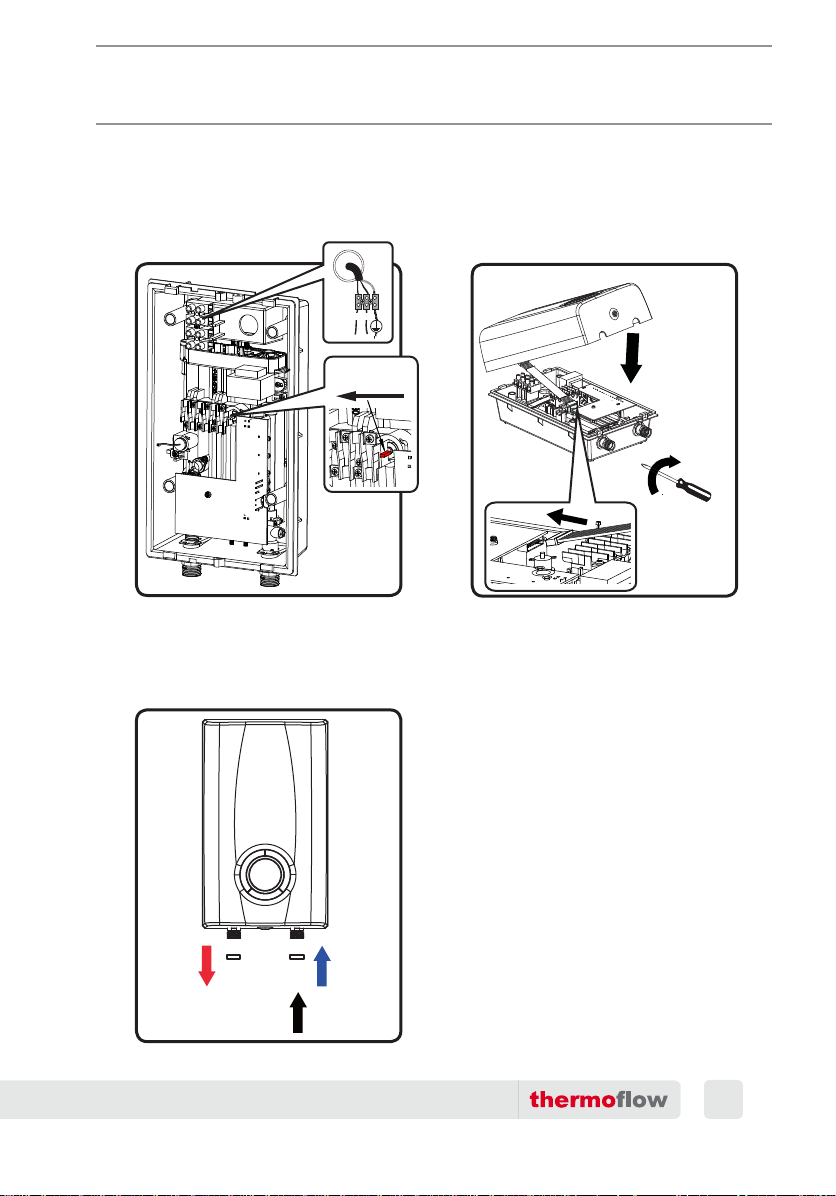
4. Cut the cable to the required length and connect it to the terminal
block, press the button to reset the switch, as A8 and A9 shown.
The electrical connection should be made by a qualitied electrician, in
accordance with the relevant regulations (IEC, NEC, etc.)
This appliance must be earthed properly!
Circuit breaker must be installed!
See image A10, A11
1. Insert the display plug.
2. Install the top of the housing.
3. Insert the screw at the bottom.
4. Switch on the circuit breaker, turn on the appliance and open the
hot water tap, wait for about 20 secs before the appliance start working.
Electric tankless Water heater - Installation Maunal and User Guide
13
TM
Page 14
Mounting instructions
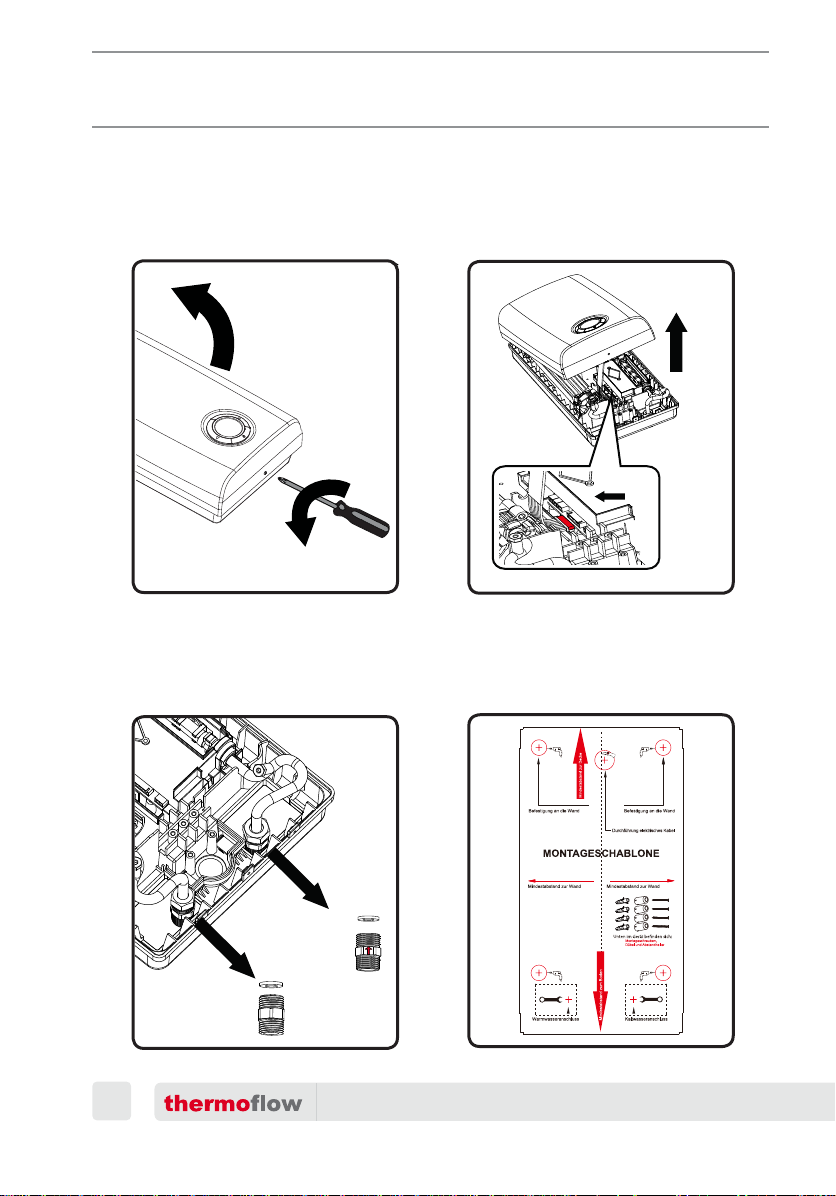
See image B1, B2
Remove the screw with a philips-head screwdriver and open the top
cover. Remove the display plug and remove the top cover and put
beside.
See image B3
Install the supplied plumbing components as illustrated. The filter mat
must be installed on the inlet of the appliance.
See image B4, B5
1. Use two pieces of tape to fix the template on the wall where the device
is to be installed.
2. Drill four 5/16” holes through the template, as indicated in B4.
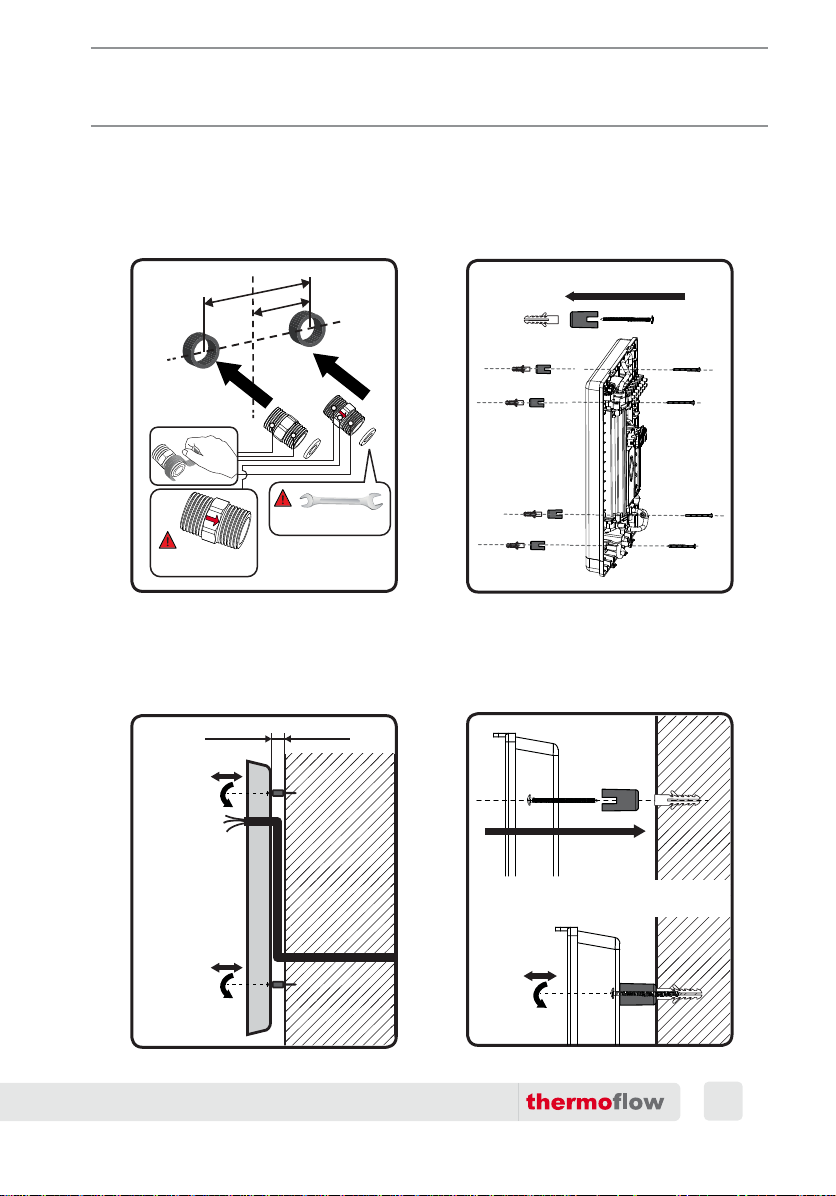
3. Install cold water inlet connecter and filter mat to cold water supply (in
the wall) on the right, and hot water outlet connecter to hot water supply
(in the wall) on the left, as shown in B5. Teflon tape must be used for
sealing the threads. Make sure the arrow on the inlet connector outward
from the wall.
See image B6, B7, B8, B9, B10
1. Insert the anchors into the holes drilled at last step.
2. Install the appliance with the supplied screws and spacers.
3. Install the hot water pipe to the left, and install the cold water supply
to the right. Make sure the connections are watertight! To prepare the
connection to the water supply, Teflon tape must be used for sealing the
threads.
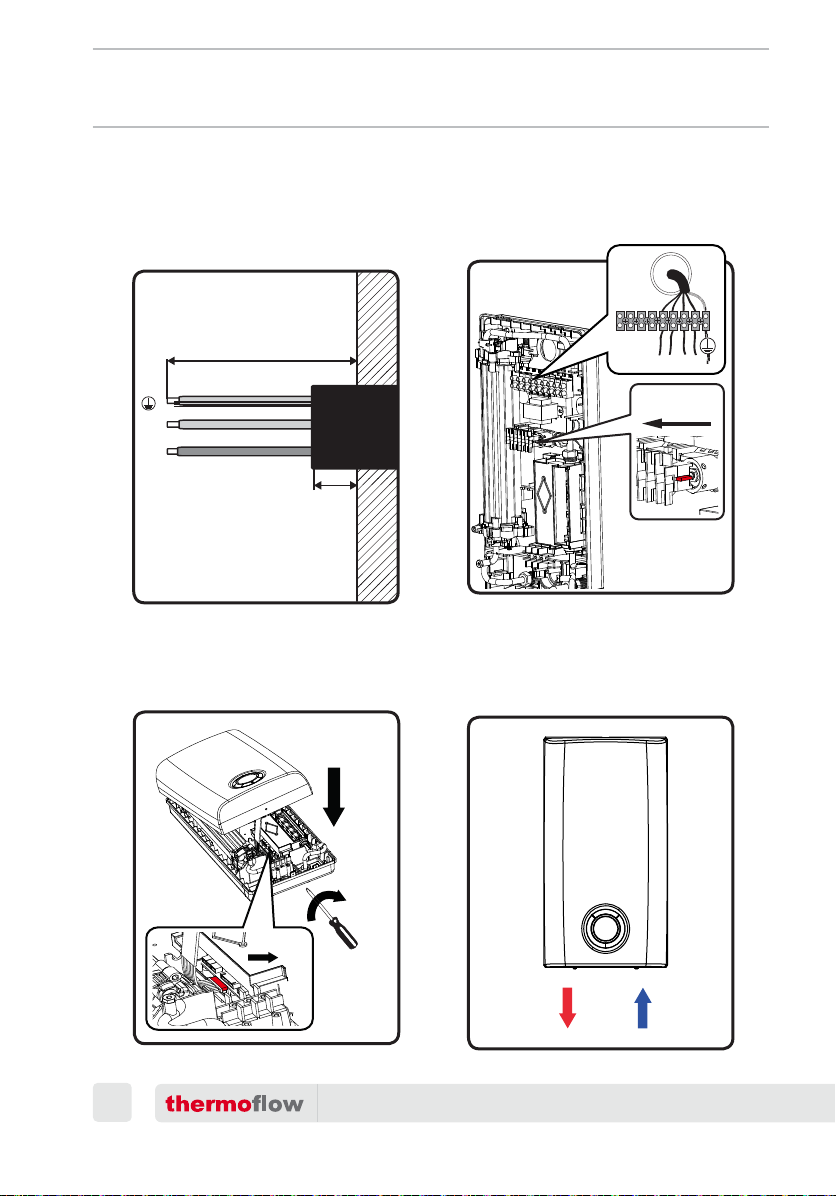
4. Cut the cable to the required length and connect it to the terminal
block, press the button to reset the switch, as B9 and B10 shown.
The electrical connection should be made by a qualitied electrician, in
accordance with the relevant regulations (IEC, NEC, etc.)
This appliance must be earthed properly!
Circuit breaker must be installed!
See image B11, B12
1. Insert the display plug.
2. Install the top of the housing.
3. Insert the screw at the bottom.
4. Switch on the circuit breaker, turn on the appliance and open the
hot water tap, wait for about 20 secs before the appliance start working.
14
Electric Tankless Water heater - Installation Maunal and User Guide
TM
Page 15
Mounting instructions
Commissioning
• Fill the device and vent it by opening a hot water tap connected to it.
• Only switch on the electrical supply once the device is clear of any
air.
• Check the operation of the device.
Frost
This device should be installed in a climate-controlled location,
protected from freezing temperatures.
Technical specifications
Instant water heater model
Electric supply
Nominal power rating
Nominal current
Circuit Breaker
Flow rate (∆t=45°F)
Flow rate (∆t=65°F)
Cable size
Temperature range
Switch on flow rate
Non-usage consumption
Protection class
Type of protection
Unit Dimensions
Unit weight
Water connections
Max. pressure water mains
Switch on flow pressure
Elex 8.5
220-240V 50/60Hz
8.5 kW
35-39 A
2-POLE 40A 2-POLE 60A
1.3 GPM
0.9 GPM
10 AWG
104-140 °F
0.58 GPM
<1 Wh/h
I
IP 24
13¾ x 7⅞ x 4¾''
5.4 lb
1/2’’ NPT
115 PSI
15 PSI
Elex 12
220-240V 50/60Hz
12 kW
50-55 A
1.8 GPM
1.3 GPM
8 AWG
104-140 °F
0.58 GPM
<1 Wh/h
I
IP 24
13¾ x 7⅞ x 4¾''
5.4 lb
1/2’’ NPT
115 PSI
15 PSI
Electric tankless Water heater - Installation Maunal and User Guide
15
TM
Page 16
Mounting instructions
Technical specifications
ThermoflowTM model
Electric supply
Nominal power rating
Nominal current
Circuit Breaker
Flow rate (∆t=45°F)
Flow rate (∆t=65°F)
Cable size
Temperature range
Switch on flow rate
Non-usage consumption
Protection class
Type of protection
Unit Dimensions
Unit weight
Water connections
Max. pressure water mains
Switch on flow pressure
Elex 15
220-240V 50/60Hz
15 kW
2 x 32 A
2 x 2-POLE 40A
2.3 GPM
1.6 GPM
2 x 10 AWG
104 - 140 °F
0.66 GPM
<1 Wh/h
I
IP 24
18¾ x 10⅛ x 4⅞''
8.4 lb
1/2’’ NPT
115 PSI
15 PSI
Elex 18
220-240V 50/60Hz
18 kW
2 x 38 A
2 x 2-POLE 50A
2.7 GPM
1.9 GPM
2 x 10 AWG
104 - 140 °F
0.66 GPM
<1 Wh/h
I
IP 24
18¾ x 10⅛ x 4⅞''
8.4 lb
1/2’’ NPT
115 PSI
15 PSI
16
Electric tankless water heater - Installation Maunal and User Guide
TM
05
Page 17
Mounting instructions
Technical specifications
ThermoflowTM model
Electric supply
Nominal power rating
Nominal current
Circuit Breaker
Flow rate (∆t=45°F)
Flow rate (∆t=65°F)
Cable size
Temperature range
Switch on flow rate
Non-usage consumption
Protection class
Type of protection
Unit Dimensions
Unit weight
Water connections
Max. pressure water mains
Switch on flow pressure
Elex 21
220-240V 50/60Hz
21 kW
2 x 44 A
2 x 2-POLE 50A
3.1 GPM
2.2 GPM
2 x 10 AWG
104 - 140 °F
0.66 GPM
<1 Wh/h
I
IP 24
18¾ x 10⅛ x 4⅞''
8.4 lb
1/2’’ NPT
115 PSI
15 PSI
Elex 24
220-240V 50/60Hz
24 kW
2 x 50 A
2 x 2-POLE 60A
3.6 GPM
2.6 GPM
2 x 8 AWG
104 - 140 °F
0.66 GPM
<1 Wh/h
I
IP 24
18¾ x 10⅛ x 4⅞''
8.4 lb
1/2’’ NPT
115 PSI
15 PSI
Electric tankless water heater - Installation Maunal and User Guide
17
TM
Page 18
Mounting instructions
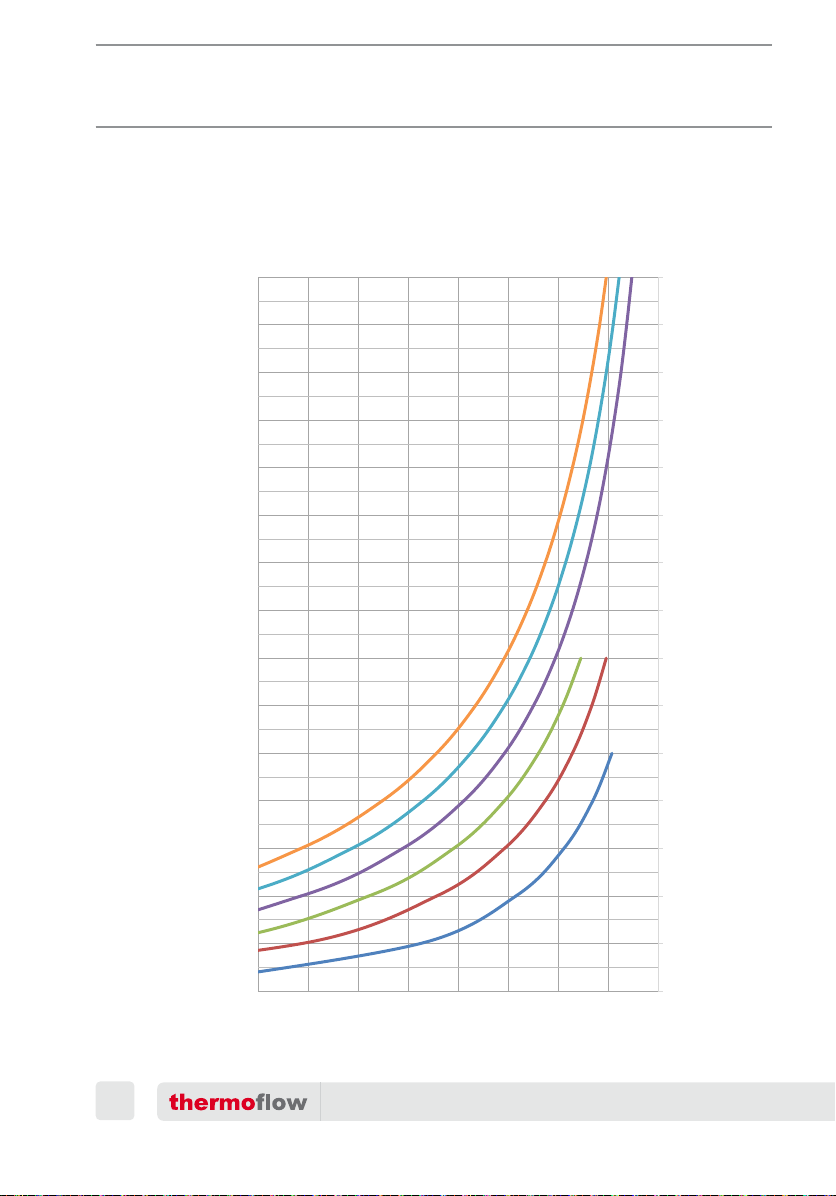
Temperature Rise vs. Flow Rate at 240V
Note: Temperature rise = Hot Water Temp. - Cold Water Temp.
Elex 18
Elex 24
Elex 21
Elex 15
Elex 12
Flow Rate GMP
18
Elex 8.5
Temperature Rise vs. Flow Rate at 240V
0.5 1.0 1.5 2.0 2.5 3.0 3.5 4.0 4.5 5.0 5.5 6.0 6.5 7.0 7.5 8.0
10.0
20.0
30.0
40.0
50.0
60.0
70.0
80.0
90.0
Electric tankless water heater - Installation Maunal and User Guide
TM
Temperature Rise F
Page 19
User manual
Operation
The integrated flow control valve accommodates changes in water
pressure and thus maintains a fairly constant temperature.
Commissioning
If the selected outflow temperature is not reached when the tap is fully
opened, then the water flow through the device exceeds the capacity
of the device (ThermoflowTM Elex 8.5/12/15/18/21/24). In this case, the
flow should be reduced with the hot water valve. There is a danger of
scalding at outflow temperatures exceeding 108°F.
This unit is intended for use with shower heads with a low pressure loss.
Mixer taps and thermostatic mixer taps should be of a design compatible with devices with flow control.
Fittings for vented systems should not be used!
Suggestion: To ensure that the minimum flow (switch-on flow) of a waterpressure operated device is reached, the pressure loss (head loss) of the
device, fittings, shower head, shower hose and piping should all be
considered when installing the device.
Typical pressure losses at a water flow of approx. 2.6 GPM:
• Mixer tap: 5.8 - 11.6 PSI
• Thermostatic mixer tap: 4.4 - 7.3 PSI
• Shower head: 4.4 - 21.8 PSI
The electronically regulated continuous-flow water heater with automatic tempera
This takes place regardless of the feed temperature, up to the
temperature limit.
The device has push-buttons to switch it on and off, and arrow keys to
adjust the heat ing. Blue: decrease heating performance, red: increase
heating performance.
ture adjustment keeps the outflow temperature constant.
Adjust the temperature settings as desired.
Electric tankless water heater - Installation Maunal and User Guide
19
TM
Page 20
User manual
Without a temperature limiter, high temperatures may be reached at usage
points. Keep children away from the usage points.
Danger of scalding!
The device should be isolated from the electric supply before any work is
done on live components.
Disconnect this appliance from the power source in a safe way.
The main water valve should be closed before any work is done on the
water pipe.
If the water supply is interrupted, e.g. due to maintenance on the main
water supply, then the following steps should be undertaken before returning the device to operation:
1. Turn off power to device.
2. Open a hot water valve connected to the device until the air is vented
from both the device and the cold water supply pipe.
20
Electric tankless water heater - Installation Maunal and User Guide
TM
Page 21
Maintenance
Maintenance
This device does not require any maintenance by the user. Professional
maintenance may only be carried out by authorized technical staff.
Maintenance, e.g. verifying electrical safety, should only be undertaken
by a qualified electrician, observing the relevant regulations (IEC, UL,
etc.).
If faulty, please take follow the trouble shooting in page.22 to make
the diagnosis. If still have problem, never try to repair the hot water
device yourself, please contact the nearest service specialist for
help.
Care
The enclosure can simply be cleaned with a damp cloth. Do not use
harsh chemicals or abrasives!
Descaling
A service inspection should be performed by authorized and qualified
technical staff every year. Descaling of the device during this inspection
is highly recommended, especially when you live in an area with hard
water exceeding 12 dH. Higher water temperature will intensify calcification. It is therefore recommended to set the device at maximum
131°F(55°C).
Legionella prevention
Do not use heater water as drinking water.
After prolonged shutdown of the device, for example while on vacation, the device should be fully heated up to the maximum temperature (tap at minimum flow) before resuing. It is recommended to flush
the pipes for one minute.
Electric tankless water heater - Installation Maunal and User Guide
21
TM
Page 22
Trouble shooting
First aid
• Check the fuses / breakers.
• Check if any fittings or shower head are affected by the build-up of
limescale or dirt.
• See also “Troubleshooting”.
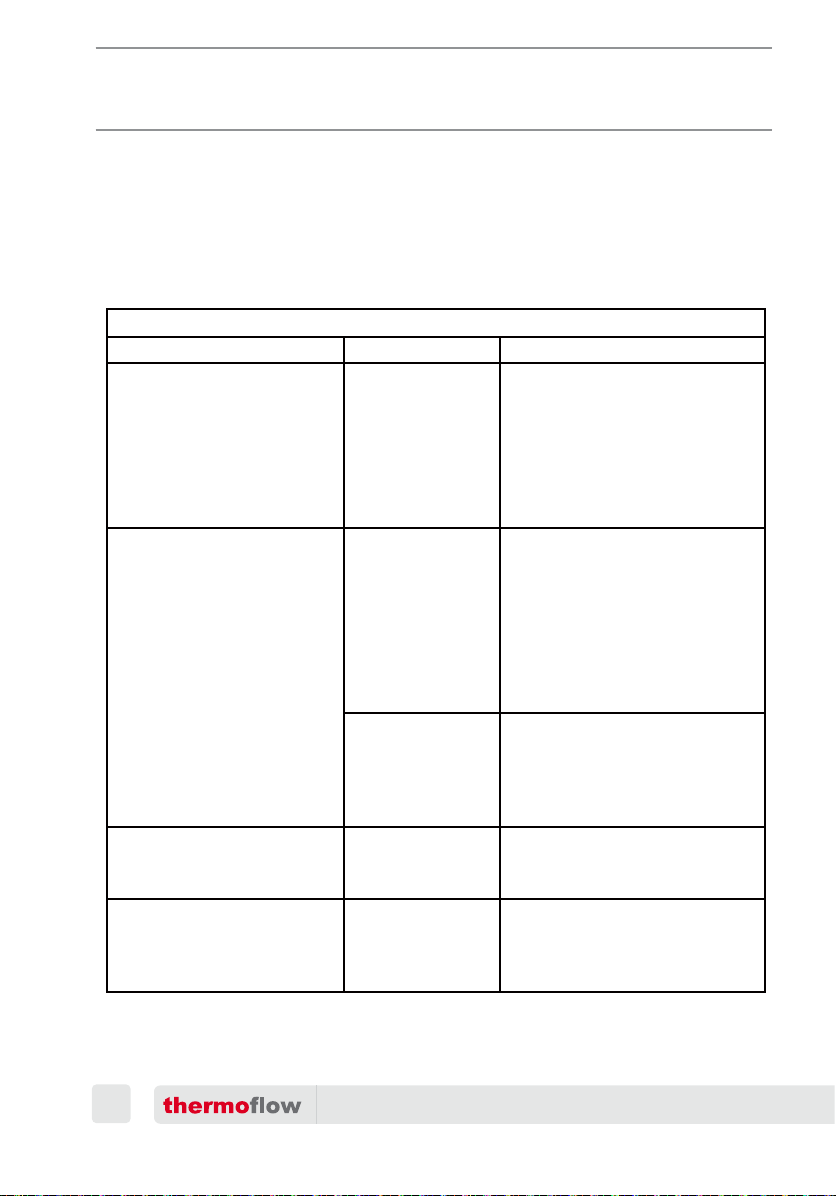
Troubleshooting
Problem Cause Solution
Water heater is not heating at
all (water is flowing but the
unit is not heating - the
outgoing water temperature
is the same as the cold water
supply) - the digital display
does NOT light up.
Water heater is not heating at
all (water is flowing but the
unit is not heating - the
outgoing water temperature
is the same as the cold water
supply) The digital display
DOES light up.
No power or
incorrect wiring.
Flow rate is too
low / water
pressure is too
low.
The air bubbles in
the water heater
have not been
purged out.
Make sure the breakers at main
electrical panel are ON. You may
have a faulty breaker or unit may
be wired in correctly.
Your water heater has an
activation flow rate of
approximately 0.6 GPM (2.5
LPM). If your water flow rate is
less than this level, your unit will
not activate. Increase th e flow
rate or check the filter m
the inlet connector.
Make sure the breakers at main
electrical panel are ON, turn on
the unit and open the hot water
tap for about 20 s.
at inside
Water heater is not heating at
all. The LCD display shows
“E2”
Flow rate is too low
22
Internal part
failure
Something was
blocked in the
filter mat / Pipe
was blocked
Electric tankless water heater - Installation Maunal and User Guide
TM
Please call for your local service.
Check and clean the filter mat
inside the inlet connector.
Page 23
Trouble shooting
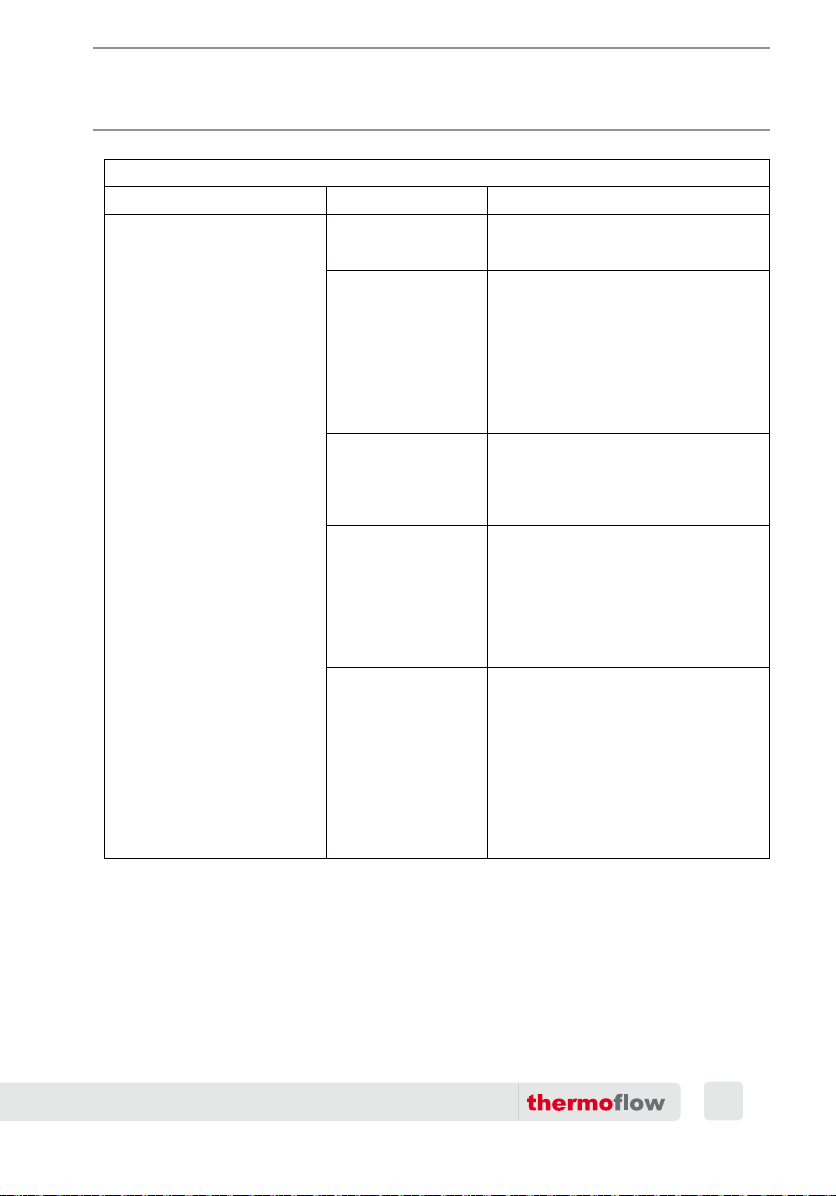
Troubleshooting
Problem Cause Solution
User temperature
setting too low.
Flow rate is too
high.
Crossed wires.
Water heater is heating, but
the water temperature is
not hot enough.
Voltage less than
240 volts.
Mixing too much
cold water.
Increase the temperature setting on
the unit.
Depending on your incoming water
temperature and the kW of your
heater, your water flow rate may
exceed the physical heating
capacity of your water heater.
Reduce the flow rate by installing a
Flow Regulator.
If it’s a new installation, have your
electrician double check the wiring.
Is possible that the wiring is
incorrect.
The heating elements on your water
heater are design for 240 volts.
When used with a lower voltage,
they produce less heating power.
You may need to upgrade to a
larger input heater.
You do not need to mix as much
cold water with your tankless water
heater compared to when you use a
conventional water heater. You may
also have an anti-scald feature on
your faucet that is mixing cold
water. These types of faucets can
usually be adjusted to reduce the
amount of cold water mixed.
Electric tankless water heater - Installation Maunal and User Guide
23
TM
Page 24
Trouble shooting
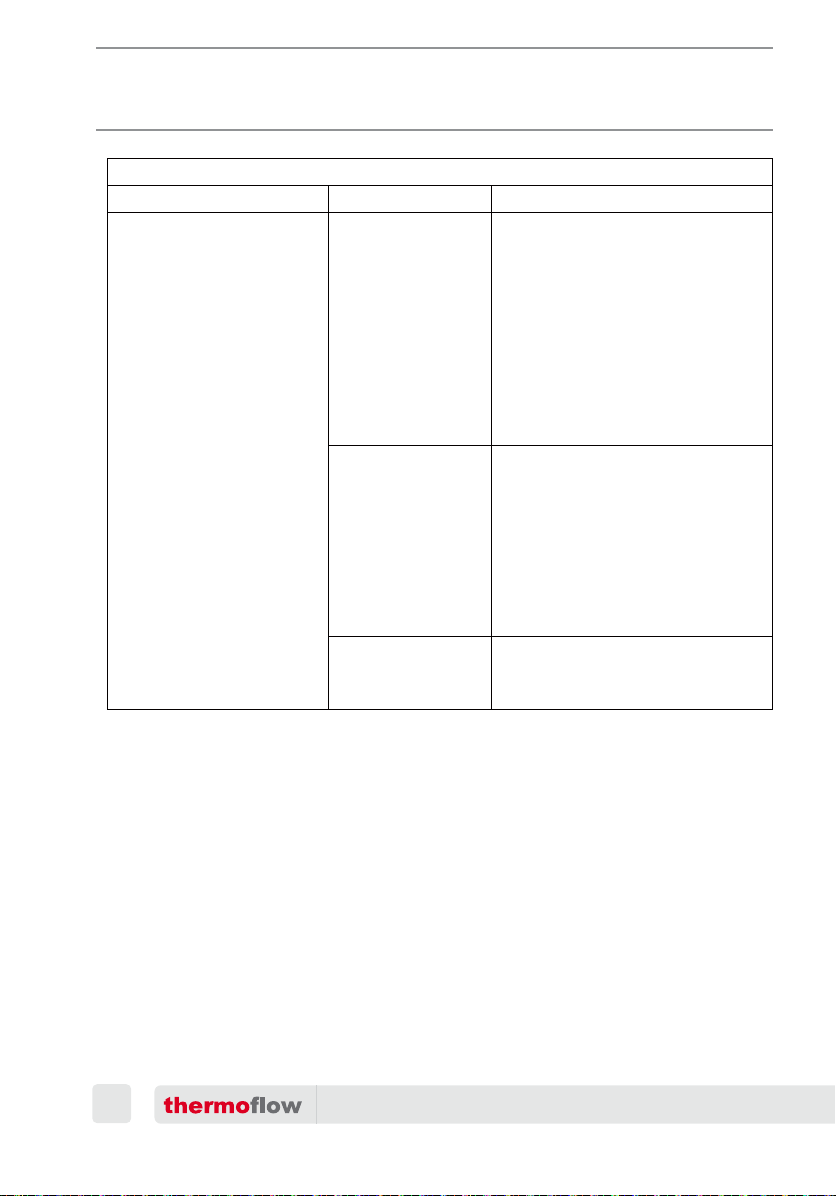
Troubleshooting
Problem Cause Solution
Your faucet may have an anti-scald
feature or a tempering valve that
automatically mixes cold water
Anti-Scald
pressure/balancing
valve or tempering
valve.
The water temperature at
the faucet is less or greater
than the temperature
setting of my water heater.
Thermal loss due
to long pipe run
Water temperature
at the faucet is too
hot
even when you turn your control
lever or handle to full hot. These
devices are usually adjustable so
you can turn off the cold mix
completely.
for this by increasing the setting on
your water heater if you need/want
hotter water.
As the hot water from the heater
runs through the hot water delivery
system to your faucet, some heat
will be lost especially if it has long
distance to travel or the pipes are
cold. This is normal. You can
compensate for this by increasing
the setting on your water heater if
you need/want hotter water.
Check your flow for too little flow,
set point temperature is too high.
You ca
n compensate
If the appliance still fails to operate after you have exectued this procedure,
please inform customer service.
24
Electric tankless water heater - Installation Maunal and User Guide
TM
Page 25
Warranty conditions
Warranty
Entitlement
Content
Claims
The rights under this manufacturer’s warranty shall apply in
addition to the buyer’s statutory rights. This warranty shall
in no way restrict the buyer’s statutory rights in particularly
towards the seller.
The claiming of rights under this warranty shall be subject
to the submission of the respective proof of purchase.
We shall guarantee as the manufacturer that this product is
free of material and manufacturing errors. Material and
manufacturing errors arising during the warranty period
shall justify the rights under the warranty. This warranty
shall not cover errors due to improper installation or incorrect usage, incorrect operating conditions or defective maintenance or repair work.
Normal wear and tear such as lime scaling shall also be
excluded under this warranty. The warranty will not be valid
if the problem is caused by extreme values of drinking water
(pH value not between 7 and 9.5 and/or Cl above 150 mg/l
and/or Fe above 0.2mg/l).
The warranty shall be valid for 24 months. The warranty
period shall commence on the day on which the product is
purchased. Warranty services provided shall neither prolong
the warranty period nor initiate a new warranty period.
Invalidity of
warranty
Restriction
Electric tankless water heater - Installation Maunal and User Guide
Attempted repairs carried out by a customer or third party
that are not authorized by us shall invalidate the warranty.
The same shall apply if parts are installed in the product or
connected to the product that are not original parts from us.
This warranty shall be restricted to rectification and subsequent delivery. This warranty shall not include compensation, withdrawal from the agreement, reduction in price or
any reimbursement for consequential loss due to defects.
The statutory provisions and delivery conditions of the
national company or importers must be observed.
25
TM
Page 26

Page 27

Page 28

Elex 8.5 / 12 / 15 / 18 / 21 / 24
REV2.1 NA 201901
TM
 Loading...