

Page 1
APPLICATION NOTE
Blood banking applications using
the Thermo Scientific Sorvall
BP 8 and 16 and Cryofuge 8
and 16 Centrifuges
Author: Romana Hinz, Thermo Fisher
Scientific, Osterode am Harz, Germany
Key words: Blood processing, Blood bank protocols,
ACE integrator function, Centrifuge loading
Introduction
Blood banks collect, process, store and distribute blood
and blood products [1]. After collection, whole blood
(WB) is separated into its main components. Red blood
cells, plasma and platelets are used effectively for patient
purposes, while white blood cells are depleted [2]. Red
blood cells transport oxygen to body tissues, plasma has
specific proteins that allow proper regulation of coagulation
and healing, and platelets help the blood clot [3].
A key instrument in the blood banking workflow is a
centrifuge. Centrifuges separate whole blood into red blood
cells, plasma and platelets.
This note presents possible methods for the preparation
of blood components and illustrates general guidelines for
the different protocols in blood component production.
In addition, it provides a troubleshooting guide for the
improvement of blood product yields as well as gives
guidance on the correct use of centrifuge accessories and
explains the Thermo Scientific™ Accumulated Centrifugal
Effect (ACE™) integrator function.
Page 2
Blood processing
Blood component preparation is performed to separate
blood components from whole blood. Red blood cells
(RBCs) and plasma are produced by a single-step hard
spin centrifugation. Platelet concentrates (PLTs), RBCs and
plasma are prepared by a two-step centrifugation. The two
main procedures for preparing PLTs are the platelet-rich
plasma (PRP) method and the buffy-coat method [4].
Platelets from whole blood (buffy-coat method)
In European countries, platelets preparation is done by the
buffy-coat (BC) method [5].
Platelets from platelet-rich plasma (PRP) method
Mainly in the United States, platelets are prepared from
whole blood with the PRP method [6].
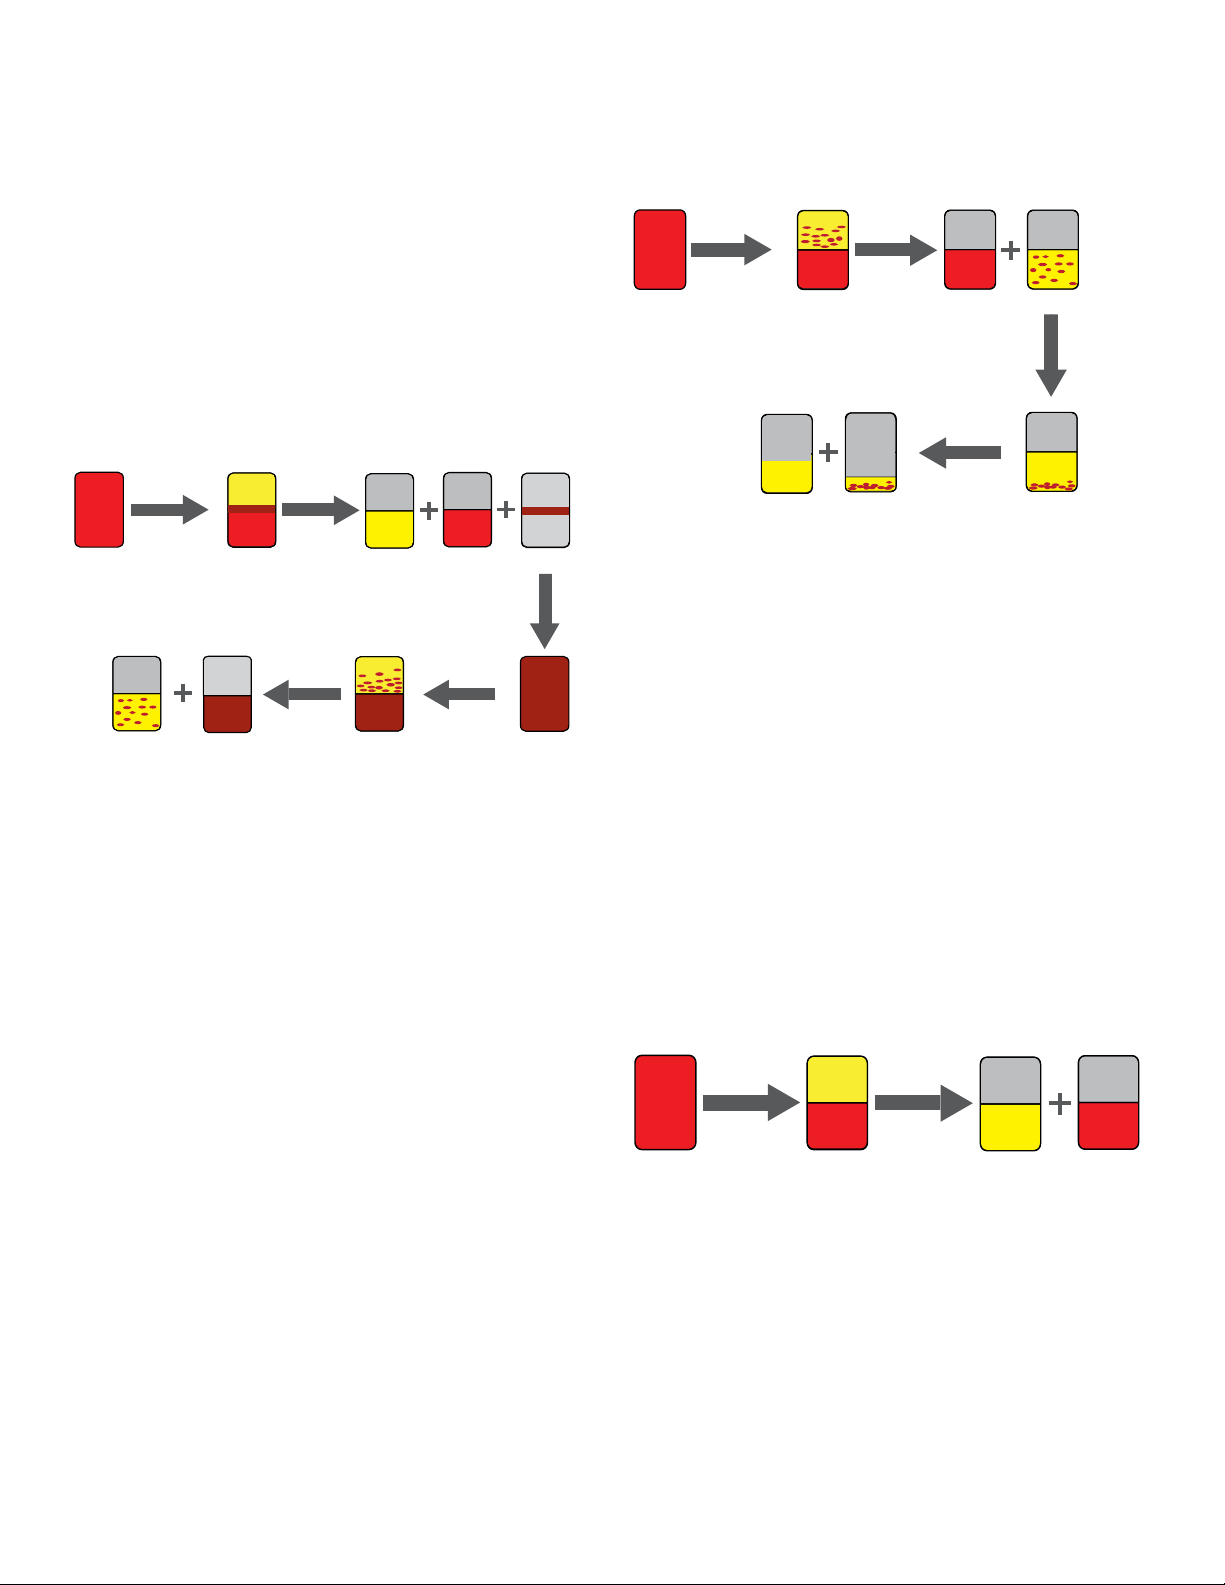
Centrifugation
First spin
WB
Separation
RBC
Centrifugation
Second spin
Separation
PRP
Centrifugation
First spin
WB
PLTs Waste BC pool
Figure 1. Whole blood processing with the BC method.
Separation
Separation
Plasma RBC BC
Pooling of
4–6 units
Centrifugation
Second spin
The first centrifugation step (hard-spin) is used initially
to separate whole blood into three components: RBCs,
plasma and a BC layer. The components are extracted into
a “top-and-bottom” or a “top-top” blood bag collection set,
in which plasma and RBCs are transferred to storage bags
and the BC layer is left in the primary collection bag. This
BC contains PLTs, white blood cells (WBCs), plasma, and
some RBCs.
Subsequently, pools of 4–6 ABO-matched BCs are made
and either a plasma unit or a platelet additive solution
is added.
PLTsPPP
Figure 2. Whole blood processing with the PRP method.
PLTs
The first centrifugation step (soft spin) results in RBCs and
PRP. PRP is extracted with or without leukofiltration into a
so-called “satellite blood bag” and the RBCs are left in the
primary bag.
The PRP contains platelets, plasma and WBCs. The
secondary hard-spin centrifugation produces platelet-poor
plasma (PPP) and a platelet pellet. The PPP is extracted
into a satellite bag and the platelet pellet is re-suspended
in plasma.
Red blood cells/plasma separation
After a hard spin leukoreduced whole blood is separated
into its two main components: RBCs and plasma. Plasma
is extracted into a satellite bag while RBC is left in the
primary bag.
Centrifugation
First spin
WB
Separation
Plasma RBC
The second centrifugation step (soft step) is used
to produce PLTs which are then extracted with or
without leukofiltration.
Figure 3. Blood processing with RBC/plasma separation.
Page 3
Guidelines for blood component production
Blood separation is the partial separation of particles
from a liquid by gravity through sedimentation. The rate
of sedimentation is a function of liquid viscosity, particle
density and particle size, concentration of the solution
and the force of gravity. To speed up sedimentation, a
centrifuge is used.
Centrifugation conditions for blood component preparation
are shown in Tables 1, 2 and 3. These guidelines are based
on technical manuals and were validated in the Thermo
Scientific™ Sorvall™ BP 8 and 16 and Thermo Scientific™
Cryofuge™ 8 and 16 blood banking centrifuges [6], [7],
[8], [9]. Table 4 shows a troubleshooting guide to improve
blood component production. An adjustment in speed
by 200 rpm increments or time by 30 seconds should be
Since there is a relationship between the physical
properties of blood components and the physical principles
done. The protocol must be adjusted until the desired yield
of products is obtained.
of centrifugation that impact separation, the optimal
centrifugation for blood component production is achieved
by determination of the appropriate centrifuge parameters
such as time or ACE with a Thermo Scientific centrifuge,
speed and acceleration and deceleration profiles.
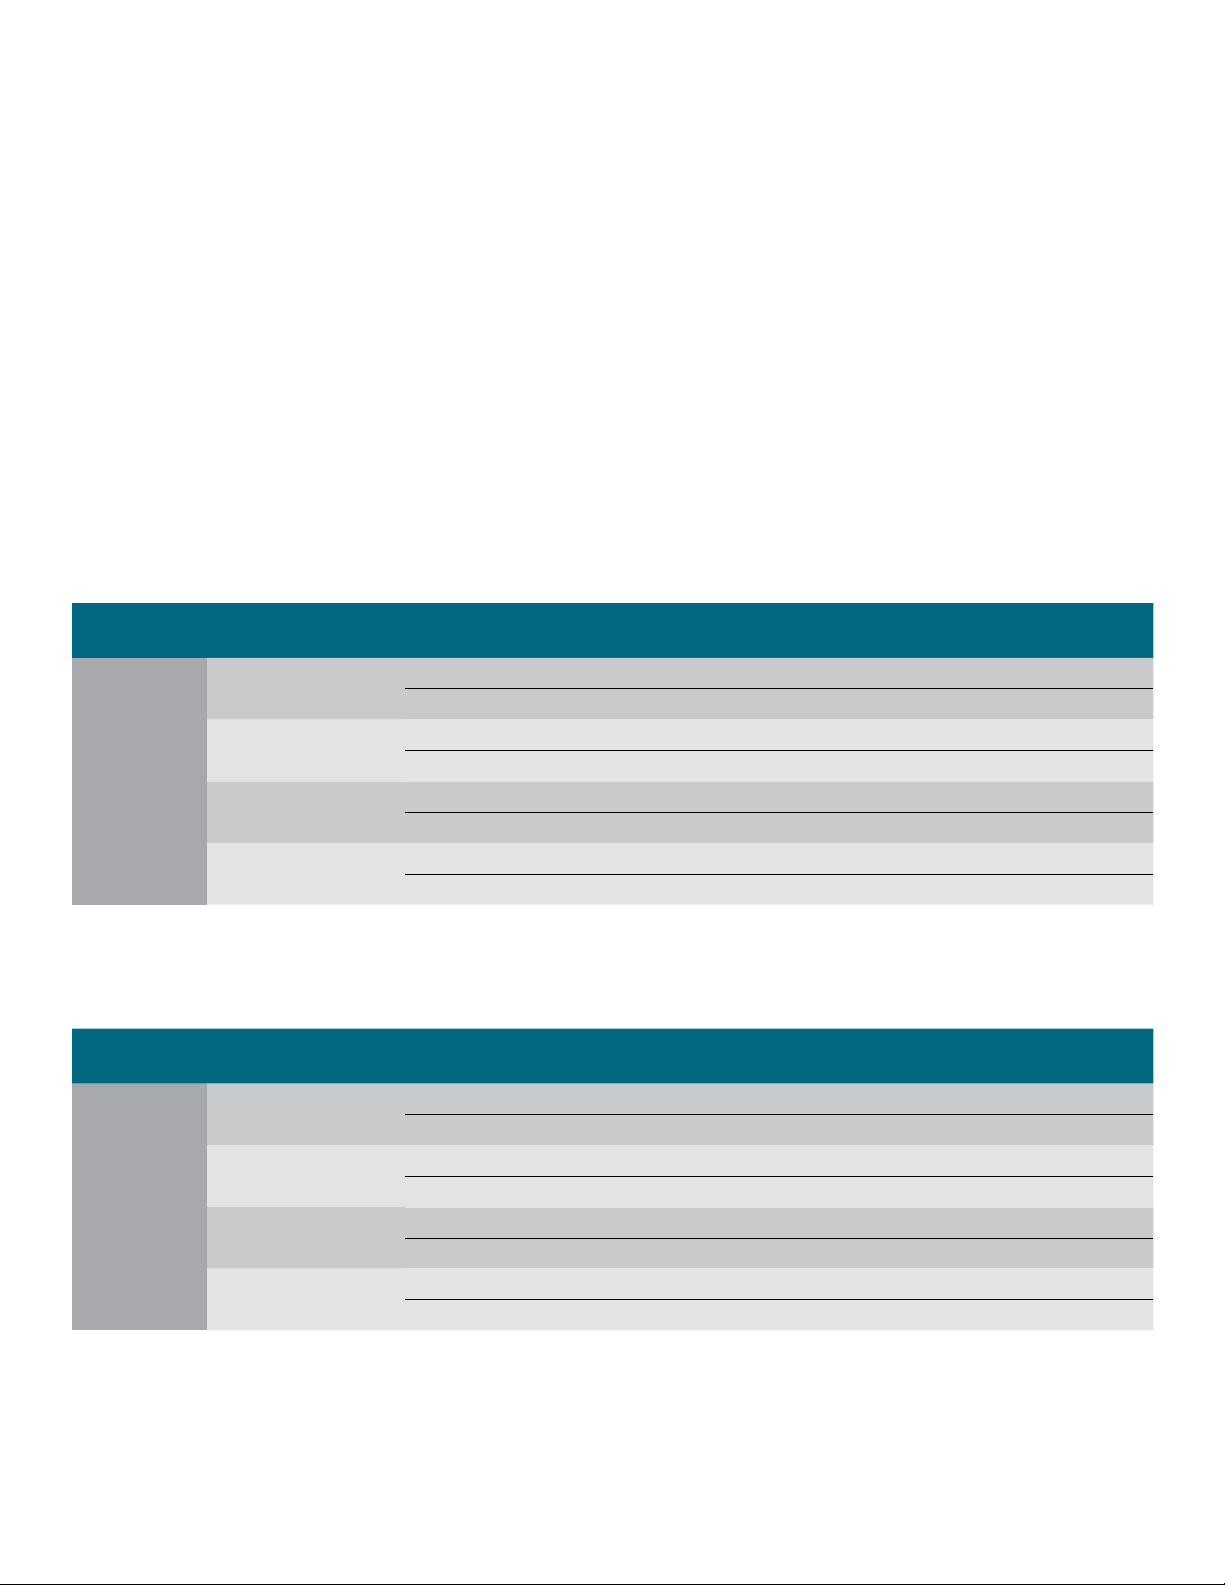
Table 1. Centrifuge conditions for whole blood processing with the buffy-coat method using the Sorvall BP 8 and 16 and Cryofuge 8 and 16
centrifuges and 500 mL blood bag systems.
Thermo Scientific
Method
Platelets
from WBC
(Buffy-coat
method)
Note: The given values are only a guideline; user should test different values to find optimized centrifuge conditions.
* At star t.
rotor Spin Speed (rpm)
HAEMAFlex™ 6
HAEMAFlex 8
HAEMAFlex 12
HAEMAFlex 16
1st spin: 3744 10:00 22 9 4
2nd spin: 1382 9:30 22 3 2
1st spin: 3393 10:00 22 9 4
2nd spin: 1294 9:30 22 3 2
1st spin: 3347 10:00 22 9 4
2nd spin: 1282 9:30 22 3 2
1st spin: 3201 10:00 22 9 4
2nd spin: 1242 9:30 22 3 2
Time*
(min:sec)
Temperature
(°C)
Acceleration
profile
Deceleration
profile
Table 2: Centrifuge conditions for whole blood processing with the PRP method using the Sorvall BP 8 and 16 and Cr yofuge 8 and 16
centrifuges and 500 mL blood bag systems.
Thermo Scientific
Method
Platelets
from PRP
Note: The given values are only a guideline; user should test different values to find optimized centrifuge conditions.
rotor Spin Speed (rpm) ACE
HAEMAFlex 6
HAEMAFlex 8
HAEMAFlex 12
HAEMAFlex 16
1st spin: 3025 1.70E+07 22 9 7
2nd spin: 3832 5.5 E+07 22 9 7
1st spin: 2742 1.70E+07 22 9 7
2nd spin: 3474 5.5 E+07 22 9 7
1st spin: 2704 1.70E+07 22 9 7
2nd spin: 3427 5.5 E+07 22 9 7
1st spin: 2587 1.70E+07 22 9 7
2nd spin: 3278 5.5 E+07 22 9 7
Temperature
(°C)
Acceleration
profile
Deceleration
profile
Page 4

Table 3. Centrifuge conditions for whole blood processing with the PRP method using the Sorvall BP 8 and 16 and Cr yofuge 8 and 16
centrifuges and 500 mL blood bag systems.
Method
Red blood
cell/
plasma
separation
Thermo Scientific
rotor Spin Speed (rpm)
HAEMAFlex 6 1st spin: 3744 10:00 22 9 4
HAEMAFlex 8 1st spin: 3393 10:00 22 9 4
HAEMAFlex 12 1st spin: 3347 10:00 22 9 4
Time*
(min:sec)
Temperature
(°C)
Acceleration
profile
Deceleration
profile
HAEMAFlex 16 1st spin: 3201 10:00 22 9 4
Note: The given values are only a guideline; user should test different values to find optimized centrifuge conditions.
* At star t.
Table 4. Troubleshooting guide to improve blood product yields.
1st spin
Problem/observation
finding 1st spin action
Platelet pellet appears firm, well packed OK
Platelet concentrate has aggregates present OK
Platelet pellet appears soft, loosely packed OK
Plasma and red cell volume acceptable OK
Plasma volume high and
red cell volume low
Too hard Decrease time or speed OK Keep speed and time as is
Keep speed and time
as is
Keep speed and time
as is
Keep speed and time
as is
Keep speed and time
as is
2nd spin
finding 2nd spin action
OK Keep speed and time as is
Too hard Decrease time or speed
Too soft Increase time or speed
OK Keep speed and time as is
Plasma volume low Too soft Increase time or speed OK Keep speed and time as is
Platelet yield and plasma volume acceptable OK
Keep speed and time
as is
OK Keep speed and time as is
Platelet yield is low and pellet appears firm Too hard Decrease time or speed OK Keep speed and time as is
Platelet yield is low and pellet appears soft Too hard Decrease time or speed Too soft Increase time or speed
Platelet yield acceptable
and plasma volume low
No distinct red cell and plasma line.
‘Bloody interface’
Too soft Increase time or speed OK Keep speed and time as is
Too hard Decrease slow stop rate OK Keep slow stop rate same
Page 5

ACE integrator function
Results without the ACE integrator function
Obtaining a consistent product requires understanding
and controlling process variables. Variations in rotor load,
fluctuations in voltage or slight mechanical differences can
affect how quickly centrifuges reach set speed. The ACE
integrator function calculates the effect of speed in relation
to time and adjusts run duration to account for differences
in acceleration, thereby improving separation consistency
and run reproducibility—run after run, from centrifuge
to centrifuge [10].
2 bags
Speed
2,800 rpm
Figure 4. In a typical first centrifugation step, a two-bag rotor load
attains set speed faster than a six-bag load. Since both loads will time
out at the set time of 3:30 minutes, different total accumulated g-forces
are achieved during the run. By using the ACE integrator function, the time
for 2 bags would be changed to 3:00 minutes to obtain the same overall
accumulated g-force for both loads.
Results with the ACE integrator function
Run prole for 2 bags
Run prole for 6 bags
Speed
6 bags
3:30 min
Time out ACE value
Time out ACE value
Time out
Time
The ACE value is not a calculation as it depends on the
acceleration conditions and the deceleration rate. It can be
determined by using a stopwatch:
1. Determine the optimal time and speed for you application.
2. Choose a high ACE value.
3. Set your speed at the optimal speed.
4. Set your acceleration/deceleration setting.
5. Start the centrifuge.
6. As the stopwatch reaches the optimal run time, write down
the ACE value.
Guidelines for centrifuge loading
Blood bags that are not properly loaded could possibly
result in leakage or breakage of blood bag systems.
Leakage and/or breakage can cause contamination.
The following are instructions for properly preparing blood
collection systems for centrifugation:
1. Attach all buckets to the rotor and ensure all buckets move
freely. All buckets must be in place before run. Choose a
centrifugation setting that will achieve the optimal yield for
your procedure; See Tables 1–4.
2. When possible, use the ACE integrator function to
standardize centrifugation from run to run for better
reproducibility and consistency; See section IV.
3. Gently mix the blood bag by inversion.
4. Blood bag systems should be packed following the
blood bag manufacturer´s instructions [11], [12], [13].
2,800 rpm
Time out ACE value
at 0 rpm
Time (in ACE mode)
Figure 5. With an ACE value and speed set at the start of a run, times
were adjusted to achieve the same overall g-force regardless of the
rotor load.
5. Blood bag systems must be placed into liners. Thermo
Scientific liners and liner stands are used for simplifying
the liner loading and unloading process. It enables
easier transportation and stabilization of blood bags in
an effort to improve the quality of the blood separation.
Spacers should be used to compensate for low volume
blood bags.
6. Counterbalance all liners and use weights as necessary.
7. Place liners into buckets.
Page 6

8. Make sure all tubing is secured inside the centrifuge
Tubing outside of the liner
Syphoning of blood.
Risk of centrifuge cycle failure
Low volume, bags
without compensation
Red cell traps
Blood bag systems only in one cavity
bucket. During loading, the tubing must be put between
the bags with the bag tabs remaining upright to prevent
them from becoming tangled around the rotor body
during centrifugation.
Correct loading. No need for spacers or balance bags
Figure 6. Incorrect loading of tubing not properly secured.
9. Blood bags with a low volume must be compensated by
using spacers or balance bags. Without compensation,
low volume blood bags could result in red cell traps.
As balancing bags could easily break after several
centrifugation runs, select spacers for use over a longer
time period.
Figure 7. Incorrect loading of bags without compensation.
Correct loading. Low volume blood bag systems, spacers
Figure 8. Correct loading.
or balance bags are needed
10. Prior to centrifugation all liners should be loaded with
blood bag systems. Never run empty liners. If there is
only one blood bag system left, then the empty cavity of
the liner should be filled with water filled bags.
Incorrect loading.
Correct loading.
Blood bag systems in each cavity
Running empty liners
is not permitted
Correct loading.
Water filled bag is used instead
Figure 9. Incorrect loading of only one cavity loaded and correct
loading of full liners.
Page 7

Summary
This application note presented possible methods for the
preparation of blood components and showed general
guidelines for different protocols for blood component
production. In addition, it provided a troubleshooting
guide for the improvement of blood product yields. It
also provided guidance on the correct use of centrifuge
accessories and explains the ACE integrator function.
References
1. American Red Cross [online] (2016). http://www.redcross.org/blood.
2. Higgins, Vl, Leukocyte-reduced blood components: patient benefits and practical
applications, May; 23 (4); 659 – 67 (1996).
3. Rodney A. Rhoades, David R. Bell Medical Physiology, Principles for Clinical Medicine,
4th edition, (2013).
4. Hans Gulliksson, Platelets from platelet-rich-plasma versus buffy-coat-derived platelets:
what is the difference?; Rev Bras Hematol Hemoter, 34 (2); 76 – 77 (2012).
5. Christopher D. Hillyer, Blood Banking and Transfusion Medicine: Basic Principles &
Practice, 2nd edition, (2007).
6. AABB. [Online] (21.01.2016). https://www.aabb.org/tm/coi/Documents/coi1113.pdf.
7. Guide to the preparation, use and quality assurance of blood components, European
committee (partial agreement) on blood transfusion, 16th Edition (2010).
8. Thermo Scientific Sorvall BP 8/16 and Cryofuge blood banking centrifuges, brochure,
14.02.2016.
9. Validation was done at Bonfils Blood Center, 717 Yosemite Street, Denver, CO 80230.
10. Smart Note: How can blood banks eliminate potential variables to ensure consistent
product yield and reproducibility?, Thermo Fisher Scientific, brochure 01.02.2017.
11. Fresenius. [Online] (21.01.2016). https://www.fresenius.de/689.htm.
12. Haemonetics. [Online] (21.01.2016). http://wbt.haemonetics.com/en/Products.aspx.
13. Macopharma. [Online] (21.01.2016).
http://www.macopharma.com/category/transfusion/blood-processing/blood-bags/.
Find out more at
thermofisher.com/bloodbankcentrifuges
This product is intended for General Laboratory Use. It is the customer’s responsibility to ensure that the performance of
the product is suitable for customer s specific use or application. © 2017, 2020 Thermo Fisher Scienti fic Inc. All rights reserved. All
trademarks are the property of Thermo Fisher Scientific and its subsidiaries unless otherwise specified. ANCFGBLOODBANK 0420
 Loading...