

Thermofilm HEATSTRIP CROSSRAY+ TCS2FL, HEATSTRIP CROSSRAY+ TCS2PL, HEATSTRIP CROSSRAY+ TCS4FL, HEATSTRIP CROSSRAY+ TCS4PL Operator's Manual
OPERATOR’S MANUAL
TCS2FL
TCS2PL
TCS4FL
Thermolm Australia Pty Ltd
17 Johnston Court, Dandenong South,
Victoria 3175, Australia
Telephone: (03) 9562 3455
Email: info@thermolm.com.au
TCS4PL
CONTACT INFORMATION
For spare parts order or service warranty and Natural
Gas Conversion queries call (03) 9562 3455 or email
info@thermolm.com.au Your purchase receipt is
required for all warranty claims.
Retain manual for future reference.
MANUAL # P80196010A - DATE:2017/8/17
1

TABLE OF CONTENTS
HOSE AND REGULATOR SAFETY
GAS SAFETY / TECHNICAL DATA
ASSEMBLY
OPERATING PROCEDURE
COOKING TIPS
FAULT FINDING
CARE & MAINTENANCE
PARTS LIST / DIAGRAM
WARRANTY
CONNECTING NATURAL GAS
GAS INSTALLATION CODES
Barbecues must be used in accordance with the installation requirements of your gas supply authority, or the appropriate installation code issued by Standards Australia
AS/NZ 5601.
Barbecues for use with bottled gas are labelled ‘propane
gas’ or ‘Universal LPG’.
Barbecues for use with natural gas are labelled ‘natural
gas’ and must be installed by an licensed plumber/gas
tter. Check the gas type sticker attached to the barbecue.
2 - 7
8 - 13
14
15
16
17 -19
20 - 25
26
27
The regulator and hose assembly supplied with the barbe-
cue are suitable for propane.
A gas regulator adjusted to have an outlet pressure of
2.75kPA is supplied for connection to the Propane gas
cylinder. The pressure regulator and hose assembly
supplied with the barbecue must be used. Replacement
pressure regulators and hose assemblies must be those
specied by the barbecue manufacturer.
When connecting the hose and regulator assembly to the
gas cylinder, take care to avoid unnecessary twisting of the
exible hose. Also, take care to avoid a loose connection
with the gas cylinder. After the assembly has been secured,
turn on the gas and check for leaks by brushing a soap and
water solutio n over all visibl e and accessible gas line
connections. Include checking those connections which
were made by your supplier. The presence of bubbles will
indicate a gas leak. Refer to page 5. If you are unable to
correct the leak by tightening the connections, turn off the
gas and contact the supplier immediately.
Always ensure the barbecue is kept away from ammable
materials and the gas cylinder clear of any heat source.
When changing over from an empty gas cylinder to a full
one make sure this procedure is carried out in a ame free
atmosphere.
Inspect the gas hose assembly when exchanging the gas
cylinder, or at least once a year, whichever is more frequent.
If the O-Ring or PVC hose is cracked, cut, abraded or
damaged in any way, the appliance must not be operated.
The complete assembly must be replaced if damaged and
when statutory conditions require it. Contact your place of
purchase if uncertain.
LOCATION OF YOUR BARBECUE
CLEARANCES
Minimum Clearances from combustible materials must be:
Rear - 450mm Sides - 250mm Top - 1000mm
Opening at the rear and sides of the appliance provide air
for combustion and must not be obstructed.
CLEARANCES
Height
- Hood closed: 1258mm; Hood open: 1500mm
Width
- TCS4PL: 1700mm
- TCS2PL: 1410mm
Depth
- Hood close: 542mm; Hood open: 696mm
DO NOT use your barbecue in garages, porches, sheds,
breezeways, or other enclosed areas. Your barbecue is to
be used OUTDOORS. The barbecue is not intended to be
installed in or on recreational vehicles and/or boats.
LOCATION OF YOUR BARBECUE under any surface that
will burn. Do not obstruct the ow of combustion and ventilation air around the barbecue housing. Refer to page 6.
2

PROTECT CHILDRENWARNING
Read carefully before assembling and operating your •
barbecue And retain the manual for future reference.
Failure to comply with these instructions could result •
in a re or explosion which could cause serious bodily
injury, death or property damage.
Accessible parts may be very hot.•
Keep young children away.•
Any modications of this barbecue may be dangerous.•
Do not move this barbecue during use.•
Turn off gas supply at the gas cylinder after use.•
Parts sealed by the manufacturer or their agent must •
not be manipulated by the user. This barbecue is only
to be used outdoors.
This appliance shall not be used indoors.•
Do not store a spare gas cylinder under or near this •
barbecue.
Never operate this barbecue without a regulator.•
If you smell gas•
Shut off ga s to the barb ecue at its s ource, if 1.
possible.
Extinguish any open ame.2.
Open hood/oven door.3.
if odour continues immediately call your gas 4.
supplier or re department.
Do not con nect you r ba rbecue to a g as cyl inder •
exceeding 9Kg capacity.
Never connect an unregulated gas cylinder to your •
barbecue.
If storing the barbecue indoors. The gas cylinder must •
be removed.
Store gas cylinder outdoors in a well ventilated area. •
Refer to Page 6 for gas cylinder safety.
Do not spray aerosols in the vicinity of this appliance •
while it is in poeration.
Do not use or store ammable materials in or near this •
appliance.
Do not place articles on or against this appliance.•
Do not modify this appliance.•
Keep children away from barbecue during use and until
barbecue has cooled after you have nished. Do not allow
children to operate barbecue or to swing on handle.
Always ensure that no sporting or physical activities are
carried out in close proximity to the barbecue during use
and while still hot.
GAS CYLINDER USE & SAFETY
This is a low pressure barbecue and must only be used with
the hose and regulator supplied. Your barbecue is designed
for use with 4.5Kg or 9Kg propane gas cylinders certied to
AS 2469.
DO NOT CONNECT YOUR BARBECUE TO A GAS
CY LINDER LESS TH AN OR EXC EEDING THIS
CAPACITY.
The gas cylinder should be lled by a reputable gas supplier
and visually inspected and re-qualied at each lling.
Always keep cylinder in an upright position. Always close
the cylinder valve when the barbecue is not in use.
Do not subject gas cylinder to excessive heat.
NEVER STORE YOUR GAS CYLINDER INDOORS.
If you store your barbecue indoors, ALWAYS
disconnect the gas cylinder first and store the
cylinder safely outside.
Cylinders must be stored outdoors in a well ventilated
area out of reach of children, and must not be stored in a
building, garage or any other enclosed area.
3
Certication Number
IMPORTANT:
AGA Certicate: AGA 8441 G
CONNECTIONS
Inlet thread: 5/8 - 18UNF (3/8 SAE)
Gas cylinder: POL
INPUTS
Gas type: ULPG
Gas pressure: 2.75kpa
TCS4PL/TCS2PL Jet mm(Hi) Input Mj/h
Main Burner 1.02 13
Gas type: Natural Gas
Gas pressure: 1.0kpa
TCS4PN/TCS2PN Jet mm(Hi) Input Mj/h
Main Burner 1.77 12.5
NOTE: Specificatio ns can be found on the da ta l abe l
located inside the appliance cabinet door.
Do not store or use petrol or other ammable liquids in •
the vicinity of this or any other appliance.
Keep the gas hose away from hot surfaces and protect •
from dripping grease. Avoid unnecessary twisting of
hose. Visually inspect the hose prior to each use for
cracks, excessive wear or other damage. Replace the
hose if necessary.
For storage and cylinder exchange, disconnect hose •
at the cylinder only - Do not disconnect hose from the
appliance.
Nev e r le an ov e r co okin g su r fac e wh e n l i g hti n g •
barbecue.
Ne ver alter or mod ify the re gula tor or gas sup ply •
assembly.
Ensure the barbecue is set up on a level and stable •
surface.
Do not move the barbecue while in use or when hot. •
Remove the drip tray before moving.
DANGER - IF YOU SMELL OR HEAR
THE HISS OF ESCAPING GAS FROM
THE GAS CYLINDER:
Keep clear of the gas cylinder.•
Turn all controls on the barbecue to OFF.•
Extinguish any open ame.•
If odour continues, immediately call you gas •
supplier or re department.
4
ALWAYS CHECK FOR GAS LEAKS
EACH TIME YOU USE YOUR BARBECUE.
You should follow this procedure after any of the following:
Not having used the barbecue for an extended period of time,•
Initial assembly of barbecue,•
Any disconnection and reconnection of hose assembly,•
Changing gas cylinder,•
Upon re-connecting gas cylinder after it has been disconnected for storage.•
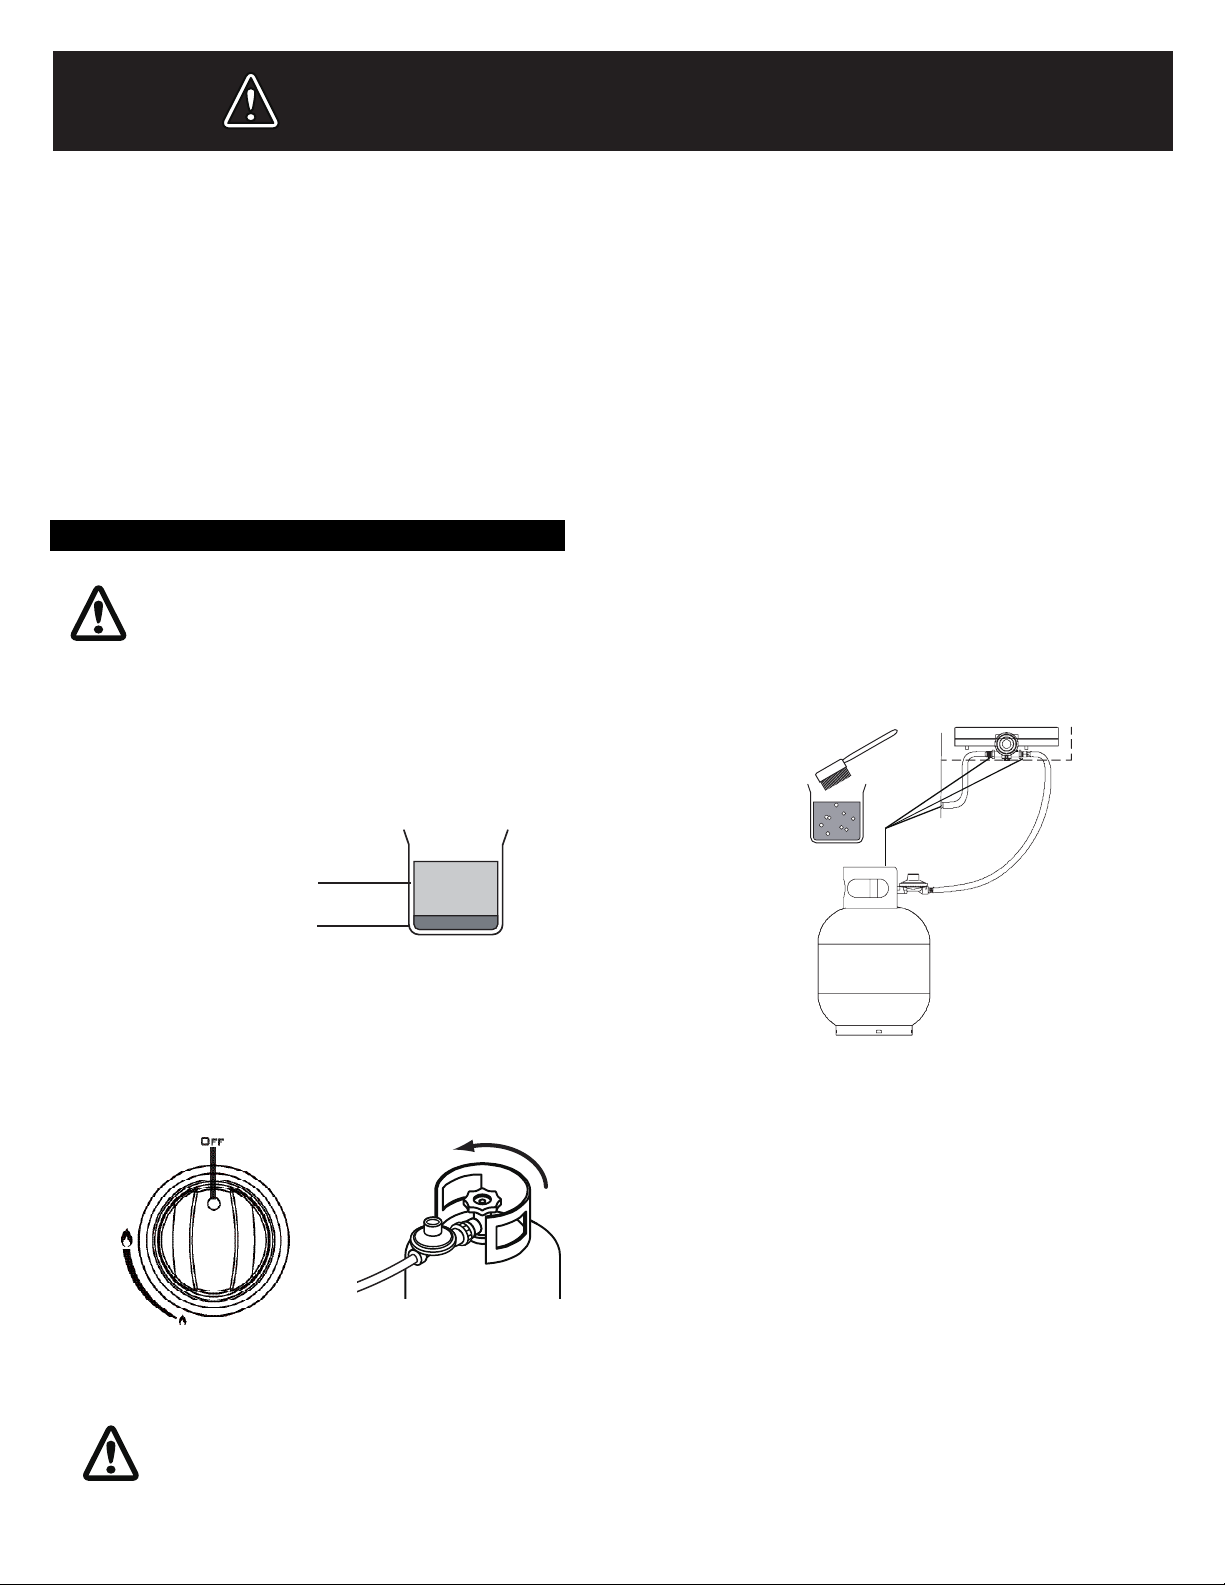
CHECKING FOR GAS LEAKS
CHECKING FOR GAS LEAKS
NEVER CHECK FOR LEAKS WITH
A FLAME.
Make liquid detergent solution by mixing one (1) part 1.
liquid detergent and four (4) parts water.
4 parts water
1 part liquid
detergent
Turn burner control knob(s) to "OFF", then turn on gas 2.
at source.
Open
3. Apply the liquid detergent solution to all visible and accessible gas connections, including the connection to the
gas cylinder. Bubbles will appear in the liquid detergent
solution if connections are not properly sealed. Tighten or
rectify as necessary.
Note:
This barbecue is approved for use on Natural gas but
must be properly converted from the factory built LP.
Contact your service agent for details.
Conversion and installation must be by a licensed
plumber or gas tter and comply with local codes
IF YOU HAVE A GAS LEAK YOU CANNOT
RECTIFY, TURN OFF THE GAS AT THE
SO UR CE . CO N TA C T T H E S E R V IC E
AGENT
5
OUTDOOR AREAS SAFE APPLIANCE LOCATIONS
THIS APPLIANCE SHALL ONLY BE USED IN AN ABOVE GROUND OPEN AIR SITUATION WITH NATURAL VENTILATION, WITHOUT STAGNANT AREAS, WHERE GAS LEAKAGE AND PRODUCTS OF COMBUSTION ARE RAPIDLY DISPERSED BY WIND AND
NATURAL CONVECTION.
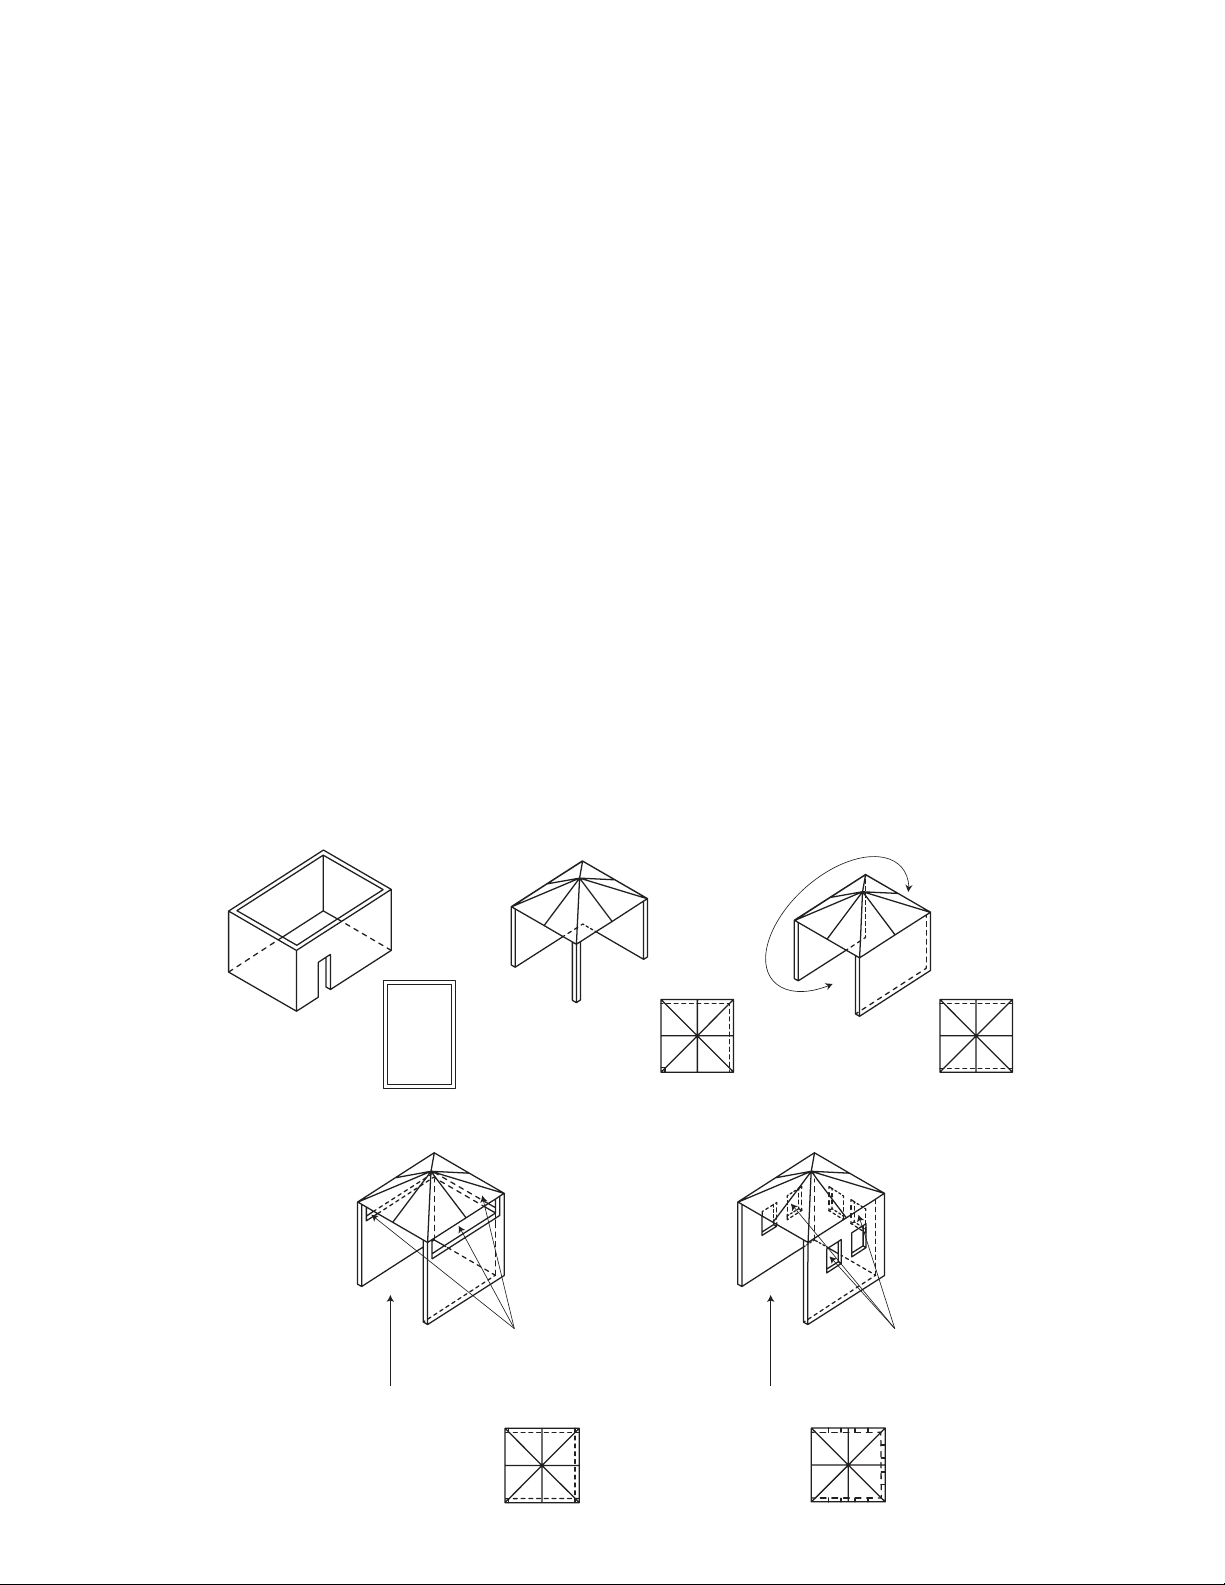
ANY ENCLOSURE IN WHICH THE APPLIANCE IS USED SHALL COMPLY WITH ONE OF THE FOLLOWING:
AN ENCLOSURE WITH •
WALLS ON ALL SIDES, BUT
AT LEAST ONE PERMA-
NENT OPENING AT GROUND
LEVEL AND NO OVERHEAD
COVER
WITHIN A PARTIAL• ENCLOSURE THAT INCLUDES AN
OVERHEAD COVER AND NO
MORE THAN TWO WALLS
WITHIN A PARTIAL ENCLO-•
SURE THAT INCLUDES AN
OVERHEAD COVER AND
MORE THAN TWO WALLS,
THE FOLLOWING SHALL APPLY:
The following diagrams are examples of outdoor areas.
These same principles apply to canopy or shaded cloth areas.
(i) AT LEAST 25% OF THE
TOTAL WALL AREA IS
COMPLETELY OPEN: AND
(ii) AT LEAST 30% OF THE
REMAINING WALL AREA IS
OPEN AND UNRESTRICTED
IN THE CASE OF BALCO-•
NIES, AT LEAST 20% OF THE
TOTAL OF THE SIDE, BACK
AND FRONT WALL AREAS
SHALL BE AND REMAIN
OPEN AND UNRESTRICTED
DO NOT USE YOUR BARBE-•
CUE IN GARAGES, PORCHES, BREEZEWAYS, SHEDS
OR OTHER ENCLOSED
AREAS.
YOUR BARBECUE IS TO BE
USED OUTDOORS ONLY.
Refer below
THE BARBECUE IS NOT IN-•
TENDED TO BE INSTALLED
IN OR USED ON RECREATIONAL VEHICLES AND/OR
BOATS AND SHOULD NOT
BE PLACED ADJACENT TO
OR UNDER ANY SURFACE
THAT WILL BURN
DO NOT OBSTRUCT THE •
FLOW OF COMBUSTION
AND VENTILATION AIR
AROUND THE BARBECUE
HOUSING WHILST IN USE.
Open side at
least 25% of
total wall area
30% or more in total
of the remaining
wall area is open
and unrestricted
6
Open side at
least 25% of
total wall area
30% or more in total
of the remaining
wall area is open
and unrestricted
ASSEMBLY
GENERAL CHECK BARBECUE FOR ANY DAMAGE
While it is possible for one person to assemble the barbe-
cue, we recommend asking for the assistance of another
person when manoeuvring some of the larger or heavier
pieces.
ASSEMBLY TIPS
Flatten cardboard packagi n g and u s e this a s a 1.
protective work surface to assemble upon.
Some protective coating may need to be removed from 2.
components prior to assembly.
TOOLS YOU WILL NEED
Standard Phillips-head screwdriver.
Adjustable spanner (open end shifter).
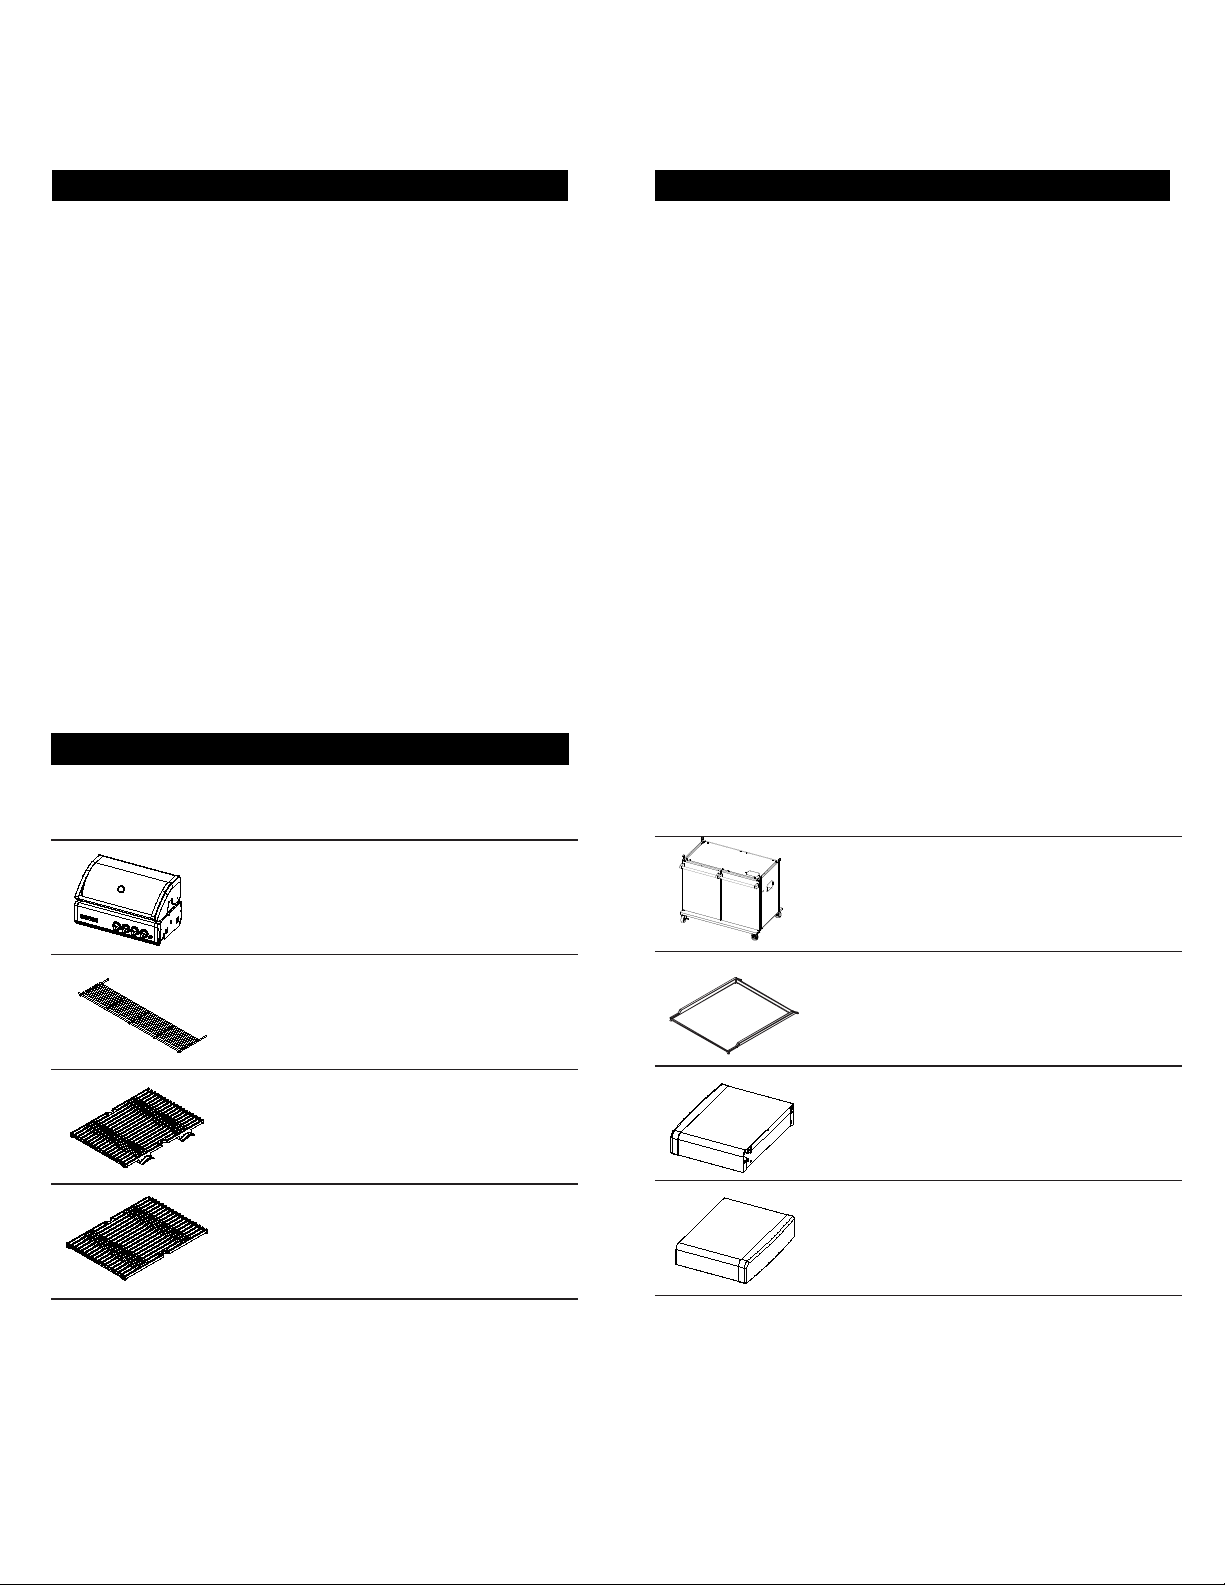
CARTON CONTENTS LIST
CHECK BARBECUE FOR ANY DAMAGE
Before attempting to assemble your barbecue, remove
transit protection and check that all the necessary parts
have been included using the parts list below. Inspect
barbecue and trolley parts as you proceed.
Conta ct your place of purch ase for as sist ance
regarding replacement of any damaged or missing parts.
Supplier contact de tails are on the back cover of the
instruction manual.
Do not assemble or operate a barbecue that appears
damaged.
Check that the barbecue supplied is correct for the
gas type being used. There is a label on the side panel of
the barbecue above the gas connection. Barbecues for u
se w ith g as c ylinders a re l abelled Propane or "Universal
LPG". Barbecues for use with natural gas are labelled
"Natural Gas".
DESCRIPTION QTY
BBQ Body Assembly 1
Warming Rack 2
Cooking Grid 1
Cooking Grid 1
DESCRIPTION QTY
Trolley Assembly 1
Plancha 1
Side Shelf, Left 1
Side Shelf, Right 1
7
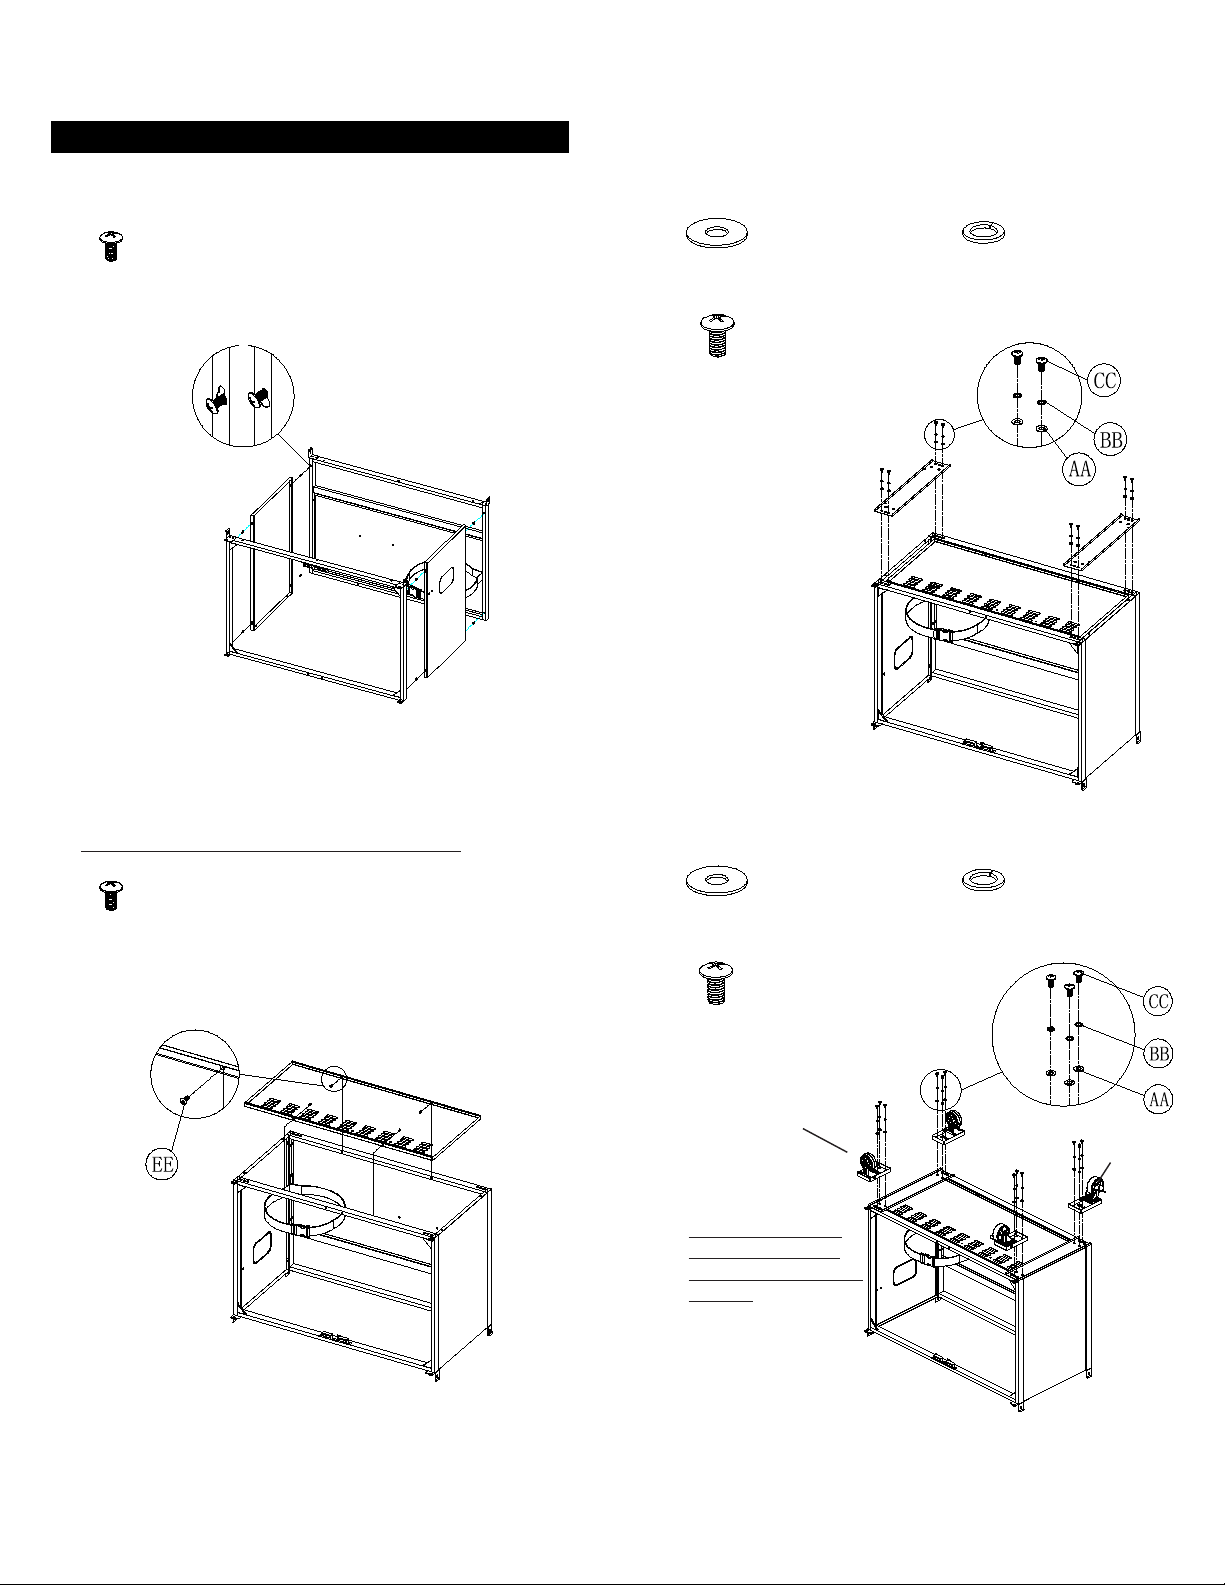
ASSEMBLY
Model: TCS4PL / TCS2PL
1. Assemble the Trolley Side Panels 3. Attach the Caster Seats
Phillips Head Screw
M4x12
Qty.8
EE
Part # S112M04121
AA
CC
Plain Washer
Qty. 8
Part # S411M06161
Phillips Head Screw
M6X12
Qty. 8
Part # S112M06121
Spring Washer
Qty. 8
BB
Part # S431M06091
2. Assemble the Trolley Bottom Panel 4. Attach the Casters
Note: take the trolley upside down
Phillips Head Screw
M4x12
Qty.4
EE
Part # S112M04121
AA
CC
Note: install each
casters to correct
place, as the Sticker
shown.
LF - Left Front
LR - Left Rear
RF - Right Front
RR - Right Rear
Plain Washer
Qty. 12
Part # S411M06161
Phillips Head Screw
M6X12
Qty. 12
Part # S112M06121
Caster without
Brake
Spring Washer
Qty. 12
BB
Part # S431M06091
Caster with
Brake
8
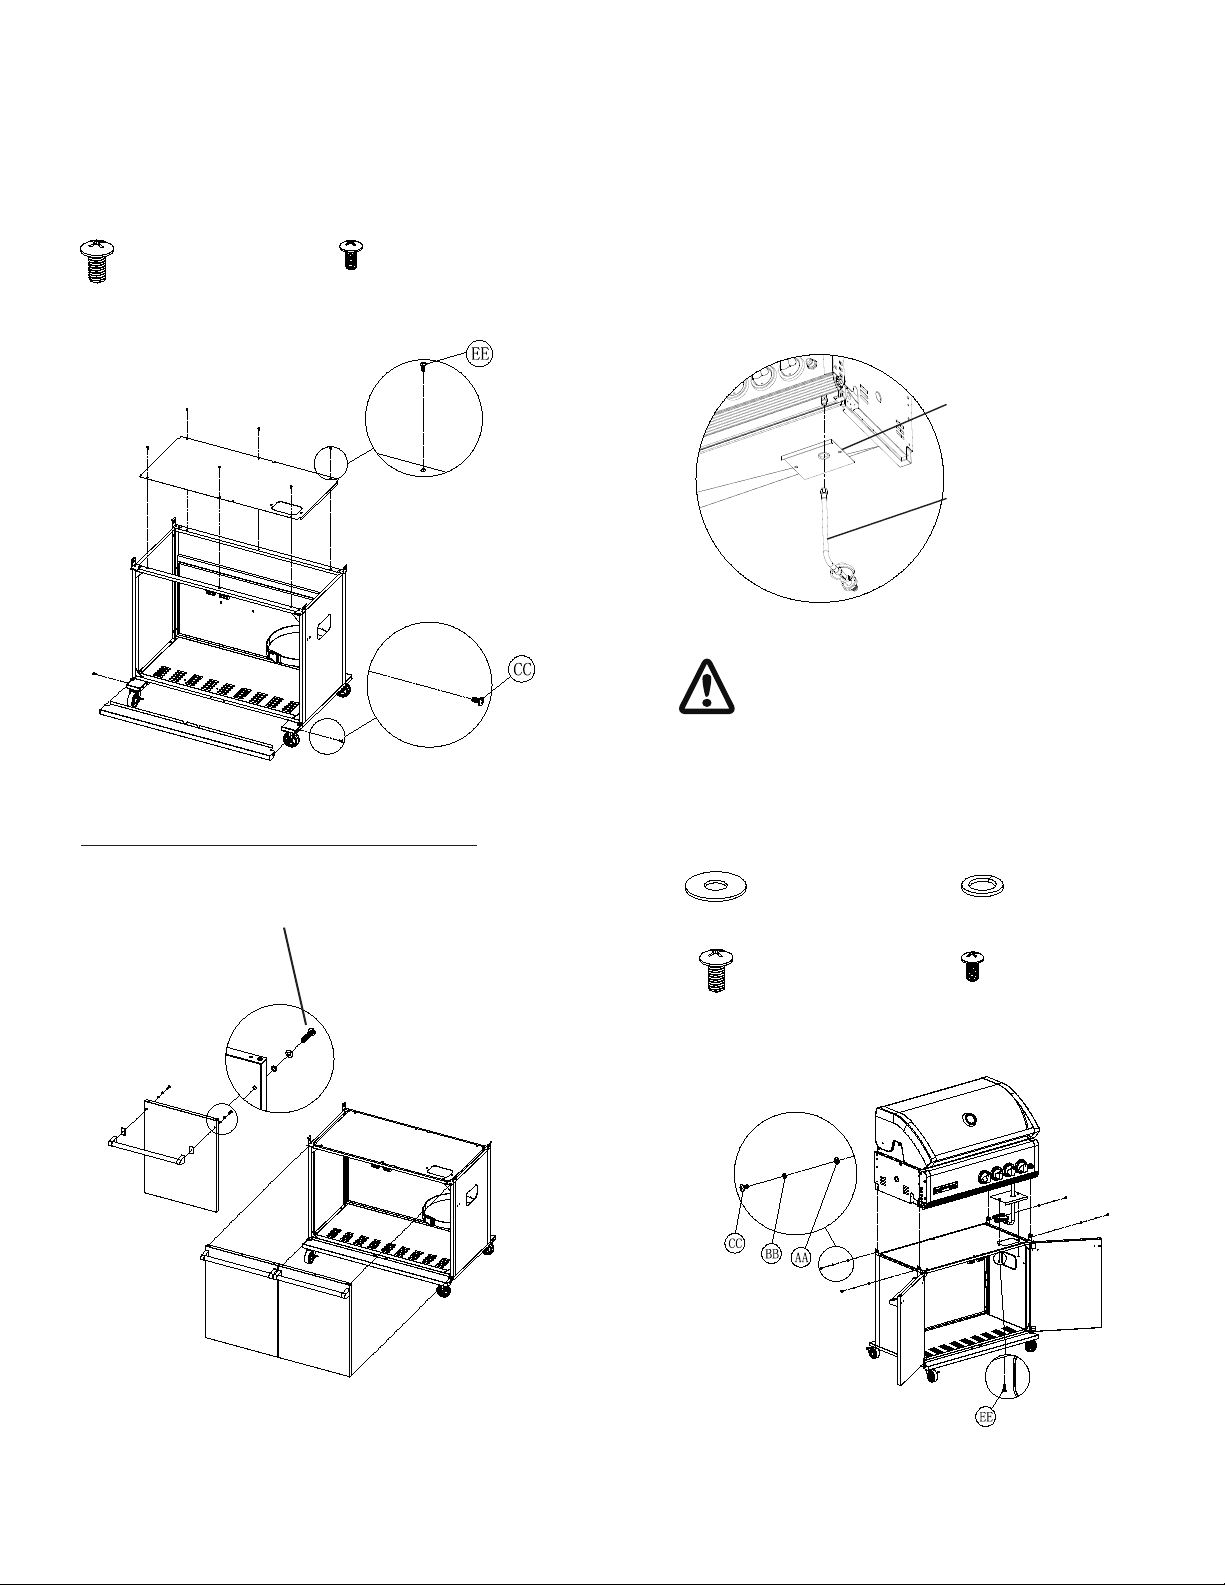
ASSEMBLY
5. Attach Trolley top panel and trim panel 7. Install Cart Insulated Panel
Phillips Head Screw
M4x12
Qty.6(TCS4PL)
EE
4(TCS2PL)
Part # S112M04121
(1) Remove the Regulator with Hose
(2) Install Cart Insulated Panel
(3) Reinstall the Regualtor with Hose
CC
Phillips Head Screw
M6X12
Qty. 2
Part # S112M06121
Waring: After install the Regulator
with hose, please do a leak test
(refer to page 5) at gas manifold
connector.
6. Install the Left and Right Doors 8. Install Grill Head
NOTE: ONE DOOR ONLY FOR MODEL: TCS2PL
Regulator with Hose
Cart Insulated Panel
Pr e-assem b l ed
screws
AA
CC
Plain Washer
Qty. 8
Part # S411M06161
Phillips Head Screw
M6X12
Qty. 8
Part # S112M06121
Spring Washer
Qty. 8
BB
Part # S431M06091
Phillips Head Screw
M4x12
Qty.2
EE
Part # S112M04121
9
 Loading...