


MIDI
RoHS
ErP
COMPLIANT
EXCELLENCE IN HOT WATER TECHNOLOGY
The MIDI Electric Water Heater, suitable
for low or medium demand water
consumption applications.
EXCELLENCE IN HOT WATER TECHNOLOGY
UNIT 3 SANDBEDS TRAD. EST. DEWSBURY ROAD
OSSETT WEST YORKSHIRE WF5 9ND
T 01924 270847 F 01924 271310
SALESTHERMAQ.CO.UK WWW.THERMAQ.CO.UK
Follow us on twitter @ ThermaQ
ThermaQ endeavour to keep the content of this
brochure as up-to-date as possible. We reserve the right
to make changes to all ThermaQ products and services
at anytime. To ensure you have the most current
information please contact ThermaQ directly.
12
T/ELECTRIC/OCTOBER/2016/VER1

Please read and follow the installation and operation
instructions carefully, to ensure the long life and reliable
operation of this appliance.
CONTENTS
Important Safety Instructions ........................................................................................ 3
Product Features
Product Structure
Technical Data
Installation Guideline
Installation Method
System Diagrams
Maintenance
Trouble-Shooting
................................................................................................................................... 4
................................................................................................................................. 4
............................................................................................................................................ 5
.................................................................................................................... 5
.......................................................................................................................... 6
.................................................................................................................................. 7
.............................................................................................................................................10
.............................................................................................................................11
Attention!
This is not a do-it-yourself project. Failure to have this appliance installed by a licensed
plumber and electrician will void all warranties.
Under no circumstances should you attempt to install, repair or disassemble the electric
instantaneous water heater without rst shutting o all power to the unit directly at the
circuit breaker box.
Installation of this product is restricted to indoor locations only by licensed plumbing or
electrical contractors.
Important Safety Instructions
1. The installation must be installed in compliance with National Electrical regulations
and your local electrical and plumbing codes.
2. This appliance must be EARTHED. (If the model is equipped with a plug, it is an
electric leakage protection plug).
3. Install or locate this water heater only in accordance with the provided installation
instructions.
4. Use this water heater only for its intended use as described in this manual.
5. Contact a qualied electrician to have the unit properly installed for the models
which are not equipped with a plug.
6. This appliance is not intended for use by persons (including children) with reduced
physical sensory or mental capabilities, or lack of experience and knowledge, unless
they have been given supervision or instruction concerning use of the appliance by
a person responsible for their safety. Children should be supervised to ensure that
they do not play with the appliance.
7. This appliance MUST be permanently connected to the xed circuit breaker and it
must be installed vertically (excluding the models which are equipped with a plug).
DO NOT install this appliance directly onto timber or in a strong magnetic eld.
8. This appliance MUST NOT be switched on if you think it may be frozen, as this could
result in serious damage to the unit. Wait until you are sure that the ThermaQ Midi
has completely thawed out before you switch it on.
9. Please test the outlet hot water temperature with your hand to make sure it is
suitable for showering to avoid possible scalding or injury.
10. Before connecting pipes to the water heater outlet and inlet hoses, it is extremely
important to FLUSH the pipes to wash away all plumbing waste or residue that
could be detrimental or damaging to the unit.
11. If there is damage to the wiring, you must contact a qualied electrician to replace
it with dedicated wire from our authorized dealers.
12. A check valve is required to be installed at the water inlet.
13. The water relief valve should work periodically to remove calcium carbonate
deposits.
14. The drain-pipe which is connected to the water relief valve should be installed
facing vertically downwards in a frostless environment.
15. The spray head must be descaled regularly.
2
Excellence in Hot Water Technology.
ThermaQ Specification Hotline 01924 270847
3
Product Features
Power
Indicator
e
SPECIFICATION
The most universally applicable unit in the electric water heater range for low and medium
volumes of water, the ThermaQ Midi immediately produces good quality hot water at mains
pressure whenever you need it. Available in both over and under sink varieties suitable for
any water system setup, the Midi can be sited almost anywhere. The small dimensions and
low power consumption ensure the Midi will be leading the ThermaQ revolution in electric
water heating.
The unit has the following features:
1. High strength ABS splash-proof casing.
2. Streamlined, aesthetic outer body for unobtrusive siting.
3. Built in immersion heater with carefully selected kW ratings mean quick
reheats but easy installation that does not require an electrician.
4. Replaceable magnesium anode.
5. Compact square design makes for easy siting above or below the sink.
6. Fully incorporated safety controls.
7. High value product insulation gives ‘B’ ErP banding for all of the Midi range.
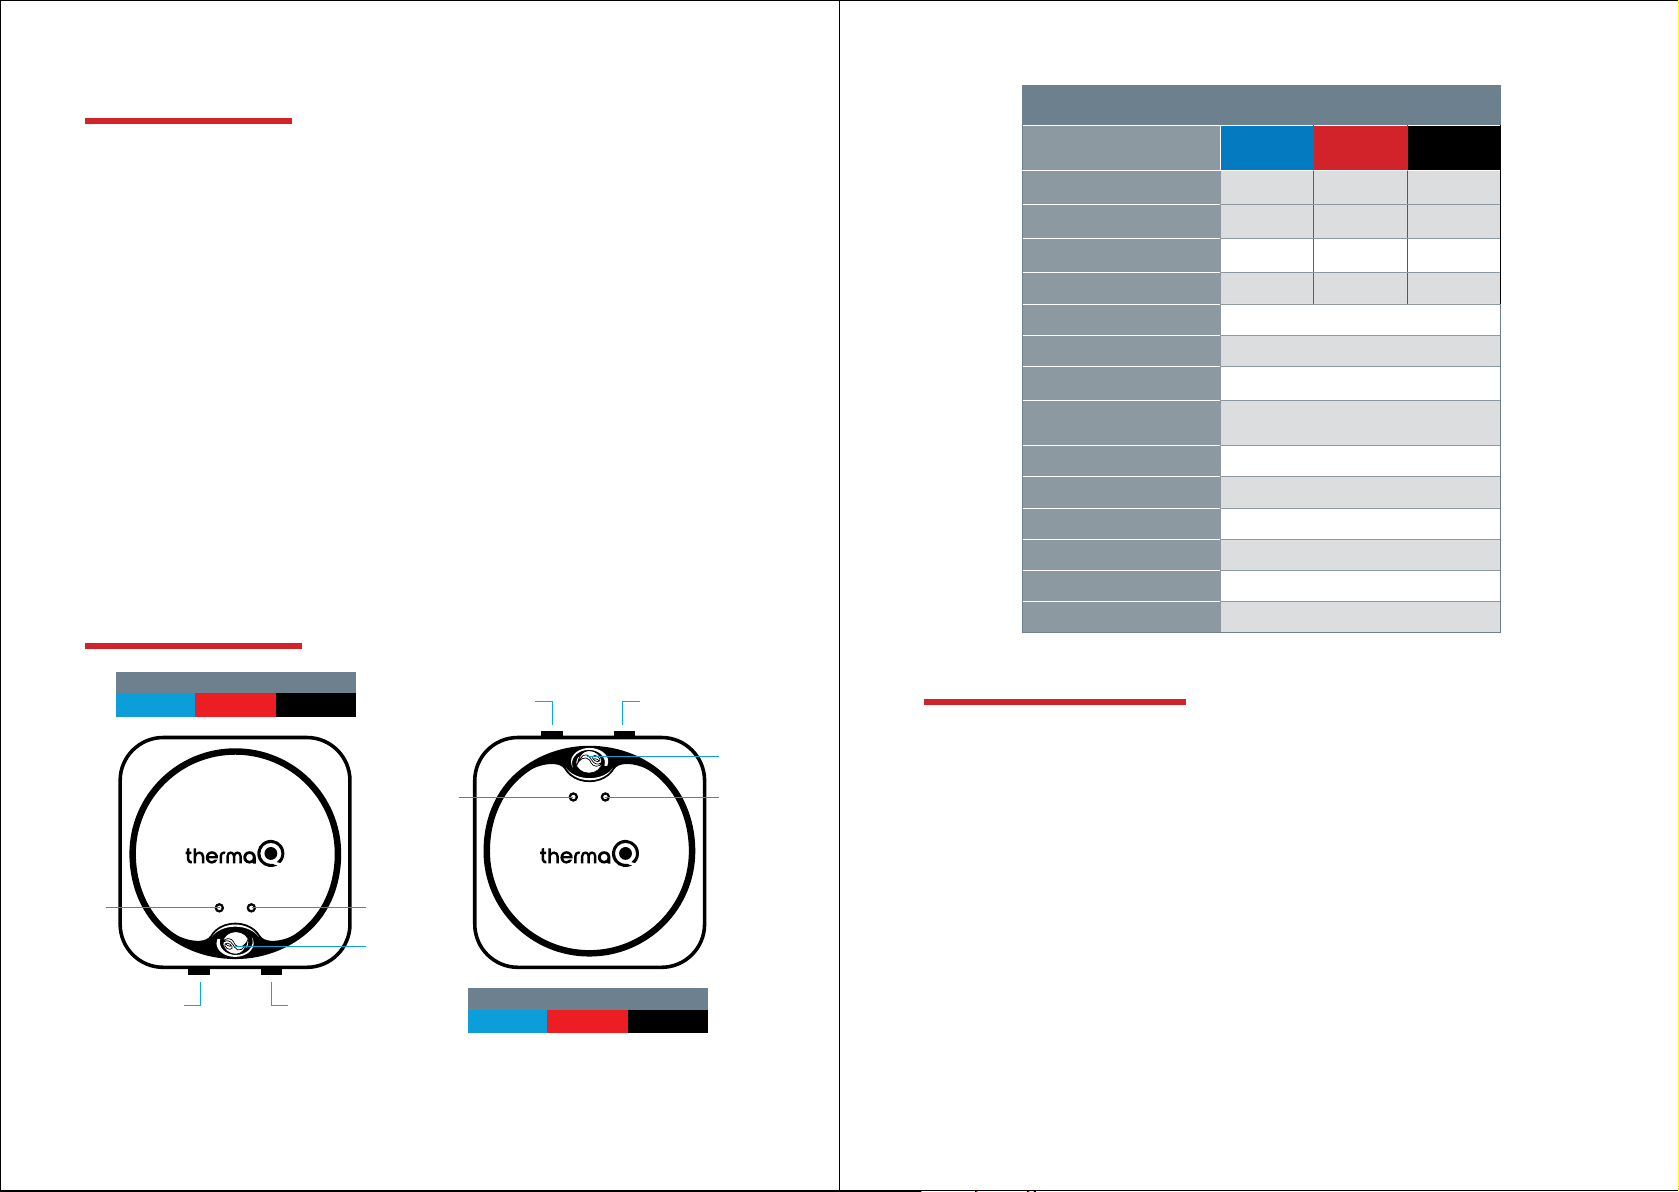
Product Structure
ABOVE SINK
EWH0002 EWH0003 EWH0004
Hot Outlet
Cold Outlet
Product
ABOVE SINK Prod.codE
BElOw SINK Prod. codE
PowEr
Flow ratE (UPTO)
body MatErial
VoltagE
ratEd currEnt
rEcoMMEndEd
cablE sizE
oVErhEat ProtEction
thErMal cut-out
control ModE
worKing PrEssurE
watEr connEctions
diMEnsions
Installation Guideline
MIDI 6 MIDI 10 MIDI 15
EWH0002 EWH0003 EWH0004
EWH0005 EWH0006 EWH0007
2kW 2.5kW 2.5kW
6L/MIN 8L/MIN 10L/MIN
HIGH STRENGTH ABS CASING
220240V
21.7A
2
2.5mm
60°C
95°C
MANUAL CONTROL DIAL
0.2-6 bar
G1/2”
198 x 160 x 98mm
4
Hot Outlet Cold Outlet
Fig 1. Above and below sink units.
Excellence in Hot Water Technology.
Power
Indicator
Heating
Indicator
Temperature
Dial
BELOW SINK
EWH0005 EWH0006 EWH0007
Temperatur
Dial
Heating
Indicator
The installation must be in compliance with the National Electrical
Guidelines, as well as your local electrical and plumbing regulations.
1. Make sure the appliance is intact, and the ttings are complete.
2. Please make sure the mains power supply, incoming water pressure and the
grounding conditions are adequate, and the ammeter and wire are at the correct
standard required for installation.
3. The appliance must be properly grounded due to the dedicated branch circuits of
high voltage within the unit. Ground wires must be brought to the 'ground' at the
circuit breaker panel.
4. This appliance MUST be permanently connected to the xed circuit breaker. If you
don’t use the heater, please switch o the circuit breaker.
5. Do NOT install this appliance on timber or in the presence of a strong magnetic
eld. The appliance can be installed above or under the sink, and must only be
mounted in a VERTICAL position near by the water ttings.
ThermaQ Specification Hotline 01924 270847
5

Installation Method
No Additional Equipment Required
A
To
System 1
62mm
Recommended
Incoming Cold Mains Below 5 Bar.
The ThermaQ Midi electric water heater can be used for hand washing or
cleaning in a kitchen, etc. and it can be installed above or under the sink.
INSTALLING THE UNIT
Using the brackets and mountings provided please mount your unit on the wall, please take
into account the following points when choosing where to mount your water heater.
1. The wall must be strong enough to take the weight of not just the water heater, but
the water it holds as well, wherever possible we would recommend securing onto
an external brick wall Fig. 2.
2. The unit should be located in a position as close to the outlets as possible, this
reduces the amount of pipework between the heater and the outlet thus reducing
heat loss across the pipework..
3. Ensure the water heater is in the correct orientation, the oversink model should
always have the connections at the bottom of the unit and the undersink module
should always have the connections on the top of the unit Fig. 1.
Minimum Distance Required
Pressure Relief for Expansion:
HEATER
6L Unit - 1.85m
10L Unit - 2.80m
15L Unit - 4.20M
A
Pressure
Relief Valve
System 2
Pressure Relief Closer Than Required (See System 1).
Expansion Vessel
HEATER
Pressure
Relief Valve
Check Valve
Closest Cold
Draw O
Discharge To Drain
Additional Equipment Required:
2L Portable Expansion Vessel
Closest Cold
Draw O
Discharge To Drain
Service Valve
(Not Supplied)
Check Valve
Service Valve
(Not Supplied)
External
Brick Wall
System 3
Incoming Cold Mains 5 Bar Or Above.
Expansion Vessel
HEATER
Check Valve
Additional Equipment Required:
2L Portable Expansion Vessel
Closest Cold
Draw O
Pressure Reducing Valve
Pressure
Reducing
Set
Check Valve
Service Valve
(Not Supplied)
Fig 2. Fixing unit to an external brick wall.
Pressure
Relief Valve
Discharge To Drain
Fig 3. System requirements.
6
Excellence in Hot Water Technology.
ThermaQ Specification Hotline 01924 270847
7

Plumbing
Your new water heater's connections are 1/2" BSP ttings and these connections are clearly
marked on the unit. It is important that these two connections are not swapped over.
The connection from the heater to the system pipework should be made using exible
stainless steel hoses, this facilitates the operation of the unit and also makes future
maintenance easier.
The pipework used should be capable of with standing 7.5 bar of working pressure and
temperature in access of 80°C.
The included safety release valve must always be tted without exception and should
have no obstructions whatsoever between the valve and the heater itself. Always make
sure that the discharge vents to a safe and visible location so as to provide a visible
indicator that the system is not performing as expected.
Once the unit has been completely plumbed in accordance with this manual please ensure
the system is ushed through completely by opening the outlets for a minimum of 10
seconds, all air and debris should be purged from the system before operation.
Under certain circumstances it may be necessary for additional safety components
to be tted to the system installation, please see Fig. 3 for diagrams to ascertain your
installation conguration and any potential equipment that may or may not be required
to complete the installation.
Electrical
Your ThermaQ Electrical Water Heater must be wired in accordance with all relevant electrical
requirements and local regulations at the time and in accordance with the latest IEE
regulations.
Connection should be made via a 13A switched fuse spur.
The cable supplied with the electrical water heater should be of ample length, but in the
circumstances that it is insucient we recommend removing the shorter length and replacing
it with the correct length of cabling. We advise against joining the cable at any point.
ALWAYS ENSURE YOUR WATER HEATER IS CORRECTLY EARTHED.
As previously recommended, please ensure that your unit has been lled, correctly ushed
and all debris and airlocks have been removed before turning your water heater on. By
bypassing this step you risk irreversible damage to your water heater that will not be covered
by your warranty.
Electrical connections can be made via an external time clock if required, this gives a greater
deal of control for the operating times of this unit.
Operation
Once the system has been plumbed and wired in accordance with this manual it is time to
switch the mains supply on.
When power is supplied to the unit the indicator light will illuminate to show that the system
is ready and beginning to heat the water.
The dial on the outside of the case can be used to control the temperature that the internal
water store is heated to, turning this higher will increase the store temperature, turning it
lower will decrease it. We recommend adjusting the thermostat over a few days until the
desired temperature is achieved. Remember to run the heater only at the temperature
required to avoid wasting energy.
In the event of overheating there is a safety cut out stat built into the unit. This has a
resettable switch that can be pressed to reset and can be found on the immersion heater on
the inside of the unit. We recommend that you have a proper engineer service the unit and
this is not attempted by the user.
The immersion heater is located below the grey plate on the underneath of the unit. If the
unit has been installed so this plate is inaccessible please disconnect the unit from the mains,
isolate the water supply, drain-down and remove the unit from the wall for maintenance.
Before attempting to maintain the unit please ensure you have isolated the
electricity supply.
8
Excellence in Hot Water Technology.
ThermaQ Specification Hotline 01924 270847
9
Maintenance
Trouble-Shooting
Note: Do not attempt to repair this water heater yourself, call a qualied plumber for
assistance. Before maintenance takes place, the power supply needs to be shut o.
The ThermaQ Midi does not require any regular maintenance. However, to ensure
consistent water ow, it is recommended to complete the following.
1. Periodically remove scale and dirt that may build up at the aerator of the faucet or in
the shower head.
2. Your water heater includes a Magnesium sacricial anode as part of the immersion
heater assembly. The anode is present to ensure that your water heater tank does
not corrode, should this device not be serviced. The location of the immersion is as
described above and is accessible from the grey service hatch on the bottom of
the unit.
3. The anode should be inspected annually and its condition checked, if the anode
is suciently corroded it should be replaced to ensure the protection of your water
heater.
4. The pressure relief valve should be inspected annually as well as the expansion
vessel, check valve and pressure reducing set if tted.
Guarantee
Your ThermaQ water heater is guaranteed for a period of 12 months from the date of
purchase. The unit is only guaranteed if the water heater has been installed and maintained
in accordance with these instructions. Full guarantee information can be found at:
ThermaQ.co.uk/guarantee.
PROBLEMS POSSIBLE CAUSES CORRECTIVE ACTIONS
The pressure release
valve is constantly
discharging or
dripping.
The pressure release
valve drips or
discharges whilst the
unit is heating up.
The unit is not
producing any hot
water.
Insufficient amounts
of hot water
available.
The unit has begun
to leak.
The incoming cold mains
•
pressure is to high.
There is insufficient expansion for
•
your system.
The unit is not powered up.
•
The thermal cut-out has activated.
•
The element has failed.
•
The thermostat has failed.
•
The heater has been undersized.
•
The unit has been mounted the
•
wrong way round.
The thermostat has failed.
•
Faulty plumbing connection.
•
Tank gasket has failed.
•
Please fit pressure reducing set
•
in-line with system 3.
Please fit an expansion vessel or
•
increase the vessel size.
Please check the system has
•
access to power supply.
Reset the cut-out in accordance
•
with this manual.
Please replace the immersion
•
heater.
Please replace the thermostat.
•
Please replace the heater with
•
one of adequate size.
Please mount the heater
•
ensuring pipes are facing
downwards.
Please replace the thermostat.
•
Please check all joints to the
•
water heater.
Please replace the gasket that
•
attaches between the tank and
the immersion heater.
10
Excellence in Hot Water Technology.
All other faults
PACKING
LIST
Please contact your installer before contacting ThermaQ Limited.
•
ITEM UNIT QUANTITY
Electric Water Heater. Unit 1
Bracket. Piece 1
Rubber plug and screw. Piece 1
Operation and Installation instructions. Copy 1
Cable Clamp and Screw Sets. Set 1
ThermaQ Specification Hotline 01924 270847
11
 Loading...