

Page 1
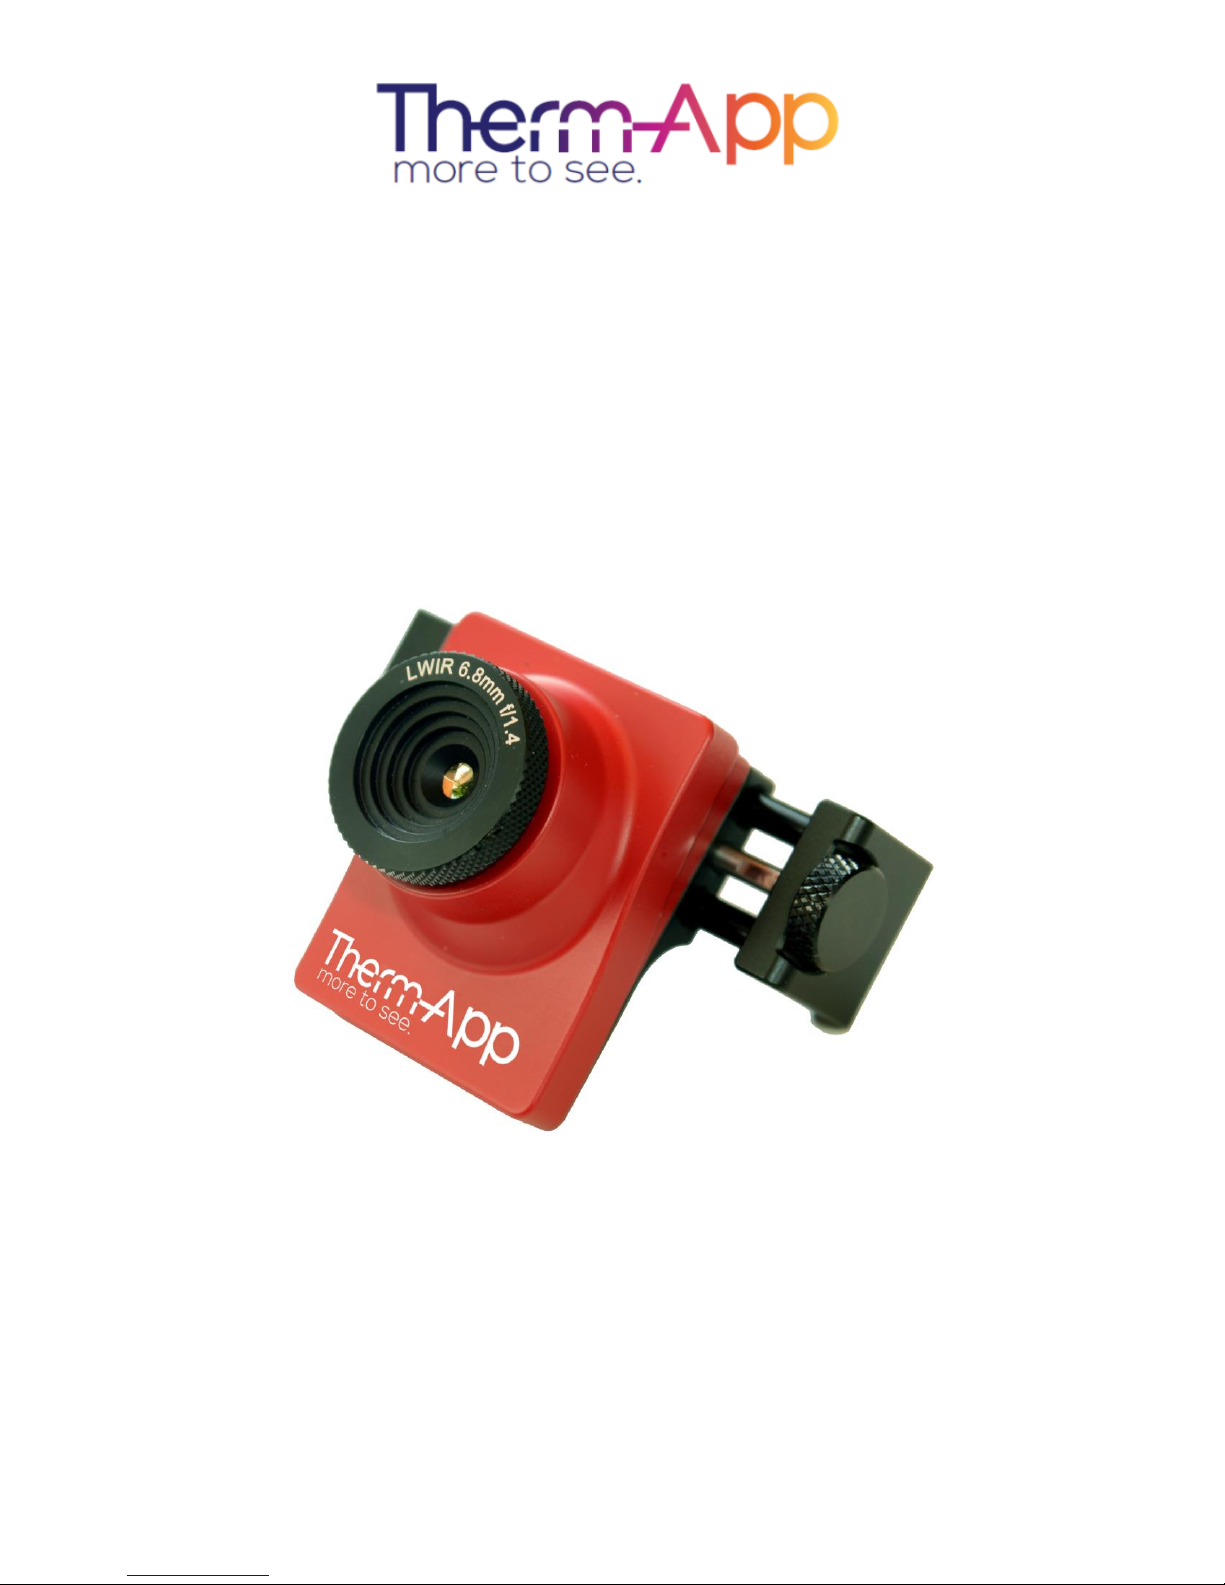
Therm-App TH for Thermography -
High Resolution
Mobile Thermal Imaging Tool
Operation Manual
Page 2
Quick Start Guide Therm-App Operation Manual
Copyright © 2014 Therm-App, All rights reserved.
Visit Therm-App® website: www.therm-app.com
Table of Contents
Quick Start Guide.............................................................................................. 3
Safety and Caution Notes ................................................................................. 4
Product Description........................................................................................... 5
Android Device Minimum Requirements ........................................................... 6
Opening the Therm-App Box ............................................................................ 7
Installation ......................................................................................................... 7
Application Operation ........................................................................................ 9
Troubleshooting .............................................................................................. 21
Document: UM-TAH68AQ-1100_A Page 2 of 22
Page 3
Quick Start Guide Therm-App Operation Manual
Make sure the Android device is compatible with
the Android Device Minimum Requirements.
Visit the Google Play online store and download
the free Therm-App Basic app, or scan the QR
code.
Install the Therm-App basic application on your
Android device.
Verify that you have a stable internet connection.
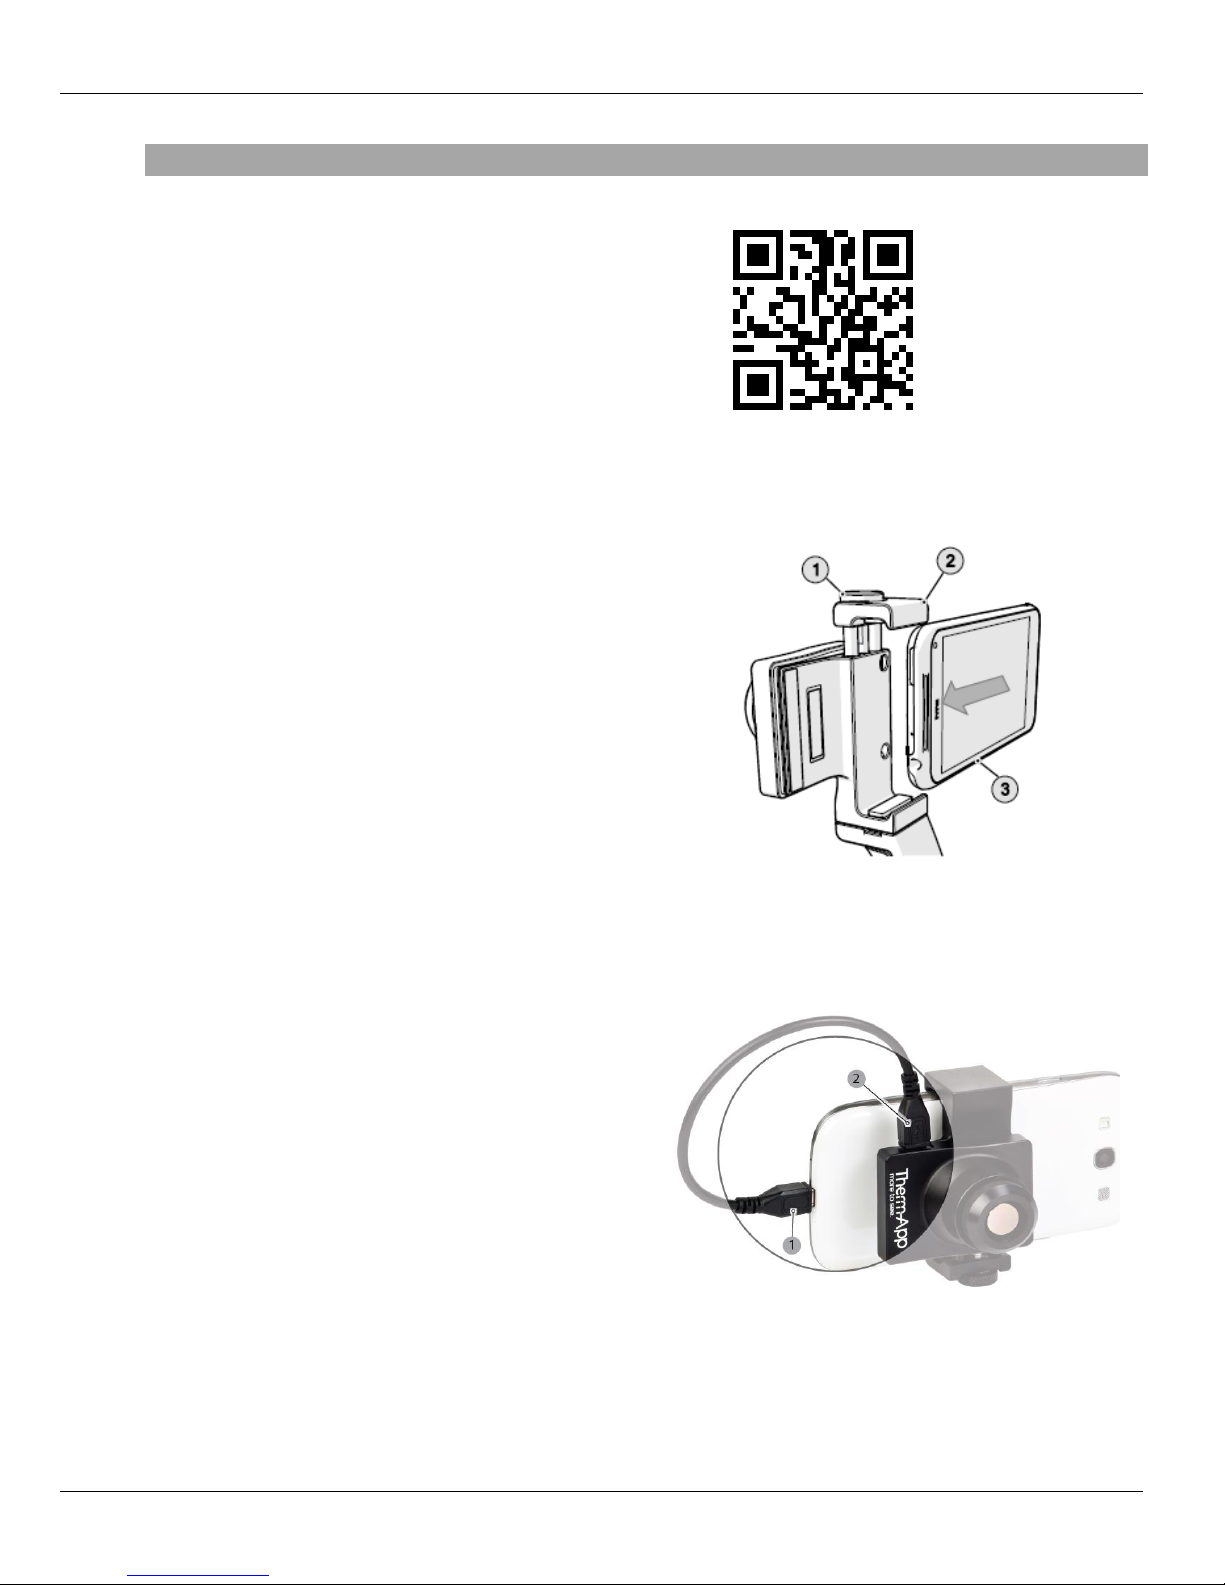
Insert the Android device (3) into the Therm-App
device Attachment bracket (2) and carefully
fasten the Size knob (1).
Connect the Android device with the Therm-App
device using the USB-OTG cable supplied.
Therm-App application should pop-up
automatically and begin downloading of files from
Therm-App server.
Wait until download and initialization process are
competed. For the first operation of the ThermApp device, downloading may take a few
minutes.
Read and confirm the user agreement. The basic
application is running and you are ready to start
using your Therm-App.
Quick Start Guide
Unpack Therm-App package.
Document: UM-TAH68AQ-1100_A Page 3 of 22
Page 4

Safety and Caution Notes Therm-App Operation Manual
Safety and Caution Notes
Attach Therm-App to your mobile device with care. Do not use any external tools as too much
pressure might mark or damage your mobile device. Secure locking knob using your fingers
only.
Therm-App uses specific factory-prepared calibration data. If, during prolonged field usage of
Therm-App, a degraded performance is noted, we recommend that you send the Therm-App
device, for re-calibration. Please contact our support team at http://www.therm-app.com for
further instructions.
For the most accurate temperature measurement, it is recommended to wait at least three
minutes after Therm-App starts for stabilization.
Therm-App manuals are updated from time to time, and product-critical notifications are
published occasionally. To access the latest manuals and notifications, go to http://www.thermapp.com.
Therm-App is a Class B digital product.
This product has been tested and found to comply with the limits for a class B digital product,
pursuant to Part 15 of the U.S. FCC Rules.
Some parts of Therm-App have sharp edges and could cause injury.
Read this document in full, as well as the warranty document provided with the product.
Do not drop Therm-App or apply pressure on the IR lens to avoid breaking the lens. If the IR
lens breaks, do not touch the broken pieces. Touching the broken lens pieces can cause injury.
Do not point the infrared detector (with or without the lens and lens cover) at intensive energy
sources, for example products that emit laser radiation, or the sun. This could damage the
detector.
Do not use Therm-App in a temperature environment higher than +50 degrees Celsius (+122
degrees Fahrenheit), unless specified otherwise in user documentation or technical data. High
temperatures can cause damage to the detector.
The Therm-App device is not sealed. Do not expose the Therm-App device to water, rain or
dust.
Do not apply solvents or similar liquids to the detector or the lens.
The lens has a delicate anti-reflective coating. Clean the lens using a soft cloth applying very
light pressure.
During lens exchange, the IR detector is exposed. Avoid all contact with the detector. Do not
touch, clean or blow air on the detector. Replacement of the lens must be done in a clean, dry
area. Do not leave the IR detector exposed more than needed for performing the replacement.
Do not use pneumatic system pressurized air to remove dust from the Therm-App device.
Pressurized air contains oil mist intended to lubricate pneumatic tools, this type of a
pressurized air could damage the detector and lens.
Power the Therm-App device with 5V DC connected through the micro USB connector only, by
connecting it to a smartphone or other USB host connector. Using any other type of power
source may damage the Therm-App device.
Use only the USB OTG cables provided with the Therm-App device. Using any other types of
cables could damage the equipment.
A label tamper is attached to one of the screws on the back of the Therm-App device.
Removing this label or the S/N label voids the warranty.
For more information, FAQ, and updated device compatibility views, please visit the Therm-
App website: http://www.therm-app.com.
As with most electronic products, Therm-App device must be disposed in an environmentally
friendly way, and in accordance with existing regulations for electronic waste. Please contact
our support team at http://www.therm-app.com for more details.
Document: UM-TAH68AQ-1100_A Page 4 of 22
Page 5
Product Description Therm-App Operation Manual
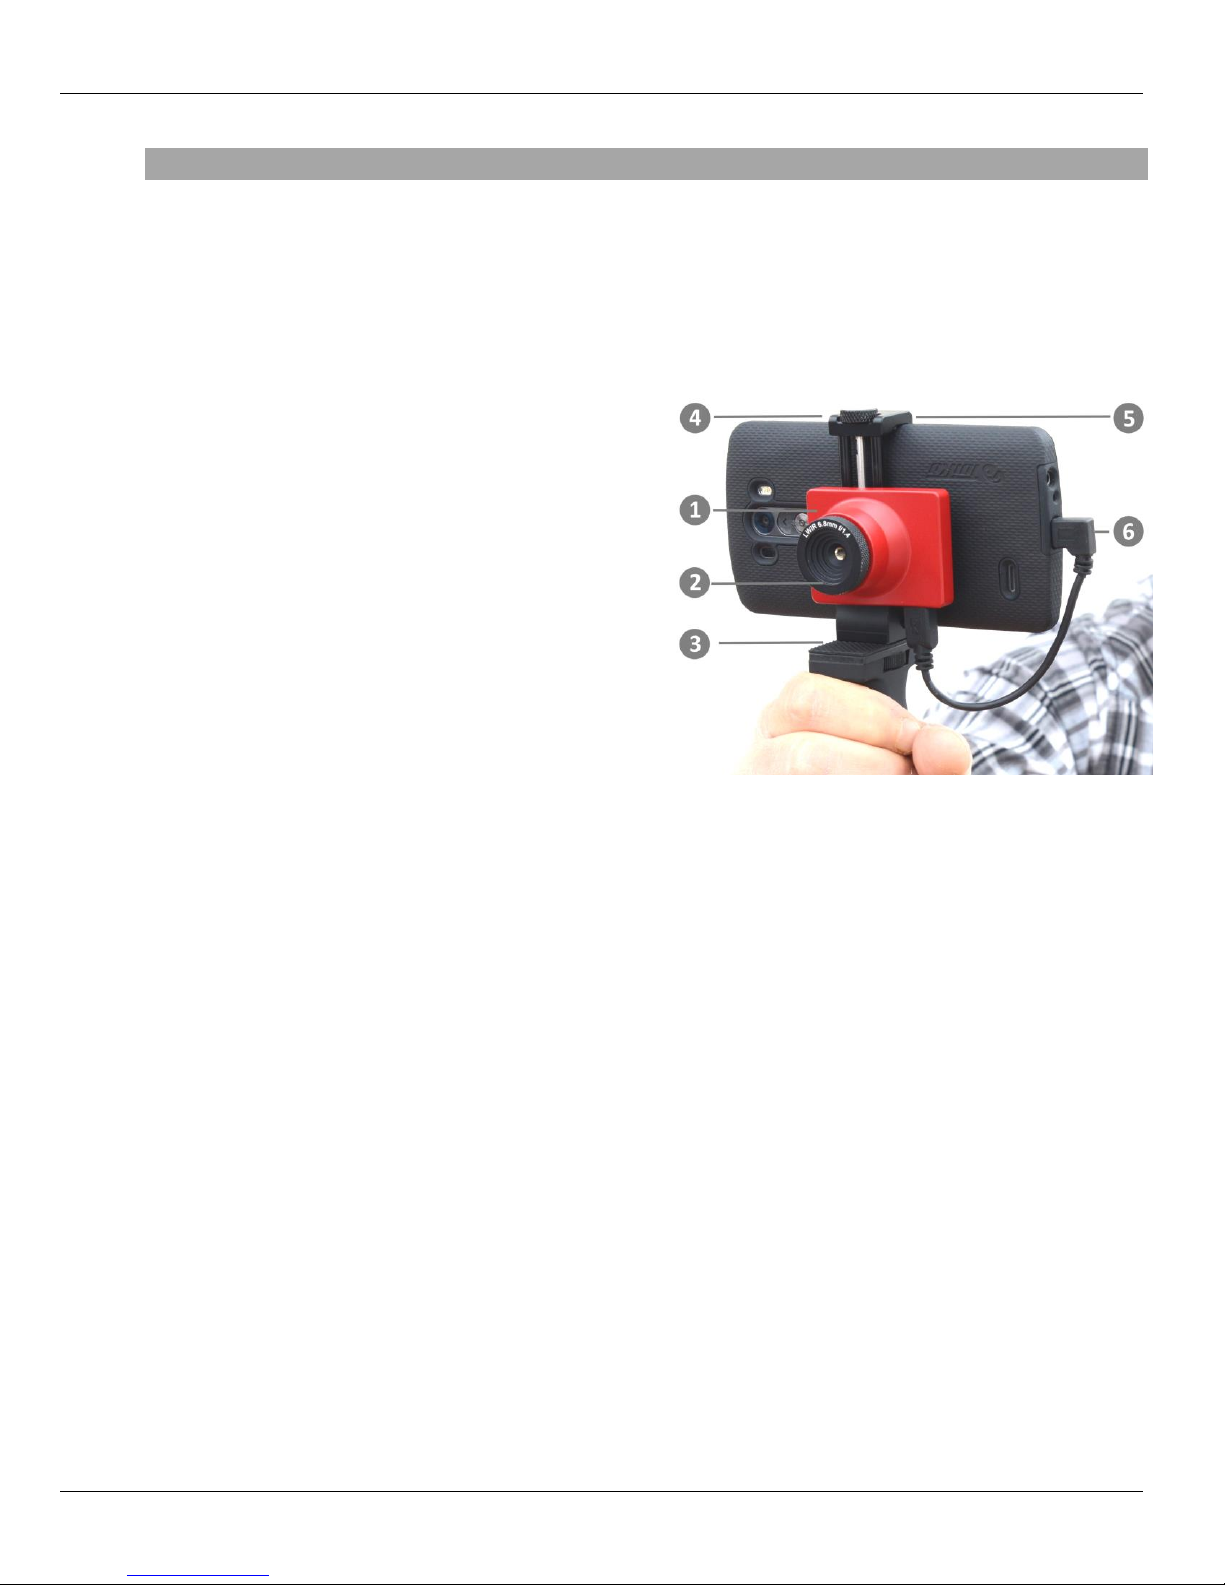
The Therm-App device main
components:
Therm-App device housing [1]
Lens [2] with manual focus
Grip Handle [3]
Attachment bracket [4] – connects the Therm-
App device with the Android device.
Size knob [5] – for adjustment to fit different sizes
of Android devices
OTG USB cable [6] – for communication with the
Android device.
Product Description
Therm-App is a revolutionary concept that extends human vision by turning an Android device into a thermal
camera. This lightweight, modular, high resolution device clips onto your Android device. Therm-App provides
your Android device with a capability of a powerful camera, able to display, record, and share thermal images.
Therm-App runs an entirely new suite of exciting night vision and thermography applications.
Therm-App combines the power of a fully functional thermal camera with the mobility, connectivity, processing
power, display capabilities and advanced features provided by Android devices today.
Document: UM-TAH68AQ-1100_A Page 5 of 22
Page 6
Android Device Minimum Requirements Therm-App Operation Manual
Android Device Minimum Requirements
Therm-App was designed to work with Android OS ver. 4.1 or above. Due to modifications and
variations made by mobile manufacturers and operators there could be cases of noncompatibility.
Android device supporting USB OTG (On-The-Go, also known as USB HOST mode).
Important Note: Most off-the-shelf cables are not USB-OTG and will not operate with the
Therm-App device. Use only the USB-OTG cables that are provided with the product.
Below is a partial list of supported devices (For an updated list visit: http://therm-app.com/therm-
app-supported-devices/):
LG: Nexus 5, G2, Flex
Samsung:, Galaxy Note 1, Galaxy Note 2, Galaxy Note 3, Galaxy Note 4, Galaxy Note 4 Edge,
Galaxy S3, Galaxy S4, Galaxy S5, Galaxy Express, Galaxy Mega 6.3,
Sony: Xperia Z, C6603, Xperia C, Xperia Z1, Xperia Z3, Xperia Z3 compactXiaomi – HongMi,
HM 1SW, MI-2, MI-2S, MI-3
Zopo: C3
HTC: One (M7) – Android 4.3 and up.
Motorola: Moto G
Document: UM-TAH68AQ-1100_A Page 6 of 22
Page 7
Opening the Therm-App Box Therm-App Operation Manual
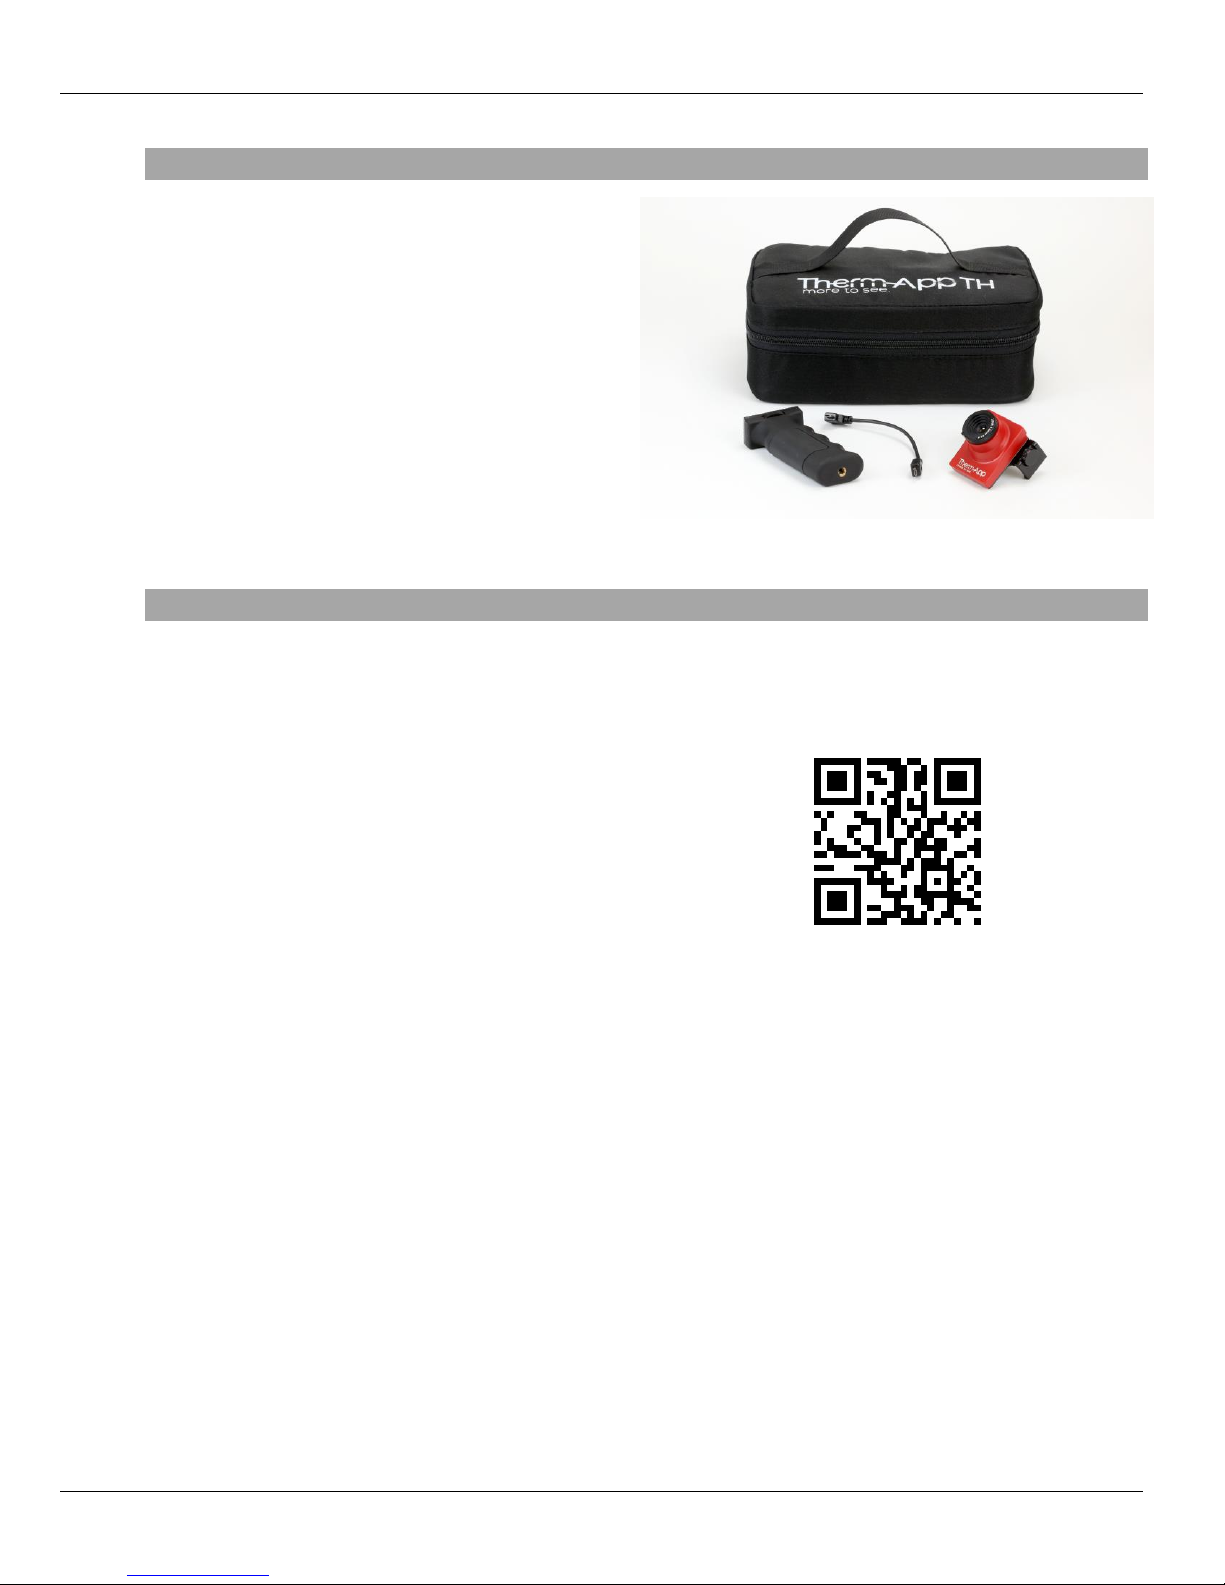
The Therm-App TH carry case contains:
Therm-App TH device with 6.8mm lens
15 cm right angle USB-OTG cable
15 cm left angle USB-OTG cable
21 cm straight USB-OTG cable
Handle
Quick start guide
Make sure the Android device operating system
(OS) is either version 4.1 or above excluding 5.0
and above, supporting USB On-The-Go.
Visit the Google Play online store, download and
install the free Therm-App Basic app, or scan the
QR code.
Opening the Therm-App Box
Installation
Installing the Application
Document: UM-TAH68AQ-1100_A Page 7 of 22
Page 8
Installation Therm-App Operation Manual
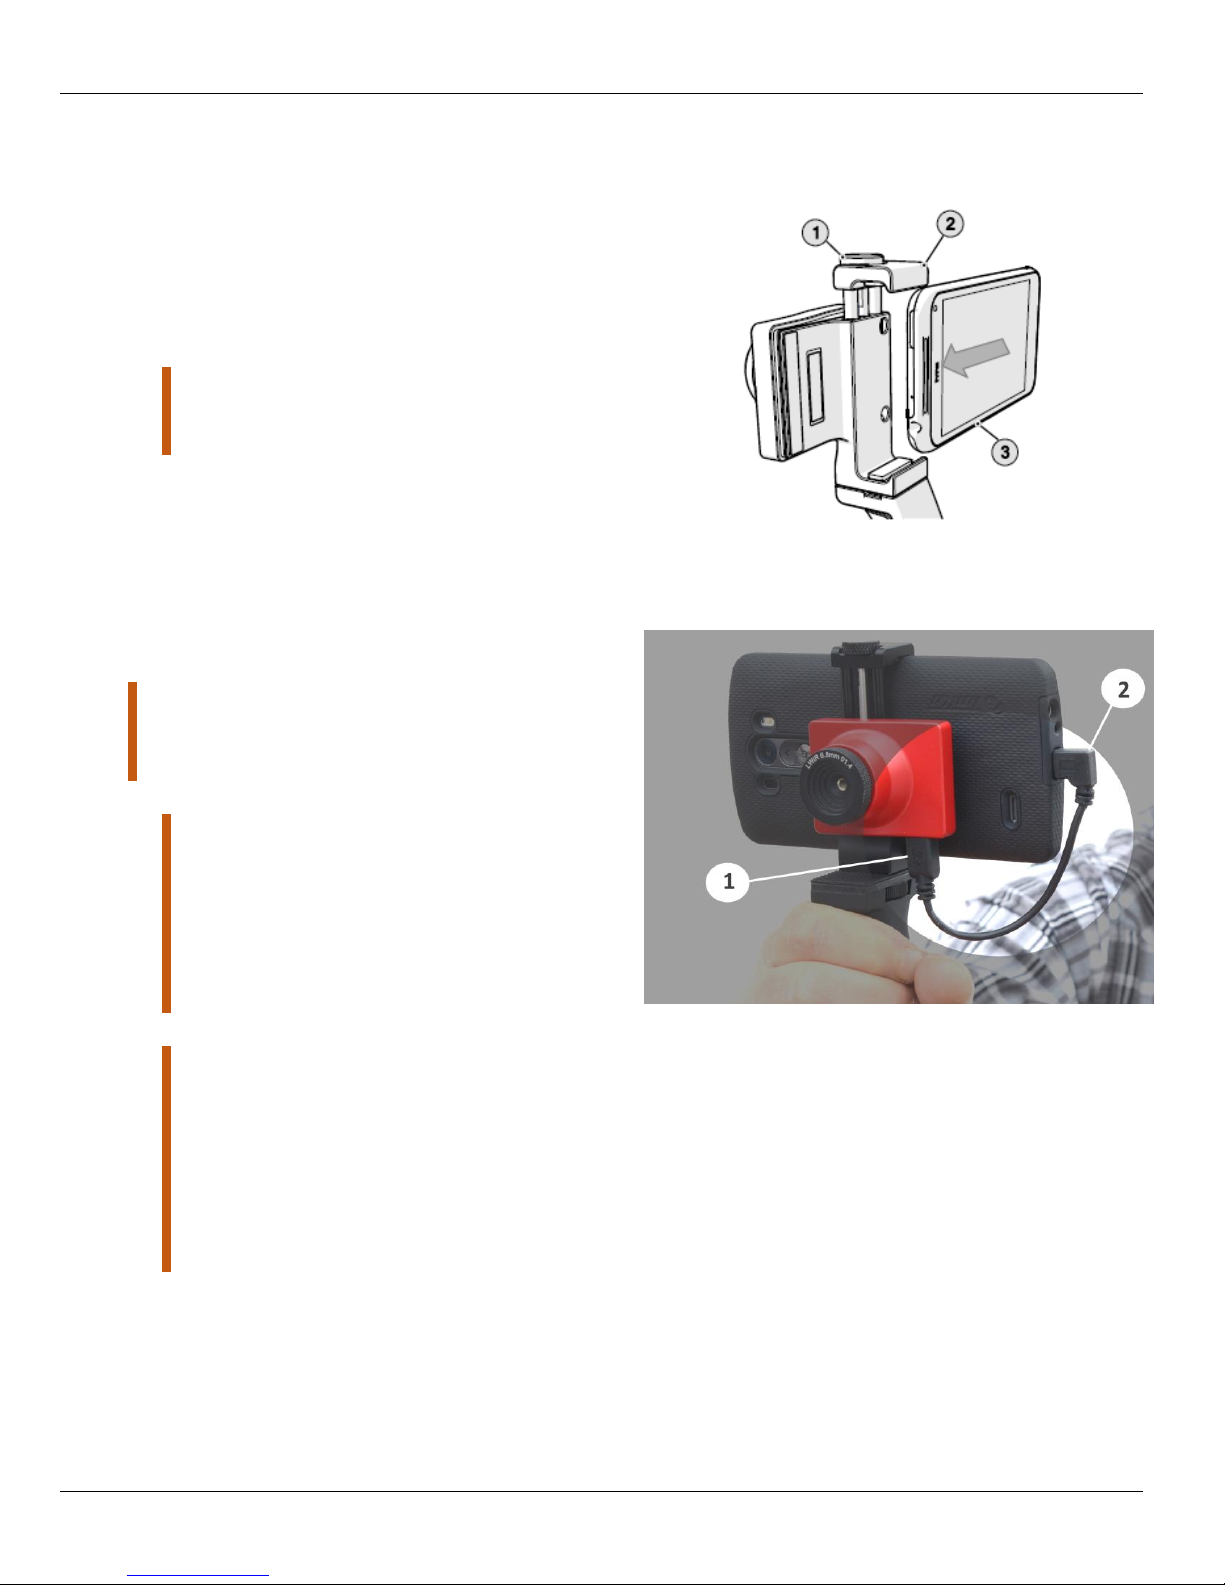
Turn the Size knob (1) so the Android device
slides (3) in the Attachment brackets (2).
Attach Therm-App to the back of the mobile
device by turning the size knob.
Fasten the Size knob (1) and the Attachment
bracket (2) to fit the Android device. Ensure that
the device is firmly attached.
Note: Do not fasten the size knob too tightly.
Fastening the size knob too tightly could damage
the Android device.
Connect the USB-OTG cable to both Therm-App
[2] and the mobile device (1).
Note: Use only the USB-OTG cable supplied. In
most cases, the micro USB cables supplied with
mobile phones do not support the USB-OTG
functionality.
Note: Verify that the USB-OTG cable is
connected properly to the Therm-App device and
to the mobile device.
Once it is a connected a USB connector
connected (or similar) message should be
shown and the Therm-App application, if already
installed, should start automatically.
Notes: For the first use of the Therm-App device
with an Android device, an initialization process
that involves downloading of data must be
completed. This process may take a few minutes
and must not be interrupted. Make sure you
have a stable high speed internet connection,
preferably WiFi, prior to connecting your mobile
device to the Therm-App device.
Connecting Therm-App to the Android Device
Document: UM-TAH68AQ-1100_A Page 8 of 22
Page 9
Application Operation Therm-App Operation Manual
This section is relevant to the first connection between the Therm-App
device and the Android device.
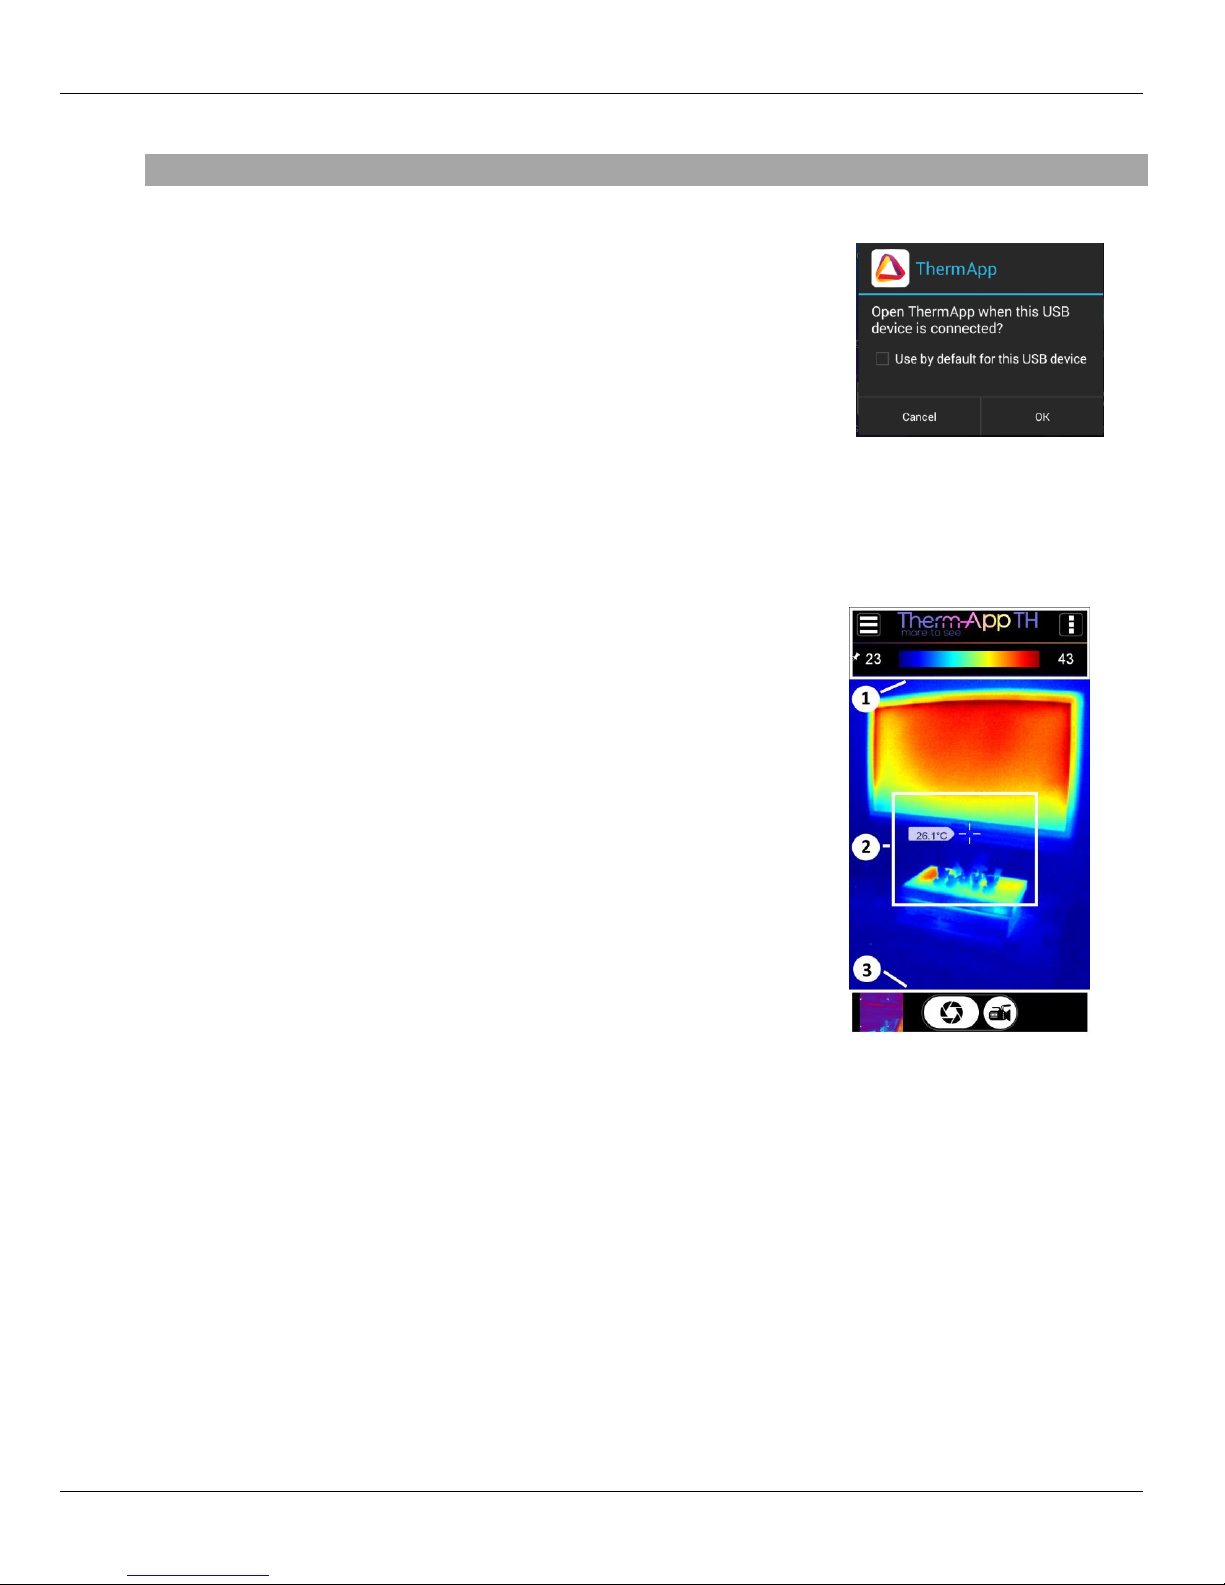
The Android device asks for your permission to associate the USB port
with the Therm-App application.
Select the Use by default for this USB device check box and tap the OK.
The Therm-App application (App) automatically starts and displays the
Terms and conditions screen. Review and accept the Terms and
conditions.
The App shows the Initializing message and downloads files which are
specific to your Therm-App device (per device serial number). When
download is completed, the App displays the Camera View screen.
The Camera View screen includes:
Upper Toolbar (1)
Image display (2)
Lower toolbar (3)
Application Operation
Initialization
Camera View – Thermography mode
Document: UM-TAH68AQ-1100_A Page 9 of 22
Page 10
Application Operation Therm-App Operation Manual
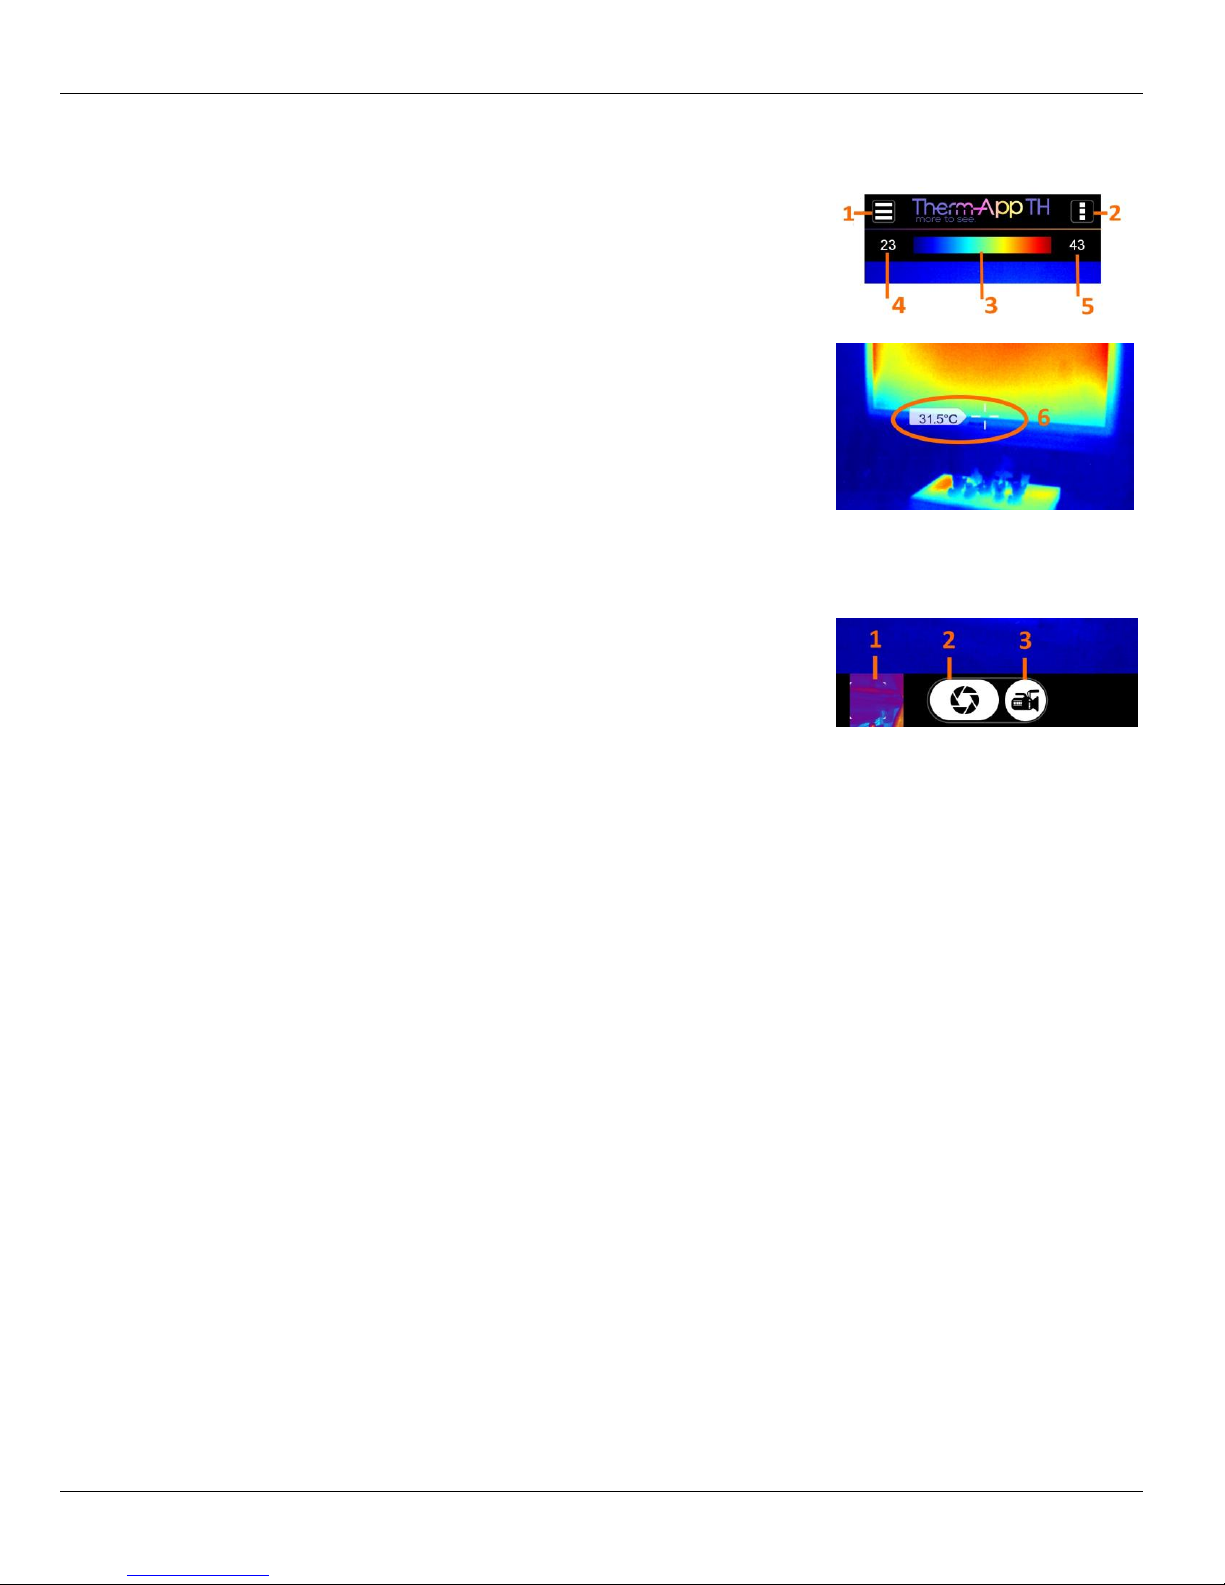
The upper toolbar includes:
Settings button (1) – for configuring the Therm-App TH Settings.
Quick access button – allows for quick access to settings needed while
taking measurments
Temperature bar (3) – presents the range of temperatures currently
viewed.
The minimum and maximum image temperatures are also functional
buttons (4, 5) –- displayed on both sides of the bar. Pressing them
allows to manually set the min and max temperatures.
Temperature reading (6) – displays the temperature at the center of the
image (marked by the cross hair).
Note: In nightvision mode the temperature is not presented.
Lower Toolbar
The lower toolbar includes:
Gallery (1) – displays pictures stored in the Android device using default
album application.
Photo (2) – takes a photo.
Video (3) – starts video recording.
Upper Toolbar
Document: UM-TAH68AQ-1100_A Page 10 of 22
Page 11
Application Operation Therm-App Operation Manual
Setting Thermography Color
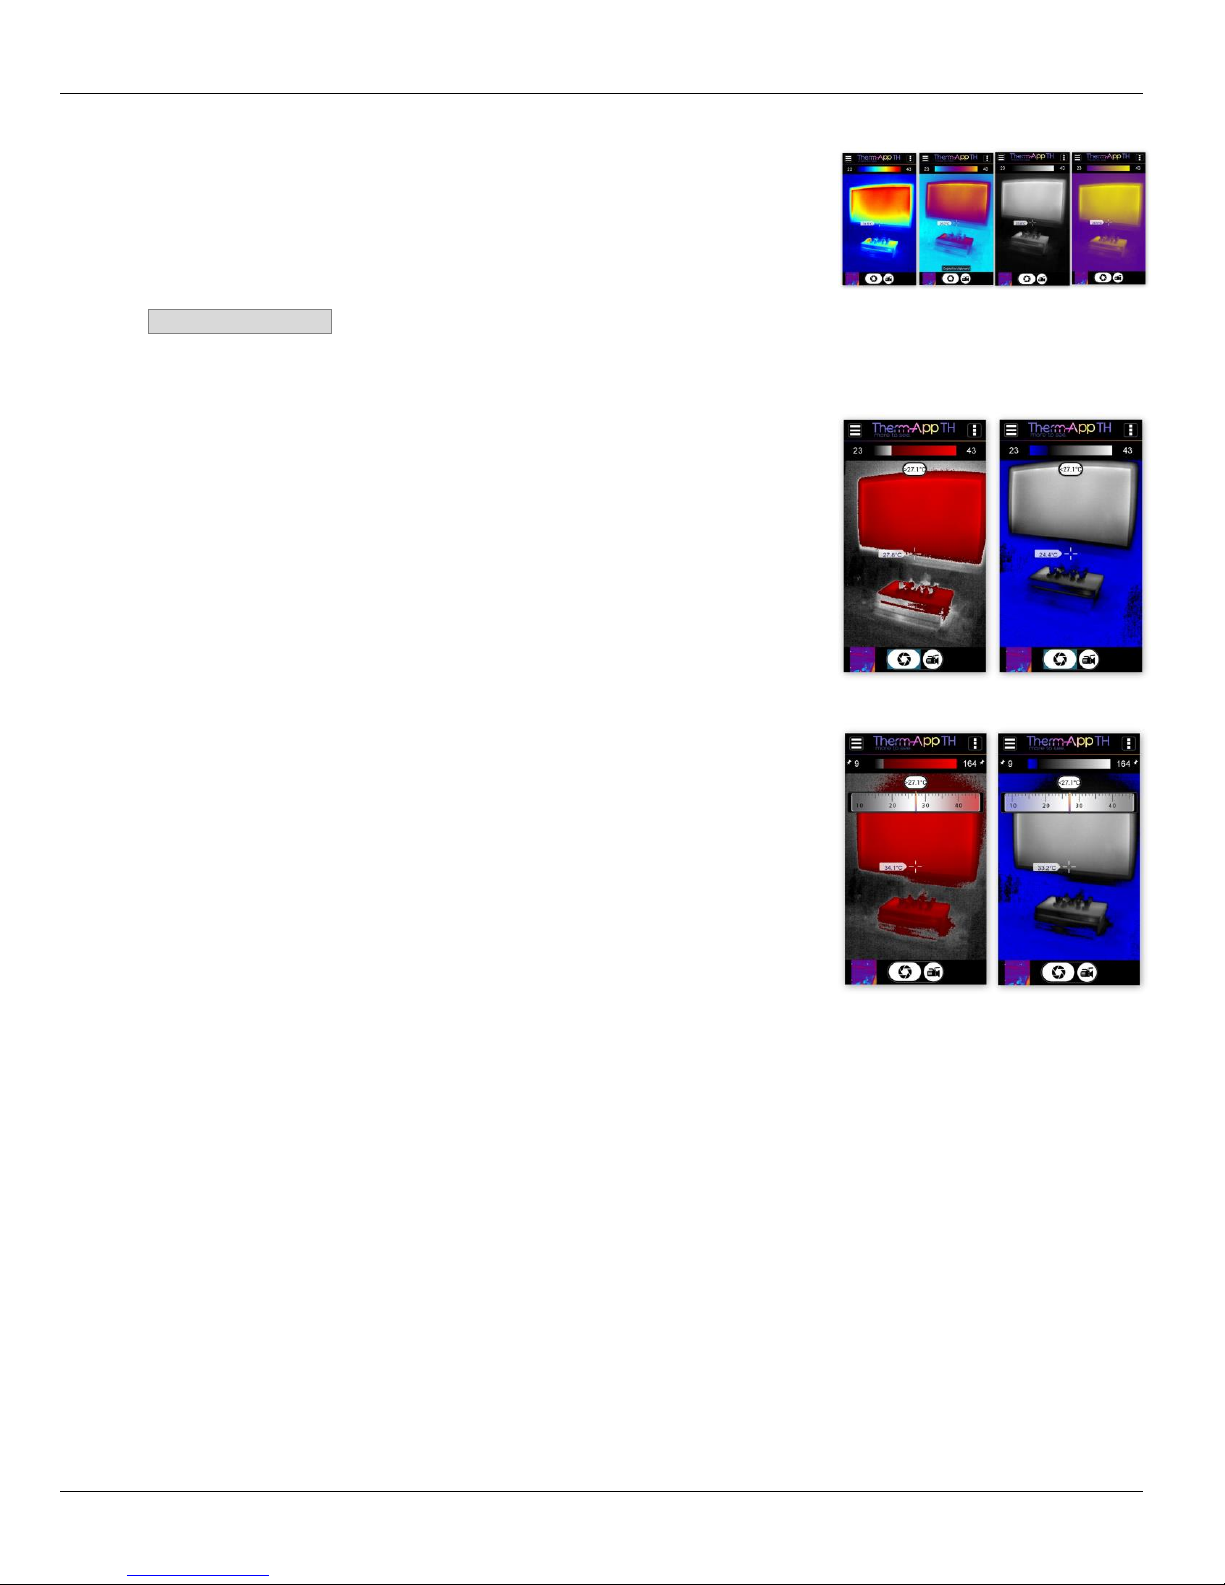
When the Thermography mode is selected, the Therm-App device image
can be displayed using one of four palettes.
To change the selected palette:
Swipe the main screen left or right to toggle between palettes (or tap the
Thermography Color option on the Therm-App Settings screen).
Select one of the following palettes:
Rainbow
Iron
Vivid
Grayscale
Note: In nightvision mode there are two grayscale palettes -
Hot white / cold black and Hot black / cold white.
In addition to the color palettes, you can choose one of two functional
palettes presenting “Hot Threshold” and “Cold Threshold”. Once setting the
hot threshold, only items with temperature readings above the threshold will
be colored in Red, and the rest will be in grayscale.
Once setting the cold threshold, only items with temperature readings below
the threshold will be colored in Blue, and the rest will be in grayscale.
Adjusting Hot & Cold Threshold:
By pressing the threshold temperature indicator just below the temperature
scale, an adjustable gauge will appear on screen. Swipe it left or right for
setting your threshold of choice. By touching anywhere on the screen the
gauge will disappear.
Document: UM-TAH68AQ-1100_A Page 11 of 22
Page 12
Application Operation Therm-App Operation Manual
Setting Manual Temperature Scale
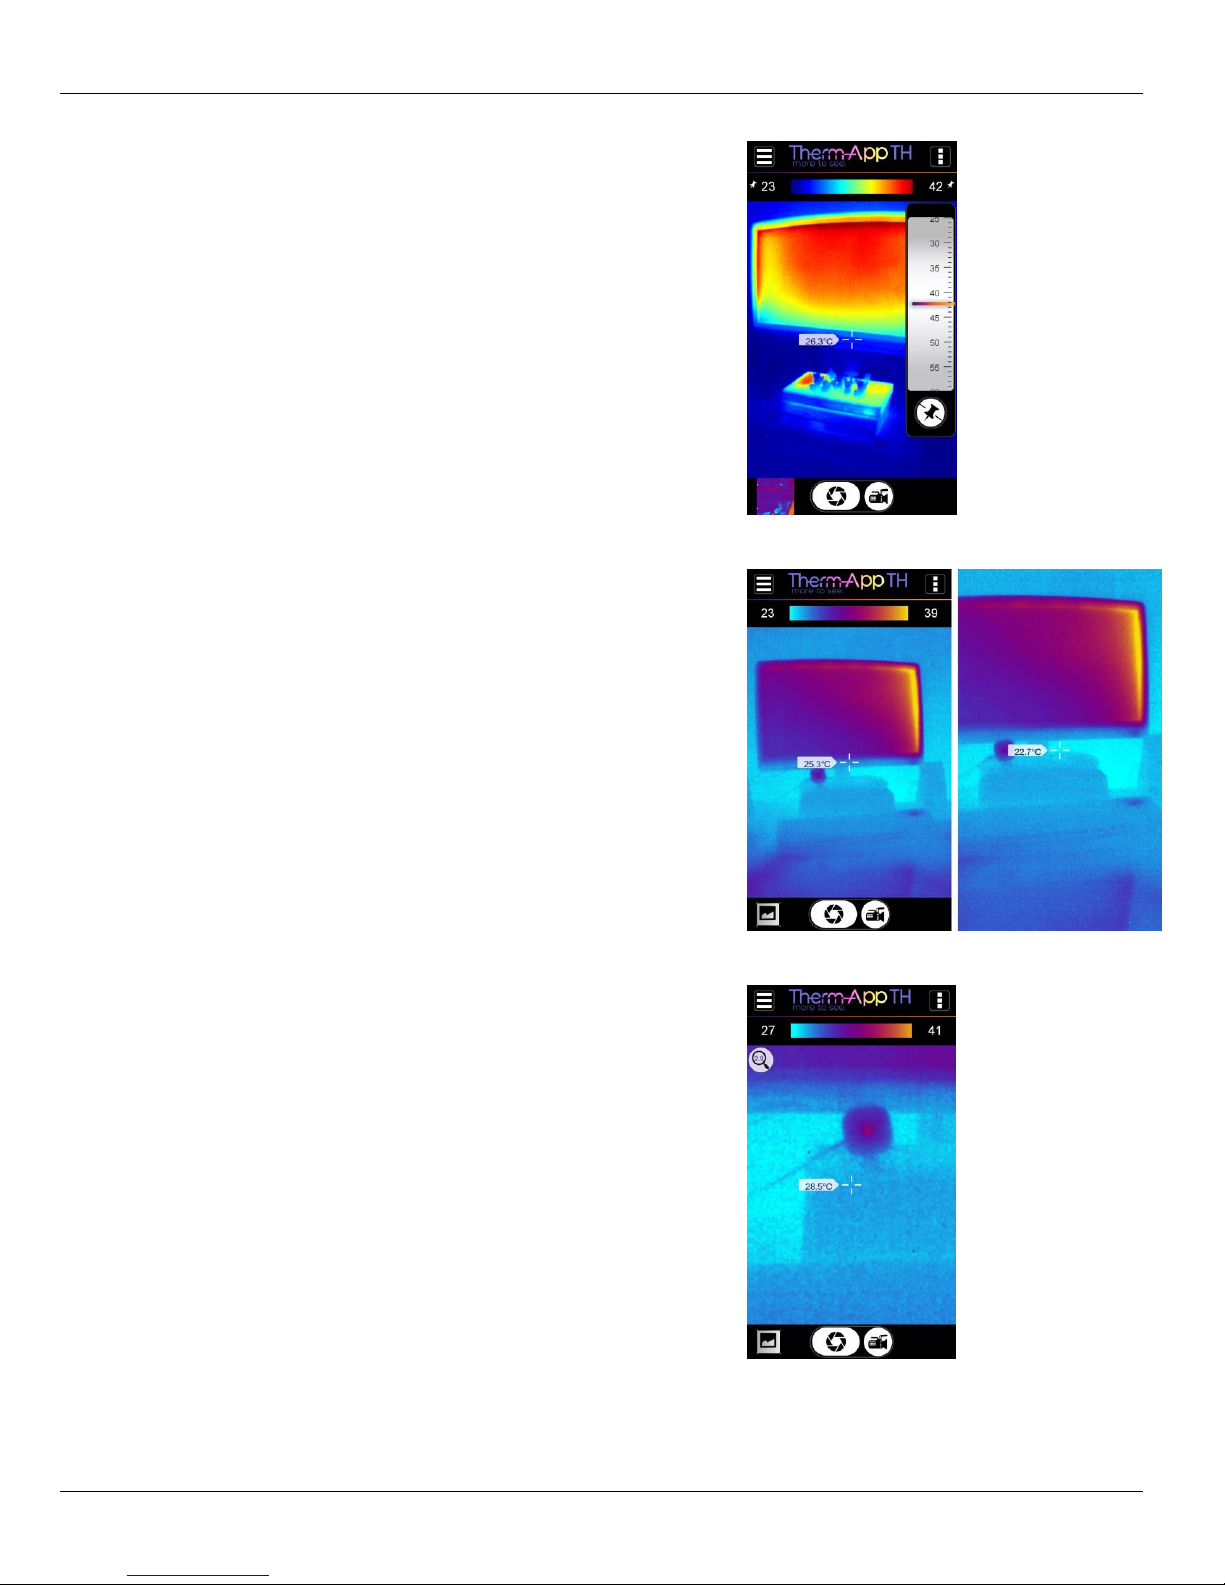
By pressing the left or right temperature scale
reading number, a drop down scale allows for
manually fixing the range. After choosing the fixed
temperature, touch anywhere on the screen to
continue.
A fixed temperature scale is marked with a
thumbtack icon near the min or max temperature
indication.
For cancelling the fixed range touch the cancel-
thumbtack icon at the bottom of the drop down
scale.
Full Screen Mode
By tapping twice quickly, you can switch between
standard and full screen modes:
Digital Zoom
By pinching the screen the image will be zoomed in
and out. When in zoom mode, a magnifying glass
icon with the zoom level appears on the top left
corner of the thermal image.
Document: UM-TAH68AQ-1100_A Page 12 of 22
Page 13
Application Operation Therm-App Operation Manual
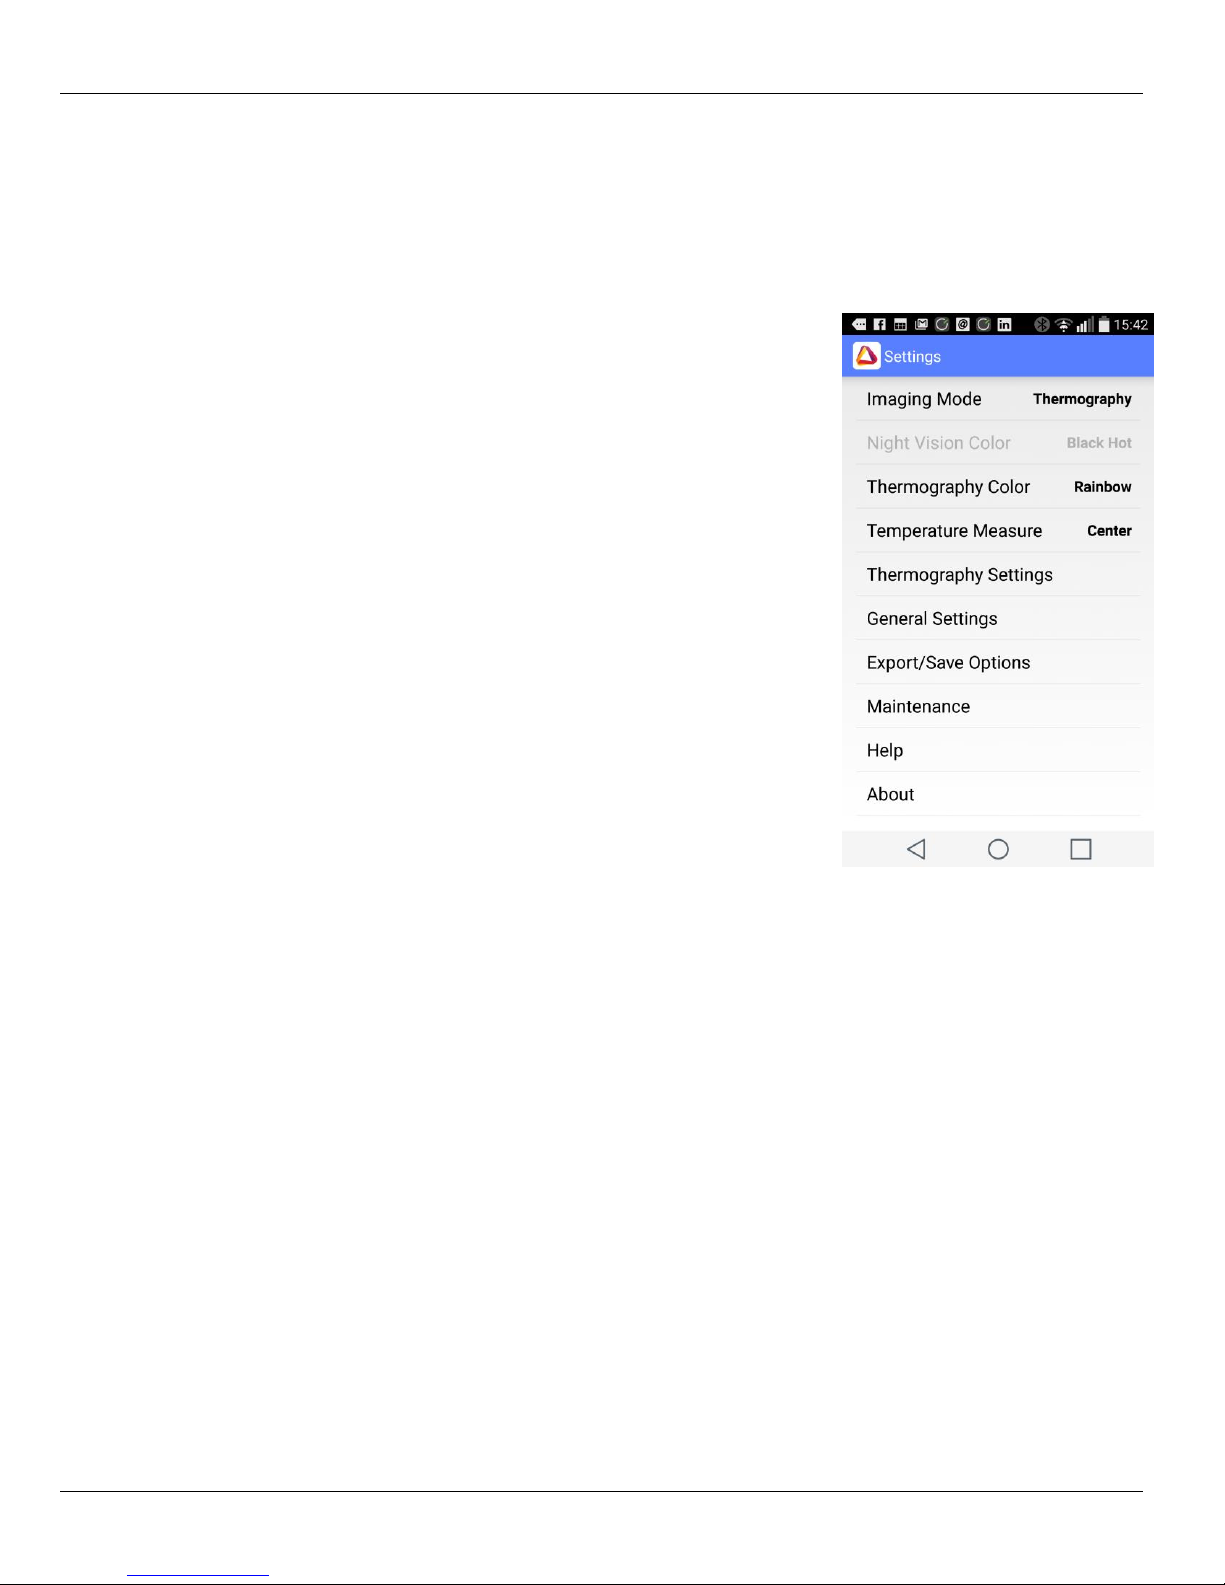
Tap the Settings button located on the upper toolbar. The Settings screen is
displayed and includes:
Imaging Mode – switches between Night Vision and Thermography
modes.
Night Vision Color – inverts Black and White on Night Vision mode.
Thermography Color – enables selecting thermography color palettes.
Temperature Measure – in Thermography, selecting Center activates
readings of temperature measured at the center of the image (at the
cross hair mark).
Thermography Settings – enables choosing temperature units,
emissivity, reflected temperature, and scale truncation level.
General Settings – choose adding audio to videos, watermark
settings, disabling screen timeout, and adding annotations to raw data
options.
Export – allows for defining which files (such as IR Photo, Color
Photo, Screenshots, and more) are created and shared when using
Therm-App TH. Here you’ll also be able to link Therm-App TH to your
DropBox account for auto upload.
Maintenance – performs bad pixel repair.
Help - Therm-App Support – link to Therm-App support web page.
About – general application and device version information.
Tap the Back button to exit the Settings screen and return to
the Camera View screen
Therm-App Settings
Document: UM-TAH68AQ-1100_A Page 13 of 22
Page 14
Application Operation Therm-App Operation Manual
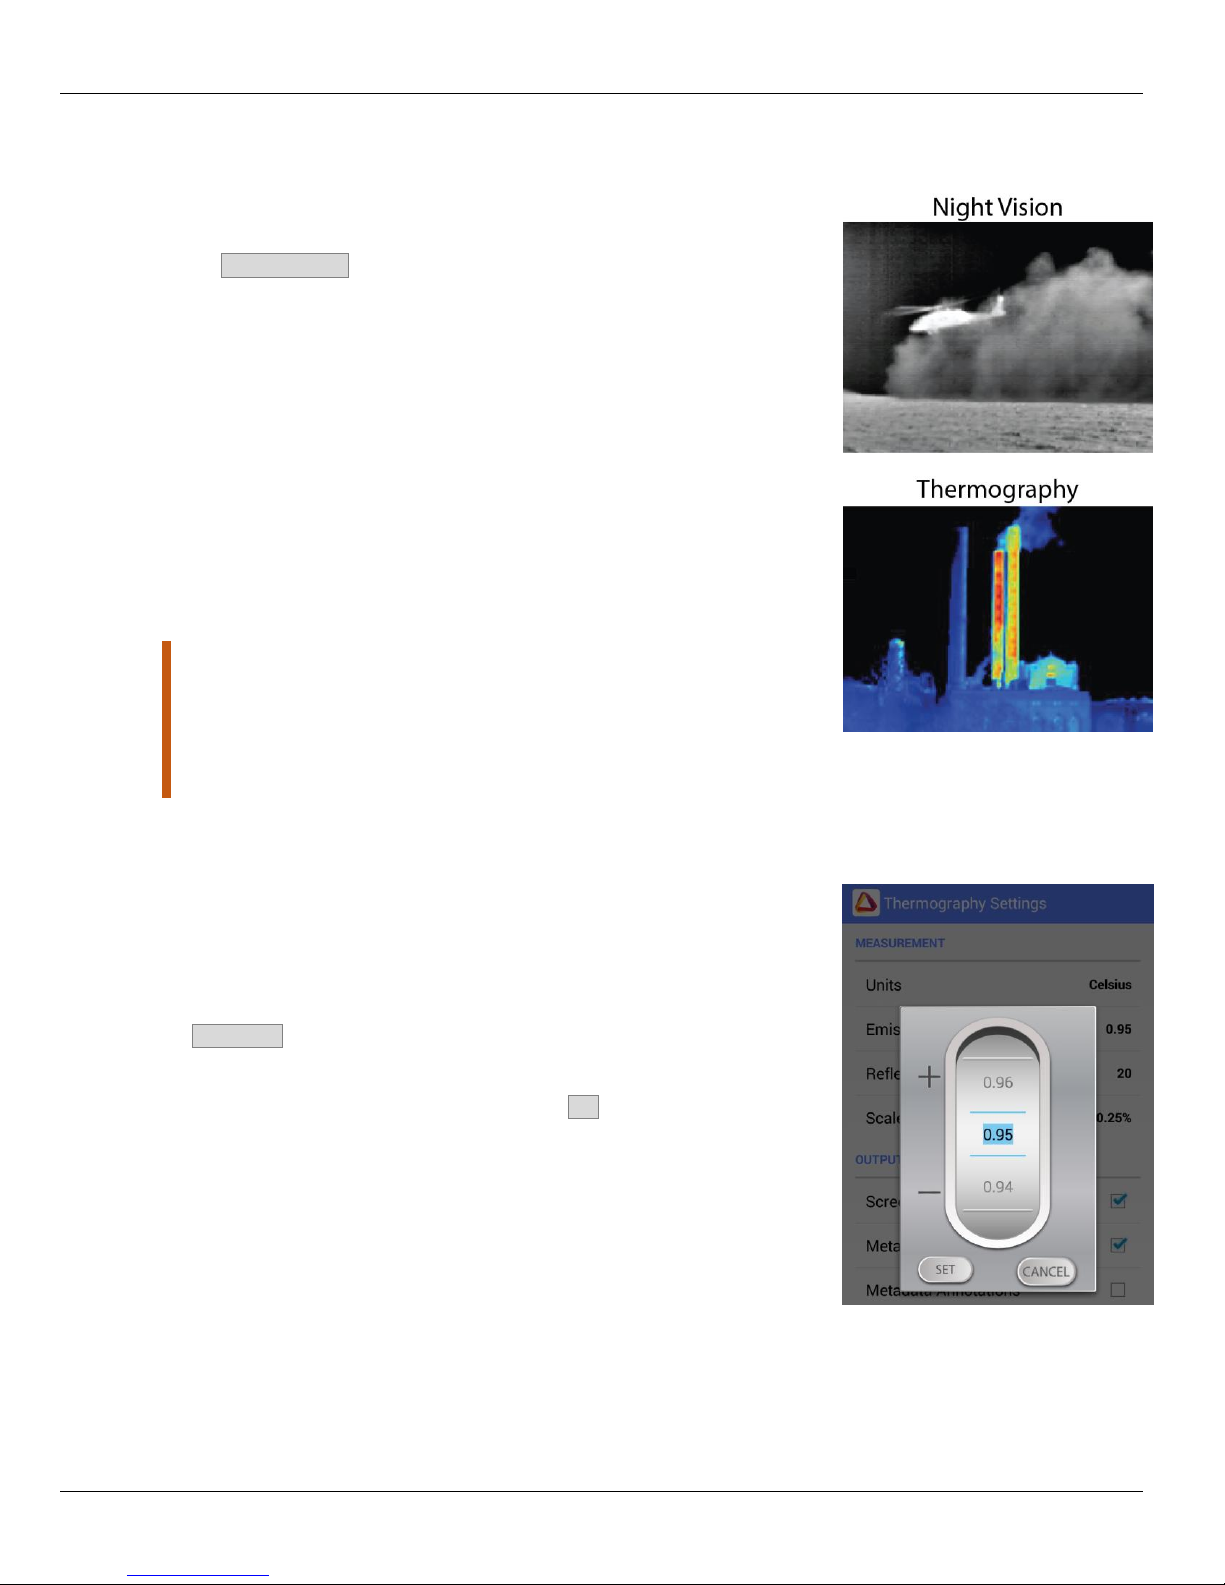
The Therm-App device image can be displayed in one of two modes.
To change the imaging mode:
Tap the Imaging Mode option on the Therm-App Settings screen.
Select one of the following modes:
Thermography - image pixels are colored in relation to their
temperature. On the default rainbow palette, the blue indicates
the coldest measured temperature and red represents the hottest
temperature measured. This mode is useful with applications
searching for temperature differences on the scanned scene.
The color palette is selectable.
Night Vision – the default pallete displays image using 256
shades of gray. This mode displays more detailed image, useful
for human observation during surveillance and detection. In night
vision mode image quality is enhanced but temperature
information is lost (two pixels with the same color might have
different temperature).
Notes: Temperature measurements are stabilized about 3 minutes after
activating the Therm-App TH device (connecting the USB cable).
Thermography measurement might be influenced by the environment of
the measured objects, the surrounding objects reflected temperature,
and the measured object emissivity.
Emissivity is a characteristic of the material being observed. Emissivity is the
ability of the material surface to emit energy by radiation. The emissivity
value (0 – 1) represents the ratio of energy radiated by the material being
observed to the energy radiated by a black body at the same temperature.
To adjust the emissivity:
Tap the Emissivity option on the
Therm-App Settings screen.
Scroll to the correct emissivity ratio and tap the Set button.
Another option is to use the quick access menu while at the camera mode.
Imaging Mode
Adjusting Emissivity
Document: UM-TAH68AQ-1100_A Page 14 of 22
Page 15
Application Operation Therm-App Operation Manual
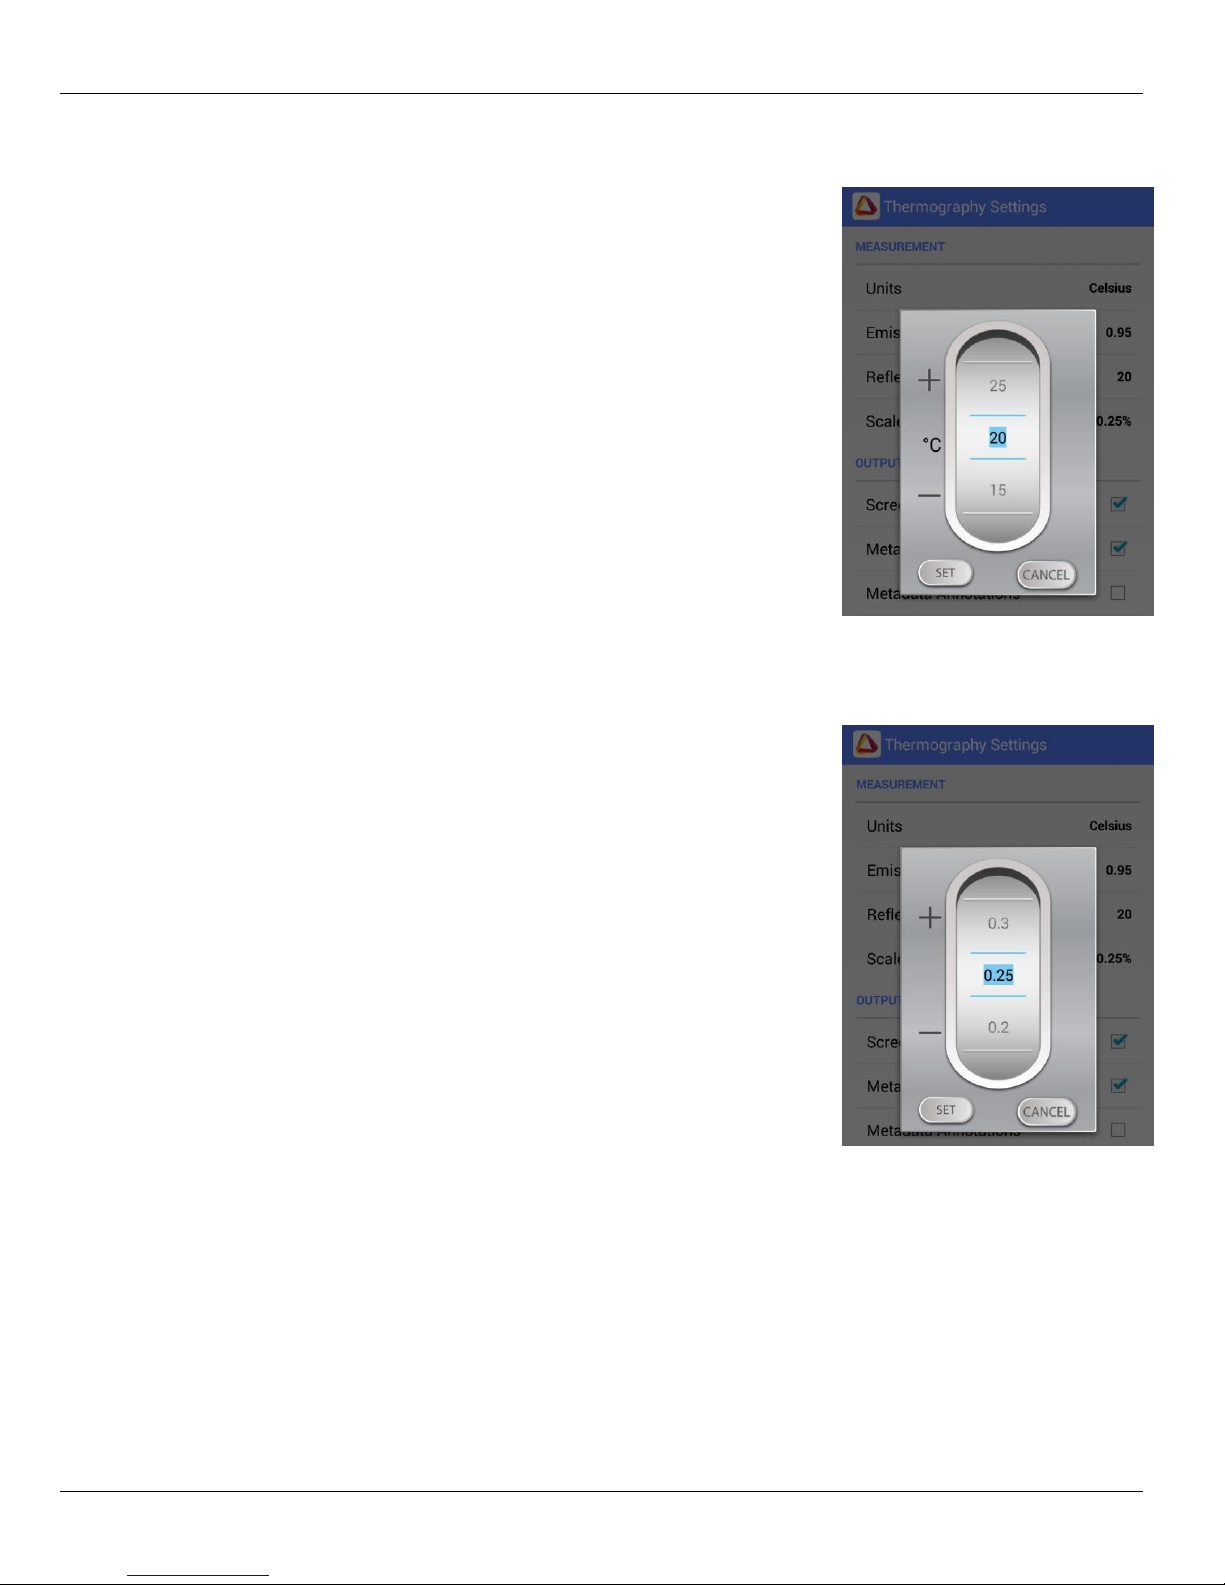
Reflected temperature represents the energy emitted by the
surrounding objects and reflected by the measured surface. Setting
this value accurately is important if the Emissivity value is low.
To adjust the reflected temperature:
Tap the Reflected Temperature option on the
Therm-App Settings screen.
Scroll to the correct temperature and tap the Set button.
Within every image frame, the temperature span is calculated and
displayed on the top of the thermography image. Use this parameter to
define the minimum number of pixels (defined by percentage) require to
impact the temperature span calculation. This setting prevents a small
number of pixels to reduce the temperature measuring resolution.
To adjust the truncation value:
Tap the Scale Truncation option on the
Therm-App Settings screen.
Scroll to the desired value and tap the Set button.
Adjusting the Reflected Temperature
Adjusting the Scale Truncation
Document: UM-TAH68AQ-1100_A Page 15 of 22
Page 16
Application Operation Therm-App Operation Manual
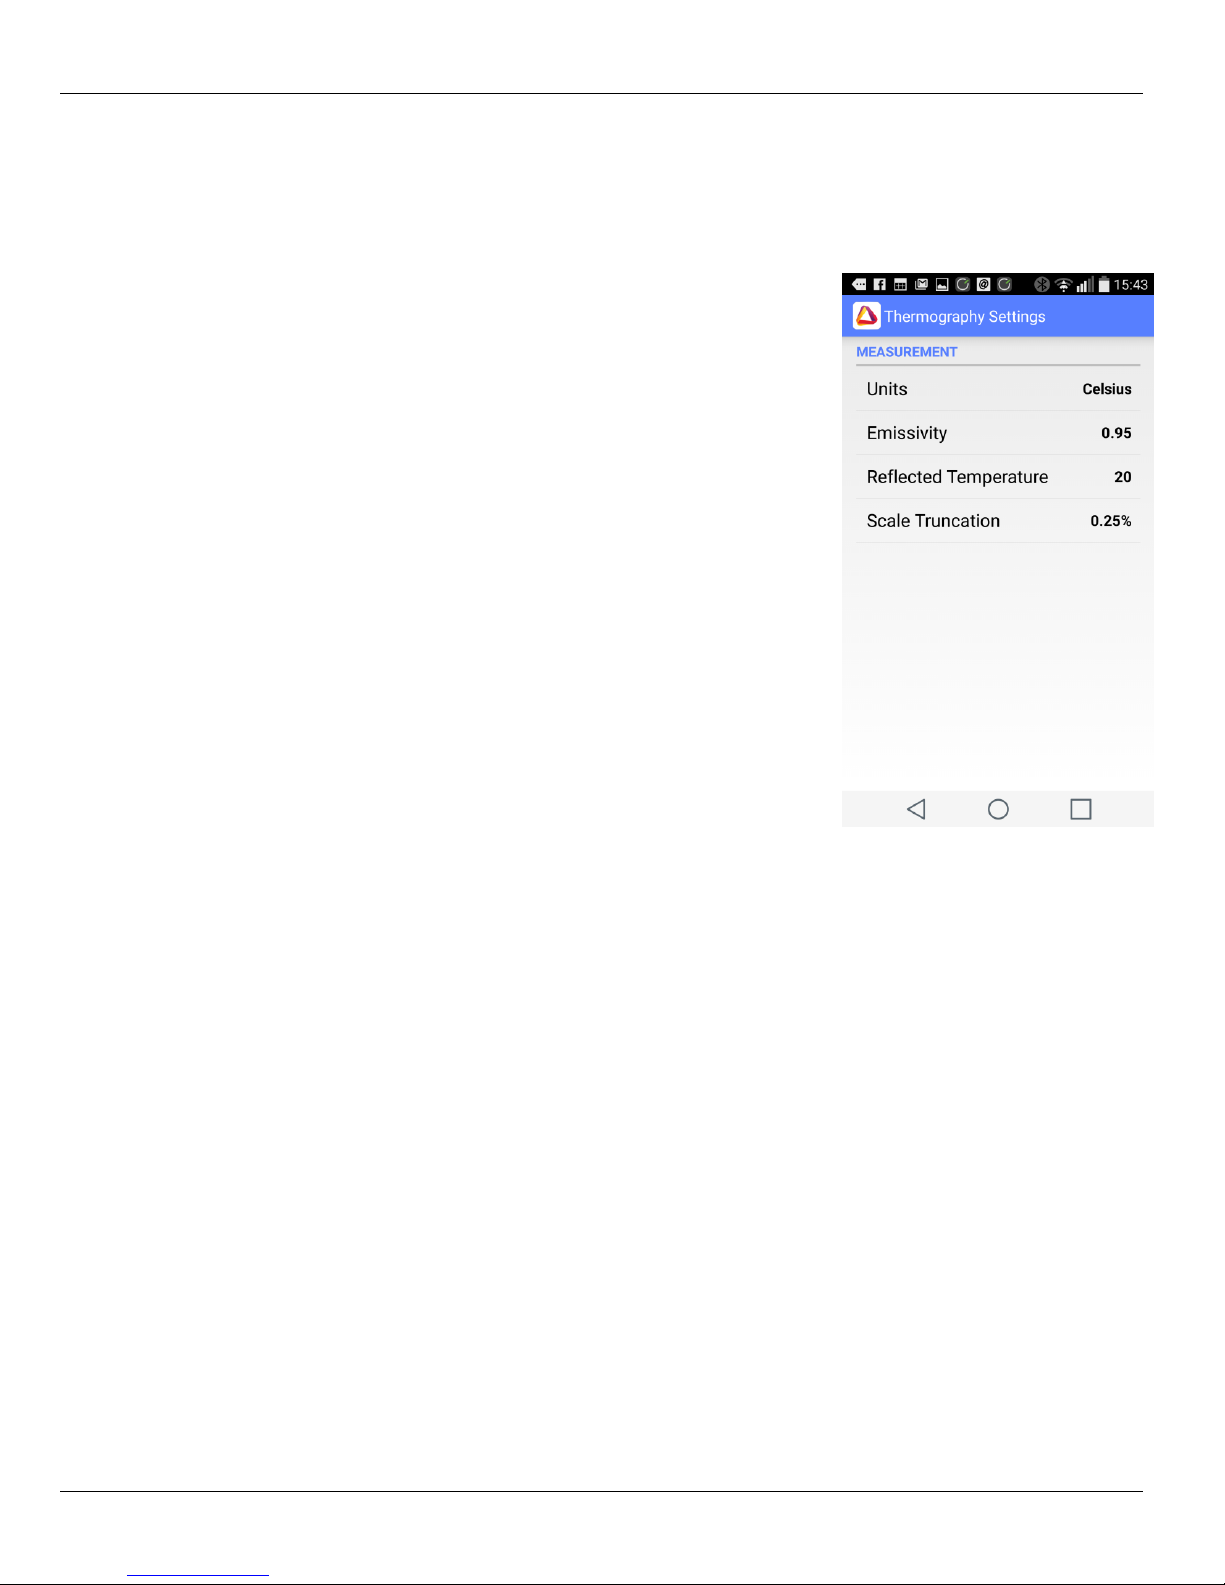
Units – choose between Celsius and Farenheit.
Emmisivity – change the Emissivity according to the measured item’s
charestatistic and material.
Reflected temperatures – improve temperature readings by
adjusting this value for reflected background correction.
Scale Truncation
Thermography Settings
Document: UM-TAH68AQ-1100_A Page 16 of 22
Page 17
Application Operation Therm-App Operation Manual
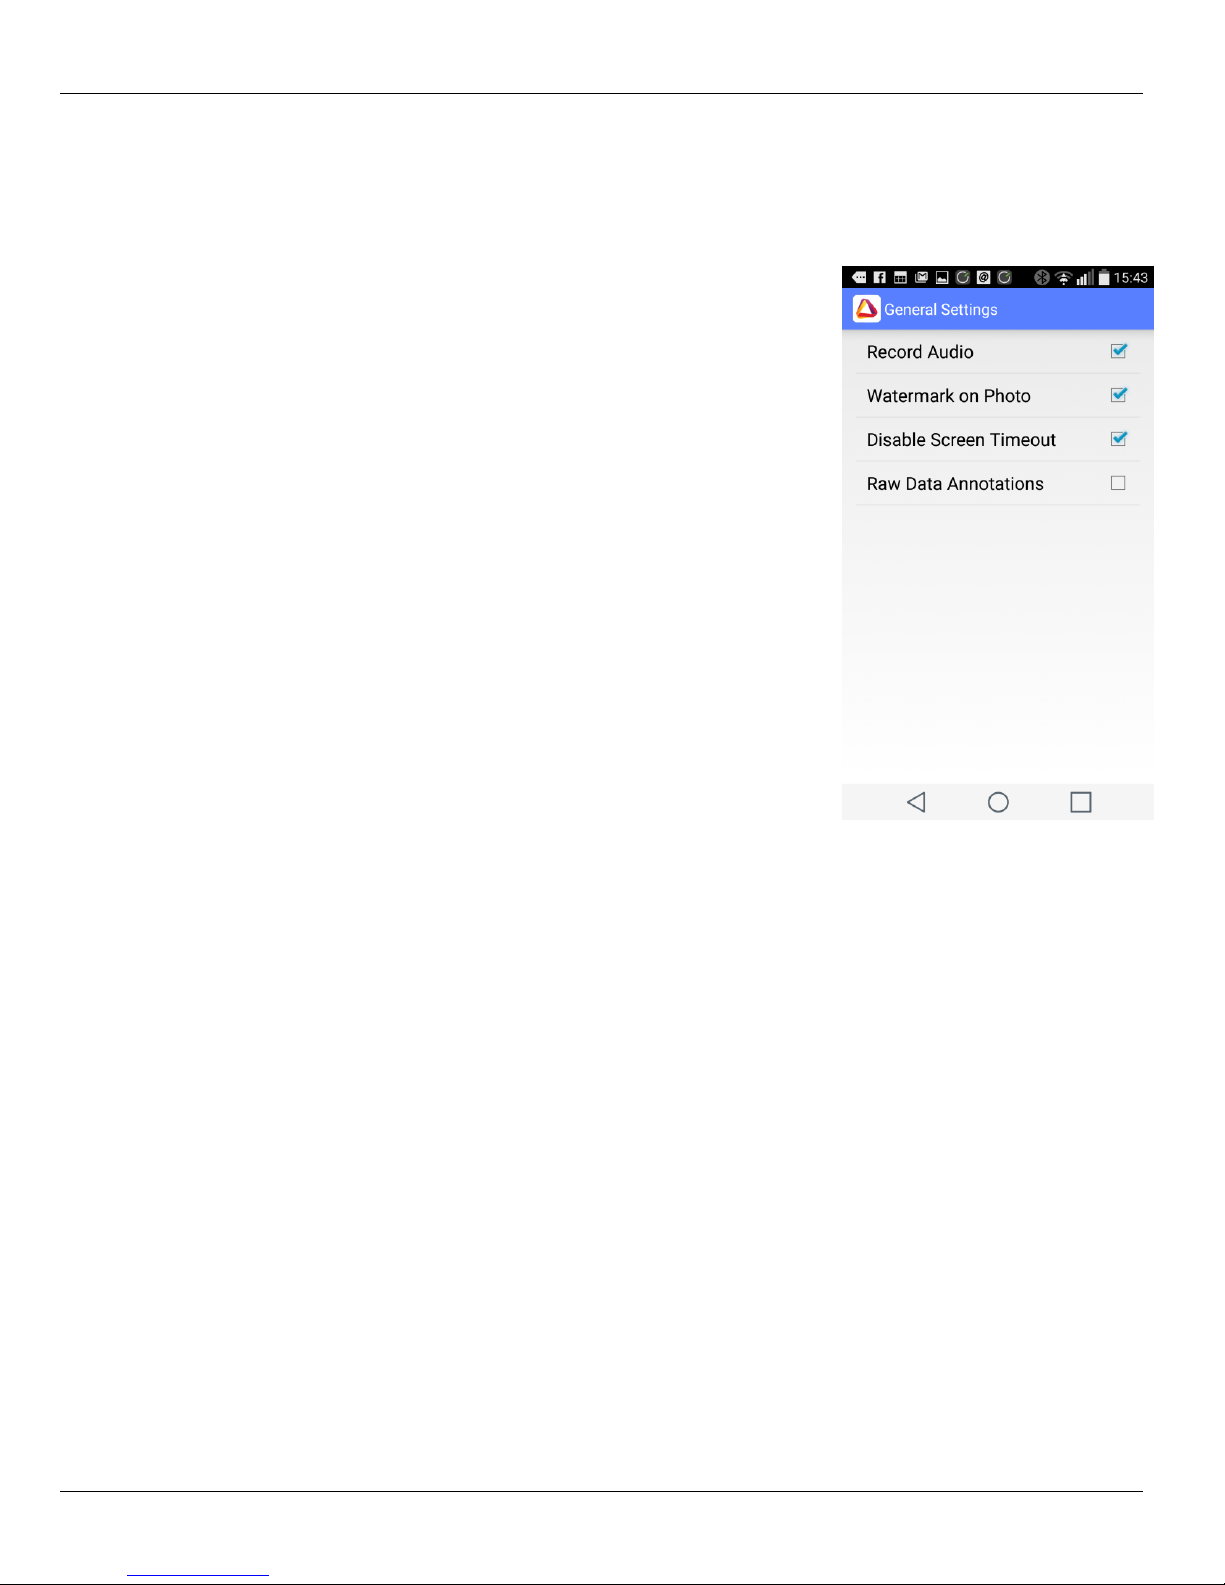
Record Audio – Enable or disable audio recording during video
recording.
Watermark on Snapshot – enable or disable the Therm-App
watermark on images.
Disable screen timeout – allows you to disable the devices’ default
screen timeout for working continuously with Therm-App (only valid
when Therm-App is connected and image is shown).
Raw Data Annotations – marking it will make a pop up screen to
appear after each photo is taken, where you’ll be able to add
annotations to the photo.
General Settings
Document: UM-TAH68AQ-1100_A Page 17 of 22
Page 18
Application Operation Therm-App Operation Manual
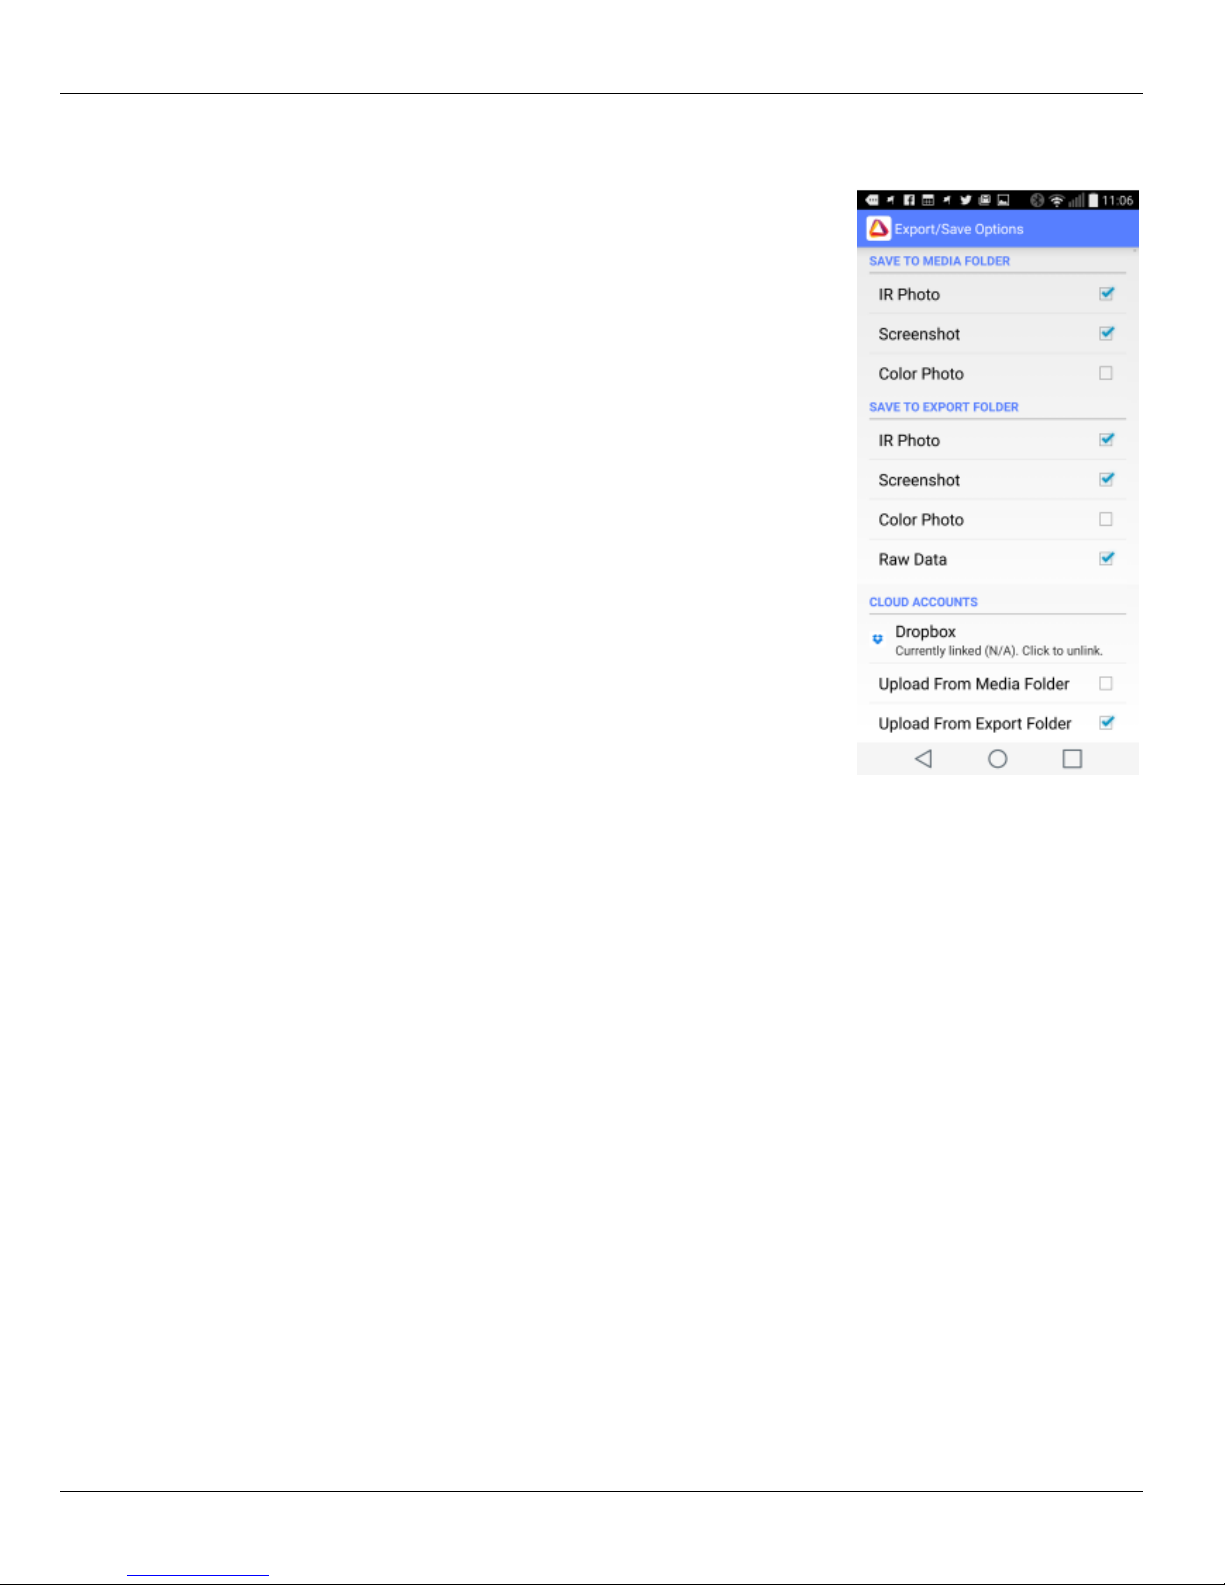
Therm-App TH has user customizable media creation and saving options.
Save To Media Folder – Media folder is the Android device’s native camera
images and videos folder. When marking the file types in this section you
allow for using the Android’s native gallery and camera with Therm-App
outputs.
IR Photo – the thermal image taken by Therm-App TH.
Screenshot – The thermal image and its surrounding data: the
temperature readings, scale colors and temperatures, etc.
Color Photo – The native Android camera picture. You can set it to
capture automatically in addition to Therm-App TH, for having a
standard visible light image in addition to the thermal image.
Save To Export Folder – Export Folder is a Therm-App TH dedicated
folder that allows for media to be exported from Therm-App to its PC
reporting software.
Row Data – A mandatory file for using the PC analysis and reporting
software with all data of an image, annotations, metadata, etc.
Cloud Accounts
DropBox - Therm-App outputs can be uploaded automatically to a DropBox
account. Use the “click to link” for linking the Therm-App TH app with your
DropBox account.
Uplaod from Media Folder – upload files marked for saving on the media
folder. Choose this option for backing up or accessing images from
DropBox, but without using the PC reporting software.
Upload from Export Folder – Check this checkbox If you use your dropbox
account for transferring Therm-App TH outputs to the Therm-App TH’s PC
analysis and reporting software.
Note: marking all check boxes will create more copies of the images and will
allow for accessing the outputs and checking images on the devices’ gallery
apps, exporting to the reporting and analysis PC software, and to DropBox,
but will consume more memory space.
Export/Save Options
Document: UM-TAH68AQ-1100_A Page 18 of 22
Page 19
Application Operation Therm-App Operation Manual
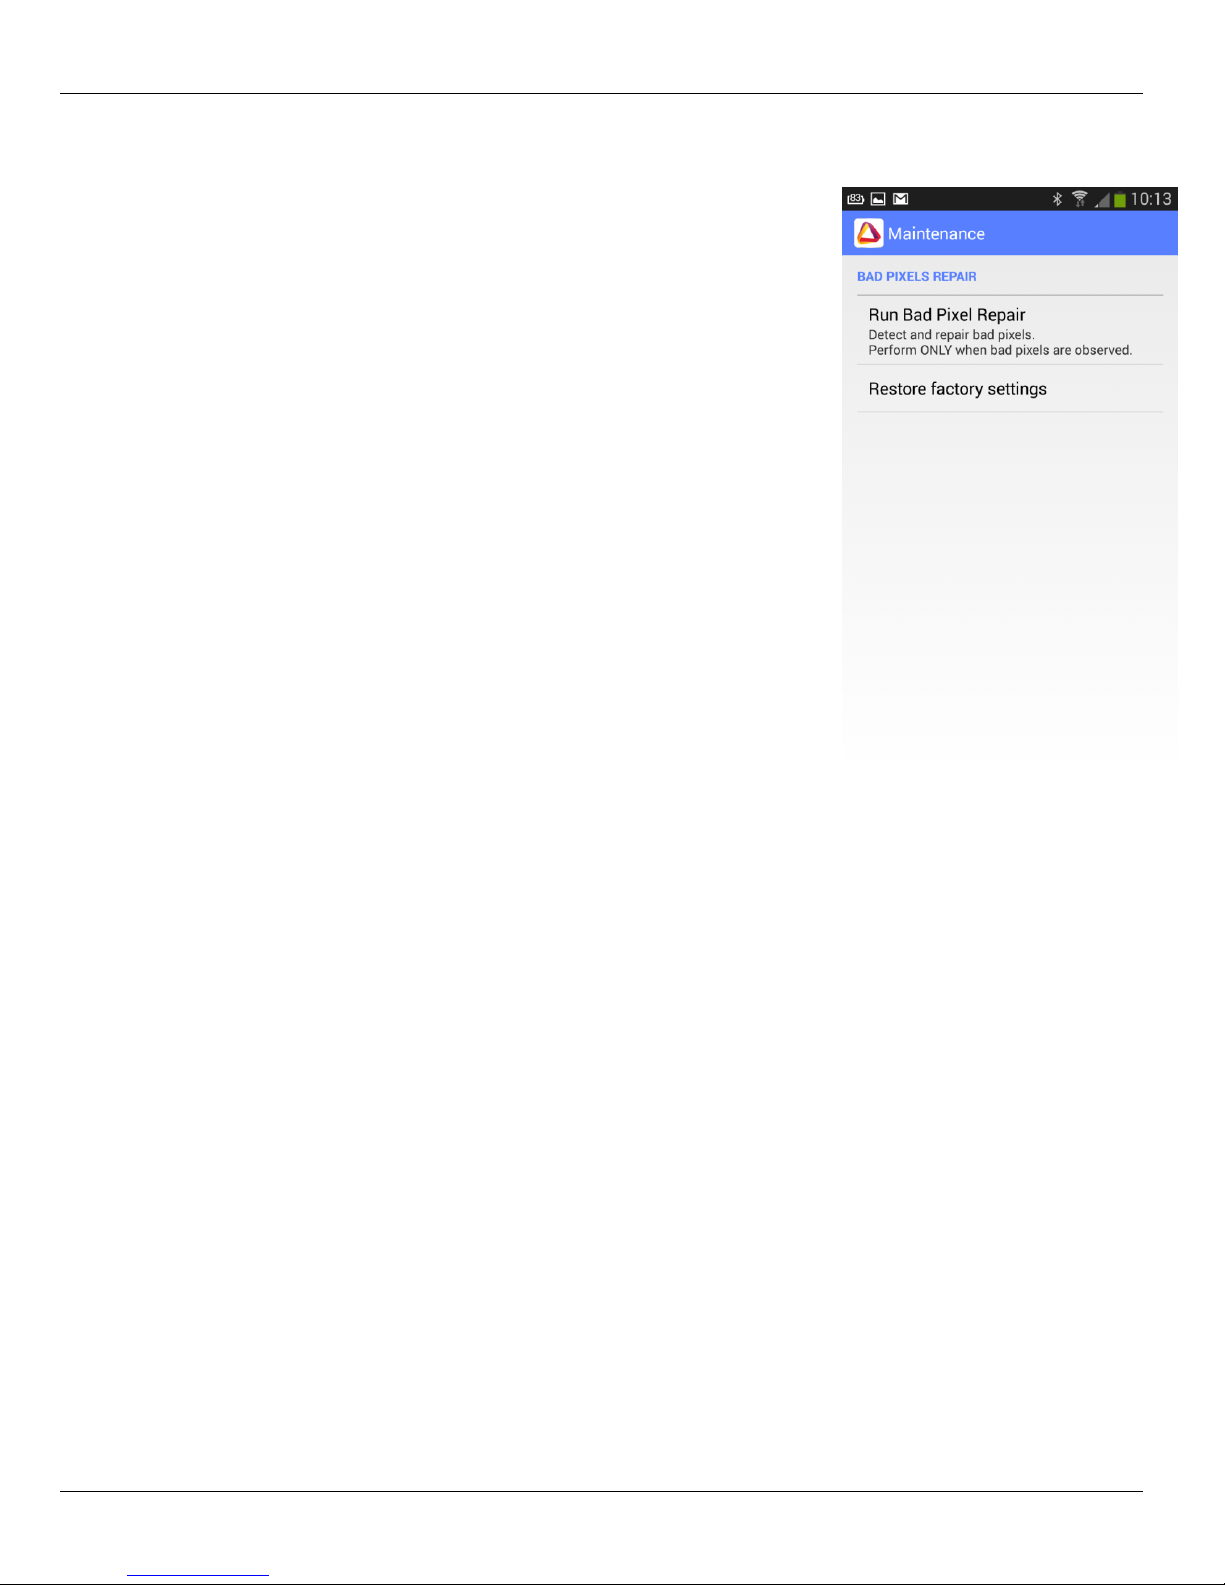
During extensive operation of the thermal sensor, or due to mechanical
shocks, some of the pixels may need repair. Bad pixels are observed as
pixels that are darker or brighter than their surroundings. To eliminate these
"bad pixels" press “Run Bad Pixel Repair” > Start and follow the on screen
instructions.
Bad Pixel Repair
Document: UM-TAH68AQ-1100_A Page 19 of 22
Page 20
Application Operation Therm-App Operation Manual
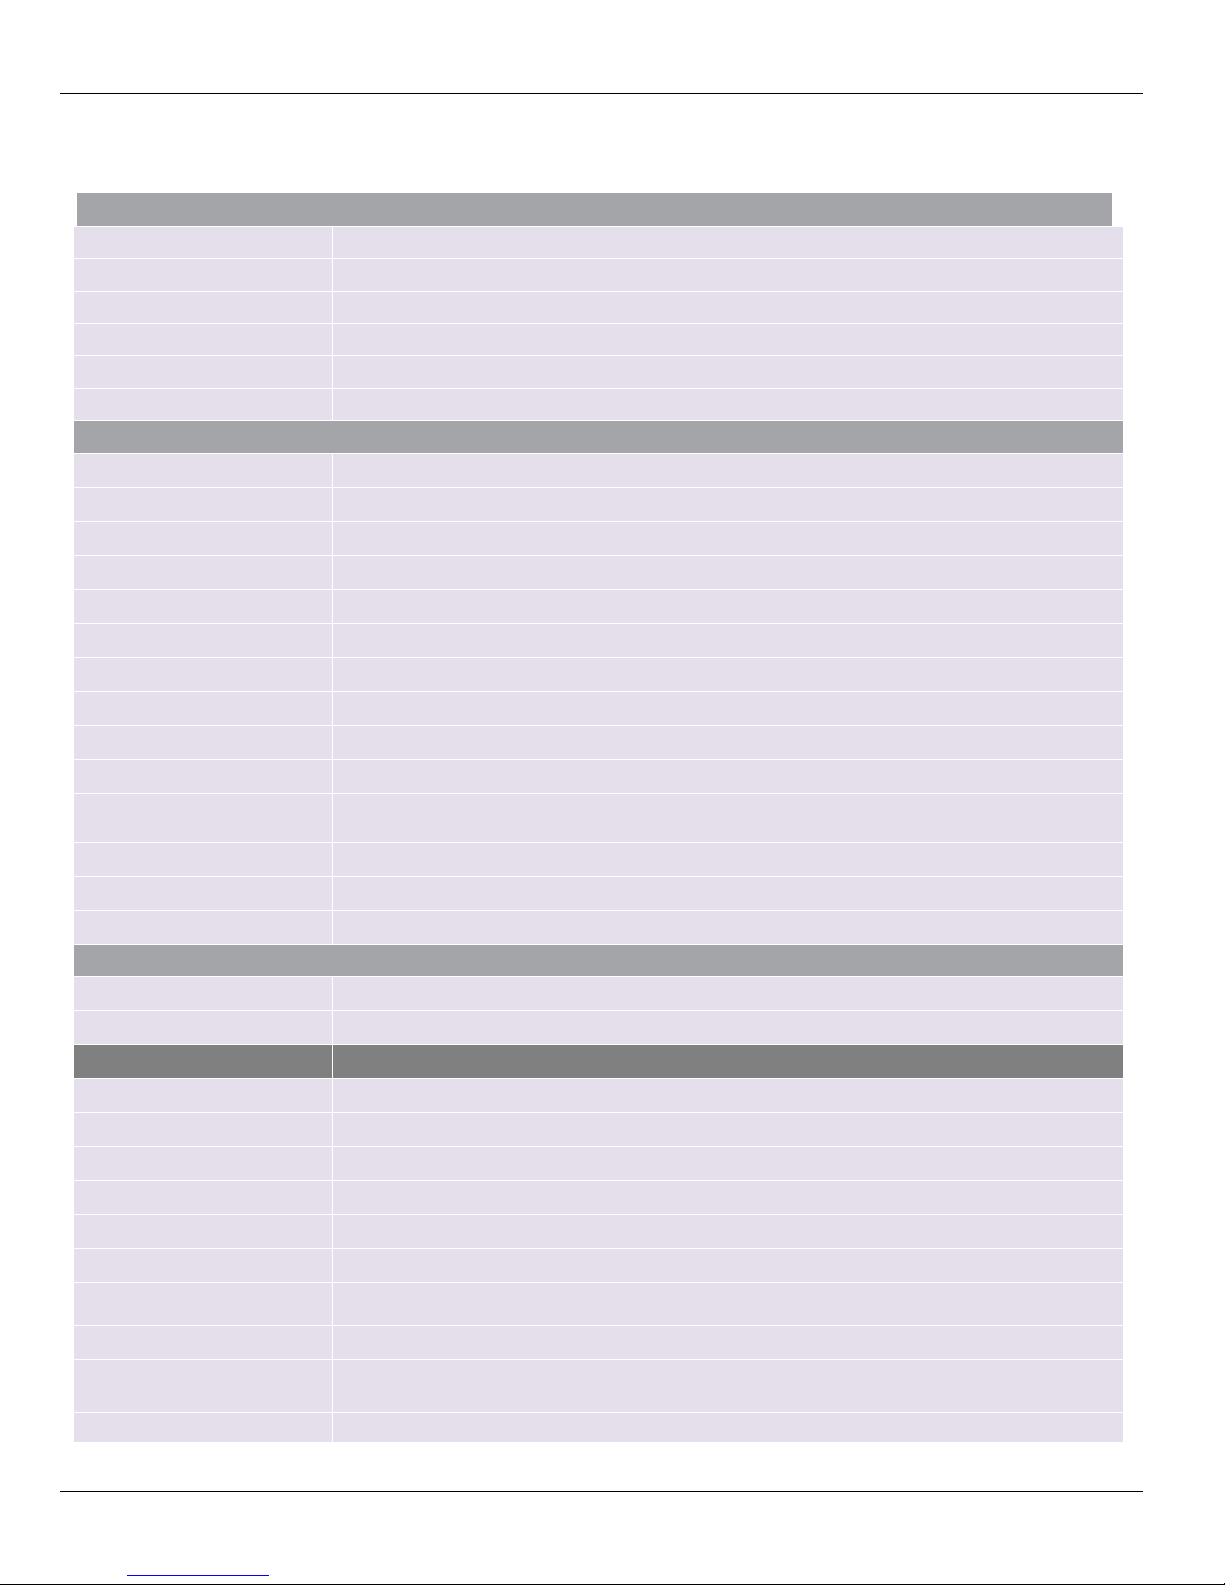
Resolution
384 x 288 pixels (>110,000 pixels )
Accuracy
± 2°C or 2% (@25°C) whichever is higher
Sensitivity
NETD < 0.10°C
Scene Temperature range
0 – 200 °C
NUC calibration
Shutterless
Calibration Routine
Est. 2 years
Hardware
Imager
384 x 288 microbolometer, LWIR 7.5 -14um
Optics
6.8mm lens (55⁰ x 41⁰)
Focus Range
0.6m to Infinity
Frame Rate
8.7Hz
Weight
123 grams / 4.33 ounces
Size
55 x 65 x 40mm (2.16" x 2.55" x 1.57")
Operating Temperature
-10°C to +50°C (14°F to +122°F)
Storage Temperature
-20°C to +50°C (-4°F to +122°F)
Power Supply
No battery, 5V over USB OTG cable, power consumption < 0.5W
Certifications
CE, FCC, RoHS, WEEE
Ingress protection (IP) rating
(IEC 60529)
IP 54
Visible camera
Depending on Android device used
Mount / Handle
Ergonomic handle, using 1/4'' standard tripod interface
Device Attachment
Clip-on for smartphone (5 -10cm span)
Smartphone
Minimal requirements
Android 4.1 and above, supporting USB-OTG
High Resolution touch screen
Yes (by the Android device used)
Software
Annotations
Text + Video annotations
Output
Video + Audio (h.264), Snapshot (IR + VIS + Metadata)
Cloud Share
Dropbox
Android Share
Via Android’s media gallery functionality to multiple services
Color Palettes
Rainbow, Iron, Vivid, Grayscale, Red Hot Thershold, Blue Cold Thershold
Temperature Scale Range
Auto, Manual
Zoom
Digital touch screen gesture
Bad Pixel Repair
Self-supported user function
Background (reflected)
compensation
Yes
Software and feature updates
Yes (via Google Play applications update mechanism)
Specifications
Document: UM-TAH68AQ-1100_A Page 20 of 22
Page 21
Troubleshooting Therm-App Operation Manual
No.
Problem\
System Failure
Indication
Solution
1
Application does
not start.
App is not initiated after
connecting to Therm-App.
Ensure that USB OTG cable is properly connected between
the Android device and Therm-App device.
Try using a different cable, from the 3 supplied.
Ensure that the Therm-App Basic app is installed from
Google Play.
Try installing the app on a different device to find if this is
an Androidd Device or Therm-App device problem.
On some rare cases thre might be compatibility issues
between the Android device and the Therm-App device.
2
Application shuts
off.
Application shuts itself
off.
Ensure that USB OTG cable is properly connected between
the Android device and Therm-App device.
Verify that you are using a USB-OTG cable.
3
Repeated
initialization
Each startup Therm-App
performs the initialization
process.
From the Apps menu, select My files > all files >
Thermapp.
Delete folder with a serial number tag.
Uninstall and re-install Therm-App Basic application.
Plug the Therm-App device again.
4
Battery saver
interrupts ThermApp.
Android device switches
to sleep mode.
Select the Disable screen timeout check-box on the
Therm-App Settings screen.
5
Therm-App
application is not
found.
The Android device
switches to Safe mode.
Unplug the USB-OTG cable.
Restart the Android device.
Connect the Therm-App device with the Android device.
6
Application screen
is not displayed
A messages screen
appears on App startup
Press the Android Home button to exit the App and
reconnect Therm-App and the Android device.
7
No active view
Camera view is not
displayed after
completing app initial
setup
From the Apps menu, select My files > All files >
Thermapp.
Delete folder with a serial number tag.
Re-install Therm-App Basic application.
Plug the Therm-App device again.
8
Video not
displayed on the
Android device.
Blank screen
Ensure that the Android device is turned on.
Ensure that the Therm-App device lens is not covered or
blocked.
Ensure that USB OTG cable is properly connected between
the Android device and Therm-App device.
Troubleshooting
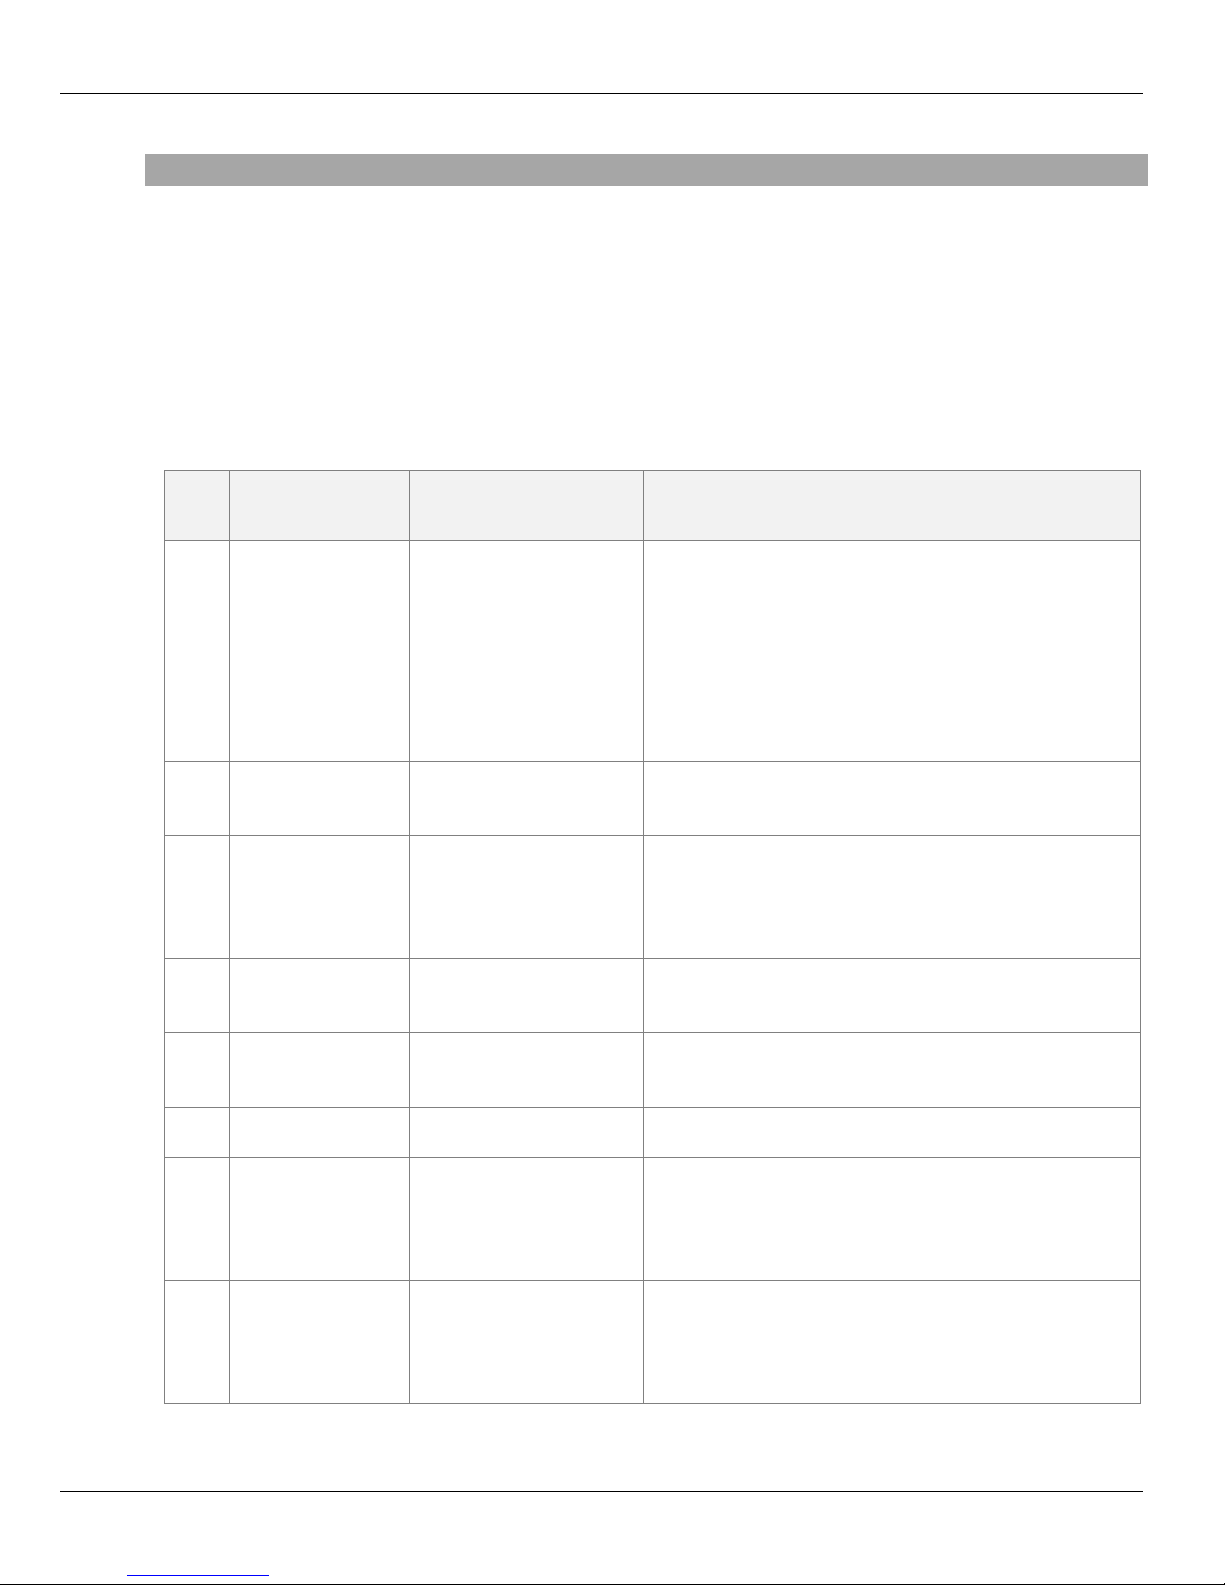
Before starting any troubleshooting procedure, make sure that:
The Android device is compatible with Therm-App.
The Therm-App Basic application is installed from Google Play.
Therm-App and the Android device are connected properly via a USB-OTG cable.
Verify that your cable is OTG compatible:
Plug the USB OTG cable into the Android device USB port.
Verify that the USB connector connected message appears on top of the screen. Replace the
cable if this message does not appear.
Table -1: Troubleshooting List
Document: UM-TAH68AQ-1100_A Page 21 of 22
Page 22
Troubleshooting Therm-App Operation Manual
No.
Problem\
System Failure
Indication
Solution
9
Noisy image
Ensure that USB OTG cable is properly connected between
the Android device and Therm-App device.
Ensure that nothing is obstructing the Therm-App device
view.
Check that the camera lens is clean.
Ensure that line of sight is not blocked by glass or other
transparent materials.
10
Unfocused image
Image blurred
Turn the lens focus ring while pointing the Therm-App
device to a sharp edged object.
Do not turn the lens focus ring too far as the lens could
slip out of place.
11
Inaccurate
temperature
readings
Temperature readings are
not as expected
Verify that you use the original 6.8mm lens. Calibrationi
will work only for it.
If you just turned-on the device or you changed the
environmental temperature, e.g., went out to the cold,
wait for a few minutes until device temperature stabilizes.
12
Battery quick
discharge.
Android device battery
discharges quickly.
Disconnect the USB-OTG cable when Therm-App is not in
use.
13
Bright or dark
pixels appear on
pictures and videos
Little dots appear on all
images and videos in
exactly the same spot
Run “Bad Pixel Repair” procedure. Enter Settings >
General Settings > Bad Pixel Repair
14
Android device
overheat
Android device overheats
while connected to
Therm-App
When an Android device is not fully USB-OTG compatible
and power consumption exceed normal use.
Connect Therm-App to a supported Android device
Document: UM-TAH68AQ-1100_A Page 22 of 22
 Loading...