

Page 1
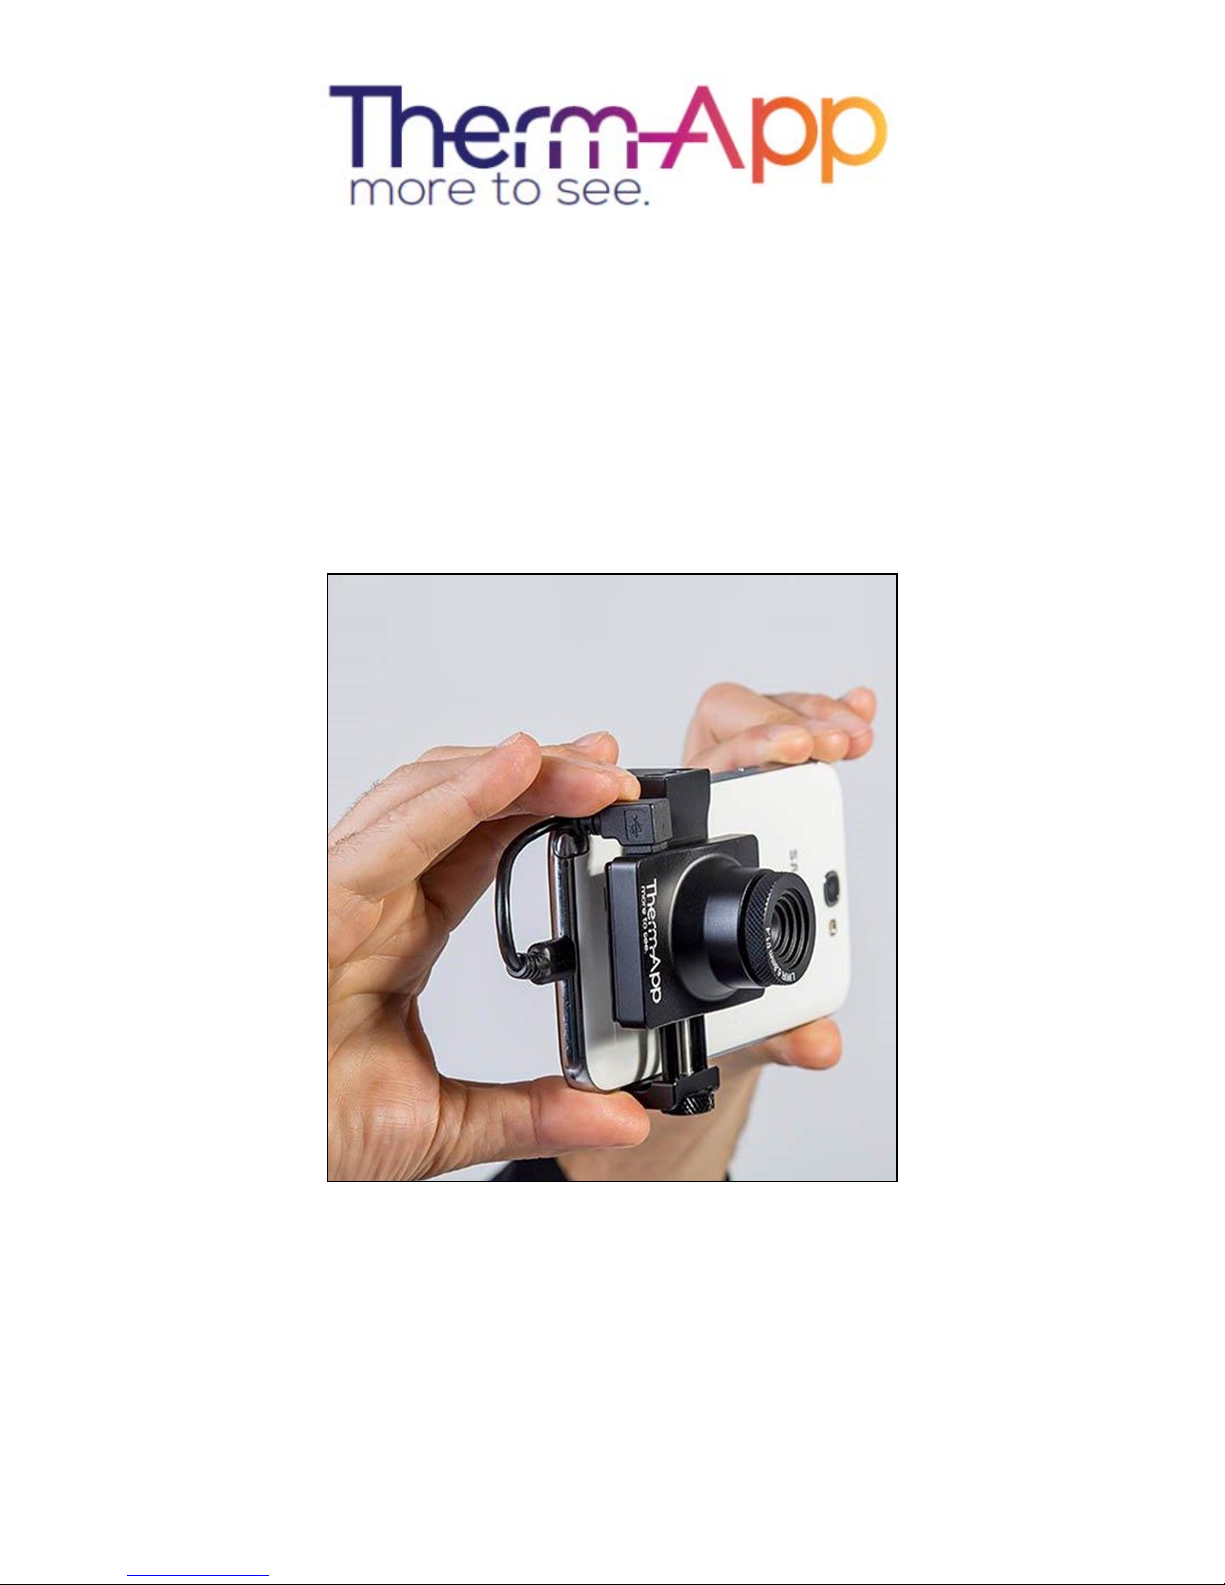
Operation Manual
High Resolution
Mobile Thermal Imaging Device
Page 2
Safety and Caution Notes Therm-App Operation Manual
Copyright © 2014 Therm-App, All ri ghts reserved.
®
Visit Therm-App
website: www.therm-app.com
Table of Contents
Safety and Caution Notes ................................................................................. 3
Quick Start Guide ............................................................................................. 4
Product Description........................................................................................... 5
Minimum Requirements .................................................................................... 6
Opening the Therm-App Box ............................................................................ 7
Installation ......................................................................................................... 7
Application Operation........................................................................................ 9
Specifications .................................................................................................. 13
Troubleshooting .............................................................................................. 14
Page 2 of 15
Page 3

Safety and Caution Notes Therm-App Operation Manual
Safety and Caution Notes
Attach Therm-App to y our mobil e dev ic e with care. Do not use any external tool s as too much
pressure might m ar k or damage y our mobile device. Secure locking knob using y our fingers only.
Therm-App uses specific factory-prepared calibration data. If, during prolonged fiel d usage of
Therm-App, a degraded per formance is noted, we recommend that you send the Therm-App
device, for re-calibration. Please contact our support t eam at http://www.therm-app.com for further
instructions.
For the most accurate temperature measurement results, it is recommended to wait at least five
minutes after Therm-App starts and before star ting temperature reading.
Therm-App manuals are updated from time to time, and product-critical notific ations are published
occasionall y . T o access the latest manuals and notifications, go to http://www.therm-app.com.
Therm-App is a Cl ass B digital product
This product has been tested and found to comply with the limit s for a class B digital product,
pursuant to Part 15 of the U.S. FCC Rules.
Some parts of Therm-App have sharp edges and could c ause i njury.
Read this document in f ull, as well as the warranty document provided with the product.
Do not drop Therm-App or apply pr essure on the I R lens to avoid breaking the lens. If the IR lens
breaks, do not touch t he br ok en piec es, the pieces. Touching the broken lens pi ec es can cause
injury.
Do not point the infr ar ed detector (with or without the lens and lens cover ) at intensive energy
sources, for example products that emit laser radi ation, or the sun. This could damage the
detector.
Do not use Therm-App in a temperat ur e env ir onm ent higher than +50 degrees Celsius (+122
degrees Fahrenheit), unless specified ot her wise i n user documentation or tec hnic al dat a. High
temperatures can cause dam age to the detector.
The Therm-App devi c e i s not sealed. Do not expose the Therm-App device to water, rain or dust.
Do not apply solvents or similar liquids to the detector or the lens.
The lens has a delic ate anti-reflective coating. Clean the lens using a soft cloth applying very light
pressure.
During lens exchange, the IR detector is exposed. Avoid all contact with the detector. Do not
touch, clean or blow air on the det ec tor. Replacement of the lens must be done in a clean, dry
area.
Do not use pneum atic system pressurized air to remove dust from the Therm-App devic e.
Pressurized air cont ains oil mist intended to lubricate pneumatic tools, this type of a pressurized
air could damage the detector and lens.
Power the Therm-App dev ic e with 5V DC connected through the micro USB connector only. Using
any other type of power source may damage the Therm-App device.
The Therm-App devi c e i s supplied with an appropriate USB-OTG cable. Use only the USB OTG
cable provided. Using any other types of cables could damage the equipment.
A label tamper is attached to one of the screws on the back of the Therm-App devic e. Removing
this l abel v oids the warranty.
Temperature measurement is accurate in zoomed out m ode only . If y ou pinc h the screen for zoom
in the temperatur e r eading will not be valid.
For more information, FAQ, and updated device compatibility views, please visit the Therm-App
website: http://www.therm-app.
As with most electr onic pr oduc ts, Therm-App device must be disposed in an environmentally
friendly way, and in acc or danc e with existing regulati ons for electronic waste. Please cont ac t our
support team at http: // www.therm-app.com for more details.
com.
Page 3 of 15
Page 4
Quick Start Guide Therm-App Operation Manual
Quick Start Guide
1. Unpack Therm-App package.
2. M ak e sure t he A ndr oid device is compatible
with the Minimum Requirem ents.
3. V isit the Google Play
download the free Therm-App Basic app, or
scan the QR code.
4. Install the Therm-App basic application on
your Android dev ic e.
5. Verify that you have a stable internet
connection.
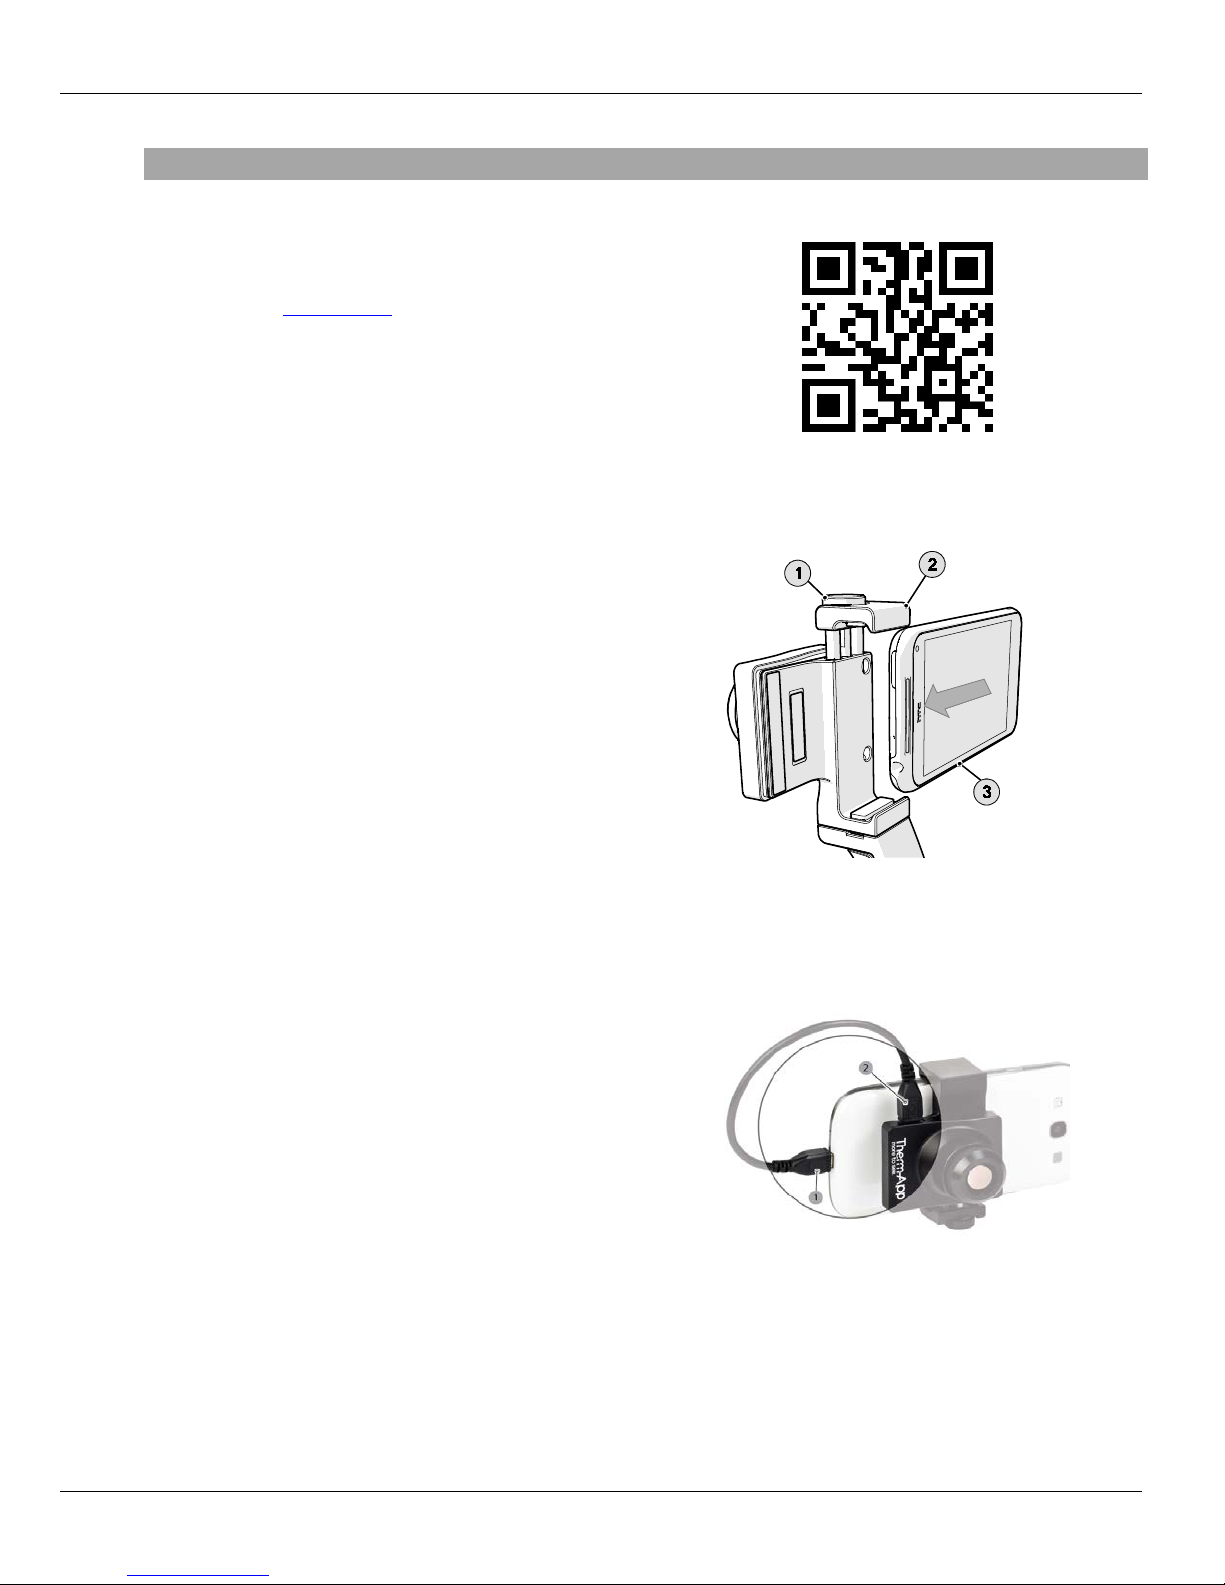
6. Insert the Android device (3) into the ThermApp device Att ac hm ent brac k et (2) and
carefully fasten the Size knob (1).
online store and
7. Connect the Android device with the ThermApp device using the USB-OTG cable
supplied.
8. Wait until download and i nitialization pr oc ess
are competed. For the first operation of the
Therm-App device, downloading may take a
few minutes.
9. Read and confirm the user agreement. The
basic applic ation is running and you are ready
to start using your Therm -App.
Page 4 of 15
Page 5
Product Description Therm-App Operation Manual
Product Description
Therm-App is a revol utionary concept that extends hum an v ision by turning an Andr oi d device into a thermal
camera. Thi s lightweight, modular, hi gh resolution device c lips onto your Android dev ice. Therm-App provides
your Android dev ic e with a capability of a powerful camera, abl e to display , record and share thermal images.
Therm-App runs an enti r ely new suite of ex ci ting night vision and thermography applicati ons.
Therm-App combines the power of a fully functi onal thermal camer a with the mobilit y, processing power, di splay
capabiliti es and advanced features provided by A ndr oid devi c es today.
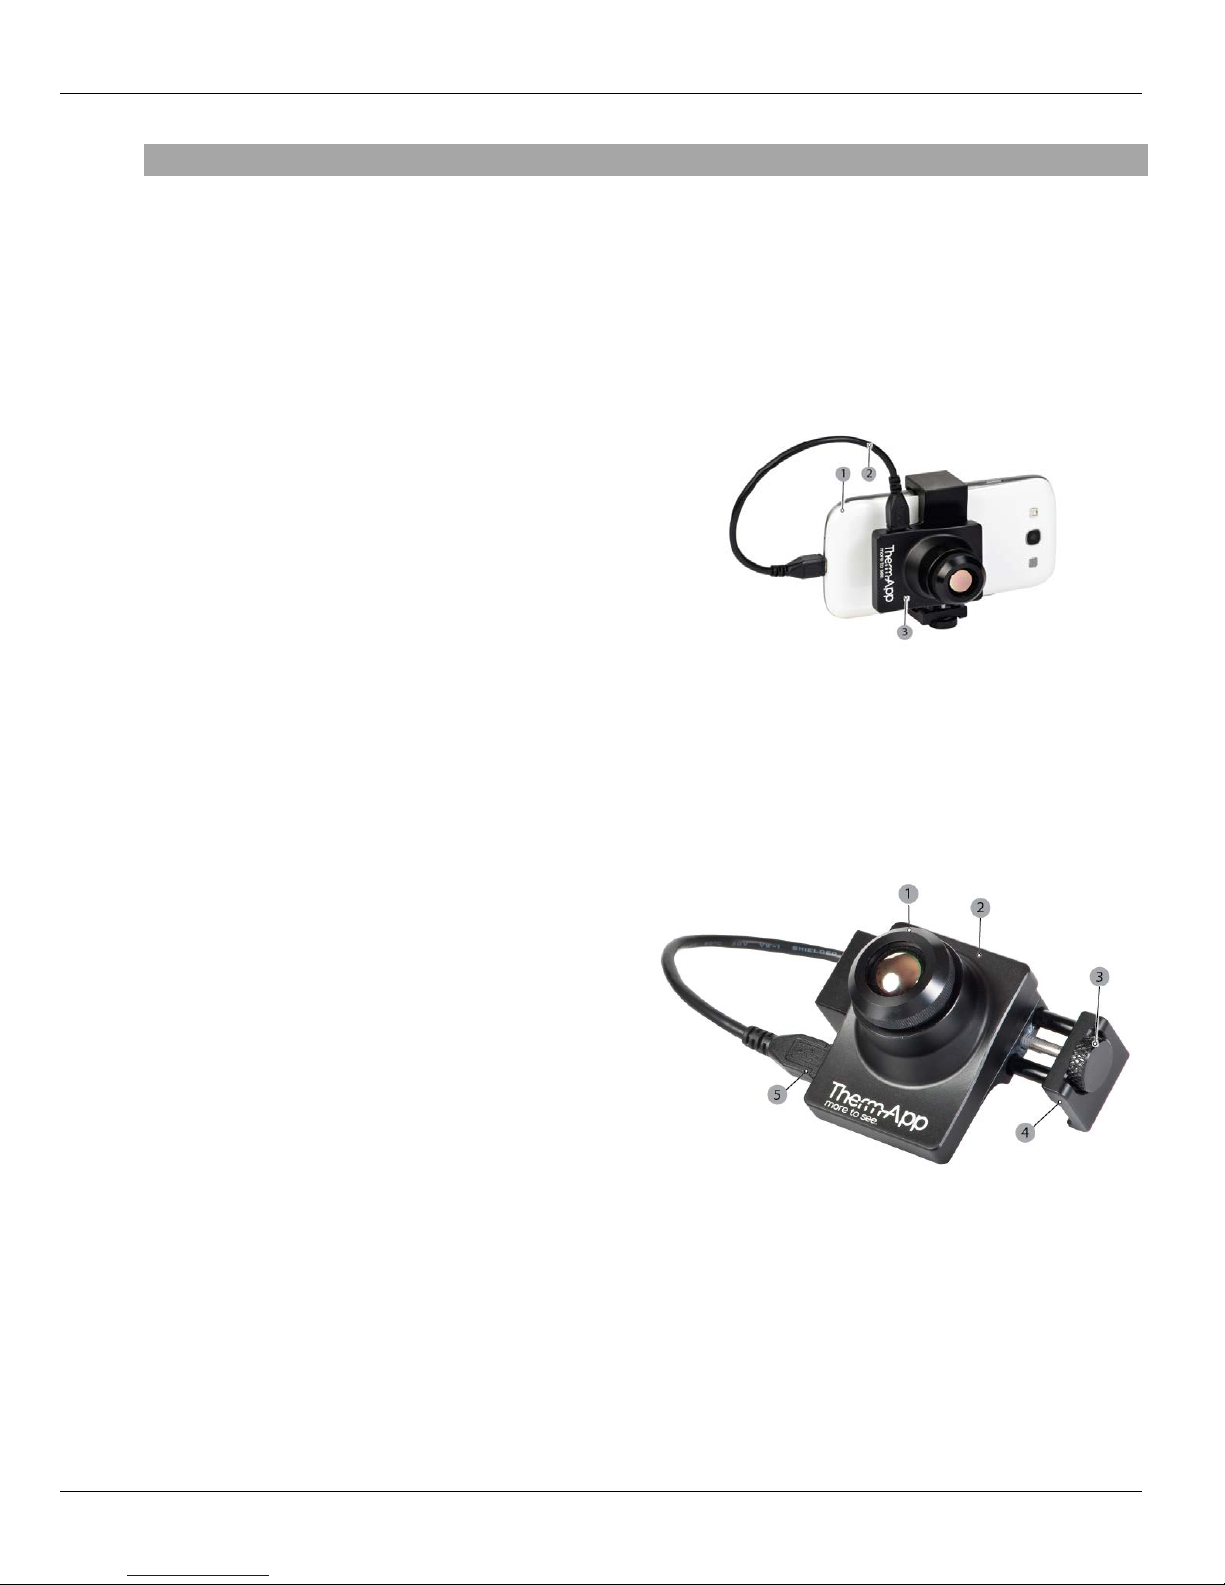
The Therm-App devi c e main com ponents:
Android device [1] (not supplied with
Therm-App).
USB-OTG cable [2]
Therm-App device [ 3]
The Therm-App devi c e includes:
Therm-App device housing [2]
Lens [1] – with exchangeabl e option
OTG port [5] – for communication with
the Android dev ic e.
Attachment brack et [ 4] – connec ts the
Therm-App device with the Android
device.
Size knob [3] – for adjustment to fit
different siz es of A ndr oid dev ic es
Page 5 of 15
Page 6

Minimum Requirements Therm-App Operation Manual
Minimum Requirements
Android device running an Android ver. 4.1 or above.
Android device support ing USB OTG (On-The-Go, also known as USB host mode).
USB-OTG cable, male to male, microUSB.
Important Note: Most off-the-shelf cables are not USB-OTG and will not operate wit h the Therm-
App device. Use only the USB-OTG cables that are provided with the product.
Below is a partial list of supported devices:
LG: Nexus 5, G2, Flex
Samsung: Galaxy Note 3, G alax y S3, Galaxy S 4
Sony: Xperia Z, C6603
Zopo: C3
HTC: One
Motorola: Mot o G
For the full list visit: http://therm-app.com/therm-app-supported-devices/
Page 6 of 15
Page 7
Opening the Therm-App Box Therm-App Operation Manual
Opening the Ther m -App Box
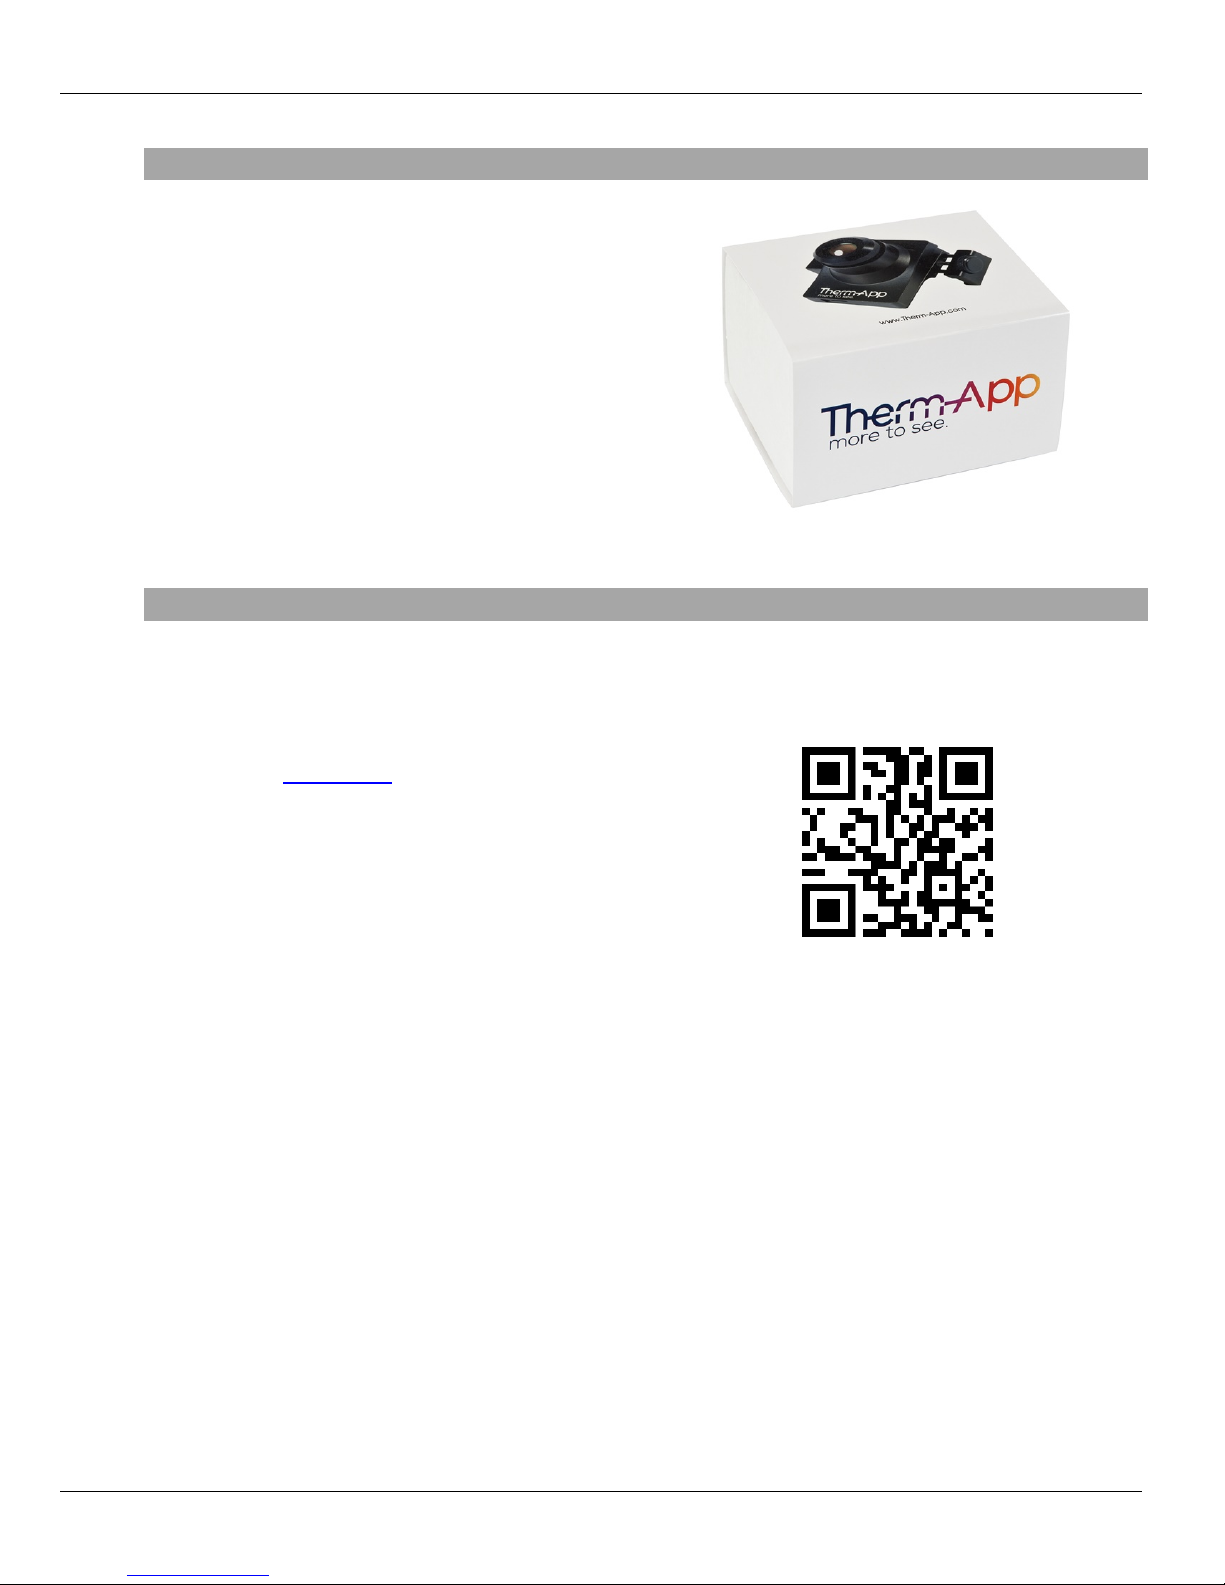
The Therm-App box contains:
Therm-App device wit h lens
(P/N TA19A17Q-1000)
17 cm USB-OTG cables
(P/N TA00000C-0017)
21 cm USB-OTG cables
(P/N TA00000C-0021)
Quick start guide (P/N D01642-001)
According to client specific order, the following
optional accessory m ay be incl uded in the box:
6.8 mm lens (P/N TA68A000-0000)
Installation
Installing the Application
1. M ak e sure the Android device operating
system (OS) is either version 4.1 or above,
supporting USB On-The-Go.
2. V isit the Google Play
online store and
download the free Therm-App Basic app, or
scan the QR code.
Page 7 of 15
Page 8
Installation Therm-App Operation Manual
damage
Note:
Note:
Notes:
must be completed. This process may take a few
Connecting Therm-App to the Android Device
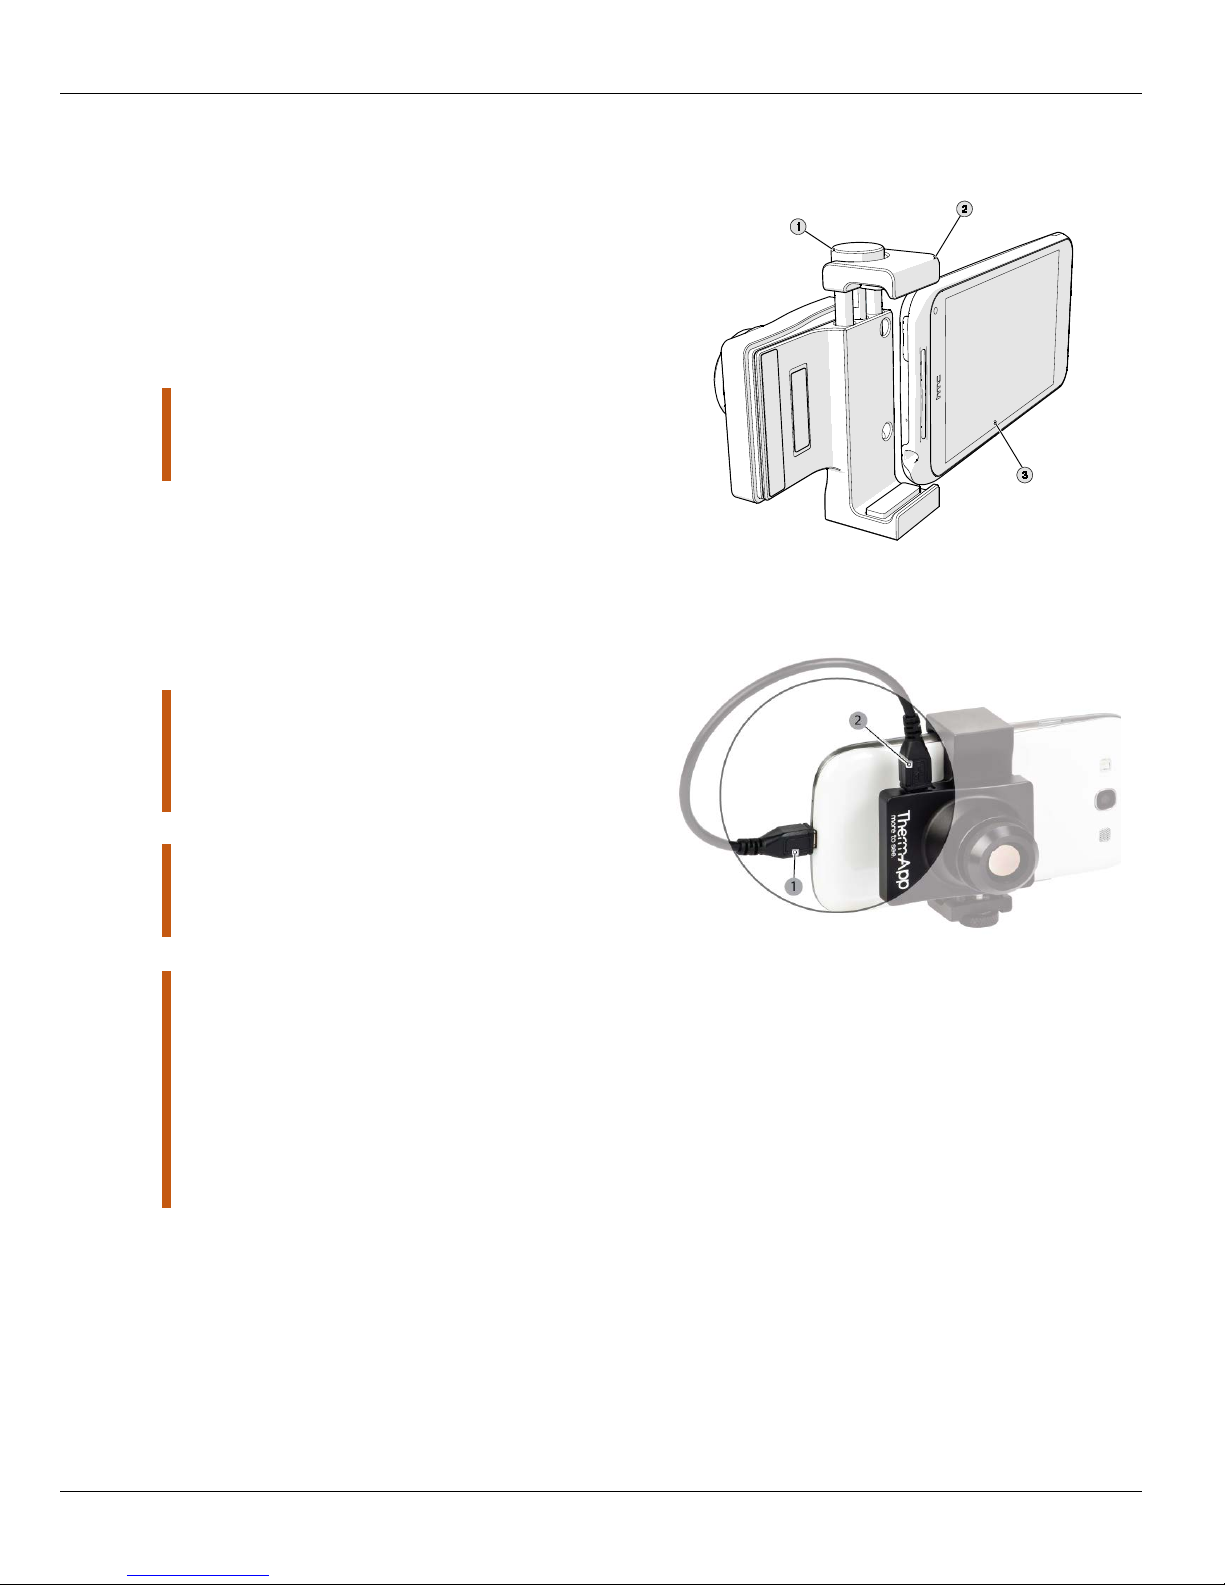
1. Turn the Size knob (1) so the Android device
slides (3) in the Attachment brackets (2).
2. Attach Therm-App to the back of the mobile
device by turning the size knob.
3. Fasten the Size knob (1) and the Attachment
bracket (2) to fit the Android device. Ensure
that the devic e is firmly attached.
Note: Do not fasten the size knob too tightly.
Fastening the size knob too tightly could
the Android device.
1. Connec t the USB-OTG cable to both Therm-
App [1] and the mobile device (2).
Use only the USB-OTG cable supplied. In
most cases, the micro USB cables supplied with
mobile phones do not support the USB-OTG
functionality.
Verify that the USB-OTG cable is
connected properly to the Therm-App device and
to the mobile device.
For the first use of the Therm-App device
with an Android device, an initialization p rocess
minutes and must not be interrupted. Make sure
you have a stable internet connection prior to
connecting your mobile device to the Therm-App
device. Perform d ownload using internet
connection with no environmental interference.
Page 8 of 15
Page 9
Application Operation Therm-App Operation Manual
Application Operation
Initialization
This section is relevant to the first connection between the Therm-App
device and a new Androi d dev ic e.
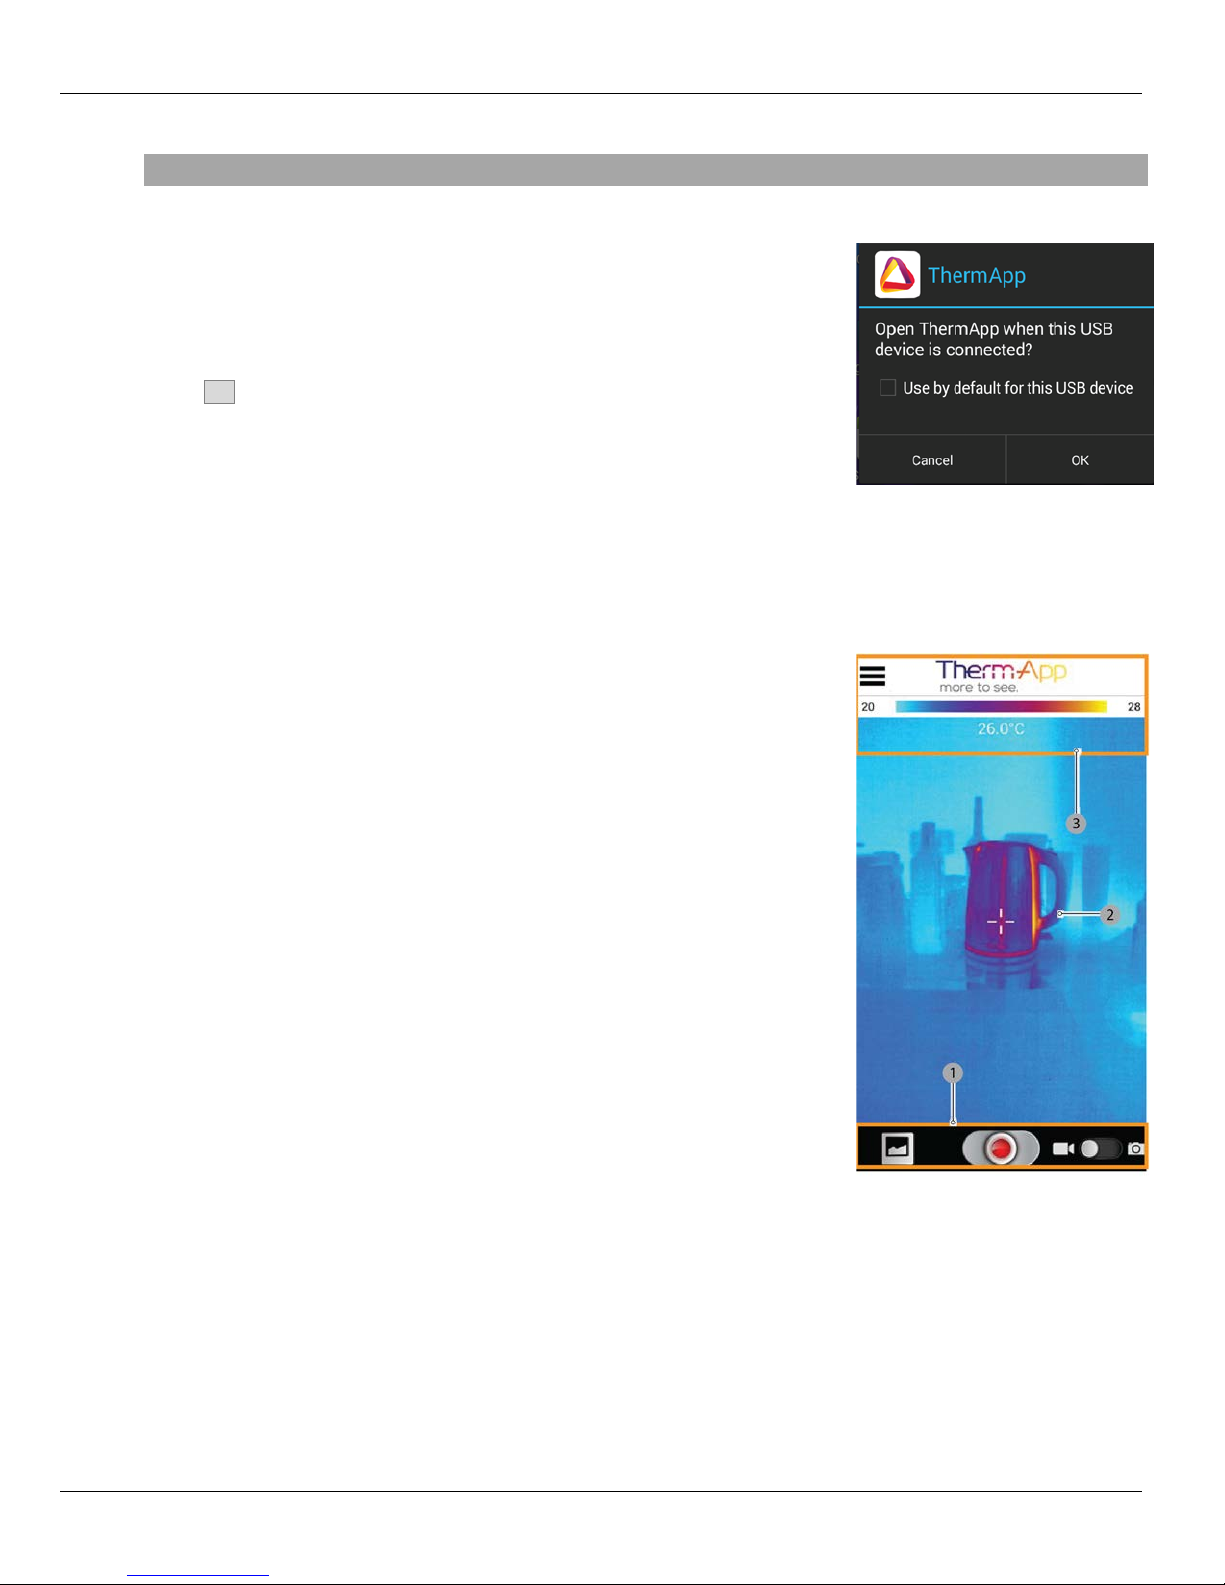
The Androi d devi ce asks for your per m ission t o associat e the US B port with
the Therm-App application.
1. Select the Use by defaul t for this US B device check box and tap the
OK. The Therm-App applic ation (App) automatically starts and
displays the Terms and conditions screen. Review and accept the
Terms and condition s.
2. The App shows the Initializing message and downloads fi les which
are specific to your Therm-App device (per devic e serial number).
When download is completed, the App displays the Camera Vi ew
screen.
Camera View
The Camera View screen includes:
Upper Toolbar (3)
Image display (2)
Lower toolbar (1)
Page 9 of 15
Page 10
Application Operation Therm-App Operation Manual
Upper Tool bar
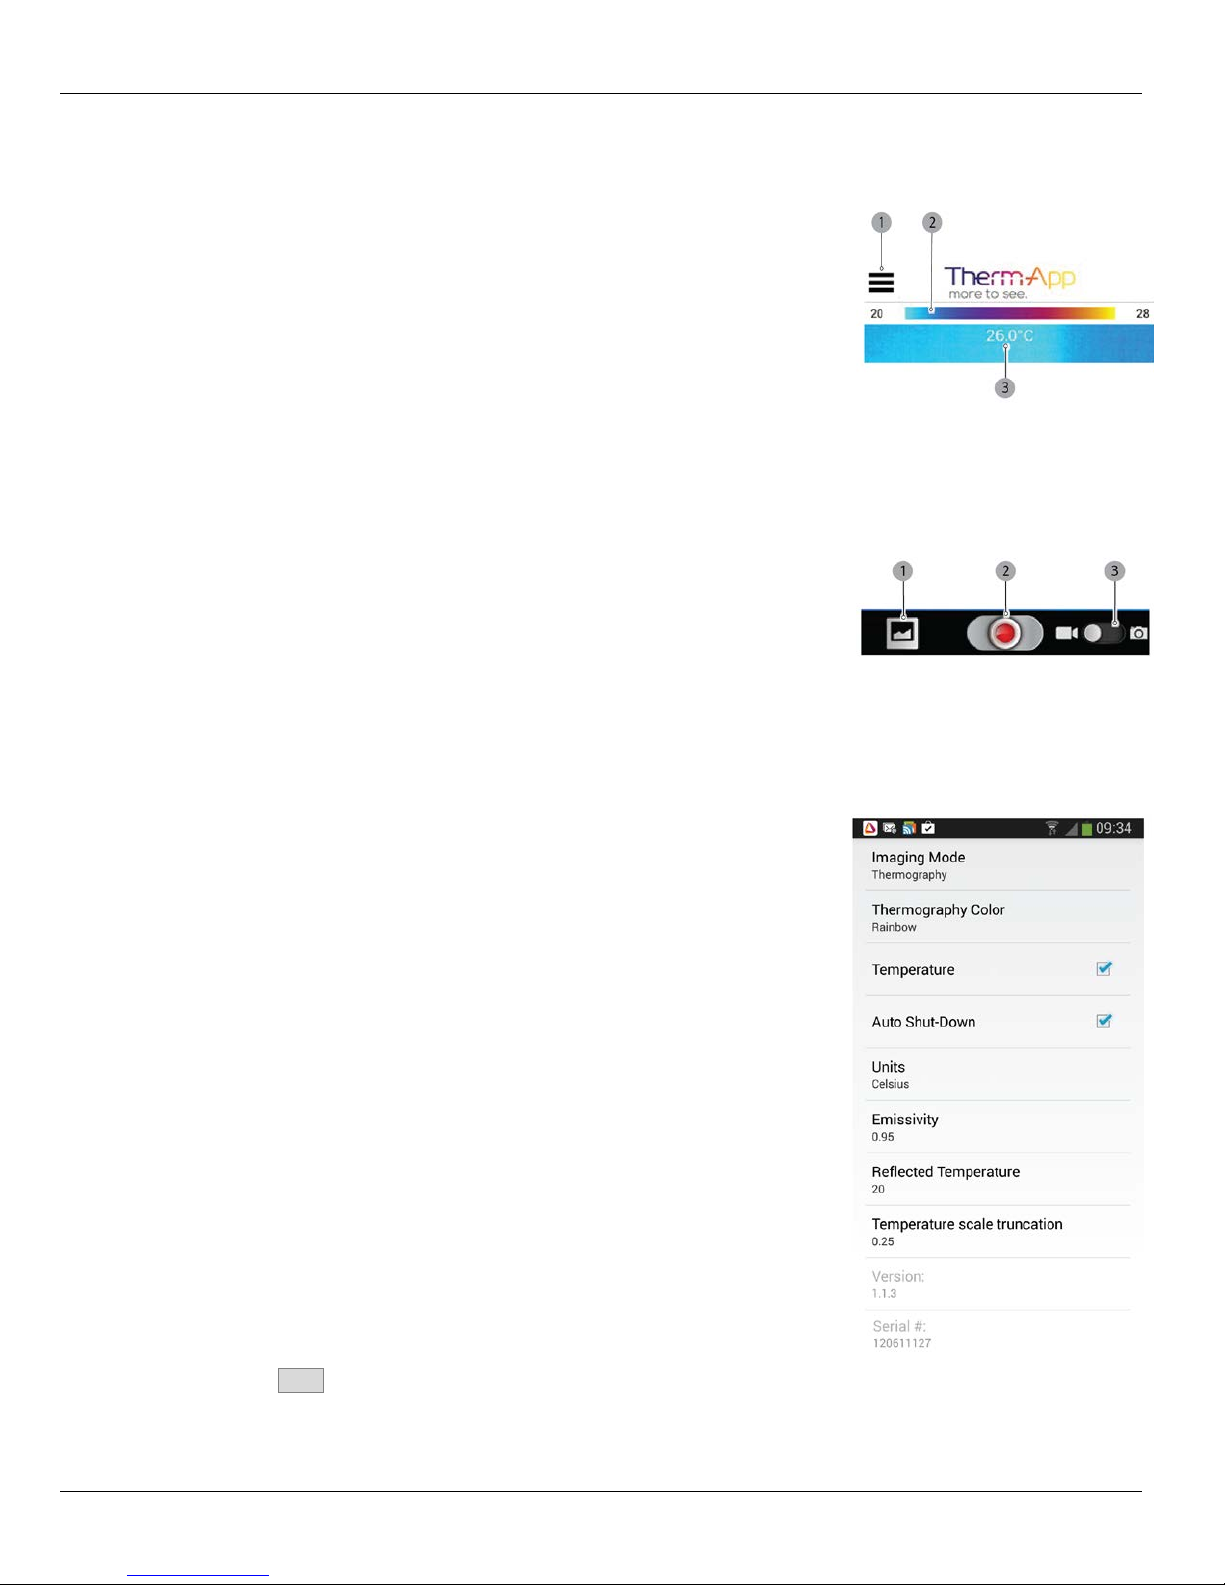
The upper toolbar i ncl udes:
Settings button (1) – for configuring the Therm-App Settings.
Temperature bar (2) – presents the range of temperatures
currently viewed. The minimum and maximum temperatures
are displayed on both si des of the bar.
Temperature read ing ( 3) – displ ay s the temper ature at the
center of the image (mar k ed by the cross hair).
Set button (4) – enables entering new parameters.
Lower Tool bar
The lower toolbar i ncl udes:
Gallery (1) – display s pict ur es stored in the Android device
default album application.
Shooting Mode (3) – switches between video and still image
modes.
Shooting button (2) – according to the selected shooting
mode (3), starts and stops video recording, or tak es a photo.
Therm-App Settings
Tap the Sett ings button located on the upper toolbar. The Sett ings screen i s
displayed and incl udes:
Imaging Mode – switc hes between Night Visi on and
Thermography modes.
Th ermog raph y Col or – enables selecting thermography
color palett es.
Temperature – selec ting the Temperature checkbox activates
readings of temperature measured at the center of t he im age
view (at the cross hair mark) .
Disab le sleep mode – Selecting the check box deactivates
the Android devic e sleep mode.
Units – switches t emperature readings between Celsius and
Fahrenheit.
Emissivity – for Adjusting Emissivity.
Reflected Temperature – for Adjusting the Reflected
Temperature.
Temperature Scale Truncation – for Adjusti ng the
Temperature Truncation.
Version – displays the App version.
Serial Number – display s the Therm-App device serial
number.
3. Tap the Back button to exit the Settings screen and return to the
Camera View screen.
Page 10 of 15
Page 11
Application Operation Therm-App Operation Manual
Notes:
minutes
be
, the
and the measured object
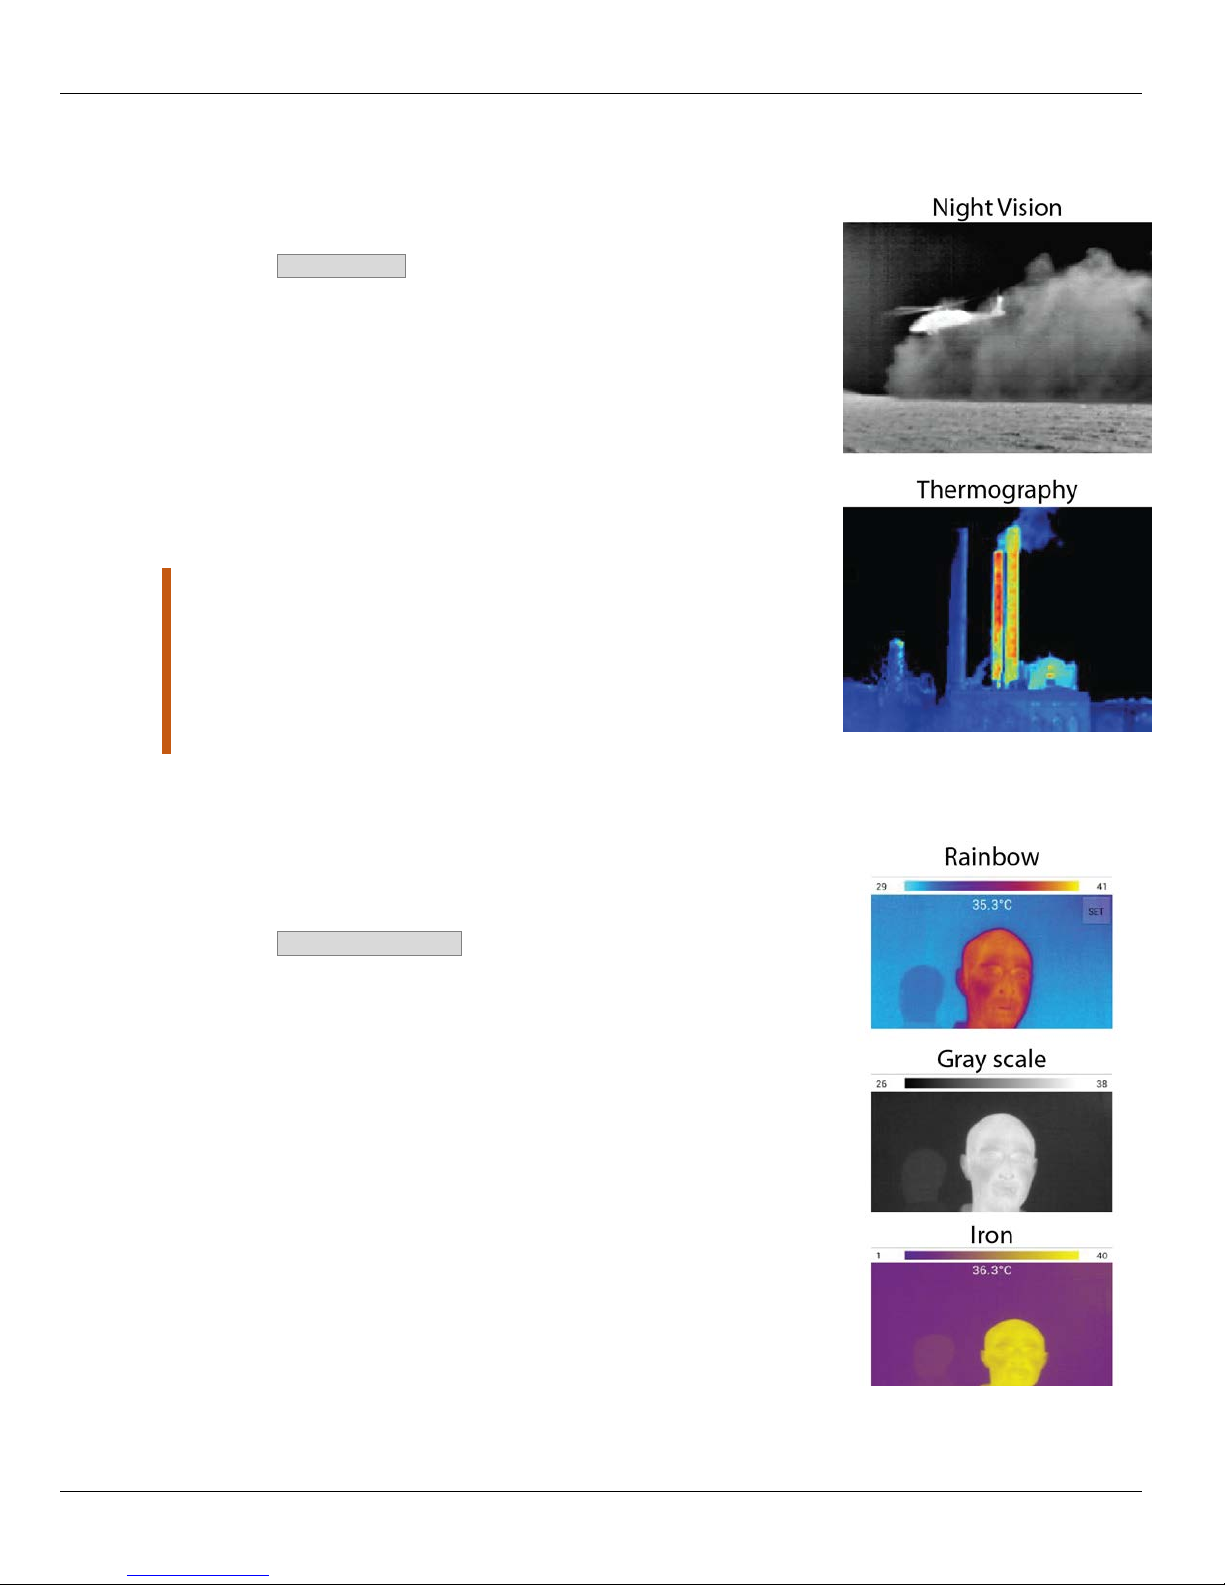
Imaging Mode
The Therm-App devi c e image can be displ ay ed in one of two modes.
To change the imaging mode:
1. Tap the Imaging Mode option on the Therm-App Settings screen.
2. Select one of the following modes:
Night Vision - displays video image using 256 shades of
gray. This mode displ ay s more detailed image, useful for
human observati on duri ng surveillance and detection.
Thermography - im age pix els are colored in relation t o their
temperature. On the default rainbow palette, the blue
indicates the coldest measured temperatur e and r ed
represents the hott est temperature measured. This mode is
useful with applications searching for temperature
differenc es on the scanned scene. The color palette is
selectable.
Temperature measurements are stabilized about five
after activating the Therm-App device.
Thermography measurement of temperatures calculation might
influenced by the environment of the measured objects
surrounding objects reflected temperature,
emissivity.
Setting Thermography Color
When the Thermography mode is selected, the Therm-App device image
can be displayed using one of three palettes.
To change the select ed palette:
1. Tap the Thermography Color opt ion on the Therm-App Settings
screen.
2. Select one of the following palettes:
Rainbow
Gray
Iron
Page 11 of 15
Page 12
Application Operation Therm-App Operation Manual
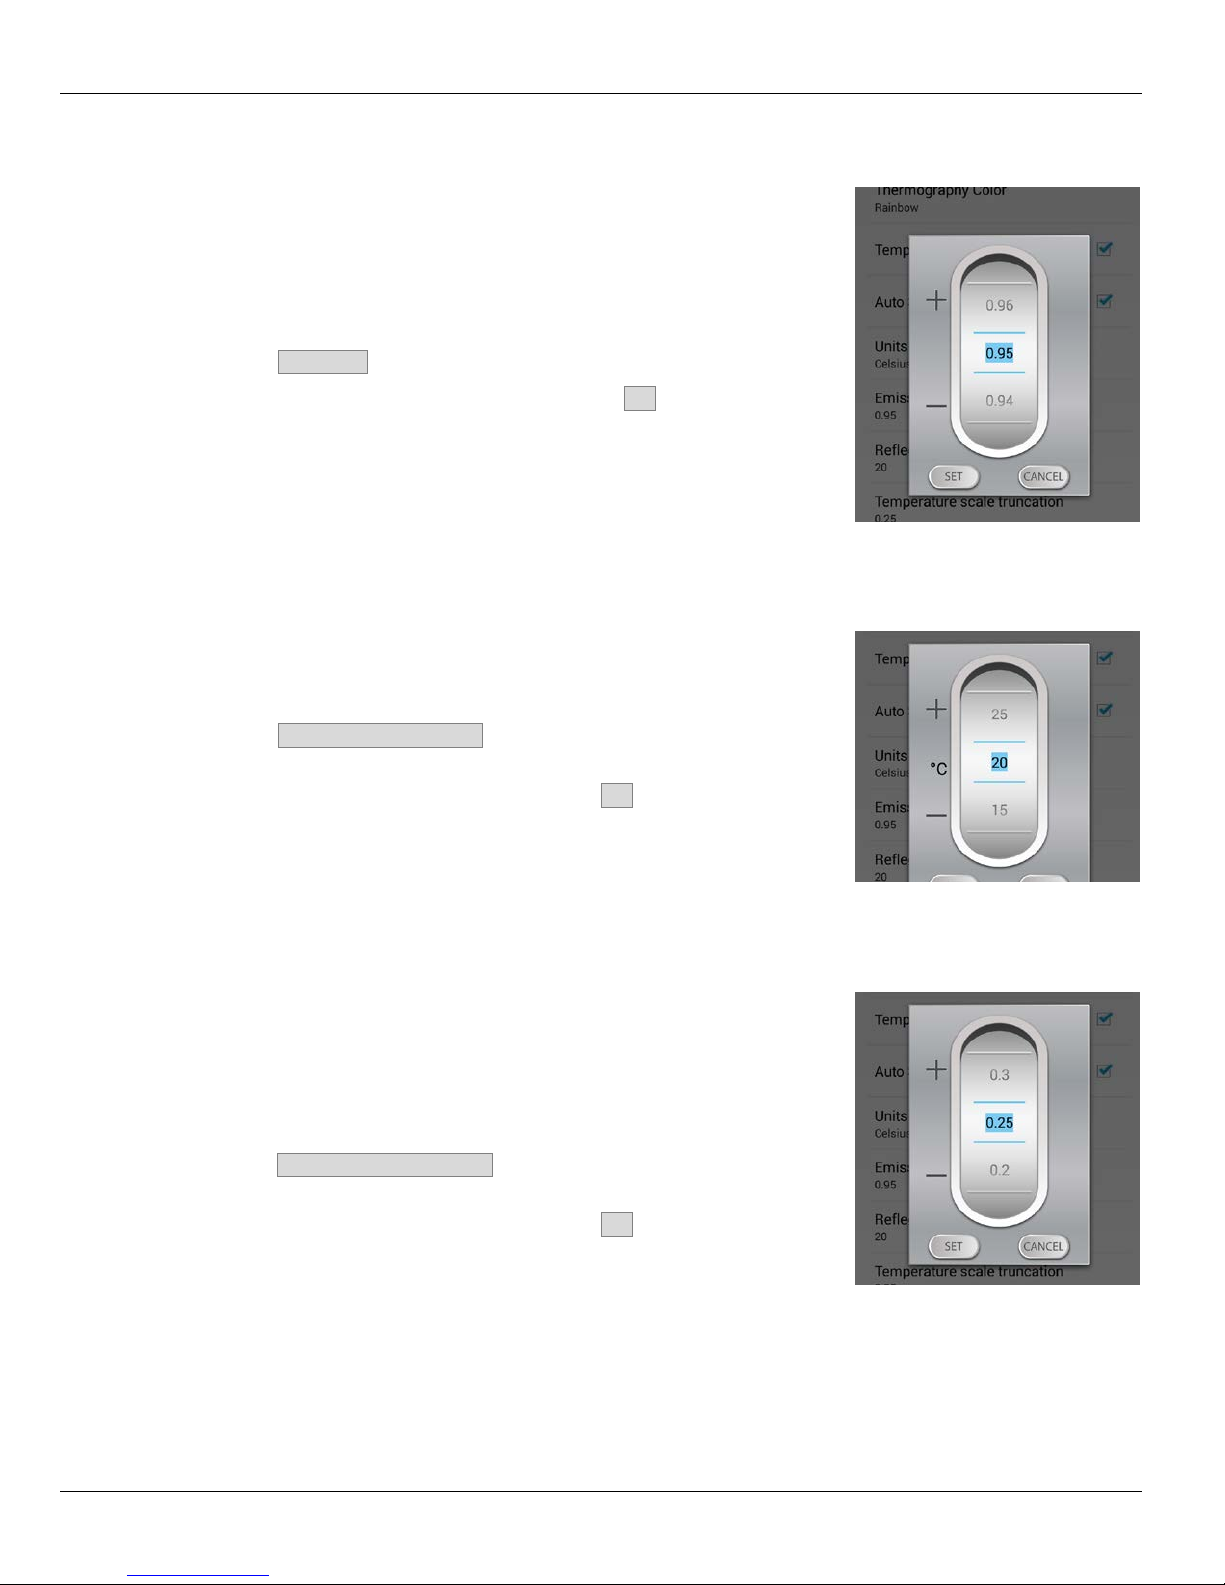
Adjusting Emissivity
Emissivity is a charac teristic of the materi al being observed. Emissivity is
the ability of the material surf ac e to emit energy by radiat ion. The
emissivity value (0 – 1) represents the rati o of energy radi ated by the
material being observed to the energy radiated by a black body at the
same temperatur e.
To adjust the emissivity:
1. Tap the Emissivity option on the Therm-App Settings screen.
2. Scroll to the correct emissivity ratio and tap the Set button.
Adjusting the Reflected Temperature
Reflected temperature represents the energy emitted by the surrounding
objects and reflected by the measured surface.
To adjust the reflected temperature:
1. Tap the Reflected Temperature option on the Therm-App Settings
screen.
2. Scroll to the correct temperature and tap the Set button.
Adjusting the Temperat ur e Truncation
Within every image fr ame, the temperature span is calculated and displayed
on the top of the thermography image. Use this parameter to define the
minimum number of pixels (defined by percentage) require to impact the
temperature span cal c ulation. This setting prevents a small number of pixels
to reduce the temperature measuring resolution.
To adjust the truncation scale:
1. Tap the Temperature Truncation option on t he Therm-App Set tings
screen.
2. Scroll to the correct temperature and tap the Set button.
Page 12 of 15
Page 13
Specifications Therm-App Operation Manual
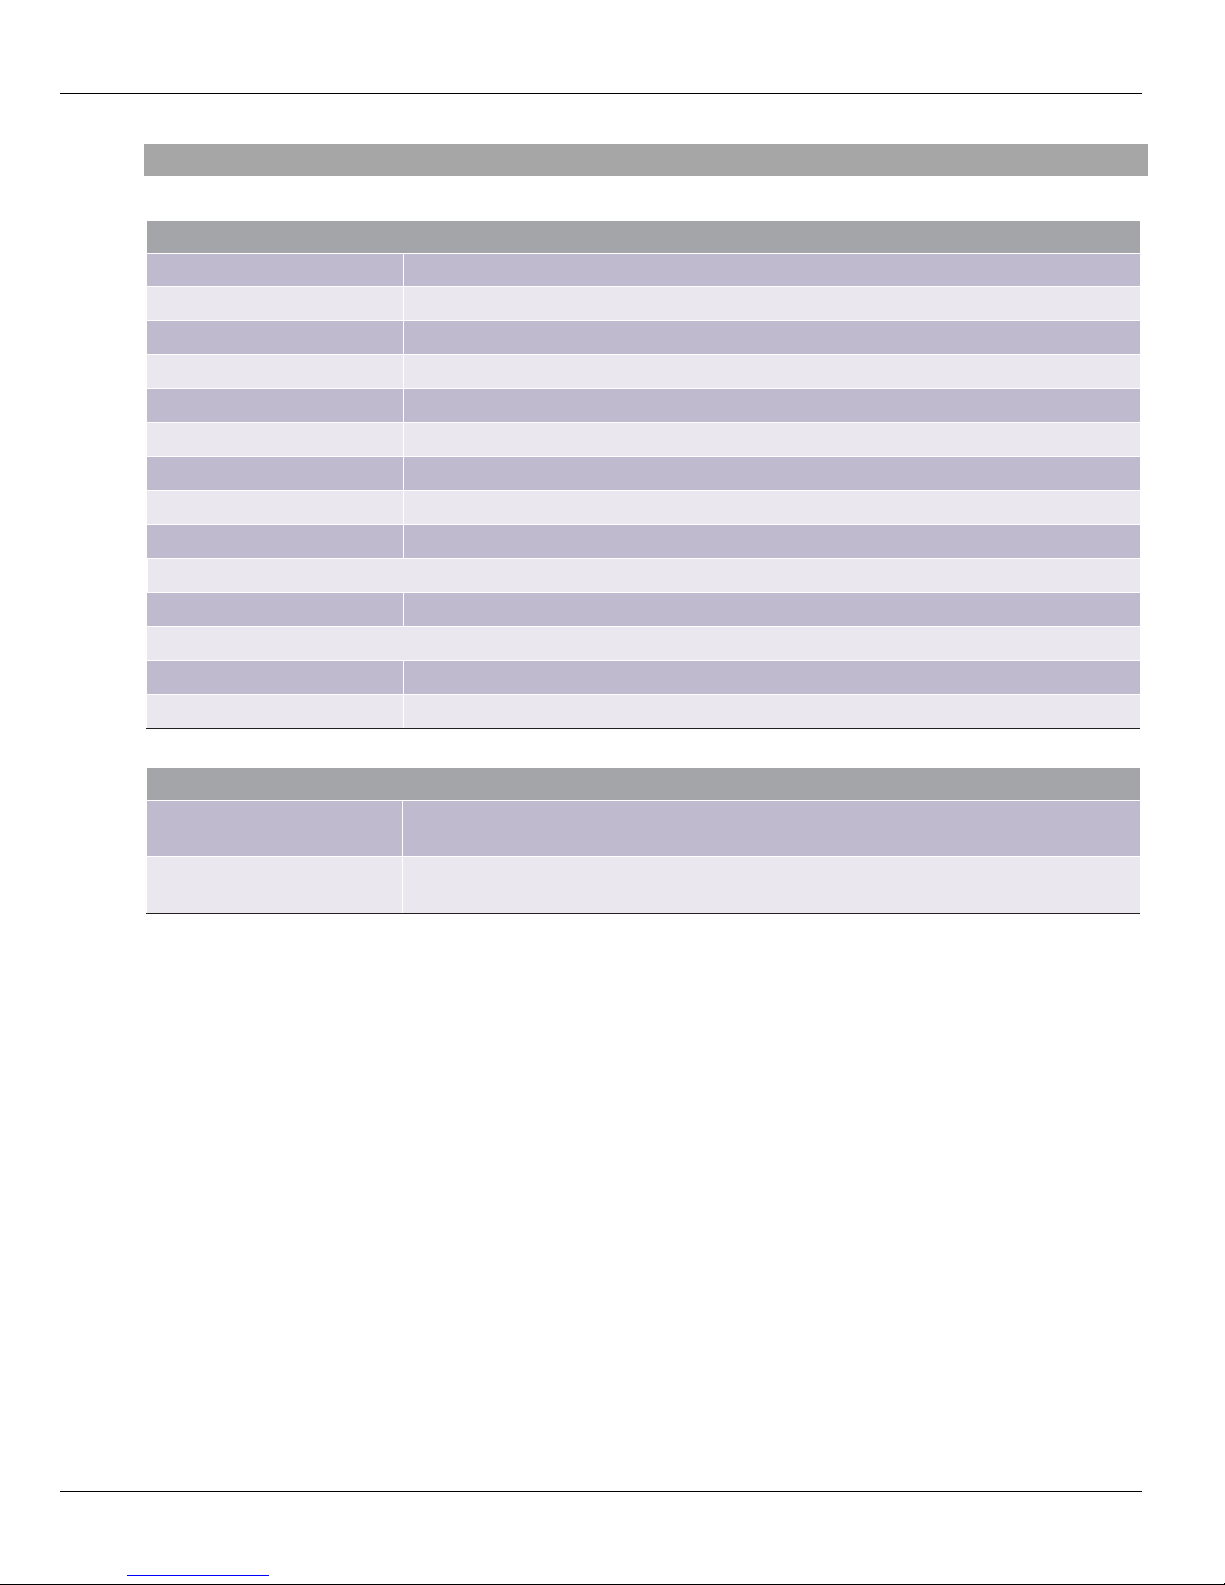
Specifications
General Information
Resolution 384 x 288 pixels (>110k pixels)
Spectrum LWIR 7.5 -14um
Lens Options and FOV 6.8mm lens (55 x 41⁰) 19mm lens (19 x 14⁰)
Frame Rate 8.7Hz
Weight 138 grams / 4.87 ounces (with 19mm lens)
Size 55 x 65 x 40mm (2.16 x 2.55 x 1.57 in)
Operating Temperature -10°C to +50°C (-4°F to +122°F)
Power Supply 5V over USB cable
Power Consumption Less than 0.5W
Certifications CE, FCC
Device Attachment Clip-on for smartphone (5 -10cm span)
Mobile Platform Support USB OTG (On The Go) compatible devices
Mobile OS Compatibility Android 4.1 and
Recording and Sharing Therm-App™ Smartphone App plus any sharing App
Imaging Modes
Thermography Color temperature mapping: 5°C to 90°C
Available palettes: Rainbow, Iron, Grayscale
Enhanced Vision High-resolution thermal imagery (grayscale day/night vision)
NETD <0.07°C
Page 13 of 15
Page 14
Troubleshooting Therm-App Operation Manual
No.
Problem\
System Failure
Indication
Solution
1
Application does
App is not initiated after
Ensure that USB OTG cable is properly connected between
Google Play.
2
Application shuts
Application shuts itself
Ensure that USB OTG cable is properly connected between
Verify that you are using a USB-OTG cable.
3
Repeated
Each startup Therm-App
From the Apps menu, select My files > all files >
Plug the Therm-App device again.
4
Battery saver
Android device swi tches
Select the Disable screen timeout check-box on the Therm-
5
Therm-App App is
The Android device
Unplug the USB-OTG cable.
Connect the Therm-App device with the Android device.
6
Application screen
is not displayed
A messages screen
appears on App startup
Press the Android Home button to exit the App and
reconnect Therm-App and the Android device.
7
No active view
Camera view is not
From the Apps menu, select My files > All files >
Plug the Therm-App device again.
8
Video not
Blank screen
Ensure that the Android device is turned on.
USB OTG cable is properly connected between
9
Noisy image
Ensure that USB OTG cable is properly connected between
transparent materials.
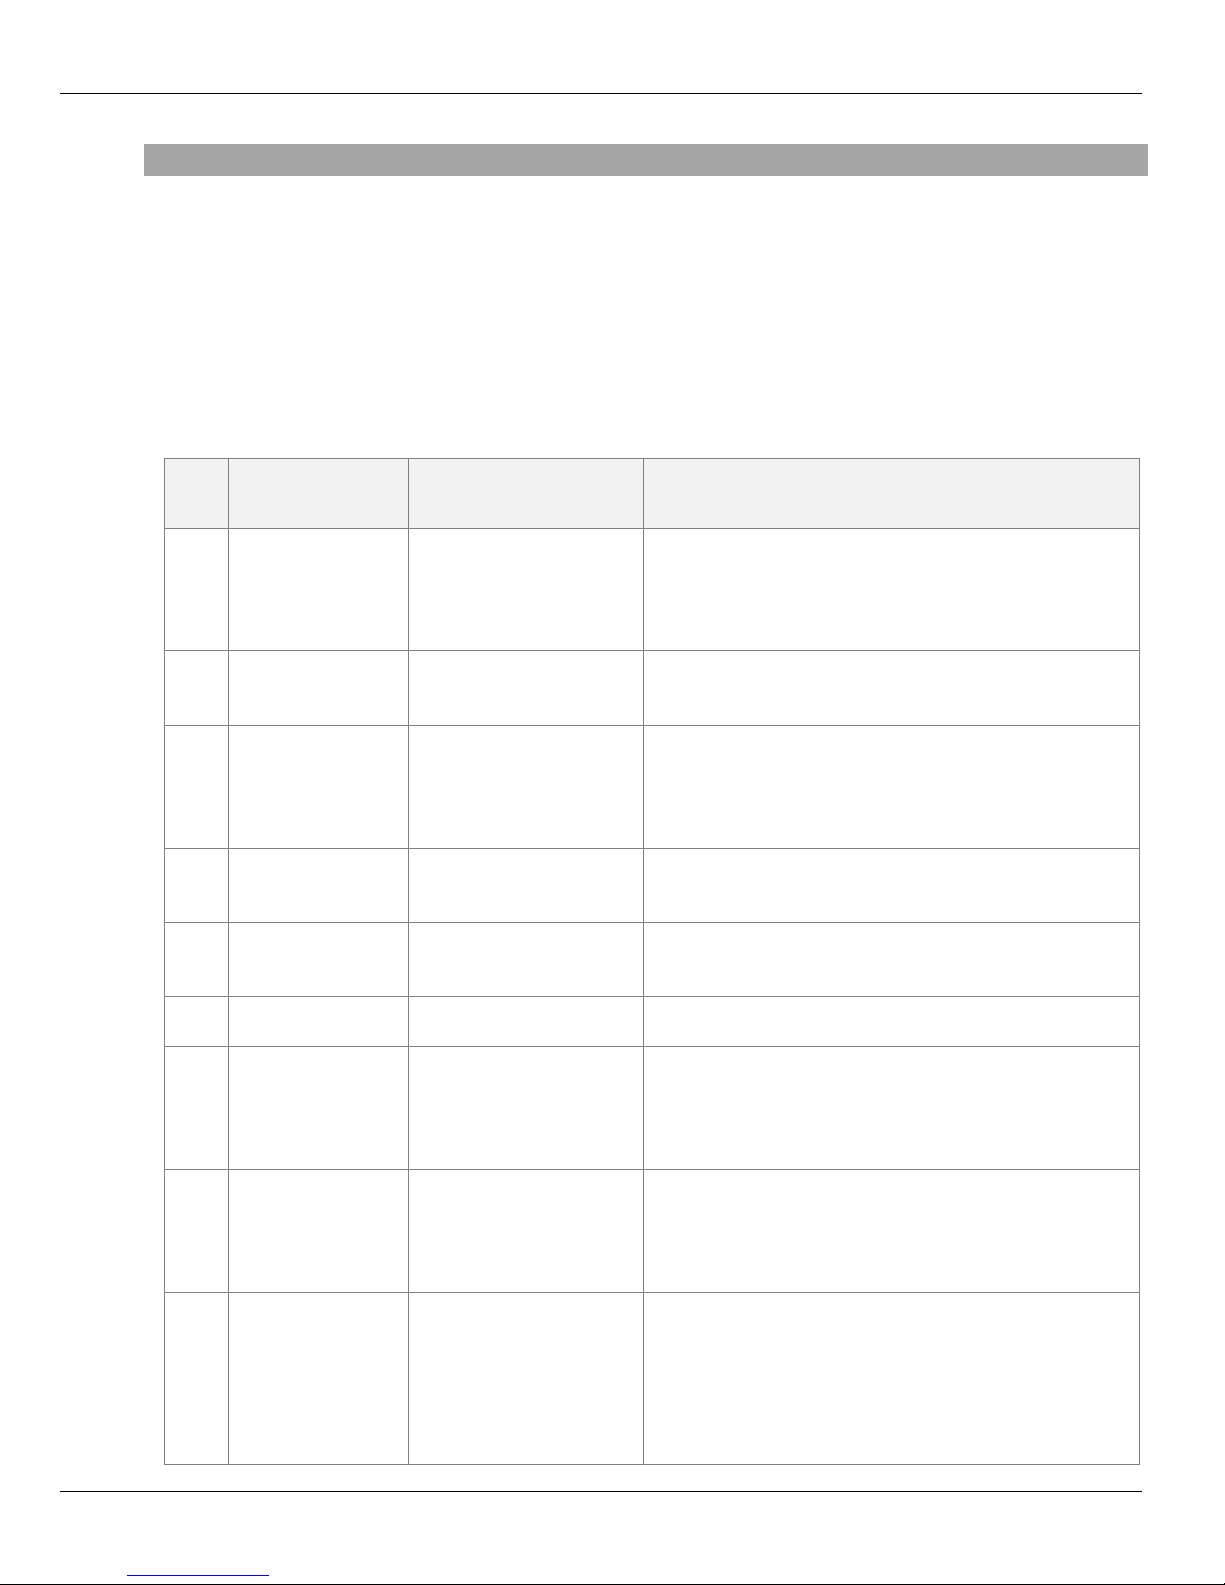
Troubleshooting
Before starting any troubleshooting procedur e, make sure that:
The Android device is compatible with Therm-App.
The Therm-App Basic appli c ation is installed from Google Play.
Therm-App and the Android device are connected properly via a USB-OTG cable.
Verify that your cable is OTG compatible:
1. Plug the USB OTG cable into the Andr oid dev ic e US B port.
2. Verify that the USB connector connected message appears on top of the screen. Replace the cable if
this message does not appear.
Table -1: Troubleshooting List
not start.
off.
initialization
interrupts ThermApp.
not found.
connecting to Therm-App.
off.
performs the initialization
process.
to sleep mode.
switches to Safe mode.
displayed after
completing app initial
setup
the Android device and Therm-App device.
Verify that you are using a USB-OTG cable.
Ensure that the Therm-App Basic app is installed from
the Android device and Therm-App device.
Thermapp.
Delete folder with a serial number tag.
Re-install Therm-App Basic application.
App Settings screen.
Restart the Android device.
Thermapp.
Delete folder with a serial number tag.
Re-install Therm-App Basic application.
displayed on the
Android device.
Ensure that the Therm-App device lens is not covered or
blocked.
Ensure that
the Android device and Therm-App device.
the Android device and Therm-App device.
Ensure that nothing is obstructing the Therm-App device
view.
Check that the camera lens is clean.
Page 14 of 15
Ensure that line of sight is not blocked by glass or other
Page 15
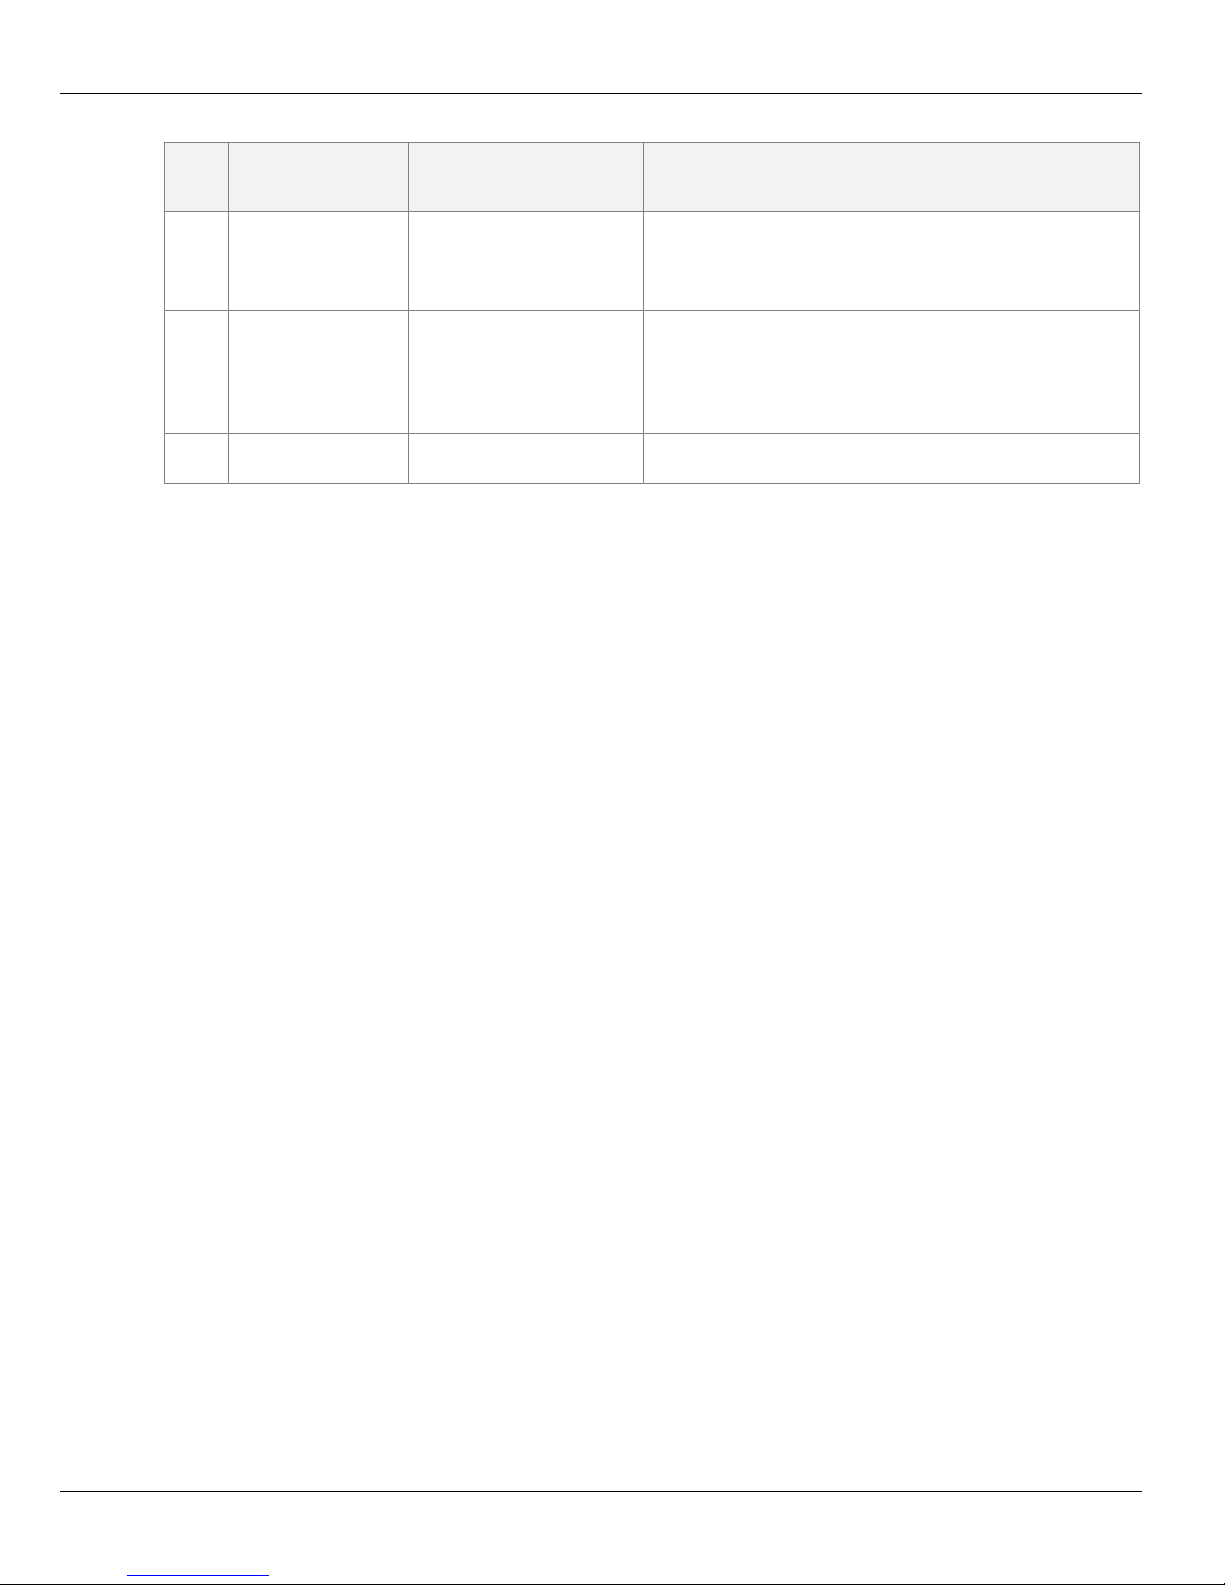
Troubleshooting Therm-App Operation Manual
No.
Problem\
System Failure
Indication
Solution
10
Unfocused image
Image blurred
Turn the lens focus ring while pointing the Therm-App
11
Inaccurate
Temperature readings are
From the Apps menu, select My files > All files >
Plug in the Therm-App device again.
12
Battery quick
discharge.
Android device battery
discharges quickly.
Disconnect the USB-OTG cable when Therm-App is not in
use.
device to a sharp edged object.
Do not turn the lens focus ring too far as the focus ring
could slip out of place.
temperature
readings
too high
Thermapp.
Delete folder with a serial number tag.
Re-install Therm-App Basic application.
Page 15 of 15
 Loading...