

Page 1

OPERATING INSTRUCTIONS FOR
MINI-SPLIT HEAT PUMP SYSTEM
MODEL
MSC49HP13115A
MSC412HP13115A
950-0021-revB 11-29-06
Copyright IRP 2006
Page 2

TABLE OF CONTENTS
USER INSTRUCTIONS.......................................................................................................................................................................1
PARTS IDENTIFICATION....................................................................................................................................2
REMOTE CONTROL OPERATION AND INDICATORS....................................................................................................................3
MAINTENANCE.................................................................................................................................................................................9
TROUBLESHOOTING.......................................................................................................................................................................9
WARRANTY.......................................................................................................................................................................................10
TECHNICAL ASSISTANCE...............................................................................................................................................................10
Page 3

USER INSTRUCTIONS AND INFORMATION
In this manual, you will find safety information for installation and operation. For your safety and the safety of others, please read and understand
all cautions located throughout this manual.
WARNINGS AND CAUTIONS
WARNING
This symbol refers to a hazard or unsafe practice which can result in severe personal injury or death.
CAUTION
This symbol refers to a hazard or unsafe practice which can result in personal injury or property damage.
Please read the instruction manual prior to use to ensure proper operation of your unit.
INSTALLATION
These units are not designed to be installed in the following locations:
In areas where there is a possibility of combustible gases or fumes.
In damp or moist areas.
Always use proper size breaker or fuse. Failure to do so may cause fire.
OPERATION
Always turn the unit to the “OFF” mode with the remote control. Never use a circuit breaker or fuse as a means to turn the unit off and on
except in the case of an emergency.
Do not operate this unit if you are wet or have wet hands. Electric shock can occur.
Do not spray insecticides, paints, or other flammable sprays or liquids into or around the unit.
Do not put foreign objects into the unit.
Do not hang or place items on the unit.
Do not use harsh chemicals such as paint thinner, benzene, or polish to clean the unit.
During cooling operation, shades, blinds, and curtains should be used to shade the room from direct sunlight.
-1-
Page 4
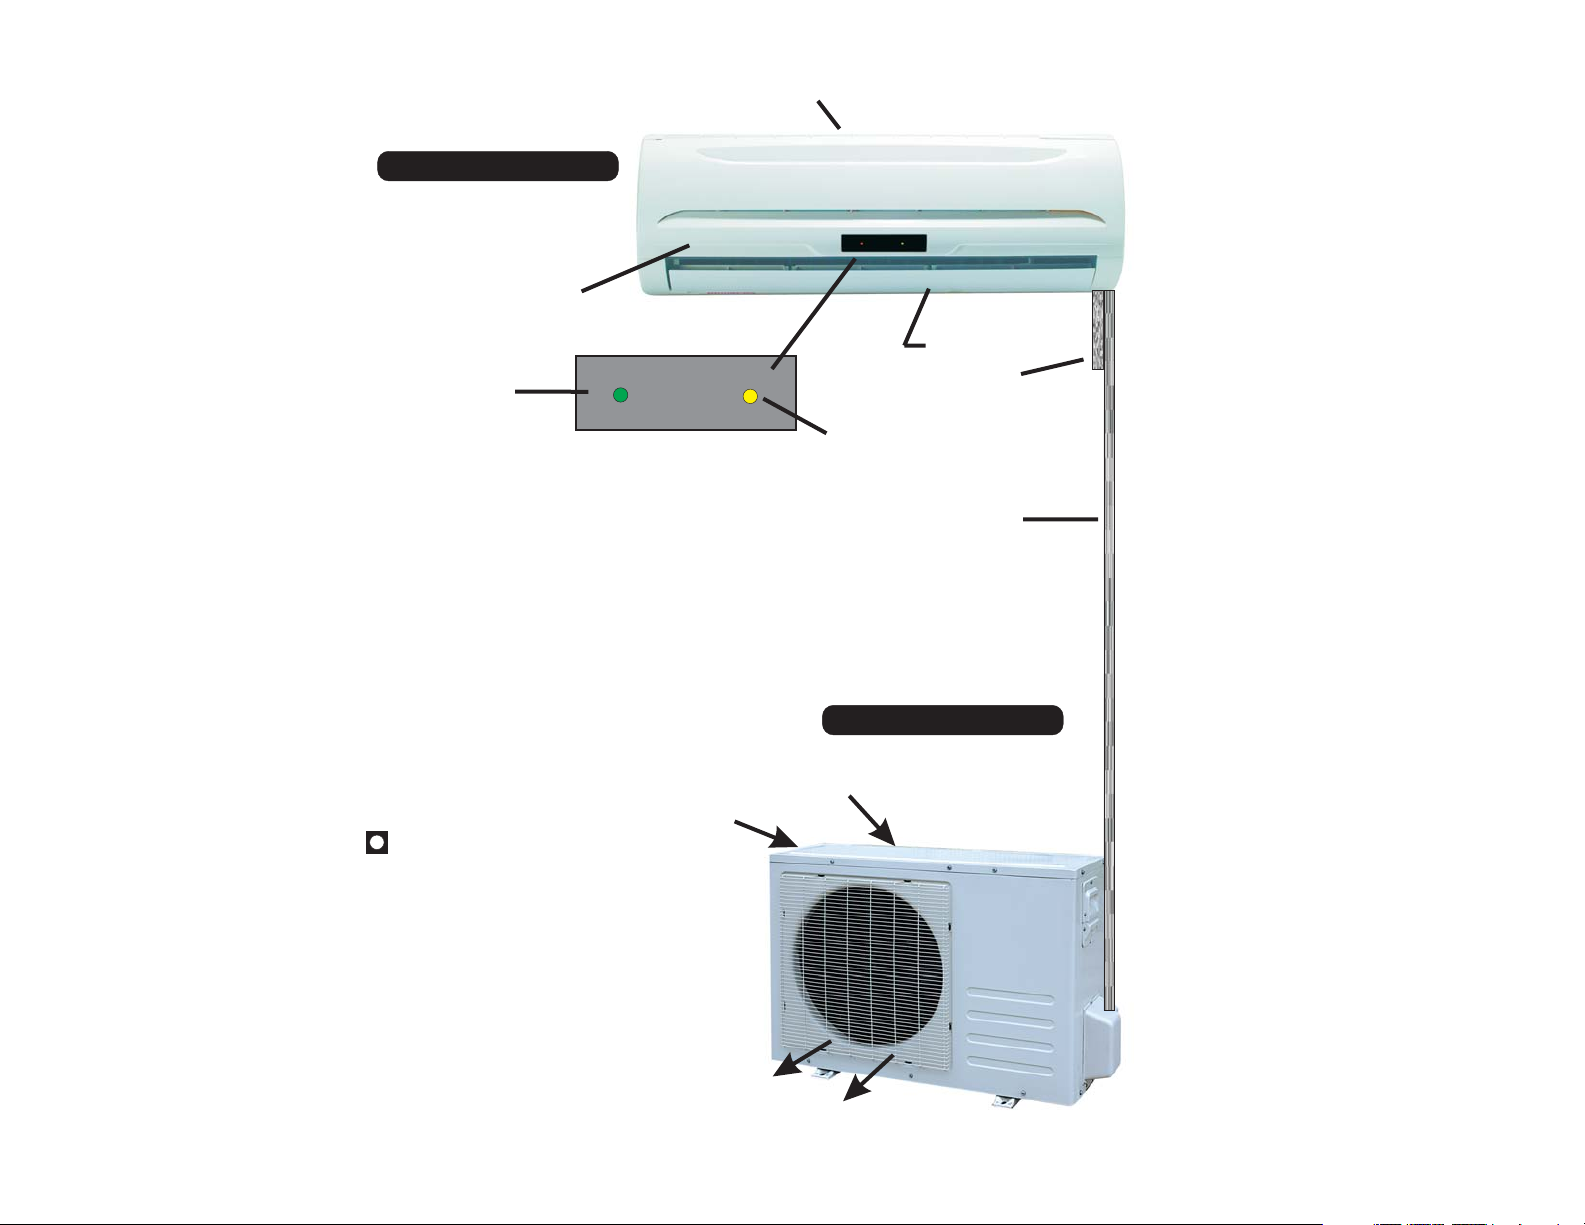
PARTS IDENTIFICATION AND FUNCTIONS
AIR RETURN
INDOOR UNIT
AIR FILTER
(UNDER COVER)
AIR OUTLET
POWER ON
LIGHT
CONDENSATE
DRAIN
TIMER ON
LIGHT
Line-set and
WHEN:
RUN light is on - Unit is operating in the set mode.
i.e. Cool, Dehumidify, Fan.
TIMER light is on - Unit is in AUTOSTART mode and will start
at the set time.
cables
RUN AND TIMER light is on - Unit is
operating in AUTOSTOP mode and will stop
at the set time.
CONDENSER
AIR INLETS
(side and back)
EMERGENCY OPERATION SWITCH
Is located under front cover of indoor
unit. PRESS ON
Unit will operate at last known function
and temperature.
PRESS OFF
Unit will stop until restarted by the
remote or by this switch.
CONDENSER
AIR DISCHARGE
-2-
OUTDOOR UNIT
Page 5
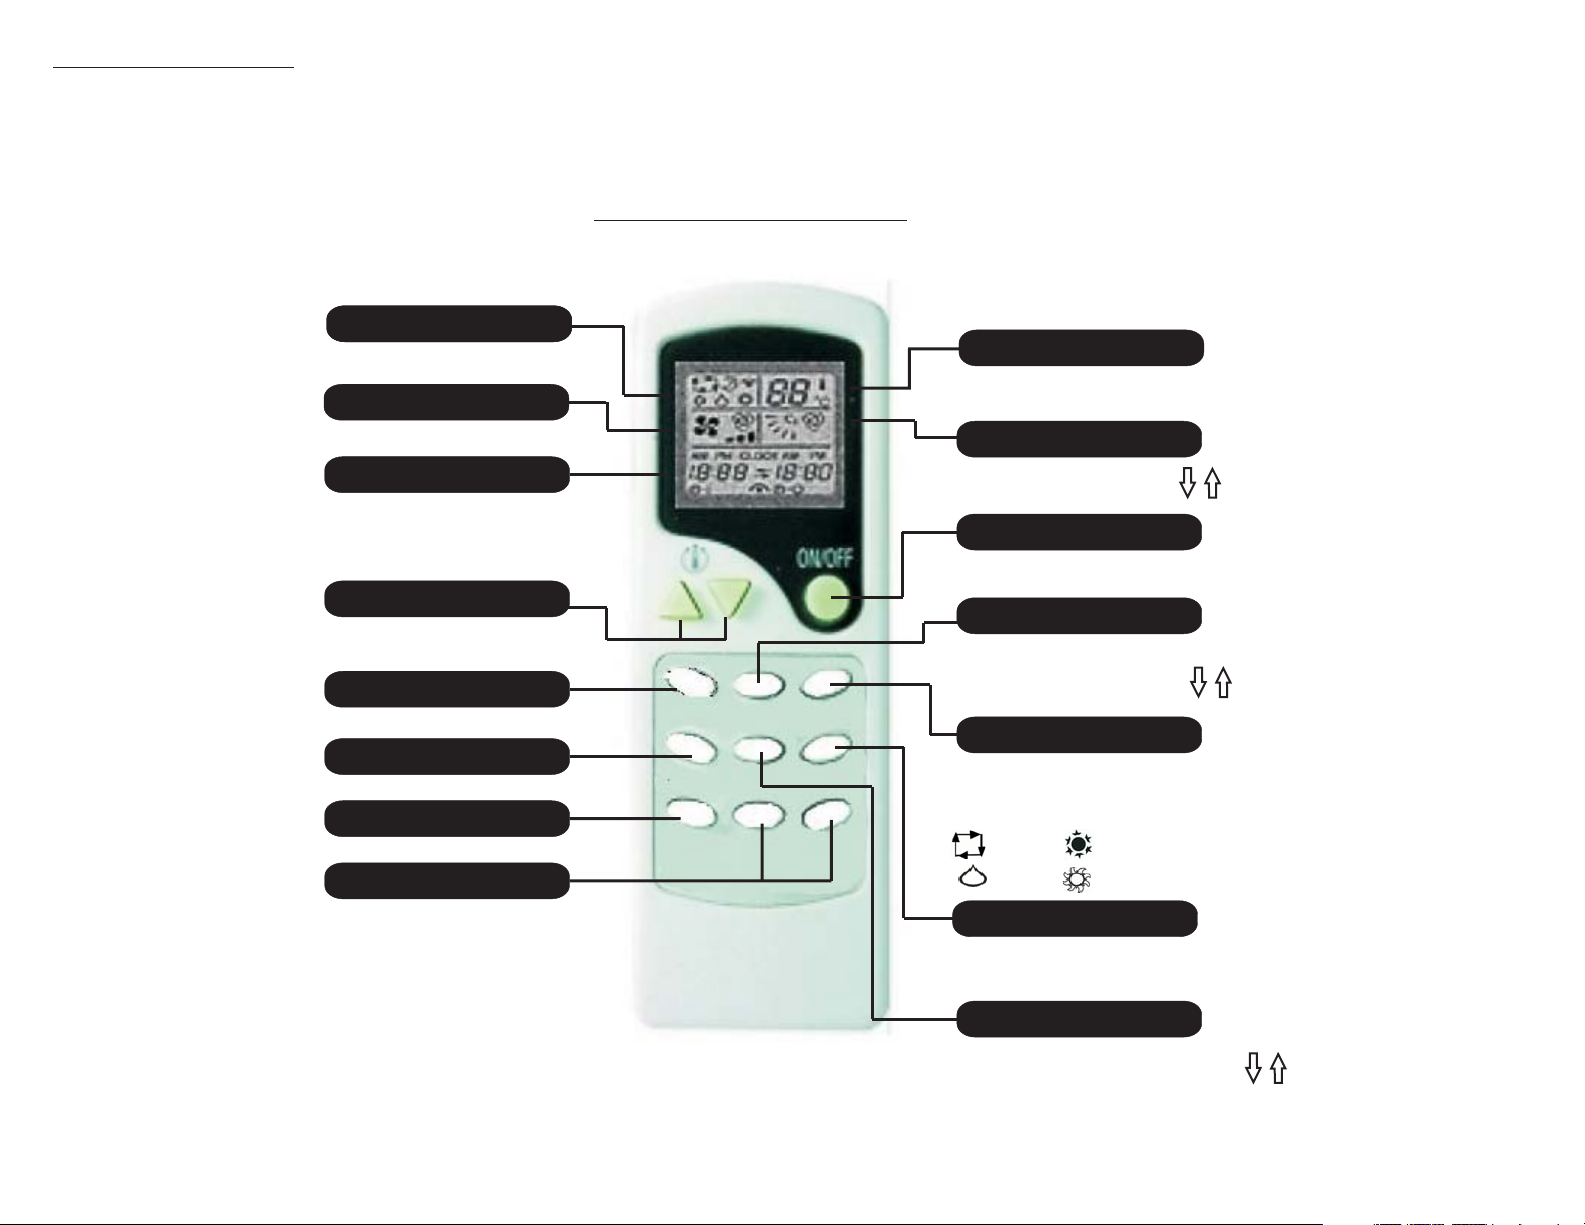
TO OPEN FRONT COVER
Press inward on the sides of the cover near the bottom to release, then pull bottom of cover outwards
To close the cover, press the corners inward to latch. DO NOT OVEREXTEND THE FRONT COVER.
REMOTE CONTROL OPERATION
OPERATION MODE IndicatorOPERATION MODE Indicator
Indicates selected operation mode.
FAN SPEED Indicator
Indicates the selected fan speed.
TIME Indicator
During TIMER operation display
indicates the set time.
During normal operation display
indicates current time.
SET TEMPERATURE Buttons
These buttons adjust the room
temperature
SLEEP Button
Activates the SLEEP mode.
AUTO START Button
Starts timer operation
AUTO STOP Button
Stops timer operation
HOUR - MIN Buttons
These buttons are used for
setting present and auto
start/stop times.
VANE CONTROL
SLEEP
AUTOSTART SWING FAN SPEED
AUTOSTOP HOUR MIN
MODE
OPERATION MODE Indicator
Indicates set temperature
(except in AUTO mode)
Indicates swing angle of
Pressing this button turns the
VANE CONTROL Button
Pressing this button selects
1 of 5 fixed swing angles for
the horizontal louvers
Pressing this button changes
the operating mode in the
following order:
(AUTO) (COOL)
Pressing this button selects
between HI-MED-LOW or
PRESSING THIS BUTTON ACTIVATES
THE CONTINUOUS UP-DOWN SWINGING
ACTION OF THE HORIZONTAL LOUVERS
SWING Indicator
horizontal louvers
ON/OFF Button
unit On or OFF
MODE Button
(DRY) (HEAT)
FAN SPEED Button
AUTO fan speeds
SWING Button
-3-
Page 6
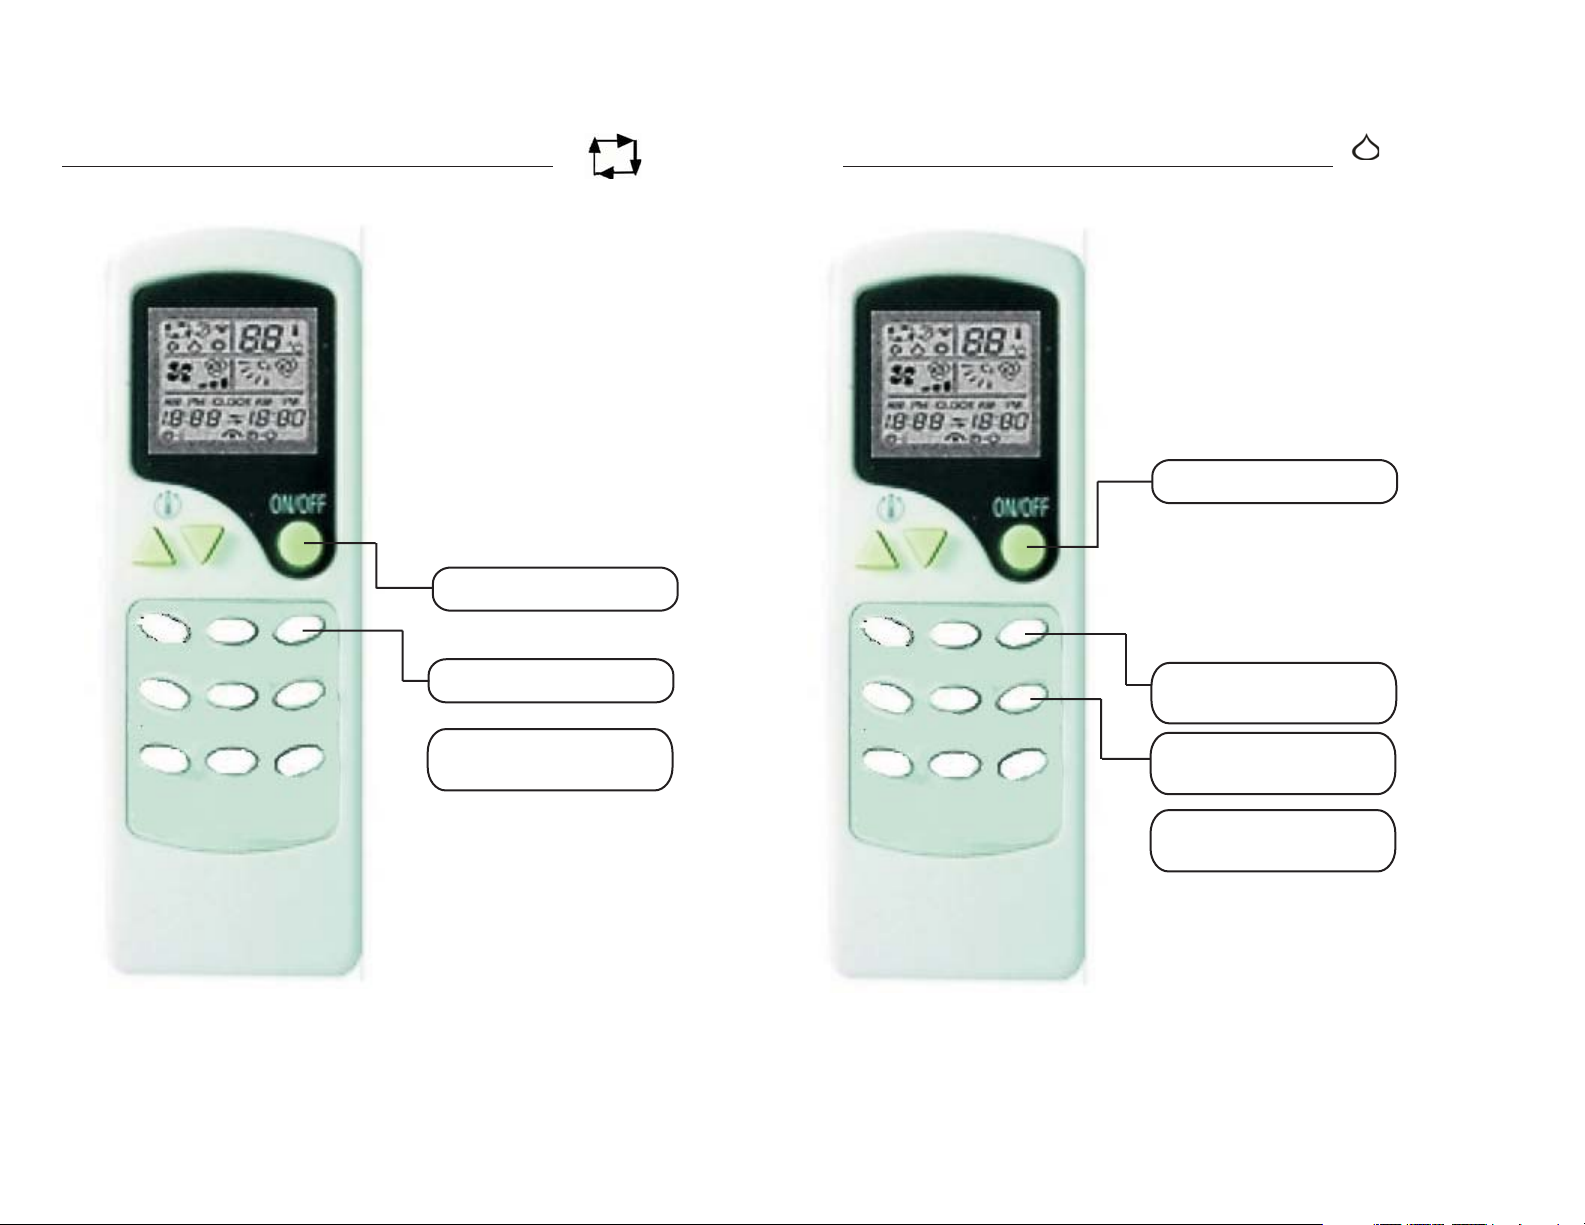
NOTE: When changing functions, please allow3-4minutes for the condensor unit to restart.
USE OF THE REMOTE CONTROL (AUTO SELECT MODE) USE OF THE REMOTE CONTROL (DEHUMIDIFIER MODE)
In the AUTOSELECT mode, the system
functions as described below:
When the room temperature is below
70° F, the system will function in the
HEAT mode.
When the room temperature is between
During the de-humidification process, the
outdoor compressor and the inside
evaporator will turn on and off based on
the “sensed” indoor and outdoor
temperatures and is not a function of the
set temperature.
Temperature can not be adjusted
during de-humidification.
70° F and 79° F, the system will function
in the DEHUMIDIFY mode.
SLEEP
AUTOSTART SWING FAN SPEED
AUTOSTOP HOUR MIN
VANE CONTROL
MODE
When the room temperature is above
79°F, the system will function in the
COOLING mode.
1) Press the ON/OFF Button to
turn the unit ON
2) Press the MODE Button
and select the AUTO mode.
3) Press the ON/OFF Button
or select another mode to
stop the AUTO mode.
FAN SPEED Button
VANE CONTROL
SLEEP
AUTOSTART SWING FAN SPEED
AUTOSTOP HOUR MIN
MODE
1) Press the ON/OFF Button to
turn the unit ON
2) Press the MODE Button
and select the DEHUMIDIFY
3) Press the FAN SPEED
Button to select the desired
fan speed
4) Press the ON/OFF Button
or select another mode to
stop the DEHUMIDIFY mode.
Temperature adjusting procedure during AUTO SELECT operation
mode.
FAN SPEED Button
-4-
Page 7
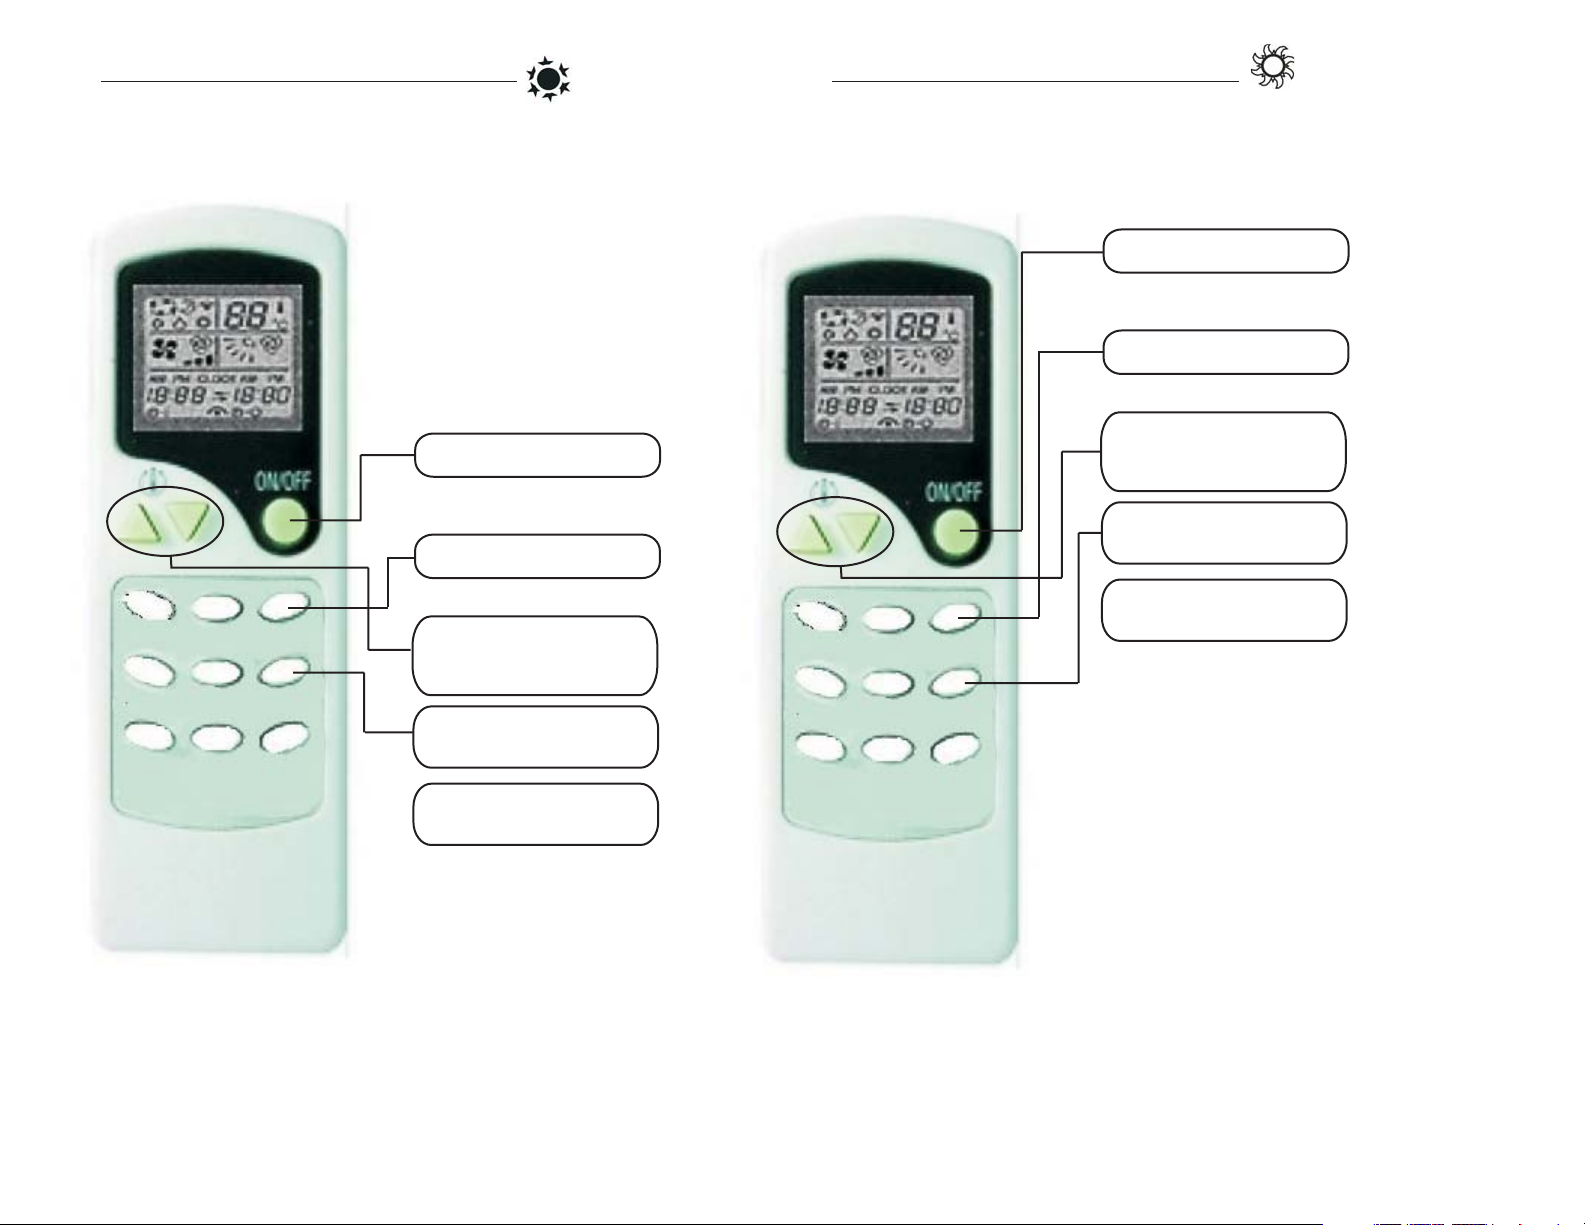
USE OF THE REMOTE CONTROL (COOL MODE) USE OF THE REMOTE CONTROL (HEAT MODE)
The HEAT mode activates the
outdoor compressor as
necessary to satisfy the
selected room temperature.
1) Press the ON/OFF Button to
The COOL mode activates the
turn the unit ON
outdoor compressor as
necessary to satisfy the
SLEEP
AUTOSTART SWING FAN SPEED
AUTOSTOP HOUR MIN
VANE CONTROL
MODE
selected room temperature.
1) Press the ON/OFF Button to
turn the unit ON
2) Press the MODE Button
and select the COOL Mode
3) Press the + or - Buttons
to adjust the room temperature
Each press of the button will
change the temperature 1°
4) Press the FAN SPEED
Button to select the desired
fan speed
5) Press the ON/OFF Button
or select another mode to
stop the COOL mode.
FAN SPEED Button
SLEEP
AUTOSTART SWING FAN SPEED
AUTOSTOP HOUR MIN
VANE CONTROL
MODE
NOTE: When the outside temperature is very
low and the humidity is very high, frosting will
occur on the heat exchanger of the outside
unit. When this happens, the auto-defrost will
turn on to to defrost the heat exchanger.
Heating will be suspended for 5 to 10 minutes
while the defrost cycle completes. At the end
of the defrost cycle, normal heating will resume.
During the defrost cycle, steam may be seen
coming from the outside heat exchanger. This
is normal and is of no concern.
2) Press the MODE Button
and select the HEAT Mode
3) Press the + or - Buttons
to adjust the room temperature
Each press of the button will
change the temperature 1°
4) Press the FAN SPEED
Button to select the desired
fan speed
5) Press the ON/OFF Button
or select another mode to
stop the HEAT mode.
FAN SPEED Button
Temperature adjusting procedure during AUTO SELECT operation
-5-
Temperature adjusting procedure during AUTO SELECT operation
Page 8
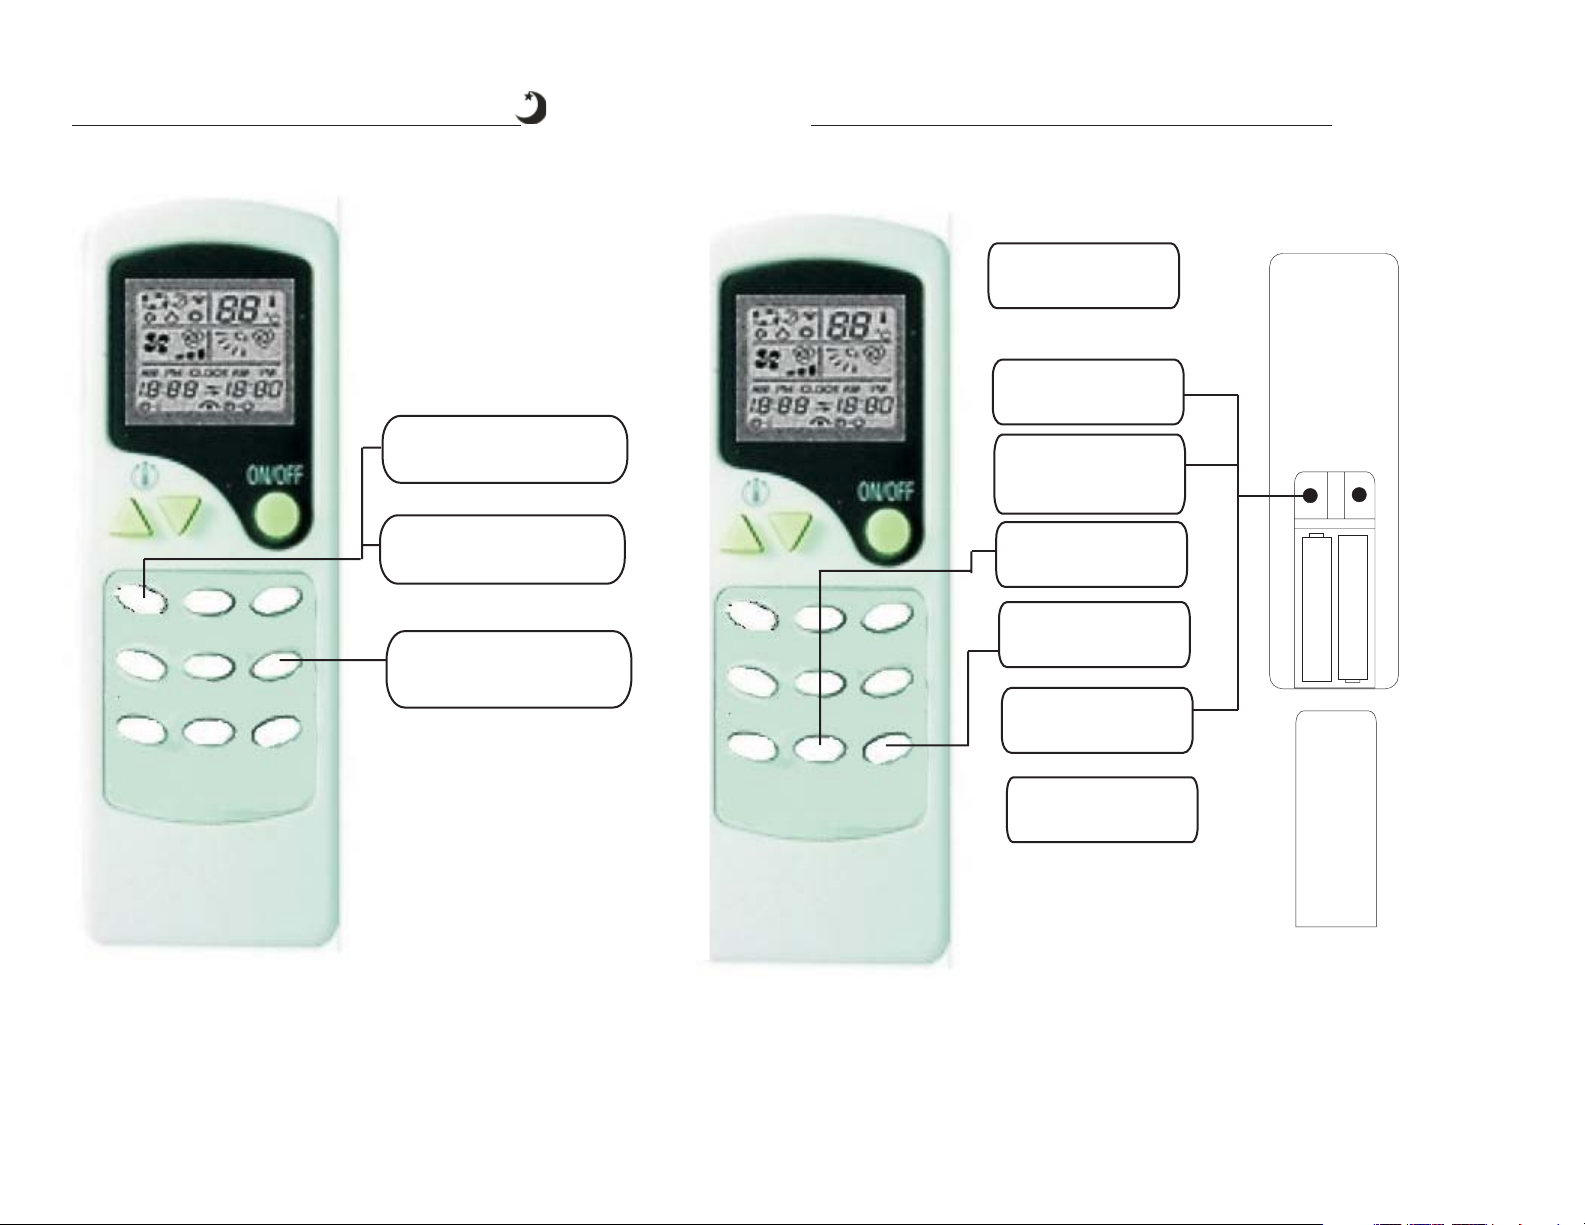
USE OF THE REMOTE CONTROL (SLEEP MODE) USE OF THE REMOTE CONTROL (CLOCK SET - BATTERIES)
SLEEP
AUTOSTART SWING FAN SPEED
AUTOSTOP HOUR MIN
VANE CONTROL
MODE
In the SLEEP mode, the system
lowers the fan speed, and raises
the setpoint temperature slightly.
1) Press the SLEEP Button to
change to the sleep mode
(quiet operation)
2) Press the SLEEP Button
again to return to normal
operation.
NOTE: Pressing the
FAN SPEED button during
SLEEP mode will cancel the
sleep mode.
SLEEP
AUTOSTART SWING FAN SPEED
AUTOSTOP HOUR MIN
VANE CONTROL
MODE
1) Remove the battery
cover on the back
of the remote
CLK Button
(to set clock)
2). Use a ball point
pen or similar
device, press this
button one time
3). Press the HOUR
button to set the hours
4). Press the MIN button
to set the minutes.
5.) Press the CLK button
again to lock in set time.
6). Replace the battery
cover by sliding it
back on
+
+
Temperature adjusting procedure during AUTO SELECT operation
Replace batteries with 2 ea
AAA cells. Observe proper
Polarity.
-6-
Page 9
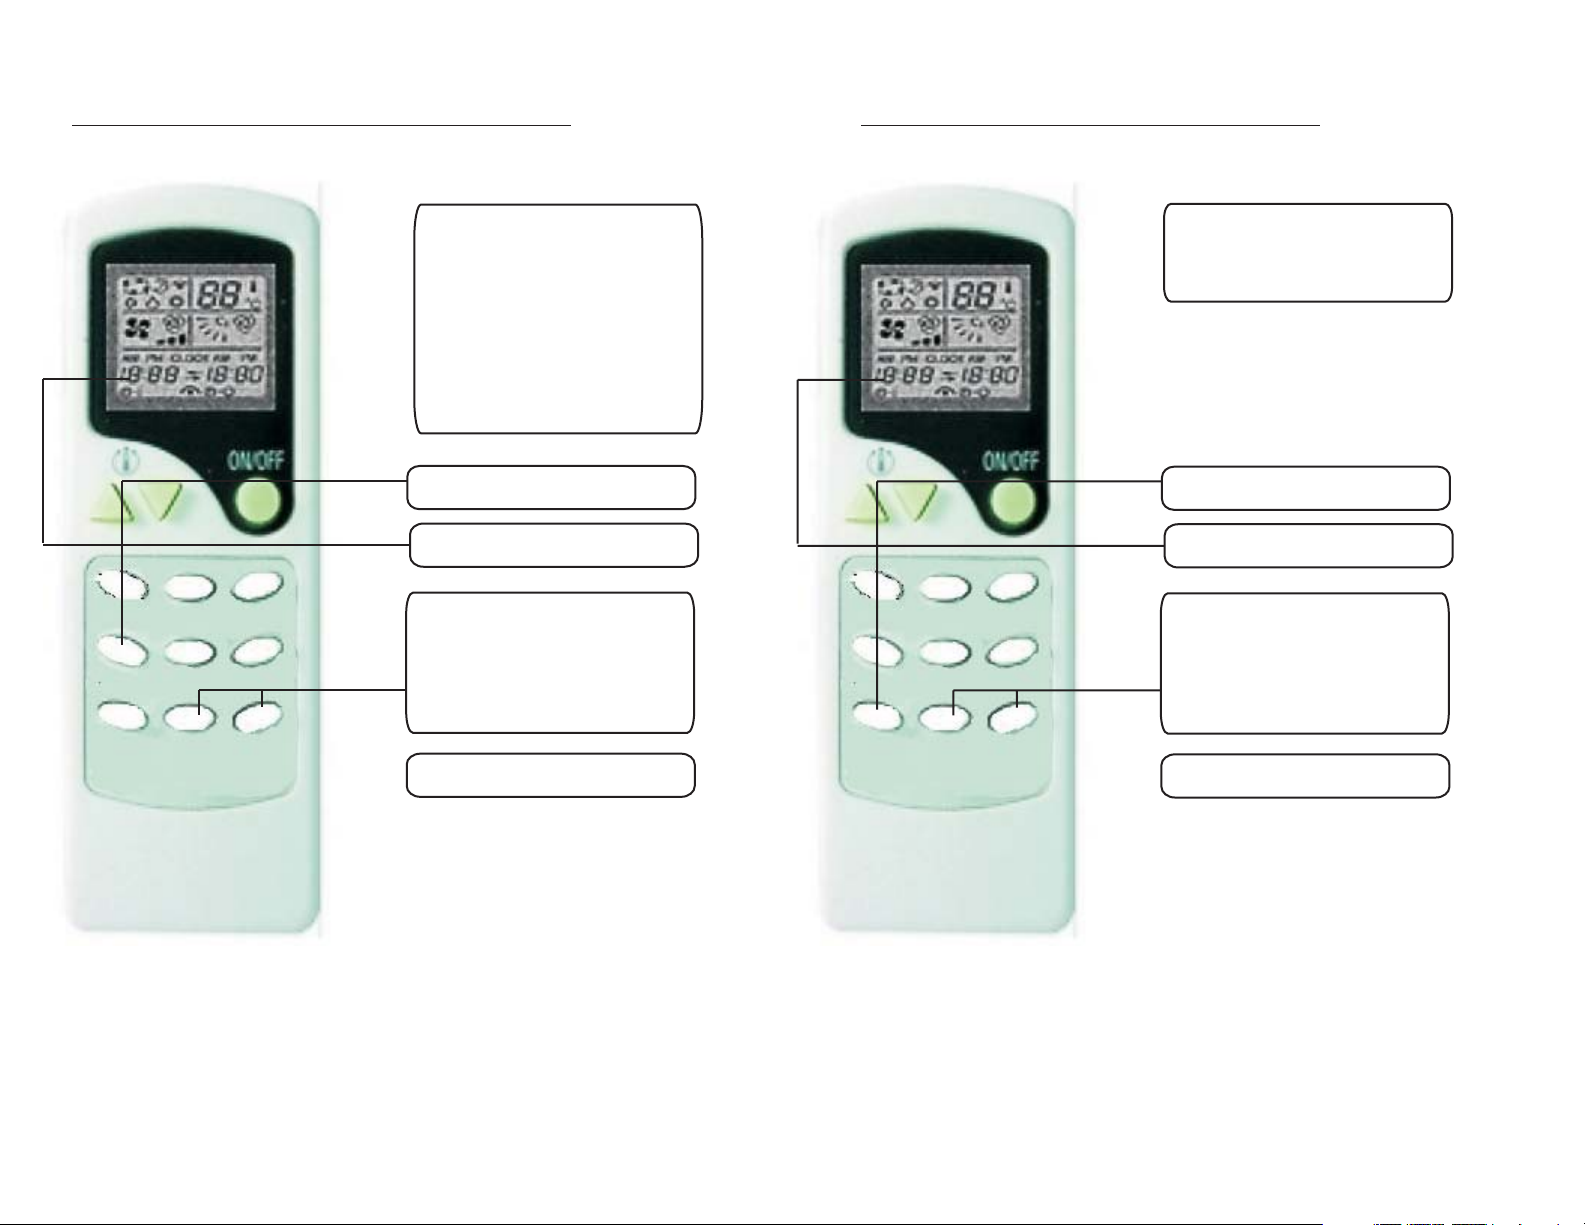
USE OF THE REMOTE CONTROL (AUTOSTART MODE) USE OF THE REMOTE CONTROL (AUTOSTOP MODE)
SLEEP
AUTOSTART SWING FAN SPEED
AUTOSTOP HOUR MIN
VANE CONTROL
MODE
The Autostart function will start the
unit in the last selected mode.
The Autostart function will turn the
unit ON when the selected time
is reached.
During the “ON” period, modes, fan
speeds, and temperatures may be
adjusted.
If the unit is “ON” when
AUTOSTART is selected, it will turn
OFF until the selected time is
reached.
1). Press the AUTOSTART button
to set the TURN ON timer
2). The clock will display the turn
on time.
3). Press the HOUR and MIN buttons
to set the turn on time.
Each time the HOUR button is
pressed will increment the time by
1 hour. Each time the MIN button is
pressed will increment the time by
10 minutes.
4.) Press the AUTOSTART button
again will release the timer.
NOTE: The clock must be set in order
for the AUTOSTART mode to function
properly
SLEEP
AUTOSTART SWING FAN SPEED
AUTOSTOP HOUR MIN
VANE CONTROL
MODE
The Autostart function will stop the
unit in the last selected mode.
The Autostart function will turn the
unit OFF when the selected time
is reached.
1). Press the AUTOSTOP button
to set the TURN ON timer
2). The clock will display the turn
off time.
3). Press the HOUR and MIN buttons
to set the turn off time.
Each time the HOUR button is
pressed will increment the time by
1 hour. Each time the MIN button is
pressed will increment the time by
10 minutes.
4.) Press the AUTOSTOP button
again to release the timer.
NOTE: The clock must be set in
order for the AUTOSTOP function
to work properly.
NOTE: The AUTOSTART and AUTOSTOP timers can be used in combination with each other.
For example, to have the unit come on and run for 3 hours beginning at 10:00 am set the AUTOSTART time to 10:00 am, and set the AUTOSTOP time to 1:00 pm.
At 10:00 am, the unit will turn on in the selected modes, and turn off at 1:00 pm.
The timer which is set to the earliest time will activate first. For example, if AUTOSTOP is set for 10:00 am and AUTOSTART is set for 11:00 am, the unit will turn off at 10:00 am and turn back on
at 11:00 am.
The time settings will remain in memory of the remote until changed, but AUTOSTART and/or AUTOSTOP are not recurring events, and must be activated again by pressing AUTOSTART or
AUTOSTOP again if desired.
Pressing the AUTOSTART button or the AUTOSTOP button during the set time period will cancel that operation.
-7-
Page 10
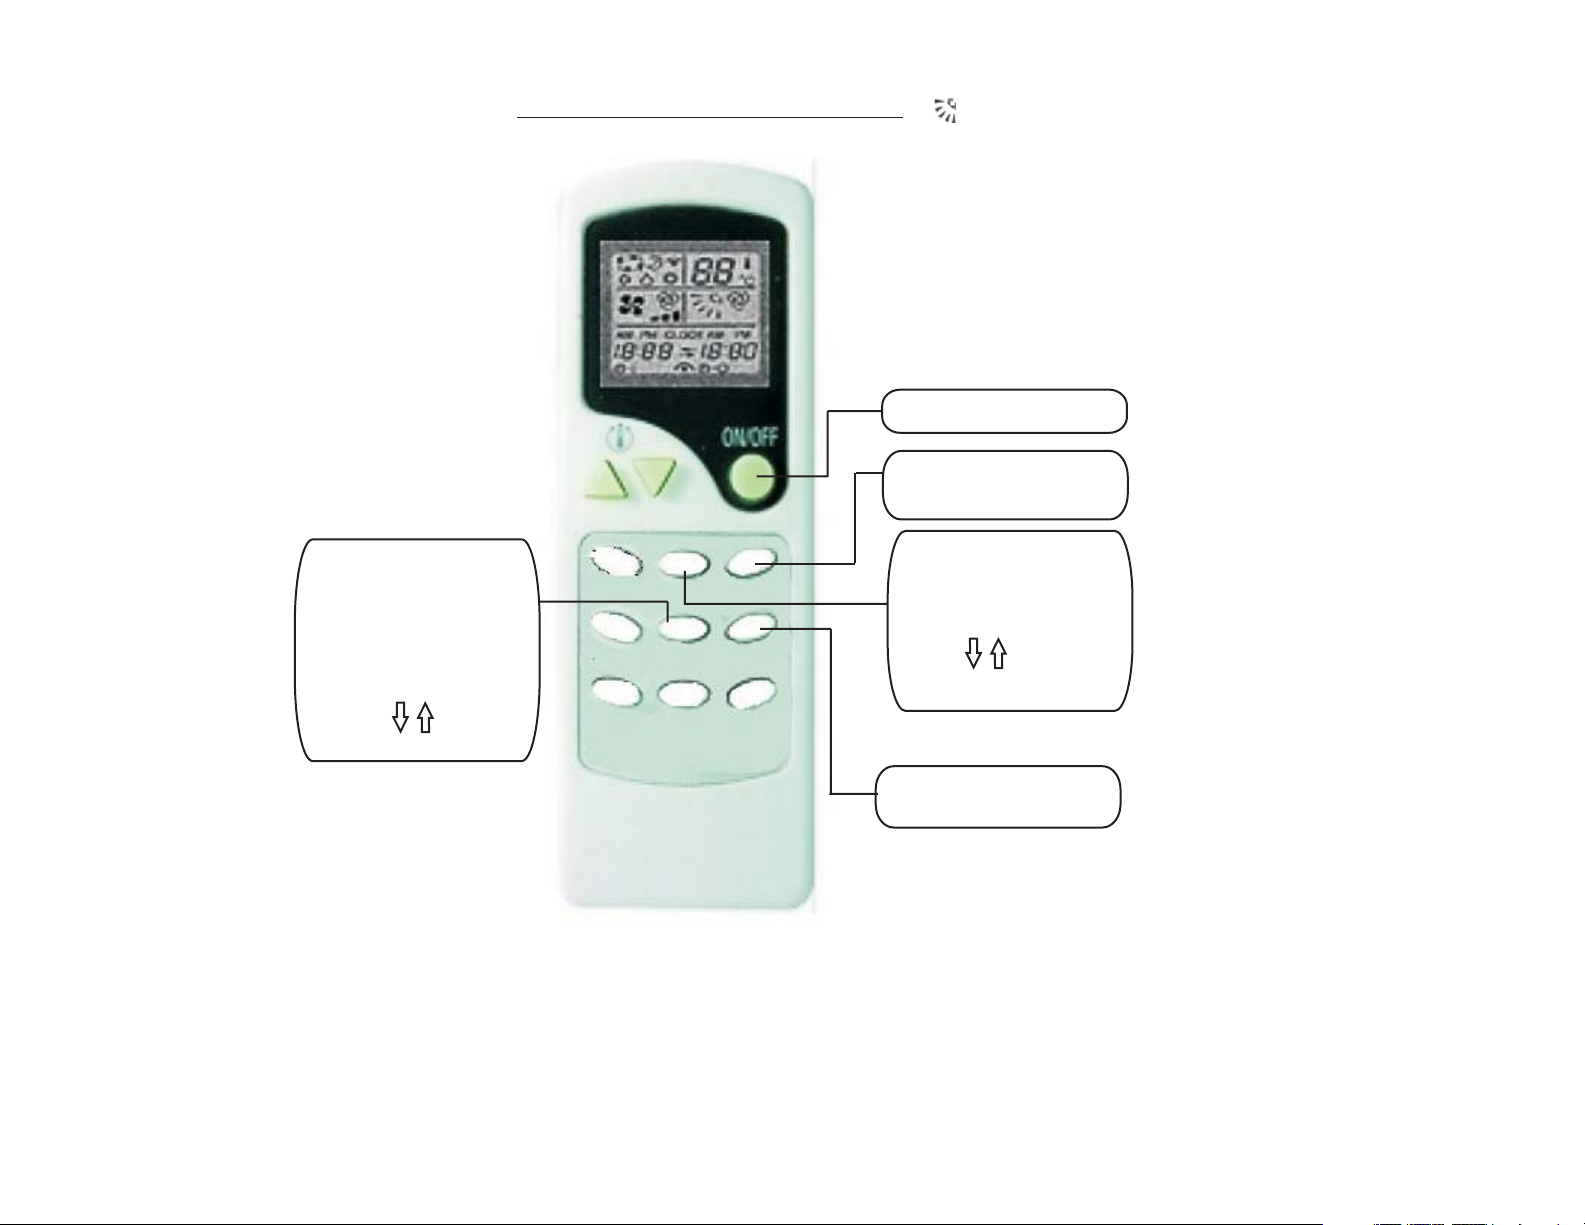
LOUVER ADJUSTMENTS (Air Flow Direction)
By operating the VANE CONTROL
and SWING buttons, you may direct
the airflow to maximize the cooling
effectiveness
1) Press the ON/OFF Button to
turn the unit ON
2) Press the MODE Button
and select the desired mode
(AUTO, COOL, DRY, or FAN)
5) Press the SWING
button to over-ride the VANE
CONTROL button. When
pressed, The SWING button
makes the horizontal louvers
swing continuously up
and down
AUTOSTART SWING FAN SPEED
AUTOSTOP HOUR MIN
SLEEP
VANE CONTROL
NOTE: in the cooling operation with the VANE CONTROL blowing down (4th & 5th positions),
the outer horizontal louvers will return to the level (position 1) after 1 hour in order to
MODE
Temperature adjusting procedure during AUTO SELECT operation
3) Press the VANE CONTROL
Button to select the desired
angle of the outer horizontal
louvers. The horizontal
louvers control the vertical
air flow from the unit.
There are 5 stationary angles.
4) Press the FAN SPEED
Button to select the desired
FAN SPEED Button
fan speed
prevent condensate water from dripping.
-8-
Page 11
MAINTENANCE OF YOUR UNIT
Beginning of Season
PRIOR TO OPERATION
• Carefully inspect both indoor and outdoor unit for blockages of
the inlet and outlet exhaust vents.
• Inspect ground connection. Ensure that ground wire is properly
connected.
• Inspect Air Filters and clean if necessary.
• Install new batteries in the remote control unit(2ea“AAA”).
During the Season
CLEANING THE AIR FILTERS
• Filters should be cleaned every 2 weeks or more often if the unit
is used continuously or the unit is operated in a high dust area.
TO REMOVE THE AIR FILTERS:
• To open the indoor unit, pressing on the outside edges of the
lower corners of the cover and pull outwards. The front cover
will swing upwards. DO NOT OPEN FRONT COVER FURTHER
THAN STOPS. DO NOT FORCE THE FRONT COVER OPEN.
• To remove the filters, push the filter upwards from the bottom to
release.
• Clean the filters by washing in lukewarm water (about 86°F).
Allow the filters to dry before re-installing. DO NOT USE HOT
WATER. DO NOT USE HARSH CHEMICALS.
• Turn the unit off. In the OFF mode, the unit still comsumes
about 5 watts of power. If you wish to completely turn the unit
off, turn off the breaker to the unit.
• Clean and re-install the air filters.
• Clean both the indoor and outdoor units.
• Remove the batteries from the remote control and store the
remote control in a safe place.
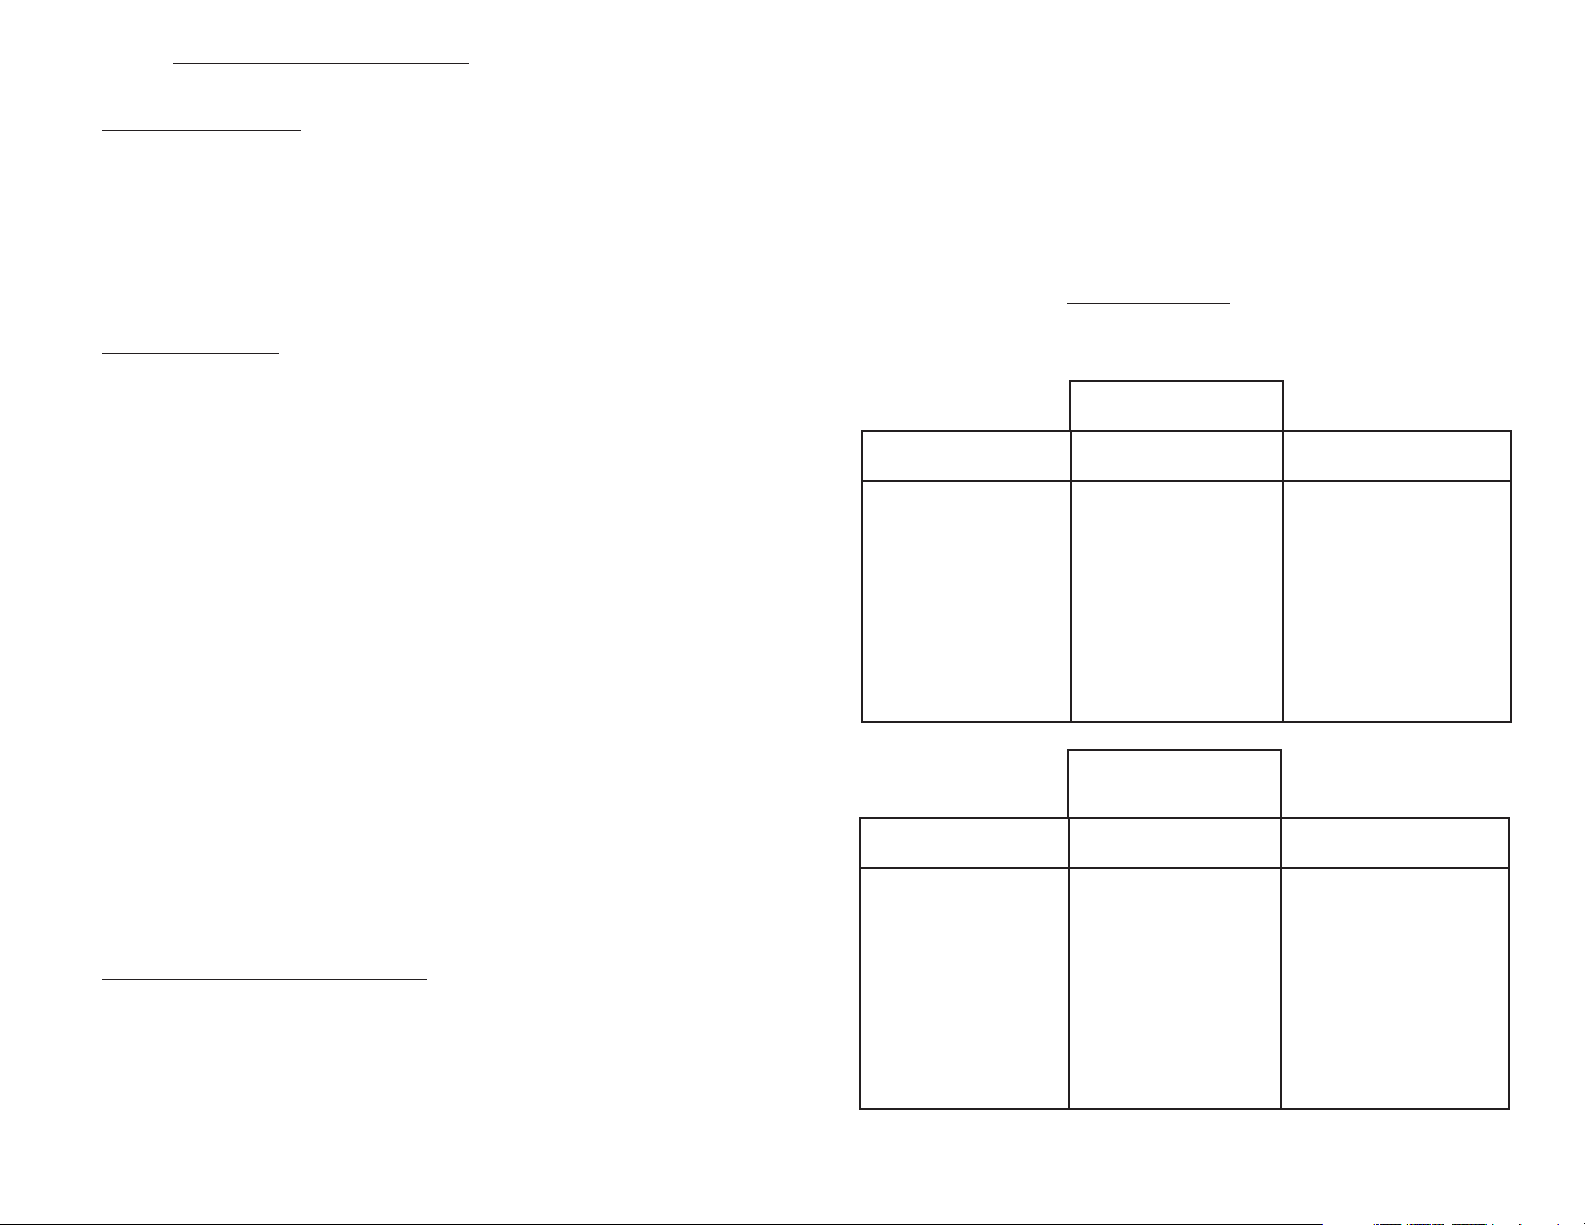
TROUBLESHOOTING
If you have a problem with your unit, please check the following
items BEFORE calling for service:
If the unit will
not operate
Is there power at the Is the remote control Is the timer on
unit operating
Check for tripped Point remote at unit Check the TIMER
breaker or blown and press the power status. If the TIMER is
fuse button. You should on, press
hear a “BEEP” if the “AUTOSTART” button
Turn breaker off for unit is receiving a to cancel timer
30 seconds then turn signal from the operation.
remote.
Replace batteries in
remote.
• Re-install clean filters by sliding the filter in at the top then
locking behind tabs on the bottom.
• DO NOT OPERATE THE UNIT WITHOUT THE FILTERS IN
PLACE. DAMAGE TO THE UNIT COULD OCCUR.
NOTICE: Performance of this unit is greatly reduced when operated
with dirty, damaged, or clogged filters.
AFTER THE OPERATING SEASON
• Set the temperature to 86°F and operate the unit in the FAN
MODE for about 4 - 6 hours to thoroughly remove any moisture
from the interior of the unit.
If the unit will
operate but not
cool
Is there remote set Is there air flow? Is unit sized properly?
properly
Set temperature Check for clogged Check with
lower than current filter. Installation contractor
room temperature. Check for blocked
Verify that unit is in intake or outlets.
“COOL” mode. Check fan mode
Unit takes 3 minutes
to restart after
shutdown.
-9-
Page 12

WARRANTY
TECHNICAL ASSISTANCE
THERMAL ZONE warrants the accompanying split air conditioner
system to be free of defects in material and workmanship for the
applications specified in the operation manual and installation
manual for a period of (1) year on parts and five (5) years on the
compressor, valid from date of original retail purchase in the
United States or Canada.
LABOR is not covered under warranty.
If the unit exhibits a defect in normal use and it is determined to
be within the warranty period, THERMAL ZONE will, at its option,
either repair or replace the unit free of charge within a reasonable
time after the unit is returned.
This warranty DOES NOT cover:
• Damage, accidental or otherwise, to the unit while in possession
of the consumer that is not a result of a defect in material or
workmanship.
• Damaged caused by consumer misuse, tampering, or failure
to follow all care and maintenance instructions in the manual.
• Damage to the finish of the case or other parts caused by water.
• Damage caused by repairs or alterations to the unit by anyone
other than a qualified technician.
IF YOU STILL NEED SERVICE:
Please contact the installation contractor, or call International
Refrigeration Products at 9704) 504-8590 between the hours of
7:30 a.m. and 4:00 p.m. E.S.T. , Monday thru Friday.
For faster service, please have the model and serial numbers of
both the inside unit and the outside unit available when you call.
• Air Filters
• Freight and insurance cost for the warranty service.
Warranty Activation Card must be completed and sent in to
activate the warranty for the accompanying unit.
-10-
 Loading...