

Page 1
C
ore
P
6
TG
Your Build. Our Core
User's Manual
Benutzerhandbuch
Mode d’emploi
Manual del usuario
Manuale dell’utente
Manual do Utilizador
安裝說明書
用戶手冊
ユーザーズマニュアル
Руководство пользователя
kullanıcı elkitabı
(EEE Yönetmeliğine Uygundur)
คู่มือการใช้
Picture is for reference only
© 2021 Thermaltake Technology Co., Ltd. All Rights Reserved. 2021.07
All other registered trademarks belong to their respective companies.
Tested To Comply
With FCC Standards
FOR HOME OR OFFICE USE
www.thermaltake.com
www.thermaltake.com
Page 2
TT Premium
TT Premium
To continue achieving the corporate mission of delivering the
perfect user experience, Thermaltake developed “TT Premium”
with the essence of combining supreme quality products with a
new logo design. TT Premium is far more than just a guarantee
of quality. Behind the name, it represents the passion in DIY,
Modding and Thermaltake’s desire to be the most innovative
brand in the PC hardware market. To satisfy the demand of the
high-end PC users, TT Premium follows its core values of
Excellent Quality, Unique Design, Diverse Combinations and
Boundless Creativity to provide a high performance PC product
for every enthusiast. http://ttpremium.com
Contents
Chapter 1. Product Introduction
Tt LCS-Liquid Cooling Support Certification
Tt LCS Certified is a Thermaltake exclusive certification
applied to only products that pass the design and
hardcore enthusiasts standards that a true LCS chassis
should be held to. The Tt LCS certification was created
so that we at Thermaltake can designate to all power
users which chassis have been tested to be best
compatible with extreme liquid cooling configurations to
ensure you get the best performance from the best
features and fitment.
Joi n Tt Comm unity To Re ceive Benef its
Dear Valued Customer,
Thank you for choosing Thermaltake.
As a new user we value your thoughts and opinions and
your feedback is important to us. We at Thermaltake
would like to use this opportunity to invite you to join our
Community Forums. Register today to start enjoying the
full benefits of our community.
Benefits of being a member:
Quick and responsive user support
Receive help and advice with new builds
Keep up to date with new product releases
Share your thoughts and builds with the community
Enter monthly contests and giveaways
Brand official website
http://www.thermaltake.com/
Global Facebook
https://www.facebook.com/ThermaltakeInc
Taiwan Facebook
http://www.facebook.com/ThermaltakeTW
Global community forums
http://community.thermaltake.com
1.0
Specification
1.1
Accessory
1.2
War nin g an d No tice
Chapter 2. Installation Guide
Remove Components
2.0
Power Supply Unit (PSU) Installation
2.1
Motherboard Installation
2.2
3.5" & 2.5" HDD Installation
2.3
PCI Card Installation
2.4
Liquid Cooling Installation
2.5
Ai r Co oling I ns talla ti on
2.6
Wall-mounting
2.7
I/O Connection
2.8
01
02
03
06
10
12
13
15
19
21
22
23
Page 3
Cor e P6 TG Cor e P6 TG
Specification
Accessory
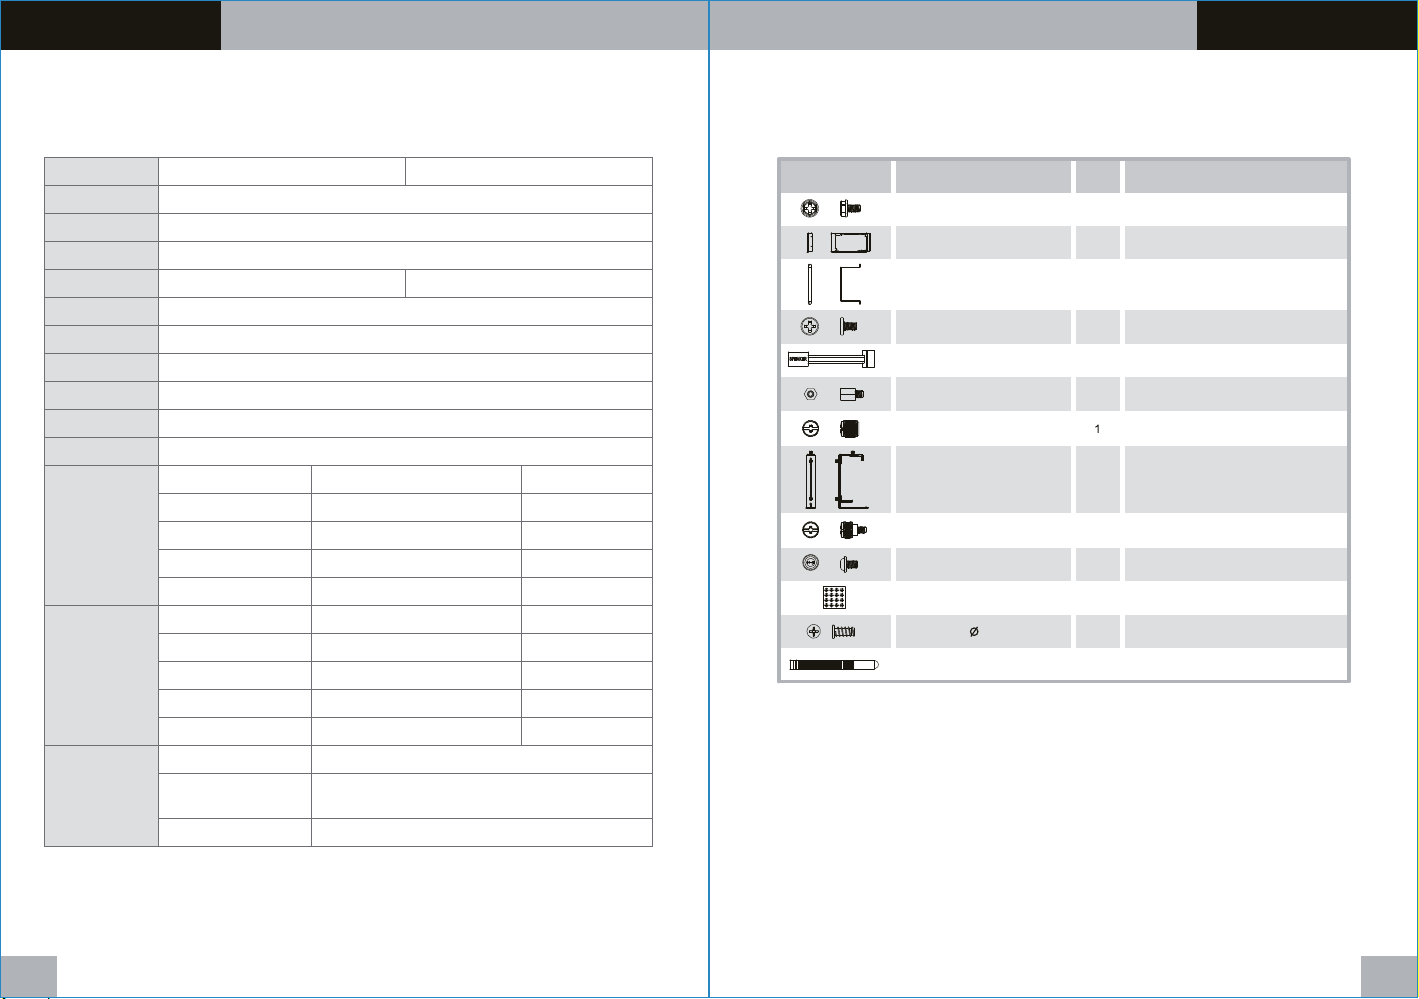
Model
Cas e Type
Dimension (H*W*D)
Side Panel
Color
Material
Drive Bays
Expansion Slots
Motherboards
I/O P ort
PSU
Fan Support
Radiator Support
Clearance
Cor e P6 TG Cor e P6 TG Sno w Edi tion
Mid Tower
565 x 2 55 x 530 mm ( 22.2 x 10 x 2 0.9 inc h)
Tempe red Gla ss x 3
Black
SPCC
4 x 3.5 ” or 8 x 2.5”
7 (Rotatable Patented Design)
6.7 ” x 6.7” (M ini ITX ), 9.6” x 9 .6” (Mi cro ATX), 1 2” x 9. 6” (ATX) , 12” x 1 0.5 ” (CEB)
USB 3 .2 (Gen 2 ) Type C x 1 , USB 3.0 x 2 , USB 2.0 x 2 , HD Audio x 1
Standard PS2 PSU (optional)
Front
Top
Rear
Rig ht (M/B S ide)
Bottom
Front
Top
Rear
Rig ht (M/B S ide)
Bottom
CPU cooler height limitation
VGA length limitation
PSU l ength l imita tion
3 x 120 m m, 2 x 120 mm , 1 x 120 mm 2 x 140 mm, 1 x 140 mm
3 x 120 m m, 2 x 120 mm , 1 x 120 mm
1 x 120 m m
3 x 120 m m, 2 x 120 mm , 1 x 120 mm
3 x 120 m m, 2 x 120 mm , 1 x 120 mm
1 x 360mm, 1 x 24 0mm, 1 x 12 0mm 1 x 280mm, 1 x 140mm
1 x 360mm, 1 x 24 0mm, 1 x 12 0mm
1 x 360mm, 1 x 24 0mm, 1 x 12 0mm
1 x 240 m m, 1 x 120 mm
300mm(With Reservoir), 400mm(Without Reservoir)
430mm(With Radiator), 458mm(Without Radiator)
1 x 120 m m
White
2 x 140 mm, 1 x 140 mm
2 x 140 mm, 1 x 140 mm
2 x 140 mm, 1 x 140 mm
1 x 280mm, 1 x 140mm
1 x 280 mm, 1 x 140mm
180mm
200mm
Figure
Part Name
Screw #6-32 x 6 mm
Power Backplate
Power Bracket
Screw #6-32 x 6 mm
Buzzer
Stand-off Screw #6-32 x 6.5 mm
Net setter
VGA Support Bracket
Thumb Screw #6-32 x 6mm
Screw M3 x 6 mm
HDD Rubber
Screw 5 x 12 mm
Cable Ties
Q`ty
8
1
1
29
For Motherboard / 3.5” HDD / Riser Cable
1
2
Use For
For PSU
For PSU
For PSU
For Motherboard Alarm
For Backup
For Stand-off
1
2
28
1
12
5
For VGA
For VGA Support Bracket
For 2.5” HDD / SSD
For 2.5” HDD
For Fan
For Cable Management
01 02
Page 4
Cor e P6 TG Cor e P6 TG
War ning and Notic e
War ning and Notic e
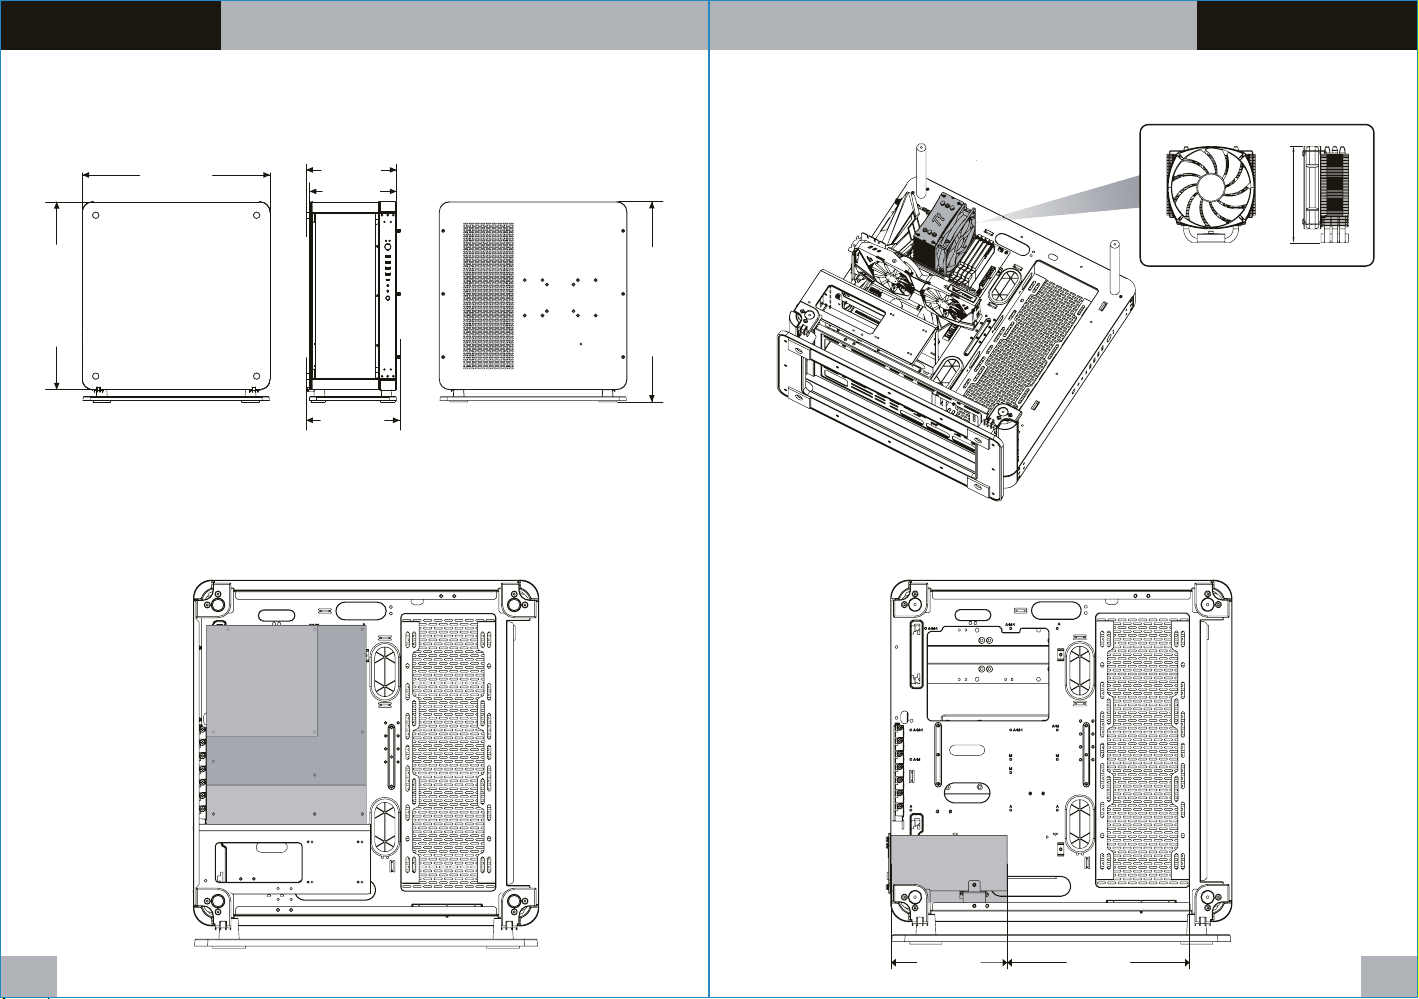
Chassis dimension
530mm
530mm
255mm
245mm
264mm
Motherboard Compatibility: ITX / mATX / ATX / C EB
(Up to 267mm wide)
ITX
CPU c ooler ma x height : 180mm
180mm
565mm
PSU max length: 200mm
mATX
ATX
03 04
200mm 263mm
Page 5
Cor e P6 TG Cor e P6 TG
War ning and Notic e
Remove Components
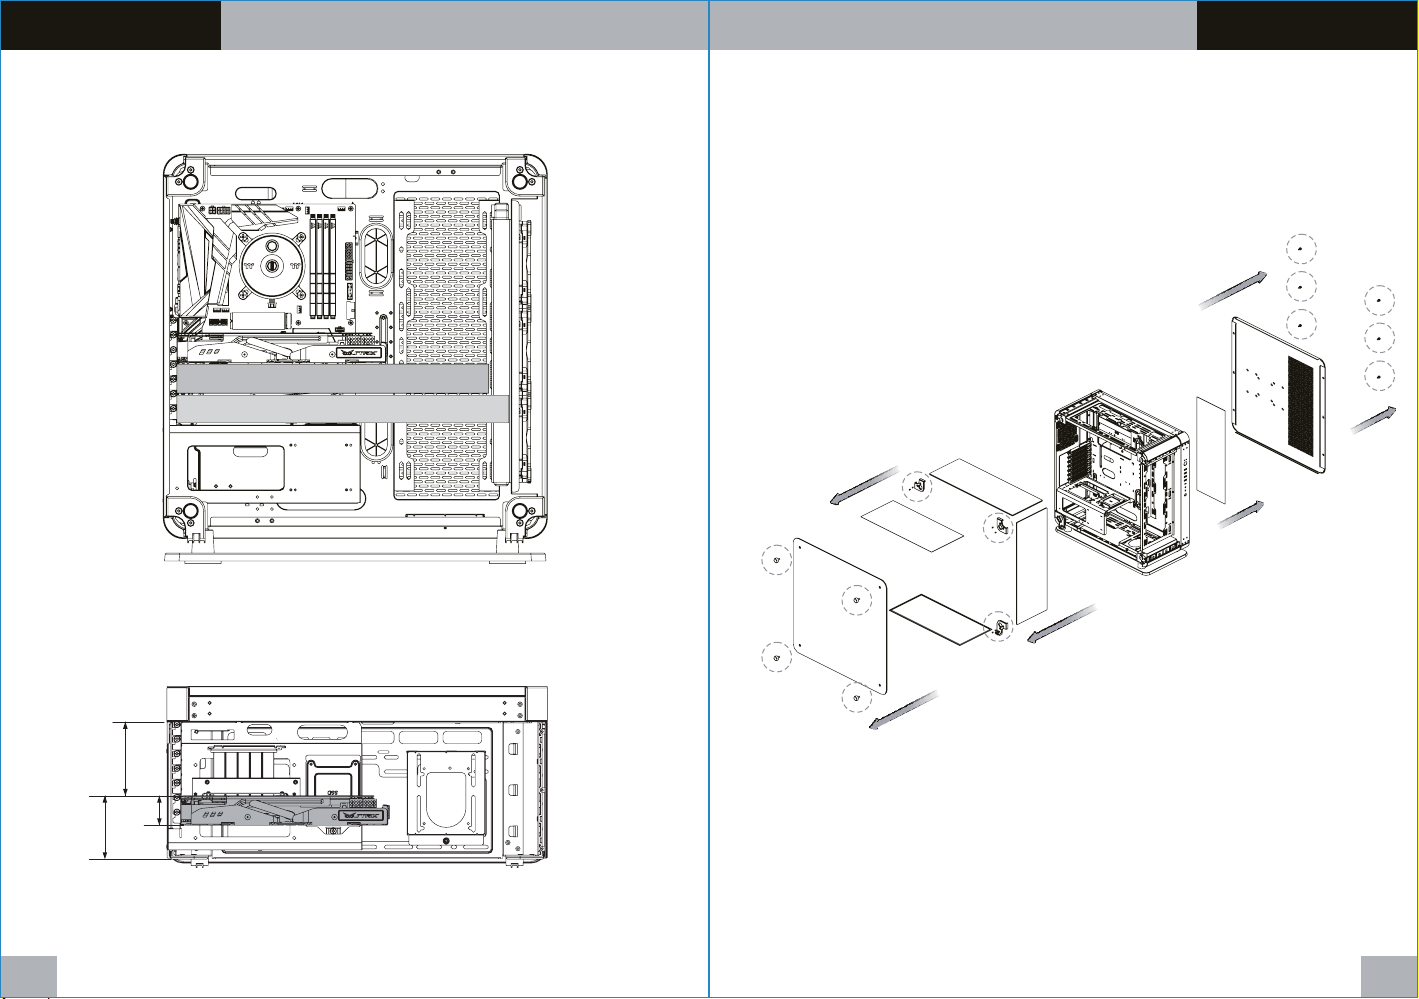
VGA length max length: 458mm
Radiator 360mm
VGA length max length: 430mm
VGA length max length: 458mm
VGA m ax width : 88mm
103 mm
88 mm
41mm
05 06
Page 6
Cor e P6 TG Cor e P6 TG
Remove Components Remove Components
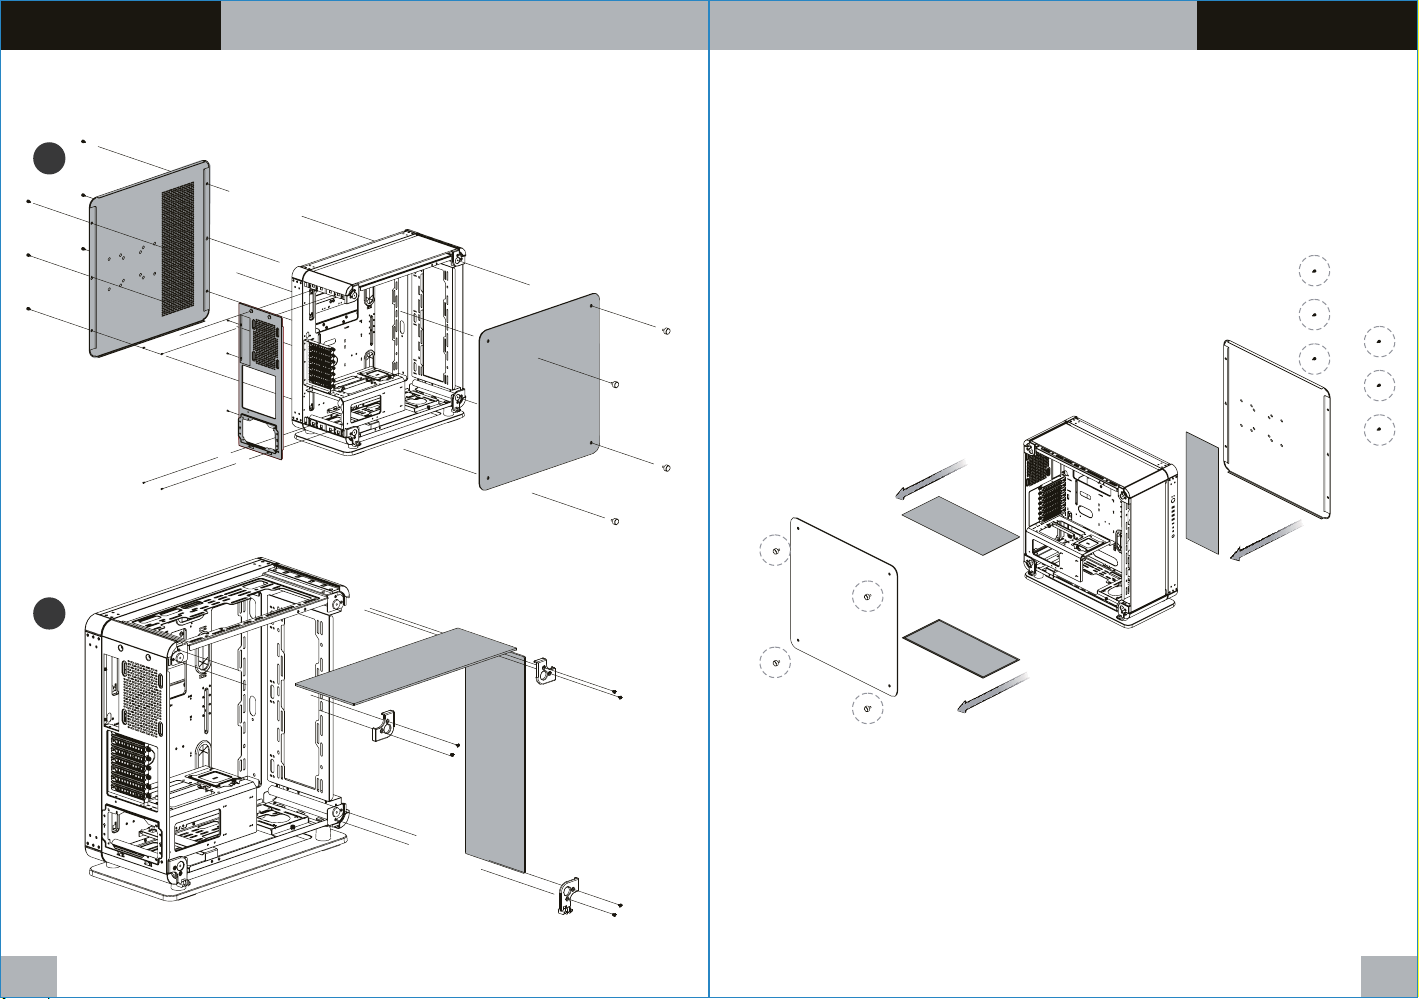
Remove Tempered Glass & Side Panel
1
2
Remove Filters
07 08
Page 7
Cor e P6 TG Cor e P6 TG
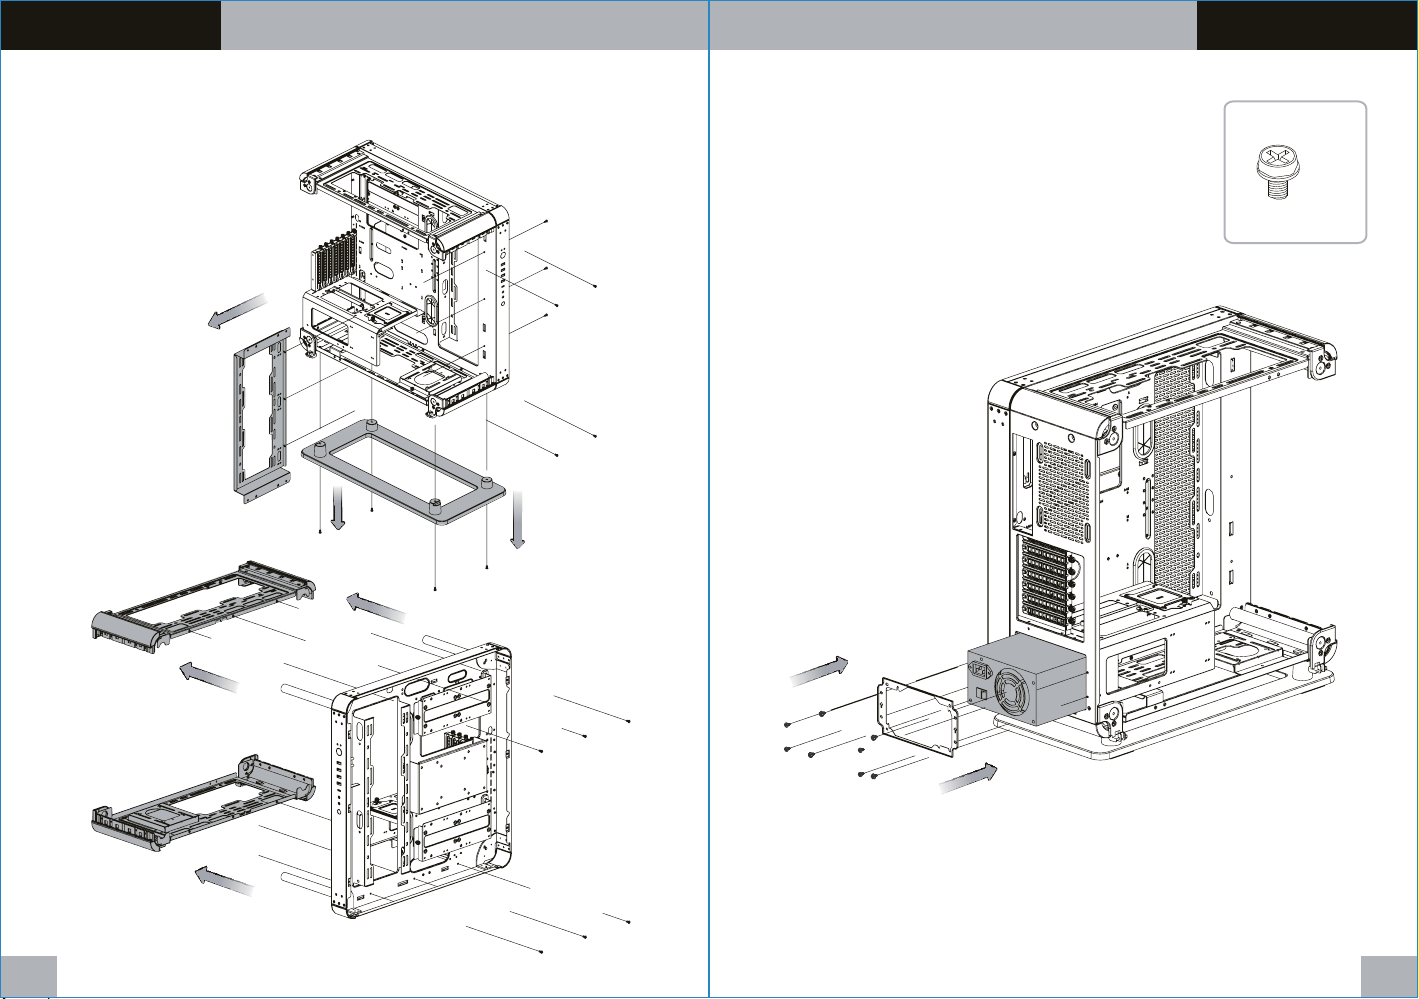
Remove Components
Pow er Supply Unit I nstallatio n
Remove Fan Bracket & Stand (If Necessary)
Type A: Horizontal PSU
x 4
09 10
Page 8
Cor e P6 TG Cor e P6 TG
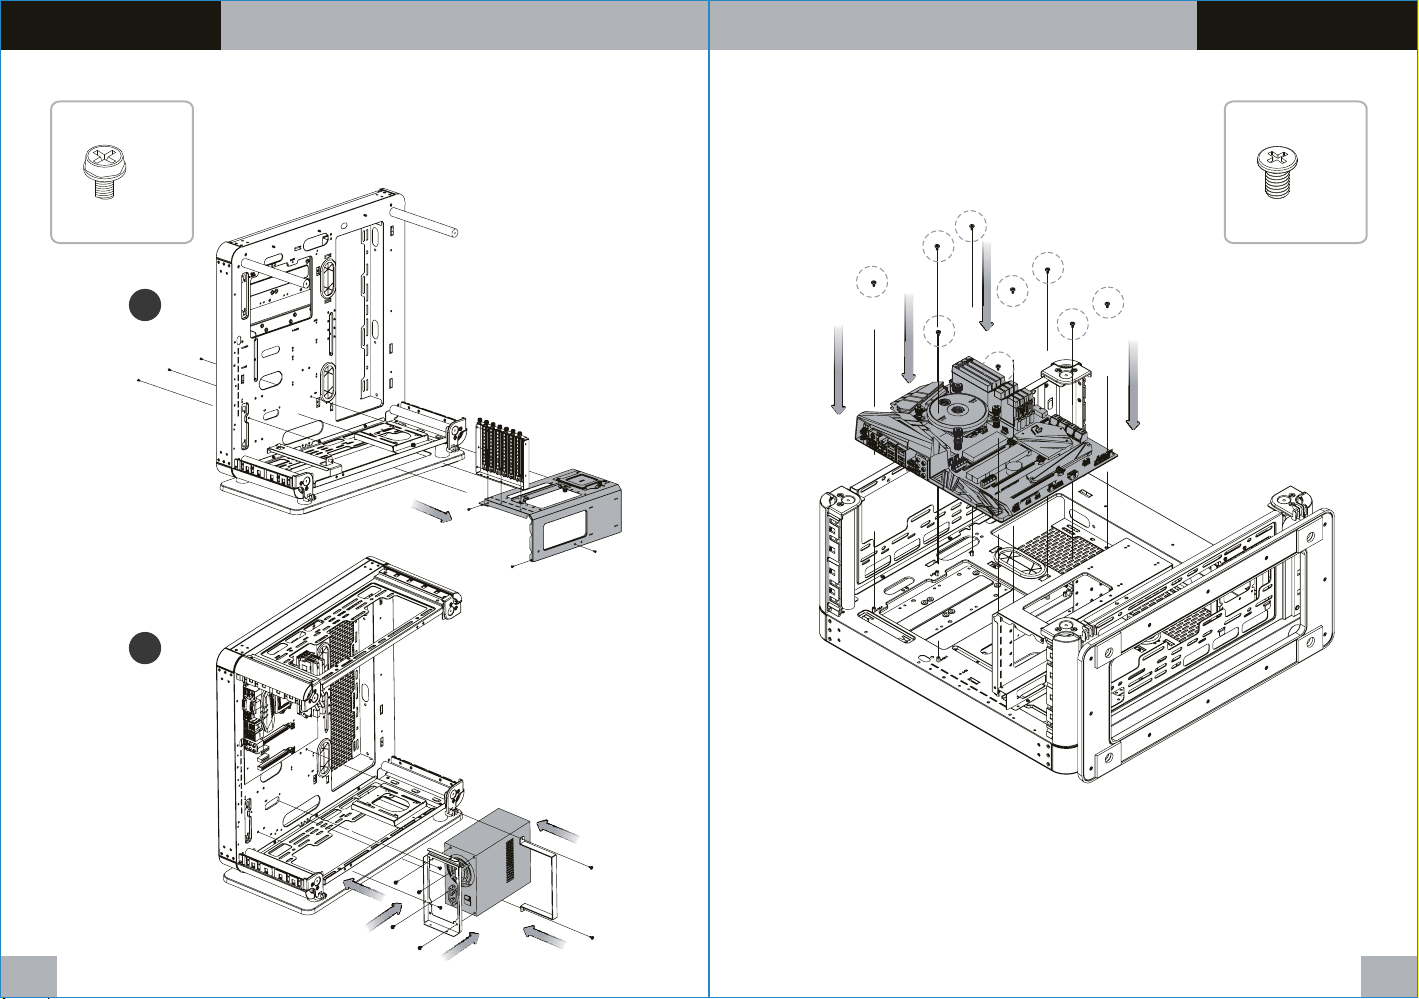
Power Supply Unit Installation Mot herboard Ins tallation
Type B: Vertical PSU
(mATX/ITX motherboard only)
x 4
1
x 9
2
11 12
Page 9
Cor e P6 TG Cor e P6 TG
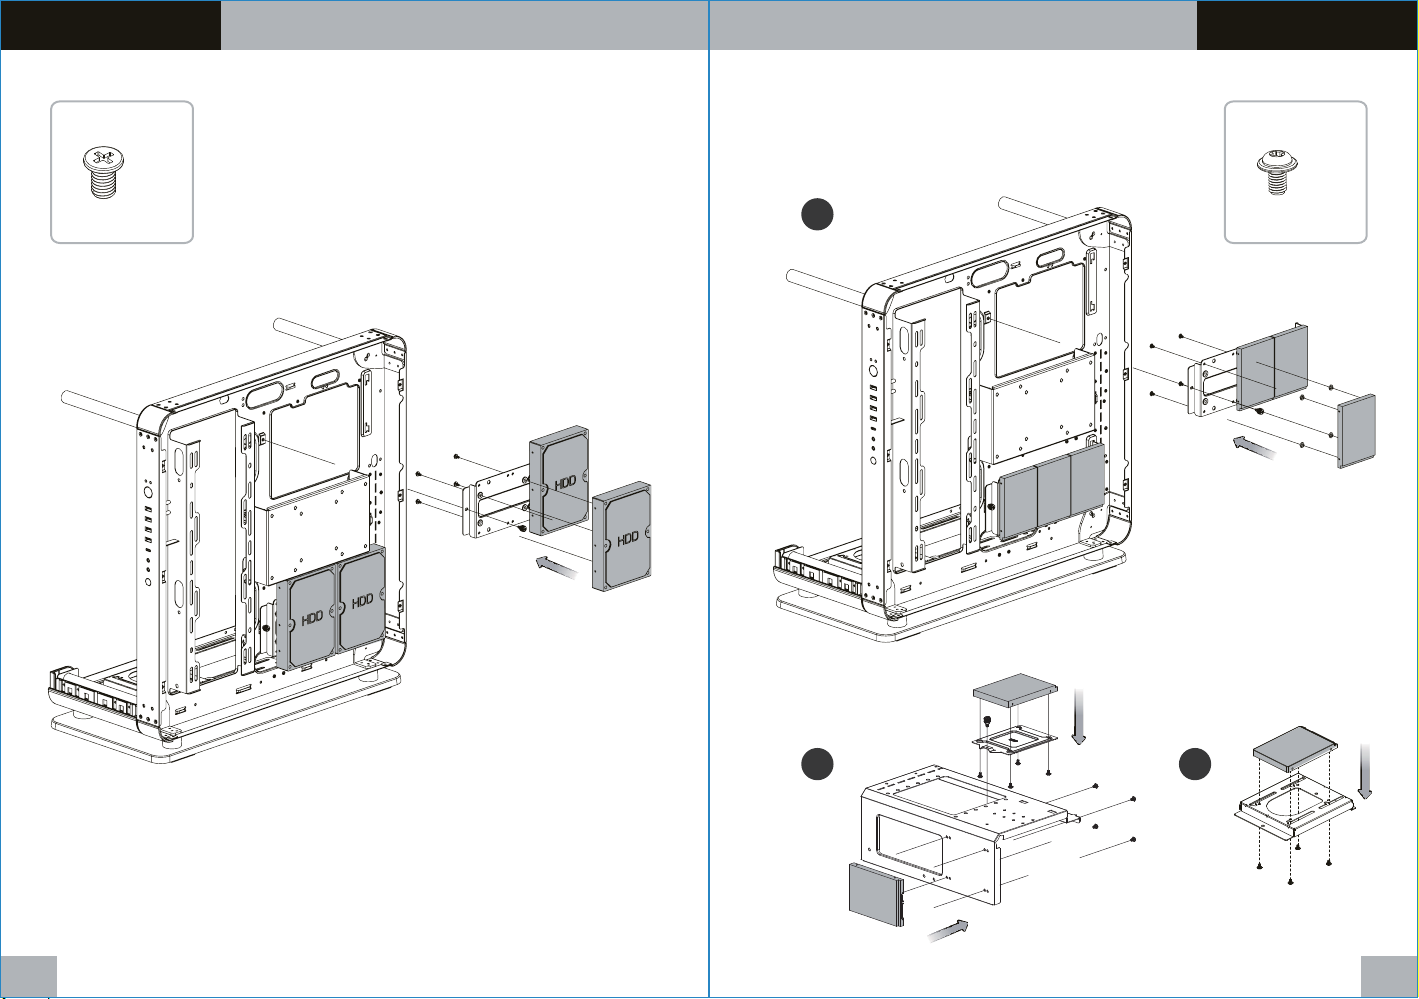
3.5” HDD Installation
2.5” HDD Installation
x 4
x 4
1
2 3
13 14
Page 10
Cor e P6 TG Cor e P6 TG
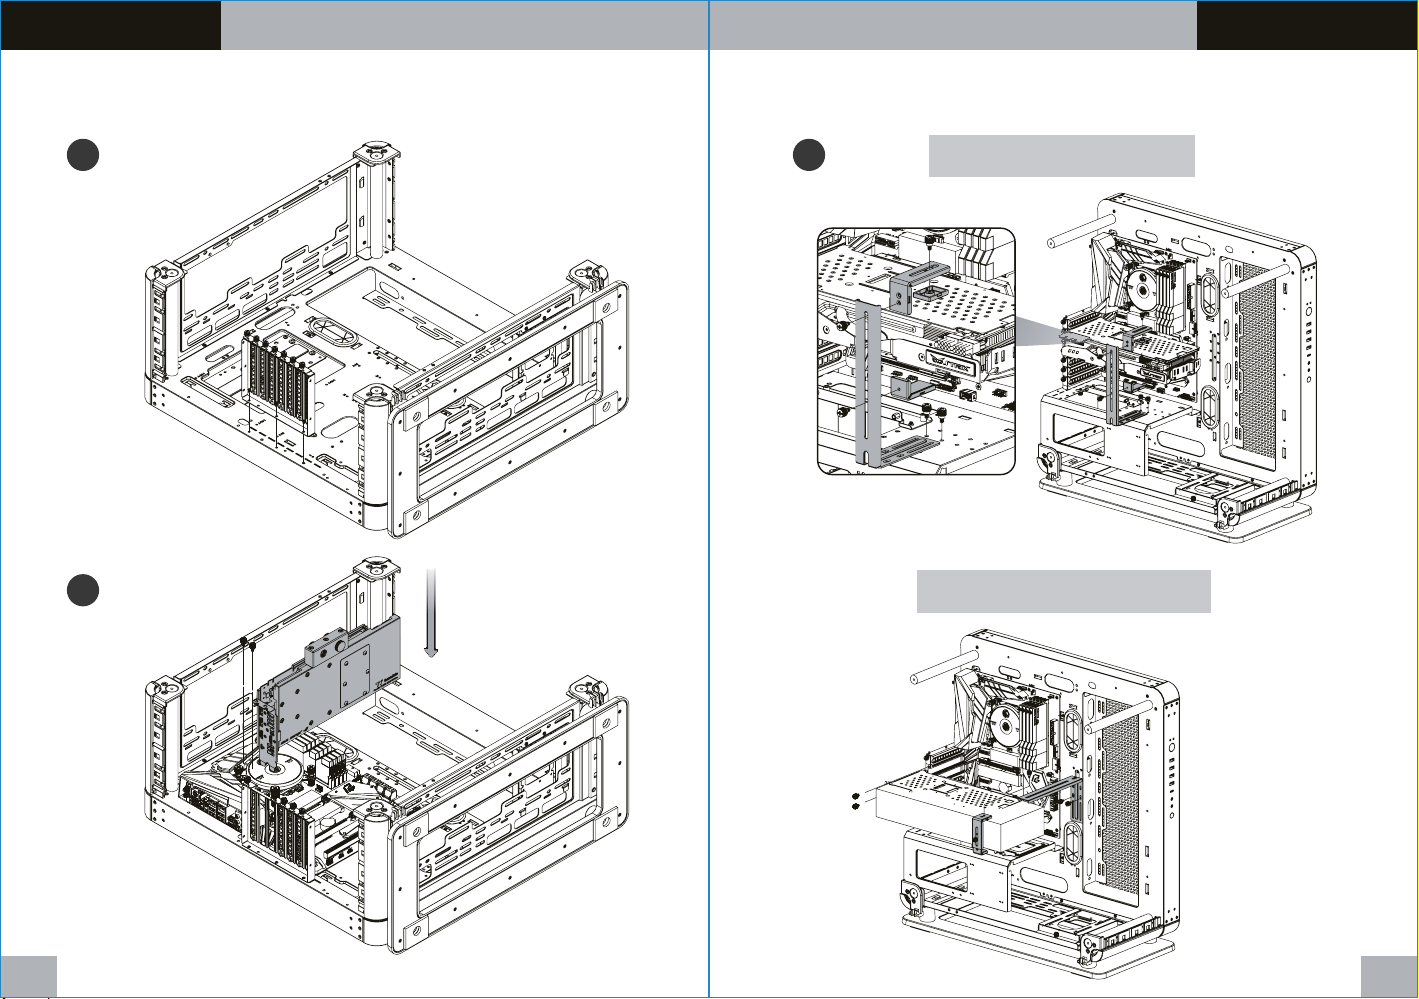
PCI Card Installation
PCI Card Installation
Type A: Installing to Motherboard
1
2
Type A: Installing VGA Support Bracket
3
A: Fix to power cover
B: Fix to power Chassis
15 16
Page 11
Cor e P6 TG Cor e P6 TG
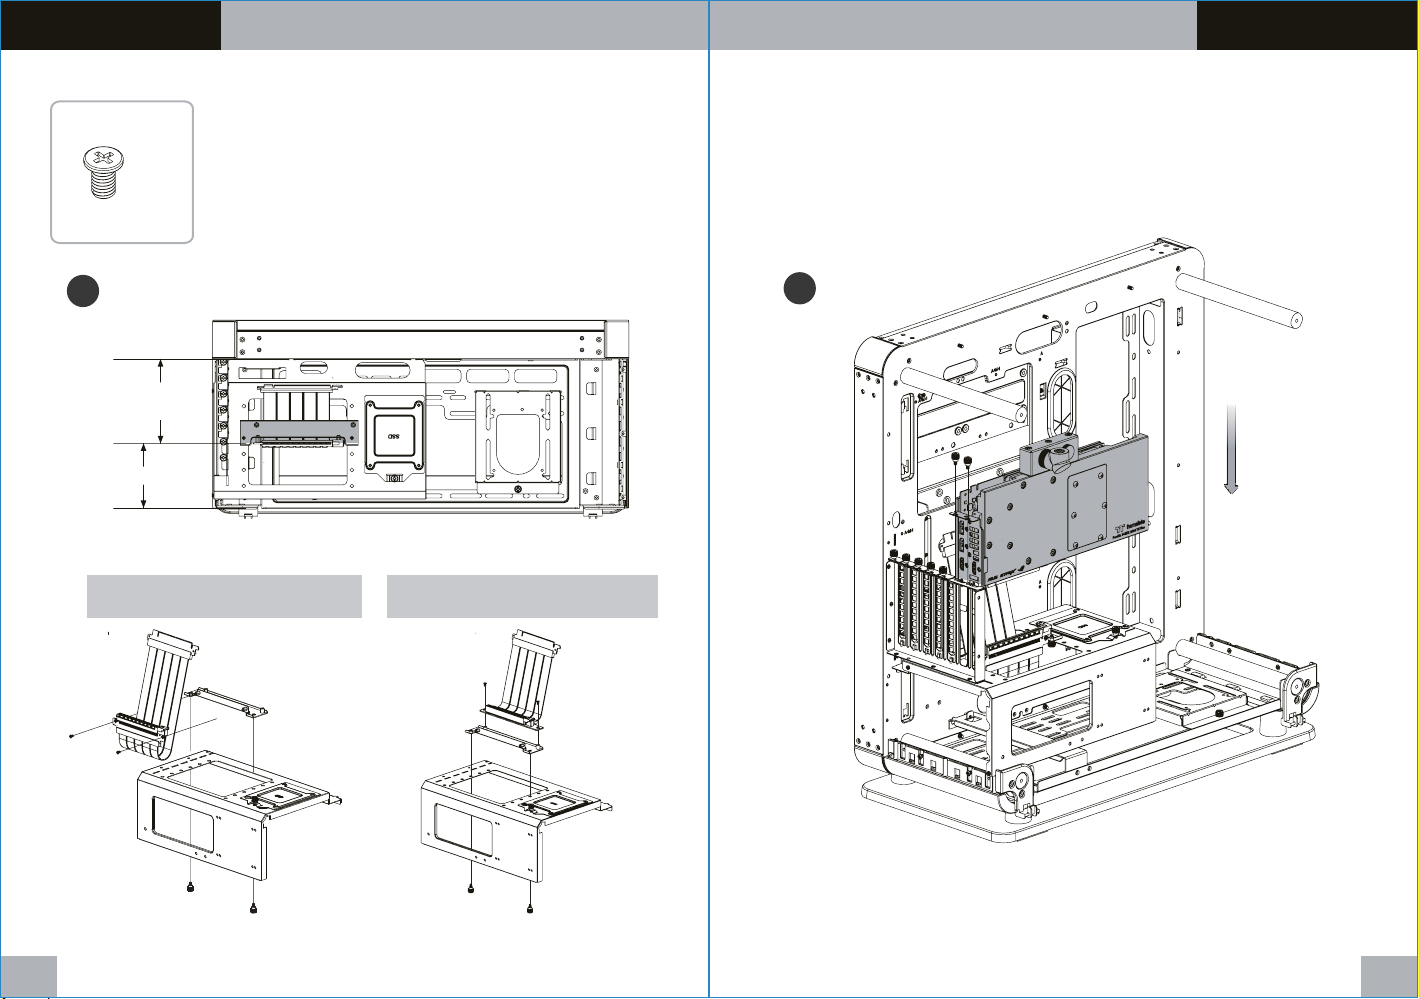
PCI Card Installation
PCI Card Installation
Type B: Installing to extended bracket
(Riser cable is not included)
x 2
1
107mm
84mm
A: 180 degree adapter B: 90 degree adapter
2
17 18
Page 12
Cor e P6 TG Cor e P6 TG
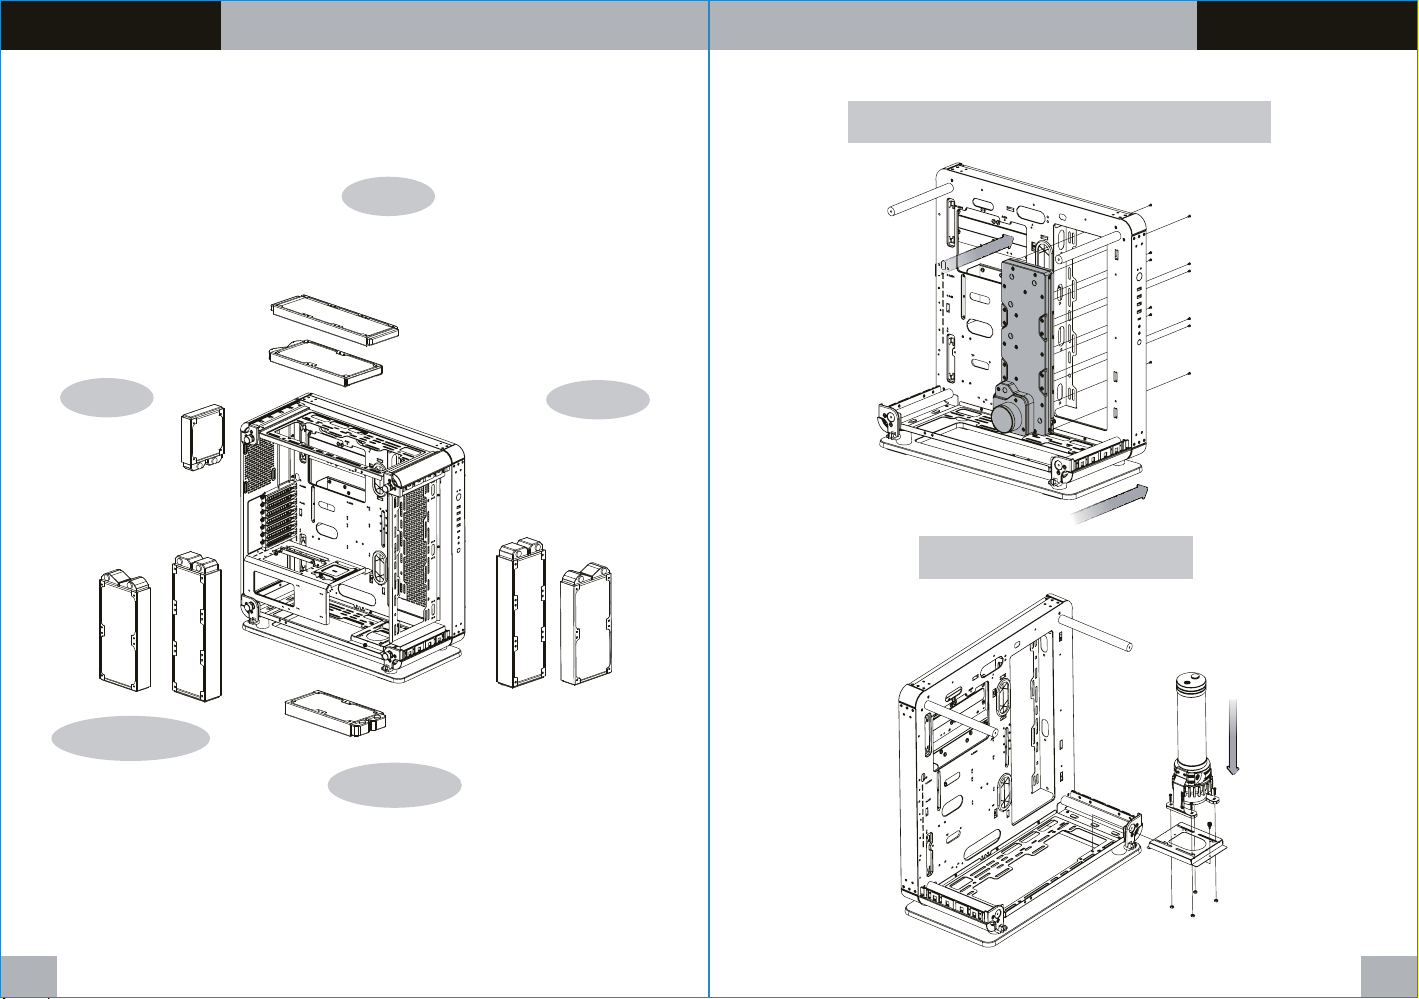
Liquid Cooling Installation
Liquid Cooling Installation
Pacific DP100-D5 Plus Distro-Plate
Top
360mm x 1
or
280mm x 1
Rear
120mm x 1
Front
360mm x 1
or
280mm x 1
Pacific PR22-D5 Plus
M/B Side
360mm x 1
or
280mm x 1
19 20
Bottom
240mm x 1
Page 13
Cor e P6 TG Cor e P6 TG
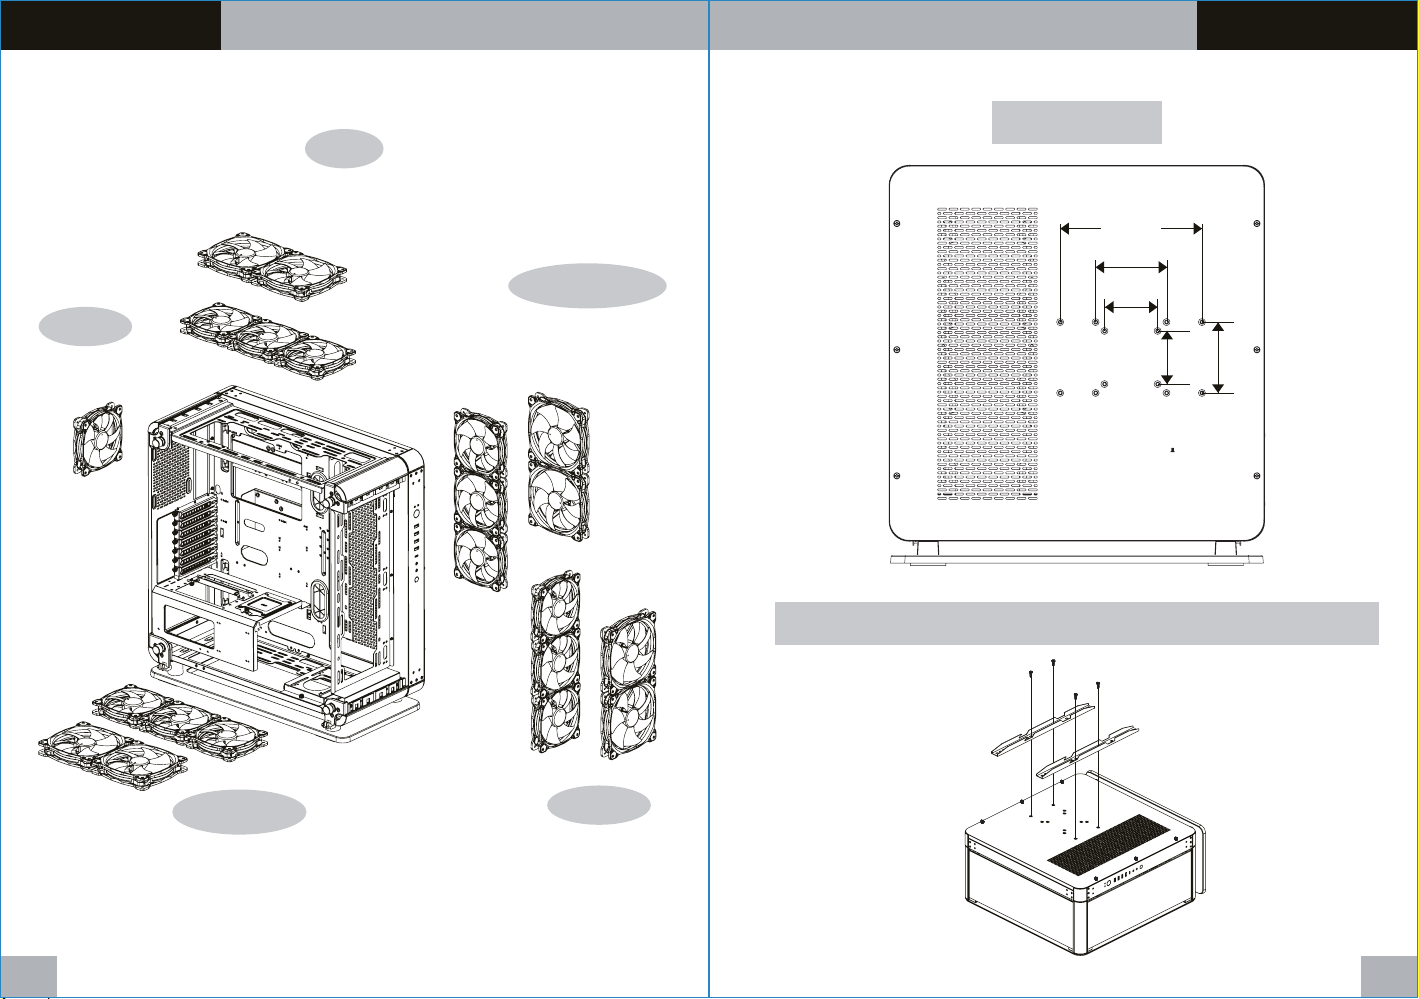
Air Cooling Installation
Wall-mounting
VESA Mount
Top
140mm x 2
or
120mm x 3
200 mm
100 mm
Rear
120mm x 1
Bottom
140mm x 2
or
120mm x 3
M/B Side
140mm x 2
or
120mm x 3
Front
140mm x 2
or
120mm x 3
75 mm
100 mm
75 mm
Screws Hole : M6 x 1 pitch (Bracket is not included)
21 22
Page 14
Cor e P6 TG Cor e P6 TG
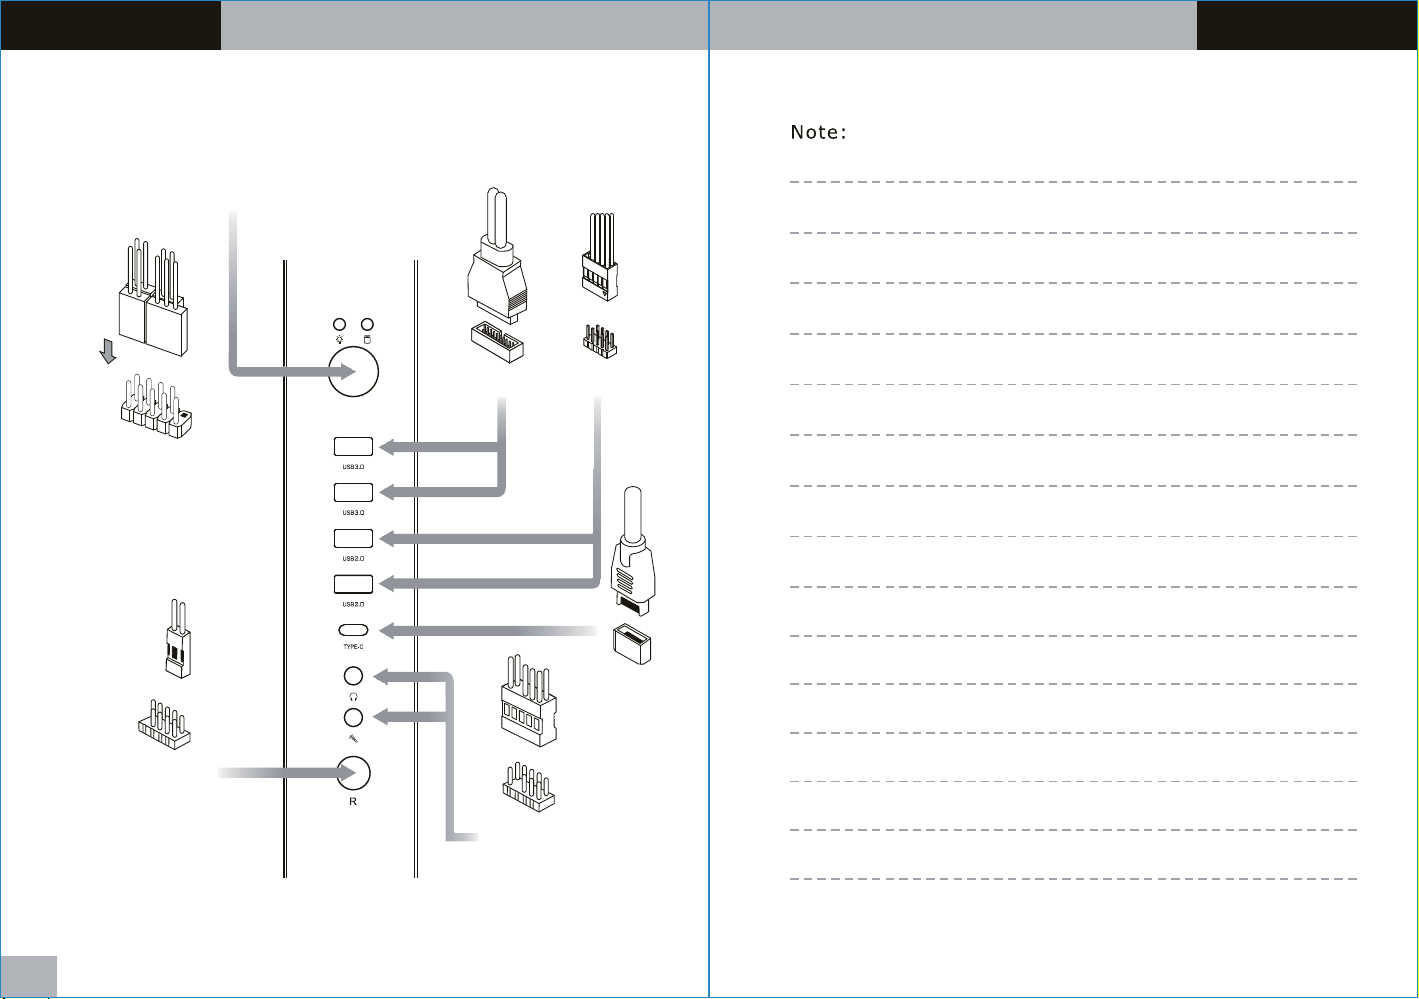
Power SW / Power LED /
HDD LED
I/O Connection
RESET
USB 3.0
HD Audio
USB 2.0
TYPE-C
23
 Loading...