

Page 1
Mechanical Keyboard User Guide
Level 20 RGB
01
Page 2

TT Premium | Level 20 RGB Mechanical Keyboard User Guide
PAGE 40
PAGE 20
Keyboard Features Overview
TT iTAKE Installation
Functions Available on the Home Page
Key Configurations
Default Functions
Single-Key Operations
Macros
Multimedia Features
Hot Keys
Program Execution
Game Profiles
Key Deactivation
Functions Available on the Macro Page
PAGE 05
--------------------------------------- 23
--------------------------------------- 24
--------------------------------------- 26
--------------------------------------- 28
--------------------------------------- 30
--------------------------------------- 32
--------------------------------------- 37
--------------------------------------- 39
02
PAGE 17
PAGE 22
Table of Contents
Page 3

TT Premium | Level 20 RGB Mechanical Keyboard User Guide
PAGE 42
--------------------------------------- 53
--------------------------------------- 57
--------------------------------------- 61
--------------------------------------- 65
--------------------------------------- 69
--------------------------------------- 70
--------------------------------------- 74
--------------------------------------- 78
--------------------------------------- 82
--------------------------------------- 84
--------------------------------------- 86
--------------------------------------- 88
--------------------------------------- 90
--------------------------------------- 92
--------------------------------------- 96
--------------------------------------- 98
How to Record Macros
Recording a Macro
Recording a Character Set
Functions Available on the Lighting Effects Page
Lighting Effects Overview
Static
Pulse
Wave
Spiral Rainbow
Spectrum Cycling
Reactive
Flow
Ripple
Ribbon
Scan
Raindrop
Snake Marquee
Marquee
Flashing
Sound Control
System Temperature
PAGE 50
PAGE 52
--------------------------------------- 43
--------------------------------------- 48
03
Table of Contents
Page 4

TT Premium | Level 20 RGB Mechanical Keyboard User Guide
Functions Available on the Settings Page
TT iTAKE APP Features Overview
Downloading the App
Connecting the App with Software
Lighting Features
Macros
Virtual Controller
Voice Control
Virtual Keyboard
Voice Control Table
04
Table of Contents
--------------------------------------- 102
--------------------------------------- 103
--------------------------------------- 106
--------------------------------------- 108
--------------------------------------- 111
--------------------------------------- 115
--------------------------------------- 116
--------------------------------------- 117
PAGE 101
PAGE 99
Page 5

TT Premium | Level 20 RGB Mechanical Keyboard User Guide
Chapter 1:
Keyboard Features Overview
05
Page 6
TT Premium | Level 20 RGB User Guide
Web Browser
Open the default web browser/return to the home page.
+
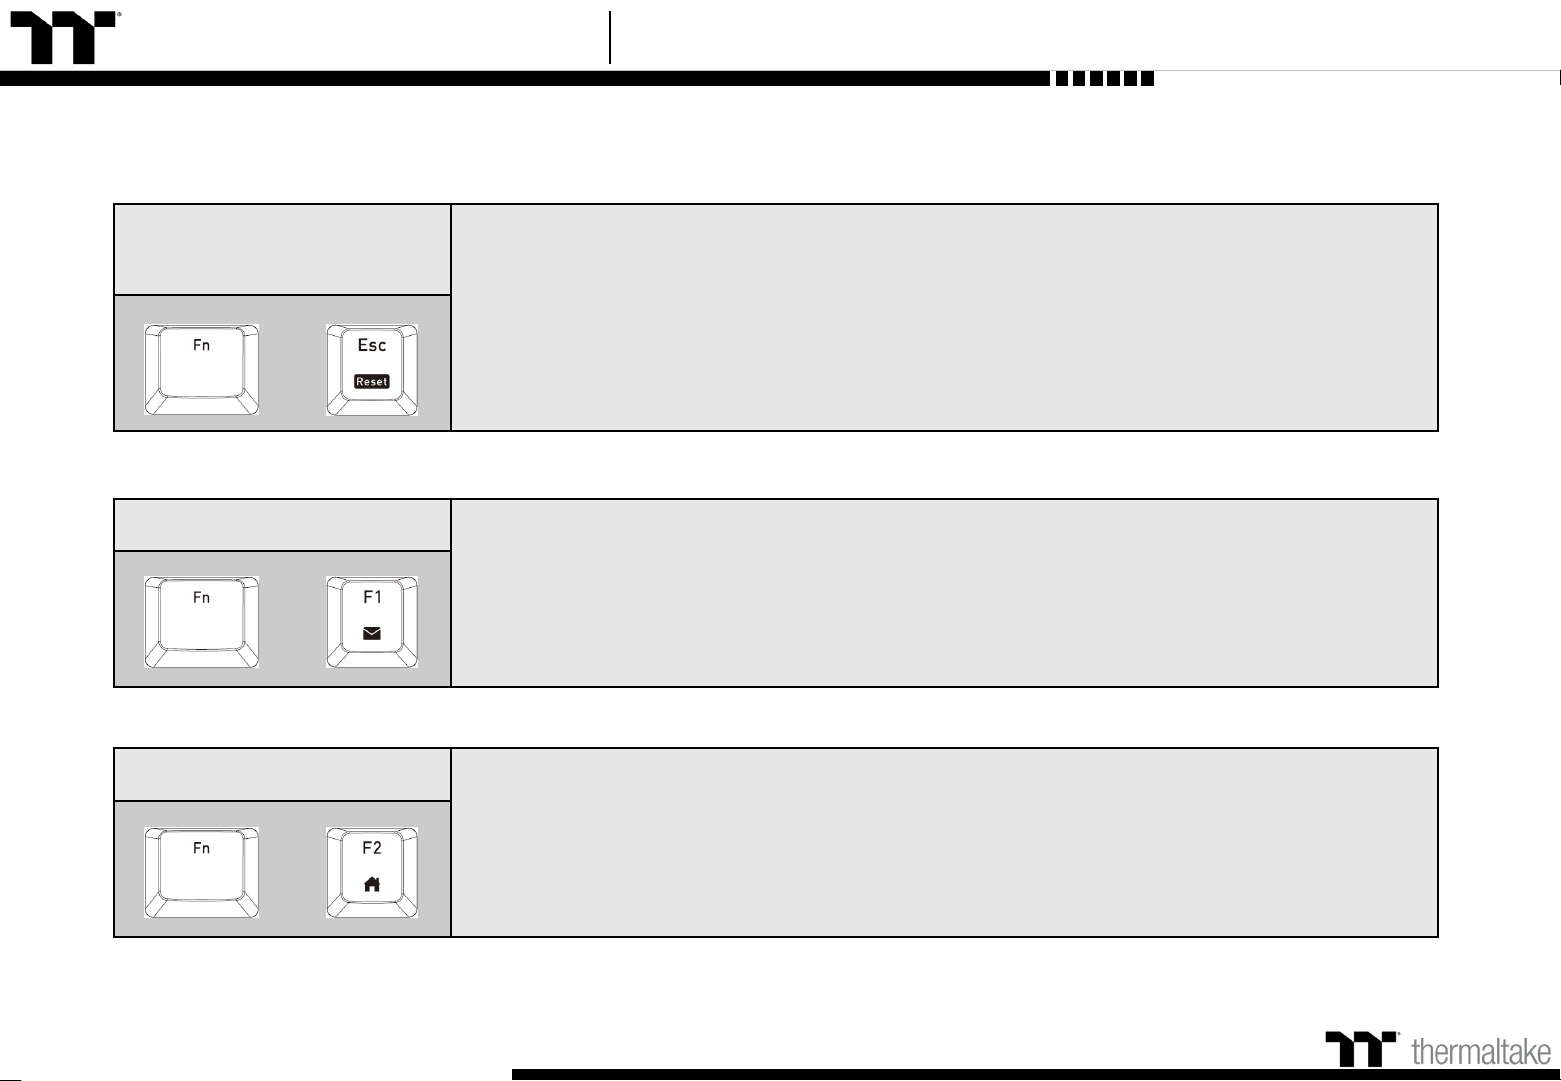
Email
Open the default email box.
+
Keyboard Features Features Overview
06
Restore Factory
Settings
Press and hold for five seconds to restore factory settings (including all lighting effects and
macros).
※ After the settings are restored, a startup animation will run once to indicate that all settings
have been restored.
+
Page 7
TT Premium | Level 20 RGB User Guide
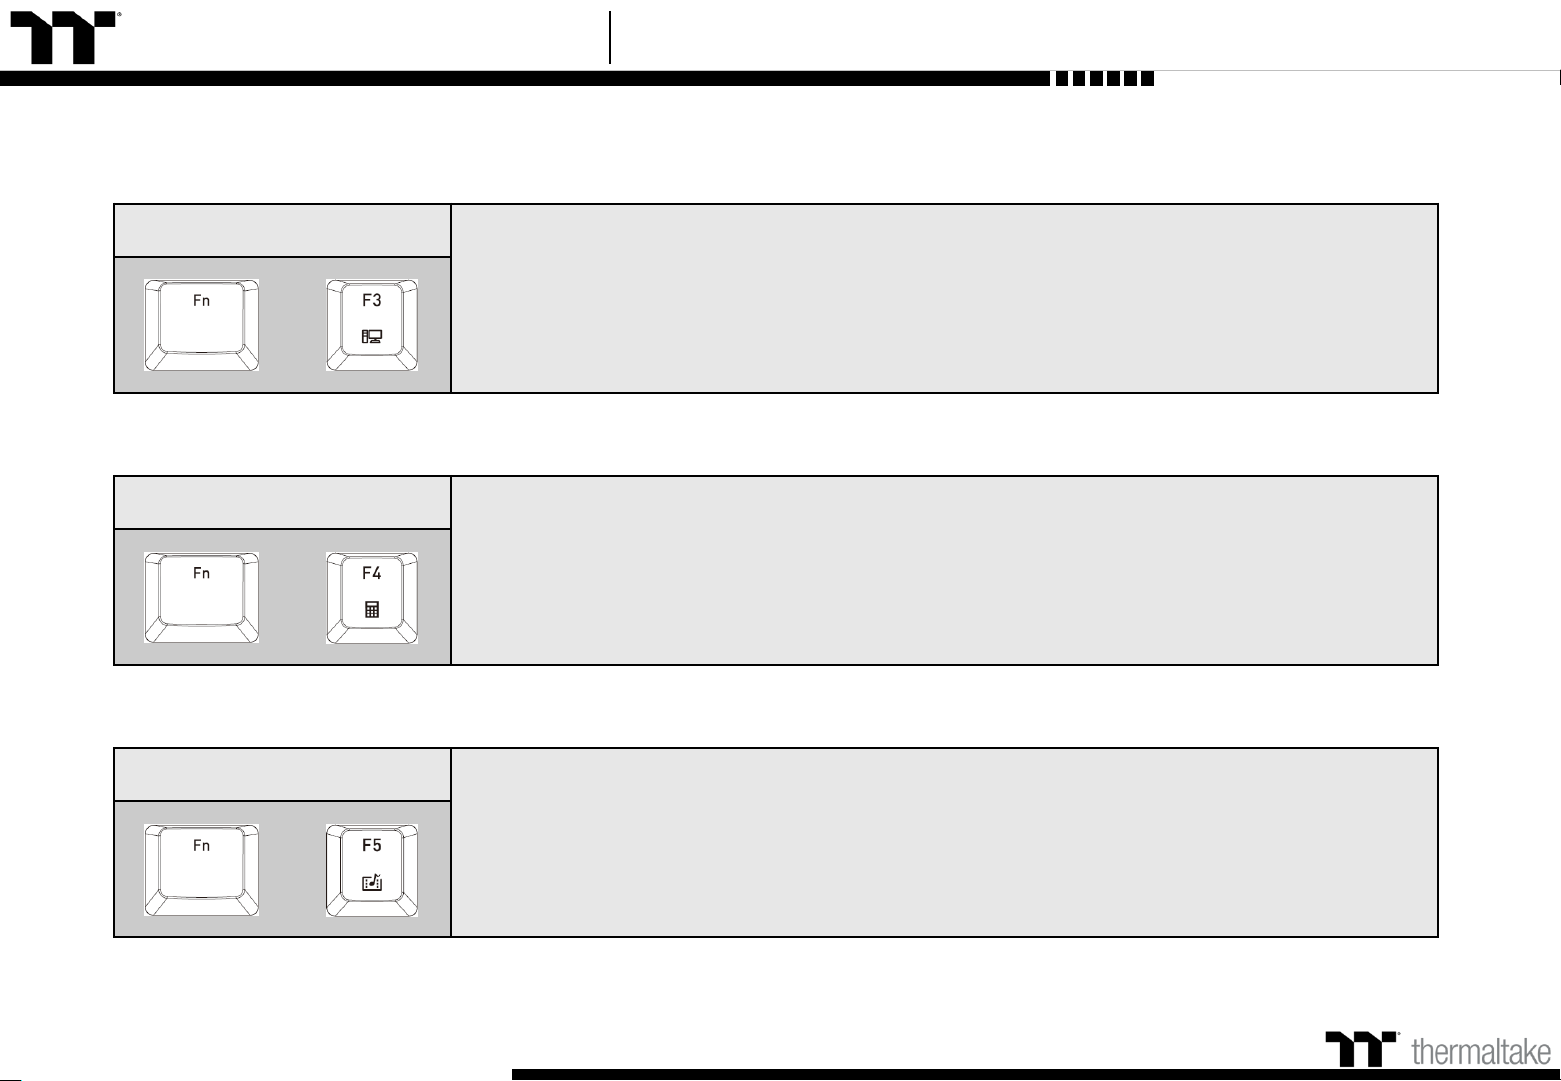
Multimedia Player
Open the system's built-in multimedia player.
+
Calculator
Open the system's built-in calculator.
+
My Computer
Open My Computer.
+
Keyboard Features Features Overview
07
Page 8
TT Premium | Level 20 RGB User Guide
Switching Lighting
Effects(Front Side)
Static:
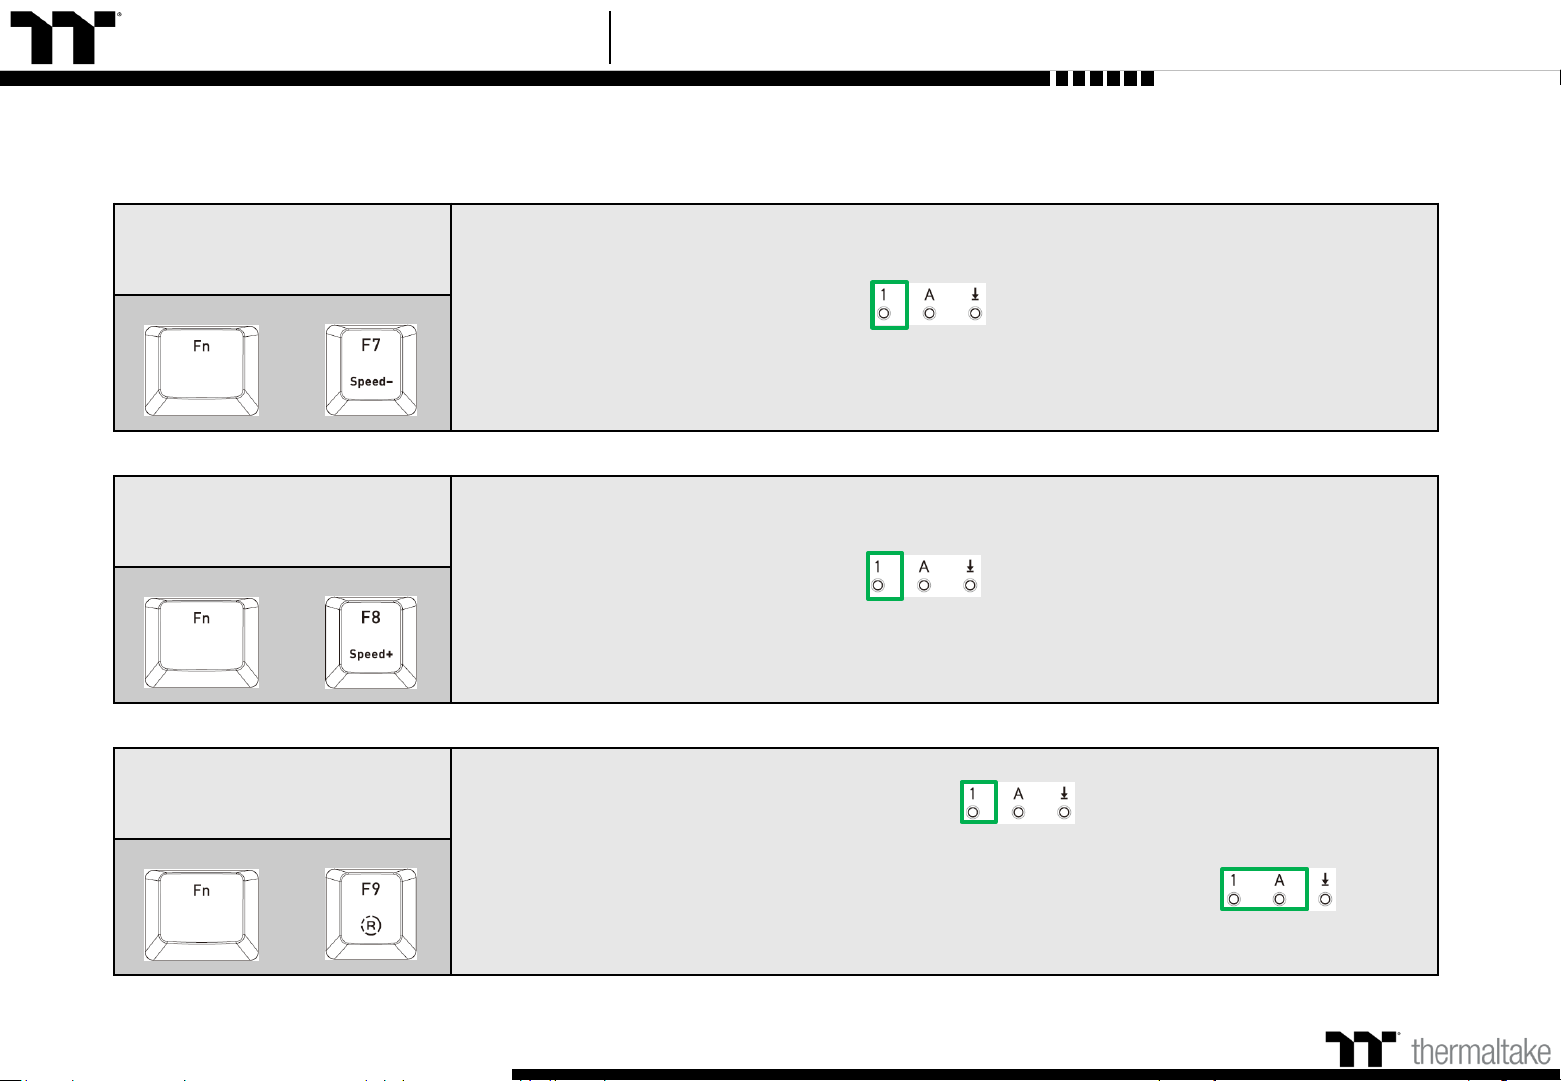
(1). You can use Fn + F9 (red), F10 (green), and F11 (blue) to change the color of the lighting effect.
Pulse:
(1). You can use Fn + F7 (slower) and F8 (faster) to adjust the speed of the lighting effect.
(2). You can use Fn + F12 to switch between monochrome and random color modes.
(3). Under monochrome mode, Fn + F9 (red), F10 (green), and F11 (blue) can be used to adjust the color of the lighting effect.
Wave:
(1). You can use Fn + F7 (slower) and F8 (faster) to adjust the speed of the lighting effect.
(2). You can use Fn + ↑, ↓, ←, or → to change the direction of running lights.
(3). You can use Fn + F9 (red), F10 (green), and F11 (blue) to change the color of the lighting effect.
Spiral Rainbow:
(1). You can use Fn + F7 (slower) and F8 (faster) to adjust the speed of the lighting effect.
(2). You can use Fn + ← (counterclockwise) or → (clockwise) to switch the direction of running lights.
(3). You can use Fn + F9 (red), F10 (green), and F11 (blue) to change the color of the lighting effect.
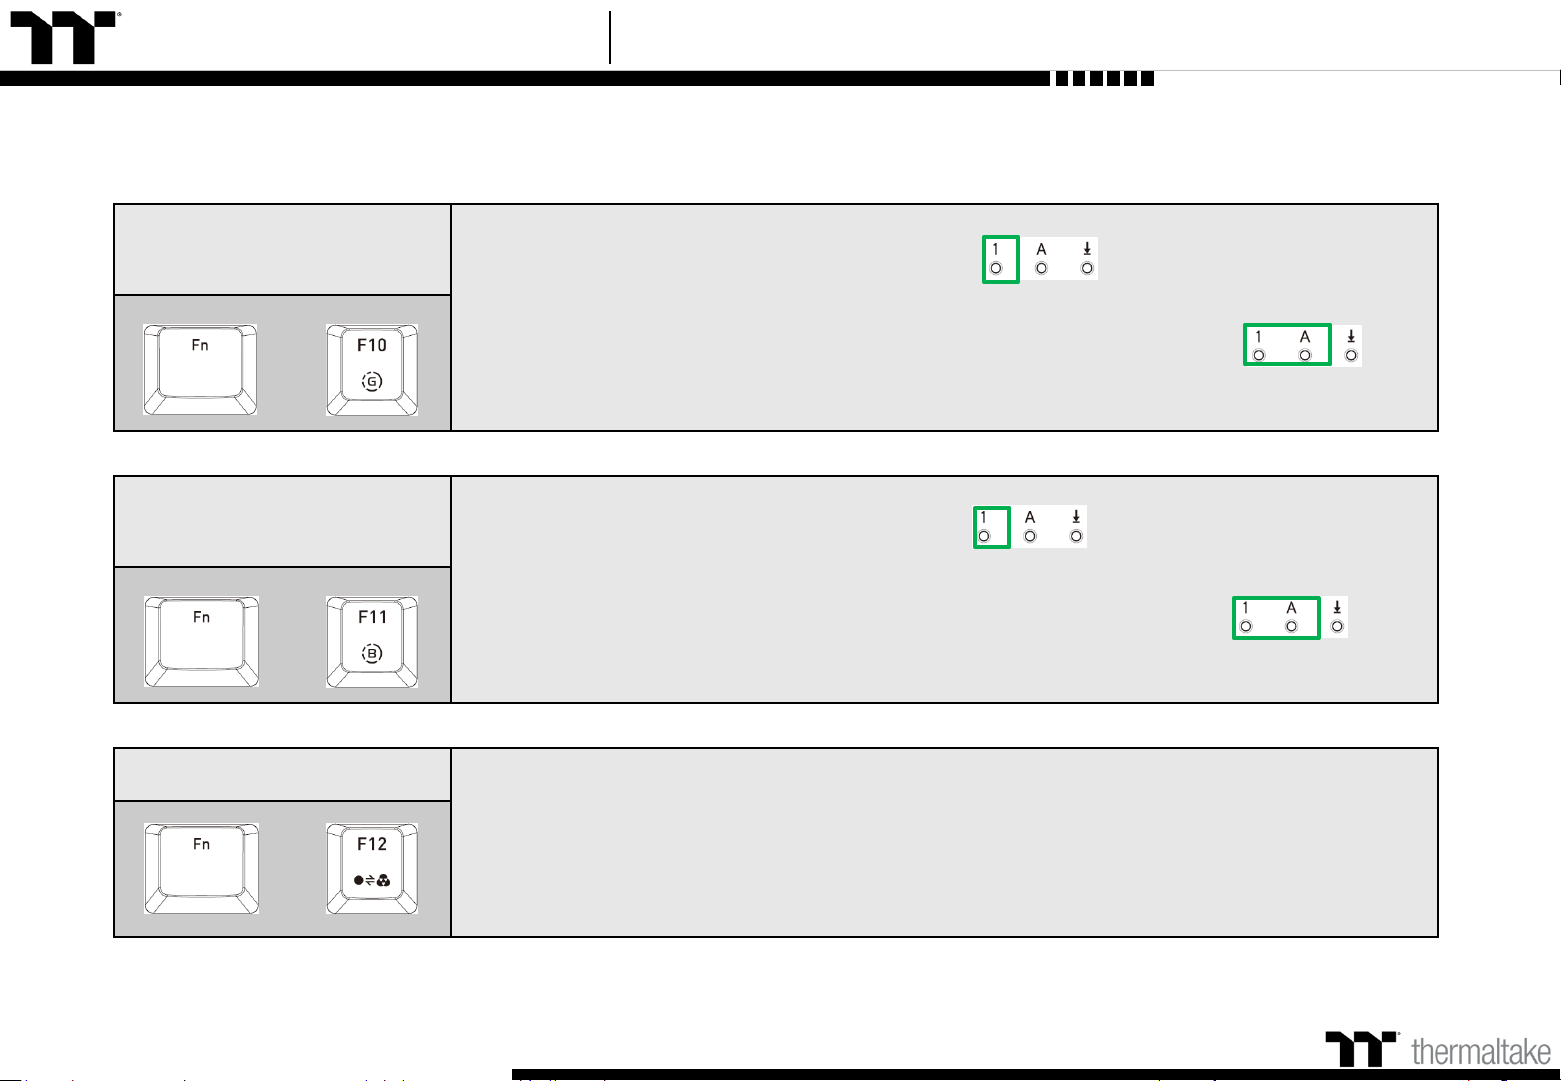
Spectrum Cycling:
(1). You can use Fn + F7 (slower) and F8 (faster) to adjust the speed of the lighting effect.
Reactive:
(1). You can use Fn + F7 (slower) and F8 (faster) to adjust the speed of the lighting effect.
(2). You can use Fn + F12 to switch between monochrome and random color modes.
(3). Under monochrome mode, Fn + F9 (red), F10 (green), and F11 (blue) can be used to adjust the color of the lighting effect (F12 will display the blended color).
Flow:
(1). You can use Fn + F7 (slower) and F8 (faster) to adjust the speed of the lighting effect.
(2). You can use Fn + F12 to switch between monochrome and random color modes.
(3). Under monochrome mode, Fn + F9 (red), F10 (green), and F11 (blue) can be used to adjust the color of the lighting effect (F12 will display the blended color).
Ripple:
(1). You can use Fn + F7 (slower) and F8 (faster) to adjust the speed of the lighting effect.
(2). You can use Fn + F12 to switch between monochrome and random color modes.
(3). Under monochrome mode, Fn + F9 (red), F10 (green), and F11 (blue) can be used to adjust the color of the lighting effect (F12 will display the blended color).
Raindrop:
(1). You can use Fn + F7 (slower) and F8 (faster) to adjust the speed of the lighting effect.
(2). You can use Fn + F12 to switch between monochrome and random color modes.
(3). Under monochrome mode, Fn + F9 (red), F10 (green), and F11 (blue) can be used to adjust the color of the lighting effect (F12 will display the blended color).
Snake Marquee:
(1). You can use Fn + F7 (slower) and F8 (faster) to adjust the speed of the lighting effect.
(2). You can use Fn + ← or → to change the direction of running lights.
(3). You can use Fn + F12 to switch between monochrome and random color modes.
(4). Under monochrome mode, Fn + F9 (red), F10 (green), and F11 (blue) can be used to adjust the color of the lighting effect (F12 will display the blended color).
Flashing:
(1). You can use Fn + F7 (slower) and F8 (faster) to adjust the speed of the lighting effect.
(2). You can use Fn + F12 to switch between monochrome and random color modes.
(3). Under monochrome mode, Fn + F9 (red), F10 (green), and F11 (blue) can be used to adjust the color of the lighting effect (F12 will display the blended color).
+
+
Keyboard Features Features Overview
08
※ You must press Fn + Backspace and
the will flash to indicate
that you have switched to the front
side before Fn + F6 is switched.
Page 9

TT Premium | Level 20 RGB User Guide
Switching Lighting
Effects(Side Face)
Static:
(1). You can use Fn + F9 (red), F10 (green), and F11 (blue) to change the color of the lighting effect (F12 will display the blended color).
Pulse:
(1). You can use Fn + F7 (slower) and F8 (faster) to adjust the speed of the lighting effect.
(2). You can use Fn + F12 to switch between monochrome and random color modes.
(3). Under monochrome mode, Fn + F9 (red), F10 (green), and F11 (blue) can be used to adjust the color of the lighting effect (F12 will display the blended color).
Wave:
(1). You can use Fn + F7 (slower) and F8 (faster) to adjust the speed of the lighting effect.
(2). You can use Fn + ↑, ↓, ←, or → to change the direction of running lights.
(3). You can use Fn + F9 (red), F10 (green), and F11 (blue) to change the color of the lighting effect.
Spiral Rainbow:
(1). You can use Fn + F7 (slower) and F8 (faster) to adjust the speed of the lighting effect.
(2). You can use Fn + ← (counterclockwise) or → (clockwise) to switch the direction of running lights.
(3). You can use Fn + F9 (red), F10 (green), and F11 (blue) to change the color of the lighting effect.
Spectrum Cycling:
(1). You can use Fn + F7 (slower) and F8 (faster) to adjust the speed of the lighting effect.
Reactive:
(1). You can use Fn + F7 (slower) and F8 (faster) to adjust the speed of the lighting effect.
(2). You can use Fn + F12 to switch between monochrome and random color modes.
(3). Under monochrome mode, Fn + F9 (red), F10 (green), and F11 (blue) can be used to adjust the color of the lighting effect (F12 will display the blended color).
Flow:
(1). You can use Fn + F7 (slower) and F8 (faster) to adjust the speed of the lighting effect.
(2). You can use Fn + F12 to switch between monochrome and random color modes.
(3). Under monochrome mode, Fn + F9 (red), F10 (green), and F11 (blue) can be used to adjust the color of the lighting effect (F12 will display the blended color).
Ribbon:
(1). You can use Fn + F7 (slower) and F8 (faster) to adjust the speed of the lighting effect.
(2). You can use Fn + ↑, ↓ to change the direction of running lights.
(3). You can use Fn + F12 to switch between monochrome and random color modes.
(4). Under monochrome mode, Fn + F9 (red), F10 (green), and F11 (blue) can be used to adjust the color of the lighting effect (F12 will display the blended color).
Scan:
(1). You can use Fn + F7 (slower) and F8 (faster) to adjust the speed of the lighting effect.
(2). You can use Fn + F12 to switch between monochrome and random color modes.
(3). Under monochrome mode, Fn + F9 (red), F10 (green), and F11 (blue) can be used to adjust the color of the lighting effect (F12 will display the blended color).
Raindrop:
(1). You can use Fn + F7 (slower) and F8 (faster) to adjust the speed of the lighting effect.
(2). You can use Fn + F12 to switch between monochrome and random color modes.
(3). Under monochrome mode, Fn + F9 (red), F10 (green), and F11 (blue) can be used to adjust the color of the lighting effect (F12 will display the blended color).
Marquee:
(1). You can use Fn + F7 (slower) and F8 (faster) to adjust the speed of the lighting effect.
(2). You can use Fn + ← or → to change the direction of running lights.
(3). You can use Fn + F12 to switch between monochrome and random color modes.
(4). Under monochrome mode, Fn + F9 (red), F10 (green), and F11 (blue) can be used to adjust the color of the lighting effect (F12 will display the blended color).
Flashing:
(1). You can use Fn + F7 (slower) and F8 (faster) to adjust the speed of the lighting effect.
(2). You can use Fn + F12 to switch between monochrome and random color modes.
(3). Under monochrome mode, Fn + F9 (red), F10 (green), and F11 (blue) can be used to adjust the color of the lighting effect (F12 will display the blended color).
+
+
※ You must press Fn + Backspace and
the will flash to indicate
that you have switched to the front
side before Fn + F6 is switched.
Keyboard Features Features Overview
09
Page 10
TT Premium | Level 20 RGB User Guide
Adjust the brightness
of the red light
Ten brightness level settings for the red light (the will flash when the brightness is
set to the brightest setting).
※Press and hold for three seconds to clear the red value (once cleared, the will
flash at the same time).
+
Increasing the Speed
of Lighting Effects
Five different lighting effect speeds (the will flash when the speed is set to the
fastest setting).
+
Decreasing the Speed
of Lighting Effects
Five different lighting effect speeds (the will flash when the speed is set to the
slowest setting).
+
Keyboard Features Features Overview
10
Page 11
TT Premium | Level 20 RGB User Guide
Switching Color Modes
Can be used to switch between monochrome and random color modes for a specific lighting
effect.
※ Under monochrome mode, this key serves as the mixed-color indicator.
+
Adjust the brightness
of the blue light
Ten brightness level settings for the blue light (the will flash when the brightness is
set to the brightest setting).
※ Press and hold for three seconds to clear the blue value (once cleared, the will
flash at the same time).
+
Adjust the brightness
of the green light
Ten brightness level settings for the green light (the will flash when the brightness
is set to the brightest setting).
※ Press and hold for three seconds to clear the green value (once cleared, the will
flash at the same time).
+
Keyboard Features Features Overview
11
Page 12

TT Premium | Level 20 RGB User Guide
Switching Profiles
Up to six profiles can be saved. The current active profile is shown by the
color displayed on the .
P1: Red, P2: Green, P3: Blue, P4: Yellow, P5: Purple, P6: Aquamarine.
※ The color statuses described above are only visible under Game Mode.
+
Changing the Direction of Lighting Effects
You can switch the running direction of a specific lighting effect.
+
Keyboard Features Features Overview
12
Page 13
TT Premium | Level 20 RGB User Guide
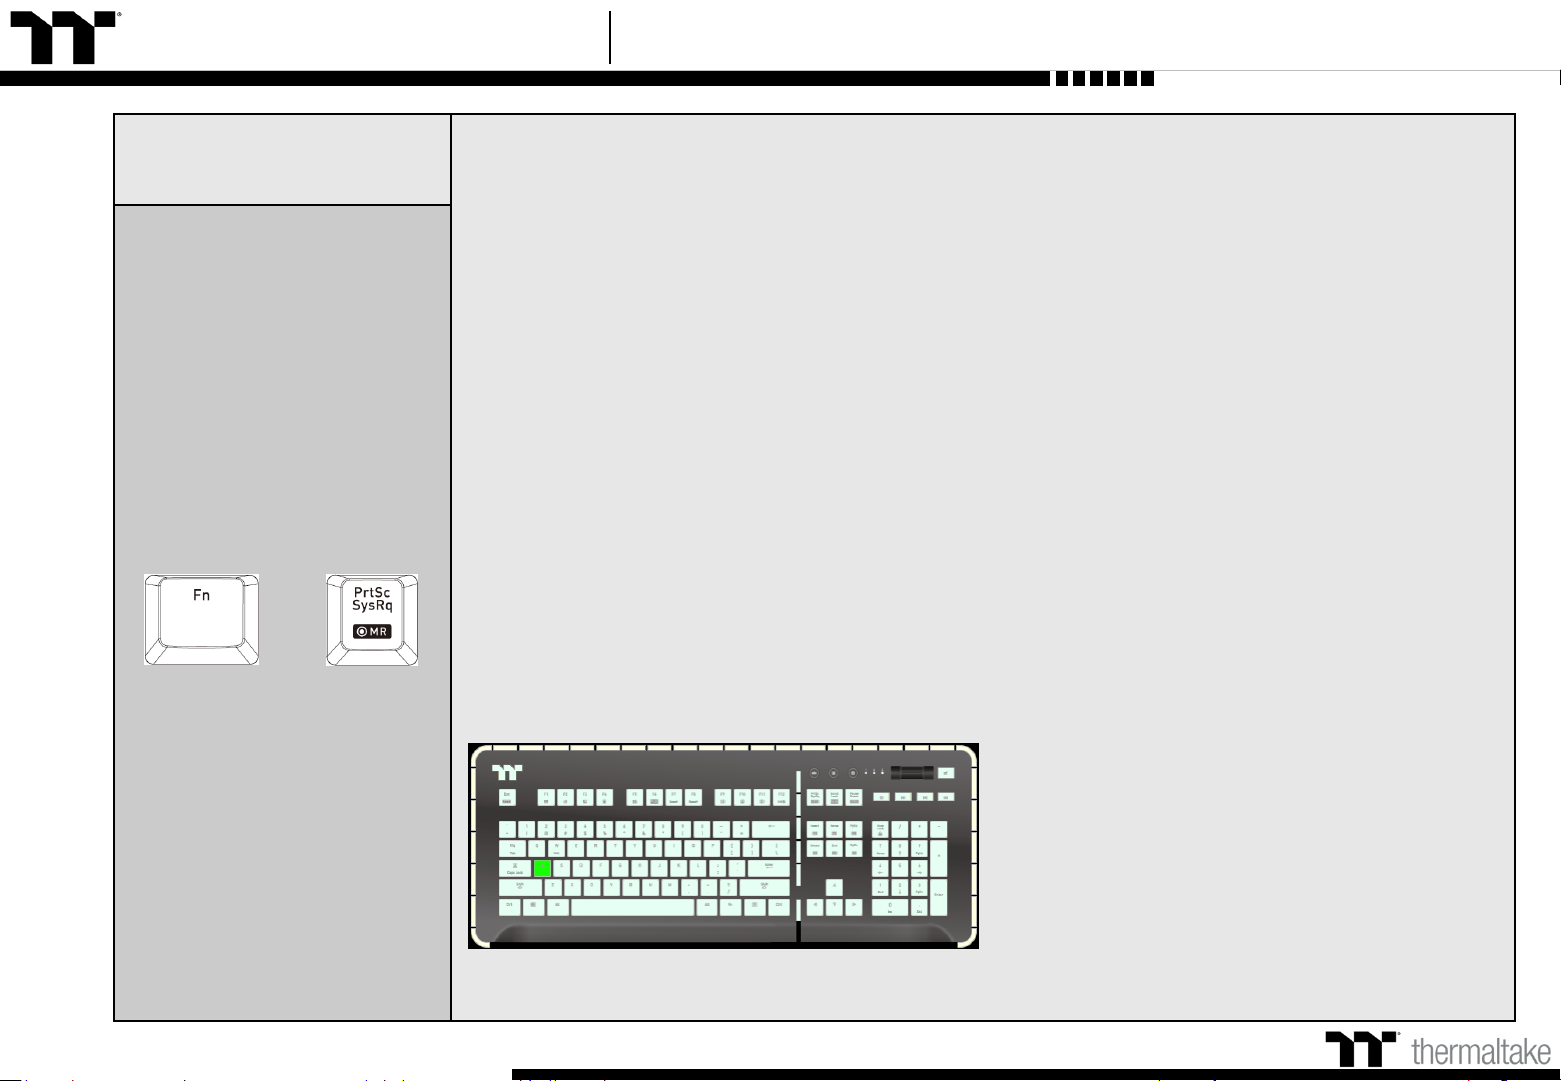
On-the-Fly Macro
Recording
Macro Recording (only available under Game Mode):
(1). Press Fn + PrtSc to enter recording mode (the entire keyboard will light up and the Record button
will begin to flash).
(2). Press Fn + Any Key (excluding the Recording key) to specify a key to save the macro under (a red
light will appear after a slight delay; if you press Fn + the same key, a blue light will appear without a
delay
). Once the key selection is completed, all lights on the keyboard will go out, and the recording key
will change from flashing to constantly lit.
(3). Enter the sequence to be recorded (keys recorded will flash in aquamarine).
(4). After the sequence is entered, press Fn + PrtSc to exit recording mode (the light for the Recording
key will go off).
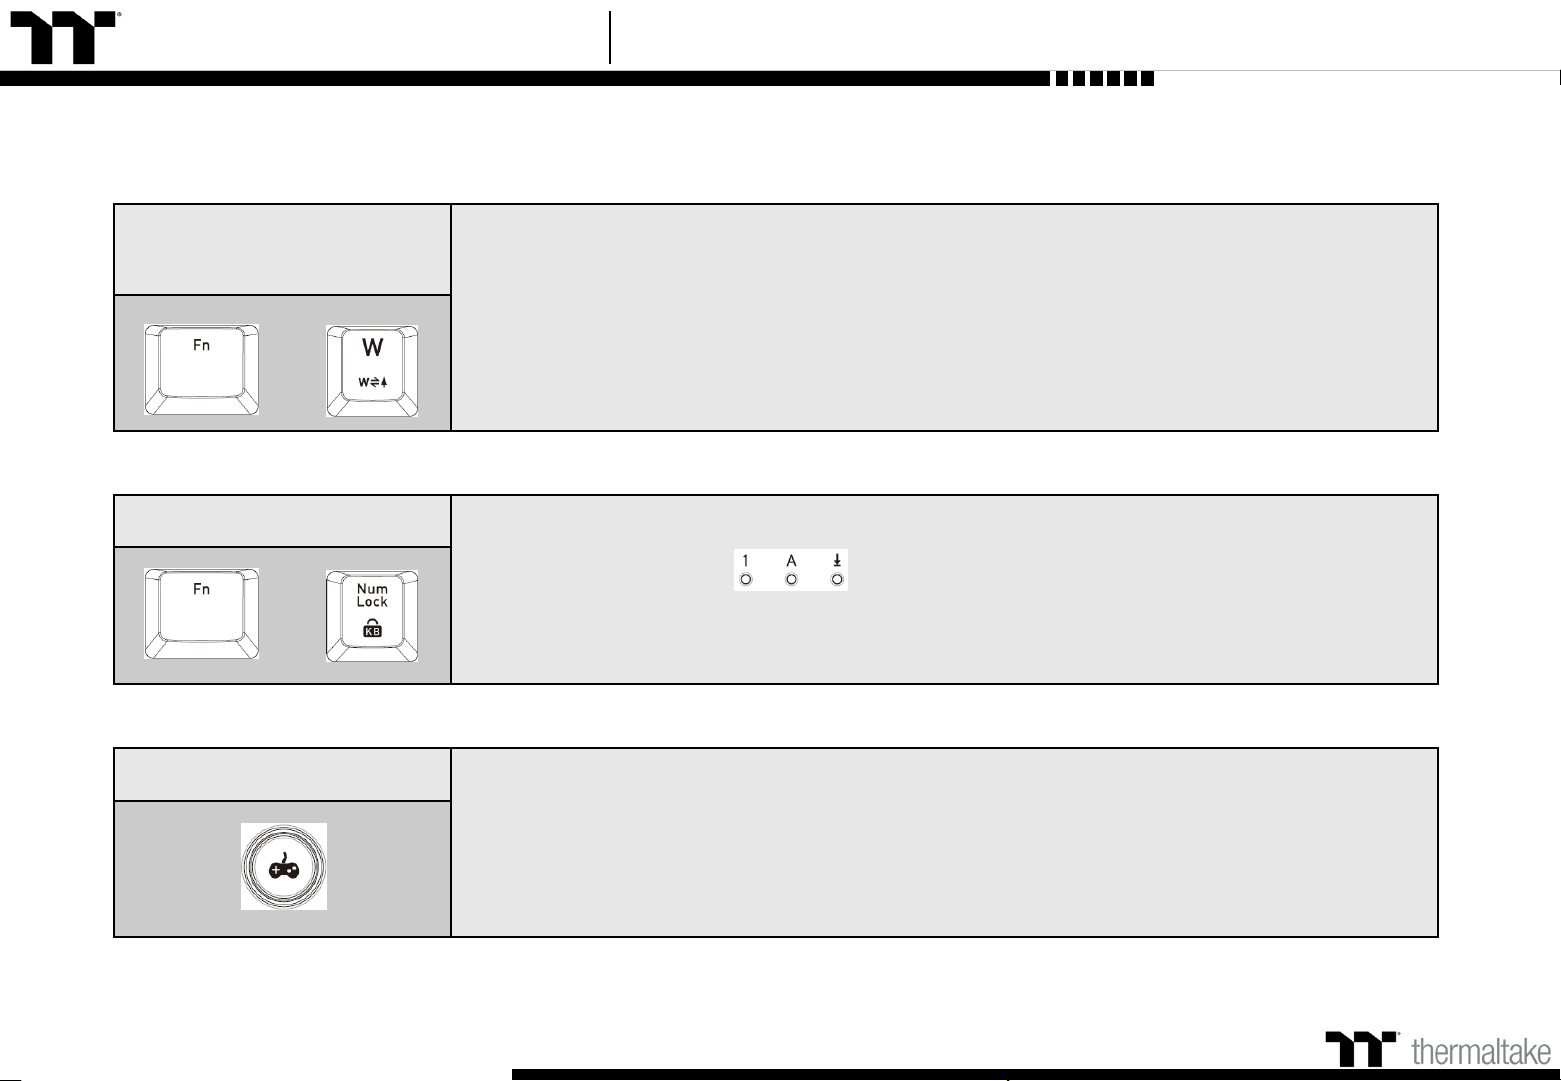
※ When a key has been designated for macro assignment, before any keystrokes are recorded, the key
assignment can be changed by pressing Fn + another key.
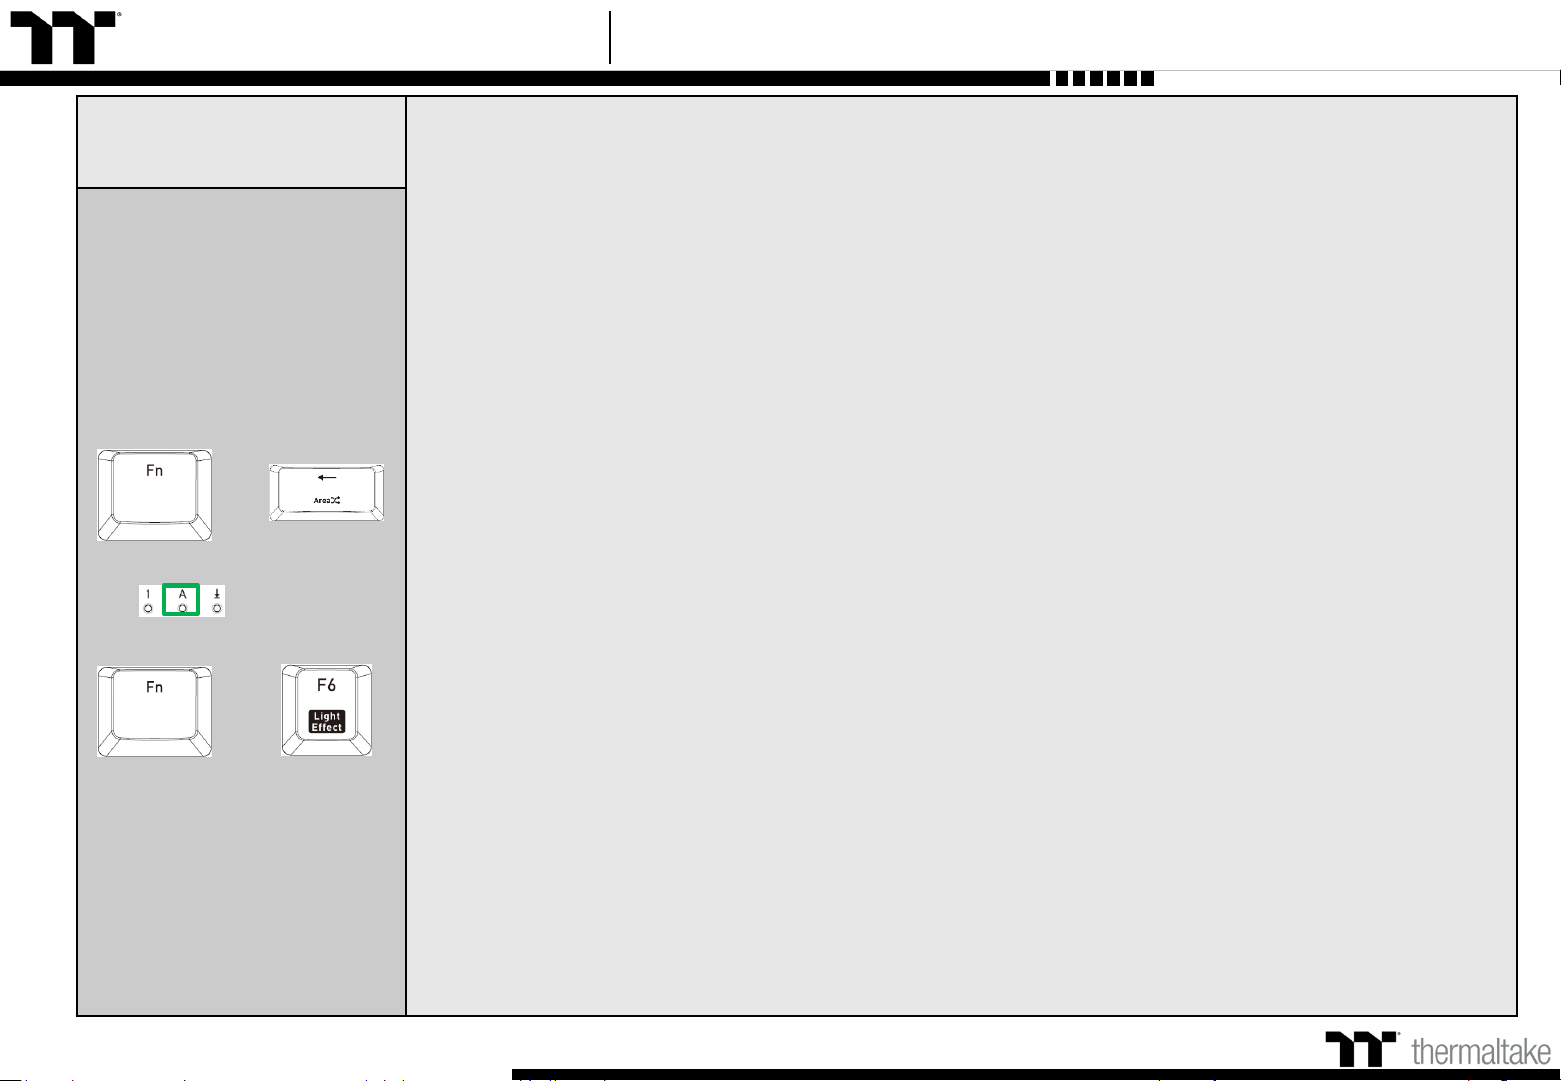
Macro Prompt Function:
While in recording mode, if the key's backlight is solid white, that means there is currently no macro
assigned to this key. If the key is solid green, that means a macro has been assigned to this key (as
shown in the following figure: the "A" key has a macro assigned to it).
※ Press and hold a key which has been assigned a macro for more than 3 seconds to erase the saved
macro.
+
Keyboard Features Features Overview
13
Page 14
TT Premium | Level 20 RGB User Guide
Recording Area
Backlight
Recording procedure (recording can only be activated while in Area Backlight Mode):
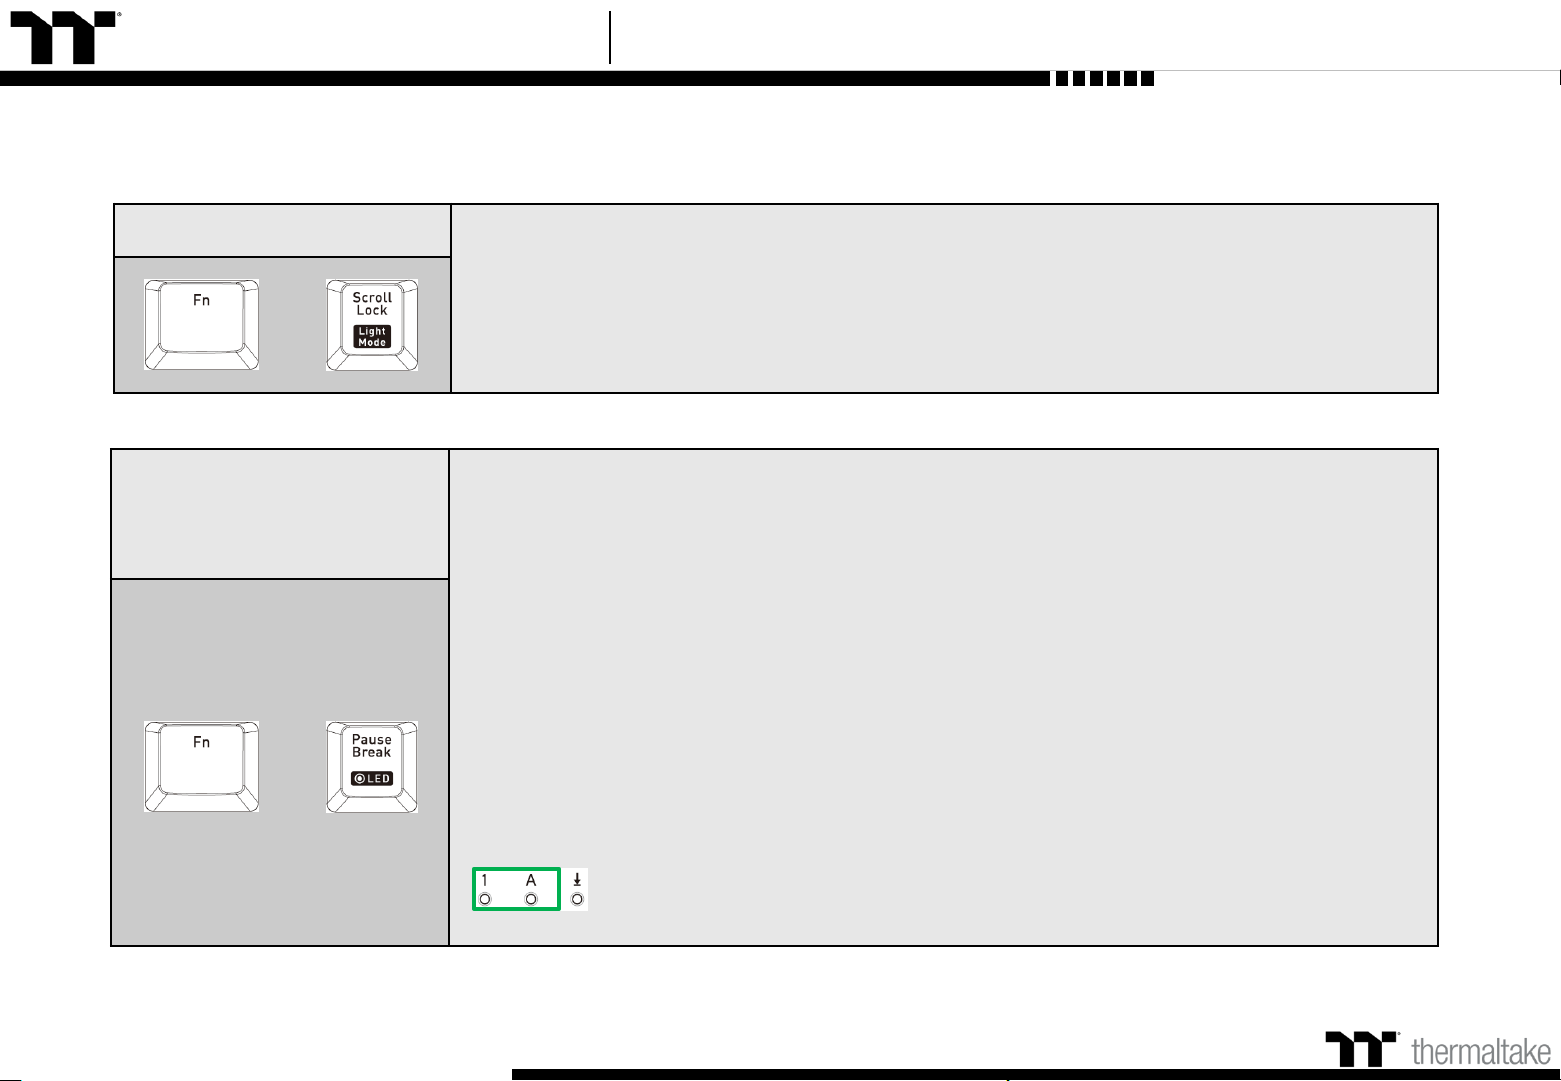
(1).Press Fn + ScLk to enter Area Backlight mode.
(2).Press Fn + Pause to enter Backlight Recording mode (the recording button will flash).
(3).Press Fn + F9 (red), F10 (green), and F11 (blue) to produce a desired color by mixing the
three colors together (F12 will display the blended color).
(4).Press the key in each display area in order (if you wish to change to another color, please
return to the previous step).
(5).Once completed, press Fn + Pause to exit Recording mode (the recording button will stop
flashing).
※ When a key's backlight color is identical to the blended color shown by the F12 key, pressing
it will cancel the backlight color. If it is a different color, the color will be overwritten.
※ Press and hold for five seconds to restore the area's preset light position and color value
( indicator lights will flash at the same time to indicate that the settings have been
restored).
+
Area Backlight
Supports up to five presets: FPS1、FPS2、MMO、MOBA、RTS。
※ All five presets listed above can be recorded and modified separately.
+
Keyboard Features Features Overview
14
Page 15
TT Premium | Level 20 RGB User Guide
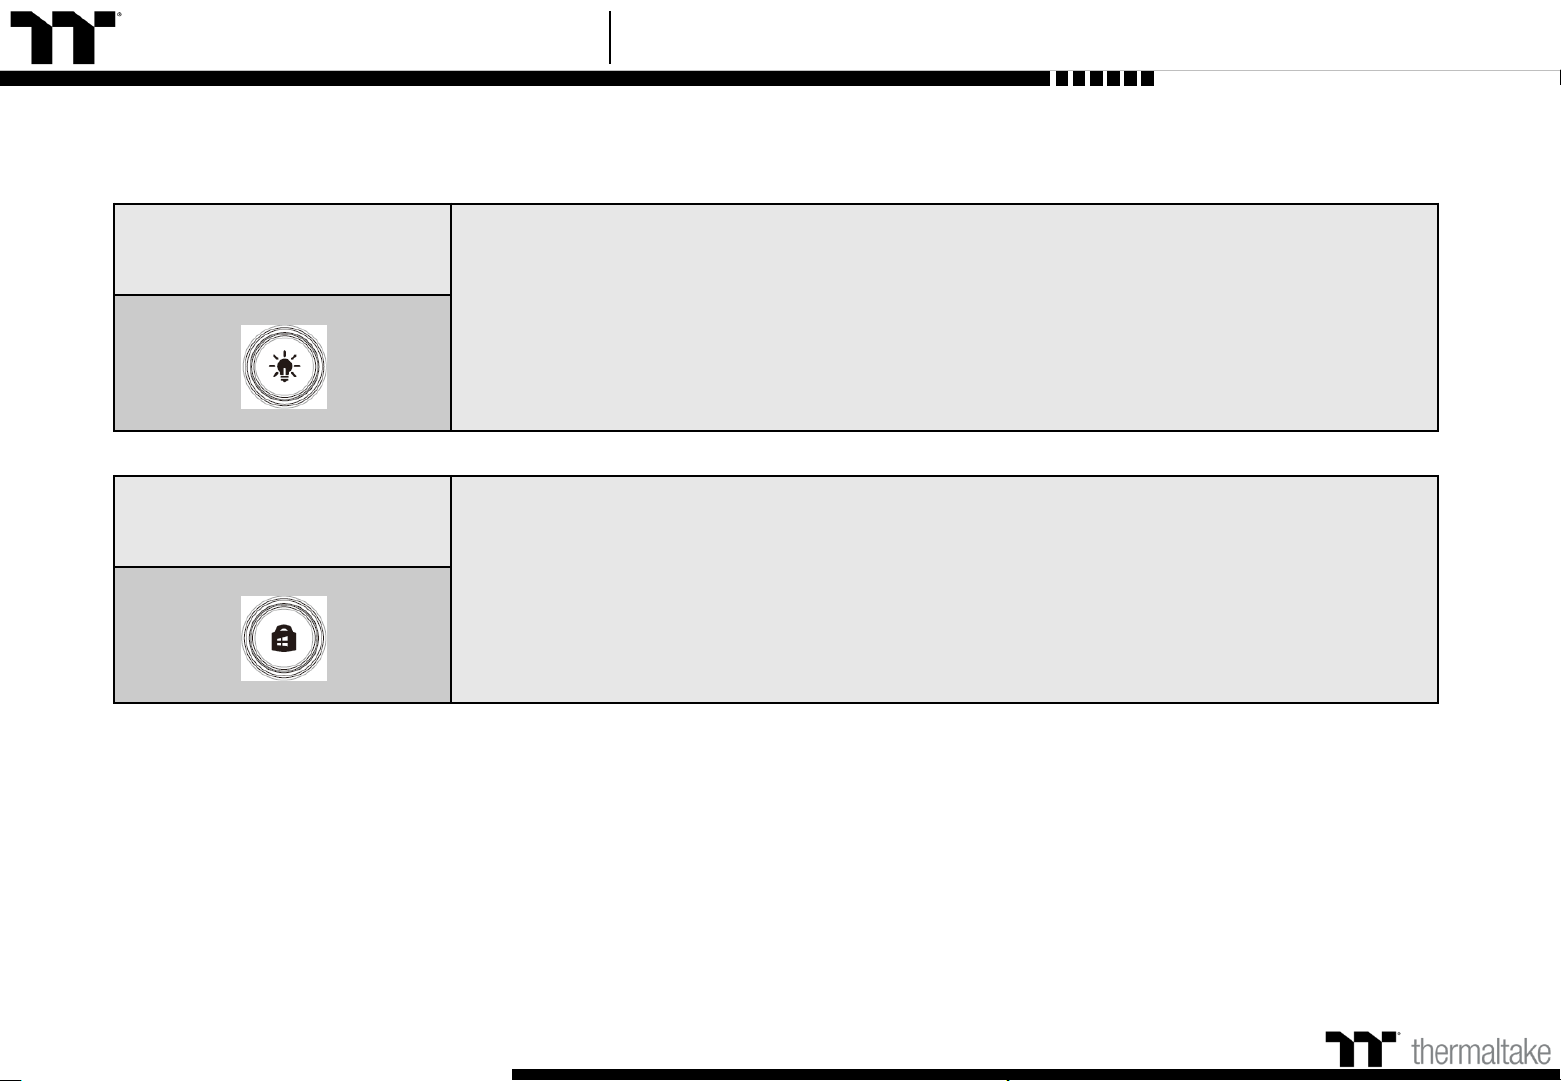
Game Mode
When this key is lit up in white, this means it is in non-Game Mode. Once Game Mode is
activated, the indicator color will light up in the color specified in the setup profile.
※
While not operating under Game Mode, all keys will function according to their preset values.
Full Keyboard Lock
Lock the entire keyboard ( indicator lights will flash at the same time to indicate
the current status).
+
Switching WASD and
the Direction Keys
Switches the functions of WASD keys with the arrow keys.
+
Keyboard Features Features Overview
15
Page 16
TT Premium | Level 20 RGB User Guide
Software Requirements:
Compatible with Windows® 7 / Windows® 8 / Windows® 10.
An Internet connection is required.
And at least 200MB of free hard disk space.
※Please plug the keyboard into a USB port that is directly connected to the computer's motherboard. Avoid using a
USB hub, which may not supply sufficient power for the keyboard to function properly.
※After the software program is started up, all keyboard functions will be controlled by the program (only the functions
of Fn + F1 ~ F6、Num will be kept; other switching functions and lighting effects will become temporarily unavailable).
Locking the Windows
Key
The Windows key can be replaced with the function of the Ctrl key.
※ Before the key is locked, a white-colored light will turn on. After the key is locked, an
aquamarine-colored light will turn on.
Full Keyboard
Brightness Adjustment
A total of five brightness levels are available for adjusting the brightness of the keyboard's
lighting effects.
※ The last level completely disables the backlight for all keys.
Keyboard Features Features Overview
16
Page 17

TT Premium | Level 20 RGB Mechanical Keyboard User Guide
Chapter 2:
TT iTAKE Installation
17
Page 18
TT Premium | Level 20 RGB User Guide
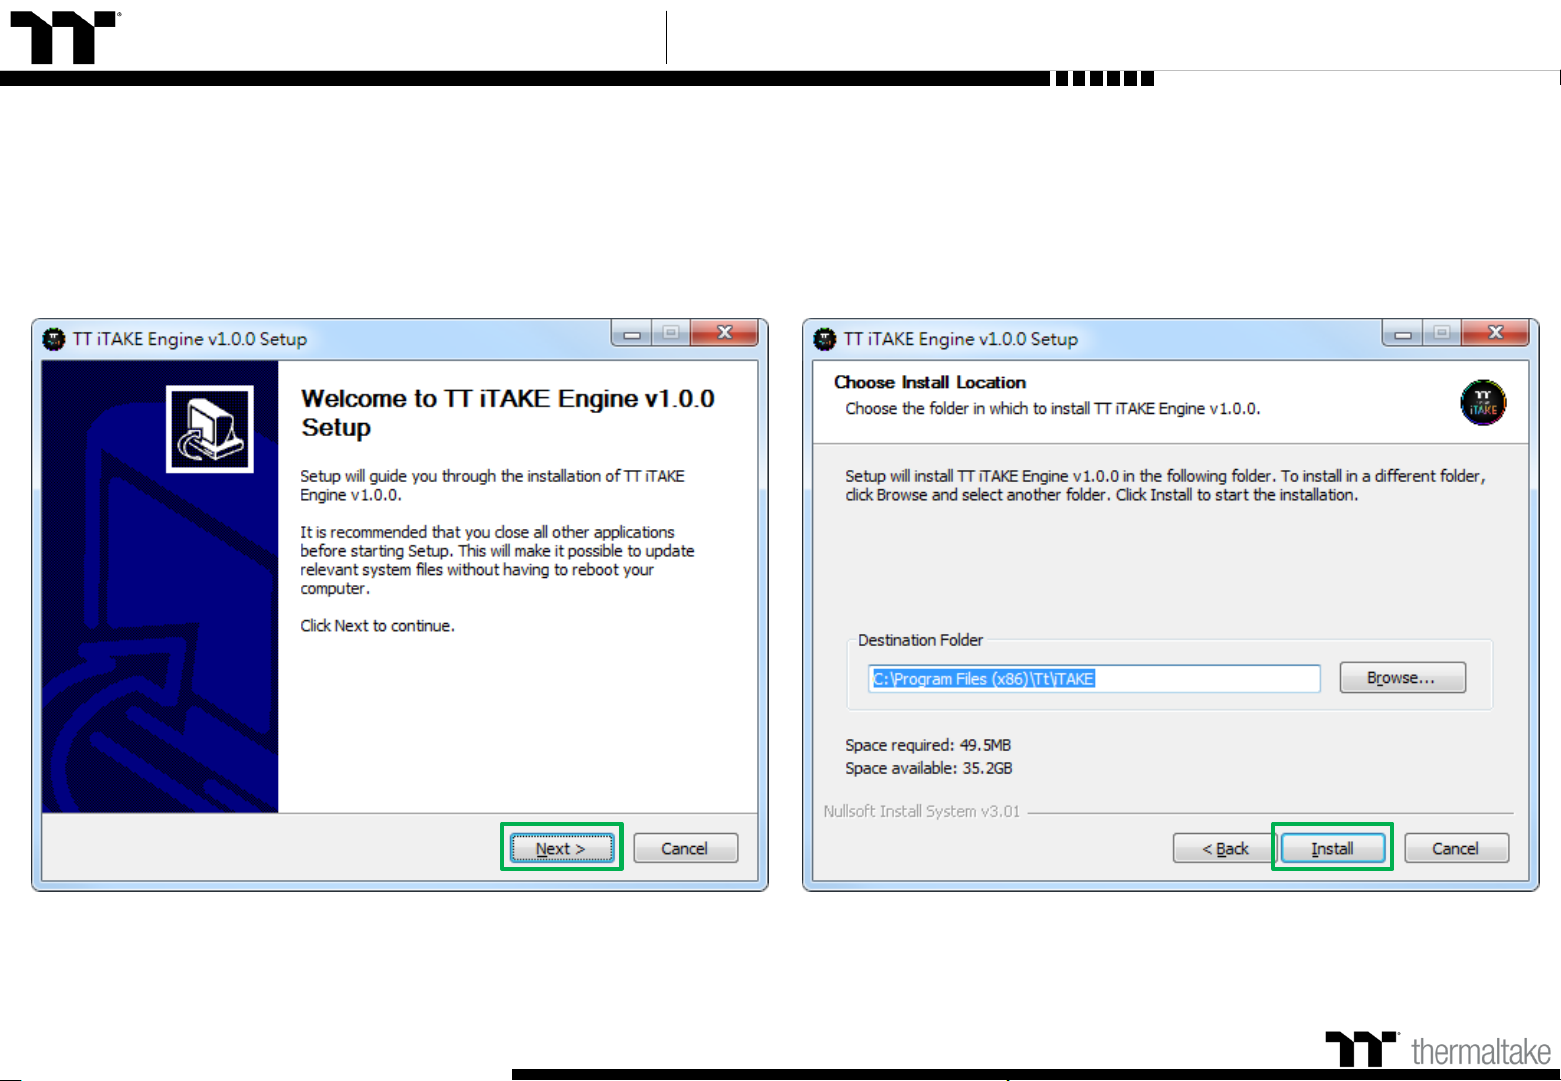
Step 1: Step 2:
18
Launch the setup executable file (.EXE) file and click Next. Click Install to begin the setup process.
Software Installation Setup Instructions
Page 19
TT Premium | Level 20 RGB User Guide
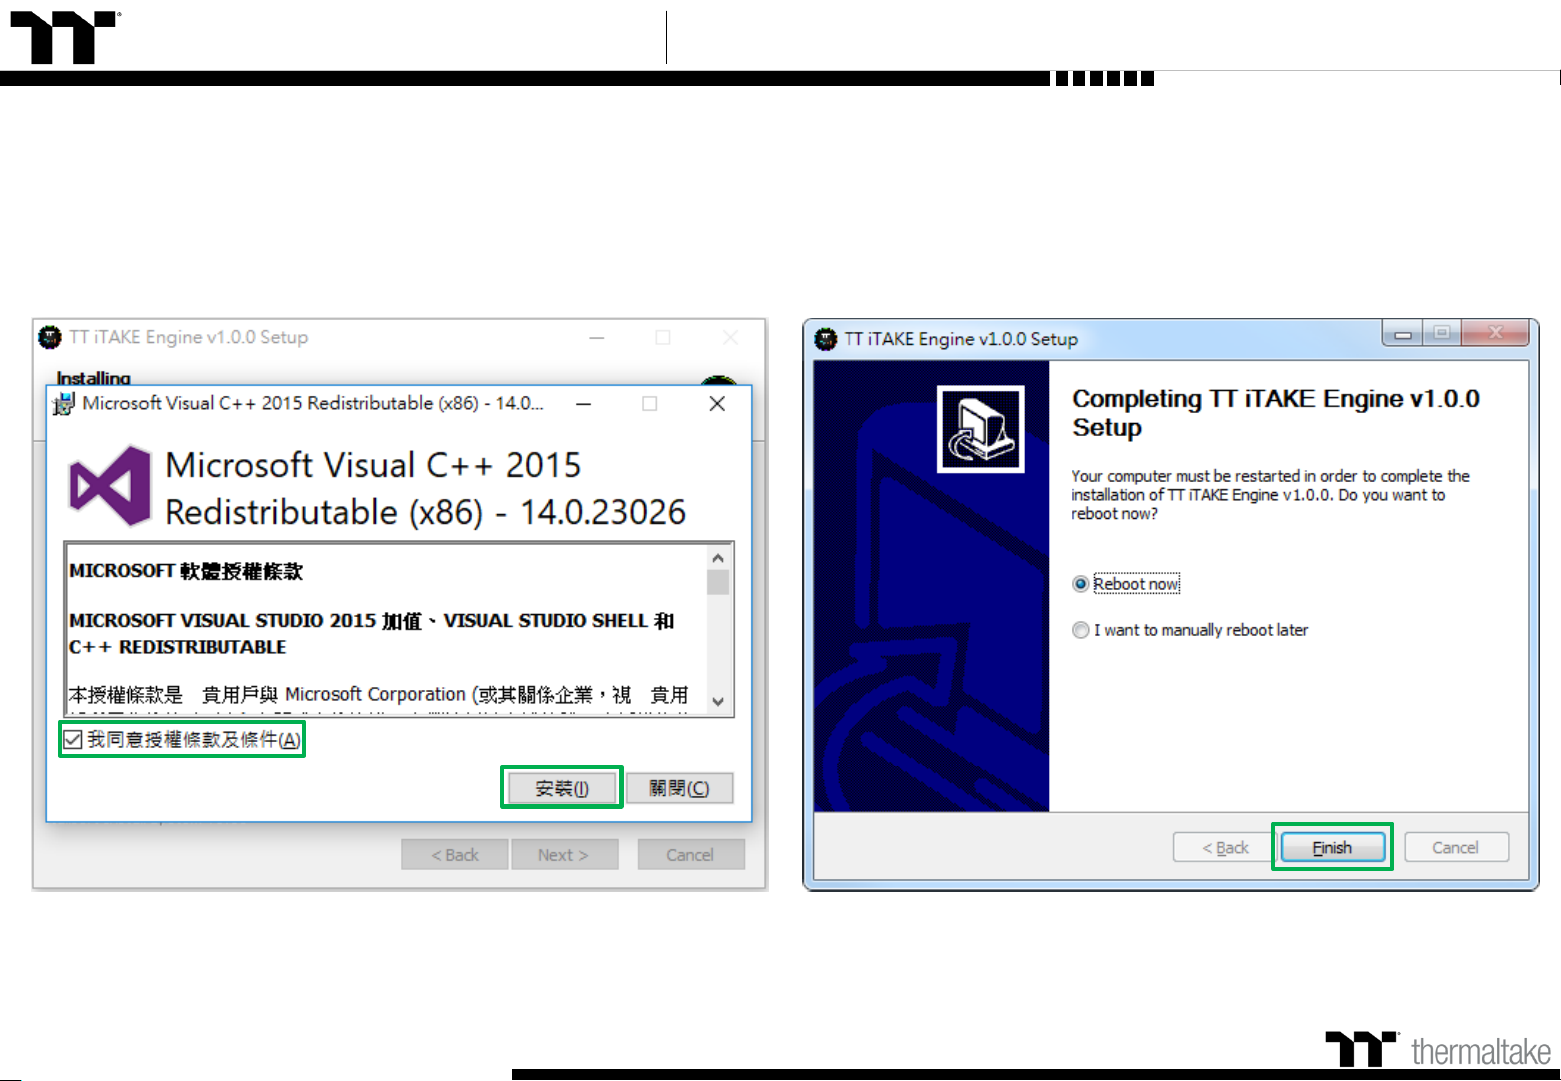
Step 3:
Software Installation Setup Instructions
19
Once setup is complete, you will also need to install the Microsoft Visual C++ 2015
Redistributable Package.
※ Without installing the Redistributable Package, the software will fail to launch.
Step 4:
Click Finish to complete the installation.
Page 20

TT Premium | Level 20 RGB Mechanical Keyboard User Guide
Chapter 3:
Functions Available on the Home Page
20
Page 21
TT Premium | Level 20 RGB User Guide
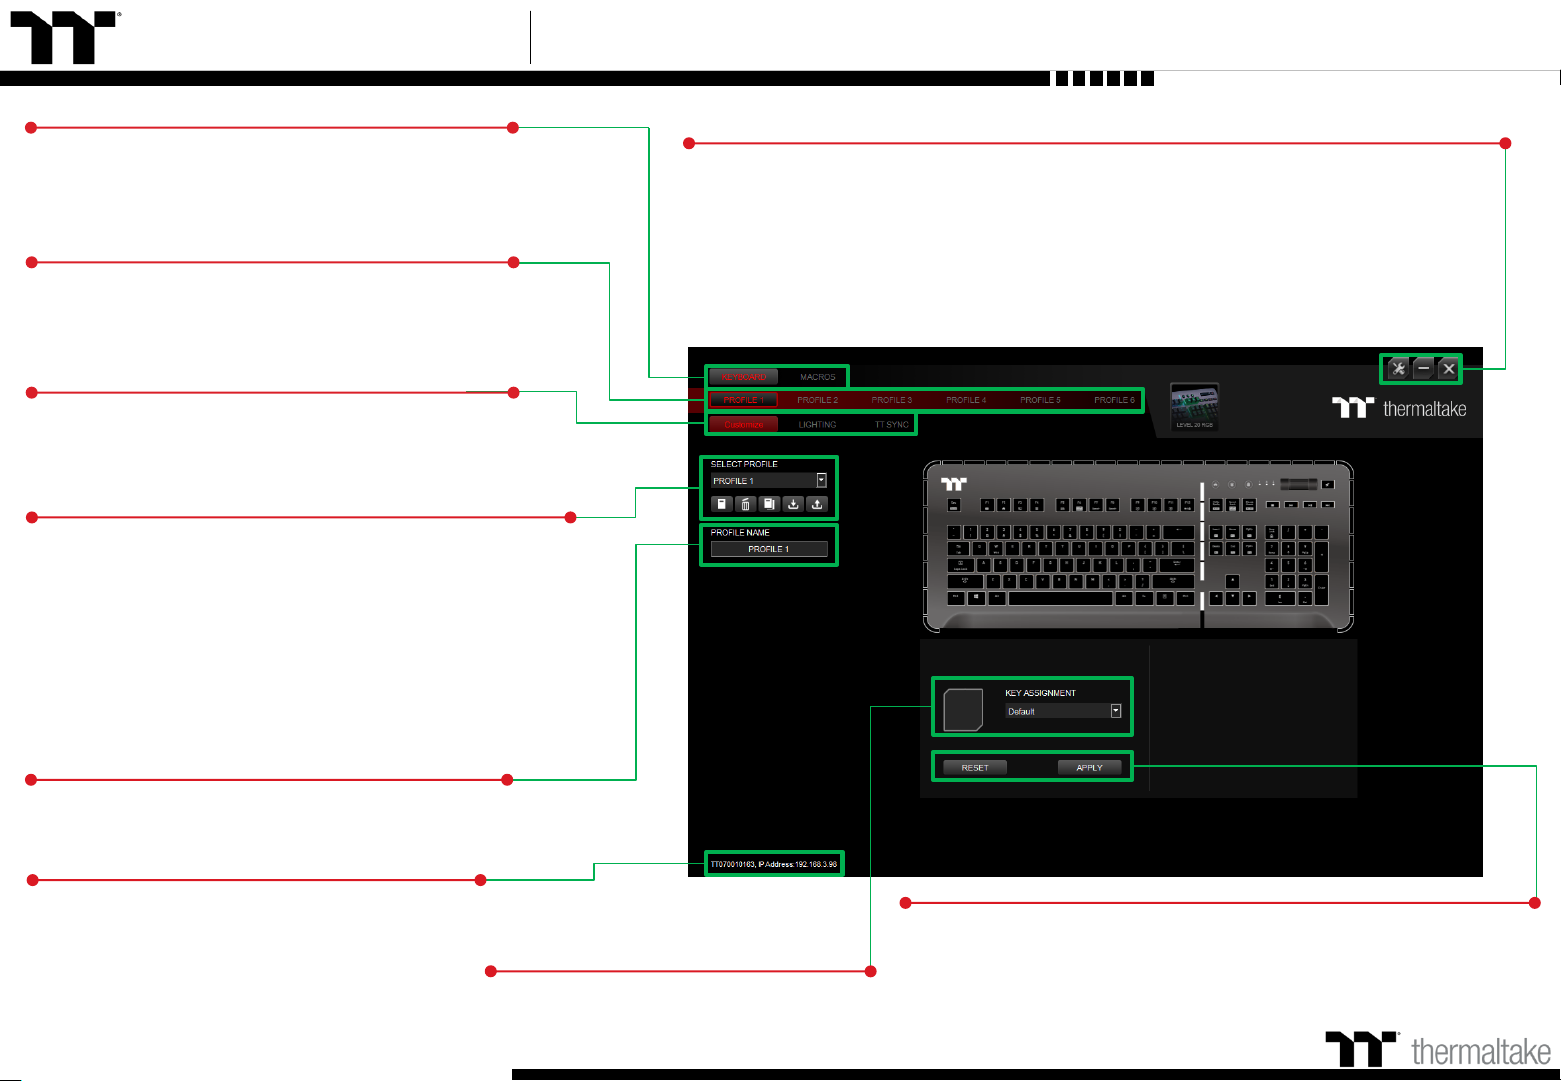
Keyboard Page Key Assignment Setting
Assigning Key Functions
Eight different functions can be assigned.
Other Settings / Shrink Window / Close Window
Other Settings: Software version, firmware version, Amazon Alexa setting and switching
the language used for the user interface.
Shrink Window: Close the display and minimize the program to the taskbar.
Close Window: Close the display and minimize the program to the lower right corner.
Functions for Managing Profiles
Up to 15 profiles can be added for use. The functions of
each button from left to right are:
Add: Create a new profile.
Delete: Delete an existing profile.
Copy: Copy a profile.
Import: Import a profile.
Export: Export a profile.
Switching Profiles
The Level 20 RGB can support up to 6 profiles,
which can be switched as required.
Restore Keyboard Settings for All Keys / Apply
Restore Keyboard Settings for All Keys: All key functions saved
under the current profile will be restored to factory default values.
Apply: Save and apply all settings to the selected key.
21
Switching Configuration Pages
Switches between the configuration pages singlekey operation, lighting effects and sync setting.
Correcting the Name of a Profile
The name of a new profile can be modified directly.
Switching the Home Page
You can switch the main keyboard configurations
page with the macro recording page.
Use the TT iTAKE APP to enter the IP for control.
PC IP Address
Page 22

TT Premium | Level 20 RGB Mechanical Keyboard User Guide
Key Configurations
22
Chapter 4:
Page 23
TT Premium | Level 20 RGB User Guide
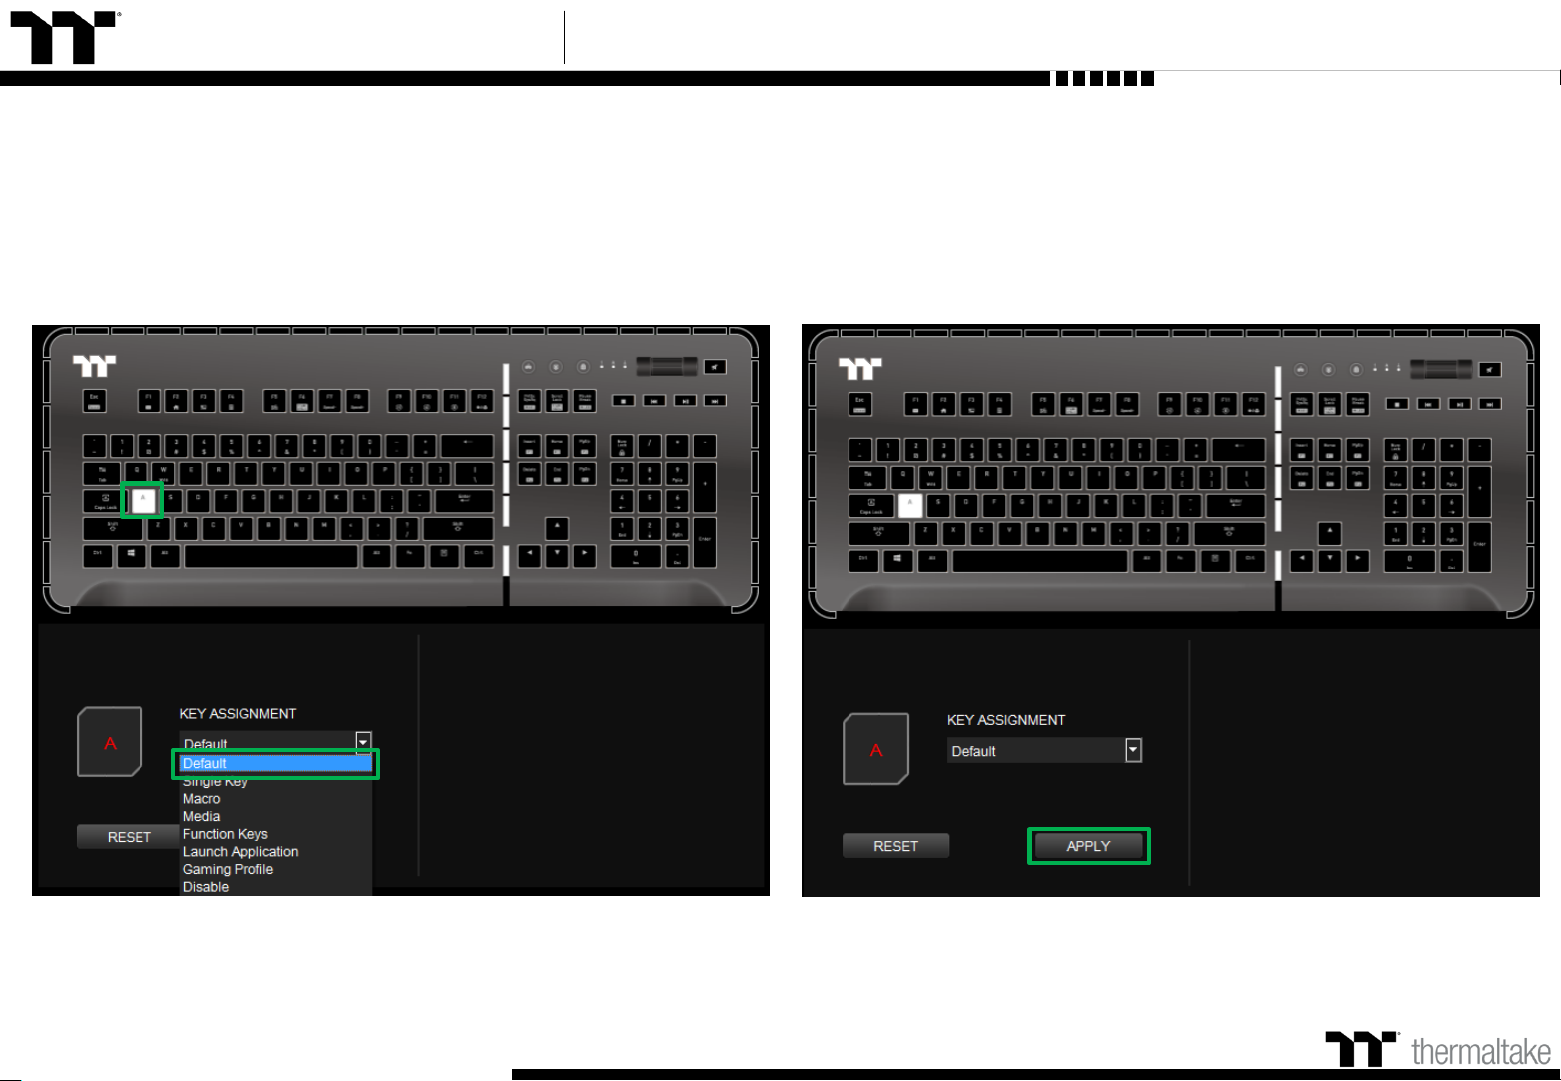
Default Function Default Key Setting
Step 1: Step 2:
23
Select a key, then select a "Default" function from the drop-down list. Click Apply to change and save the new function.
Page 24
TT Premium | Level 20 RGB User Guide
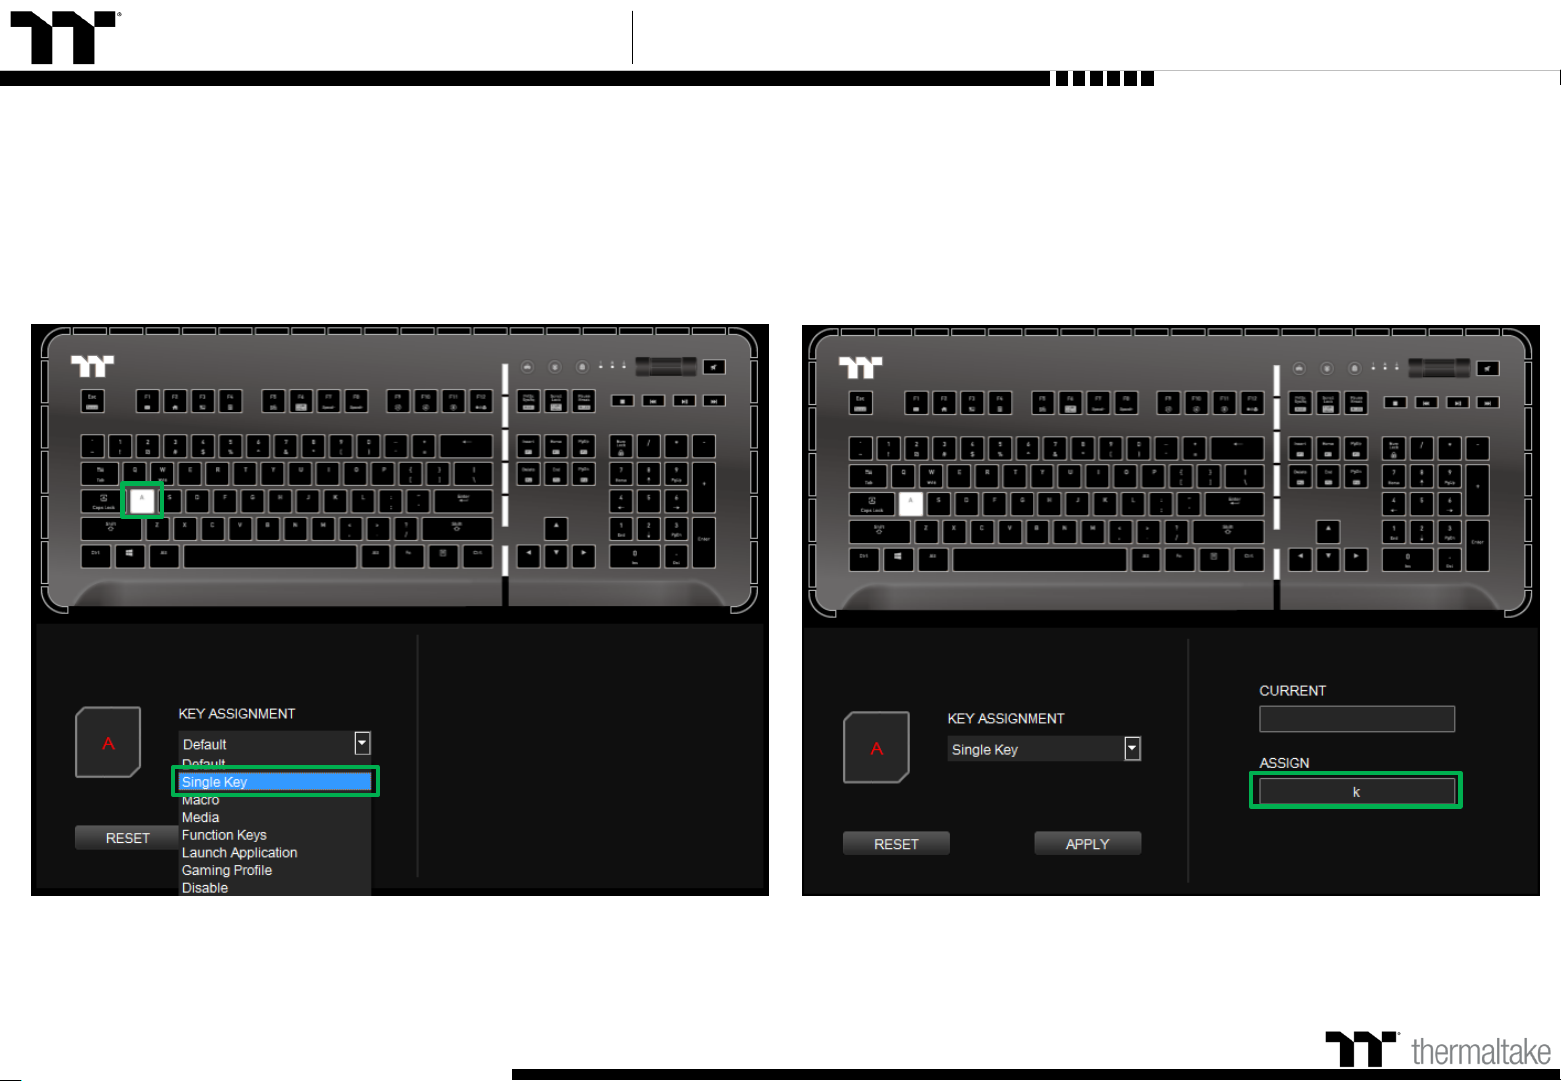
Step 1: Step 2:
Single Key Function Single Key Setting
24
Select a key, then select "Single Key" from the drop-down list. Enter a new key value into the lower-right box.
Page 25
TT Premium | Level 20 RGB User Guide
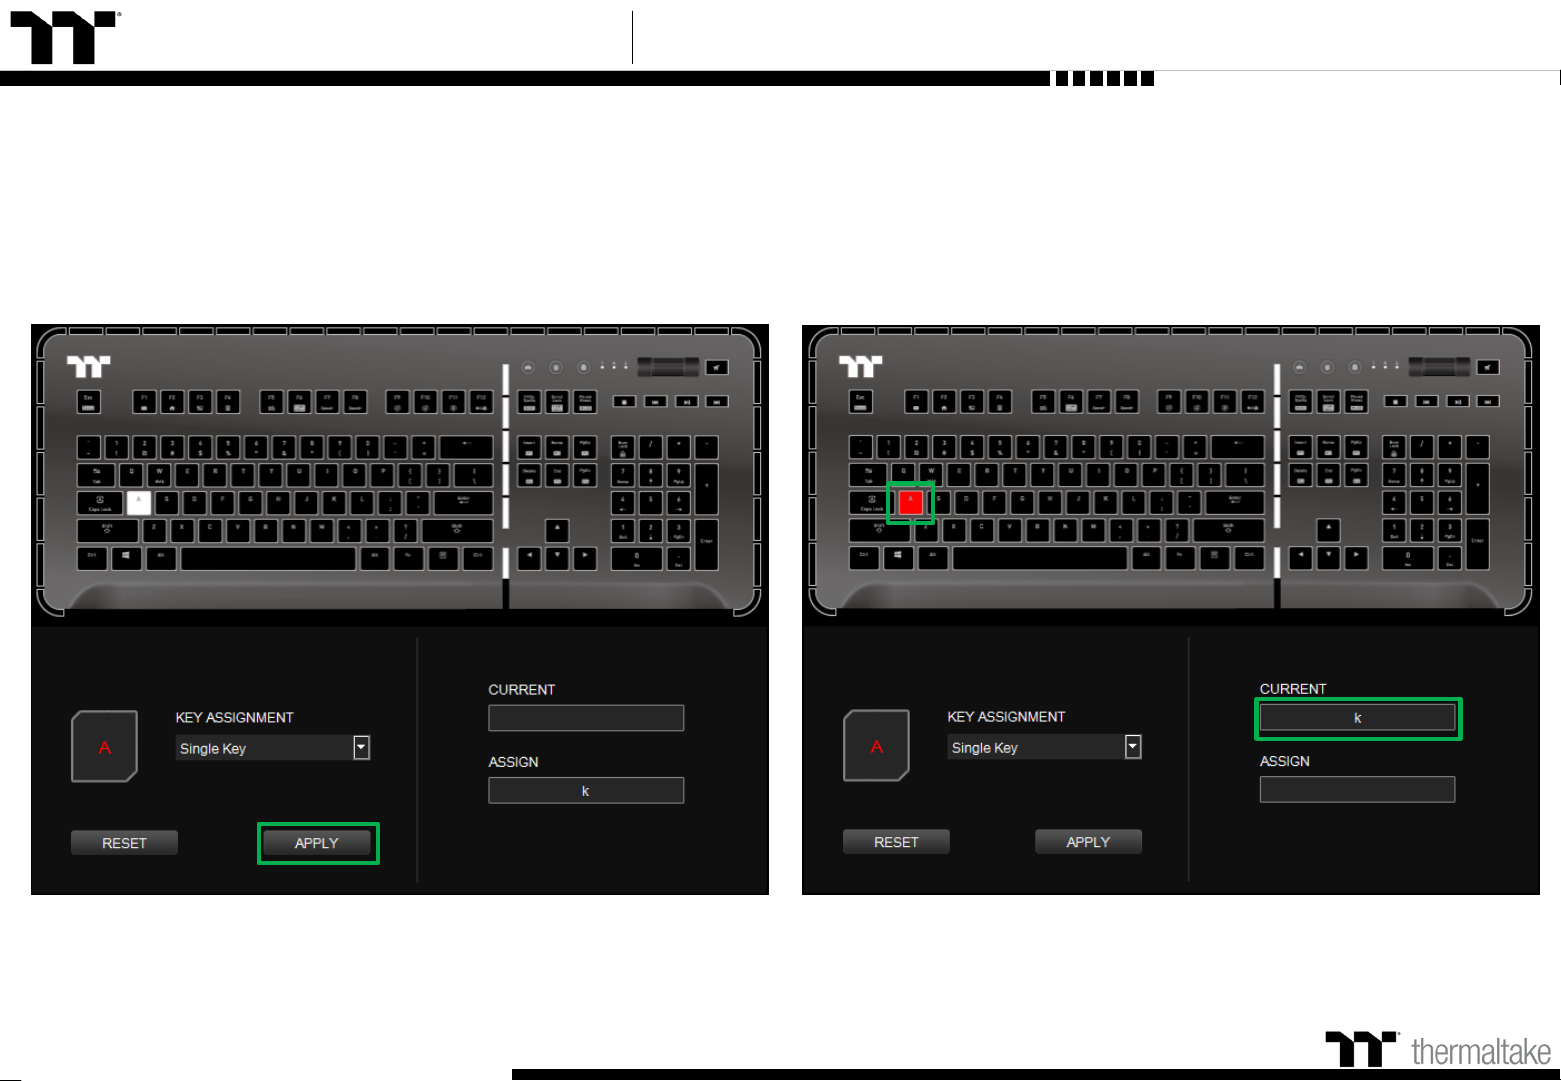
Single Key Function Single Key Setting
Step 3:
Step 4:
25
Click Apply to change and save the new function.
Based on the information and color displayed on the screen, you will be able to
see if the new key setting is applied properly.
Page 26
TT Premium | Level 20 RGB User Guide
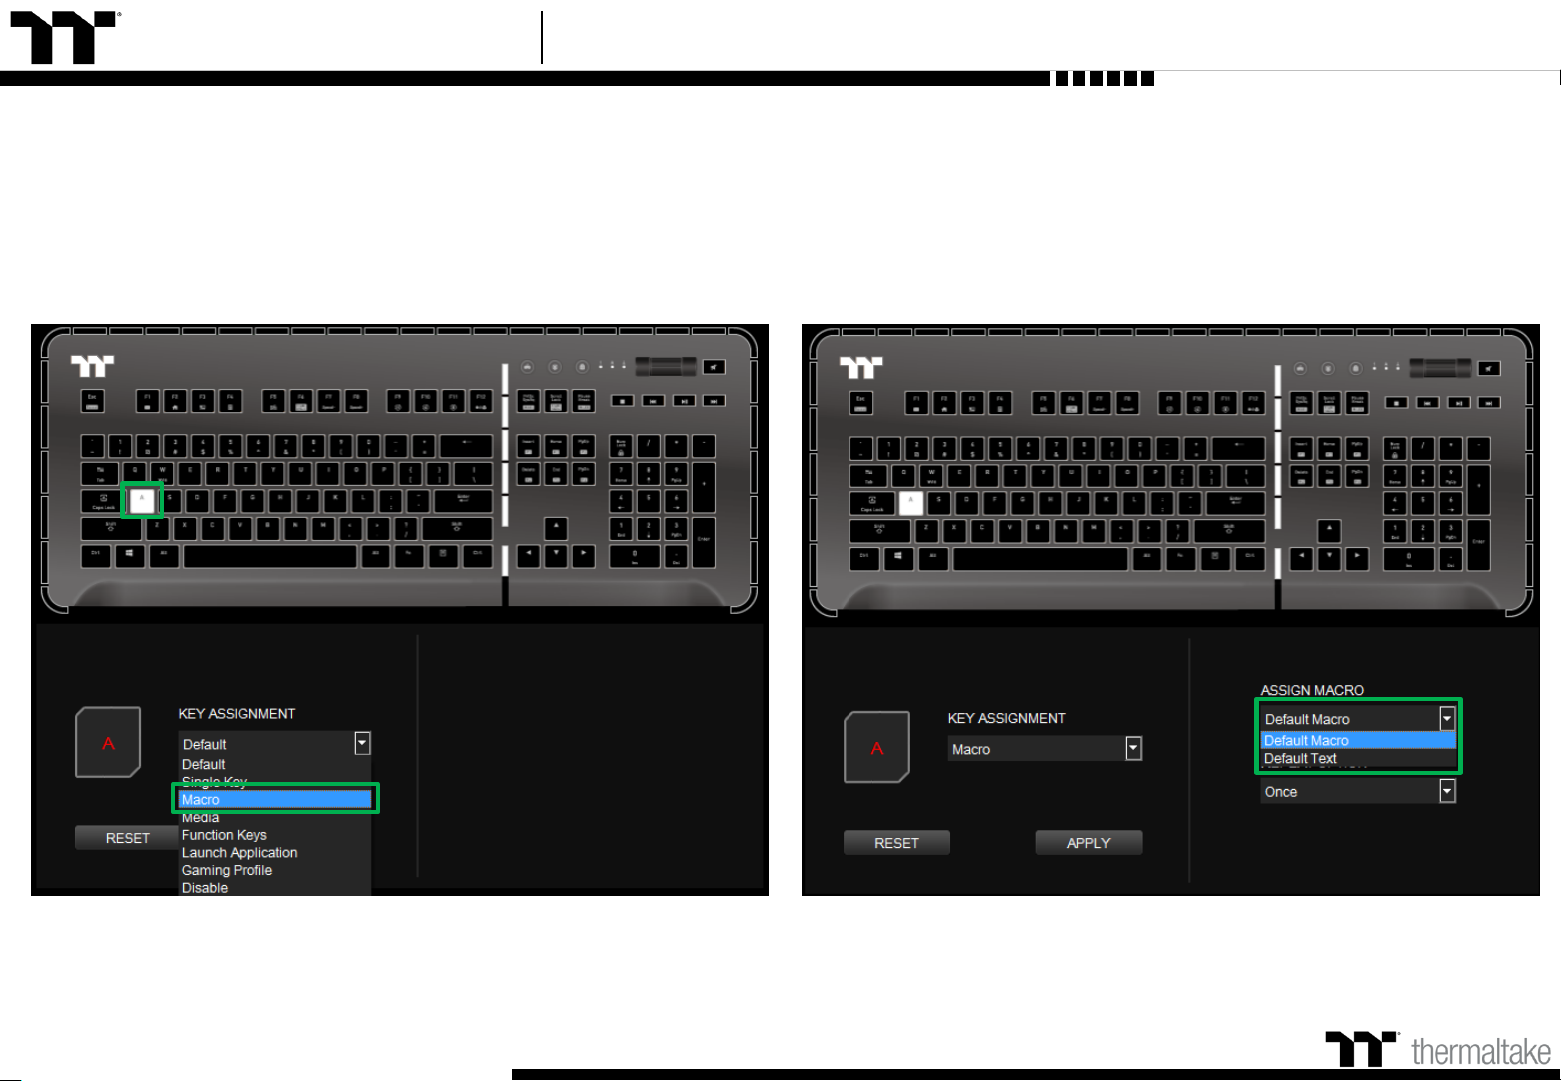
Step 1: Step 2:
Macro Function Macro Key Setting
26
First, you must designate a key, then select "Macro" in the drop-down list. Select a macro from the upper-right.
Page 27

TT Premium | Level 20 RGB User Guide
Step 3: Step 4:
27
Select a macro repeat option from the drop-down list located in the
lower-right corner.
Click Apply to save the new function. Verify if the new key function is applied
properly by looking at the color displayed on the screen.
Macro Function Macro Key Setting
Page 28
TT Premium | Level 20 RGB User Guide
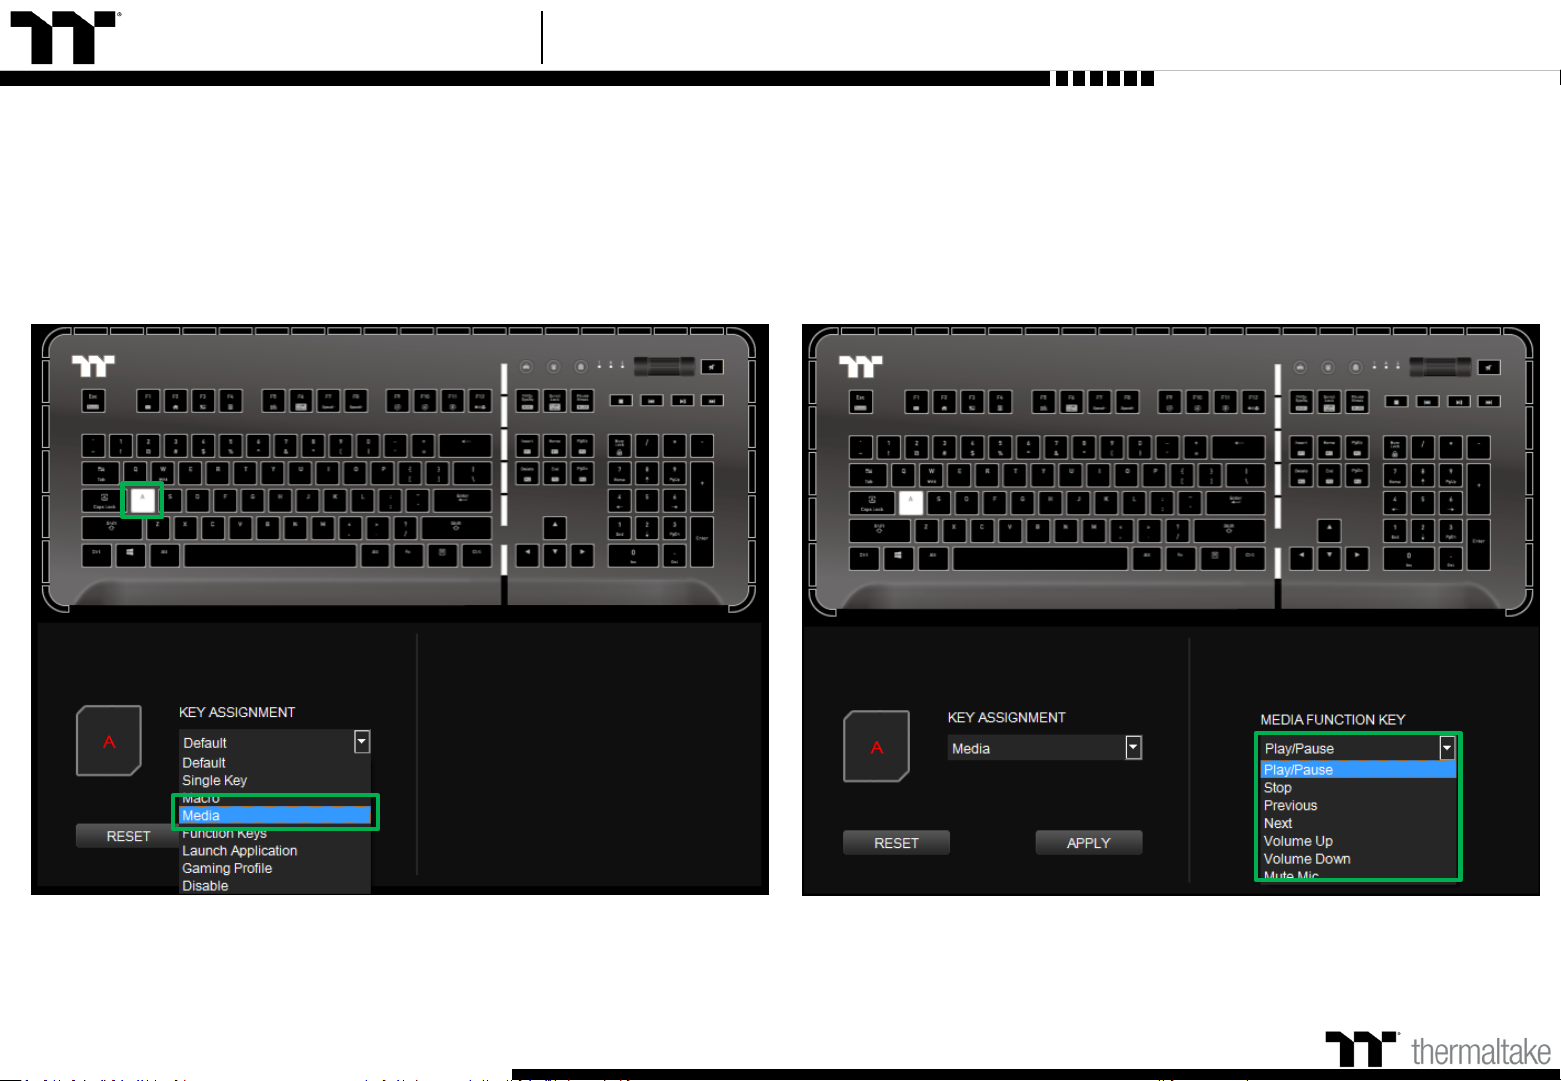
Step 1: Step 2:
Media Function Media Key Setting
28
Select a key, then select “Media" from the drop-down list.
Select a multimedia function in the right drop-down list.
Page 29
TT Premium | Level 20 RGB User Guide
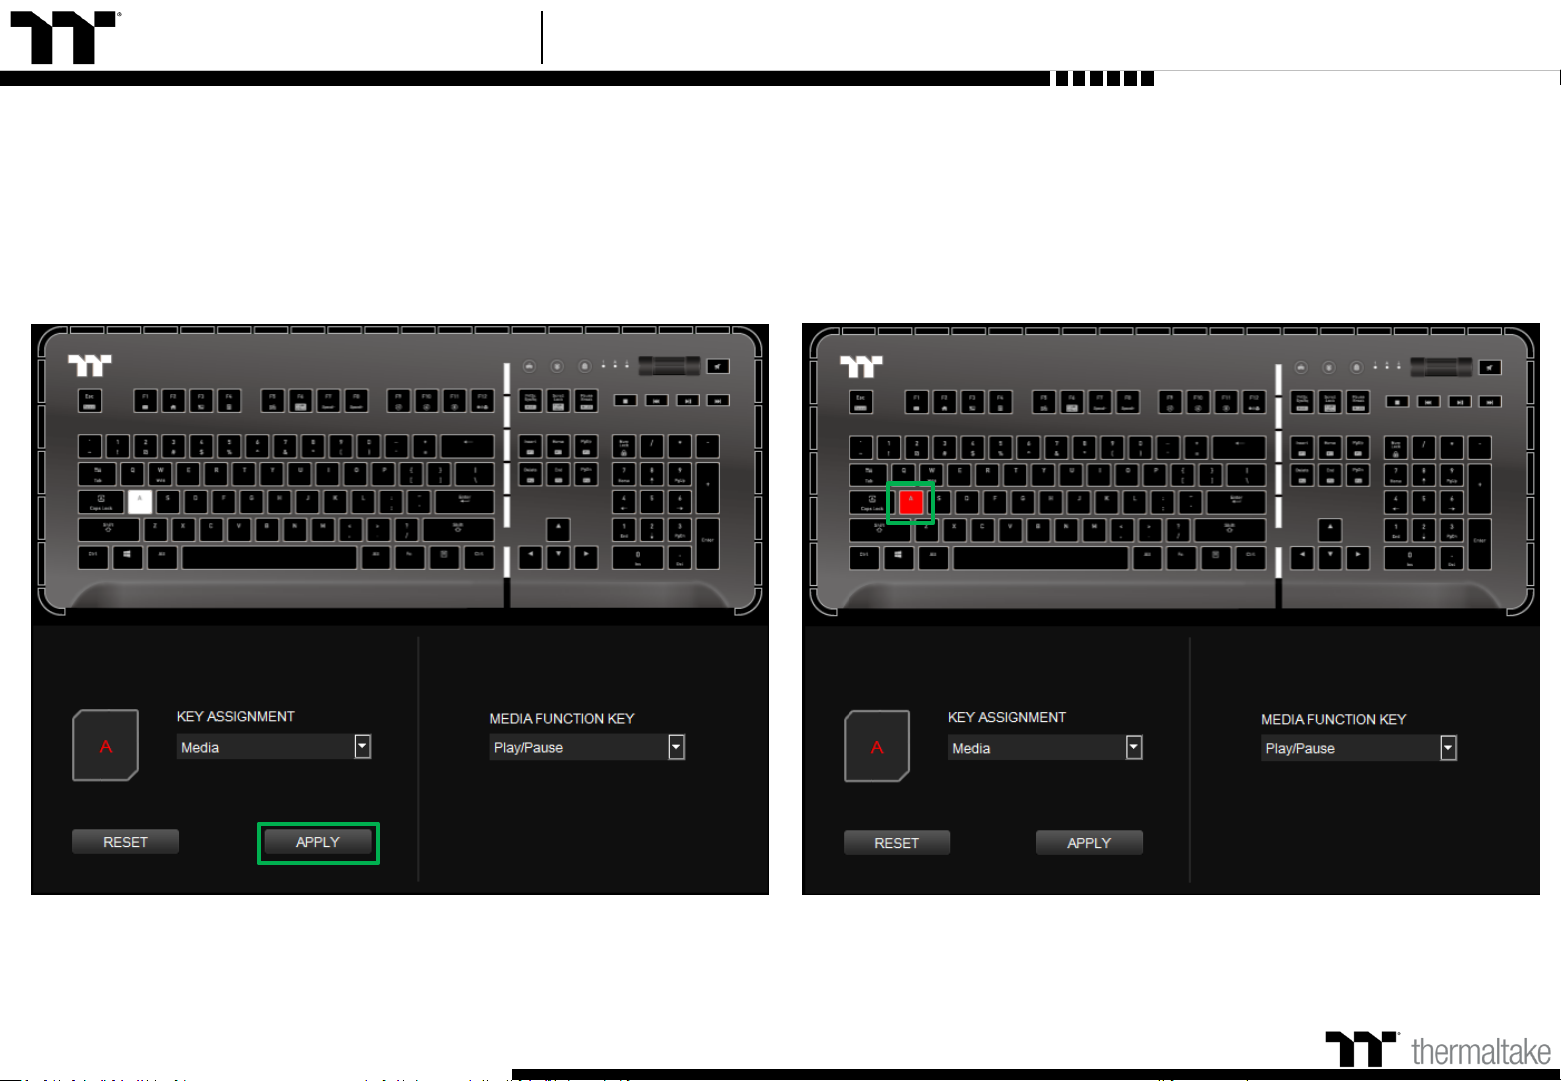
Step 3:
Step 4:
29
Click Apply to change and save the new function.
Based on the information and color displayed on the screen, you will be able to
see if the new key setting is applied properly.
Media Function Media Key Setting
Page 30
TT Premium | Level 20 RGB User Guide
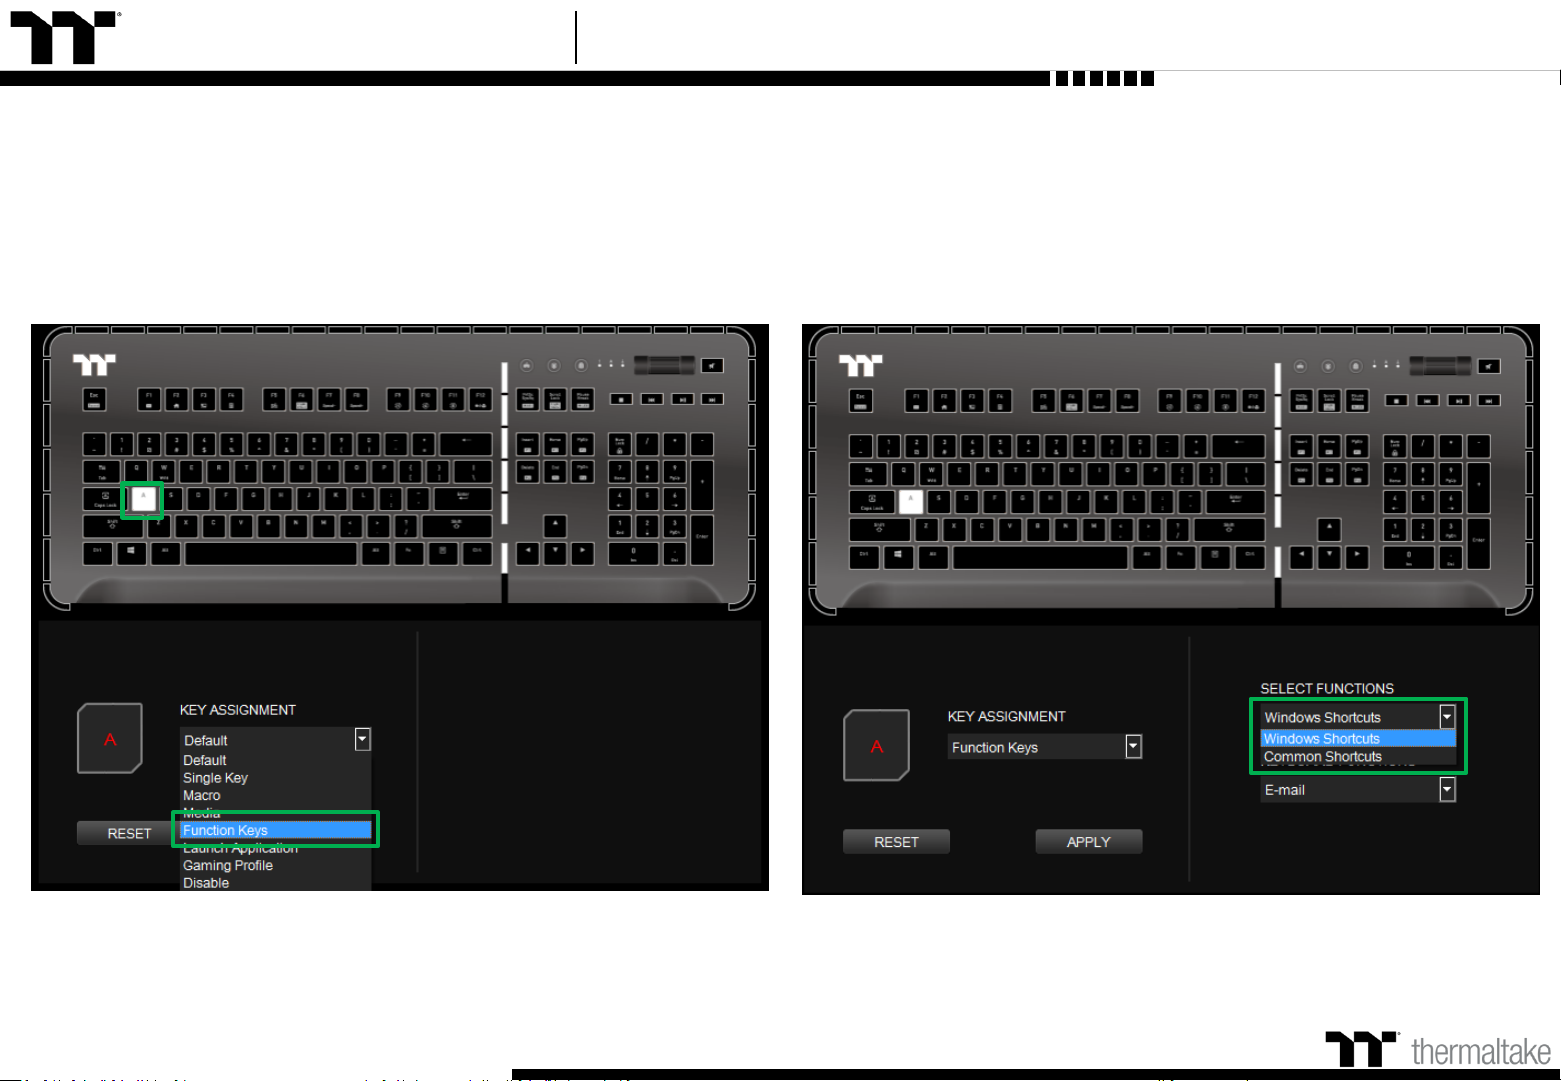
Step 1: Step 2:
Hot Key Function Hot Key Setting
30
Select a key, then select "Function Keys" from the drop-down list. Select a type of hotkey function in the upper-right drop-down list.
Page 31

TT Premium | Level 20 RGB User Guide
Step 3:
Step 4:
31
Select a keyboard function in the lower-right drop-down list.
Click Apply to save the new function. Verify if the new key function is applied
properly by looking at the color displayed on the screen.
Hot Key Function Hot Key Setting
Page 32

TT Premium | Level 20 RGB User Guide
Step 1: Step 2:
Launch Application Function Application Setting
32
Select a key, then select "Launch Application" from the drop-down list. Select "Application" in the upper-right drop-down list.
Page 33

TT Premium | Level 20 RGB User Guide
Launch Application Function Application Setting
Step 3: Step 4:
33
Click on the Open File button located on the bottom-right. Select the executable file (.EXE) to open.
Page 34

TT Premium | Level 20 RGB User Guide
Launch Application Function Application Setting
Step 5:
Step 6:
34
Click Apply to change and save the new function.
Based on the information and color displayed on the screen, you will be able to
see if the new key setting is applied properly.
Page 35

TT Premium | Level 20 RGB User Guide
Step 1: Step 2:
35
Select a key, then select "Launch Application" from the drop-down list. Select "Web" in the upper-right drop-down list.
Launch Application Function Website Setting
Page 36

TT Premium | Level 20 RGB User Guide
Step 3:
36
Enter the URL into the textbox located on the bottom-right and press Enter.
Step 4:
Click Apply to save the new function. Verify if the new key function is applied
properly by looking at the color displayed on the screen.
Launch Application Function Website Setting
Page 37

TT Premium | Level 20 RGB User Guide
Step 1:
Step 2:
Gaming Profile Function Gaming Key Setting
37
Select a key, then select "Gaming Profile" from the drop-down list.
Select a game title in the upper-right drop-down list.
Page 38

TT Premium | Level 20 RGB User Guide
Step 3:
Step 4:
38
In the lower-right drop-down list, select an in-game action.
Click Apply to save the new function. Verify if the new key function is applied
properly by looking at the color displayed on the screen.
Gaming Profile Function Gaming Key Setting
Page 39

TT Premium | Level 20 RGB User Guide
Step 1:
Disable Function Disable Key Setting
39
Select a key, then select "Disable" from the drop-down list.
Step 2:
Click Apply to save the new function. Verify if the new key function is applied
properly by looking at the color displayed on the screen.
Page 40

TT Premium | Level 20 RGB Mechanical Keyboard User Guide
40
Functions Available on the Macro Page
Chapter 5:
Page 41

TT Premium | Level 20 RGB User Guide
41
New Macro / Delete / Copy / New Text / Import
/ Export
New macro: Create a new macro.
Delete: Delete a macro or text.
Copy: Copy a macro or text.
New text: Create a new text.
Import: Import a macro or text.
Export: Export a macro or text.
Modifying the Name of a Macro / Text
You can change the name of a new macro or text directly.
Macro Recording Settings
Record Delay Times: Record a macro based on the time interval
between each keystroke.
Fixed Delay: Record a macro based on the specified time interval.
No Delay: Record a macro without recording the time interval
between each keystroke.
Record / Delete / Insert / Pause / Edit
Record: Begin macro recording.
Delete: Delete the assigned value of a specific key.
Insert: Insert an additional value above or below the
existing value of a specific key.
Stop: End macro recording.
Edit: Edit the delay time of a specific key.
Macro Recording Area
You can verify the sequence recorded by the macro and
the key assignment.
Macro Page Macro Recording Setting
Page 42

TT Premium | Level 20 RGB Mechanical Keyboard User Guide
42
How to Record Macros
Chapter 6:
Page 43

TT Premium | Level 20 RGB User Guide
Step 1: Step 2:
43
Add a new macro and modify its name. Select the delay method used to record the macro by using the checkboxes below.
Macro Recording Function Recording Setting
Page 44

TT Premium | Level 20 RGB User Guide
Macro Recording Function Recording Setting
Step 3:
Step 4:
44
Press the Record button.
Enter the sequence to be recorded from the keyboard, then press the Stop
button to complete the recording.
Page 45

TT Premium | Level 20 RGB User Guide
Step 1: Step 2:
45
Select a macro by clicking on the key it is assigned to. Click the Insert button.
Macro Recording Function Insert Setting
Page 46

TT Premium | Level 20 RGB User Guide
Step 3: Step 4:
46
Select the position where new content is to be inserted. Press the Record button.
Macro Recording Function Insert Setting
Page 47

TT Premium | Level 20 RGB User Guide
Step 5: Step 6:
47
Enter the sequence to be recorded from the keyboard. Click the Stop button to complete the insertion process.
Macro Recording Function Insert Setting
Page 48

TT Premium | Level 20 RGB User Guide
Step 1: Step 2:
48
Add a new character set and modify its name. Enter the values for the "Start Key" and "End Key" in the upper right corner.
Text Recording Function Recording Setting
Page 49

TT Premium | Level 20 RGB User Guide
Step 3:
Step 4:
49
Click on the input box located at the bottom-right corner and enter the
characters to be recorded from the keyboard.
Click the Save button to complete the recording of the character set.
Text Recording Function Recording Setting
Page 50

TT Premium | Level 20 RGB Mechanical Keyboard User Guide
50
Functions Available on the Lighting Effects Page
Chapter 7:
Page 51

TT Premium | Level 20 RGB User Guide
51
Switching Lighting Effects
Keyboard light of 13 lighting effects are supported: Static, Pulse, Wave, Spiral Rainbow, RGB Spectrum, Reactive,
Flow, Ripple, Raindrops, Snake, Blink, Sound Control and System Temperature.
Keyboard around of 14 lighting effects are supported: Static, Pulse, Wave, Spiral Rainbow, RGB Spectrum, Reactive,
Flow, Ribbon, Scan, Raindrops, Marquee, Blink, Sound Control, and System Temperature.
Lighting Effects Configurations
Can be used to adjust the color, direction, speed, and brightness
level of the lighting effect within an area; can also be used to switch
to random colors.
Apply / Restore Lighting Effect Settings
Apply: Apply the new lighting effect settings to all keys on the
keyboard.
Restore Lighting Effect Settings: All lighting effect settings saved
under the current profile will be restored to factory default
values.
Color Pattern Settings
Add Pattern: Add a new pattern with red to black gradient.
Delete Pattern: Delete the currently selected color pattern.
Insert Color Point: Add a red color point to the color pattern.
Delete Color Point: Delete the selected color point from the
color pattern.
Color Wheel Settings
You can select a color from the color wheel directly or enter
RGB color values to adjust the color of the lighting effect.
Lighting Page Lighting Function Setting
Page 52

TT Premium | Level 20 RGB Mechanical Keyboard User Guide
52
Lighting Effects Overview
Chapter 8:
Page 53

TT Premium | Level 20 RGB User Guide
Step 2:
Click on a color inside the color wheel or enter the RGB color values to change
the color.
Step 1:
53
Select "Static Area" in the Lighting Effect drop-down list.
Static Mode Color Area Setting
Page 54

TT Premium | Level 20 RGB User Guide
Step 3: Step 4:
54
Adjust the brightness level of the keyboard's backlight. Click Apply to save the new settings.
Static Mode Color Area Setting
Page 55

TT Premium | Level 20 RGB User Guide
Step 1: Step 2:
55
Switch the zones to "Customized." Click on a color inside the color wheel or enter the RGB color values to set the color.
Static Mode Customized Setting
Page 56

TT Premium | Level 20 RGB User Guide
Click on the keyboard image directly with the left mouse button to change the
key color.
※ Right click to cancel the color.
Step 3:
Step 4:
56
Click Apply to save the new settings.
Static Mode Customized Setting
Page 57

TT Premium | Level 20 RGB User Guide
Step 2:
Click on a color inside the color wheel or enter the RGB color values to change
the color.
Step 1:
57
Select "Pulse Area" in the Lighting Effect drop-down list.
Pulse Mode Color Area Setting
Page 58

TT Premium | Level 20 RGB User Guide
Step 3: Step 4:
58
Adjust the backlight speed. Click Apply to save the new settings.
Pulse Mode Color Area Setting
Page 59

TT Premium | Level 20 RGB User Guide
Step 1: Step 2:
59
Switch the zones to "Customized." Click on a color inside the color wheel or enter the RGB color values to set the color.
Pulse Mode Customized Setting
Page 60

TT Premium | Level 20 RGB User Guide
Click on the keyboard image directly with the left mouse button to change the
key color.
※ Right click to cancel the color.
Step 3:
Step 4:
60
Click Apply to save the new settings.
Pulse Mode Customized Setting
Page 61

TT Premium | Level 20 RGB User Guide
Step 1: Step 2:
61
Select "Wave Area" in the Lighting Effect drop-down list. Select a set of color patterns on the upper-right.
Wave Mode Pattern Setting
Page 62

TT Premium | Level 20 RGB User Guide
Step 3: Step 4:
62
Set the direction, speed, and brightness level of the lighting effect. Click Apply to save the new settings.
Wave Mode Pattern Setting
Page 63

TT Premium | Level 20 RGB User Guide
Step 1: Step 2:
63
Add a new set of color patterns. Add a new color-insertion point and drag it to the desired position.
Wave Mode Customized Pattern Setting
Page 64

TT Premium | Level 20 RGB User Guide
Step 3: Step 4:
64
Click on each color-insertion point to modify its color. Click Apply to save the new settings.
Wave Mode Customized Pattern Setting
Page 65

TT Premium | Level 20 RGB User Guide
Step 1: Step 2:
65
Select "Spiral Rainbow Area" in the Lighting Effect drop-down list. Select a set of color patterns on the upper-right.
Spiral Rainbow Mode Pattern Setting
Page 66

TT Premium | Level 20 RGB User Guide
Step 3: Step 4:
66
Set the direction, speed, and brightness level of the lighting effect. Click Apply to save the new settings.
Spiral Rainbow Mode Pattern Setting
Page 67

TT Premium | Level 20 RGB User Guide
Step 1: Step 2:
67
Add a new set of color patterns. Add a new color-insertion point and drag it to the desired position.
Spiral Rainbow Mode Customized Pattern Setting
Page 68

TT Premium | Level 20 RGB User Guide
Step 3: Step 4:
68
Click on each color-insertion point to modify its color. Click Apply to save the new settings.
Spiral Rainbow Mode Customized Pattern Setting
Page 69

TT Premium | Level 20 RGB User Guide
Step 1:
Step 2:
69
Select "Spectrum Cycling Area" in the Lighting Effect drop-down list.
Set the speed and brightness level of the backlight and click on Apply
to save the new settings.
Spectrum Cycling Mode Area Function Setting
Page 70

TT Premium | Level 20 RGB User Guide
Step 1:
Step 2:
70
Select "Reactive Area" in the Lighting Effect drop-down list.
Click on a color inside the color wheel or enter the RGB color values to change
the color.
Reactive Mode Color Area Setting
Page 71

TT Premium | Level 20 RGB User Guide
Step 3: Step 4:
71
Adjust the backlight speed. Click Apply to save the new settings.
Reactive Mode Color Area Setting
Page 72

TT Premium | Level 20 RGB User Guide
Step 1: Step 2:
72
Switch the area to "Customized." Click on a color inside the color wheel or enter the RGB color values to set the color.
Reactive Mode Customized Setting
Page 73

TT Premium | Level 20 RGB User Guide
Click on the keyboard image directly with the left mouse button to change the
key color.
※ Right click to cancel the color.
Step 3:
Step 4:
73
Click Apply to save the new settings.
Reactive Mode Customized Setting
Page 74

TT Premium | Level 20 RGB User Guide
Step 1:
Step 2:
74
Select "Flow Area" in the Lighting Effect drop-down list.
Click on a color inside the color wheel or enter the RGB color values to change
the color.
Flow Mode Color Area Setting
Page 75

TT Premium | Level 20 RGB User Guide
Step 3: Step 4:
75
Set the speed and brightness level of the backlight. Click Apply to save the new settings.
Flow Mode Color Area Setting
Page 76

TT Premium | Level 20 RGB User Guide
Step 1: Step 2:
76
Set the area to "Customized", then add a new set of color patterns. Add a new color-insertion point and drag it to the desired position.
Flow Mode Customized Setting
Page 77

TT Premium | Level 20 RGB User Guide
Step 3: Step 4:
77
Click on each color-insertion point to modify its color. Click Apply to save the new settings.
Flow Mode Customized Setting
Page 78

TT Premium | Level 20 RGB User Guide
Step 1:
78
Select "Ripple" in the Lighting Effect drop-down list.
Ripple Mode Color Setting
Step 2:
Click on a color inside the color wheel or enter the RGB color values to change
the color.
Page 79

TT Premium | Level 20 RGB User Guide
Step 3: Step 4:
79
Set the speed and brightness level of the backlight. Click Apply to save the new settings.
Ripple Mode Color Setting
Page 80

TT Premium | Level 20 RGB User Guide
Step 1: Step 2:
80
Set the area to "Customized", then add a new set of color patterns. Add a new color-insertion point and drag it to the desired position.
Ripple Mode Customized Setting
Page 81

TT Premium | Level 20 RGB User Guide
Step 3: Step 4:
81
Click on each color-insertion point to modify its color. Click Apply to save the new settings.
Ripple Mode Customized Setting
Page 82

TT Premium | Level 20 RGB User Guide
Step 1:
82
Select "Ribbon" in the Lighting Effect drop-down list.
Ribbon Mode Color Setting
Step 2:
Click on a color inside the color wheel or enter the RGB color values to change
the color.
Page 83

TT Premium | Level 20 RGB User Guide
Step 3: Step 4:
83
Set the direction, speed, and brightness level of the lighting effect. Click Apply to save the new settings.
Ribbon Mode Color Setting
Page 84

TT Premium | Level 20 RGB User Guide
Step 1:
84
Select "Scan" in the Lighting Effect drop-down list.
Scan Mode Color Setting
Step 2:
Click on a color inside the color wheel or enter the RGB color values to change
the color.
Page 85

TT Premium | Level 20 RGB User Guide
Step 3: Step 4:
85
Set the speed and brightness level of the backlight. Click Apply to save the new settings.
Scan Mode Color Setting
Page 86

TT Premium | Level 20 RGB User Guide
Step 1:
86
Select "Raindrops Area" in the Lighting Effect drop-down list.
Raindrop Mode Color Area Setting
Step 2:
Click on a color inside the color wheel or enter the RGB color values to change
the color.
Page 87

TT Premium | Level 20 RGB User Guide
Step 3: Step 4:
87
Set the speed and brightness level of the backlight. Click Apply to save the new settings.
Raindrop Mode Color Area Setting
Page 88

TT Premium | Level 20 RGB User Guide
Step 1:
88
Select “Snake" in the Lighting Effect drop-down list.
Snake Mode Color Setting
Step 2:
Click on a color inside the color wheel or enter the RGB color values to change
the color.
Page 89

TT Premium | Level 20 RGB User Guide
Step 3: Step 4:
89
Set the direction, speed, and brightness level of the lighting effect. Click Apply to save the new settings.
Snake Mode Color Setting
Page 90

TT Premium | Level 20 RGB User Guide
Step 1:
90
Select “Marquee" in the Lighting Effect drop-down list.
Marquee Mode Color Setting
Step 2:
Click on a color inside the color wheel or enter the RGB color values to change
the color.
Page 91

TT Premium | Level 20 RGB User Guide
Step 3: Step 4:
91
Set the direction, speed, and brightness level of the lighting effect. Click Apply to save the new settings.
Marquee Mode Color Setting
Page 92

TT Premium | Level 20 RGB User Guide
Step 1:
92
Select “Blink Area" in the Lighting Effect drop-down list.
Blink Mode Color Area Setting
Step 2:
Click on a color inside the color wheel or enter the RGB color values to change
the color.
Page 93

TT Premium | Level 20 RGB User Guide
Step 3: Step 4:
93
Adjust the backlight speed. Click Apply to save the new settings.
Blink Mode Color Area Setting
Page 94

TT Premium | Level 20 RGB User Guide
Step 1: Step 2:
94
Switch the zones to "Customized." Click on a color inside the color wheel or enter the RGB color values to set the color.
Blink Mode Customized Setting
Page 95

TT Premium | Level 20 RGB User Guide
Click on the keyboard image directly with the left mouse button to change the
key color.
※ Right click to cancel the color.
Step 3:
Step 4:
95
Click Apply to save the new settings.
Blink Mode Customized Setting
Page 96

TT Premium | Level 20 RGB User Guide
Step 2:Step 1:
96
Select “Music Mode" in the Lighting Effect drop-down list.
Music Mode Color Setting
Set the desired mode of lighting effects.
Page 97

TT Premium | Level 20 RGB User Guide
Step 3:
Step 4:
97
Click on a color inside the color wheel or enter the RGB color values to change
the color of each row.
Click Apply to save the new settings.
Sound Control Mode Color Setting
Page 98

TT Premium | Level 20 RGB User Guide
Step 1: Step 2:
98
Select "System Temperature" in the Lighting Effect drop-down list. Click Apply to save the new settings.
System Temperature Mode Function Setting
Page 99

TT Premium | Level 20 RGB Mechanical Keyboard User Guide
99
Functions Available on the Settings Page
Chapter 9:
Page 100

TT Premium | Level 20 RGB User Guide
100
Settings Page Else Function
Language Settings
Sets the language of the program's user
interface.
Official Website / Social Media
Official Website: Visit the Product official website.
Social Media: Visit Thermaltake on Facebook.
Software Version / Firmware Version
Software Version: Displays the version number of
the installed program.
Firmware Version: Displays the version number of
the keyboard's driver.
TT iTAKE APP Password Setting
Enter four number or English alphabet.
※ Empty is disable function.
Amazon Alexa Login
TT iTAKE software support Amazon Alexa voice
service, allowing you to control the lights by talking
to the Alexa Enabled device.
 Loading...