

Page 1
Core V1
Your Build. Our Core
User's Manual
Benutzerhandbu ch
Mode d’emploi
Manual del usuario
Manuale dell’ute nte
Manual do Utilizad or
安裝說明書
用戶手冊
ユーザーズマニュアル
Руководство поль зоват еля
kullanıcı elkitabı
(EEE Yönetmeliğine Uygu ndur)
คู่มือการใช้
© 2 014 Therma lta ke Tech nol ogy Co., L td. All Ri ght s R ese rve d. A -20 14. 06
All other r egis tered t rademar ks bel ong to their r espe ctive comp anies.
Tested To C omply
With F CC Standa rds
FOR H OME OR O FFICE USE
www. therm altak e.com
ww w. ther m a ltak e . com
Page 2
Contents
Chapter 1. Product Introduction
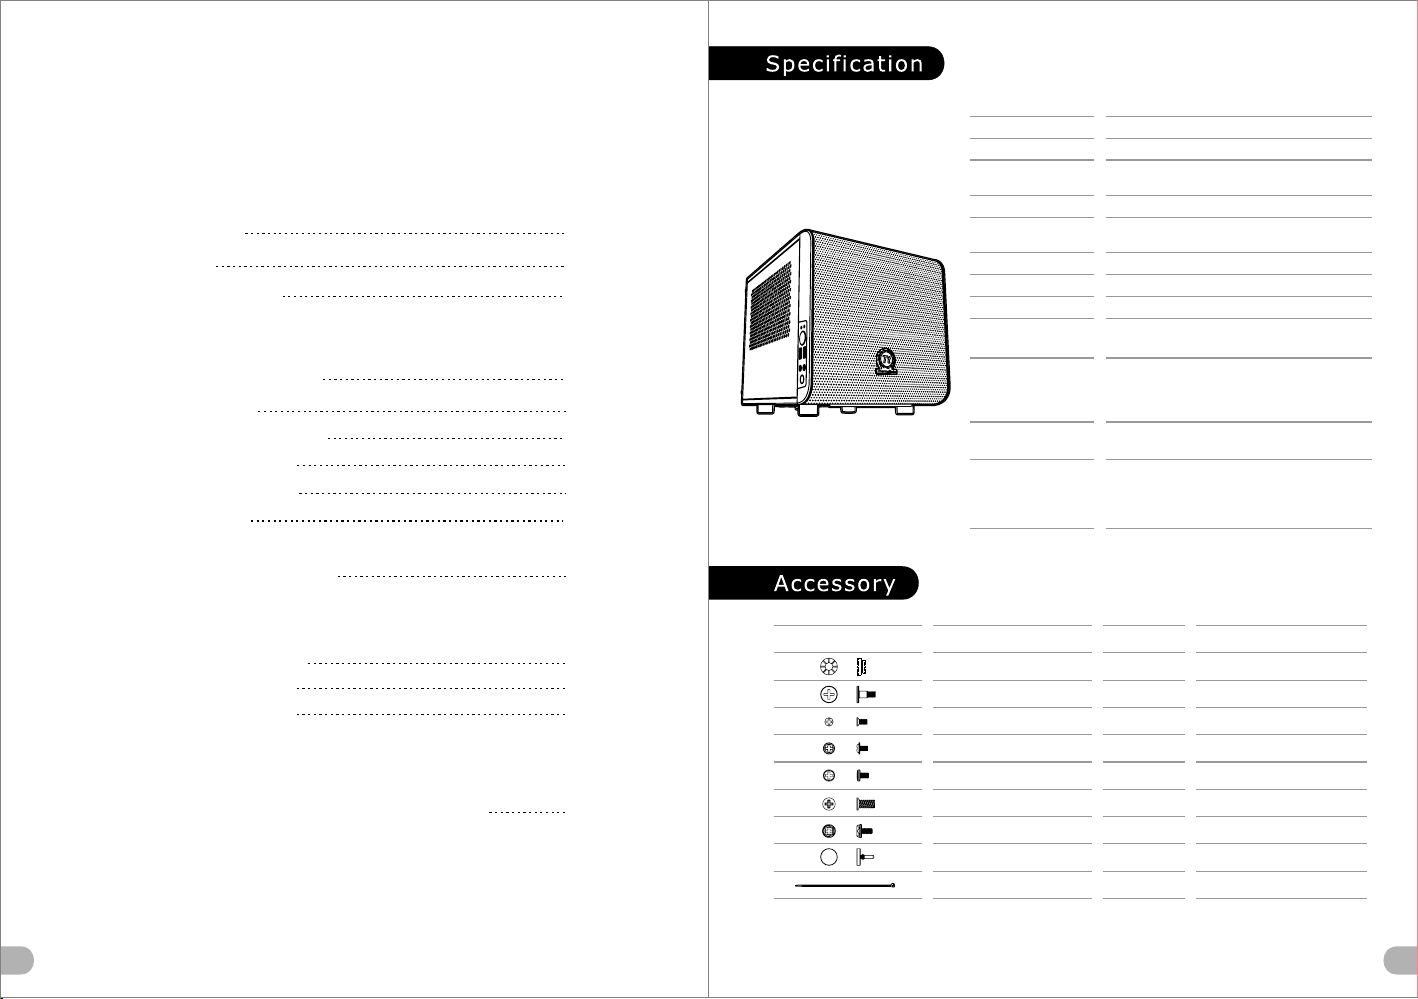
Sp eci f ica tio n
1.1
1.2
Ac ces s ory
1.3
War n ing a nd No t ice
Chapter 2. Installation Guide
2.1
Si de Pa nel D isa s sem bly
2.2
PS U Ins t all ati o n
2.3
Mo the r boa rd In s tal lat i on
2.4
3. 5" HD D I nst all a tio n
2.5
2. 5" HD D I nst all a tio n
2.6
PC I Slo t U sag e
Ai r Coo l ing I nst a lla tio n
2.7
Li qui d C ool ing I n sta lla t ion
02
02
03
05
06
07
08
09
10
11
Mod el
Cas e Type
Dim ensio n (H*W* D)
Mat erial
Dri ve Bays
-Hi dden
Exp ansio n Slots
Mot herbo ard
I/O P ort
Coo ling Sy stem
Fan S uppor t
Rad iator S uppor t
Cle aranc e
Cor e V1
Min i Case
276 x 2 60 x 316 mm
(10 .9 x 10.2 x 1 2.4 inc h)
SPC C
2 x 3.5 ” , 2 x 2.5”
2
6.7 ” x 6.7” (M ini ITX )
USB 3 .0 x 2, HD Aud io x 1
Fro nt (int ake) :
200 x 2 00 x 30 mm fa n (800r pm, 13d BA)
Fro nt:
1 x 120 mm or 1 x 140 mm or 1 x 200 mm
Rea r:
2 x 80m m
Fro nt :
1 x 120 mm or 1 x 140 mm
CPU c ooler h eight l imita tion: 1 40mm
VGA le ngth li mitat ion: 25 5mm (In ner cha ssis)
285 mm (Out er chas sis)
PSU l ength l imita tion: 2 00mm
Chapter 3. Leads Installation
Ca se LED Con n ect ion
3.1
US B 3.0 Conn e cti on
3.2
Au dio Conn e cti on
3.3
Chapter 4. Other
Th erm a lta ke Po w er Sup p ly Ser i es (Op t ion al)
4.1
*Pi cture f or refer ence on ly
*In forma tion in t he user m anual i s subje ct to cha nge wit hout no tice
12-1 7
12-1 7
12-1 7
18
Fig ure
Par ts Name
3.5 ” HDD Rub ber
Scr ew # 6-32 x 1 1 mm
Scr ew M3 x 6 mm
Scr ew M3 x 7 mm 4
Scr ew # 6-32 x 5 m m
Scr ew 5 x 10 mmØ
Scr ew # 6-32 x 6 m m
PSU R ubber
Cab le Tie
Q'ty
12
Use d for
8
8
8
4
4
2
4
3.5 "HDD
3.5 "HDD
2.5 "HDD (B ottom )
2.5 "HDD (S ide)
Mot herbo ard
Fan
PSU
PSU ( Botto m)
Cab le Mana gemen t
1 2
Page 3
Warnin g a nd Notice
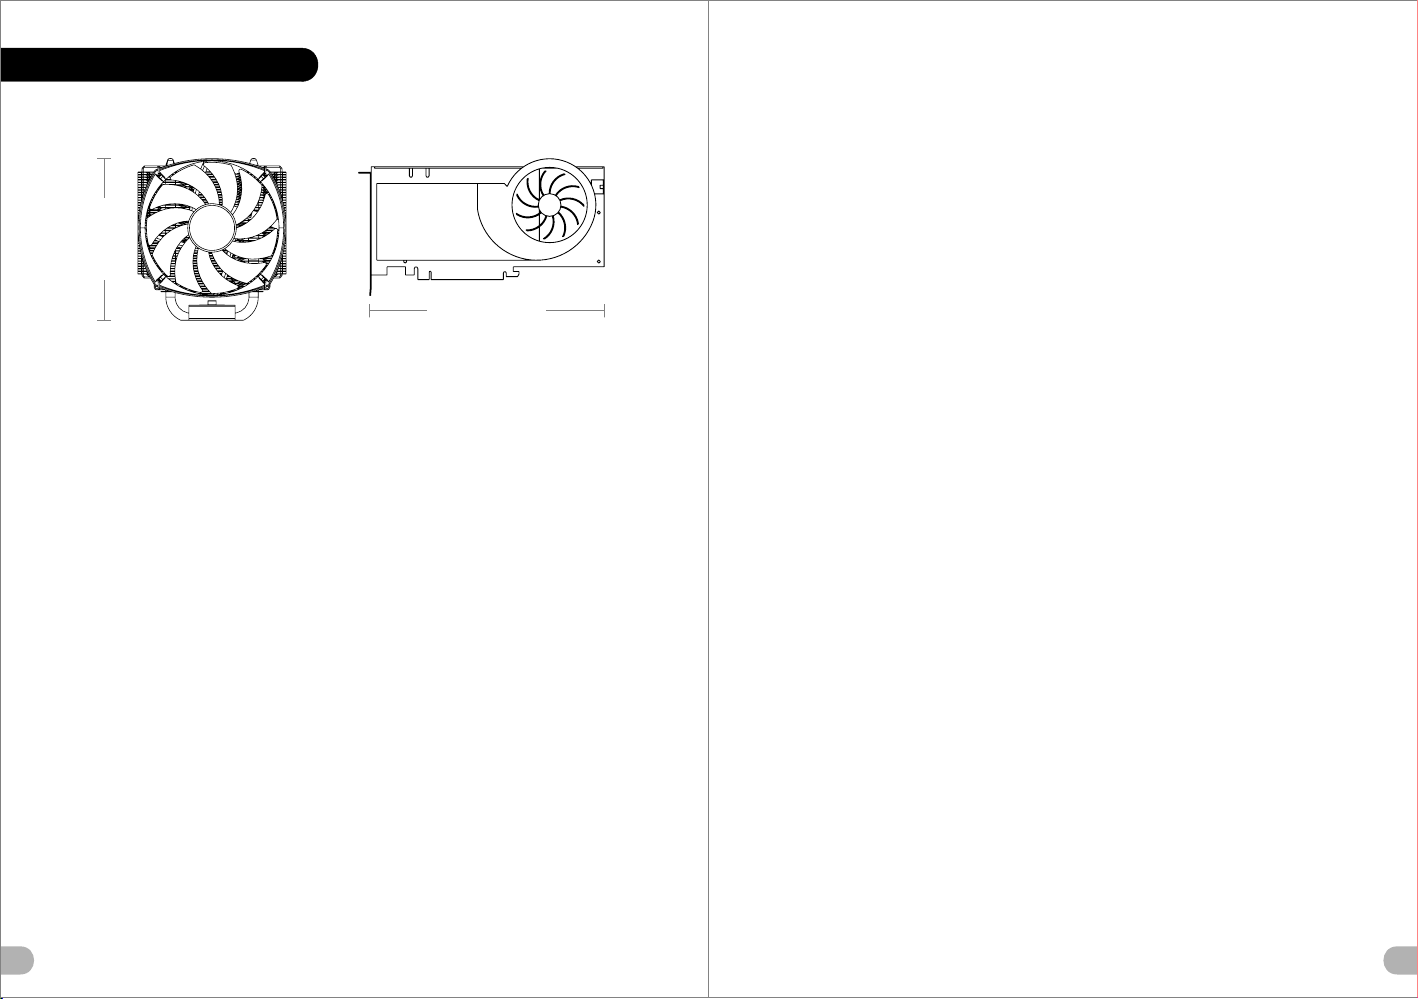
CPU Cooler Height Limitation VGA (A dd - on c ar d) L en gt h Li mi ta ti on
<1 40 m m
<2 55 m m
Ate nção! !
- Lim ite de al tura pa ra o diss ipado r do CPU:
O lim ite de al tura pa ra o diss ipado r do CPU é 14 0 mm (5,5 p olega das).
- Lim ite de co mprim ento pa ra VGA (p laca gr áfica ):
O lim ite de co mprim ento pa ra VGA (p laca gr áfica ) é 255 mm (1 0 poleg adas) .
警告! !
- CPU散 熱器的高度 限制:
CPU散 熱器的高度 限制為140 mm(5. 5英吋)。
- VGA (顯示卡)的長度 限制:
VGA (顯示卡)的長度 限制為255 mm(10英 吋)。
War ning! !
- Hei ght lim it for th e CPU hea tsink :
The h eight l imit fo r the CPU h eatsi nk is 140 m m (5.5 in ches) .
- Len gth lim it for th e VGA (gr aphic s card) :
The l ength l imit fo r the VGA ( graph ics car d) is 255 m m (10 inc hes).
War nung! !
- Höh enbes chrän kung fü r CPU-K ühler :
Die H öhenb eschr änkun g für den C PU-Kü hler li egt bei 1 40 mm (5, 5 Zoll) .
- Län genbe schrä nkung f ür die VG A (Graf ikkar te):
Die L ängen besch ränku ng für di e VGA (Gr afikk arte) b eträg t 255 mm (1 0 Zoll) .
Ave rtiss ement !
- Hau teur li mite du d issip ateur t hermi que du pr ocess eur :
La ha uteur l imite d u dissi pateu r therm ique du p roces seur es t de 140 mm ( 5,5 pou ces).
- Lon gueur l imite d e la cart e VGA (ca rte gra phiqu e) :
La lo ngueu r limit e de la car te VGA (c arte gr aphiq ue) est d e 255 mm (1 0 pouce s).
Pre cauci ón
- Lím ite de al tura pa ra el dis ipado r de calo r de la CPU :
El lí mite de a ltura p ara el di sipad or de cal or de la CP U es de 140 m m (5,5 pu lgada s).
- Lím ite de lo ngitu d para la t arjet a gráfi ca (VGA ):
El lí mite de l ongit ud para l a tarje ta gráf ica (VG A) en de 25 5 mm (10 pu lgada s).
Att enzio ne!
- Lim ite di al tezza p er il dis sipat ore di ca lore de lla CPU :
Il li mite di a ltezz a per il di ssipa tore di c alore d ella CP U è 140 mm (5 ,5’’) .
- Lim ite di lu nghez za per la V GA (sch ede gra fiche ):
Il li mite di l unghe zza per l a VGA (sc heda gr afica ) è 255 mm (1 0’’).
警告! !
- CPU散 热器的高度 限制:
CPU散 热器的高度 限制为140 mm(5.5英寸 )。
- VGA( 显卡)的长 度限制:
VGA( 显卡)的长 度限制为25 5mm(10英寸 )。
警告
- CPUヒ ートシンク の高さ制限:
CPUヒ ートシンク の高さ制限 は140 mmです 。
- VGA( グラフィッ クスカード )の長さ制 限:
VGA( グラフィッ クスカード )の長さ制 限は255 mmで す。
Вни мание!
- Огр аниче ние по вы соте дл я радиа тора ЦП.
Огр аниче ние по вы соте дл я радиа тора ЦП с остав ляет 14 0 мм (5,5 д юйма).
- Огр аниче ние по дл ине для п латы VG A (графи ческа я плата) .
Огр аниче ние по дл ине для п латы VG A (графи ческа я плата) с остав ляет 25 5 мм (10 дю йма).
Uya rı!!
- CPU ısı a lıcısı için yü ksekl ik sınırı:
CPU ısı a lıcısı için yü ksekl ik sınırı 140 mm ’dir (5 ,5 inç) .
- VGA ( grafi k kartı) iç in uzun luk sınırı:
VGA ( grafi k kartı) iç in uzun luk sınırı 255 m m’dir ( 10 inç) .
- Kas aya üst ö n fanı takıy orsanız , lütfe n ilk 5,2 5” bölm esine a ygıt takm ayın.
คำเ ตือน! !
- ขีด จำกัด ความส ูงสำห รับฮี ตซิงก ์ของ CP U:
ขีด จำกัด ความส ูงสำห รับฮี ตซิงก ์ของ CP U คือ 140 ม ม. (5.5 น ิ้ว)
- ขีด จำกัด ความย าวสำห รับ VGA ( การ์ด แสดงผ ล):
ขีด จำกัด ความย าวสำห รับ VGA ( การ์ด แสดงผ ล) คือ 25 5 มม. (10 น ิ้ว)
3 4
Page 4
Side Panel Disa s sembly
PSU Instal lation
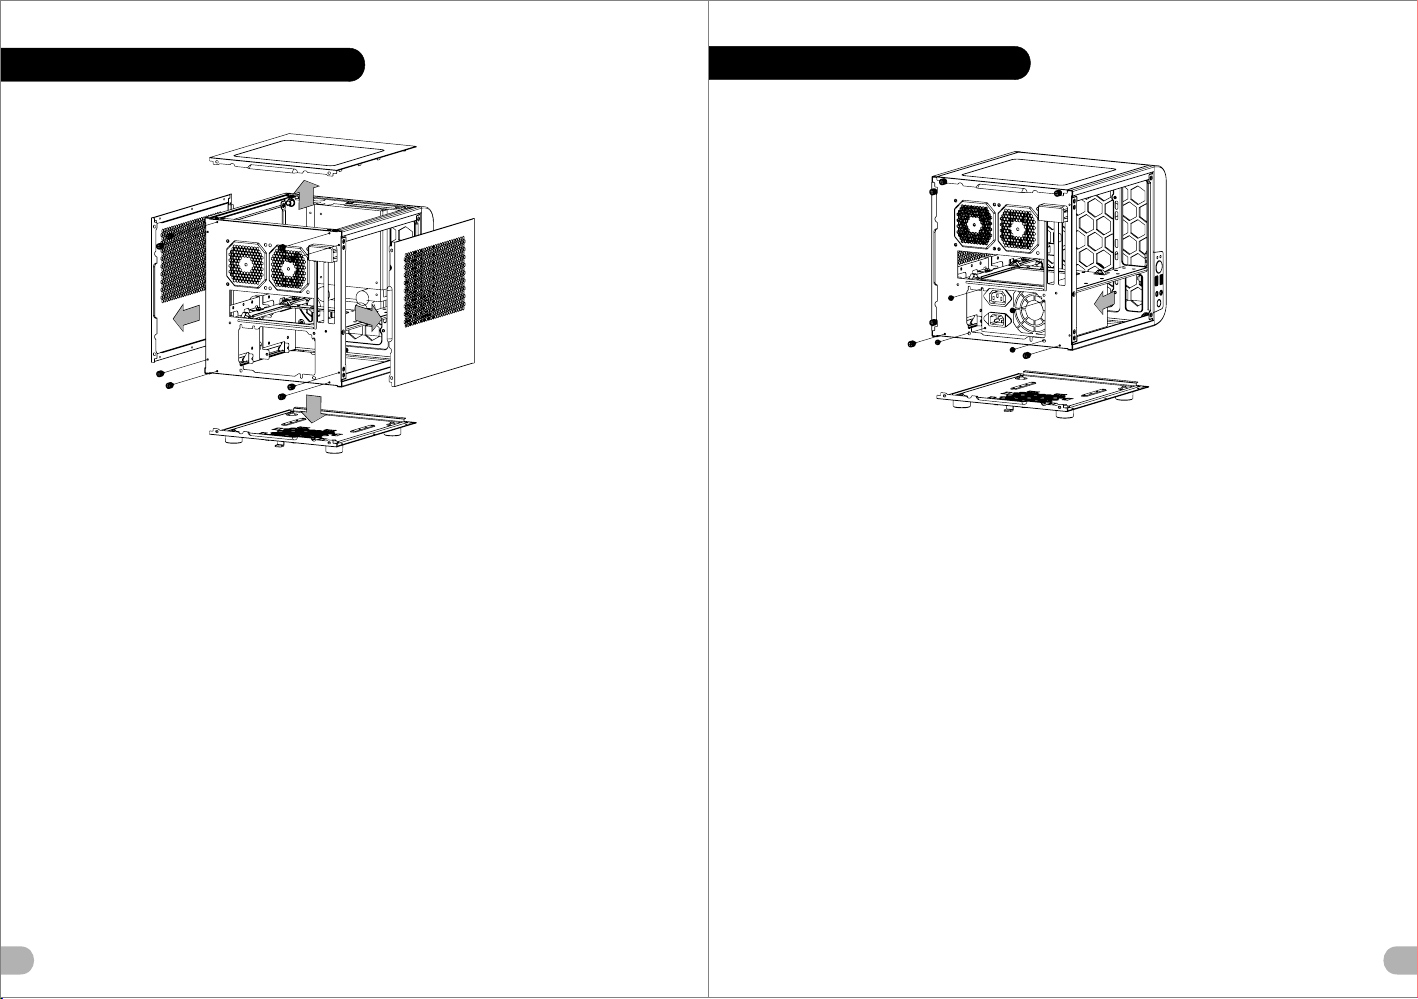
English /
Remove the screws on the back of the chassis,
and open the side panel.
Deutsch /
Entfe rnen Sie die Schrauben auf der Rückseite
des Gehäuses und öffnen Sie das Seitenteil.
Français /
Enlevez les vis à l’arrière du châssis et ouvrez le
panneau latéral.
Español /
Extraiga los tornillos de la parte posterior de la
caja y abra el panel lateral.
Itali ano /
Rimuovere le viti sulla parte posteriore dello
chassis e aprire il pannello laterale.
Portu guês/
Remova os parafusos na parte de trás da caixa e
abra o painel lateral.
5
繁體中文 /
移除機殼後 方螺絲,將側窗打開。
简体中文 /
卸除机壳后 方螺丝,将侧窗打开。
日本語 /
シャーシ背 面のねじを取り外し、サイドパネ
ルを開きま す。
Русск ий /
Откру тите винты на задней стенке корпуса
и откройте боковую панель.
Türkç e /
Kasanın arkasındaki vidaları çıkarın ve yan
paneli açın.
ภาษาไทย /
ถอดสกรูท ี่ด้านหลังข องแชสซีส์
แล้วเปิด แผงด้านข้าง
English /
Place the power supply in proper location and
secure it with screws.
Deutsch /
Insta llieren Sie das Netzteil an seiner Position und
sichern Sie es mit Schrauben.
Français /
Mettez l'alimentation dans le bon endroit et
sécurisez-la avec des vis.
Español /
Coloque el suministro de alimentación en el lugar
adecuado y asegúrelo con tornillos.
Itali ano /
Posizionare l'alimentatore in modo appropriato e
fissa rlo utilizzando le viti.
Portu guês/
Coloque a fonte de alimentação na devida
localização e aparafuse.
繁體中文 /
將電源供應 器放在正 確的位置,並用螺絲固定
鎖上。
简体中文 /
恰当定位电 源供应器位置并以螺丝安全固定。
日本語 /
電源装置を 適切な場 所に取り 付け、ねじで固
定します。
Русск ий /
Устан овит е блок п итан ия в над лежа щее
место и закре пите е го вин тами .
Türkç e /
Güç kaynağı nı uygun konuma yerleş tiri n ve
vidalarla s abit leyi n.
ภาษาไทย /
วางแหล่งจ่ายไฟในตำแหน่งที่เหมาะสมแล้วขันสกรู
ยึดให้แน่น
6
Page 5
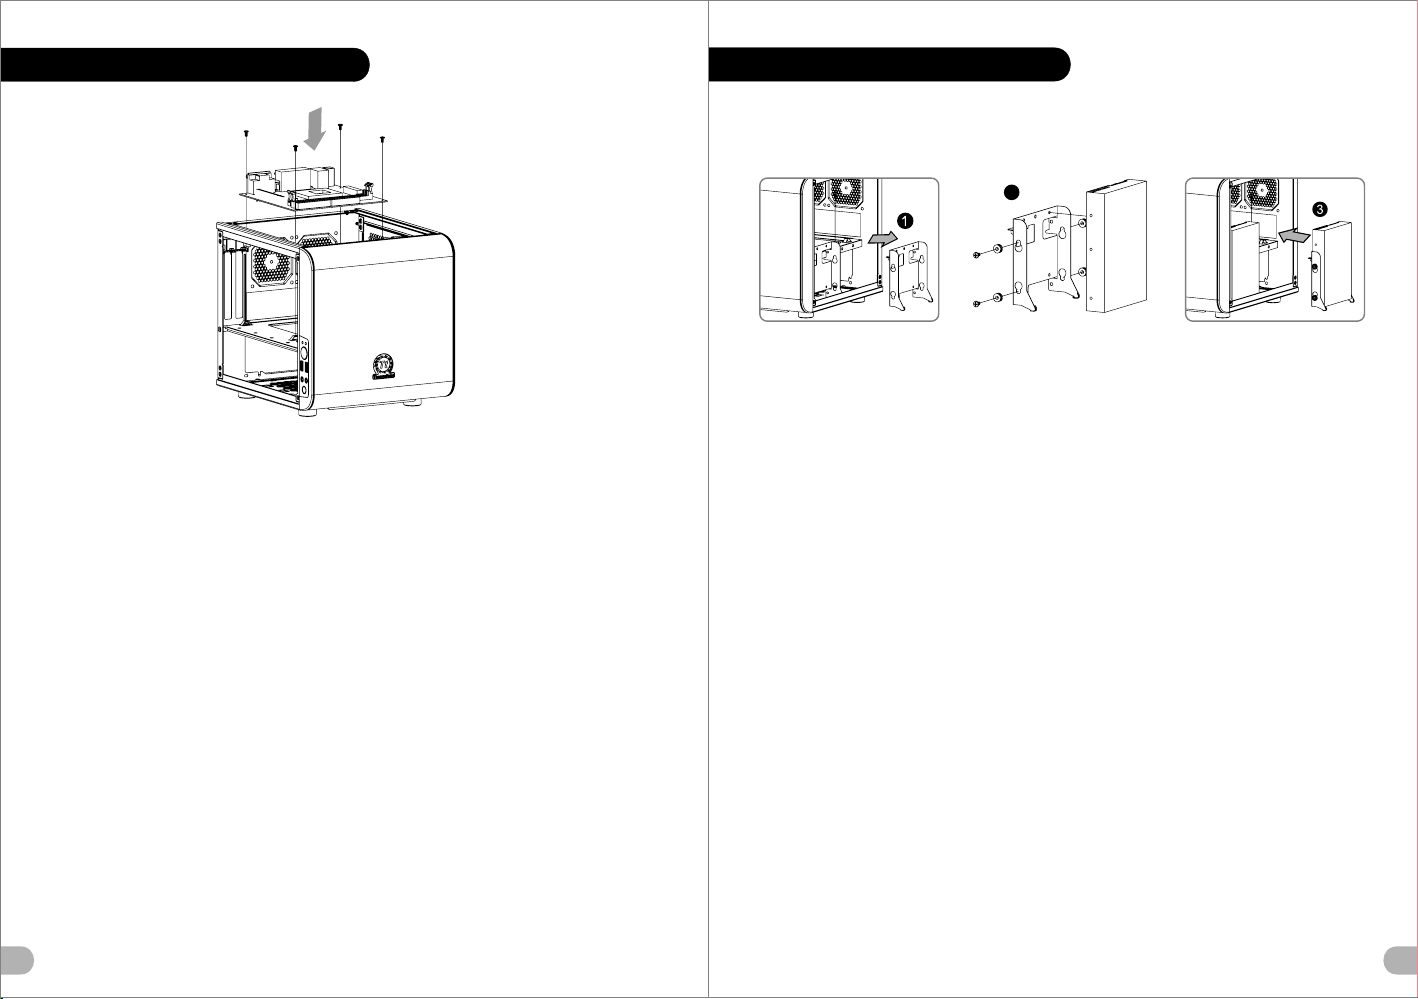
Motherbo ard Install ation
English /
Install the motherboard in proper location and
secure it with screws.
Deutsch /
Installieren Sie die Hauptplatine in ihrer
vorgesehenen Position und sichern Sie sie mit
Schrauben.
Français /
Insta llez la carte mère dans l'endroit approprié et
sécurisez-la avec des vis.
Español /
Instale la placa madre en la ubicación adecuada y
asegúrela con tornillos.
Itali ano /
Installare la scheda madre nella posizione
appropriata e fissarla con le viti.
Portu guês/
Instale a motherboard no local adequado e aparafuse.
繁體中文 /
將主機板放 置在合適 的位置並用零件包中之螺絲
固定。
简体中文 /
在合适的位置安装主板并以螺丝安全固定。
日本語 /
マザーボードを適切 な場所に 取り付け、ねじで固定
します。
Русск ий /
Устан овит е мате ринс кую пл ату в на длеж ащее
место и закре пите е е винт ами.
Türkçe /
Ana kartı uygun konuma takın ve v idal arla
sabitleyi n.
ภาษาไทย /
ติดตั้งเมนบอร์ดในตำแหน่งที่เหมาะสมแล้วขันสกรู
ยึดให้แน่น
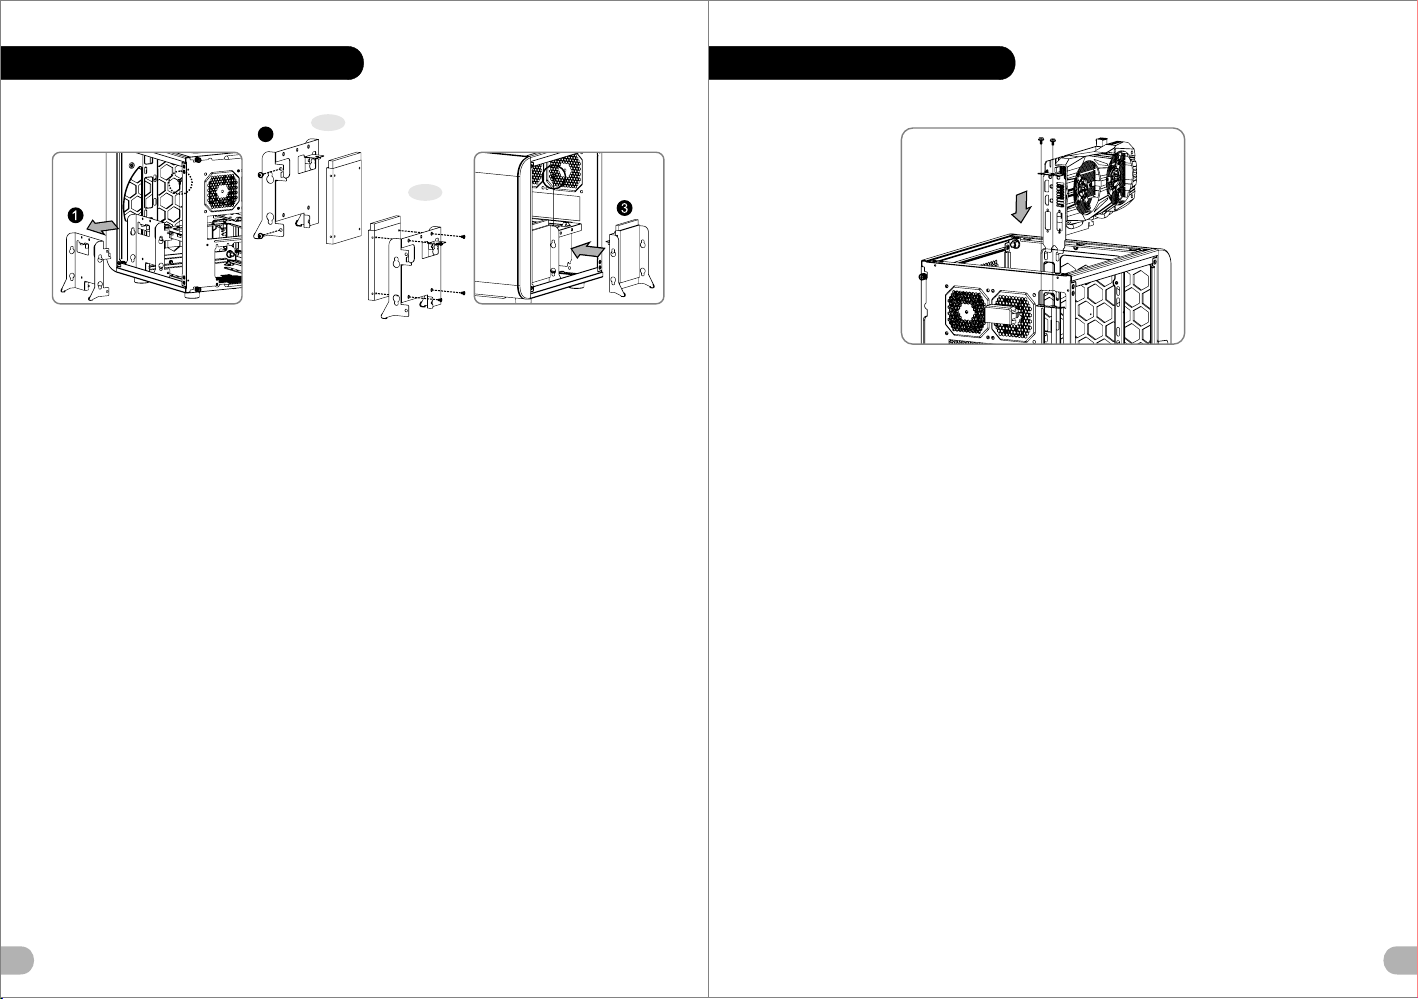
3.5” HDD Ins t allation
3.5 " HDD
2
Engli sh / 繁體中文 /
1. Pull t he HDD tray out . 1. 將硬碟托 盤取出
2. Plac e the 3.5” HDD on p roper locat ion and secur e 2 . 將 3.5” 硬碟置於適當位 置,然後用螺絲固定 。
it with screws.
3. Slid e the HDD tray ba ck to the HDD cag e.
Deuts ch /
1. Zieh en Sie den HD-S chacht hera us.
2. Plat zieren Sie di e 3,5 Zoll HDD an i hrer Positi on
und sic hern Sie sie mi t Schrauben .
3. Schi eben Sie den Sc hacht wiede r in den
Festp lattenkäf ig.
Franç ais /
1. Enle vez le boîtie r du disque dur .
2. Mettez le disque du r 3.5” dans le bo n
empla cement et séc urisez le ave c des vis.
3. Refa ites glisse r le boîtier du d isque dur dan s la
cage de d isques durs .
Españ ol /
1. Extraiga la bande ja del disco du ro.
2. Sitú e el HDD de 3,5 pul gadas en la ubi cación
adecu ada del HDD y ase gúrelo con to rnillos.
3. Vuel va a meter la ban deja del disc o duro en su
hueco .
Itali ano /
1. Estrarre il vano HD D.
2. Posi zionare l’H DD da 3,5” nell a posizione
appro priata e fiss arlo con le vit i.
3. Fare scorrere l’H DD indietro v erso la strut tura a
gabbi a HDD.
Portu guês /
1. Puxe a b andeja do dis co rígido par a fora.
2. Colo que o disco ríg ido de 3,5” na de vida
local ização e apar afuse.
3. Desl ize a bandeja d o disco rígid o de volta para a
caixa d o disco rígid o.
3. 將硬碟托 盤放回硬碟磁架中
简体中文 /
1. 将硬盘托 盘取出
2. 将 3.5” 硬盘 置于正确位置并以螺 丝固定。
用螺丝固定 硬盘
3. 将硬盘托 盘放回硬盘磁架中
日本語 /
1. HDDトレ イを引き出して外し ます。
2. 適切な場 所に3.5” HDDを置き、
ねじで締め 付けます。
3. HDDトレ イをHDDケージに戻し ます。
Русск ий /
1. Вытя ните лоток дл я жестких дис ков.
2. Уста новите 3,5-д юймовый жес ткий диск в
надле жащий отсек и з акрепите ег о винтами.
3. Уста новите лото к для жестких д исков
обрат но в каркас.
Türkç e /
1. HDD te psisini dışar ı çeki n.
2. 3.5” HD D’yi uygun ko numa yerleş tirin ve vida larla
sabit leyin.
3. HDD te psis ini HDD k afes ine ger i yerl eştir in.
ภาษาไทย /
1. ดึงถาด HDD ออกมา
2. ใส่ HDD ขนาด 3.5”
ในตำแหน่งที่เหมาะสมแล้วขันสกรูยึดให้แน่น
3. เลื่อนถาด HDD กลับเข้าในโครง HDD
7 8
Page 6
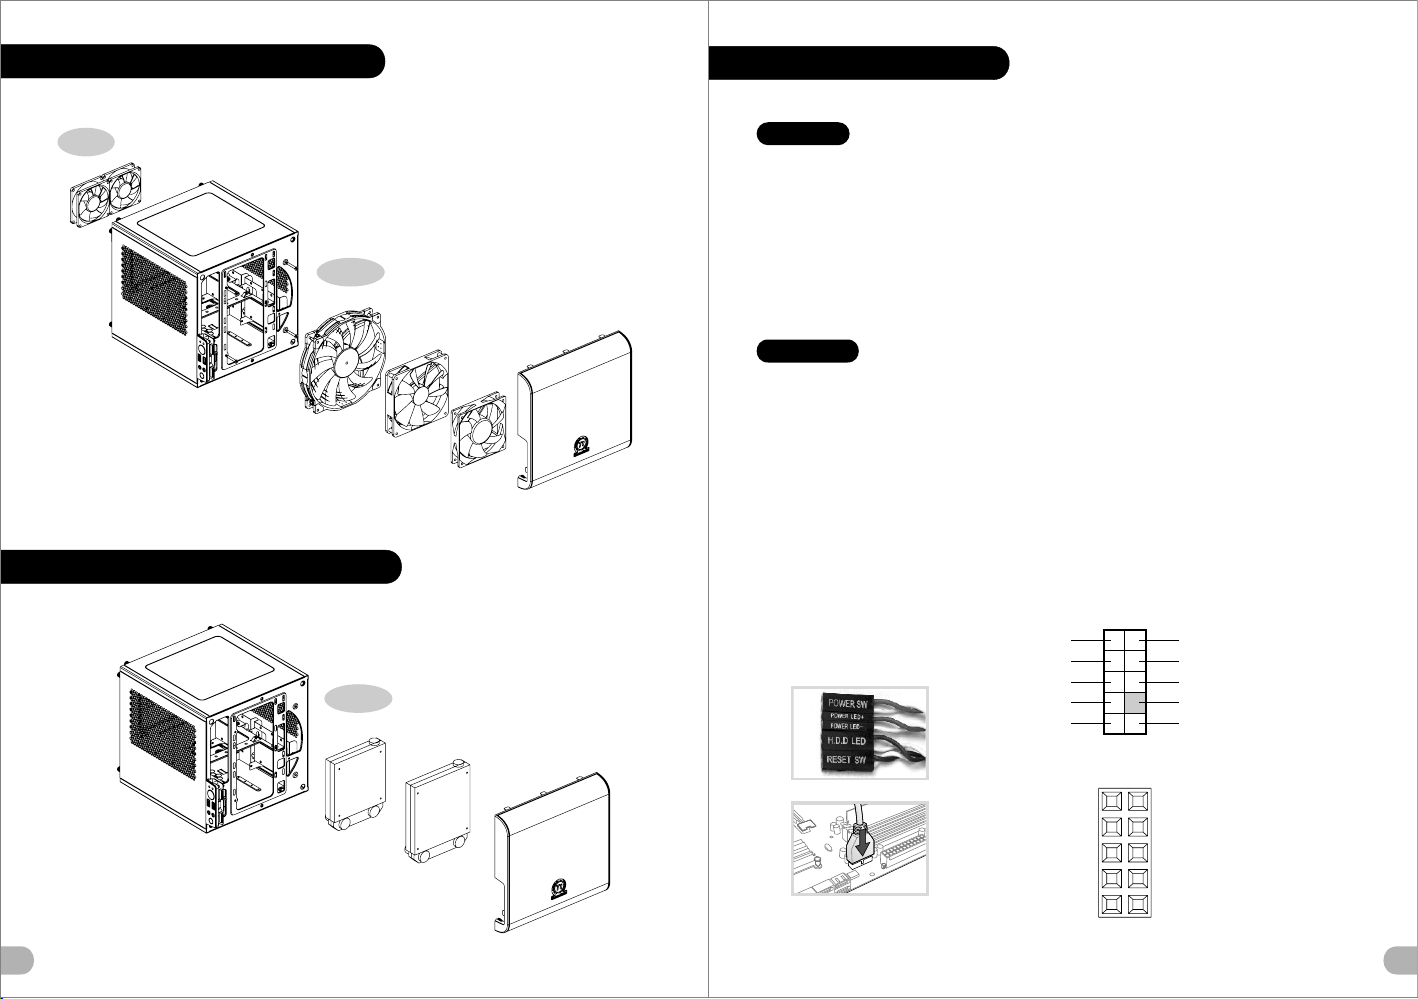
2.5" HDD Ins t allation
Type A
2
Engli sh / 繁體中文 /
1. Pull t he HDD tray out . 1. 將硬碟托 盤取出
2. Plac e the 2.5” HDD on p roper locat ion and secur e 2 . 將 2.5” 硬碟置於適當位 置,然後用螺絲固定 。
it with screws.
3. Slid e the HDD tray ba ck to the HDD cag e.
Deuts ch /
1. Zieh en Sie den HD-S chacht hera us.
2. Plat zieren Sie di e 2,5 Zoll HDD an i hrer Positi on
und sic hern Sie sie mi t Schrauben .
3. Schi eben Sie den Sc hacht wiede r in den
Festplattenkäf ig.
Franç ais /
1. Enle vez le boîtie r du disque dur .
2. Mettez le disque du r 2.5” dans le bo n
empla cement et séc urisez le ave c des vis.
3. Refa ites glisse r le boîtier du d isque dur dan s la
cage de d isques durs .
Españ ol /
1. Extraiga la bande ja del disco du ro.
2. Sitú e el HDD de 2,5 pul gadas en la ubi cación
adecu ada del HDD y ase gúrelo con to rnillos.
3. Vuel va a meter la ban deja del disc o duro en su
hueco .
Itali ano /
1. Estrarre il vano HD D.
2. Posi zionare l’H DD da 2,5” nell a posizione
appro priata e fiss arlo con le vit i.
3. Fare scorrere l’H DD indietro v erso la strut tura a
gabbi a HDD.
Portu guês /
1. Puxe a b andeja do dis co rígido par a fora.
2. Colo que o disco ríg ido de 2,5” na de vida
local ização e apar afuse.
3. Desl ize a bandeja d o disco rígid o de volta para a
caixa d o disco rígid o.
2.5" H DD
Type B
2.5" H DD
3. 將硬碟托 盤放回硬碟磁架中
简体中文 /
1. 将硬盘托 盘取出
2. 将 2.5” 硬盘 置于正确位置并以螺 丝固定。
用螺丝固定 硬盘
3. 将硬盘托 盘放回硬盘磁架中
日本語 /
1. HDDトレ イを引き出して外し ます。
2. 適切な場 所に2.5” HDDを置き、
ねじで締め 付けます。
3. HDDトレ イをHDDケージに戻し ます。
Русск ий /
1. Вытя ните лоток дл я жестких дис ков.
2. Уста новите 2,5-д юймовый жес ткий диск в
надле жащий отсек и з акрепите ег о винтами.
3. Уста новите лото к для жестких д исков
обрат но в каркас.
Türkç e /
1. HDD te psisini dışar ı çeki n.
2. 2.5” HD D’yi uygun ko numa yerleş tirin ve vida larla
sabit leyin.
3. HDD te psis ini HDD k afes ine ger i yerl eştir in.
ภาษาไทย /
1. ดึงถาด HDD ออกมา
2. ใส่ HDD ขนาด 2.5”
ในตำแหน่งที่เหมาะสมแล้วขันสกรูยึดให้แน่น
3. เลื่อนถาด HDD กลับเข้าในโครง HDD
PCI Slot Usa ge
English /
1. Loosen the screws with a screwdriver.
2. Install the PCI card in proper location and secure
it with s crews.
Deutsch /
1. Lösen Sie die Schrauben mit einem
Schra ubendreher.
2. Installieren Sie die PCI-Card in der
vorgesehenen Position und sichern Sie sie mit
Schra uben.
Français /
1. Desserrez les vis à l’aide d’un tournevis.
2. Installez la carte PCI dans l'endroit approprié et
fixez-la avec des vis.
Español /
1. Aflo je los tornillos con un destornillador.
2. Instale la tarjeta PCI en la ubicación adecuada y
asegúrela con tornillos.
Itali ano /
1. Allentare le viti con un cacciavite.
2. Installare la scheda PCI nella posizione
appropriata e fissarla con le viti.
Portu guês /
1. Desaperte os parafusos com a chave de fendas.
2. Instale a placa PCI no local adequado e
aparafuse.
繁體中文 /
1. 用螺絲起 子將螺絲 取下.
2. 將擴充卡 放置在合 適的位置並用螺絲固定。
简体中文 /
1. 用螺丝起 子将螺丝取下.
2. 将扩充卡 放置在合适的位置并用螺丝固定。
日本語 /
1.ドライバ ーでねじを緩めます。
2. PCI カードを適切な場所に 取り付け 、ねじで固
定します。
Русск ий /
1. Осла бьте винты отверткой.
2. Уста новите плату PCI в надлежащий разъем
и закрепите ее винтами.
Türkçe /
1. Vidaları, bir tornavida ile gevşetin.
2. PCI ka rtın ı uygu n konu ma tak ın ve vi dala rla
sabitleyi n.
ภาษาไทย /
1. ใช้ไขควงขันสกรูออก
2. ติดตั้งการ์ด PCI
ในตำแหน่งที่เหมาะสมแล้วขันสกรูยึดให้แน่น
9
10
Page 7
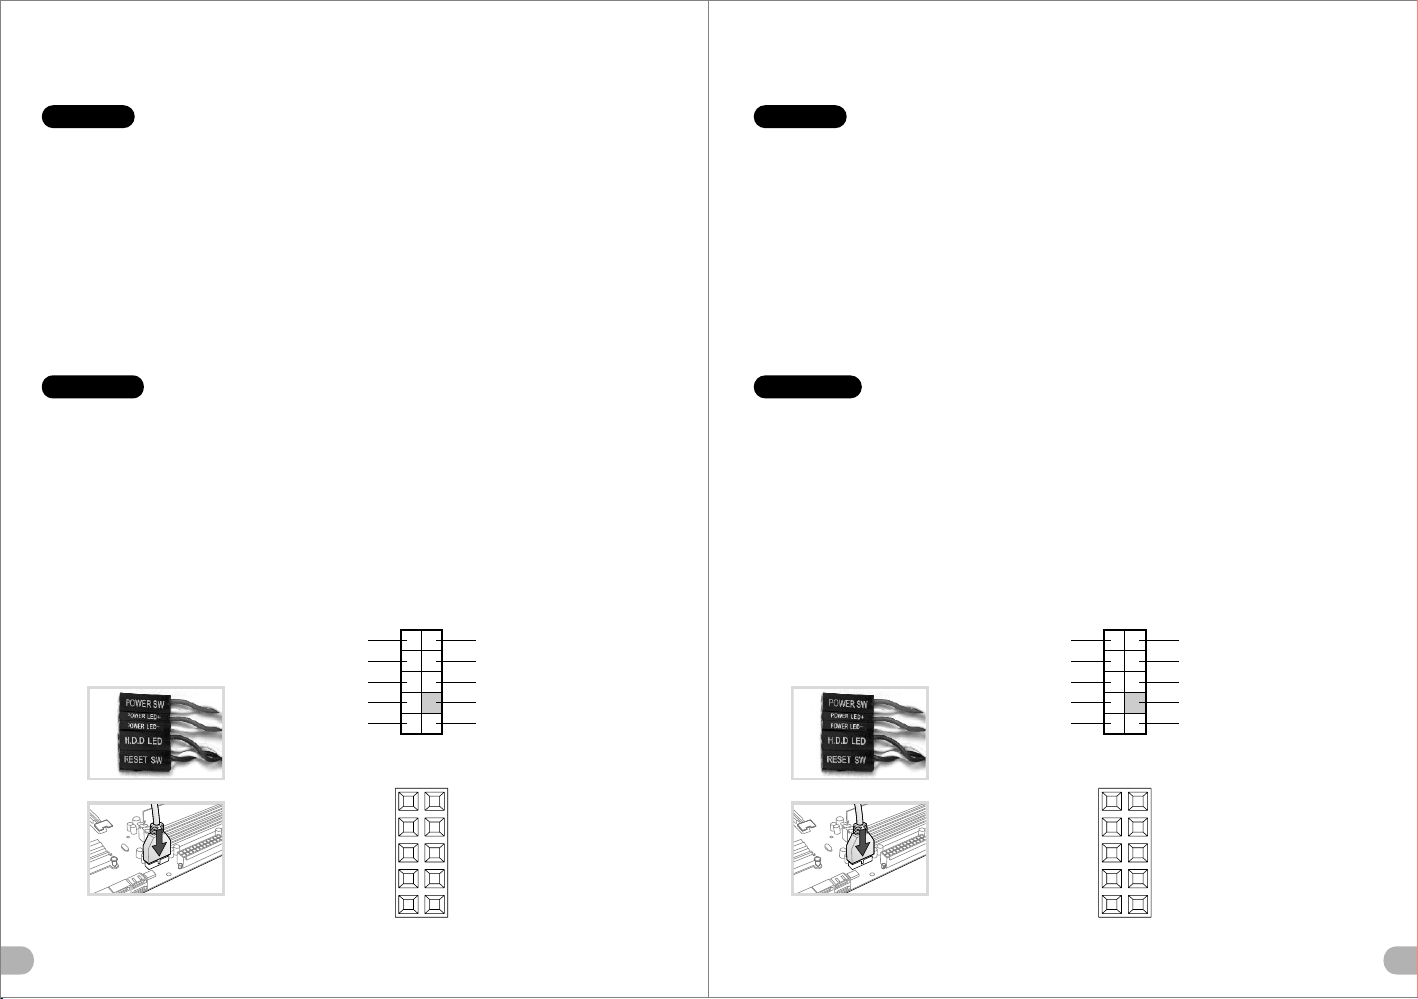
Air Coolin g Installat ion
Leads Inst allation
Re a r
8cm x 2
Fr o nt
20cm x 1
Liquid Coo ling Instal lation
Fr o nt
14cm x 1
12cm x 1
English
Leads Inst all ation Guide
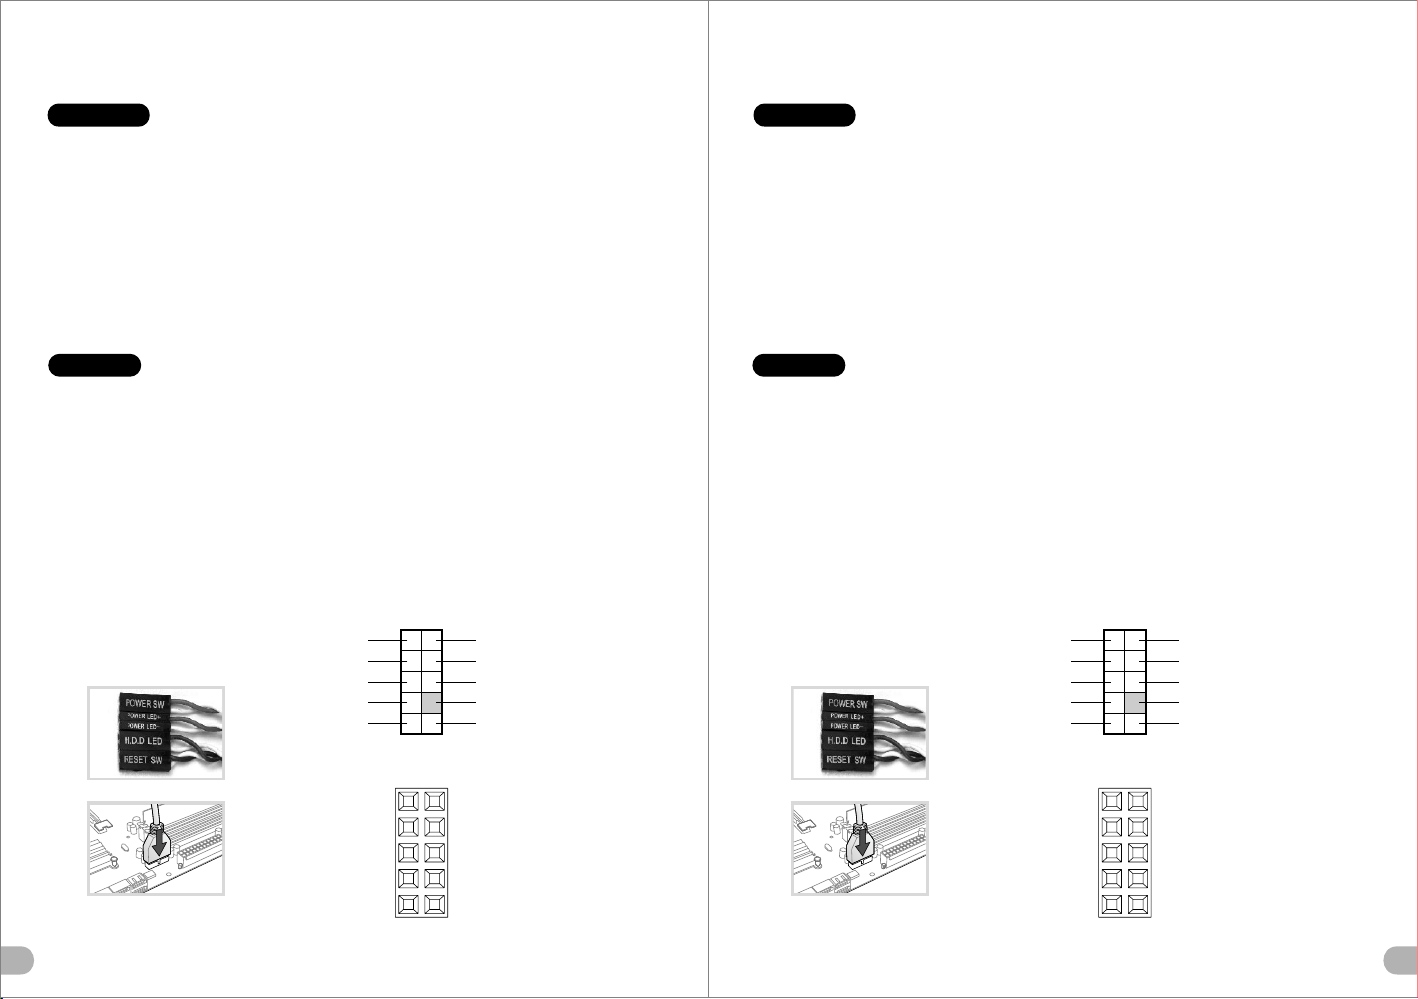
Case LED Connectio n / On th e front o f the cas e, you ca n find so me LEDs a nd swit ch lead s. Plea se cons ult you r user
man ual of yo ur moth erboa rd manu factu rer, th en conn ect the se lead s to the pa nel hea der on th e mothe rboar d.
USB 3.0 connecti on /
1. Ma ke sure y our mot herbo ard sup ports U SB 3.0 co nnect ion.
2. Co nnect t he USB 3. 0 cable t o the ava ilabl e USB 3.0 p ort on yo ur comp uter.
Aud io C on ne ction / Pl ease re fer to th e follo wing il lustr ation o f Audio c onnec tor and y our mot herbo ard use r manua l.
Ple ase sel ect the m other board w hich us ed AC’9 7 or HD Aud io(Az alia) ,(be aw are of th at your a udio su pport s AC’97 o r HD
Aud io (Aza lia)) o r it will d amage y our dev ice(s ).
Deut sch
Anschlü sse h erst ell en
Gehäuse-LED- Ver bi nd un ge n / Au f der G ehäus evord ersei te find en Sie ei nige LE Ds und Ve rbind ungen . Bitte n ehmen
Sie d ie Gebr auchs anwei sung Ih res Mot herbo ard Her stell ers zur H ilfe un d schli eßen Si e diese V erbin dunge n an die Pa nel
Hea der Bel egung d es Moth erboa rds an.
USB 3.0 Ansch lu ss /
1. St ellen S ie sich er, das s Ihre Ha uptpl atine d en USB 3. 0 Ansch luss un terst ützt.
2. Ve rbind en Sie da s USB 3.0 K abel mi t dem USB 3 .0 Port a uf Ihre m Compu ter.
Aud io A ns ch lü ss e / Bi tte bea chten S ie die fo lgend e Abbil dung de r Audio A nschl üsse un d die Anw eisun g in der
Geb rauch sanwe isung I hres Mo therb oards . Bitte w ählen S ie das Mo therb oard, d as AC’9 7 oder HD A udio( Azali a)
ver wende t, (ach ten Sie d arauf , dass Ih r Audio A C’97 bz w. HD Aud io (Aza lia unt erstü tzt)) . Ander nfall s entst ehen sc hwere
Sch äden an I hrem( n) Gerä t(en) !!!
AUD IO HD AUDIO Fu nc tio n
BROWN
PORT1 L
PORT1 R
PORT2 R
SENSE_SEND
PORT2 L
RED
YELLOW
PURPLE
BLUE
BLACK
BLACK
ORANGE
KEY
GREEN
AUD GND
PRESENCE#
SENSE1_RETURN
SENSE2_RETURN
11
12cm x 1
14cm x 1
USB 3.0 C on ne ct io n
VCC1
D1-
D1+
GND
NC
USB F unction
RED2
WHITE2
GREEN2
BLACK2
N.C KEY
RED1
WHITE1
GREEN1
BLACK1
VCC2
D2-
D2+
GND
KEY
12
Page 8
Fran çais
Guide d'installation des fils
Con nex ion de s voyants d u b oît ie r / S ur la fa ce avan t du boîtie r, v ous trouver ez plus ieurs v oyants et l es f ils des
bout ons. S' il vous plaît c onsulte z le gui de d'ut ilisate ur du fa brican t de votre c art e mè re, puis co nnectez ces fil s aux
onne cteurs sur la c arte mè re.
Con nex ion US B 3.0 /
1. Vé rifie z que vot re cart e mère pr end en ch arge la c onnex ion USB 3 .0.
2. Co nnect ez le câb le USB 3. 0 au port U SB 3.0 di sponi ble sur v otre or dinat eur.
Con nex ion Audio / S'il v ous pla ît r éférez vous à l 'illust ration suivant e du con necteur au dio et au gu ide de l 'utilis ateur d e
votr e carte mère. S 'il vous pl aît sélecti onnez u ne cart e mè re s upporta nt AC'9 7 ou HD A udi (Az alia), (faites attent ion que
votr e audio suppor te l 'AC '97 ou H D Audio (Azalia )) sino n cela p ourrait endomm ager vo tre mat ériel.
Ital iano
Guida di ins ta ll azione dei cont atti
Con nes sione del LE D d el cas e / Nella parte anteriore del cas e, sono presen ti a lcu ni c ont atti pe r in ter ruttori e LED.
Cons ultare il manu ale ute nte del produtt ore del la sche da m adr e, q uin di c onn ettere i co ntatti alla parte superiore del
pann ello su lla sch eda mad re.
Con nes sione USB 3. 0 /
1. Ac certa rsi che l a sched a madre s uppor ti la con nessi one USB 3 .0.
2. Co llega re il cav o USB 3.0 a lla por ta USB 3. 0 dispo nibil e sul com puter .
Connessione Audio / Far e rifer iment o all’i llust razio ne ripo rtata d i segui to del co nnett ore Aud io e al man uale ut ente pe r
la sc heda ma dre.S elezi onare l a sched a madre r elati va a AC’9 7 o HD Audi o (Azal ia) e con sider are che i l suppo rto aud io è
com patib ile con A C’97 o HD A udio (A zalia ); in cas o contr ario, l e perif erich e potre bbero v enire d anneg giate .
Espa ñol
Guía de Inst al ac ión de Ca bles
Con exi ón d el LED de la caja / En la pa rte fro nta l de la caja , en contrar á algun os LED y cables de inte rruptor es. Con sulte
el m anual d el u sua rio del fabrica nte de l a placa madre, a conti nuación conecte estos cables al conecto r de la placa madre.
Con exi ón U SB 3.0 /
1. As egúre se de que l a placa b ase adm ite con exión U SB 3.0.
2. Co necte e l cable U SB 3.0 al p uerto U SB 3.0 di sponi ble en el e quipo .
Con exi ón d e A udi o / Con sulte l a si gui ente il ustración del conector de Au dio y el man ual del usuario de la placa ma dre.
Sele ccione la plac a ma dre que uti liza AC ’97 o HD Audio ( Azalia) , (aseg úrese d e qu e su audio a dmite A C’97 o H D Audio
(Aza lia)) s i no, su s dispo sitivos result arán da ñados
AUD IO HD AUDIO Fu nc tio n
BROWN
PORT1 L
PORT1 R
PORT2 R
SENSE_SEND
PORT2 L
RED
YELLOW
PURPLE
BLUE
BLACK
BLACK
ORANGE
KEY
GREEN
AUD GND
PRESENCE#
SENSE1_RETURN
SENSE2_RETURN
USB F unction
USB 3.0 C on ne ct io n
VCC1
D1-
D1+
GND
NC
RED2
WHITE2
GREEN2
BLACK2
N.C KEY
RED1
WHITE1
GREEN1
BLACK1
VCC2
D2-
D2+
GND
KEY
13
Port uguês
Guia de Inst ala ção E léc tri ca
Ligação do LED da Caix a / Na pa rte dia nteir a da caix a pode en contr ar algu ns LEDs e f ios elé ctric os. Con sulte o
man ual de ut iliza dor do fa brica nte da su a mothe rboar d e ligue o s fios à pa rte sup erior d o paine l na moth erboa rd.
Ligação USB 3.0 /
1. Ce rtifi que-s e que a sua m other board s uport a ligaç ão USB 3. 0.
2. Li gue o cab o USB 3.0 à p orta US B 3.0 dis ponív el no seu c omput ador.
Ligação Áudio / Con sulte a i magem s eguin te do con ector Á udio e o ma nual de u tiliz ador da s ua moth erboa rd.
Sel eccio ne a moth erboa rd que ut iliza A C’97 ou H D Áudio (Azal ia), (v erifi que se a su a placa d e áudio s uport a AC’97 o u HD
Áud io(Az alia) ) ou irá da nific ar o(s) s eu(s) d ispos itivo (s).
AUD IO HD AUDIO Fu nc tio n
BROWN
USB 3.0 C on ne ct io n
PORT1 L
PORT1 R
PORT2 R
SENSE_SEND
PORT2 L
VCC1
GND
D1-
D1+
NC
RED
YELLOW
PURPLE
BLUE
USB F unction
RED2
WHITE2
GREEN2
BLACK2
N.C KEY
BLACK
BLACK
ORANGE
KEY
GREEN
RED1
WHITE1
GREEN1
BLACK1
AUD GND
PRESENCE#
SENSE1_RETURN
SENSE2_RETURN
VCC2
D2-
D2+
GND
KEY
14
Page 9
繁體中文
線材安裝說明
機殼LE D連接方式 / 在機 殼前方的面 板後面,可 以找到一些L ED與開關線 材(POWE R Switc h….),請 參考主機板 使用說明書 ,
並將機 殼上的線材 正確地連接 到主機板上 ,這些線材 通常都會印 有標籤在上 面,如果沒 有的話,請 找出機殼前 方面板上線 材原
本的位 置以知道正 確的來源。
USB 3 .0 連接 /
1. 請確 認主機板是 否支援USB 3 .0傳輸介面 。
2. 連接U SB 3.0傳輸 線至主機板 上的USB3 .0接埠。
音效連 接 / 請根據下面 的音源接頭 圖示與主機 板使用手冊 來連接音效 裝置,請確 認主機板上 的音效裝置 是支援AC' 9 7音效或是
HD音效( Azali a),裝置錯 誤可能會導 致主機板音 效裝置的毀 損,某些主 機板的音效 裝置不會與 下方的圖示 完全相同, 請參酌主
機板使 用手冊以得 到正確的安 裝資訊
日本語
リード線の取り付けガイド
ケース LE D の接 続 / ケース 前面には、LEDとスイッチリー ド線がありま す。 マザーボードメーカー のユーザーマニュアル
を参照し 、これらのリ ード線をマザー ボードのパネ ルヘッダに接続 してください 。
USB 3.0 の接続 /
1. お 使いのマザーボ ードがUSB 3 .0接続をサポー トしているこ とを確認してく ださい。
2. U SB 3 .0ケー ブルをコンピュ ータの空いて いるUSB 3.0ポートに接続し ます。
オーディ オ接続 / オーディオコネ クタの次の図 とマザーボード のユーザーマ ニュアルを参照 してください。AC’97または
HDオーデ ィオ(Azal ia)を使用する マザーボード を選択してくだ さい(オーディオ がAC’97またはH Dオーディオ(A zalia)をサ ポ
ートして いることを確 認してください)。 サポートして いないと、デバ イスが損傷し ます)。
简体中文
线材安装说明
机壳LED连 接方式 / 在机壳前方的面 板后面,可以 找到一些LED与开 关线材(POWER S witch….),请参 考主板使用说 明
书,并将 机壳上的线材 正确地连接到主 板上,这些线 材通常都会印有 标签在上面, 如果没有的话, 请找出机壳前 方面板上线
材原本的 位置以知道正 确的来源。
USB 3.0 连接 /
1.请确认 主板是否支持USB 3 .0传输 接口。
2.连接US B 3.0传输线 至主板 上的USB3.0接埠。
音效连接 / 请根据 下面的音源接头 图示与主板使 用手册来连接音 效装置,请确 认主板上的音效 装置是支持AC' 97音 效或是
HD音效(A zalia), 装置错误可能会 导致主板音效 装置的毁损,某 些主板的音效 装置不会与下方 的图标完全相 同,请参酌主板
使用手册 以得到正确的 安装信息
AUD IO HD AUDIO Fu nc tio n
BROWN
USB 3.0 C on ne ct io n
PORT1 L
PORT1 R
PORT2 R
SENSE_SEND
PORT2 L
VCC1
GND
D1-
D1+
NC
RED
YELLOW
PURPLE
BLUE
USB F unction
RED2
WHITE2
GREEN2
BLACK2
N.C KEY
BLACK
BLACK
ORANGE
KEY
GREEN
RED1
WHITE1
GREEN1
BLACK1
AUD GND
PRESENCE#
SENSE1_RETURN
SENSE2_RETURN
VCC2
D2-
D2+
GND
KEY
Русс кий
Указан ия по про кладке кабелей
Под ключе ние и ндика торов корп уса / В пер едней част и кор пуса распо ложен ы инд икато ры и прово да вы ключа телей.
Пер ед по дсоед инени ем эт их пр оводо в к м онтаж ной к олодк е пан ели н а мат еринс кой п лате изучи те ру ковод ство пол
ьзо вател я про извод ителя мате ринск ой пл аты.
Под ключе ние U SB 3.0 /
1. У бедит есь, чт о мат еринс кая п лата подде ржива ет по дключ ение по ст андар ту US B 3.0.
2. П одсое динит е каб ель U SB 3.0 к сво бодно му по рту U SB 3.0 компь ютера.
Под ключе ние а удиор азъем а / См. следу ющую иллюс траци ю ауд иораз ъема и рук оводс тво п ользо вател я мат еринс ко
й п латы. В ыбери те ма терин скую плату, в кот орой испол ьзует ся ко дек A C'97 и ли HD Audio (Azal ia) (уб едите сь, что зв
уко вая п лата подде ржива ет ко дек A C'97 и ли HD Audio (Azal ia)). В про тивно м слу чае м ожно повре дить устро йства.
AUD IO HD AUDIO Fu nc tio n
BROWN
USB 3.0 C on ne ct io n
PORT1 L
PORT1 R
PORT2 R
SENSE_SEND
PORT2 L
VCC1
GND
D1-
D1+
NC
RED
YELLOW
PURPLE
BLUE
USB F unction
RED2
WHITE2
GREEN2
BLACK2
N.C KEY
BLACK
BLACK
ORANGE
KEY
GREEN
RED1
WHITE1
GREEN1
BLACK1
AUD GND
PRESENCE#
SENSE1_RETURN
SENSE2_RETURN
VCC2
D2-
D2+
GND
KEY
15
16
Page 10
Türk çe
Ara Kablo Kurulum Kılavuzu
Kasa ışık bağ lantıs ı / K asanın ön k ısmında bazı ış ıklar v e anaht ar a ra k ablolar ı göreb ilirsin iz. Lüt fen ana kar t ür eti cini zin
sağl adığı k ullanım kılavu zuna ba kın ve d aha son ra, bu a ra kabl ola rı, ana kart üzerin deki pa nel bağ lan tı n okt ala rına bağlay ın.
USB 3.0 Bağ lantısı /
1. Ana k artınızın USB 3.0 bağlantısını deste klediğ inden e min olu n.
2. U SB 3 .0 k ablosun u, bilg isayarınızd aki kul lanılabil ir USB 3 .0 bağl antı no ktasına b ağlayın.
Ses Bağ lant ısı / Lü tfen aş ağıdaki Ses kon ektörü resmine ve anak artını zın kul lan ım k ıla vuzu na bakı n. Lütf en A C’9 7 ve ya H D
Audi o(Azal ia) spe sif ikas yonunu kullana n bir an akart s eçin (s es s ist emi niz in A C’9 7 ve ya H D Au dio (Az ali a) s pes ifik asyonu nu
dest ekledi ğin i un utm ayın ); aksi takdir de, ayg ıt( lar) ınız za rar gör ür.
Thermaltake Power Supply Series (Optional)
As to da y’ s te ch no lo gy u pd at es r apidly, co ns um er s ar e al wa ys r eq ue sting for h ig he r an d hi gh er P C
perfo rm an ce , wh ic h al so i nc re as es l oa ds t o po we r supplie s. T he re fo re , se le ct in g a suitabl e an d re li ab le
power s up pl y be co me s a ne ce ss ar y le ss on f or a ll P C us ers.
ภาษา ไทย
คู่ม ือก ารต ิดตั้ งสา ยไฟ
การ เชื่อ มต่อไ ฟ LED ของ เค ส / ที ่ด ้า นห น้ าข อง เค ส คุ ณจ ะเห็นไฟ L ED แ ละ สา ยไ ฟข อง สว ิต ซ์
กรุ ณาศึก ษาราย ละ เอ ีย ดจ าก คู ่ม ือ ผู ้ใ ช้ ขอ งผู้ผลิ ตแ ผง วง จร หล ัก ขอ งค ุณ
จาก นั้นใ ห้ เช ื่ อม ต่ อส าย ไฟ เห ล่ าน ี้เข้าก ับส่ว นห ัว ขอ งแ ผง บน แผ งว งจ รห ลั ก
การ เชื่อ มต่อ US B 3. 0 /
1. ตร วจ ดู ให ้แ น่ ใจ ว่ าแ ผง วง จร หลักของ คุณรอ งรับก าร เช ื่ อม ต่ อ US B 3. 0
2. เช ื่ อม ต่ อส าย U SB 3 .0 เ ข้ าก ับ พอ ร์ต USB 3.0 ท ี่ สา มา รถ ใช ้ง าน ได ้บ นค อม พิวเตอร ์ข อง คุ ณ
การ เชื่อ มต่ออ ุปกรณ ์ร ับ ส่ งส ัญ ญา ณเ สี ยง / กร ุณ าดูรายล ะเอีย ดจากภ าพประ กอบขอ งต ัว เช ื่ อม ต่ อส ัญ ญา ณเ สี ยง ต่อไปนี ้
และ คู่มื อผู้ใ ช้ ขอ งผ ู้ ผล ิต แผ งว งจ รห ลั กของคุณ
กรุ ณาเลื อกแผง วง จร หล ัก ที ่ใ ช้ A C’ 97 ห รื อ HD A ud io(Azal ia )
(กร ุณาตร วจสอบ ให ้แ น่ ใจ ว่ าอ ุป กร ณ์ รั บส ่งสัญญา ณเ สี ยง ขอ งค ุณ รอ งร ับ A C’ 97 ห รื อ HD Audio (A za li a) )
มิฉ ะนั้น อุ ปก รณ ์ข อง คุ ณอ าจ เส ีย หา ยไ ด้
AUD IO HD AUDIO Fu nc tio n
BROWN
USB 3.0 C on ne ct io n
PORT1 L
PORT1 R
PORT2 R
SENSE_SEND
PORT2 L
VCC1
GND
D1-
D1+
NC
RED
YELLOW
PURPLE
BLUE
USB F unction
RED2
WHITE2
GREEN2
BLACK2
N.C KEY
BLACK
BLACK
ORANGE
KEY
GREEN
RED1
WHITE1
GREEN1
BLACK1
AUD GND
PRESENCE#
SENSE1_RETURN
SENSE2_RETURN
VCC2
D2-
D2+
GND
KEY
Why Choose Therm altak e Power Supply?
Qual ity F rom Within
Eve ry p ow er s up pl y un it s fr om T hermaltak e sh ou ld p as s a ve ry s tr ic t qu al it y co nt ro l before se nt t o
custo me rs , in cl ud in g BI T( Bu rn -i n- te st ) for over 8 co nt in uo us h ou r in a 4 5℃ r oo m to t es t if a u ni t ca n ru n
norma ll y un de r us ua l sc en e, a nd H ip ot t es t to e ns ure the pow er s up pl y un it c an s ur vi ve a nd p ro te ct b ot h
users a nd t he ir s ys te ms w he n th e vo lt ag e vo lu me s urges.
Less i s mor e
In or de r to p re ve nt w as te d en er gy, all of The rm al ta ke ’s produc ts s ho ul d ha ve a t le as t 80 % of
tra ns fo rm in g ef fi ci en cy, an d we ’r e al so o ne o f th e ma nu fa ct ur er s that have t he m os t 80 P LU S
certi fi ca te s. B ec au se T he rmaltak e kn ow s ho w to s av e fo r th e ea rt h an d cu st om er s; w e know what m ak es
less to b e mo re .
Bein g Sup por tiv e By All M ean s
A produc t wi th b et te r qu al it y ca n ha ve l on ge r li fe a nd w orking ho ur s bu t le ss p ol lu ti on . Th ermalta ke
obeys a nd r es pe ct s al l en vi ro nm en ta l cl au se s in a ll countr ie s an d ma ke s ur e al l of o ur p ro du ct s ar e bo th
user an d en vi ro nm en ta l- fr ie nd ly. Th er ef or e we s ho w ou r su pp or ts b y giving 2 to 7- ye ar w ar ra nt ie s, w hi ch
is not on ly a q ua li ty c om mi tm en t to t he u se rs , bu t al so love to th is p la ne t by r ed uc in g re so ur ce s an d
waste s.
The rm al ta ke h as s ev er al p ow er s up pl y pr od uc t li nes;
pleas e re fe r to o ur o ff ic ia l we bs ite and Fac eb oo k Fa n Pa ge f or m or e de ta il i nf or ma ti on !
Brand o ff ic ia l we bs it e:
htt p: // ww w.t he rm al ta ke .c om /
Glo ba l Fa ce bo ok :
htt ps :/ /w ww. fa ce bo ok .c om /T he rm al ta keInc
Taiw an F ac eb oo k
htt ps :/ /w ww. fa ce bo ok .c om /T he rm al ta keTW
17
18
 Loading...