

Page 1
Patented
Floe DX RGB
240
TT Premium Edition
16.8 Million Color
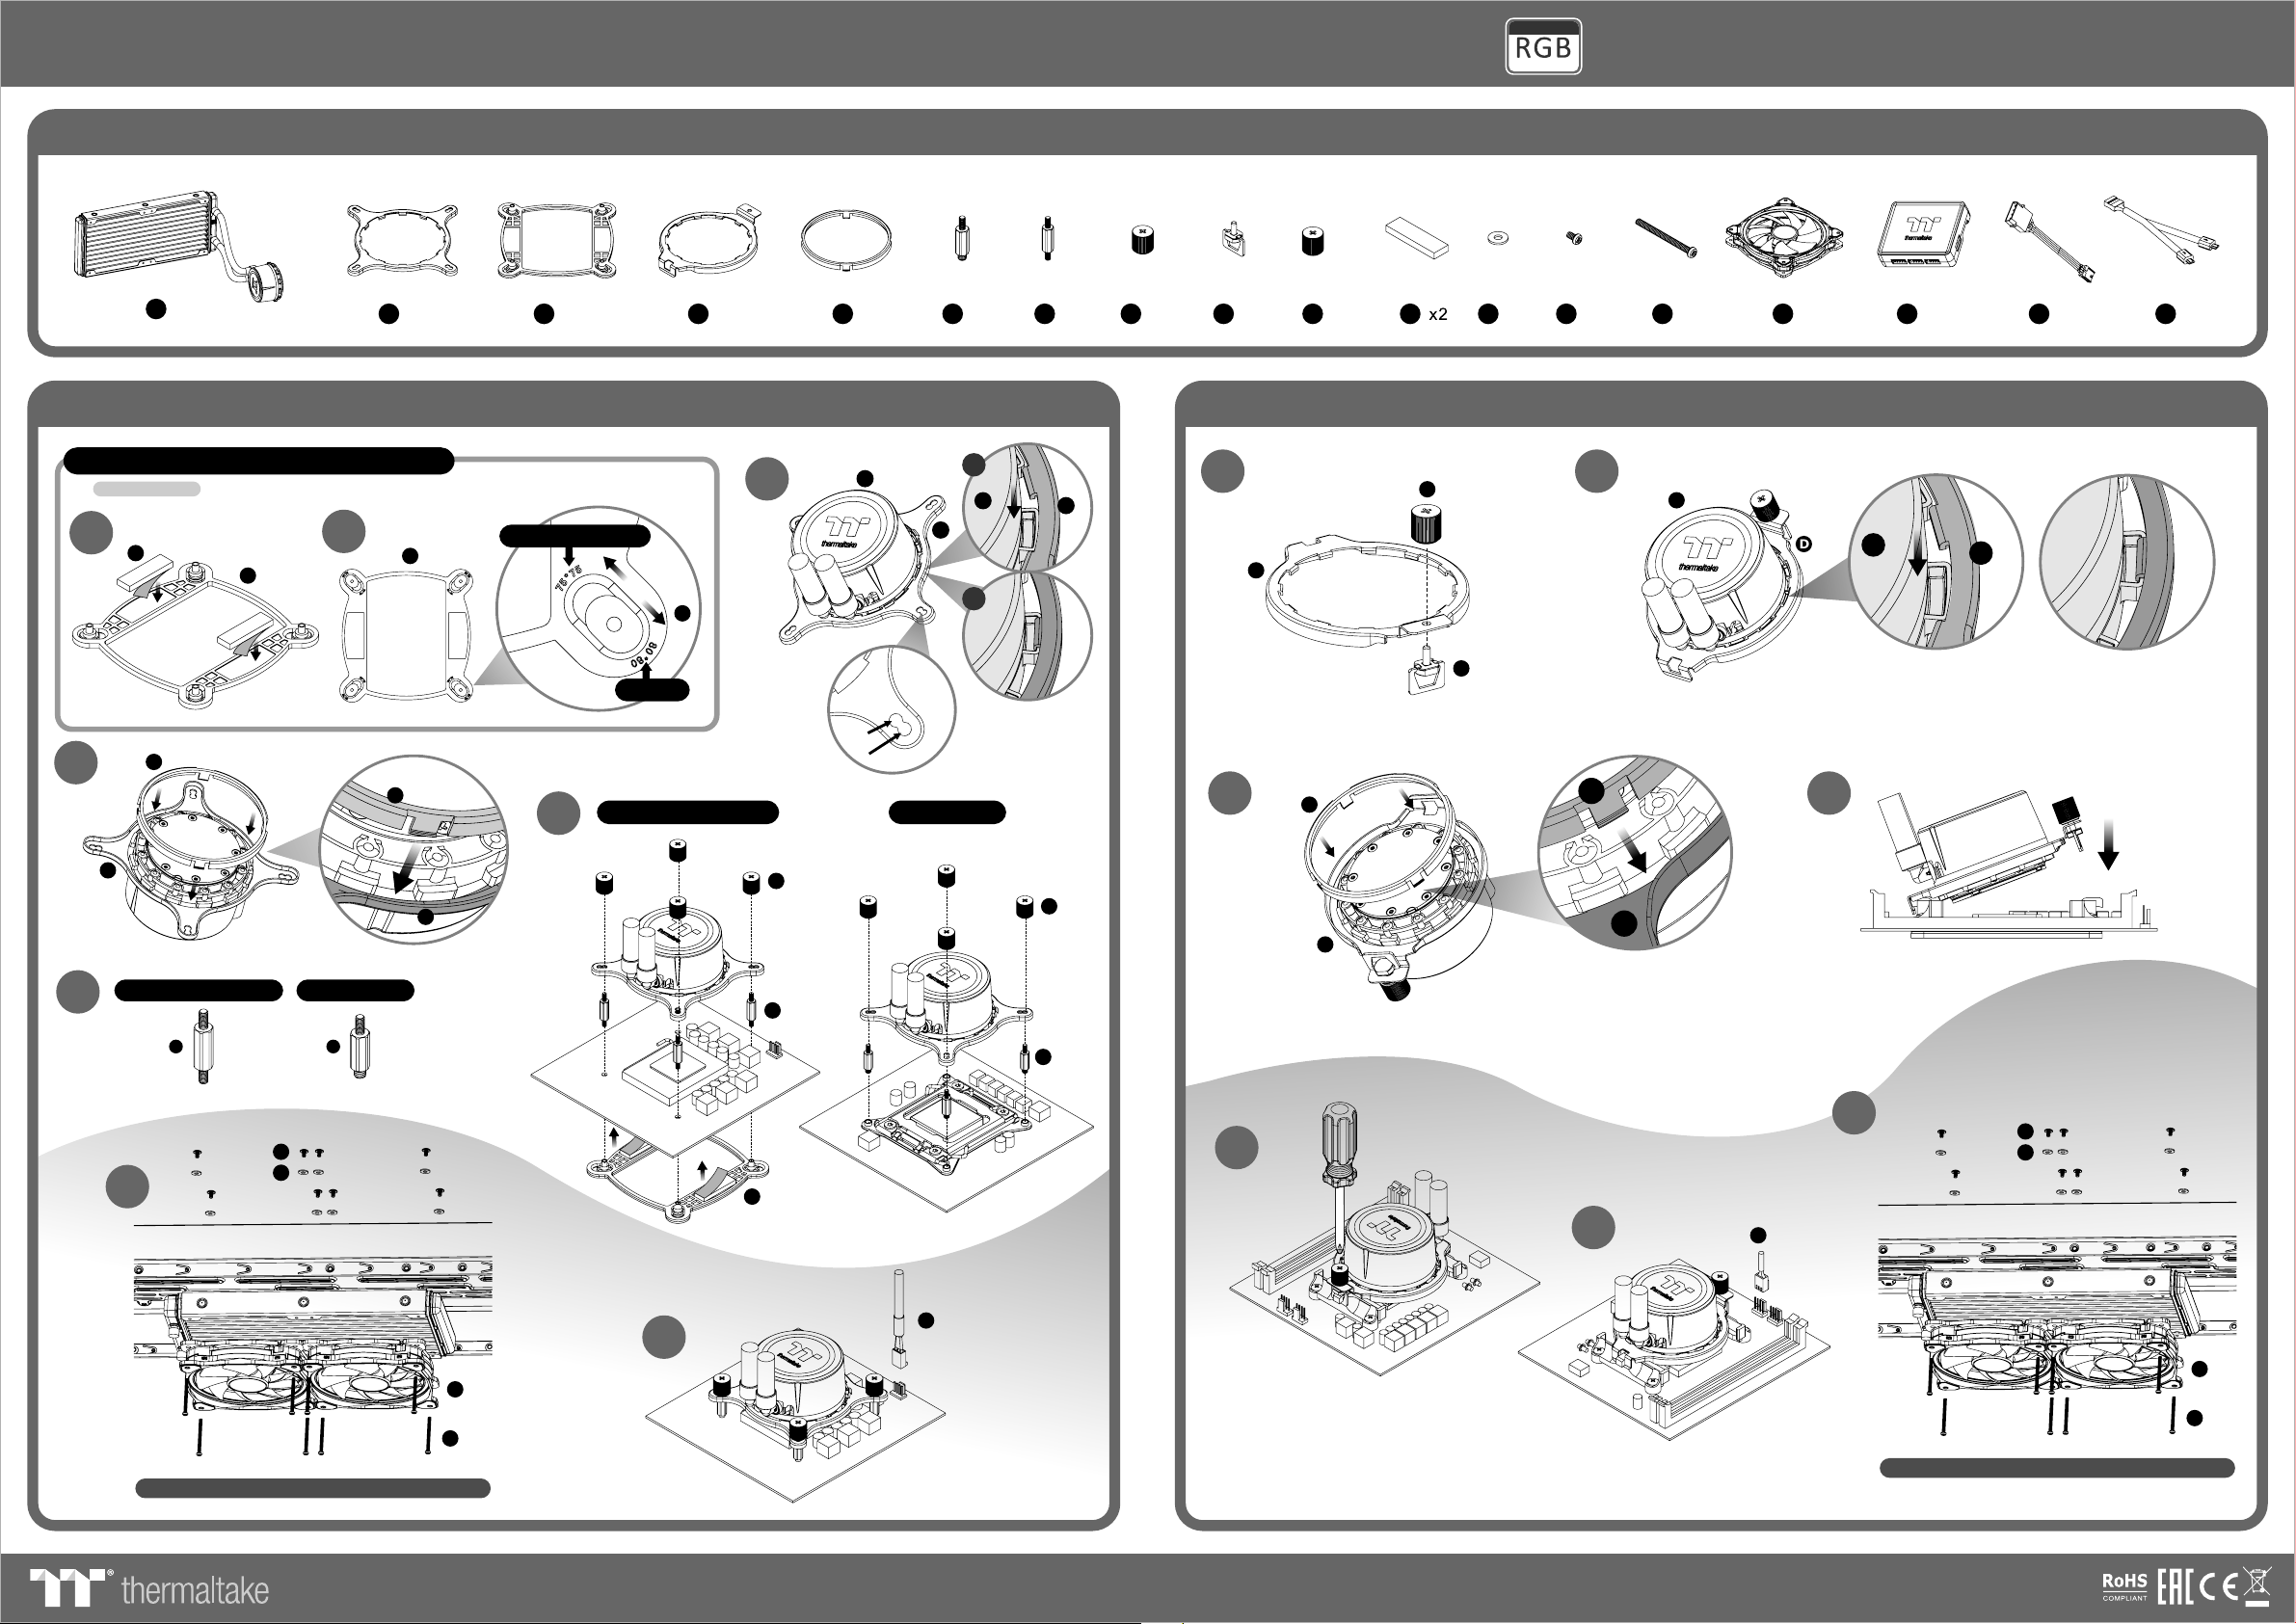
Parts List
A
x1
x1
B
x1
C
x1
D
x1
E
x4
F
x4
G
x4
H
x1
I
x1
J
K M
x8
L
x8
x8
N
x2
O
x1
P
Q
x1
x1
R
Intel Installation
Intel (Socket LGA 1366/1156/1155/1151/1150) Installation
For LGA2066/2011 installation, skip step 1 , 2 and continue with step 3
4
1
K
C
E
B
2
C
E
B
LGA 1156/1155/1151/1150
LGA 1 366
LGA 1366/1156/1155/1151/1150 LGA 2066 /2 011
6
3
C
LGA 1156/1155/1151/1150LGA 1156/1155/1151/1150
LGA 2066/2011/1366LGA 2066/2011/1366
AMD Installation
A
H
1
A
B
B
1
J
D
2
A
D
A
D
OK
2
OK
I
3
H
E
E
D
D
4
LGA 1366/1156/1155/1151/1150 LGA 2 066 /20 11
5
M
L
7
Compatibility may vary based on chassis design.
G
FG
C
A
F
5
6
7
A
CPU F an Port
M
L
8
O
N
CPU F an Port
Compatibility may vary based on chassis design.
O
N
© 2019 Therm alt ak e Techn olo gy C o., L td. All Ri ght s Re ser ved. ww w.t he rm altake.com A-2017.06
Page 2

ON
1 2 3 4
Floe DX RGB
240
TT Premium Edition
Patented
16.8 Million Color
InstallationController
P
9
123
A
OO
Conn ect the plug in to t he port in nume rical order,
star t with plug one .
11
R
Conn ect the contr ol ler cable ont o the mainboa rd
(USB 2 .0, 9 pin) and th e co ntroller.
12
Q Q
TT RGB Plus Software control interface
Please do wnload software f rom Thermalt ake Official website.
www.thermal take.com/home.aspx
and searc h " TT RGB Plus " on the offici al website.
10
45
Set th e DIP sw itch on the bac k side of the
cont roller to ass ig n the number of t he controll er
NO .1
ON
NO .2
ON
R
1 2 3 4
NO .5
ON
1 2 3 4
NO .9
ON
1 2 3 4
NO .1 3
ON
1 2 3 4
1 2 3 4
NO .6
ON
1 2 3 4
NO .1 0
ON
1 2 3 4
NO .1 4
ON
1 2 3 4
NO .3
ON
1 2 3 4
NO .7
ON
1 2 3 4
NO .1 1
ON
1 2 3 4
NO .1 5
ON
1 2 3 4
NO .4
ON
1 2 3 4
NO .8
ON
1 2 3 4
NO .1 2
ON
1 2 3 4
NO .1 6
ON
1 2 3 4
OS compat ibility: Window s 7 / 8 / 8.1 / 10
When you op en the software, ch oose the "Floe Riin g RGB" in the drop-down list(C- 4) first.
1. Software User Interface
BB
A-1A-1
C-3C-3
A-2A-2
C-4C-4
D-1D-1
D-2D-2
A-3A-3
C-4C-4
C-2C-2
Riin g Plus
Floe R iing RG B
RL36 0 Plus
PR22 -D5 Plu s
W4 Plu s
C-1C-1
C-5C-5
VGA Plu s
Lumi P lus
Pure P lus
W6
C-1C-1
A. TT RGB Plus software Profile Setting
A-1 Set up a profile: Choose a Profile and set up the LED Lighting Mo de ,
then click the SAVE ic on (A -3 ) to s to re y ou r se tt in gs t o th e so ftware.
A-2 Save a profile to controller: Select a profile and a contro ll er,
then click the Save icon to assign the profile to the contr ol le r.
B. Follow the Installation Guide step 3, you can se t up t he n um be r of t he c on tr ol le r
C. LED Lighting Mode
Full Lighted / Wa ve / P ul se / Ripple / Microphone / Sound effect / RGB Spectrum / Flow/e tc ..
C- 1 LED Selection: set up the LEDs ligh ti ng , co lo r, an d sp ee d.
Light Mode: Choose a lighting mode
Color Mode: Choose the LEDs color
Light Speed: Set up the speed of the LEDs light
LED Spot & Color Palette: Choose the color of each of the indiv id ua l LE Ds b y cl ic ki ng t he c ol or p al et te
Done: Save your setting
Default: Reset the LED setting back to the default
Brightness: Drag the mouse to adjust LED light brightne ss .
LED On/Off: Click t he L ED L ig ht i co n to t ur n on o r off the LED light
RGB Color Code: Enter the Decimal Code of Red, Green, and Blu e to s et t he L ED s co lo r
C-2 Performance Mode: 500~1500RPM(Duty cycle0%~ 10 0% )
Silent Mode: 500~900RPM(Duty cycle0%~50%)
PWM Mode: The PWM fun ct io n ca n be t ur ne d off and set the fan speed manually
C-3 LED On/Off: Use r ca n sw it ch o ff the LED control function in the software if the fan is not plug into t he c on tr ol le r.
C-4 Product Selection: click the product name to choice a no th er y ou w an t.
C-5 Fan LED Ring Selection: Choose diff er en t fa n ri ng t o se tt in g the lighting modes.
D-1 & D-2. Product Selection: click the control pan el t o ro ta te i t to t he f ro nt
2. Mobile APP Connection Password
To connect the TT RGB P lu s APP, please connect the PC to your
wireless first, and click the Password setting under th e so ft wa re
setting menu, set up your connection password. Th e TT RGB Pl us AP P
will ask for your password every time when starting the APP.
For more information please visit www.thermaltake. co m
English
English
正體中文
正體中文
簡體中文
簡體中文
Deutsch
Deutsch
Français
Français
日本語
日本語
ไทย
ไทย
Auto Update On
Auto Update On
Password O n
Password O n
Password :8888
Password :8888
Conn ect the power c ab le to the 4pin Mo lex
conn ecter and the c on troller.
sof tware interface may v ary wi th fea ture u pdate,
ple ase dow nload t he l ate st u ser man ual fro m ou r
www.the rma ltake.com
© 2019 Therm alt ak e Techn olo gy C o., L td. All Ri ght s Re ser ved. ww w.t he rm altake.com A-2017.06
 Loading...