

Page 1
Core 71
Your Build. Our Core
User's Manual
Benutzerhandbu ch
Mode d’emploi
Manual del usuario
Manuale dell’ute nte
Manual do Utilizad or
安裝說明書
用戶手冊
ユーザーズマニュアル
Руководство поль зоват еля
kullanıcı elkitabı
(EEE Yönetmeliği ne Uygu ndur)
คู่มือการใช้
© 2 016 Therma lta ke Tech nol ogy Co., L td. All Rights Reserv ed. 20 16. 11
All other r egis tered t rademar ks bel ong to their r espe ctive comp anies.
Tested To C omply
With F CC Standa rds
FOR H OME OR O FFICE USE
www. therm altak e.com
ww w. therm a ltak e . com
Page 2
Join Tt Comm unity To Recei ve B enefits
Dear Valued Customer,
Thank you for choosing Thermaltake.
As a new user we value your thoughts and opinions and
your feedback is important to us. We at Thermaltake
would like to use this opportunity to invite you to join our
Community Forums. Register today to start enjoying the
full benefits of our community.
Benefits of being a member:
Quick and responsive user support
Receive help and advice with new builds
Keep up to date with new product releases
Share your thoughts and builds with the community
Enter monthly contests and giveaways
Tt LCS-Liqu id Cooling Su pport Certi fication
Tt LCS Certified is a Thermaltake exclusive certification
applied to only products that pass the design and
hardcore enthusiasts standards that a true LCS chassis
should be held to. The Tt LCS certification was created
so that we at Thermaltake can designate to all power
users which chassis have been tested to be best
compatible with extreme liquid cooling configurations to
ensure you get the best performance from the best
features and fitment.
Bra nd offici al webs it e
htt p://www.the rm altak e. com/
Glo bal Fac eb ook
htt ps://ww w.fa ce book. co m/The rm altak eInc
Taiwa n Fa ceboo k
htt p://www.fac eb ook.c om /Ther ma ltake TW
Glo bal com mu nity fo ru ms
htt p://com munit y.th ermalta ke.com
Page 3
Specific ation
Co nte nts
Chapter 1. Product Introduction
1.0
Sp eci f ica tio n
1.1
Ac ces s ory
1.2
War n ing a n d Not i ce
Chapter 2. Installation Guide
Si de Pa nel s D isa sse m bly
2.0
Powe r S upp l y Uni t ( PSU ) I ns t all a tio n
2.1
Mo the r boa rd In s tal l ati on
2.2
5. 25" D e vic e I nst all a tio n
2.3
3. 5" & 2.5 " HDD In sta lla t ion
2.4
PC I Car d I nst a lla tio n
2.5
Ai r Coo l ing I n sta lla t ion
2.6
Li qui d C ool i ng In sta l lat ion
2.7
Fi lte r I nst a ll a tio n
2.8
Chapter3 Leads Installation Guide
Ca se LE D c onn e cti on
3.0
US B 3.0 co nne cti o n
3.1
Au dio c o nne cti o n
3.2
01
01
02
04
05
06
07
08
10
12
13
15
16
16
16
Accessor y
Fig ure
Cas e Type
Dim ensio n (H*W* D) 677 x 2 50 x 511 mm (2 6. 7 x 9. 8 x 20 .1 in ch)
Mat erial
Fan S uppor t
Rad iator S uppor t
Cle aranc e
Par ts Na me
Stand-off#6-32 x 6mm
Screw#6-32 x 6mm
Screw#6-32 x 5mm
Rubber
Screw M3 x 5mm
Nut Setter
Screw Ø5 x 12mm
Cable Tie
Buzzer
Low Noise Cable
8-pin Extension Cable
Fan Bracket
Power Rubber
Ful l Tower
SPC C
Fro nt :
3 x 120 mm, 3 x 140 mm, 2 x 200 mm
Top :
3 x 120 mm, 3 x 140 mm, 2 x 200 mm
Rea r :
1 x 120 mm, 1 x 140 mm
Bot tom :
2 x 120 mm, 2 x 140 mm
Lef t / Right S ide:
3 x 120 mm, 2 x 140 mm
Fro nt :
1 x 480 mm, 1 x 420 mm
Top :
1 x 360 mm, 1 x 280 mm
Rea r :
1 x 120 mm, 1 x 140 mm
Bot tom :
1 x 120 mm, 1 x 140 mm
Lef t / Right S ide:
1 x 360 mm, 1 x 280 mm
CPU c ooler h eight l imita tion: 1 80mm
VGA le ngth li mitat ion: 27 8mm(w ith HDD r ack)
420 mm(wi thout H DD rack )
PSU l ength l imita tion: 1 80mm (W ith Bot tom Fan )
220 mm (Wit hout Bo ttom Fa n)
Q't y
12
12
22
2
4
1
4
5
1
2
Power Connector Extension Cable
1
4
4
Use d for
Motherboard
Power
3.5”HDD
3.5”HDD
Motherboard, 2.5”HDD
Stand-off
Case Fan
Cable Management
Motherboard Alarm
Fan
Fan
PSU
1
Page 4
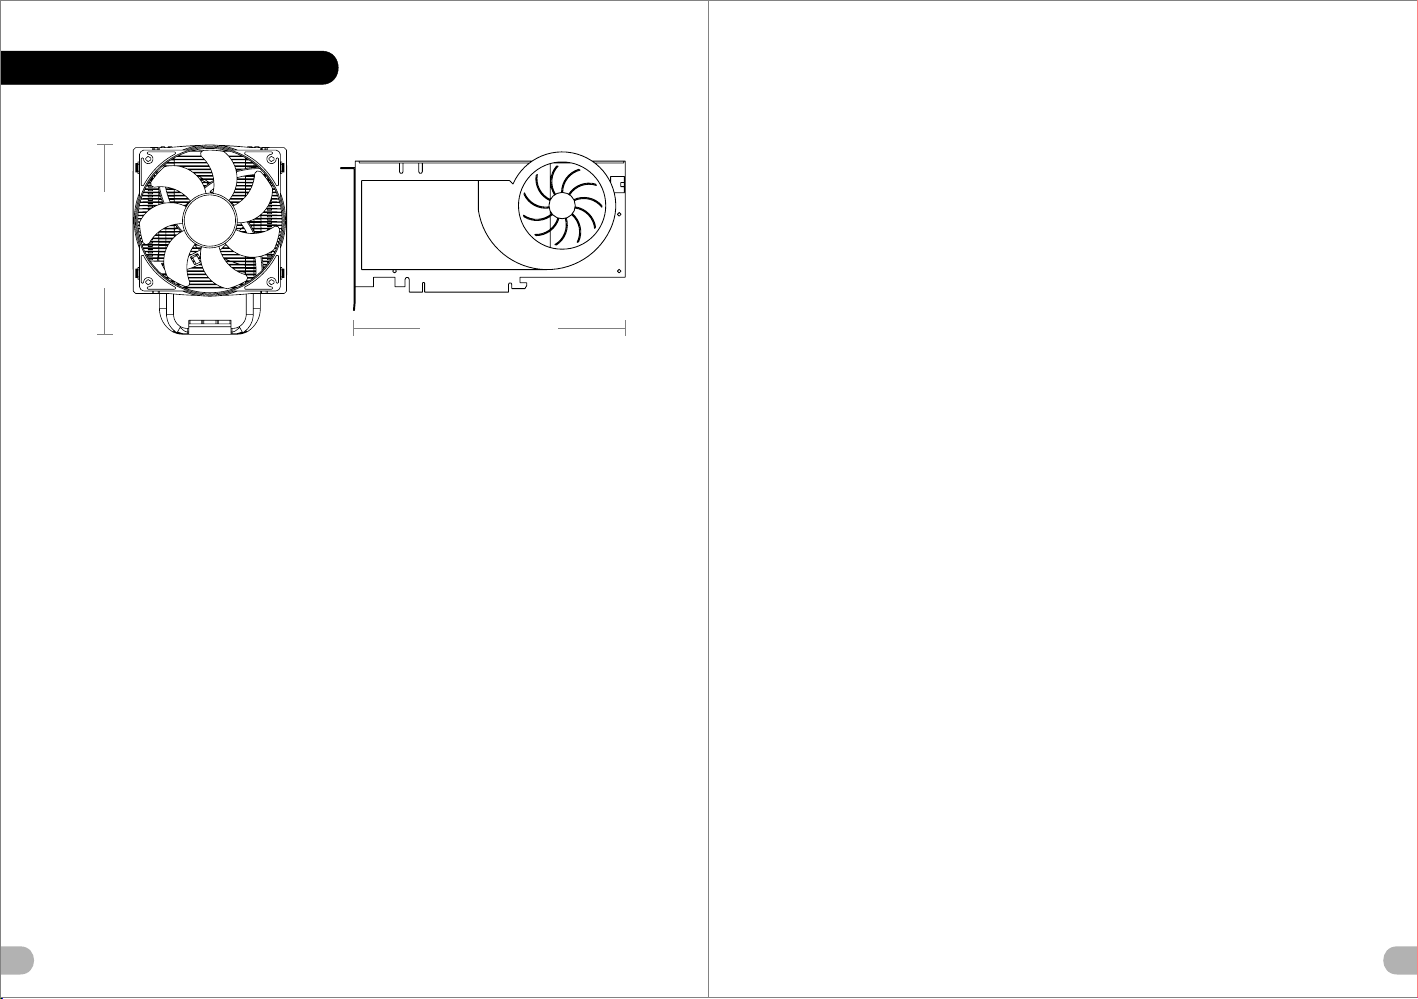
Warnin g and Notice
Atenção! !
Limite de altura para o dissipador d o CP U:
O limite de altura para o dissipador d o CP U é 18 0 mm ( 7, 1 po le ga da s).
Limite de comprimento para VGA (pl ac a gr áf ic a) :
O limite de comprimento para VGA (pl ac a gr áf ic a) é 2 78 m m (1 0. 9 po legadas).
<1 80 m m
<2 78 m m
War ni ng !!
CPU Cooler Height Limitation:
Please ensure that your CPU cooler does NOT exceed 180mm (7.1 inches) height.
VGA (Add-on card) Length Limitation:
Please ensure that your VGA (Add-on card) does NOT exceed 278mm (10.9 inches) length.
Warnun g!!
CPU-Kühler Höhenbeschränkung:
Bitte stellen Sie sicher, dass Ihr CPU-Kühler 180 mm (7,1 Zoll) Höhe nicht überschreitet.
VGA (Add-on-Karte) Längenbeschränkung:
Bitte stellen Sie sicher, dass Ihre VGA (Add-on-Karte) 278 mm (10,9 Zoll) Länge nicht
überschreitet.
Averti ssem ent !
Limite de hauteur du ventilateur de CPU :
Vérifiez que la hauteur du ventilateur de CPU ne dépasse pas 180 mm.
Limite de longueur de la carte (complémentaire) VGA :
Vérifiez que la longueur de votre carte (complémentaire) VGA ne dépasse pas 278 mm
Precaución
Limitación de altura del refrigerador de CPU:
Asegúrese de que la altura de su refrigerador de CPU no excede los 180 mm (7,1 pulgadas).
Limitación de longitud de la tarjeta de vídeo (adicional):
Asegúrese de que la longitud de su tarjeta de vídeo (adicional) no excede los 278 mm (10,9
pulgadas).
Attenzione!
Limitazione altezza dissipatore CPU:
Assicurarsi che l’altezza del dissipatore CPU NON superi 180 mm (7,1 pollici).
Limitazione lunghezza VGA (scheda aggiuntiva):
Assicurarsi che la lunghezza del VGA (scheda aggiuntiva) NON superi 278 mm (10,9 pollici).
警告!!
CPU 冷卻器的高度限制:
請確保 CPU 冷卻器的高度不超過 180 mm (7.1 英吋)。
VGA (附加介面卡) 的長度限制:
請確保 VGA (附加介面卡) 的長度不超過 278 mm (10.9 英吋)。
警告!!
CPU 散热器高度限制:
请确保 CPU 散热器的高度不超过 180 mm(7.1 英寸)。
VGA(附加卡)长度限制:
请确保 VGA(附加卡)的长度不超过 278 mm(10.9 英寸)。
警告
CPUクーラーの高さ制限:
CPUクーラーの高さが180mmを超えていないことを確 認し てく ださ い。
VGA(アドオンカード)の長さ制限:
VGA(アドオンカード)の長さが278mmを超えていな いこ とを 確認 して くだ さい 。
Внимание!
Ограничение по высоте охладите ля Ц П
Убедитесь, что высота охладител я ЦП (ц ен тр ал ьн ог о пр оц ес сора) НЕ превышает 180 м
(7,1 дюйма).
Ограничение по длине видеокарт ы VG A (пл ат а ра сш ир ен ия)
Убедитесь, что длина видеокарты VGA (п ла та р ас ши ре ни я) НЕ п ре вышает 278 мм
(10,9 дюйма).
Uyarı!!
CPU Soğutucu Yükseklik Sınırlaması:
Lütfen CPU soğutucunuzun yükse kl iğin in 1 80 mm ’y i (7 ,1 inç) GEÇMEDİĞİNDEN emin olun.
VGA (Eklenti kartı) Uzunluk Sınırlaması:
Lütfen VGA’nızın (Eklenti kartı) uzunluğun un 2 78 mm ’y i (1 0, 9 inç) GEÇMEDİĞİNDEN emin
olun.
คำเตือน!!
ขีดจำกัดความสูงสำหรับฮีตซิงก์ของ CPU:
ขีดจำกัดความสูงสำหรับฮีตซิงก์ของ CPU คือ 180 มม. (7.1 นิ้ว)
ขีดจำกัดความยาวสำหรับ VGA (การ์ดแสดงผล):
ขีดจำกัดความยาวสำหรับ VGA (การ์ดแสดงผล) คือ 278 มม. (10.9 นิ้ว)
2
3
Page 5
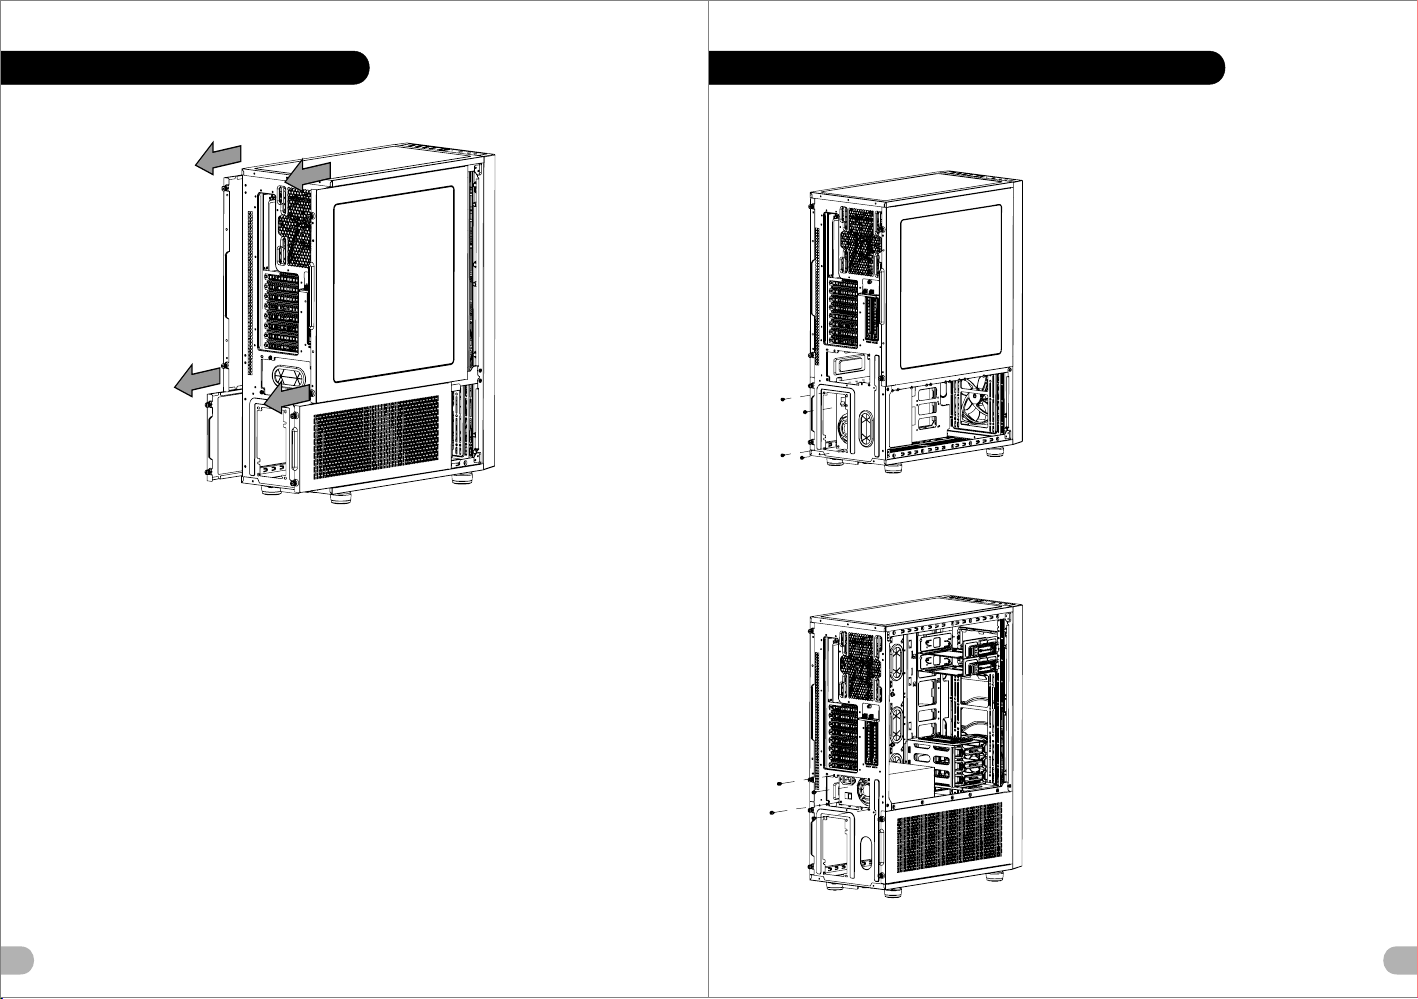
Side Panels Dis assembly
English /
Remove the screws on the back of the chassis,
and open the side panel
Deutsch /
Entfe rnen Sie die Schrauben auf der Rückseite
des Gehäuses und öffnen Sie das Seitenteil
Français /
Enlevez les vis à l’arrière du châssis et ouvrez le
panneau latéral
繁體中文 /
移除機殼後 方螺絲,將側窗打開
简体中文 /
卸除机壳后 方螺丝,将侧窗打开
日本語 /
シャーシ背 面のねじを取り外し、サイドパネ
ルを開きま す
Pow er Supply Uni t (PSU) Insta llation
Position APosition A
English /
Place the PSU in proper location.
Deutsch /
Platzieren Sie das Netzteil in der richtigen Position.
Français /
Placez l’alimentation dans la position appropriée.
Español /
Instale la PSU en la ubicación correcta.
Itali ano /
Posizionare la PSU in modo corretto.
Portu guês/
Coloque o PSU na sua devida posição.
Position B
繁體中文 /
將電源供應 器放在正 確的位置
简体中文 /
将电源供应 器放在正确的位置
日本語 /
PSUを適切なロケーションに取り付けます。
Español /
Extra iga los tornillos de la parte posterior de la
caja y abra el panel lateral
Itali ano /
Rimuovere le viti sulla parte posteriore dello
chassis e aprire il pannello laterale
Portu guês/
Remova os parafusos na parte de trás da caixa e
abra o painel lateral
4
Русск ий /
Откру тите винты на задней стенке корпуса
и откройте боковую панель
Türkçe /
Kasanın arkasındaki vidaları çıkarın ve yan
paneli açın
ภาษาไทย /
ถอดสกรูท ี่ด้านหลังข องแชสซีส์
แล้วเปิด แผงด้านข้าง
Русск ий /
Устан овите блок питания в надлежащ ее место.
Türkç e /
PSU’yu, uygun konuma yerleştirin.
ภาษาไทย /
วาง PSU ในตำแหน่งที่เหมาะสม
5
Page 6

Motherbo ard Install ation
5.25" Devi ce Installa tion
Engli sh /
1. Remo ve the 5.25” dr ive bay cover .
2. Slid e the 5.25” dev ice into the dr ive bay to lock t he device.
Note: P ress the 5.25 ” tool-free m echanism to u nlock the
devic e.
Deuts ch /
1. Entfernen Sie die A bdeckung de s 5,25 Zoll
Laufw erksschac hts.
English /
1.Lay down the chassis.
2.Ins tall the motherboard in proper location and
secure it with screws.
Deutsch /
1.Legen Sie das Gehäuse auf die Seite.
2.Ins tallieren Sie die Hauptplatine in ihrer
vorgesehenen Position und sichern Sie sie mit
Schrauben.
Français /
1.Posez à plat le châssis.
2.Ins tallez la carte mère dans l'endroit approprié et
sécurisez-la avec des vis.
Español /
1. Tumb e el chasis.
2. Instale la placa madre en la ubicación adecuada
y asegúrela con tornillos.
Itali ano /
1.Poggiare lo chassis.
2.Ins tallare la scheda madre nella posizione
appropriata e fissarla con le viti.
Portu guês/
1. Deixe a caixa.
2. Instale a motherboard no local adequado e
aparafuse.
繁體中文 /
1. 將機殼平 放。
2. 將主機板 放置在合 適的位置 並用零件 包中之螺
絲固定。
简体中文 /
1. 放平机箱 。
2. 在合适的 位置安装主板并以螺丝安全固定。
日本語 /
1.シャーシ を下に置 きます。
2.マザーボ ードを適 切な場所 に取り付け、ねじで
固定します 。
Русск ий /
1. Раск ройт е сист емный блок.
2. Уста нови те мат еринскую плату в
надле жаще е мест о и закр епите ее винтами.
Türkç e /
1.Kasayı yan yatırın.
2.Ana kartı uygun konuma takın ve vidalarla
sabitleyin.
ภาษาไทย /
1.วางแชสซีส์นอนลง
2.ติดตั้งเมนบอร์ดในตำแหน่งที่เหมาะสม
แล้วขันสกรูยึดให้แน่น
6
2. Schi eben Sie the 5, 25 Zoll Einhe it in den
Laufw erksschac ht, um die Einh eit zu sperre n.
Anmer kung: Drück en Sie den 5,25 Z oll werkzeu glosen
Mecha nismus, um di e Einheit zu ve rriegeln.
Franç ais /
1. Enle vez le couver cle de la baie de l ecteur de 5,2 5".
2. Faites glisser le p ériphériq ue de 5,25" dan s la baie de
lecte ur.
Remar que : Appuyez s ur le mécanis me sans outil d e 5,25"
pour dé verrouill er le périphé rique.
Españ ol /
1. Extraiga la tapa de l hueco de la uni dad de 5,25".
2. Meta el dispositi vo de 5,25” en el h ueco de la unid ad para
cerra r el disposit ivo.
Nota: P resione el me canismo lib re de herrami enta de 5,25”
para ab rir el dispos itivo.
Itali ano /
1. Rimu overe il cope rchio dell’ alloggiam ento vano uni tà da
5,25’ ’.
2. Fare scorrere il di spositivo d a 5,25” nell’ alloggiam ento
dell’ unità per blo ccare il disp ositivo.
Nota: P remere il mec canismo too l-free da 5,2 5” per
sbloc care il dispo sitivo.
Portu guês/
1. Remo va a cobertur a da baía da unid ade de 5,25".
2. Desl ize o disposi tivo de 5,25" p ara a baía da uni dade, para
bloqu ear o disposi tivo.
Nota: P ressione o me canismo de 5, 25" sem utili zar
ferra mentas para d esbloquea r o dispositi vo.
繁體中文 /
1. 移除5.2 5”擴充槽 檔板
2. 將5.25” 裝置至適 當的位置
注意: 如需移除5 .25”裝 置,先按壓5 .25”無 螺機機構, 再將
5.25”裝 置往前推 出。
简体中文 /
1. 移除5.2 5”槽盖
2. 将5.25” 设备滑入驱动器槽
注意: 如需移除5 .25”设备,先按压5 .25”免用工具机械 装
置,再将5. 25”设备往前推出
日本語 /
1. 5.25” ドライブベイのカバ ーを取り外します。
2. 5.25” デバイスをドライブ ベイにスライドさせ てデバイ
スをロック します。
注: 5.25”工 具不要メカニズムを 押してデバイスをア ンロ
ックします 。
Русск ий /
1. Сним ите крышку от сека для 5,25 -дюймовых
диско водов.
2. Вста вьте 5,25-дю ймовое устр ойство в отсе к
диско вода для фикс ации.
Приме чание. Нажми те на не требую щий
испол ьзования ин струменто в механизм от сека
для 5,2 5-дюймовых д исководов, ч тобы
разбл окировать у стройство.
Türkç e /
1. 5,25 " sürücü bölm esi kapağını çıka rın.
2. 5,25 ” aygıtını kilitle mek için sürü cü bölmesin in içine
doğru k aydırın.
Not: Aygıtın kilidini aç mak için 5,25 ” araçsız
mekan izmayı bastırın.
ภาษาไทย /
1. ถอดฝาปิดช่องไดรฟ์ขนาด 5.25" ออก
2. เลื่อนอุปกรณ์ขนาด 5.25" เข้าในช่องไดร์ฟเพื่อล็อคอุปกรณ์
หมายเหตุ: กดตัวล็อคเครื่องมือขนาด 5.25"
เพื่อปลดล็อคอุปกรณ์
7
Page 7

3.5" & 2.5" HD D I nstallat ion
Type B
3.5 ” HD D
2.5 ” HD D
Type A
Engli sh / 繁體中文 /
1. Pull t he HDD tray out . 1. 將硬碟托 盤取出
2. Plac e the 2.5” or 3.5 ” hard drive on t he tray 2. 將2.5”或3 .5”硬碟放置在硬碟 托盤上,用螺絲固
and sec ure it with scr ews. 定硬碟
3. Slid e the HDD tray ba ck to the HDD cag e. 3. 將硬碟托 盤放回硬碟磁架中
Deuts ch / 简体中文 /
1. Zieh en Sie den HD-S chacht hera us. 1. 将硬盘托 盘取出
2. Mont ieren Sie die 2 ,5 oder 3,5 Zol l Festplatt e 2. 将2.5”或3 .5”硬盘放置在硬盘 托盘上,
im Scha cht und siche rn Sie sie mit Sc hrauben.
3. Schi eben Sie den Sc hacht wiede r in den
Festp lattenkäf ig.
Franç ais /
1. Enle vez le boîtie r du disque dur .
2. Plac ez le disque du r de 2,5” ou de 3,5 ” dans le
boîti er et fixez-l e avec des vis.
3. Refa ites glisse r le boîtier du d isque dur dan s
la cage d e disques dur s.
Españ ol /
1. Extraiga la bande ja del disco du ro.
2. Colo que el disco du ro de 2’5 ó 3'5” en l a
bande ja y fíjelo con l os tornillo s.
3. Vuel va a meter la ban deja del disc o duro en su
hueco .
Itali ano /
1. Estrarre il vano HD D.
2. Posi zionare il di sco fisso da 2, 5” o 3,5” nel
vano e fi ssarlo con le v iti.
3. Fare scorrere l’H DD indietro v erso la strut tura
Type DType C
ODD Tray In st al la ti on
a gabbi a HDD.
Portu guês /
1. Puxe a b andeja do dis co rígido par a fora.
2. Colo que o disco ríg ido de 2,5” ou 3, 5” na
bande ja e fixe com par afusos.
3. Desl ize a bandeja d o disco rígid o de volta para
a caixa d o disco rígid o.
用螺丝固定 硬盘
3. 将硬盘托 盘放回硬盘磁架中
日本語 /
1.HDDト レイを引き出して外 します。
2.2.5インチH DD、SSD もしくは 3.5イン チ
HDDドライ ブをトレイにネジで 固定します。
3. HDDトレ イをHDDケージに戻し ます。
Русск ий /
1. Вытя ните лоток дл я жестких дис ков.
2. Уста новите 2,5- и ли 3,5-дюймо вый жесткий
диск в ло ток и закрепи те его винтам и.
3. Уста новите лото к для жестких д исков
обрат но в каркас.
Türkç e /
1. HDD te psisini dışarı çekin.
2. 2,5” veya 3,5” sabit disk sürücüsünü tepsinin
üzerine yerleştirin ve vidalarla sabitleyin.
3. HDD tepsisini HDD kafesine geri yerleştirin.
ภาษาไ ทย /
1. ดึงถาด HDD ออกมา
2. วางฮาร์ดไดร์ฟขนาด 2.5” หรือ 3.5”
ลงบนถาดแล้วขันสกรูยึดให้แน่น
3. เลื่อนถาด HDD กลับเข้าในโครง HDD
12
8
9
Page 8

PCI Card Ins tallation
Type A
Dire ct in sta lli ng to M otherboa rd
Type B (Optional)
Exte nd in sta lli ng to M otherboa rd (P CI- E Cab le No t Included )
10
11
Page 9

Air Coolin g Installat ion
Liquid Coo ling Instal lation
Re a r
14cm x 1
Si d e
12cm x 3
12cm x 1
14cm x 2
12cm x 2
To p
20cm x 2
14cm x 3
12cm x 3
12cm x 3
14cm x 3
Si d e
14cm x 2
Fro n t
12cm x 3
Re a r
14cm x 1
Si d e
12cm x 1
36cm x 1
28cm x 1
12cm x 1
To p
36cm x 1
28cm x 1
Si d e
36cm x 1
28cm x 1
Fro n t
42cm x 1
12
14cm x 2
Bo t t om
20cm x 1
48cm x 1
14cm x 1
Bo t t om
13
Page 10

Maximum Radiator Installation Notice
Top Radiator Installation Notice
* Please consult radiator & memory height for proper installation
安裝前請參考水冷 排與記憶體高度
57. 1mm
140 mm
129 mm
36 cm R adiato r 48 cm R adiato r
50m m
Filter Ins tallation
14
202 .27mm
15
Page 11

Leads Inst allation
English
Leads Inst all ation Guide
Case LED Connect io n / On th e front o f the cas e, you ca n find so me LEDs a nd swit ch lead s. Plea se cons ult you r user
man ual of yo ur moth erboa rd manu factu rer, th en conn ect the se lead s to the pa nel hea der on th e mothe rboar d.
USB 2.0 Connecti on / Plea se cons ult you r mothe rboar d manua l to find o ut the se ction o f “USB co nnect ion”.
USB 3.0 connecti on /
1. Ma ke sure y our mot herbo ard sup ports U SB 3.0 co nnect ion.
2. Co nnect t he USB 3. 0 cable t o the ava ilabl e USB 3.0 p ort on yo ur comp uter.
Aud io C on ne ction / Pl ease re fer to th e follo wing il lustr ation o f Audio c onnec tor and y our mot herbo ard use r manua l.
Ple ase sel ect the m other board w hich us ed AC’9 7 or HD Aud io(Az alia) ,(be aw are of th at your a udio su pport s AC’97 o r HD
Aud io (Aza lia)) o r it will d amage y our dev ice(s ).
Deutsch
Anschlü sse h erst ell en
Gehäuse-LE D- Ver bi nd un ge n / Au f der G ehäus evord ersei te find en Sie ei nige LE Ds und Ve rbind ungen . Bitte n ehmen
Sie d ie Gebr auchs anwei sung Ih res Mot herbo ard Her stell ers zur H ilfe un d schli eßen Si e diese V erbin dunge n an die Pa nel
Hea der Bel egung d es Moth erboa rds an.
USB 2.0 Ansch lu ss / B itte ne hmen Si e die Geb rauch sanwe isung I hres Mo therb oards z ur Hilf e und les en Sie un ter dem
Kap itel „U SB Ansc hlüss e“ nach .
USB 3.0 Ansch lu ss /
1. St ellen S ie sich er, das s Ihre Ha uptpl atine d en USB 3. 0 Ansch luss un terst ützt.
2. Ve rbind en Sie da s USB 3.0 K abel mi t dem USB 3 .0 Port a uf Ihre m Compu ter.
Aud io A ns ch lü ss e / Bi tte bea chten S ie die fo lgend e Abbil dung de r Audio A nschl üsse un d die Anw eisun g in der
Geb rauch sanwe isung I hres Mo therb oards . Bitte w ählen S ie das Mo therb oard, d as AC’9 7 oder HD A udio( Azali a)
ver wende t, (ach ten Sie d arauf , dass Ih r Audio A C’97 bz w. HD Aud io (Aza lia unt erstü tzt)) . Ander nfall s entst ehen sc hwere
Sch äden an I hrem( n) Gerä t(en) !!!
L- O UT
SE NS E
R-O UT
MI C- P OW ER
MI C- I N
SE NS E 2
KE Y
SE NS E 1
PR ES E NS E
GN D
Français
Guide d'installation des fils
Con nex ion de s voyants d u b oît ie r / S ur la fa ce avan t du boîtie r, v ous trouver ez plus ieurs v oyants et l es f ils des
bout ons. S' il vous plaît consulte z le gui de d'ut ilisate ur du fa brican t de votre c art e mè re, puis co nnectez ces fi ls a ux
onne cteurs sur la c arte mè re.
Con nex ion US B 2.0 / S'il vo us p laît consultez le manu el de vo tre car te mère à la sec tion "Connexio n USB"
Con nex ion US B 3.0 /
1. Vé rifie z que vot re cart e mère pr end en ch arge la c onnex ion USB 3 .0.
2. Co nnect ez le câb le USB 3. 0 au port U SB 3.0 di sponi ble sur v otre or dinat eur.
Con nex ion Audio / S'il v ous pla ît r éférez vous à l 'illust ration suivant e du con necteu r au dio et au gu ide de l 'utilis ateur d e
votr e carte mère. S 'il vous pl aît sélecti onnez u ne cart e mè re s upporta nt AC'9 7 ou HD A udi (Az alia), (faites attent ion que
votr e audio suppor te l 'AC '97 ou H D Audio (Azalia )) sino n cela p ourrait endommage r votre matériel.
Español
Guía de Inst al ac ión de Ca bles
Con exi ón d el LED de la caja / En la pa rte fro nta l de la caja , en contrar á algun os LED y cables de inte rruptores. Consul te
el m anual d el u sua rio del fabricante de la placa madre, a c ontinua ción co necte estos cables al conecto r de la placa m adre.
Con exi ón U SB 2.0 / C onsulte el manu al de la placa m adre pa ra obtener más informa ción so bre el a partado “Conex ión USB ”
Con exi ón U SB 3.0 /
1. As egúre se de que l a placa b ase adm ite con exión U SB 3.0.
2. Co necte e l cable U SB 3.0 al p uerto U SB 3.0 di sponi ble en el e quipo .
Con exi ón d e A udi o / Con sulte l a si guiente ilustr ación del c onector de Audio y el manual d el u suario de l a pl aca mad re.
Sele ccione la plac a ma dre que uti liza AC ’97 o HD Audio ( Azalia), (asegúre se de qu e su aud io admi te AC’97 o H D Audio
(Aza lia)) s i no, su s dispo sitivos result arán da ñados
L- O UT
SE NS E
R-O UT
MI C- P OW ER
MI C- I N
SE NS E 2
KE Y
SE NS E 1
PR ES E NS E
GN D
L- O UT
R-O UT
MI C- P OW ER
MI C- I N
USB 3.0 C on ne ct io n
L- R ET
KE Y
R-R ET
GN D
USB 3.0 C on ne ct io n
L- O UT
R-O UT
MI C- P OW ER
MI C- I N
L- R ET
KE Y
R-R ET
GN D
16 17
Page 12

Italiano
Guida di ins ta ll azione dei co nt atti
Con nes sione del LE D d el cas e / Nella p arte an teriore del cas e, sono presen ti a lcu ni c ontatti per int erruttori e LE D.
Cons ultare il manu ale ute nte del produtt ore del la sche da m adr e, q uindi connette re i con tatti a lla parte s uperiore d el
pann ello su lla sch eda mad re.
Con nes sione USB 2. 0 / Consult are il m anuale per la s cheda m adre ch e co mpr ende la sezione relative alla
“con nessio ne U SB” .
Con nes sione USB 3. 0 /
1. Ac certa rsi che l a sched a madre s uppor ti la con nessi one USB 3 .0.
2. Co llega re il cav o USB 3.0 a lla por ta USB 3. 0 dispo nibil e sul com puter .
Connession e Audio / Far e rifer iment o all’i llust razio ne ripo rtata d i segui to del co nnett ore Aud io e al man uale ut ente pe r
la sc heda ma dre.S elezi onare l a sched a madre r elati va a AC’9 7 o HD Audi o (Azal ia) e con sider are che i l suppo rto aud io è
com patib ile con A C’97 o HD A udio (A zalia ); in cas o contr ario, l e perif erich e potre bbero v enire d anneg giate .
繁體中文
線材安裝說明
機殼LE D連接方式 / 在機 殼前方的面 板後面,可 以找到一些L ED與開關線 材(POWE R Switc h….),請 參考主機板 使用說明書 ,
並將機 殼上的線材 正確地連接 到主機板上 ,這些線材 通常都會印 有標籤在上 面,如果沒 有的話,請 找出機殼前 方面板上線 材原
本的位 置以知道正 確的來源。
USB 2 .0 連接 / 請參考 主機板使用 手冊找出主 機板上的US B連接孔位
USB 3 .0 連接 /
1. 請確 認主機板是 否支援USB 3 .0傳輸介面 。
2. 連接U SB 3.0傳輸 線至主機板 上的USB3 .0接埠。
音效連 接 / 請根據下面 的音源接頭 圖示與主機 板使用手冊 來連接音效 裝置,請確 認主機板上 的音效裝置 是支援AC' 9 7音效或是
HD音效( Azali a),裝置錯 誤可能會導 致主機板音 效裝置的毀 損,某些主 機板的音效 裝置不會與 下方的圖示 完全相同, 請參 酌主
機板使 用手冊以得 到正確的安 裝資訊
Português
Guia de Inst ala ção E léc tri ca
Ligação do LED da Caix a / Na pa rte dia nteir a da caix a pode en contr ar algu ns LEDs e f ios elé ctric os. Con sulte o
man ual de ut iliza dor do fa brica nte da su a mothe rboar d e ligue o s fios à pa rte sup erior d o paine l na moth erboa rd.
Ligação UBS 2.0 / Con sulte o m anual d a sua mot herbo ard par a ver a sec ção de “L igaçã o USB”.
Ligação USB 3.0 /
1. Ce rtifi que-s e que a sua m other board s uport a ligaç ão USB 3. 0.
2. Li gue o cab o USB 3.0 à p orta US B 3.0 dis ponív el no seu c omput ador.
Ligação Áudio / Con sulte a i magem s eguin te do con ector Á udio e o ma nual de u tiliz ador da s ua moth erboa rd.
Sel eccio ne a moth erboa rd que ut iliza A C’97 ou H D Áudio (Azal ia), (v erifi que se a su a placa d e áudio s uport a AC’97 o u HD
Áud io(Az alia) ) ou irá da nific ar o(s) s eu(s) d ispos itivo (s).
L- O UT
SE NS E
R-O UT
MI C- P OW ER
MI C- I N
L- O UT
R-O UT
MI C- P OW ER
MI C- I N
USB 3.0 C on ne ct io n
SE NS E 2
KE Y
SE NS E 1
PR ES E NS E
GN D
L- R ET
KE Y
R-R ET
GN D
简体中文
线材安装说明
机壳LED连 接方式 / 在机壳前方的面 板后面,可以 找到一些LED与开 关线材(POWER S witch….),请参 考主板使用说 明
书,并将 机壳上的线材 正确地连接到主 板上,这些线 材通常都会印有 标签在上面, 如果没有的话, 请找出机壳前 方面板上线
材原本的 位置以知道正 确的来源。
USB 2.0 连接 / 请参考主板 使用手册找出主 板上的USB连接 孔位
USB 3.0 连接 /
1.请确认 主板是否支持USB 3 .0传输 接口。
2.连接US B 3.0传输线 至主板 上的USB3.0接埠。
音效连接 / 请根据 下面的音源接头 图示与主板使 用手册来连接音 效装置,请确 认主板上的音效 装置是支持AC' 97音 效或是
HD音效(A zalia), 装置错误可能会 导致主板音效 装置的毁损,某 些主板的音效 装置不会与下方 的图标完全相 同,请参酌主板
使用手册 以得到正确的 安装信息
L- O UT
SE NS E
R-O UT
MI C- P OW ER
MI C- I N
L- O UT
R-O UT
MI C- P OW ER
MI C- I N
USB 3.0 C on ne ct io n
SE NS E 2
KE Y
SE NS E 1
PR ES E NS E
GN D
L- R ET
KE Y
R-R ET
GN D
1918
Page 13

日 本 語
リード線の取り付けガイド
ケース LE D の接 続 / ケース 前面には、LEDとスイッチリー ド線がありま す。 マザーボードメーカー のユーザーマ ニュアル
を参照し 、これらのリ ード線をマザー ボードのパネ ルヘッダに接続 してください 。
USB 2.0 の接続 / マザーボ ードのマニュア ルを参照して 、「USB接続」の セクションを 探します。
USB 3.0 の接続 /
1. お 使いのマザーボ ードがUSB 3 .0接続をサポー トしているこ とを確認してく ださい。
2. U SB 3 .0ケー ブルをコンピュ ータの空いて いるUSB 3. 0ポートに接続し ます。
オーディ オ接続 / オーディオコネ クタの次の図 とマザーボード のユーザーマ ニュアルを参照 してください 。AC’97または
HDオーデ ィオ(Azal ia)を使用する マザーボード を選択してくだ さい(オーディオ がAC’97またはH Dオーディオ(A zalia)をサ ポ
ートして いることを確 認してください)。 サポートして いないと、デバ イスが損傷し ます)。
Türkçe
Ara Kablo Kurulum Kılavuzu
Kasa ışık bağ lantısı / K asanın ön k ısmında bazı ış ıklar v e anahtar ara k ablolar ı göreb ilirsin iz. Lüt fen anakart üreticini zin
sağl adığı k ullanım kılavu zuna bakın ve d aha sonra, bu a ra kabloları, anakart üzerindek i panel bağlantı noktalarına bağlay ın.
USB 2.0 bağlantısı / Lütfe n anaka rt kılavuzunuz un “USB bağlantısı” bölümüne bakın.
USB 3.0 Bağ lantısı /
1. Ana k artınızın USB 3.0 bağlantısını deste klediğinden e min olu n.
2. U SB 3 .0 k ablosun u, bilg isayarınızd aki kul lanılabil ir USB 3 .0 bağl antı no ktasına b ağlayın.
Ses Bağlant ısı / Lü tfen aş ağıdaki Ses kon ektörü resmine ve anak artınızın kullanım kılavuzu na bakı n. Lütfen AC’97 veya H D
Audi o(Azalia) spesifikas yonunu kullanan bir anakart seçin (ses sistemi nizin A C’97 veya HD Au dio (Azalia) spesifik asyonunu
dest eklediğini unutmayın ); aksi takdirde, aygıt(lar)ını z zarar görür.
Русский
Указан ия по про кладке кабелей
Под ключе ние и ндика торов корп уса / В пер едней част и кор пуса распо ложен ы инд икато ры и прово да вы ключа телей.
Пер ед по дсоед инени ем эт их пр оводо в к м онтаж ной к олодк е пан ели н а мат еринс кой п лате изучи те ру ковод ство пол
ьзо вател я про извод ителя мате ринск ой пл аты.
Под ключе ние U SB 2.0 / См. ра здел «Подк лючен ие US B» в р уково дстве мате ринск ой пл аты.
Под ключе ние U SB 3.0 /
1. У бедит есь, чт о мат еринс кая п лата подде ржива ет по дключ ение по ст андар ту US B 3.0.
2. П одсое динит е каб ель U SB 3.0 к сво бодно му по рту U SB 3.0 компь ютера.
Под ключе ние а удиор азъем а / См. следу ющую иллюс траци ю ауд иораз ъема и рук оводс тво п ользо вател я мат еринс ко
й п латы. В ыбери те ма терин скую плату, в кот орой испол ьзует ся ко дек A C'97 и ли HD Audio (Azal ia) (уб едите сь, что зв
уко вая п лата подде ржива ет ко дек A C'97 и ли HD Audio (Azal ia)). В про тивно м слу чае м ожно повре дить устро йства.
L- O UT
SE NS E
R-O UT
MI C- P OW ER
MI C- I N
L- O UT
R-O UT
MI C- P OW ER
MI C- I N
USB 3.0 C on ne ct io n
SE NS E 2
KE Y
SE NS E 1
PR ES E NS E
GN D
L- R ET
KE Y
R-R ET
GN D
ภาษาไทย
คู่ม ือก ารต ิดตั้ งสา ยไฟ
การ เชื่อ มต่อไ ฟ LED ของ เค ส / ที ่ด ้า นห น้ าข อง เค ส คุ ณจ ะเห็นไฟ L ED แ ละ สา ยไ ฟข อง สว ิต ซ์
กรุ ณาศึก ษาราย ละเอี ยด จา กค ู่ มื อผ ู้ ใช ้ข อง ผู ้ผ ลิตแผงว งจ รห ลั กข อง คุ ณ
จาก นั้นใ ห้ เช ื่ อม ต่ อส าย ไฟ เห ล่ าน ี้ เข้ากับ ส่ วน หั วข อง แผ งบ นแ ผง วง จร หลัก
การ เชื่อ มต่อ US B 2. 0 / กร ุณ าศ ึก ษา รา ยล ะเ อี ยด จา กคู่มือ ผู ้ใ ช้ ขอ งผ ู้ ผล ิต แผ งว งจ รห ลักของค ุณ
ในห ัว ข้ อ "ก าร เช ื่ อม ต่ อ US B"
การ เชื่อ มต่อ US B 3. 0 /
1. ตร วจ ดู ให ้แ น่ ใจ ว่ าแ ผง วง จร หล ักของคุ ณร อง รั บก าร เช ื่ อม ต่ อ US B 3. 0
2. เช ื่ อม ต่ อส าย U SB 3 .0 เ ข้ าก ับ พอ ร์ต USB 3.0 ท ี่ สา มา รถ ใช ้ง าน ได ้บ นค อม พิ วเตอร์ข อง คุ ณ
การ เชื่อ มต่ออ ุปกรณ ์ร ับ ส่ งส ัญ ญา ณเ สี ยง / กร ุณ าด ูรายละเ อี ยด จา กภ าพ ปร ะก อบ ขอ งต ัว เช ื่อมต่อ สัญญา ณเ สี ยง ต่ อไ ปน ี้
และ คู่มื อผู้ใ ช้ ขอ งผ ู้ ผล ิต แผ งว งจ รห ลั กข องคุณ
กรุ ณาเลื อกแผง วง จร หล ัก ที ่ใ ช้ A C’ 97 ห รื อ HD A ud io(Azal ia)
(กร ุณาตร วจสอบ ให ้แ น่ ใจ ว่ าอ ุป กร ณ์ รั บส ่ง สัญญาณเ สี ยง ขอ งค ุณ รอ งร ับ A C’ 97 ห รื อ HD A udio (Aza li a) )
มิฉ ะนั้น อุ ปก รณ ์ข อง คุ ณอ าจ เส ีย หา ยไ ด้
L- O UT
SE NS E
R-O UT
MI C- P OW ER
MI C- I N
L- O UT
R-O UT
MI C- P OW ER
MI C- I N
USB 3.0 C on ne ct io n
SE NS E 2
KE Y
SE NS E 1
PR ES E NS E
GN D
L- R ET
KE Y
R-R ET
GN D
2120
Page 14

Note:
 Loading...