

Page 1

Bigwater 780e
CL-W0169
Eng lis h Eng lis h
2008 Therma ltake Technolo gy Co., Ltd. A ll Righ ts Rese rved. 2008.01 O4655
C
Tested To Co mply
With FC C Standar ds
FOR HO ME OR OF FICE USE
All other re gistere d trade marks belong to thei r respe ctive c ompanie s.
www. therm altak e.com
7 8 0 e
7 8 0 e
3U Bay Drives Liqui d Cooling System
P/N : CL-W0 16 9
Page 2

Bigwater 780e
CL-W0169
Eng lis h Eng lis h
Limited Li abi lity
The se wa rra nti es replac e all o the r war ran tie s, ex pres sed or im plied i nclud ing,
but n ot limi ted to, t he impl ied war ranti es of mer chant abili ty and fi tness f or a
par ticul ar purp ose.
The rma lta ke di sclaims a ll ot her w arr ant ies , exp ress ed or imp lied in cludi ng,
wit hout li mitat ion, im plied w arran ties of m ercha ntabi lity an d fitne ss for a pa rticu lar
pur pose.
Som e juris dicti ons do no t allow t he excl usion o f impli ed warr antie s so this
lim itati on may no t apply t o you. All e xpres sed and i mplie d warra nties a re limi ted in
dur ation t o the lim ited wa rrant y perio d. No war ranti es appl y after t hat per iod, so me
jur isdic tion do n ot allo w limit ation o n how lon g an impl ied war ranty l asts, s o this
lim itati on may no t apply t o you.
Lim itati ons of li abili ty, Ther mal take's re spo nsi bil ity u nde r this, or an y oth er
war ranty, i mpl ied o r exp ressed, a re li mit ed to r epa ir or r epl acem ent, as s et fort h
abo ve. The se re med ies a re the sole a nd excl usive r emedi es for an y breac h of
war ranty. T her maltake i s not r esp ons ibl e for d irect, sp eci al, i nci den tal , or
con seque ntial d amage s resul ting fr om any br each of w arran ty or und er any ot her
leg al theo ry incl uding , but not l imite d to, los t profi ts, dow ntime , goodw ill, da mage
to or r eplac ement o f equip ment an d prope rty, and a ny co st of r eco vering,
rep rogra mming , or repr oduci ng any pr ogram o r data st ored in o r used wi th a
sys tem con taini ng Ther mal tak e pro duct. Som e jur isd ict ion s do no t all ow the
exc lusio n or limi tatio n of inci denta l or excl usion s may not a pply to y ou.
Ext ent of li mited w arran ty, Ther mal take d oes not warr ant t hat y our p rod uct w ill
be fr ee from d esign d efect s or erro rs know n as "ERR ATA". C urr ent c har acteriz ed
err ata are a vaila ble upo n reque st. Thi s lim ite d war ran ty doe s not cov er an y cos ts
rel ating t o remov al or rep lacem ent of an y part th at is sol dered o r other wise af fix ed
to yo ur syst em's mo therb oard. T his l imi ted w arranty d oes n ot co ver d ama ges d ue
to ex terna l cause s, incl uding a ccide ntal, p roble ms with e lectr ical po wer, usa ge not
in ac corda nce wit h produ ct inst ructi ons, mi suse, n eglec t, alte ratio n, repa ir,
imp roper i nstal latio n, or imp roper t estin g. Nor is T her mal tak e held liab le for an y
bod ily dam age tha t may res ult dur ing the i nstal latio n, main tenan ce, rep air, or is
oth erwis e assoc iated w ith thi s produ ct, The rma lta ke is f ree from an y leg al ac tio ns
tha t may res ult in de ath, pa in and an guish , or any ot her for m of pers onal da mage
tha t may occ ur by pur chasi ng this p roduc t.
You, th e buyer, a gree to t his war ranty a nd its te rm set wi thin it s expre ssed an d
imp lied li mited w arran ty. This l imi ted warra nty g ive s you s pec ifi c legal rig hts , and
you m ay also h ave oth er righ t that va ries fr om juri sdict ion to ju risdi ction .
CAUTION
Befo re installing Thermaltake Bigwater 780e
Liqu id Cooling System, we strongly suggest you
to rea d the manual thro ughly and make sure all
comp onents are included in the package. Please
do fol low the installation guide step-by-step.
Impr oper installa tion may cause serious
dama ge to the system as w ell as to the water
cool ing unit. Thermaltake will not responsible for
any da mages due to incorrect installation and
inco rrect usage of th is product.
Page 3
Bigwater 780e
CL-W0169
Eng lis h Eng lis h
01 02
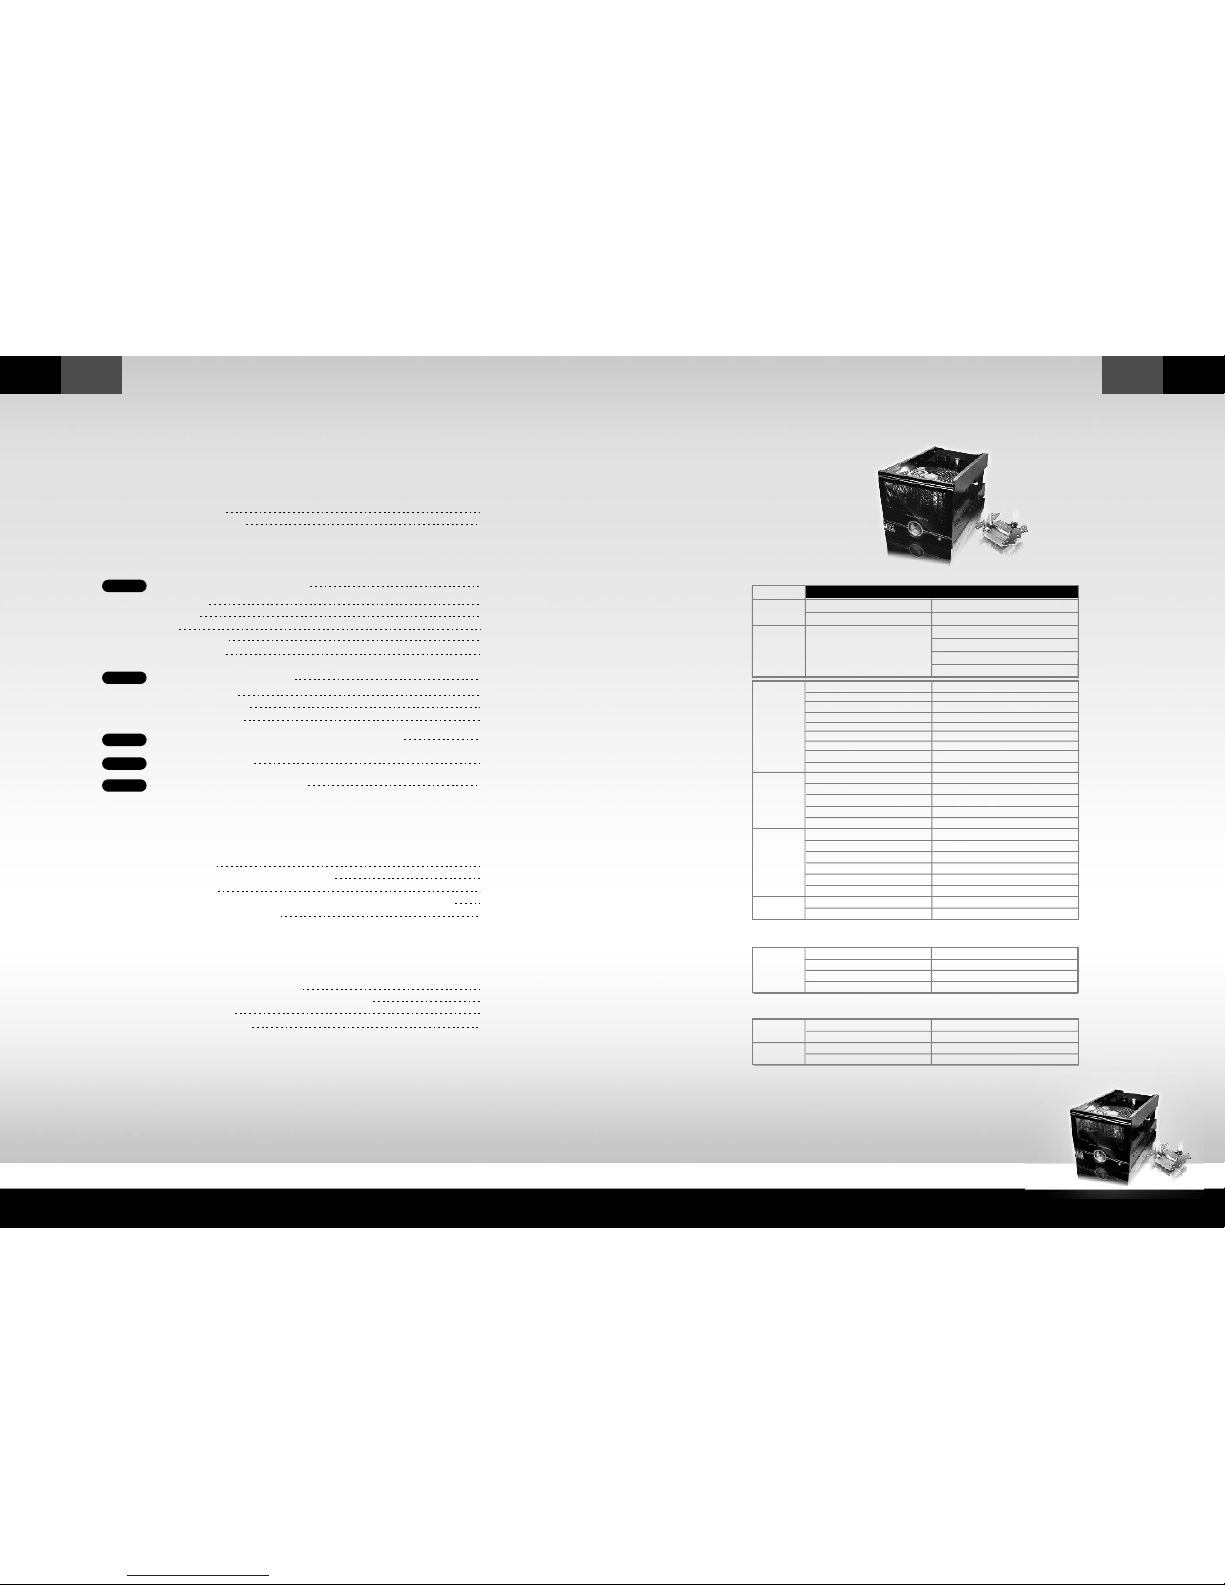
1.1 Specification
Chapter 1. Product Introduction
Water Bloc k
3U Bay Dri ves
P/N CL-W0169
Pump
Radiator
Weight
Dimensi on
Fan
Liquid Tank
Tube
Coolant
CPU
Application
Contents
Chapter 1. Product Introduction
Chapter 2. Liquid Cooling Installation Steps
Spe cific atio n
Com ponen ts c heck
Chapter 3. Thermaltake ESA Watercooling
Software User Guide
1.1
1.2
Chapter 4. Other
02
03
Inte l LGA 77 5
Inte l P4 4 78
AMD K8
AMD A M2 / AM2 +
Inst all Wat er tu be
Inst all th e Mai n Uni t
ESA P CB Intr oducti on
ESA P CB Inst allati on
Syst em Upd ate
NVID IA nTune Perfor mance Appli catio n
NVID IA Monit or
Swit ch bet ween NVIDI A Mo nitor & NVID IA P erfor mance softwa re
Water cooli ng LE D Indic ation
Armo r Plus ESA Ser ies ( optio nal)
Toughp ower ESA po wer s upply series (optio nal)
Liqu id Coo ling Q&A
Sche dule M ainte nance
Ins tall the main unit
Con nect the Quick conn connec tor
Ref ill Coolant
Pow er o n the s yste m
Ins tall ation w ater block
2.1
2.2
2.3
2.4
2.5
2.6
2.7
2.8
3.1
3.2
3.3
3.4
3.5
4.1
4.2
4.3
4.4
05
05
07
09
12
15
17
17
18
19
21
21
24
27
32
34
35
36
37
38
39
40
STE P1
STE P2
STE P3
STE P4
STE P5
249. 5mm(L ) X 149mm (W) X 128 mm(H)
1.74 (kg)
AMD AM2 / AM 2+
AMD K8
Inte l LGA77 5
Inte l P4
Dime nsion
Bear ing
Maxi mum Cap acity
Rate d Voltag e
Inpu t curre nt
Conn ector
Nois e
Life t ime
Conn ector
75(L ) x 70(W) x 7 5(H) mm
Cera mic bea ring
500 L/ h r
DC 12V
600 mA (MAX)
4 pin
10 ~16 d BA
8000 0 hr (MTB F)
4-Pi n PWM fun ction
Dime nsion
Mate rial
Tube De sign
Fin De sign
Tubin g & Hoes Cl ip
Fan Di mensi on
Fan Sp eed
Rate d Voltag e
Nois e
Life E xpect ancy
Conn ector
Dime nsion
Capa city
Mate rial
Dime nsion
Tubin g & Hoes Cl ip
Weig ht
Dime nsion s
Mate rial
Capa city
Majo r Mater ial Ing redie nt
All co pper de signe d
58mm (L) X 58m m(W) X 35 mm(H)
For 9. 5mm ID (3 /8") tu bing
318( g)
9.5m m ID(3/ 8") tub e
Gree n UV
1000 c .c
Prop ylene G lycol
130. 2 (L) x 107 .2(W) x 5 1.5(H ) mm
530 c. c
120( L) x 120( w) x 25(H ) mm
800~ 2500 RP M(PWM )
12V
10 ~20 d B
30,0 00 hr
4-Pi n PWM fun ction
153( L) x 120( W) x 28(H ) mm
Alum inum
Alum inum, D imple
Alum inum, L ouver ed
For 9. 5mm ID (3 /8") tu bing
Page 4
Bigwater 780e
CL-W0169
Eng lis h Eng lis h
03 04
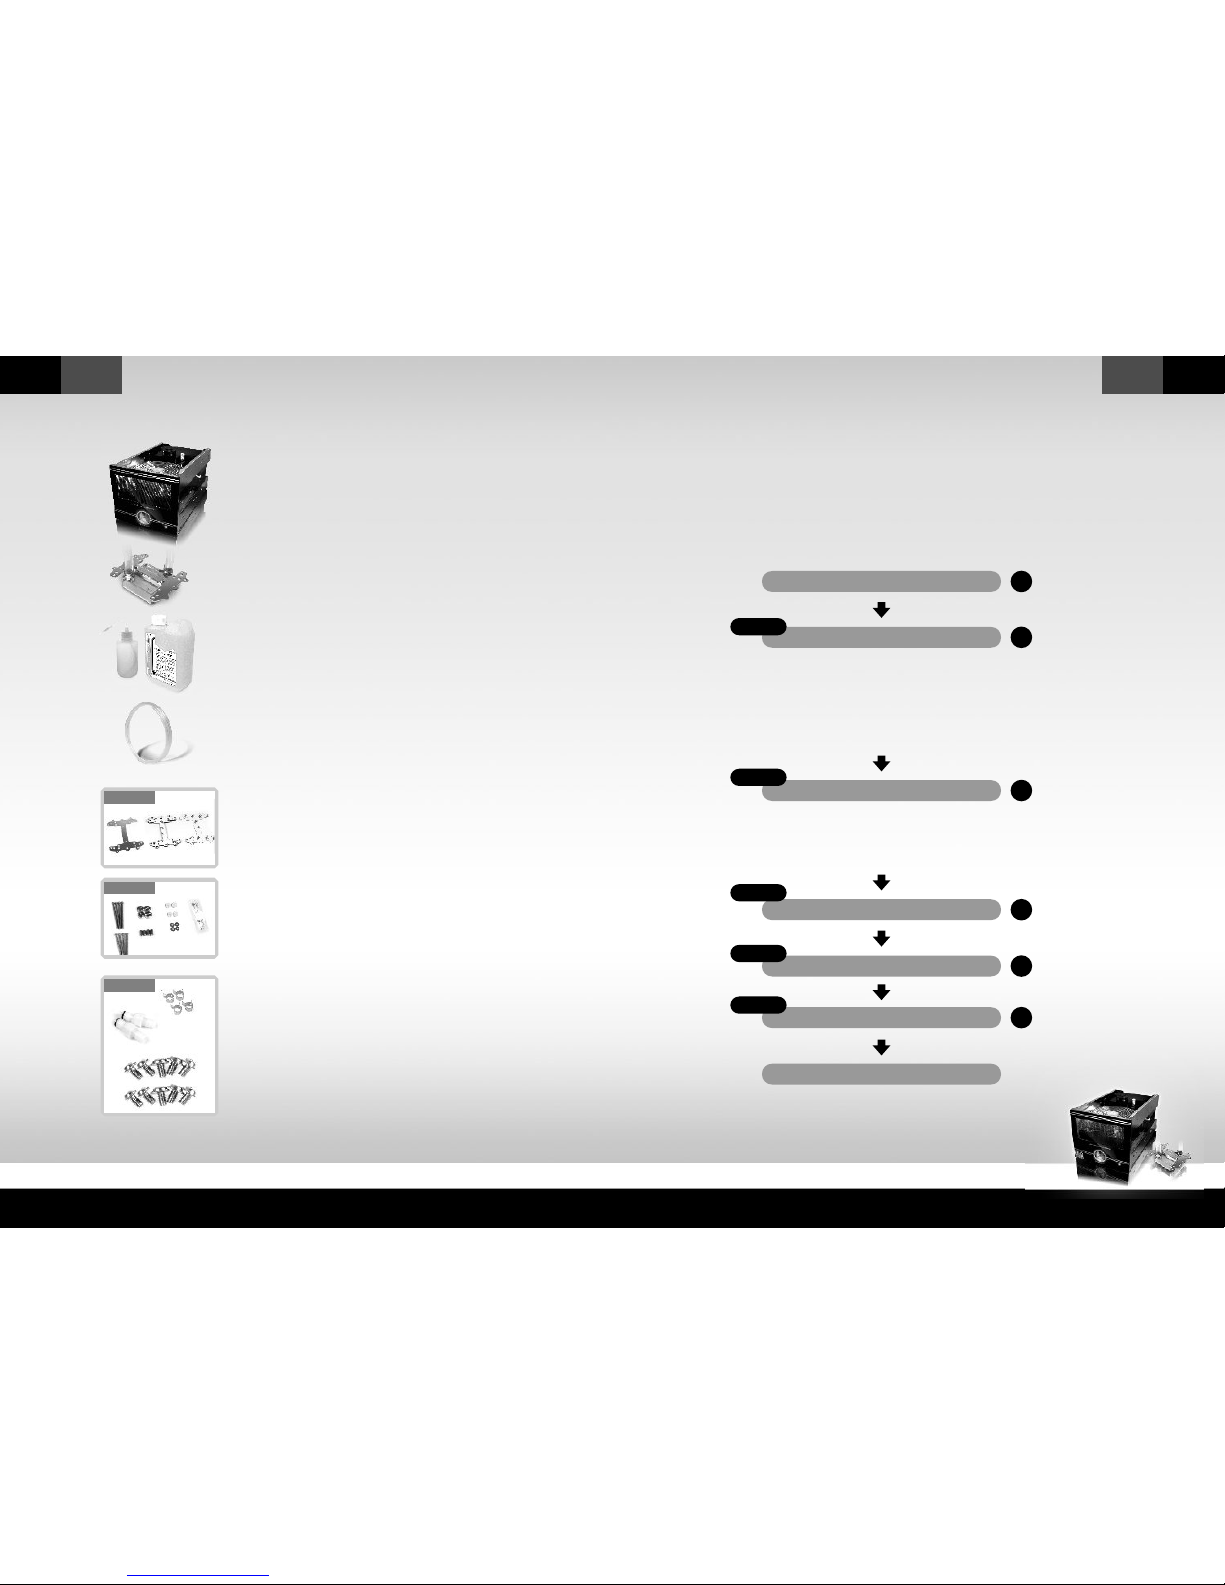
1.2 Components check
Bag (A)
Bag (B)
Bag (C)
A
B
C
D
E
F
H
I
J
K
M
A - M etal H- type cl ip
B - Cushion
C - Insulat or
D - 50mm
E - Thumb n uts x4
F - White w ashers x4
G - Thermal compou nd
H - 38mm sc rews x 4
I - Stand offs x 4
J - Red was hers x 4
scre ws x4
K - Quickco nn Con necter X2
L - H ose cli ps(for tube) x4
M - 5mm scr ews x 10
Clip s for :
- In tel LGA 775 & P4 478
- AMD AM2+ / AM2 & K 8
All copper water block
main unit
Water tube
Trans parent UV tub e (3/8" )
UV s ensitiv e 1000 cc
Cool ant x 1
Refi ll Bott le
G
L
2.1 Liquid Cooling Installation steps
C ompo nents check
2.1 Intel LGA 775
2.2 Intel P4 478
2.3 AMD K 8
2.4 AMD AM2 / AM 2+
2.5 Install Water tube
2.6 Install the Main U nit
2.7 ESA PCB Introduct ion
2.8 ESA PCB Installat ion
We stro ngly su gges t the f ollo wing in stal lation
pro cedu res. Fa ilur e to co mply may resul t in
lea ks a nd dama ged compone nts.
Ins tall Waterb lock
Ins tall the Main Unit
Ref ill Coolant
Con nect the Quickconn con nector
Power on the sy stem
Com plet e installat ion
Chapter2 Liquid Cooling Installation
P05
P03
P17
P21
P21
P24
STEP1
STEP2
STEP3
STEP4
STEP5
Page 5

Bigwater 780e
CL-W0169
Eng lis h Eng lis h
05
06
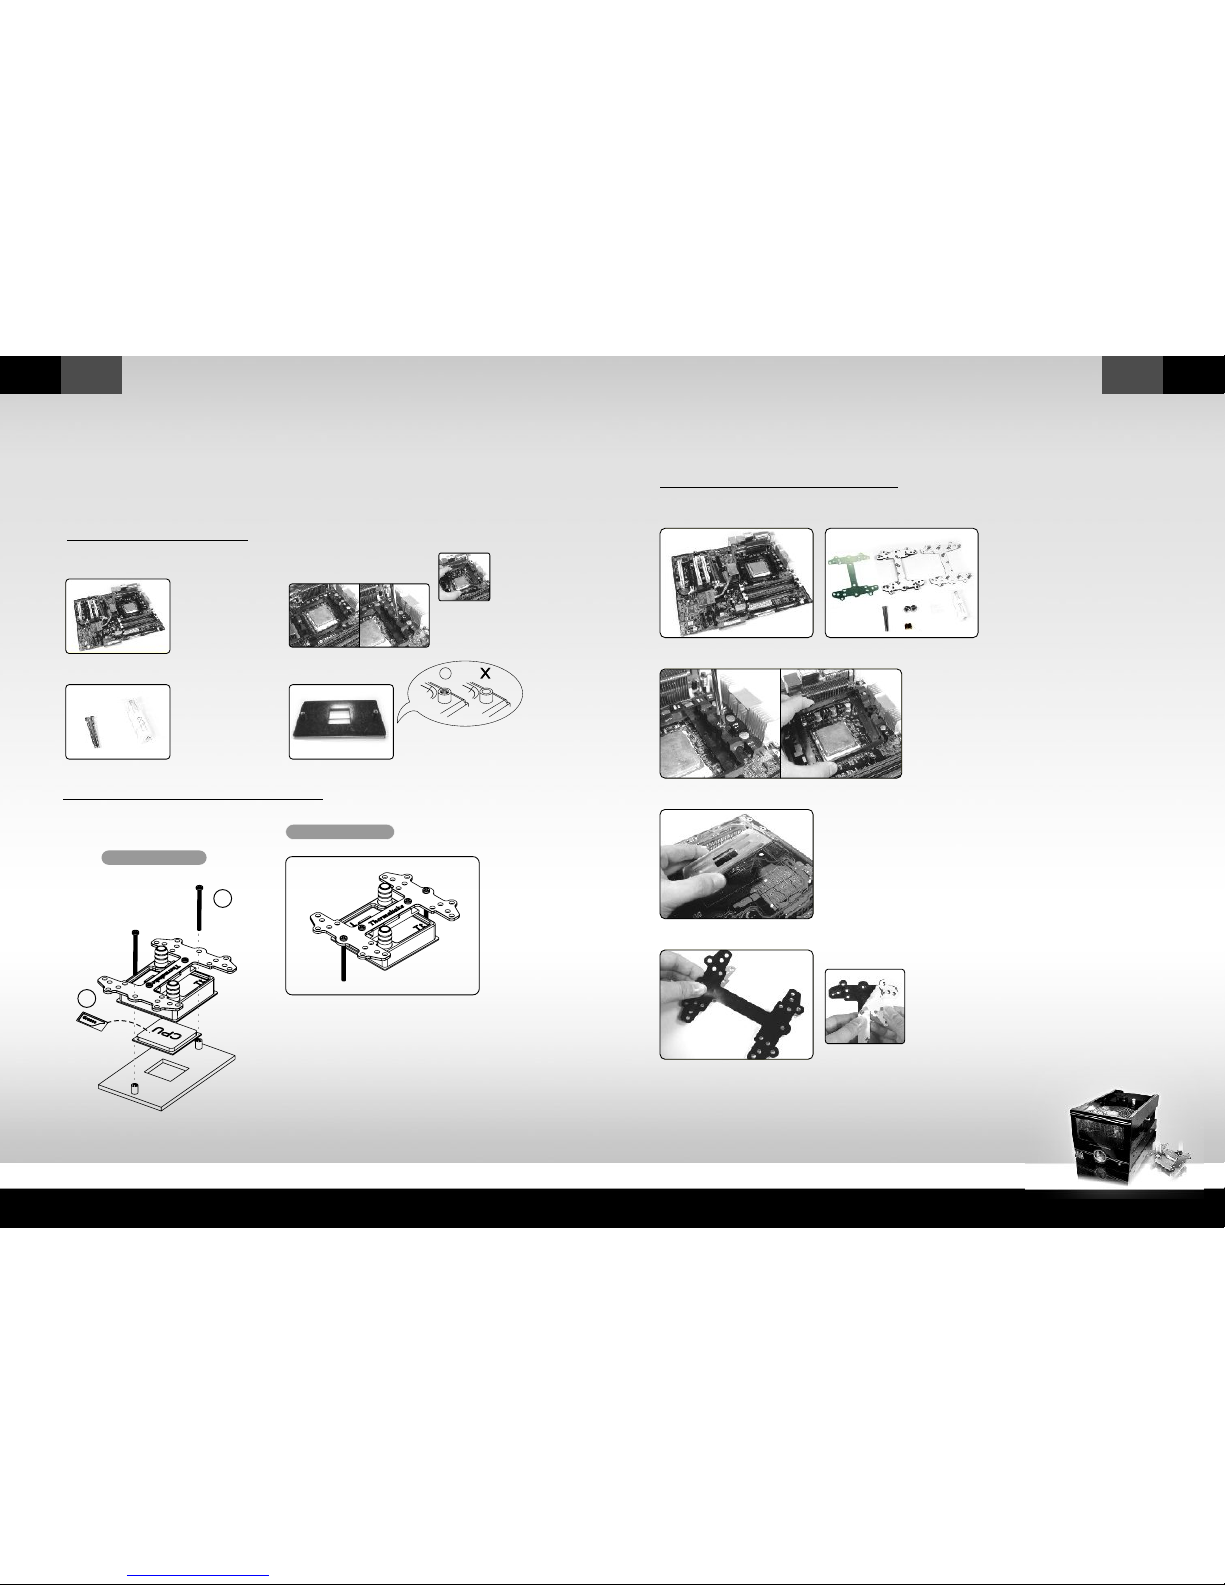
2.1 Intel LGA 775 - Secure Waterblock onto CPU
2.1 .1 I nstall the Clip on Mot herboar d
>> Install waterblock
2.1 .2 I nstall Wate rblo ck on M othe rboard
Intel L GA 775
Mothe rboard
Compo nents for
LGA 775:
Tear off the tape on the
back of the insula tor ( C)
and place it o n the metal
H-typ e cli p(A).
Combi ne th e ins ulator(C) an d
the cushio n (B) using t he
adhes ive. Stick the metal H-type
clip( A) wi th th e insulators (BC).
Tear off the protectiv e lay er to
adher e it onto the motherb oard.
Attac h H-t ype c lips(includin g
ABC)o n the back si de of
mothe rboard .
Not e: Plac ing the c ushio n onto th e
mot herbo ard wit h the adh esive w ill
pre vent yo u from re movin g the cus hion
in th e futur e. If you a re plan ning to r emove
the c ushio n for fut ure use , pleas e don't
rem ove the p rotec tive ta pe.
A-M etal H- type cl ip
B-C ushio n
C-I nsula tor
D-5 0mm scr ews
E-T humb nu ts
G-T herma l compo und
I -St and off s
J -Re d washe rs
A
B
C
A
B
C
D
E
G
I
J
A
C
B
Ex ploded View
Compl eted View
1.Ins ert t he sc rews (D) th rough the clip(AB C)
in to th e fou r holes on the Motherboard.
2.Put the was hers (J) a long the sc rews to prevent
th e ele ctric current.
3.Put the sta nd of fs (I ) alon g the screws to fi x the
sc rews on th e motherboar d.
4.App ly a thin layer of thermal co mpound (G) o nto
th e pro cessor .
5.Pla ce wa terblo ck on the processor throu gh th e
sc rews and f ix it by thumb nuts(E).
Note:
ACB
E
A
I
J
D
G
STEP1
Page 6

Bigwater 780e
CL-W0169
Eng lis h Eng lis h
07 08
2.2 Intel P4 Socket 478 - Secure Waterblock onto CPU
2.2 .1 I nstall the Clip on Mot herboar d
2.2 .2 I nstall Wate rblo ck on M othe rboard
A
C
B
Intel P4 478
Mothe rboard
Compo nents for
P4 4 78 :
Tear off the tape on the
back of the insula tor ( C)
and place it o n the metal
H-typ e cli p(A).
Not e: Plac ing the c ushio n onto th e
mot herbo ard wit h the adh esive w ill
pre vent yo u from re movin g the cus hion
in th e futur e. If you a re plan ning to
rem ove the c ushio n for fut ure use , pleas e
don 't remo ve the pr otect ive tap e.
A-M etal H- type cl ip
B-C ushio n
C-I nsula tor
D-5 0mm scr ews
E-T humb nu ts
G-T herma l compo und
I -St and off s
J -Re d washe rs
A
B
C
D
E
I
G
J
Combi ne th e ins ulator(C) an d
the cushio n (B) using t he
adhes ive. Stick the metal H-type
clip( A) wi th th e insulators (BC).
Tear off the protectiv e lay er to
adher e it onto the motherb oard.
Attac h H-t ype c lips(includin g
ABC)o n the back si de of
mothe rboard .
Ex ploded View
Note:
1.Ins ert t he sc rews (D) th rough the clip(AB C)
in to th e fou r holes on the Motherboard.
2.Put the was hers (J) a long the sc rews to prevent
th e ele ctric current.
3.Put the sta nd of fs (I ) alon g the screws to fi x the
sc rews on th e motherboar d.
4.App ly a thin layer of thermal co mpound (G) o nto
th e pro cessor .
5.Pla ce wa terblo ck on the processor throu gh th e
sc rews and f ix it by thumb nuts(E).
Compl eted View
G
E
A
I
J
D
ACB
Page 7
Bigwater 780e
CL-W0169
Eng lis h Eng lis h
09
10
2.3 .1
m othe rboard back plate
Sta ndar d insta llat ion - I nsta ll wate rblo ck by
2.3
Waterblock onto CPU
AMD K8 Socket 754 / 939 / 940 - Secure
2.3.1 .1 Ch eck T he Back Pla te
Ex ploded View
G
H
2.3.2 .1 In stall the Clip o n Mot herboard
2.3 .2 I nstall wate rblock by c lips in clud ed in p acka ge
2.3.1 .2 In stall Waterb lock on Mot herboa rd
AMD K8
Mothe rboard
Compo nents f or
AMD K8:
G-T herma l compo und
H-3 8mm scr ews
Rem ove the r etent ion
fra me from m other board .
Check Your Ba ck Plat e!
A. If t he back p late do es have t hread ed
sta ndoff s, plea se cont inue wi th stan dard
ins talla tion 2. 3.1.
B. If t he back p late do es NOT ha ve
thr eaded s tando ffs, pl ease co ntinu e
wit h 2.3.2 .
Compl eted View
1.App ly a thin layer of thermal co mpound (G)
on to th e pro cessor.
2.Pla ce wa terblo ck on the processor.
3.Sec ure t he wa terblock on the motherboard by
us ing s crews( H).
AMD K8 Mo therbo ard
A-M etal H- type cl ip
B-C ushio n
C-I nsula tor
D-5 0mm scr ews
E-T humb nu ts
F-W hite wa shers
G-T herma l compo und
I -St and off s
Compo nents for
AMD K8:
Remov e the retentio n
modul e fro m the motherbo ard.
Remov e the back pl ate o n
back side of motherboa rd.
Tear off the tape on the back of
the insula tor ( C) and plac e it on
the metal H-typ e clip(A).
Not e: Plac ing the c ushio n onto
the m other board w ith the
adh esive w ill pre vent yo u from
rem oving t he cush ion in th e
fut ure. If y ou are pl annin g to
rem ove the c ushio n for fut ure
use , pleas e don't r emove t he
pro tecti ve tape .
H
G
A
B
C
D
E
F
I
G
Page 8

Bigwater 780e
CL-W0169
Eng lis h Eng lis h
11 12
2. Secure Waterblock onto CPU (AMD Socket AM2 /
AM2+)
4
2.4 .1
m othe rboard back plate
Sta ndar d insta llat ion - I nsta ll wate rblo ck by
2.4.1 .1 Ch eck T he Back Pla te
Ex ploded View
H
G
Combi ne th e ins ulator(C) an d the
cushi on (B ) usi ng the adhe sive.
Stick the met al H- type clip(A) with the
insul ators (BC). Tear of f the protectiv e
layer to adhe re it onto th e mot herboard.
Attac h H-t ype c lips(includin g
ABC)o n the back si de of
mothe rboard .
2.3.2 .2 In stall Waterb lock on Mot herboa rd
Ex ploded View
Compl eted View
1.Ins ert t he sc rews (D) th rough the clip(AB C)
in to th e two holes o n the Motherboard.
2.Put the was hers (F) a long the sc rews to prevent
th e ele ctric current.
3.Put the sta nd of fs (I ) alon g the screws to fi x the
sc rews on th e motherboar d.
4.App ly a thin layer of thermal co mpound (G) o nto
th e pro cessor .
5.Pla ce wa terblo ck on the processor throu gh th e
sc rews and f ix it by thumb nuts(E).
AMD A M2
Mot herbo ard
Compo nents f or
AMD AM2/AM2+ :
G-T herma l
com pound
H-3 8mm scr ews
Remov e the retention
frame from mo therboar d.
2.4.1 .2 In stall Waterb lock on Mot herboa rd
Check Your Ba ck Plat e!
Compl eted View
1.App ly a thin layer of thermal co mpound (G)onto
th e pro cessor .
2.Pla ce wa terblo ck on the processor.
3.Sec ure t he wa terblock on the motherboard
by using s crews( H).
G
H
A
C
B
E
A
I
F
D
G
ACB
A. If t he back p late do es have t hread ed
sta ndoff s, plea se cont inue wi th
sta ndard i nstal latio n 2.4.1 .
B. If t he back p late do es NOT ha ve
thr eaded s tando ffs, pl ease co ntinu e
wit h 2.4.2 .
Page 9

Bigwater 780e
CL-W0169
Eng lis h Eng lis h
13 14
2.4.2 .1 In stall the Clip o n Mot herboard
2.4 .2 I nstall wate rblock by c lips in clud ed in p acka ge
A-M etal H- type cl ip
B-C ushio n
C-I nsula tor
D-5 0mm scr ews
E-T humb nu ts
F-W hite wa shers
G-T herma l compo und
I -St and off s
Compo nents for AMD AM2/AM2+ :
AMD AM2 M otherb oard
Remov e the retentio n
modul e fro m the motherbo ard.
Remov e the back pl ate o n
back side of motherboa rd.
Tear off the tape on the back of
the insula tor ( C) and plac e it on
the metal H-typ e clip(A).
Not e: Plac ing the c ushio n onto
the m other board w ith the
adh esive w ill pre vent yo u from
rem oving t he cush ion in th e
fut ure. If y ou are pl annin g to
rem ove the c ushio n for fut ure
use , pleas e don't r emove t he
pro tecti ve tape .
A
B
C
D
E
F
I
G
2.4.2 .2 In stall Waterb lock on Mot herboa rd
Combi ne th e ins ulator(C) an d the
cushi on (B ) usi ng the adhe sive.
Stick the met al H- type clip(A) with the
insul ators (BC). Tear of f the protectiv e
layer to adhe re it onto th e mot herboard.
Attac h H-t ype c lips(includin g
ABC)o n the back si de of
mothe rboard .
Ex ploded View
Compl eted View
1.Ins ert t he sc rews (D) th rough the clip(AB C)
in to th e fou r holes on the motherboard.
2.Put the was hers (F) a long the sc rews to prevent
th e ele ctric current.
3.Put the sta nd of fs (I ) alon g the screws to fi x the
sc rews on th e motherboar d.
4.App ly a thin layer of thermal co mpound (G) o nto
th e pro cessor .
5.Pla ce wa terblo ck on the processor throu gh th e
sc rews and f ix it by thumb nuts(E).
A
C
B
E
A
I
F
D
G
A
CB
Page 10

Bigwater 780e
CL-W0169
Eng lis h Eng lis h
15 16
2.5 Install Water tube
Rem ove black rubbe r caps fr om
the waterb lock .
Ins ert the h ose clip throug h
the tube. Conn ect the tube with
the waterb lock .
Use pliers to tig hten the hose c lips .
Rep eat the s teps for the ot her side .
Fir st determ ine the leng th r equir ed f or
tub ing from wate rblo ck t o th e mai n
uni t. Th en c ut t he tubing accor dingly.
I nsert the hose clips and
m ale quick conne ctor
t hrough th e tu be.
Use pliers to tig hten
the hose c lips . Re peat the
ste ps for th e ot her side .
Install Qu ickconn Con necter
In
Out
CP U Waterb lock
3U b ay liqu id cool ing sys tem
Page 11

Bigwater 780e
CL-W0169
Eng lis h Eng lis h
17 18
>> Install the Main Unit
2.6 Install the Main Unit
Remo ve the drive bay cov er
from the s elect ion pos ition.
(The follo wing duagra ms ar e the
Ther maltak e Armo r plu s case .)
Note :
If y ou use other cases , plea se in stall
the Bigwat er 78 0e fol low o rigin al
5.25 " devi ce in stalla tion.
You ca n also sesure the Bi gwater 780e
by s crews( M).
Big wate r 780e is h ighly r ecom mended to b e insta lled in the top 3 driv e
bay s of Thermalta ke X aser VI and Armor P lus Chassis .
Inse rt the Bigwat er 78 0e
into 5.25 drive bay.
Pull the r ight- hand si de of the l ever
to r emove the 5 .25" de vice.
Inst allati on co mplete .
STEP2
2.7 ESA PCB Introduction
a
b
d
e
f
g
h
i
c
a. Po wer con necto r : Conne ct the 4- pin pow er conn ector .
b. Ca se LED :C onnec t to ESA Wat erc ooling LE D con nec tor m ark ed in F igure 1(P 19) .
It is n ot nece ssary t o conne ct to cha ssi s if yo u are n ot us ing Th erm alt ake E SA- com pliant
cha ssis sy stem.
c. LE D : Conne ct LED co nnect or
d. PW M pump : Co nnect t o PWM pum p.
e. PW M fan : Con nect to P WM fan.
f. US B conne ctor : Co nnect t o USB con necto r on the mo therb oard.
g. Wa ter Temp s ens or( 1) : Co nne ct to F low TX ( Inl et) t emp erature s ens or.
h. Wa ter Temp s ens or( 2) : Co nne ct to F low TX ( Out let ) tem peratur e sen sor.
i. Wa ter L evel sens or : Co nne ct to Wa ter L eve l sen sor o n the tank .
Page 12

Bigwater 780e
CL-W0169
Eng lis h Eng lis h
19 20
a
f
Ste p 1: Conn ect the 4 -pin po wer con necto r of BigW ater 78 0e to pow er supp ly.
Pow er conn ector c able (a )
2.8 ESA PCB Installation
Please following installation procedure.
Ple ase not e that th e pins of V CC &
GND m ust be co nnect ed corr ectly o r
it ma y cause s ome dam age.
Signal
Pin
D-
D+
1(Red wire)
2
3
4
Ground
VCC(+5V)
D-
D+
Ground
VCC(+5V)
Ste p 2: Conn ect to US B conne ctor on t he moth erboa rd.
USB c onnec tor cab le(f)
Ste p 3: Connect L ED ca ble f rom t he ES A cha ssis i f
you a re usin g this Wa terco oling w ith Tt ES A chass is as wel l.
Cas e LED cab le(b)
The re are tw o LED con necto rs on the E SA chas sis PCB f or Tt ESA
wat ercoo ling an d Tt ESA po wer sup ply. Pl ease co nnect t he ESA Wa terco oling
sta tus LED c able to t he corr ect con necto r for ESA B igwat er 780e . For
mor e detai l infor matio n, plea se refe r to your T herma ltake E SA
cha ssis us er manu al.
Fig ure 1
ESA C hassi s PCB
ESA W aterc oolin g PCB
b
Page 13

Bigwater 780e
CL-W0169
Eng lis h Eng lis h
21 22
>> Connect the Quickconn connector
>> Refill Coolant
Ope n the cap of li quid tank .
Fil l the tan k up with coola nt.
(Th e followi ng d uagr ams are the
The rmaltake A rmor plus c ase. )
Con nect the
Qui ckconn co nnec tor.
Turn on the PC power s witc h.
Ple ase make sure liquid is
flo wing cont inuo usly and
smo othly wit hin the tube .
Clo se the ca p of liquid tan k.
Liq uid level will decrease when you
pow er o n the syste m, please keep
fil ling cool ant unti l th e ta nk is fille d up .
STEP3
STEP4
Not e:
If you use o ther chassis, t he c oola nt
sho uld be re fill ed f rom the side pane l.
In
Out
CP U Waterb lock
3U b ay liqu id cool ing sy stem
Page 14

Bigwater 780e
CL-W0169
Eng lis h Eng lis h
23 24
Not e:
1. If bubble s ar e fo rmin g wi thin the tubi ng, you may tap t he
t ubing gen tly to r emov e th em un til all are gone .
2. Af ter inst alla tion is compl eted , pl ease ensure there are no
b ent tubin gs.
Adj ust the f an s peed .
(80 0~25 00 RP M)
Turn off th e PC powe r sw itch .
Clo se the co ver of c hass is.
>> Power on the system
Turn on the PC power s witc h.
Ins tallation compl ete.
STEP5
Page 15

Bigwater 780e
CL-W0169
Eng lis h Eng lis h
25 26
Chapter 3. Thermaltake ESA Watercooling
Software User Guide
ESA de vices provi des real-tim e mon itor and co ntrol of Th ermalt ake P C Chas sis,
Therm altake Power S upply and T hermal take Wa ter-co oling devices.
Note:
The latest ESA softw are c an be downloading on nvidia.c om an d wil l be shippe d wit h
mothe rboard s.
Syste m Req uireme nt:
Supported O perati ng Sy stems
Micros oft Windows XP (3 2-bit & 64 -bit)
Micros oft Windows VistaT M
Supported M otherb oards:
NVIDIA n Tune supports all nForc e 680 Platform as we ll as nForce 78 0 Platfor m
motherboards .
Insta lling NVIDI A ESA softwares
- Be fore you b egin, please make su re yo ur ha rdware meets th e “Sys tem R equirements”.
- Un instal l any previous versions of NVID IA NV Monitor / Perfo rmance / Syste m upd ate
be fore inst alling th e l atest ver sion
Insta llatio n Ins tructions
1.D ownloa d the zip fil e, then unz ip to a tempo rary folder.
2.D ouble- click Setup fr om you r tempora ry folder .The Instal lShiel d Wiz ard st arts,
an d dir ects you through the rest of the installatio n p rocess .
3.A t the Welcome window, click Next.
4.R ead t he li cense agreem ent, then click Yes if you agr ee to the terms .
5.A t the choose destin ation locati on wi ndow, b rowse to lo cate the folder where you
wa nt to NVIDIA file s i nstall ed,or just use the defa ult locat ion and clic k N ext.
6. At th e Ins tallShield W izard Compl ete wi ndow, y ou ca n choose to create Deskto p
sh ortcut s and Quick L aunch shortc uts i tems, cli ck Fin ish..
-
-
-
-
Aft er install th e NV Monitor, Perform ance and Syst em update,
you can see thre e icons on th e desktop of Windows sy stem.
Page 16

Bigwater 780e
CL-W0169
Eng lis h Eng lis h
27 28
Ple ase make sure your Therm alta ke E SA de vice s with la test firmwa re.
Ste p1:
You n eed to choose Therm altake ES A Wate rcoo ling .
3.1 System Update
Cau tion!!
All the la test ESA fir mwar e po sted at The rmal take Webs ite is f or pr oduc ts s old and
pac kage d by Ther malt ake. Updati ng t he E SA fi rmwar e on ly i f yo u ha ve pr oble ms a nd y ou
are sure t hat the new firmw are revi sion will s olve your p robl ems. Care less upda ting may
res ult to mo re p robl ems with the Ther malt ake ESA C hassis, T herm alta ke E SA Wat er
Coo ler and T herm alta ke E SA Po wer Suppl y!
For the la test inform atio n, p leas e vis it w ww.th erma ltak e.com
Page 17

Bigwater 780e
CL-W0169
Eng lis h Eng lis h
29 30
Ste p 2:
You need to browse th e folder w her e you put the ESA Watercooli ng
fir mware (for ex ample) file a nd then open it.
Page 18

Bigwater 780e
CL-W0169
Eng lis h Eng lis h
31 32
Ste p 4:
Aft er finished t he firmware u pdate, please click the OK bottom.
Ste p 3:
Cli ck the load F W button to l oad firmwa re.
Aft er selecting the performan ce icon, the user must sel ect“Accept
End User License Agreement” l ink and agree to begin usi ng nTune.
3.2 NVI DIA nTune Performance A pplic ation
Page 19

Bigwater 780e
CL-W0169
Eng lis h Eng lis h
33 34
In the NVIDIA C ontrol Pane l under per formance it em, you can use Device
set ting s to ch oose or Waterco oler (Figur e1). At each device 's s etting,
you are able to a djus t PWM & PWM Fan sp eed in perc enta ge.
All the adjustmen t wi ll disp lay in NVID IA M onitor.
(Fi gure1)
Onc e you impleme nt the NVIDIA Monitor softw are, you are able to
sel ect which com ponents that you want t o c heck its s tatus.
For the Thermalt ake ESA waterc ooling, you w ill see seven icons
wit h different f unction.
Use rs are able t o monitor Wate r Level, Water Temp erature in /
Temperat ure out.
3.3 NVI DIA Monitor
Page 20

Bigwater 780e
CL-W0169
Eng lis h Eng lis h
35 36
Whi le y ou are usin g NVIDI A Monitor so ftware, you may click the
arr ow t o shrin k it and adjus t an y value in NVIDIA P erformance as you wish .
Onc e yo u finis h th e adjus tmen t in NV IDIA Perform ance, you c an
dou ble click t he N VIDIA Mo nitor icon on t ool bar or
typ e Ct rl + ALT + C and see the change in NVIDIA M onit or.
3.4 Swi tch between NVIDIA Moni tor & NVI DIA
Perfo rmance software
Ca ut ion!!
Al l the late st ESA fi rmw ar e p os ted at The rm alt ake Web sit e is fo r pro duc ts
so ld an d pac kag ed by The rma lt ake . Upd ati ng the ES A fir mwa re only if you
ha ve pr obl ems a nd you ar e sur e tha t the new firm wa re re vis ion wil l sol ve
yo ur pr obl ems .C are les s up dat ing may resu lt to mor e pro ble ms wi th the
Th erm alt ak e E SA Chas si s, Th erm alt ak e E SA Wate r Coo le r a nd Ther ma lta ke
ES A Pow er Su ppl y!
Fo r the late st info rma ti on, ple ase visi t www .t her mal ta ke. com
3.5 Water cooling LED Indication
- Green Light : Good
- Orange Ligh t: Warni ng
- Red Li ght: Fail
Not e:
If yo u are usi ng chas sis fro m other b rands , the ope ratio n statu s of
Big Water 7 80e c an also be mo nit ore d fro m the L ED at t he fro nt.
ESA Bigwat er 780e i nstall wi th Ther malta ke ESA chass is
ESA C hassi s LED
ESA W aterc oolin g LED
Page 21

Bigwater 780e
CL-W0169
Eng lis h Eng lis h
37 38
Chapter 4 Other
4.1 Armor Plus ESA Series (optional)
Armor Plus
Vh6 001 Ser ies
- Op tim iz ed de sign fo r both li qui d co oli ng a nd ai r cooli ng sy st em
- Sl idi ng h ood w ith too lbo x on t op. ( Up gra da ble t o LCS.)
- 10 P CI sl ot s des ign for q uad -g rap hi c car d co nfi gu rat ion
- To ol fr ee d esi gn for 5. 25” d ev ice a nd P CI sl ot .
- Sl idi ng m oth erboa rd tr ay
- In dep en den t th erm al mana gem en t for C PU , VGA & H DD .
- Ca ble m an age ment sy stem fo r bet te r cab le r out ing and
in ter na l air f low
- Ev olu ti ona ry adju sta bl e PSU s up por ti ng br idge
- Mi cro AT X, AT X, Exte nd-AT X sup po rte d
冷
4.2 Toughpower ESA power supply series (optional)
To ughpo we r 850W
P/N :W017 8
The Therm altake ESA Pow er Su pply serie s spe cifica tion suppor ts N VIDIA ESA Techno logy.
It also meets lates t Int el & AMD dual & Quad core proc essors and NVIDI A & AMD h igh
perf ormanc e gra phic cards; it off ers plent y of fu nction s, which main ly includ e:
1. ESA p ower supply is capa ble f or t empera ture sensin g, cu rrent sens ing, voltag e
s ensing , and status LED s upport .
2. ESA p ower supply will al so re port opera ting condit ions so t hat u sers can monit or a nd
c ontrol tem perat ure, curren t, a nd voltag e re gulat ion.
3.Au tomati c F an S peed Cont rol: All ESA power supplies ca n de tect the insi de heat
a nd a utomat icall y ad just the fan spe ed t o p rovide ade quate air flow.
4.Ul tra Silen t: B all beari ng f ans with hig h re liabil ity 140mm coo ling fan and sup er
l ow a cousti c n oise unde r al l lo ad condit ion.
5.Mo dulari zed Cable Man ageme nt: To elimin ate clutte r a nd i mprov e ai rflow ins ide
t he c ase.
The funct ions can a ssure all Therm altake ESA Power Supply meets the balan ce in nois e
cont rol a nd h eat exhau sted. All pow er supply pro vides com plete pro tectio n fu nction
as follo w:
1. Over power prote ction.
2. Short circu it pr otecti on o n all outp ut.
3. Over voltag e pro tectio n / Under volt age p rotect ion.
4. Over curren t pro tectio n.
5. Over temper ature prote ction .
Besi des, Therma ltake enabl es t he qu ality assur ance of a ll ES A pow er su pply:
100% Hi-P OT an d ATE Function Test, 1 00% B urn-I n and AC Input cycle d
on/o ff un der h igh t empera ture condi tion. Furth ermore , it has been appro ved
by UL, C UL, T UV, C B, FC C, C E, an d BSM I.
Ther e are thre e mai n p roduct s lin e of Therm altak e PSU whic h div ided into
Toug hpower , Pur epower (include Purepowe r RX) and TR2 (include TR2 RX) se ries.
Plea se re fer t o htt p://ww w.the rmalta ke.com /produ ct/Pow er/po wer_in dex.as p
Page 22

Bigwater 780e
CL-W0169
Eng lis h Eng lis h
39 40
Q: How oft en do I hav e to re fil l th e sy stem?
A: Dep end ing on t he usa ge o r su rro und ing env iro nme nt,
w e st ron gly recommen d c hec king the w ater lev el
o nce a m onth to ens ure opti mal per for mance.
I f th e l iquid l eve l is belo w th e lo w l evel, p lea se f oll ow
t he i nst all ati on s tep s(P.2 1) t o re fil l the c ool ant .
Q: How do I un ins tal l th e li qui d c ooli ng sy ste m?
A : T her e ar e n o sp eci al i nst ruc tio n wh en un-i nstal ling.
P lea se r efe r to inst all ati on a nd r eve rse the p roc edu res .
Q: Can I a dd a not her liq uid coo lin g up grade kits on my
l iqu id c ool ing sys tem ?
A : Yes , the re a re numerou s u pgr ades av ail abl e fo r al l
d iffe rent com pon ents in PC.
P lea se v isi t ww w.th erm alt ake .co m fo r mo re inf orma tion.
Q: How do I kn ow i f t he p ump is wor king ?
A: Pla ce y our hand on t he pum p.
I f th e p ump is o per ati ng, the p ump sho uld vibrate gen tly.
Q: I'm run nin g lo w o n co ola nt. Wha t's happe ning and
w hat can I do?
A: The Per for mance C ool ant inc lud ed w ith main uni t
c ont ain s wa ter bas ed mate rial so i t i s su bje ct t o n atur al ev apo rat ion.
I t is norm al f or the coo lan t to dec rea se depe ndi ng on t he u sag e or
s urr oun ding en vir onm ent. For b est p erf orm ance, w e hi ghl y
r eco mme nd r epl aci ng t he c oolan t eve ry 6 mont h.
4.3 Liquid Cooling Q&A
Per forming sche dule d c heck up f or t he liqu id cool ing
sys tem will en sure op timal co olin g p erfor manc e!
4.4 Schedule Maintenance
Ens ure pump is wo rkin g pr oper.
Pump
Water Tank
Che ck for wate r l evel wit hin the w ater ta nk.
w e strong ly reco mmen d ch ecki ng the wate r l evel on ce a mo nth
If the l iqui d l evel is
bel ow the low level, pl ease fo llow the in stal lati on s teps on ma nual
to refill th e c oolan t.
( )
Note : It i s rec ommen ded t hat coo lant to be re place once e very 6 months .
Depe nding on th e wor kload of the system , cool ant m ay need to be
refi lled m ore o ften.
Fan Assembly
. . ۱Che ck if L ED is work ing prop erly
٢. Make sure fa n co ntro ller is wor king pr oper ly.
٣. Make sure fa n is op erat ing proper ly without abno rmal no ise.
Page 23

Bigwater 780e
CL-W0169
Eng lis h Eng lis h
41 42
Tubing
Tub ing Connecti ons
Tub ing with in the system mu st not be be nt. Replac e
tub ing if nece ssar y.
Mak e sure ea ch c onne ctio n is tigh tly secu red and
tha t there a re n o si gn o f le akage .
 Loading...