

Page 1
Quick Reference
GUIDE
Gas Cooktops SGS, SGSX, SGSP, SGSXP
IMPORTANT: This reference guide is not a substitute for the Use & Care manual. Read and consult the appliance
9
Use & Care manual for important safety messages and additional information regarding the use of your new appliance.
General Tips
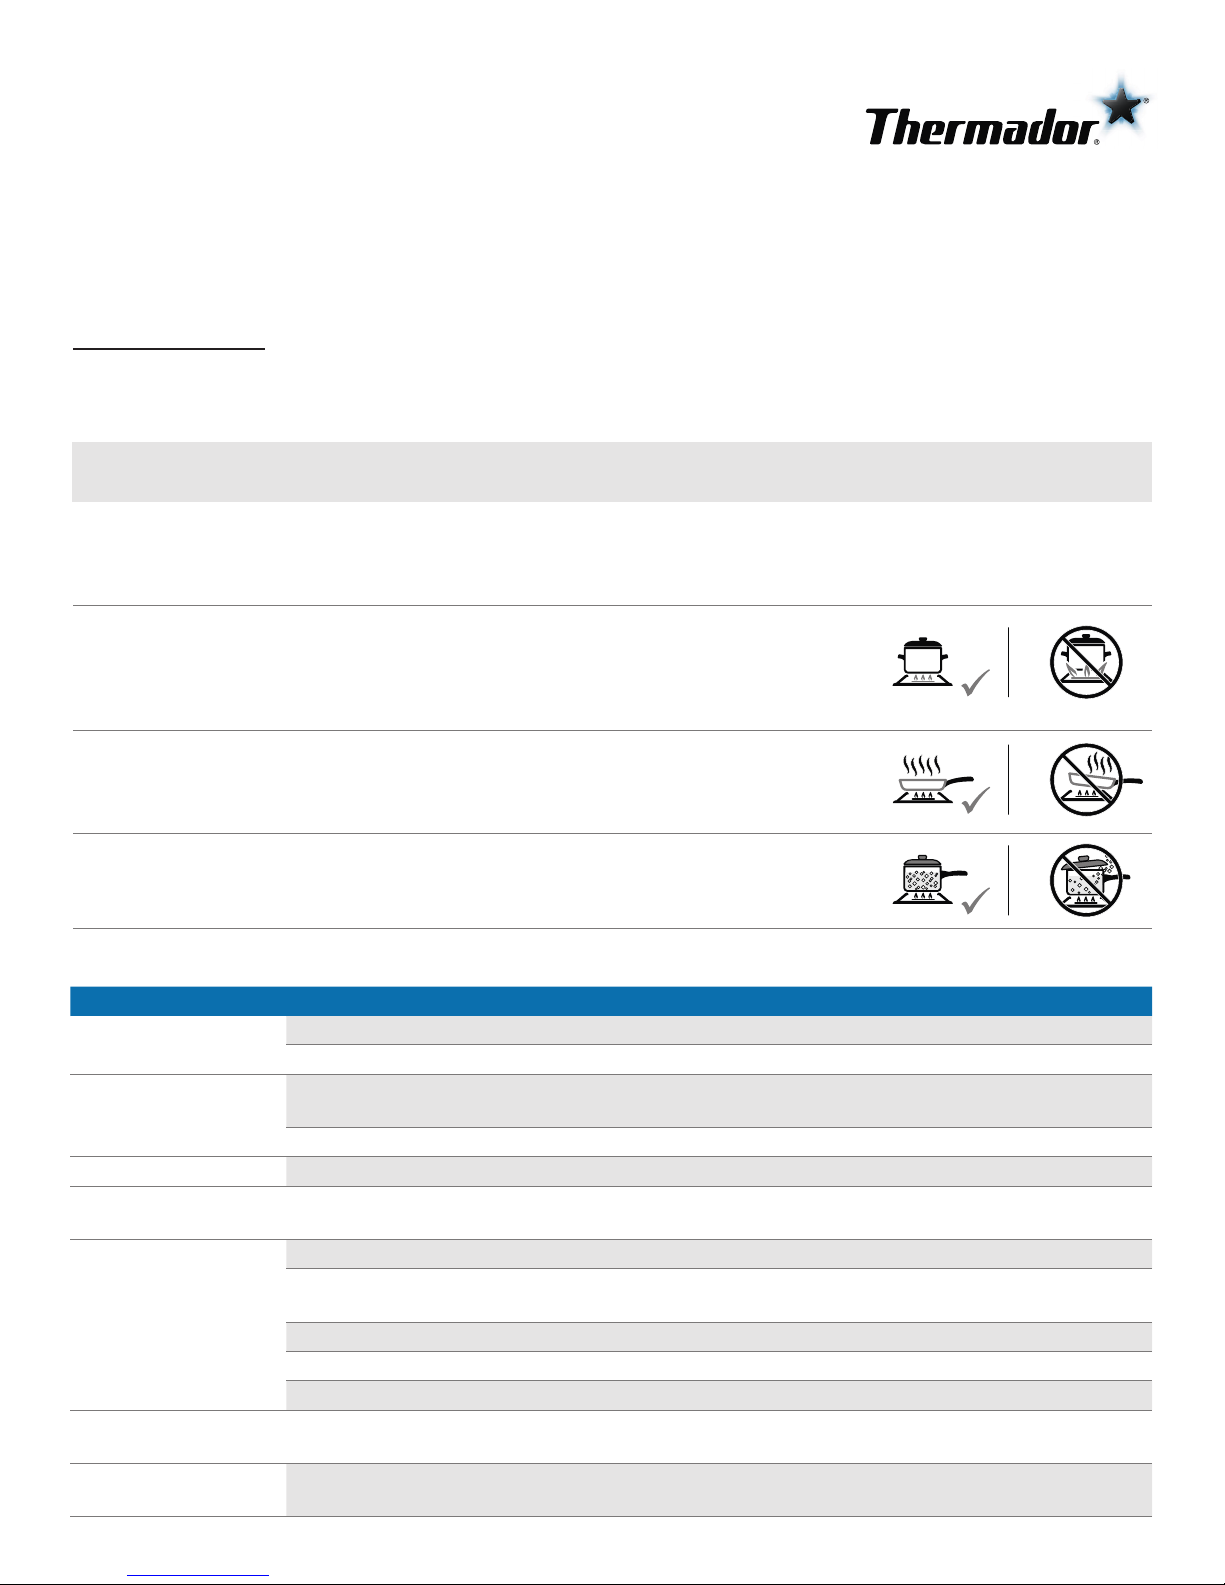
Cookware Recommendations
Pan bottom diameter
• The ame should be the same size as the bottom of the pan or smaller.
• Do not use small pans with high ame settings as the ames can lick up the sides of the pan.
• Oversize pans that span two burners are placed front to back, not side to side.
• For best cooking results, large pans should not extend over the sides of the grates.
Use balanced pans
• Balance is important for stability and even cooking.
• Pans must sit level on the cooktop grate without rocking or wobbling.
• Center pan over burner.
Use a lid that ts properly
• A well-tting lid helps shorten the cooking time.
• For best cooking results, always use a lid when boiling water.
Cleaning Guidelines
Surface Type of Cleaning How to Clean
Burner Grates Frequent Cleaning Wash with dish soap and hot water. Use a plastic mesh pad.
Stubborn Stains Mild abrasive cleaners such as Bon Ami
Burner Caps Food Splatters Clean the food-soiled area with ammonia or a spray cleaner such as Fantastic
Formula 409
Stubborn Stains Mild abrasive cleaners such as Bon Ami
Burner Base Frequent Cleaning Wash with dish soap and hot water. Use a plastic mesh pad.
Igniters Frequent Cleaning Carefully wipe with cotton swab dampened with water, ammonia, or liquid spray
cleaner.
Stainless Maintop Frequent Cleaning Wash with dish soap and hot water, Fantastic
Stubborn Stains Mild abrasive cleaners such as Kleen King Stainless Steel Liquid Cleaner
Cameo Aluminum and Stainless Steel Cleaner
Hard Water Spots Household white vinegar on a paper towel.
Heat Discoloration Bar Keepers Friend
Polishing Stainless Steel Magic
Glass Panel (SGSP and
SGSXP models)
Thermador Appliqué
(SGS and SGSX models)
Frequent Cleaning When cool, wash with hot, soapy water and wipe dry with paper towel.
Clean immediately after cooking.
Frequent Cleaning When cool, wash with hot, soapy water and wipe dry with paper towel.
Clean immediately after cooking.
®
.
®
.
®
to protect the nish from staining and pitting.
®
or Soft Scrub® with a plastic mesh pad.
®
or Soft Scrub® with a plastic mesh pad.
®
, or Formula 409®.
®
®
, or Bon Ami®.
,
®
or
Page 2
Standard Burner Cooking
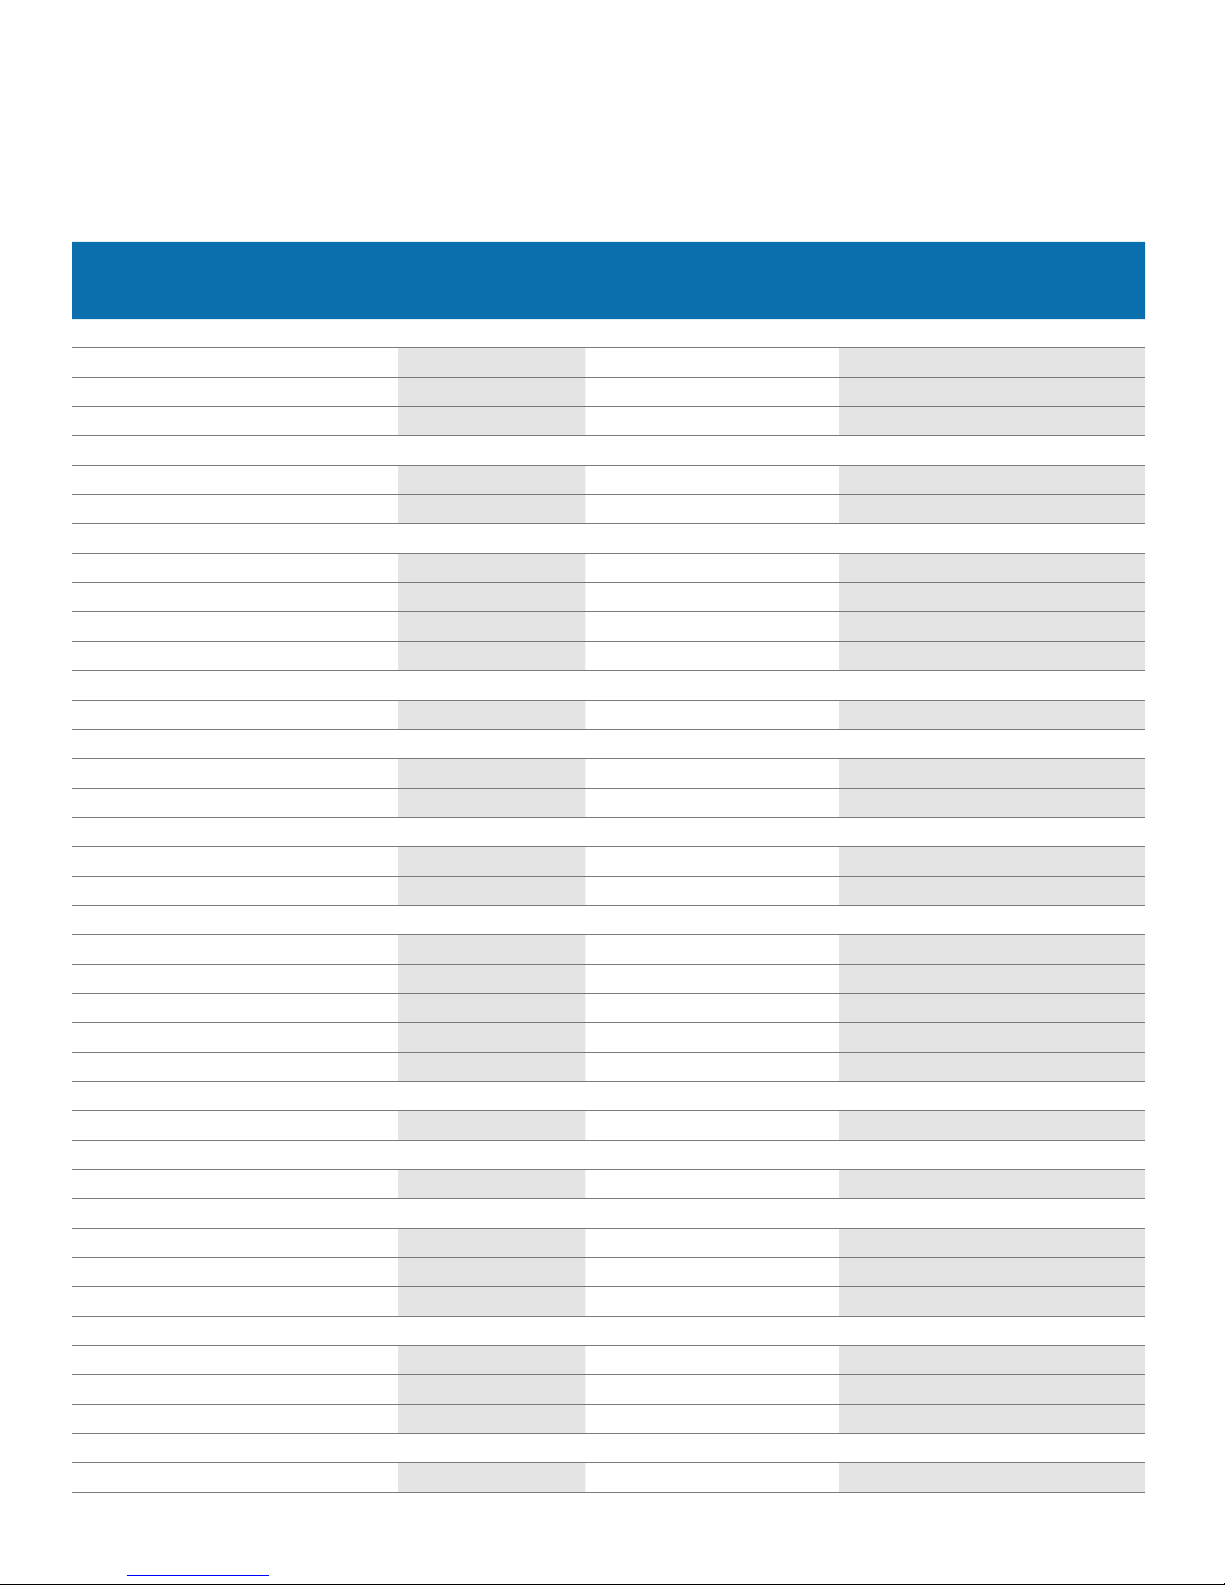
The table lists the optimal heating setting for various dishes. The temperature and cooking time depend on the amount, composition
and temperature of the food. Setting ranges are indicated for this reason. Try using the lower values at rst. Heat can be increased
during cooking.
Food Burner Heat Level
Start Cooking
(boil, melt, brown, fry, etc.)
Beverages
Mulled Cider Large High Medium Low
Hot Chocolate Large Medium High Low
Tea Small High Low
Breads
French Toast Large Medium Medium- Medium Low
Pancakes Large Medium Medium- Medium Low
Cereals
Beans Large High Medium- Medium Low
Cornmeal/Polenta Medium High Medium- Medium Low
Grits Medium High Medium- Medium Low
Oatmeal Medium High Medium- Medium Low
Deep Frying
French Fries, Donuts Large Medium High Medium High
Desserts
Pie Filling, Fruit Compote Small Medium Low Medium- Medium Low
Poached Fruit Large High- Medium High Medium- Medium Low
Eggs
Fried Large Medium High Medium Low
Scrambled Large Medium High Medium Low- Low
Meat, Fish, Poultry
Bacon, Sausage Patties Large Medium High Medium- Medium Low
Braising Large Medium High Low
Shallow Frying Large Medium Medium- Medium Low
Pan Frying Large Medium High Medium
Simmering Large High Medium Low
Pasta
All types Large High High
Rice
White Rice, Brown Rice Medium High Low
Sauces
Tomato Sauce Large High Low
Cream Sauce Large Medium Low
Butter Sauce Small Medium Low
Soups and Stocks
Cream Soup Medium Medium Low
Broth Soup Medium High Low
Stock Medium High Low
Vegetables
Fresh, Frozen Medium High Medium
Heat Level
Continue Cooking
(simmer, braise, poach, hold, etc.)
Page 3
ExtraLow Burner Cooking (SGSX and SGSXP Models only)
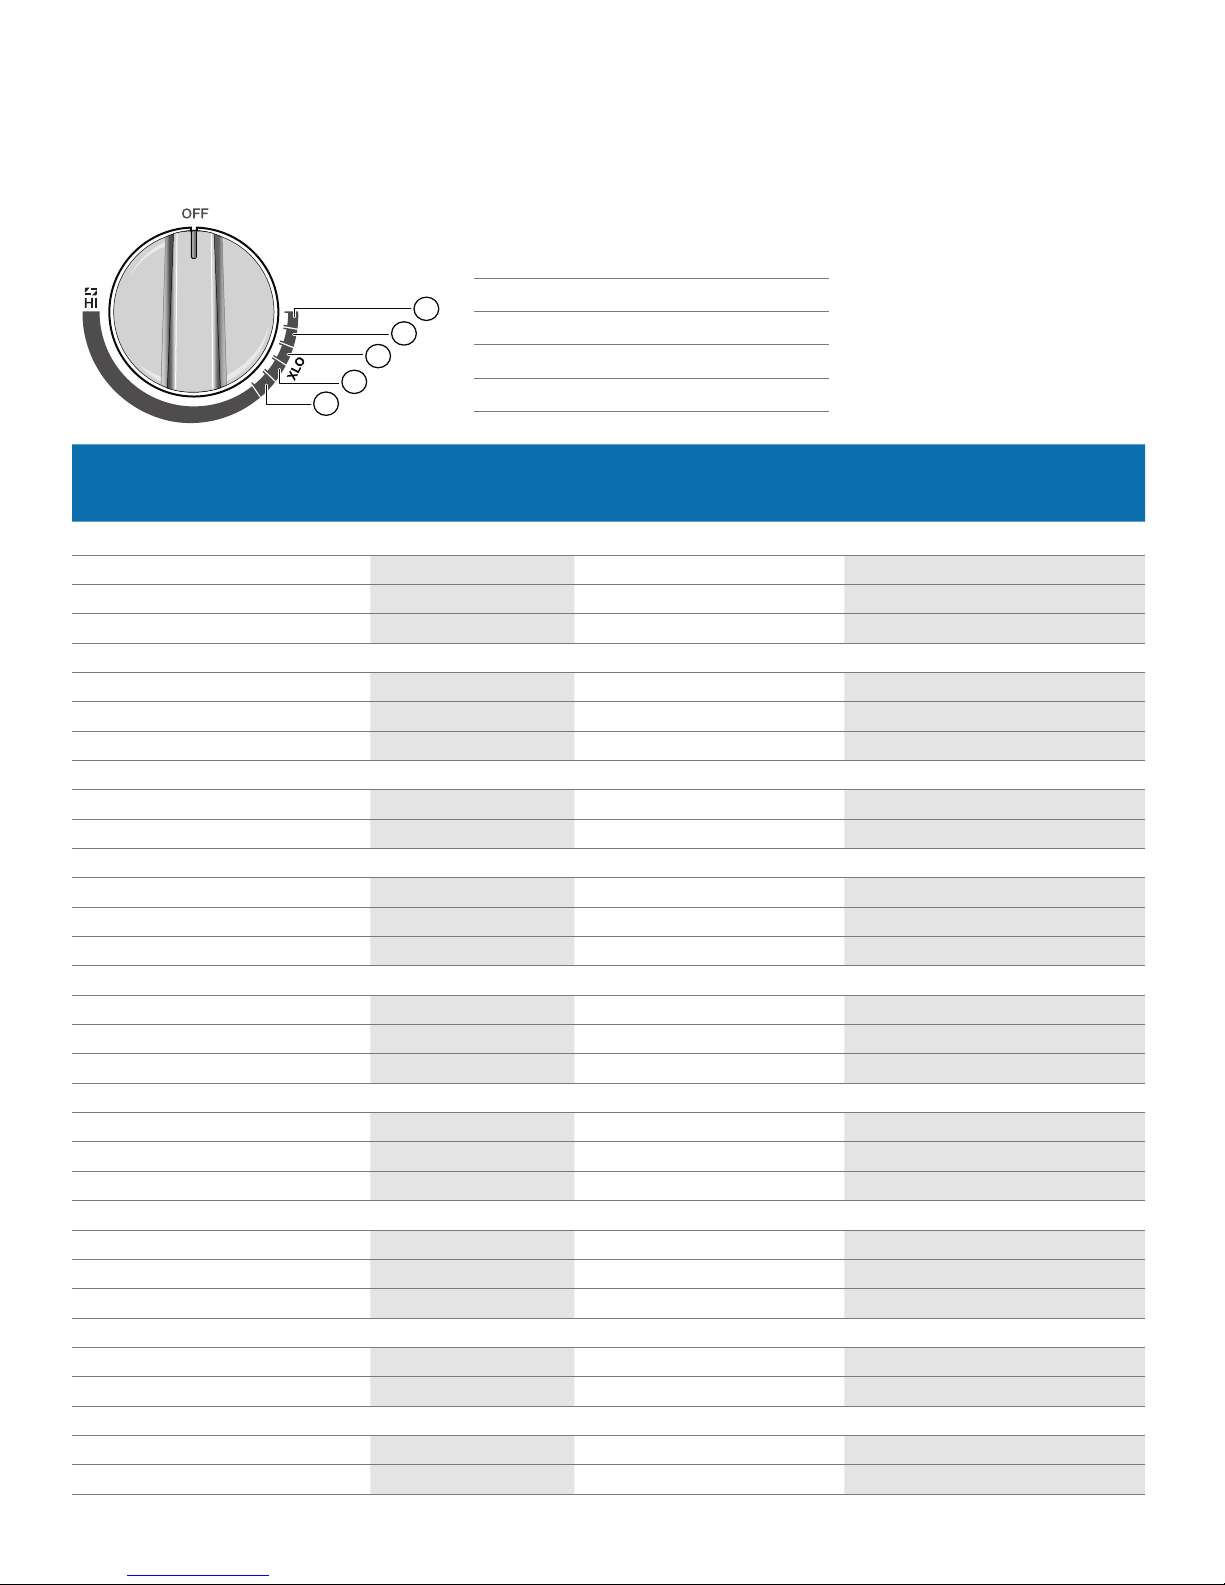
The Center and Left Front burners are enhanced with the ExtraLow (XLO) feature. When the control knob is set within one of the ve
XLO settings, the ame cycles ON and OFF automatically. This cycling is normal and allows you to reduce the heat even further than
the Low setting. XLO allows you to simmer, poach, melt or hold cooked food without scorching or burning.
Extra Low (XLO) Setting Locations
A XLO 5 (highest heating level)
E
D
C
B
A
B XLO 4
C XLO 3
D XLO 2
E XLO 1 (lowest heating level)
Food Burner Heat Level
Start Cooking
(boil, melt, brown, fry, etc.)
Beverages
Mulled Cider Center High XLO 4
Hot Chocolate Left Front Medium High XLO 3
Tea Left Front High XLO 2
Cereals
Beans Center High XLO 2
Grits Left Front High XLO 3
Oatmeal Center High XLO 3
Desserts
Chocolate Left Front XLO 2 XLO 2
Poached Fruit Center High XLO 3
Eggs
Poached Center High XLO 5
Scrambled Center XLO 5 XLO 5
Frittata Center Medium High- Medium XLO 5
Meat, Fish, Poultry
Braising: Beef, Pork, Lamb Center Slow Cook- XLO 4 XLO 4
Braising: Chicken Center Slow Cook- XLO 3 XLO 3
Poaching: Fish & Poultry Center High XLO 3
Rice
White Rice Left Front High XLO 4
Brown Rice Left Front High XLO 3
Risotto Center Medium High- Medium XLO 5
Sauces
Tomato Sauce Center High XLO 2
Cream Sauce Left Front Medium XLO 2
Butter Sauce Left Front XLO 1 XLO 1
Soups and Stocks
Soup Left Front High- Medium XLO 1
Stock Left Front High XLO 5
Vegetables
Fresh, Frozen Left Front High XLO 5
Casseroles Center Medium High- Medium Heat/Simmer- XLO 2
Heat Level
Continue Cooking
(simmer, braise, poach, hold, etc.)
Page 4
Troubleshooting
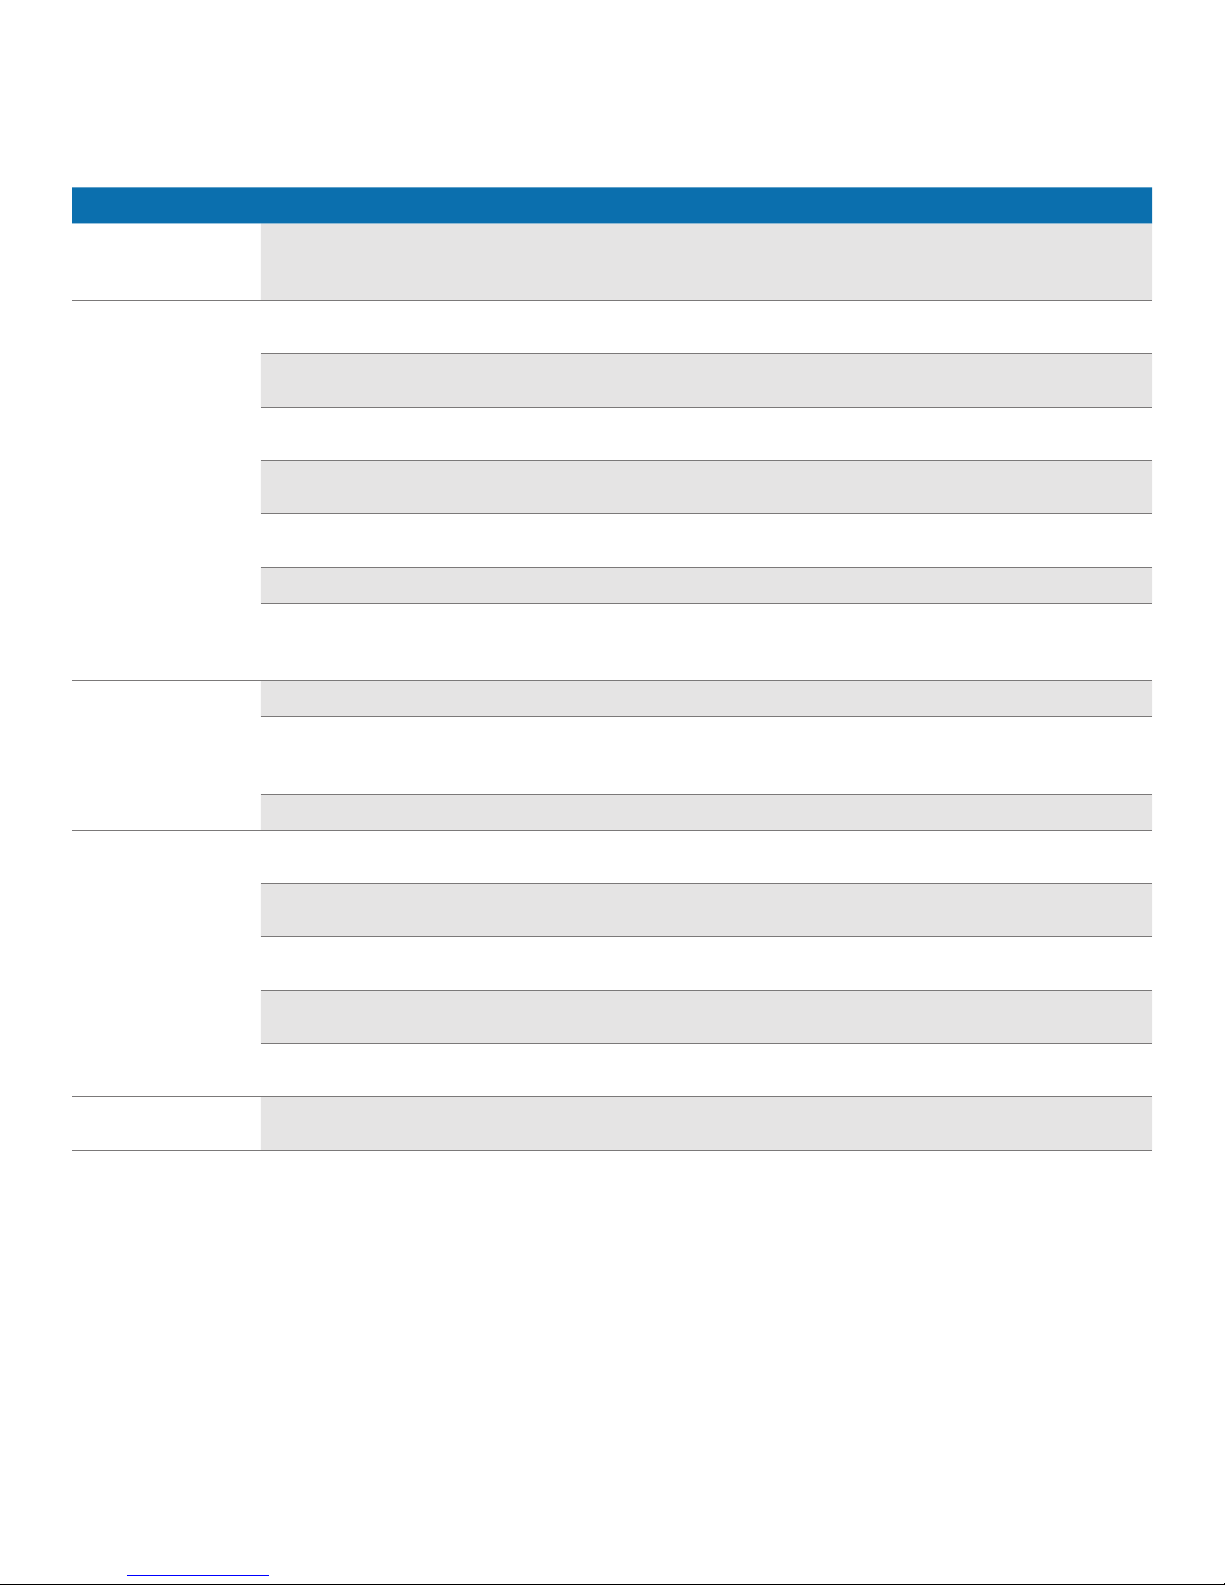
If you encounter a problem, it often will merely be something minor. Before calling customer service, consult this troubleshooting
guide. Refer to the Use and Care manual for additional information.
Problem Possible Cause Suggested Solution
Burners continue
to click when rst
plugged in
Surface burners
do not light
Clicking noise-
continuous or
intermittently
Incorrect house wiring Call electrician. Do not use cooktop.
Gas is turned off Make sure the gas shut-off valve is in the ON position, and the gas supply to
the house is not shut off.
Unit is not hooked up to gas
supply
Plug is not completely
inserted in outlet
Circuit breaker is tripped Check circuit breaker and reset if necessary.
Burner ports are clogged With the cooktop turned off, remove burner caps and use a thin wire or
Misaligned burner cap Make sure the burner caps are properly positioned on the burner base.
Igniter may be wet,
damaged, or dirty
Misaligned burner cap Make sure the burner caps are properly positioned on the burner base.
Igniter may be wet,
damaged, or dirty
Incorrect housing wiring Call Electrician.
Call Gas Company.
Check the power supply. It should be grounded with the correct polarity.
Make sure the unit is fully plugged into the outlet.
Check or replace fuse.
straightened paper clip to unclog.
Check to be sure the igniter is dry. If not, allow to air dry before using.
Check for burned-on food or grease. See Cleaning Guidelines for cleaning
recommendations. Burner will not light if igniter is wet, damaged, or dirty.
Check to be sure the igniter is dry. If not, allow to air dry before using.
Check for burned-on food or grease. See Cleaning Guidelines for cleaning
recommendations. Burner will not light if igniter is wet, damaged, or dirty.
Uneven
or too high ame
Rubber feet from
grate come off
Burner ports are clogged With the cooktop turned off, remove burner caps and use a thin wire or
straightened paper clip to unclog.
Burner may have moisture
present
Burner cap not replaced
correctly
LP Customer- installation and
conversion not done properly
LP Customer- using Cook ‘n
Vent (downdraft ventilation)
May have been removed by
cleaning
Turn off burner. Cool and dry burner caps and burner base thoroughly.
Make sure the burner caps are properly positioned on the burner base.
Refer to installer of cooktop or call service.
Flame is pulled to back by downdraft. This is a natural occurrence.
Do not use a grate if the rubber feet are missing or damaged. Replace feet.
For replacement call, 1-800-735-4328. Have model number available.
Customer Service
Please check the troubleshooting pages in this guide before calling Customer Service. Commonly asked questions are addressed
there and may resolve your issue the fastest. In the event you still need to contact Customer Service, there is some information you
can have ready to speed up the process: 1) model & serial number 2) date of purchase. Product Rating Label shows model and serial
number. Consult your Use and Care Manual for the specic label location.
To contact Customer Service:
US: 800-735-4328
Web: www.thermador.com/support
Parts & Accessories: www.thermador-eshop.com
9001258896 • 08/17
 Loading...