

Page 1
THERMADOR PRO HARMONY® Range
Quick Reference Guide
IMPORTANT: This reference guide is not a substitute for the Use & Care Guide. Before using this product, read the appliance Use
& Care Guide for important safety messages and additional information regarding the use of your new appliance.
NOTE: Not all items discussed will apply to all models.
The use of brand names is intended only to indicate a type of cleaner. This does not constitute an endorsement. The omission of any
brand name cleaner does not imply its adequacy or inadequacy. Many products are regional in distribution and can be found in the local
markets. It is imperative that all products be used in strict accordance with instructions.
GETTING TO KNOW YOUR NEW RANGE
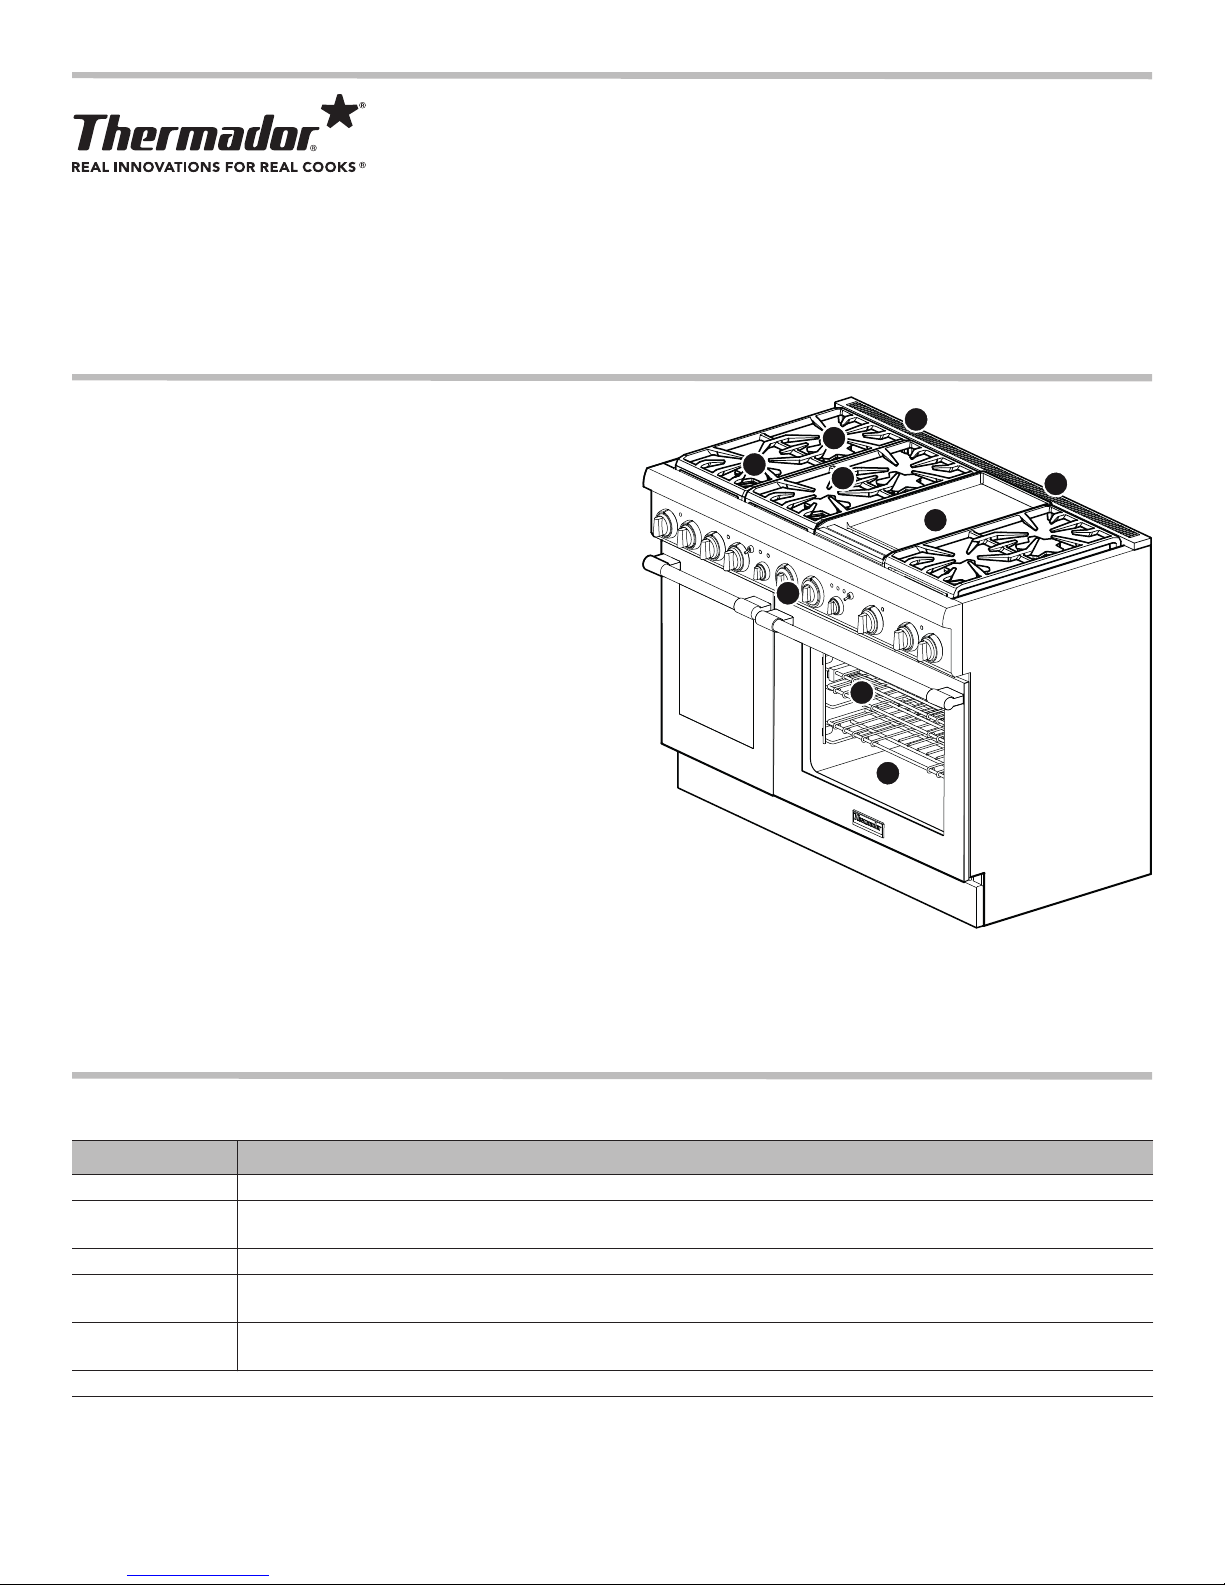
1. The ExtraLow® feature cycles on and off to maintain
temperatures as low as 100°F. XLO
delicate sauces or keeping food warm without scorching.
To access, turn the burner knob to XLO, the very lowest setting.
The burner will turn on for 7 seconds and then turn off for 53
seconds. When the knob is rotated just beyond the SIM setting,
the flame will cycle on for approximately 54 seconds and off for
6 seconds. This cycle repeats itself until the burner is turned to
a different setting or off.
2. The pedestal STAR
designed for easy surface cleaning and superior heat spread
for any size pan.
If any one or more burners blow out, the electronic igniter
automatically activates to re-light the flame.
3. Removable griddle and/or grill accessory for easy cleanup
(some models).
4. A rear element convection offers precise airflow for cooking on
multiple levels without flavor transfer
5. The cooling blowers activate after the oven reaches 300°F.
When the oven is turned of
oven temperature cools below 250°F.
6. Superfast 2-hour self-clean mode (Dual Fuel models).
7. Each oven rack can be pulled out and pushed back into the oven with minimal effort.
Always remove the oven racks before self-cleaning the oven. If the racks remain in the oven during Self-Clean, the finish will
discolor
.
®
Burner with QuickClean® Base is
f, the blowers remain on until the
®
is perfect for simmering
.
1
Model shown is a 48'' with a large and small oven and griddle option.
1
2
6
5
3
7
4
5
PRO HARMONY COOKING MODES AND DESCRIPTION USAGE
MODE USE
BAKE Cooks with dry, heated air. Variety of foods, such as cakes, cookies, pastries, quick breads, quiche and casseroles.
CONV BAKE Similar to Bake, but air is circulated by a fan at the back of the oven. Best for baked goods such as cakes,
cornbread, pies, quick breads, tarts, and yeast breads.
EXTENDED BAKE This unique cooking mode is for assisting the user for compliance to Sabbath principles.
BROIL Uses intense heat radiated from the upper element. Tender cuts of meat (1" or less), poultry, browning bread &
casseroles.
CONV BROIL* Combines intense heat from upper element with fan circulation. Tender cuts of meat (more than 1"), poultry and
fish. Not for browning.
*Dual Fuel models only.
Page 2
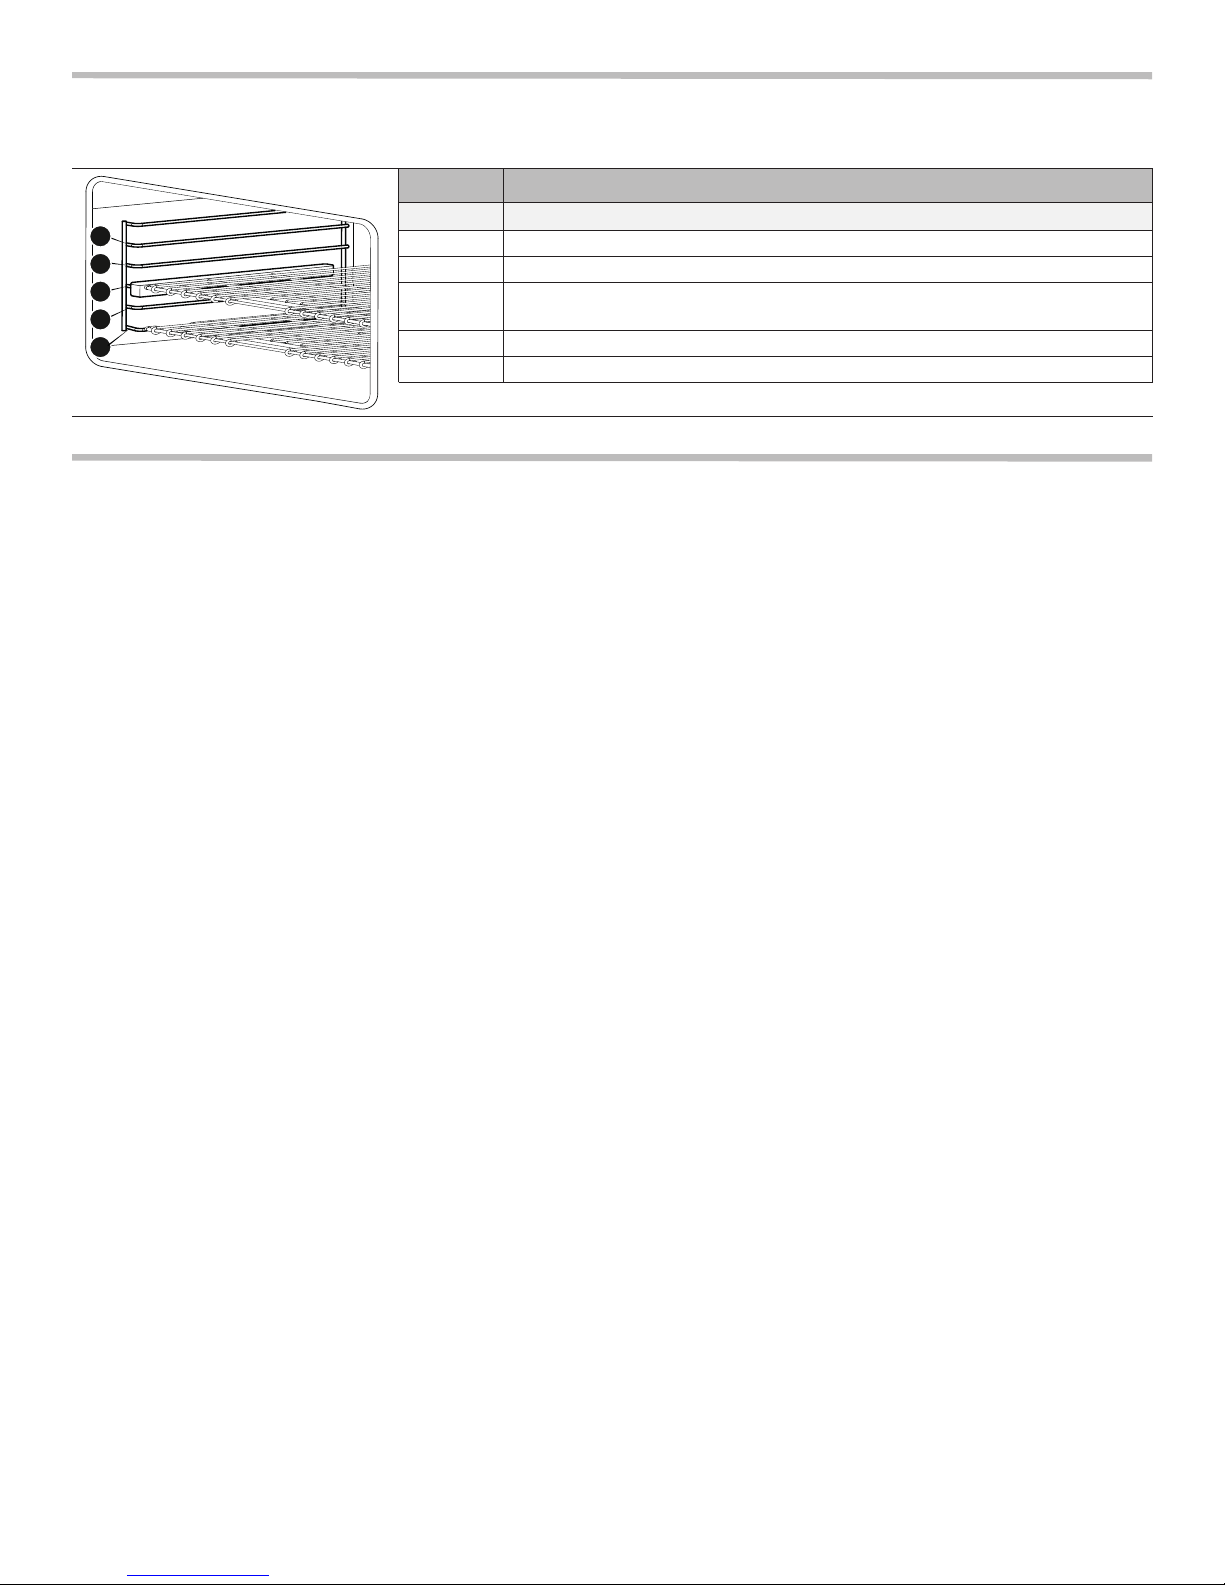
RACK LEVELS
Do not handle the rack when it is hot. Make sure the oven rack is in the desired position before preheating the oven
.
MAIN OVEN CAVITY
LEVELS BEST FOR
55
44
33
22
11
5 Hamburgers, steaks, toasting bread, broiling most meats, melting cheese
4 Best for two rack cooking. Broiling in Gas units.
3
Most baked goods on cookie sheet or baking pan, frozen foods, cakes,
casseroles, frozen pizza
2 Roasting most meats
1 Large roasts, turkey, angel food cake
Refer to the Use and Care Guide for helpful temperature recommendations.
OPERATION
TO SET SELF-CLEAN
1. Select SPEED CLEAN using the Mode Selector Knob.
2. Set Temperature Selector Knob to CLEAN.
– Oven door locks and the cooling blower turns on.
– OVEN ON, PREHEATING and CLEANING lights turn on.
– When the oven reaches maximum self-clean temperature, the PREHEATING light turns off.
NOTE: The door closing process takes approximately 20 seconds to complete, at which time the door becomes locked. Check to make
certain the door is locked.
A
T THE END OF THE CLEAN CYCLE
The Speed Clean cycle takes 2 hours to complete. The OVEN ON light and the CLEANING light turn off when the cycle is finished. DO
NOT turn either of the oven temperature knobs to the OFF position until the automatic lock cycles to the open position.
1. Select OFF using the Mode Selector Knob.
– The door latch will open automatically when the oven is below 500°F (260°C) and the automatic Door Lock completes its 60
second cycle to the open position.
– The cooling blower turns off when the oven temperature drops to 200°F (93°C).
2. Turn the oven temperature knob to OFF position.
E
XTENDED BAKE
1. Select EXTENDED BAKE mode using the Mode Selector Knob.
2. Set oven temperature using the Temperature Selector Knob.
• PREHEATING PHASE is the same as for other BAKE modes. Once the oven is preheated to the selected temperature, the 22
minute Extended Bake cycle begins.
• ACTIVE PHASE baking is as usual for 19 minutes, except during the last 2 minutes, the OVEN ON and PREHEA
TING lights
blink slowly (on 3 sec. / off 3 sec. together) to serve as a NOTICE for the final phase.
• ACCESS PHASE (oven idle) Once the two lights stop blinking (both remaining on), the final 3 minutes allows the Sabbath user
access to the oven without effecting a change in the operation of the range. Heating elements remain off during this phase.
C
ONVECTION BAKING
When using Convection Bake, reduce the temperature recommended in the recipe by 25°F (14°C), although the temperature does not
need to be reduced when cooking meats and poultry. When roasting meats, check internal temperature prior to time recommended by
recipe to prevent over cooking.
Page 3

HANDY HINTS
Care
CLEANING BURNER CAPS AND BASES — Wash with hot soapy water, rinse and dry thoroughly. Mild abrasive cleaners such as Bon Ami®
or other mild abrasive cleaners such as Soft Scrub
®
may be used. When reassembling, make sure the burner cap is seated on the base.
Cleaners with chlorine should be avoided.
C
LEANING THE SPILL TRAYS — Cooktop spill trays should be cleaned with warm soapy water, rinsed well, and then dried thoroughly after
each use. Spill trays can be soaked to soften the soil. Burned-on food can be removed with Bar Keeper’s Friend
mild abrasive cleaners such as Soft Scrub
®
.
®
or Bon Ami® or other
Apply all cleaners with care — soap-filled fiber or steel wool pads may scratch the spill trays. After cleaning, maintops can be wiped with
glass cleaners, such as Windex®, for a shiny finish. Cleaners with chlorine should be avoided.
C
LEANING THE GRIDDLE OR GRILL — Clean the griddle or grill surface with warm soapy water, rinse well, and wipe dry with a soft cloth. If
food particles stick to the griddle plate, remove with a mild abrasive cleaner such as Soft Scrub
®
. Never flood a hot griddle or grill with
cold water as this can warp or crack the aluminum plate. Cleaners with chlorine should be avoided.
OVEN CLEANING — Before cleaning self-cleaning oven, remove all racks and utensils from the oven and wipe up any puddles of grease
and loose soil. Remove any soil from outside the door seal area. Make sure the light bulbs and glass covers are in place. Turn on the
ventilator hood above the range and leave it on until the oven has completed the self-clean cycle. After setting the oven to self-clean, wait
until the clean light comes on then confirm that the oven door is locked. After the clean cycle is complete and the oven has cooled, wipe
out the ash in the bottom of the oven.
®
Ovens can be washed with hot soapy water. Mild cleaners such as Bon Ami
, Bar Keepers Friend®, or Soft Scrub® can be used.
Cleaners with chlorine should not be used.
Use
EXTRALOW® BURNERS — Two of the controls have flame settings even lower than the standard SIM setting. When the knob is set within
this range, the flame cycles on and off. These settings are suitable for simmering and poaching, melting chocolate, and holding cooked
foods at temperatures without scorching or burning.
S
ETTINGS AND COOKWARE TO USE — The cooking utensil affects the setting. Its size, type, material, and whether a lid is used, all affect
the consistency of the cooking temperature.
To maintain a low or simmer heat setting, bring food to a boil. Stir well then cover the pan and lower the heat to the desired setting.
Check periodically to determine if the control knob should be turned to another setting.
If an over-sized pan is used, the simmer action may occur mainly in the center of the pan. To equalize the temperature throughout the
food, stir the food around the outer edges of the pan into the food in the center.
It is normal to stir food occasionally while simmering. This is especially important when simmering for several hours.
When lowering the flame setting, adjust it in small steps. If the setting is too low to hold a simmer, bring the food back to a boil before resetting to a higher heat.
Use cookware that has good heat conductivity, good balance, a flat and correctly-sized base to fit the burner, and a properly fitting lid. A
5½'' base size is generally the smallest pan recommended.
A properly fitting lid will shorten cooking time and make it possible to use a low heat setting.
When using two extra large stock pots at one time, do not use adjacent burners; use staggered burners to provide adequate air around
the burners.
SING THE OVEN — Preheat the oven to the desired setting when preparing baked products. The preheat time is calibrated to provide the
U
best baking results, so do not bake until the oven is preheated. The oven does not need to be preheated for roasting meats.
Use the proper bakeware for baking. Warped, lightweight pans or pans with tall sides do not yield high quality baked products. Cookies
should be baked on a flat sheet with a lip on one side. For better browning, baking pans should be placed crosswise on the rack with the
shorter sides on the right and the left. This allows the air to circulate freely.
For tender, golden crusts use light non-stick anodized or shiny metal pans. For crisp brown crusts, use dark non-stick/anodized or dark
dull metal utensils or glass bakeware. These may require lowering the temperatures 25°F when using convection bake. There is no need
to reduce the temperature when roasting meats.
It is recommended to reheat dishes or leftovers slowly between 225°F and 250°F until an internal thermometer reaches 165°F.
Page 4
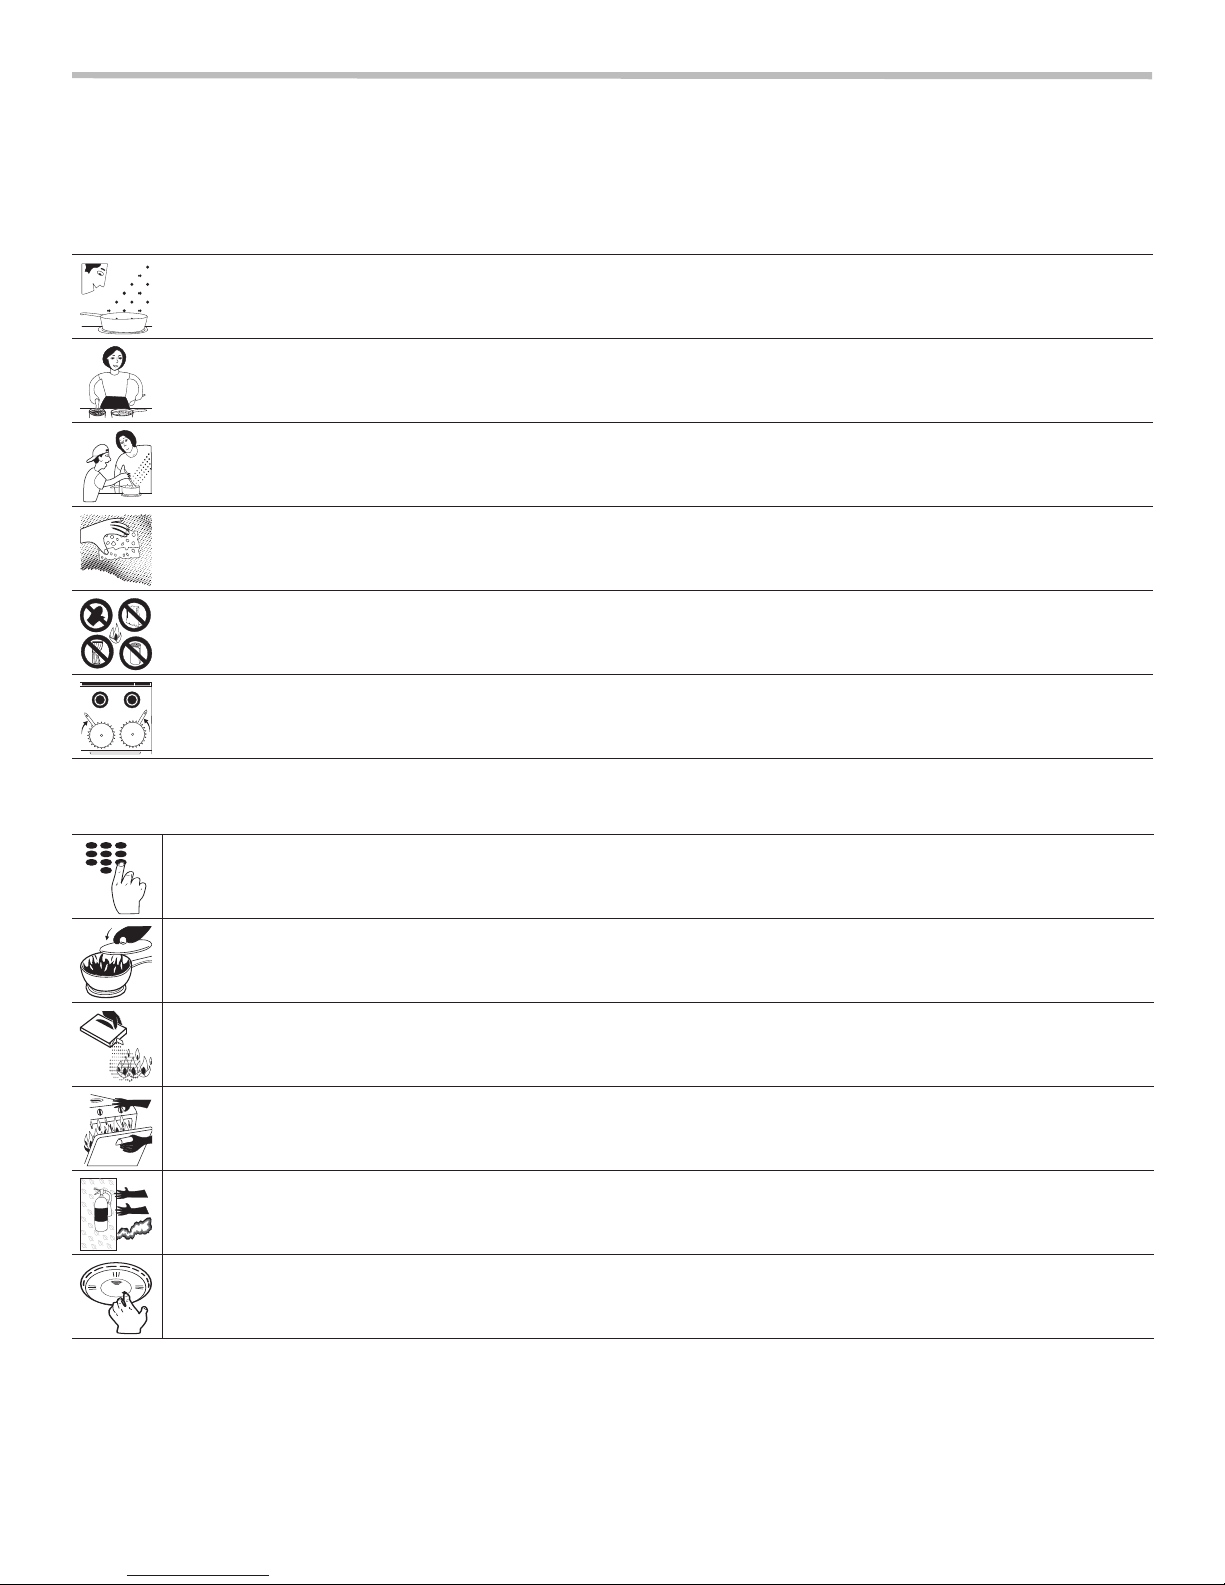
RECIPE FOR SAFER COOKING
Follow these tips to protect you and your family when in the kitchen. Whether stirring up a quick dinner or creating a masterpiece fourcourse meal, here’s a recipe for safer cooking you need to use daily.
To Prevent a Cooking Fire in Your Kitchen
Keep an eye on your cooking and stay in the kitchen. Unattended cooking is the #1 cause of cooking fires.
Wear short or close-fitting sleeves. Loose clothing can catch fire.
Watch children closely. When old enough, teach children to cook safely.
Clean cooking surfaces to prevent food and grease build-up.
Keep curtains, towels and pot holders away from hot surfaces, and store solvents and flammable cleaners away from heat
sources. Never keep gasoline in the house.
Turn pan handles inward to prevent food spills.
To Put Out a Cooking Fire in Your Kitchen
123
654
789
0
BA
KI
SOD
NG
A
OFF
Call the fire department immediately. In many cases dialing 911 will give you Emergency Services.
Slide a pan lid over flames to smother a grease or oil fire then turn off the heat and leave the lid in place until the pan cools.
Never carry the pan outside.
Extinguish other food fires with baking soda. Never use water or flour on cooking fires.
Keep the oven door shut and turn off the heat to smother an oven or broiler fire.
Keep a fire extinguisher in the kitchen. Make sure you have the right type and training.
Keep a working smoke detector in your home and test it monthly.
1901 Main Street, Suite 600, Irvine, CA 92614 • 800-735-4328 • www.thermador.com
9001039561 • Rev. A • 5U06G2 • © BSH Home Appliances Corporation, 09/14
 Loading...